Still scrolling through endless Patio Shade Ideas 2026 photos without a clear plan taking shape? It’s a common rabbit hole. You save pin after pin, but translating that inspiration into a real, workable solution for your own backyard can feel overwhelming. That’s where we come in.
We’ve done the heavy lifting, filtering through hundreds of designs to find the 32 most practical and stylish patio shade ideas that actually work for real homes. We’re covering everything from grand, built-in pergolas to clever, renter-friendly solutions. And stay until the end—we break down the most common mistakes that can ruin these looks.
📌 Save this to Pinterest for later—you’ll want to revisit these ideas.
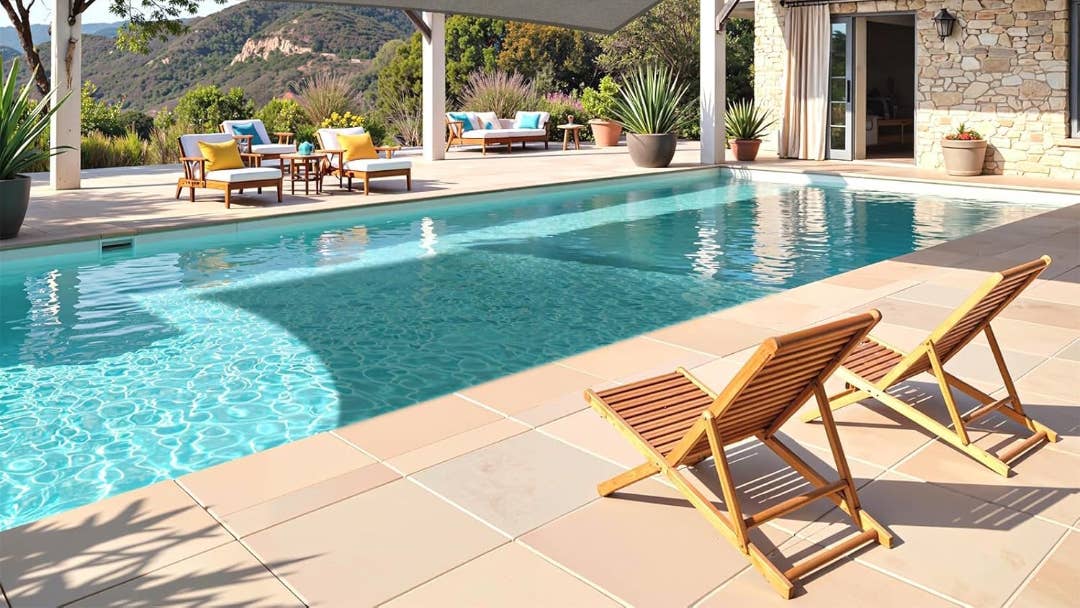
1. Modern Poolside Shade with a White Pergola and Dark Fabric
The magic here is in the high contrast. The brilliant white of the pergola structure feels crisp and modern against the light blue of the pool, but the dark grey shade cloth is the real workhorse. It absorbs the harshest sunlight, creating a genuinely cool and usable space underneath. The light-colored pavers reflect heat, but the shade makes it all work, preventing the area from feeling like a hot stone oven. It’s a smart combination of reflective and absorptive surfaces.
|
📋 Copy HEX 🔗 Share |
✅ Before You Start
This is a solution best suited for large, open spaces. To get this luxurious, resort-like feel, you need a minimum patio area of about 20×20 feet, not including the pool deck. The scale of the pergola needs to feel generous, not cramped. A ceiling height of at least 9 feet for the pergola is crucial to maintain an open, airy feeling and not feel visually compressed. This look would overwhelm a small, narrow yard.
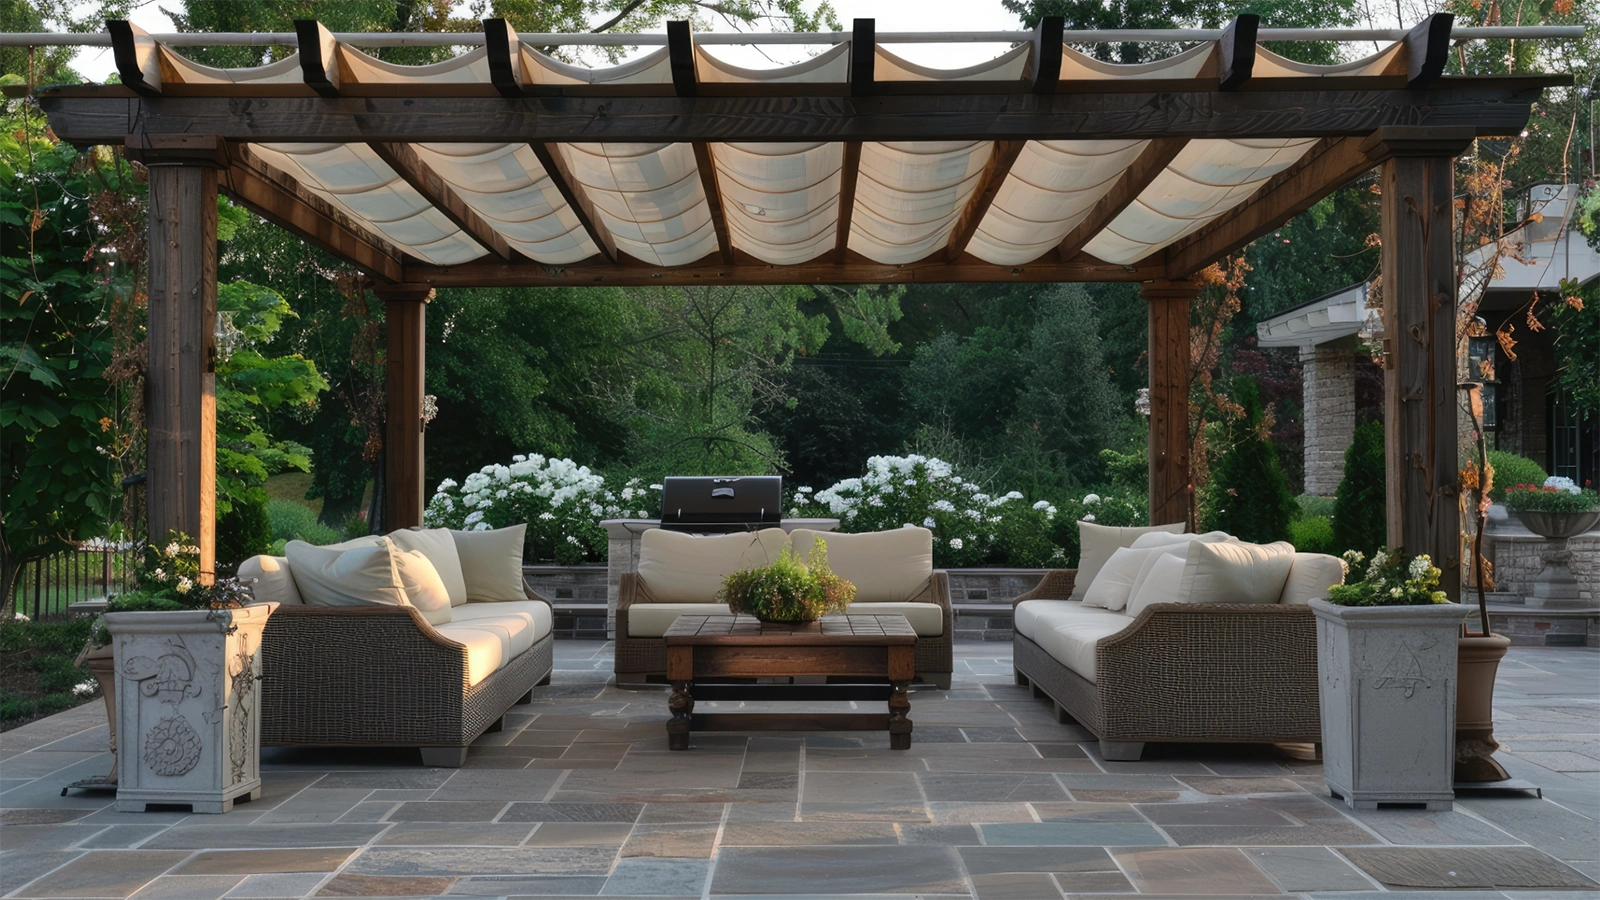
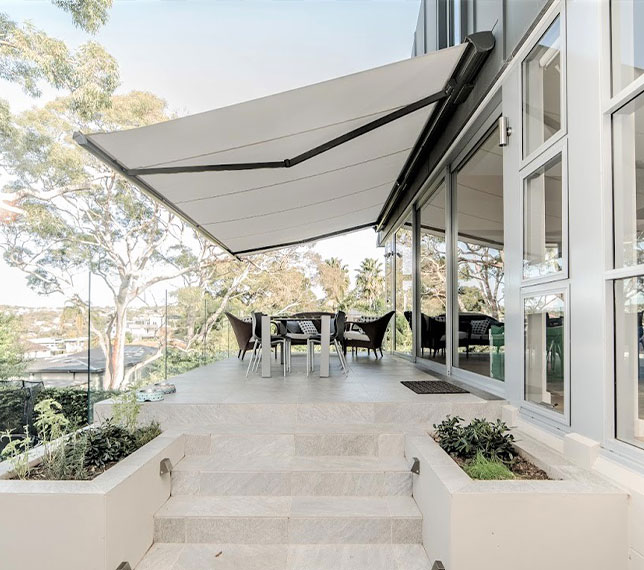
2. Wavy Retractable Canvas Shade on a Dark Wood Pergola
The single element that defines this entire space is the retractable, wavy canvas shade. Without it, you just have a standard (though beautiful) wood pergola. But with the fabric, the entire atmosphere changes. It introduces a soft, organic texture that contrasts beautifully with the hard lines of the wood and stone. The gentle, undulating rhythm of the fabric panels creates a sense of calm and movement, like soft clouds or gentle waves. It feels custom and thoughtful.
|
📋 Copy HEX 🔗 Share |
💰 Budget Breakdown
When choosing fabric for a retractable shade system like this, don’t just go for the cheapest outdoor canvas. You need to consider the weight. A fabric that is too light (less than 5 oz. per square yard) will flap excessively in the wind and may not retract smoothly. A fabric that is too heavy (over 9 oz. per square yard) can put a strain on the trolley system and sag unattractively over time. Look for a marine-grade acrylic canvas around 7-8 oz. for the perfect balance of durability and performance. For a fixed-awning version, check out the sleek design of Idea #6.
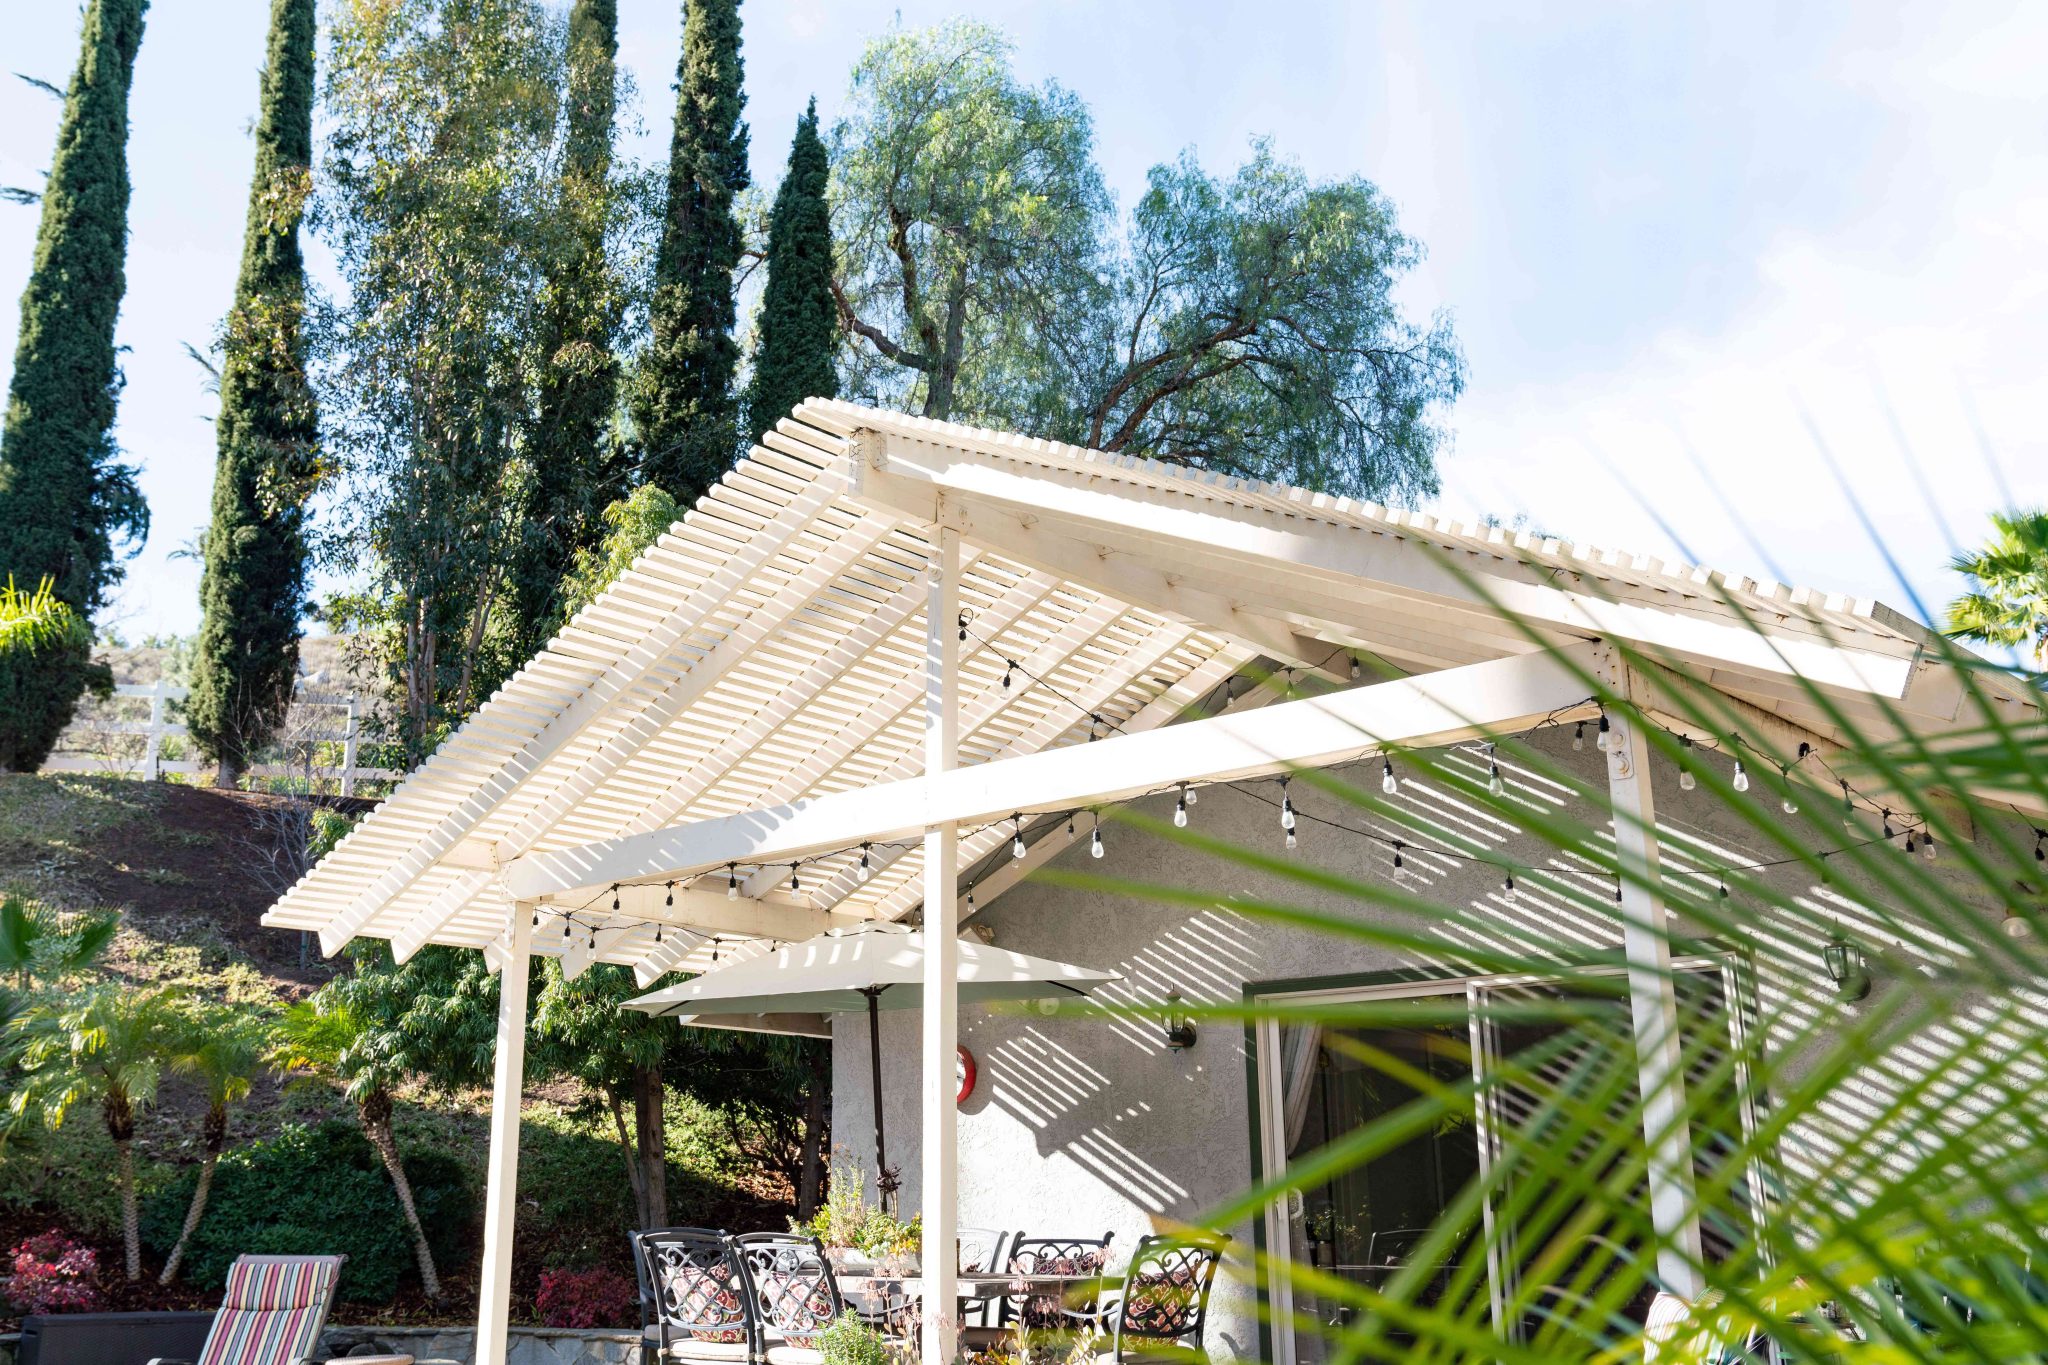
3. Create Evening Ambiance with a White Pergola and String Lights
The formula for this charming look is simple but effective: 50% structure, 30% texture, and 20% light. The white slatted pergola provides the main architectural element. The textured gray stucco wall adds depth and a slightly rustic feel, preventing the white from feeling too stark. Finally, the string lights introduce a layer of warm, ambient light that transforms the space from a simple shaded spot into a magical evening destination. The striped shadows cast by the pergola during the day are a free bonus pattern!
|
📋 Copy HEX 🔗 Share |
⭐ The One Thing
While those globe string lights look fantastic, be honest with yourself about maintenance. Exposed bulbs, especially affordable ones, will need replacing. Birds may find the strings a convenient perch, which can lead to messes on your patio below. Also, consider your climate. In areas with high winds or heavy snowfall, you may need to take the lights down seasonally to prevent damage to the cords or bulbs, which can be a tedious yearly chore.
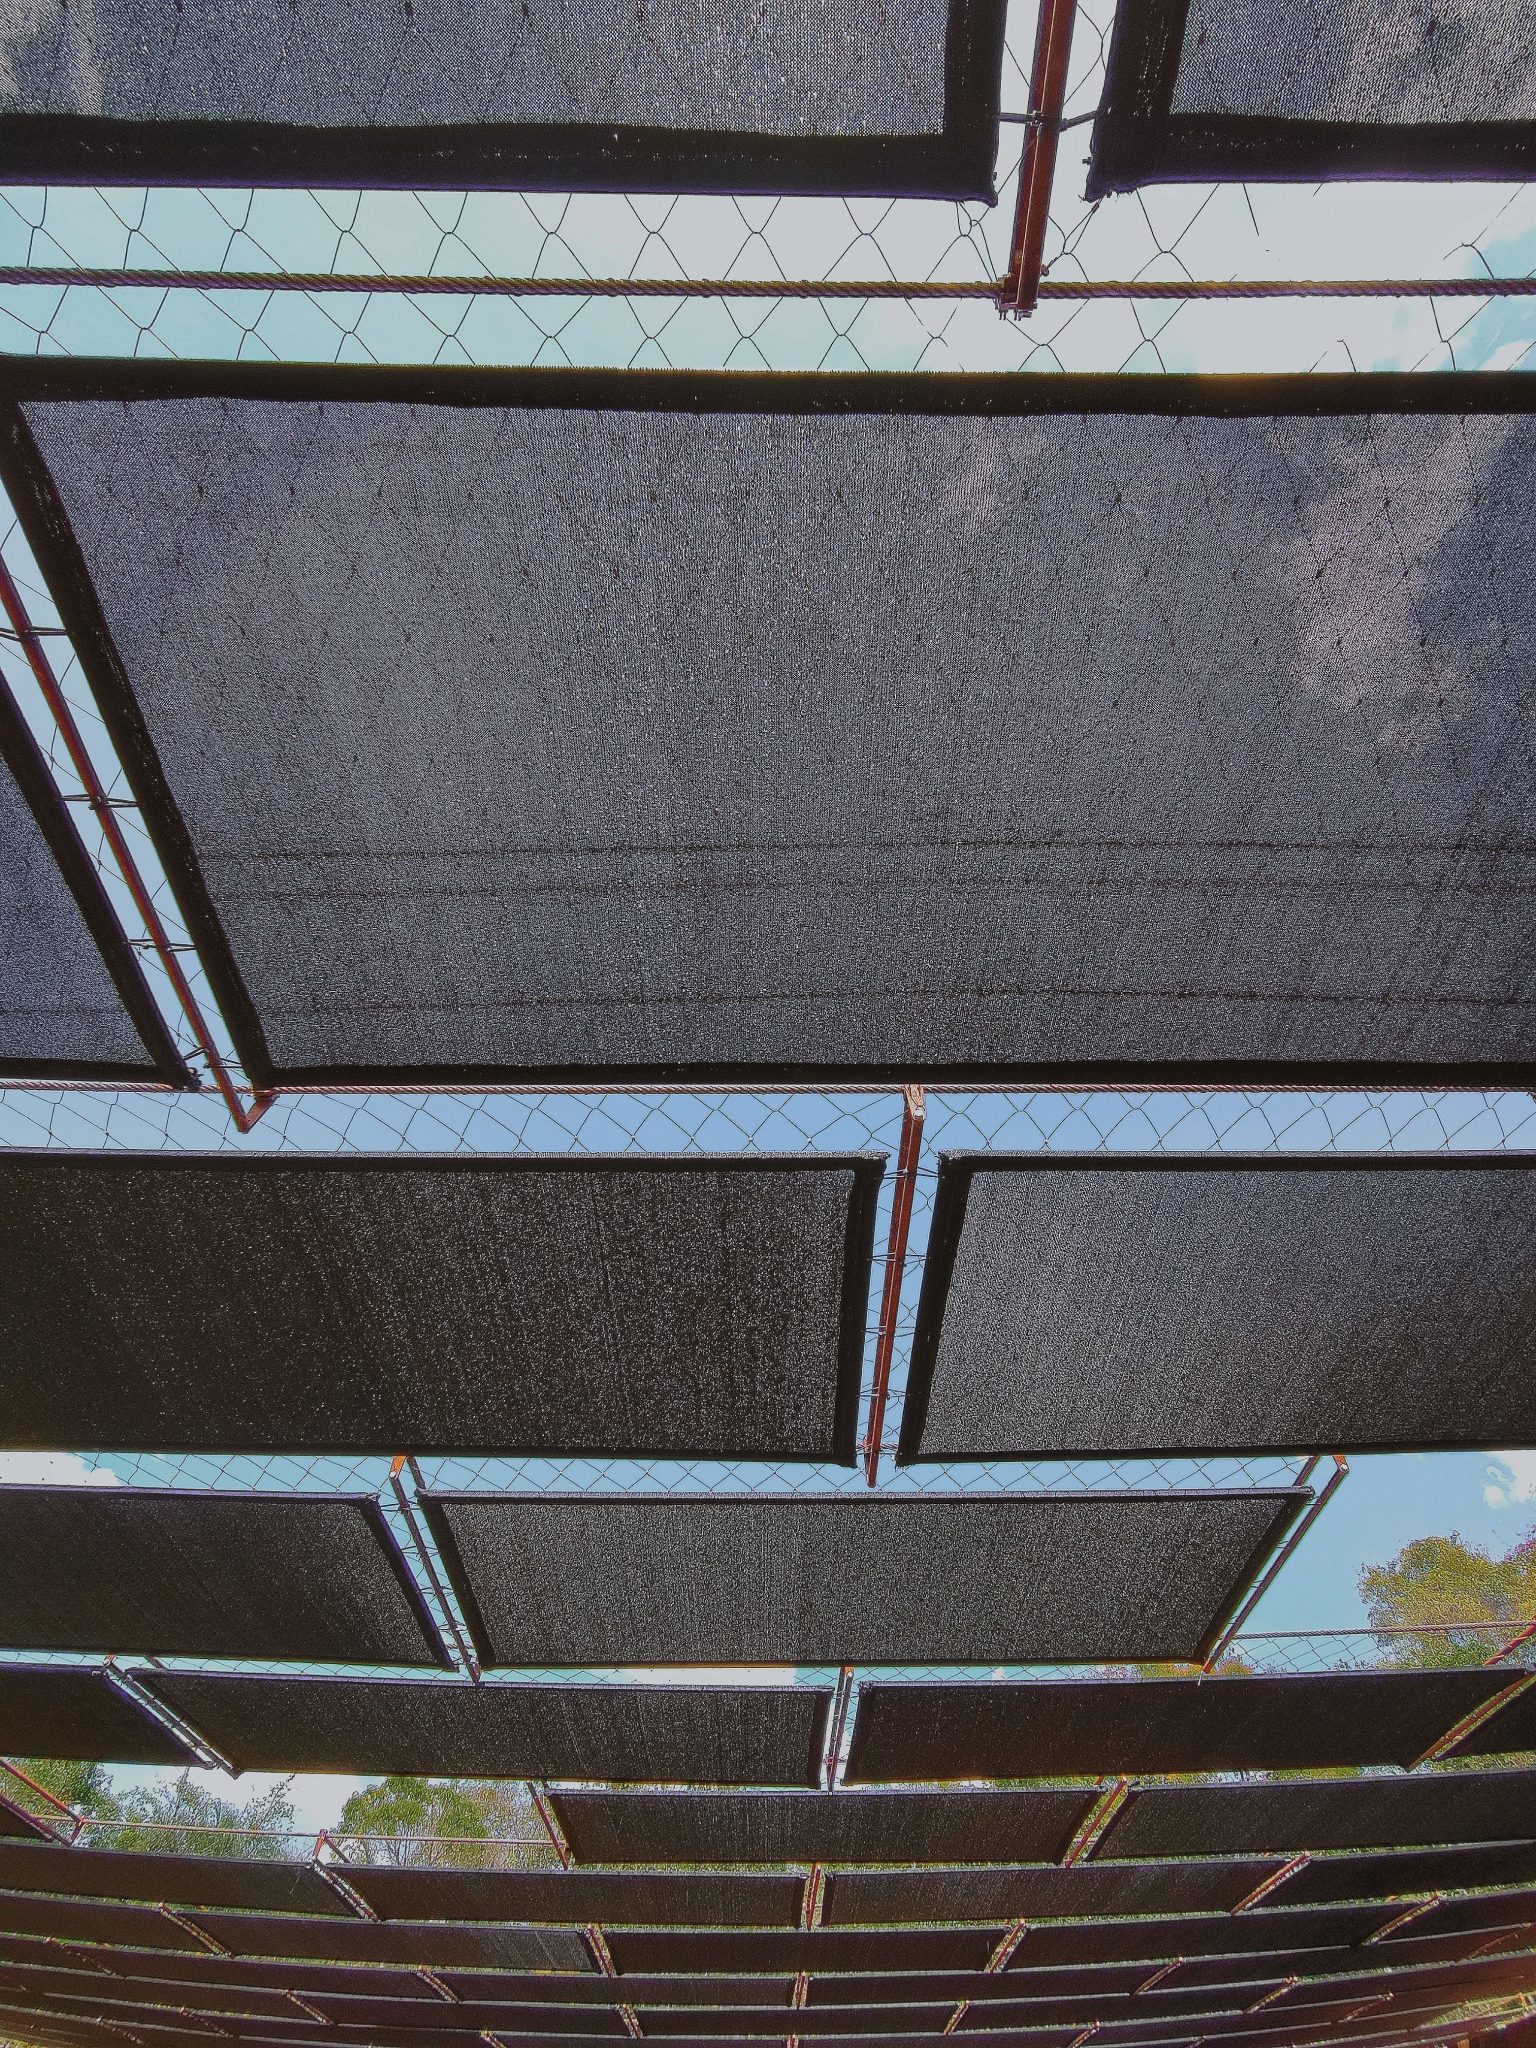
4. A Graphic Grid of Black Rectangular Shade Panels
This design works because of two key principles: repetition and negative space. The repeated pattern of the identical black panels creates a strong, rhythmic visual that feels intentional and modern. It’s a very architectural approach to shade. Just as important are the gaps between the panels. This “negative space” allows pockets of blue sky and light to peek through, preventing the structure from feeling like a heavy, oppressive solid roof. It provides shade without completely disconnecting you from the outdoors.
|
📋 Copy HEX 🔗 Share |
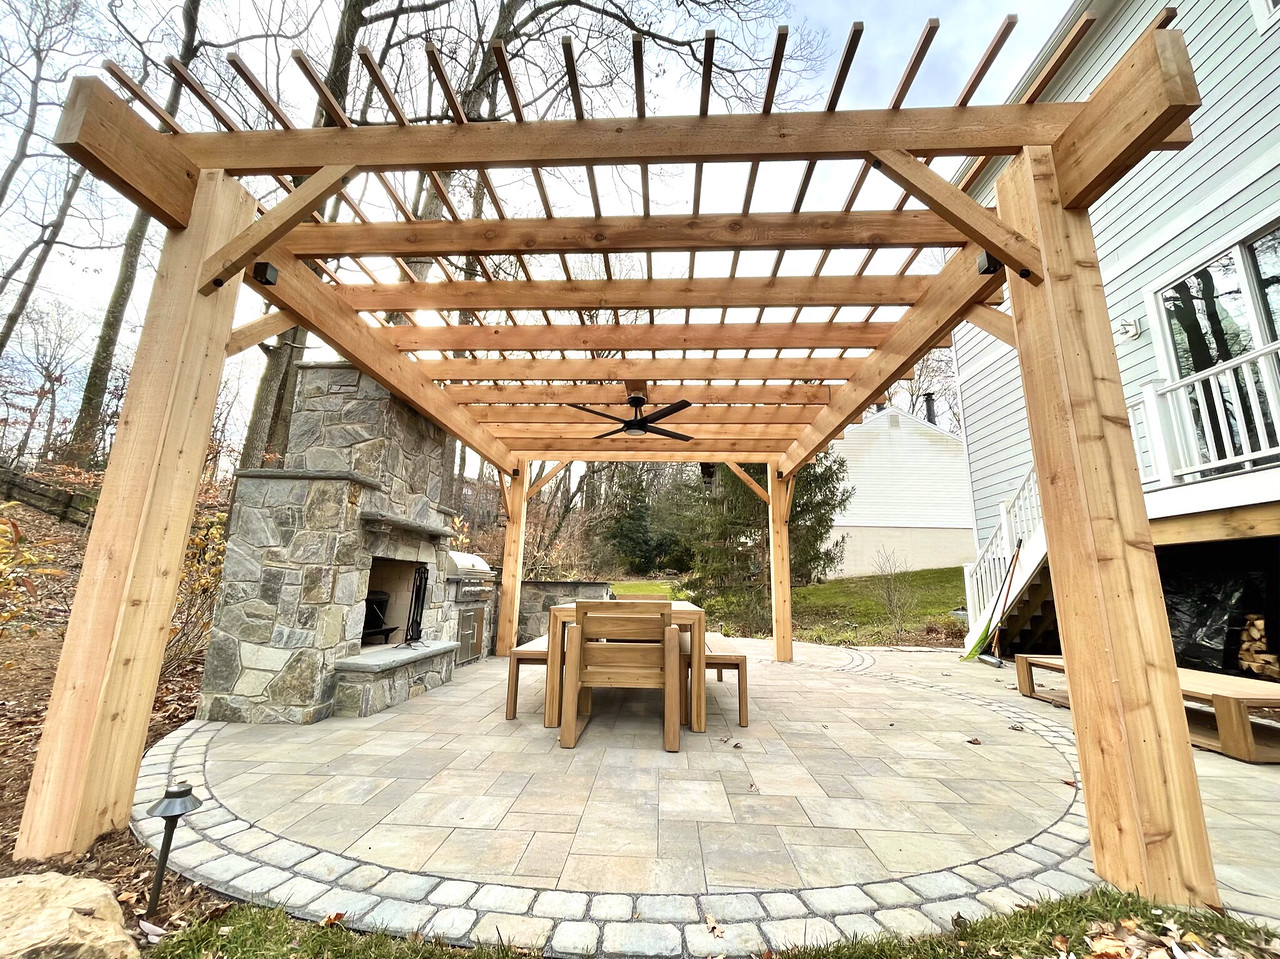
🧹 Maintenance Reality
While visually stunning, a grid of horizontal panels can be a debris trap. Leaves, twigs, and dirt will inevitably collect on top of the panels, and they won’t just wash away with rain. Plan on a quarterly cleaning to keep it looking sharp. This involves getting on a ladder and using a hose or leaf blower to clear each panel individually. If that sounds like too much work, a solid retractable awning like in Idea #8 might be a better fit for your lifestyle.
5. Build Your Own Covered Patio with a DIY Kit
Putting together a patio cover kit can be a weekend project that permanently transforms your outdoor space. Here’s a basic approach to buying and building:
- Measure Everything Twice: Get the exact width, depth, and desired height. Check for obstructions like doors or windows.
- Choose Your Material: Decide between wood, vinyl, or aluminum (like the Alumawood in Idea #21) based on your budget and maintenance tolerance.
- Foundation First: Ensure your concrete slab or deck footings are adequate to support the posts. This is the most critical step.
- Assemble the Frame: Follow the kit instructions precisely, starting with the posts, then the beams, and finally the rafters. This is a two-person job!
- Attach the Roofing: Secure the roofing panels, ensuring they overlap correctly to be watertight.
Time estimate: 2 days. Cost: $2,000-$7,000.
|
📋 Copy HEX 🔗 Share |
💡 Designer Tip
A pre-fabricated kit is convenient, but you can achieve a similar result for 40-50% less by buying your own lumber and hardware. For about $1,200-$3,500, you can purchase pressure-treated wood posts, beams, rafters, and polycarbonate roofing panels from a big-box hardware store. This DIY approach requires a solid plan, more precise cuts, and a bit more construction savvy, but the cost savings can be significant, allowing you to splurge on better outdoor furniture.
6. Sleek Retractable Awning for a Modern Tiled Patio
When installing a retractable awning, especially a large one, the pitch is more than just an aesthetic choice. For rain runoff, you need a minimum drop of 2-3 inches for every foot of projection. So, for a 10-foot awning, the front bar should be at least 20-30 inches lower than where it mounts to the house. Many professional installers will set this for you, but if you’re adjusting it yourself, use a level and a tape measure to get it right. An insufficient pitch can cause water to pool, which can stretch and damage the fabric over time.
|
📋 Copy HEX 🔗 Share |
🔥 Trending Context
Before you even get a quote for a wall-mounted retractable awning, grab a tape measure and a stud finder.
- Verify you have a clear, flat mounting space on the wall that is at least 12 inches tall and as wide as the desired awning.
- Use a stud finder to confirm there is solid structural wood (headers or studs) to bolt into. Mounting on just brick facade or siding is a recipe for disaster.
- Measure the projection you need. Sit in your chairs during the sunniest part of the day to see how far the shade actually needs to extend to be useful.
7. An Extendable Black Awning for Flexible Patio Dining
Here’s a look at what it would cost to recreate this cozy dining nook. The real investment is the awning itself.
- Manual Extendable Awning (12-foot): $500 – $1,500
- Wooden Dining Set (4-6 chairs): $600 – $2,000
- Textiles (cushions, tablecloth): $100 – $300
- Decor (planters, lighting): $150 – $400
- TOTAL: $1,350 – $4,200
Budget alternative: A large cantilever umbrella ($250), a used dining set from Facebook Marketplace ($200), and DIY planter boxes ($100) could give you a similar vibe for around $550.
|
📋 Copy HEX 🔗 Share |
🎯 What Makes It Work
A manually extendable awning is a fantastic budget-friendly option, but you have to be its brain. Unlike motorized versions with wind sensors, this one relies on you to know when to retract it. A sudden gust of wind can turn a large extended awning into a giant sail, putting immense stress on the arms and wall mountings. If you live in a notoriously windy area, you either need to be incredibly diligent about retracting it or consider a more permanent structure like the pergola in Idea #12.
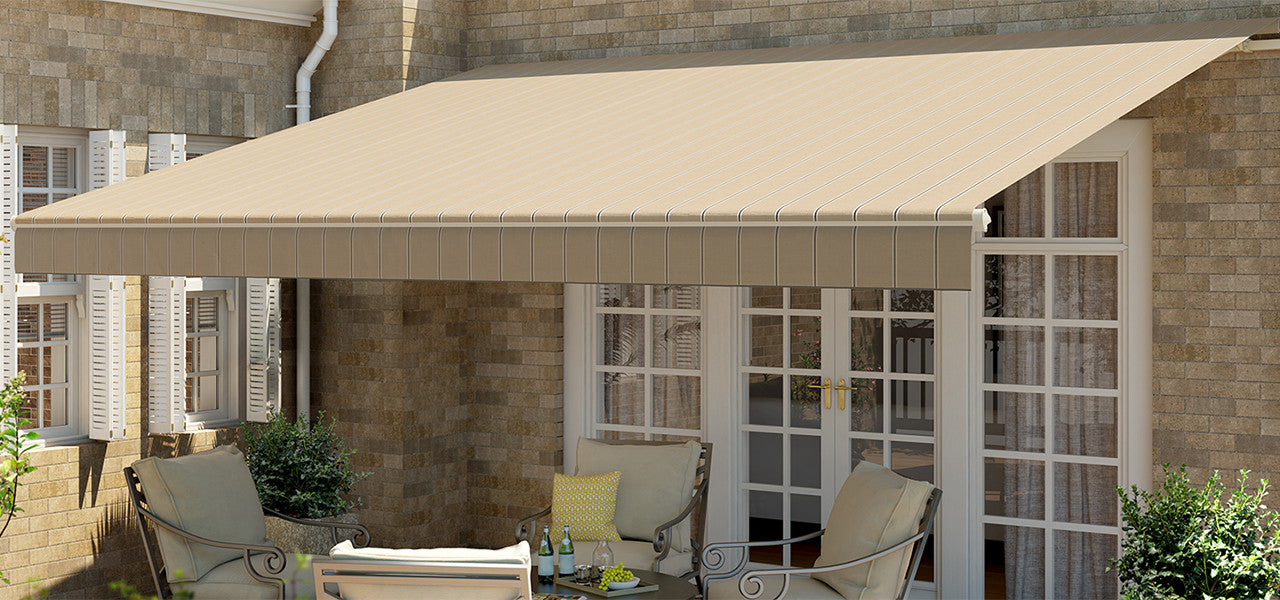
8. Classic Beige Awning for a Timeless Brick Patio
This look is pure classic comfort, and its formula is refreshingly simple: 60% traditional architecture + 30% neutral fabric + 10% heritage details. The brown brick facade and white framed windows provide a strong, timeless base. The large, light beige awning is a soft, neutral intervention that doesn’t fight with the brick. The final 10% comes from the cast iron chairs, a detail that evokes a sense of history and permanence. You could swap the beige for a muted olive or navy stripe and it would still work perfectly.
|
📋 Copy HEX 🔗 Share |
💸 Get This Look For Less
In a world of fast-paced trends, there’s a growing appreciation for styles that endure. This look taps into the “European Summer” or “Classic Courtyard” aesthetic that feels established and permanent. It’s a quiet rebellion against the minimalist, all-white-everything trend of recent years. People are craving warmth and character in their outdoor spaces, and combining classic architectural materials like brick with simple, functional elements like this awning is the perfect way to achieve it. It suggests stability and a relaxed, unpretentious elegance.
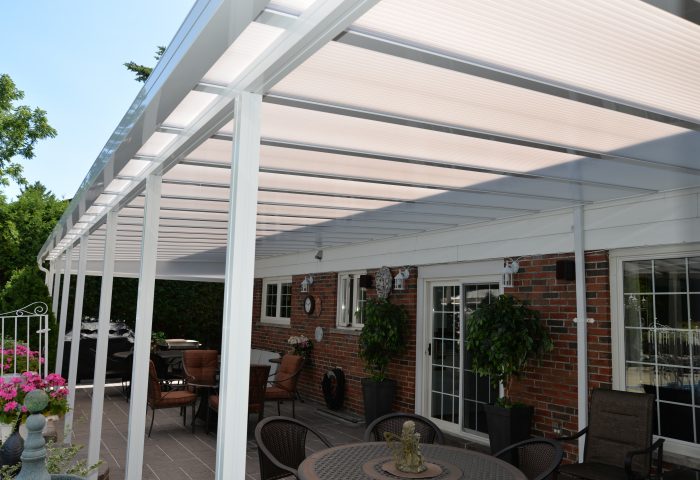
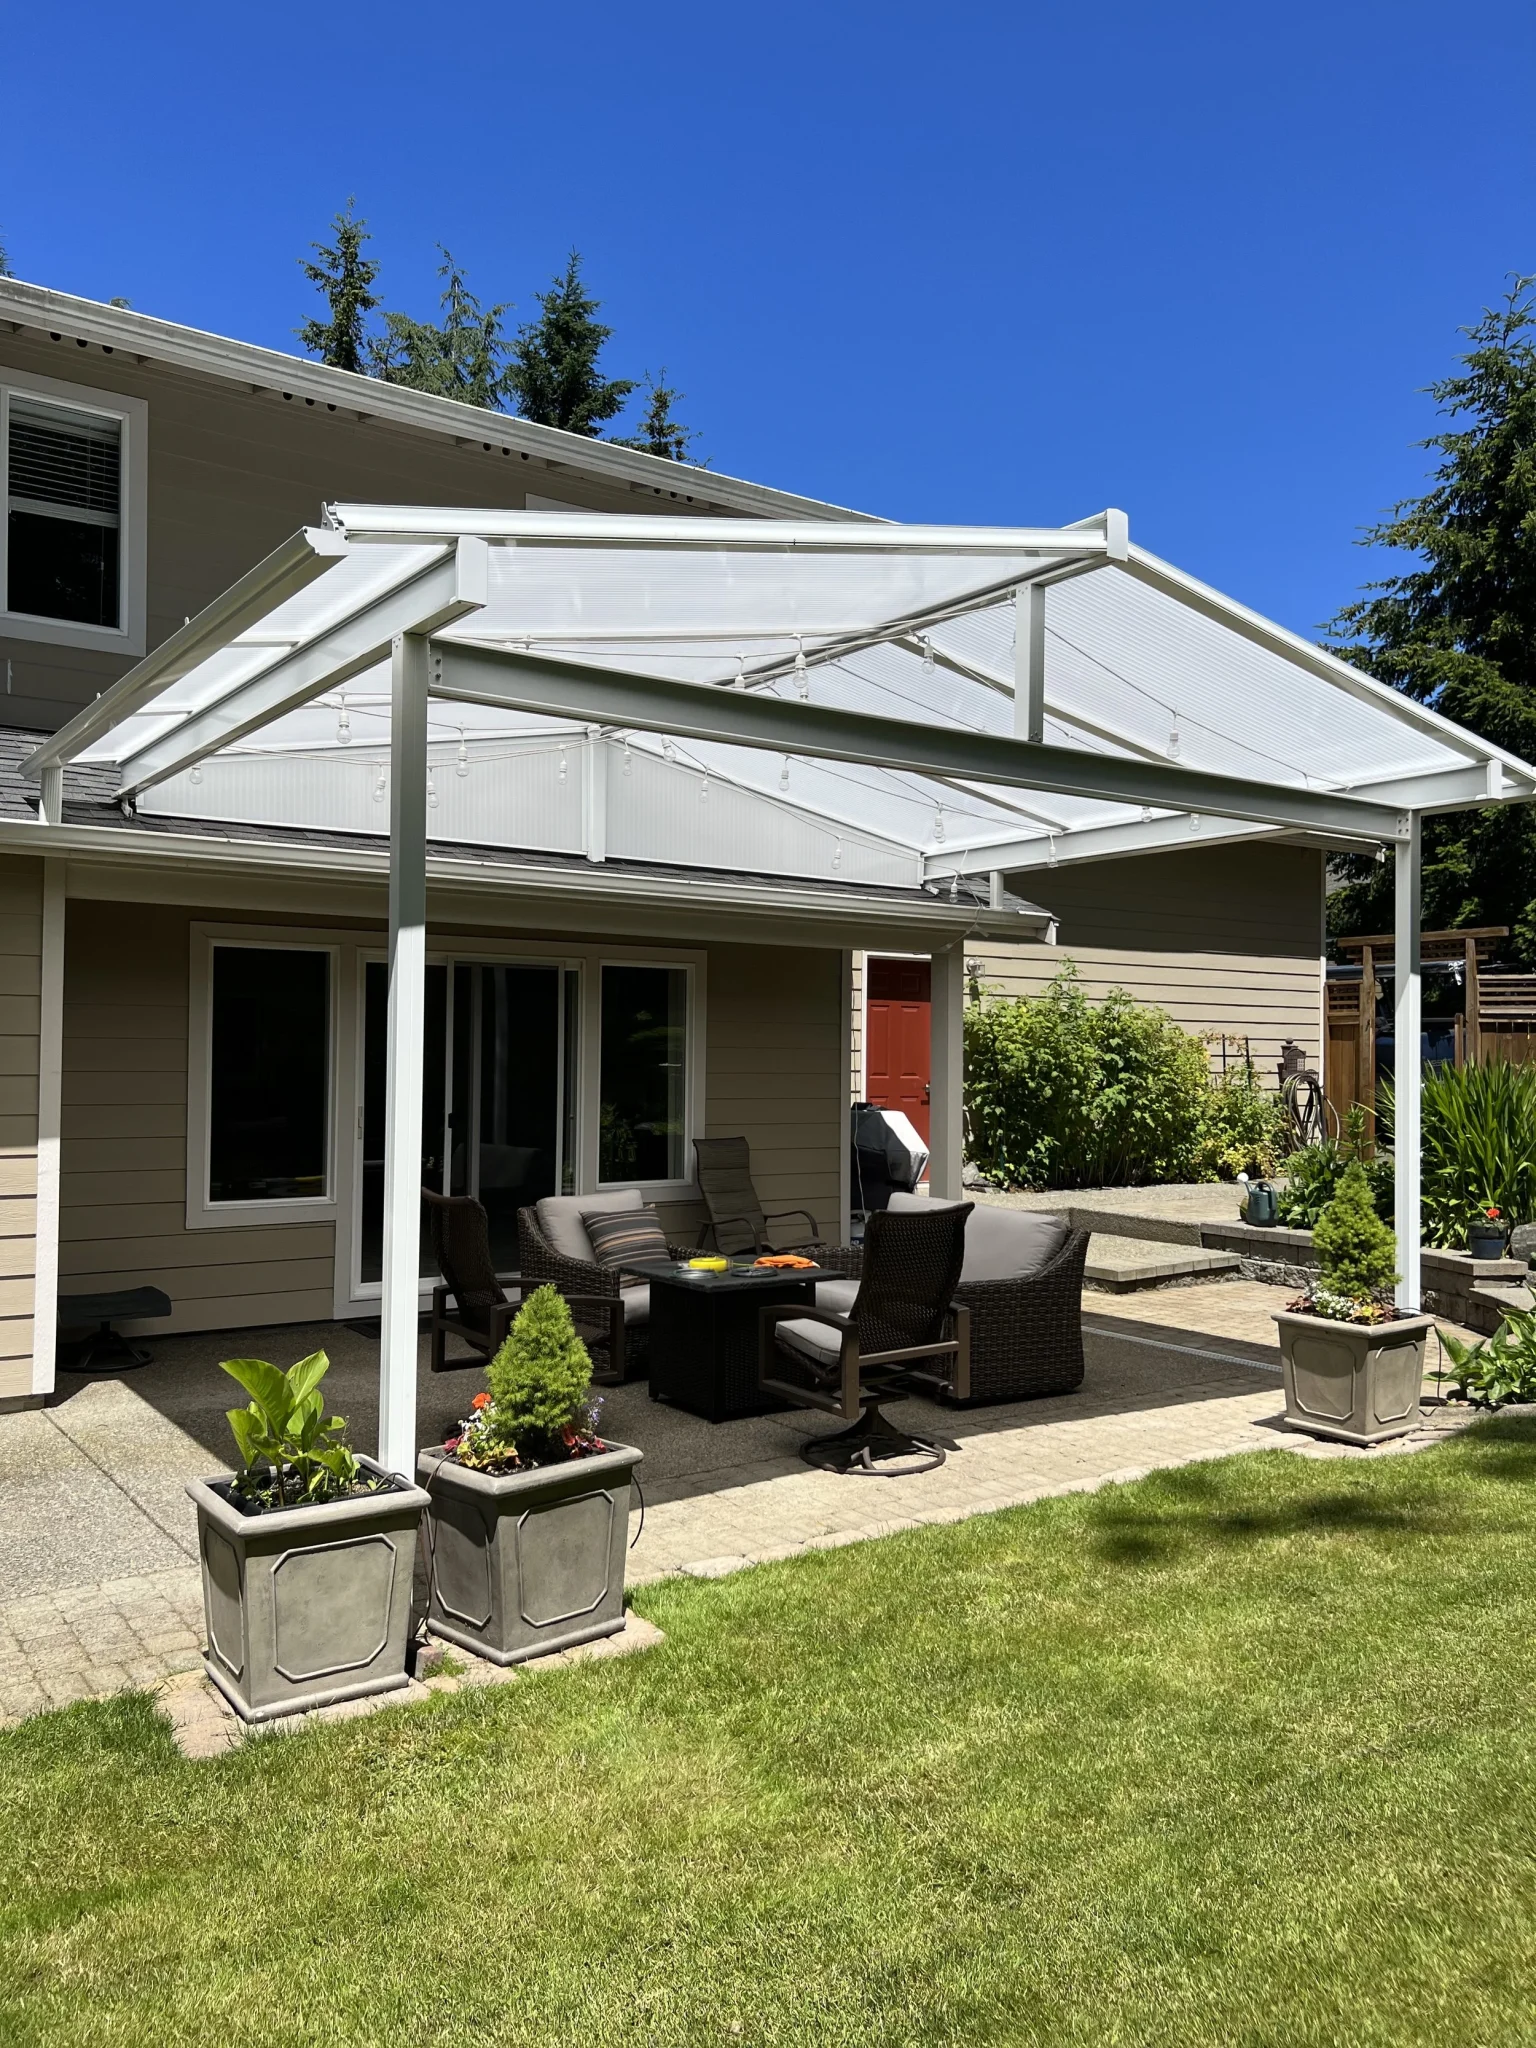
9. Modern White Pergola with a Weatherproof Translucent Roof
The single most important element making this patio so usable is the translucent corrugated roof. A standard slatted pergola top, like in Idea #3, offers partial shade, but this solid roof offers all-weather protection. It allows the space to be filled with bright, diffused light—so it doesn’t feel dark—while providing total shelter from both UV rays and rain. This one feature is what elevates the area from a simple patio to a genuine three-season outdoor room where you can comfortably sit, even during a summer shower.
|
📋 Copy HEX 🔗 Share |
🔧 How-To Brief
A translucent roof is fantastic for letting in light, but it shows dirt, mildew, and fallen leaves very clearly. To keep it looking its best, plan for a twice-yearly cleaning. The easiest way is with a long-handled, soft-bristle brush, a bucket of soapy water, and a garden hose. Avoid using a pressure washer, as the high-powered stream can be too harsh for some polycarbonate or fiberglass panels and could even force water into the seams if you’re not careful. The corrugated shape also means you have to clean in the channels.
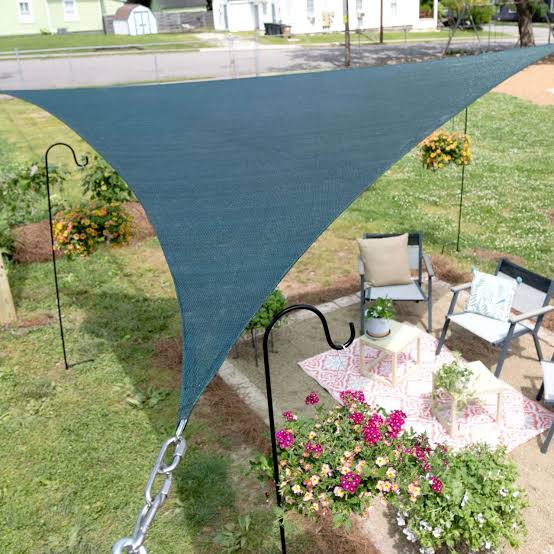
10. The Ultimate Renter-Friendly Triangle Sun Sail
A triangle sun sail is a perfect rental solution because it can often be installed with zero permanent changes to the property. Here’s how to do it smartly:
- Identify Anchor Points: Look for existing sturdy structures. A mature tree trunk, a solid fence post, or the eaves of the house are ideal.
- Use Tension Hardware: For each corner, you’ll need a turnbuckle. This allows you to get the sail incredibly taut, which is key to making it look good and resist wind.
- Rope or Straps for Anchors: Use heavy-duty polyester rope or webbing straps to loop around your chosen tree or post. This avoids drilling holes.
- Get the Right Angle: Install the sail with a slight tilt (at least a 20-degree angle). This not only looks more dynamic but it ensures rainwater runs off instead of pooling in the middle.
Time estimate: 1-2 hours. Cost: $50 – $150.
|
📋 Copy HEX 🔗 Share |
📏 Scale Guide
You don’t need to spend a fortune on a custom sail. In fact, some of the best budget options are hiding in plain sight. Check Amazon, Wayfair, or even Walmart for sun shade sails; you can often find one for $30-$60. For hardware, skip the branded kits and go to the hardware section of Home Depot or Lowe’s. You can buy turnbuckles, carabiners, and rope for a fraction of the cost. A complete, robust setup can easily be assembled for under $75.
11. Elegant Shade Curtains for a West-Facing Pergola
For a west-facing wall that gets blasted by the intense afternoon sun, fabric choice is everything. Don’t use standard indoor-outdoor polyester; it will fade within a season. Your best bet is solution-dyed acrylic or olefin fabric. Brands like Sunbrella are the gold standard for a reason. With these fabrics, the color pigment is part of the fiber itself, not just dyed on the surface. This makes them incredibly resistant to fading from UV exposure. They cost more upfront, but you won’t be replacing sad, faded curtains next year.
|
📋 Copy HEX 🔗 Share |
⚠️ Real Talk
Outdoor curtains look dreamy and romantic, but they can be a total pain in windy locations. Light, breezy curtains will spend more time tangled on top of your pergola than hanging gracefully. If you’re committed to the look, you need a two-part strategy: use heavy decorator-weight fabric and install a chain weight in the bottom hem (just like with high-end indoor drapes). Even then, you’ll need to invest in robust tie-backs to keep them secured when the wind picks up.
12. A Statement Black Pergola with Natural Wood Slats
This design is a masterclass in material contrast. The sleek, sharp lines of the black metal pergola frame provide a strong, modern grid. This industrial feeling is then immediately softened and warmed up by the natural wood slats used for the roof. The combination is powerful: the black provides a graphic punch and a solid anchor, while the wood brings in natural texture and a welcoming tone. It feels both edgy and organic at the same time, which is a hard balance to strike.
|
📋 Copy HEX 🔗 Share |
📐 Style Math
A structure like this is ideal for defining a specific “zone” in a medium to large backyard. It works perfectly to create an “outdoor room” for dining or lounging, separating it visually from the rest of the yard, like a grassy play area or a pool. For this to be effective without feeling cramped, the pergola should be at least 10×12 feet, large enough to comfortably house a dining table and chairs with room to walk around. It’s less suited for a very small, narrow patio where it might feel too bulky.
13. Dressing Your Pergola: Using Curtains for Softness and Shade
Think of dressing a pergola with curtains as a simple equation: 70% structure + 30% fabric. The pergola itself is the strong, architectural skeleton. The curtains are the soft, decorative element that changes the whole mood. Without the fabric, it’s just a frame. With the fabric, it becomes a room. The key is to not overdo it. Curtains on one or two sides are usually enough to provide shade and a sense of enclosure without making the space feel stuffy or blocking all the views.
|
📋 Copy HEX 🔗 Share |
✅ Before You Start
You don’t need to spend hundreds on custom Sunbrella drapes to get this look. One of the oldest designer tricks in the book is to use canvas drop cloths from a hardware store like Home Depot. They are inexpensive (around $25 for a large 9×12 foot panel), made of heavy-duty cotton canvas, and have a beautiful, natural texture. Simply fold over the top to create a pocket for the curtain rod and use clip rings to hang them. No sewing required! It’s a high-impact, low-cost solution.
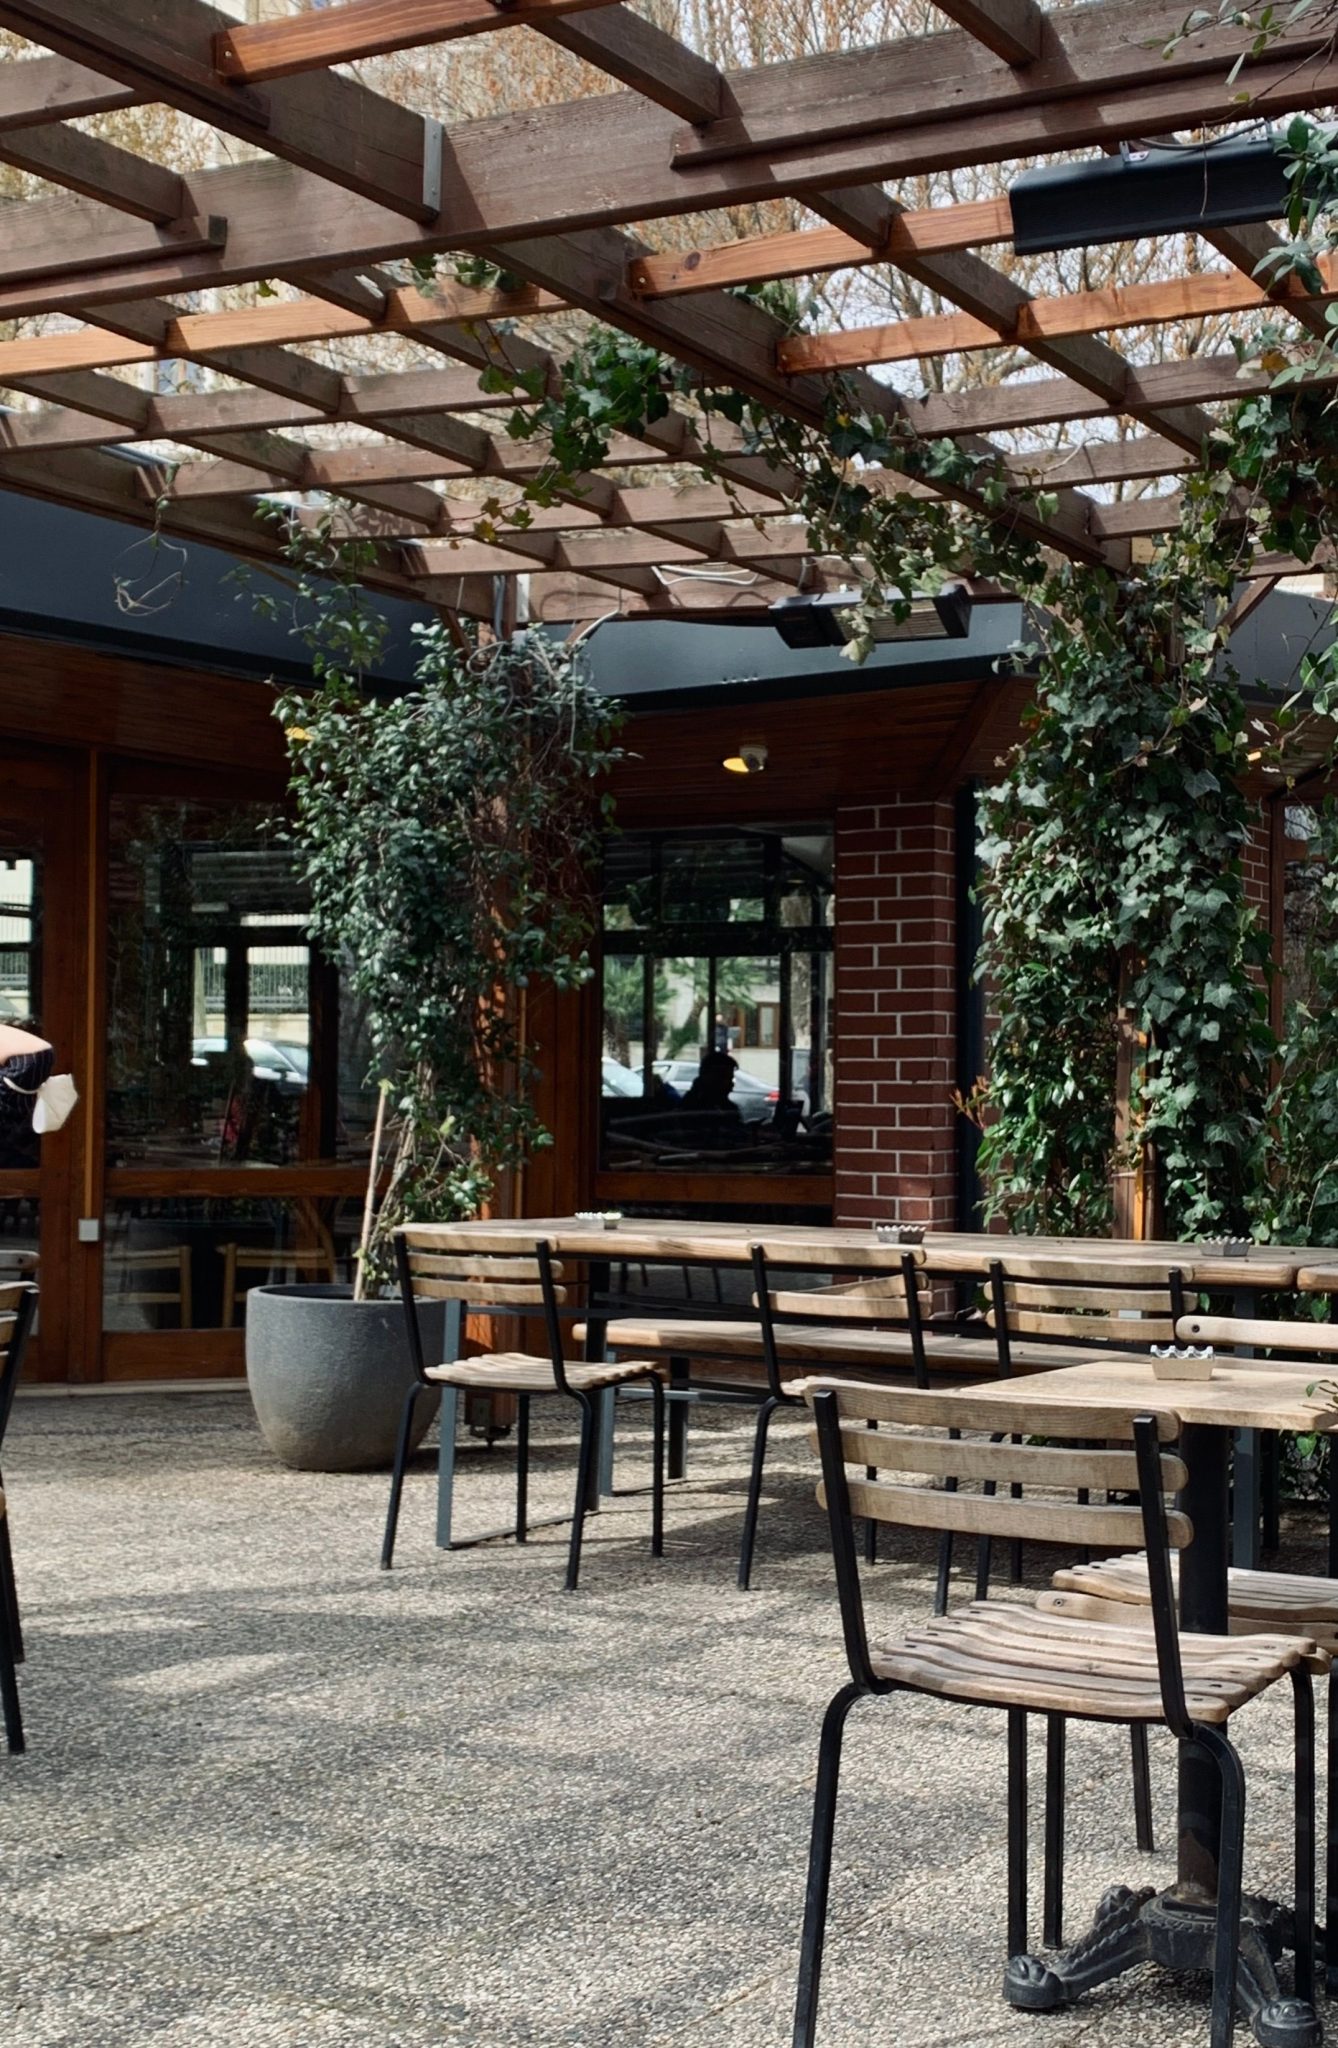
14. A Living Canopy of Creeping Vines on a Wood Pergola
The star of this show is undeniably the living element: the lush green vines. They transform a simple wooden structure into a dynamic, natural canopy. This isn’t just shade; it’s shade with life. The dappled light filtering through the leaves creates a magical, forest-floor effect that you can’t get from fabric or plastic. It also changes with the seasons, offering a different character in spring, summer, and fall. It connects the built environment directly to the garden itself.
|
📋 Copy HEX 🔗 Share |
💰 Budget Breakdown
A vine-covered pergola is gorgeous, but it’s a living system that requires care. You’ll need to commit to seasonal pruning to keep the vines from becoming overly heavy or growing into your house’s gutters. Fast-growing vines like wisteria need to be cut back aggressively 2-3 times a year. You also need to monitor for pests and ensure the plants are getting adequate water at their base. Be sure to choose a species that isn’t invasive in your area. Compare this to the low-maintenance approach of Idea #21.
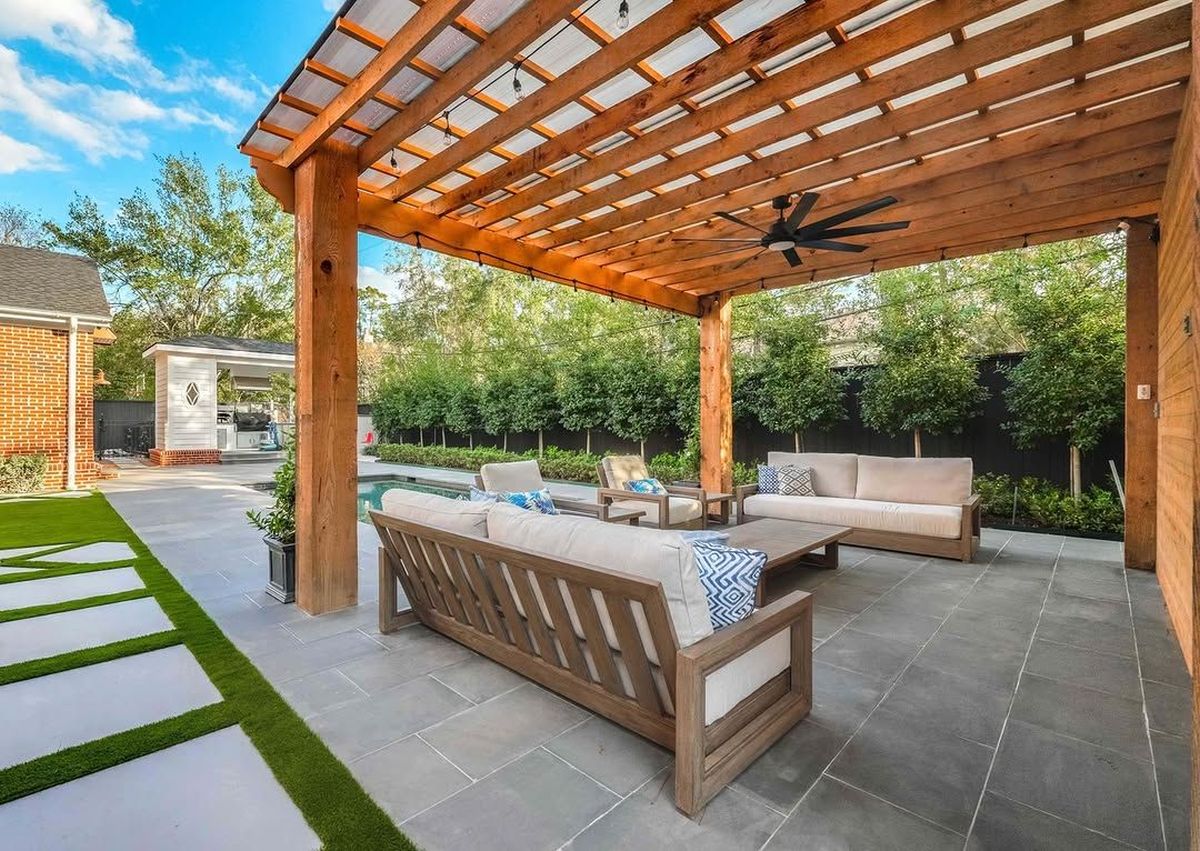
15. Effortless Shade with a Large Retractable Awning System
Large-scale retractable awnings are fantastic for covering expansive patios, but size matters. A typical residential awning can project out from the house anywhere from 8 to 13 feet. The width can often be customized up to 20 feet or more. For a dining area, you want the awning to be at least 2 feet wider and longer than your table to ensure all guests are shaded. For a lounge area, map out your furniture and ensure the projection covers the entire seating group, not just half of it.

|
📋 Copy HEX 🔗 Share |
⭐ The One Thing
A large retractable awning puts significant load on the wall where it’s mounted, especially when fully extended. Before you commit, it’s wise to perform these checks:
- Structural Integrity: Confirm you have a solid beam or header to mount to. For brick or masonry, ensure it’s solid and not just a veneer. A professional consultation is highly recommended.
- Obstructions: Check for clearance issues with light fixtures, downspouts, or window frames that could interfere with the awning’s housing or arms.
- Electrical Access: If you want a motorized version (highly recommended for large sizes), you’ll need a GFCI-protected outdoor outlet nearby for the power cord.
16. Contemporary Outdoor Living with a Slatted Wood Feature Wall
When creating a slatted wood privacy screen or feature wall, the spacing of the slats is a critical design decision. For maximum privacy, use 1×4 boards with a gap of only 1/2 inch between them. This will block most sightlines. For a more open, airy feel that just suggests separation, use 1×2 boards with a 1-inch or even 1.5-inch gap. This allows more light and air to pass through and feels less like a solid wall. The choice depends entirely on whether your priority is privacy or creating a modern, textural backdrop.

|
📋 Copy HEX 🔗 Share |
🧹 Maintenance Reality
This chic outdoor space is a beautiful exercise in balancing natural and man-made materials. The formula is roughly 40% warm wood + 30% cool stone/metal + 20% soft textiles + 10% bold accents. The slatted wood on the wall and pergola brings in natural warmth. The white stone bar and stainless steel appliances offer a sleek, cool counterpoint. The grey cushions soften the entire look, while the black TV and vibrant turquoise pool serve as dramatic focal points. It’s a sophisticated mix that feels perfectly balanced.
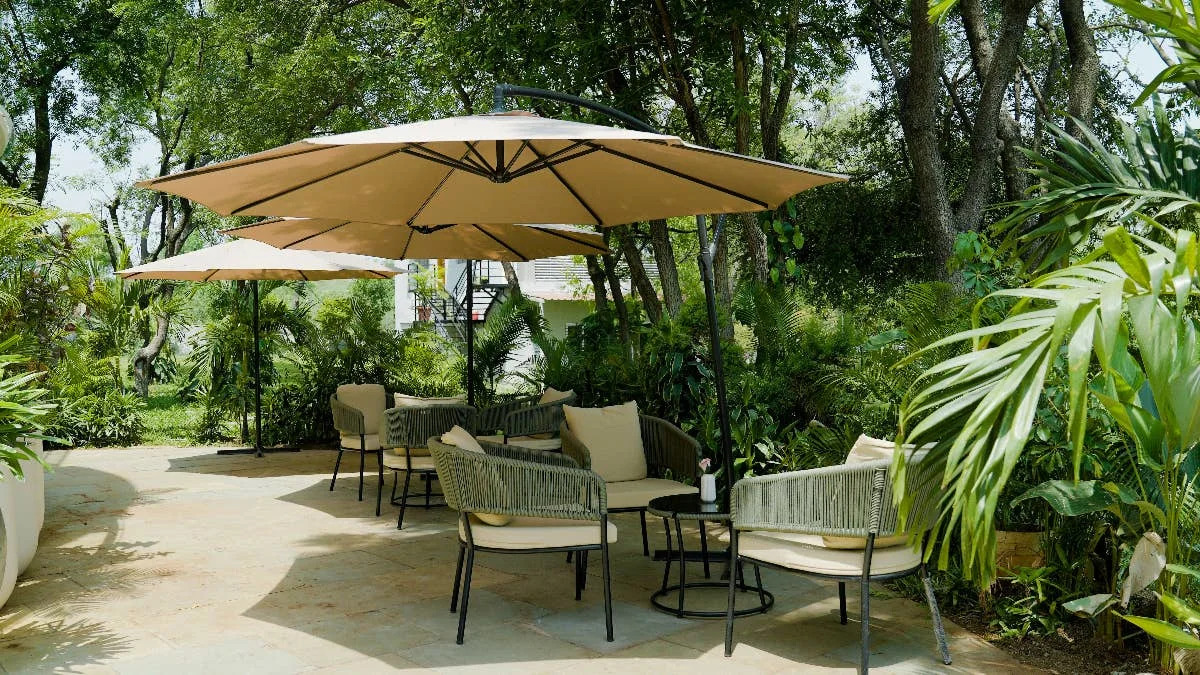
17. Flexible Shade with Multiple Cantilever Umbrellas
The genius of this setup is its flexibility. Unlike a fixed pergola or awning, using multiple cantilever umbrellas allows you to adjust your shade precisely where you need it, when you need it. You can tilt them to block the low afternoon sun, rotate them as the sun moves across the sky, and group them together to cover a large dining table or spread them out for separate lounge areas. It’s a modular solution that adapts to different situations, which is perfect for people who love to reconfigure their patio layout.
|
📋 Copy HEX 🔗 Share |
💡 Designer Tip
Let’s be honest: cantilever umbrellas can be giant kites. Their biggest weakness is wind. A beautiful, shady afternoon can turn into a disaster if a strong gust catches the canopy. You absolutely cannot skimp on the base. For a large 10-13 foot umbrella, you need a base that is at least 200-400 pounds when filled with sand or water. And no matter how heavy the base is, it is critical to close the umbrella when you’re not actively using it. A fixed structure like the one in Idea #1 is a safer bet in very windy regions.
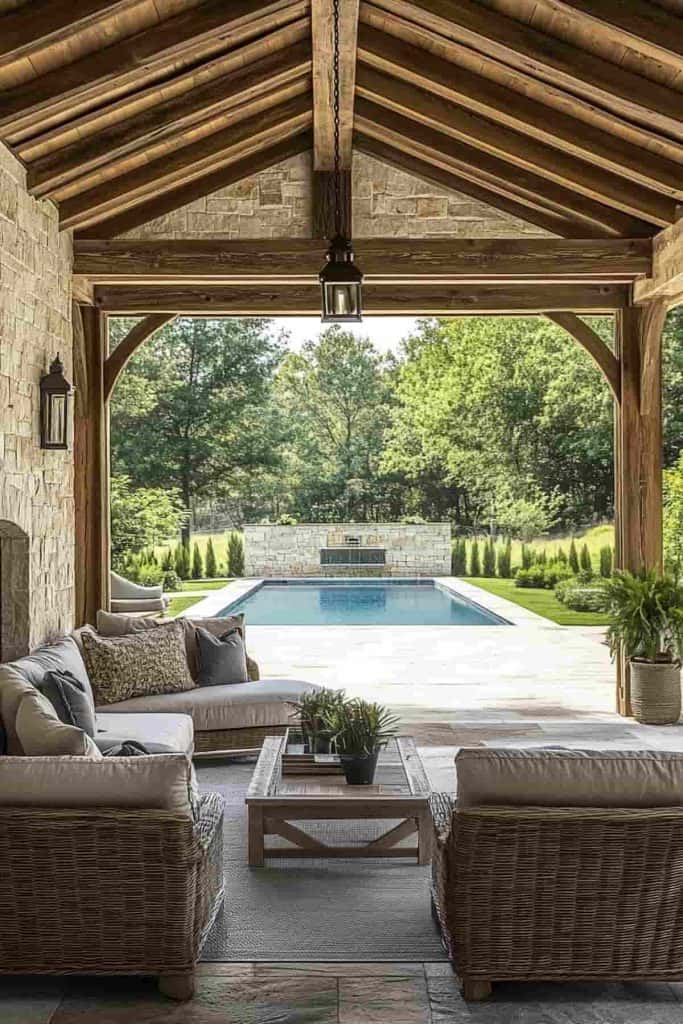
18. Rustic Charm with a Vaulted Wood Beam Patio Cover
Achieving this substantial, rustic look is a major construction project with a corresponding price tag. The beauty is in the quality of the materials and craftsmanship.
- Structural Engineering/Plans: $1,000 – $3,000
- Wood Beams & Rafters (Cedar or Douglas Fir): $8,000 – $20,000
- Stone Cladding for Walls/Pillars: $5,000 – $15,000
- Labor & Construction: $10,000 – $25,000+
- TOTAL: $24,000 – $63,000+
Budget alternative: Use standard pressure-treated lumber wrapped in cedar planks and manufactured stone veneer to get a similar feel for 40-60% less.
|
📋 Copy HEX 🔗 Share |
🔥 Trending Context
This design taps directly into the “Modern Lodge” or “Mountain Modern” trend that has been incredibly popular on Pinterest and in design magazines. Homeowners are craving spaces that feel like a vacation retreat. The combination of massive wood beams and rugged stone evokes the feeling of a luxury mountain resort. It’s about creating a destination in your own backyard—a cozy, protected space that feels completely separate from the everyday and deeply connected to nature.
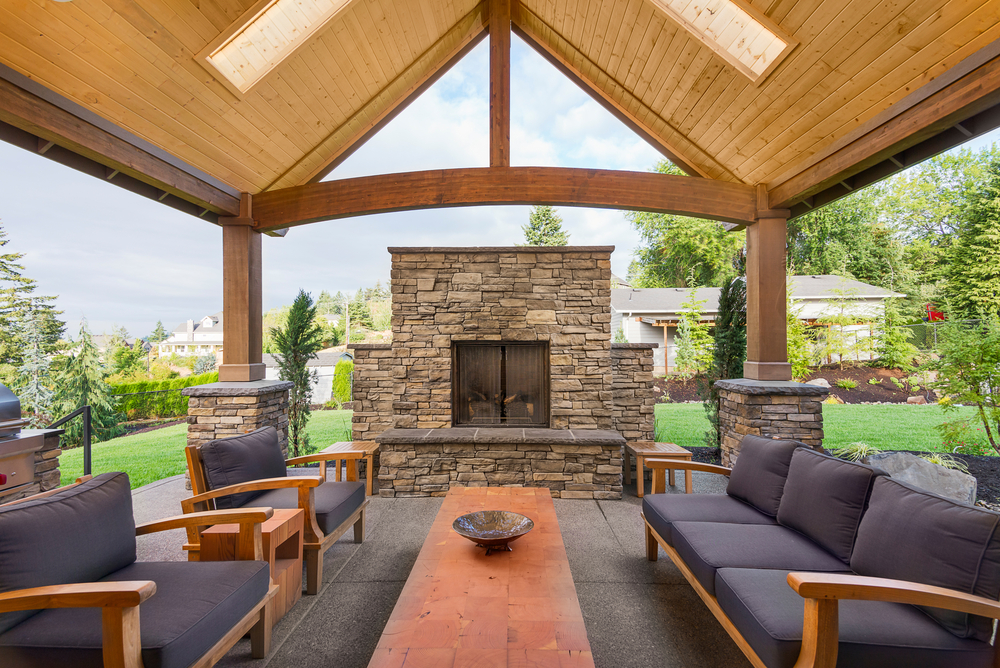
19. Cozy Up Under a Wood-Vaulted Ceiling with Skylights
The skylights are the game-changer here. While a solid wood-vaulted ceiling like the one in Idea #18 is stunning, it can create a very dark space. By strategically placing skylights in the ceiling, this design solves that problem brilliantly. It retains the cozy, sheltered feeling of being under a massive wooden structure while flooding the space with natural, indirect light. You get protection from rain and direct sun, but you don’t have to sacrifice brightness. It’s the best of both worlds.
|
📋 Copy HEX 🔗 Share |
🎯 What Makes It Work
This design works by expertly balancing feelings of enclosure and openness. The heavy stone fireplace and substantial wood beams create a very grounded, protected, “nest-like” feeling. You feel safe and sheltered from the elements. But then, you look up and see the sky through the skylights, which provides a moment of release and openness. This contrast is what makes the space so compelling and psychologically comfortable. It’s cozy without being claustrophobic.
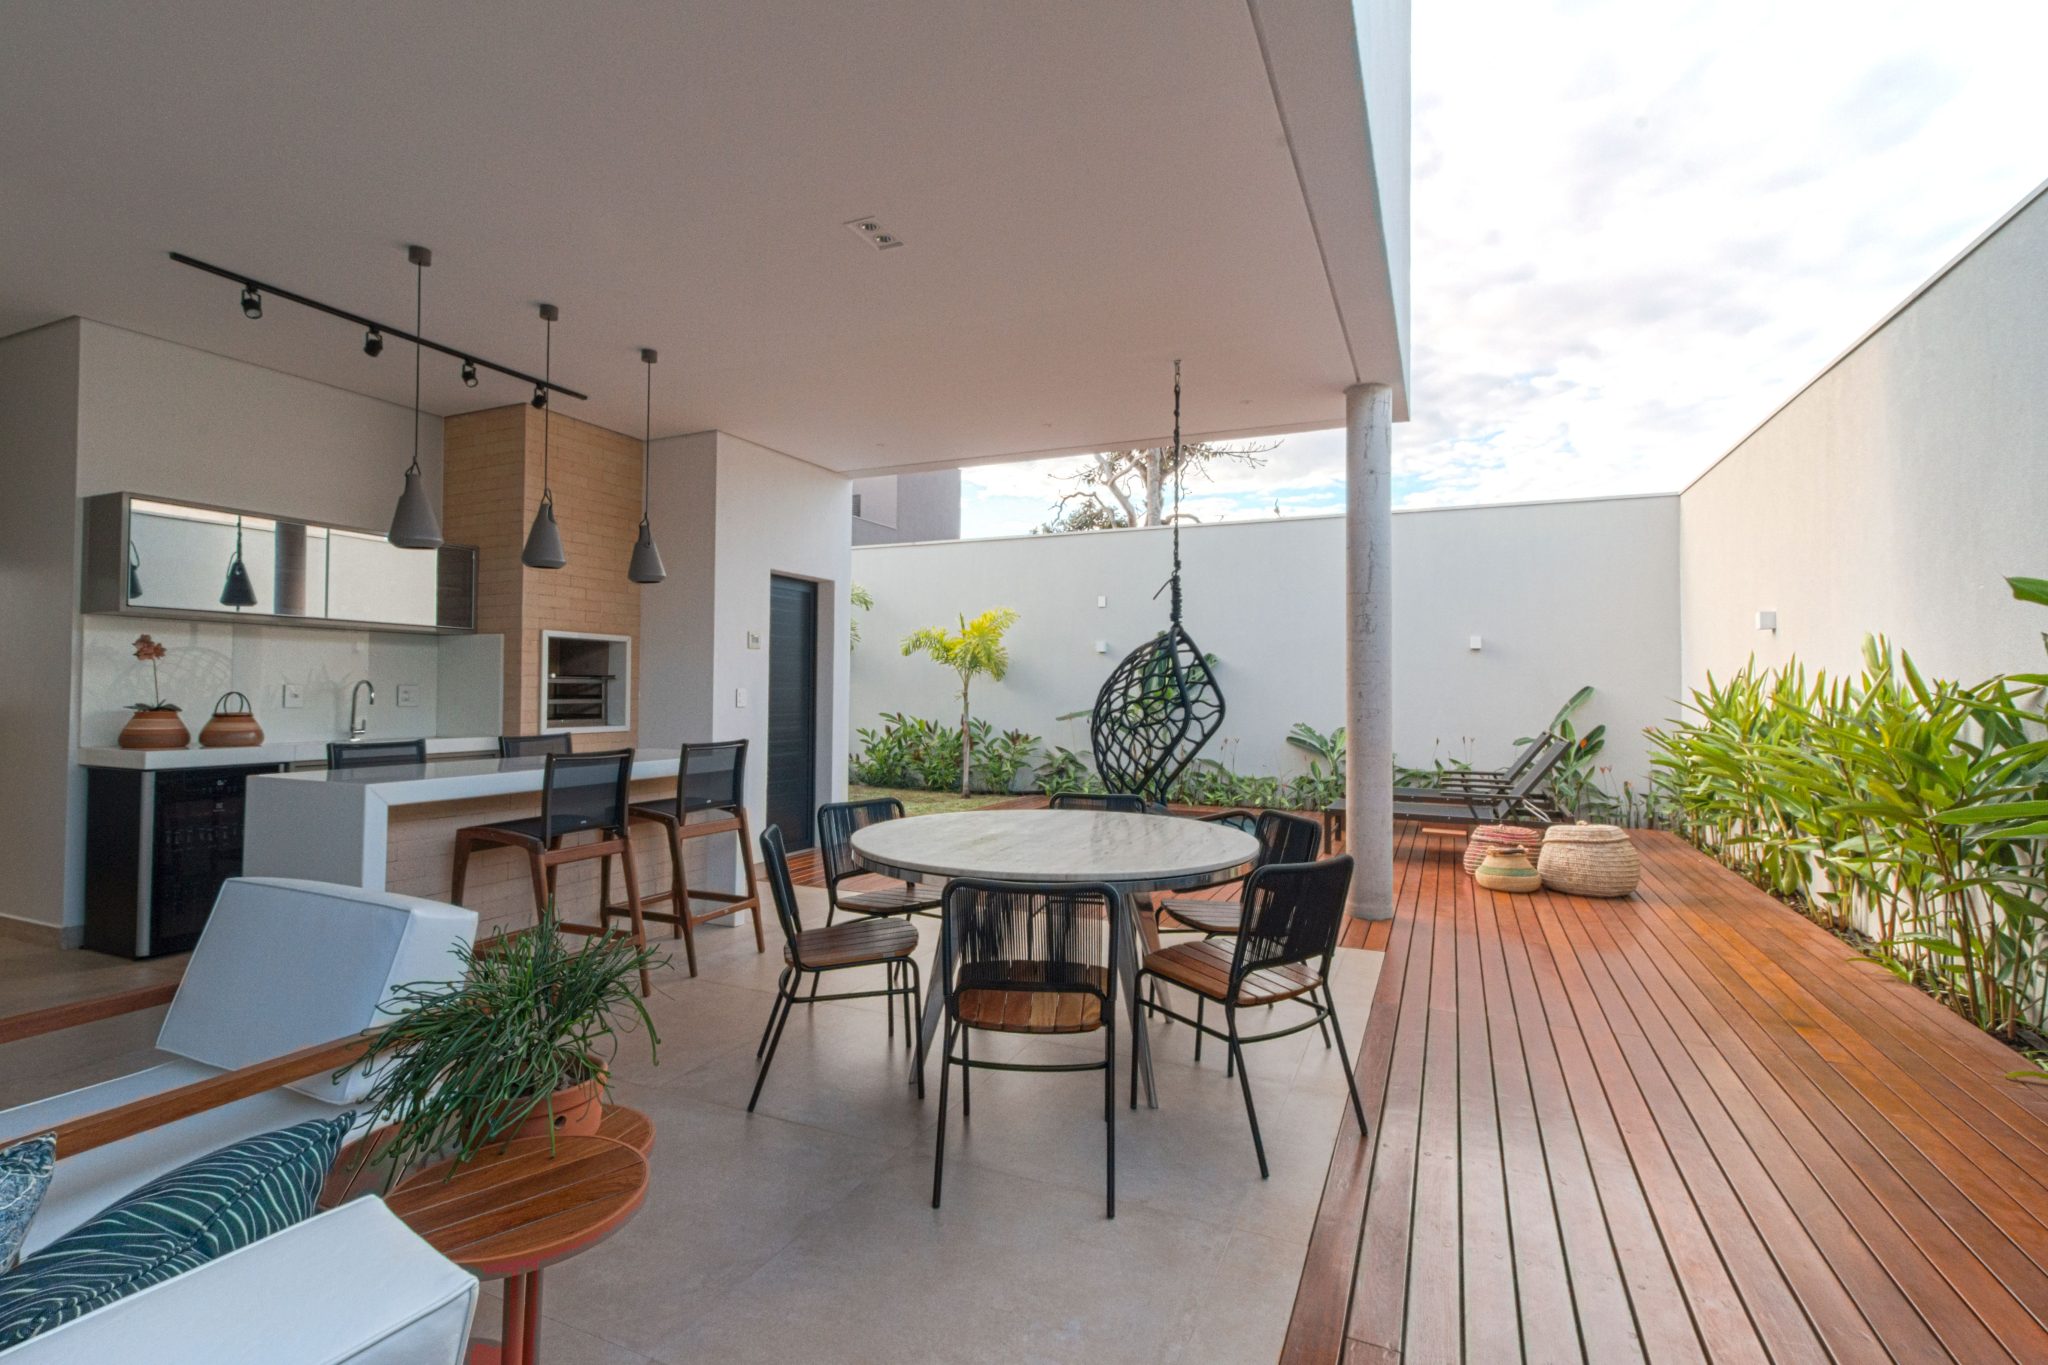
20. Zoned Outdoor Living with a Deck and Tiled Kitchen
This patio demonstrates a brilliant strategy for large spaces: using flooring materials to define functional zones. The total area is large, but it’s broken down into a “kitchen/dining” zone with practical, easy-to-clean tile and a “lounge” zone with a warm, comfortable wooden deck. This change in material underfoot sends a clear signal about the purpose of each area, making the large space feel more organized and intuitive to use. This technique is perfect for patios over 400 square feet.
|
📋 Copy HEX 🔗 Share |
💸 Get This Look For Less
When transitioning between two different outdoor flooring materials, like tile and wood decking, don’t just butt them up against each other. For a clean, professional look, incorporate a distinct border material. A line of black river stones, a narrow channel of mondo grass, or a poured-concrete curb between the two surfaces creates a deliberate, finished transition. It shows that the material change was an intentional design choice, not just a place where one thing stopped and another started.
21. The Alumawood Approach: Wood-Look, Low-Maintenance Shade
The primary appeal of an Alumawood-style patio cover is its incredibly low maintenance compared to real wood. A natural wood pergola needs to be sealed or stained every 2-3 years to protect it from moisture and sun, a chore that involves sanding, cleaning, and application. An aluminum structure, on the other hand, has a baked-on enamel finish that will last 15-20 years with nothing more than an occasional wash with soap and water to remove dust and bird droppings. It will never rot, warp, or be infested by termites.

|
📋 Copy HEX 🔗 Share |
🔧 How-To Brief
A new Alumawood patio cover is a significant investment. For a more budget-friendly approach, consider giving your existing wooden patio cover a refresh. If the structure is still sound, you can rent a pressure washer, give it a thorough cleaning, let it dry completely, and then apply a fresh coat of a solid-color outdoor stain. This can give you a “like-new” look for a weekend’s worth of work and a few hundred dollars in materials, versus the several thousand dollars a new aluminum installation would cost.
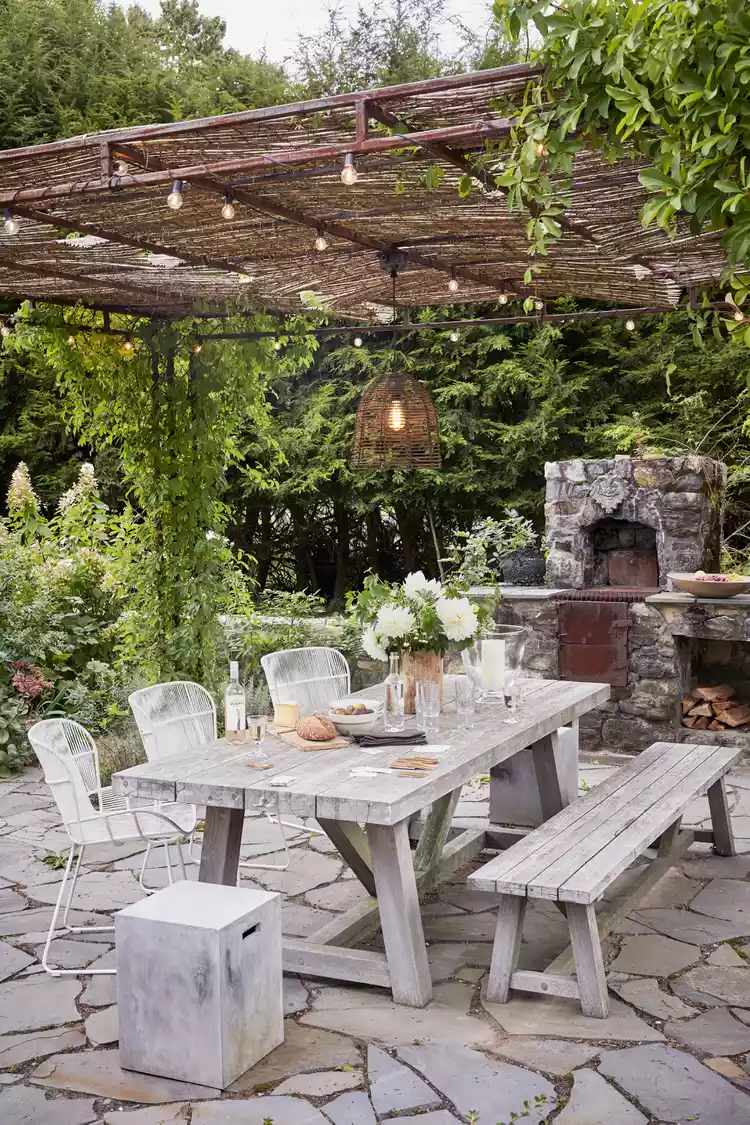
22. Earthy and Inviting with a Woven Pergola Cover
This rustically charming scene is all about texture and balance. The style math is about 50% weathered wood + 30% natural woven materials + 20% crisp modern accents. The weathered wood of the table and pergola provides a strong, rustic foundation. The woven shade cover and pendant light add a layer of soft, natural texture. The white wire chairs are the key modern accent; they keep the look from feeling too heavy or dated, adding a touch of contemporary lightness to the earthy materials.
|
📋 Copy HEX 🔗 Share |
📏 Scale Guide
Adding a woven screen to your existing pergola is a quick way to add shade and texture.
- Source Your Material: Look for rolls of reed or bamboo fencing at garden centers or online. These are inexpensive and come in various sizes.
- Cut to Size: Roll out the material on the ground and use heavy-duty shears or a hand saw to cut it to the dimensions of your pergola top.
- Attach One Edge: Starting on one side, use a staple gun with exterior-grade staples to attach the edge of the screen to the top of a pergola crossbeam.
- Stretch and Secure: Pull the screen taut across the top and secure the other three sides with staples every 6-8 inches.
Total time: 1 hour. Total cost: $50-$100
23. Minimalist Patio Shading with a Wide Slat Blind
In this clean, modern design, the shade solution is surprisingly simple and effective: a wide, exterior-mounted slatted blind. It’s the key element that makes the patio functional. Instead of a large, space-defining pergola, this blind offers targeted shade precisely where it’s needed, blocking the sun from streaming through the large window and overheating the adjacent dining and lounge areas. When not in use, it retracts, leaving a completely open, minimalist aesthetic. It’s shade on demand without the architectural commitment.
|
📋 Copy HEX 🔗 Share |
⚠️ Real Talk
An exterior blind like this is a brilliant solution, but it has its limitations. Because it’s wall-mounted, it only provides a specific “slice” of shade that moves as the sun moves. It’s perfect for blocking direct, low-angle sun in the late afternoon on a west-facing wall. However, it won’t provide much protection from high-noon, overhead sun. It’s a targeted solution for a specific problem window, not an all-day, all-purpose shade for the entire patio. Know what you’re trying to solve before you buy.
24. A Mediterranean Vibe with Vined Pergola and Wicker Seating
This entire scene channels the “Mediterranean Escape” trend that’s all over Pinterest. It’s about creating a space that feels like a sun-drenched Italian or Greek courtyard. The key ingredients are all here: the light wood pergola, the climbing flowers (bougainvillea or jasmine would be perfect), the terracotta pots, and the comfortable wicker seating. It’s a look that feels timeless, relaxed, and deeply connected to a sunny, slow-paced lifestyle that so many of us are craving right now. Compare the vibe to the more rustic vine-covered pergola in Idea #14.
|
📋 Copy HEX 🔗 Share |
📐 Style Math
When choosing a climbing vine for a pergola, especially one close to your house, opt for a “twinning” vine like jasmine or honeysuckle over one with aggressive aerial roots or tendrils, like English Ivy or Trumpet Vine. Twinning vines wrap themselves around the structure for support, which is much less damaging than vines that use suckers or roots that can dig into wood, stucco, and mortar joints over time, causing significant damage. Wisteria is beautiful but needs a very strong structure to support its mature weight.
25. Grand Scale Entertaining Under a Pergola with Stone Fireplace
This is a true “dream build” outdoor room, and the budget reflects the scale and high-end materials used to create a permanent architectural feature.
- Custom Wood Pergola (large scale): $15,000 – $30,000
- Bluestone Patio Installation: $10,000 – $25,000
- Custom Stone Fireplace & Grill Station: $12,000 – $35,000
- High-End Outdoor Furniture & Fan: $5,000 – $15,000
- TOTAL: $42,000 – $105,000+
Budget alternative: A prefab pergola kit, concrete pavers instead of bluestone, and a freestanding fire pit can give you an entertaining zone for under $10,000.
|
📋 Copy HEX 🔗 Share |
✅ Before You Start
This space works so well because it has a powerful, undeniable focal point. The massive stone fireplace immediately draws your eye and anchors the entire seating and dining area. All of the furniture is arranged in relation to it, making it the heart of the space. Even when unlit, it gives the patio a sense of purpose and gravity. The pergola defines the “room,” but the fireplace gives it its soul. It’s a magnet for gathering, conversation, and creating memories.
26. A Bright & Modern Pergola with a Translucent Roof
Before installing a pergola with a translucent roof, spend a full day observing your patio. Where does the sun fall at 9 am, noon, and 4 pm? A translucent roof is great for rain protection and blocking UV, but it only reduces heat and glare by about 30-50%, depending on the tint. It does not create deep shade. It is ideal for north-facing patios that you want to keep bright, or for homeowners who want rain protection without making their adjacent indoor rooms darker.
|
📋 Copy HEX 🔗 Share |
💰 Budget Breakdown
Here, the style is a clean and contemporary take on the classic pergola. The formula is approximately 50% warm wood + 40% cool grey + 10% black accents. The wooden structure and furniture frames provide a warm, organic base. The large grey patio tiles and light upholstery create a cool, neutral field that feels calm and modern. The black ceiling fan and fence in the background add just enough of a graphic punch to keep the scene from feeling washed out. The patterned pillows add a final, playful touch.
27. Soften a West-Facing Patio with Heavy Outdoor Drapes
Outdoor curtains are beautiful, but they are susceptible to mold and mildew, especially in humid climates or if they get rained on frequently. To combat this, look for fabrics with a mildew-resistant finish. Even then, good air circulation is your best defense. Make sure the curtains can dry out completely after a storm. If they are bunched up in tie-backs while damp, they are much more likely to develop mildew spots. On sunny days after a rain, it’s a good idea to untie them and let them hang freely to air out.
|
📋 Copy HEX 🔗 Share |
⭐ The One Thing
To really block the intense heat from a west-facing afternoon sun, you need more than just a pretty, sheer fabric. Look for outdoor drapes that are specifically marketed as “blackout” or “thermal.” These are made from a much thicker, more tightly woven fabric that not only blocks light but also provides a tangible thermal barrier, helping to keep your patio space noticeably cooler. They may be less breezy, but they are far more effective at their primary job: creating cool, comfortable shade.
28. Casual Shelter with a Translucent Roof and Woven Chairs
You can capture the essence of this functional, casual patio without the cost of a custom-built structure. Start with a basic lean-to pergola kit from a home improvement store ($800 – $1,500). For the roof, use corrugated polycarbonate panels, which are affordable and easy to install. Then, hit up Facebook Marketplace or thrift stores for mismatched wicker or rattan chairs ($20-$50 each). A can of spray paint can unify them. Finish with some colorful cushions from a store like Target or Walmart. You can get the whole look for under $2,000.
|
📋 Copy HEX 🔗 Share |
🧹 Maintenance Reality
This space feels interesting because it’s a rich tapestry of contrasting textures. You have the smooth, almost industrial feel of the translucent roof panels. This is set against the rough, historic texture of the reddish-brown brick walls. Then, the dark-stained wood beams add a natural, linear element. Finally, the woven chairs and blue cushions introduce a layer of softness and intricate pattern. It’s this mix of smooth, rough, linear, and woven that makes the patio visually engaging and layered.
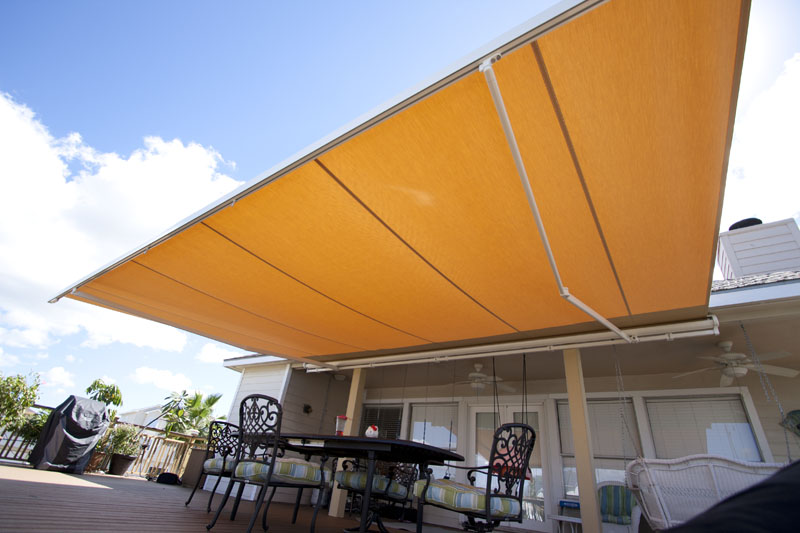
29. A Pop of Color with a Bright Orange Retractable Awning
Forget subtle. The one thing that makes this entire patio sing is the unapologetically bold orange awning. It’s a shot of pure energy and optimism. On a grey day, it provides its own sunshine. Against the neutral backdrop of the house and deck, it becomes a dramatic focal point. Removing it would leave a perfectly nice but forgettable space. The color is everything; it’s a confident design choice that telegraphs fun, warmth, and a willingness to stand out from the beige brigade.
|
📋 Copy HEX 🔗 Share |
💡 Designer Tip
When choosing a bold color for a large feature like an awning, the key is to make it look intentional, not random. The best way to do this is to repeat the color in at least two other, smaller places. For instance, with this orange awning, you could add throw pillows on the chairs that have a touch of orange in their pattern and a pot of orange flowers on the table. These small echoes of the main color will make the whole design feel cohesive and thoughtfully put together.
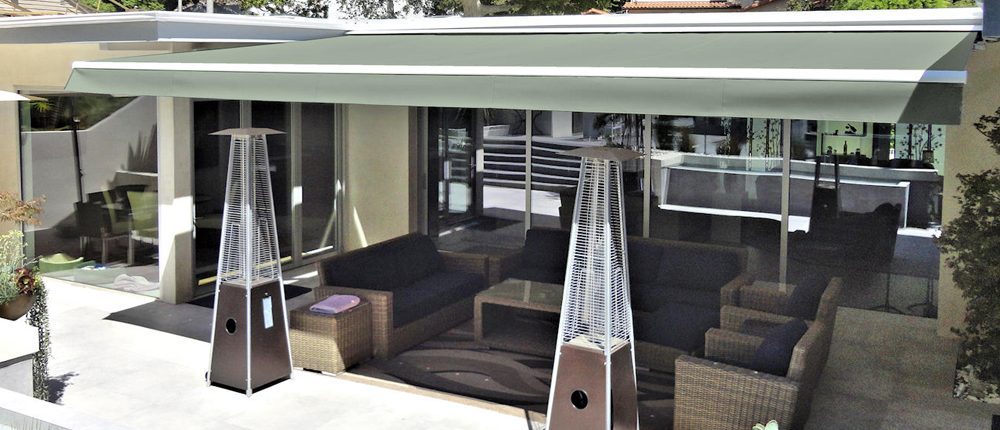
30. Year-Round Comfort with a Retractable Awning and Patio Heaters
Creating a true “three-season” patio is a functional formula: Shade + Heat + Comfort. The light green retractable awning provides the essential shade for hot, sunny days. The tall pyramid heaters are the key to extending the patio’s use into chilly spring and fall evenings. The deep-seated, woven furniture with thick cushions delivers the final layer of comfort, encouraging you to linger. It’s a practical combination that prioritizes usability from April through October in many climates.
|
📋 Copy HEX 🔗 Share |
🔥 Trending Context
Heaters under an awning require extreme caution. A retractable fabric awning should NEVER be extended directly over a patio heater when it is in use. The intense heat rising from the top of the heater can melt, scorch, or even ignite the fabric. These pyramid-style heaters are placed strategically to the side for a reason. Always maintain a minimum of 3-4 feet of clearance in all directions (especially overhead) between the top of your heater and any combustible material, including a retracted or extended awning.
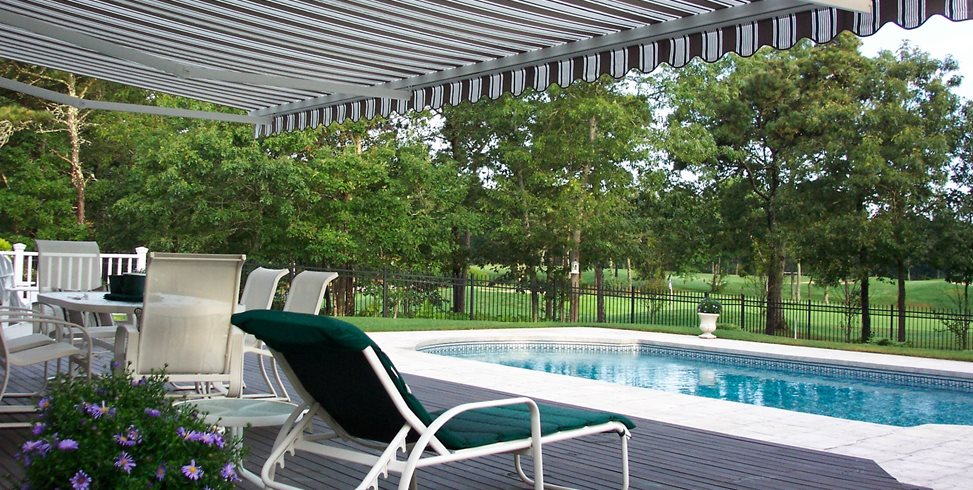
31. Classic Poolside Shade with a Striped Retractable Awning
There’s a major resurgence of classic, almost preppy, design elements, and this dark brown and white striped awning fits right in. It feels timeless, evoking images of a chic 1960s country club or a sophisticated Hamptons beach house. The stripes are graphic and bold but in a controlled, elegant way. This style offers a sense of established luxury and a nod to tradition, which feels like a comforting and stylish choice for homeowners tired of fleeting, minimalist trends.
|
📋 Copy HEX 🔗 Share |
🎯 What Makes It Work
A large, custom retractable awning can be a multi-thousand-dollar investment. To get that classic, striped poolside look on a budget, focus on umbrellas. You can find large 9 or 11-foot cantilever or market umbrellas in a classic stripe pattern for a few hundred dollars. Two or three of these strategically placed over your lounge chairs and dining table can provide ample shade and that same sophisticated visual punch for a fraction of the cost of a built-in awning. Look at stores like Pottery Barn for style inspiration, then search for similar patterns at Target or on Wayfair.
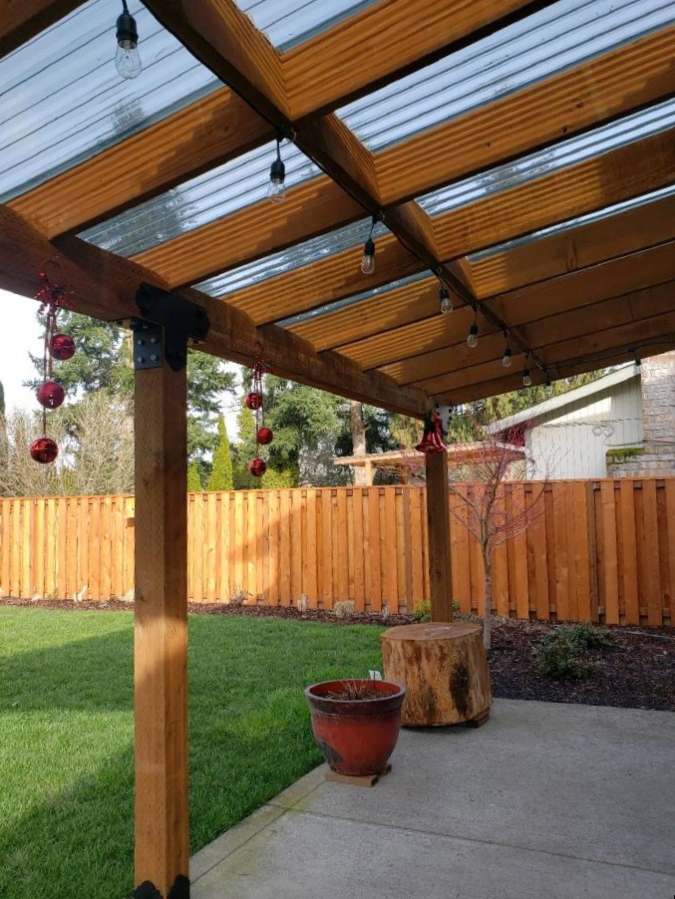
32. Festive Vibes with a Clear-Roofed Pergola and String Lights
The combination of a clear roof and string lights is a win-win. The clear corrugated panels provide shelter from rain and wind without blocking any precious sunlight, so the patio and the adjacent rooms inside the house stay bright. Then, as evening falls, the string lights strung underneath create an instant party atmosphere. The clear roof actually helps by reflecting some of that light back down, making the space feel even more festive and illuminated. It’s a structure that works hard both day and night.
|
📋 Copy HEX 🔗 Share |
💸 Get This Look For Less
Hanging lights and decor from your pergola can be easy and safe if you use the right hardware.
- Choose Outdoor-Rated Everything: Make sure your lights and any extension cords are explicitly rated for outdoor use.
- Use Guide Wires: For a clean, straight line of lights, install a thin, taut guide wire first. Then, attach the light string to the wire using zip ties or clips. This prevents sagging.
- Command Hooks are Your Friend: For hanging lighter items like the red ornaments shown here, use outdoor-rated Command hooks. They hold surprisingly well and can be removed without damaging the wood.
- Secure the Plug: Where the plug meets the extension cord, wrap it in electrical tape or buy a purpose-made weatherproof cord protector to keep moisture out.
Your Perfect Patio Shade is Waiting
A well-shaded patio isn’t just a luxury; it’s a whole new room for your home, ready for morning coffees, lazy afternoons, and lingering dinners. We hope these ideas have sparked a plan for your own outdoor escape.
Don’t forget to save your favorites! Pin this article to your outdoor boards so you can come back to it when you’re ready to make your dream patio a reality.