That Pinterest board full of “Dream Backyard” pins? It’s time to stop scrolling and start doing. Creating a genuinely chic outdoor space doesn’t require a lottery win. After filtering through hundreds of options from places like IKEA, Target, and even thrift stores, we narrowed it down to 32 cheap backyard ideas that actually deliver on style without draining your bank account, with projects ranging from a $150 weekend refresh to a $2,000 full makeover.
Inside, you’ll find everything from cozy bohemian patios and rustic fire pit setups to modern, minimalist retreats. For 2026, the biggest trend is the “outdoor room”—a space that feels like a true extension of your home—and these ideas will show you exactly how to get it. And stay until the end — we break down the most common mistakes that can ruin these looks.
📌 Save this to Pinterest for later — you’ll want to revisit these ideas.
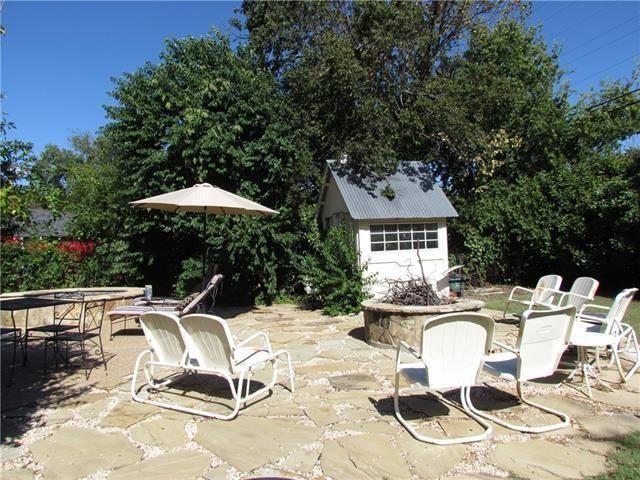
1. Build a Rustic Fire Pit Area on an Irregular Flagstone Patio
The magic here lies in the textural contrast. The rough, irregular flagstones create a natural, organic base that feels grounded, especially with the white gravel filling the gaps. This earthy foundation is perfectly balanced by the clean, simple lines of the white metal frame chairs. The combination of rustic stone and modern seating keeps the space from feeling dated or overly thematic. It’s a masterclass in mixing materials for a relaxed but intentional look, with the stone fire pit acting as the perfect central gathering spot.
|
📋 Copy HEX 🔗 Share |
⚠️ Real Talk
You don’t need to spend a fortune on custom stonework for this vibe. Check Facebook Marketplace or local stone yards for leftover flagstones or pavers—people often overbuy and sell the excess for cheap. For seating, a set of classic metal bistro chairs from Walmart or Target will only set you back about $80-$120. The key is to hunt for deals on the hardscaping materials and then choose simple, affordable furniture to complete the scene. A DIY-friendly fire pit ring can be found for under $100.
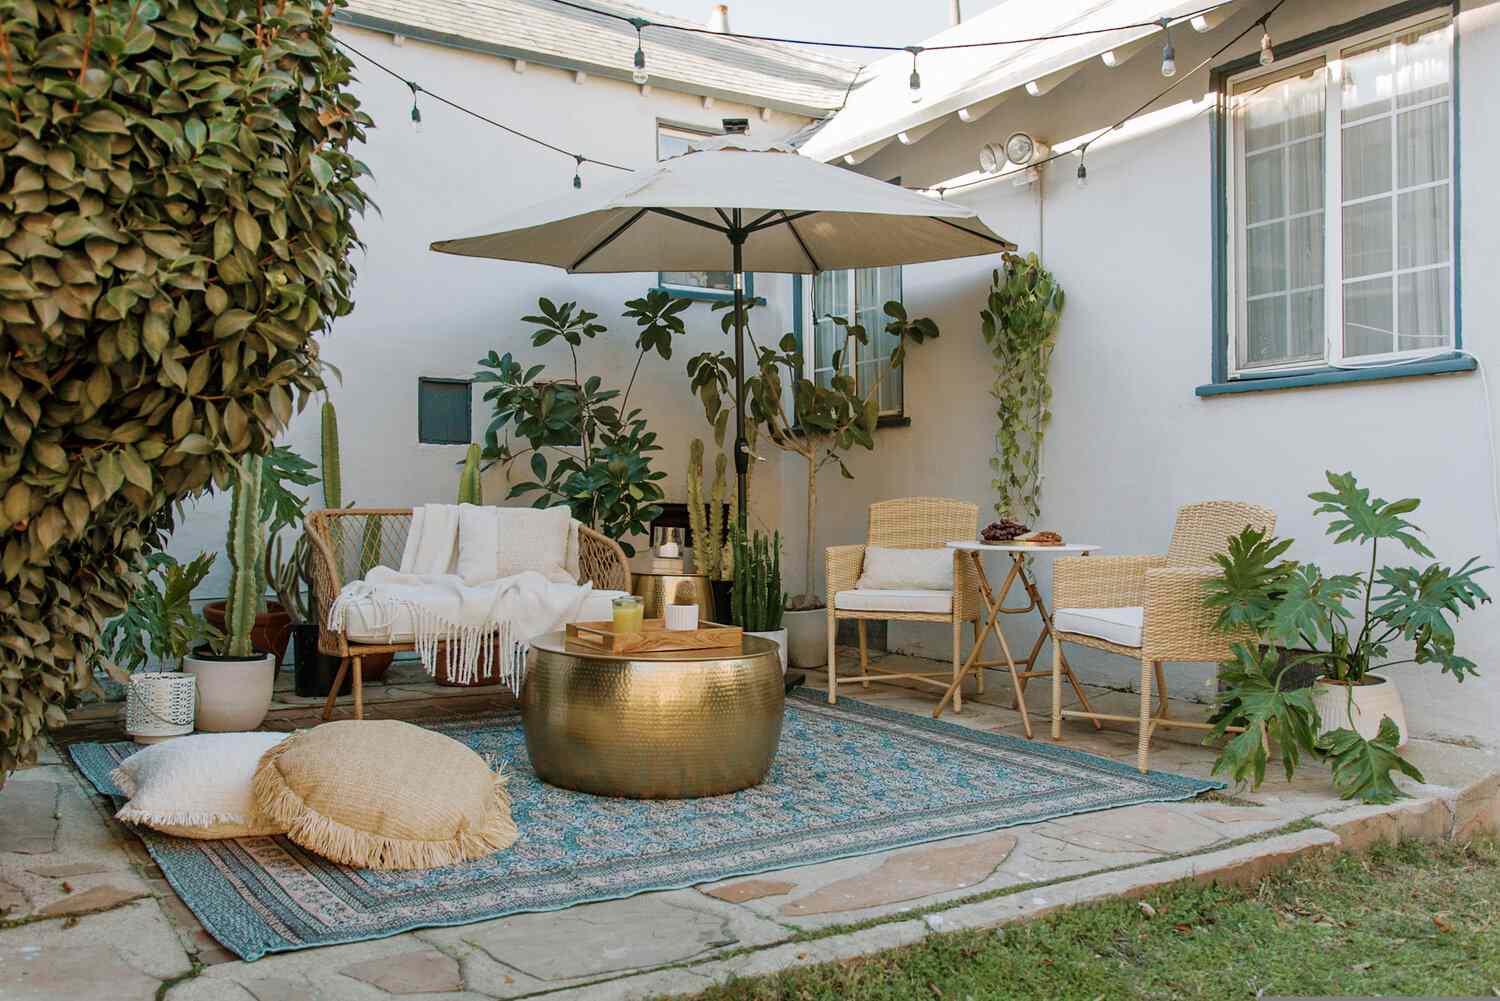
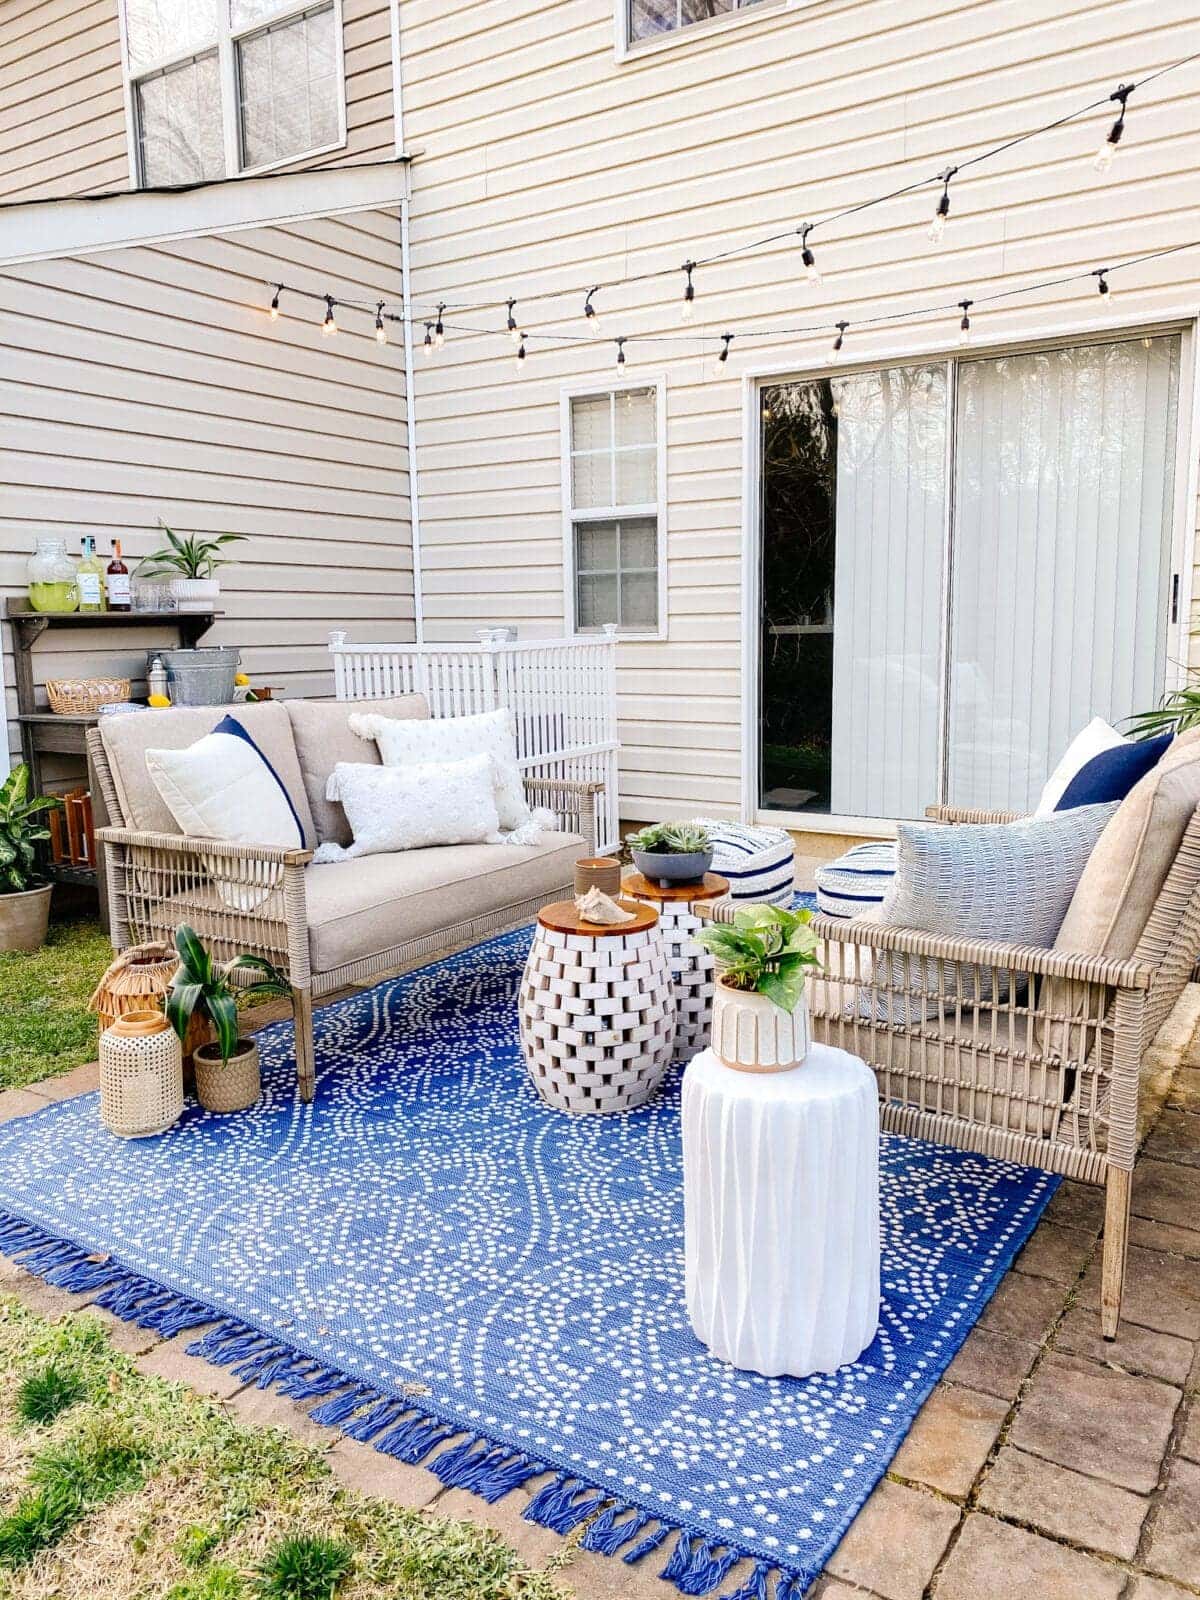
2. Create a Cozy Bohemian Patio with Woven Furniture
This look is all about a specific recipe for texture and color. Think of it as: 50% natural texture (the woven rattan sofa and chairs) + 30% bold pattern (that gorgeous blue outdoor rug) + 10% metallic shine (the hammered gold coffee table) + 10% living greenery. By sticking to this formula, you can easily swap elements. Don’t like blue? A terracotta or black and white rug would work just as well, as long as it has a strong pattern. Not a fan of gold? A copper or even a painted ceramic drum table would keep the balance.
|
📋 Copy HEX 🔗 Share |
🔧 How-To Brief
Woven rattan and natural materials look amazing, but they require some care. If your patio is exposed to harsh sun or rain, the fibers can fade, dry out, and become brittle over time. To keep them looking fresh, you’ll need to clean them periodically and consider applying a protective sealant. The blue rug will also fade in direct sunlight, so rotating it every few months can help it wear more evenly. It’s a trade-off for that effortlessly cool, bohemian vibe.
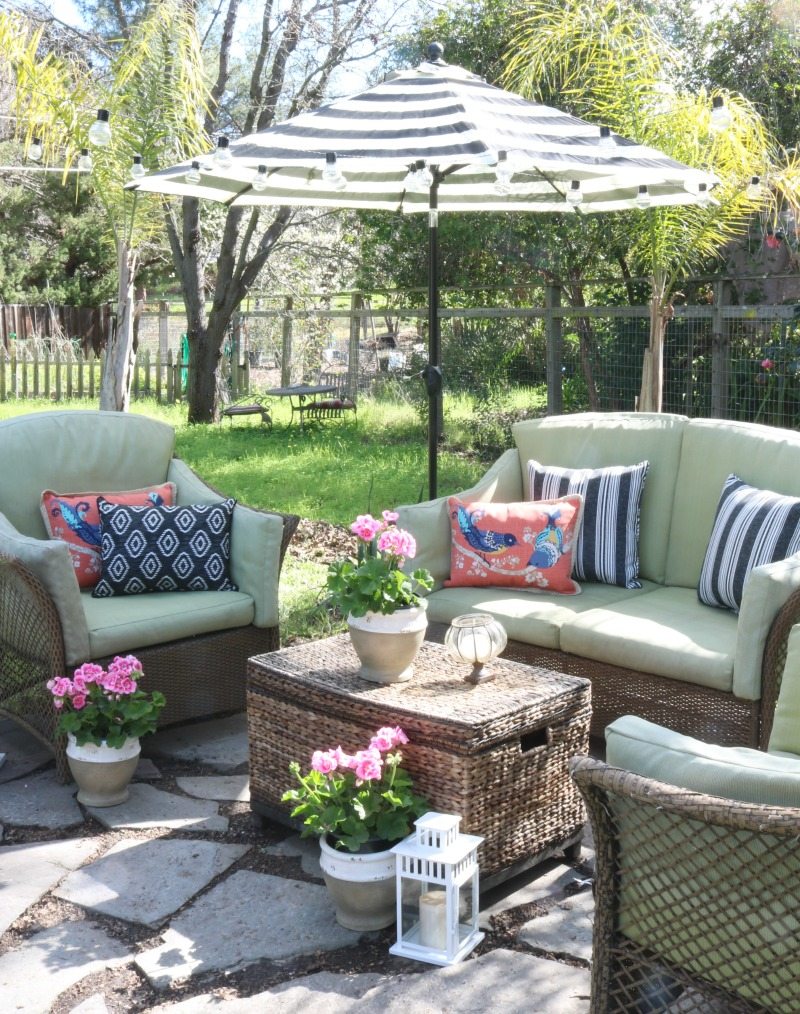
3. Style a Casual Seating Nook with a Striped Umbrella
that truly makes this design pop is the black and white striped umbrella. Without it, you’d have a perfectly nice, but fairly standard, patio set. The umbrella adds instant graphic punch, a touch of personality, and a sense of vertical height to the space. It draws the eye upward and creates a defined ‘room’ feel in an open-air setting. It’s a perfect example of how a single, bold accessory can do all the heavy lifting in a design, turning ‘nice’ into ‘memorable’ without a huge investment.
|
📋 Copy HEX 🔗 Share |
💡 Designer Tip
When you’re dealing with a smaller patio, creating the illusion of space is key. The secret here is layering your lighting. Don’t just rely on the ambient glow from string lights. Add a secondary, lower source of light, like the white lantern on the table. This creates pockets of light and shadow, which adds depth and makes the area feel more dynamic and larger than it actually is. For a cheap version, a simple solar-powered lantern or even a large candle in a hurricane glass works wonders.
4. Install a Lush Vertical Garden as a Living Backdrop
A living wall is a showstopper, but it’s not a ‘plant it and forget it’ feature. Maintaining that lush look requires commitment. You’ll need a built-in irrigation system or a strict hand-watering schedule, as the small pockets of soil dry out quickly. Be prepared for monthly check-ins: trimming back overgrowth, replacing any plants that aren’t thriving, and checking for pests. The annual cost for plant replacement and soil amendments might be around $50-$150, depending on the scale and plant types. It’s a living piece of art that needs regular care.
|
📋 Copy HEX 🔗 Share |
🔥 Trending Context
This idea is a game-changer for narrow or small urban courtyards, especially those between 100-250 sq ft. In a tight space where you can’t build ‘out,’ you have to build ‘up.’ A vertical garden uses zero floor space to add maximum greenery and impact. It’s ideal for areas with wall heights of at least 8 feet to get a really lush effect. For a larger yard, this could feel a bit overwhelming, but in a small, enclosed space, it creates a feeling of being completely surrounded by nature. This is a far better use of space than the tiered garden in Idea #6 for a tiny footprint.
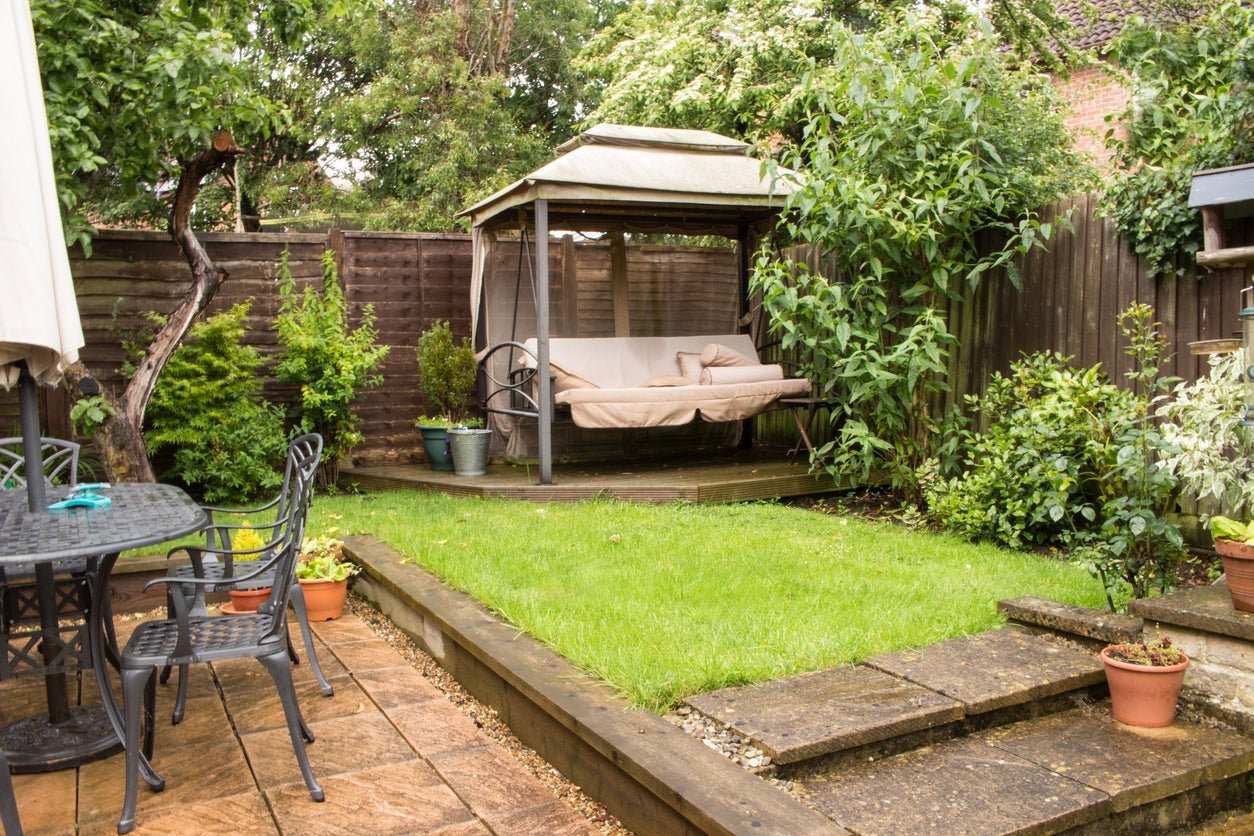
5. Design a Multi-Zone Yard with a Patio and Raised Lawn
This backyard feels so functional and polished because it cleverly uses elevation and material changes to define different ‘zones.’ The paved patio clearly signals ‘dining and entertaining,’ while the raised lawn creates a separate, softer area for lounging or play. This separation makes the yard feel larger and more organized than a single, flat expanse would. The covered swing gazebo at the back adds a third ‘destination,’ giving the eye a place to land and making the entire space feel like a private retreat complete with lush border plantings.
|
📋 Copy HEX 🔗 Share |
📏 Scale Guide
Creating this multi-zone look is more affordable than you might think. Here’s a rough estimate to get you started on a similar design:
- Main Furniture: Dark metal dining set ($250-$500)
- Lighting/Shade: Large patio umbrella ($100-$250)
- Structures: Covered swing gazebo ($400-$800)
- Hardscaping: Pavers for a 10×12 ft patio ($300-$600)
- Landscaping: Raised lawn materials (wood, soil, sod) ($200-$400)
- TOTAL: $1,250 – $2,550
Budget alternative: Build the raised lawn border with cheaper landscape timbers and find a used dining set on Facebook Marketplace to save around 50%.
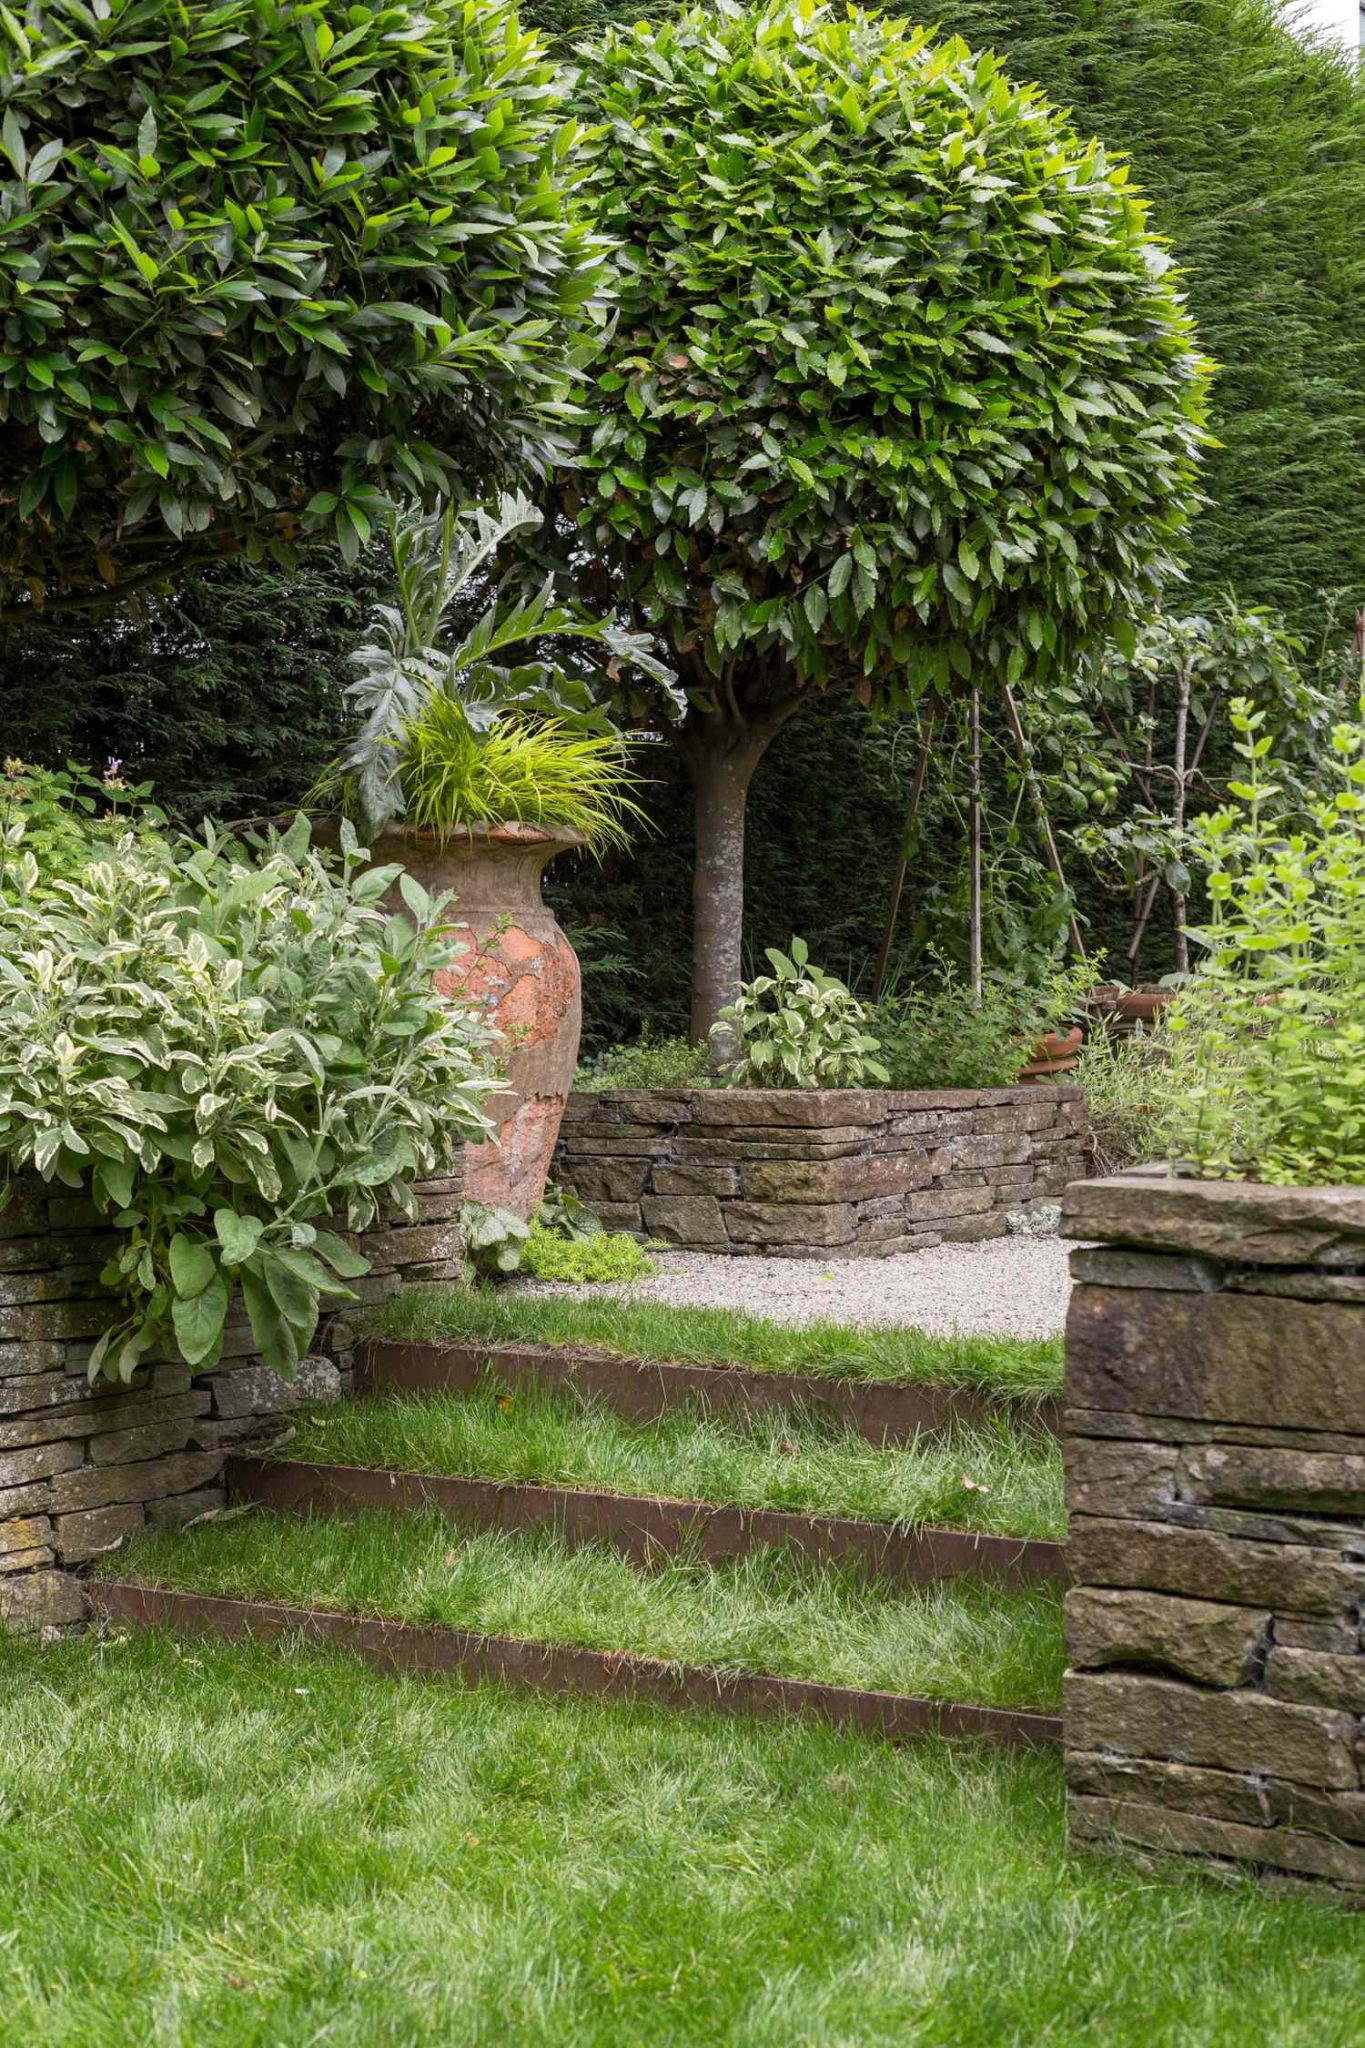
6. Craft a Layered Garden Path with Grass Steps and Stone Walls
The grass-topped steps are the absolute heart of this design. They are an unexpected, charming detail that elevates the entire garden from ordinary to enchanting. Replacing them with standard stone or wood steps would make the path purely functional. Instead, integrating the lawn directly into the staircase blurs the line between hardscaping and softscaping, creating a seamless, organic flow. It’s a whimsical touch that says this garden is meant to be explored and enjoyed, not just looked at.
|
📋 Copy HEX 🔗 Share |
🎯 What Makes It Work
While undeniably beautiful, dry-stacked stone walls can be a real pain if not installed correctly. Without mortar, the stones rely on gravity and friction to stay in place. This makes them vulnerable to shifting over time, especially in areas with ground freeze/thaw cycles. You may find yourself having to reseat or adjust stones every few years. Also, the gaps between stones can be a haven for weeds and burrowing critters, so be prepared for a bit more maintenance than you would with a solid, mortared wall.
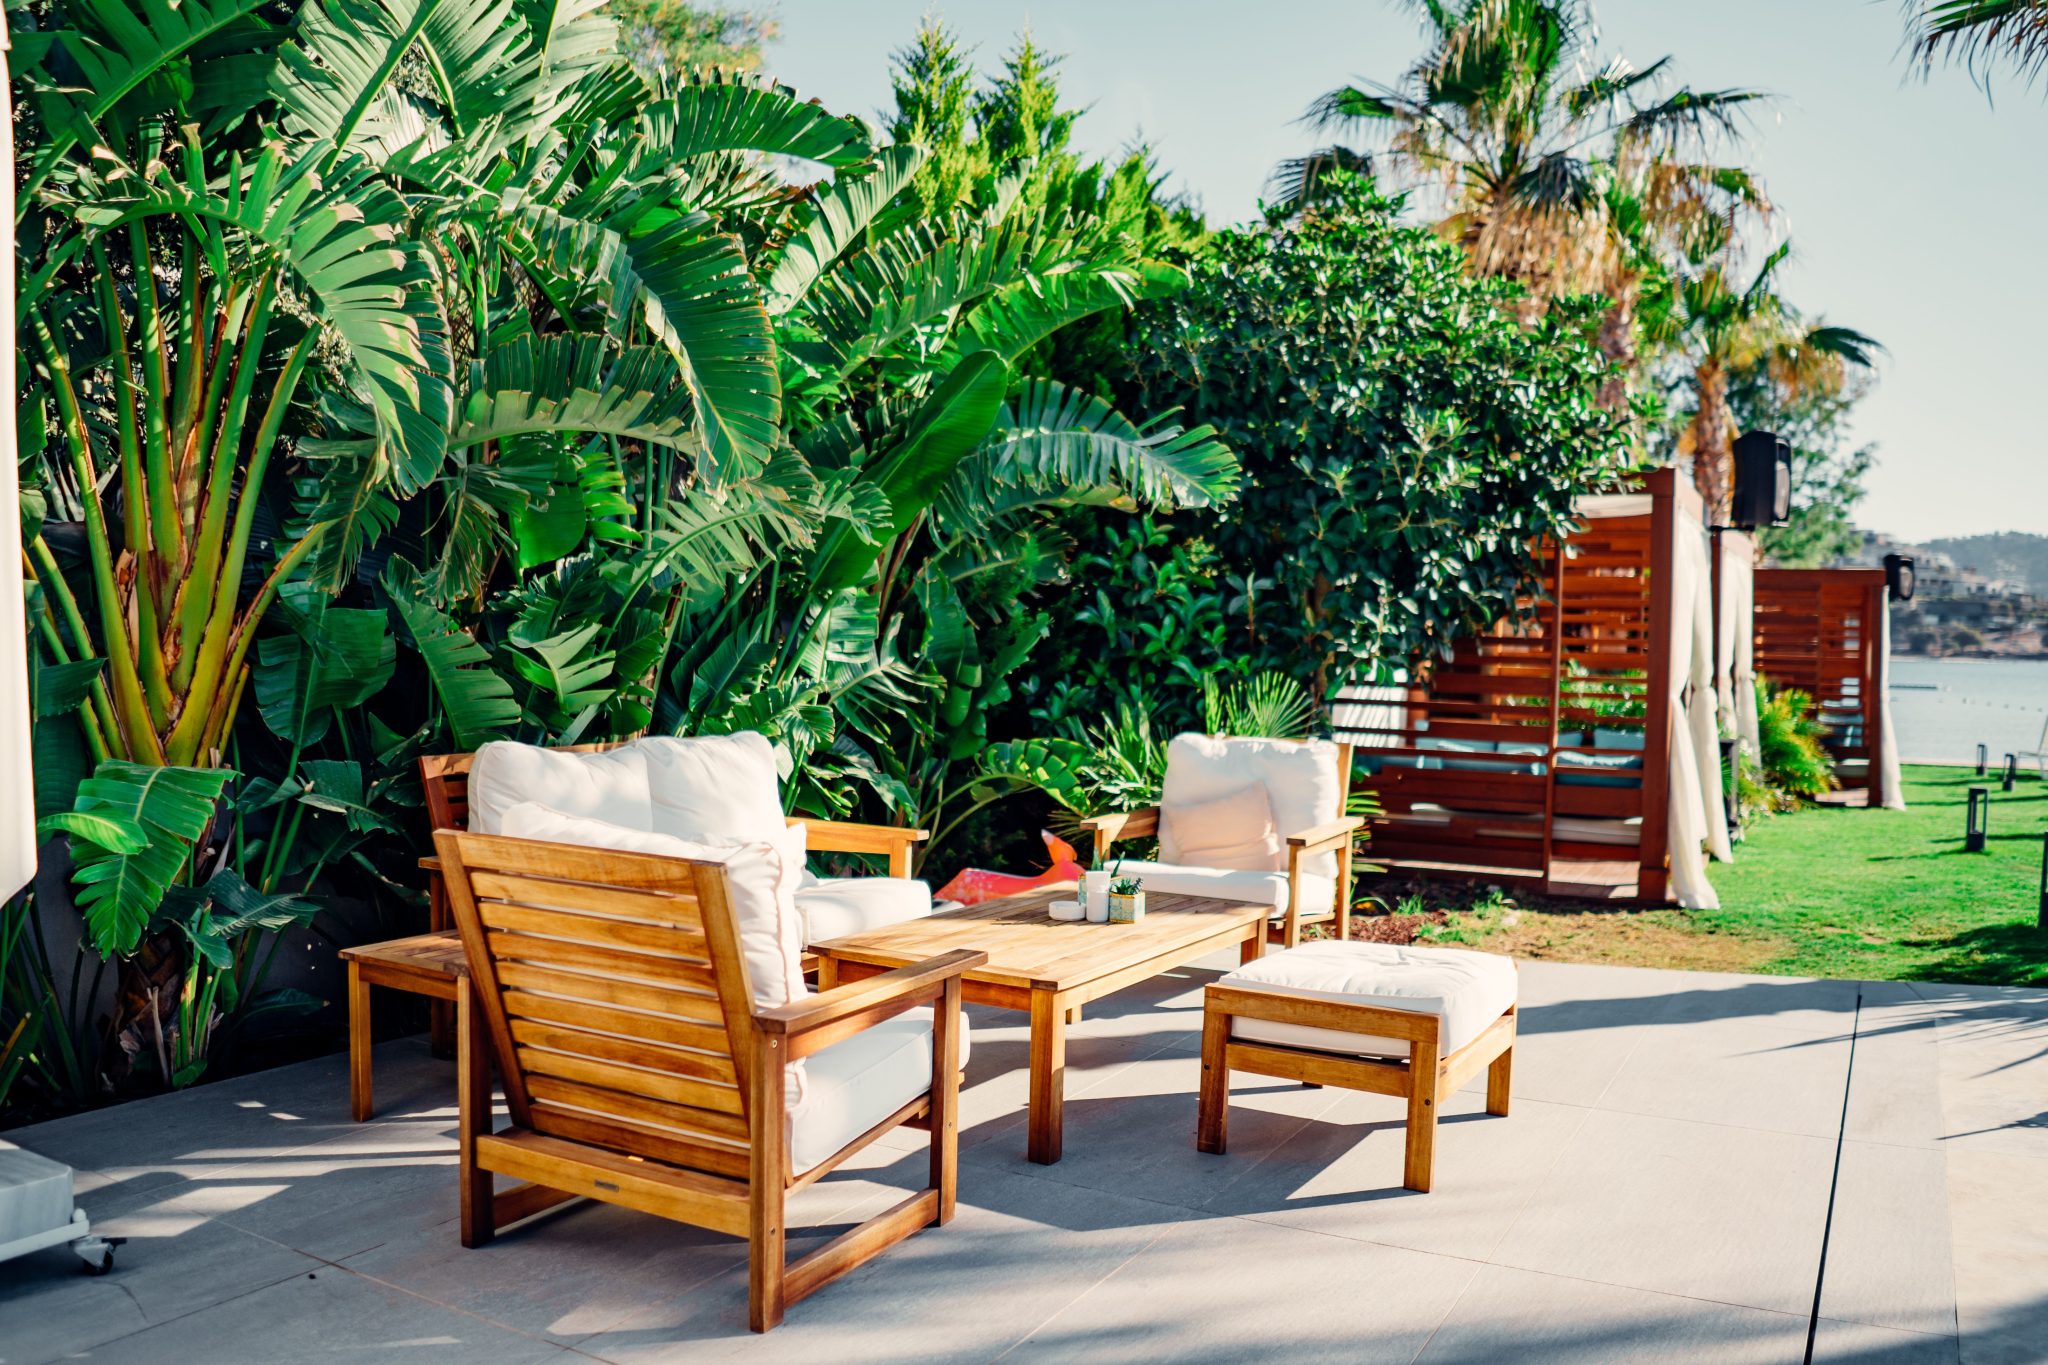
7. Create a Serene Tropical Vibe with Natural Wood Patio Furniture
Get this breezy look by focusing on a simple material formula: 70% natural wood + 20% crisp white + 10% lush greens. The key is the dominance of the warm, light-toned wood on the chairs and table, creating an earthy, grounded feel. The white cushions provide a clean, sharp contrast that keeps it from looking too rustic, and the oversized tropical leaves are the final touch that pushes it into a serene, resort-like territory. You could swap the specific plants—ferns for palms, for instance—and it would still work perfectly as long as the 70/20/10 ratio is maintained.
|
📋 Copy HEX 🔗 Share |
⭐ The One Thing
The lean into ‘biophilic design’—the concept of connecting with nature through our home environments—is huge right now, and this space is a perfect example of why. After years of being cooped up, we’re craving spaces that feel open, airy, and full of life. This trend goes beyond just having a few potted plants. It’s about using natural materials like wood, maximizing views, and surrounding yourself with greenery to create a calming effect. This isn’t just a fleeting style; it’s a wellness-driven movement with serious staying power for 2026 and beyond.
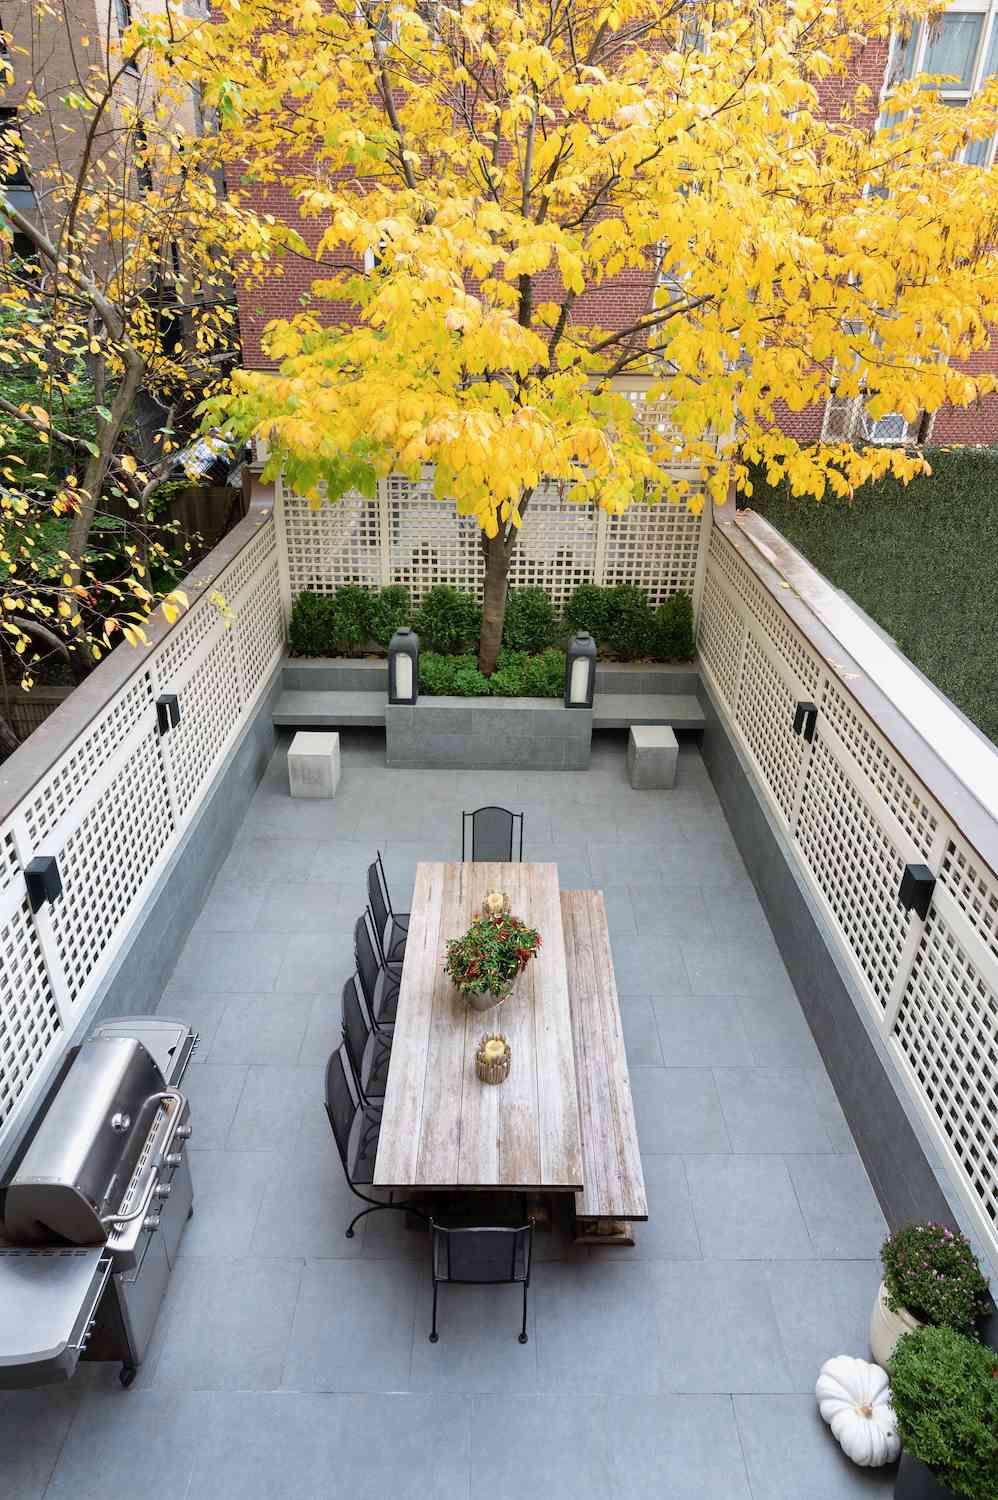
8. Maximize an Urban Patio with a Large Dining Set and Trellis Walls
This setup is perfect for a standard urban backyard or townhouse patio, typically ranging from 150 to 300 square feet. The key is using the perimeter for function. The trellis doesn’t just offer privacy; it draws the eye upward, making the space feel taller. An idea like this works best with a minimum width of about 10-12 feet to comfortably accommodate the large table and allow for circulation. Any smaller, and you might want to consider a bistro set like in Idea #15 instead of a full dining table.
|
📋 Copy HEX 🔗 Share |
✅ Before You Start
Don’t be afraid to go big with your furniture, even in a smaller space. A common mistake is to use a bunch of small, separate pieces, which can actually make a patio feel cluttered. Using one large, substantial dining table, as seen here, creates a single, strong focal point. It makes the space feel more intentional and less chaotic. The matching bench is also a great space-saver, as it can tuck neatly under the table and visually disappears more than individual chairs would.
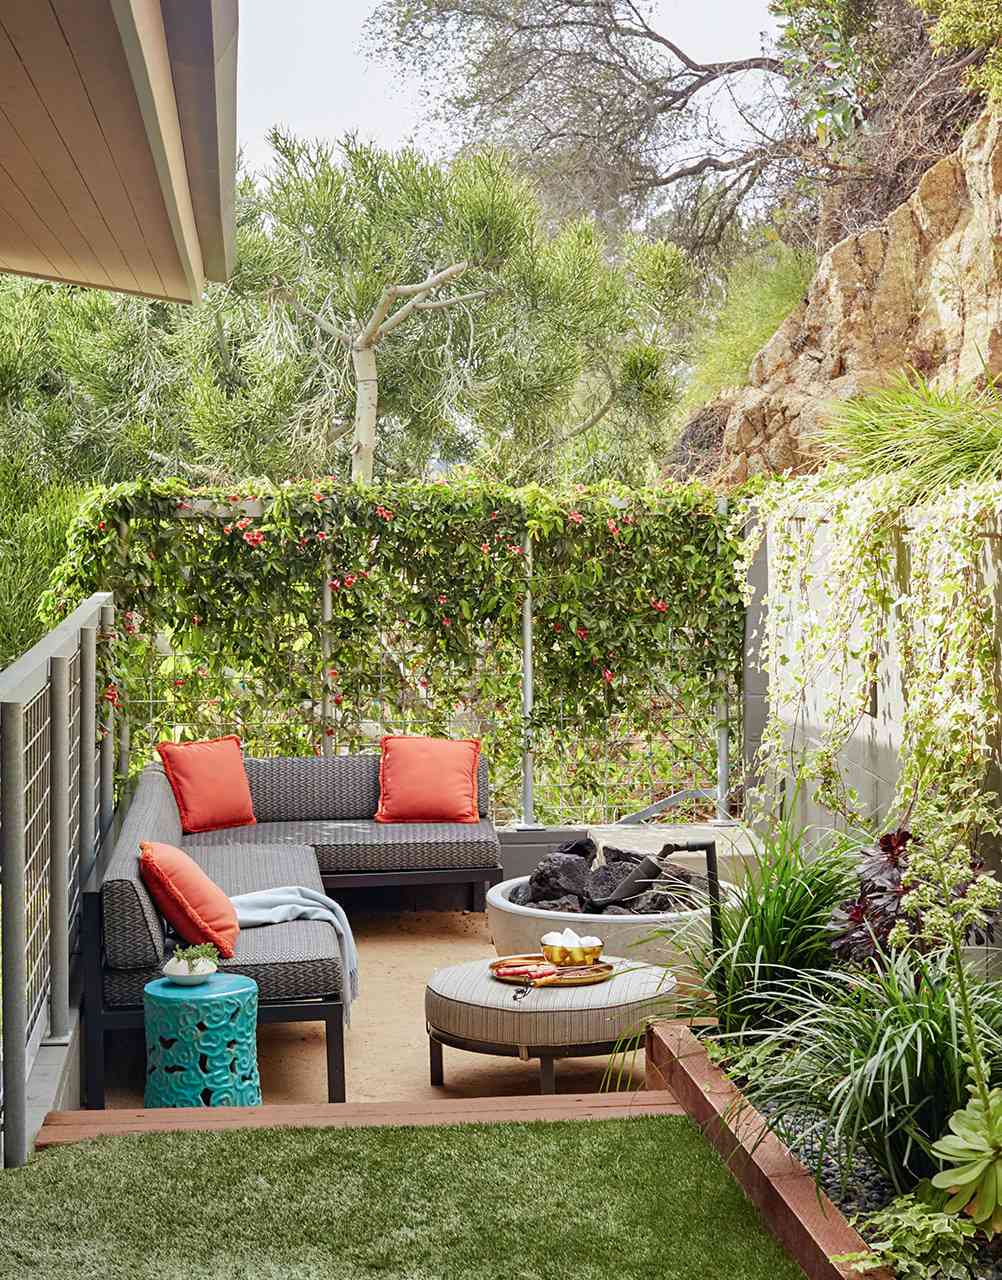
9. Define a Cozy Corner with an L-Shaped Sofa and a Fire Pit
This corner feels like a true outdoor room because of the strong sense of enclosure. The L-shaped sofa carves out a clear conversational zone, while the walls and fences covered in lush climbing vines create a soft, green boundary. This ‘living wall’ effect blurs the hard edges of the yard, making the space feel more like a secluded grotto than a suburban backyard. The round ottoman and circular fire pit soften the geometry of the sofa, adding to the relaxed, comfortable atmosphere. It feels cozy because it’s literally closing you in with green.

|
📋 Copy HEX 🔗 Share |
💸 Get This Look For Less
Before you commit to a cozy corner like this, run through a quick checklist:
- Fire Pit Placement: Do you have at least 10 feet of clearance from your house, any overhanging structures, and fences? Check your local fire codes.
- Sofa Measurements: Will the L-shaped sectional overwhelm your patio? Use painter’s tape to mark out the dimensions on the ground to get a real feel for the scale.
- Sun vs. Shade: How does the sun hit this corner throughout the day? You may need to plan for an umbrella or shade sail if it gets blasted by the afternoon sun.
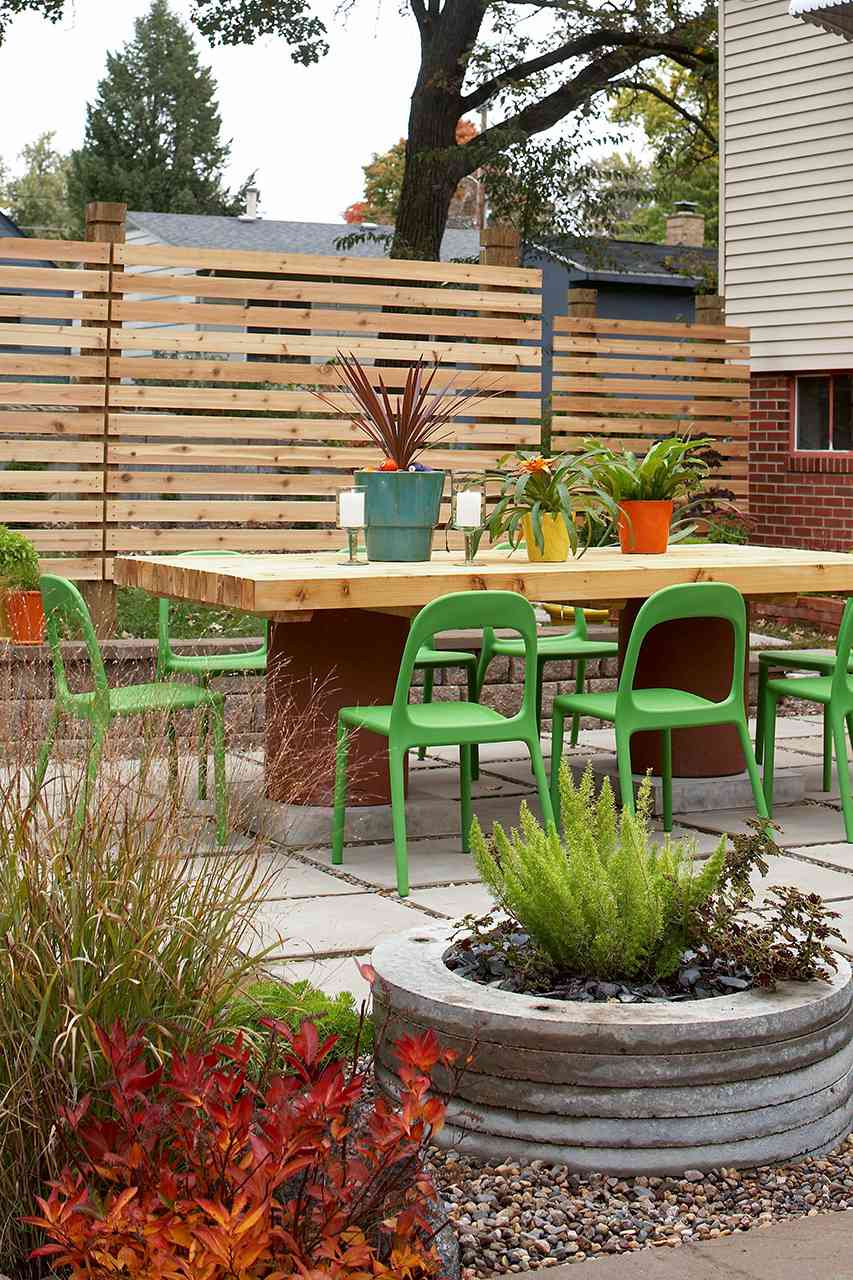
10. Add a Pop of Color with Bright Green Chairs and a Wood Slat Fence
The absolute star of this show is the set of bright lime green chairs. Take them away, and you have a nice, neutral patio. But with them, the entire space is instantly energized and infused with personality. It’s a bold, confident color choice that signals this is a space for fun and relaxation. This is a powerful lesson in how transformative a single, saturated color can be. You don’t need to paint a whole wall or buy a dozen accessories; sometimes, a few well-chosen chairs are all it takes to make a statement.
|
📋 Copy HEX 🔗 Share |
📐 Style Math
You can get this vibrant, modern look on a shoestring budget. The horizontal slat fence is a classic DIY project—use standard treated pine or cedar fence pickets, which are incredibly affordable. The bright plastic chairs are a steal; you can find similar styles at IKEA or Amazon for around $40-$60 each. For the base, instead of pouring a full concrete slab, use large-format concrete pavers from a home improvement store, spaced out and filled with inexpensive pea gravel. This approach could save you 60% or more compared to professional installation.
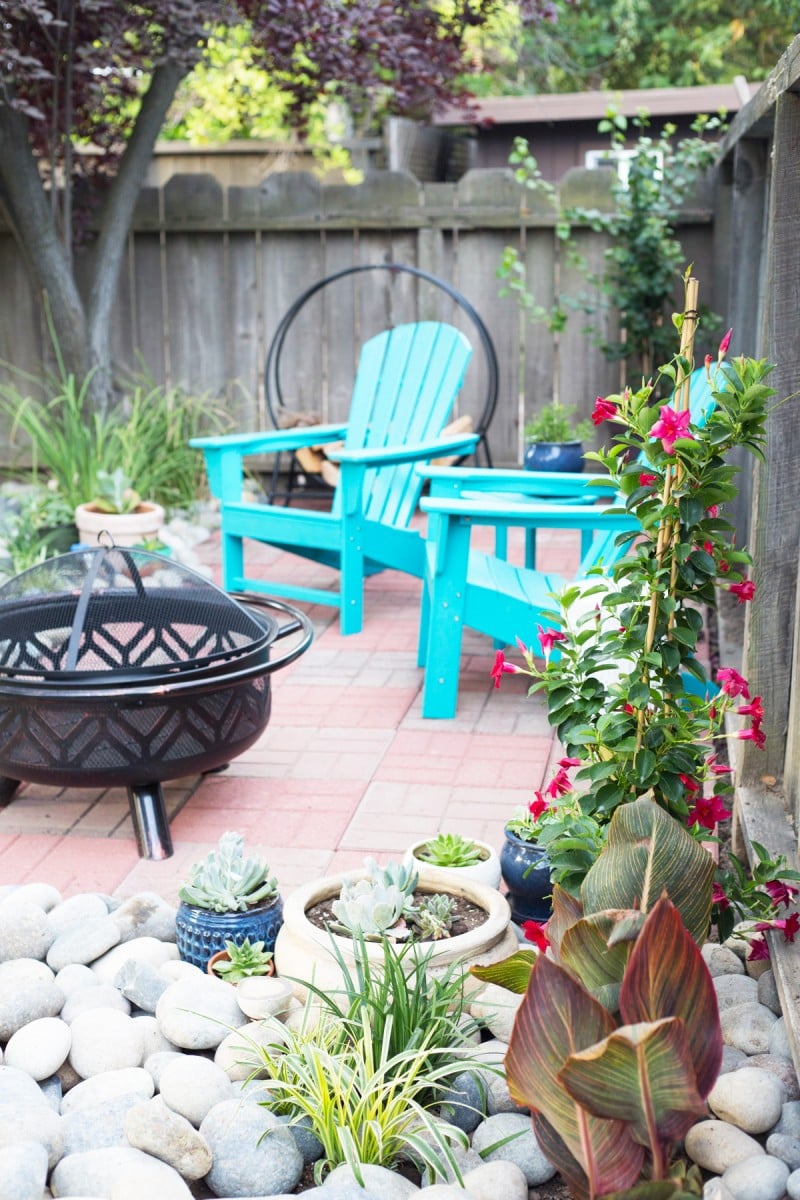
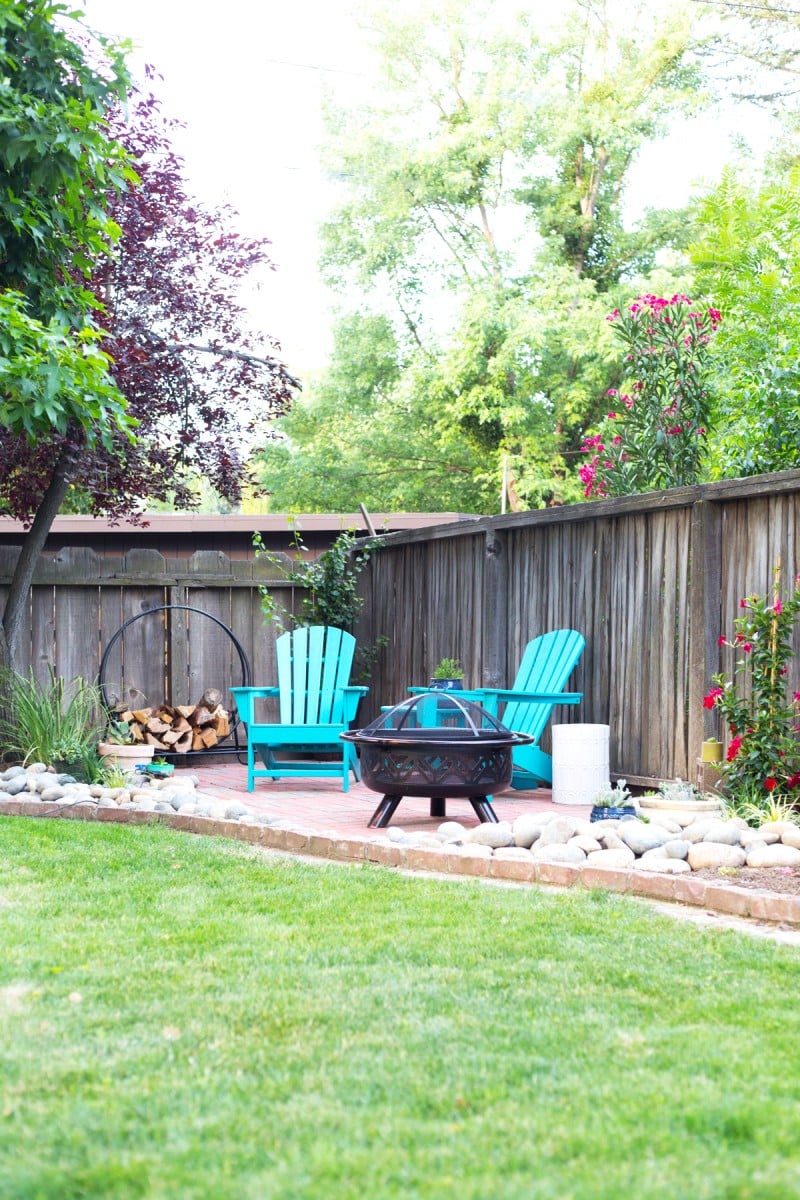
11. Create a Cheerful Nook with Aqua Adirondack Chairs
When using a bold, vibrant color like this aqua blue, the key to making it feel high-end is repetition—but with restraint. Notice how the color appears in two places: the chairs and the matching side table. This creates a deliberate, cohesive look. If you were to add the same aqua to planters, pillows, and other decor, the effect would be diluted and could feel kitschy. Stick to repeating a strong accent color just two or three times for maximum impact. This is the more colorful cousin of the setup in Idea #12.
|
📋 Copy HEX 🔗 Share |
💰 Budget Breakdown
That beautiful red paver patio is a classic for a reason, but it comes with some maintenance reality. The gaps between pavers are notorious for sprouting weeds. You’ll need to stay on top of weeding or use a polymeric sand to lock the pavers and block growth. Also, pavers can settle unevenly over time, creating tripping hazards. You might need to pull up a few, add more sand, and re-level them every few years. Finally, that red color can fade in the sun; pressure washing and sealing it every 2-3 years will keep it looking vibrant.
12. Stage a Relaxing Fire Pit Scene on a Red Brick Patio
This scene is a masterclass in color theory. The deep, rich red of the brick patio and the bright, cheerful aqua of the Adirondack chairs are complementary colors (or close to it). This high-contrast pairing creates a visual vibration that is inherently energetic and pleasing to the eye. The weathered grey fence and green foliage act as neutral balancers, keeping the bold colors from feeling overwhelming. It’s a simple but powerful combination that feels both classic and fresh. Compare this to the similar, but paver-based, version in Idea #11.

|
📋 Copy HEX 🔗 Share |
🧹 Maintenance Reality
You can build that simple, chic firewood ring yourself in under an hour for about $30. Here’s how:
- Purchase a metal garden edging ring, usually found in 3-foot or 4-foot diameters.
- Find a level spot on your patio or lawn where you want to store your wood.
- Simply unroll the metal ring and connect the ends according to the manufacturer’s instructions. Use a rubber mallet to gently tap it into place if needed.
- Stack your split firewood vertically inside the ring. Try to arrange the pieces snugly to prevent them from shifting.
- Done! It keeps your firewood neat, contained, and looking stylish.
13. Build a Deck with a Pergola-Covered Swing
An attached deck and pergola combo like this is ideal for medium-sized backyards, typically 500 sq ft or larger. You need enough space for the deck itself (a minimum of 12×16 feet is good for dining and lounging) without it swallowing your entire green space. The pergola adds vertical height, which requires a ceiling clearance of at least 9 feet from the deck floor to the roof. This idea is all about creating a substantial ‘outdoor room’, so it needs room to breathe and won’t feel right crammed into a tiny yard.
|
📋 Copy HEX 🔗 Share |
⚠️ Real Talk
That beautiful wooden deck requires annual attention to keep it safe and looking good. At least once a year, you’ll need to do a thorough cleaning with a deck-specific wash to remove mildew and dirt. Every 2-3 years, plan on a full weekend project: sanding down any rough spots and applying a fresh coat of stain or sealant. This isn’t just for looks; it protects the wood from water damage, rot, and UV fading. Failing to do this can lead to expensive repairs down the line. The annual cost for supplies is minimal ($50-$100), but the labor is all you.
14. Design a Moody Lounge Area with Dark Green Furniture
This cozy corner achieves its inviting, moody vibe with a simple formula: 60% dark, dramatic color (the painted green furniture), 30% light neutral (the beige cushions and gray ottomans), and 10% warm glow (the string lights and yellow pillow). This balance is key. The dark paint provides depth and a touch of drama, the light fabrics provide comfort and visual relief, and the warm lighting makes it all feel intimate and magical. You could swap the green for a deep navy or charcoal gray and get the same sophisticated effect.
|
📋 Copy HEX 🔗 Share |
🔧 How-To Brief
There’s no need to buy a pre-made dark green patio set. The secret here is paint! Find a sturdy but dated wooden bench and chairs on Facebook Marketplace or at a garage sale for under $100. A good cleaning, a light sanding, and a couple of coats of high-quality exterior paint in a dark, moody green (like Benjamin Moore’s ‘Salamander’) will completely transform them. Add some cheap off-the-shelf cushions from a big-box store, and you’ve recreated this custom look for about 70% less.
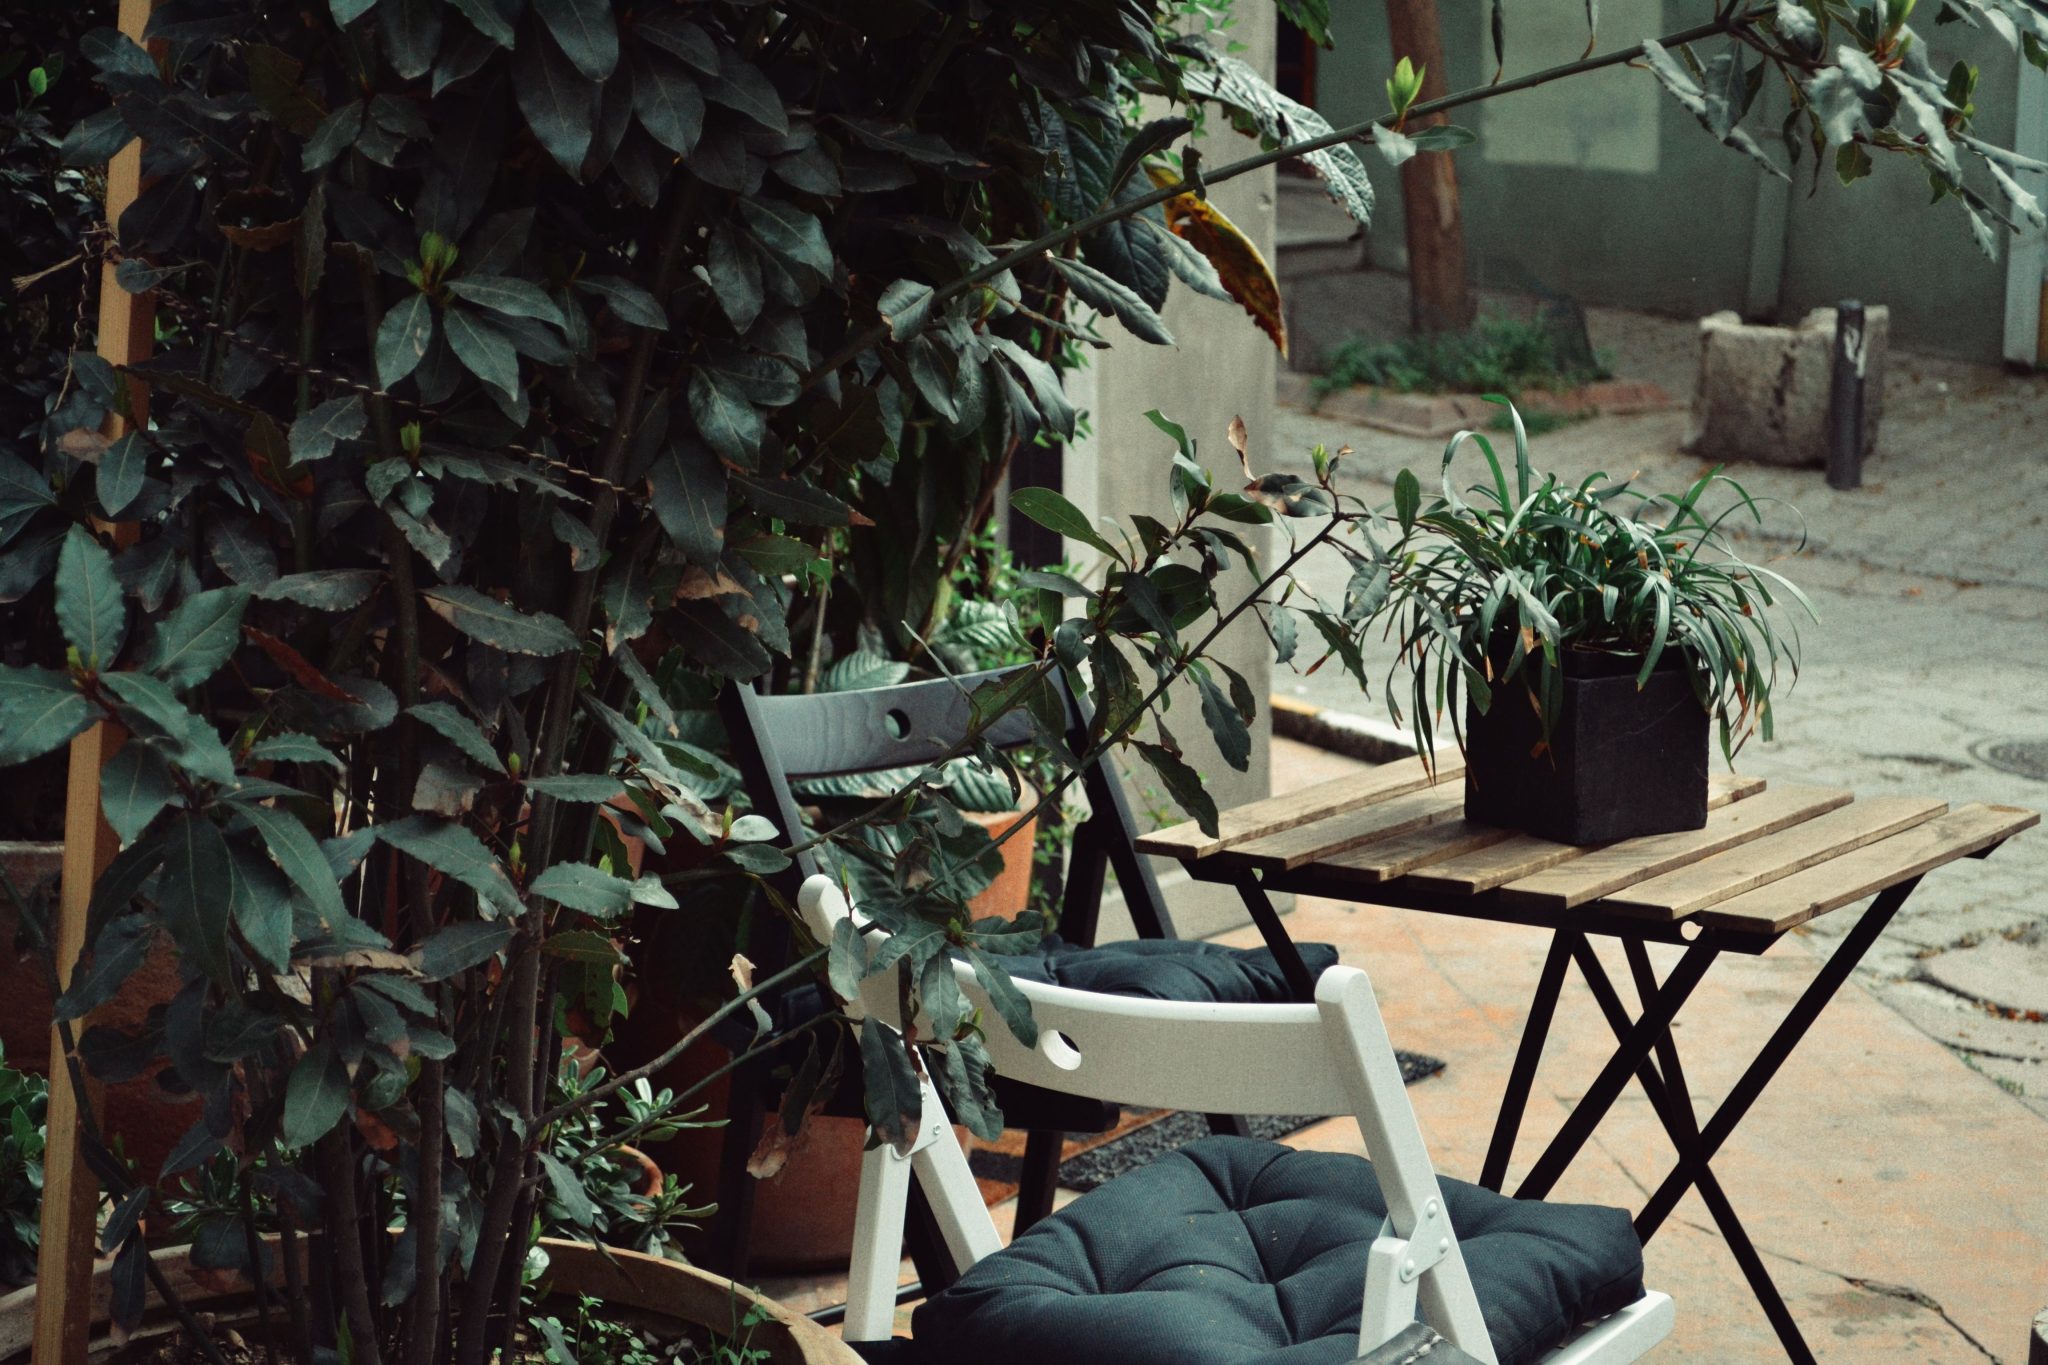
15. Carve Out a Private Nook with a Small Bistro Set
The single most important element in this little scene is the sense of enclosure provided by the lush, overgrown foliage. The simple folding bistro set is charming, but it’s the feeling of being tucked away and surrounded by green that makes it special. Without the dense bushes and potted plants creating a natural wall, this would just be a table and chairs on a patio. The greenery turns it into a private, secluded hideaway—a perfect spot for a quiet morning coffee. This proves you don’t need a fence for privacy; plants can do the job beautifully.
|
📋 Copy HEX 🔗 Share |
💡 Designer Tip
This is the ultimate small-space solution. It’s perfect for a tiny apartment balcony, a small townhouse patio, or a forgotten corner of a larger yard, requiring a footprint of only about 6×6 feet (36 sq ft). The key is the foldable furniture, which can be easily moved or stored. This concept is all about creating a functional ‘moment’ in a space that’s too small for a full dining set like in Idea #8 or a lounge area like in Idea #9. It’s proof that no space is too small for a little outdoor enjoyment.
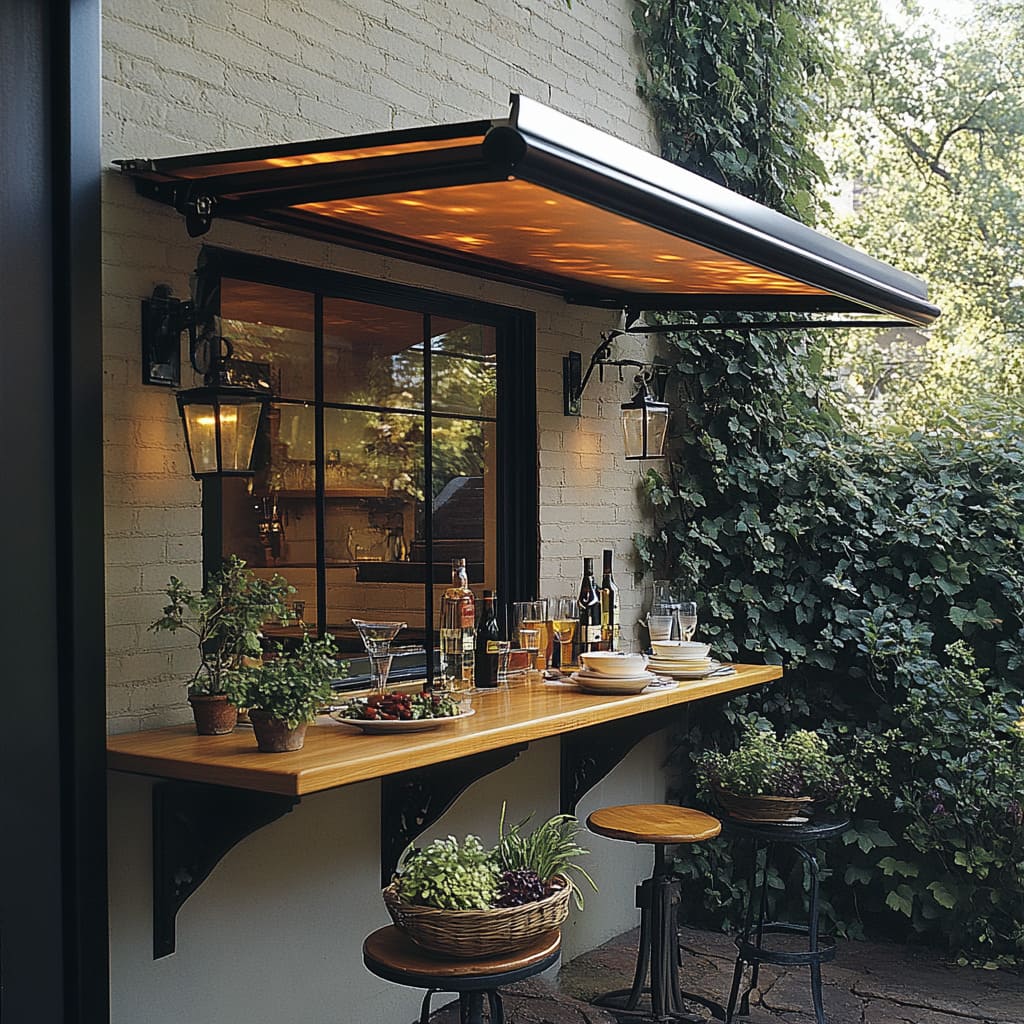
16. Install a Fold-Down Bar Under a Lighted Awning
Creating an outdoor bar counter doesn’t require a huge built-in. A wall-mounted, fold-down version is a brilliant space-saver. Here’s a quick guide to installing one:
- Pick your spot on a solid exterior wall.
- Purchase a pre-made fold-down workbench or heavy-duty hinged brackets and a solid wood plank cut to your desired size.
- Securely mount the brackets to the wall studs using lag bolts. This is crucial for safety and stability.
- Attach the wooden plank to the top of the brackets.
- Add a locking mechanism or chain to hold it in the ‘up’ position.
This project takes about 2-3 hours and costs between $75 and $200.
|
📋 Copy HEX 🔗 Share |
🔥 Trending Context
The lighting is what takes this from a functional shelf to a full-blown entertaining vibe. The retractable awning is great for shade, but the integrated amber lights are the real genius. They cast a warm, intimate glow over the bar area, making it feel like a cozy, high-end commercial patio. To get this look on a budget, you don’t need the fancy awning. Simply install a strip of waterproof LED tape light (set to a warm white or amber color) on the underside of your eaves or a standard shelf above your counter. It’s a $30 trick that provides instant atmosphere.
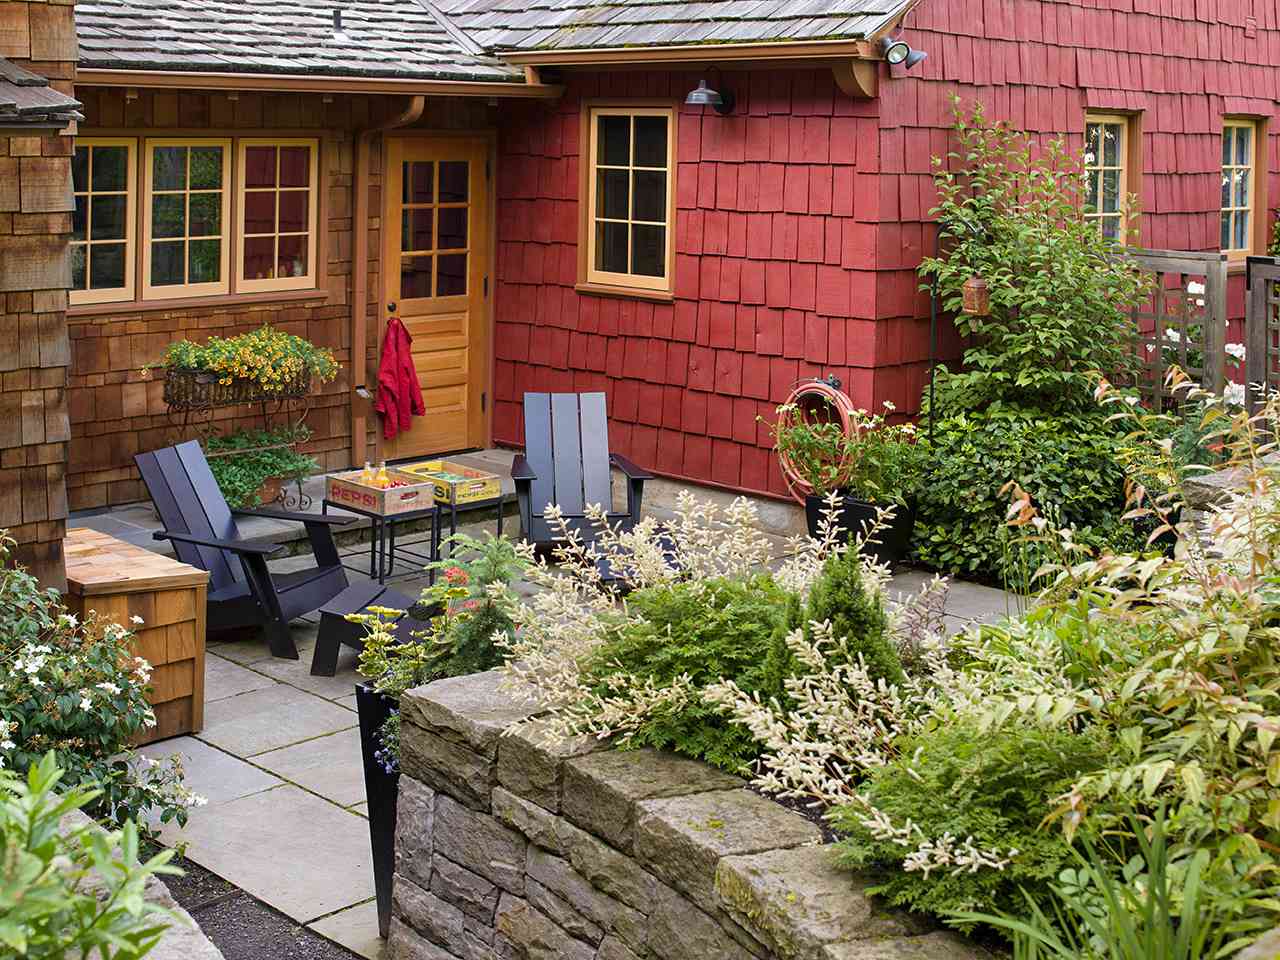
17. Mix Siding Textures for a Rustic and Cozy Patio Corner
This area feels so charming and established because of the rich layering of textures on the house itself. You have the rough, staggered pattern of the wood shingles next to the clean, horizontal lines of the red shake siding. This visual variety creates a sense of history and character, as if the home has evolved over time. The simple black chairs and gray pavers act as a quiet, modern base that allows the architectural details and the vibrant green and white foliage to really shine. It’s a beautiful mix of rustic and clean.
|
📋 Copy HEX 🔗 Share |
📏 Scale Guide
A heads-up if you’re considering real wood siding like the shingles shown here: it’s beautiful, but it’s not zero-maintenance. Cedar shingles need to be cleaned periodically to prevent moss and mildew growth, especially in damp or shady climates. While many people let them weather to a natural grey, they may need to be treated with a preservative or stain every 5-7 years to prevent rot and insect damage. It’s a commitment, but one that pays off in authentic, rustic charm that vinyl simply can’t replicate.
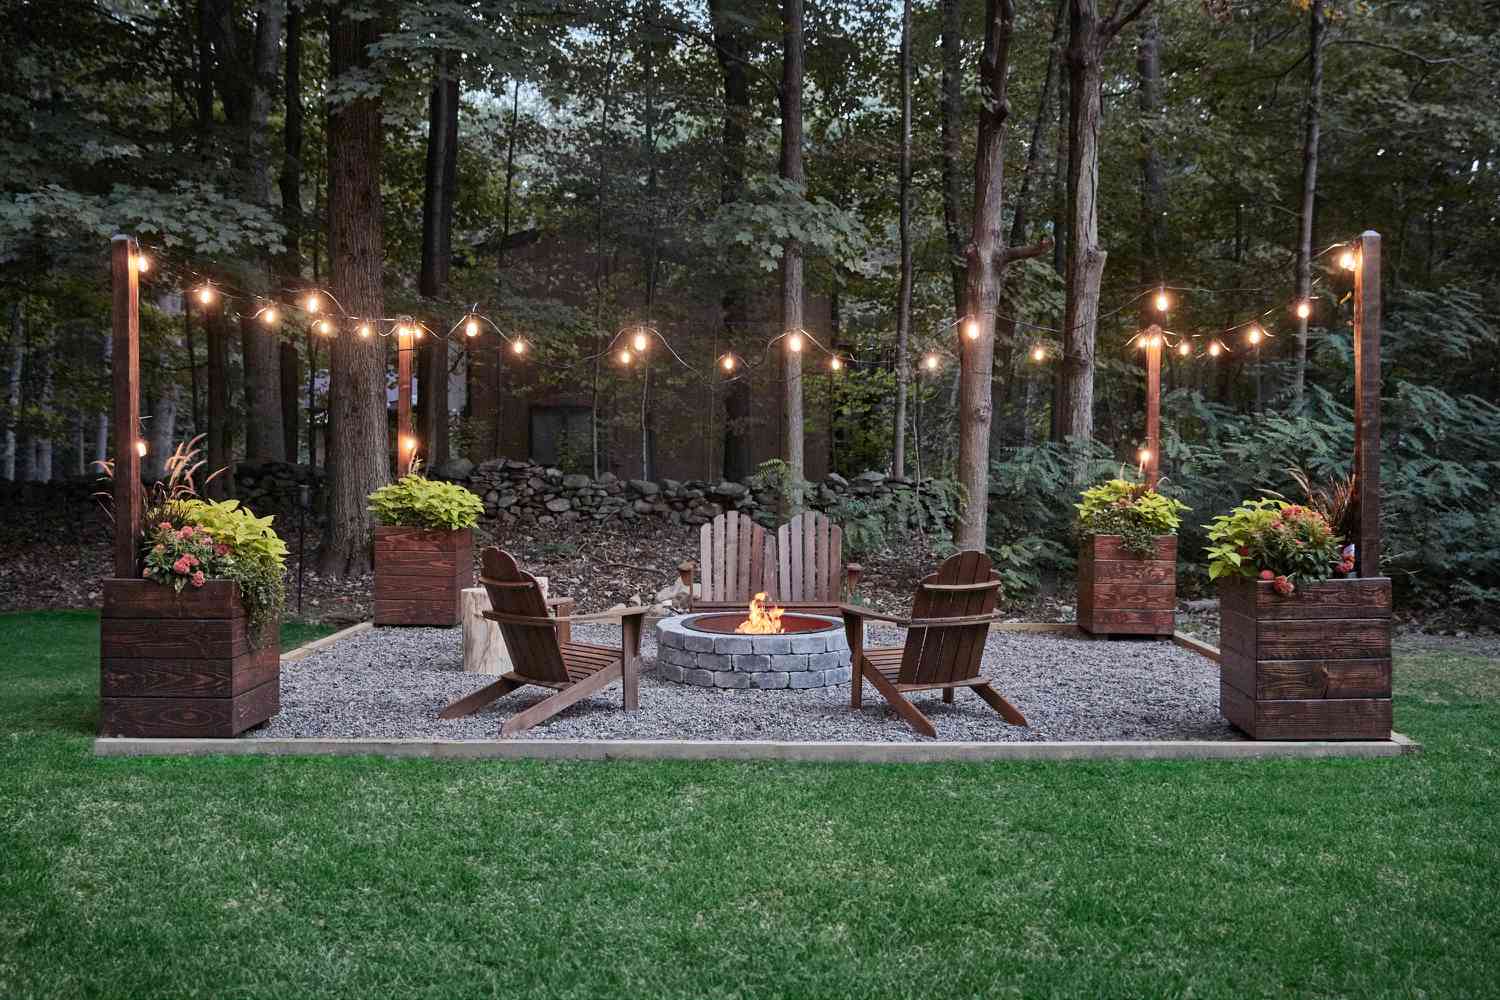
18. Use Tall Planters to Hang String Lights Over a Gravel Fire Pit
Before you dig that fire pit, check these essential points to get this look right:
- Is your chosen spot at least 15-20 feet away from any trees with low-hanging branches? String lights are great, but you need vertical clearance for fire safety.
- Do you have a relatively level area? Creating a stable gravel base is much easier on flat ground. You may need to do some light grading first.
- What’s underneath? Call 811 before you dig to ensure you won’t hit any underground utility lines when setting your planter poles.
- Is there an outdoor electrical outlet nearby for the lights, or will you need to run a heavy-duty extension cord?
|
📋 Copy HEX 🔗 Share |
🎯 What Makes It Work
The tall wood planter-poles are a genius move, but custom ones can be pricey. You can achieve the exact same function for a fraction of the cost. Get two standard, inexpensive 4×4 pressure-treated posts from any hardware store. Set them in concrete-filled buckets or planters for stability. Then, screw simple metal hooks at the top for the string lights. For a more finished look, you can build a simple square box around the base buckets using cheap fence pickets. You get the height and function for under $80, saving hundreds.
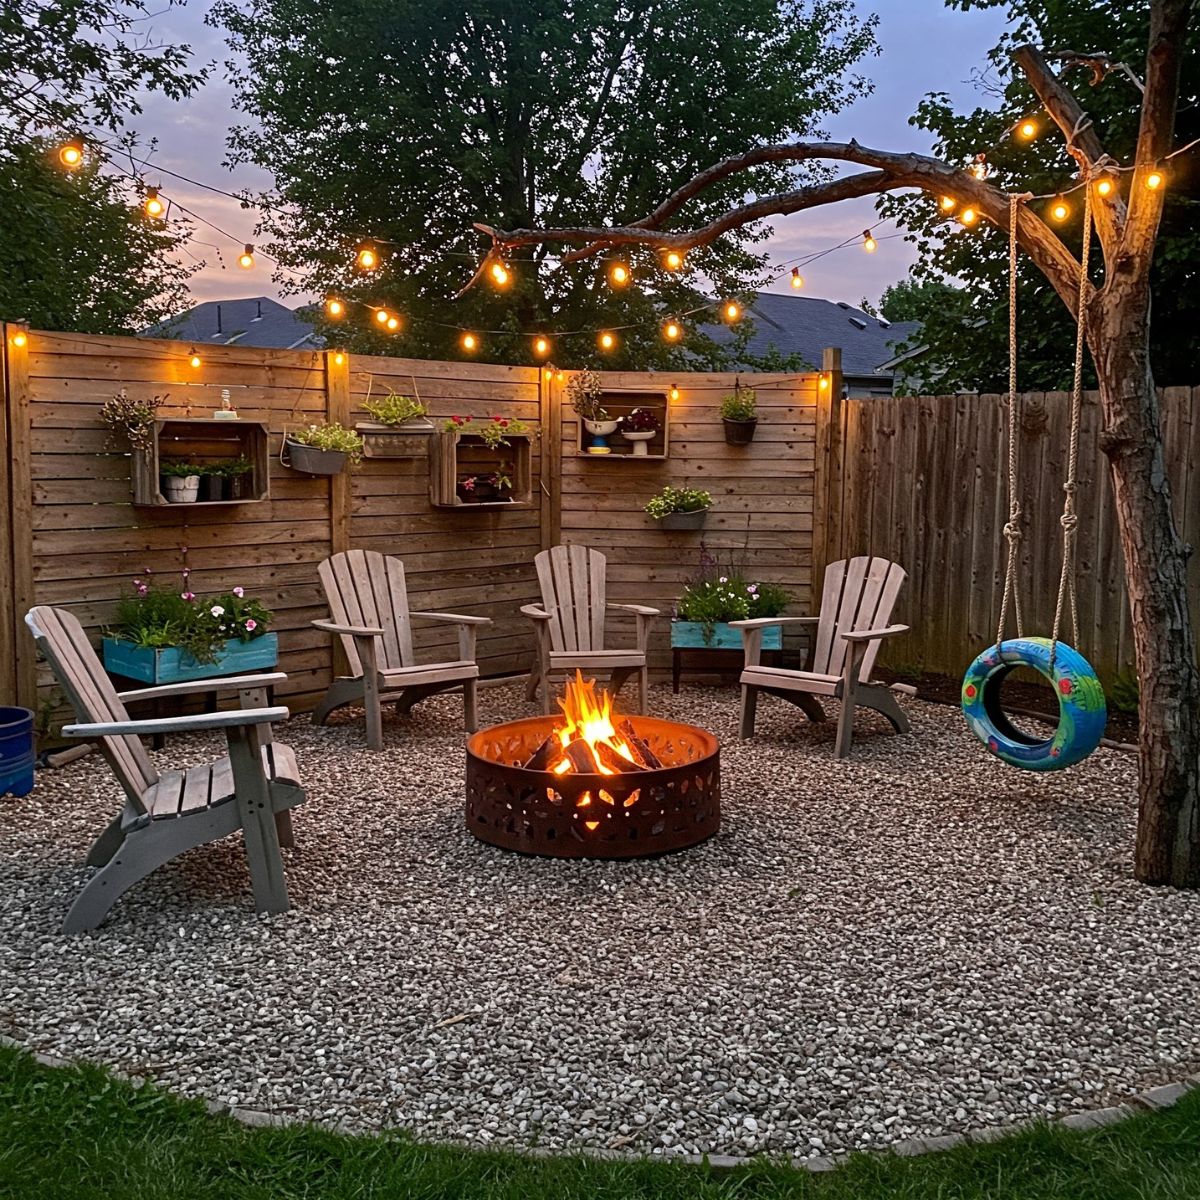
19. DIY a Rustic Fire Pit Area with Crate Planters
This backyard leans hard into the ‘upcycled rustic’ trend that is all over Pinterest. It’s a look that celebrates imperfection and found objects. Instead of sleek, new planters, we see repurposed wooden crates. The fence is made of simple, raw wood slats, and the ground is covered in basic gravel. This aesthetic is all about resourcefulness and creating a cozy, lived-in feel without a big budget. It’s a reaction against overly polished, sterile designs, embracing a more authentic and attainable kind of style. The tire swing is the perfect finishing touch for this nostalgic, DIY vibe.
|
📋 Copy HEX 🔗 Share |
⭐ The One Thing
Those wall-mounted crate planters are a fantastic and cheap DIY project. Here’s the 30-minute how-to:
- Find some old wooden crates from a craft store, flea market, or even the side of the road.
- Drill a few 1/2-inch holes in the bottom of each crate for drainage—this is essential!
- Line the inside of the crate with landscape fabric to hold the soil in while letting water out. Staple it to the top edges.
- Screw the back of the crate directly into your wooden fence posts for maximum stability.
- Fill with potting soil and your favorite plants. Voila! Instant rustic charm.
20. Create a Lush Oasis with a Pallet Sofa and Overhead Greenery
The single element holding this entire magical vibe together is the canopy of lush green foliage with string lights woven through it. The pallet sofa is cool, the mirror is a nice touch, but it’s the overhead greenery that transforms the space from a simple patio into a secret garden grotto. It provides a living ceiling, creating a profound sense of privacy and enchantment. Without it, the string lights would feel exposed and the space would lose almost all of its cozy, immersive character. This is a masterclass in using vertical space.

|
📋 Copy HEX 🔗 Share |
✅ Before You Start
Okay, let’s be honest about that gorgeous pallet sofa. While it looks incredible and is famously cheap to build, comfort can be an issue. Standard pallets are not designed for sitting, and you’ll need surprisingly thick cushions to not feel the hard wood slats beneath you. High-density foam cushions that are 5-6 inches thick are a must, and they can be the most expensive part of the project. Also, ensure your pallets are heat-treated (marked with ‘HT’), not chemically treated with MB (methyl bromide), especially if you have kids or pets.
21. Anchor a Patio with a Bold Blue and White Geometric Rug
An outdoor rug is one of the fastest ways to make a patio feel like a true ‘room.’ The key is to get the scale right. A common mistake is buying a rug that’s too small. For a conversation set like this, the rug should be large enough that at least the front feet of all the furniture pieces are on it. This visually connects everything and makes the arrangement feel cohesive and intentional, rather than like a collection of random items floating on the patio. A 8×10 or 9×12 size is usually a safe bet for a standard sofa and chair arrangement. This is a more vibrant take on the boho patio in Idea #2.
|
📋 Copy HEX 🔗 Share |
💸 Get This Look For Less
The woven furniture and ceramic garden stools can add up. To get this look for less, focus on the two main players: the rug and the string lights. You can find beautiful, bold geometric outdoor rugs at Target, Walmart, or Wayfair for under $150. Then, hunt for a used wicker or rattan seating set on Facebook Marketplace—people are practically giving them away at the end of the season. A quick spray paint job can work wonders. This strategy lets you save on the big items and splurge a little on the statement rug.
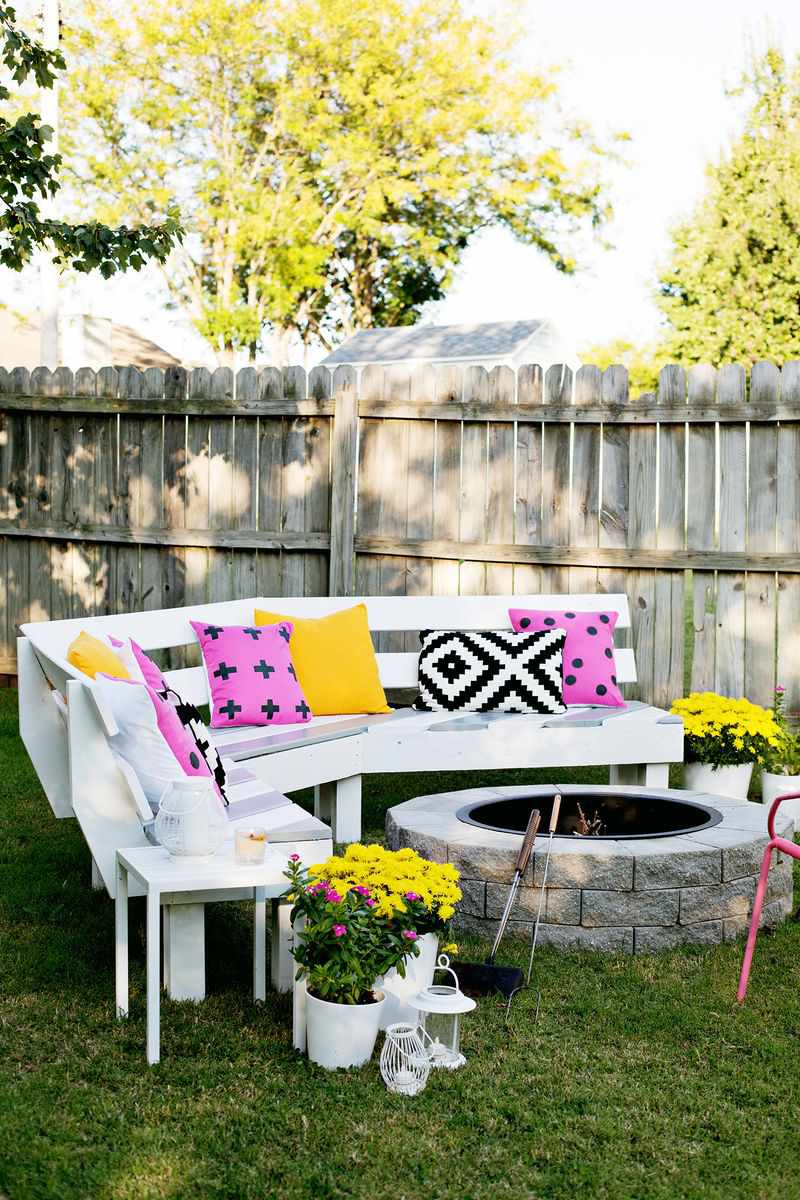
22. Circle a Stone Fire Pit with a Bright White Bench and Colorful Cushions
This fun, high-energy look is surprisingly affordable to pull together. The key is the DIY bench and the pops of color from accessories.
- Structure: DIY White Wooden Corner Bench (lumber & paint) ($200-$350)
- Focal Point: Stacked-Stone Fire Pit Kit ($250-$400)
- Textiles: Assorted colorful throw pillows (5-7) ($100-$200)
- Decor: White lanterns, side table, flower pots ($75-$150)
- TOTAL: $625 – $1,100
Budget alternative: Use concrete retaining wall blocks for the fire pit (around $80) and sew your own pillow covers from remnant fabric to bring the total cost down by 40-50%.
|
📋 Copy HEX 🔗 Share |
📐 Style Math
This space works because it masters the art of high-contrast fun. The clean, bright white of the bench and lanterns acts as a perfect canvas. Against this neutral backdrop, the saturated pops of hot pink and sunny yellow really sing. The simple black and white geometric pillows add a graphic element that keeps the look modern and prevents it from feeling too juvenile. The gray stone of the fire pit provides a necessary earthy, grounding texture to balance all that bright energy. It doesn’t take itself too seriously, and that’s why it’s so inviting.
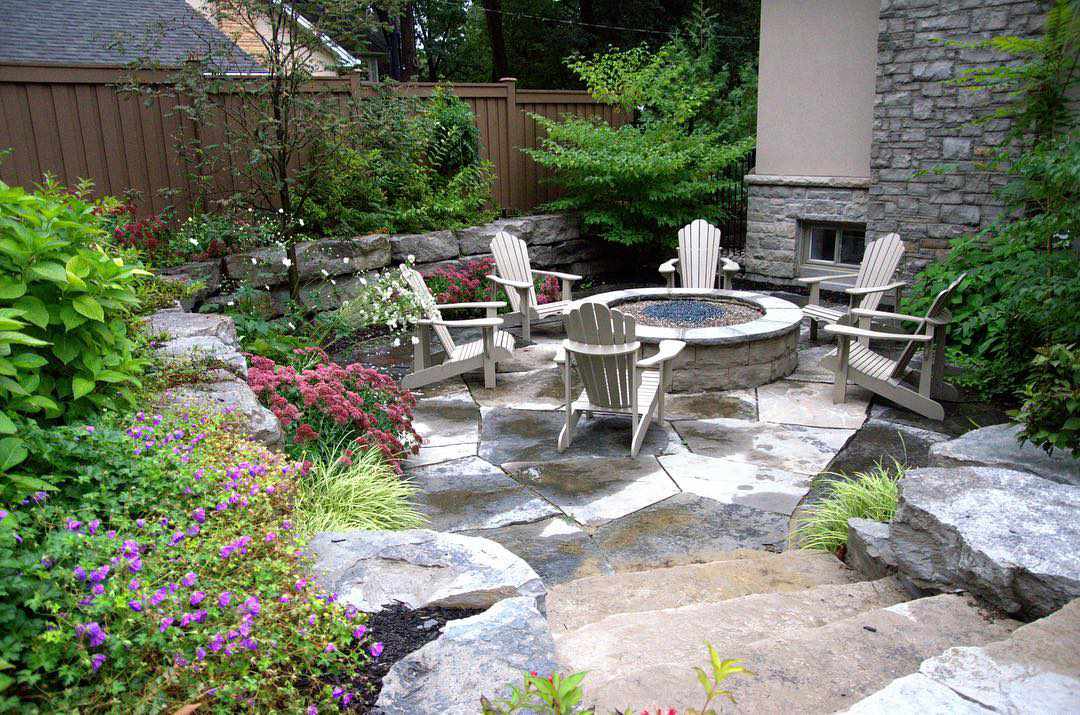
23. Gather Adirondack Chairs Around a Flagstone Patio Fire Pit
Natural flagstone patios are beautiful but require specific upkeep. The irregular gaps are often filled with gravel or sand, which can become a breeding ground for weeds. You’ll want to factor in seasonal weeding or the application of a pre-emergent herbicide. Over time, stones can also shift or settle, especially in freeze-thaw climates. Be prepared to occasionally lift a stone, add more base material, and reseat it to prevent tripping hazards. The blue fire glass is low-maintenance, but it can collect dust and pollen, so a quick rinse with a hose once a season will keep it sparkling.
|
📋 Copy HEX 🔗 Share |
💰 Budget Breakdown
This relaxing retreat follows a simple design equation: 60% rustic hardscape (the flagstone patio and stone retaining walls) + 30% classic comfort (the light-colored Adirondack chairs) + 10% vibrant life (the purple flowering plants and blue fire glass). This formula ensures the space feels grounded in nature but still designed for human enjoyment. You could swap the Adirondacks for simple wooden benches or change the flower color to yellow, and the fundamental balance of the space would still hold true.
24. Build a Modern Seating Area with a Concrete Block Fire Pit and Bench
The defining feature here is the seamless integration of materials. The concrete blocks used to build the fire pit are the exact same material used for the base of the bench. The light-toned wood planks of the bench seat are then echoed in the small accent table. This repetition creates a powerful sense of cohesion and intention. It’s not just a collection of patio furniture; it’s a unified piece of architecture. This is what gives the space its clean, modern, and custom-designed feel. The lavender plantings soften the hard lines perfectly.
|
📋 Copy HEX 🔗 Share |
🧹 Maintenance Reality
A custom-poured concrete fire pit and bench would cost thousands. You can get this exact high-end look with a trip to the hardware store. Use standard concrete retaining wall blocks (CMUs) to construct the fire pit and bench base—they cost just a few dollars each. Stack and secure them with construction adhesive. For the bench top, use affordable pressure-treated deck planks. A weekend of labor and a few hundred dollars in materials can give you a backyard feature that looks like it was done by a landscape architect.
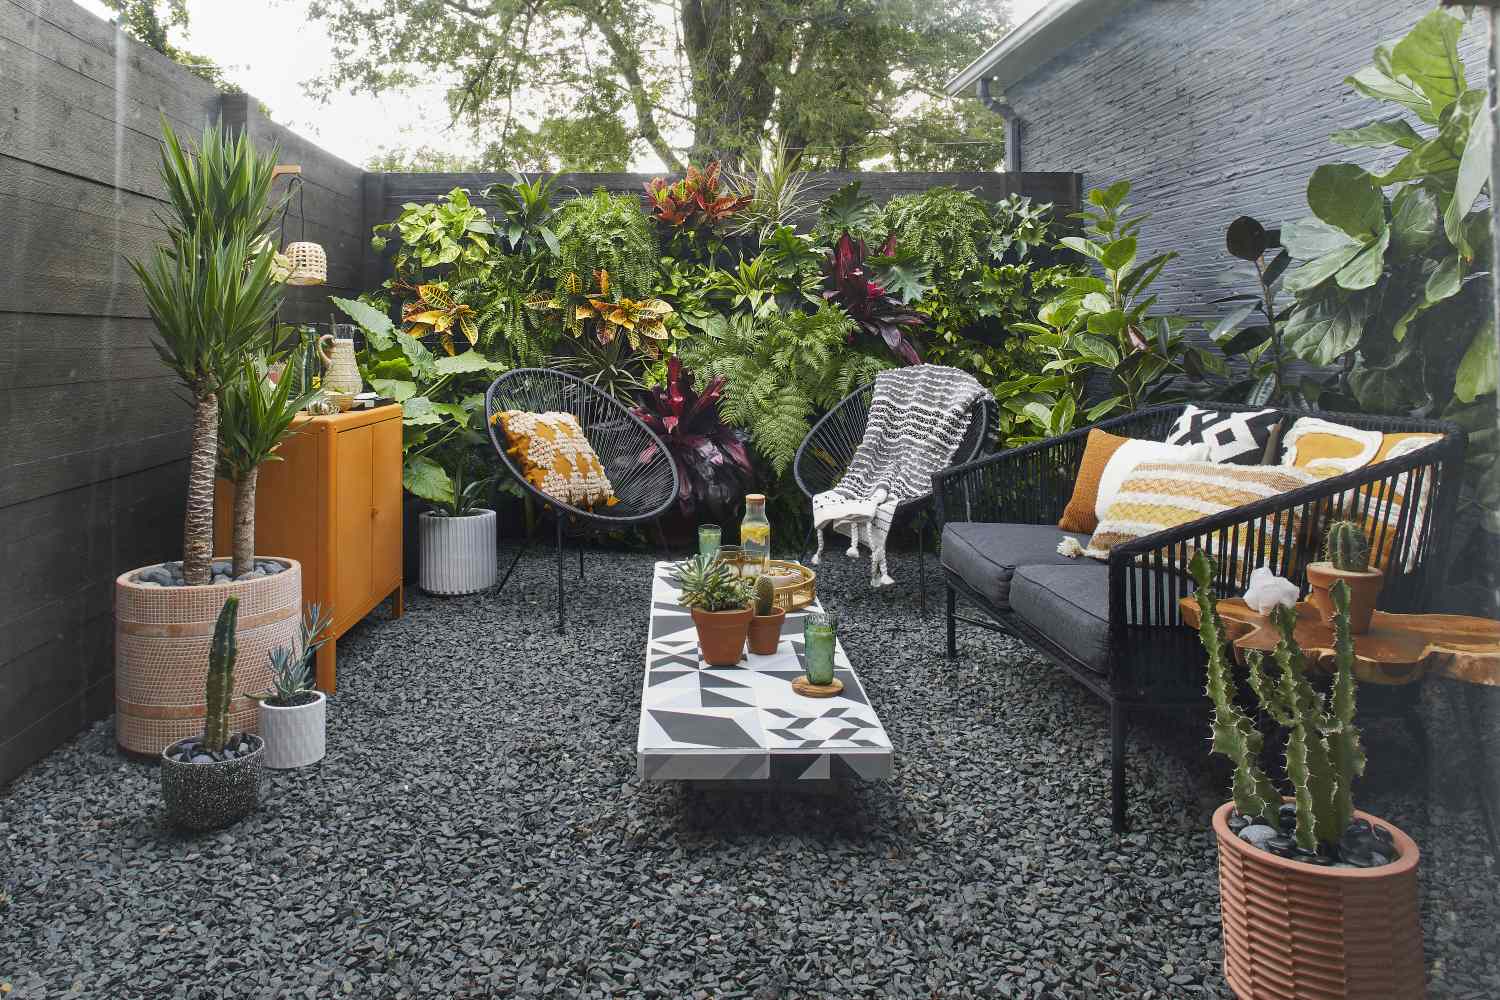
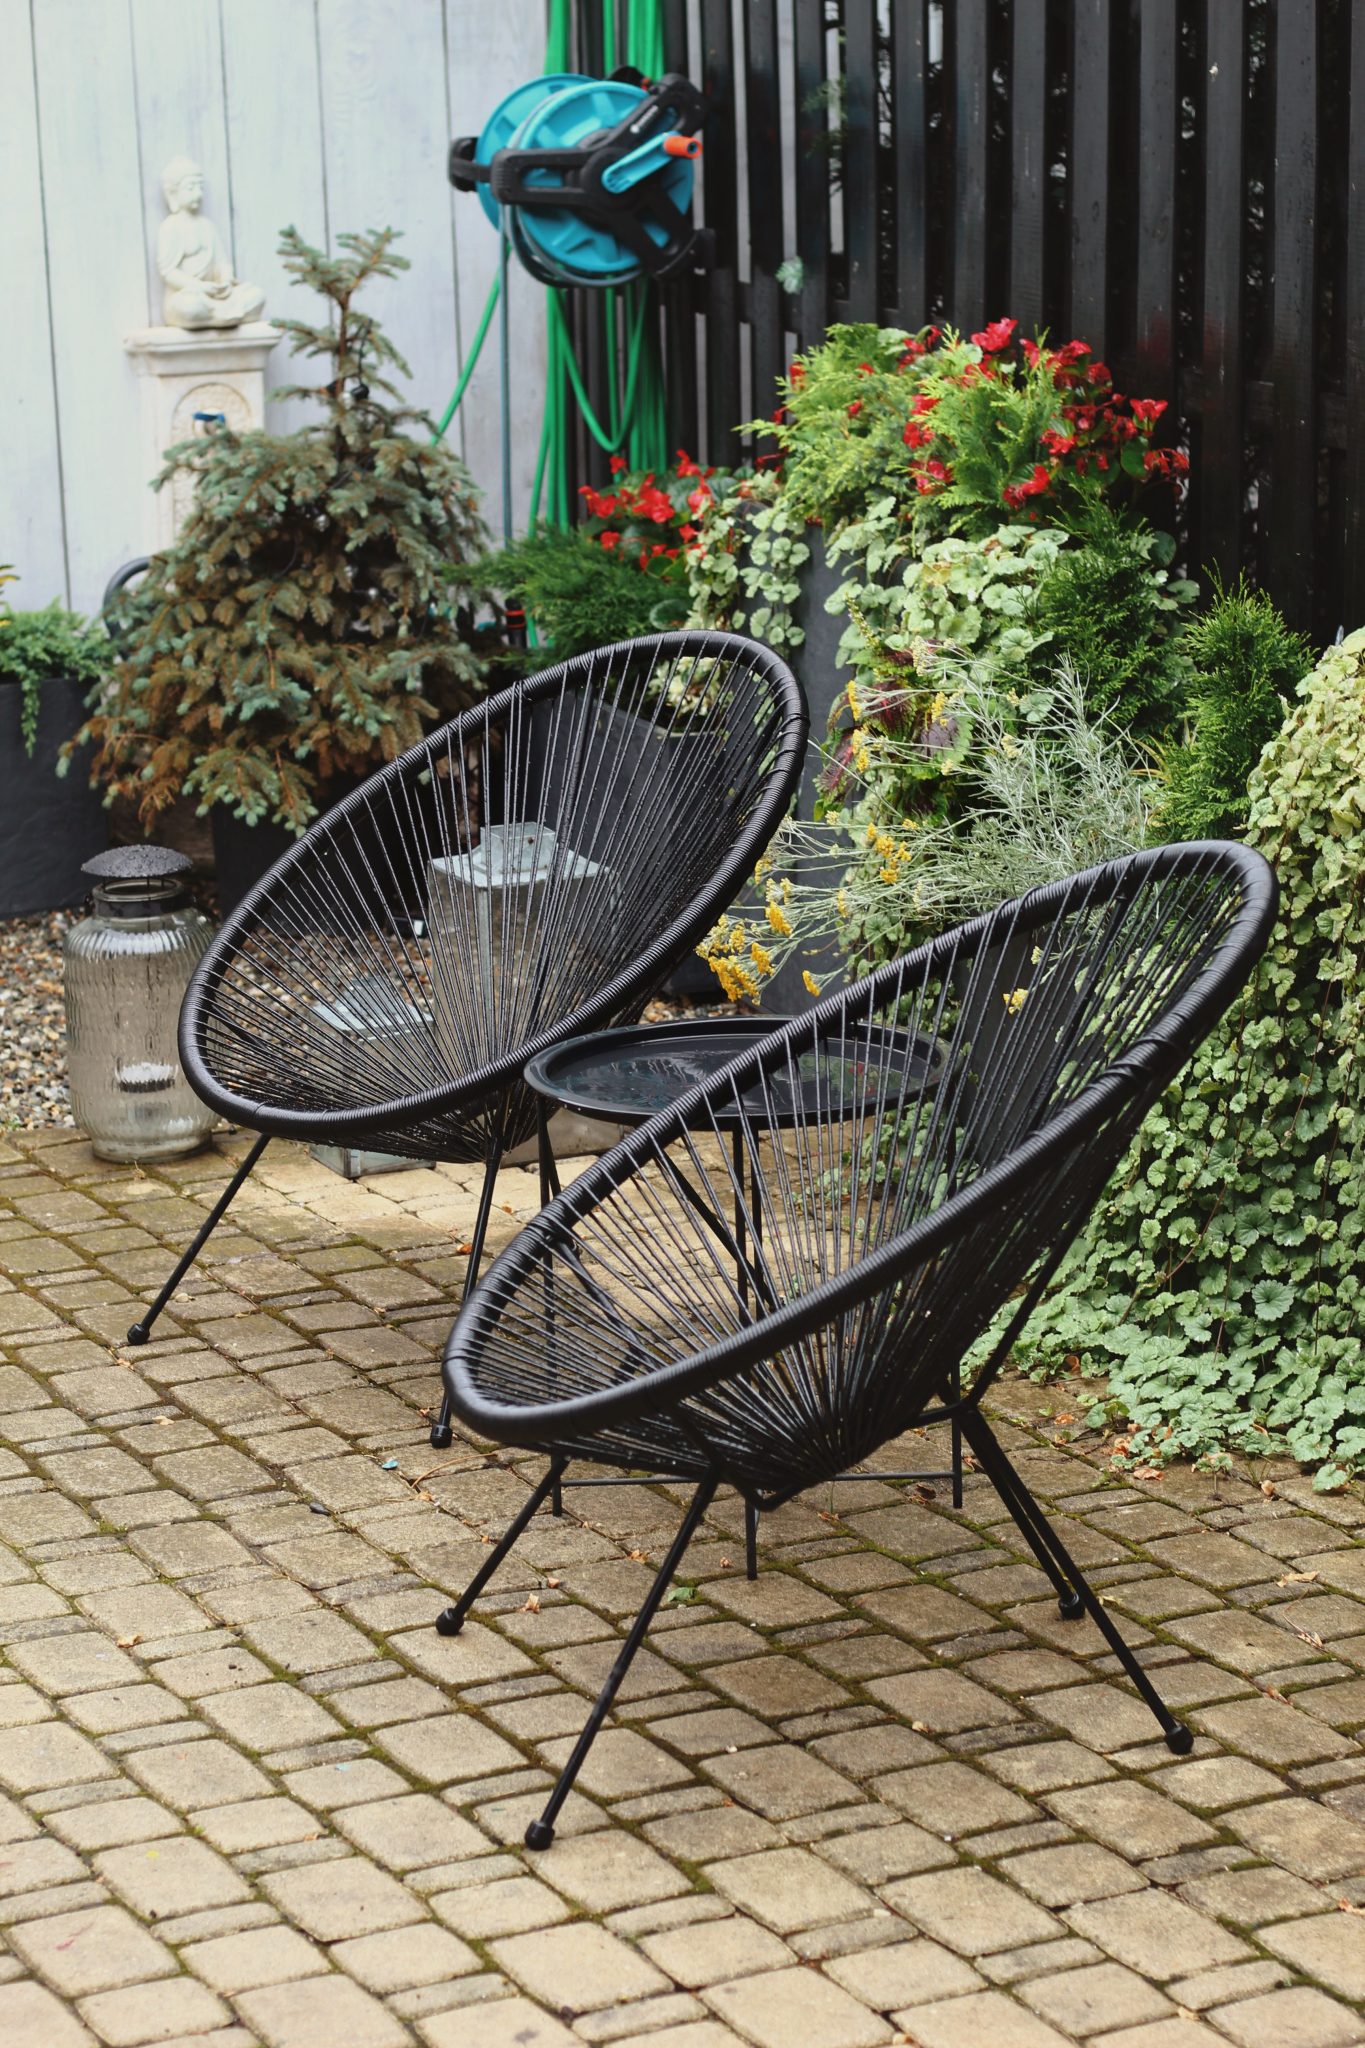
25. Arrange Modern Black Woven Chairs in a Potted Garden
This chic, simple look is all about the plants. Before you buy the furniture, make a plan:
- Potting Plan: Decide on a color scheme for your planters. Sticking to a simple palette like the dark pots here creates a cohesive backdrop for the varied greenery.
- Plant Variety: Will you mix textures and heights? Plan for a ‘thriller’ (a tall, dramatic plant), a ‘filler’ (a mid-sized bushy plant), and a ‘spiller’ (a plant that trails over the edge of the pot).
- Sun Mapping: Chart how much sun this spot gets per day. This will determine your plant selection. Full sun plants will fry in the shade, and vice versa.
|
📋 Copy HEX 🔗 Share |
⚠️ Real Talk
In a small space, visual lightness is your best friend. Notice how these black chairs have very slender metal legs. This elevates the bulky seat off the ground, allowing you to see the patio pavers underneath. This small detail prevents the chairs from feeling like heavy, solid blocks. It creates a sense of openness and makes the entire area feel less crowded. When choosing furniture for a tight spot, always look for pieces with ‘air’ underneath them—it makes a huge difference.
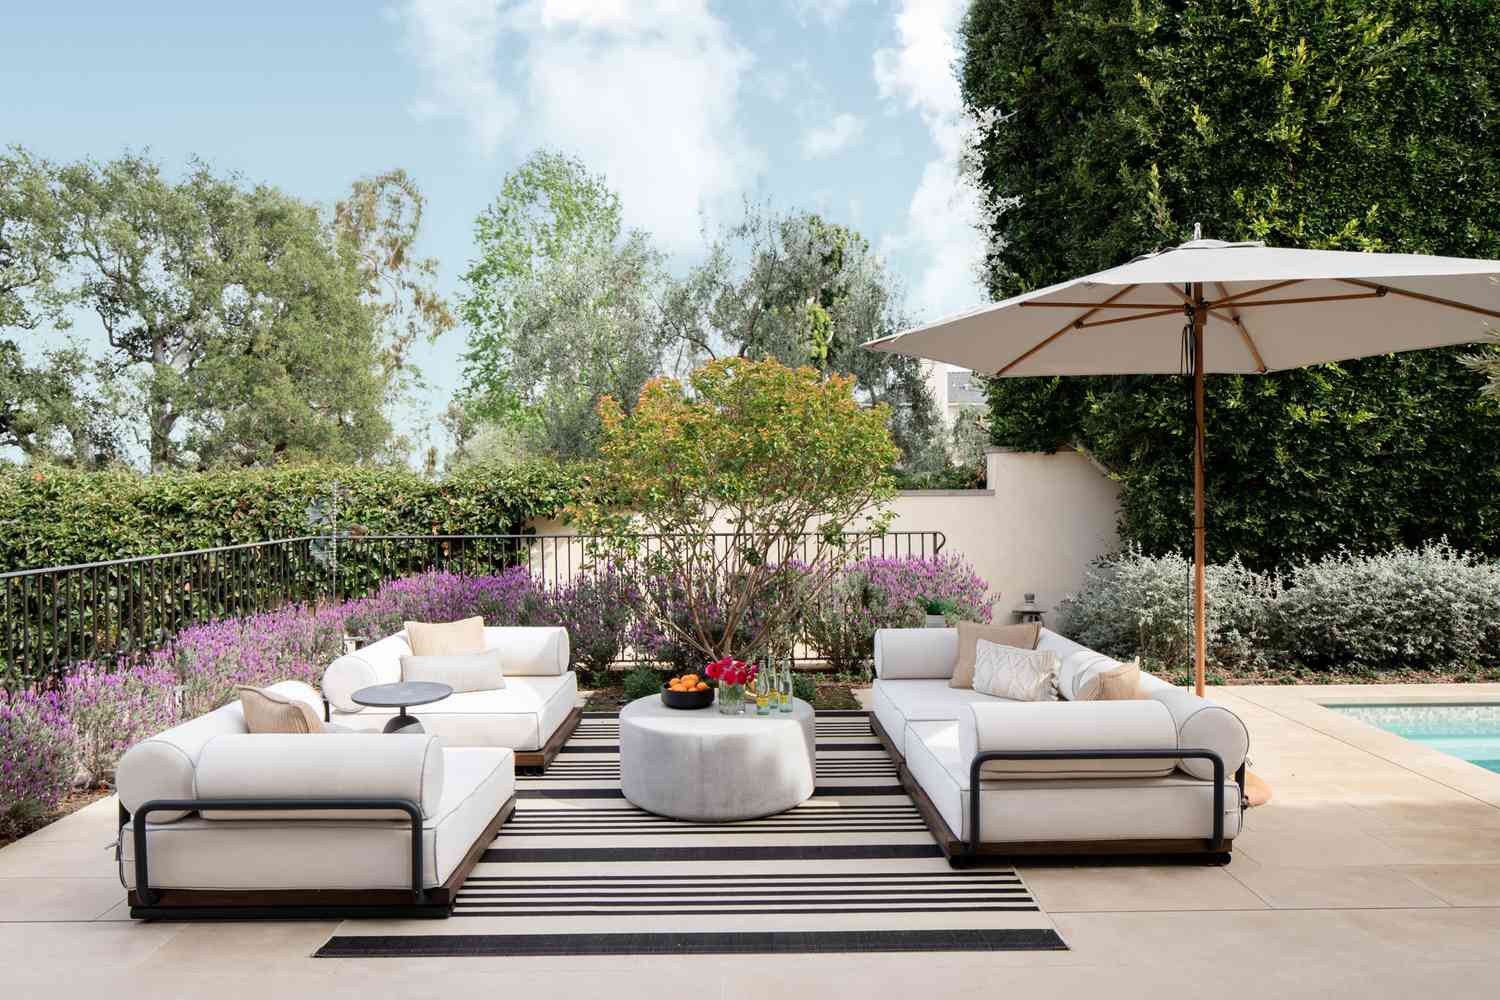
26. Stage a Chic Lounge with a Striped Rug and Purple Flowers
This is poolside glamour, straight from a boutique hotel. The trend of creating resort-like ‘daybed zones’ in backyards has been exploding on social media. It reflects a desire to make our homes feel like a vacation destination. The crisp black and white stripes, the luxurious white upholstery, and the oversized umbrella are all hallmarks of this style. It’s about creating a dedicated space purely for relaxation and indulgence, and the vibrant purple flowers add that perfect touch of exotic color. This is less about a family BBQ and more about a cocktail at sunset.
|
📋 Copy HEX 🔗 Share |
🔧 How-To Brief
White outdoor furniture is the epitome of chic, but it requires a high level of commitment. That pristine white fabric is a magnet for dirt, pollen, sunscreen stains, and bird droppings. To keep it looking this good, you absolutely must invest in high-quality outdoor performance fabrics (like Sunbrella) that are stain-resistant and easy to clean. Even then, you’ll be doing regular spot treatments and should have a plan to bring the cushions indoors or use waterproof covers before it rains. It’s a look that demands diligence.
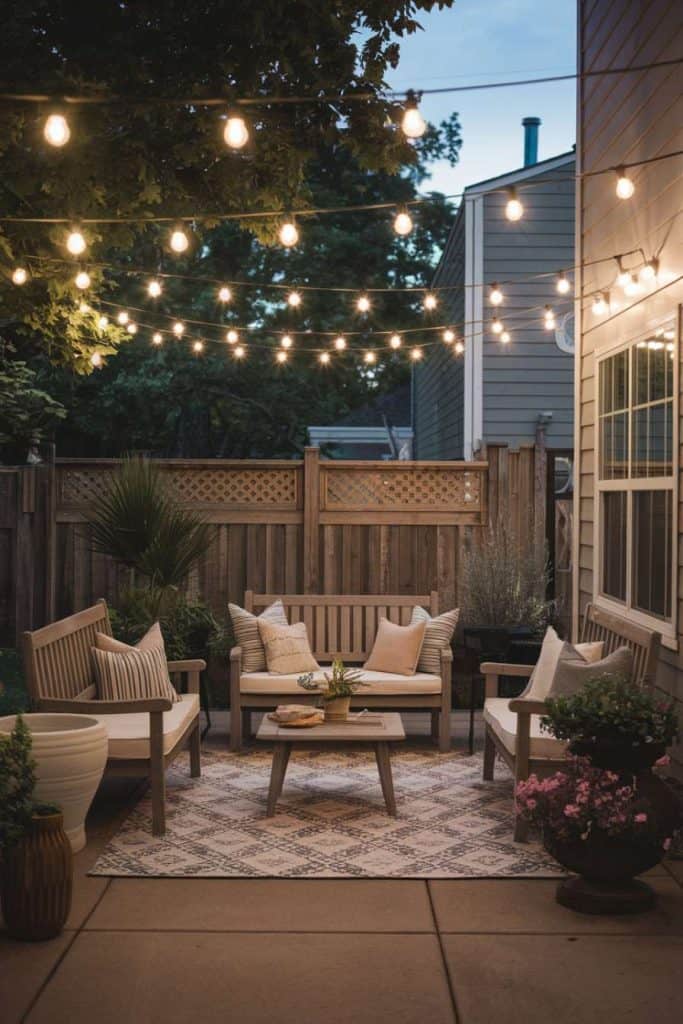
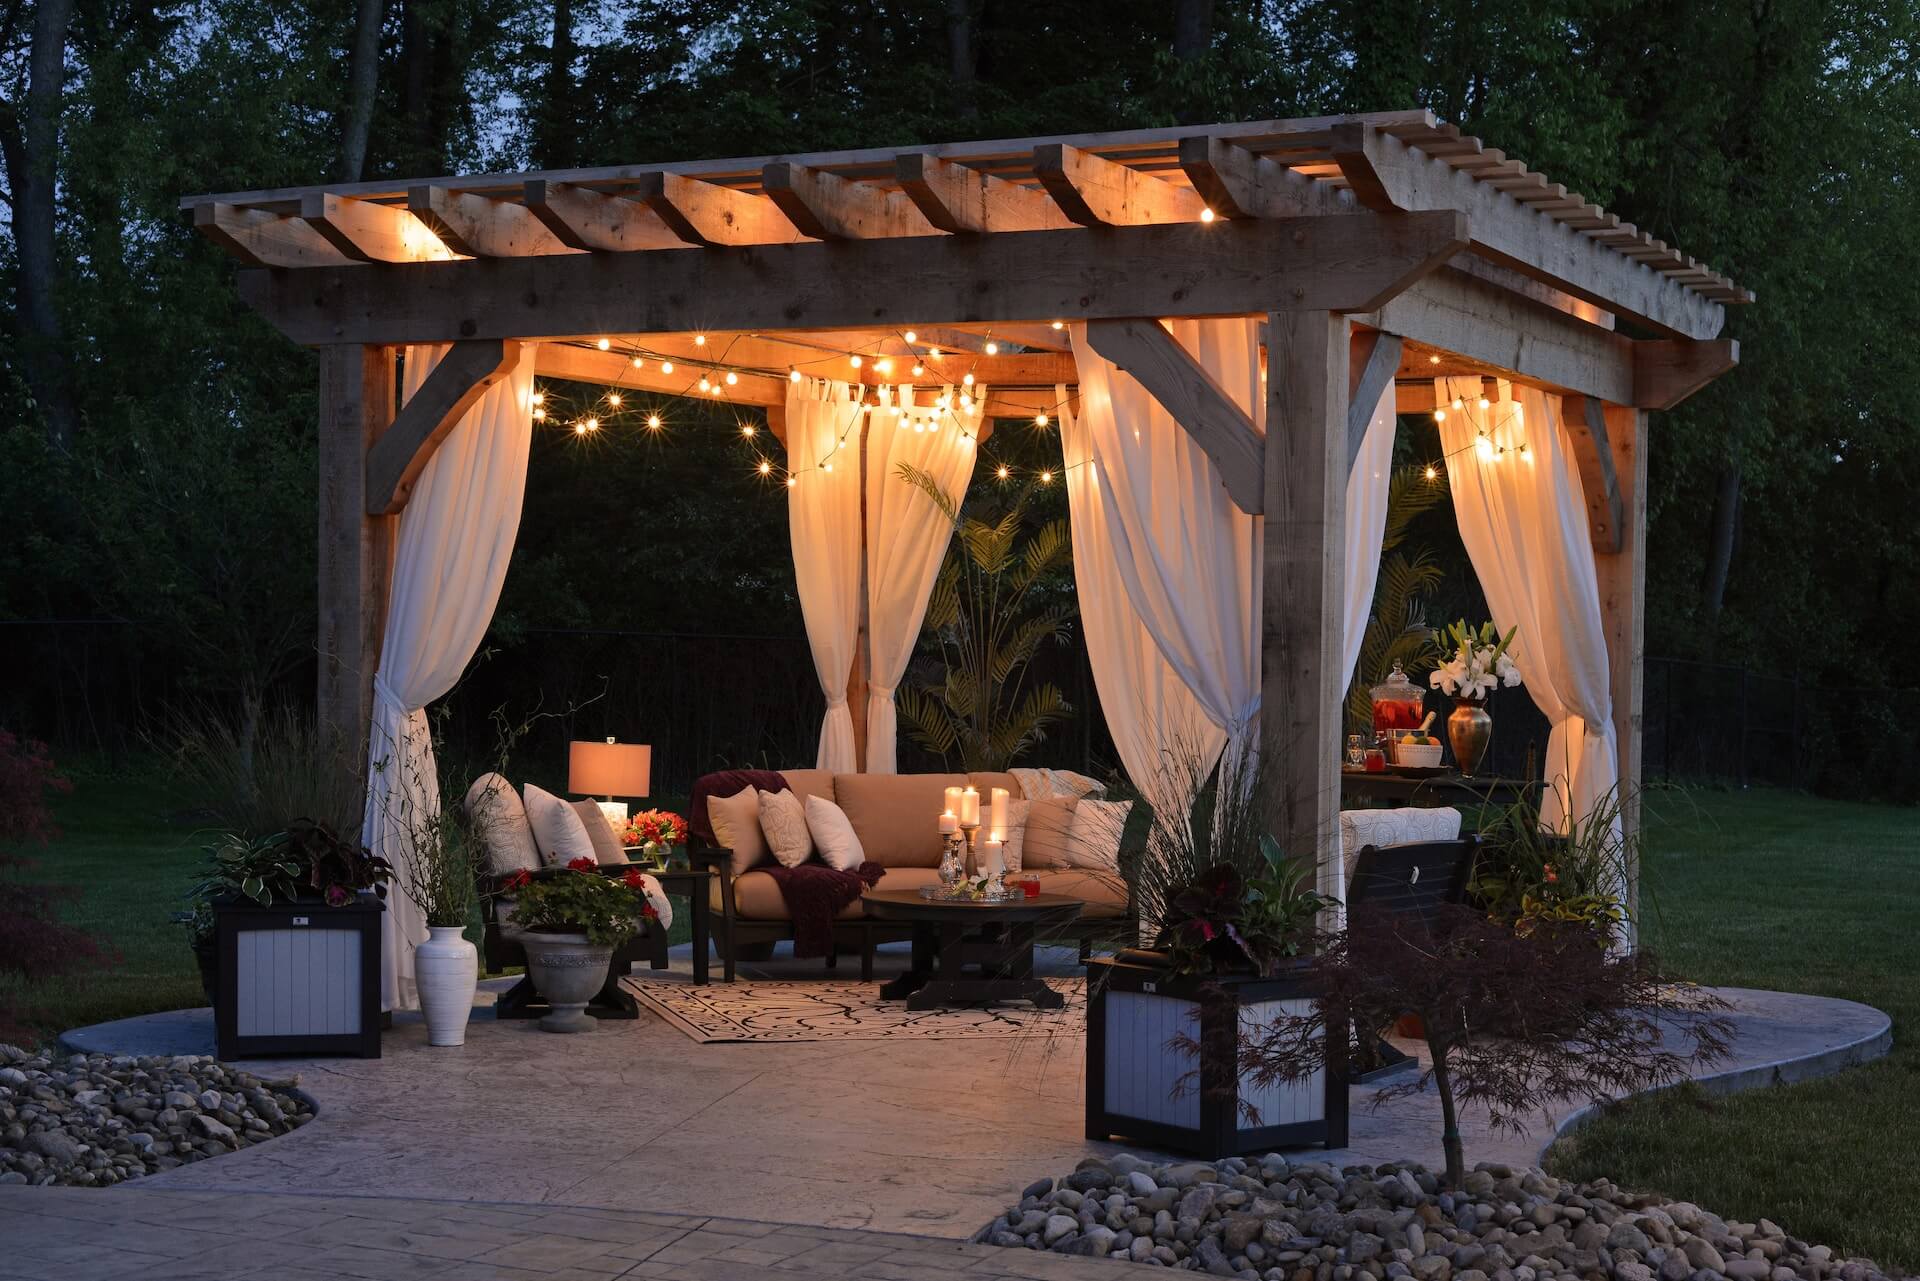
27. Light Up a Cozy Patio with Layers of String Lights
This patio feels incredibly cozy and inviting due to the ‘ceiling’ effect created by the dense web of string lights. Instead of a single strand, multiple lines are crisscrossed overhead, creating a canopy of warm light. This simple technique visually lowers the ‘ceiling’ of the outdoor space, making it feel more intimate and room-like. The warm glow reflects off the light wood furniture and cream cushions, bathing the entire area in a soft, welcoming light that encourages you to sit down and stay awhile. The patterned rug further defines this ‘room’.
|
📋 Copy HEX 🔗 Share |
💡 Designer Tip
You don’t need a fancy pergola to get this layered lighting look. This setup can be recreated using simple screw-in hooks and galvanized wire. Run the wire from your house to a sturdy fence post or even a mature tree. Then, use zip ties or clips to attach the string lights to the support wire. This prevents the lights from sagging and gives you a much straighter, more professional-looking installation. It also takes the tension off the light strands themselves, making them last longer. It’s a cheap and effective trick for a polished result.
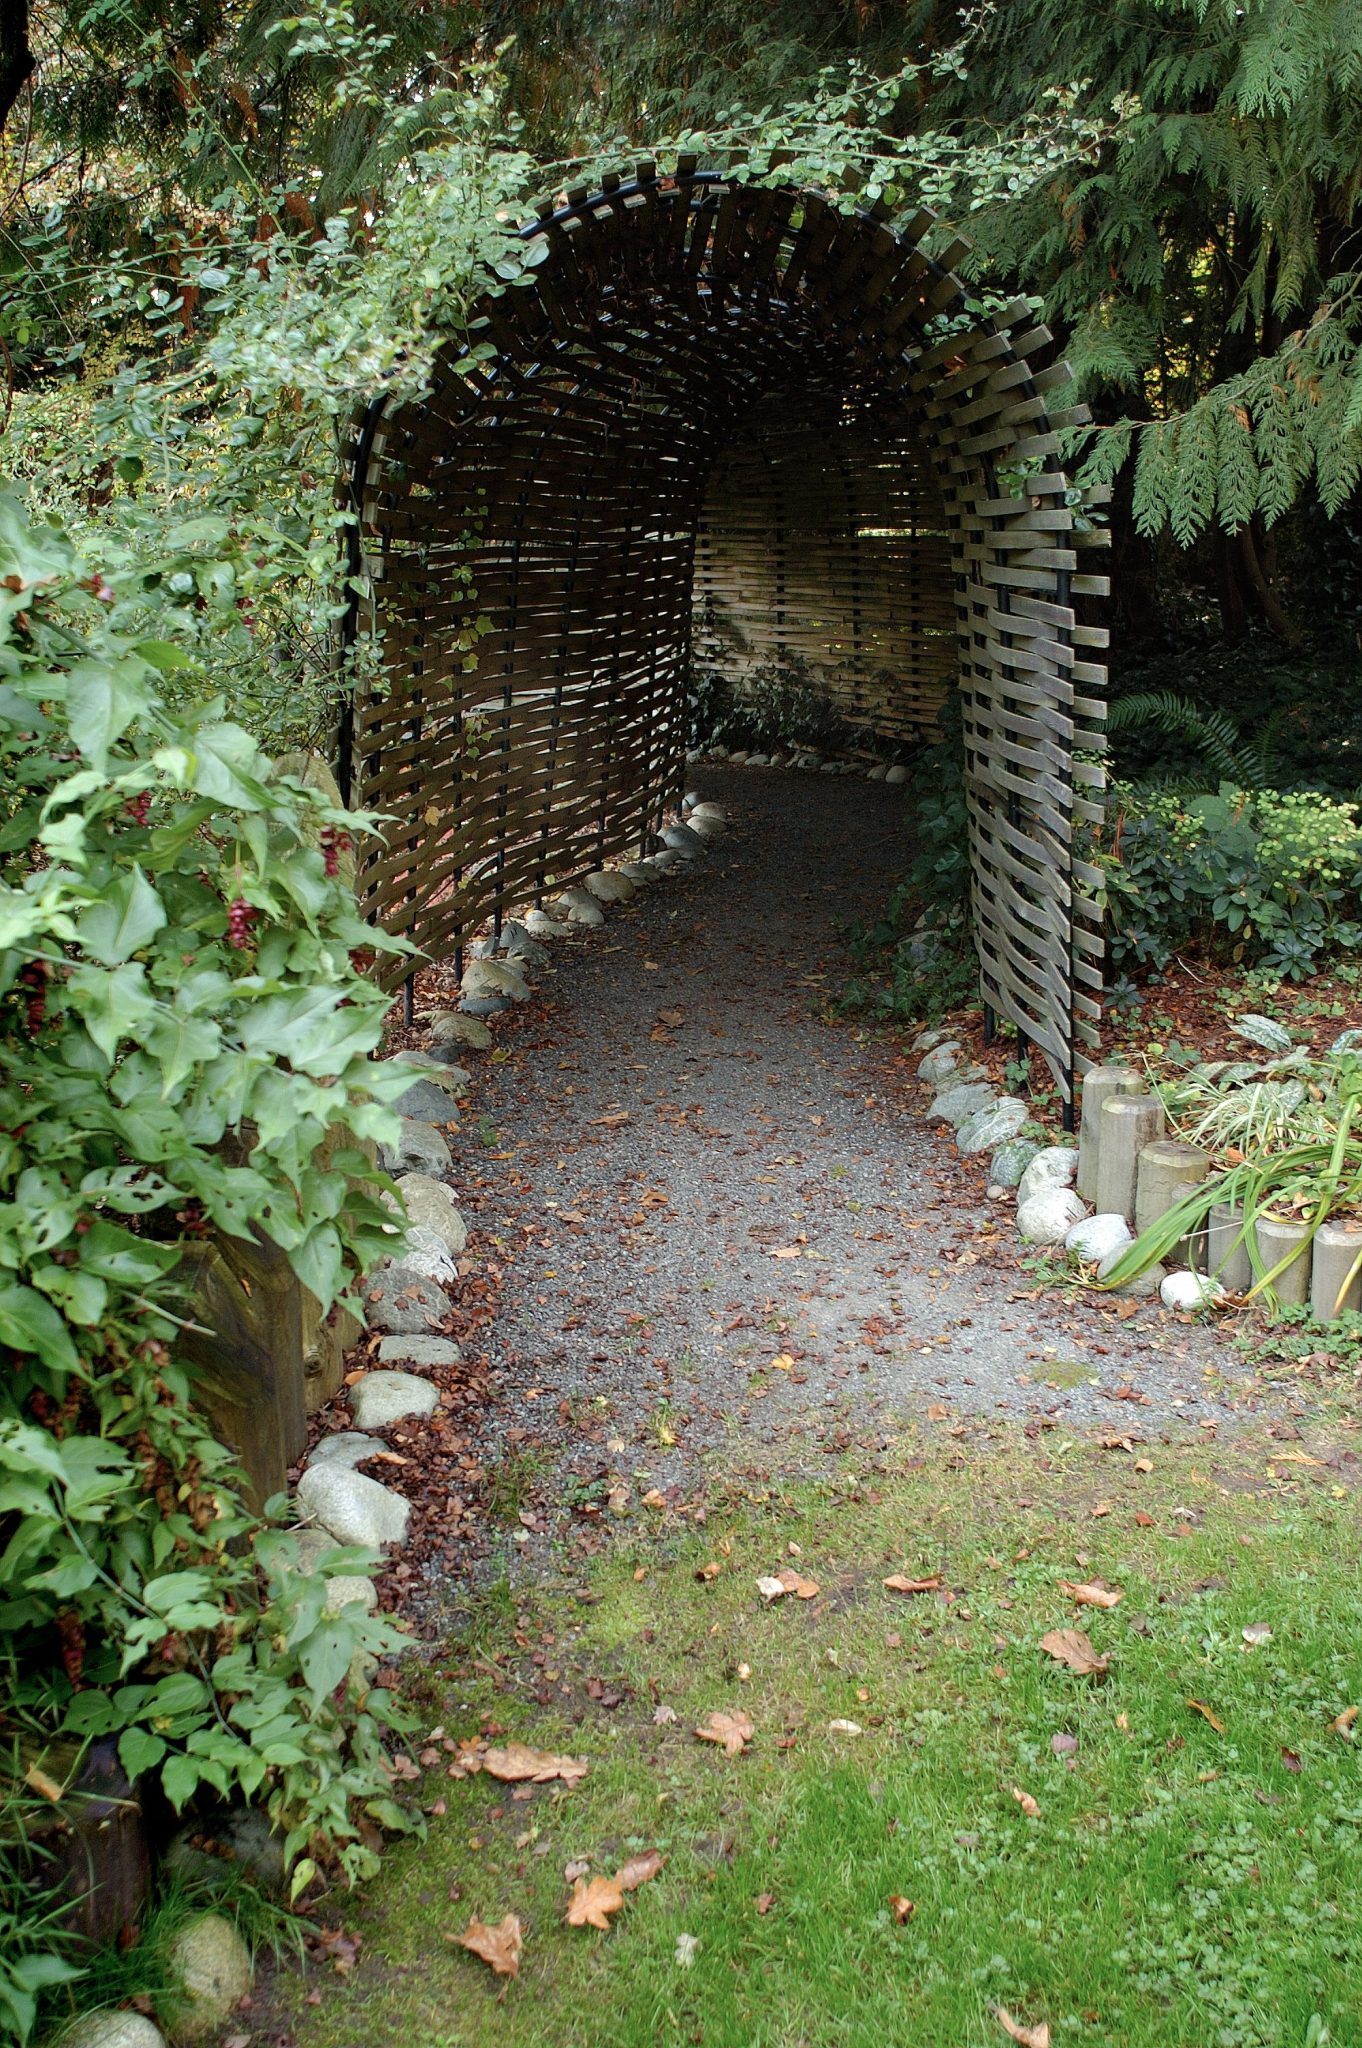
28. Build a Wooden Archway Tunnel for a Dramatic Garden Entrance
The power of this design is all in the sense of journey and mystery created by the slatted wooden tunnel. It’s not just a path; it’s a portal. The dark wood and enclosed structure create a moment of compression and shadow before you emerge into whatever lies beyond. This transition makes the garden feel more special, like a hidden world. Removing the archway would leave you with a simple gravel path. The tunnel turns a walk through the garden into a memorable experience, a far more impactful entrance than a standard gate.
|
📋 Copy HEX 🔗 Share |
🔥 Trending Context
Building a simple arched walkway like this is a great weekend DIY project. Here’s a simplified brief:
- Set two pairs of 4×4 posts in concrete on either side of your path. These are your main supports.
- Construct two arch forms out of plywood.
- Create the arch itself by bending and laminating thin strips of wood (like cedar) over the plywood form, using waterproof glue.
- Once dry, attach these two wooden arches to the tops of your 4×4 posts.
- Nail 1×2 slats across the top and sides, connecting the two arches to form the tunnel.
- Apply a dark stain or sealer to protect the wood. This project will take 2 days and cost roughly $300-$500 in lumber.
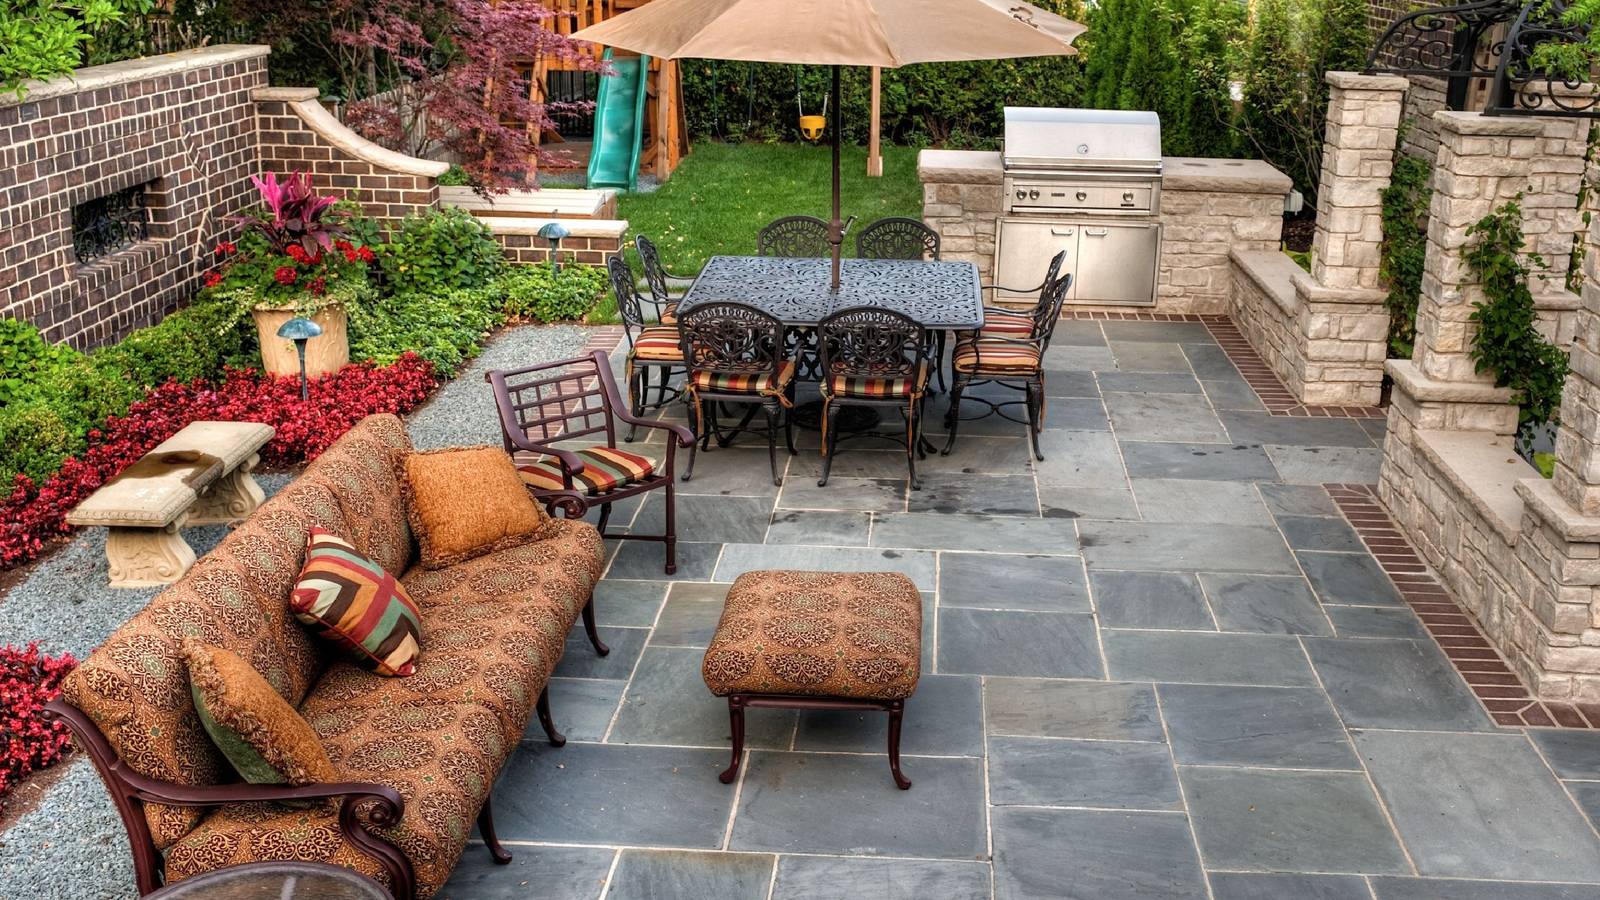
29. Combine Brick Walls and a Slate Patio for a Traditional Look
This classic, established look follows a rich textural formula: 40% rugged stone (the grey slate pavers) + 40% traditional brick (the retaining walls) + 20% lush textiles and greenery. The key is the equal balance between the two dominant hardscape materials. The cool, dark grey of the slate provides a sophisticated base that makes the warm terra cotta of the brick walls pop. The ornate furniture and abundant plants soften the hard materials, making the space feel comfortable and lived-in. It feels timeless because it’s built from materials that have been used for centuries.
|
📋 Copy HEX 🔗 Share |
📏 Scale Guide
This is a beautiful, durable patio, but let’s talk about the upkeep of that combination. The slate pavers, being dark and natural, will show every bit of dust, pollen, and fallen leaf, requiring frequent sweeping to look tidy. The brick retaining walls, especially the mortar joints, can be prone to moss or mildew growth in shady, damp areas. A yearly scrub-down with a stiff brush and a mild cleaning solution will be on your to-do list. While both materials are incredibly long-lasting, they aren’t ‘set and forget’—they demand a bit of regular cleaning to look their best.
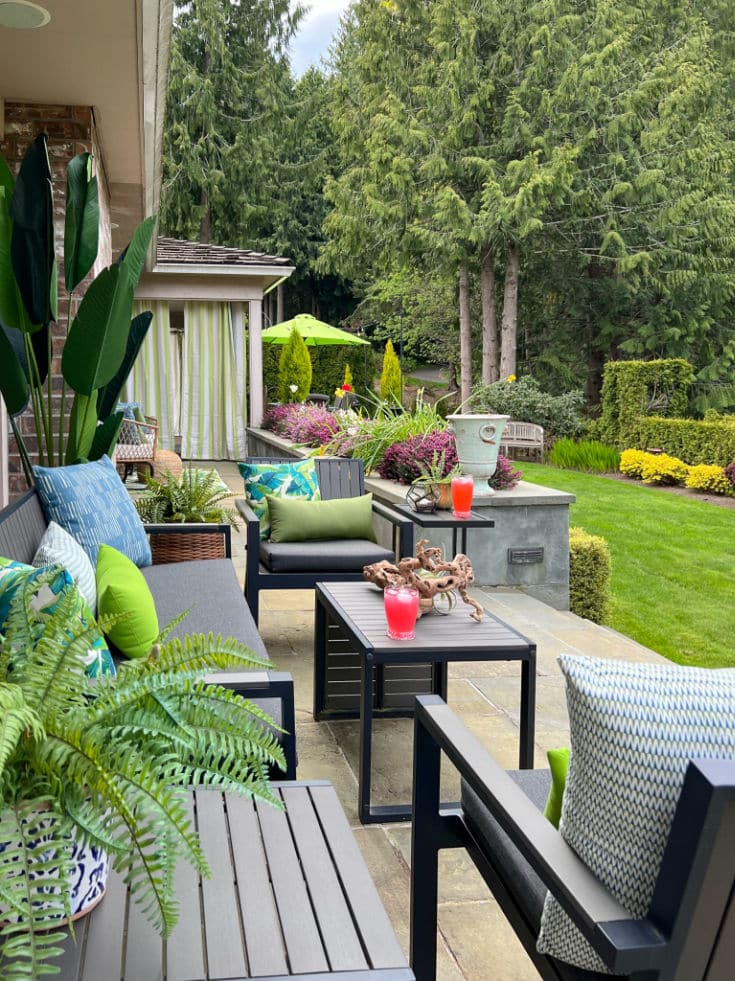
30. Use Dark Grey Furniture as a Base for Vibrant Green and Blue Accents
If you love vibrant colors but are afraid of commitment, this is your blueprint. Start with a neutral, sophisticated base like this dark grey patio furniture. It’s the perfect canvas. Then, go wild with cheap, easily replaceable accessories. The lime green umbrella and the collection of green and blue throw pillows add a massive dose of personality and color. When you get tired of them or the trend changes, you can swap them out for a whole new color scheme—maybe terracotta and cream—for just a few hundred dollars, without having to replace the expensive main furniture pieces.
|
📋 Copy HEX 🔗 Share |
🎯 What Makes It Work
that makes this outdoor space feel truly special and retreat-like is the sheer abundance of plants. It’s not just a few pots; it’s a deep, layered jungle of green that surrounds the seating area. This creates a powerful sense of privacy and separation from the outside world. If you took away half the plants, it would still be a nice patio, but it would lose that immersive ‘getaway’ feeling. The plants are doing more work than the furniture to define the mood of this space.
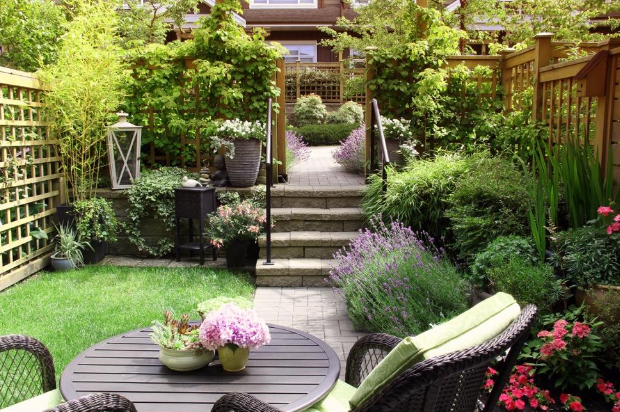
31. Design a Lush, Tiered Garden with Paved Pathways
This multi-level garden idea is a fantastic solution for a yard with a natural slope. It’s best suited for medium to large backyards where you have the space to create distinct tiers without making them feel cramped. Each level should ideally be at least 4-5 feet deep to allow for substantial planting. This approach is all about creating different ‘rooms’ and experiences as you move through the space. In a small, flat yard, this could feel forced and overly busy, but for a sloped space of 700 sq ft or more, it’s a brilliant way to add structure and interest. Compare it to the single-wall vertical garden in Idea #4, which is better for tiny spaces.
|
📋 Copy HEX 🔗 Share |
⭐ The One Thing
The genius of this design is the way it guides you on a journey. The paved path and stone steps don’t just provide access; they create a sense of discovery. You are invited to meander up and through the garden, experiencing it from different vantage points. The small patio area is a destination, a reward for your walk. The lattice fence with climbing plants adds a vertical layer, enhancing the feeling of enclosure and lushness. It works because it engages you and makes you want to explore every corner.
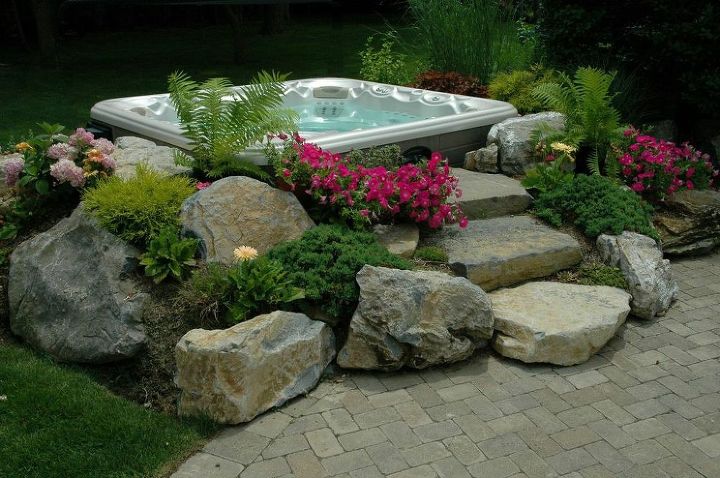
32. Integrate a Hot Tub into a Natural Rock and Plant Landscape
The key to making this hot tub look so luxe and integrated is that it’s nestled *into* the landscape, not just placed *on* it. By building up the surrounding area with large, natural rocks and dense plantings, the designers have blurred the line between the man-made hot tub and the natural environment. This makes it feel like a secret hot spring you discovered in the woods, rather than a plastic tub sitting on a concrete slab. This thoughtful integration is the single element that elevates the entire design.
|
📋 Copy HEX 🔗 Share |
✅ Before You Start
This ‘natural hot spring’ look is stunning, but it poses some practical challenges. The main issue is service access. Hot tubs have pumps, heaters, and panels that require periodic maintenance and repair. When you build rocks and dirt right up against the sides, you block access to these components. A smart design will include a hidden, removable ‘rock’ panel or a clever access path from the back. Without it, a simple repair could turn into a major project involving deconstruction of your beautiful landscaping.
Your Outdoor Oasis Awaits
See? You don’t need a massive budget or a professional landscape architect to create a backyard you genuinely love spending time in. The most beautiful spaces are the ones that feel personal and inviting. So pick an idea that speaks to you, give it your own spin, and get started.
Ready to make it happen? Pin your favorite ideas and share your beautiful results with us on Pinterest!