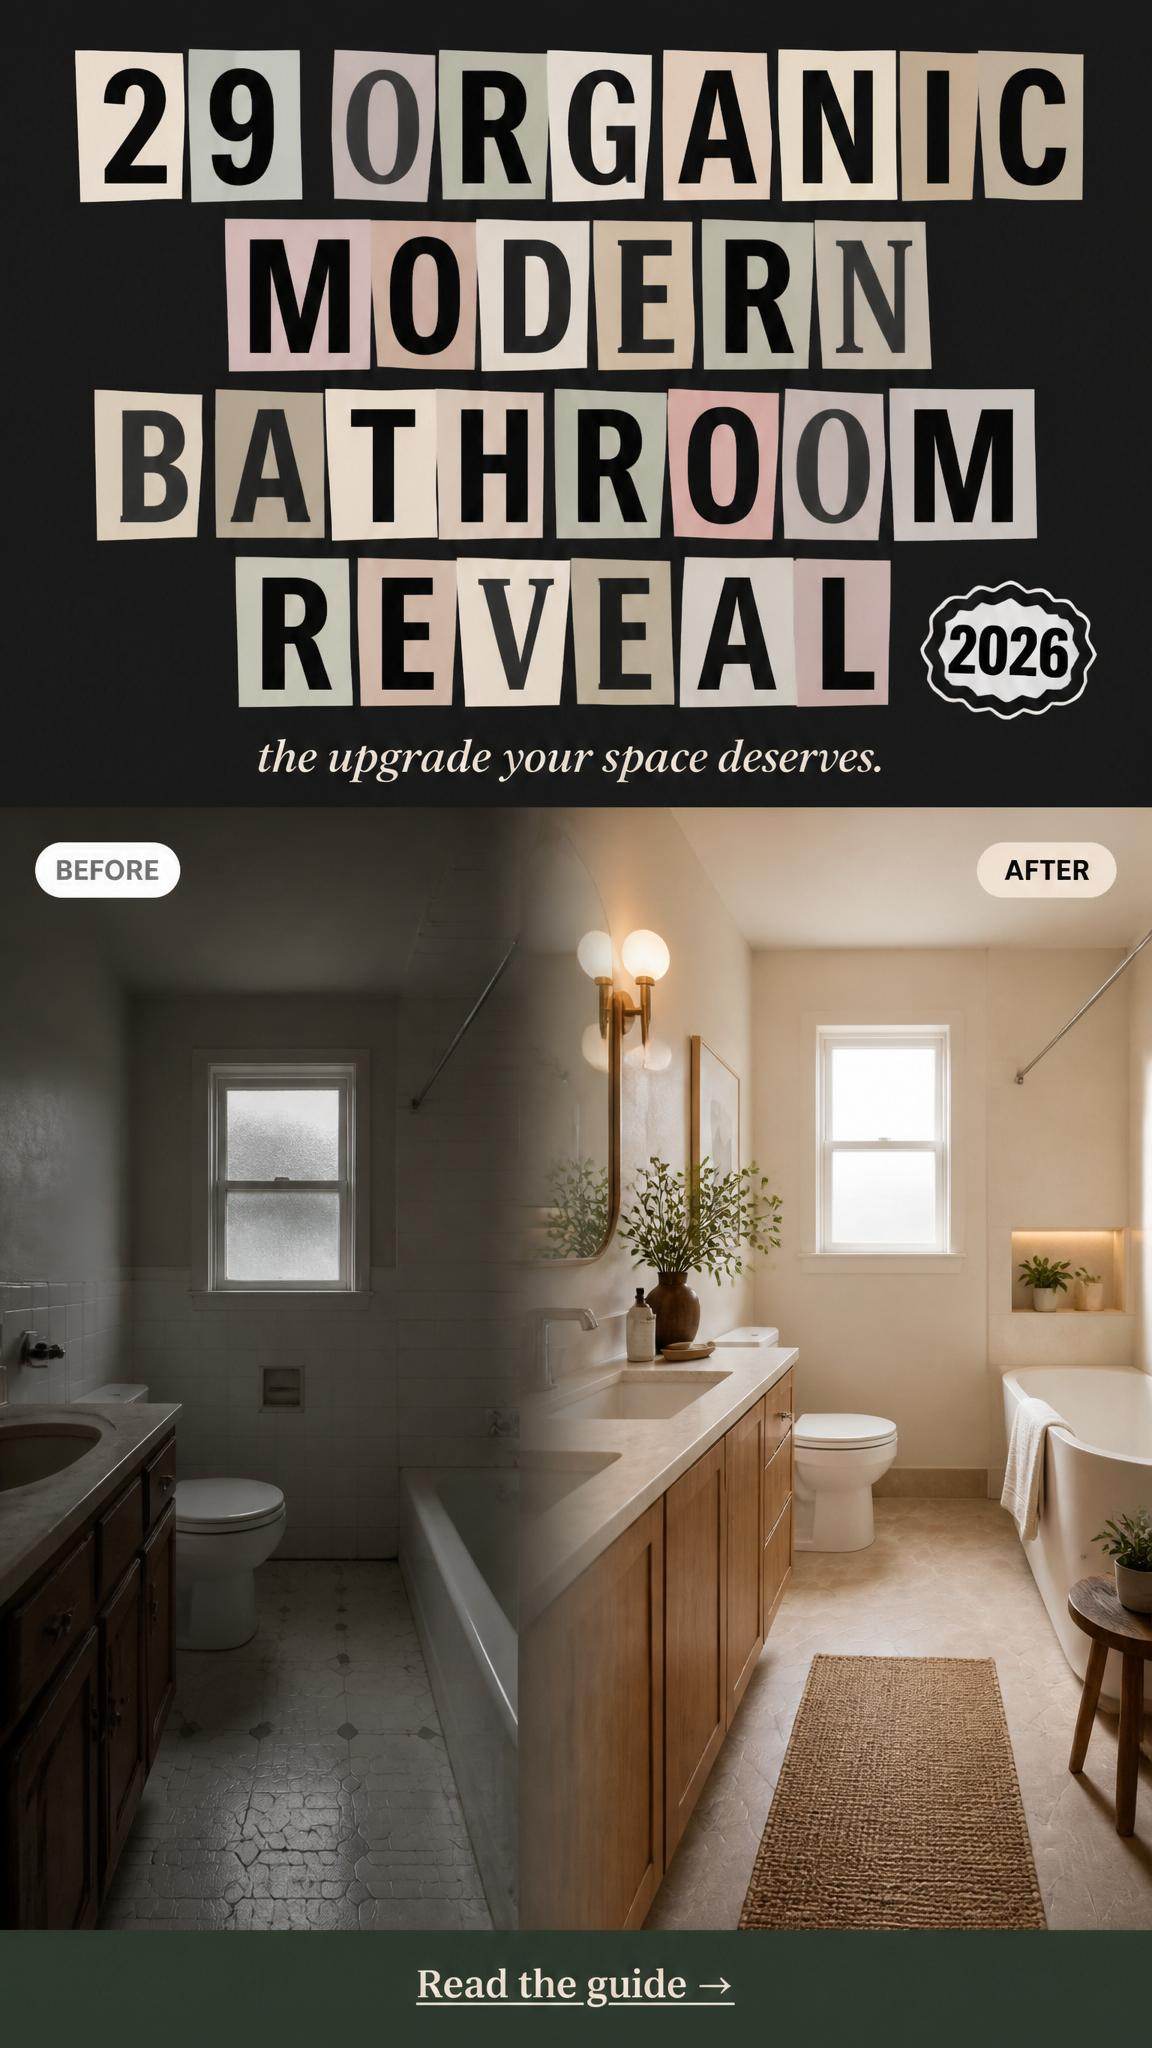
You know that feeling when you finally find the bathroom that looks exactly right for your home? That perfect pin that makes you stop scrolling and start planning. For 2026, bathroom design is all about personal sanctuaries, mixing materials, and creating a space that feels both clean and deeply comforting. Forget the generic, cookie-cutter looks of the past. We’ve gone through hundreds of real homes and designer portfolios to find what’s truly inspiring right now.
We’re showing you 30 distinct, real-world examples that prove you can have a stunning bathroom, no matter your style or budget. From modern farmhouse to luxe marble and even playful pop, there’s something here for you. And stay until the end — we break down the most common mistakes that can ruin these looks.
📌 Save this to Pinterest for later — you’ll want to revisit these ideas.
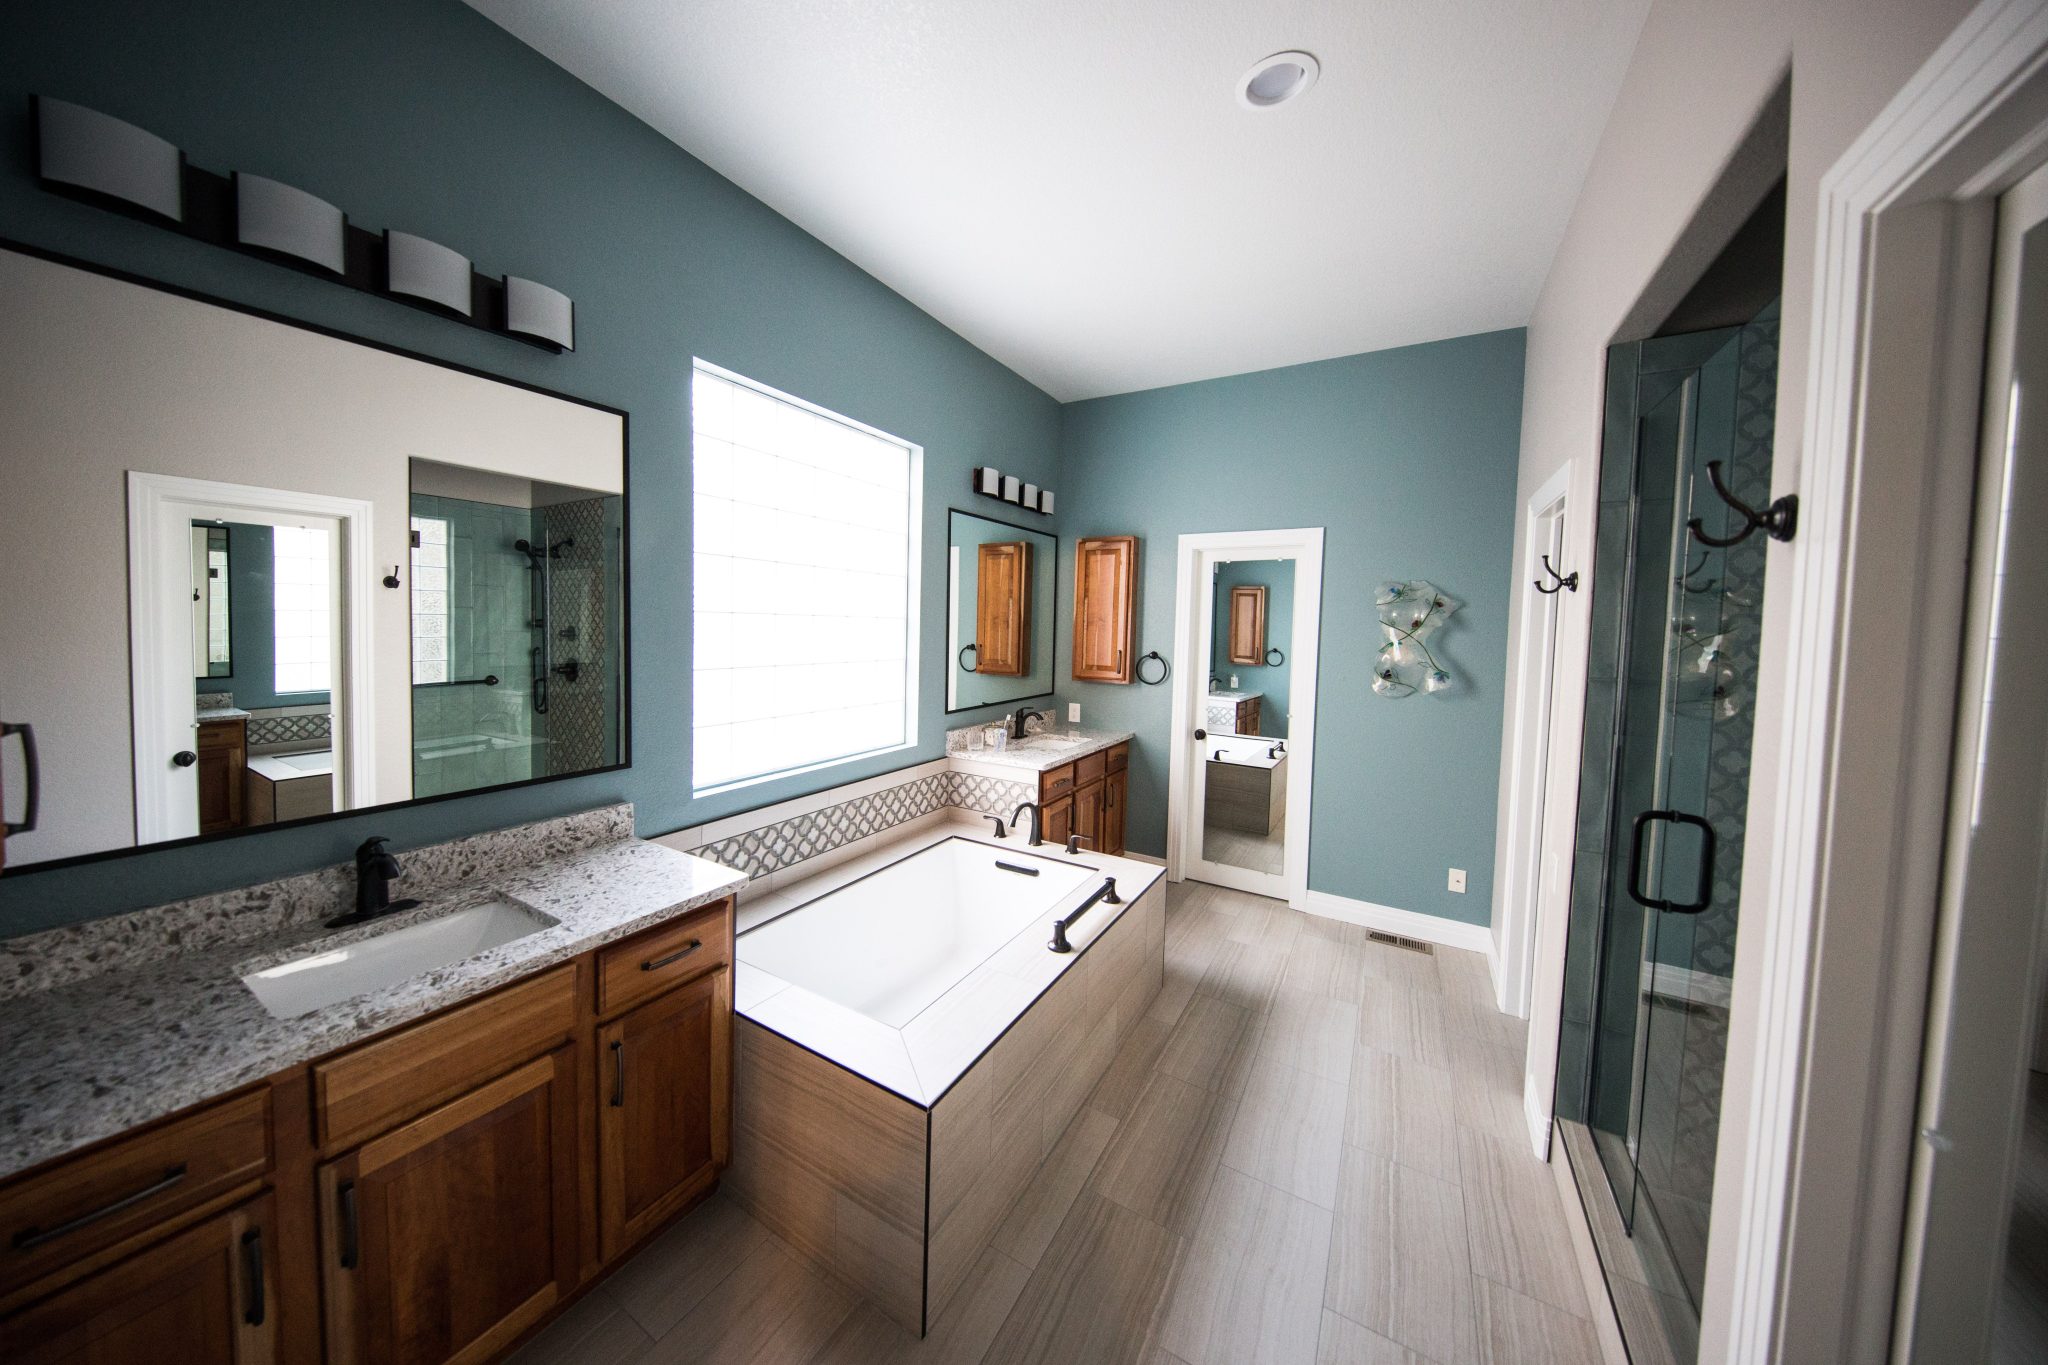
1. Modern Bathroom with Teal Walls and a Freestanding Tub
The success of this design lies in its clever use of contrast and balance. The bold teal on the upper walls provides a serene, ocean-like feeling, but it could easily feel overwhelming. By grounding the room with a wide band of light grey paint below, the design feels balanced and airy, not top-heavy. The warmth of the light wood vanities prevents the cool tones of teal and grey from feeling sterile, adding a necessary organic touch that makes the space feel inviting and modern.
|
📋 Copy HEX 🔗 Share |
📐 Style Math
When using a strong color like this teal, lighting is everything. To prevent the color from looking muddy or dark, aim for a layered lighting plan. You need at least three sources: ambient (like the ceiling fixtures), task (sconces or lights above the vanity), and natural (the large window). For paint, buy a sample pot first and paint a large poster board. Move it around the room at different times of day to see how the color truly looks in your specific lighting conditions before committing to the whole wall.
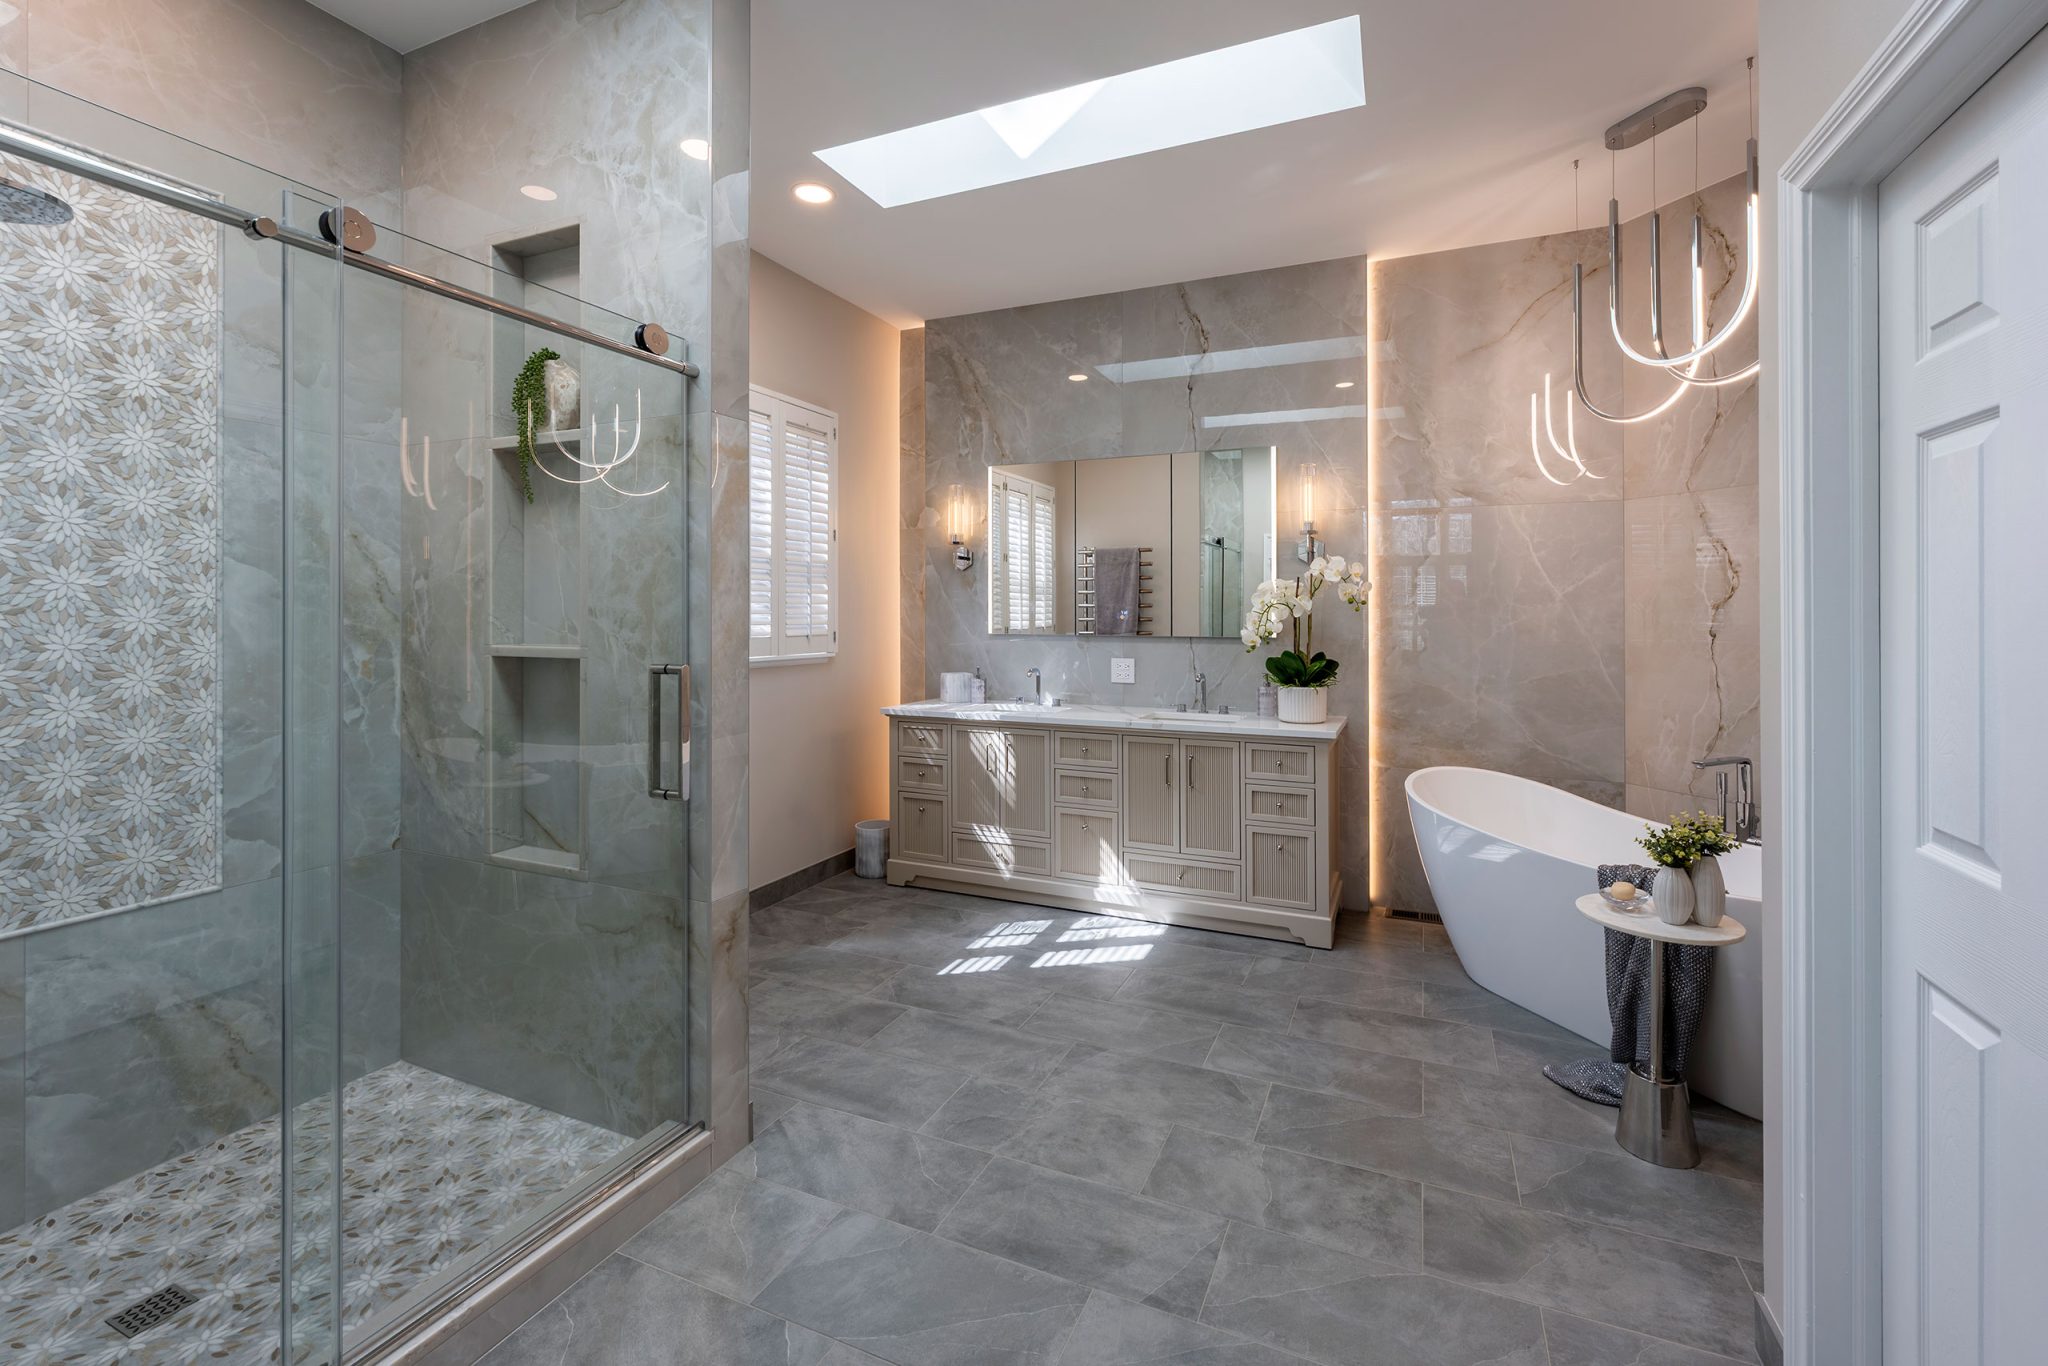
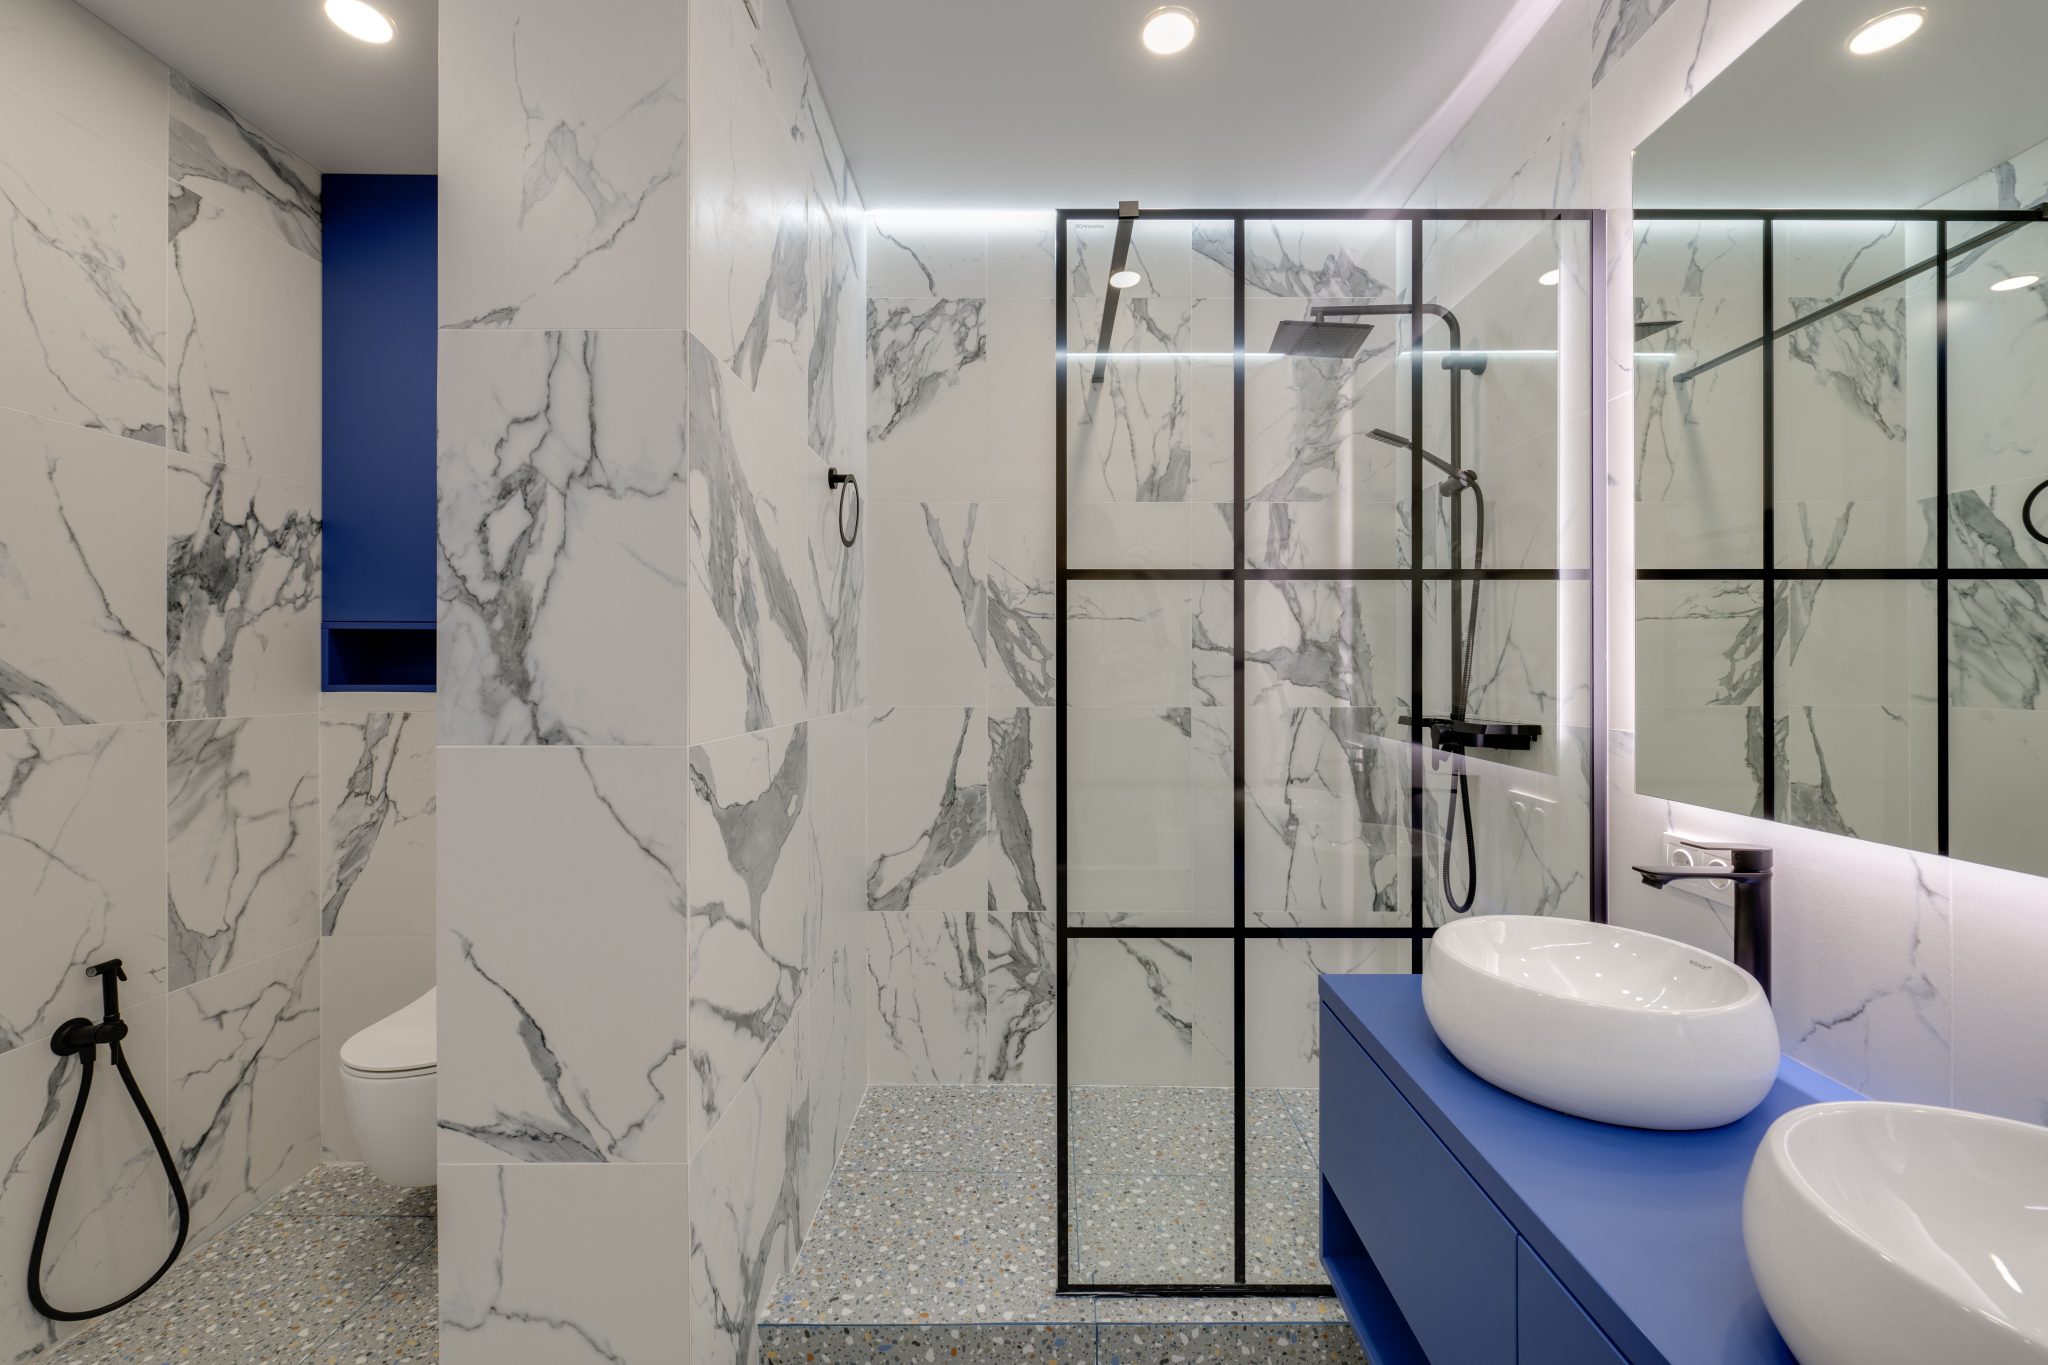
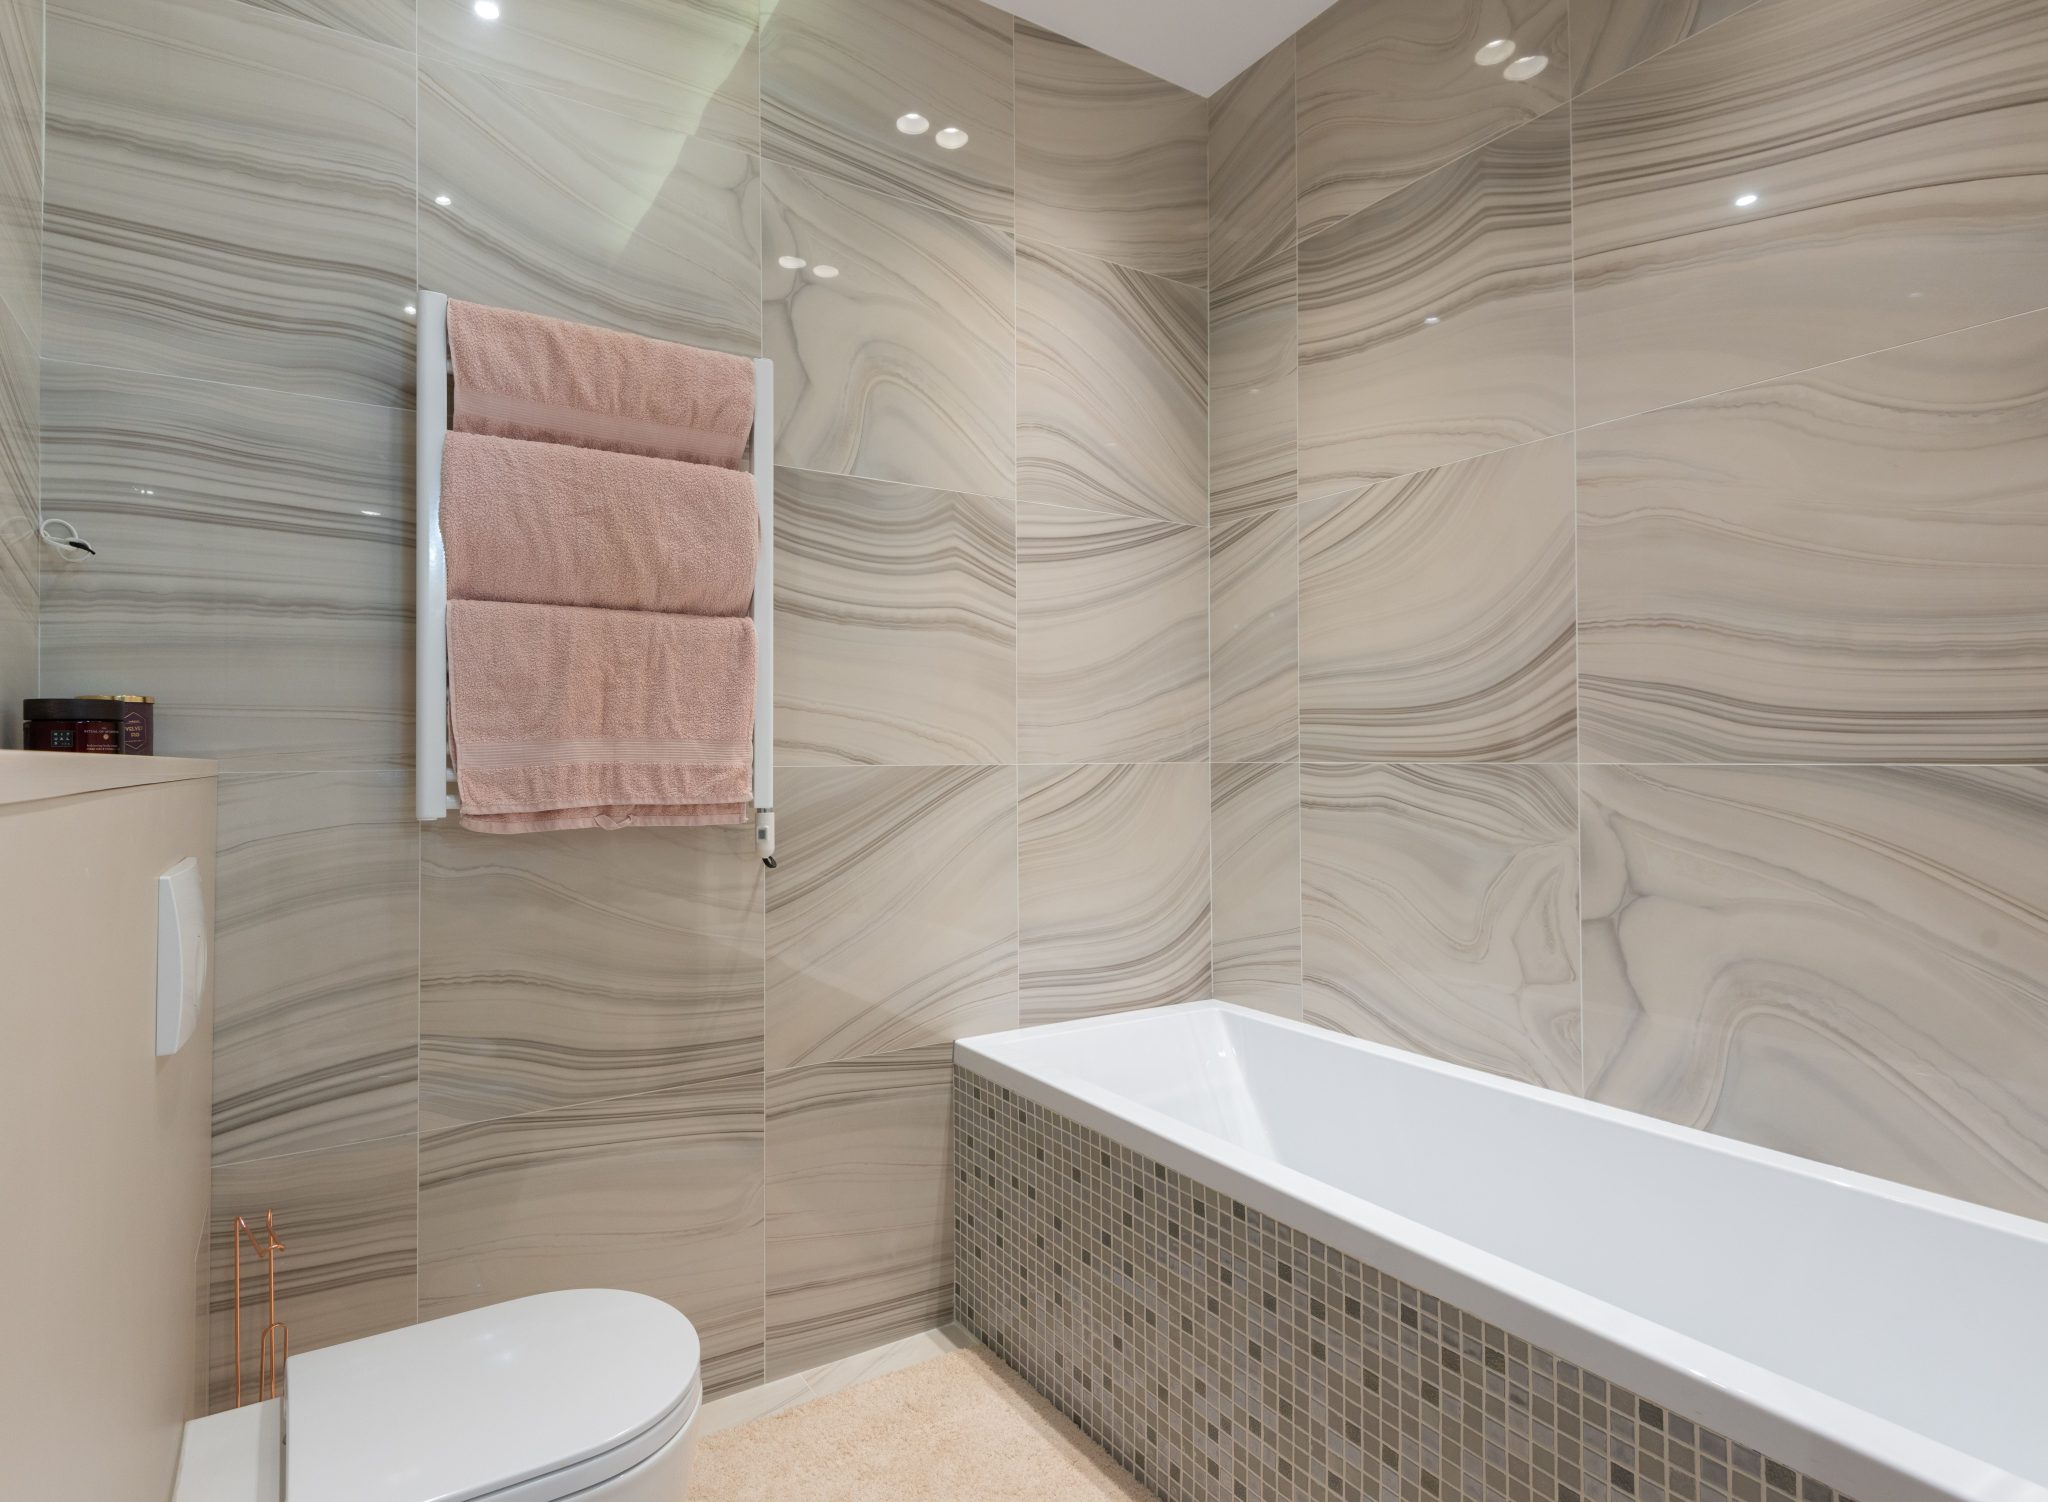
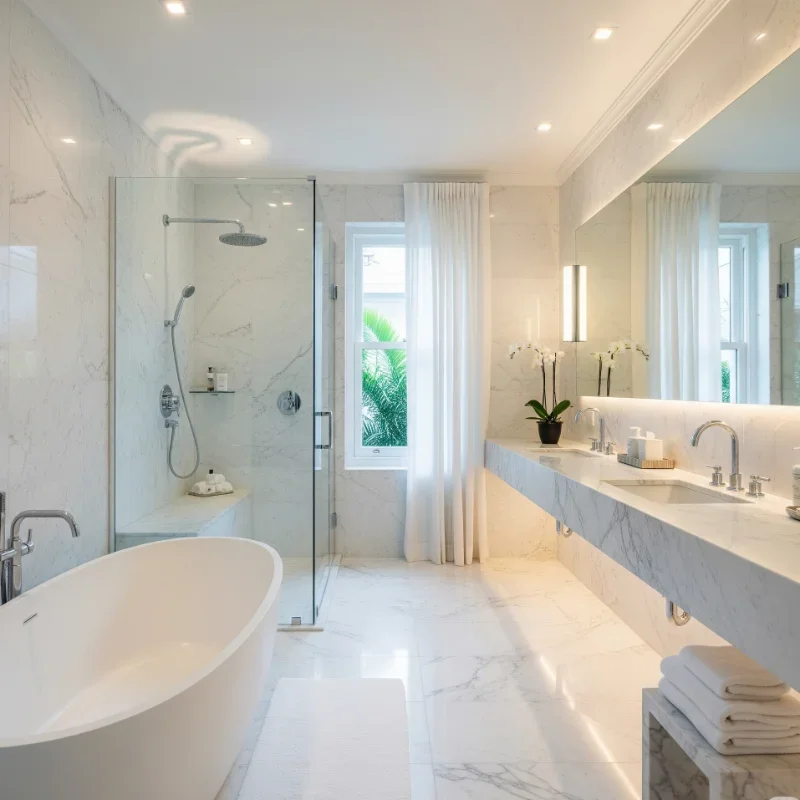
2. Spa-like Ambiance with Integrated Lighting and Mixed Marble
The single element tying this luxurious bathroom together is the integrated lighting. While the marble, soaking tub, and spacious layout are all beautiful, it’s the combination of recessed ceiling lights, a hidden linear strip light, and the large skylight that creates the serene, spa-like glow. This approach makes the materials look their best and eliminates harsh shadows, turning a functional room into a true retreat. Without the thoughtful lighting design, the space would feel much less special and far more ordinary.
|
📋 Copy HEX 🔗 Share |
💡 Designer Tip
This look requires a generous footprint. To accommodate a freestanding tub, a separate walk-in shower, and a double vanity without feeling cramped, you’ll want a room that is at least 120 square feet (e.g., 10×12 feet). The ceiling height should also be standard (8 feet) or higher to allow for the recessed lighting and skylight to feel airy, not oppressive. For smaller spaces, consider the more compact layout in Idea #6, which uses a similar color palette more efficiently.
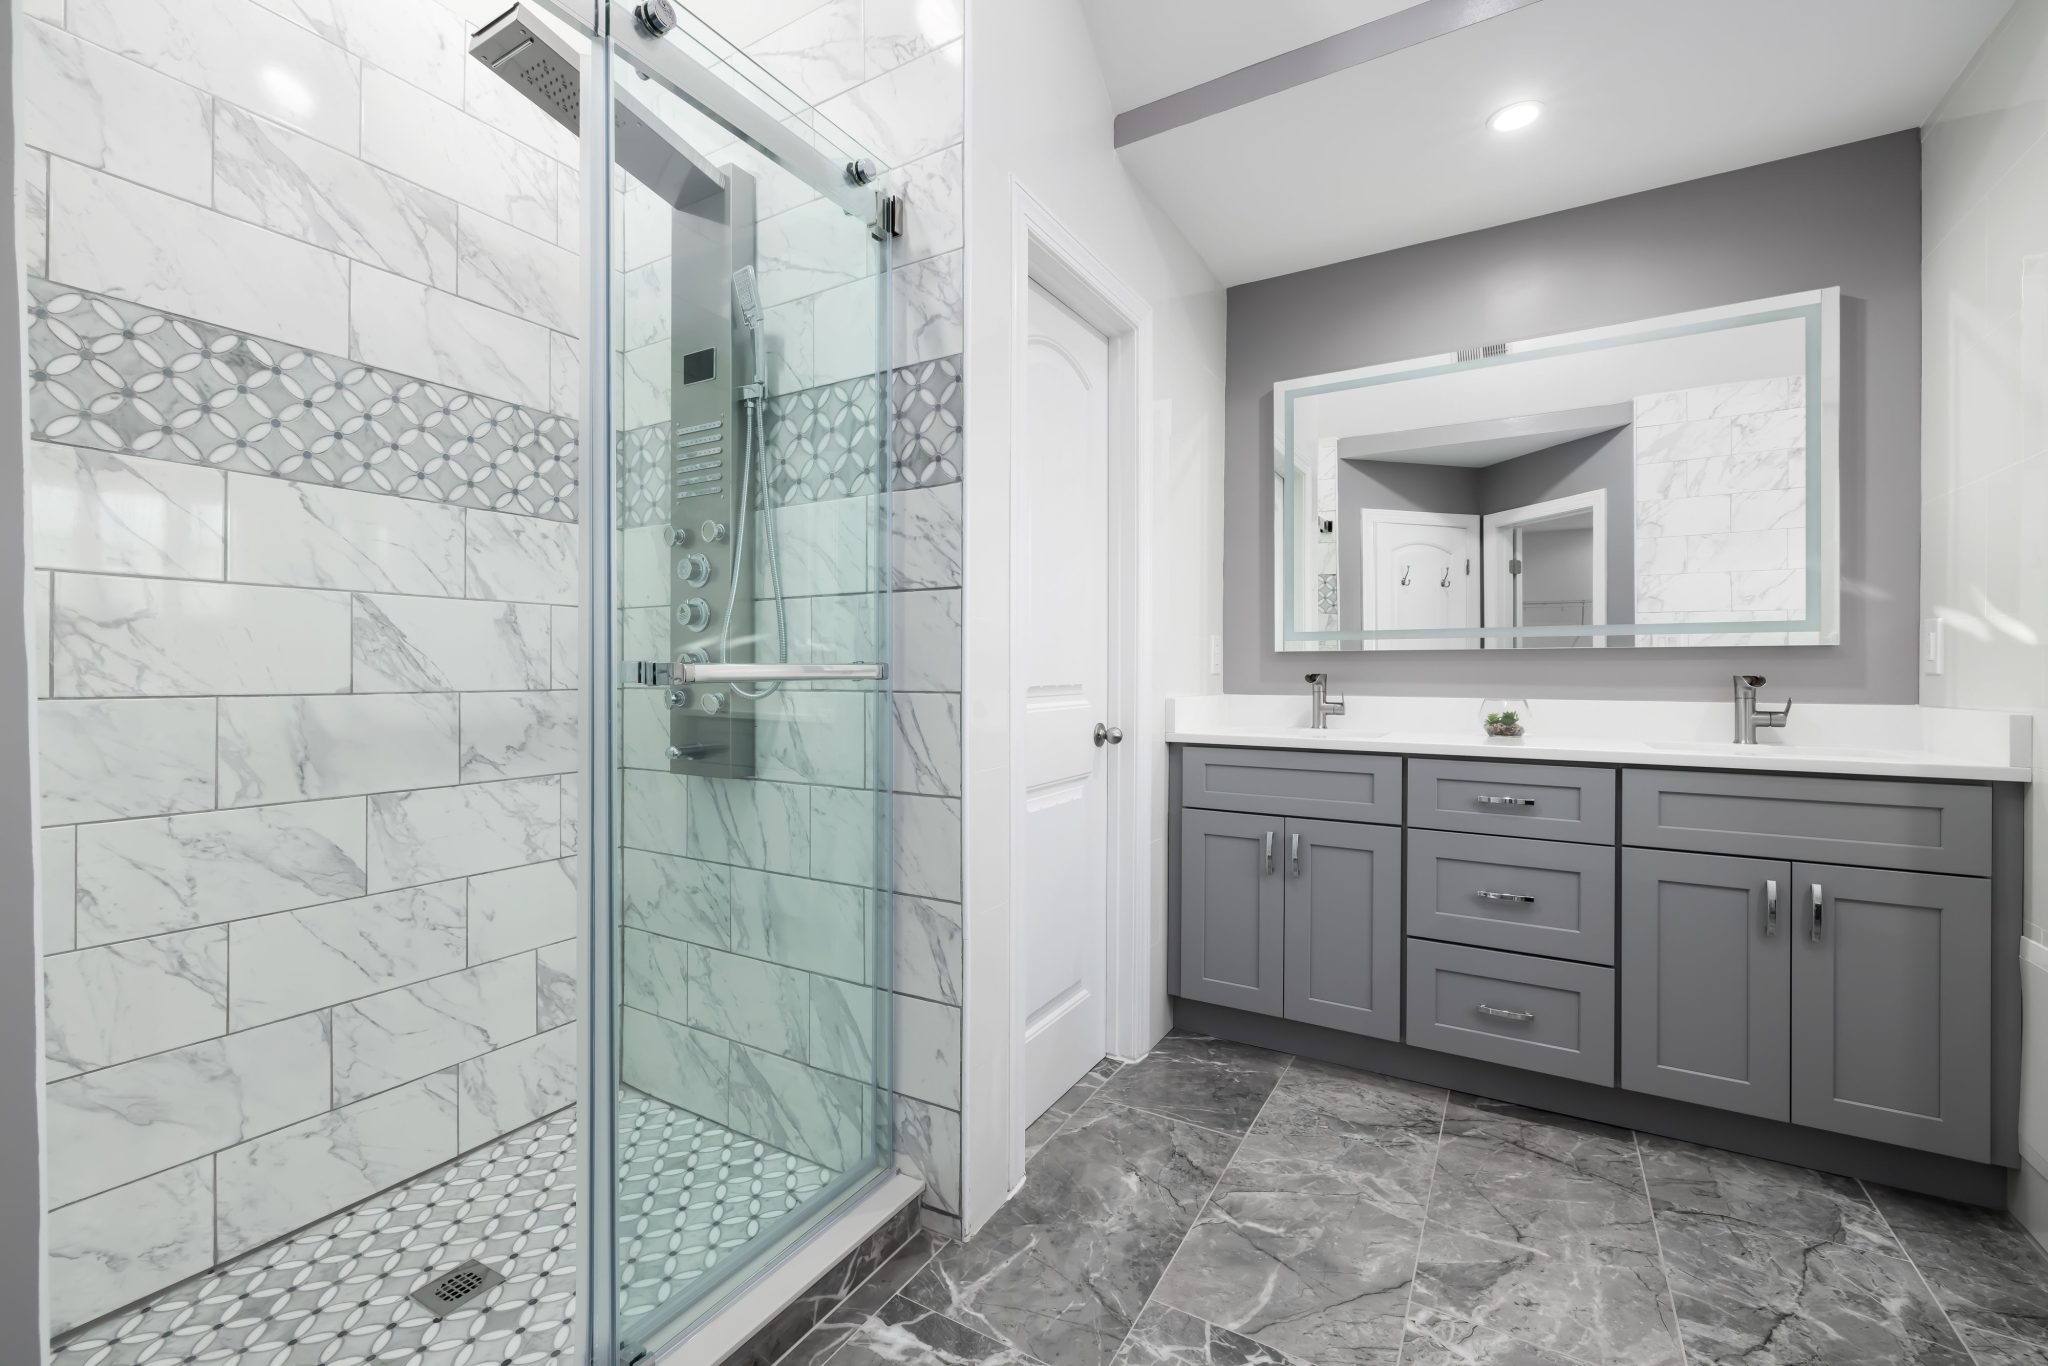
3. Classic Gray Shaker Cabinets in a Marble Setting
This look follows a simple but effective visual formula: 50% light surfaces, 40% mid-tone gray, and 10% pattern and shine. The white marble-patterned subway tiles and countertops provide a bright, clean base. The gray shaker cabinets and floor tiles add depth and a timeless quality. Finally, the geometric mosaic accent and polished chrome fixtures are the 10% that brings in personality and a touch of sparkle. You can swap the grays for navy or deep green and the chrome for brass, and the formula would still work perfectly.
|
📋 Copy HEX 🔗 Share |
💰 Budget Breakdown
You don’t need a five-figure budget to get this classic vibe. Start with a gray shaker vanity from a big-box store like Home Depot or Lowe’s, which can be found for $500-$900. Instead of marble tiles, opt for marble-look porcelain, which will cut your tile cost by 50-70%. Find a stylish geometric mosaic for the accent band on Wayfair or Overstock, where you only need a few square feet. With some savvy shopping, you can achieve this entire look for under $3,500.
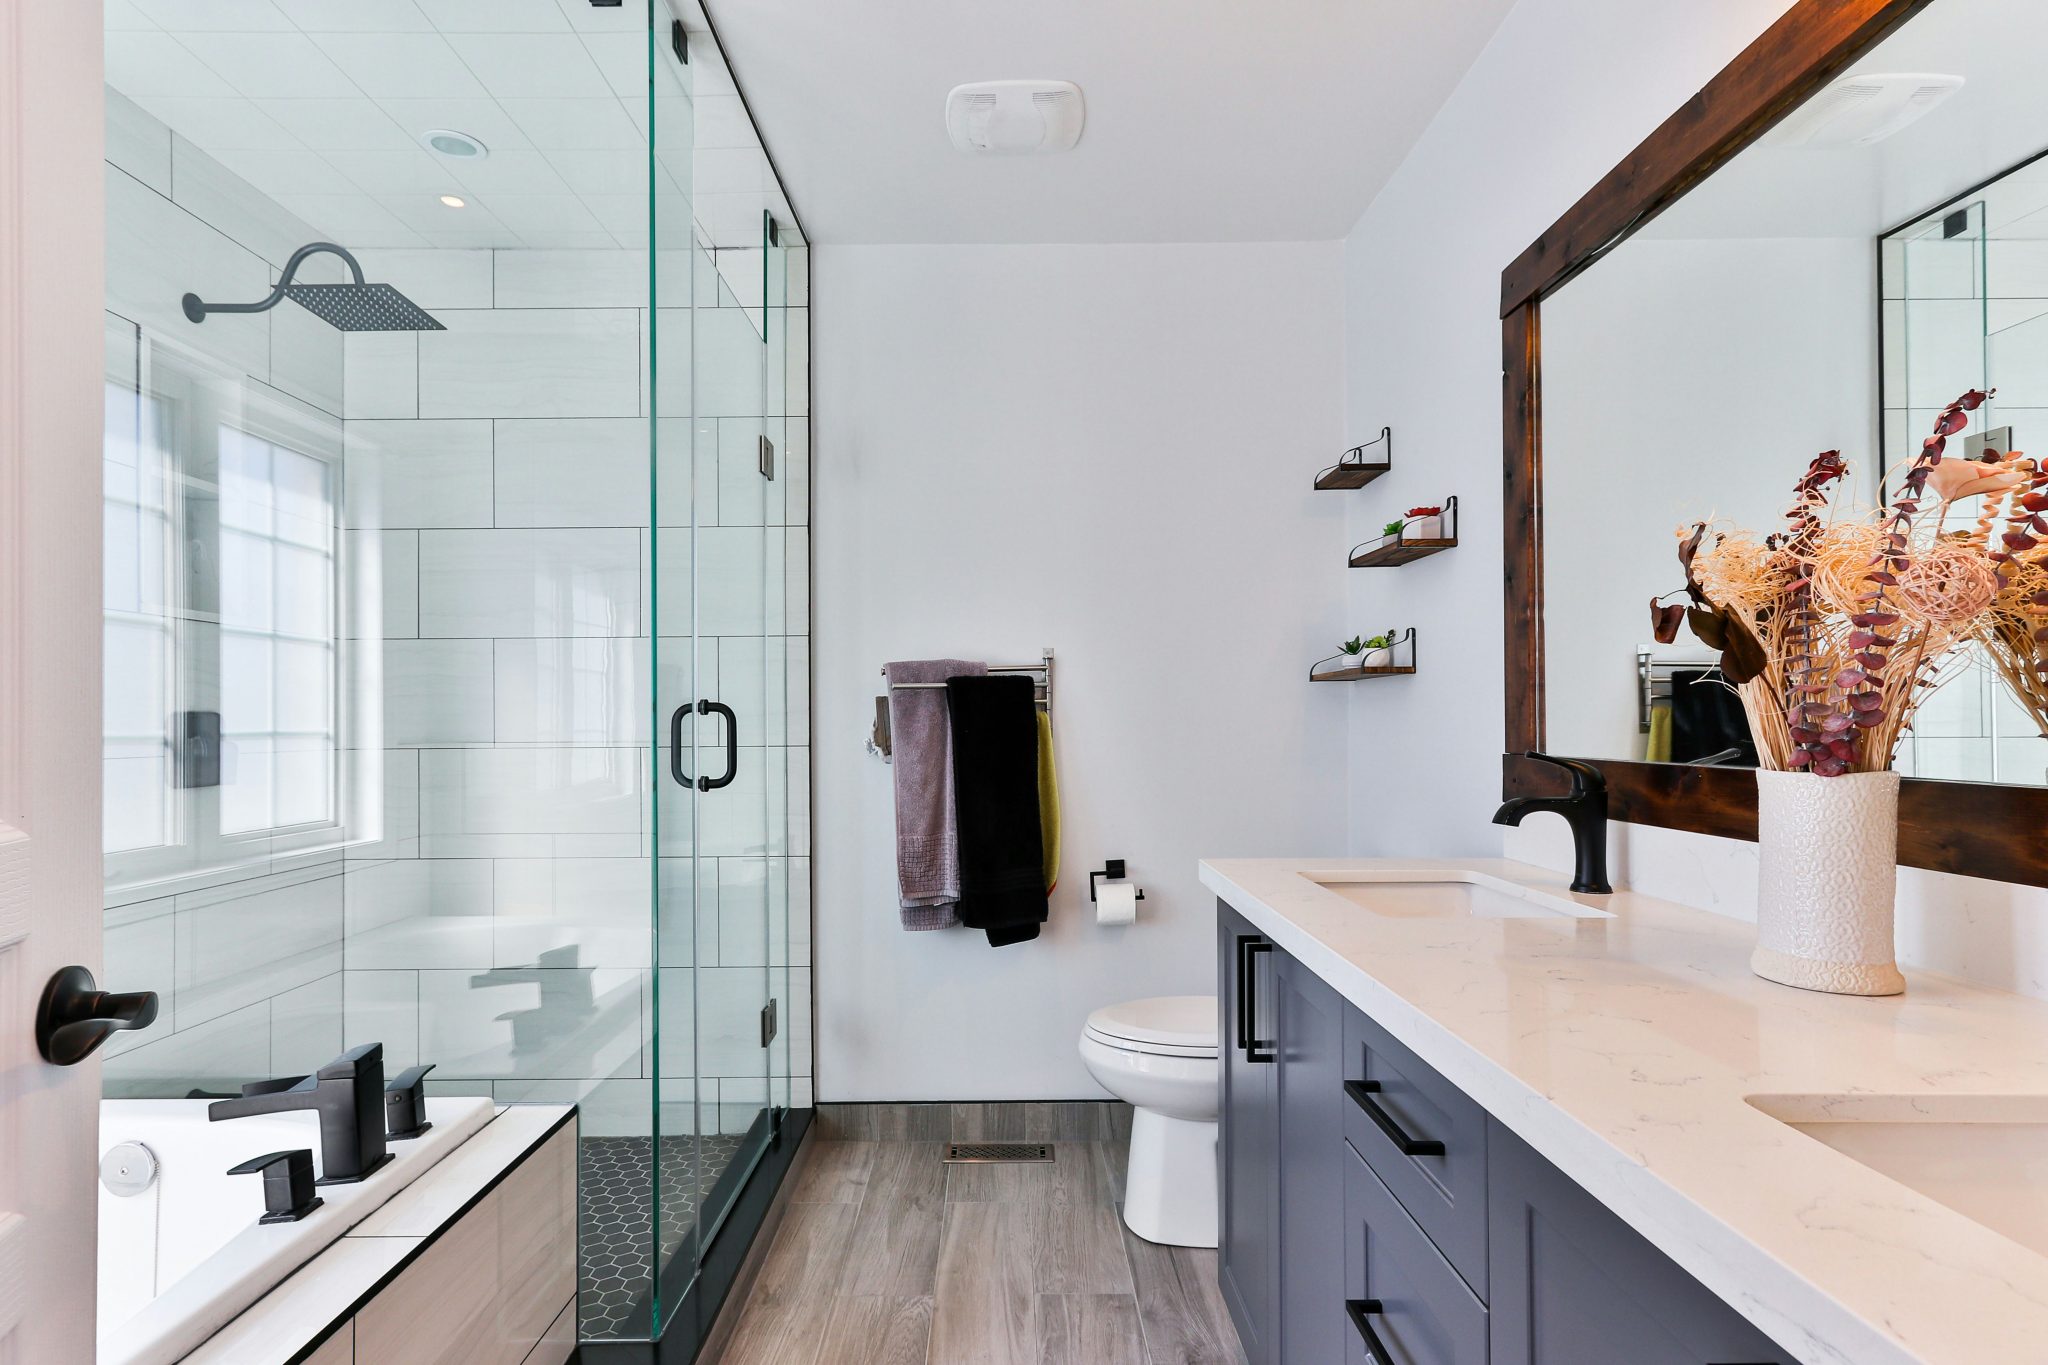
4. Modern Farmhouse Bathroom with a Dark Wood Mirror
This design nails the Modern Farmhouse aesthetic by balancing rustic warmth with clean, modern lines. The key is the high contrast. The dark-stained wood of the mirror frame provides a powerful, organic focal point against the crisp white shower tiles and light gray floor. This contrast is echoed in the matte black faucets and hardware set against the white countertop. The result is a space that feels both earthy and sophisticated, avoiding the overly distressed look of older farmhouse styles.
|
📋 Copy HEX 🔗 Share |
🎯 What Makes It Work
Matte black fixtures are undeniably chic, but they can be higher maintenance than chrome or nickel. They are prone to showing water spots and fingerprints, especially in a frequently used bathroom. To keep them looking sharp, you’ll need to wipe them down daily with a soft microfiber cloth. Avoid abrasive cleaners, which can scratch or strip the finish. For a lower-maintenance alternative with a similar vibe, consider fixtures in a brushed gunmetal or dark bronze finish.
5. Sleek Gray Marble-Look Tile with a Frameless Glass Enclosure
Let’s be honest about glass shower enclosures: they look stunning when they’re perfectly clean, but they can be a real chore to maintain. Soap scum and hard water spots are the enemy. If you’re not prepared to squeegee the glass after every single shower, this might not be the look for you. The larger the glass panels, the more cleaning is required. While it creates a wonderfully open and airy feeling, it’s a commitment. If you have kids or just hate cleaning, a shower curtain is a much more forgiving option.
|
📋 Copy HEX 🔗 Share |
📏 Scale Guide
When specifying a frameless glass shower enclosure, don’t skimp on the glass thickness. For a quality feel and long-term durability, you should opt for at least 3/8-inch (10mm) thick tempered glass. While 1/2-inch (12mm) is even more substantial, 3/8-inch is the industry standard for a sturdy, high-end installation that won’t feel flimsy or rattle when you open and close the door. Also, investing in a factory-applied water-repellent coating (like EnduroShield) will make cleaning significantly easier. Compare this sleek look to the more opulent marble in Idea #19.
6. Maximizing a Small Space with Smart Gray Tiling
This approach is specifically designed for small bathrooms, typically those under 40 square feet. In a compact space, every choice matters. Using a consistent, light-to-mid-tone gray on the larger surfaces helps unify the room and makes it feel less cluttered. A floating vanity or a pedestal sink, while offering less storage, opens up the floor space and creates an illusion of a larger room. The key is to keep the palette simple and the fixtures well-proportioned to the space.
|
📋 Copy HEX 🔗 Share |
🧹 Maintenance Reality
You can make a small bathroom feel larger by running your floor tile into the shower. This little trick erases the visual barrier of a shower curb, creating one continuous surface that tricks the eye into seeing a bigger footprint.
- Time: 1-2 Days | Cost: $200-$500 (tile dependent)
- Choose the same tile for both the main bathroom floor and the shower floor. A tile with a bit of texture is great for slip resistance.
- Plan for a trench or linear drain at the back of the shower.
- Ensure your contractor properly slopes the entire floor towards the drain to prevent pooling.
- Use a waterproofing membrane (like Schluter-KERDI) across the entire subfloor before tiling.
7. Minimalist Warmth with a Floating Wood Vanity and Black Fixtures
Take away the floating wood vanity, and this is just a nice, neutral bathroom. But with it, the space gains a warm, architectural soul. The vanity’s clean lines and warm wood tone provide a beautiful organic contrast to the cool, marble-effect tiles. By elevating it off the floor, the design not only creates a sense of spaciousness but also turns a utilitarian object into a sculptural element. It’s the piece that brings the entire minimalist concept to life.

|
📋 Copy HEX 🔗 Share |
⚠️ Real Talk
This room’s composition is a study in balanced minimalism: 70% Neutral Base + 20% Organic Texture + 10% Graphic Accent. The light beige marble-effect tiles on the walls and floor create a calm, expansive canvas. The warm wood of the floating vanity introduces natural texture and prevents the room from feeling cold. Finally, the matte black sinks, faucets, and mirror frame provide a sharp, graphic punch that defines the space and keeps it from being bland. It’s a formula that feels both modern and timeless.
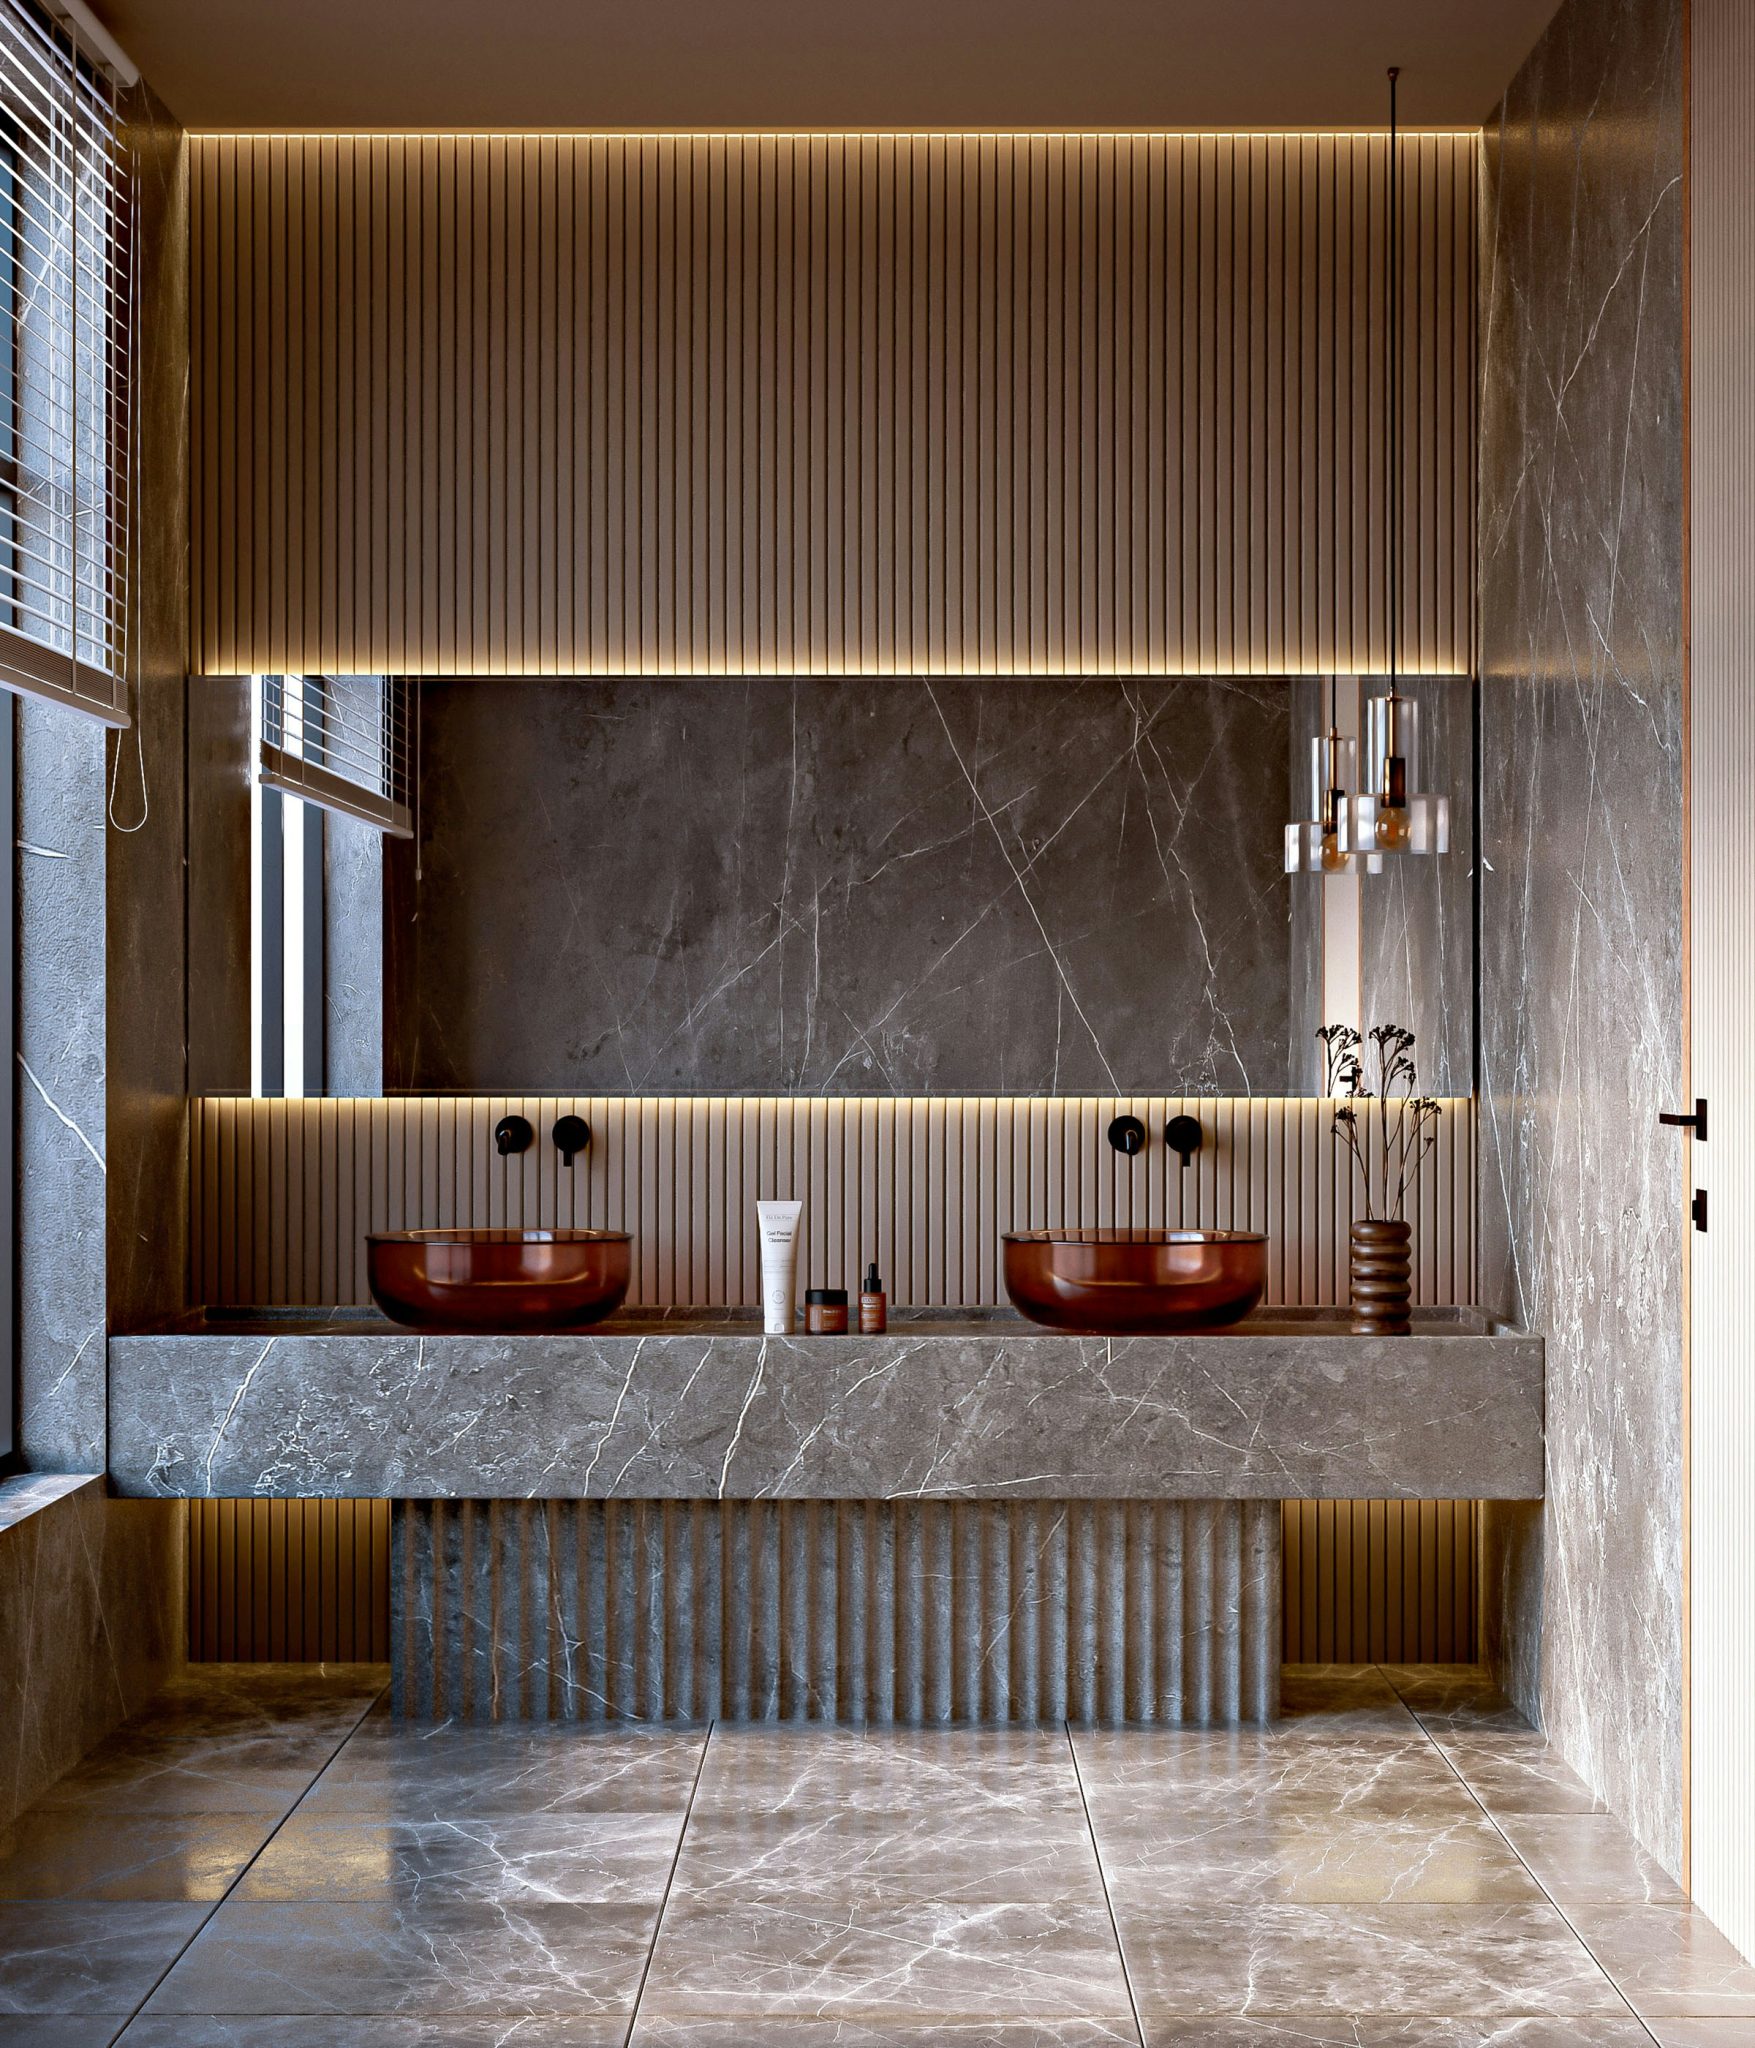
8. Luxurious Fluted Wood Panels and Amber Glass Sinks
Fluted details, whether in wood, glass, or stone, are having a major moment in design, and this bathroom shows exactly why. This trend is a direct reaction to years of flat, minimalist surfaces. Fluting adds instant texture, shadow play, and a sense of architectural depth that feels both classic and completely fresh for 2026. It’s a sophisticated way to add character without adding clutter or color. Paired with the rich tones of marble and amber glass, the look is pure, moody luxury.
|
📋 Copy HEX 🔗 Share |
🔧 How-To Brief
This high-end look is an investment in materials and craftsmanship. Recreating it requires a significant budget, especially for the custom millwork and large-format marble.
- Main Furniture (Custom Vanity/Paneling): $7,000 – $15,000
- Lighting (Pendant, Integrated Strips): $1,500 – $4,000
- Textiles (Towels): $200 – $500
- Decor/Accessories (Sinks, Faucets): $2,000 – $5,000
- Wall/Floor Treatment (Marble Slabs/Tiles): $10,000 – $25,000+
- TOTAL: $20,700 – $49,500
- Budget alternative: Use fluted wall panels from a supplier like Stikwood, choose a marble-look porcelain tile, and find amber glass sinks on Etsy for a similar vibe at around 40% of the cost.
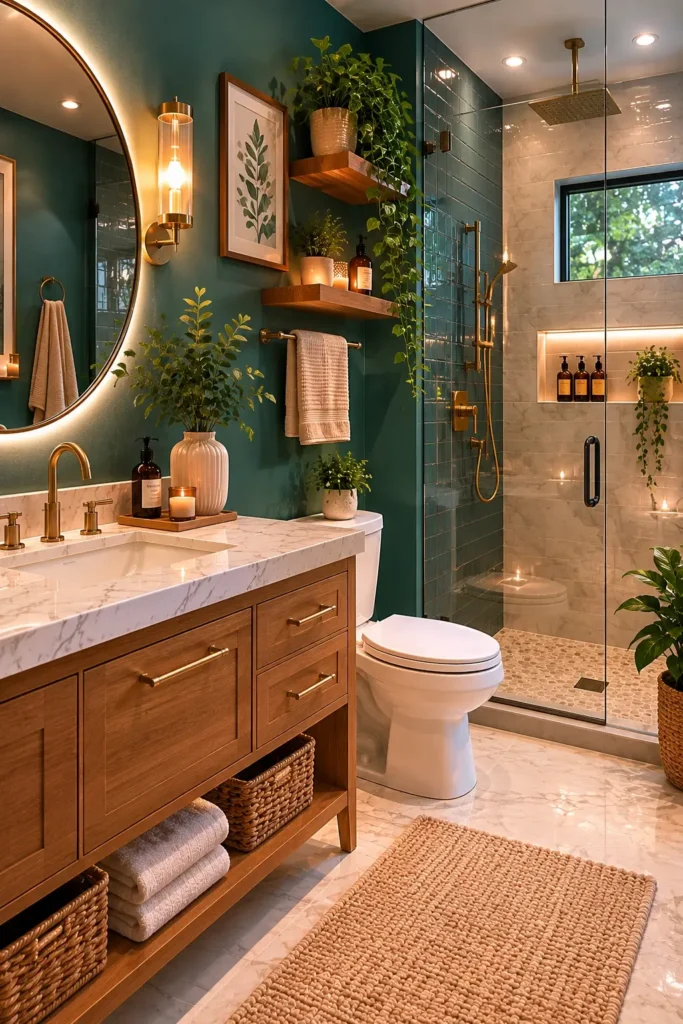
9. A Lush, Plant-Filled Bathroom with Bold Teal Walls
This bathroom is a perfect example of biophilic design, which is all about connecting our homes with nature. It works because it doesn’t just add one sad plant in the corner. It fully commits. The deep teal walls act as a rich, water-like backdrop, making the vibrant greens of the plants pop. The natural wood of the vanity and the white marble countertop mimic materials found in nature, creating a cohesive and immersive environment. The gold fixtures add a touch of sunrise, completing the picture of a lush, private oasis.
|
📋 Copy HEX 🔗 Share |
💸 Get This Look For Less
Before you turn your bathroom into a jungle, be honest about your light situation. Most of the popular houseplants you see on Pinterest need bright, indirect light to thrive. If your bathroom is windowless or only has a small north-facing window, plants like pothos, snake plants, and ZZ plants are your best friends—they are famously tolerant of low light. For the lush, vining look seen here, you almost certainly need a good-sized window that gets several hours of indirect sun daily.
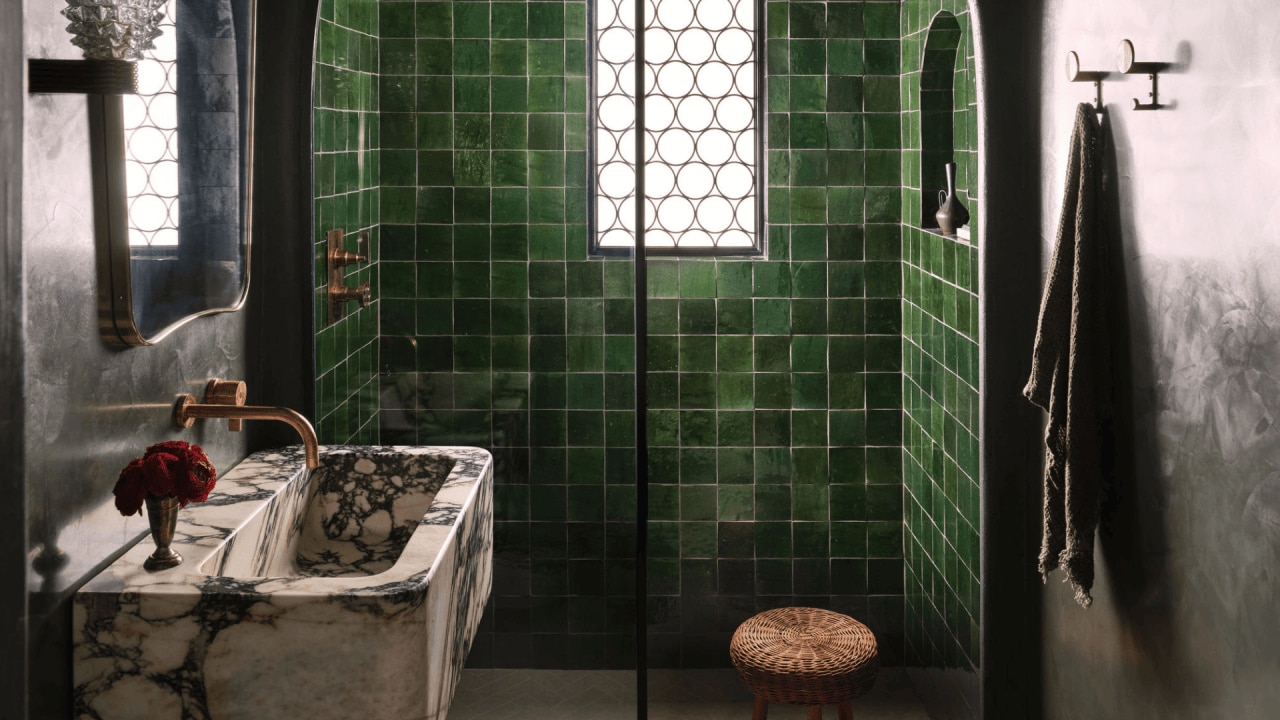
10. Moody Drama with Deep Green Tiles and a Marble Trough Sink
To achieve this rich, organic look, seek out Zellige tiles. These are traditional, handmade glazed terracotta tiles from Morocco. Their beauty lies in their imperfection—each tile has slight variations in color, texture, and size. This is what gives the wall its incredible depth and character. When ordering, be sure to get at least 15-20% overage, as a good installer will need to hand-select and blend tiles from different boxes to achieve a balanced, cohesive installation. Don’t expect perfect, uniform grout lines; the variation is the entire point.
|
📋 Copy HEX 🔗 Share |
⭐ The One Thing
Dark, textured plaster walls create an incredible mood, but they require a different kind of care than simple painted drywall. This type of finish can be prone to scuffs and scratches. More importantly, in a humid environment like a bathroom, it must be properly sealed with a matte, water-resistant topcoat to prevent moisture damage and staining. Cleaning should be done with a soft cloth and gentle, pH-neutral cleaners, as harsh chemicals can discolor the plaster. For a similar look with less worry, consider a high-quality lime-wash paint. Compare the moody feel here with the bright and airy Idea #12.
11. A Pop of Blue with a Floating Vanity and Terrazzo Floors
This bathroom proves you can be both bold and serene. The formula here is 60% Classic, 30% Bold, and 10% Graphic. The large-format white marble-look tiles are a timeless choice, providing a clean and luxurious backdrop. The vibrant blue floating vanity is the confident, bold statement piece that injects personality. Finally, the black-framed glass and terrazzo floor act as graphic elements, adding pattern and a modern edge without competing with the main color. The integrated mirror lighting ties it all together, making the whole space glow.
|
📋 Copy HEX 🔗 Share |
🔥 Trending Context
A floating vanity looks wonderfully light and airy, but it requires proper planning. Before you fall in love with the look, make sure you can tick these boxes:
- Is the wall where you plan to install it strong enough? It needs solid blocking inside the wall, secured to studs, to support the weight of the vanity, countertop, sinks, and anything you put in it. Drywall alone will not work.
- Have you planned your plumbing? The water supply and drain lines need to come from the wall, not the floor. This may require moving existing plumbing.
- How high will you mount it? The standard height for the top of the counter is 34-36 inches from the floor.
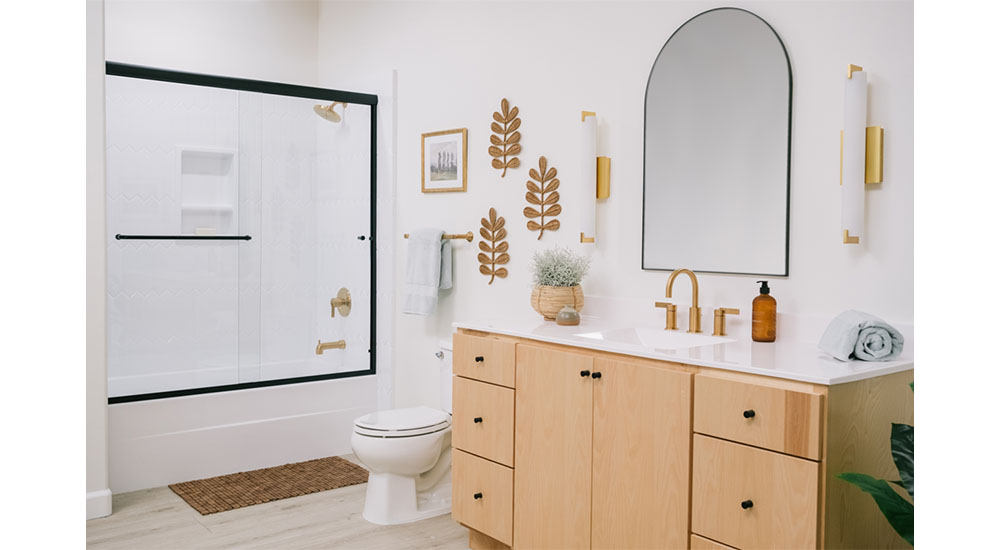
12. Bright and Breezy with a Light Wood Vanity and Brass Accents
This cheerful, modern look feels high-end but is surprisingly achievable on a budget. The light wood vanity could be an IKEA Godmorgon with a custom top, or a lucky find on Facebook Marketplace. The star of the show, the arched black-framed mirror, is a style now widely available at places like Target and Wayfair for under $150. For fixtures, brands like Signature Hardware offer beautiful brass options that don’t break the bank. The key is the mix: an affordable mirror, simple tile, and one or two splurges like the faucet and lighting.
|
📋 Copy HEX 🔗 Share |
✅ Before You Start
The single element that truly defines this space is the arched mirror. It’s a simple swap for a standard rectangular mirror, but its impact is huge. The gentle curve softens the clean, straight lines of the vanity and shower enclosure, adding a touch of elegance and a subtle art deco feel. It draws the eye upward, making the ceiling feel higher, and its black frame provides a crucial graphic anchor in an otherwise light and neutral room. Replace it with a basic mirror, and the design loses its unique personality.
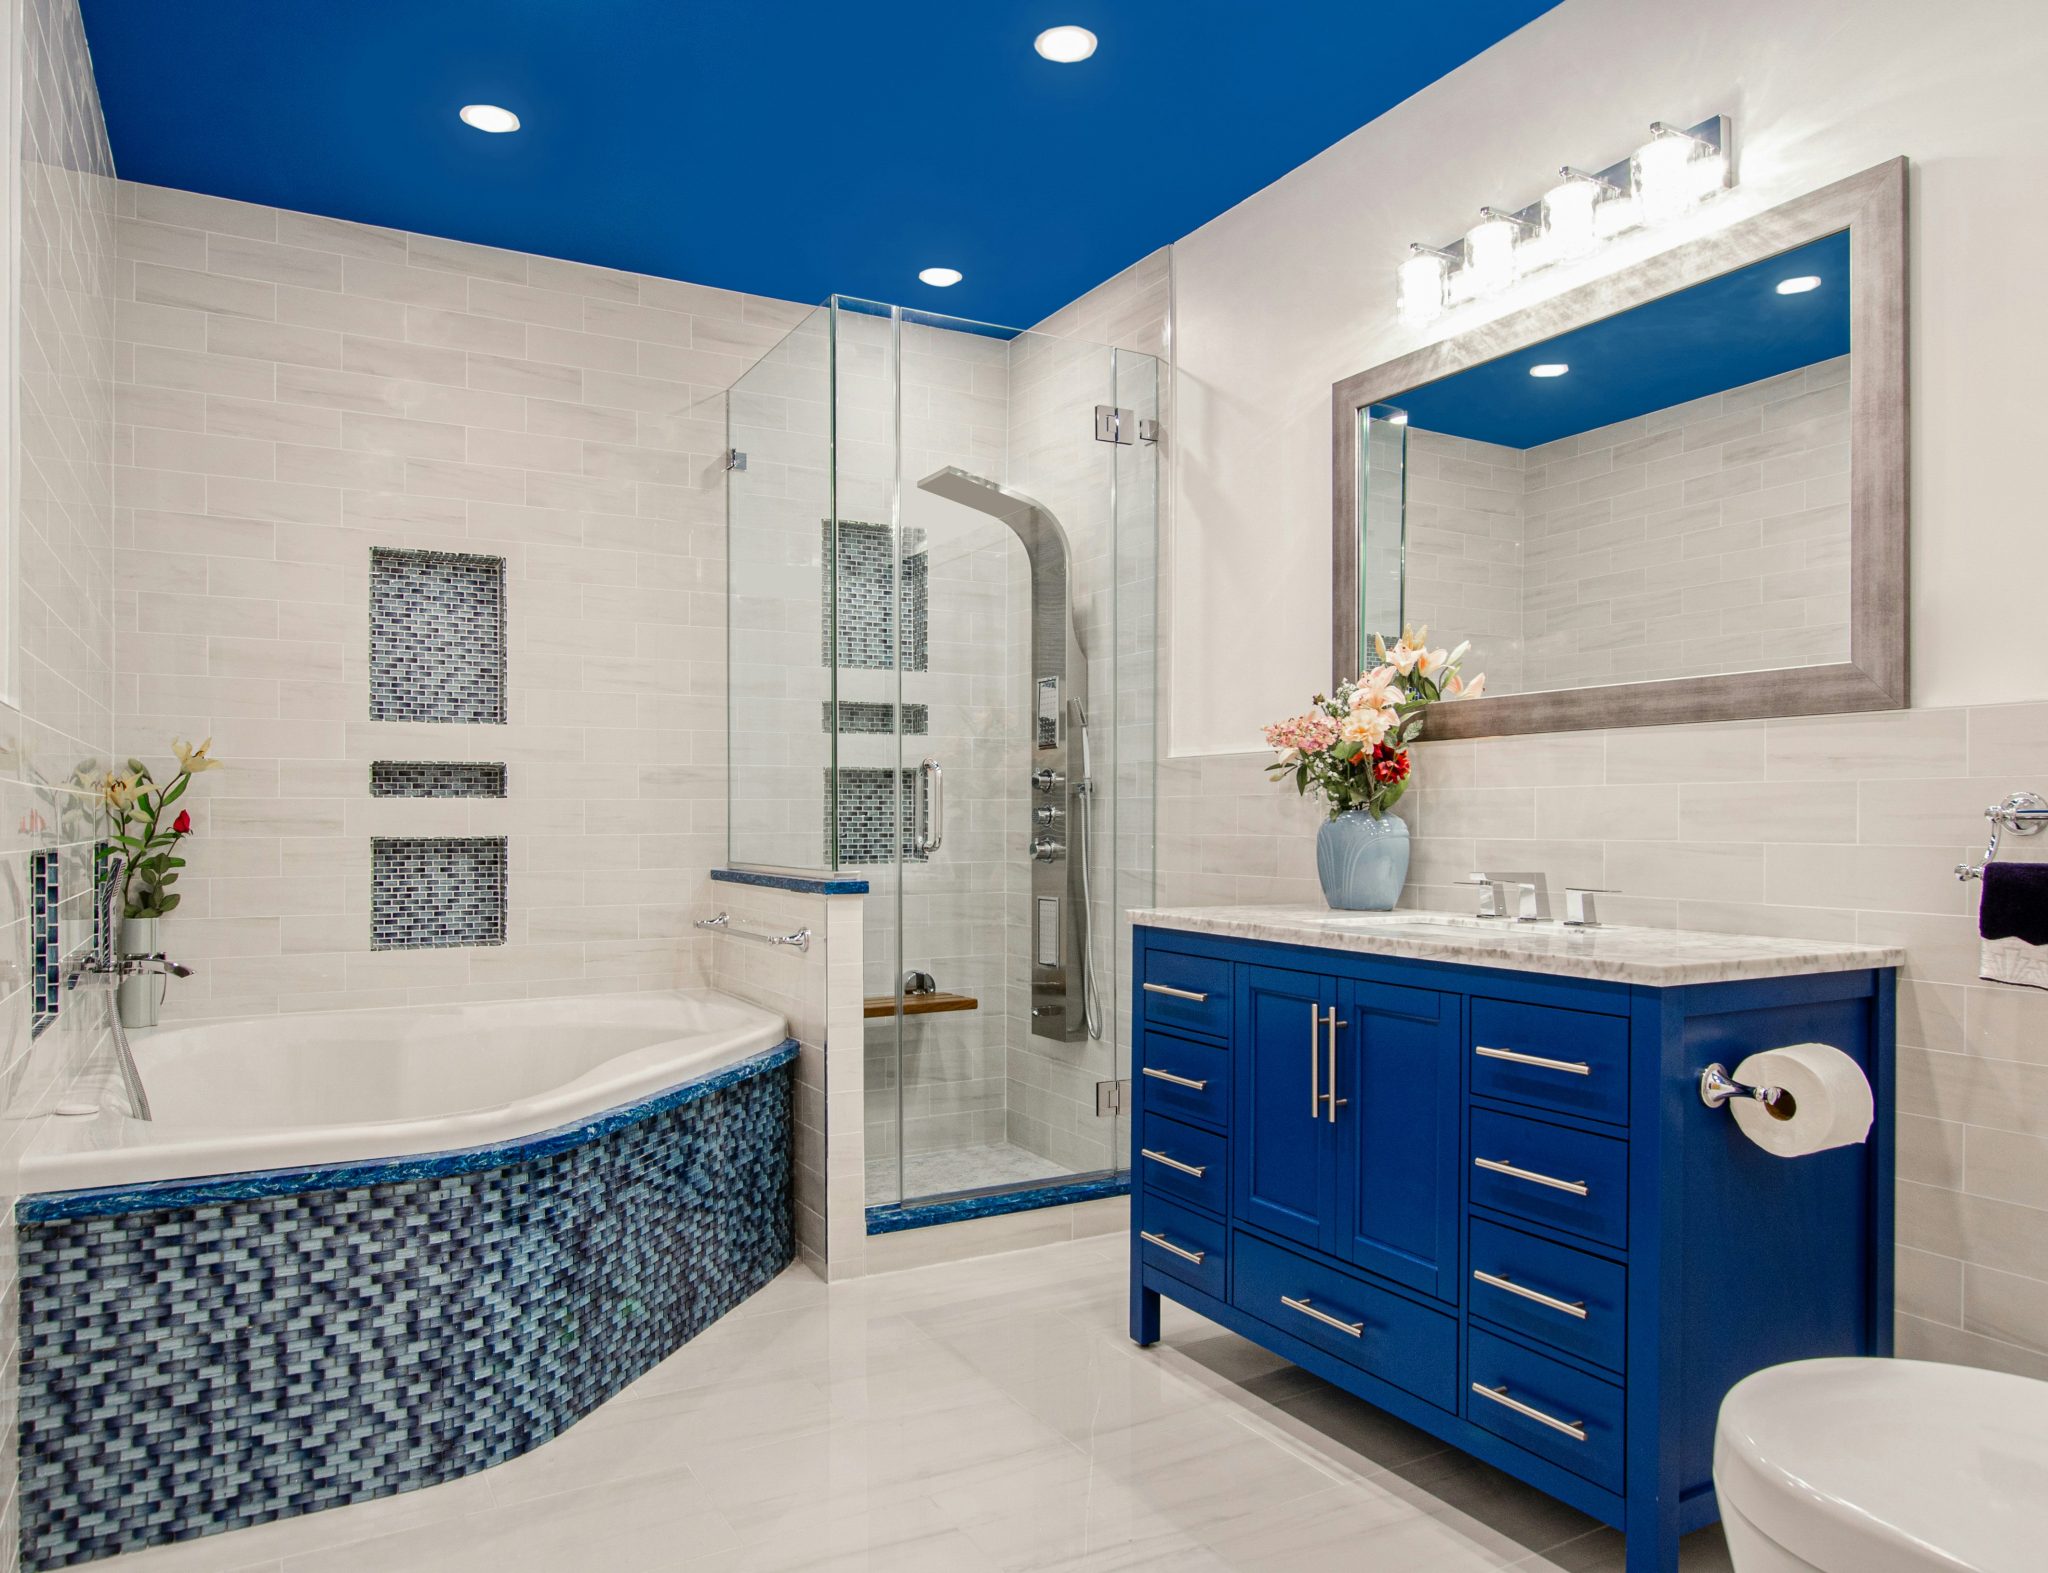
13. Bold Color Blocking with a Royal Blue Ceiling and Vanity
This bathroom is a masterclass in using the ‘fifth wall’—the ceiling. By painting the ceiling a deep, confident royal blue and matching it to the vanity, the design creates a dramatic, cohesive statement. This technique, known as color drenching, makes the room feel intentionally designed and luxurious. The light grey tiles and white countertop act as a neutral canvas, allowing the blue to be the star without overwhelming the space. It’s a bold choice that pays off in a big way.
|
📋 Copy HEX 🔗 Share |
📐 Style Math
Painting a ceiling can feel intimidating, but with the right prep, it’s a manageable weekend project that delivers a huge impact. Here’s a quick guide to getting it right:
- Time: 4-6 hours (plus drying) | Cost: $50-$100
- Start by thoroughly cleaning the ceiling to remove any dust or grime.
- Carefully tape off the edges where the ceiling meets the walls using high-quality painter’s tape. Press the tape down firmly to prevent bleeding.
- Use a paintbrush to ‘cut in’ a 2-3 inch border around the entire ceiling.
- Using a roller with an extension pole, paint the main area of the ceiling in overlapping ‘W’ motions.
- Apply a second coat once the first is dry for a rich, even color.
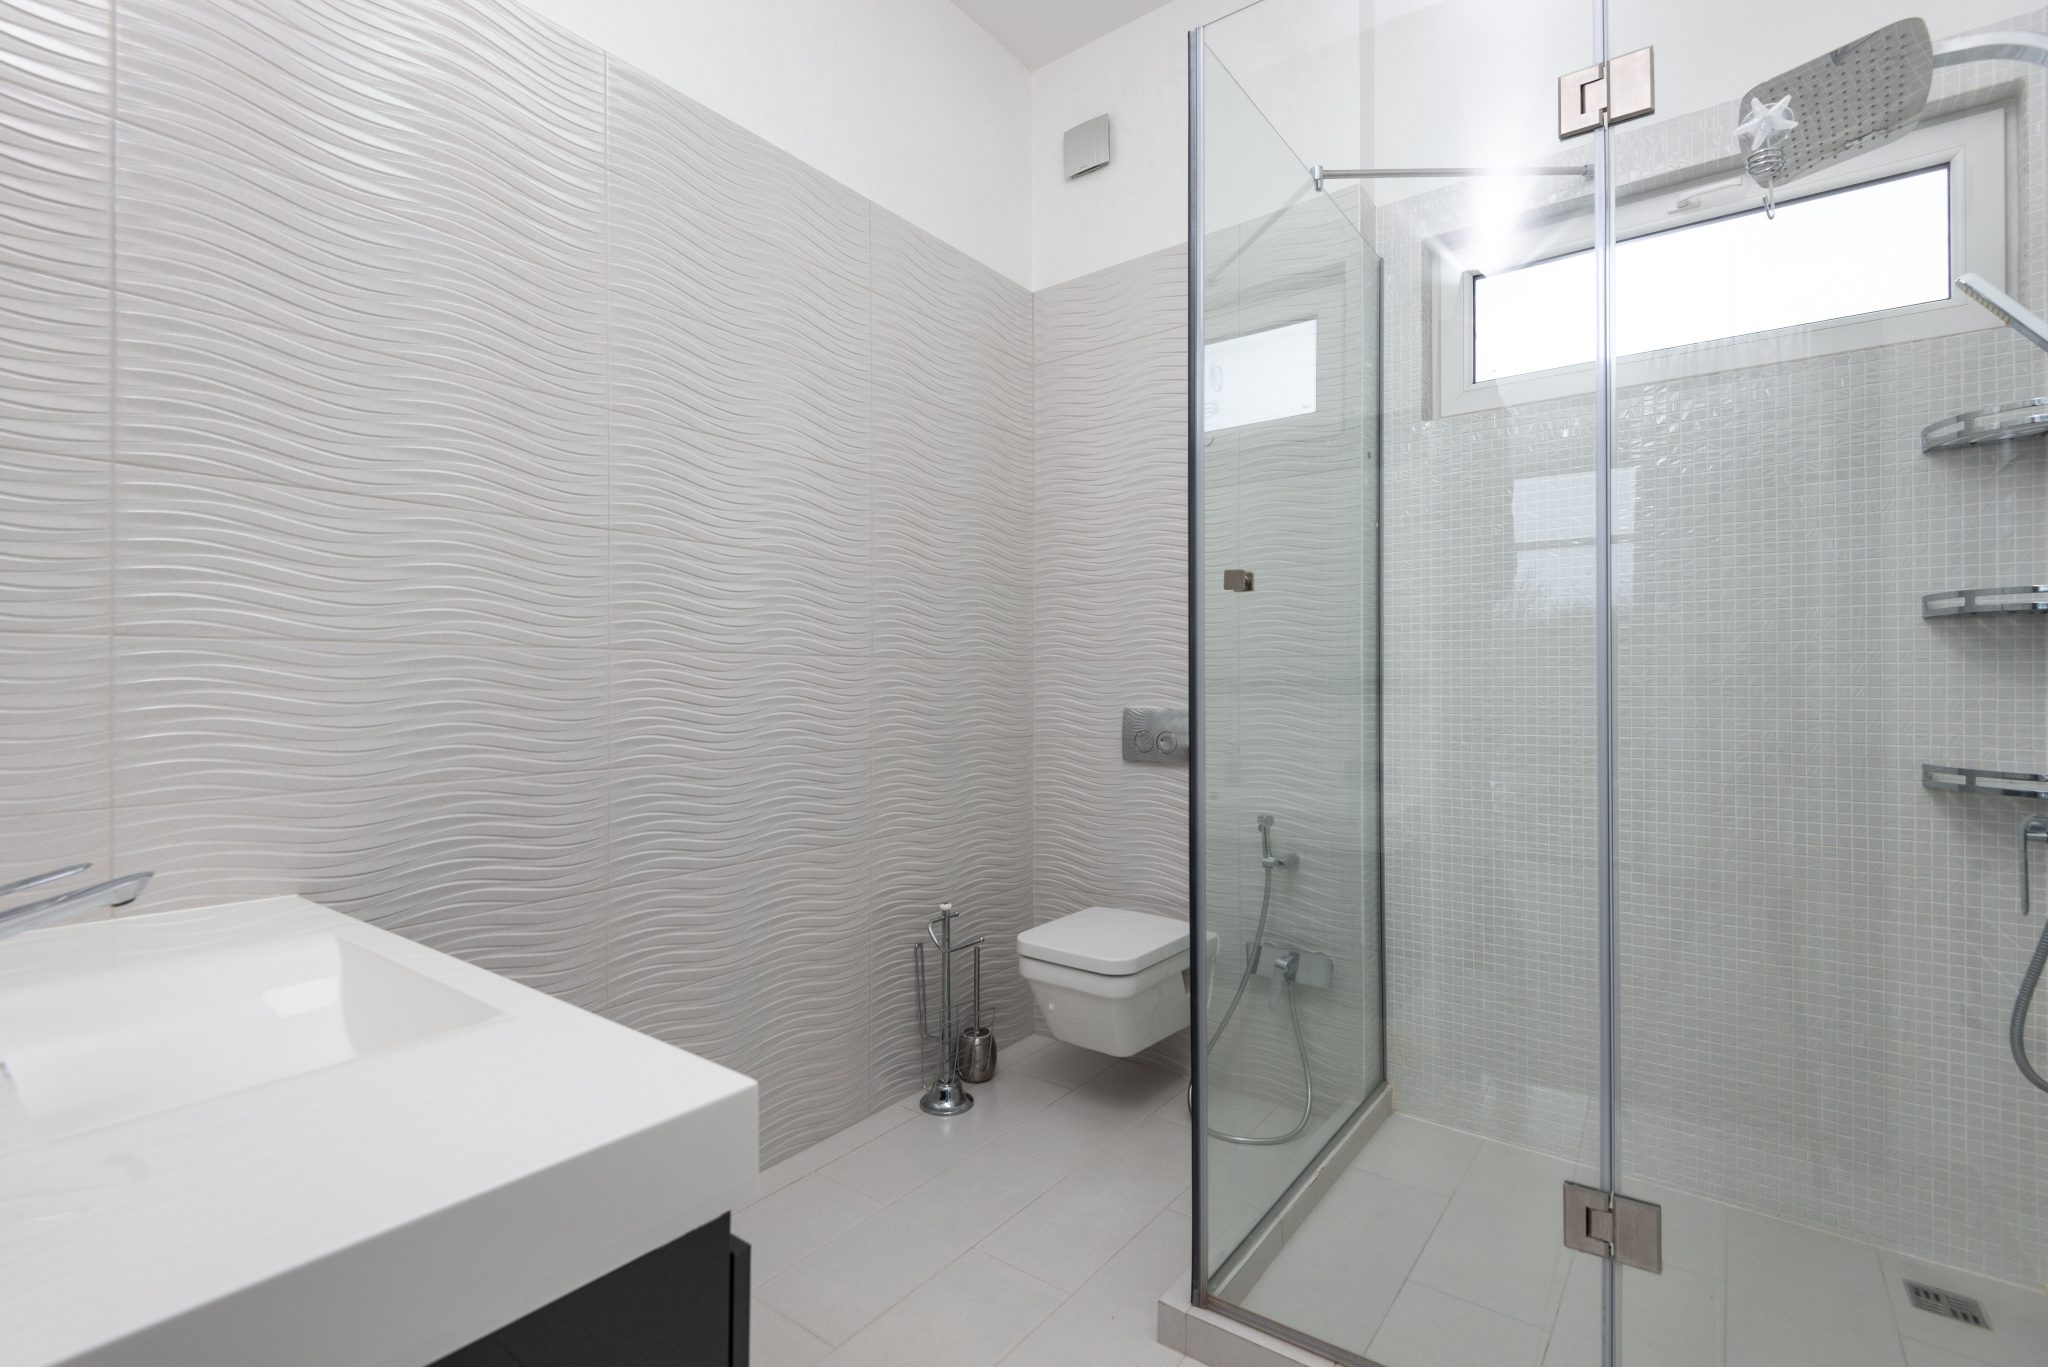
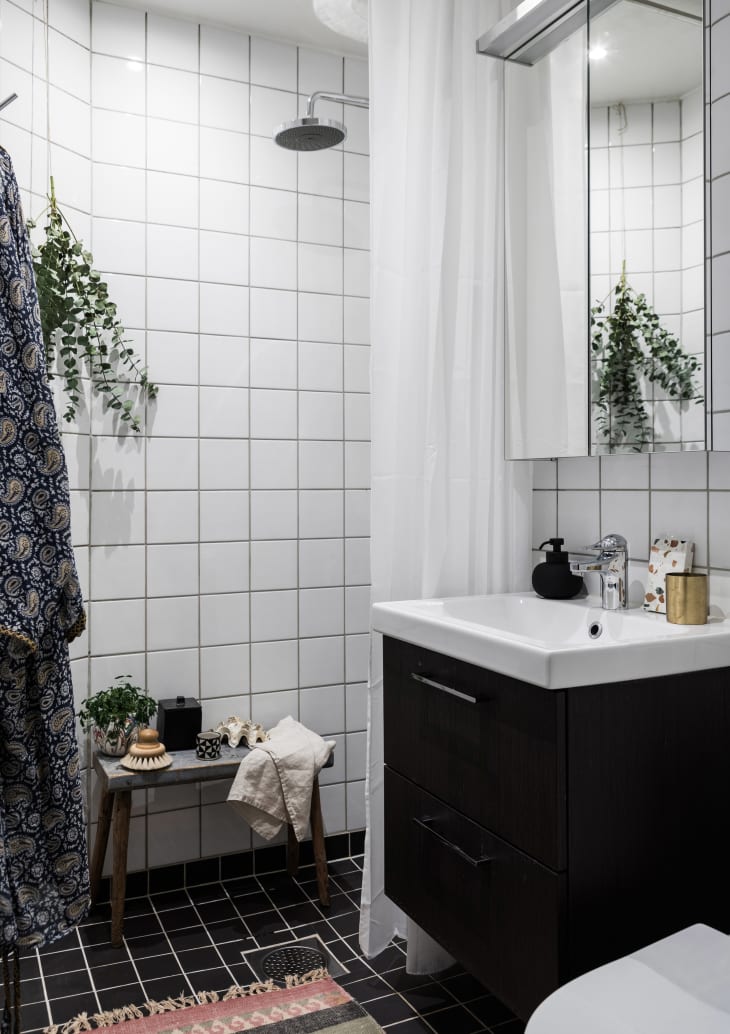
14. Subtle Texture with Wavy and Mosaic Gray Tiles
Textured tiles, like the wavy pattern seen here, are visually stunning but can be slightly trickier to clean than their smooth counterparts. The grooves and ridges are perfect little spots for soap scum and hard water deposits to build up. This doesn’t mean you should avoid them, but go in with open eyes. A weekly spray with a good tile cleaner and a gentle scrub with a soft brush (an old toothbrush works great for grout lines and ridges) will be necessary to keep them looking pristine.
|
📋 Copy HEX 🔗 Share |
💡 Designer Tip
This minimalist, textural design works best in a moderately sized bathroom, from 60 to 100 square feet. The large-format textured tiles need enough wall space to show off their continuous pattern without being cut up too much. In a very small powder room, the texture might feel a bit busy. Conversely, in a huge primary bath, the subtle effect could get lost. The frameless glass and wall-mounted toilet are excellent choices for this size range, as they enhance the sense of openness and make the floor easier to clean.
15. Dynamic Movement with Wavy Marble-Patterned Walls
When working with large format tiles that have a distinct, flowing pattern like this, planning the layout is absolutely critical. Do not let your tile installer start without a detailed conversation. Lay out a few tiles on the floor to decide if you want the ‘veins’ to run horizontally or vertically. For a cohesive, high-end look, the pattern should flow continuously from one tile to the next around the room. This may result in more waste (and higher cost), as you’ll have to cut tiles to match the pattern, but the seamless, slab-like result is worth it.
|
📋 Copy HEX 🔗 Share |
💰 Budget Breakdown
The element that elevates this bathroom from simple to stunning is the distinctive wavy pattern on the wall tiles. It mimics the look of exotic bookmatched marble slabs at a fraction of the cost. The dynamic, flowing lines create a sense of movement and energy, turning a simple wall into a piece of art. It’s a bold choice that provides all the visual interest the room needs, allowing the other elements—the tub, toilet, and mosaic—to be simple and supportive.
16. Minimalist Grid: Light Gray Tiles and Matte Black Fixtures
This is a fantastic example of a stylish bathroom on a realistic budget. Light gray square or subway tiles are among the most affordable options available, often costing just a few dollars per square foot. Matte black fixtures have become widely accessible, with great-looking, reliable options available from big-box stores and online retailers. The splurge here is the mosaic accent tile, but since it’s used for a single vertical strip, you only need to buy a few square feet to make a big impact. This proves you can have a graphic, modern bathroom without a hefty price tag.
🎯 What Makes It Work
The visual recipe here is simple and effective: 80% Cool Neutrals + 15% Graphic Black + 5% Pattern. The light gray tiles and white tub/vanity create a calm, neutral backdrop that makes the small space feel open. The matte black fixtures (shower rod, faucet, mirror frame) are the strong, graphic elements that give the room its modern edge. Finally, the vertical mosaic strip is that small dose of pattern that adds a touch of personality and visual interest, drawing the eye upward. For a different vibe, you could swap the black for brass, as seen in Idea #12.
17. Mixing Metals: Brushed Nickel and Brass in a Gray Bathroom
For years, the rule was to match all your metals. Thankfully, that rule is officially over. The trend for 2026 is thoughtful mixing, and this bathroom is a great example. Using a combination of brushed nickel and warm brass adds a layer of curated sophistication. It signals that the choices were deliberate and personal, not just bought as a matching set. This trend has real staying power because it allows for more flexibility and a richer, more collected-over-time aesthetic.
|
📋 Copy HEX 🔗 Share |
📏 Scale Guide
The reason mixing metals works here is because it’s done with intention. There’s a clear logic: the ‘functional’ hardware, like the main faucet and cabinet knobs that are touched frequently, are in durable, low-key brushed nickel. The ‘decorative’ or ‘feature’ hardware, like the shower fixtures which are a main focal point, are in a statement-making brass. By assigning each metal a specific role, the design feels cohesive, not chaotic. A good rule of thumb is to stick to two, or at most three, different metal finishes in one room.
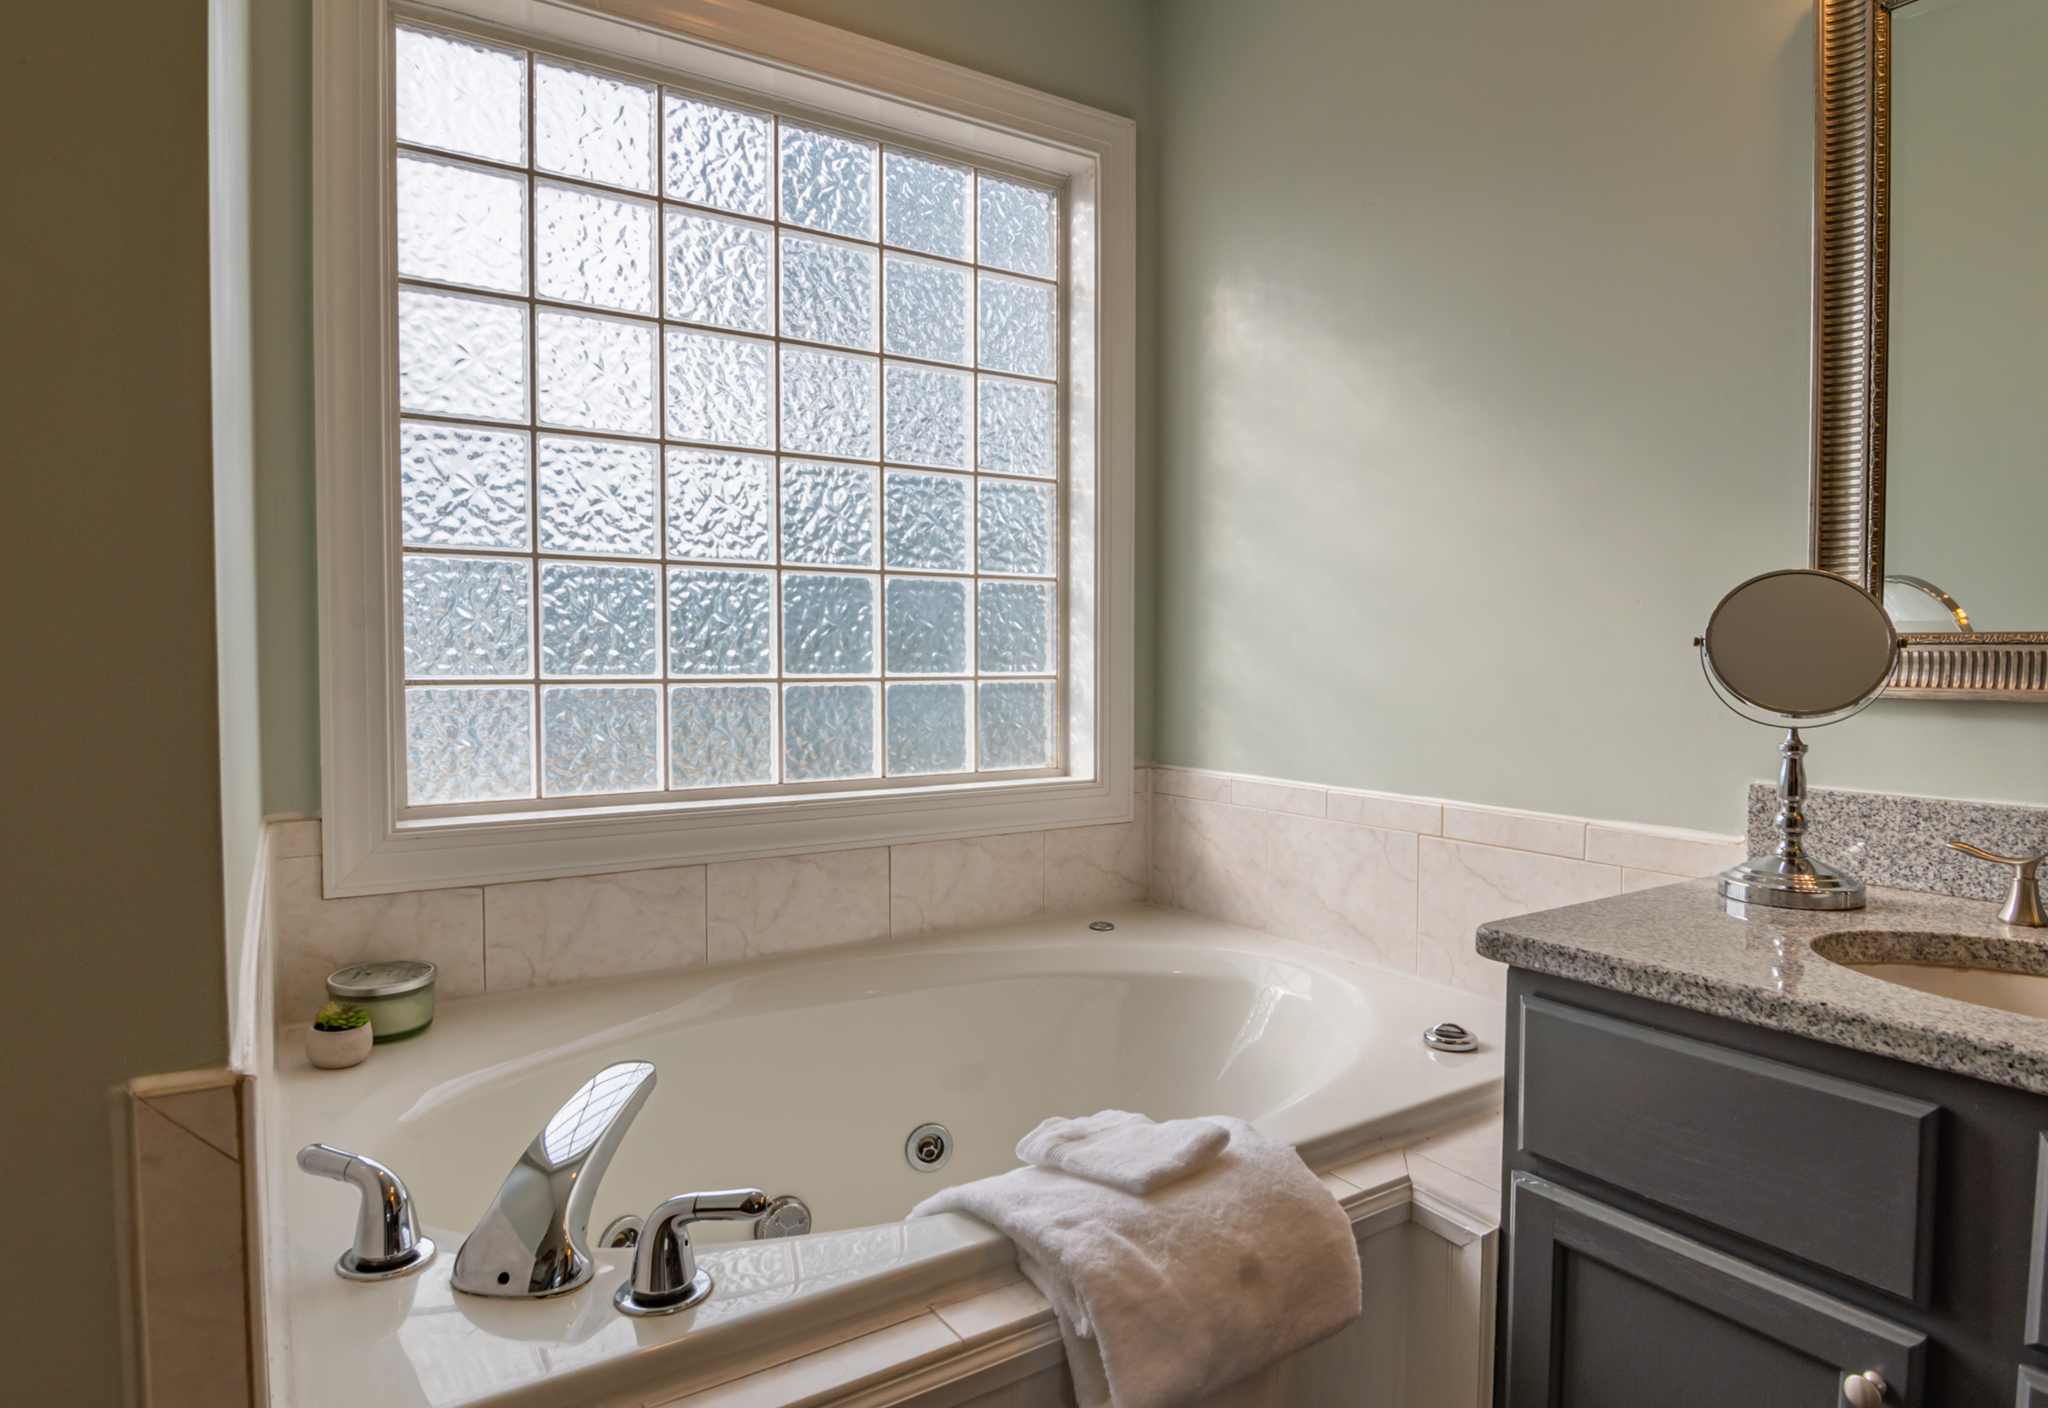
18. A Cozy Bathtub Nook with Sage Green Walls and a Privacy Window
The hero of this calm and inviting bathroom is the textured glass block window. It’s a brilliant solution that floods the bathtub nook with beautiful, diffused natural light while ensuring complete privacy—no curtains or blinds needed. It has a slightly retro, yet timeless quality that adds architectural interest. The soft light it casts enhances the soothing sage green on the walls, making this the perfect spot to unwind. Without this window, the nook would be a much darker and less special place.
|
📋 Copy HEX 🔗 Share |
🧹 Maintenance Reality
A built-in jetted tub can be a wonderful luxury, but it’s a major commitment. Before you take the plunge, go through this checklist:
- Electrical: Jetted tubs require a dedicated GFCI-protected electrical circuit. Do you have easy access to run this wiring? Consult an electrician first.
- Access Panel: The motor and pump will need occasional service. You MUST have an access panel (usually a removable part of the tile or wall) to reach them. Plan its location from the start.
- Water Heater Capacity: These tubs are often larger and deeper than standard tubs. Is your current water heater large enough to fill it with hot water?
- Usage: Be honest. Will you actually use the jets, or do you just want a soaking tub? A simpler soaker model, like in Idea #28, is less expensive and has fewer maintenance needs.
19. Opulent Classicism with Polished Marble Slab Walls
This is the pinnacle of bathroom luxury, and the budget reflects that. The cost is driven by the use of large marble slabs, which are significantly more expensive to purchase and install than tiles.
- Main Furniture (Paneled Cabinetry): $5,000 – $12,000
- Lighting: $1,000 – $3,000
- Fixtures (Tub, Faucets, Towel Warmer): $6,000 – $15,000
- Decor/Accessories: $500 – $1,500
- Wall Treatment (Marble Slabs & Installation): $20,000 – $50,000+
- TOTAL: $32,500 – $81,500
- Budget alternative: Look for large-format (e.g., 24×48 inch) porcelain tiles designed to mimic the look of marble slabs, like those seen in Idea #5. This will give you a similar continuous feel for about 20-30% of the cost of real slabs.
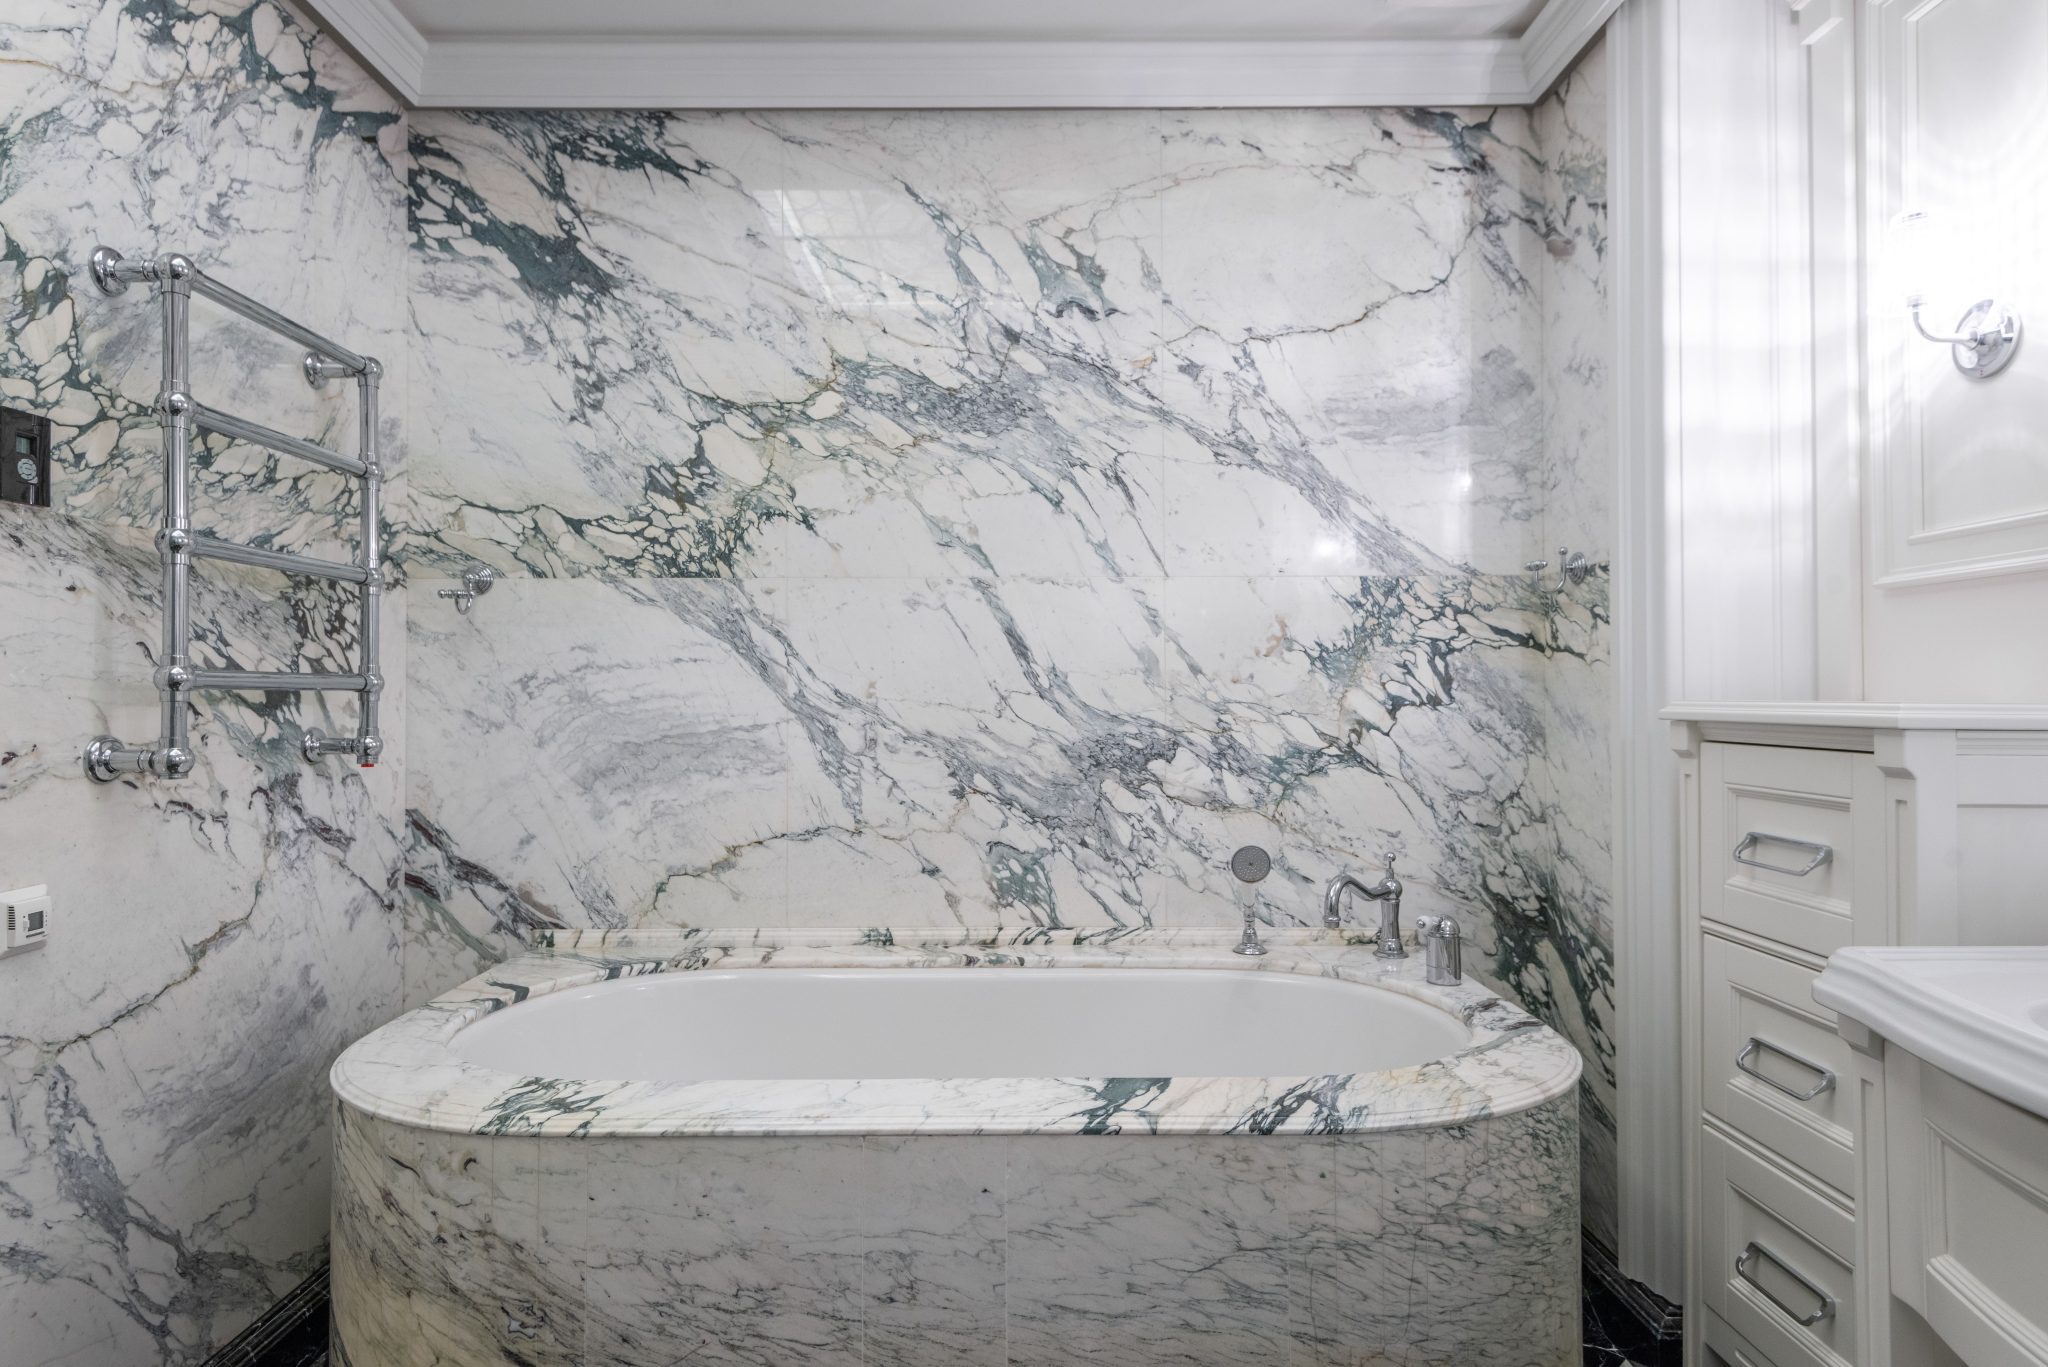
|
📋 Copy HEX 🔗 Share |
⚠️ Real Talk
Real, polished marble is absolutely breathtaking, but it is a soft, porous stone. It requires sealing upon installation and should be re-sealed every 6-12 months, especially in a wet area. Marble is susceptible to etching from acidic substances (like certain cleaners, lemon juice, or even some soaps) and can be stained. All cleaning must be done with a pH-neutral stone cleaner. Spills should be wiped up immediately. It’s a material that demands respect and consistent care to maintain its beauty.
20. Compact Charm in Black and White with Natural Wood
This design is perfectly suited for a small bathroom or powder room, typically 30 square feet or less. The high-contrast black and white color scheme is classic and creates a clean, graphic look that doesn’t feel cluttered. Using simple, affordable square tiles on the walls and floor is a smart move in a small space. The wall-mounted vanity and mirrored medicine cabinet are excellent choices for maximizing function without taking up precious floor space. The wood and plant accents add warmth and personality, proving small can still be stylish.
|
📋 Copy HEX 🔗 Share |
🔧 How-To Brief
A black and white tiled bathroom is one of the most budget-friendly styles you can choose. Basic white and black ceramic tiles are inexpensive and widely available at any home improvement store. A simple vanity, a chrome faucet, and a standard medicine cabinet are all cost-effective choices. The real personality here comes from the styling—the rustic wooden stool (a great find at a thrift store or on Facebook Marketplace), the hanging plant, and the textiles. You can create this entire look for well under $2,000.
21. The All-Marble Treatment with a Floating Vanity
A floating vanity made entirely of stone is a showstopper, but it’s a serious structural undertaking. Marble is incredibly heavy. The wall it’s mounted to can’t just be standard drywall over studs; it requires significant reinforcement. A steel support frame needs to be engineered and professionally installed within the wall cavity to safely carry the immense load. This is not a standard installation and adds significant complexity and cost to your project. Always consult with a structural engineer before attempting this.
|
📋 Copy HEX 🔗 Share |
💸 Get This Look For Less
When you’re enveloping an entire room in marble, especially the shower, superior waterproofing is non-negotiable. Don’t just rely on a standard waterproofing membrane. For a premium installation like this, insist on a full system like the Schluter-Shower System, which includes pre-sloped trays, curbs, benches, and wall membranes that all integrate seamlessly. Also, specify an epoxy grout instead of a standard cement-based one. It’s more expensive and requires a skilled installer, but it’s waterproof and stain-proof, which is critical for protecting your investment in all that beautiful marble.
22. Chic Contrast: White Subway Tile with Dark Grout and Gold Fixtures
The secret to a perfect dark grout line is color consistency and a clean installation. Here’s how to get that sharp, graphic look:
- Time: 2-3 days (includes tiling and grouting) | Cost: $100-$200 (for grout and tools)
- Choose a high-performance, stain-resistant grout in charcoal or black. Mapei Flexcolor CQ or Laticrete SpectraLOCK are excellent options.
- Make sure your tile setter uses spacers to create perfectly even grout lines (1/8 inch is a popular choice).
- When applying the grout, work in small sections and clean the excess off the tile face thoroughly as you go.
- This is crucial: after the grout has cured, apply a quality grout sealer. This will prevent it from staining or discoloring over time.
|
📋 Copy HEX 🔗 Share |
⭐ The One Thing
This look is so effective because of its high graphic impact. The dark grout turns a simple grid of white subway tiles into a bold pattern, emphasizing the shape and layout of the tile itself. This graphic quality is then softened and warmed by the gold fixtures and wood countertop. It’s a perfect marriage of opposites: the cool, hard geometry of the tiles and the warm, soft curves of the faucet and sink. The result is a space that feels both modern and glamorous, clean and inviting.
23. Functional Neutrals: Combining Beige and Grey Wood-Look Tiles
This combination is a workhorse for small to medium-sized family bathrooms, especially in the 40-70 square foot range. The design is practical and durable, with no precious materials to worry about. The wall-mounted sink is a space-saver, perfect for kids’ bathrooms where under-sink storage might just become a mess anyway. Using two different, but complementary, large-format tiles adds a touch of custom design without getting too fussy or expensive. It’s a clean, contemporary look that won’t go out of style quickly.
|
📋 Copy HEX 🔗 Share |
🔥 Trending Context
This is a prime example of getting a custom look using standard, affordable materials. Wood-look porcelain tile gives you the warmth and texture of wood without any of the maintenance headaches, and it’s very cost-effective. Pairing it with a simple, large-format beige or cream tile is a classic move. Both are readily available at big box stores for a few dollars per square foot. The fixtures are standard and clean-lined, proving you don’t need designer brands to create a neat, functional, and visually pleasing bathroom.
24. Seamless Storage with Integrated Wooden Shelving
The defining feature of this bathroom is, without a doubt, the integrated wooden shelving unit. It’s a brilliant piece of design that turns basic storage into a beautiful architectural statement. By building it flush with the tiled wall and combining it with recessed niches, the storage feels like a part of the room’s structure, not just a piece of furniture placed within it. This keeps the small space feeling open and uncluttered while providing ample room for towels and decor.
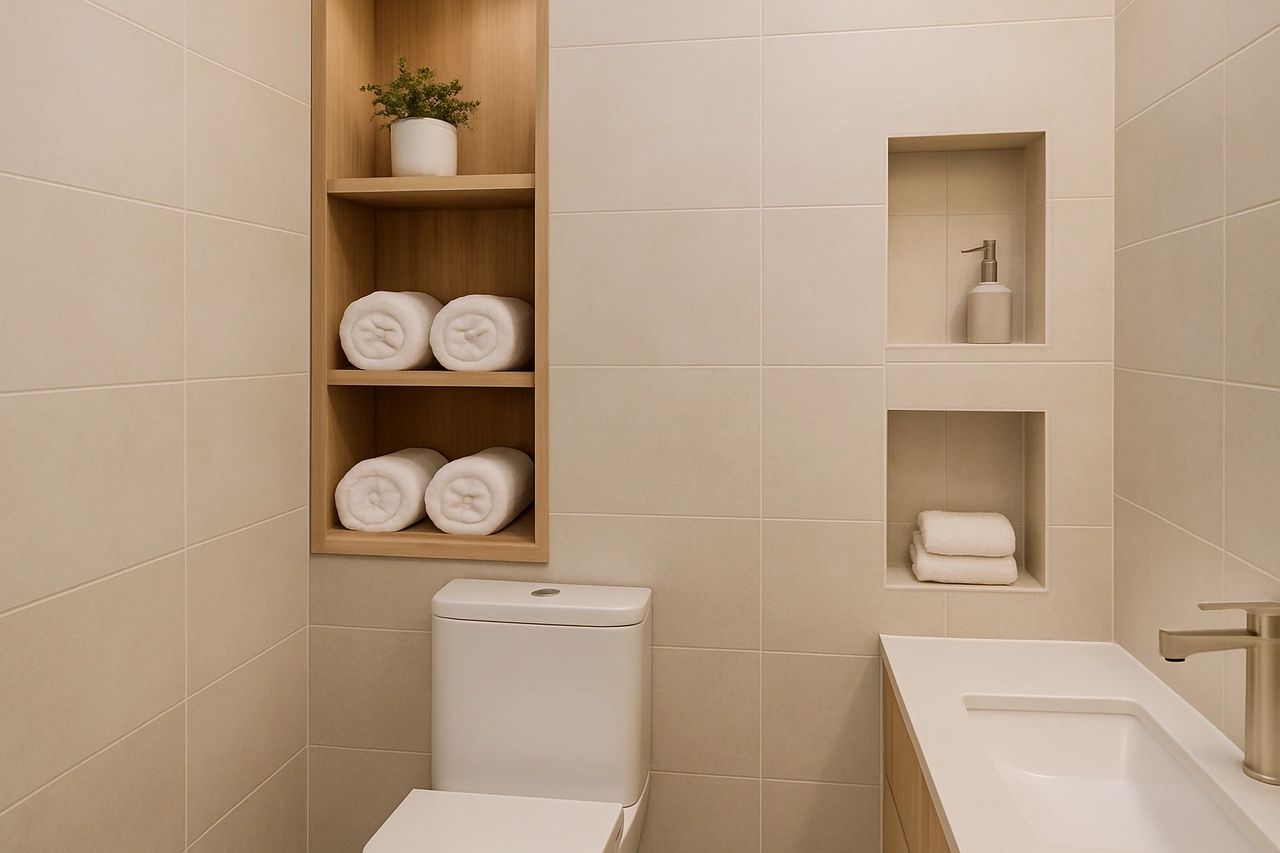
|
📋 Copy HEX 🔗 Share |
✅ Before You Start
If you’re going to incorporate wood into a ‘wet zone’ like a bathroom, material choice and finish are absolutely critical to prevent water damage and warping. For shelving or a vanity, opt for a solid wood known for its natural water resistance, like teak, iroko, or white oak. Avoid MDF or particleboard. Even with a water-resistant wood, it MUST be sealed on all six sides (top, bottom, front, back, and both sides) before installation, using a high-quality marine-grade varnish or polyurethane. This creates an impermeable barrier against humidity and splashes.
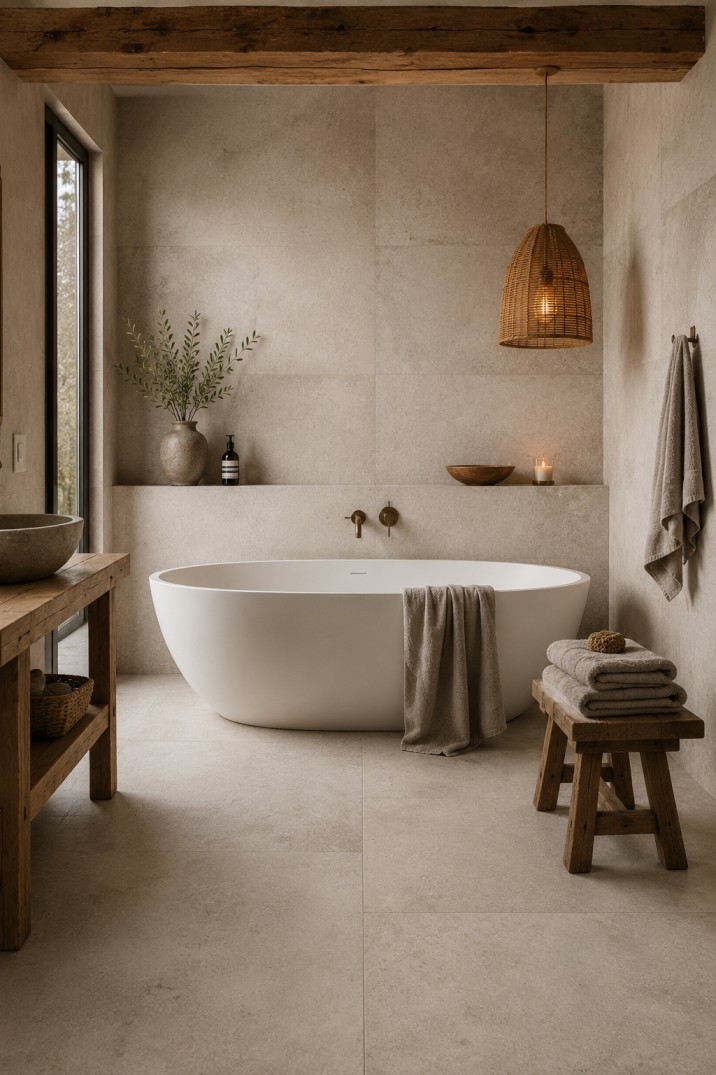
25. Earthy Minimalism with a Rattan Pendant and Rustic Wood
This space feels so calming because it excels at layering textures within a tight, neutral color palette. The smooth, matte finish of the large-format tiles provides a quiet backdrop. Then, you have the rough, rustic texture of the wooden beam and vanity, the woven complexity of the rattan pendant light, and the cool smoothness of the stone sink and white bathtub. This rich textural mix is what makes the minimalist design feel warm, inviting, and connected to the natural world. This is a much more soulful approach than the nature-inspired look of Idea #8.
|
📋 Copy HEX 🔗 Share |
📐 Style Math
This bathroom perfectly captures the ‘warm minimalism’ or ‘Japandi’ trend that continues to grow in 2026. After years of cool, gray-toned minimalism, designers and homeowners are craving spaces that feel both clean and comforting. This style focuses on natural materials, craftsmanship, and a connection to nature. It’s about creating a serene, uncluttered sanctuary at home, which feels more important than ever. This trend has serious staying power because it’s rooted in wellness and timeless materials, not fleeting fads.
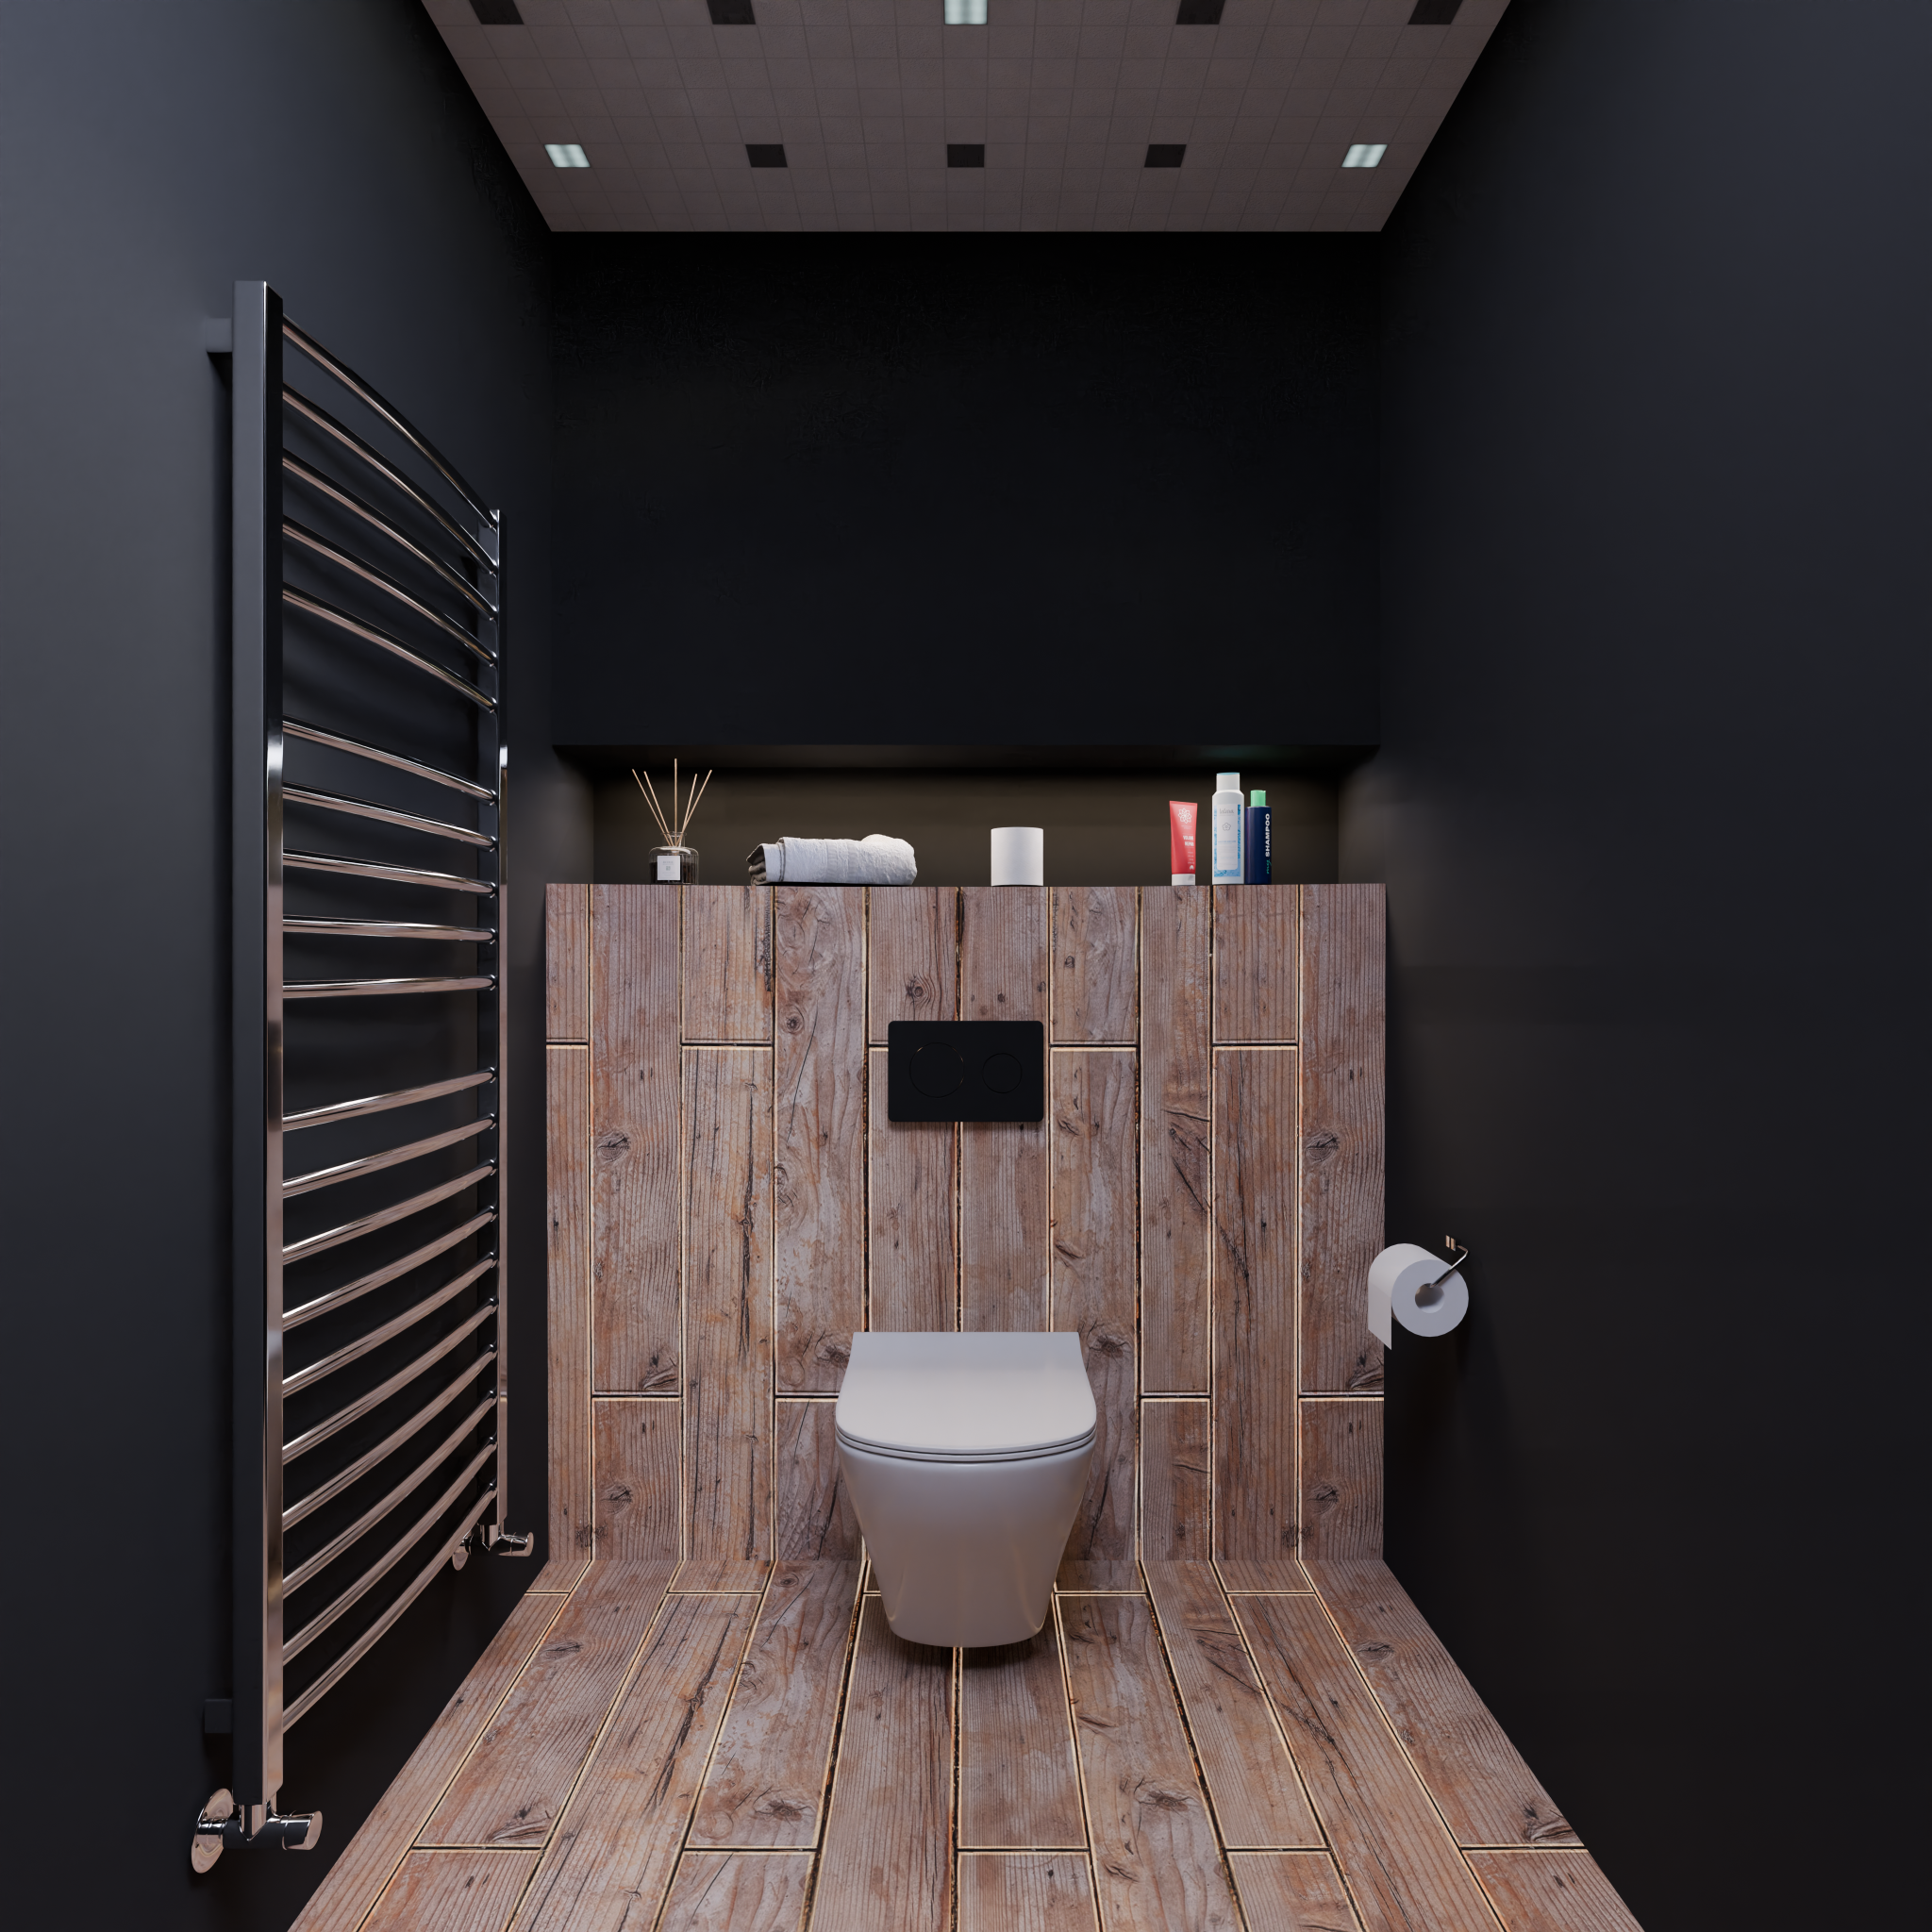
26. A Moody Monochrome Look with Rustic Wood and Black Walls
A black bathroom can be incredibly chic and dramatic, but it’s a bold move that requires a serious commitment to lighting. If your room doesn’t have ample natural light and a well-planned artificial lighting scheme, it can quickly feel like a cave. Notice the recessed ceiling lights and the hidden strip light in the niche here—they are essential. Dark colors absorb light, so you’ll need more fixtures and potentially higher-lumen bulbs than you would in a white bathroom to achieve the same level of brightness for functional tasks like shaving or applying makeup.
|
📋 Copy HEX 🔗 Share |
💡 Designer Tip
This design’s power comes from a daring formula: 50% Matte Black + 40% Rustic Wood + 10% White & Chrome. The black walls and ceiling create a dramatic, enveloping shell. The rustic wood on the floor and back wall provides a massive dose of warmth and texture, preventing the black from feeling sterile or gothic. The bright white of the toilet and the shine of the chrome towel rail are the crucial high-contrast accents that cut through the darkness and add a clean, modern touch. It’s a high-stakes, high-reward combination.
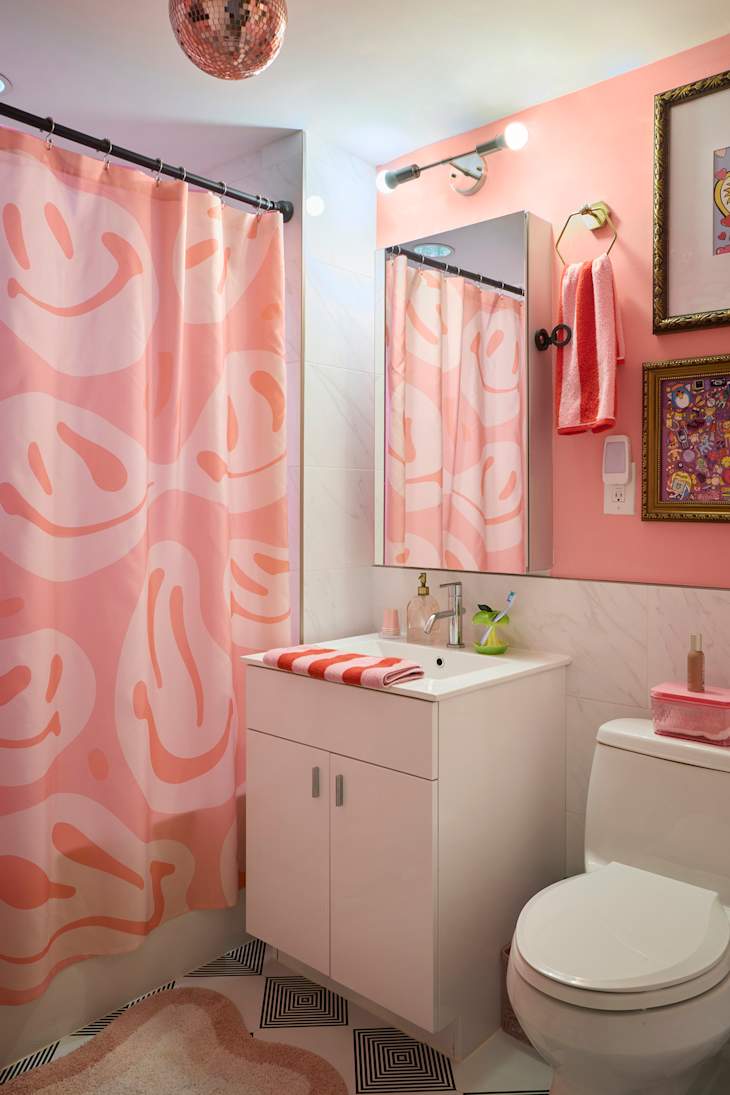
27. Playful Pop with Pink Walls and a Disco Ball
Let’s be real: the soul of this bathroom is the smiley face shower curtain and the disco ball. It’s a combination that radiates pure, unadulterated joy. This is for the person who doesn’t take their decor too seriously and wants their home to make them smile. Removing these two elements would leave you with a nice, but fairly standard, pink and white bathroom. With them, the space is transformed into a vibrant, personal statement that’s impossible to forget. It’s a lesson in the power of personality.
|
📋 Copy HEX 🔗 Share |
💰 Budget Breakdown
This high-energy look is all about personality, not price. The core elements are paint and accessories, which are some of the most affordable ways to transform a space. A can of quality pink paint is around $50. The star of the show, a fun graphic shower curtain, can be found online for $20-$40. The disco ball? Under $25 on Amazon. This whole vibe can be layered onto a basic, existing bathroom, proving that you don’t need a renovation to create a space that feels completely new and uniquely you.
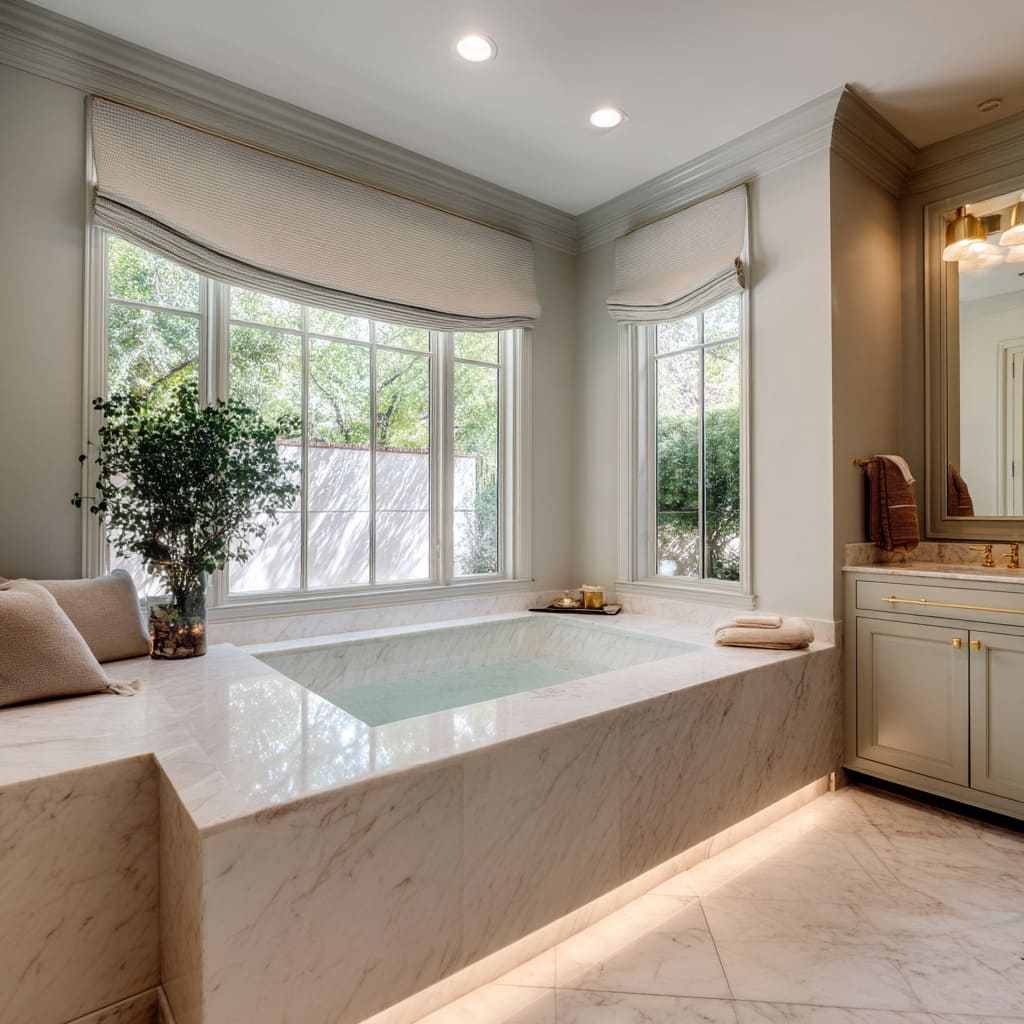
28. A Serene Marble Bathtub Alcove with a Garden View
The subtle glow from beneath the bathtub is achieved with waterproof LED strip lighting, a technique known as cove lighting. This is a high-end detail that makes the tub appear to float. To get this look, the tub surround must be custom-built with a recessed toe-kick area. The LED strip is then installed inside a channel within this recess, pointing downwards or outwards to cast a diffuse glow. Always use a dimmable, waterproof LED rated for wet locations, and have it installed by a licensed electrician.
|
📋 Copy HEX 🔗 Share |
🎯 What Makes It Work
A design featuring a large, built-in tub as a centerpiece requires significant square footage. This alcove setup, with its generous bay windows, is best suited for a primary bathroom of 150 square feet or more. You need enough space to not only house the tub itself but also to allow for comfortable circulation around it. The large windows are key to the serene, natural feel; this look wouldn’t be nearly as effective in a room without a major source of natural light. For a cozier tub nook solution in a smaller space, see Idea #18.
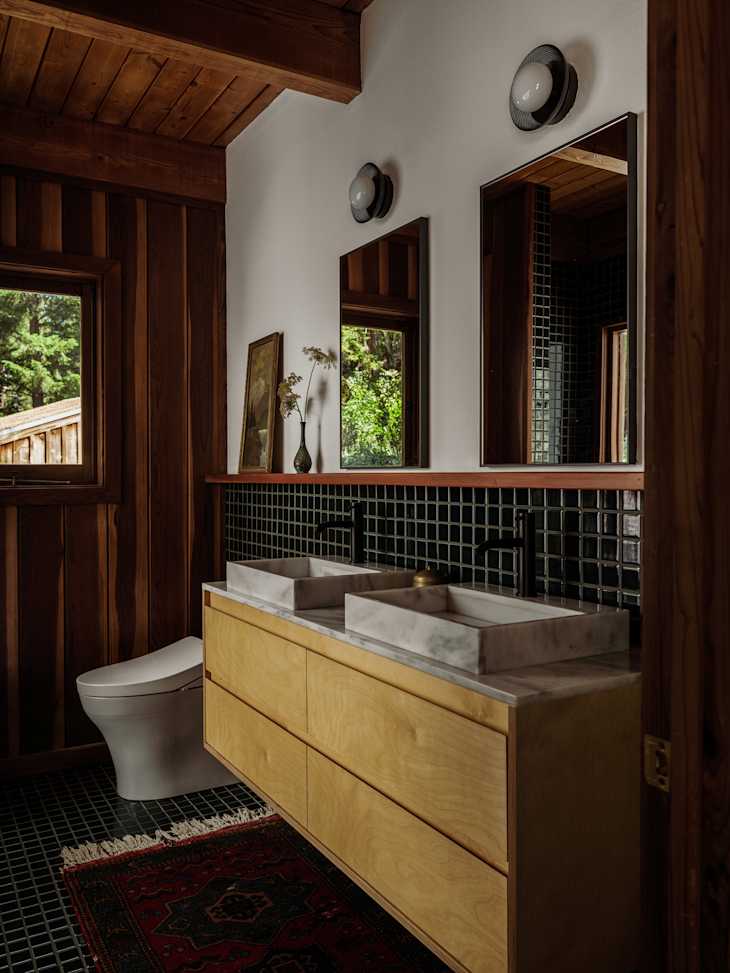
29. Rustic Modern Mix with Wood Paneling and Black Tile
This bathroom successfully marries rustic and modern styles by thoughtfully assigning them to different surfaces. The warmth and texture of the wood are used for the large vertical surfaces (wall paneling) and the main furniture piece (the vanity). The clean, graphic elements—the black square tiles—are used for the functional backsplash and floor. This clear separation prevents the styles from clashing. The marble sinks and simple round sconces act as a bridge, sharing qualities of both the natural, rustic world and the clean, modern one.
|
📋 Copy HEX 🔗 Share |
📏 Scale Guide
Installing a tile backsplash is a great DIY project that can dramatically change the look of your vanity area. Here’s a mini-guide:
- Time: 4-5 hours | Cost: $100-$300
- Measure your wall space and buy about 15% more tile than you need to account for cuts.
- Turn off water supply, remove faucet if necessary, and clean the wall thoroughly.
- Apply a thin, even layer of tile adhesive (mastic) to the wall using a notched trowel.
- Press your tiles into the mastic, using spacers to keep the lines even.
- Let the adhesive dry for 24 hours, then remove spacers and apply grout over the tiles.
- After 20-30 minutes, wipe away the excess grout haze with a damp sponge. Let it cure fully before exposing to water.
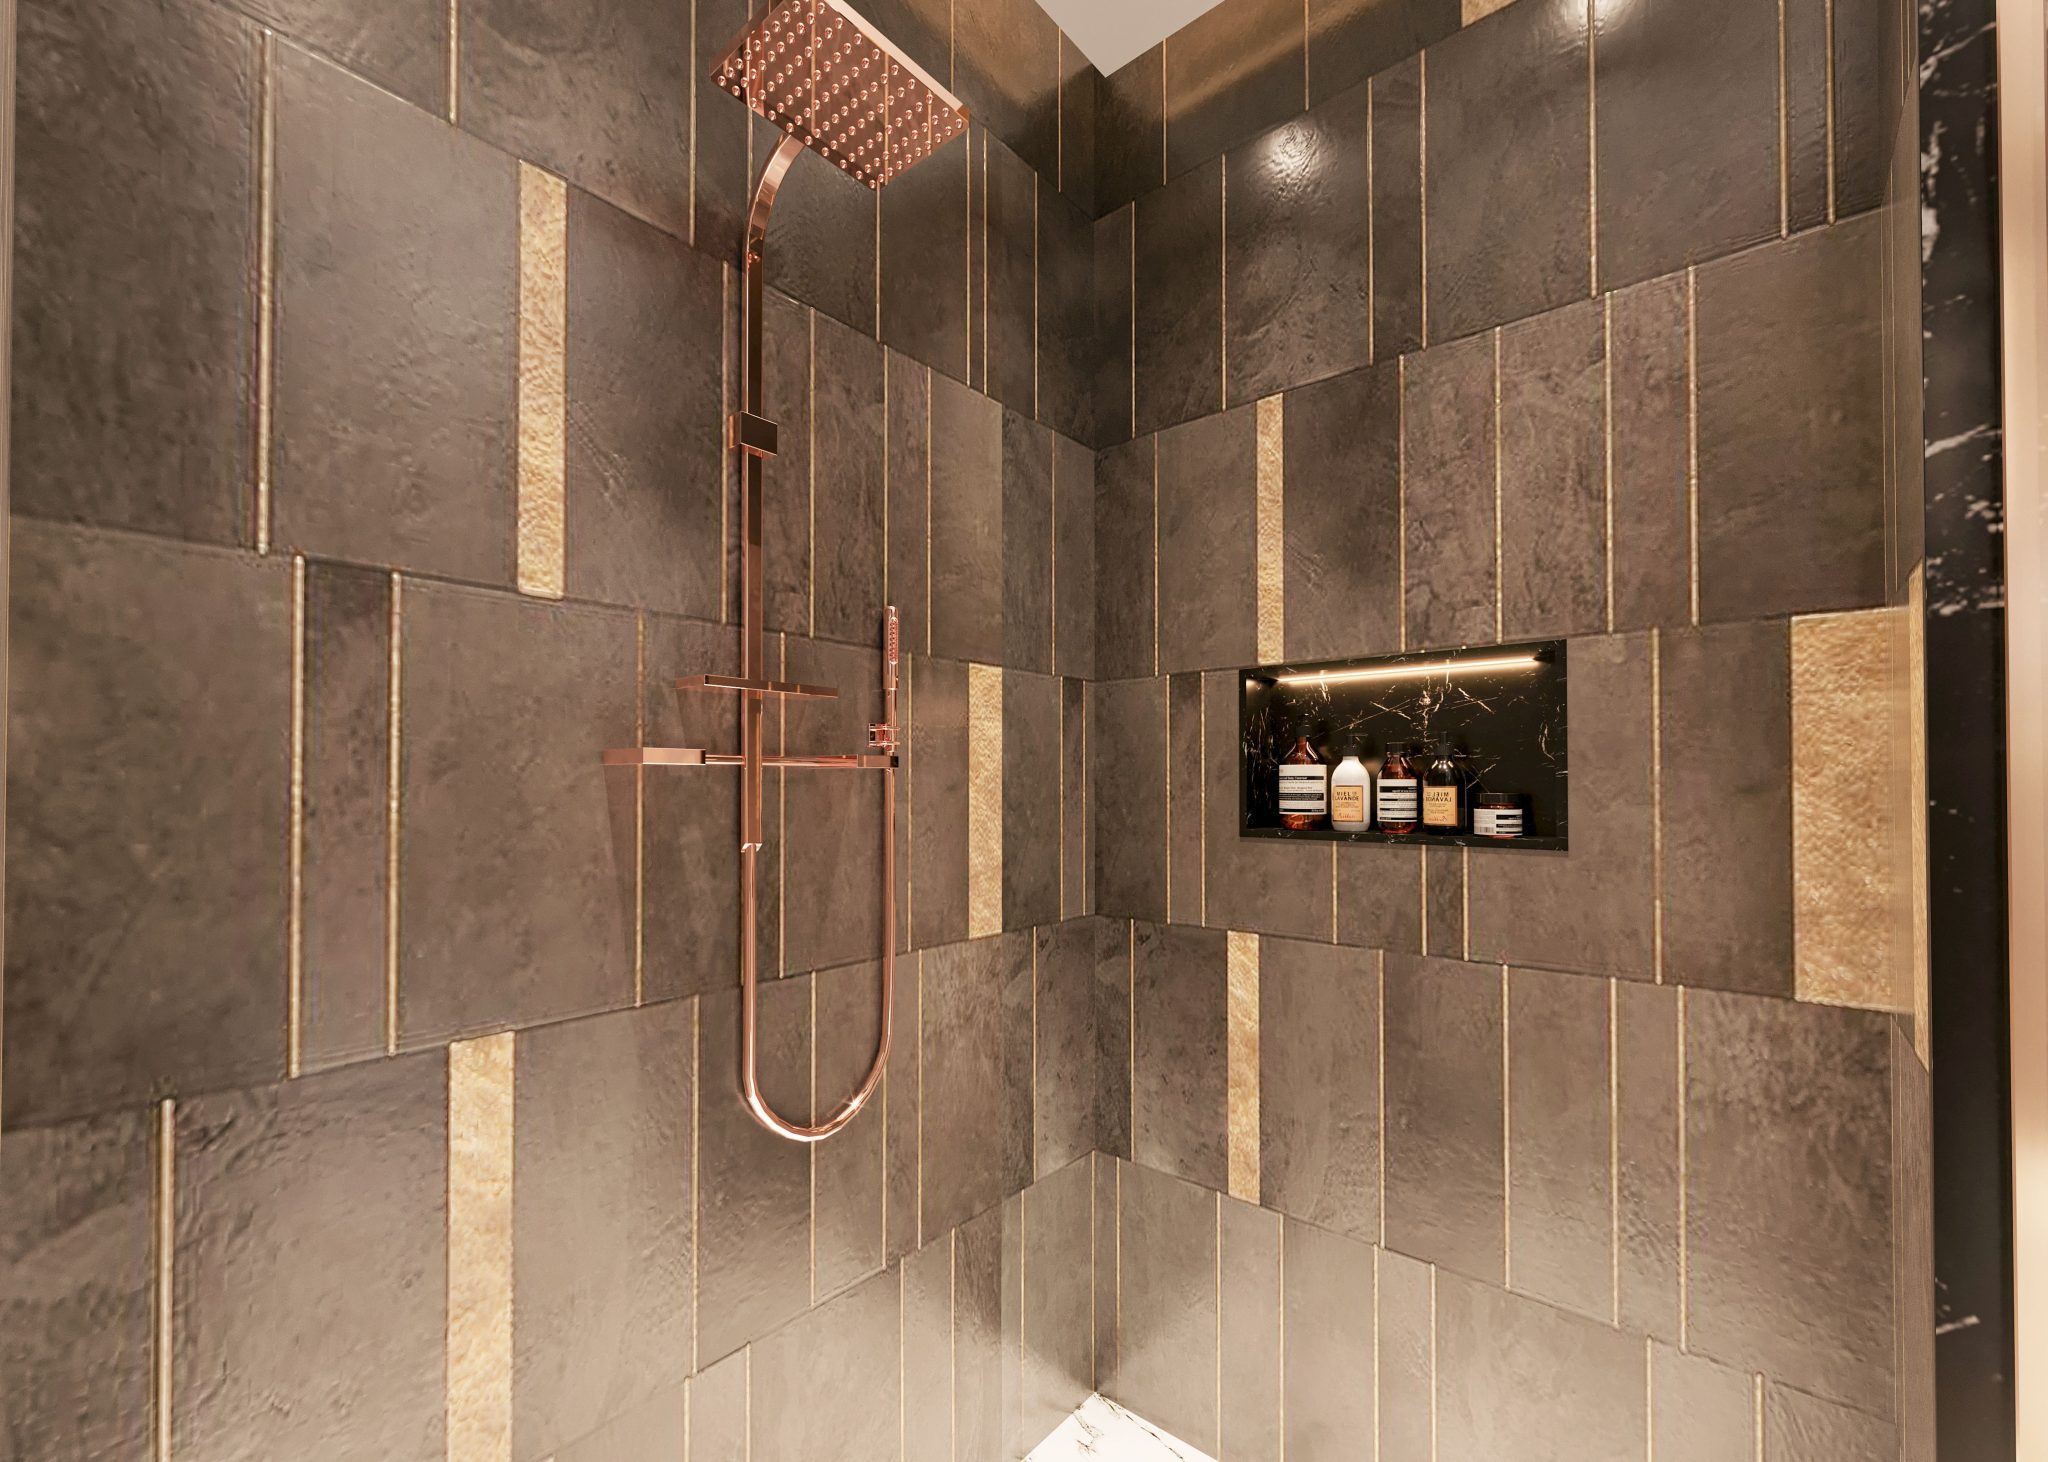
30. Refined Drama: Dark Tiles with Copper Fixtures
Copper and bronze fixtures bring a beautiful warmth to a bathroom, but they come with specific care instructions. Many have a ‘living finish,’ which means they will naturally patina and change color over time, especially when exposed to water and air. Some people love this evolving, organic look. If you prefer your fixtures to stay shiny, look for options with a PVD (Physical Vapor Deposition) finish, which is a more durable coating that resists tarnishing. Avoid harsh or abrasive cleaners; a soft cloth and mild soap are all you need.
|
📋 Copy HEX 🔗 Share |
🧹 Maintenance Reality
The single element that gives this shower its luxurious, refined character is the warm glow of the copper and bronze metals. Set against the dark, moody grey-brown tiles, these metallic elements don’t just feel like fixtures; they feel like jewelry. The vertical bronze accent strips echo the finish of the copper shower system, creating a cohesive and intentional design. It’s this warm metallic light that brings the dark space to life, preventing it from feeling cold or somber.
Your Bathroom Story Begins Now
That’s a wrap on 30 of the most inspiring bathroom directions for 2026! We hope you’ve found an idea—or even just a detail—that sparks your imagination. Remember, the best design is the one that reflects you and how you want to feel in your own home. Now, open up that Pinterest board you’ve been curating. It’s time to start dreaming and scheming.