You know that feeling when you finally find the warm neutral bathroom idea that looks exactly right? It’s a mix of relief and pure excitement. But turning that Pinterest dream into a reality requires more than just a pretty picture. We’ve done the hard work for you, curating 32 distinct takes on the warm neutral trend that feel fresh and timeless for 2026. This isn’t just about paint colors; we’re diving deep into texture, materials, and mood. And stay until the end—we break down the most common mistakes that can ruin these looks. 📌 Save this to Pinterest for later—you’ll want to revisit these ideas.
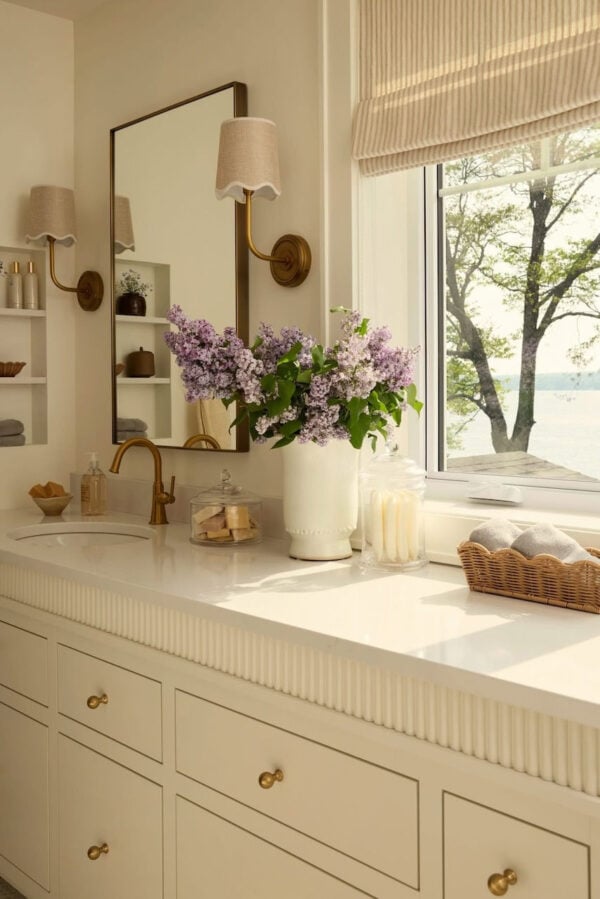
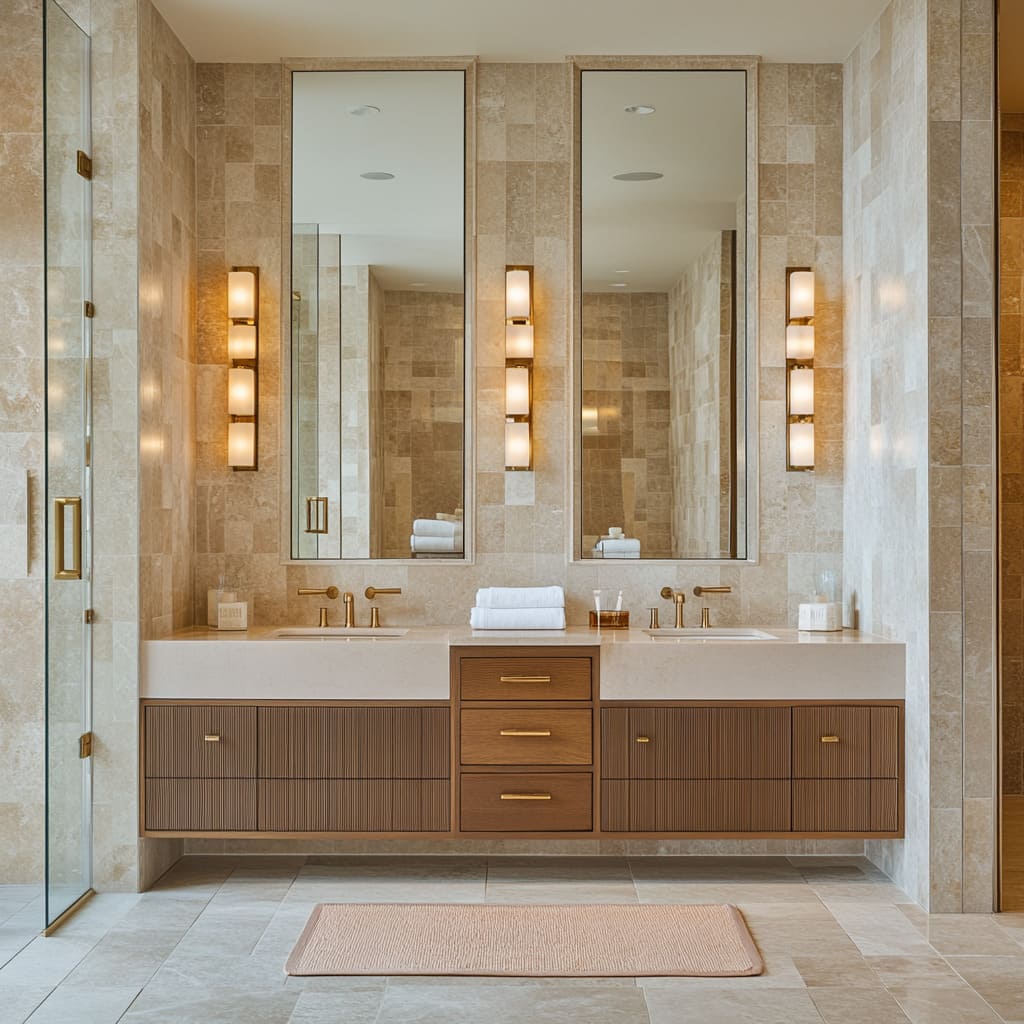
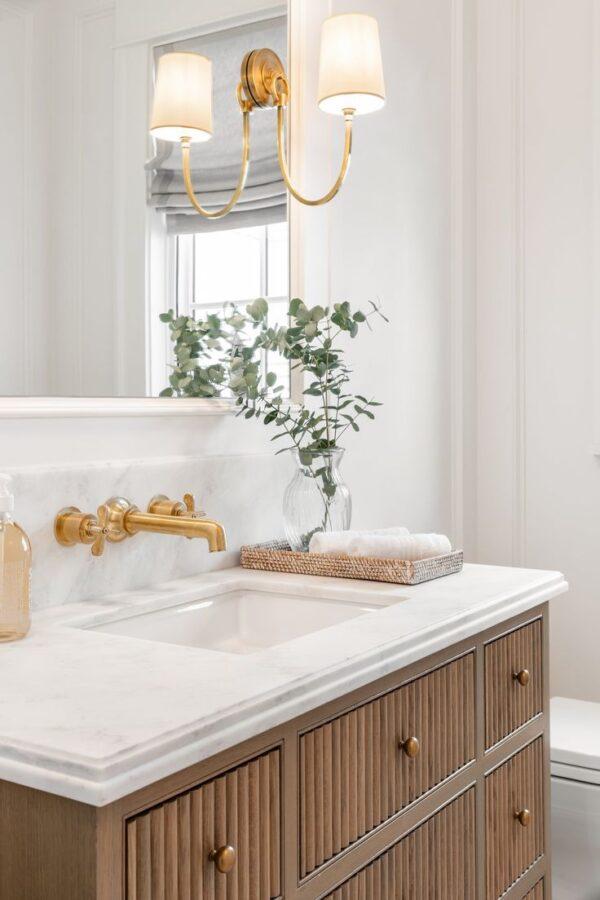
1. Embrace Elegance with a Fluted Vanity and Scalloped Sconces
What makes this space feel so special is the masterful play on texture and form. The vertical lines of the fluted vanity create a subtle rhythm that draws the eye upward, making the room feel taller. This linear element is beautifully softened by the gentle curves of the scalloped fabric sconce shades and the rounded arch of the brass faucet. It’s a classic design principle in action: pairing straight lines with curved forms creates a dynamic yet balanced composition that feels both sophisticated and welcoming.
|
📋 Copy HEX 🔗 Share |
✅ Before You Start
To get the lighting just right in a setup like this, flanking the mirror with sconces is key. For optimal task lighting when getting ready, mount the center of each sconce shade roughly 60-65 inches from the finished floor. This typically places the light source at eye level, casting an even glow across your face and eliminating those unflattering shadows that overhead lighting can create. Ensure the sconces are at least 4 inches away from the mirror’s edge to avoid a cramped look.
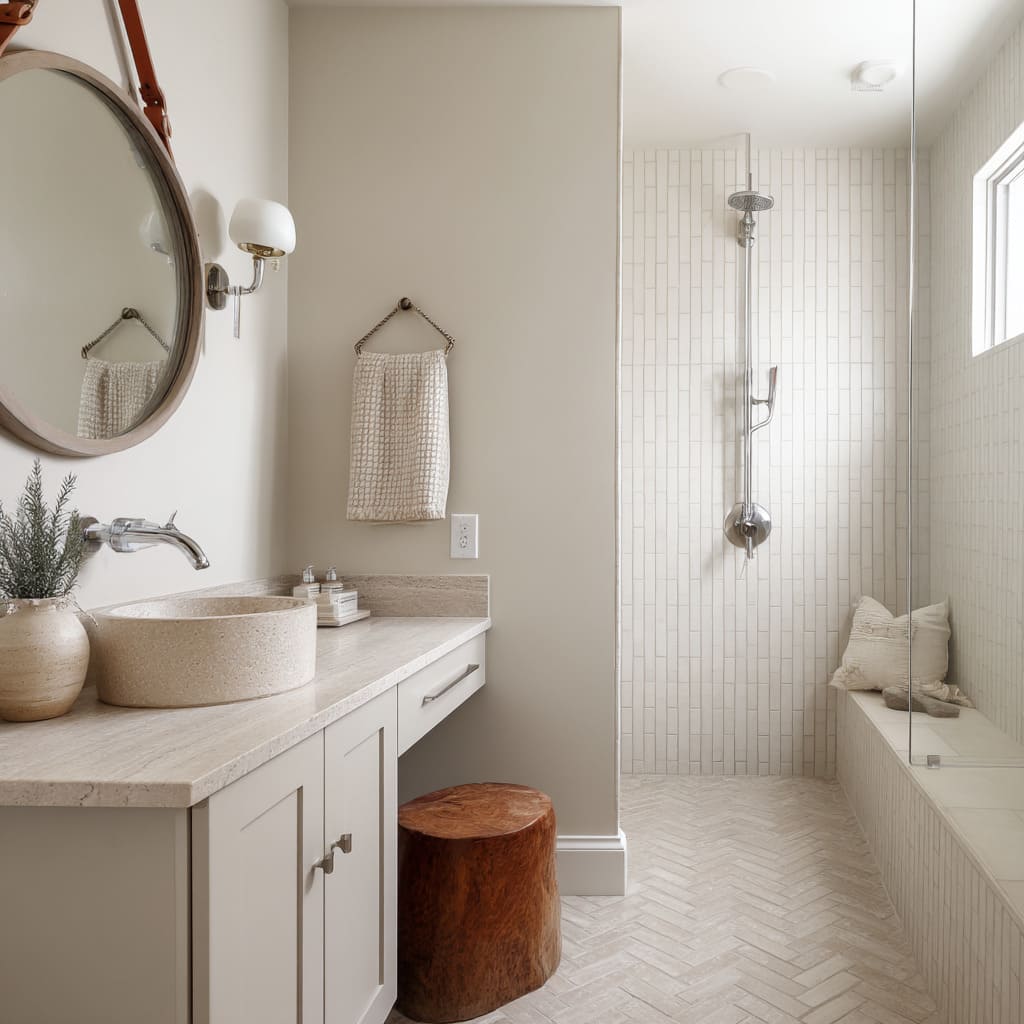
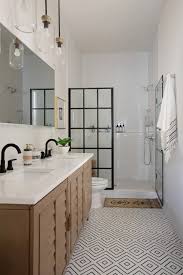
2. Combine Natural Wood and Textured Stone for Serenity
The single element that truly defines this bathroom is the travertine countertop. It’s the visual anchor, lending an earthy, organic quality that a standard white quartz or marble just couldn’t achieve. Its warm, porous texture bridges the gap between the smooth white tiles and the natural grain of the wood accents. Removing it would strip the room of its core identity, leaving a much more generic and less grounded space. It proves that one standout material choice can elevate an entire design.
|
📋 Copy HEX 🔗 Share |
🎯 What Makes It Work
A word of caution about vessel sinks: while they make a strong style statement, they can be less practical for everyday life, especially in a family bathroom. The raised height can be awkward for children, and splashing is a common issue, leading to more frequent wipe-downs of the countertop. Additionally, cleaning around the base where the sink meets the counter can be tricky. They work best in a powder room or a primary bath where form is just as important as function.
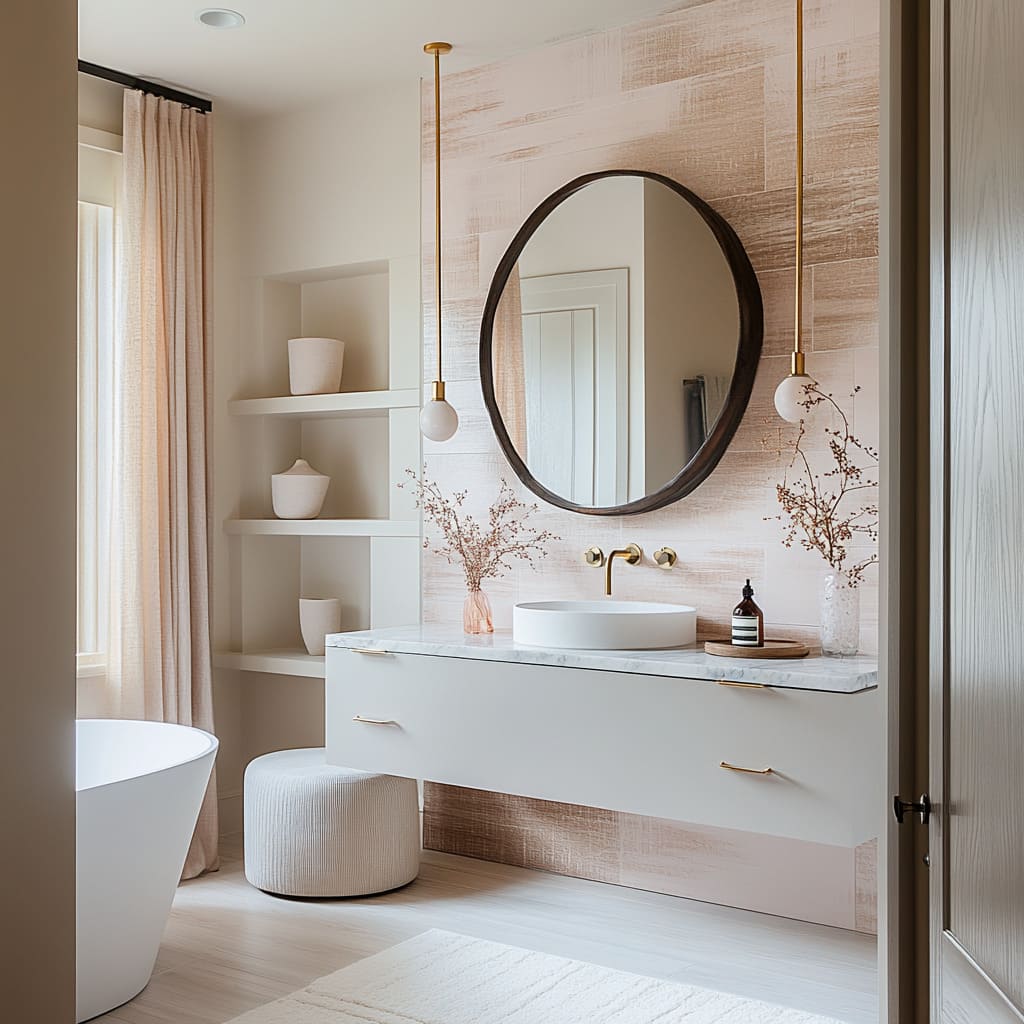
3. Soften Modern Lines with Organic Shapes and Blush Tones
This bathroom’s success lies in a carefully balanced formula: 50% soft texture + 30% clean modern lines + 20% organic shapes. The textured blush and cream wall panels provide the soft, tactile base. The floating white vanity and light wood floors are the clean, minimalist foundation. The final, crucial layer comes from the irregularly shaped mirror and oval tub, which break the geometry and add a sculptural, human touch. You could swap the blush for a soft sage or taupe and still maintain the same calming effect.
|
📋 Copy HEX 🔗 Share |
📏 Scale Guide
This look is wonderfully adaptable but thrives in a room with at least 60 square feet to breathe. The key is allowing enough negative space around the freestanding tub and floating vanity to appreciate their forms. A minimum ceiling height of 8 feet is needed to accommodate the long brass pendant lights without them feeling crowded. In a smaller space, consider a wall-mounted faucet and a single, more compact sconce to achieve a similar feel without overwhelming the room. Compare this with the more compact setup in Idea #9.
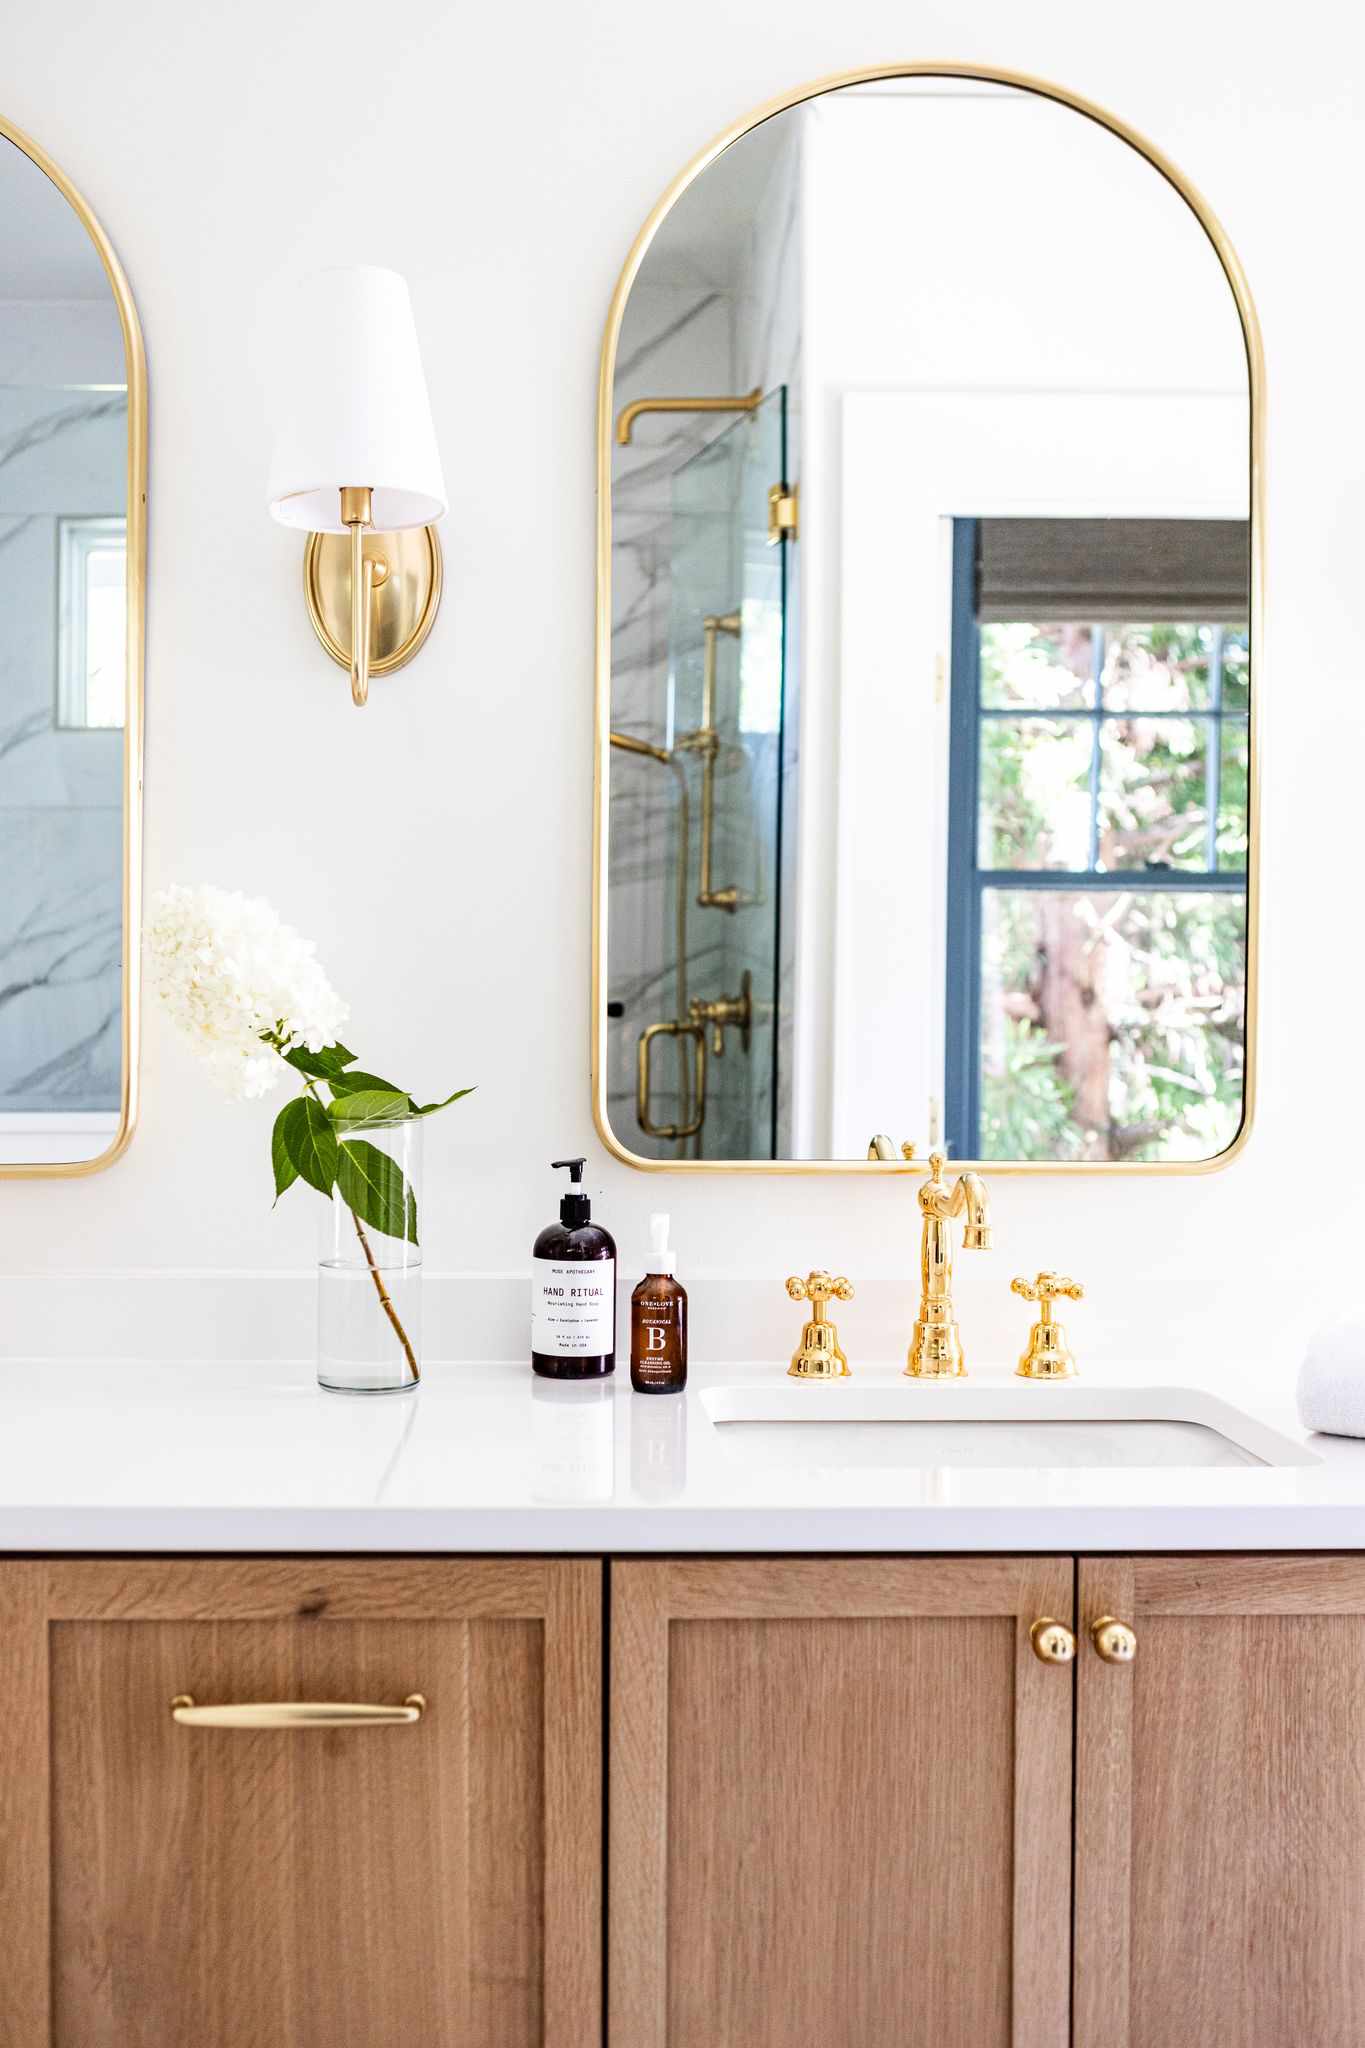
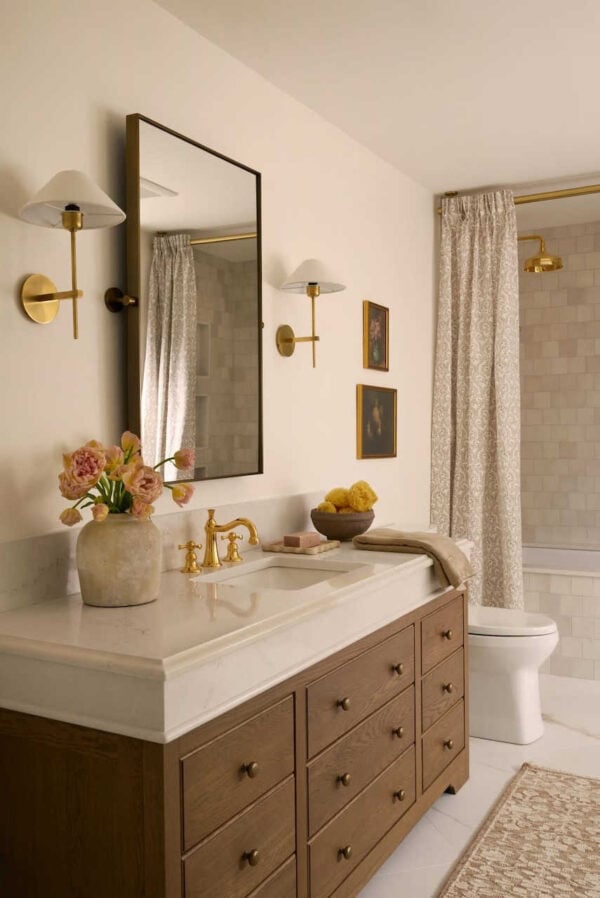
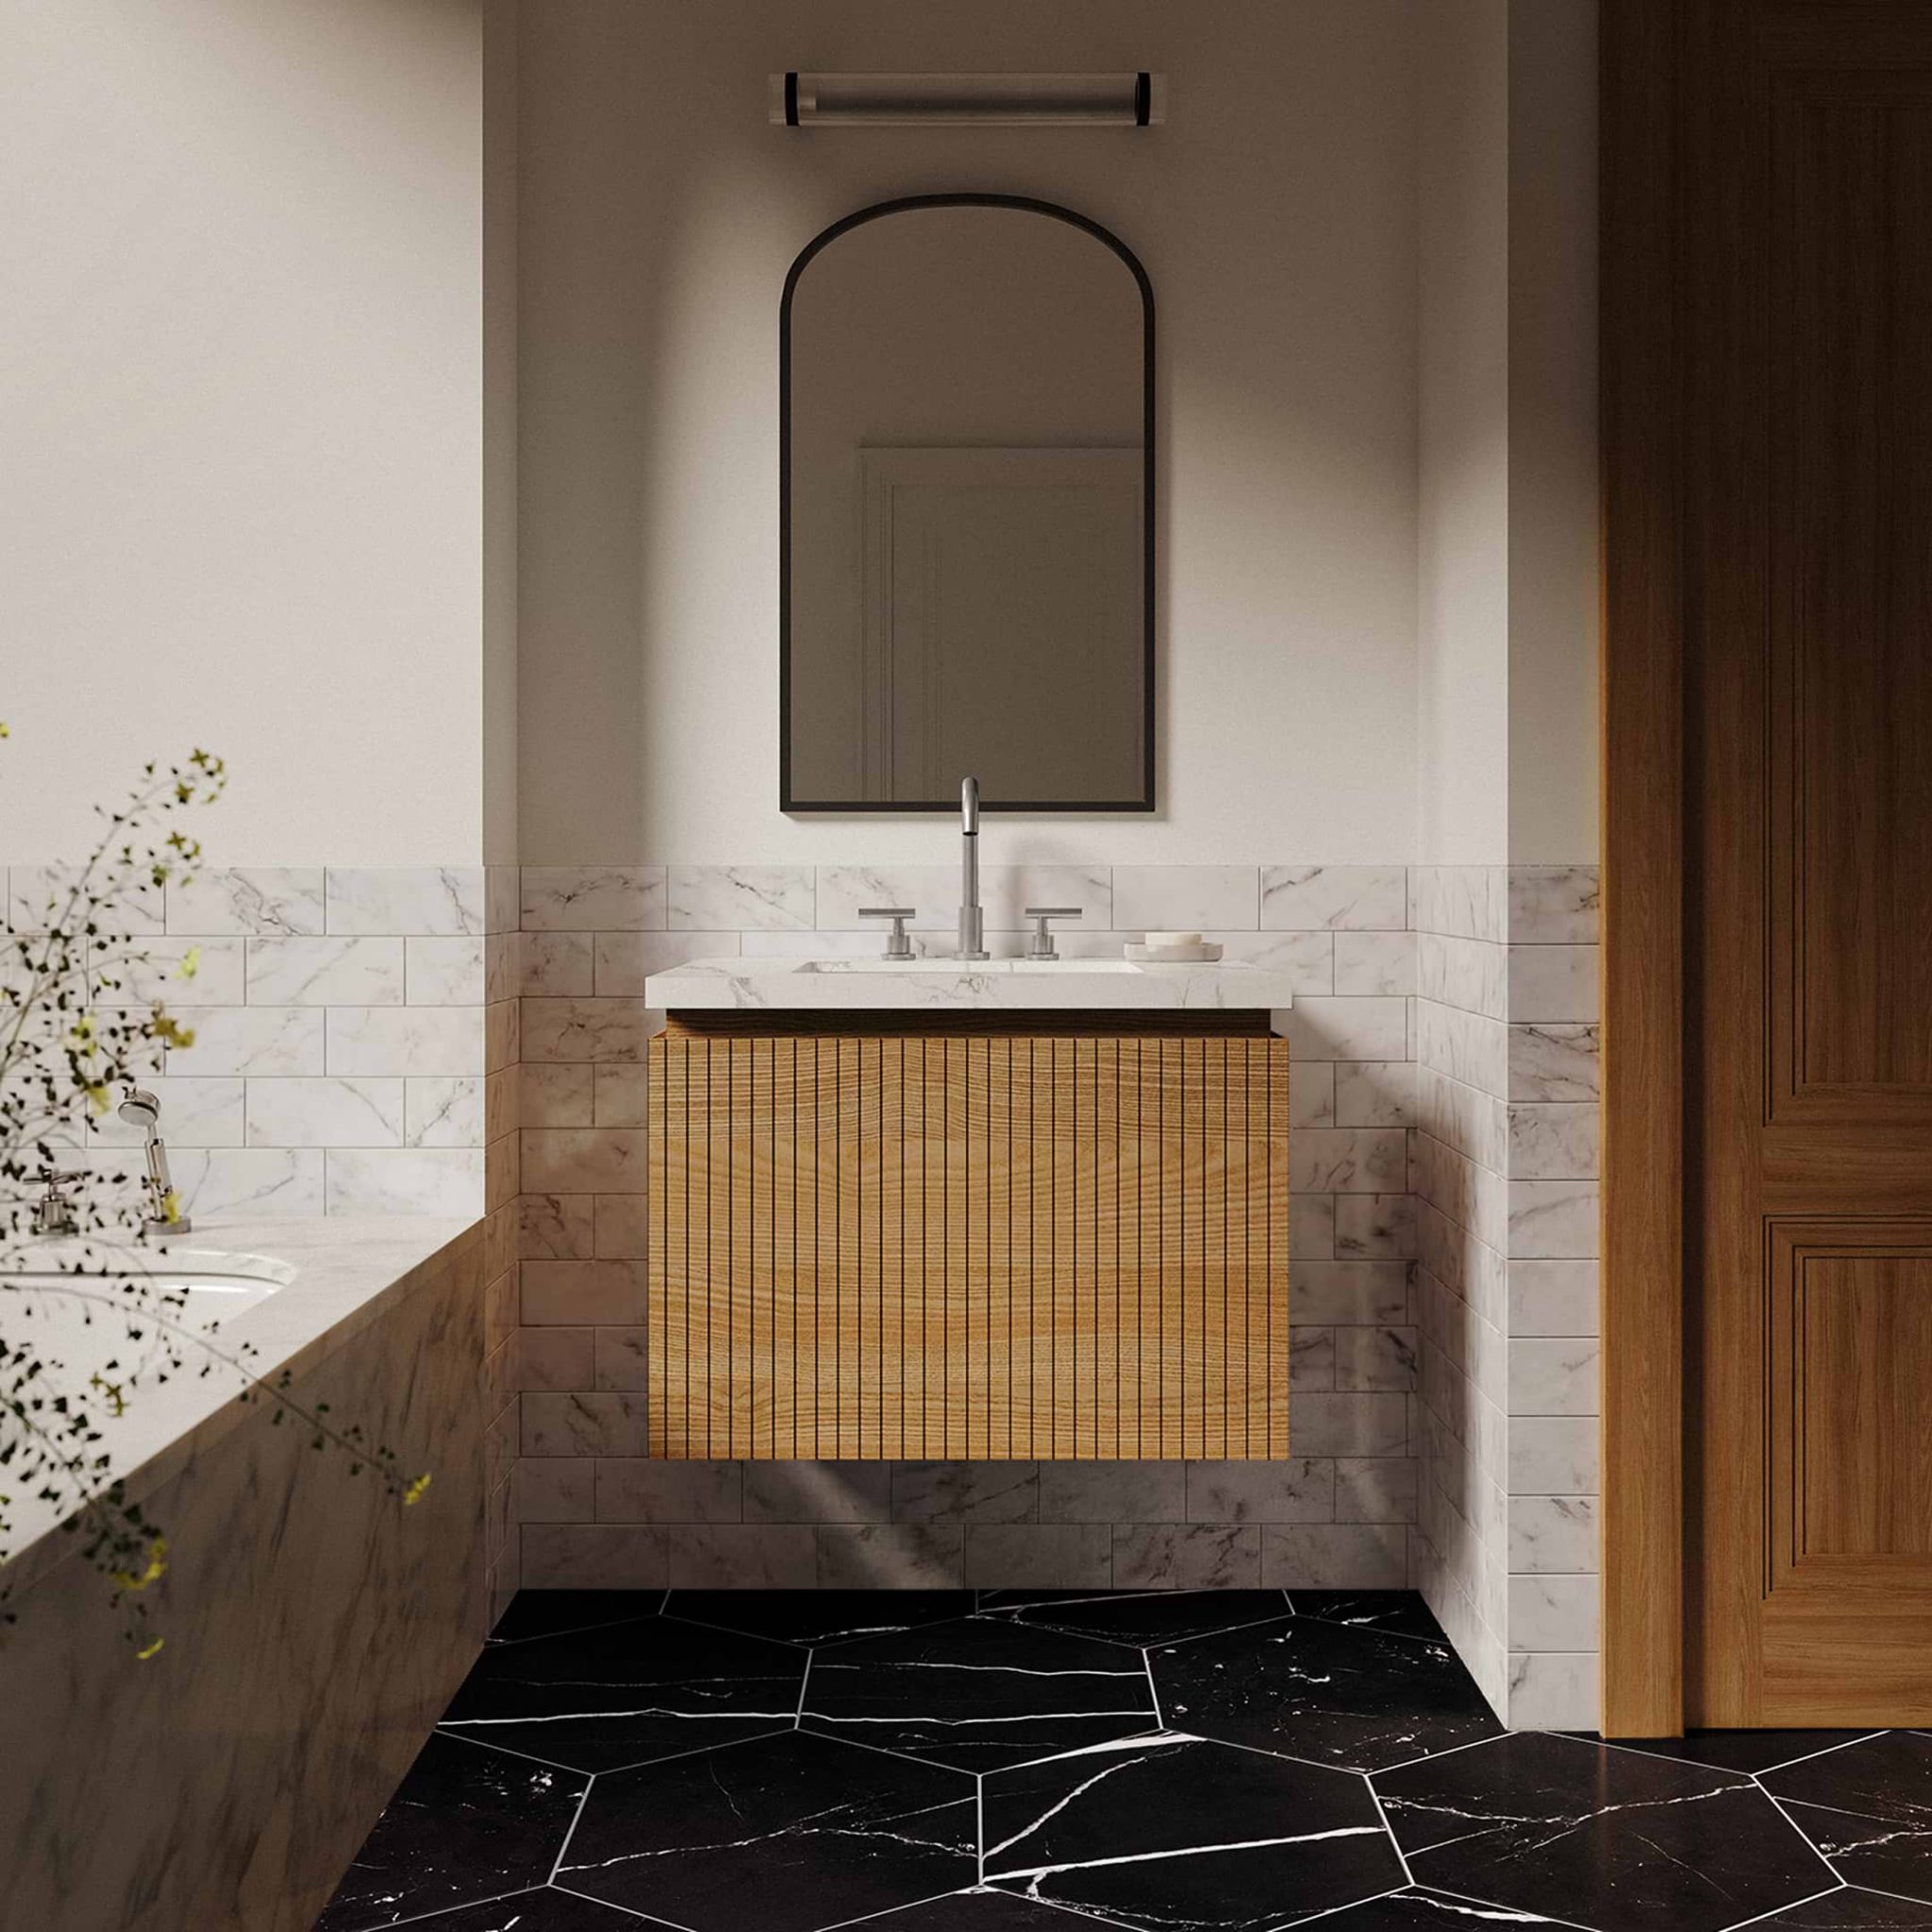
4. Use Arched Gold Mirrors to Elevate a Wood Vanity
- Main Furniture (Vanity): $800 – $2,200
- Lighting (Sconce): $150 – $400
- Mirrors (Set of 2): $300 – $700
- Fixtures (Faucet, etc.): $250 – $600
- Decor/Accessories: $50 – $150
- Budget alternative: Find a used wood dresser on Facebook Marketplace ($100-$300) and convert it into a vanity. Source mirrors from a home goods store and use rub-on gold leaf for a luxe finish, bringing the total closer to $900.
- TOTAL: $1,550 – $4,050
|
📋 Copy HEX 🔗 Share |
🔥 Trending Context
The brilliance of this design is in its repetition of shape and color. The soft curves of the arched mirrors are subtly echoed in the gooseneck of the gold faucet, creating a sense of visual harmony. This repetition makes the design feel intentional and cohesive. Furthermore, the warmth of the gold accents against the natural wood vanity creates a rich, layered look without introducing any loud colors. The bright white countertop acts as a clean break, preventing the warm tones from becoming overwhelming.
5. Achieve a Contemporary Farmhouse Feel with Warm Neutrals
You don’t need a custom-built vanity to get this warm, contemporary farmhouse look. Start with a simple base cabinet from IKEA, like the GODMORGON series ($200-$400). Then, head to a local stone yard for a remnant piece of quartz or marble for the countertop—this can save you 50% or more compared to a full slab. For the fixtures, look for brushed brass or matte black options from big-box stores like Lowe’s or Home Depot, which often have stylish options for under $200. The key is mixing high and low to create a look that feels custom without the colossal price tag.
|
📋 Copy HEX 🔗 Share |
🧹 Maintenance Reality
This refined take on the farmhouse aesthetic is gaining traction because it moves away from the rustic clichés (like shiplap everywhere) and toward a more timeless, sophisticated style. It’s part of a larger cultural shift away from overtly themed décor and towards more personal, blended interiors. This look has staying power because its core components—clean lines, natural materials, and neutral colors—are eternally classic. It feels current for 2026 but won’t look dated in 2036.
6. Create a Seamless Look with Floor-to-Ceiling Beige Tile
The floor-to-ceiling warm beige tile is the absolute hero of this bathroom. By using the same large-format rectangular tile on both the walls and the floor, the space feels expansive, seamless, and incredibly serene. This technique, known as monolith tiling, erases the visual boundaries between surfaces, tricking the eye into seeing a larger, more unified room. It creates a calming, gallery-like backdrop that allows the floating wood vanity and gold accents to truly shine without competing for attention.
|
📋 Copy HEX 🔗 Share |
💡 Designer Tip
While a fully tiled bathroom is a dream for waterproofing, keeping all that grout clean is a real commitment. Opt for the largest format tiles you can to minimize grout lines from the start. During installation, insist on an epoxy-based or stain-resistant grout, which costs more upfront but saves countless hours of scrubbing mildew later. Sealing the grout annually (a simple wipe-on, wipe-off process) is non-negotiable to keep it looking fresh and prevent discoloration, especially in the shower area.
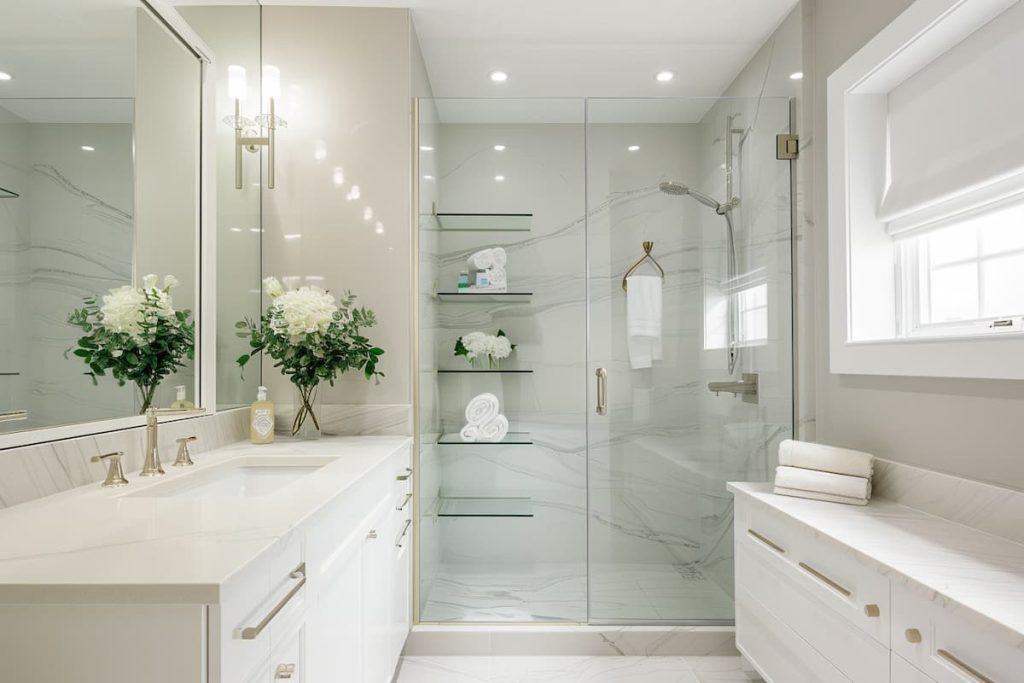
7. Mix White Marble and Brushed Gold for a Bright, Modern Vibe
This bathroom is a masterclass in mixing warm and cool tones. The white marble with cool gray veining could easily feel stark, but the introduction of brushed gold hardware and warm gray wall paint instantly raises the temperature. This balance is what makes the room feel so inviting and sophisticated. The large, simple mirror also plays a crucial role by reflecting the light and the marble pattern, making the room feel bigger and brighter without adding visual clutter.
|
📋 Copy HEX 🔗 Share |
💰 Budget Breakdown
When using a large-scale marble pattern like this, let it be the star. The key is to ensure the pattern flows logically across different surfaces. When templating your countertops and shower walls, work with your fabricator to map out exactly which parts of the slab will be used where. This allows you to highlight the most beautiful veining in prominent spots and ensure the direction of the pattern feels continuous, especially around corners. This small step makes the difference between a standard installation and a high-end designer look.
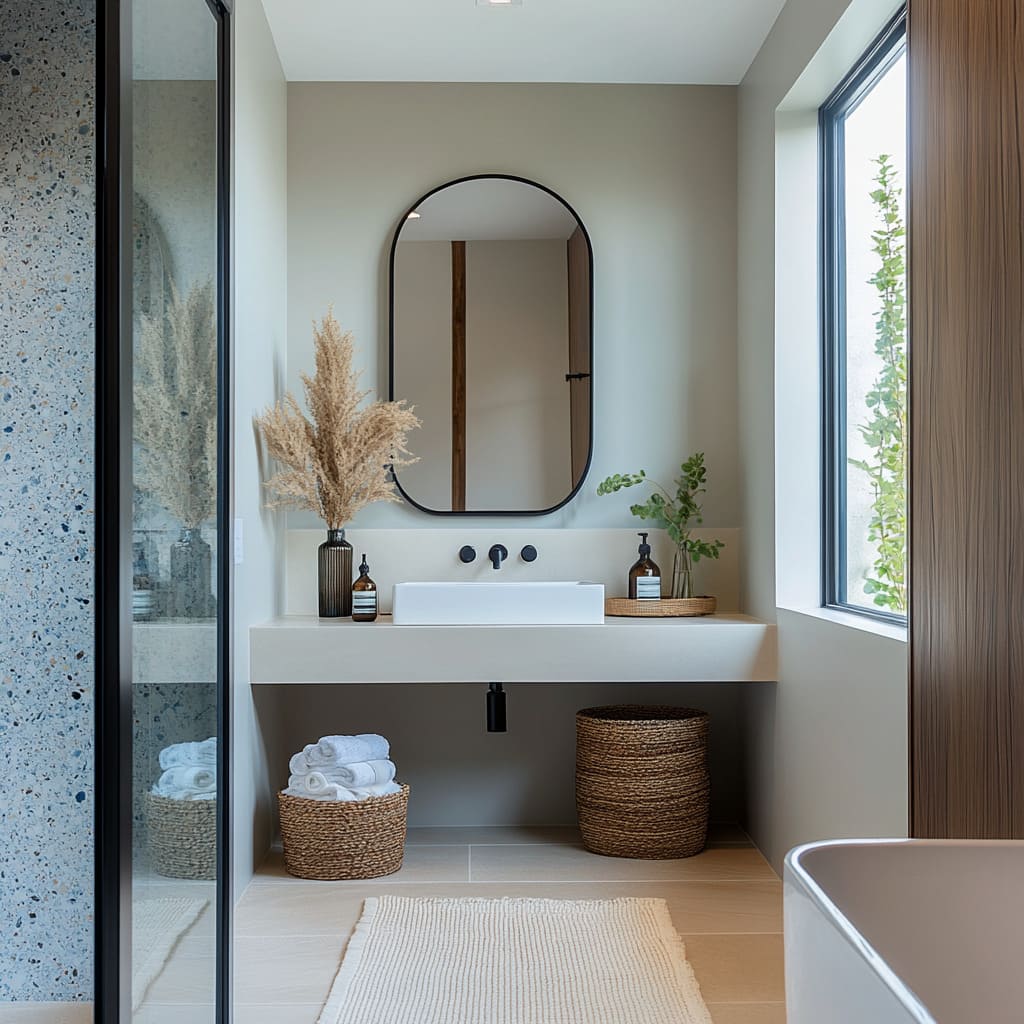
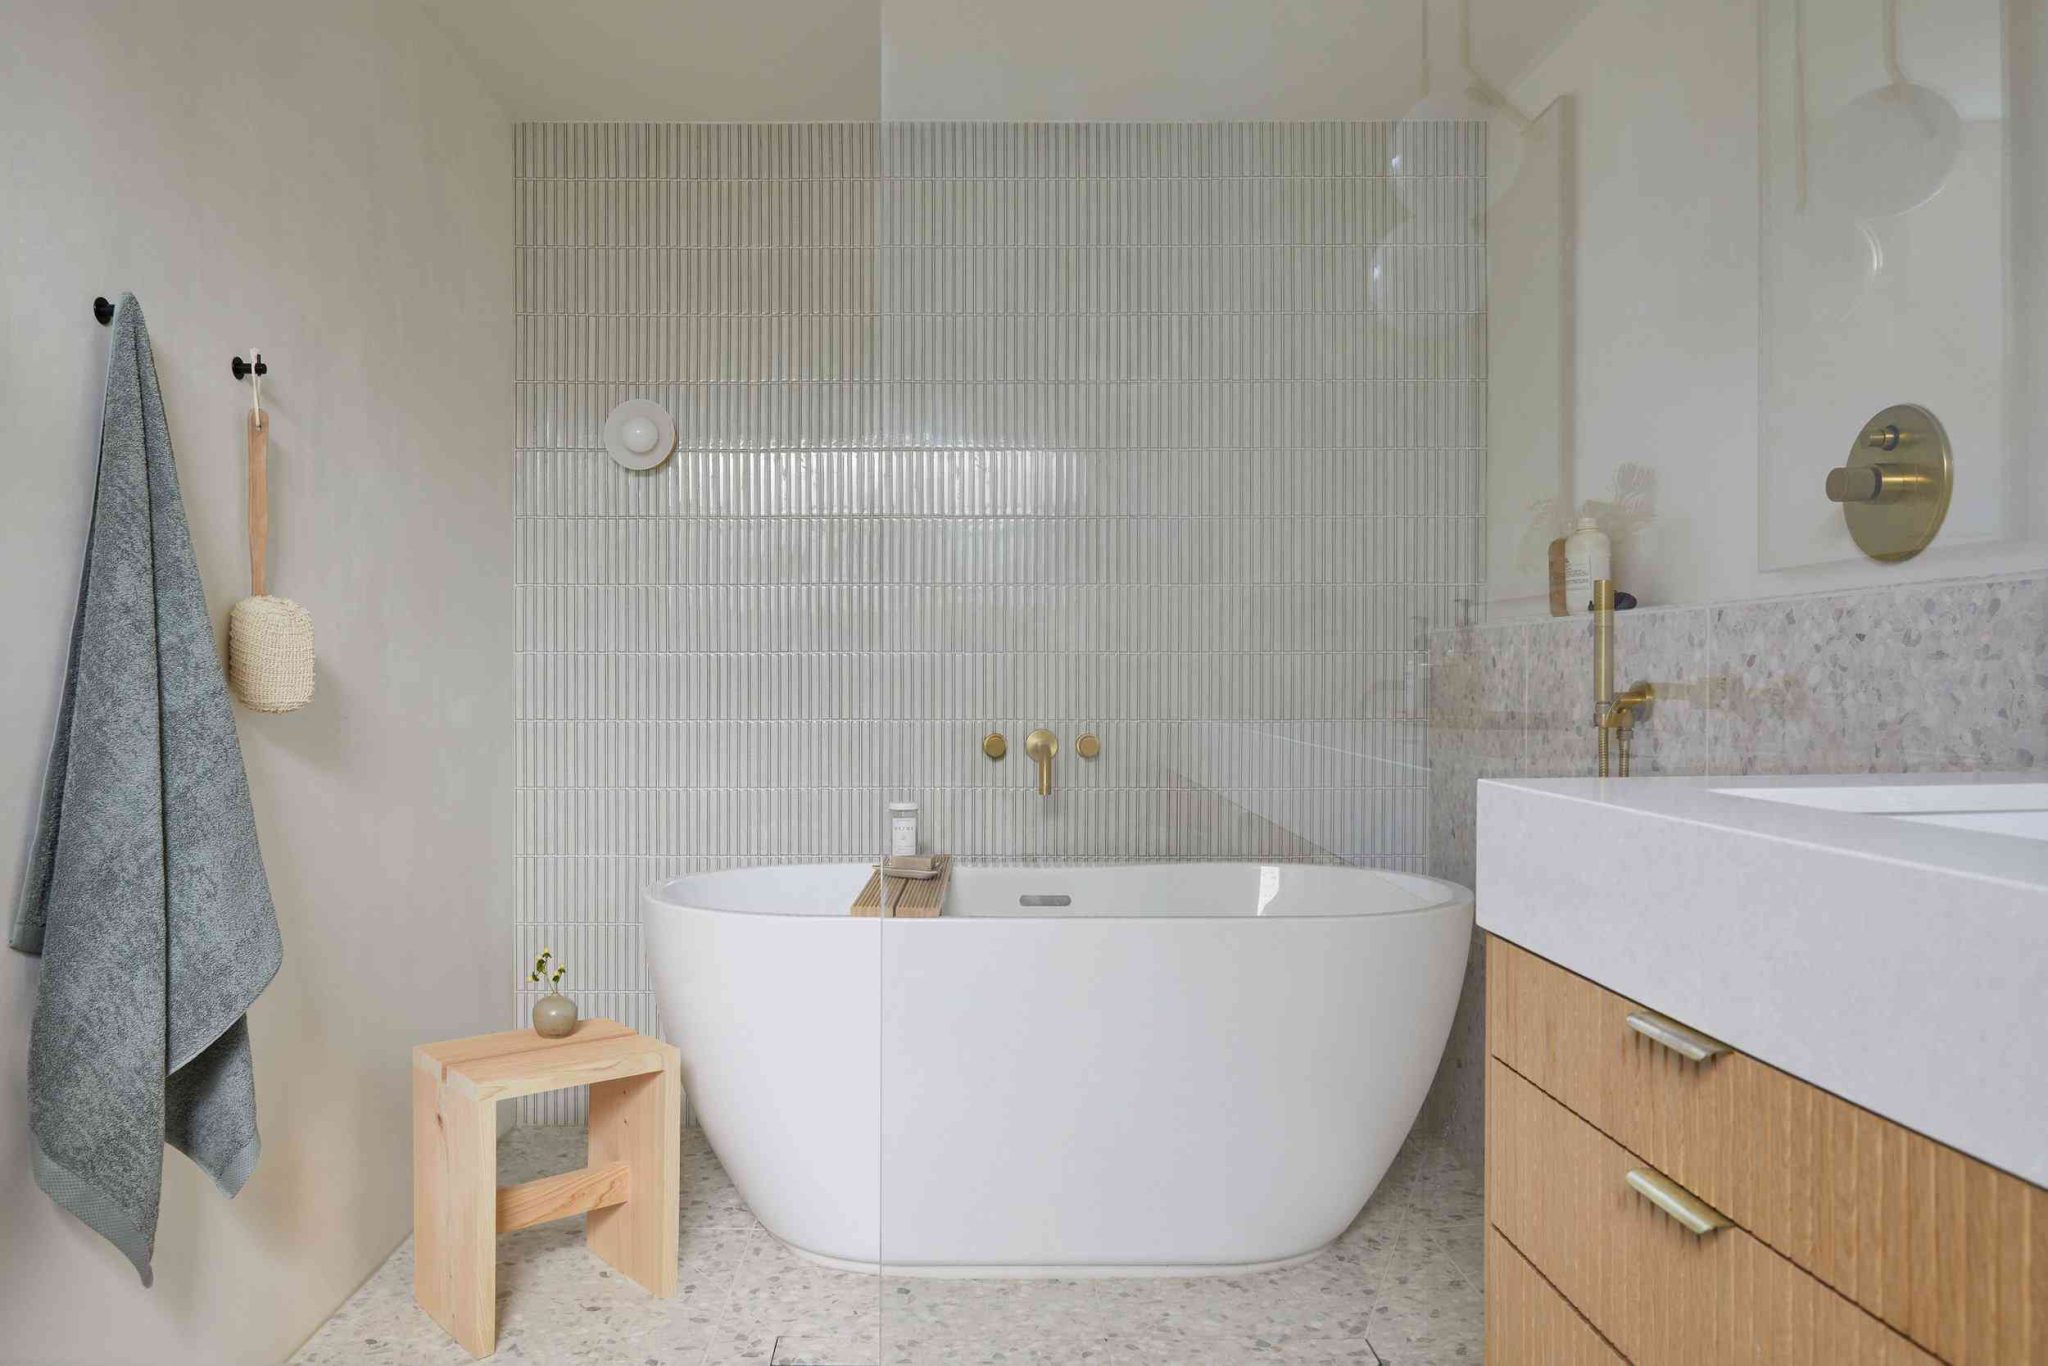
8. Add Texture with Terrazzo, Woven Baskets, and Pampas Grass
Let’s be honest about terrazzo: while it’s undeniably stylish and offers great texture, the real deal can be a significant investment. Furthermore, the subtle pattern can sometimes be lost in a smaller space or if obscured by other elements. If you’re on the fence, consider large-format porcelain tiles with a terrazzo effect. They provide a very similar look for a fraction of the cost and are often easier to maintain. Also, be mindful of pairing it with other strong patterns; terrazzo works best when it’s the main textural feature, as seen here. A similar vibe is found in Idea #26.
|
📋 Copy HEX 🔗 Share |
⚠️ Real Talk
The visual recipe here is all about balancing hard and soft: 40% smooth, painted surfaces + 30% hard-textured materials (terrazzo, tiles) + 30% soft, natural textures. The light beige walls and vanity top provide a quiet base. The terrazzo shower and floor tiles add pattern and a cool, stony feel. The final, essential 30% comes from the woven baskets, pampas grass, and wood grain, which introduce organic warmth and softness. Without this final layer, the room would feel flat and cold.
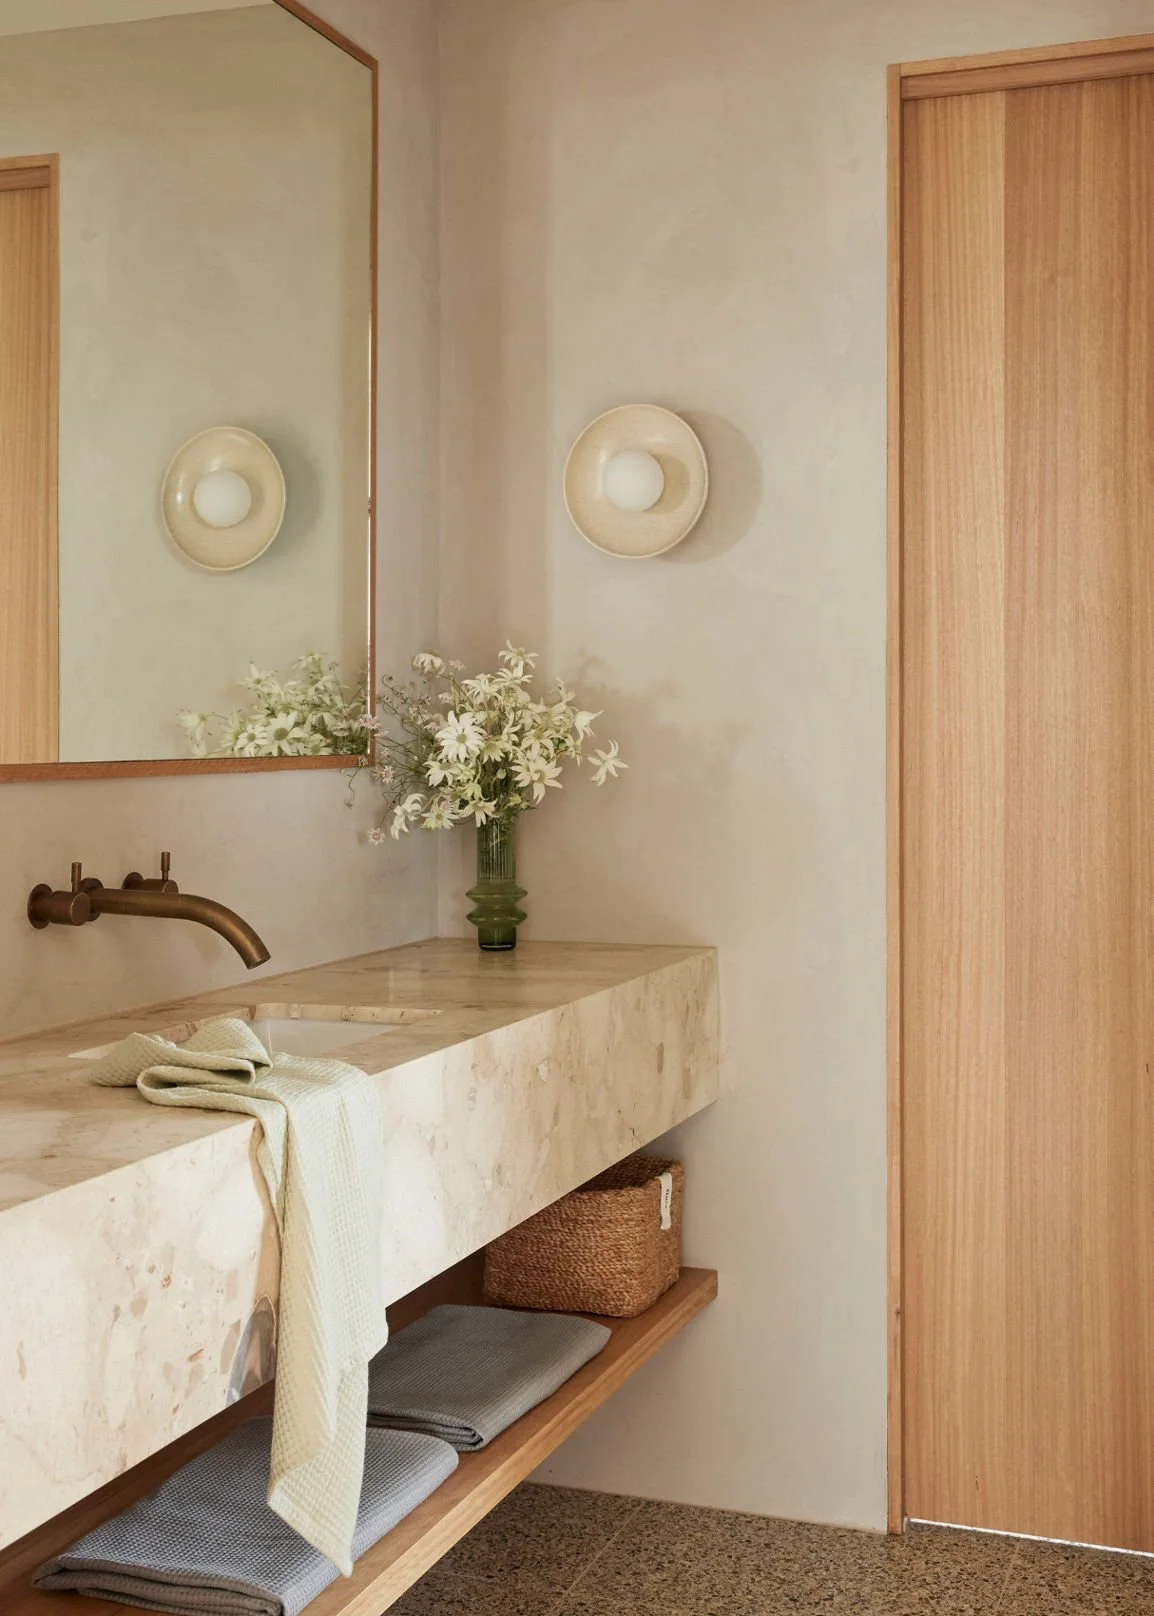
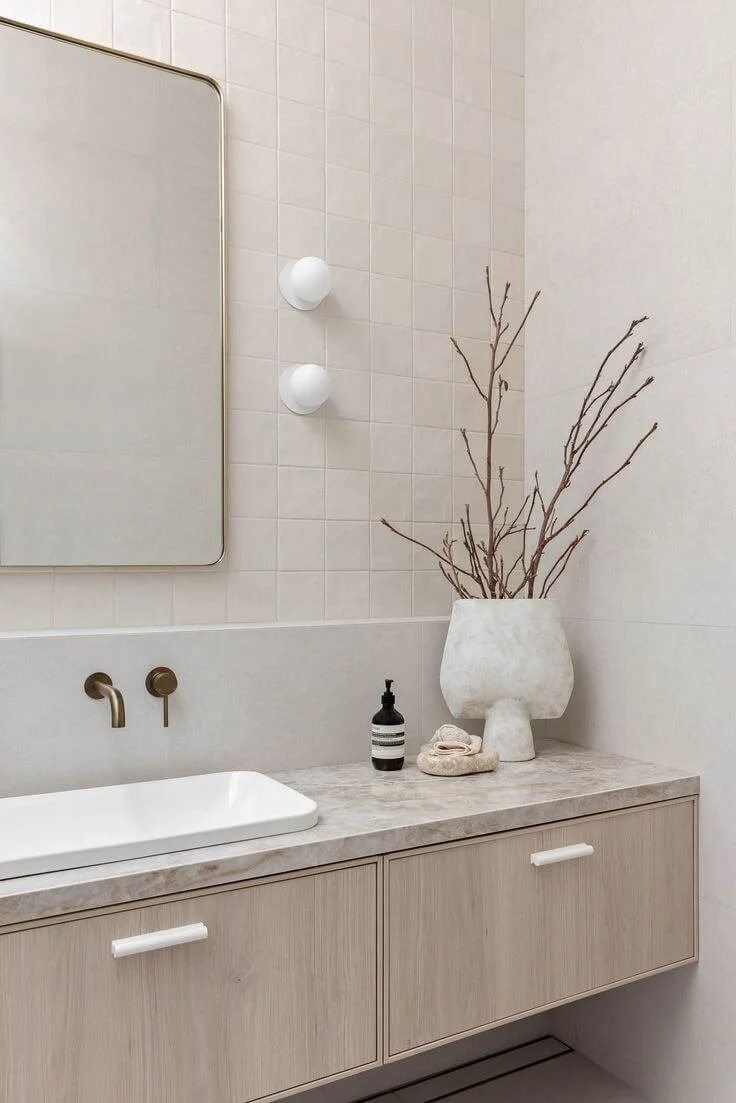
9. Use Fluted Sconces and a Floating Marble Vanity for a Minimalist Look
The delicate, fluted dish-shaped sconces are the detail that elevates this entire corner. They are unexpected and sculptural, functioning as both lighting and art. While the floating marble vanity is beautiful, it’s a more familiar element in modern design. The sconces, however, introduce a unique texture and a soft, diffused light that contrasts beautifully with the hard marble and clean lines of the faucet. They add a layer of thoughtful, artistic detail that makes the minimalist space feel curated and special.
|
📋 Copy HEX 🔗 Share |
📐 Style Math
A floating vanity setup like this is perfect for making a small bathroom or powder room (around 30-50 square feet) feel larger. By exposing the floor underneath, it creates an uninterrupted sightline that enhances the sense of space. For this look to work, ensure the vanity is mounted at a comfortable height (typically 34-36 inches from the floor to the top of the counter). The open space below isn’t just for looks; it’s a practical spot for a stylish basket or, as shown here, an open shelf for towels.
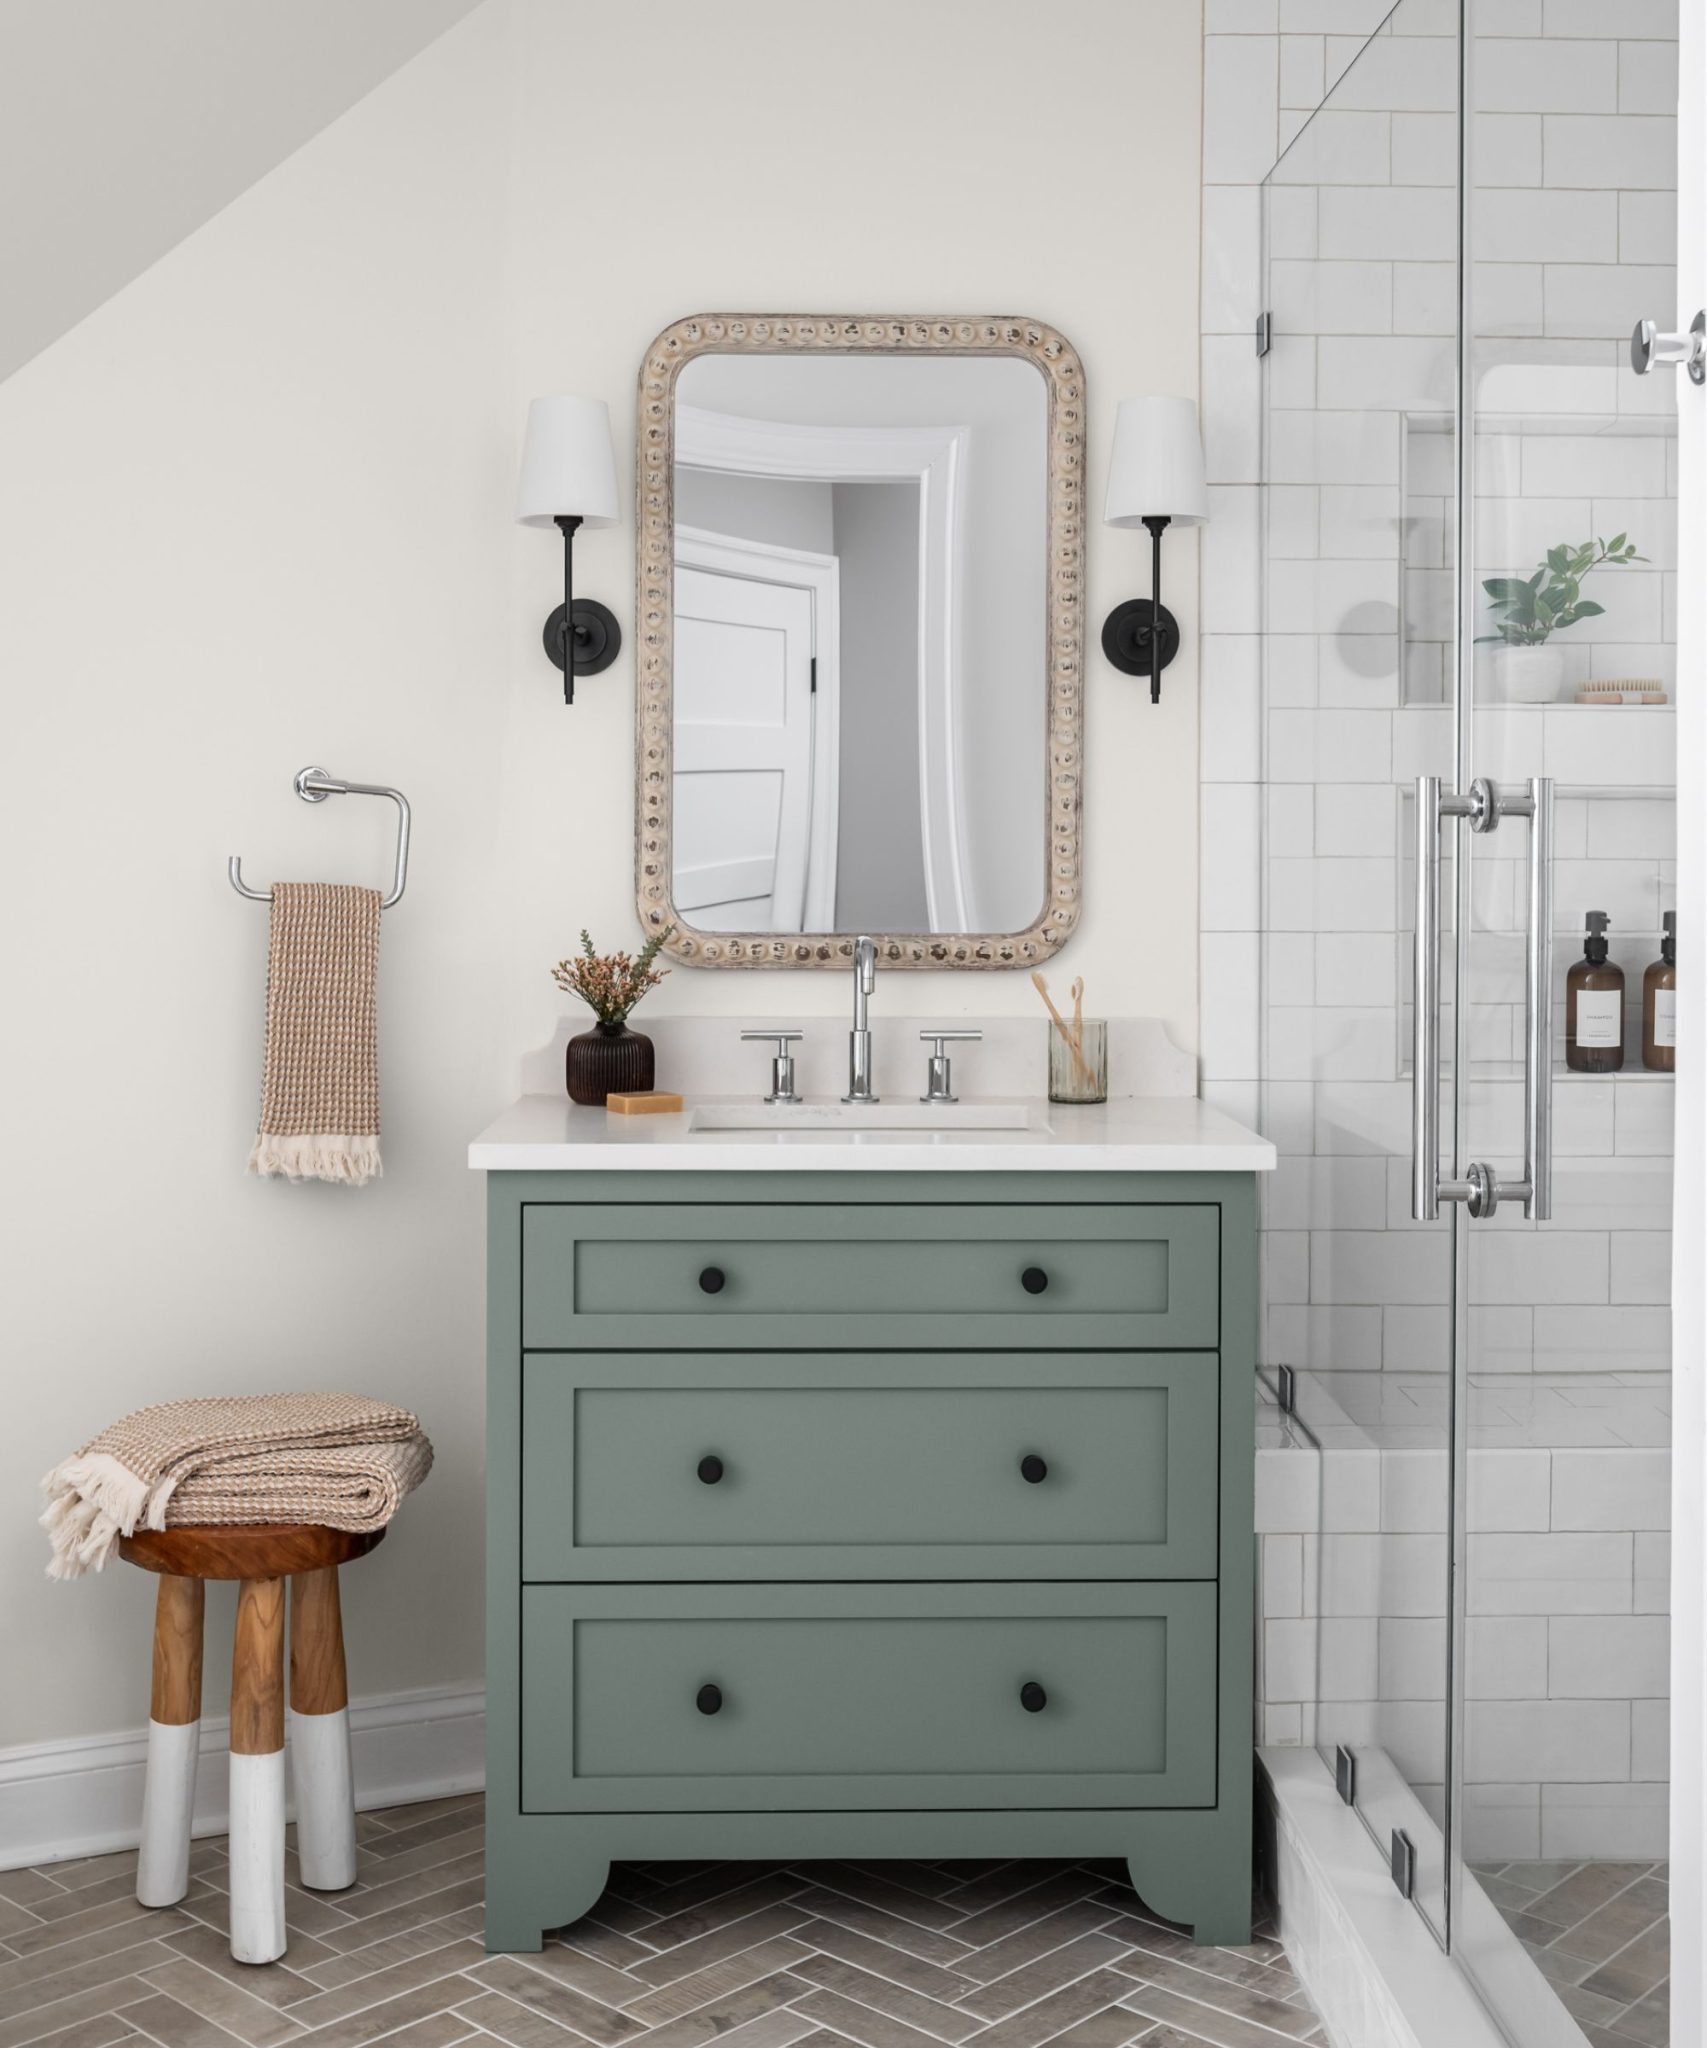
10. Ground a Room with a Sage Green Vanity and Herringbone Floors
The combination of sage green, warm gray, and white works beautifully because it’s rooted in nature. The sage green of the vanity provides a soft, earthy anchor. The warm gray herringbone floor tiles mimic the color of wet stone or slate, adding a natural texture and pattern without overwhelming the space. Finally, the crisp white of the subway tiles and countertop acts like a gallery wall, providing a clean, bright backdrop that allows the colors and patterns to stand out. It feels balanced and calm. For a bolder take on green, see Idea #13.
|
📋 Copy HEX 🔗 Share |
💸 Get This Look For Less
- Prep the Subfloor: Ensure the floor is clean, level, and free of debris. Apply a layer of thin-set mortar. (Time: 2 hours, Cost: $50)
- Find Your Centerline: Snap a chalk line down the center of the longest wall. This will be your primary guide.
- Set the First Tiles: Start in the center of the room, laying tiles at a 45-degree angle to your chalk line to begin the “V” shape of the herringbone. Use tile spacers for consistency.
- Cut and Fill: Work your way out from the center, cutting tiles with a wet saw to fit along walls and around obstacles. (Time: 4-6 hours, Cost: $75 for saw rental)
- Grout and Seal: After the mortar has cured (24-48 hours), apply grout, wipe away the excess, and let it cure. Finish by sealing the grout lines to protect them. (Time: 3 hours, Cost: $40)
11. Pair a Natural Wood Vanity with a Patterned Shower Curtain
When using dual sconces to flank mirrors over a double vanity, a common mistake is placing them too far apart. For the most effective and flattering light, the center of each sconce should be no more than 36 to 40 inches from the other. This ensures that the light from both fixtures overlaps in the middle, providing even illumination for both sink areas. Mounting them too wide creates a dark spot in the center and casts side-shadows on your face. Also, aim for the filament of the bulb to be at eye level, around 66 inches from the floor.
|
📋 Copy HEX 🔗 Share |
⭐ The One Thing
A beautiful wood vanity can be a big-ticket item. To get this warm, inviting look for less, focus on the supporting elements. You can find stunning patterned shower curtains at stores like Target or World Market for under $50. Pair that with affordable, stylish brass hardware from Amazon and framed art prints from a site like Juniper Print Shop. These details can make a more basic, budget-friendly vanity (or even a refinished secondhand piece) feel incredibly chic and intentional, giving you a similar vibe for under $1,000 all-in.
12. Achieve Serenity with Light Beige Square Tiles and Aged Brass
The single element that makes this bathroom work is the aged brass of the wall-mounted fixtures. In a space dominated by quiet, uniform neutrals like light wood and beige tile, the fixtures provide a crucial point of contrast and character. Unlike shiny polished brass, the muted, ‘living’ finish of aged brass has a depth and a story to it. It feels both modern and timeless, preventing the minimalist design from feeling sterile or one-note. It’s the perfect piece of ‘jewelry’ for the room.
|
📋 Copy HEX 🔗 Share |
🔧 How-To Brief
Wall-mounted faucets look incredibly sleek, but they require careful planning and professional installation. Unlike deck-mounted faucets, the plumbing and valve system must be installed inside the wall *before* any tile or drywall goes up. This means your sink and vanity choices need to be finalized very early in the design process to ensure the spout length and handle placement are perfect. Any future repairs will also be more invasive than with a standard faucet. It’s a stunning look, but it’s a commitment.
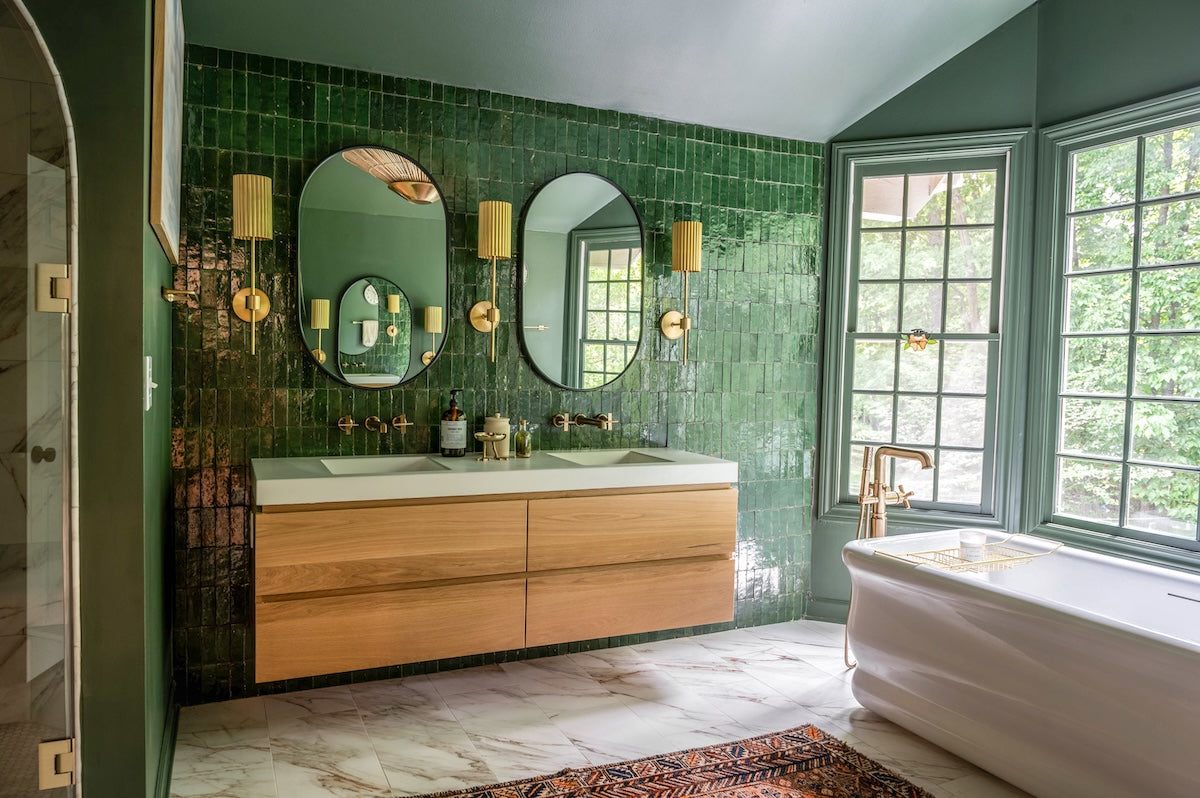
13. Make a Statement with an Emerald Green Tile Accent Wall
The magic here is in the color proportions. Think of it as: 60% bold statement color (the emerald green tile) + 30% natural warmth (the light wood vanity) + 10% crisp neutrality (the white tub and floor). This formula allows the green to be the undeniable star without overwhelming the senses. The wood provides a necessary organic counterpoint, and the white serves as a visual palate cleanser, making the whole composition feel bright and balanced. The small touches of brass add a final, jewel-like sparkle.
|
📋 Copy HEX 🔗 Share |
✅ Before You Start
- Verify lighting: A bold color like emerald green needs a lot of natural light to truly sing. Does your bathroom have a large window or potential for excellent artificial lighting to prevent it from feeling like a cave?
- Commit to the color: Are you truly in love with emerald green? A tile wall is a long-term commitment. Get a variety of tile samples and live with them in the space for a week to see how the color changes with the light.
- Check your undertones: Ensure the other ‘neutrals’ in your room have the right undertones. The light wood and brass here have warm undertones that complement the green beautifully. A cool-toned gray floor, for example, might clash.
14. Layer Warmth with a Fluted Wood Vanity and Marble Backsplash
This bathroom successfully combines multiple trending elements without feeling chaotic. The key is a shared language of warmth and elegance. The fluted texture of the wood vanity speaks to the subtle veining in the marble backsplash. The warm tones of the brass fixtures pick up on the warm tones in the wood grain. Even the greenery adds an organic touch that feels intentional. It’s a cohesive design where every piece, from the marble to the metal to the wood, is in conversation with the others.
|
📋 Copy HEX 🔗 Share |
🎯 What Makes It Work
Let’s talk about keeping this look pristine. A marble backsplash behind a sink is gorgeous, but marble is a porous natural stone, making it susceptible to staining from things like toothpaste, soap, or makeup. It’s crucial to have it professionally sealed upon installation and to reseal it every 6-12 months. Use only pH-neutral stone cleaners—never vinegar or harsh chemicals. Similarly, unlacquered brass will develop a patina over time. If you love that aged look, great! If not, be prepared for regular polishing to maintain its shine.
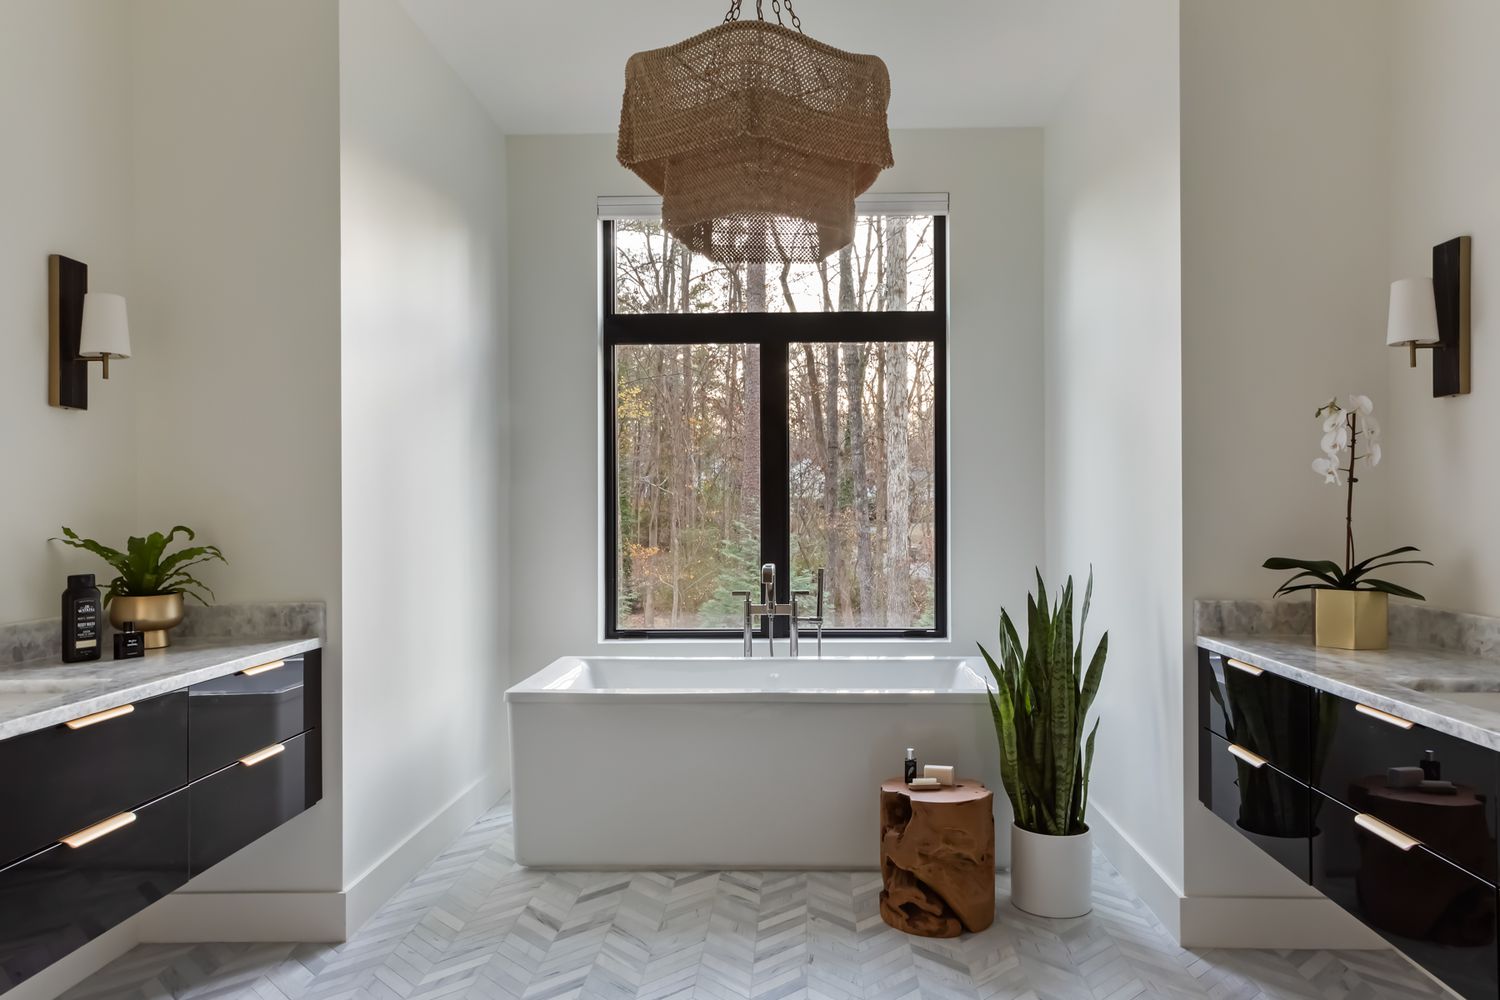
15. Frame a Forest View with a Freestanding Tub
The undisputed hero of this bathroom is the massive, black-framed window. It does more than just let in light; it turns the forest outside into a living, breathing piece of art that changes with the seasons. The entire design is orchestrated to serve this view. The freestanding tub is placed for optimal soaking and gazing, while the neutral color palette of gray, black, and white ensures that nothing inside competes with the natural beauty outside. Without the window, the room would still be nice, but it would lose its entire soul.
|
📋 Copy HEX 🔗 Share |
📏 Scale Guide
This design taps directly into the ‘biophilic design’ trend, which is all about strengthening the connection between humans and nature within our built environments. In a post-pandemic world, there’s a huge collective desire for homes that feel like sanctuaries—calm, restorative, and connected to the outdoors. A bathroom like this isn’t just a place to get clean; it’s a destination for mental decompression. This focus on wellness and nature gives the trend immense staying power for 2026 and beyond.
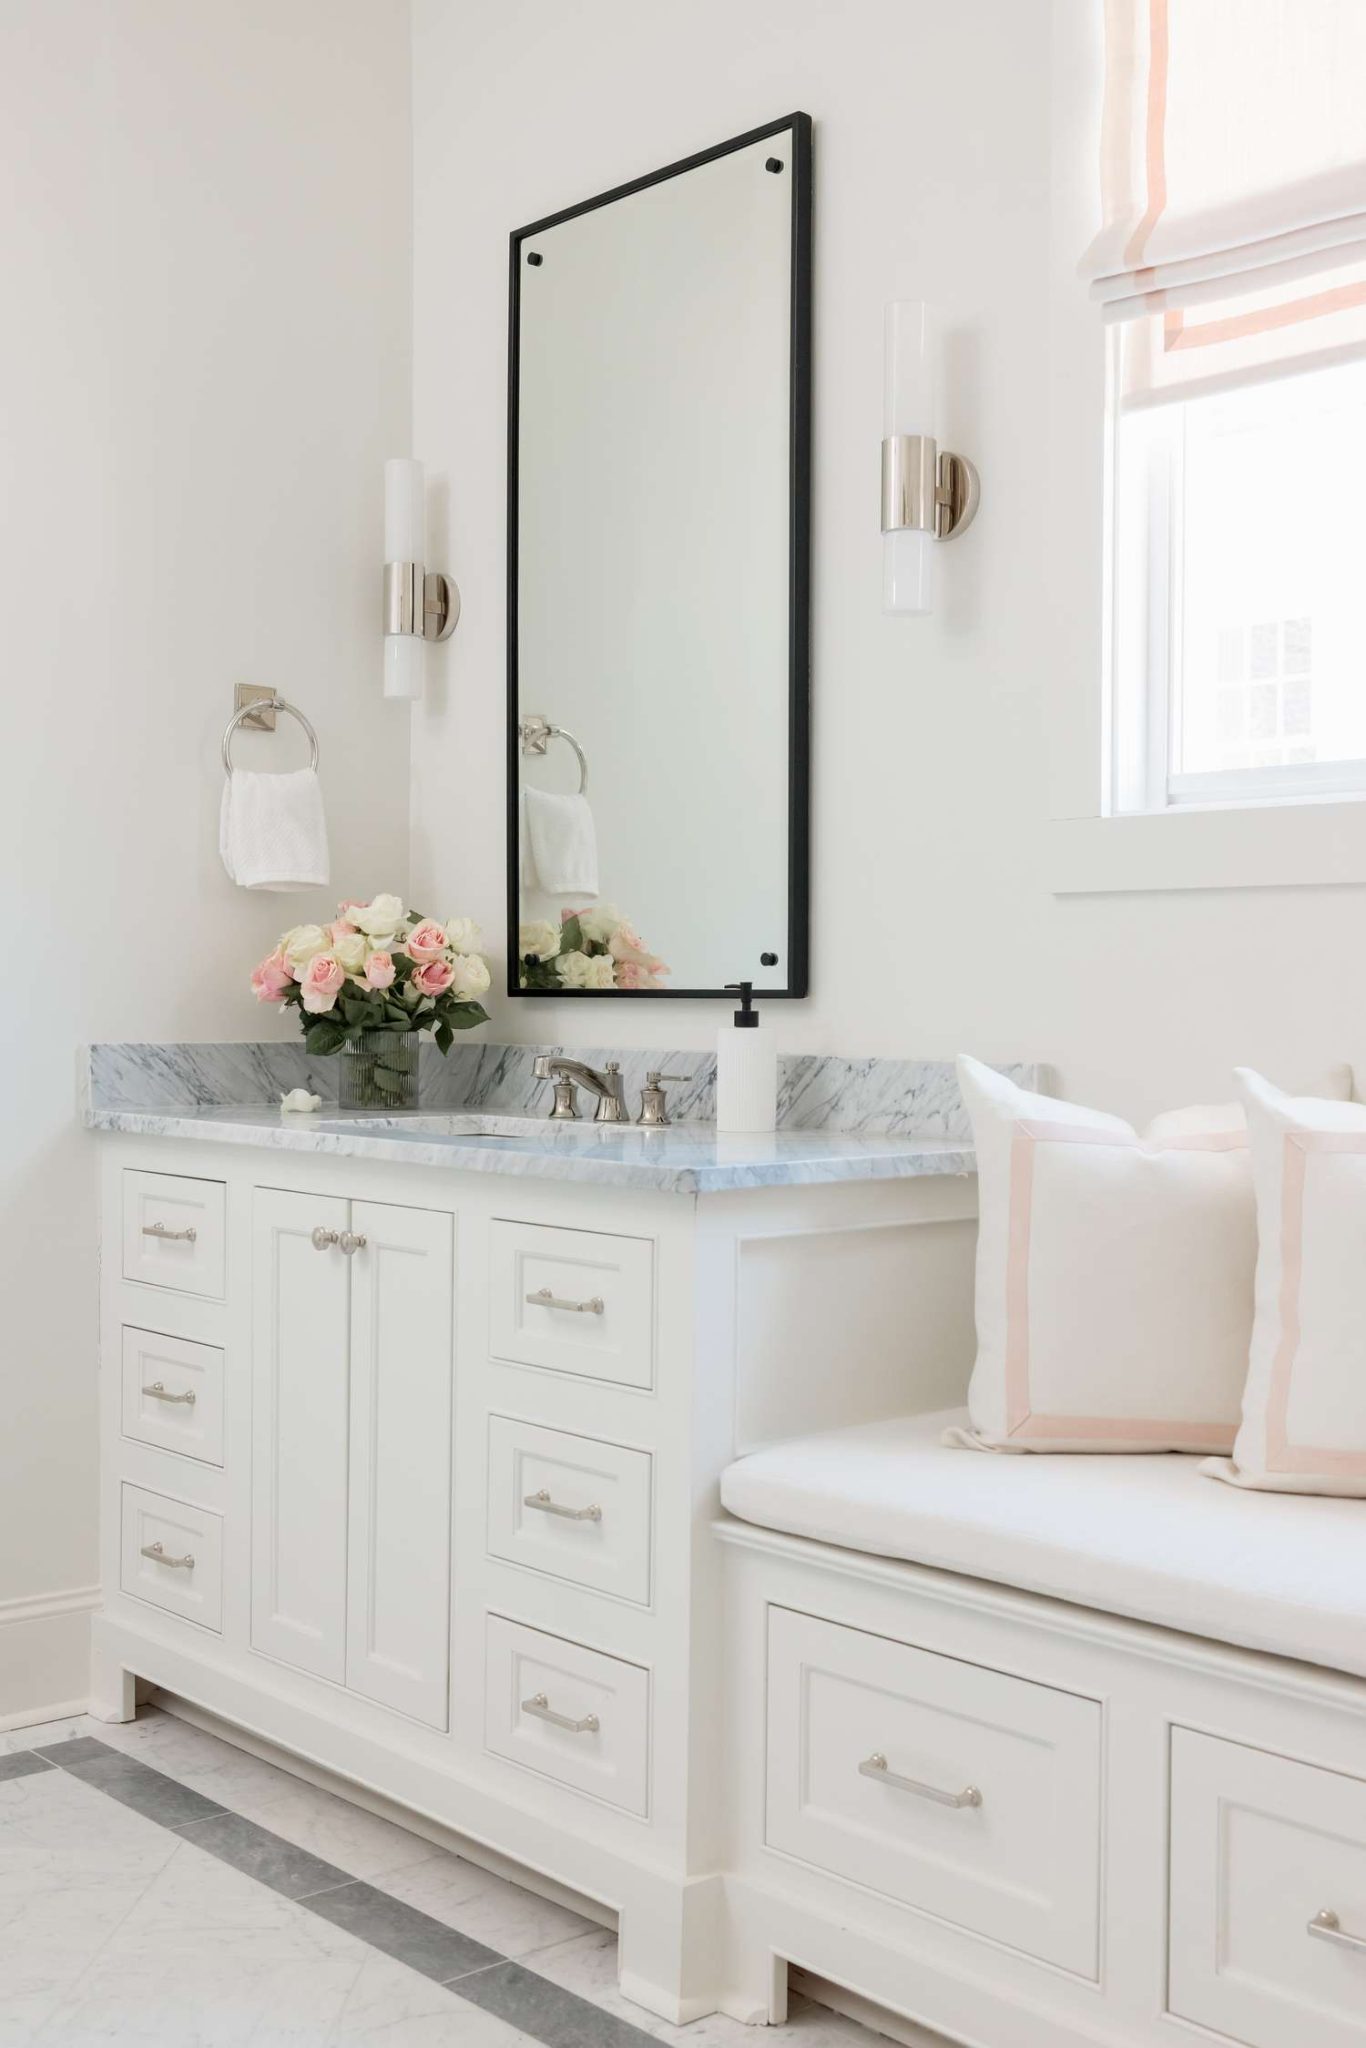
16. Incorporate Softness with a Built-In Bench and Blush Accents
When working with a largely white and gray palette, the details make all the difference in adding warmth. The choice of a soft, pale pink for the accents is intentional. It’s a color with just enough warmth to counteract the coolness of the gray marble and silver fixtures, but it’s subtle enough to maintain the overall serene and elegant feel. Notice how it’s used sparingly—on the roman blind, in the flowers, and on the pillow—creating a gentle rhythm that guides the eye without overwhelming the space. This is how you do color in a neutral room.
|
📋 Copy HEX 🔗 Share |
🔥 Trending Context
A built-in bench is a fantastic luxury, but it requires a fairly spacious bathroom to work. You’ll need a clear wall length of at least 48 inches for a functional bench that doesn’t feel cramped. This feature is best suited for primary bathrooms of 100 square feet or more. In a smaller space, a freestanding bench can offer similar utility without the permanent construction, but make sure you have at least 30 inches of clear walkway space in front of it to maintain comfortable circulation.
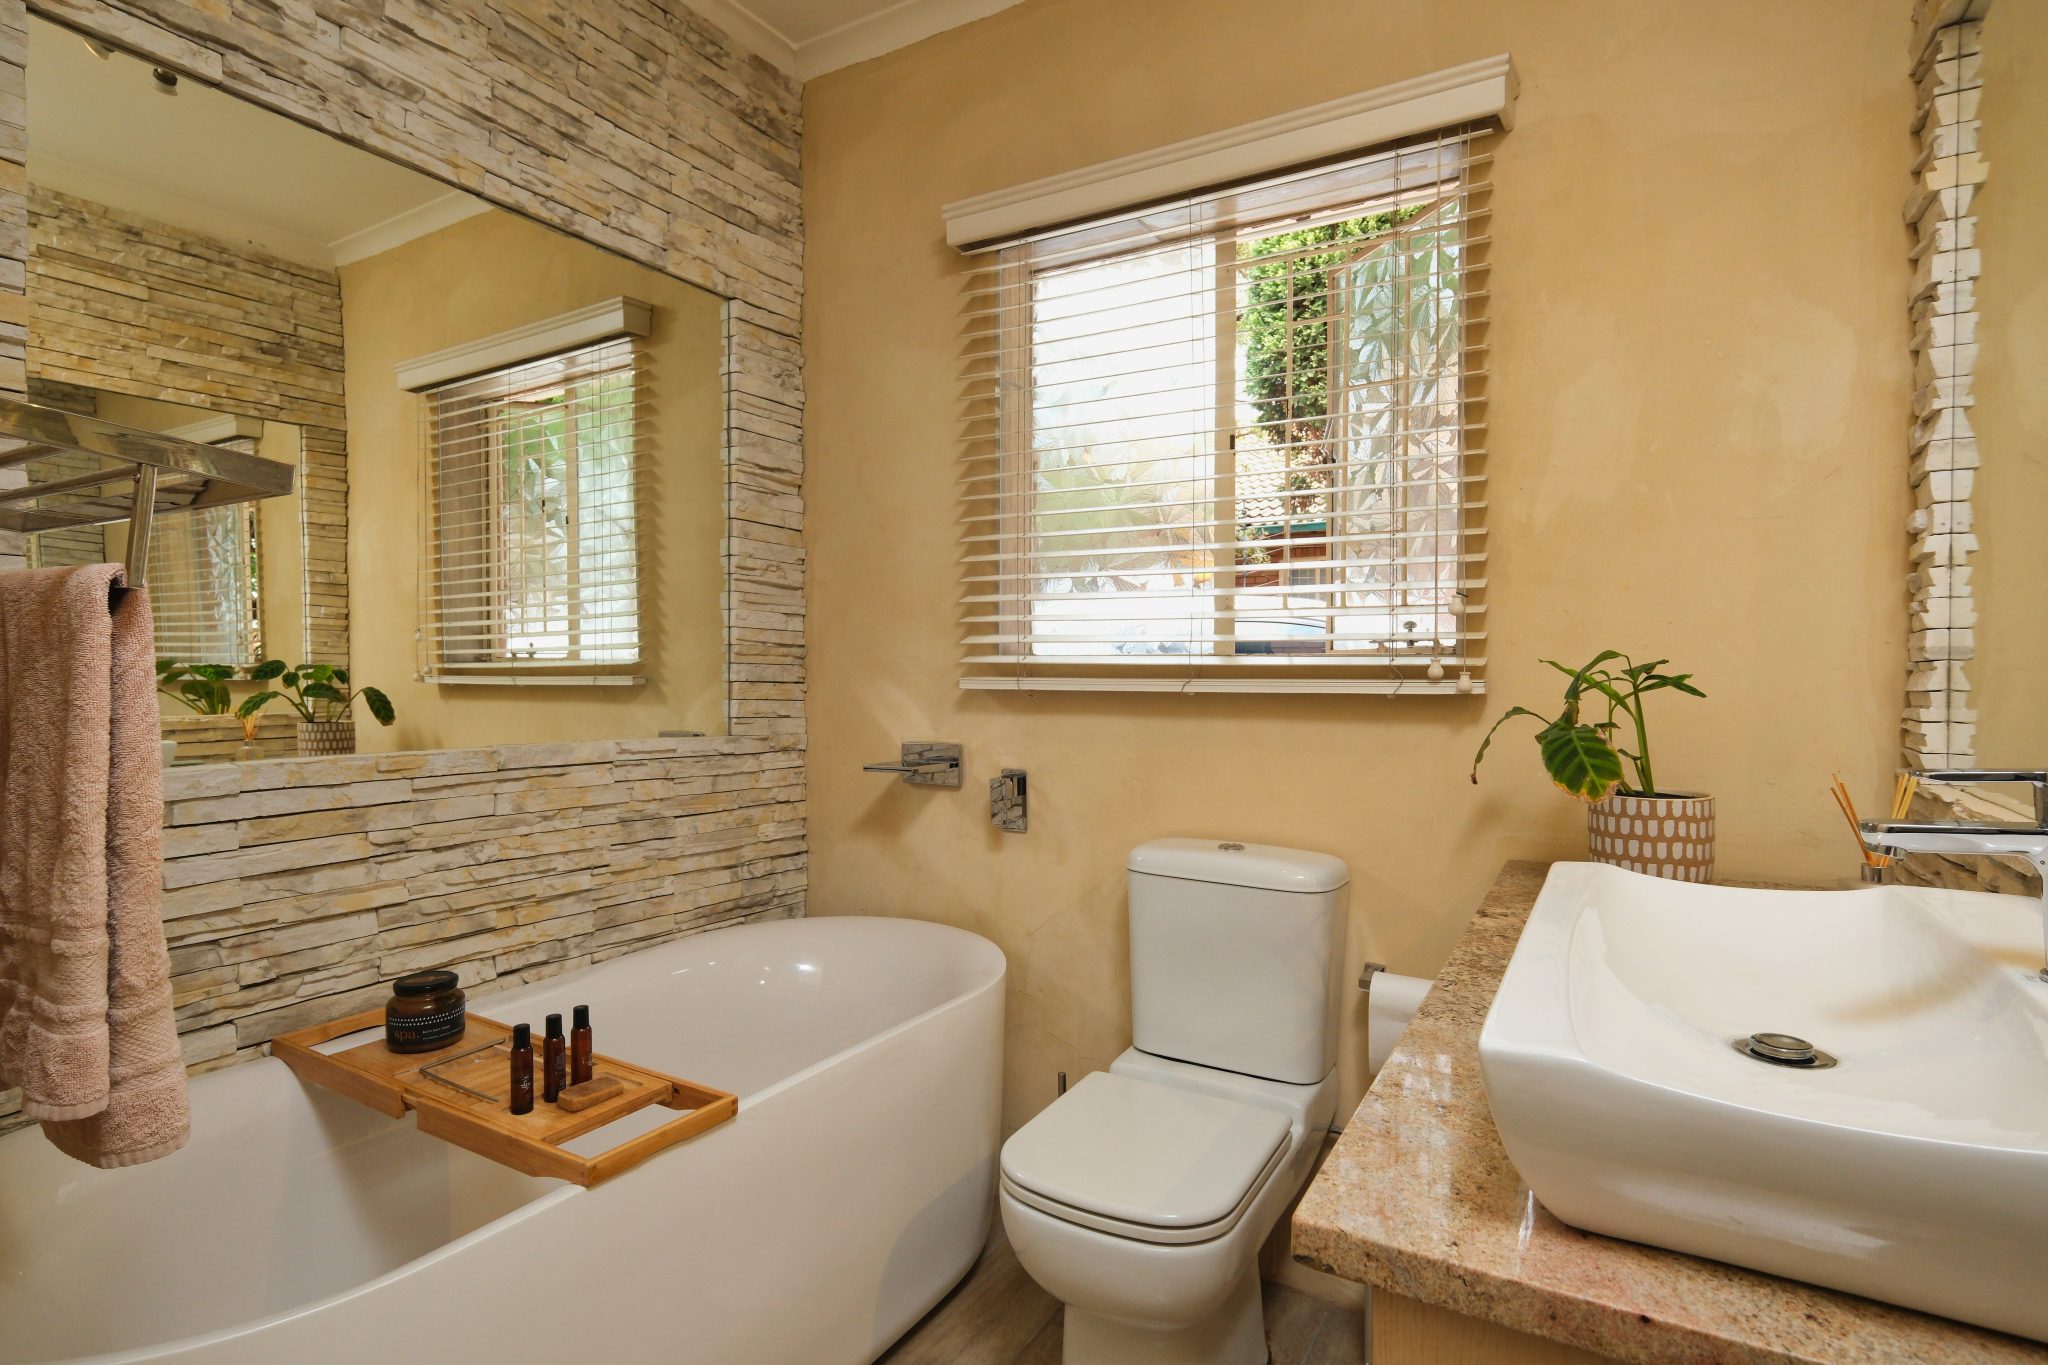
17. Build an Earthy Retreat with a Stacked Stone Accent Wall
An accent wall of stacked stone brings incredible texture and an earthy, spa-like quality to a bathroom. However, it’s a beast to keep clean. The uneven, porous surfaces are magnets for dust and, in a humid bathroom environment, can be prone to moisture issues if not properly sealed and ventilated. It’s especially difficult to clean splashes from soap or toothpaste. This feature is best reserved for a wall that’s not directly in a splash zone, like behind a tub or a vanity with a generous backsplash, as seen here.
|
📋 Copy HEX 🔗 Share |
🧹 Maintenance Reality
This bathroom design feels so cozy and grounded because of the powerful use of contrast. The rough, organic texture of the stacked stone wall is juxtaposed against the smooth, modern lines of the freestanding bathtub and vessel sink. This contrast highlights the beauty of both elements—the stone feels more rustic, and the fixtures feel more sleek. The consistent use of warm, earthy tones (beiges, tans) across different materials ensures that despite the textural contrast, the overall look is harmonious.
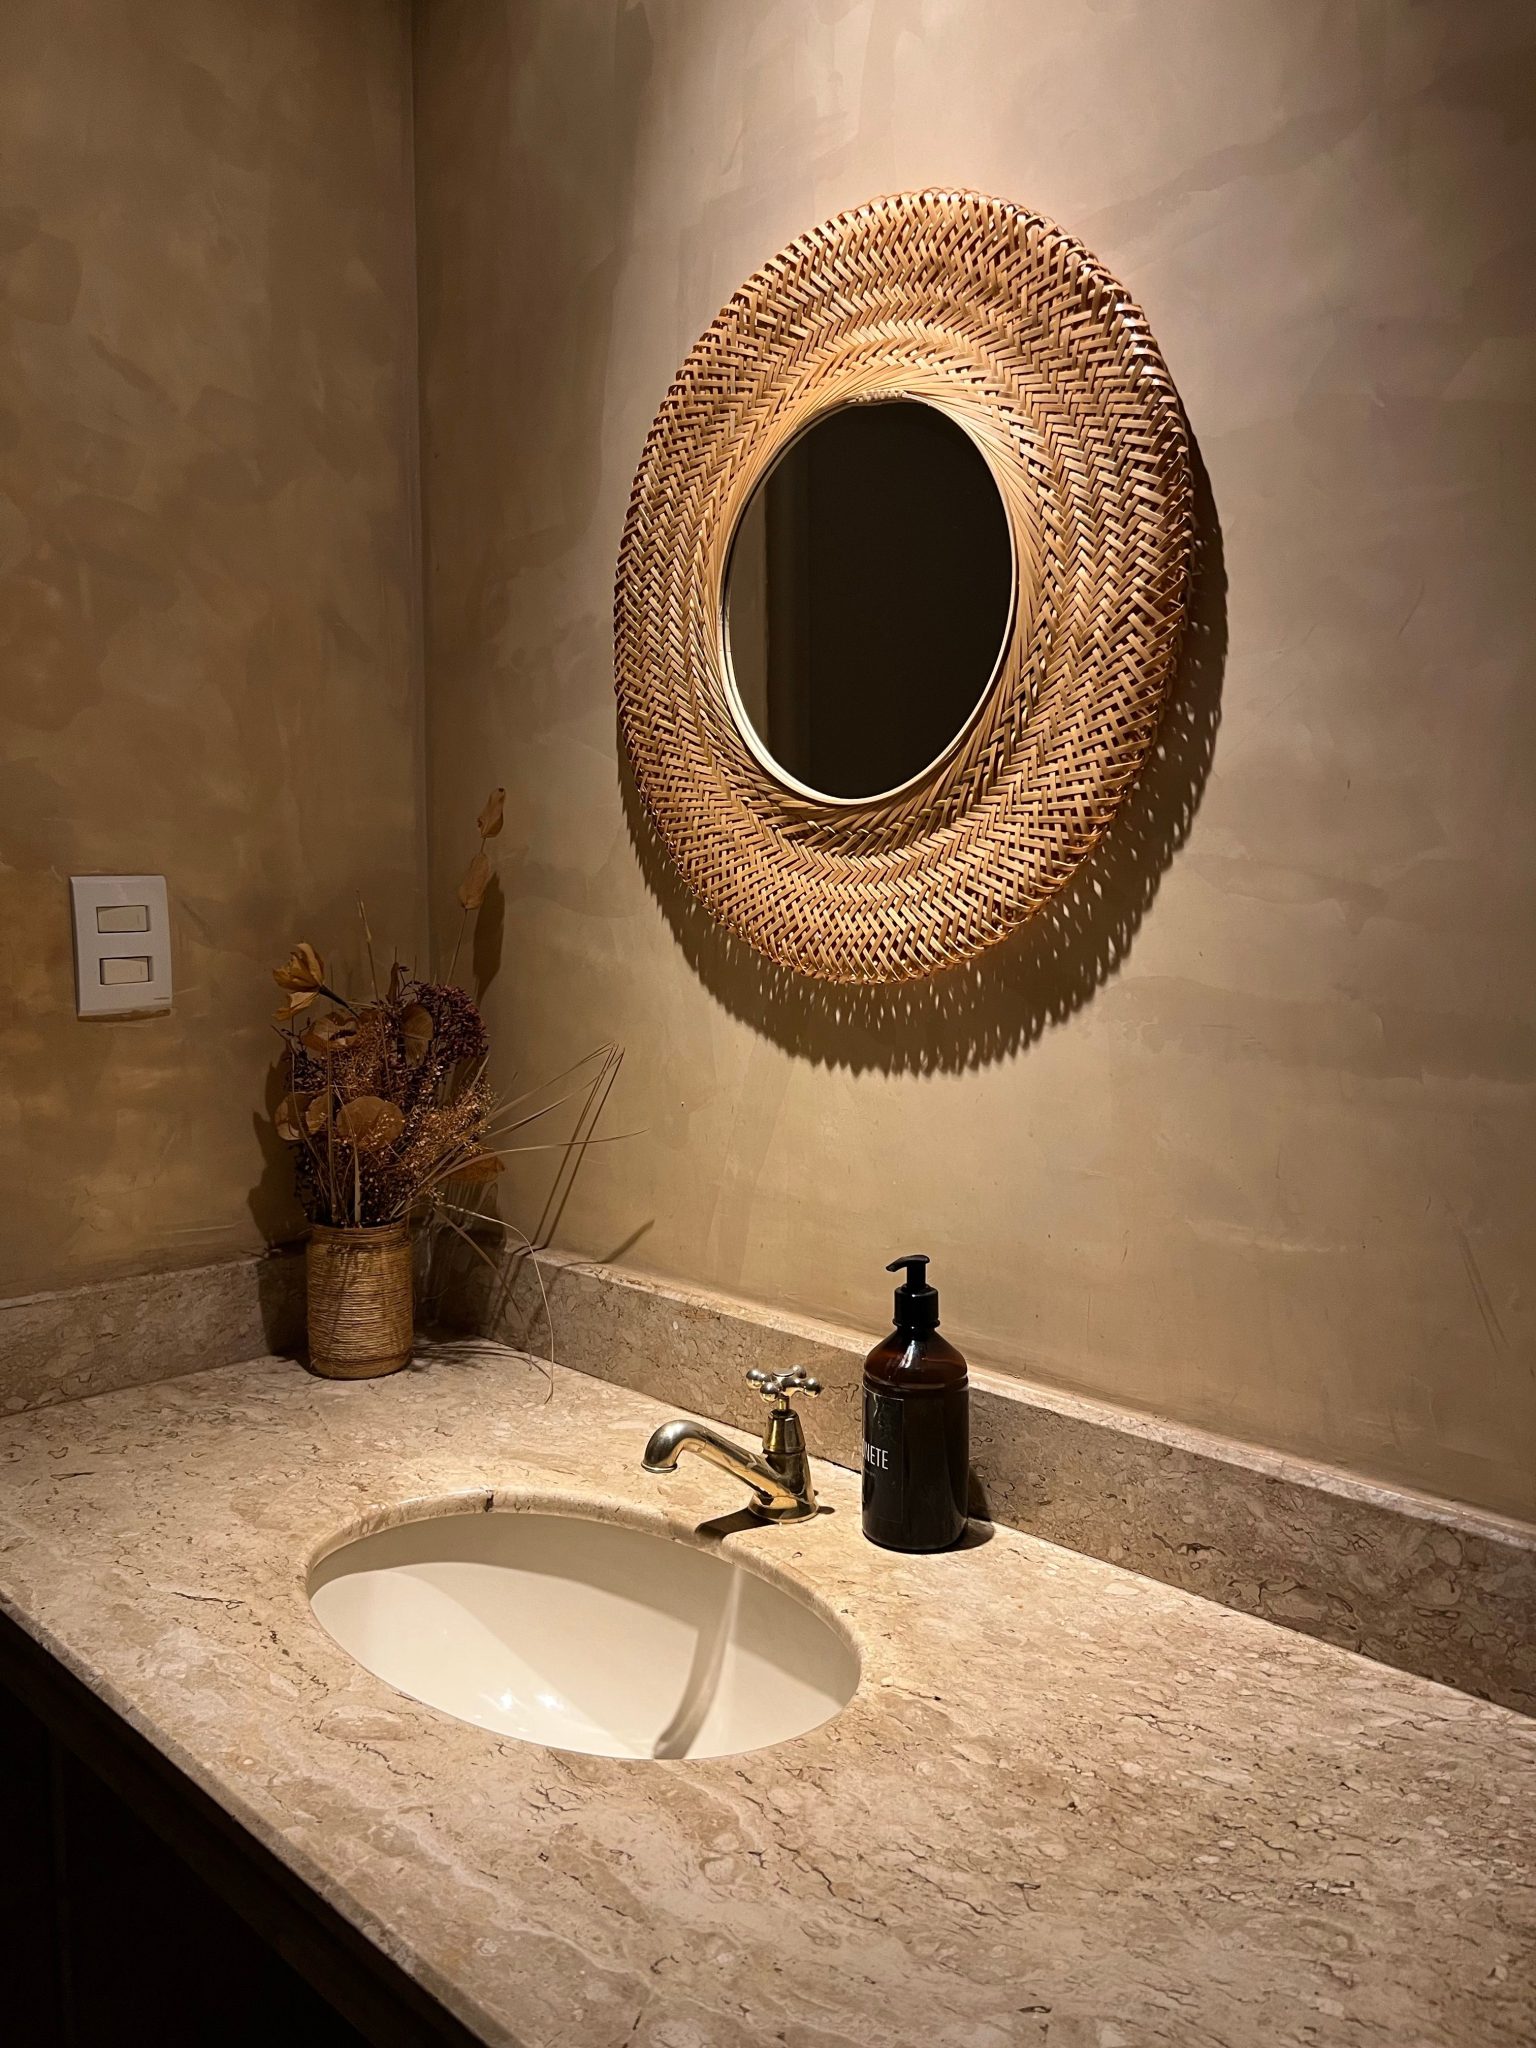
18. Add Natural Texture with a Woven Mirror and Plastered Walls
The single element pulling this entire look together is the circular mirror with its woven natural fiber frame. It’s the perfect bridge between the rustic, textured walls and the more polished marble countertop. It introduces an organic, handmade quality that keeps the space from feeling too formal or staid. The circular shape breaks up the straight lines of the vanity, while the texture of the frame echoes the natural feel of the dried botanicals, creating a beautifully cohesive and earthy vignette.
|
📋 Copy HEX 🔗 Share |
💡 Designer Tip
You can achieve this warm, textured look without splurging on a custom marble vanity. A standard vanity from a big-box store with a laminate countertop in a beige stone pattern can provide a very similar base. For the walls, instead of hiring a plasterer, you can get a similar effect with Roman clay or limewash paint from brands like Portola Paints & Glazes. It’s a DIY-friendly product that you apply with a putty knife to create that soft, textured finish for under $200 a gallon. Pair it with a woven mirror from Target or IKEA, and you’ve got the look for a fraction of the cost.
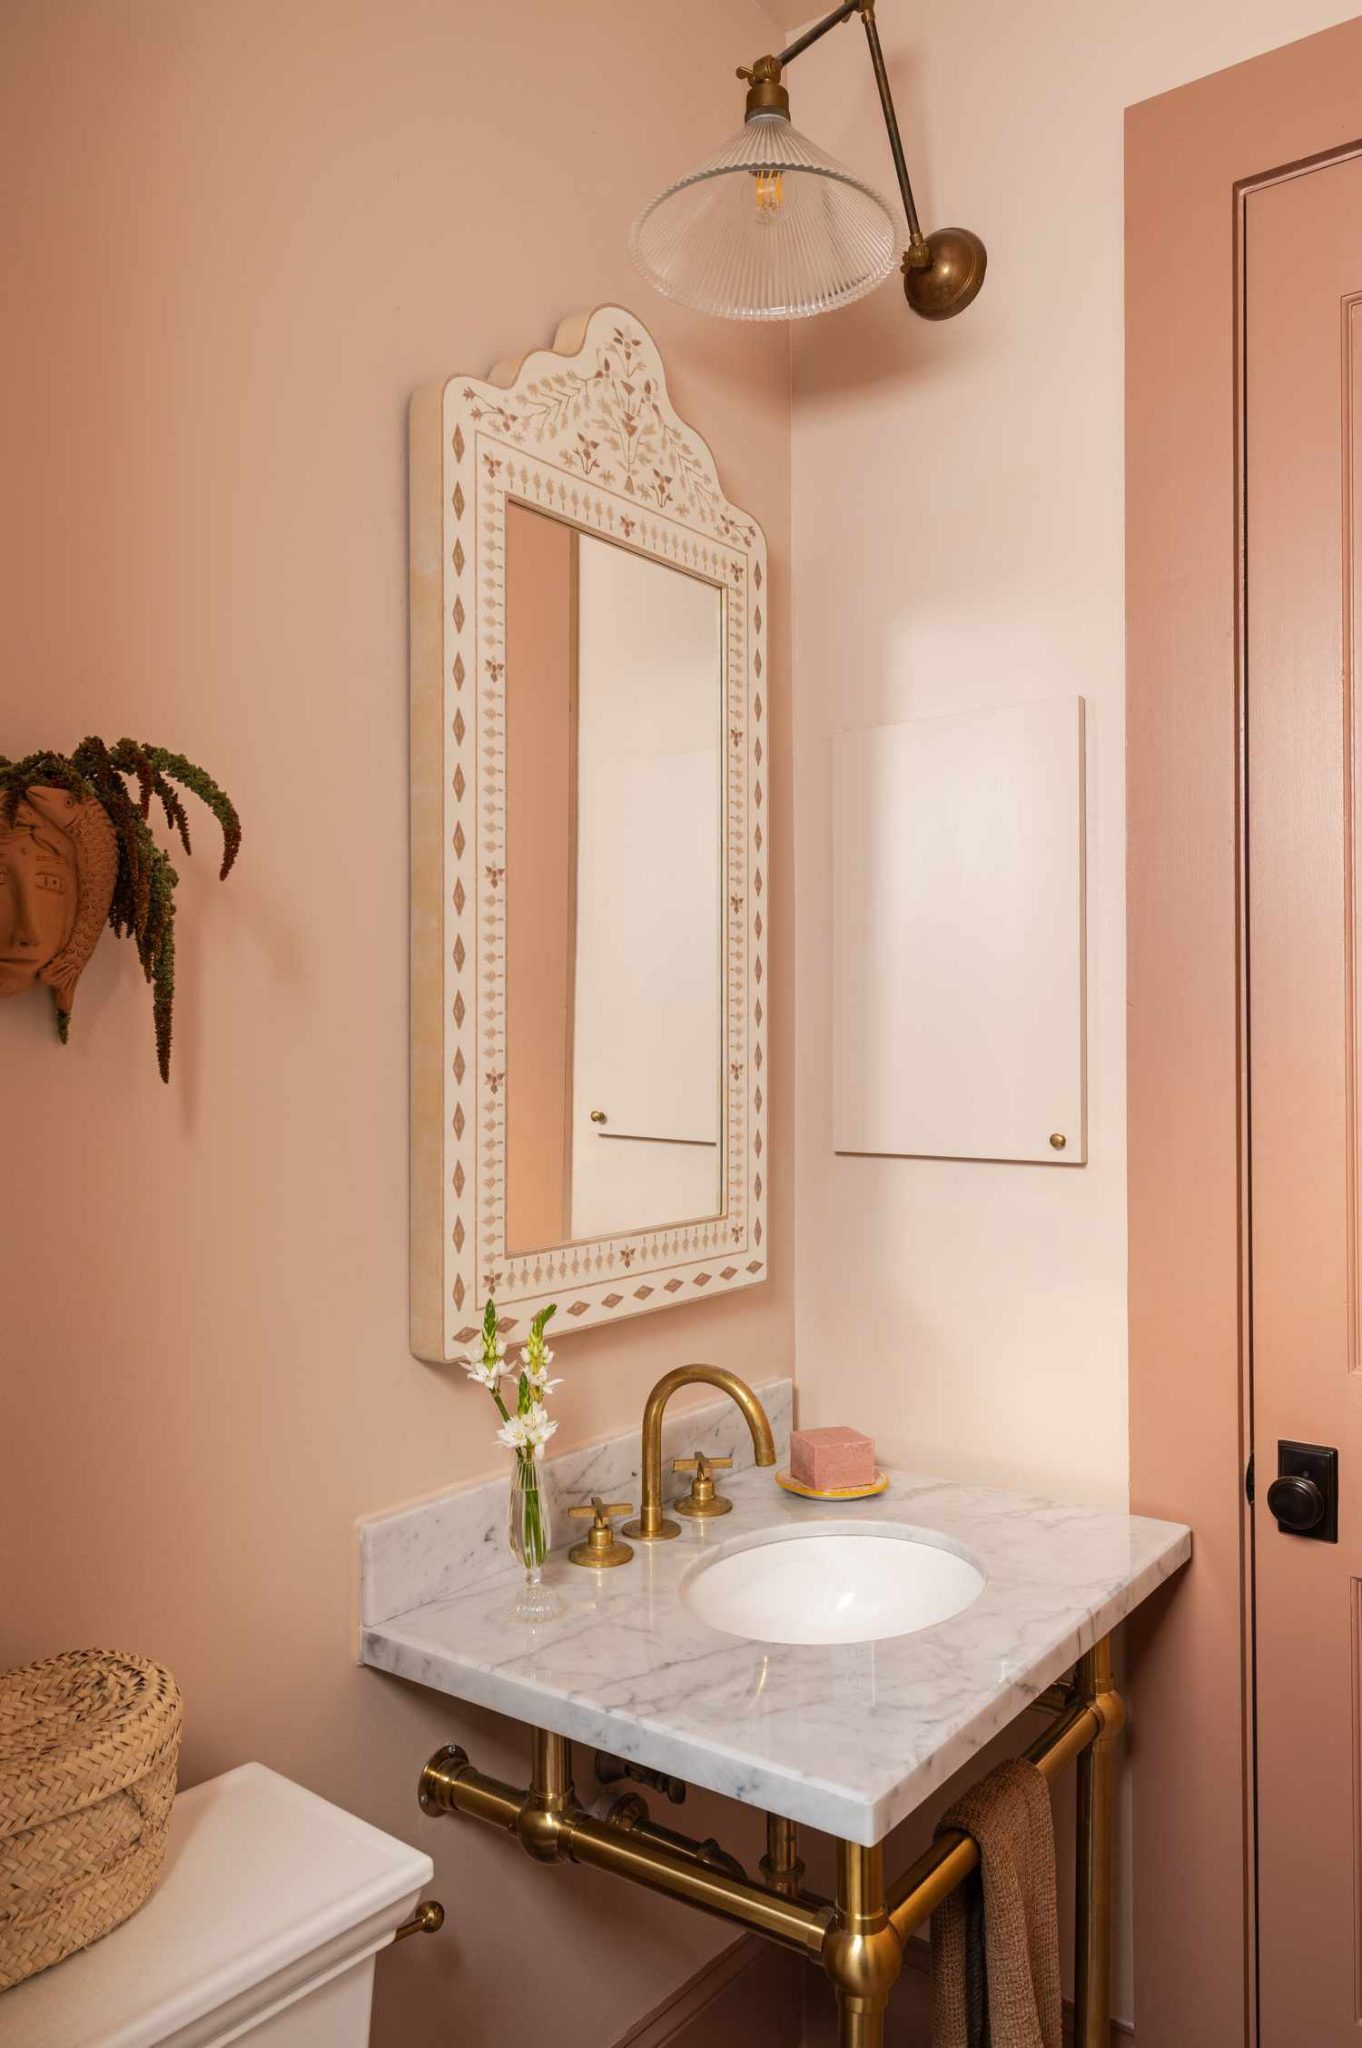
19. Create a Vintage Vibe with Blush Walls and an Ornate Mirror
This bathroom’s eclectic charm follows a simple recipe: 50% warm, uniform color + 30% ornate, vintage details + 20% classic materials. The blush pink walls and door create a bold, immersive color base. The ornately carved mirror and exposed brass plumbing provide the essential vintage character. Finally, the classic white marble countertop and simple glass sconce ground the look in timeless elegance. This formula prevents the ornate elements from feeling stuffy and the bold color from feeling childish.
|
📋 Copy HEX 🔗 Share |
💰 Budget Breakdown
A heads-up on exposed plumbing: it’s a stunning look that adds a ton of vintage character, but it’s not for every situation. First, it eliminates any potential for under-sink storage, making it best for powder rooms where storage is less of a concern. Second, every pipe and valve is on display, so they need to be kept meticulously clean and polished to look their best. Finally, the installation can be more complex and costly than a standard vanity with hidden plumbing, as every component must be perfectly aligned and finished.
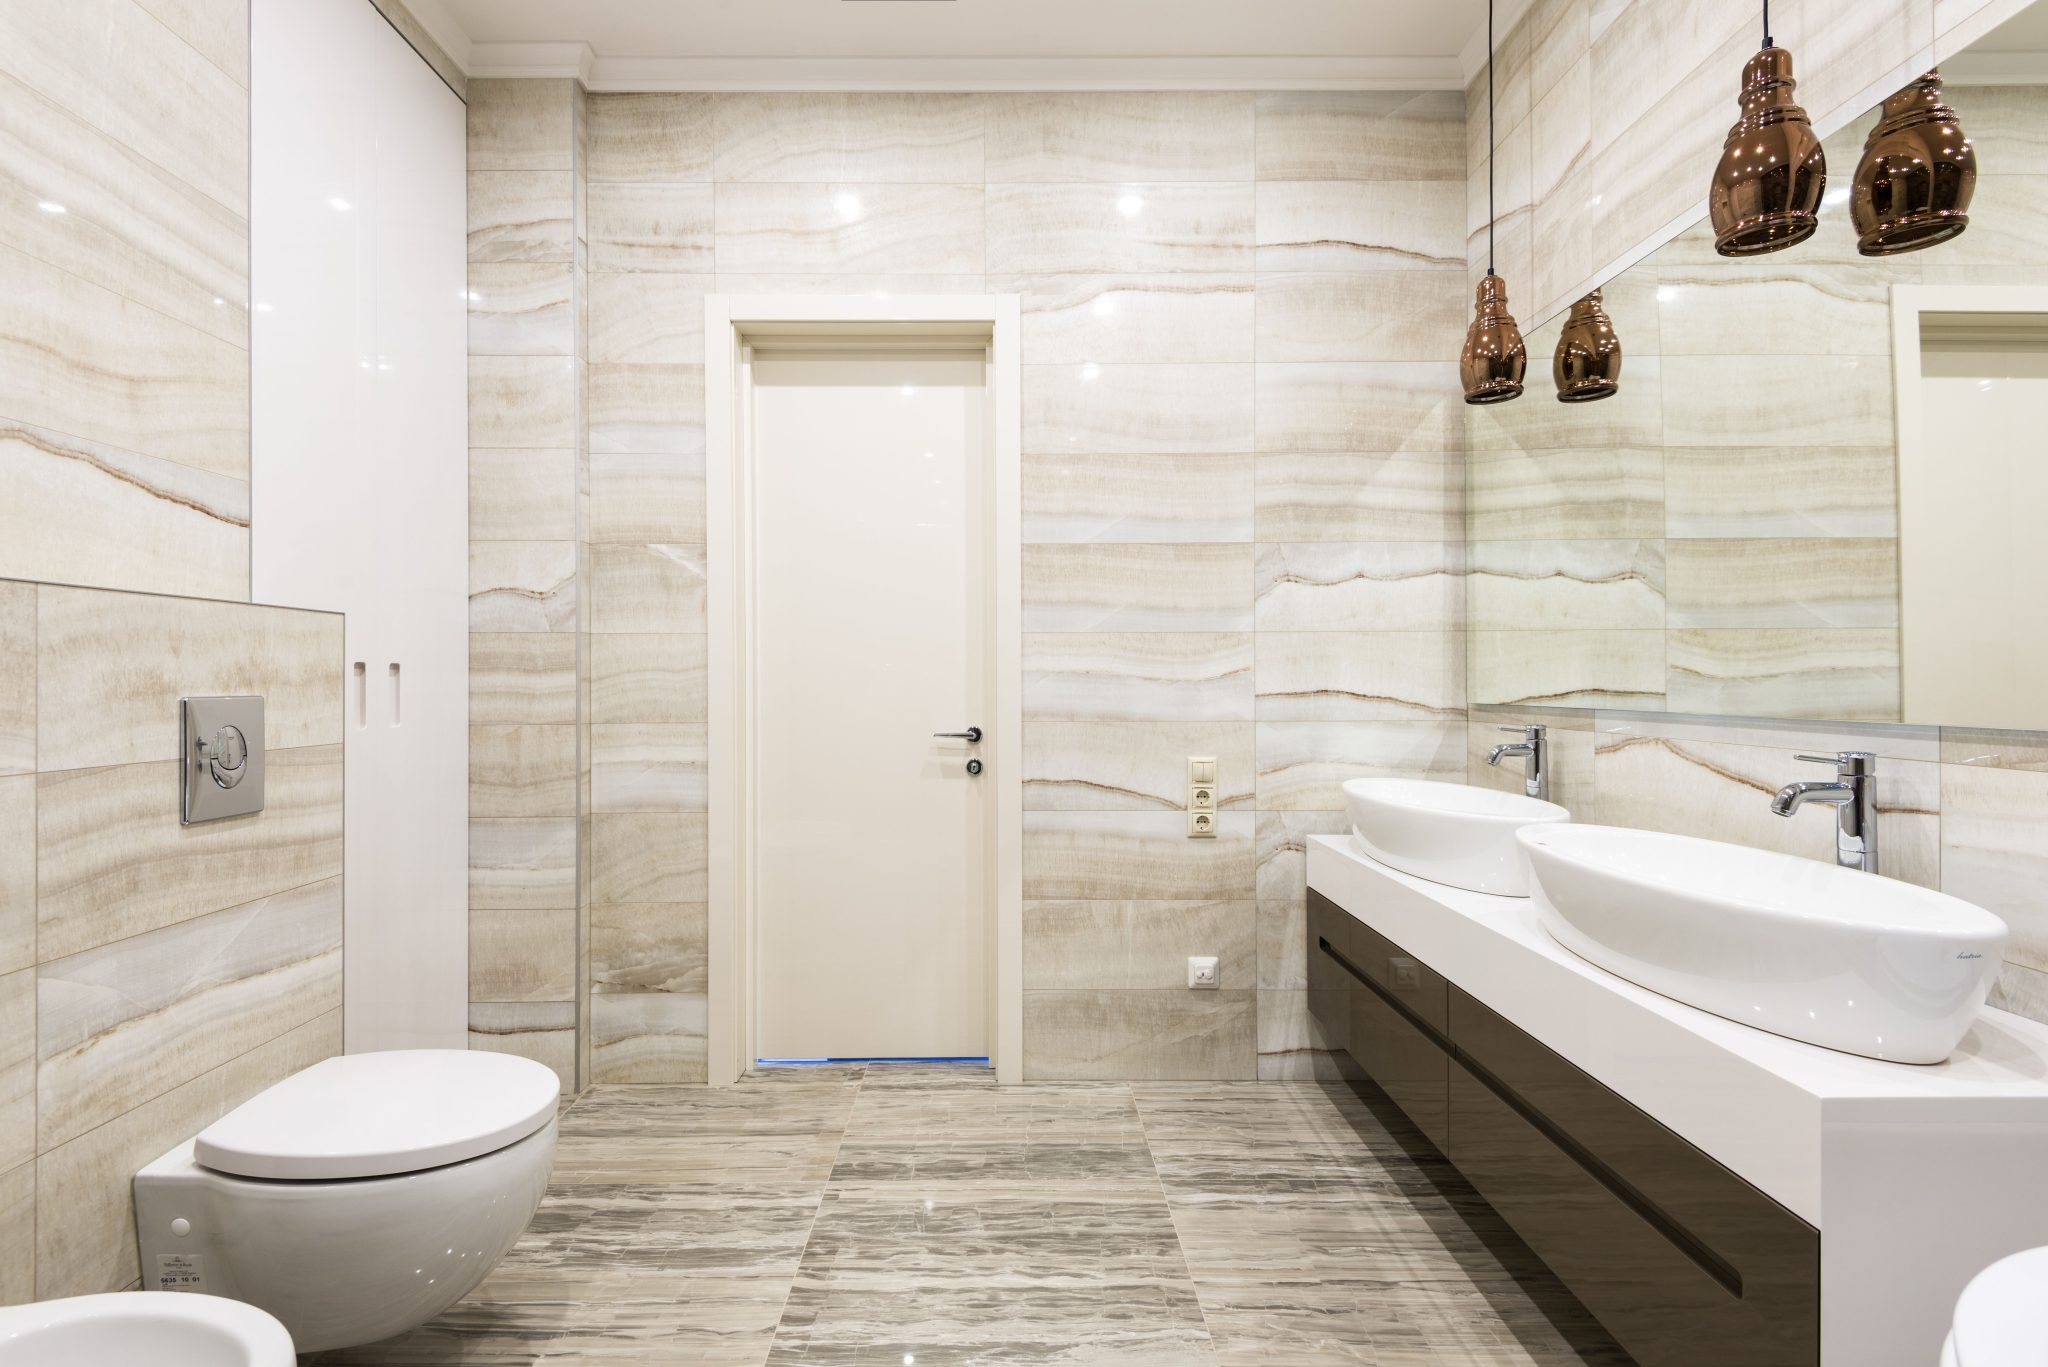
20. Go for Polished Elegance with Marble and Copper Pendants
This bathroom feels so luxurious because of the seamless transition from wall to floor. Using large-format marble tiles on the walls and a coordinating patterned marble on the floor creates an enveloping, high-end hotel vibe. The design is clever in its use of color and finish: the dark, glossy vanity provides a strong, central anchor, keeping the extensive marble from feeling washed out. The polished copper pendants then introduce a warm, metallic element that plays beautifully against the cool brown and grey veins in the stone.
|
📋 Copy HEX 🔗 Share |
⚠️ Real Talk
A bathroom this polished requires a commitment to upkeep. Glossy surfaces, from the dark vanity to the polished copper pendants and chrome fixtures, will show every single fingerprint and water spot. Regular buffing with a microfiber cloth is essential to maintain the gleam. The marble floor and walls should be sealed annually to prevent stains and moisture from penetrating the stone. Be mindful of acidic cleaners, which can etch the marble’s surface; always use a pH-neutral stone cleaner.
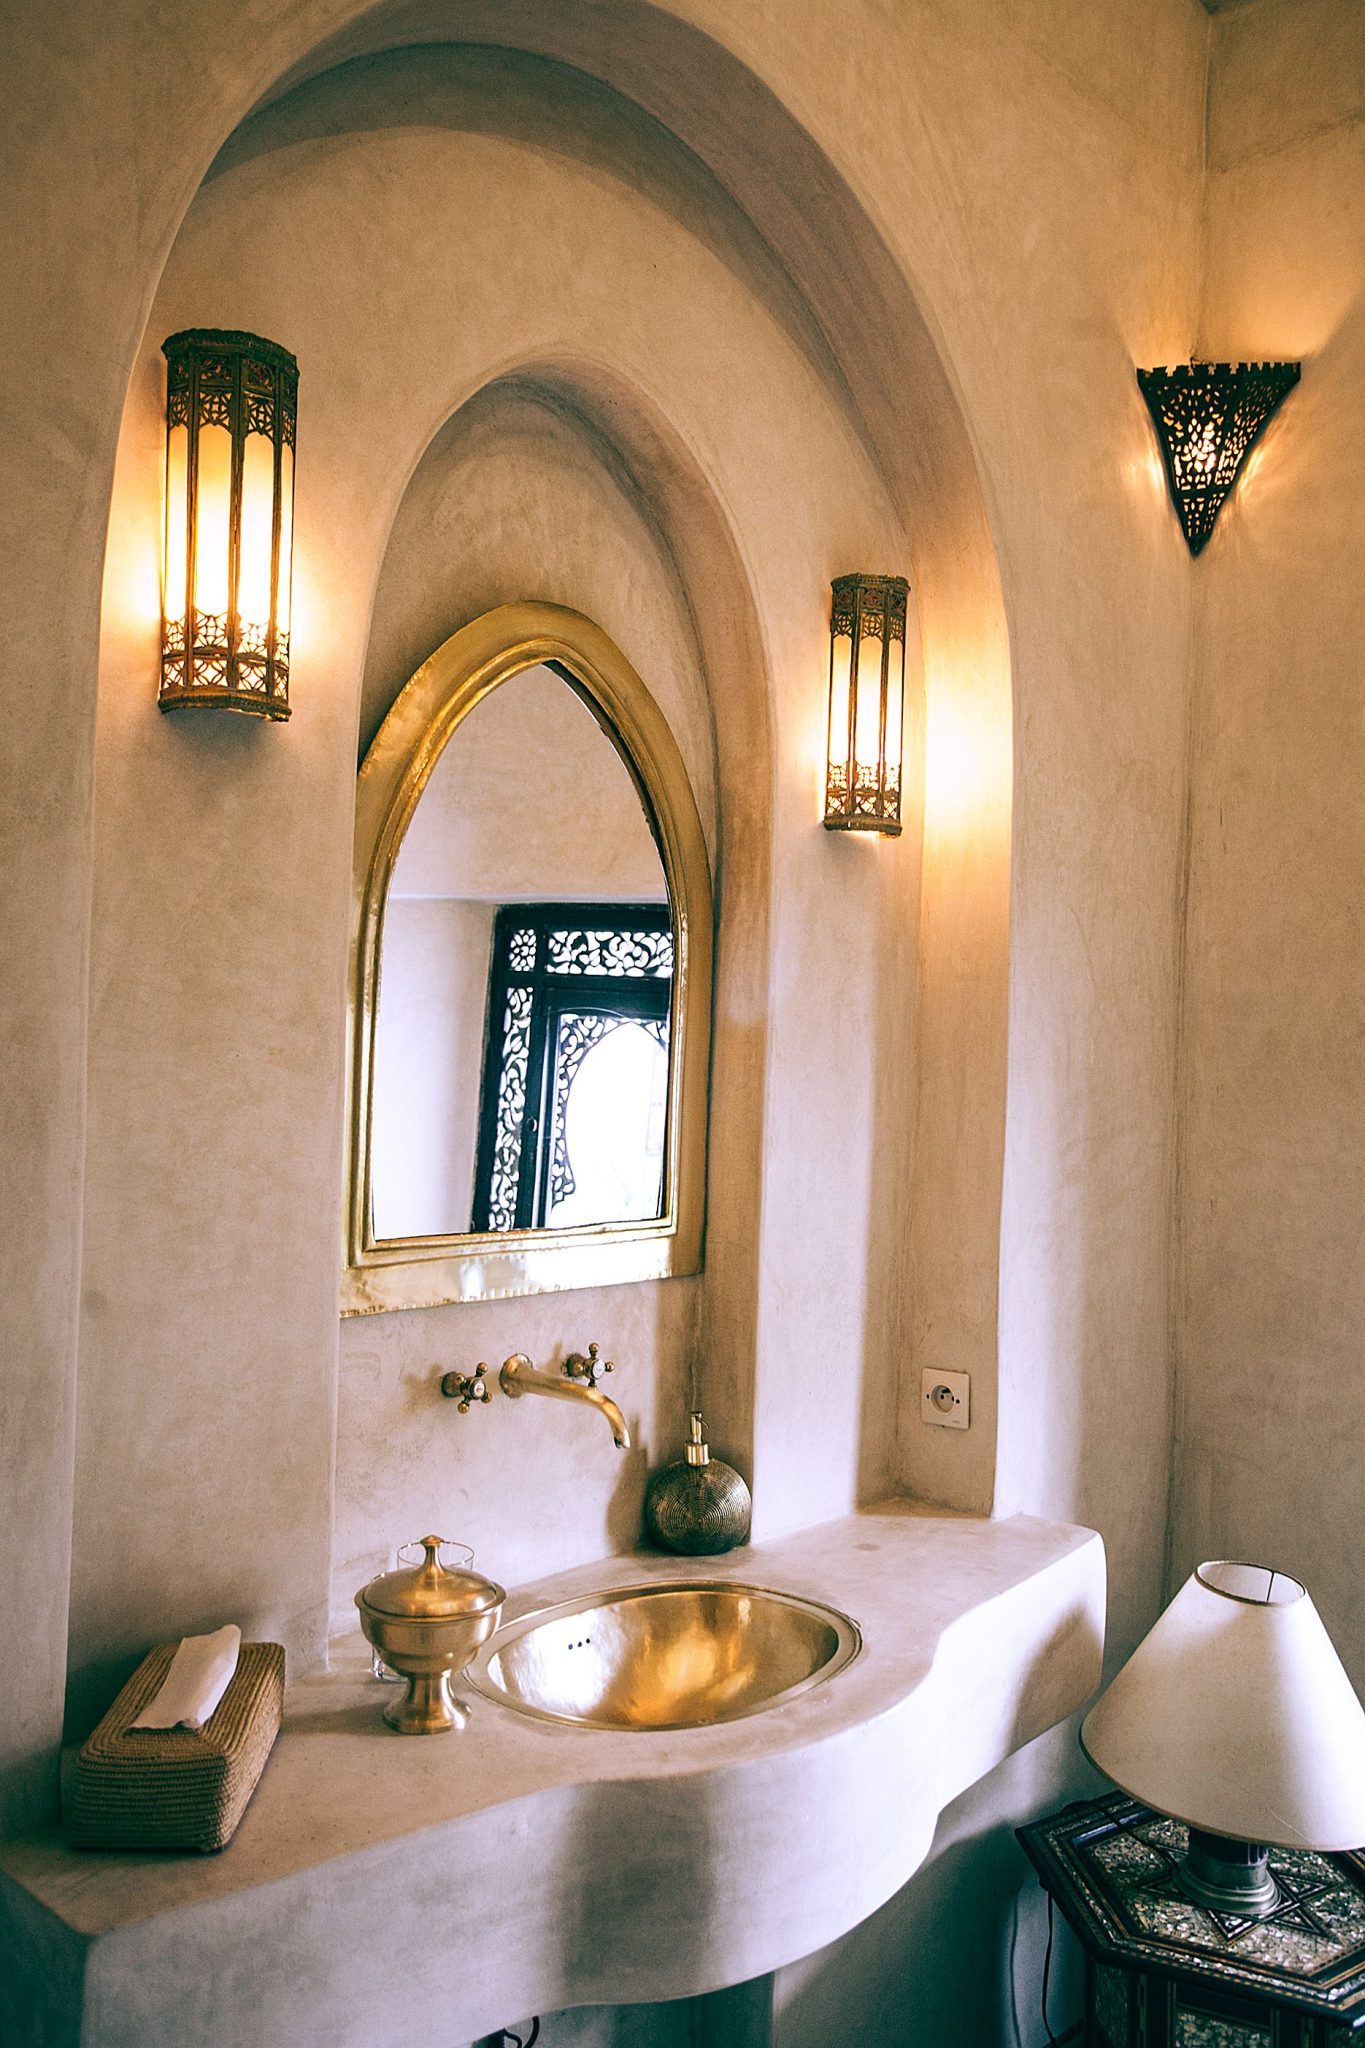
21. Create a Sanctuary with an Arched Alcove and Brass Fixtures
The single feature that transforms this bathroom from a simple space into a sanctuary is the arched alcove. This architectural element creates a sense of enclosure and intimacy, making the vanity area feel like a special, designated retreat. It’s a classic architectural motif that softens the straight lines of the room and adds an immediate sense of custom, high-end design. The warm, textured plaster within the arch further enhances the cozy, enveloping feeling, making it a true focal point.
|
📋 Copy HEX 🔗 Share |
📐 Style Math
When using polished brass, a little goes a long way. The key to making it look chic and not gaudy is to mix it with other textures. Here, the reflective shine of the brass sink and mirror is balanced by the matte, chalky finish of the plaster walls and the dark, antique finish of the sconces. This textural variety creates a rich, layered look. If everything were shiny, the space would feel flat and overwhelming. As a rule of thumb, aim for no more than two or three different finishes in a single space for a curated feel.
22. Add a Pop of Color with a Teal Vanity Against Beige Tile
This design is a perfect example of the 60-30-10 rule. The warm beige tile covering the walls and floor makes up the dominant 60% of the space, creating a calm, neutral foundation. The bold teal vanity serves as the secondary color, providing a lively 30% that energizes the room. Finally, the brass fixtures and hardware act as the 10% accent, adding a touch of warmth and luxe sparkle that ties everything together. This balanced approach ensures the pop of color feels intentional and sophisticated, not random. For another take on using cool tones, check out the blue shiplap in Idea #30.
|
📋 Copy HEX 🔗 Share |
💸 Get This Look For Less
A floating vanity in a bold custom color can be a budget-breaker. To get this look for less, consider painting a standard, affordable vanity yourself. You can find simple, clean-lined vanities at stores like Wayfair or Home Depot. With a good quality primer and a durable enamel paint (like Sherwin-Williams Emerald Urethane Trim Enamel), you can get a professional-looking finish in any color you choose. A good backlit mirror from Amazon and budget-friendly brass hardware can complete the transformation for under $800.
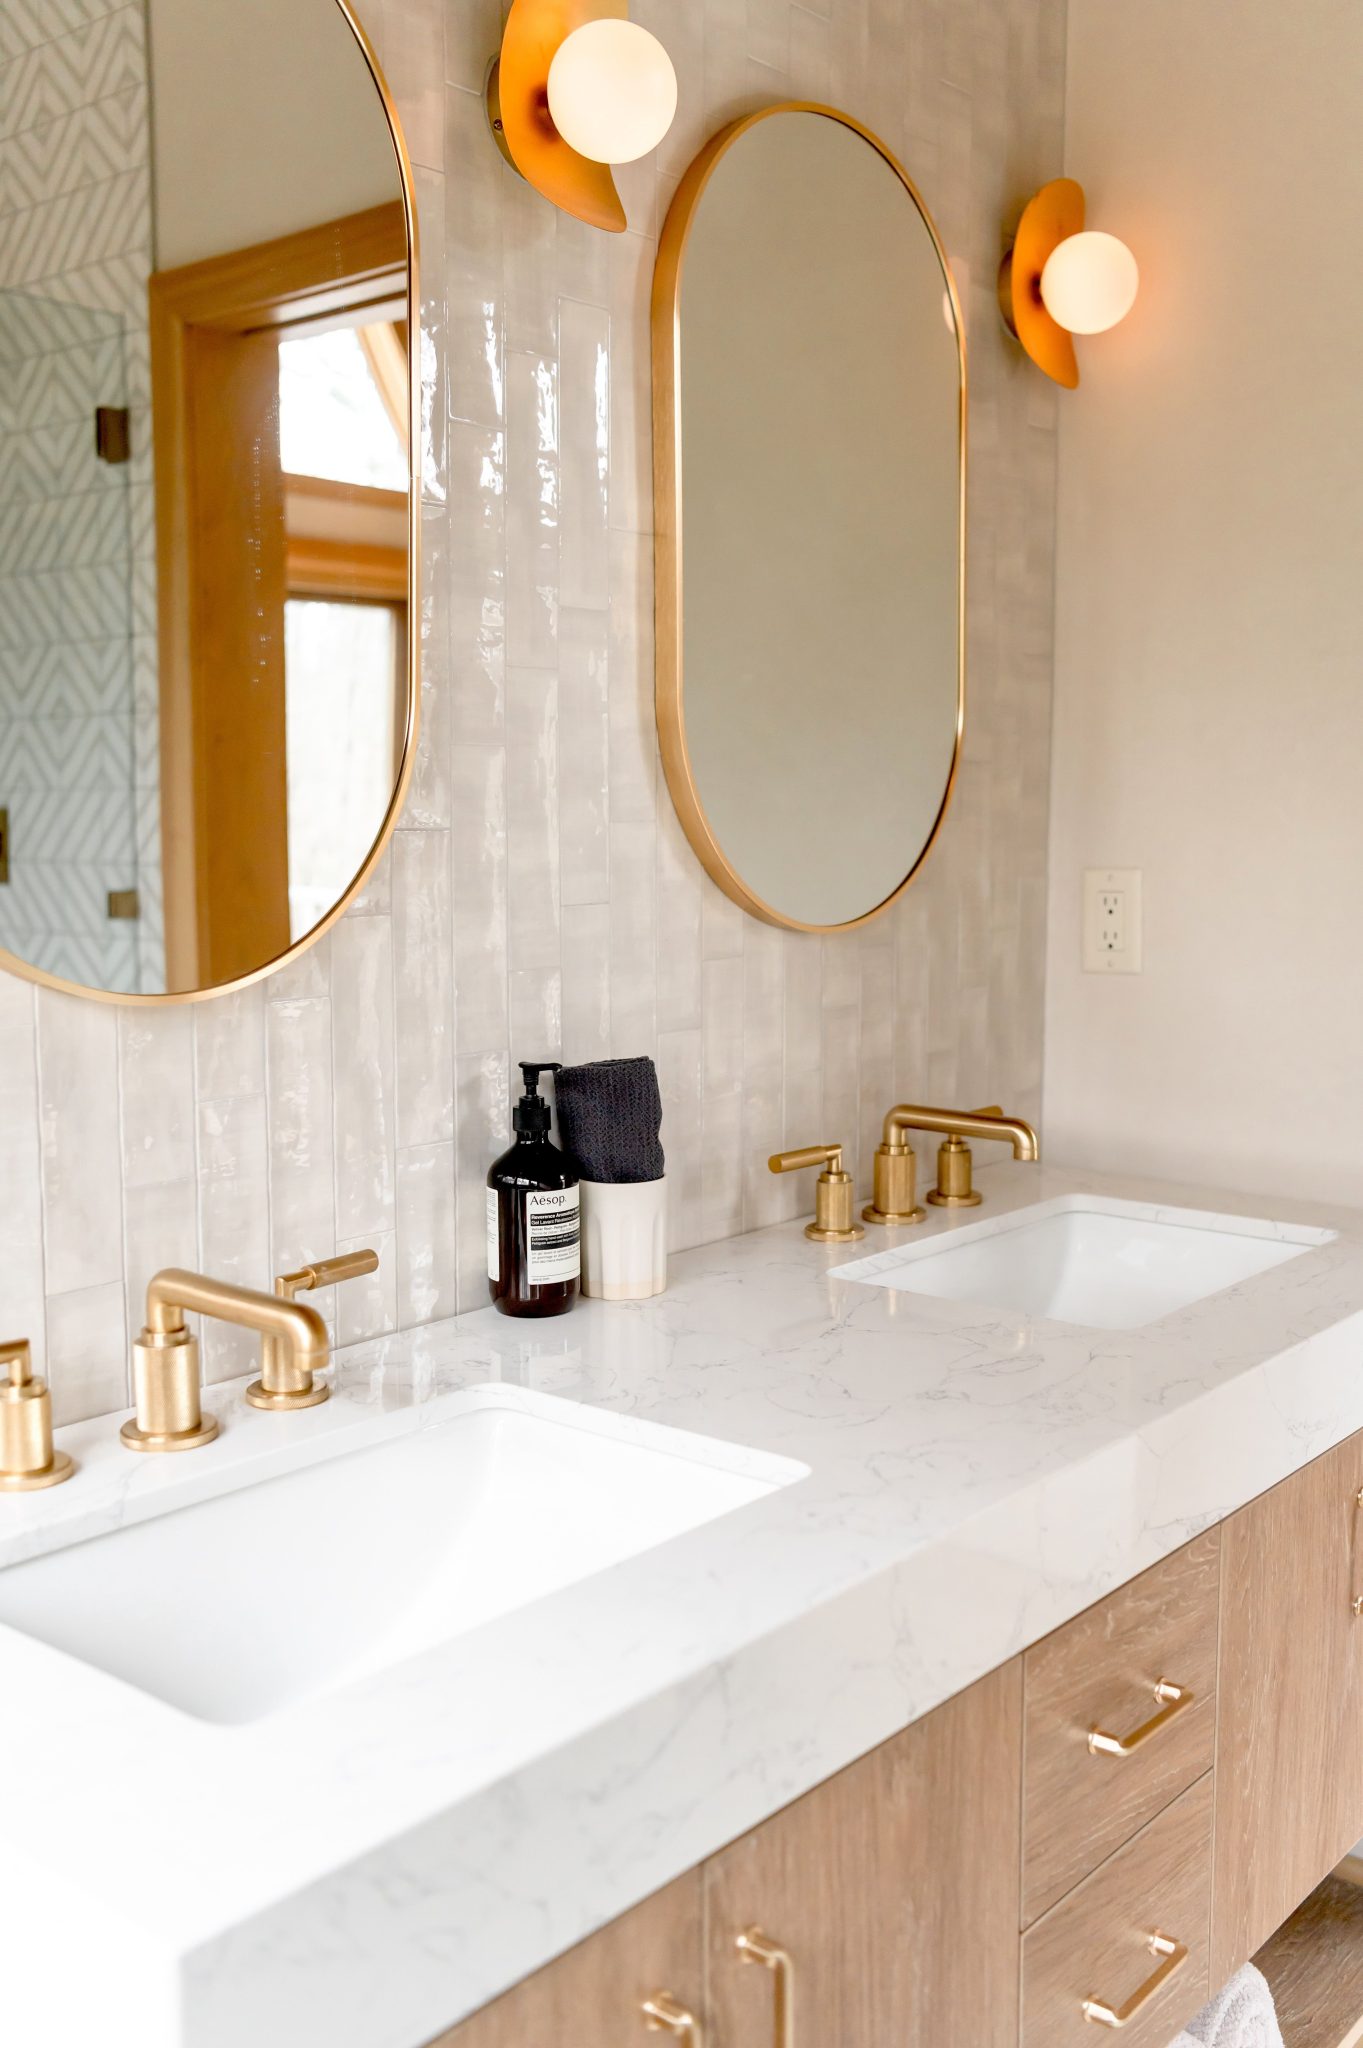
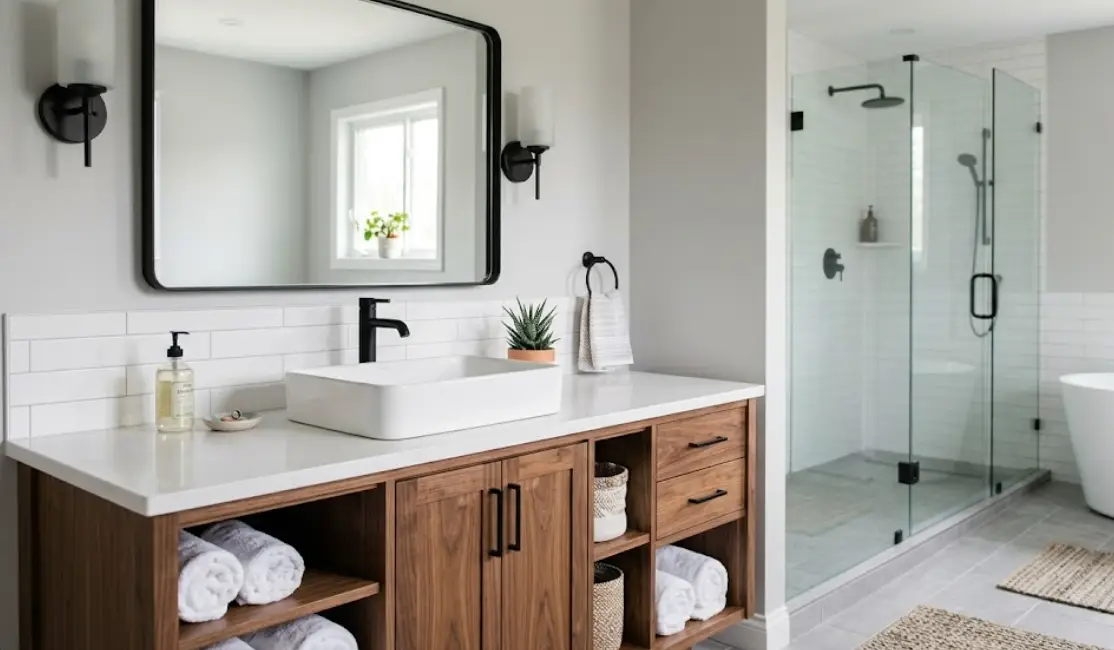
23. Balance Modern and Classic with a Double Vanity and Brass Accents
The element that truly elevates this bathroom is the backsplash of glossy, irregular-shaped vertical subway tiles. It’s a subtle but powerful choice. The vertical orientation draws the eye up, making the wall feel taller, while the irregular shape and glossy finish catch the light beautifully, adding a handmade, artisanal texture. It creates a perfect bridge between the clean lines of the light wood vanity and the classic curves of the brass-framed mirrors, adding a layer of sophisticated detail that feels both modern and timeless.
|
📋 Copy HEX 🔗 Share |
⭐ The One Thing
A double vanity is a dream for couples, but it comes with practical considerations. You’re not just doubling the cost of sinks and faucets; you’re also dealing with more complex plumbing, which can increase installation costs. It also means sacrificing counter space. Before committing, mock up the vanity area with cardboard cutouts to see if you have enough elbow room and landing space for your daily routine. Sometimes, a single, larger sink with more surrounding counter space can be more functional than two cramped sinks.
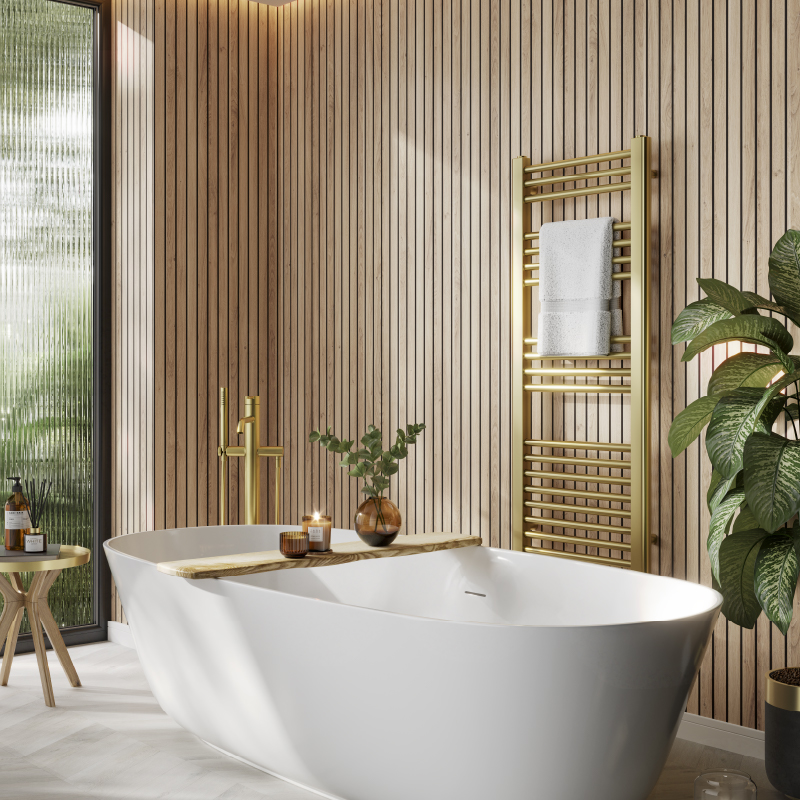
24. Incorporate a Wood Slat Wall for Spa-Like Warmth
This bathroom feels like a luxurious spa due to the masterful combination of texture and material. The warm, vertical lines of the wood slat wall create an organic, natural backdrop that contrasts beautifully with the smooth, cool surface of the white freestanding tub. The gold fixtures add a touch of glamour, their metallic sheen playing off the natural wood grain. Finally, the fluted glass window introduces another layer of texture, providing privacy while diffusing natural light into a soft, ethereal glow. It’s a symphony of textures that all work in harmony.
|
📋 Copy HEX 🔗 Share |
🔧 How-To Brief
A wood slat wall in a bathroom is a stunning feature, but it requires the right materials and placement to last. Using real, untreated wood in a high-moisture area is a recipe for warping and mold. Opt for either a naturally water-resistant wood like teak or cedar that is properly sealed, or (the smarter choice) use wood-look porcelain tiles or composite slat wall panels designed specifically for wet environments. These alternatives give you the same aesthetic without the risk of water damage and are significantly easier to clean.
25. Create High Contrast with a Black Hexagon Floor and Wood Vanity
- Assess Your Light: A black floor absorbs a significant amount of light. Do you have ample natural light from windows, or are you prepared to add multiple layers of artificial light (e.g., overhead, vanity sconces, accent lighting) to keep the room from feeling dark and gloomy?
- Consider Scale: The hexagon tile is a strong pattern. Is your bathroom large enough to handle it? In a very small powder room, a large-scale pattern can sometimes overwhelm the space. A medium-sized bathroom (60-100 sq ft) is often the sweet spot.
- Plan Your Transitions: How will the black hexagon floor meet the flooring in the hallway? A clean, simple transition strip is key. Also, plan your grout color—a light gray or white grout will make the hexagon pattern pop, while a dark gray or black grout will create a more subtle, seamless look.
|
📋 Copy HEX 🔗 Share |
✅ Before You Start
This room’s dynamic energy comes from a bold formula: 40% dramatic dark floor + 40% bright white walls + 20% warm wood tones. The black hexagon tile floor provides a powerful, graphic foundation. The white marble subway tiles and light neutral upper walls create a bright, clean canvas that balances the darkness of the floor. Finally, the slatted wood vanity and door inject essential warmth and organic texture, preventing the black and white scheme from feeling too stark or clinical. This balance is critical to the success of the look. See how a different finish, matte black, is used in Idea #28.
26. Pair a Sleek Tub with Light Gray Vertical Tiles
The clean, minimalist aesthetic of this bathroom is achieved through the principle of repetition and alignment. The strong vertical lines of the rectangular wall tiles are echoed in the vertical grain of the light wood vanity drawers. This creates a subtle but powerful sense of rhythm and order. The wall-mounted faucet and minimalist tub filler further enhance the clean look by freeing up surface space and reducing visual clutter. The result is a space that feels calm, uncluttered, and intentionally designed.
|
📋 Copy HEX 🔗 Share |
🎯 What Makes It Work
This design reflects a broader trend toward ‘quiet luxury’ in interiors. It’s not about flashy logos or over-the-top glamour, but about high-quality materials and thoughtful, understated design. The focus on clean lines, natural-inspired materials (like the wood-grain vanity and terrazzo-style floor), and a serene color palette is a direct response to a desire for homes that feel like personal retreats from a chaotic world. This isn’t a fleeting trend; it’s a long-term shift toward more mindful and timeless design. Compare with the similar natural feel of Idea #8.
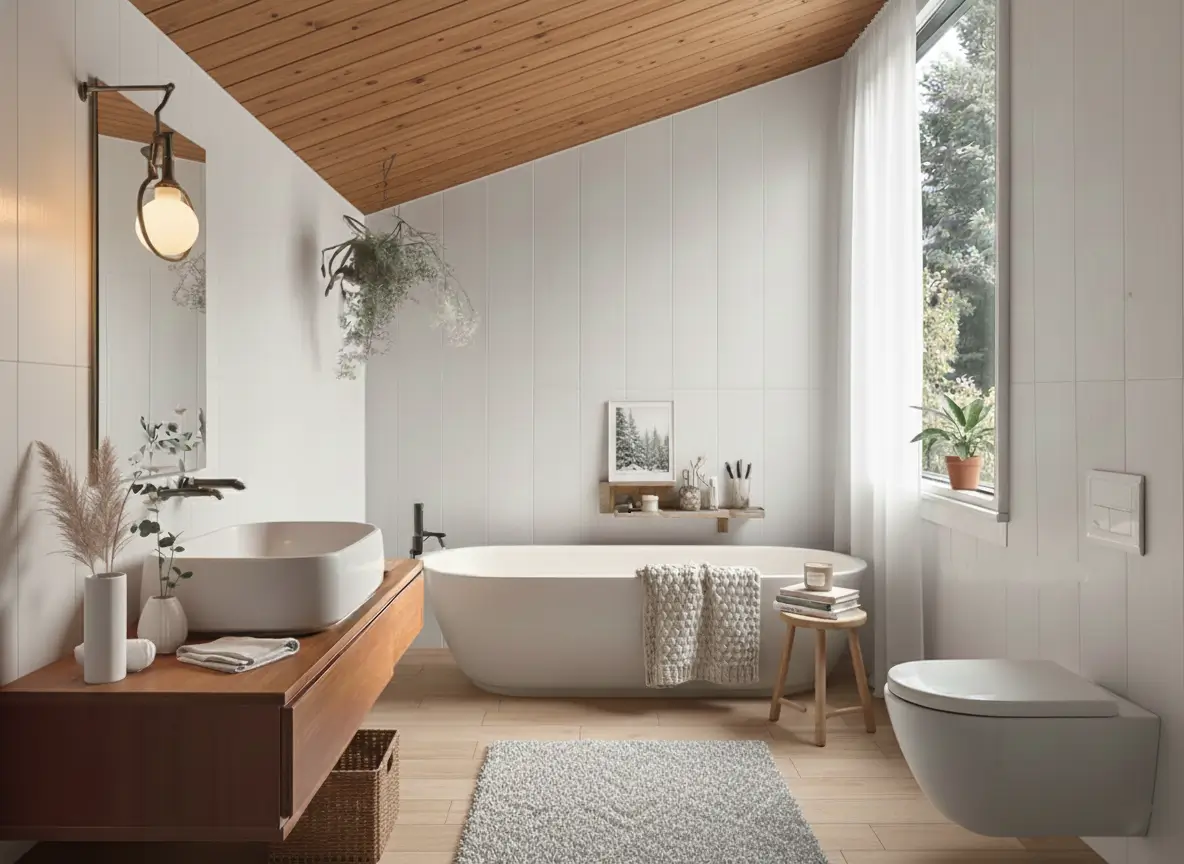
27. Embrace Scandinavian Design with a Slatted Wood Ceiling
The slatted wood ceiling is, without a doubt, the defining feature of this bathroom. While the other elements are hallmarks of Scandinavian design—floating vanity, white tiles, natural materials—the ceiling is what adds architectural drama and incredible warmth. It draws the eye upward, accentuating the room’s volume, and its organic texture cocoons the space, making it feel like a modern sauna or a tranquil cabin retreat. Without it, the bathroom would be lovely, but it would lack this powerful, statement-making element.
|
📋 Copy HEX 🔗 Share |
📏 Scale Guide
This look, with its striking angled ceiling, is ideally suited for a room with some architectural interest, like an attic conversion or a room with a vaulted ceiling. A minimum ceiling height of 9 feet at its peak is recommended to fully appreciate the effect without it feeling claustrophobic. For the floating vanity and freestanding tub to have enough breathing room, a footprint of at least 80 square feet is ideal. In a standard room with a flat 8-foot ceiling, you can achieve a similar feel by applying the slatted wood to an accent wall instead.
28. Mix a Dark Wood Vanity with Matte Black Accents
The visual success of this bathroom lies in its confident use of contrast, following a clear formula: 50% bright whites + 30% warm materials + 20% dark accents. The white subway tiles and countertop form the bright, reflective base. The light gray walls and floor act as a soft neutral transition. The dark wood vanity provides the necessary warmth and organic texture. Finally, the matte black fixtures, mirror frame, and hardware inject a sharp, modern edge that defines the entire look and keeps it from being boring.
|
📋 Copy HEX 🔗 Share |
🔥 Trending Context
Creating this high-contrast look doesn’t have to be expensive. The key elements are widely available at budget-friendly price points. Matte black spray paint can transform an old mirror frame or existing hardware for less than $10. Classic white subway tile is one of the most affordable tile options on the market. For the vanity, consider finding a dark wood secondhand dresser from Facebook Marketplace or a thrift store and have it fitted with a simple white countertop. This approach delivers the stylish, modern aesthetic without the high-end price tag.
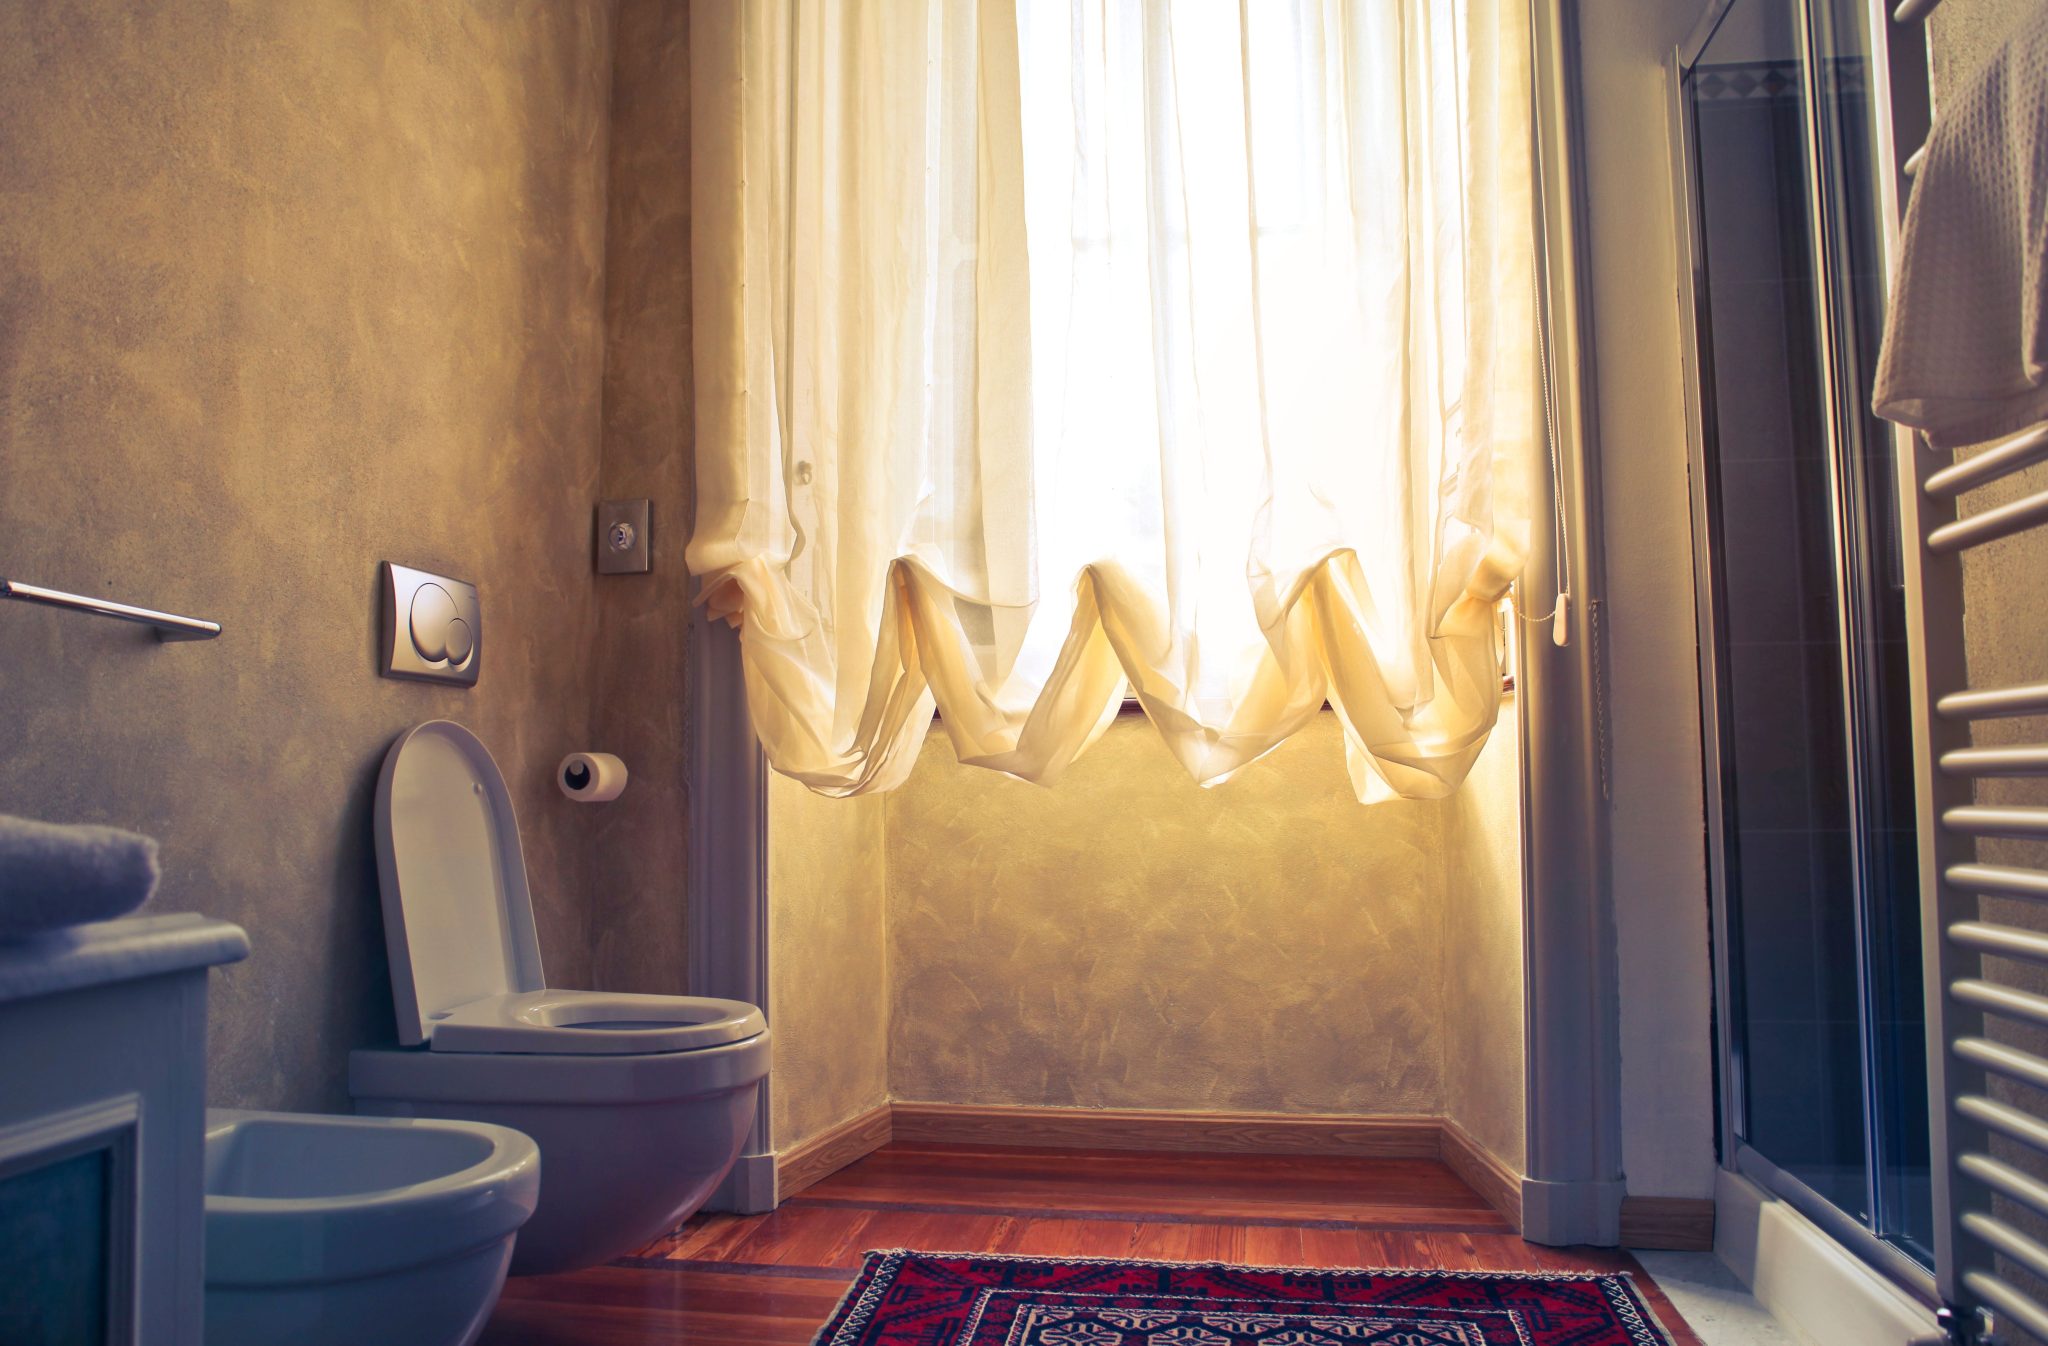
29. Drape Sheer Curtains for a Soft, Illuminated Glow
The delicate, sheer white curtains are the single most transformative element in this room. They take what could be harsh, direct sunlight from the window and diffuse it into a soft, ethereal glow that fills the entire space. This simple piece of fabric changes the quality of the light, which in turn changes the mood from functional to dreamy and serene. It adds a layer of softness and movement that contrasts beautifully with the hard surfaces of the tile and fixtures.
|
📋 Copy HEX 🔗 Share |
🧹 Maintenance Reality
This bathroom feels so warm and inviting thanks to a classic design technique: layering warm tones. The walls have a textured, golden-brown finish that provides a rich, warm base. The wood flooring adds another layer of warmth with a slightly different tone and texture. Even the ornate rug contributes, with its deep red notes. Sticking to a narrow band of analogous colors (colors next to each other on the color wheel, like yellow, orange, and red) creates a cohesive and deeply comforting atmosphere.
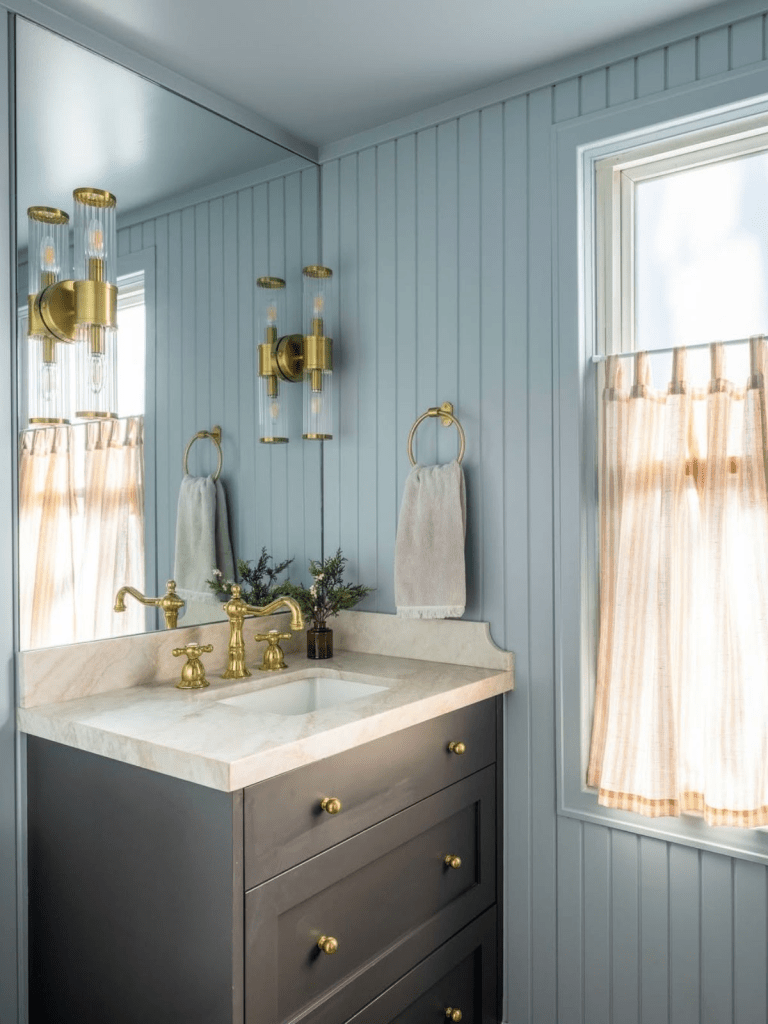
30. Combine Pale Blue Shiplap with a Dark Gray Vanity
A cafe curtain is a brilliant solution for a bathroom window where you want both privacy and natural light. To get the classic look just right, mount the tension rod or curtain rod about halfway up the window frame, or just above the horizontal sash if you have a double-hung window. The curtain itself should be just long enough to skim the windowsill. This provides privacy for the lower half of the room while allowing abundant light to stream in through the top half of the window, keeping the space bright and airy.
|
📋 Copy HEX 🔗 Share |
💡 Designer Tip
This room proves that a ‘warm neutral’ palette can include color. The formula here is about balance: 50% soft color (the pale blue shiplap) + 30% grounding dark neutral (the gray vanity) + 10% classic light neutral (the beige countertop) + 10% warm metallic accent (the brass). The blue and gray provide a sophisticated, cool base, but the warmth from the brass fixtures and the beige marble-look top is essential. This touch of warmth keeps the cool tones from feeling chilly and makes the entire space feel balanced and inviting.
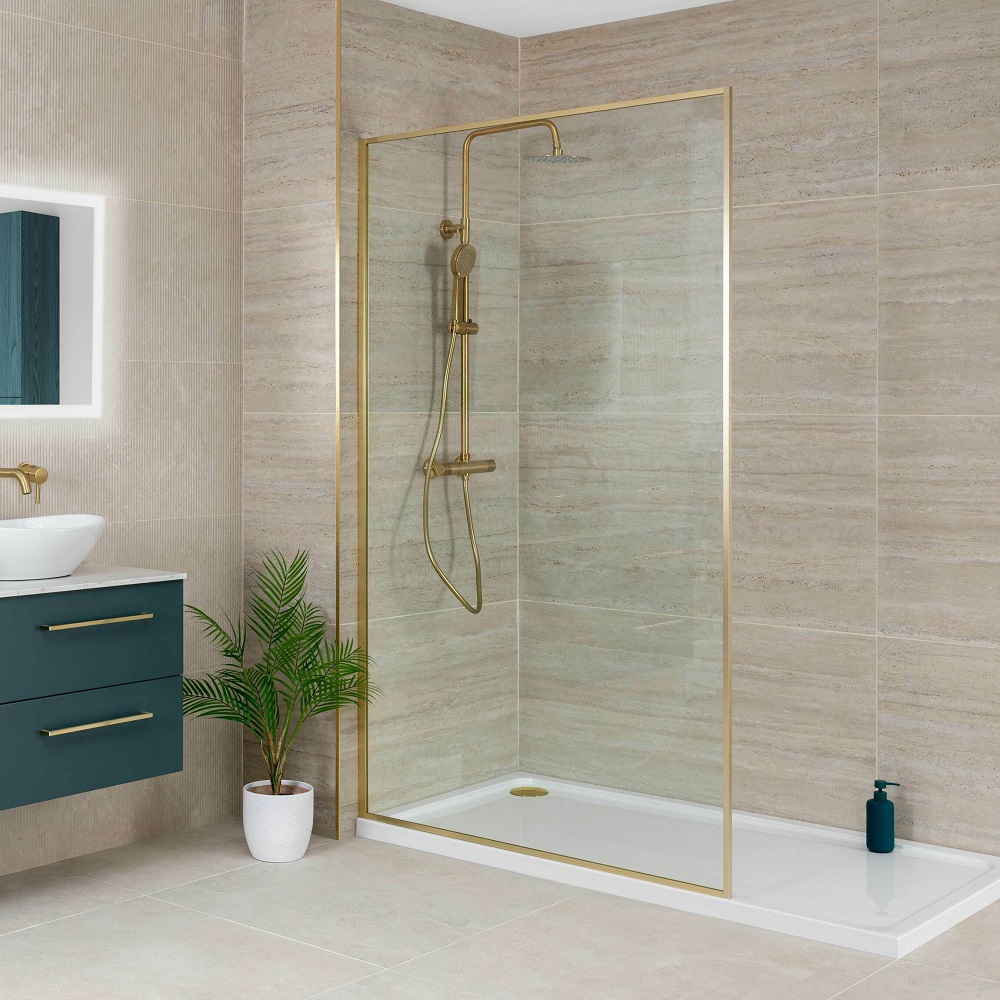
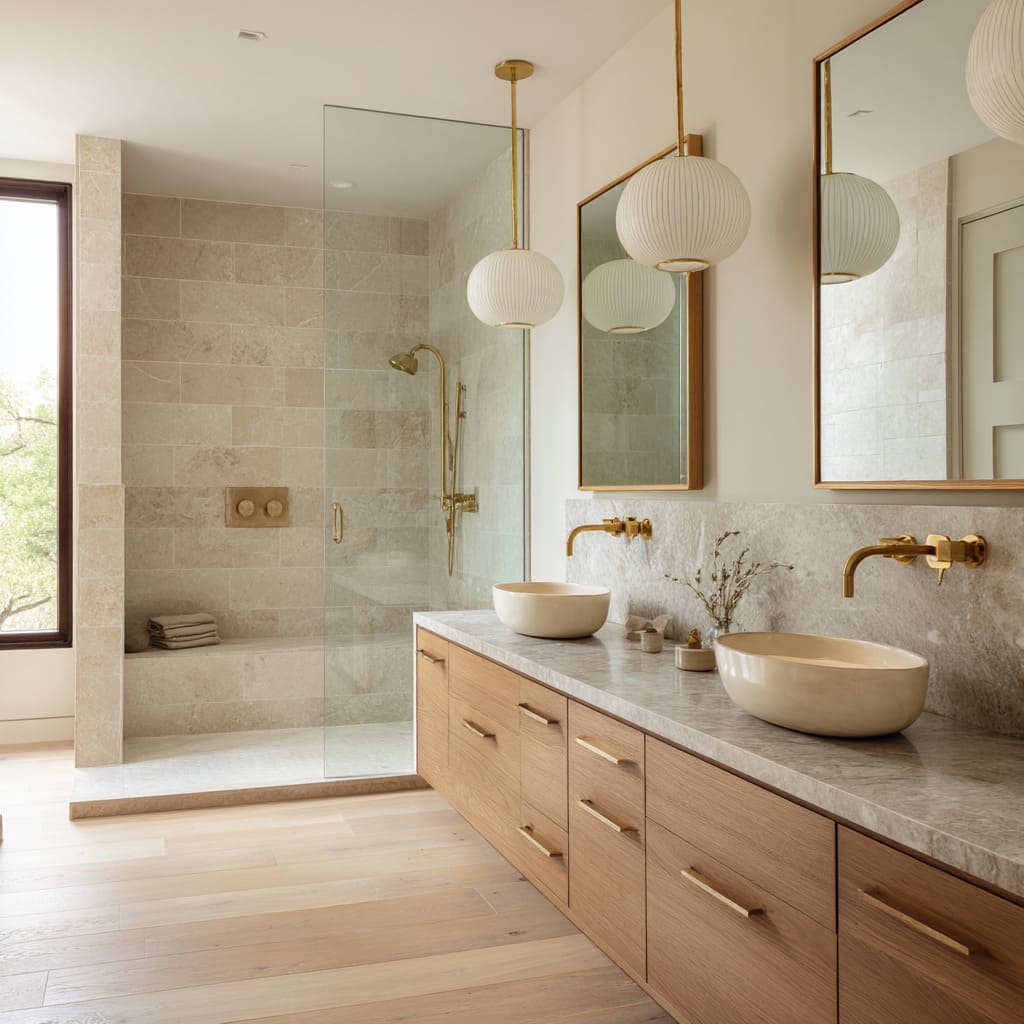
31. Design a Luxurious Retreat with a Double Vanity and Walk-In Shower
A spacious layout like this, with a long double vanity opposite a large walk-in shower, requires a generous footprint. This design works best in a primary bathroom that is at least 120 square feet, ideally in a rectangular shape. You need a minimum width of 10 feet to allow for the depth of the vanity (around 22-24 inches), the shower (at least 36 inches), and a comfortable walkway of at least 40 inches in between. Anything less will feel cramped and functional circulation will be compromised.
|
📋 Copy HEX 🔗 Share |
💰 Budget Breakdown
- Main Furniture (Double Vanity): $1,500 – $4,500
- Fixtures (Faucets, Shower System): $800 – $2,500
- Lighting (Pendants): $300 – $900
- Tile (Shower & Floor): $2,000 – $6,000 (including installation)
- Glass Shower Partition: $800 – $2,000
- Budget alternative: Use a stock double vanity from a big-box store, opt for porcelain tile instead of natural stone, and choose more affordable (but still stylish) fixtures from online retailers. This could bring the total closer to the $5,000-$7,000 range.
- TOTAL: $5,400 – $15,900
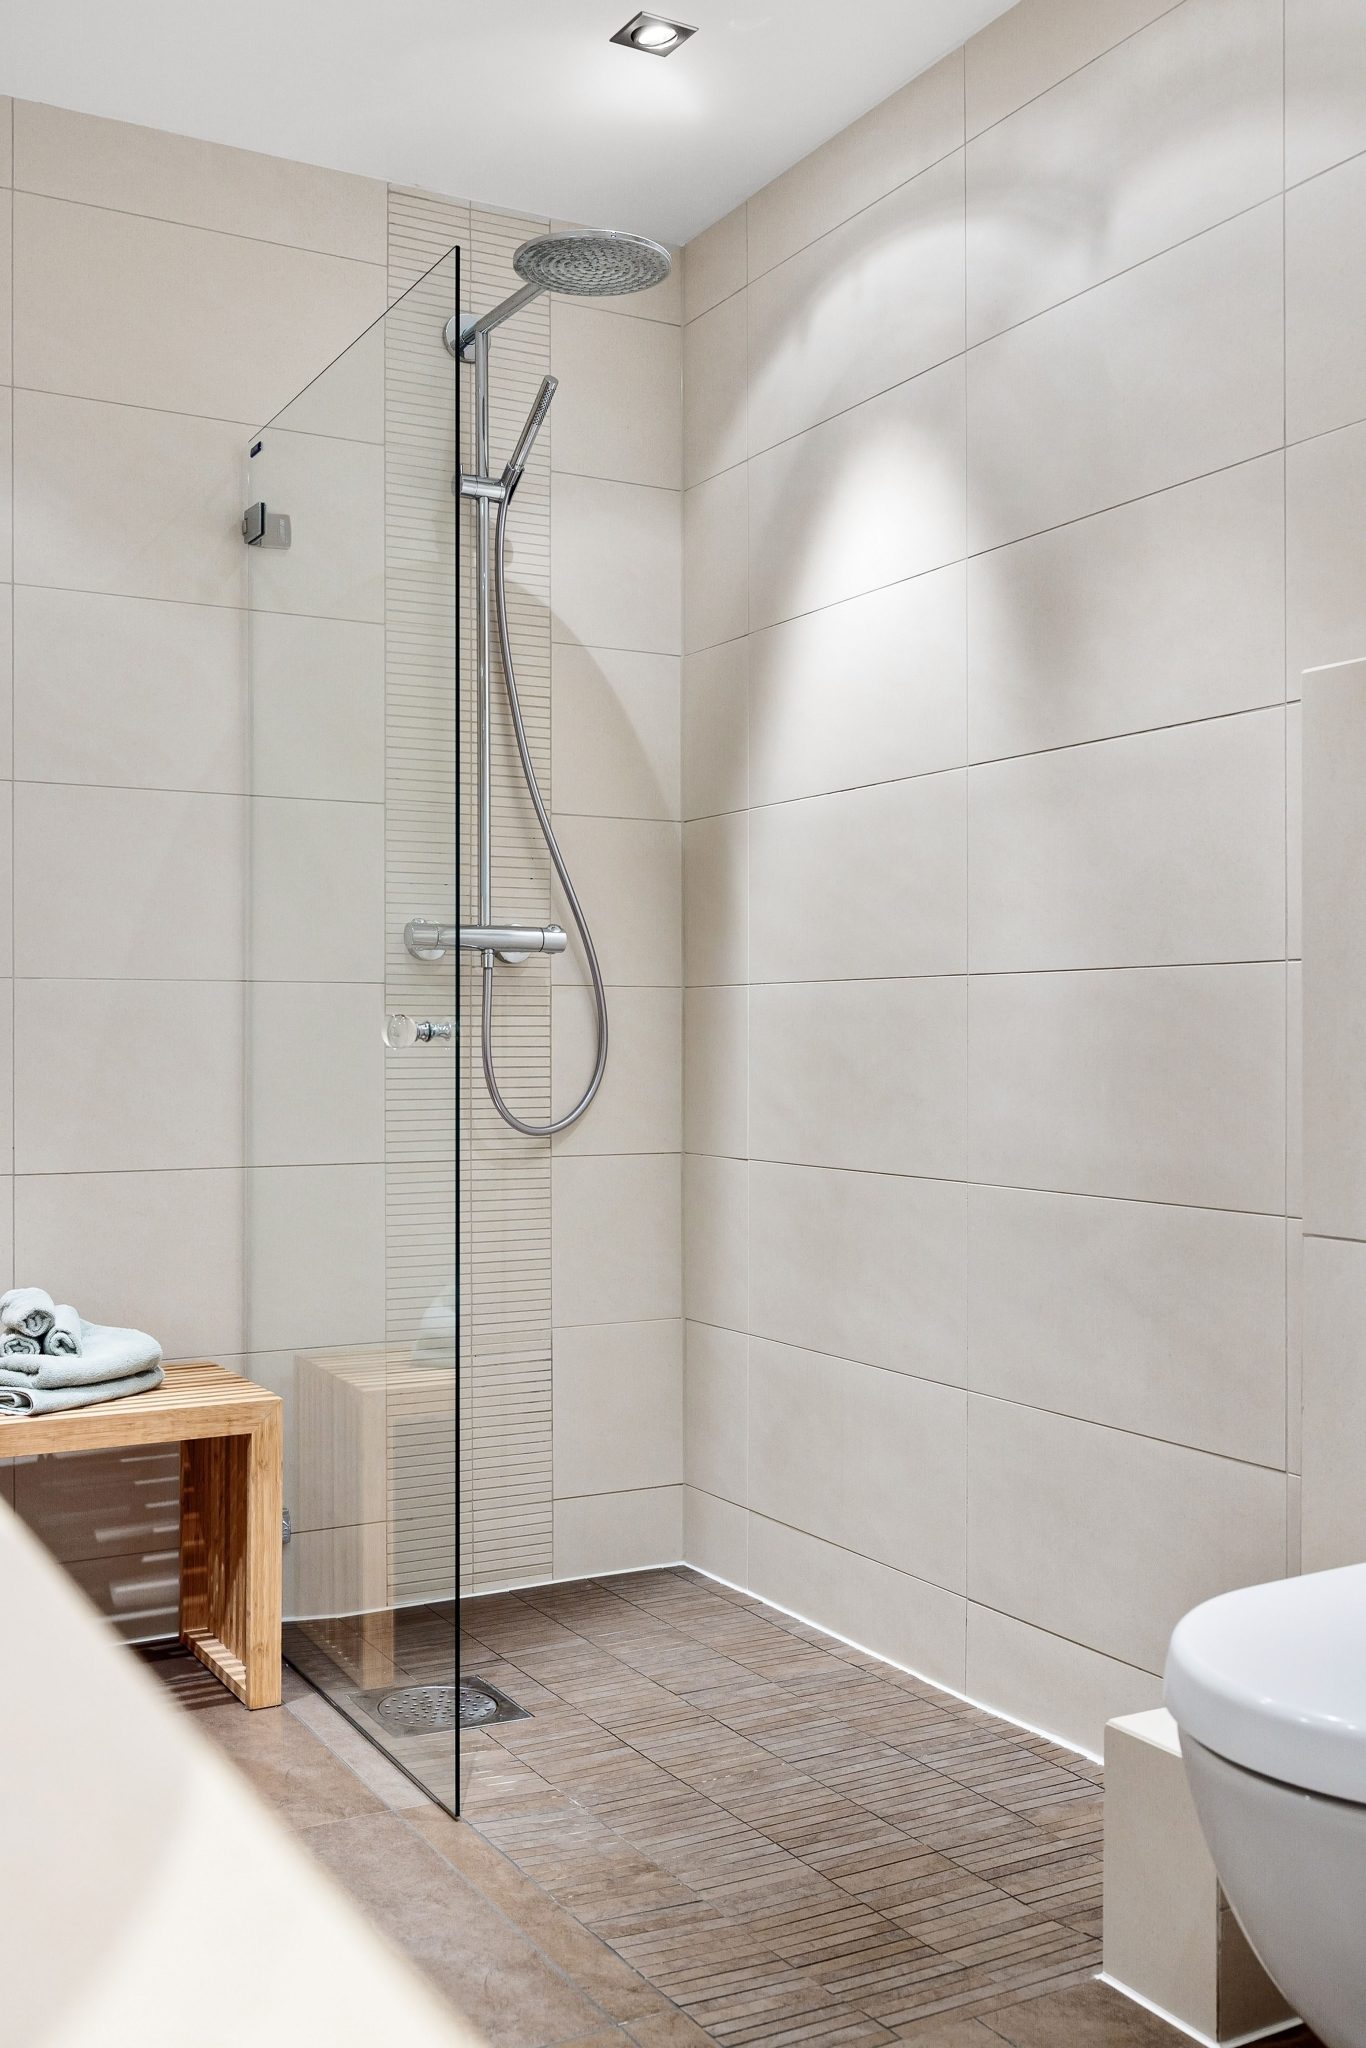
32. Use Wood-Look Floor Tiles for Warmth in a Shower
The success of this shower design lies in the smart use of material contrast. The large, light beige tiles on the walls create a bright and expansive feel. Then, the wood-look tiles on the floor introduce a surprising and welcome element of warmth and natural texture. This contrast prevents the all-tile space from feeling cold or clinical. The vertical accent strip of smaller, textured tiles adds another layer of subtle detail, breaking up the large wall surface and creating a sophisticated focal point around the fixtures.
|
📋 Copy HEX 🔗 Share |
⚠️ Real Talk
Wood-look porcelain tile is a fantastic, durable alternative to real wood in a wet environment. However, pay close attention to the grout color. Choosing a grout that closely matches the darkest tone in the tile will create the most realistic, seamless look, mimicking the natural shadows between wood planks. A contrasting grout color (like bright white) will instantly shatter the illusion, highlighting the tile grid and making it look less like real wood. Also, ensure the tiles are rated for shower floor use to provide adequate slip resistance.
Your Warm Neutral Story Starts Here
Think of these ideas not as strict rules, but as starting points for your own perfect bathroom. The beauty of a warm neutral palette is its flexibility—it’s a canvas for your personal style. Whether you’re drawn to minimalist serenity or layered elegance, the right combination of texture, tone, and light can create a space that feels like a true retreat. Ready to start planning? Pin your favorite looks to your board and let the transformation begin.