30 Jaw-Dropping Shower Tile Ideas for 2026 That Will Transform Your Bathroom into a Dream Oasis
You know that feeling when you finally find the shower tile that looks exactly right for your space? That little spark of “yes, that’s the one!” after hours of scrolling. We’ve been there. After filtering through hundreds of options across tile shops and even checking out vanities and fixtures at places like IKEA and Target, we narrowed it down to the 30 ideas that actually deliver a “wow” moment. Inside, you’ll find 30 curated shower designs, from lush green subway tiles to bold geometric patterns and serene, large-format porcelain. In 2026, the focus is shifting away from generic, all-white bathrooms to spaces with personality and warmth—something we’ve seen explode on Pinterest boards everywhere. Pin this guide for later—your future self will thank you when it’s time to actually remodel.
1. Embrace Calm with Large-Format Porcelain Walls
Using large sheets of porcelain instead of smaller tiles is one of the smartest moves you can make in a modern shower. The seamless look, with minimal to no grout lines, instantly makes a space feel bigger and more serene. It’s a clean, architectural approach that removes visual clutter, allowing the focus to remain on the material itself. This works because it follows the principle of continuity; the unbroken surface creates a monolithic effect that feels luxurious and intentional, turning a simple shower wall into a statement piece.
|
📋 Copy HEX 🔗 Share |
📐 Style Math
Let’s talk upkeep, because this is where large-format porcelain truly shines. With traditional tile, the enemy is always the grout, which is porous and prone to mildew and staining. Here, you have virtually none of that. Cleaning is as simple as wiping down a single, solid surface. A quick squeegee after each use prevents water spots. For a deeper clean, a pH-neutral cleaner is all you need. The non-porous nature of porcelain means it resists bacteria and staining, making it one of the most hygienic and low-maintenance options you can choose for a wet environment.
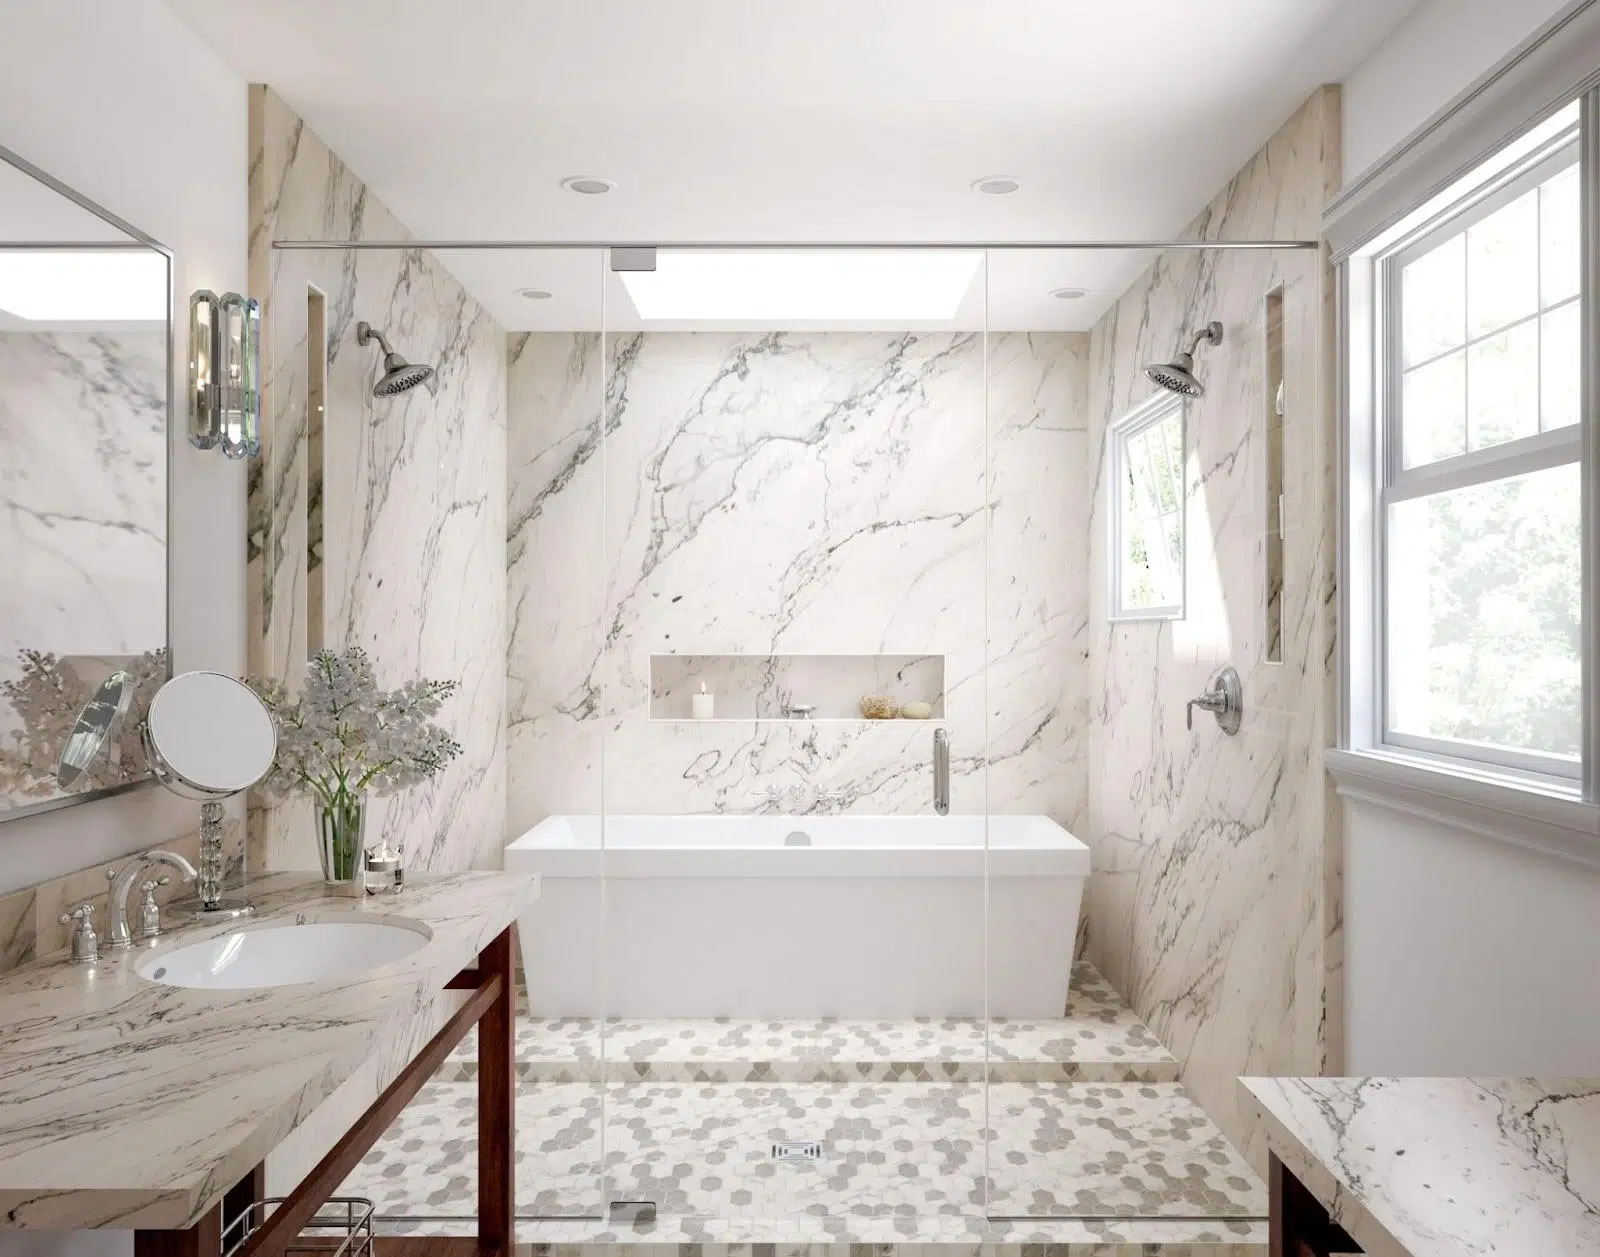
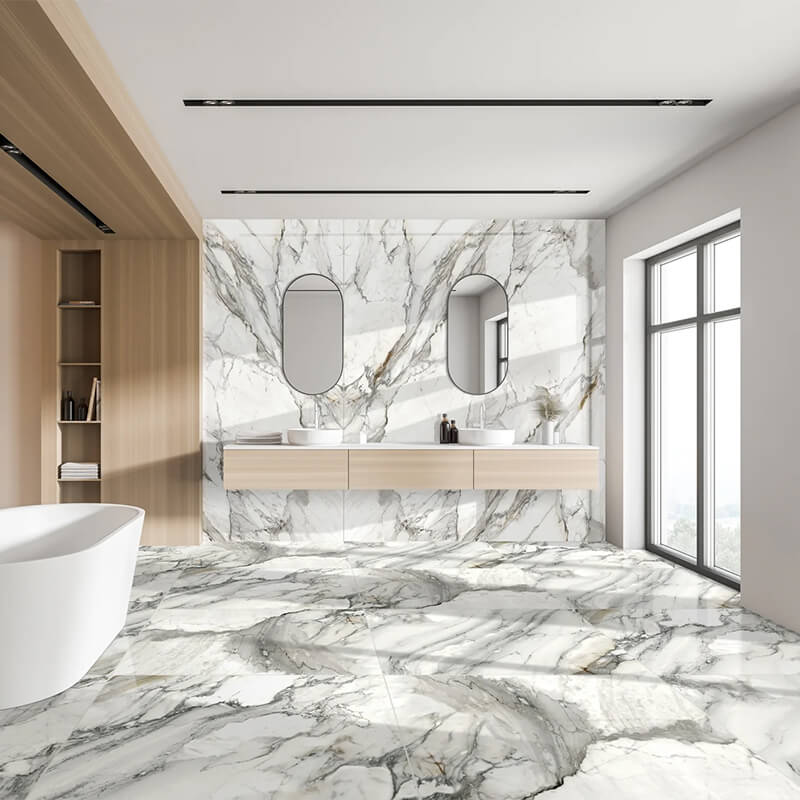
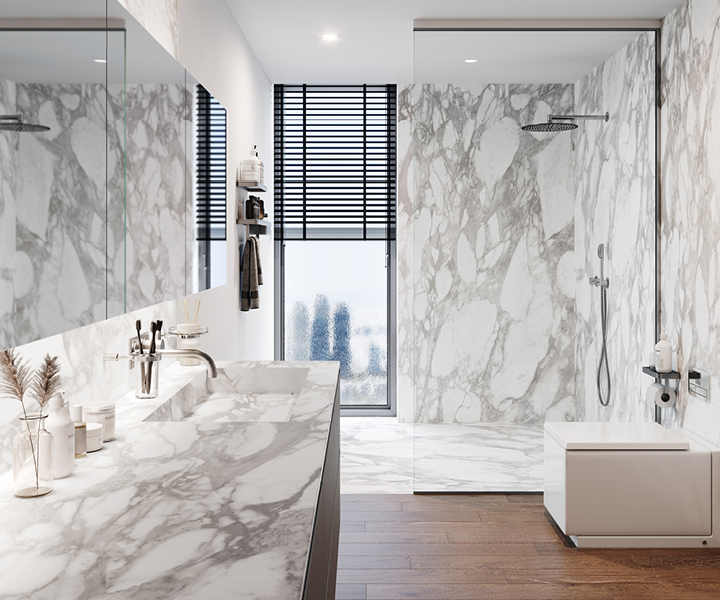
2. High-Contrast Marble with Warm Wood Paneling
The success of this bathroom is a lesson in balance. Think of it as a simple formula: 60% dramatic marble + 30% warm wood + 10% black accents. The large-scale, high-contrast white and grey marble provides the drama and luxury, but it could easily feel cold on its own. The light wood wall paneling and matching vanity are the essential counterbalance, introducing organic texture and warmth. The final 10% comes from the black frames on the oval mirrors and other small fixtures, which act like punctuation, grounding the space and adding a touch of graphic sharpness.
|
📋 Copy HEX 🔗 Share |
🎯 What Makes It Work
When mixing materials as bold as these, the transition is everything. To ensure the wood paneling feels integrated and not just tacked on, have your contractor create a recessed channel where the wood meets the marble wall. This creates a clean, intentional shadow line that makes the connection look incredibly high-end. For the vanity, floating it 10-12 inches off the floor enhances the spacious feel created by the large marble tiles and makes the entire room easier to clean. It’s a small detail that makes a huge difference in the final look.
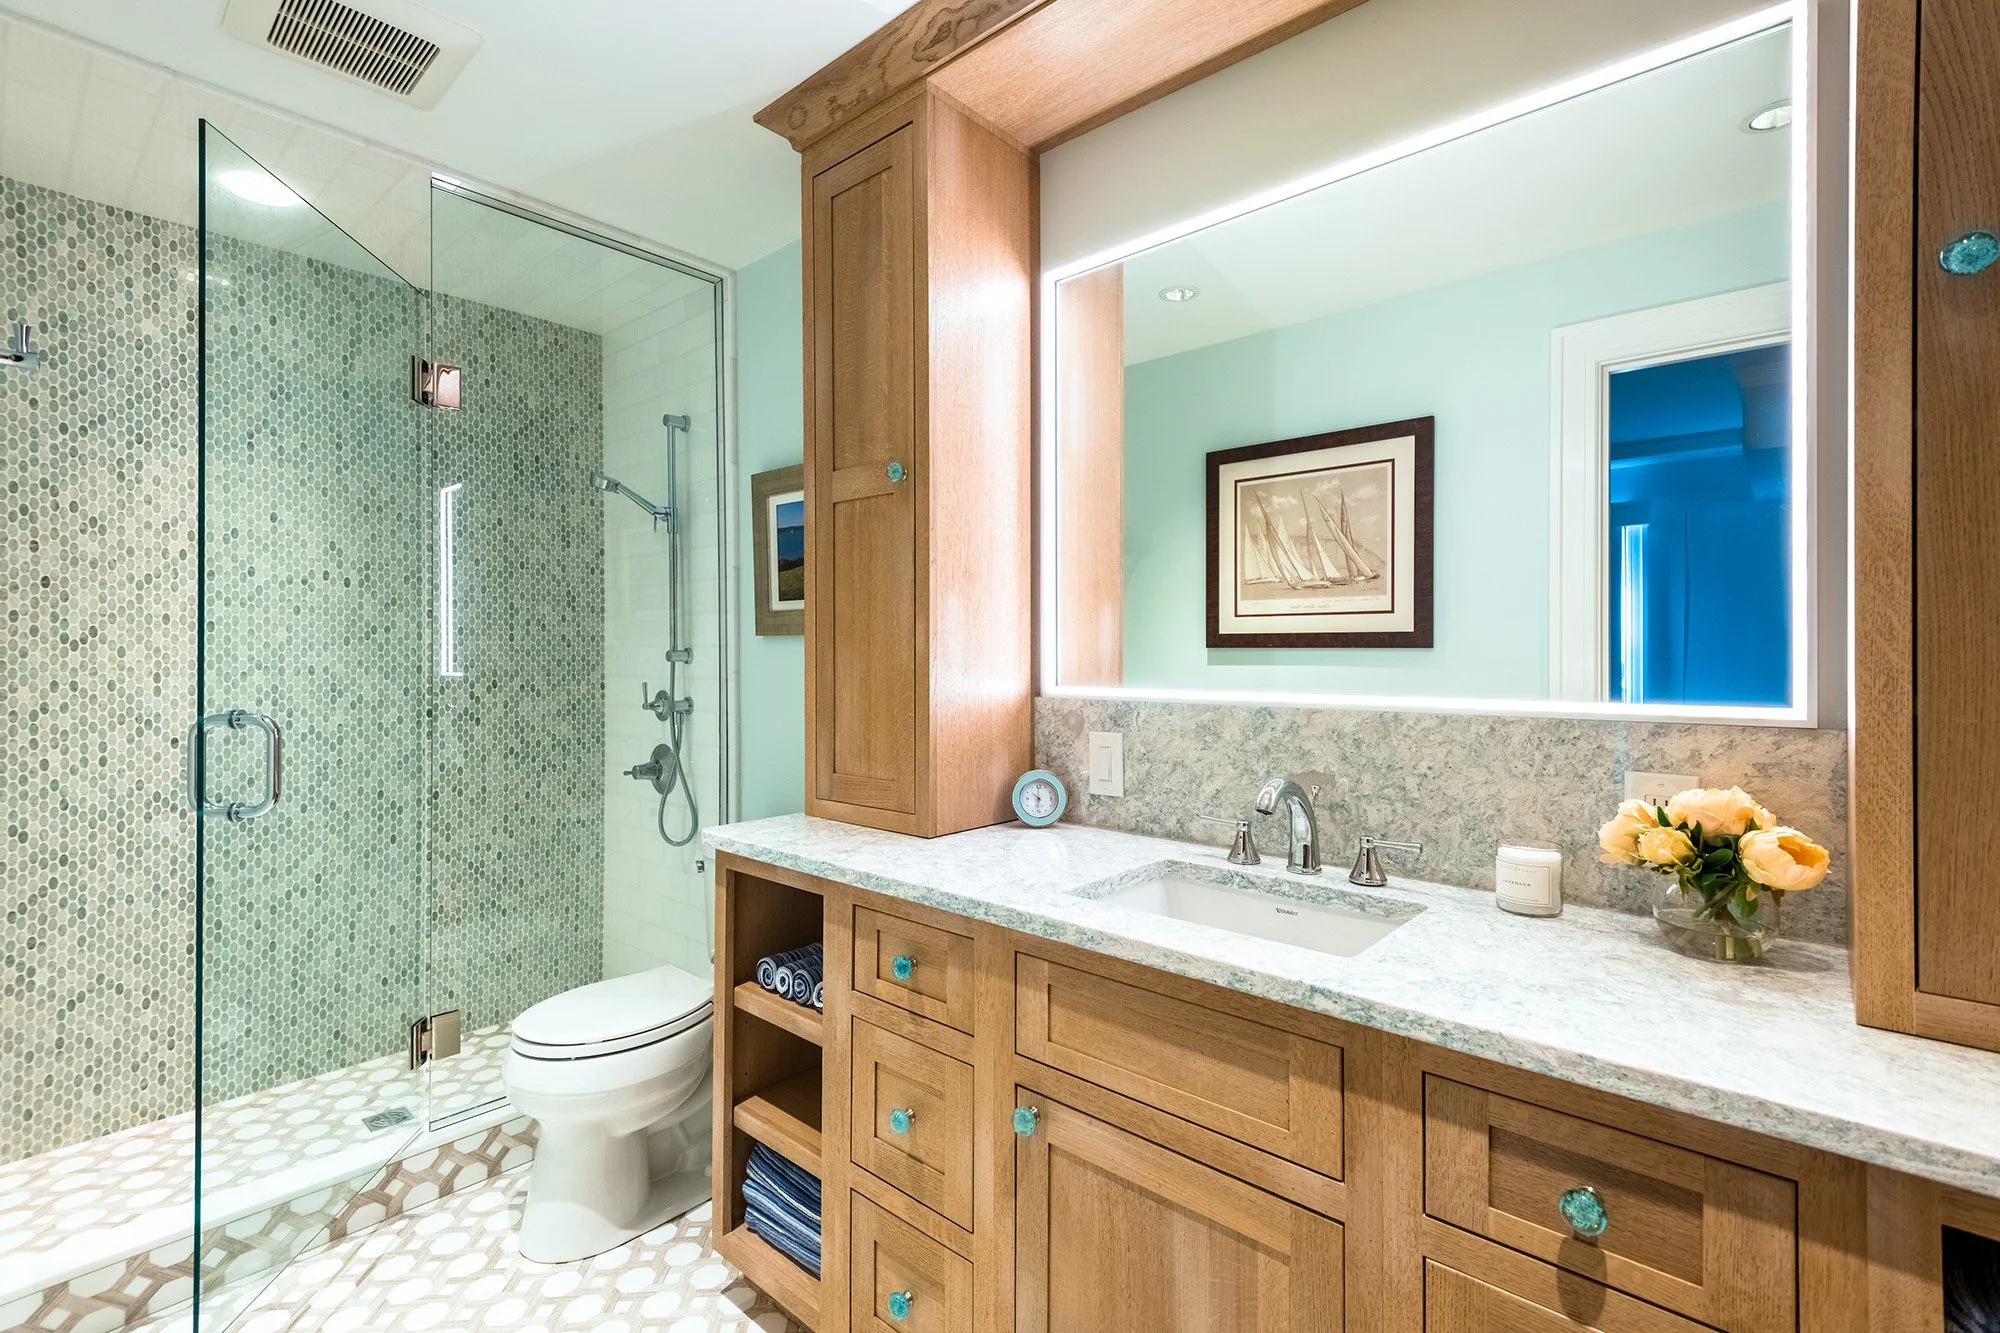
3. White Subway Tile with a Pop of Green and Blue Mosaic
The single element that makes this design sing is the band of green and blue mosaic tile. Without it, you’d have a perfectly nice, but standard, white subway tile bathroom. That vibrant accent is the personality, the focal point that draws your eye and turns the tub and shower into a feature. It adds color, texture, and a touch of intricacy that elevates the entire design from basic to bespoke. It proves you don’t need to tile every surface in a bold color to make a statement; a well-placed, thoughtful accent can do all the heavy lifting.

|
📋 Copy HEX 🔗 Share |
💰 Budget Breakdown
You can absolutely get this look for less. White subway tile is famously affordable, often coming in under $3 per square foot. The key is to splurge a little on the accent tile and save everywhere else. Look for mosaic sheets on sale at big box stores or find remnant batches on Facebook Marketplace. Instead of tiling the entire shower, use the mosaic only in a single vertical stripe or to line a shower niche. This strategy gives you that pop of custom color for a fraction of the cost, maybe $150-200 for the mosaic tile, while keeping the bulk of the project budget-friendly.
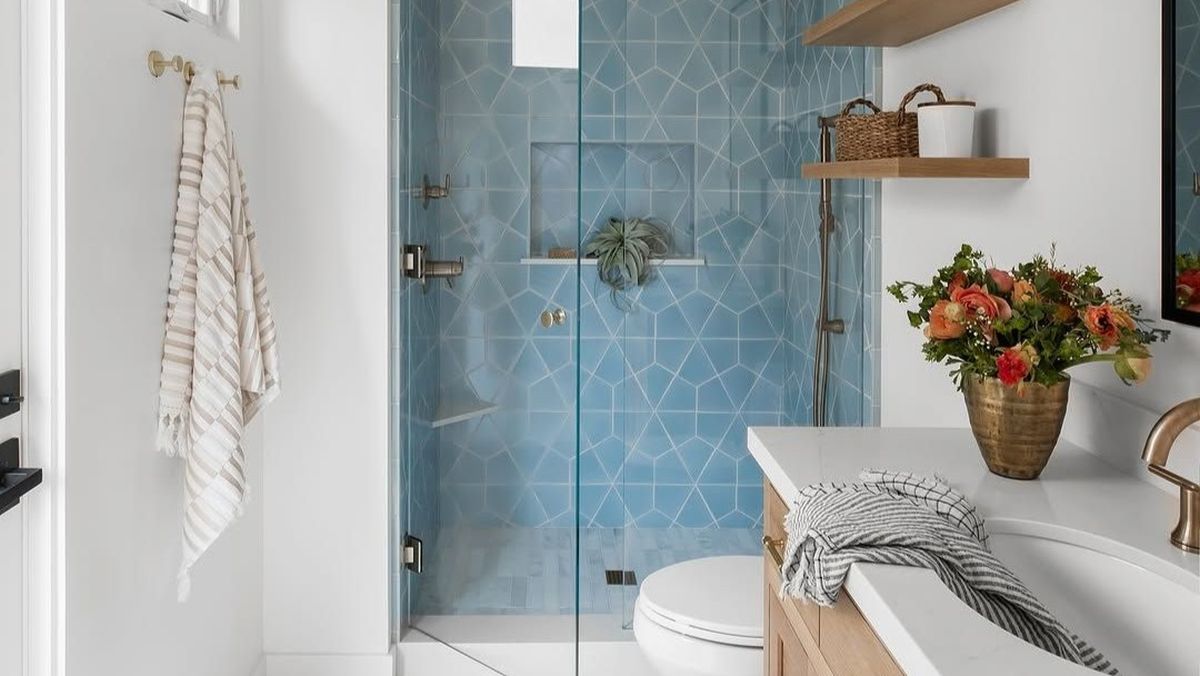
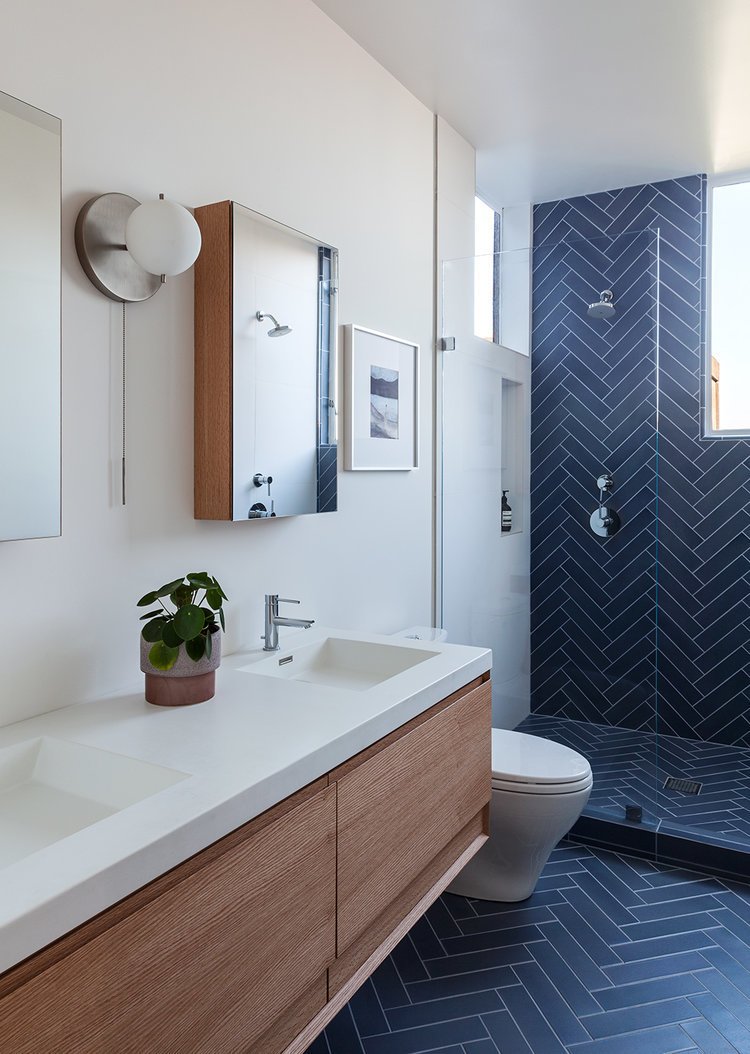
4. Blue Geometric Tiles with Warm Brass Fixtures
This design is a masterclass in mixing cool and warm tones. The sky-blue geometric tiles create a fresh, energetic backdrop that feels clean and modern. On their own, they could lean a little too cool. But the introduction of brass for all the fixtures—from the shower enclosure to the faucet—adds a necessary layer of warmth and sophistication. The light wood vanity reinforces this warmth, creating a perfectly balanced palette that feels both invigorating and inviting. The consistent use of brass ties the whole space together seamlessly.
|
📋 Copy HEX 🔗 Share |
📏 Scale Guide
This idea works beautifully in small to medium-sized bathrooms, from a compact 35 square feet to a more generous 75 square feet. The key is the scale of the pattern. Because the geometric tile is a medium-scale pattern, it adds interest without overwhelming a smaller space. For a very small shower (under 3ft x 3ft), consider using this tile on just one accent wall to avoid making the space feel too busy. It’s a more adaptable look than the grand marble of Idea #2, which needs more room to breathe.
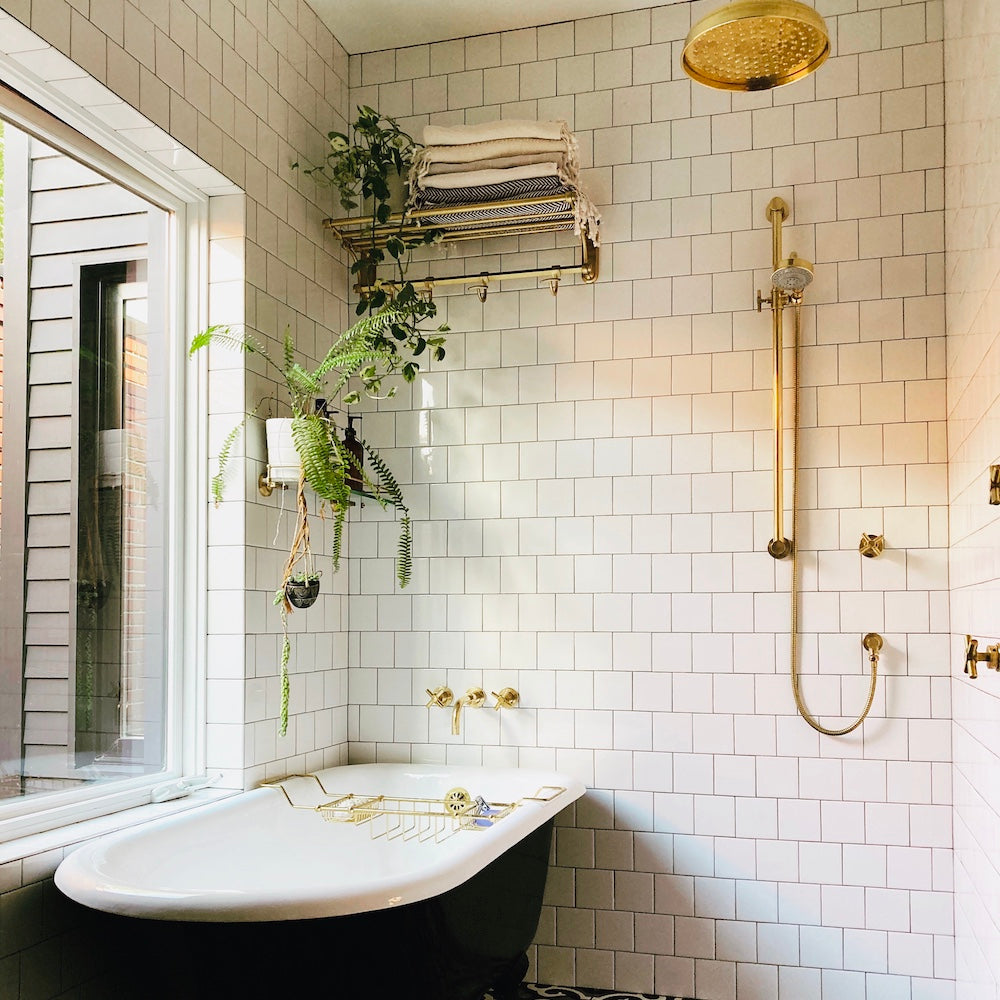
5. Classic White Subway Tile with a Touch of Greenery
The idea of a “plant-filled bathroom” has been trending on Pinterest for a few years, and this is the 2026 evolution of that look. It’s moving beyond just one sad succulent on the windowsill to a more integrated, almost “greenhouse” vibe. The combination of classic white subway tile and elegant brass fixtures provides a timeless, neutral canvas. This allows the vibrant green of the hanging and potted plants to really pop, creating a style that feels both luxurious and deeply connected to nature. It’s a response to our collective desire for more biophilic design—bringing the calming effects of the outdoors in.
|
📋 Copy HEX 🔗 Share |
🧹 Maintenance Reality
Be honest with yourself about your natural light situation. That beautiful clawfoot tub moment next to a large window is what makes these plants thrive. If you have a windowless bathroom, you can’t recreate this exact look with real plants. You’ll need to invest in high-quality faux plants (the Afloral brand has great ones) or install a dedicated grow light. Also, remember that a clawfoot tub, while stunning, can be less practical for daily showering and may require a more complex curtain setup to prevent water from splashing out.
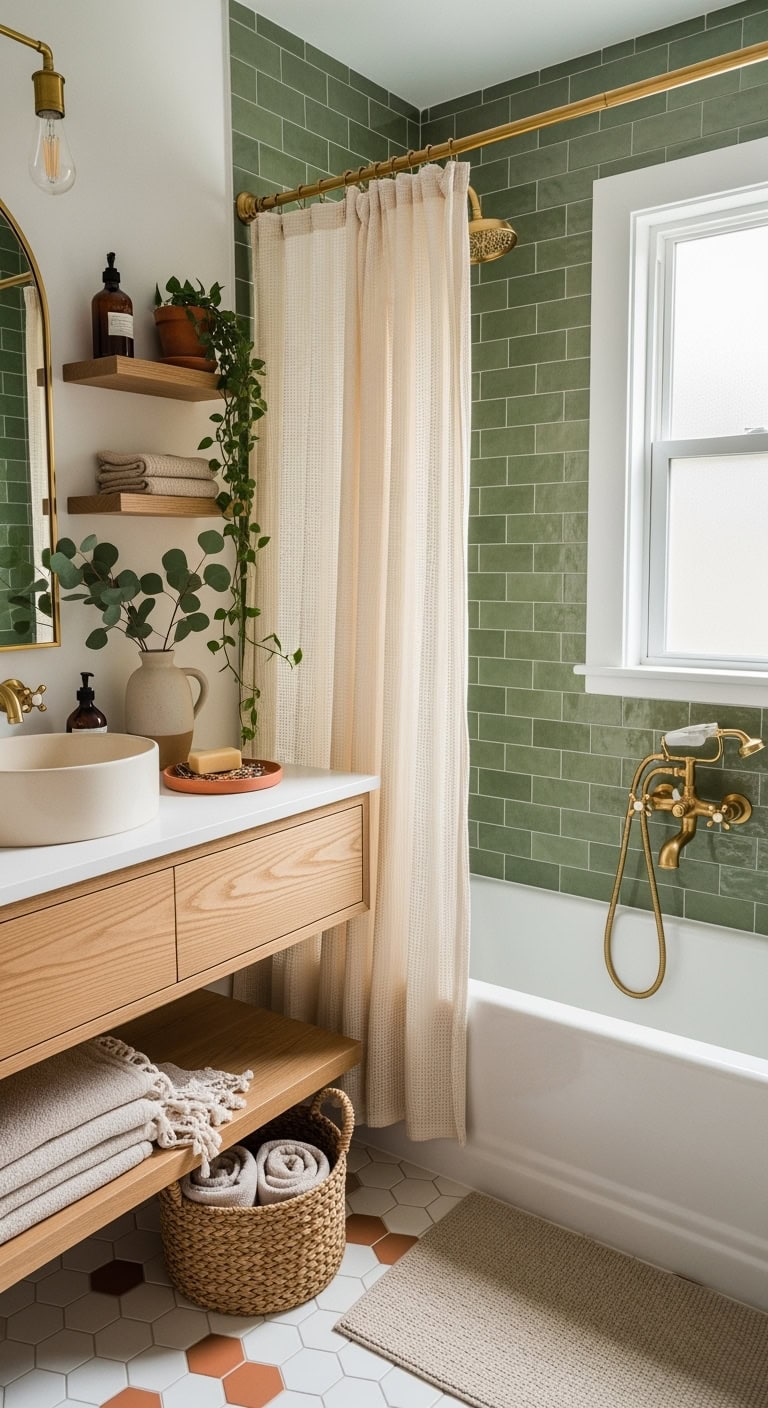
6. Sage Green Subway Tile Paired with Terracotta Floor Accents
Here’s a realistic look at what it might cost to bring this serene, earthy vibe to life. The beauty of this design is its reliance on relatively affordable materials used in a thoughtful way. It’s an approachable look that feels custom and high-end.
- Wall Tile: Sage green subway tiles – $400 – $700
- Floor Tile: White octagon tiles with terracotta accents – $250 – $450
- Fixtures: Brass shower system and tub filler – $500 – $1,200
- Vanity & Sink: Wood vanity with countertop – $600 – $1,500
- Decor: Shower curtain, rod, and accessories – $150 – $300
- TOTAL: $1,900 – $4,150
|
📋 Copy HEX 🔗 Share |
⭐ The One Thing
The terracotta accent in the floor tile is a small detail that makes a huge impact. Here’s how to plan it:
- Lay out your white octagon tiles on the floor dry, without adhesive, to determine your pattern.
- Randomly remove individual white tiles and replace them with terracotta-colored ones until you achieve a scattered, organic look. Avoid placing them in straight lines or perfect grids.
- Take a photo of your final layout! This is your map.
- Begin setting the tiles with thin-set mortar, following the pattern from your photo.
- Grout the entire floor at once to ensure a consistent finish.
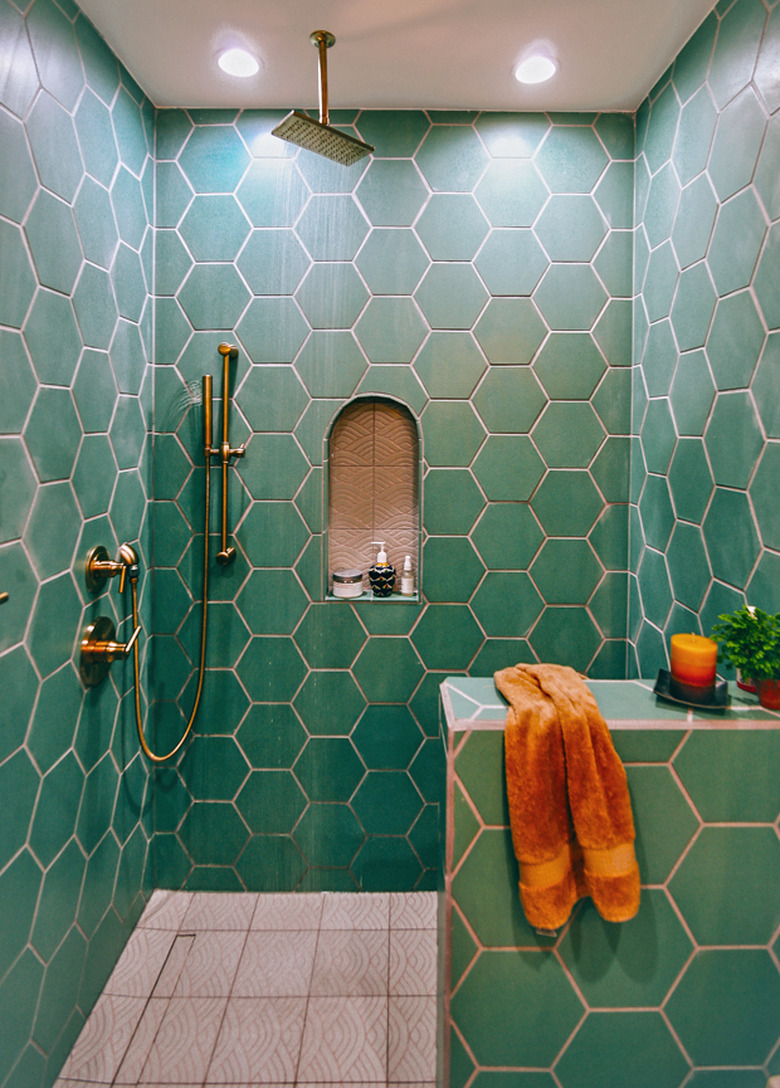
7. Light Green Hexagon Wall Tiles and a Patterned Floor
The magic here is the playful mix of patterns and shapes. While the light green hexagon wall tiles are lovely, it’s the contrast with the larger, geometrically patterned hexagon floor tiles that gives this shower its unique personality. This combination is what elevates the design. Removing the patterned floor would leave you with a sweet but simple coastal look. Keeping it introduces a layer of graphic interest that feels modern and confident. It’s a reminder that your shower floor isn’t just a functional surface; it’s another opportunity to make a style statement.
|
📋 Copy HEX 🔗 Share |
💡 Designer Tip
This design is perfect for smaller guest baths or kids’ bathrooms, typically in the 40-80 square foot range. The small scale of the wall tiles adds texture without busyness, and the larger floor tiles can actually make the floor plane feel more expansive. The light and airy color palette also helps maximize the feeling of space. If you used this idea in a very large primary bathroom, the small hex tiles might start to feel a bit too busy across a vast wall space. It’s a design that shines when it’s contained and concentrated.
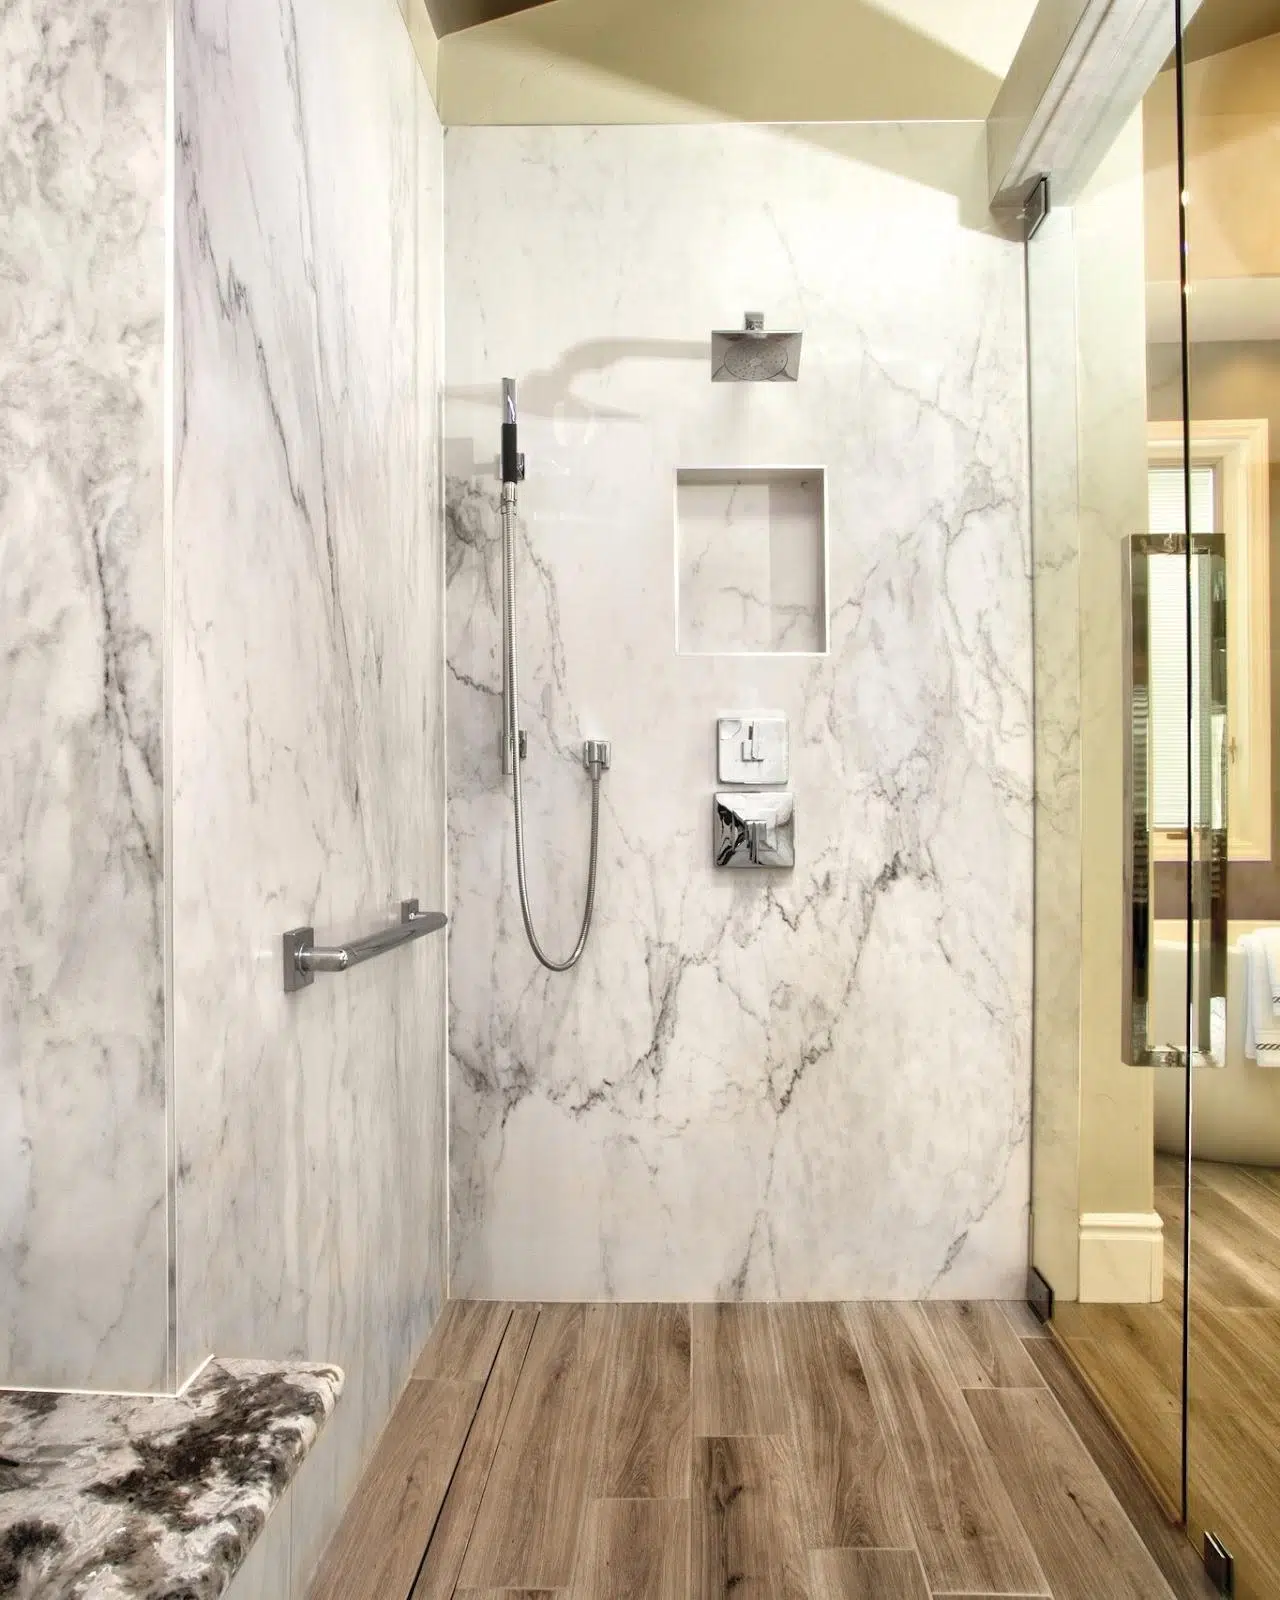
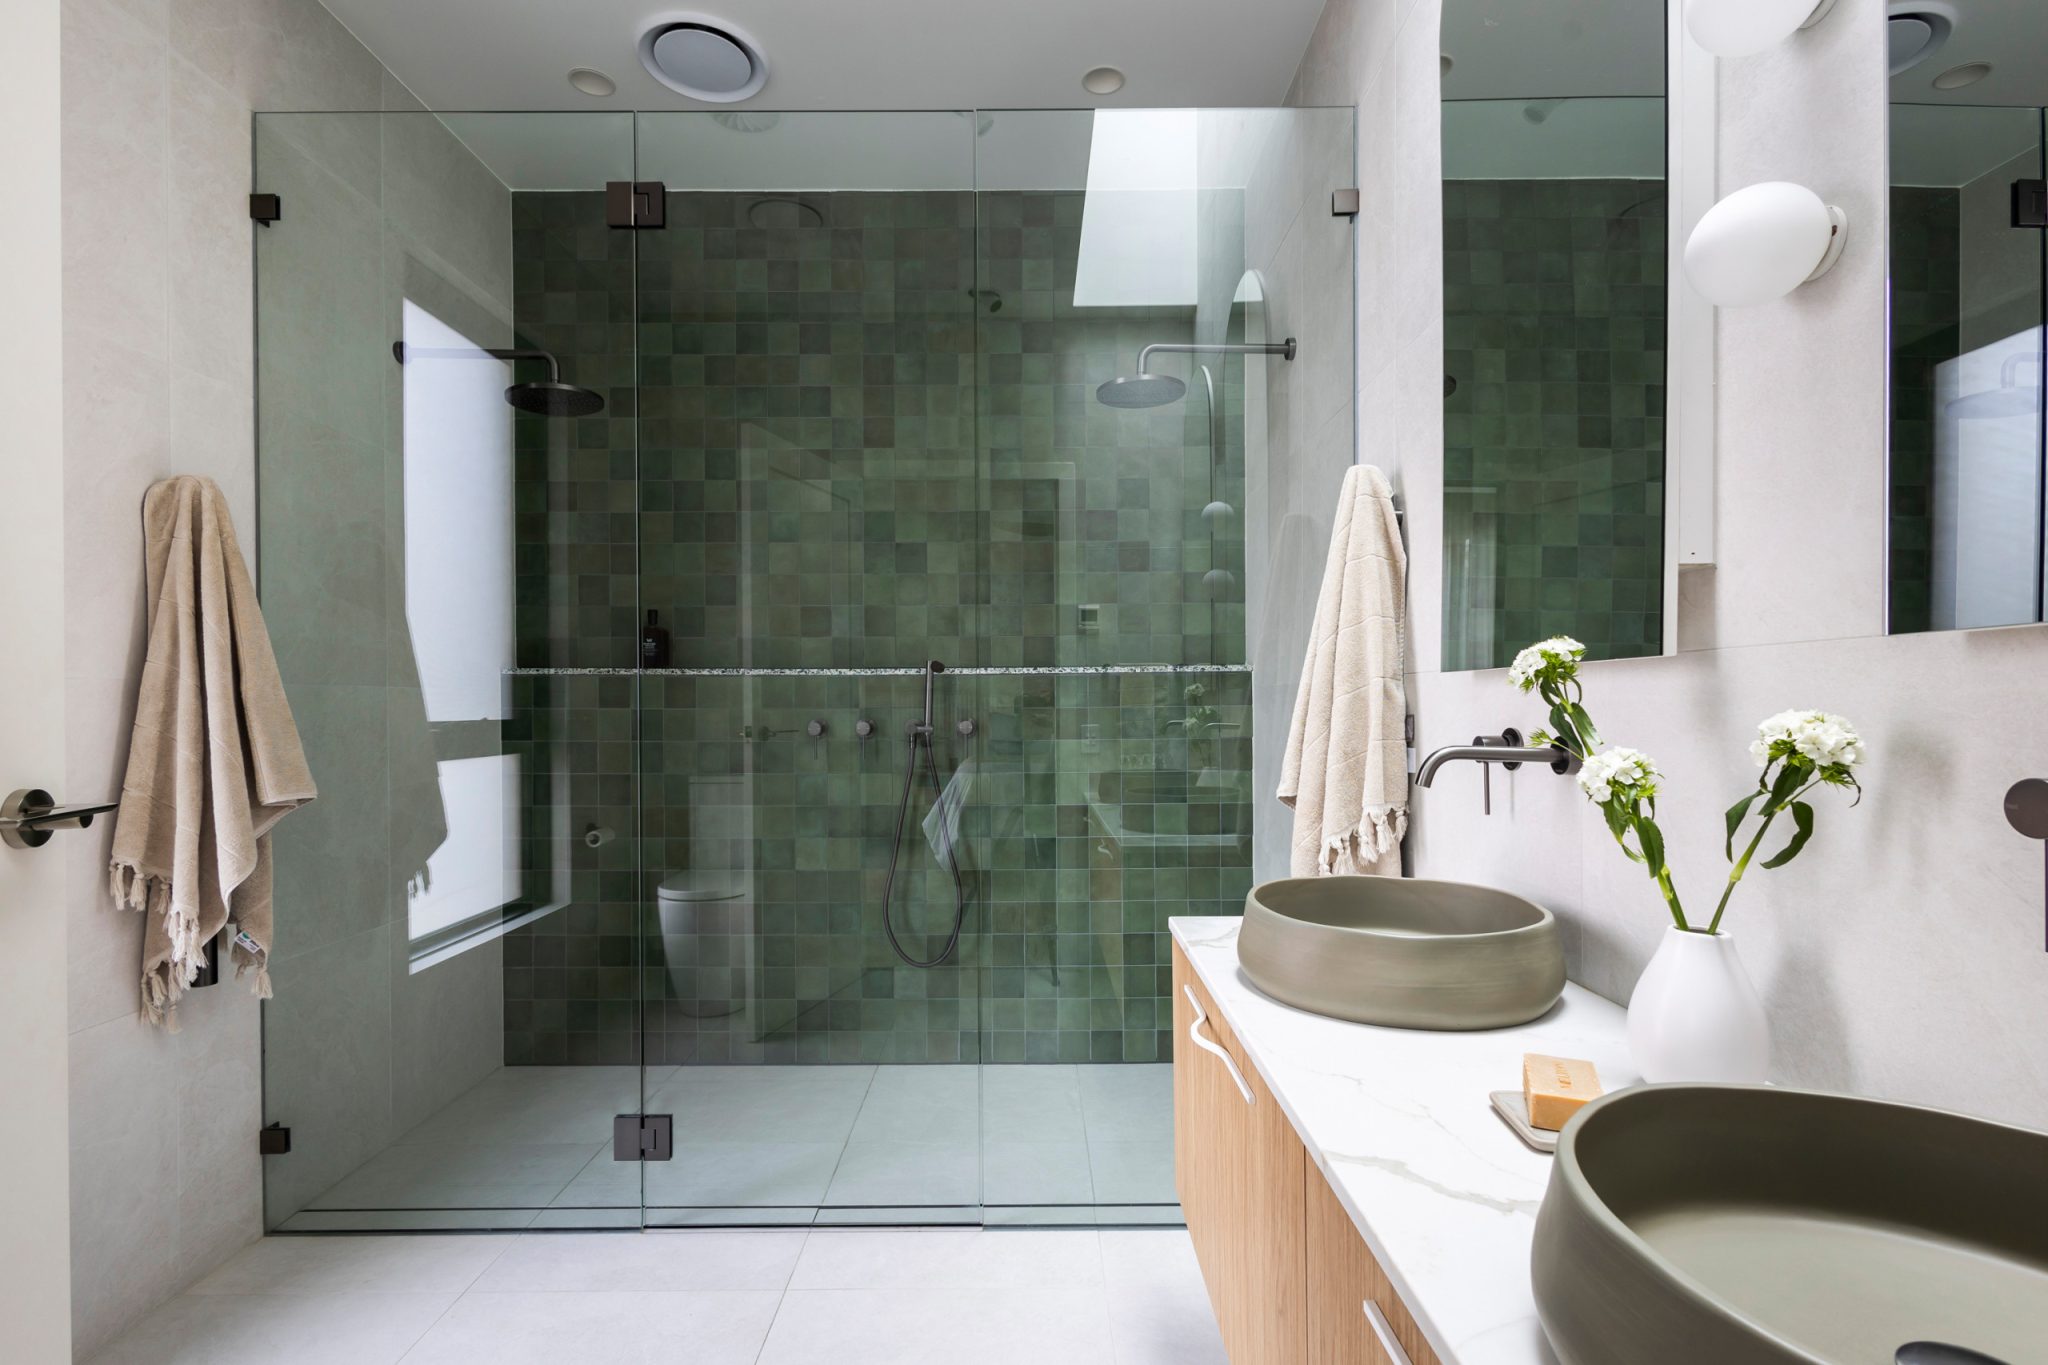
8. White & Grey Marble Walls with a Warm Wood Floor
Okay, let’s get real about wood flooring in a full bathroom. While it looks absolutely stunning and provides incredible warmth against the cold marble, it is a high-maintenance choice. You must select an engineered hardwood designed for high-humidity environments or a luxury vinyl tile (LVT) that mimics wood. Even then, you need excellent ventilation (a high-CFM fan is non-negotiable) and you must be diligent about wiping up any and all splashes immediately. A single plumbing leak could be catastrophic. Is it beautiful? Yes. Is it for everyone? Absolutely not.
|
📋 Copy HEX 🔗 Share |
🔧 How-To Brief
This bathroom design works because of its powerful material contrast. It pits the cold, hard, luxurious feel of the large-format marble against the warm, organic, and rustic texture of the wood plank flooring. This juxtaposition is what creates the visual and tactile interest. The frameless glass partition is a key supporting player, as it does its job of containing water without visually interrupting the beautiful transition from stone to wood. The black louvered blinds add a final, sharp accent that grounds the otherwise natural palette.
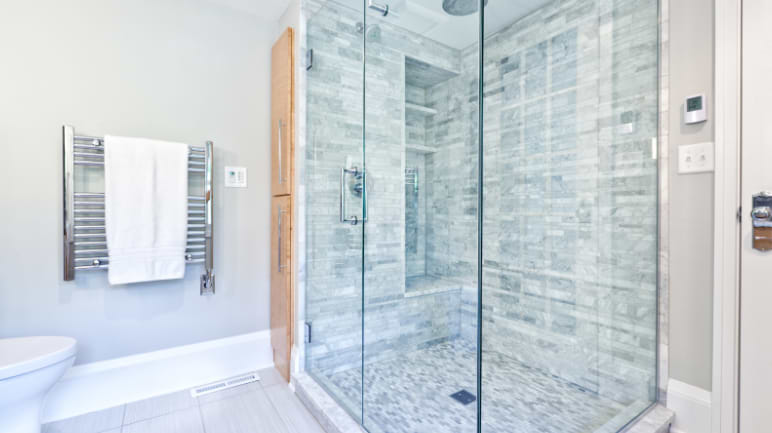
9. Frameless Glass Shower with Gray Marble and Pebble Tile
When designing a shower with a built-in bench, getting the height right is crucial for both comfort and aesthetics. A standard shower bench should be between 17 and 19 inches high—the same as a dining chair. For the depth, aim for 12 to 15 inches. This provides enough space to sit comfortably without protruding so far into the shower that it feels cramped. Make sure the bench surface has a slight, almost imperceptible slope toward the drain to prevent water from pooling.
|
📋 Copy HEX 🔗 Share |
💸 Get This Look For Less
Pebble tile floors feel amazing underfoot, like a mini foot massage every time you shower. However, they come with a significant cleaning commitment. All those individual stones create a huge amount of grout lines, which is prime real estate for soap scum and mildew. To keep it looking fresh, you’ll need to scrub the grout weekly with a good brush and a quality cleaner. Sealing the grout (and the stones, if they’re natural) every 6-12 months is also essential to prevent staining and water absorption. It’s a trade-off: high comfort for high maintenance.
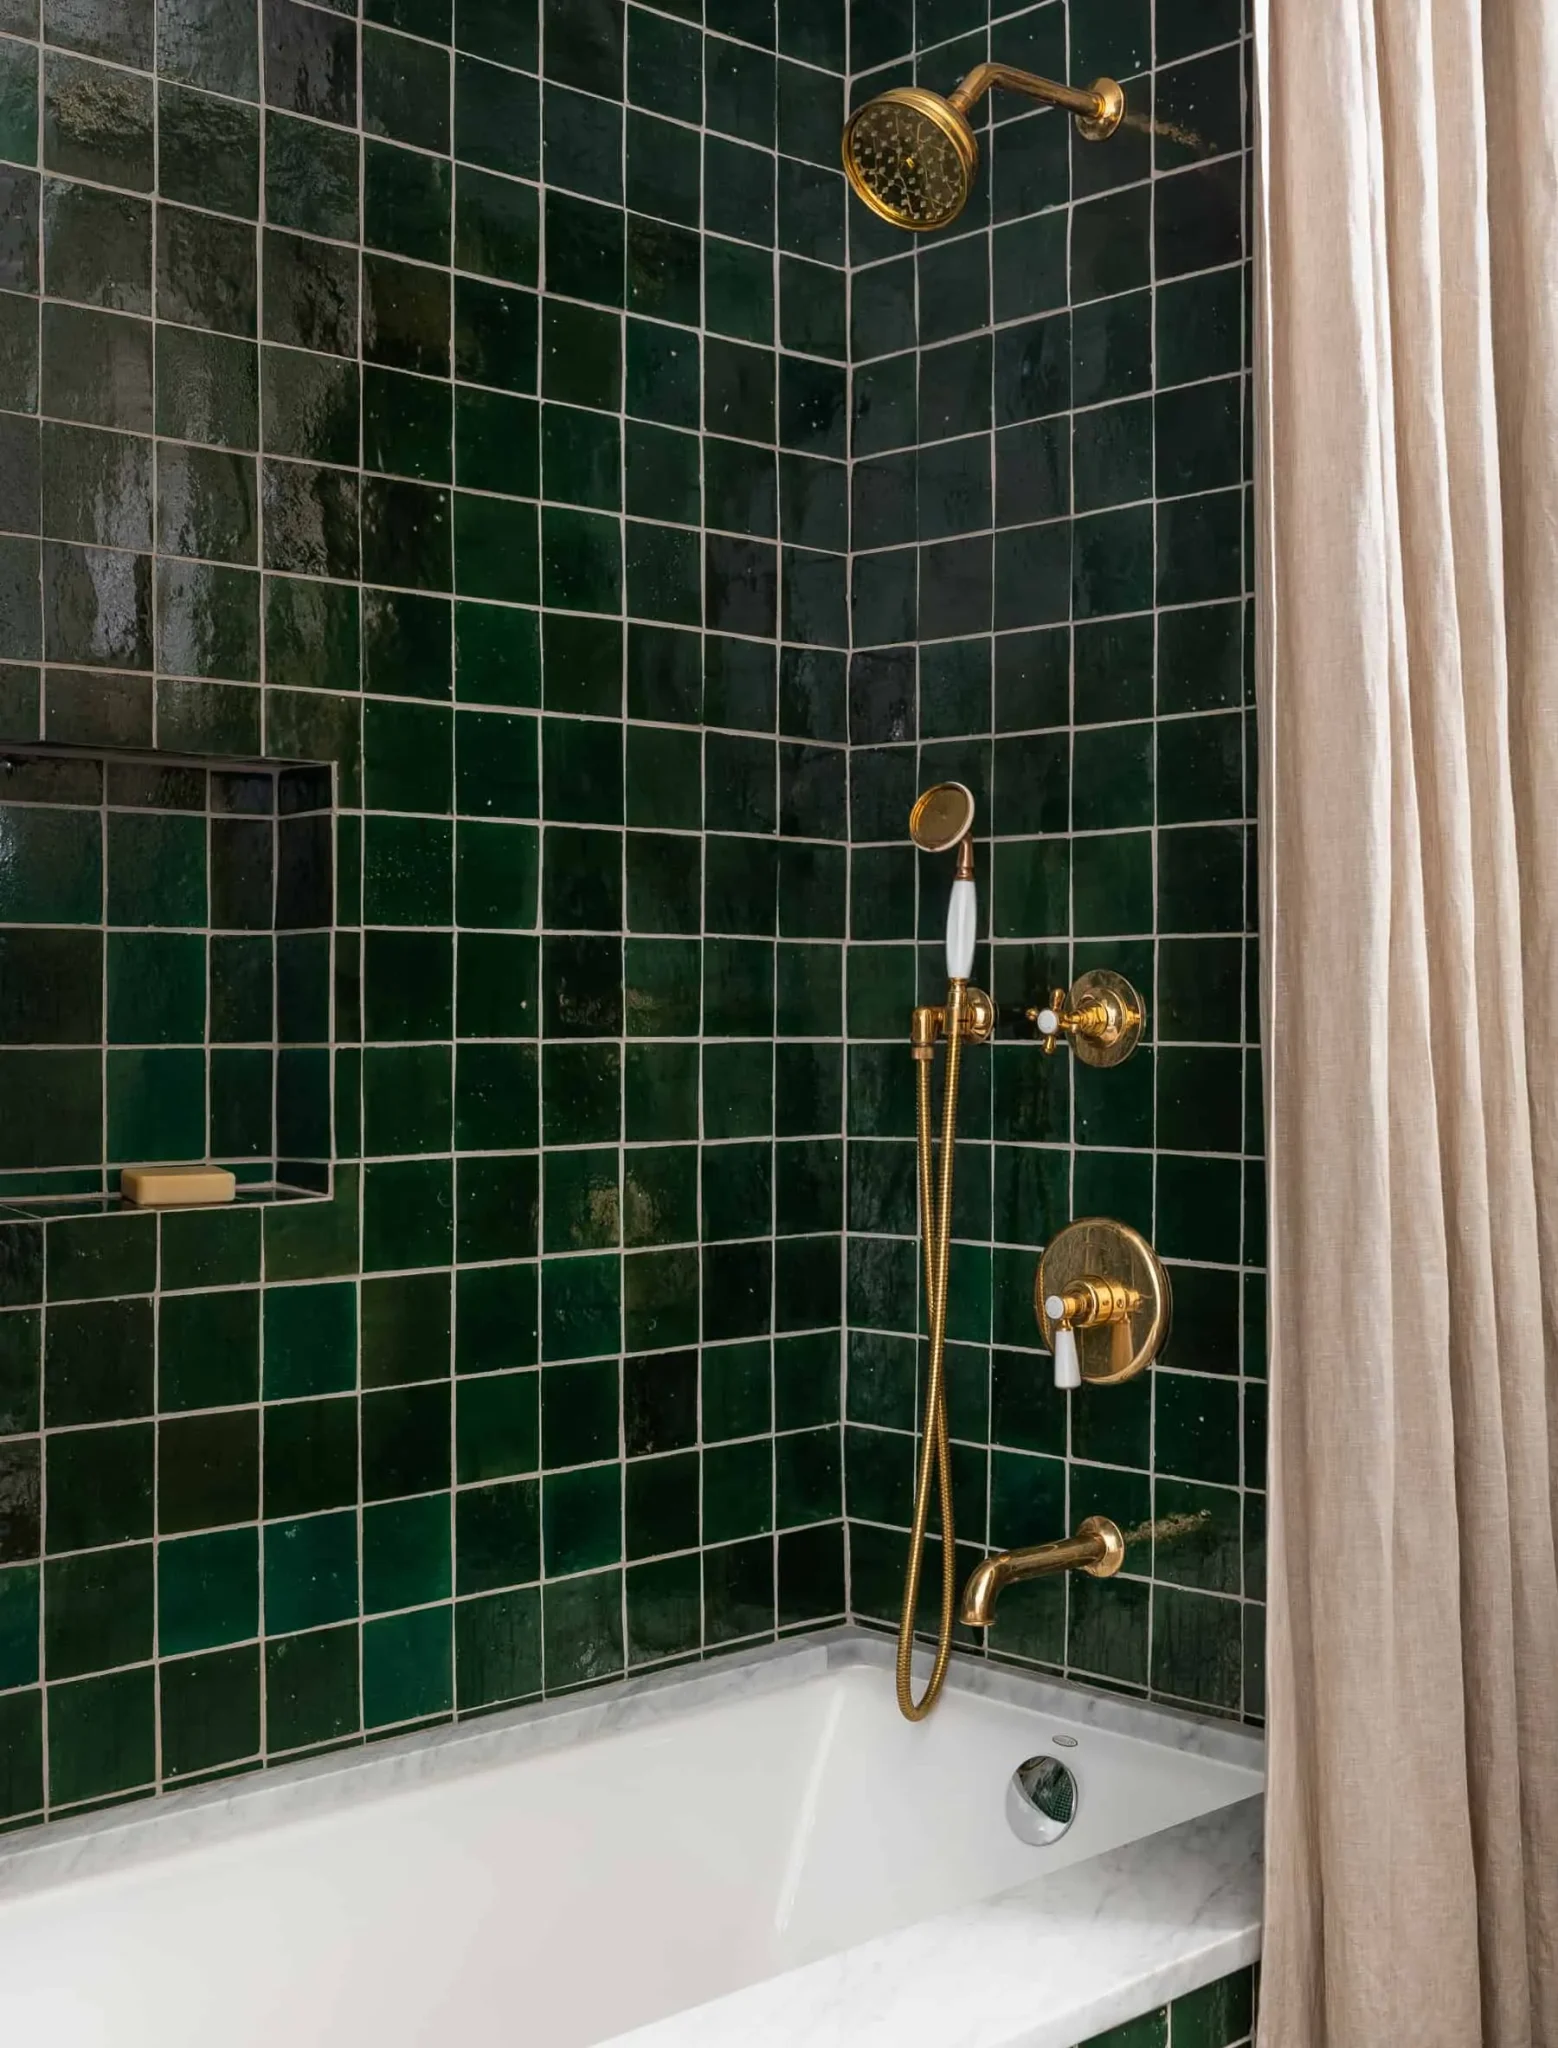
10. Deep Green Square Tiles with Elegant Brass Fixtures
The formula for this rich, classic look is surprisingly simple: 80% jewel-toned color + 15% metallic shine + 5% crisp white. The deep emerald green square tiles provide the immersive, dominant color that defines the space. The brass fixtures are the essential accent, their warm, reflective quality cutting through the depth of the green. The final touch is the crisp white of the bathtub and the handles on the fixtures, which provides a clean visual break and keeps the look from feeling too heavy. You could swap the green for a deep navy or burgundy and the formula would still hold.
|
📋 Copy HEX 🔗 Share |
⚠️ Real Talk
This look is part of a larger trend called “new heritage,” which is a modern take on classic, historical design elements. Homeowners are moving away from sterile, minimalist bathrooms and embracing spaces with color, depth, and a sense of permanence. The combination of deep green tile—a color long associated with libraries and drawing rooms—and classic brass feels both timeless and completely fresh for 2026. It’s a nod to the past without being a stuffy reproduction. Compare this to the more subtle sage green in Idea #5 to see the range within the green trend.
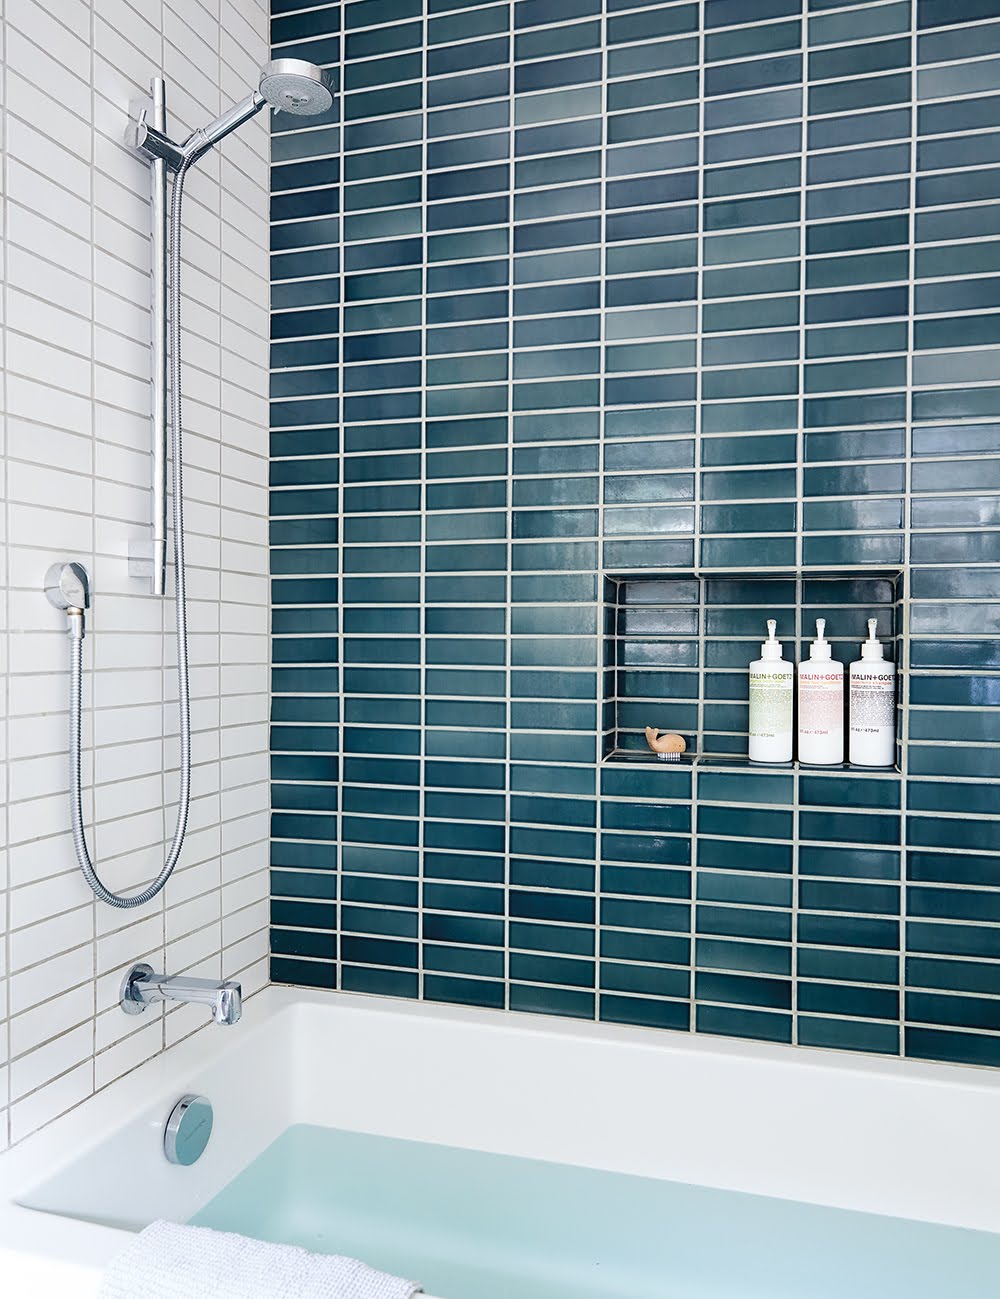
11. Deep Teal Subway Tile Accent Wall
The power of this design comes from one simple decision: containing the boldest element. By using the deep teal subway tile on just a single accent wall, it creates a dramatic focal point without overwhelming the entire space. The surrounding white tiles act as a frame, making the teal appear even richer and more saturated by comparison. If the whole shower were tiled in teal, the effect would be much more intense and cave-like. This approach is all about strategic impact, proving that sometimes, less really is more.
|
📋 Copy HEX 🔗 Share |
🔥 Trending Context
This is an incredibly budget-friendly way to introduce high-impact color. A single wall in a standard tub/shower combo is only about 30-40 square feet. Even with a moderately priced teal tile (say, $15/sq ft), you’re looking at a total cost of $450-$600 for the tile. The surrounding white subway tile is one of the cheapest materials available, often under $3/sq ft. This means you get a dramatic, custom-looking shower for a total material cost that can easily stay under $1,000. It’s maximum style for a minimal investment.
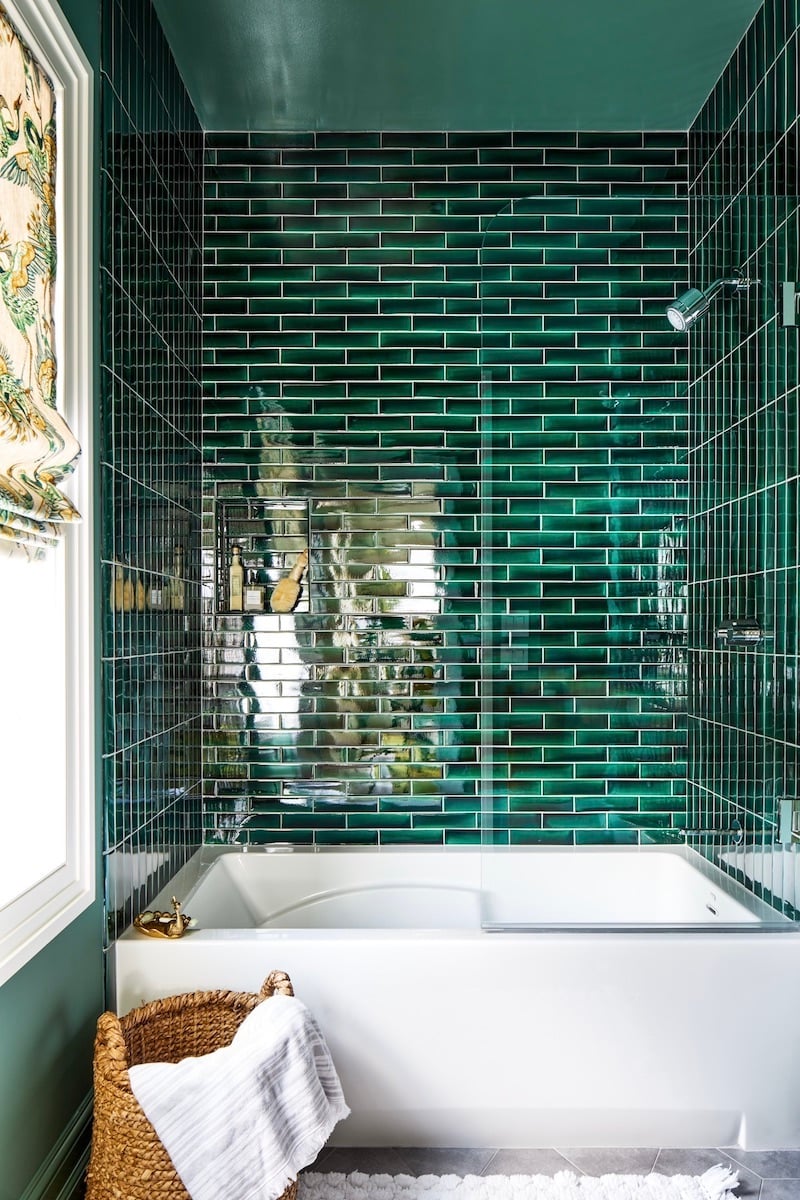
12. Glossy Dark Green Subway Tile in a Horizontal Stack
This look is all about texture and light. The glossy finish on the dark green subway tiles is crucial; it reflects light around the enclosed shower space, preventing the deep color from feeling flat or claustrophobic. The horizontal brick pattern adds a classic, familiar rhythm to the walls. Finally, the clear glass shower screen is essential—it contains water while allowing light and sightlines to pass through, making the entire bathroom feel larger and ensuring the beautiful tile remains the star of the show. A shower curtain would have hidden this stunning feature.
|
📋 Copy HEX 🔗 Share |
✅ Before You Start
A deep, glossy tile like this is beautiful, but it’s a magnet for water spots and soap scum. If you have hard water, you will be in a constant battle to keep these walls looking clean and shiny. A daily squeegee routine after every shower is not a suggestion here; it’s a requirement. If you’re not prepared for that level of daily maintenance, you might consider a similar color in a matte finish, which is far more forgiving when it comes to showing water spots and smudges.
13. Floor-to-Ceiling Vertical Yellow Tiles
When you’re using a bold, saturated color like this vibrant yellow, lean into it. Don’t just stop the tile halfway up the wall. Taking the slender, vertically stacked tiles all the way to the ceiling draws the eye upward, making the ceiling feel much higher than it actually is. The masterstroke here is painting the ceiling in a matching yellow. This creates a fully immersive “color-drenched” effect that is incredibly bold and intentional. It turns the shower from a feature in a room into a room of its own.

|
📋 Copy HEX 🔗 Share |
📐 Style Math
This is a fantastic strategy for bathrooms with standard or even low ceilings (8 feet or less). The strong vertical lines of the tile provide a powerful visual lift. This idea is best for a dedicated shower stall, either a walk-in or enclosed, where the full floor-to-ceiling effect can be appreciated. In a standard 60-100 sq ft bathroom, this creates a brilliant, light-filled jewel box. In a very large bathroom, you might use this technique to define the shower zone, while using a more neutral finish in the rest of the space to maintain balance.
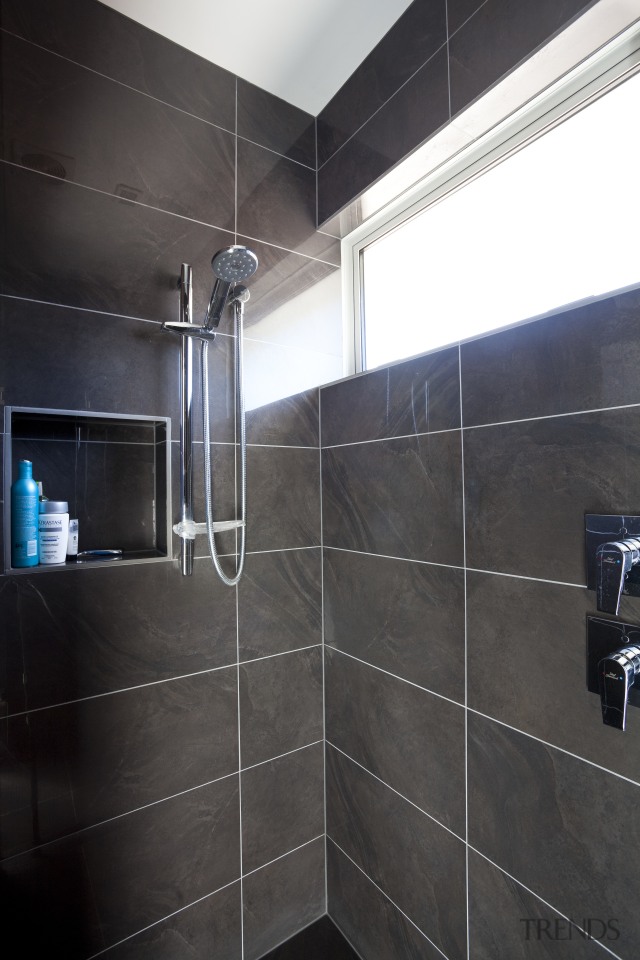
14. Modern Shower with Dark Grey Large-Format Tiles
A dark, dramatic shower like this can be stunning, but you need to check a few things before you commit. This look is not for the faint of heart or the dimly lit bathroom.
- Lighting Plan: Do you have a large window like this one, or can you add multiple light sources? You’ll need at least one waterproof recessed light directly in the shower and good ambient light in the main bathroom space to prevent it from feeling like a cave.
- Room Size: Dark colors absorb light and can make a space feel smaller. This works best in a medium to large bathroom (75+ sq ft). In a tiny bathroom, it could feel oppressive.
- Grout Choice: The light grout here creates a graphic, grid-like effect. If you want a more monolithic, seamless look, choose a grout that closely matches the dark grey of the tile.
|
📋 Copy HEX 🔗 Share |
🎯 What Makes It Work
The success of this design hinges on the interplay of light and dark. The large-format dark grey tiles create a moody, sophisticated envelope. However, it’s the large horizontal window that makes it work, pouring natural light into the space and preventing the dark tile from feeling gloomy. The bright white ceiling and light-colored grout act as highlights, providing visual relief and defining the tile’s shape. Finally, the sleek chrome fixtures add a touch of reflective shine, another small but important contrast to the matte finish of the tiles.
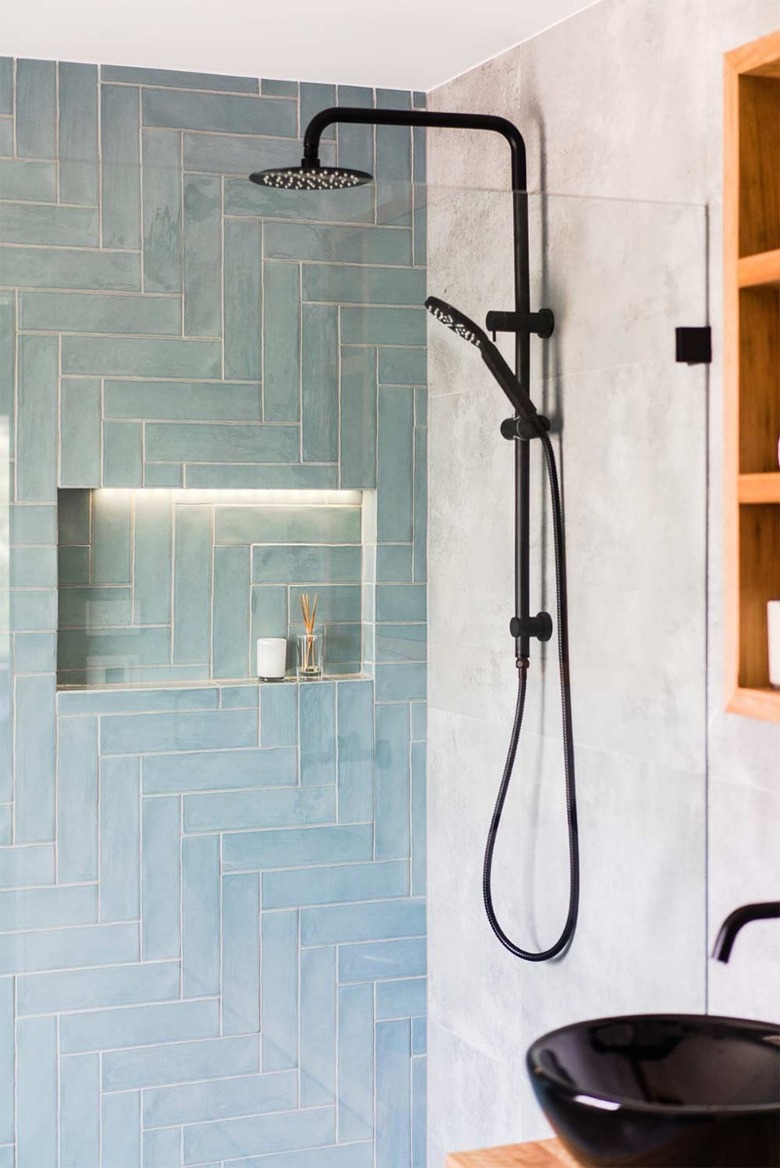
15. Aqua Herringbone Accent Wall with Matte Black Fixtures
This serene and modern look follows a clear recipe: 40% active pattern + 50% calm neutral + 10% sharp contrast. The aqua subway tiles in a herringbone pattern are the “active” element, providing color and movement. The large-format light grey tiles on the surrounding walls are the calm neutral base, creating a quiet backdrop that lets the accent wall shine. The matte black fixtures are the crucial contrasting element, their sharp, dark forms popping against the soft blues and grays. The niche lighting is a bonus that adds a touch of luxury.
|
📋 Copy HEX 🔗 Share |
💰 Budget Breakdown
A herringbone pattern is absolutely beautiful, but it is more labor-intensive—and therefore more expensive—to install than a standard brick or stacked layout. Your tile setter has to make numerous precise 45-degree cuts, especially at the edges, which takes more time and skill. You should expect the labor cost for a herringbone installation to be 20-40% higher than for a simpler pattern. It also results in more tile waste (typically 15-20% waste, versus 10% for a standard pattern), so you’ll need to order more tile upfront.
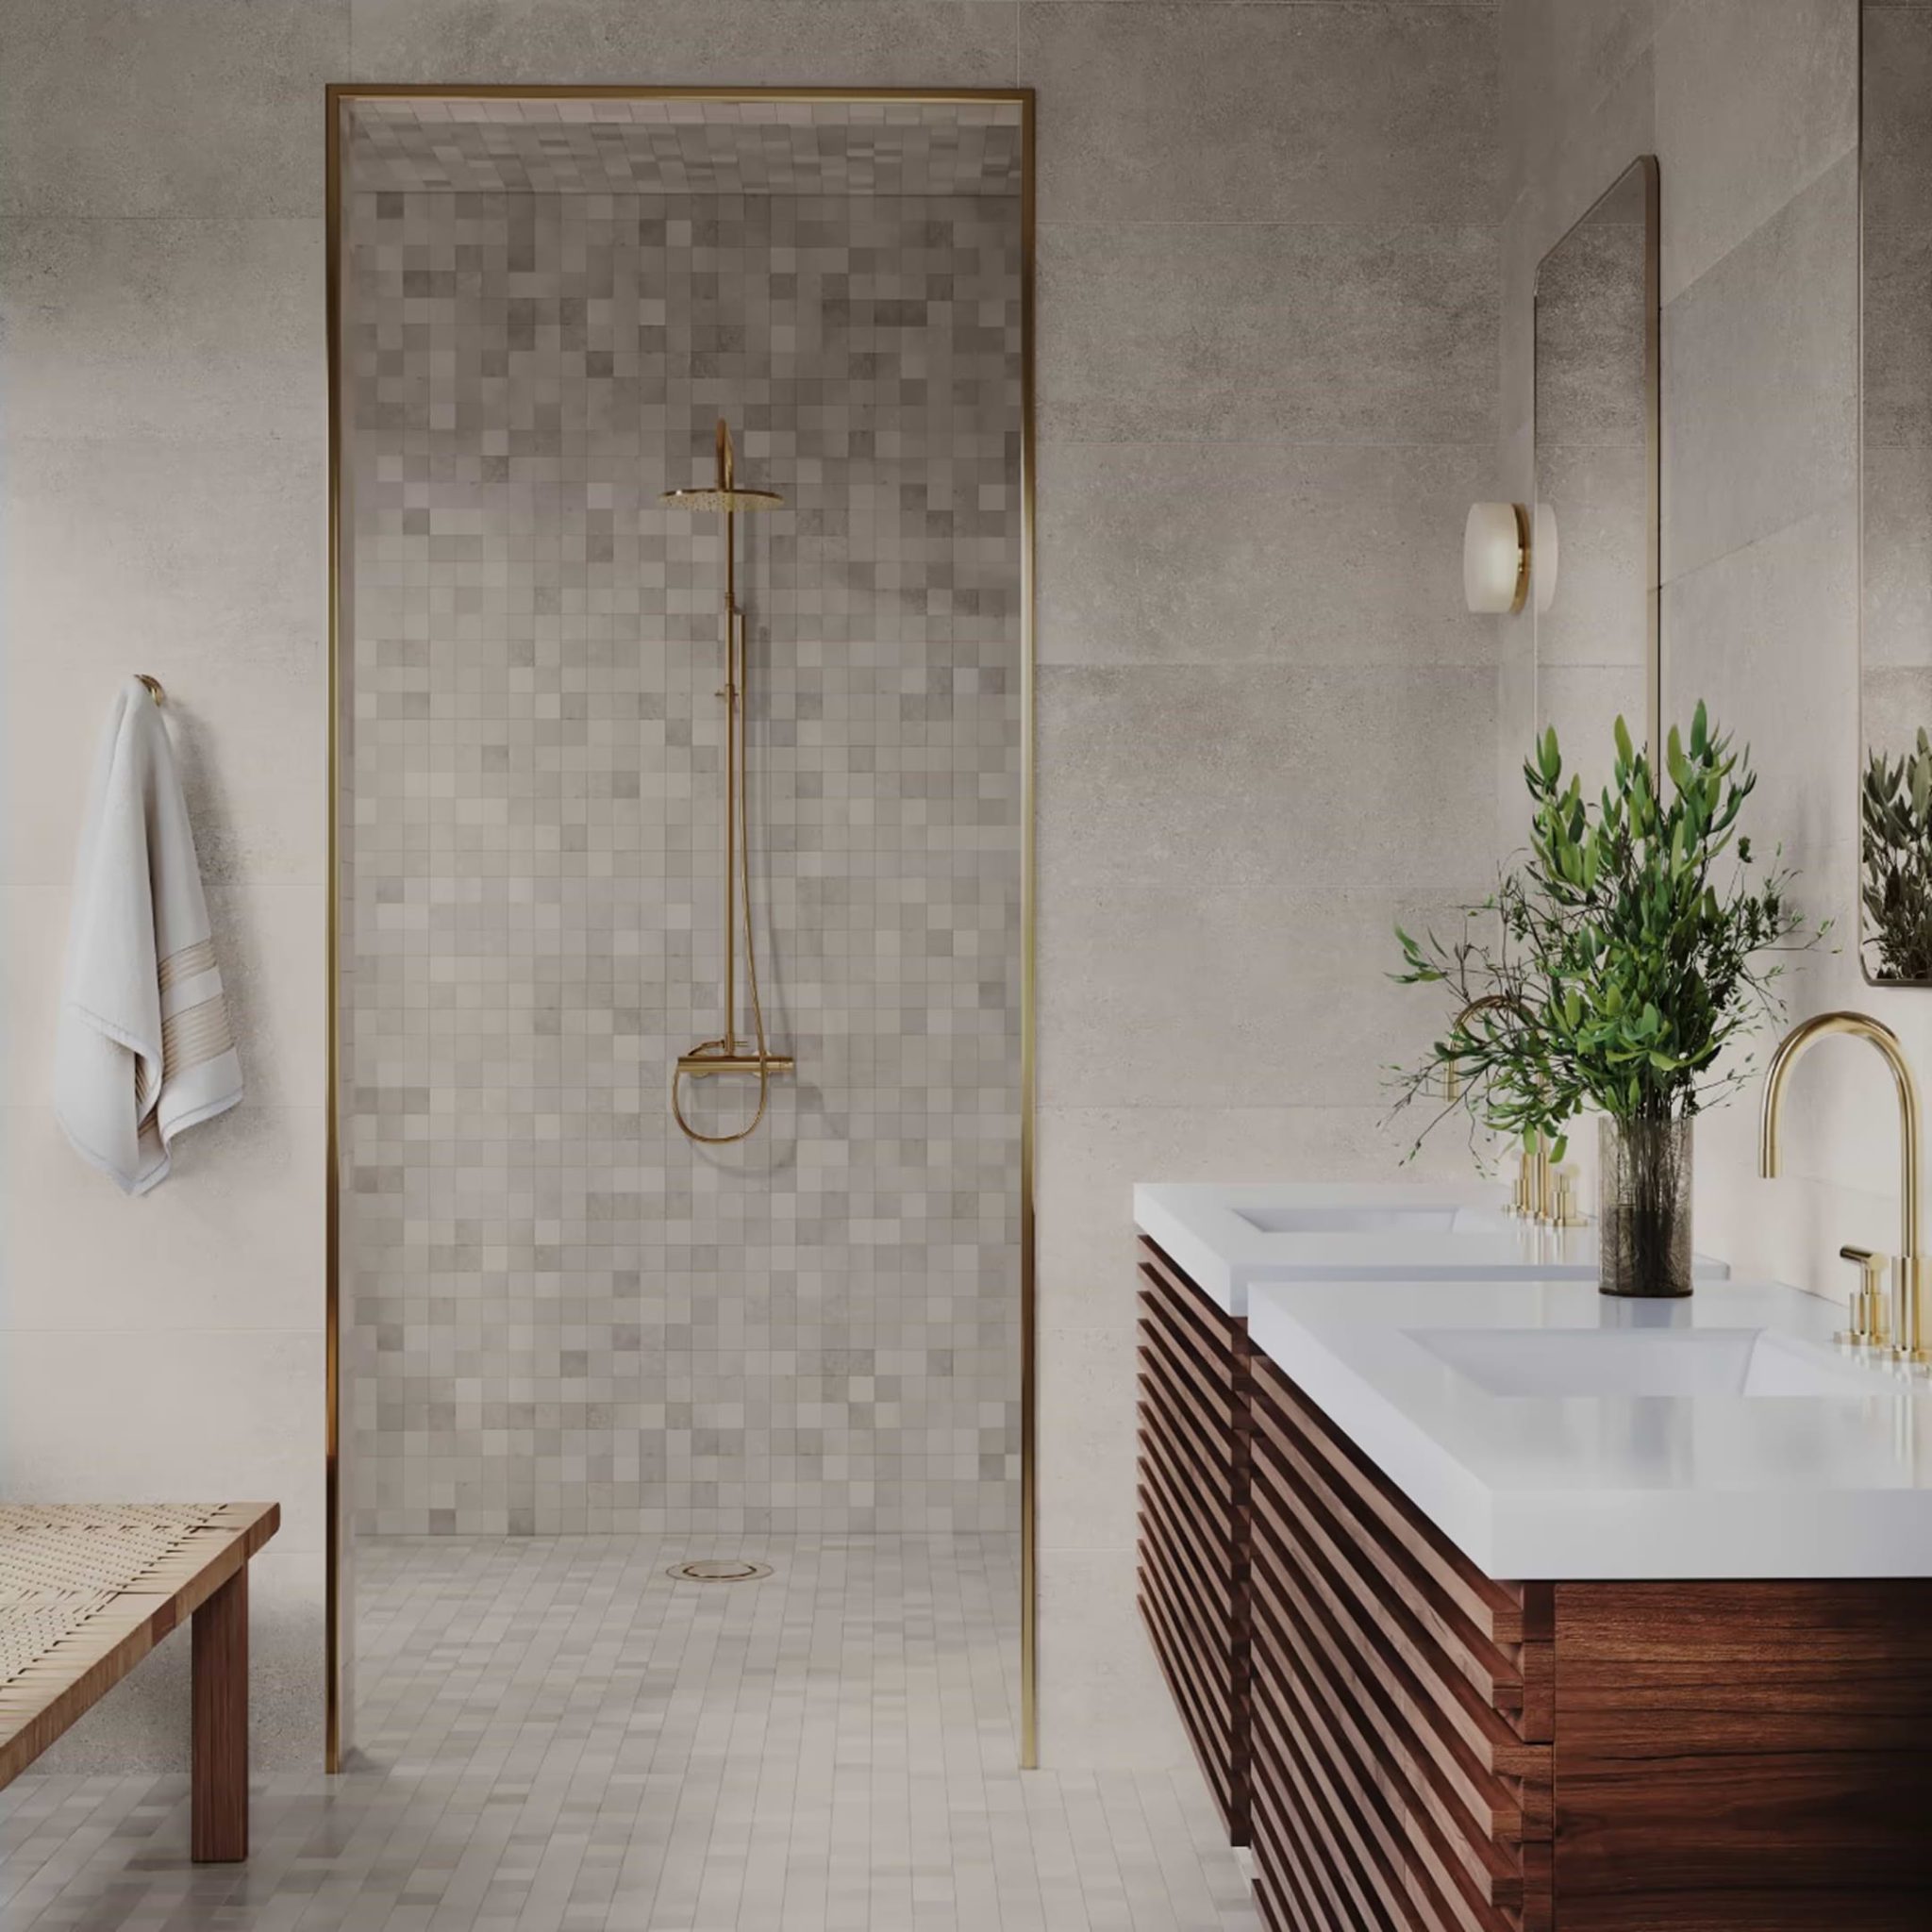
16. Neutral Mosaic Shower with a Dark Wood Vanity
This look screams luxury, and the price tag can certainly get up there, especially with the brass fixtures and custom-looking vanity. Here is an estimated breakdown for achieving this high-end modern aesthetic.
- Shower Tile: Varied-shade mosaic and rectangular floor tiles – $900 – $2,000
- Fixtures: Brass-framed enclosure, shower system, and two faucets – $2,500 – $5,000+
- Vanity: Dark wood slatted double vanity with integrated sink top – $2,000 – $4,500
- Lighting & Mirrors: Two mirrors and vanity lighting – $500 – $1,200
- TOTAL: $5,900 – $12,700+
|
📋 Copy HEX 🔗 Share |
📏 Scale Guide
When using a mosaic tile with a lot of shade variation, the key to a successful installation is blending. Before your installer touches any adhesive, have them open all the boxes of tile and lay out the sheets on the floor. Mix sheets from different boxes to ensure the variations in color and shade are distributed randomly and evenly. If you don’t do this, you risk getting noticeable patches or stripes of lighter or darker shades on your wall. This “dry-blending” step is critical for a professional, cohesive result.
17. Maximize Space with Large Porcelain Shower Panels
If you have a compact bathroom, large-format porcelain walls are your best friend. Unlike small tiles that create a busy grid of grout lines that can visually shrink a space, these expansive panels do the opposite. The unbroken- Csurface fools the eye into seeing a larger, more continuous area. It’s a minimalist approach that pays huge dividends in perceived space. This strategy is all about reducing visual noise to create a sense of calm and openness, even in the tightest of quarters. It’s a simple trick with a massive impact.
|
📋 Copy HEX 🔗 Share |
🧹 Maintenance Reality
While the day-to-day cleaning of porcelain panels is a dream—just a quick wipe-down—the installation is a job for seasoned pros only. These panels are large, heavy, and can be unwieldy. They require special handling, cutting tools, and adhesives. This is not a DIY project. The labor cost will be higher than for standard tile, but you make up for it in the long run with the incredibly low maintenance. It’s a prime example of investing more upfront to save yourself time and effort for years to come.
18. Geometric Circular Tiles with Backlit Mirror
The absolute showstopper here is the geometric wall tile. It’s a piece of art in its own right. The pattern, composed of marble-like circular segments, is complex, dynamic, and incredibly sophisticated. It acts as both a surface and a mural, providing color, pattern, and texture all at once. The backlit mirror is a brilliant choice because its soft glow highlights the texture of the tile, while its simple circular shape echoes the pattern without competing with it. Everything else in the room is designed to support and elevate this stunning tile choice.

|
📋 Copy HEX 🔗 Share |
⭐ The One Thing
A backlit mirror creates a soft, flattering glow and adds a major touch of luxury. Here’s a simplified guide to installing one:
- Turn off the power to the bathroom circuit at the breaker. Safety first!
- Determine the placement of your mirror. You’ll be connecting it to the same electrical box used for a traditional vanity light.
- Mount the mirror’s hanging bracket to the wall, making sure it’s level and securely anchored in studs.
- Connect the mirror’s wiring to the house wiring in the electrical box (usually black to black, white to white, and ground to ground).
- Hang the mirror on its bracket.
- Turn the power back on and test your beautiful new light source.
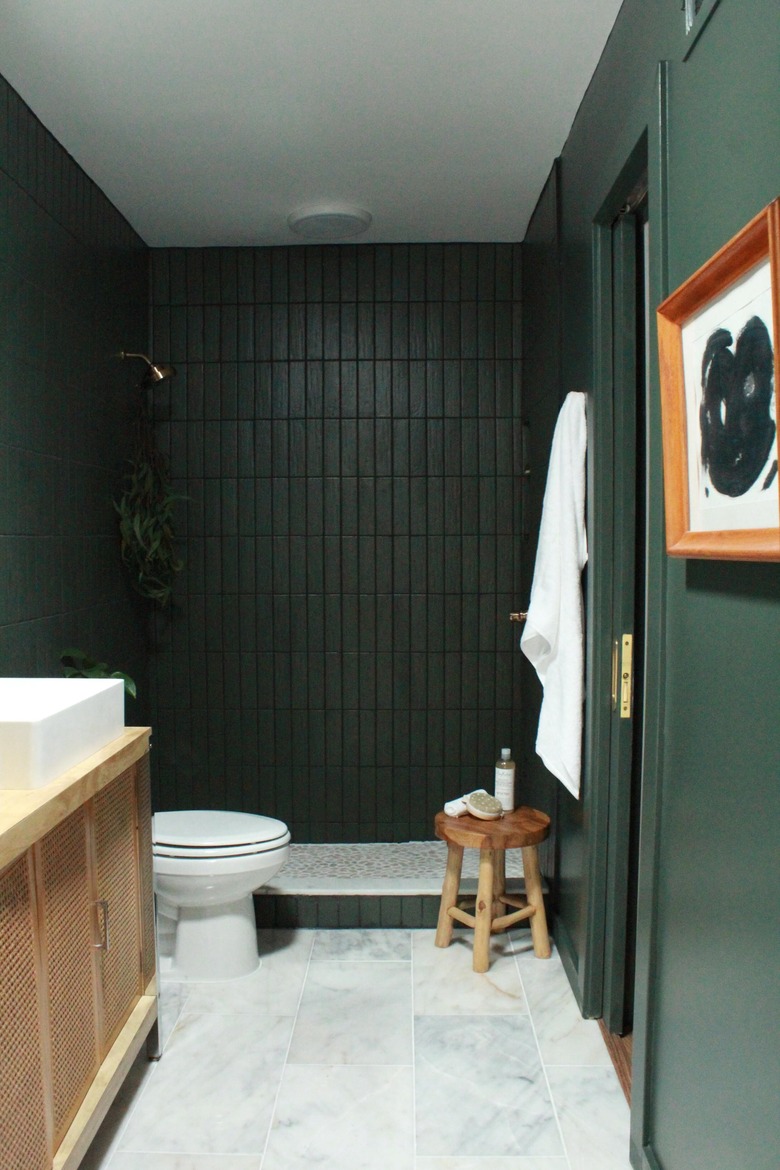
19. Dark Green Stacked Tile with a Rattan Vanity
The winning equation here is about textural balance: 50% sleek modern + 40% natural/rustic + 10% classic. The dark green, slender stacked tiles provide the sleek, contemporary element with their clean lines and matte finish. The natural warmth comes from the wooden vanity with its rattan facade and the rustic wooden stool. This is a crucial counterpoint to the cool tile. The final 10% is the classic marble floor and brass fixture, which adds a touch of timeless elegance and prevents the look from becoming too stark. This mix of textures is what makes the room feel so curated and welcoming. It’s similar in palette to Idea #9 but with a warmer, earthier feel.
|
📋 Copy HEX 🔗 Share |
💡 Designer Tip
That pebble tile shower floor is a fantastic textural contrast to the smooth marble in the main bathroom, but be prepared for the reality of cleaning it. The thousands of tiny crevasses and grout lines are a perfect trap for soap, shampoo, and grime. You’ll need to commit to a weekly scrub with a stiff-bristled brush to keep it from looking dingy. Also, pebble tile can sometimes feel uneven underfoot. It’s worth buying a single sheet and standing on it barefoot at the tile store to make sure you enjoy the sensation before committing to a full installation.
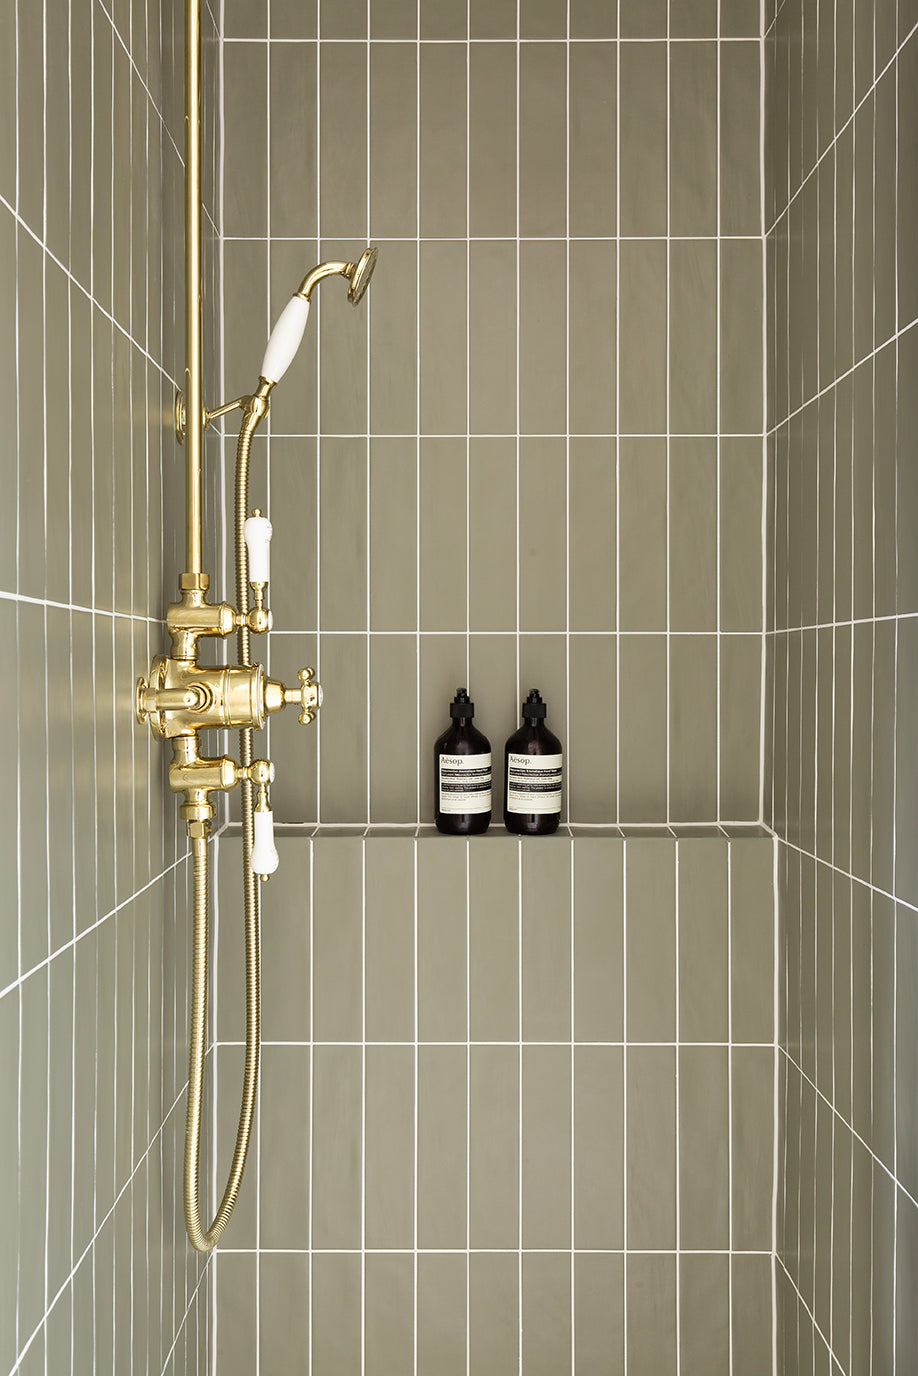
20. Olive-Green Vertical Tiles & Polished Brass Fixtures
This design is a study in quiet refinement. The vertical orientation of the olive-green subway tiles is a key decision, drawing the eye upward and creating a sense of order and height. The polished brass fixtures work so well because their warm, lustrous finish provides a perfect complement to the earthy, muted tone of the green tile. The white ceramic accents on the fixture handles are a subtle but important detail, adding a touch of classic charm and breaking up the metallic surfaces. The overall effect is clean, classic, and incredibly chic.
|
📋 Copy HEX 🔗 Share |
🔧 How-To Brief
The unsung hero of many high-end tile jobs is grout color. Here, the choice of a crisp white grout is intentional. It emphasizes the tidy, grid-like pattern of the vertically stacked tiles, turning the layout itself into a design feature. If a matching green or a neutral gray grout had been used, the individual tile shape would have blended together, creating a more uniform, monolithic look. For this specific style, where the clean lines are the point, contrasting grout is the way to go. Don’t just default to gray; consider how grout color can enhance your design.
21. Modern Bathroom with Dark Blue Herringbone Tile
You can achieve this clean, modern aesthetic on a tighter budget. The key is to find look-alikes for the big-ticket items. Instead of a custom floating vanity, look to IKEA’s GODMORGON series, which offers a similar light wood look for around $300-$500. For the dark blue herringbone tile, check online retailers like Wayfair or Overstock for deals, and consider a ceramic tile instead of porcelain to save money. Brushed nickel fixtures are widely available at all price points. A similar look can be achieved for around $2,500 in materials, a significant saving from a high-end custom version.
|
📋 Copy HEX 🔗 Share |
💸 Get This Look For Less
A floor-to-ceiling herringbone pattern like this is a bold statement that works best in a bathroom with some breathing room, ideally 70 sq ft or more. The dynamic ‘V’ shape of the pattern has a lot of visual energy, and in a very tight space, it could feel a little overwhelming. In a larger room, it becomes a stunning, immersive feature. The clean white vanity and walls are essential for providing a calming visual pause, balancing the intensity of the tile. For a smaller bath, consider using the herringbone on the floor and just one accent wall as a focal point.
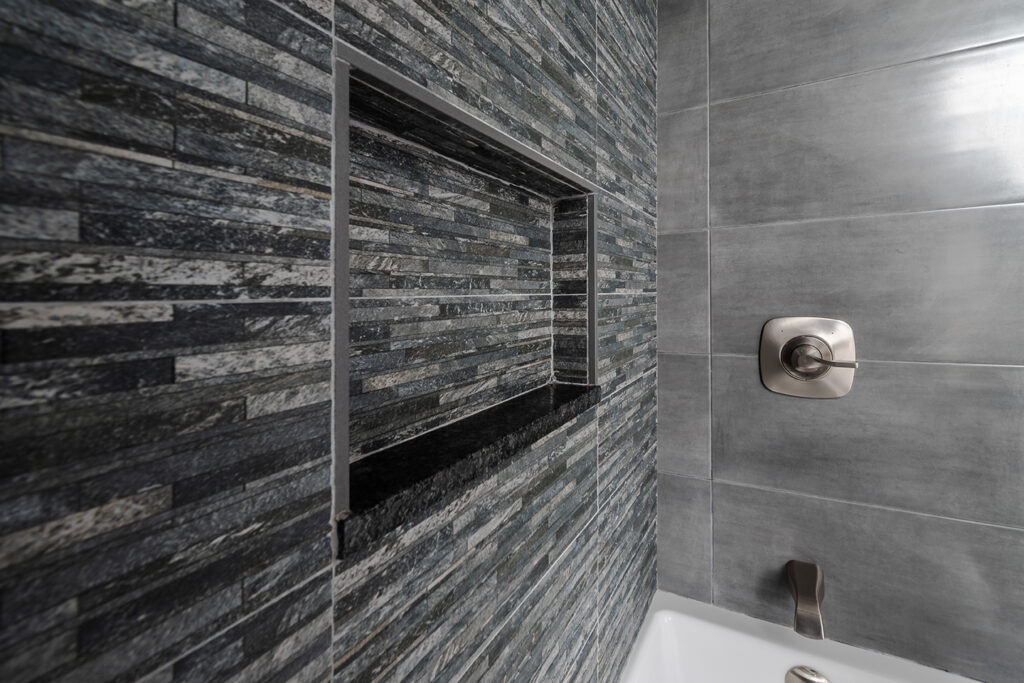
22. Stacked Stone Accent Wall in a Gray Tile Shower
The single element that defines this shower is texture. The stacked stone accent wall is a powerful focal point, introducing a rugged, organic quality that you just can’t get from smooth tile. Its varied depths, colors, and shapes create a surface that plays with light and shadow, adding incredible depth and interest. This is the feature that elevates the shower from a simple, functional space to a sophisticated, spa-like retreat. The surrounding large-format gray tiles are purposefully simple, acting as a quiet frame for the main event.
|
📋 Copy HEX 🔗 Share |
⚠️ Real Talk
Stacked stone looks incredible, but it is not the easiest surface to keep clean in a shower. The rough, uneven texture and countless crevices are perfect for trapping soap scum and hard water deposits. You cannot simply wipe it down or squeegee it. Cleaning requires a good brush, a spray cleaner, and some patience. Because it’s natural stone, it must be sealed regularly (at least annually) to prevent water from penetrating the stone and causing discoloration or damage. If you love the look but hate to clean, consider a porcelain tile that mimics the look of stacked stone for a lower-maintenance alternative.
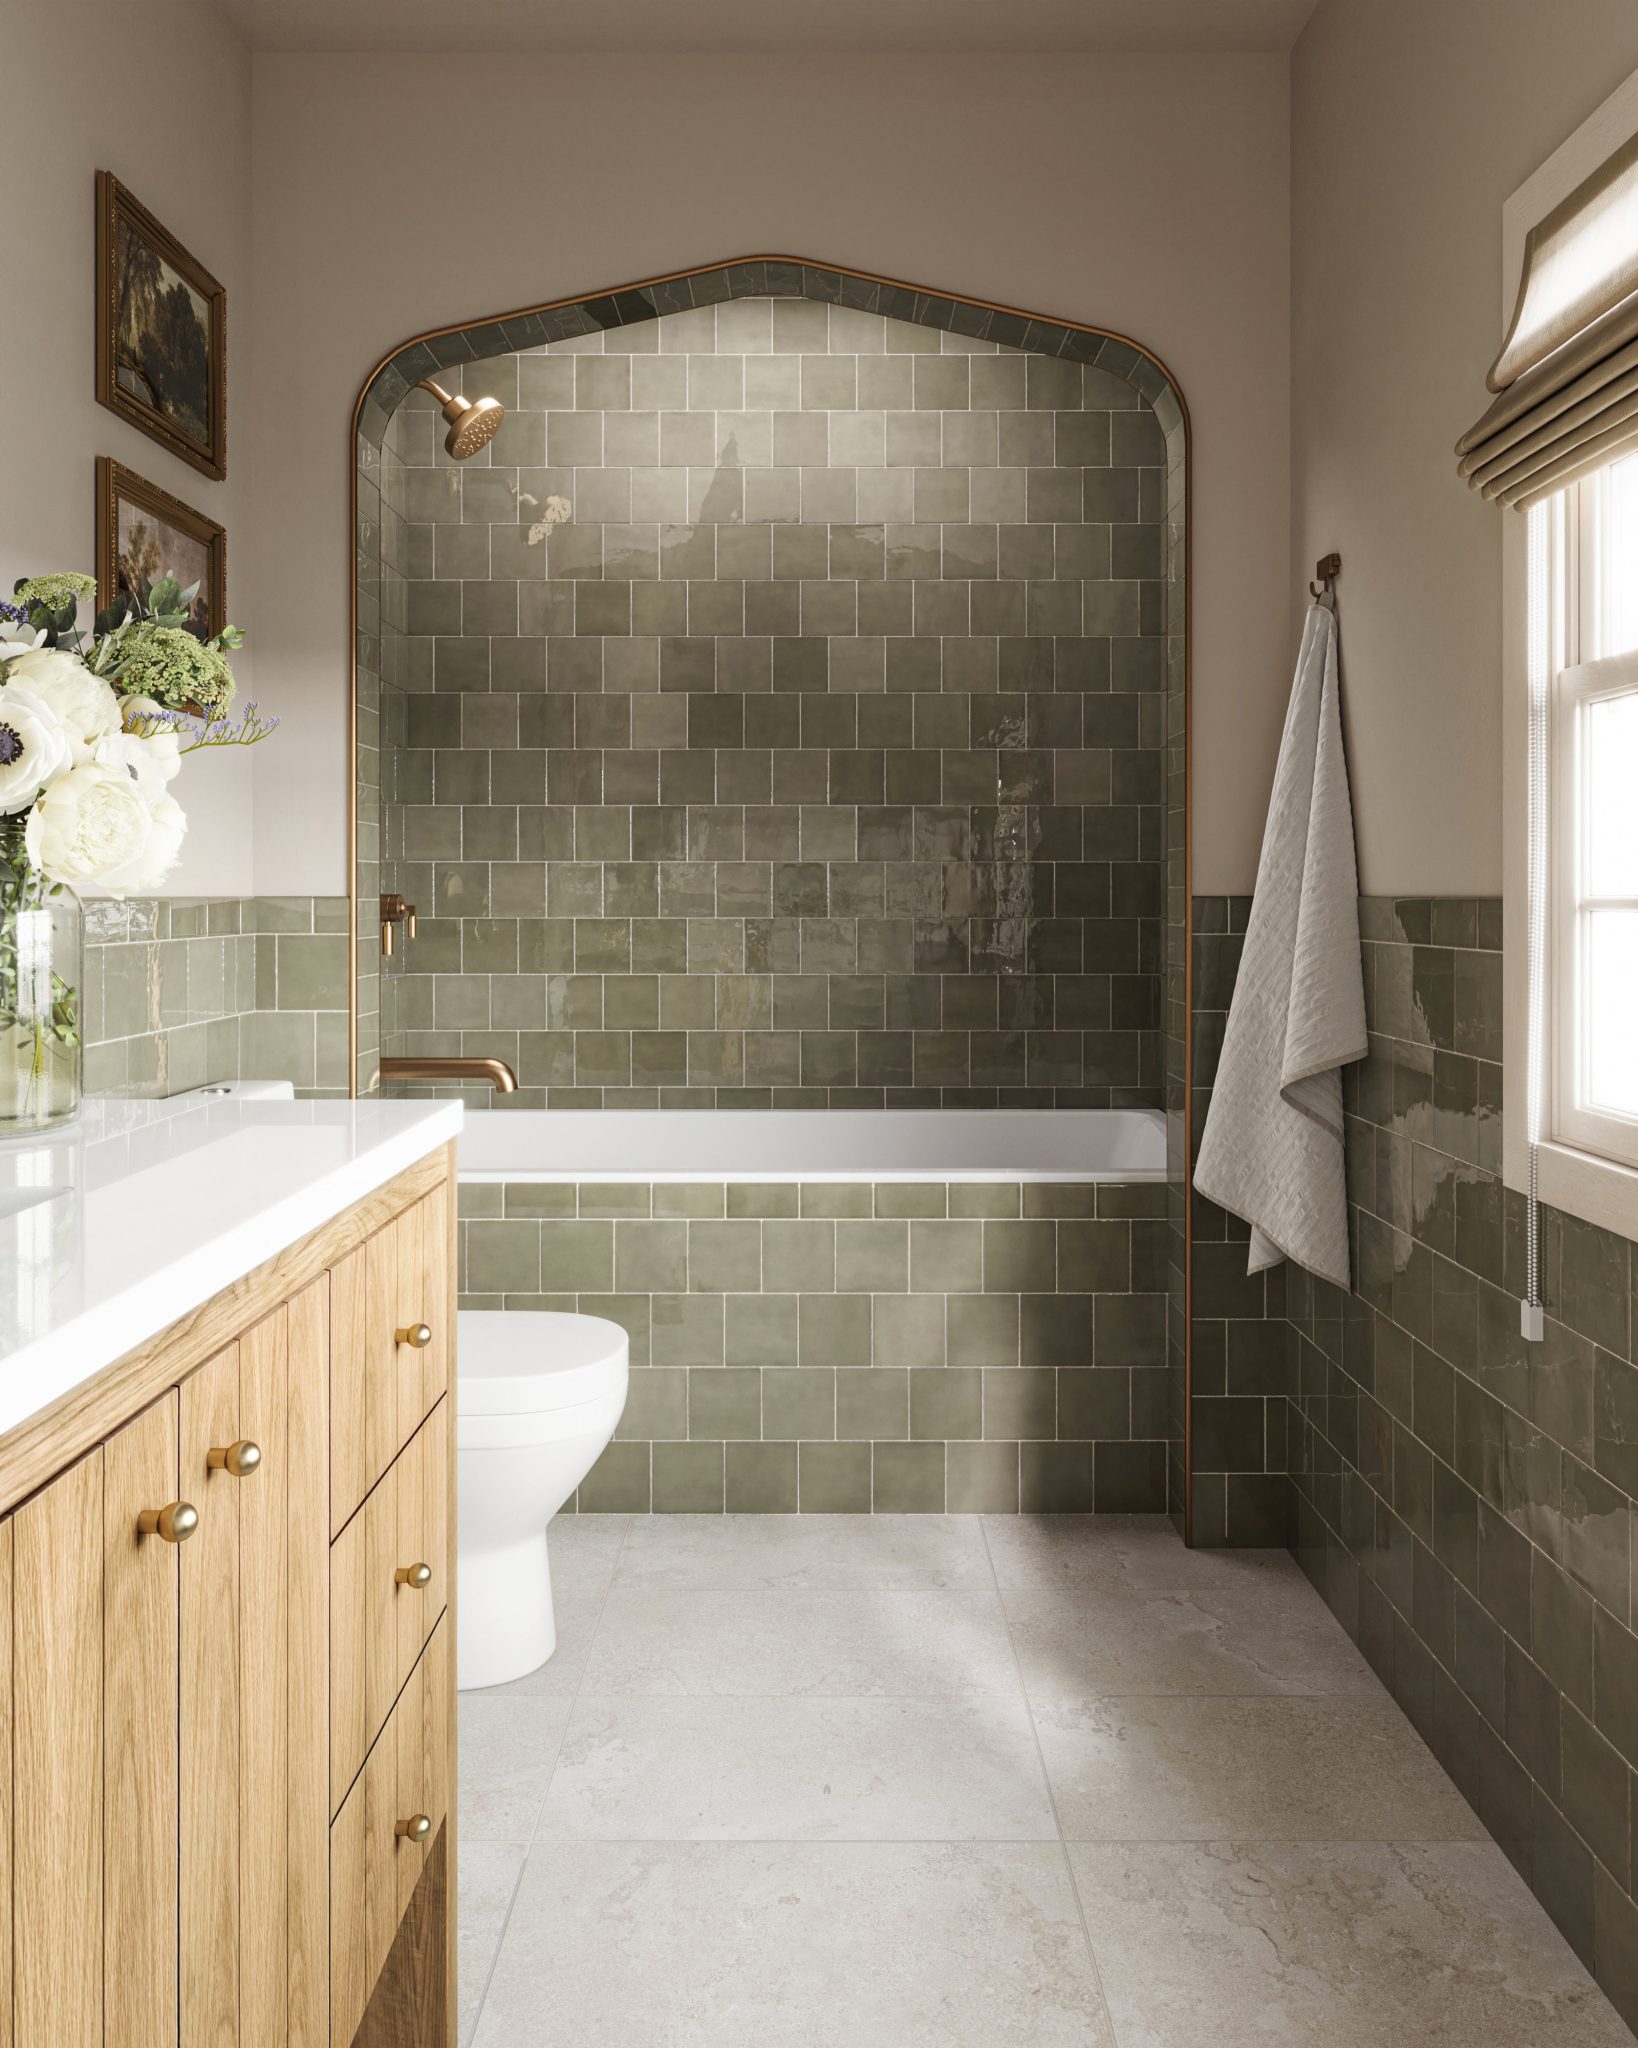
23. Sage Green Subway Tiles with an Arched Niche
An arched feature is a beautiful, on-trend detail, but it requires careful planning before you start tiling. Here’s what to confirm:
- Framing: The arch needs to be framed out with wood before any backer board goes up. This is a structural element, not just a tile pattern. Discuss this with your contractor early on.
- Tile Transitions: How will the tile on the flat wall meet the tile inside the arch? Using a pencil or bullnose trim piece creates the cleanest edge.
- Symmetry: An arch is a strong focal point, so its placement matters. Ensure it’s centered over the bathtub or another key feature for a balanced, intentional look.
|
📋 Copy HEX 🔗 Share |
🔥 Trending Context
This design feels so calm and inviting due to a smart combination of shape and color. The soft, gentle curve of the arch introduces an element of organic softness that contrasts with the straight lines of the subway tiles and the rectangular floor tiles. This use of curves is a nod to historical architecture and feels very current. The color palette—sage green, warm beige walls, and light wood—is pulled directly from nature, creating a serene and grounded atmosphere. The brass fixtures add a final touch of warmth, like afternoon sunlight. This is a softer, more romantic take on the green tile look seen in Idea #18.
24. Gray Marble Shower with a Blue Glass Tile Accent Stripe
When incorporating a vertical accent stripe, placement is everything. Don’t center it on the wall by default. A more sophisticated approach is to align it with a fixture, as seen here where it runs behind the shower controls. This makes the design feel integrated and intentional. For width, a stripe between 6 and 12 inches is typically a good scale for a standard shower—wide enough to make a statement but not so wide that it overwhelms the main tile. Putting the accent on the wall opposite the shower entrance creates an immediate focal point as you walk in.

|
📋 Copy HEX 🔗 Share |
✅ Before You Start
This is a great example of getting a high-end look by mixing splurges and saves. The majority of the shower is a classic, affordable marble-look ceramic or porcelain tile, but the pop comes from the more expensive glass accent.
- Main Wall Tile: Light grey marble-look subway tile – $300 – $600
- Accent Tile: Blue glass mosaic for a 1-foot wide stripe – $150 – $400
- Floor Tile: Small hexagonal tile – $100 – $250
- Fixtures & Glass: Chrome fixtures and glass enclosure – $800 – $1,800
- TOTAL: $1,350 – $3,050
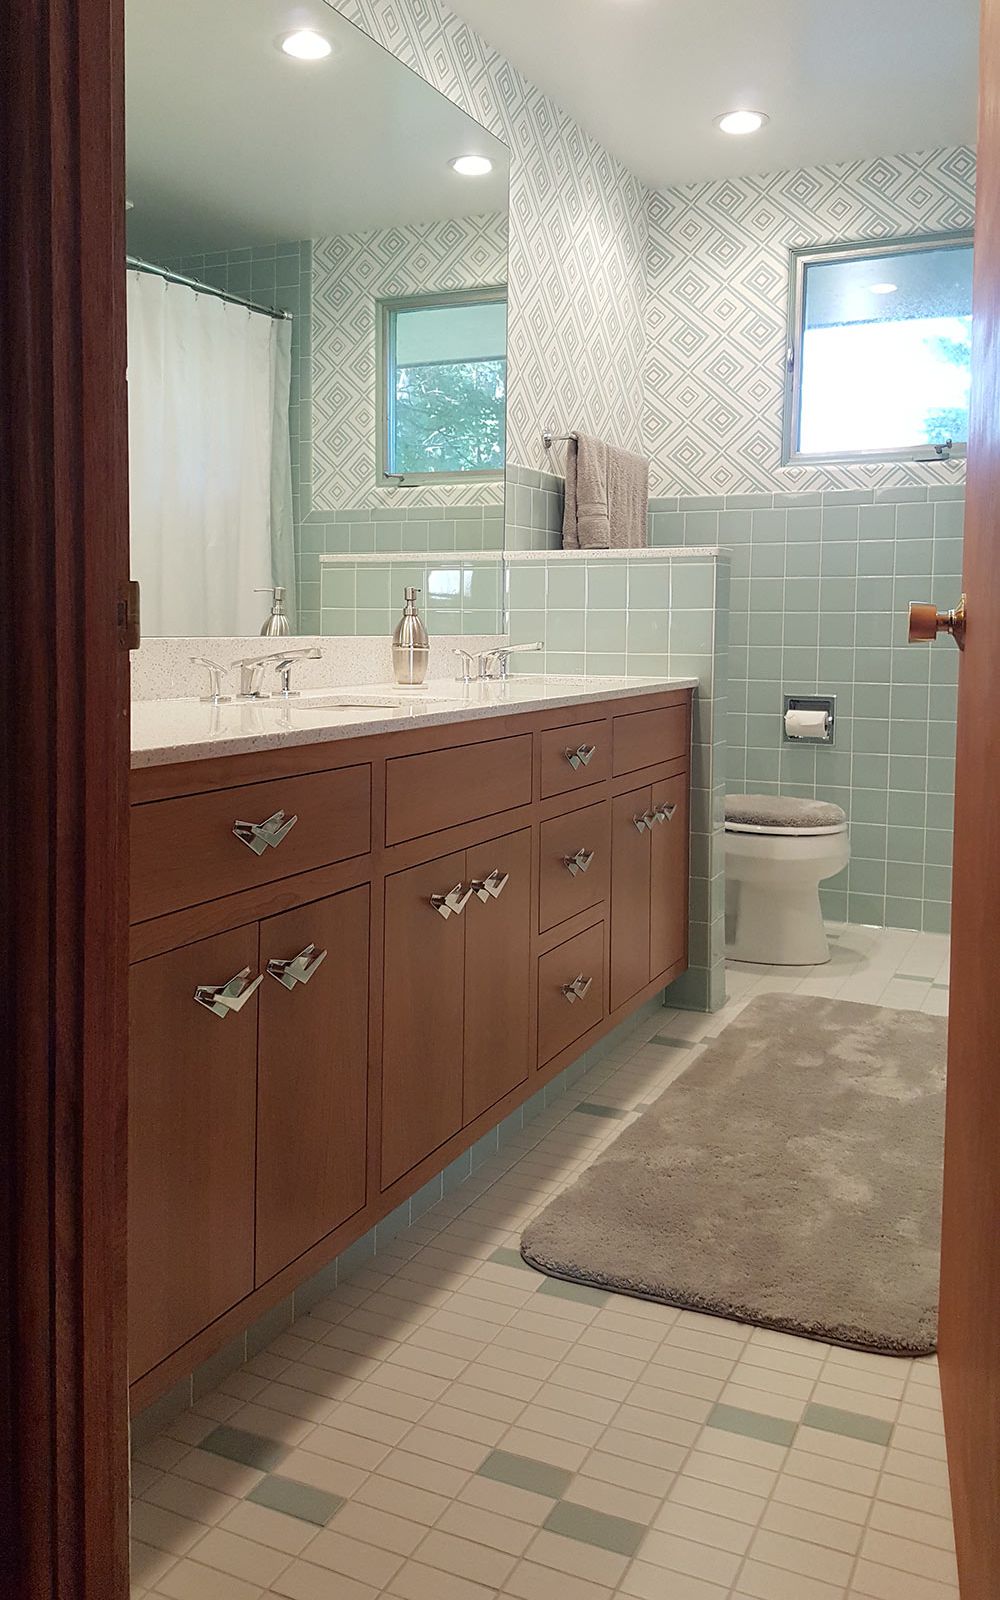
25. Mid-Century Vibe with Mint Green Tiles and Geometric Wallpaper
Mid-century modern design continues to be a huge influence, and this bathroom is a perfect example of how to get it right in 2026. It’s not a stuffy, theme-park version of the past. Instead, it pulls key elements—the clean lines of the wood vanity, the optimistic mint green color, the use of geometric pattern—and combines them in a way that feels fresh and current. This reflects a broader trend of finding inspiration in past design eras to create spaces that have personality and a story, moving away from cookie-cutter minimalism.
|
📋 Copy HEX 🔗 Share |
📐 Style Math
The visual formula here is a careful blend of authentic mid-century elements and modern restraint. Let’s call it: 40% clean-lined wood + 30% retro color + 20% subtle pattern + 10% polished chrome. The wood vanity is the anchor. The mint green subway tile provides the signature retro color pop. The geometric wallpaper and patterned floor tiles add another layer of period-appropriate detail, but their subtle white-on-white and white-and-mint palette keeps them from feeling too loud. The simple chrome hardware is the perfect finishing touch, true to the era’s focus on unadorned functionality.
26. Emerald Green Hexagon Tiles with Gold Fixtures
The defining feature of this shower is the bold commitment to a single, dramatic element: the large emerald green hexagon tiles. Using them on every wall surface creates a completely immersive, jewel-box experience. The shape is modern and graphic, while the color is deep, rich, and luxurious. This isn’t a timid design; it’s a confident statement. The choice to go all-in on this tile is what transforms the shower from a simple stall into a breathtaking focal point of the entire bathroom. Compared to the smaller hex tiles in Idea #6, this shows how scale can completely change the mood.
|
📋 Copy HEX 🔗 Share |
🎯 What Makes It Work
A dark, saturated tile color like this emerald green requires excellent lighting. Notice the recessed ceiling lights positioned directly over the shower area—this is not an accident. Without dedicated task lighting inside the shower, this space could feel very dark and cavernous, no matter how much light is in the rest of the bathroom. If you’re planning a similar design, make sure your electrical plan includes at least one or two wet-rated pot lights within the shower footprint. It’s essential for both safety and for showing off that beautiful tile.
27. Dark Green Square Tiles with a Light Wood Vanity
The success of this design lies in its sophisticated use of contrast. The back wall of the shower, with its dark green, handmade-look square tiles, offers deep color and texture. This is balanced by the light grey rectangular tiles on the side wall and floor, which provide a neutral, calming backdrop. The natural wood vanity introduces essential warmth, preventing the grey and green from feeling too cool. Finally, the matte black fixtures and frameless glass add a sharp, modern edge. Each material is distinct, yet they all work together to create a cohesive, organic-modern feel.
|
📋 Copy HEX 🔗 Share |
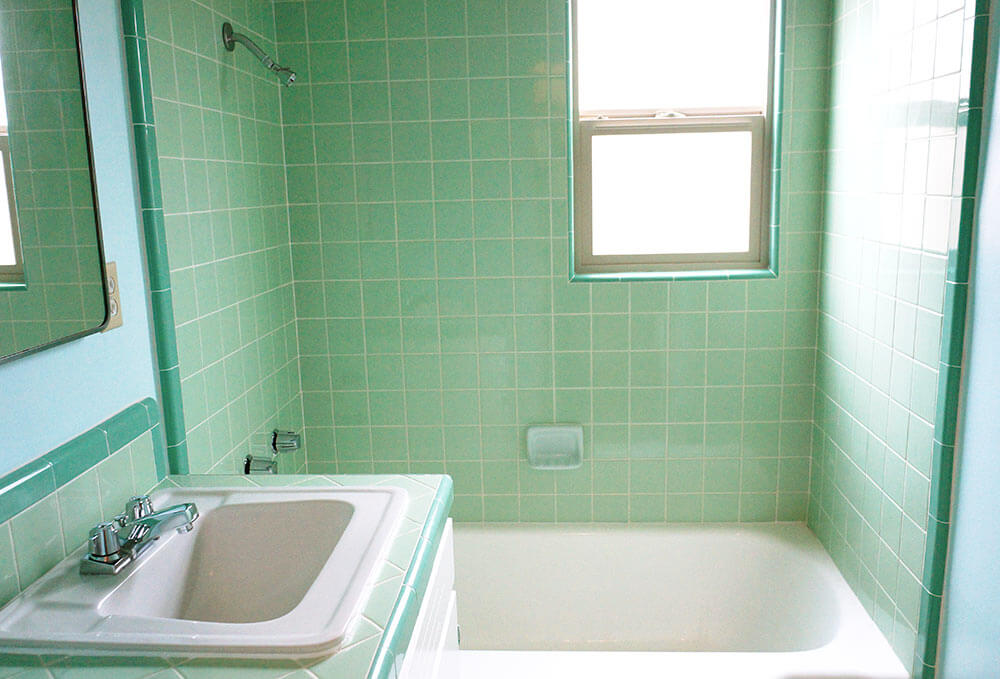
28. Retro Mint Green Square Tiles with Dark Green Trim
The secret to making this retro look feel authentic and sharp is the use of specialty trim pieces. The darker green bullnose tile used to frame the window, cap the vanity backsplash, and finish the edge of the shower is what gives the installation a clean, polished, and professional look. These pieces are designed to terminate a tile run gracefully. Without them, you’d have the unfinished edge of the field tile showing, which looks cheap and unfinished. When planning a vintage-style tile project, always make sure the collection includes the necessary trim pieces like bullnose, cove, and corner shapes.
|
📋 Copy HEX 🔗 Share |
📏 Scale Guide
This is a look that comes with a grout-cleaning commitment. With small, 4×4 inch tiles like these, the ratio of grout to tile is quite high. Light-colored grout, while perfect for this style, is also the most likely to show dirt, mildew, or staining over time. A weekly cleaning with a quality bathroom cleaner is a must. To make your life easier long-term, invest in a high-performance, stain-resistant grout (like an epoxy or urethane grout) from the start. It costs more upfront but will save you hours of scrubbing down the line.
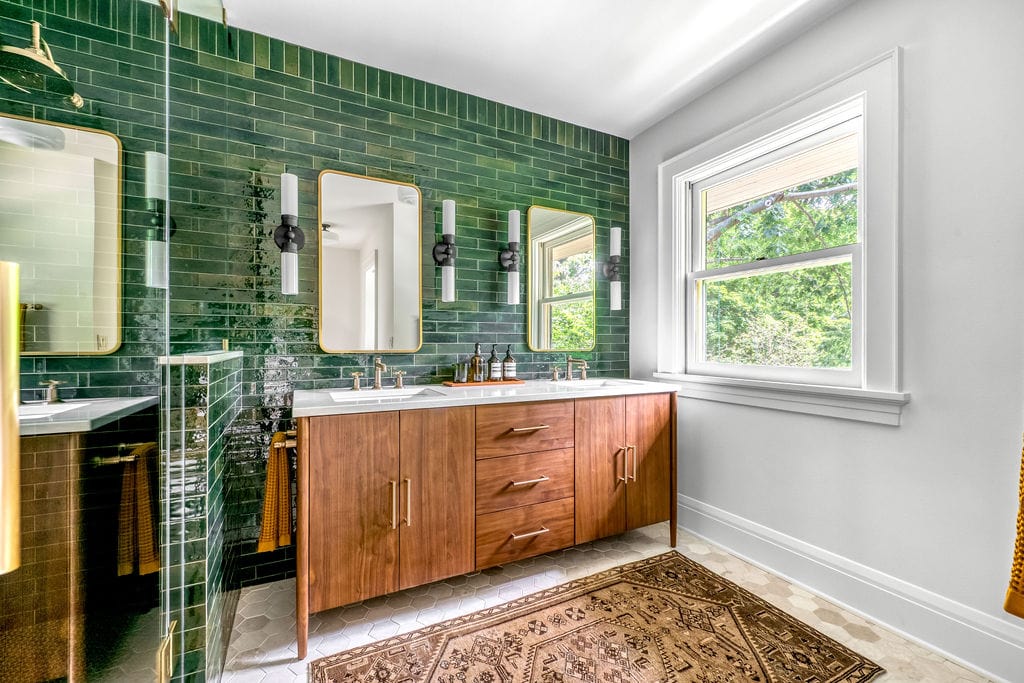
29. Emerald Green Glossy Subway Tile as a Feature Wall
This bathroom masters the art of the statement wall. The formula is: 60% bold statement + 30% natural texture + 10% metallic accent. The emerald green glossy tile wall is the undeniable star, providing rich color and reflective texture. It’s a huge dose of drama. To balance it, the warm wood of the double vanity offers a necessary organic, grounding element. The final 10% comes from the gold-framed mirrors and fixtures, which echo the warmth of the wood and add a touch of glamour that ties the whole look together. The white floor and grey walls are purposefully quiet, letting the three main elements shine.
|
📋 Copy HEX 🔗 Share |
🧹 Maintenance Reality
A dramatic feature wall like this requires a bit of prep to get right. Before you order a single tile, check these items off your list:
- Wall Flatness: Glossy tiles are unforgiving and will highlight any bumps or dips in your wall. Make sure the wall is perfectly flat and smooth before tiling begins.
- Lighting: Where will your vanity lights be mounted? On the tile? Above it? This will affect your electrical rough-in and how the light reflects off the glossy surface.
- Focal Point: Stand at the entrance of your bathroom. Is the wall you’re planning to tile the natural focal point? A statement wall is best placed where it will have the most immediate impact.
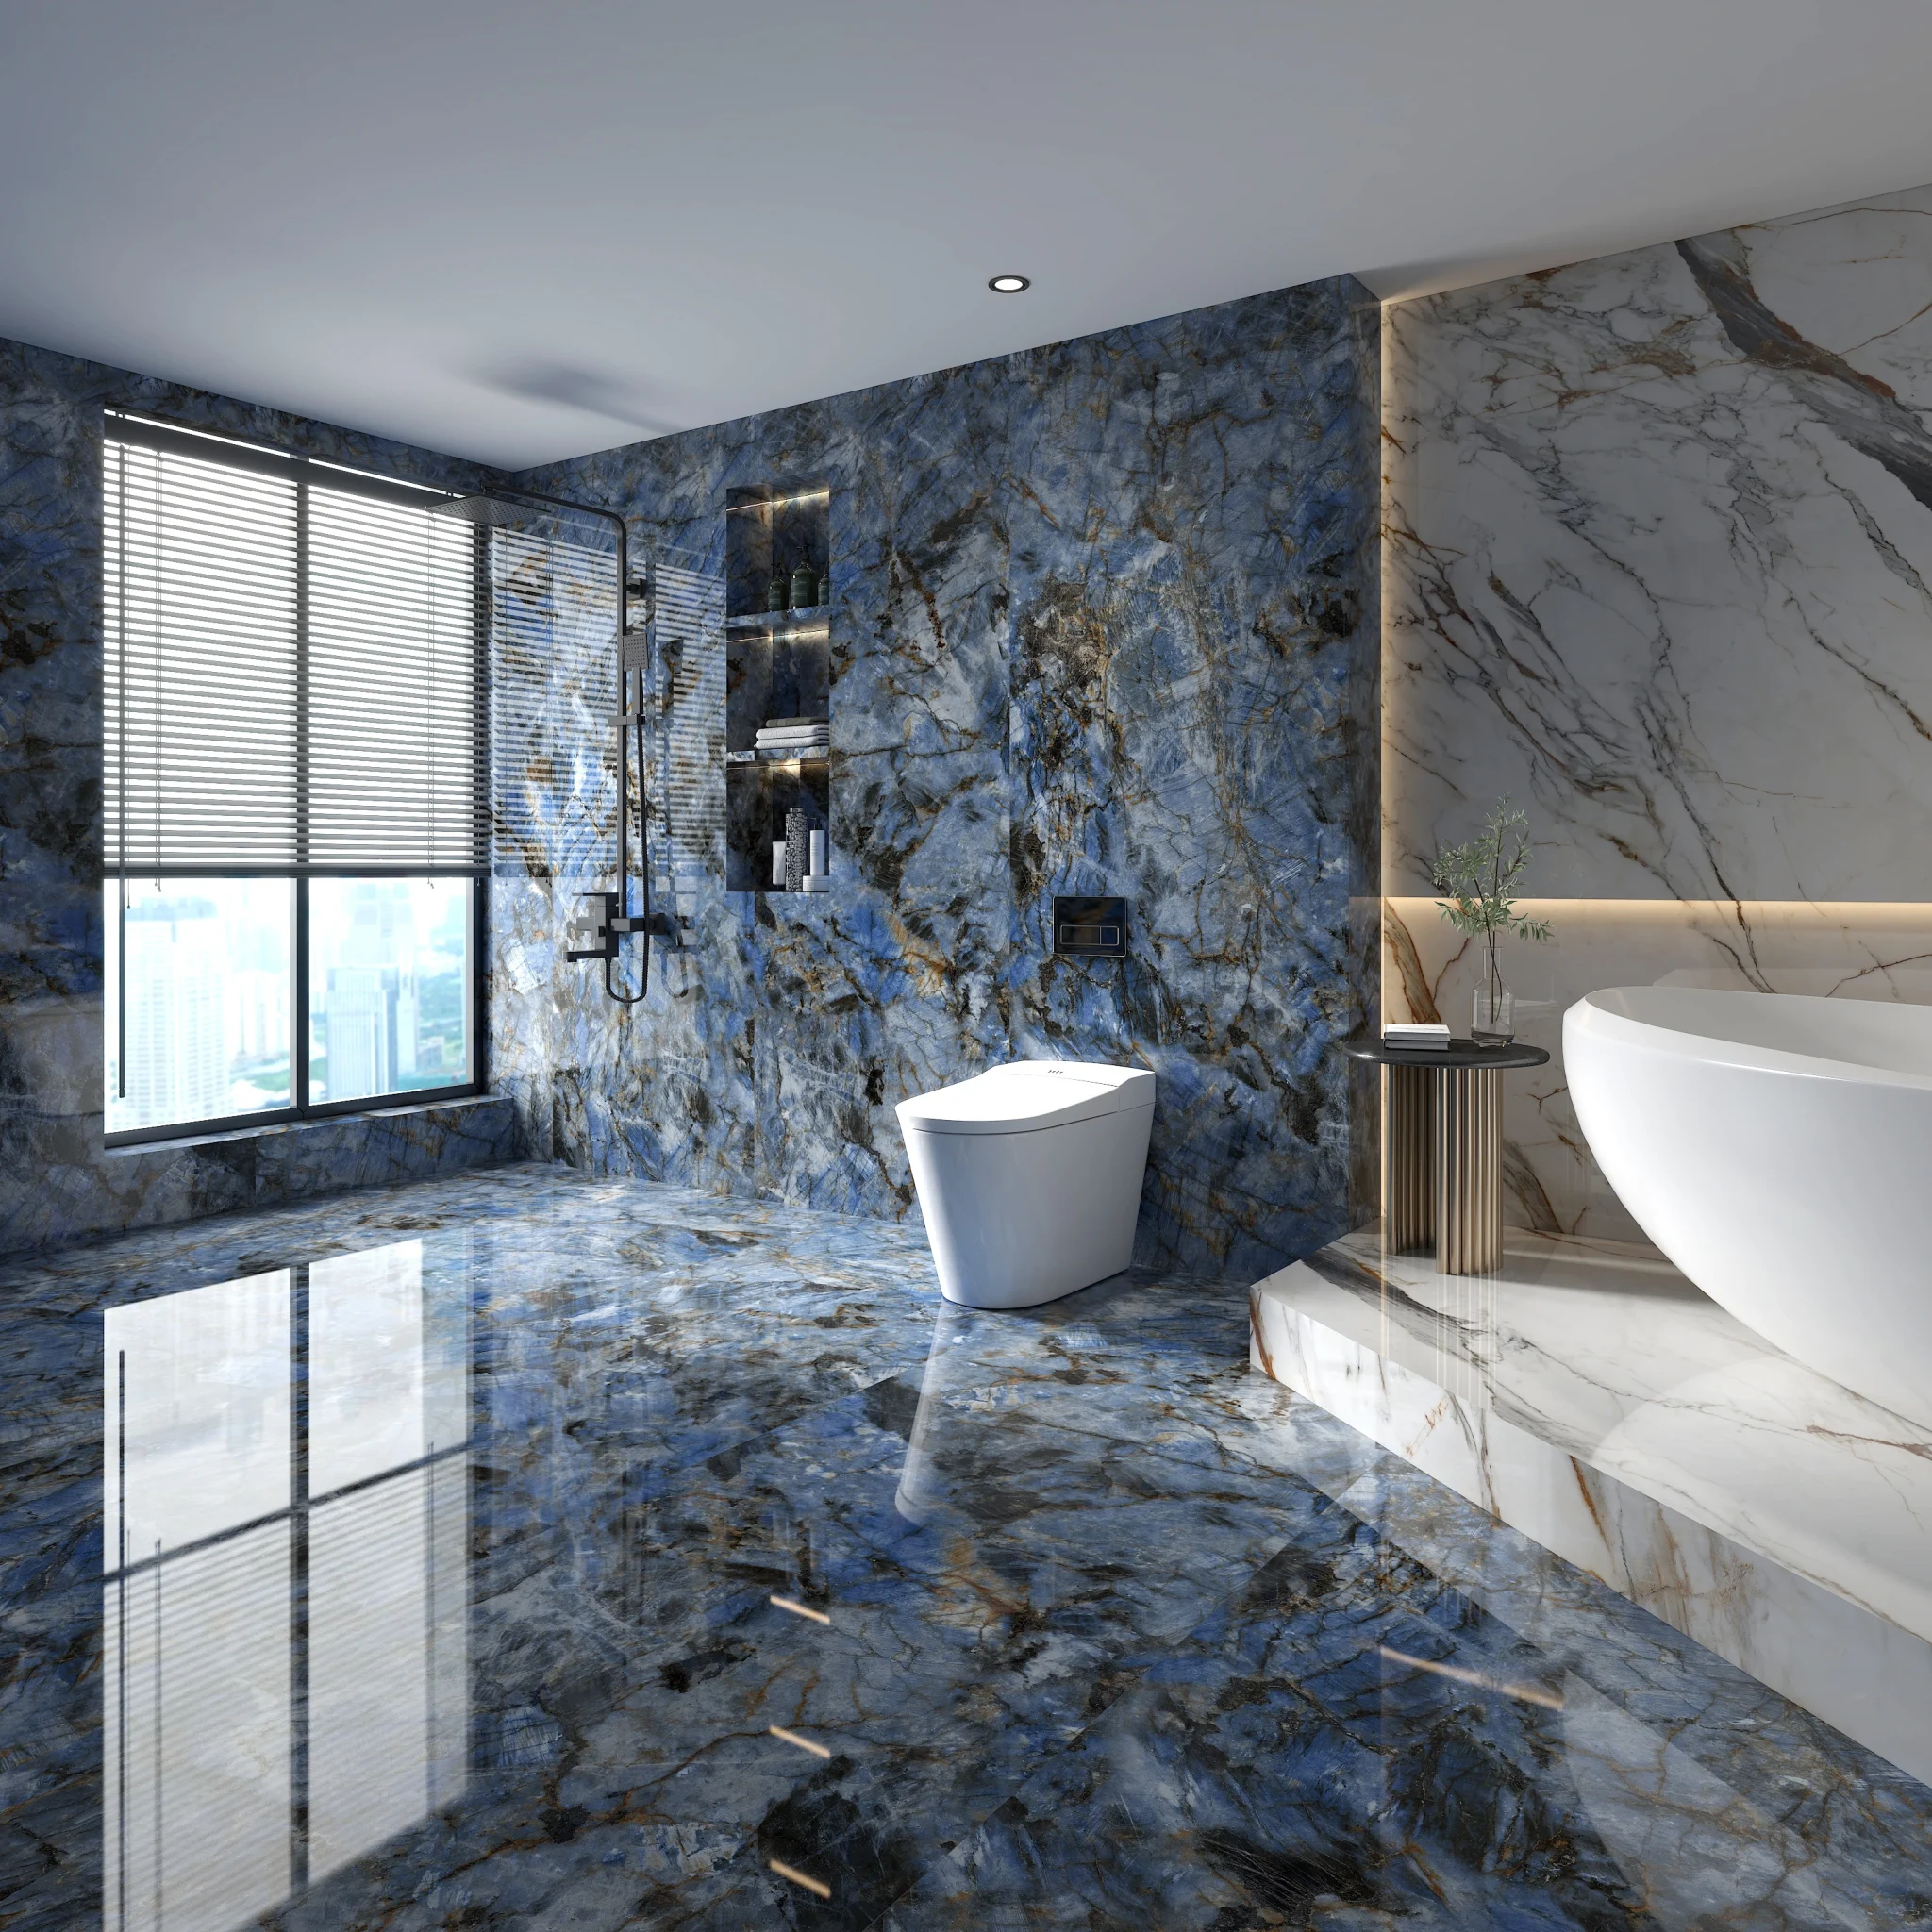
30. Dramatic Blue and Gold Marble with Integrated Lighting
The single element that takes this bathroom to the next level of luxury is the integrated lighting. Both the recessed shelving and the white marble accent wall feature hidden LED strips that cast a warm, ambient glow. This isn’t just about illumination; it’s about creating a mood and highlighting the dramatic veining of the stone. The light turns the walls into a feature, making the blue and gold marble look like a piece of backlit art. It’s a detail that feels incredibly custom, expensive, and thoughtful, transforming the room from a bathroom into an experience.
|
📋 Copy HEX 🔗 Share |
Your Shower’s Next Chapter
A great bathroom is more than just a place to get ready; it’s your own little retreat. We hope these 30 ideas have sparked some serious inspiration for a space that feels personal, functional, and beautiful. Which look will you be trying? Don’t forget to save your favorites to your Pinterest board to keep the ideas flowing!