28 Jaw-Dropping Hutch Makeover Ideas for 2026: Stunning China Cabinet Redos You Need to See
You know that feeling when you finally find the hutch makeover idea that looks and feels exactly right for your home? It stops the endless scrolling and starts the actual dreaming. That forgotten piece of furniture in the corner of your dining room (or the one you’ve been eyeing on Marketplace) has so much potential, and we’re here to help you unlock it. After sifting through hundreds of DIYs and designer projects, we’ve curated 28 distinct hutch makeovers that are trending for 2026. This isn’t just about a coat of paint; we’re diving into ideas that create functional, beautiful centerpieces for your home. We’re seeing a huge shift toward upcycling and giving new life to old pieces—it’s sustainable, budget-friendly, and creates a home with soul. 📌 Save this to Pinterest for later — you’ll want to revisit these ideas.
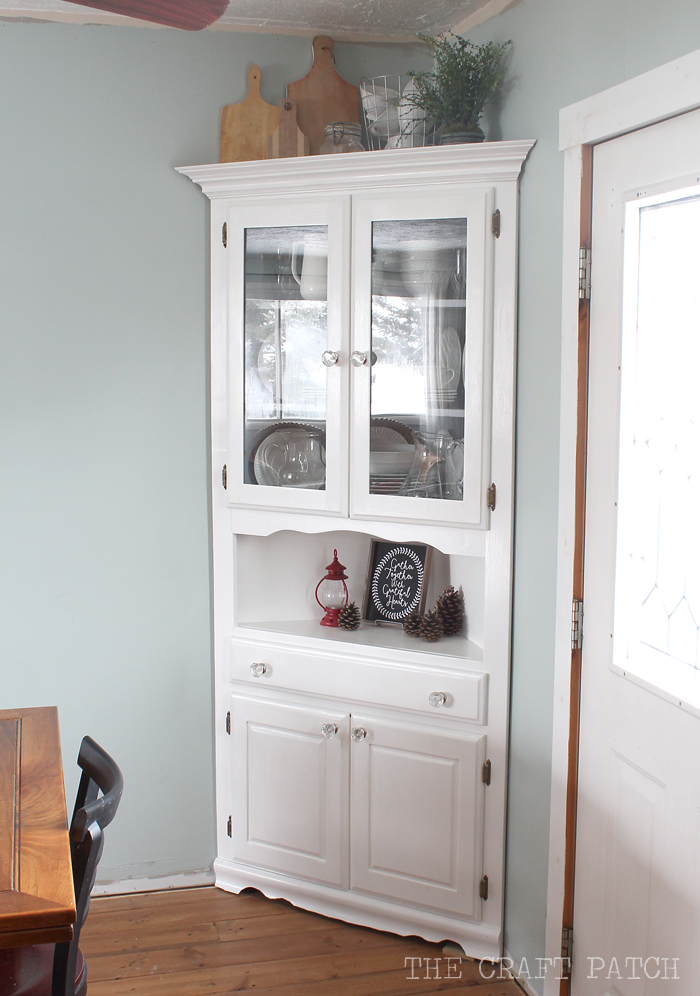
1. White Corner Hutch with Glass Knobs and Farmhouse Decor
This look proves that you don’t need a huge wall to make a statement. A corner hutch is a classic space-saver, but painting it a crisp white prevents it from feeling bulky. The transparent glass knobs are a brilliant touch; they add a hint of vintage sparkle and charm without the visual weight of metal hardware. By keeping the decor inside simple—natural wood cutting boards, a wire basket, and a pop of green—the result is clean, organized, and effortlessly rustic. The light blue-green wall color behind it provides just enough contrast to make the white pop.
|
📋 Copy HEX 🔗 Share |
📐 Style Math
When selecting a hutch for a corner, pay close attention to its “return” depth—that’s the measurement from the back corner to the front edge of the side panel. For a standard 36-inch wide doorway or walkway nearby, you want the hutch to occupy no more than 18-24 inches of diagonal wall space on either side of the corner. This ensures it feels built-in and intentional, rather than like a piece of furniture that’s just blocking traffic. Always map it out with painter’s tape on the floor first!
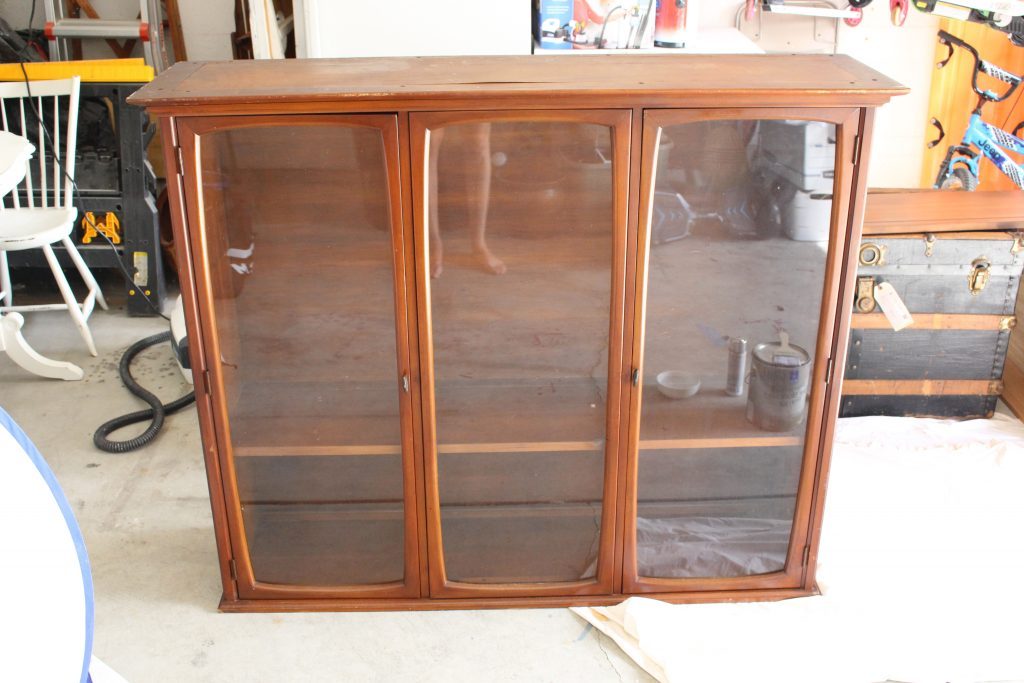
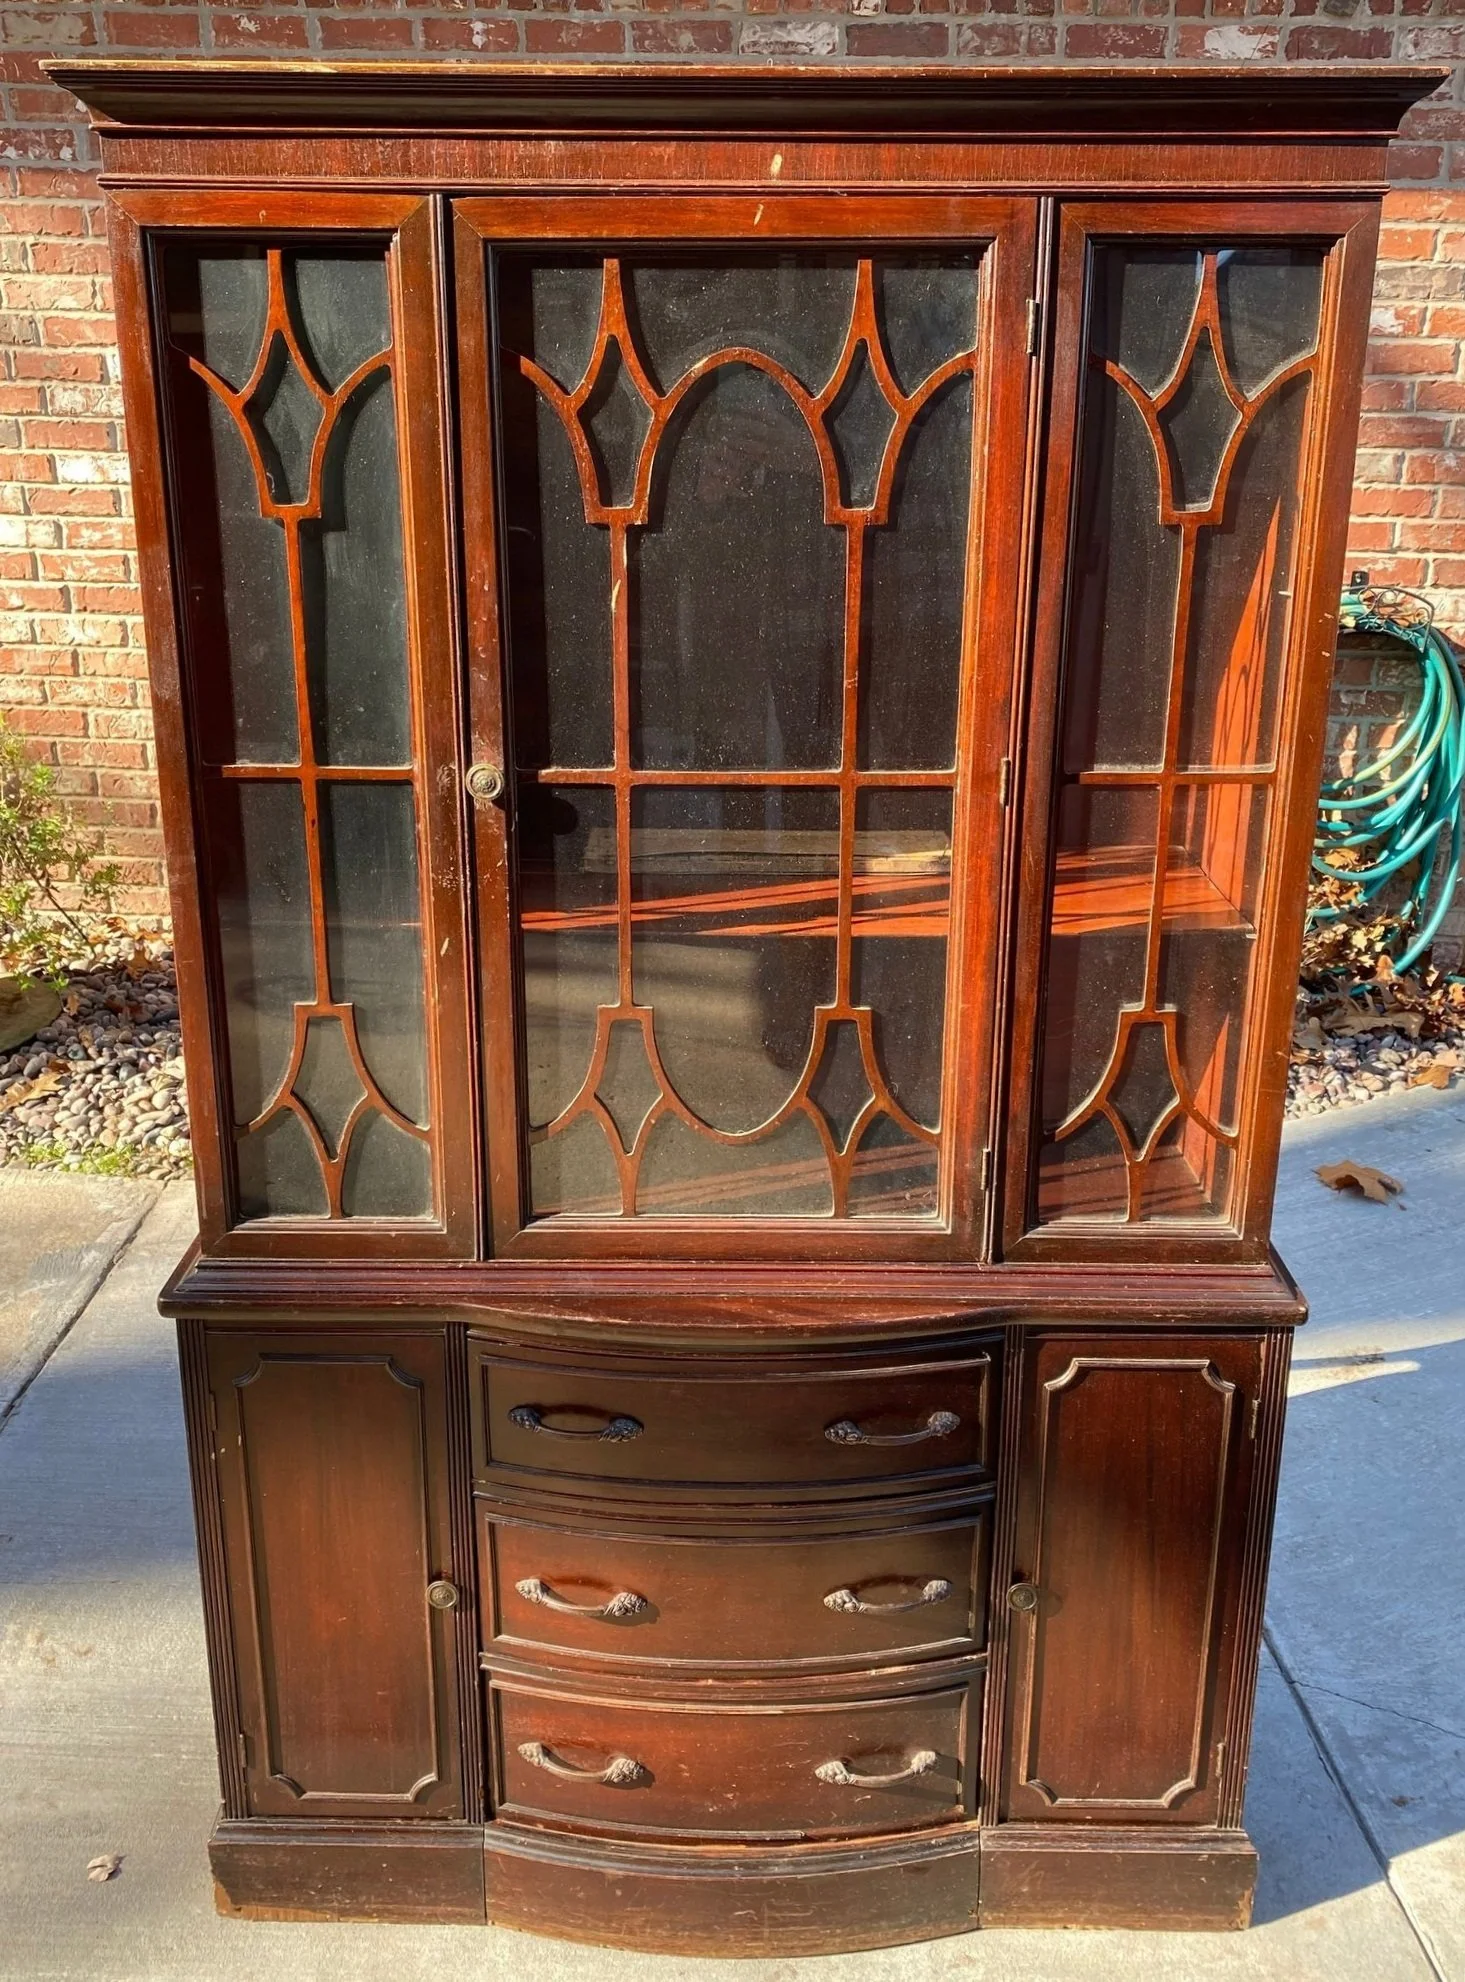
2. Restoration-Ready Three-Door Hutch with Arched Panels
Finding a hutch with “good bones” like this is the perfect starting point for a makeover. Before you even think about paint colors, do a quick audit of the piece. A simple checklist can save you a world of hurt later on. This is the first step to a successful DIY project, and ensures the piece is worth your time and effort.
- First, determine if it’s solid wood or veneer. Gently tap on a large flat surface; solid wood has a dull thud, while veneer can sound slightly more hollow. Veneer can’t handle aggressive sanding.
- Check that all doors hang evenly and drawers slide smoothly. Warped wood is very difficult to fix.
- Finally, give it a good sniff. Musty, moldy smells can be stubborn and may require sealing the entire piece with a shellac-based primer before painting.
|
📋 Copy HEX 🔗 Share |
💡 Designer Tip
Let’s be honest: a hutch of this size is a marathon, not a sprint. If you’re planning a full strip, sand, and repaint, you need to budget your time realistically. For a quality finish, you’re likely looking at 20-30 hours of active work, spread out over several days to allow for proper drying and curing times between coats. Don’t start this on a Friday afternoon expecting to have it styled and ready for its close-up by Sunday evening. Rushing the prep work is the #1 reason makeovers fail. The patient DIYer gets the best results, every time.
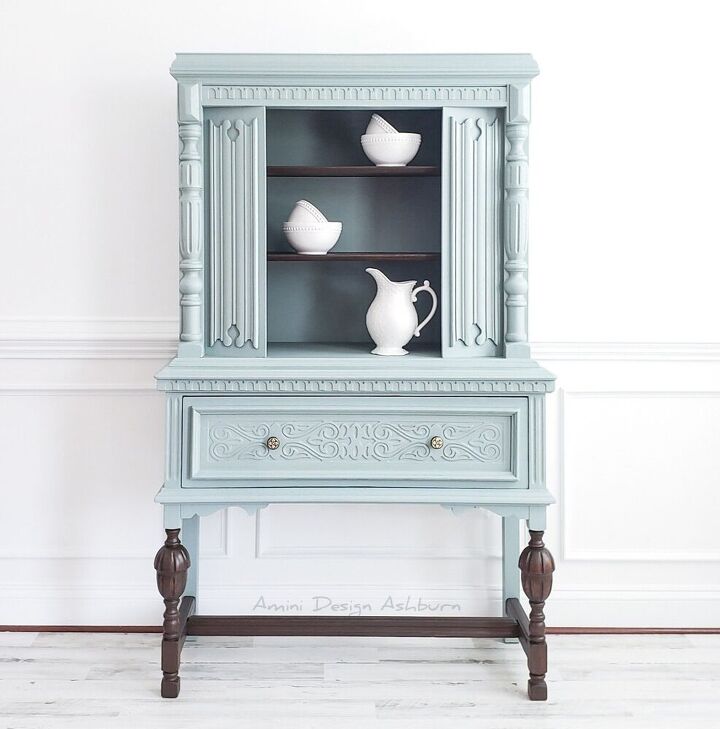
3. Powder Blue Hutch with a Dark Wood Base and Carved Details
The success of this piece is a simple but powerful formula: 70% soft, painted elegance + 30% rich, grounding wood grain. The powder blue is calming and classic, but by leaving the base and interior shelves in their original dark wood stain, the hutch gains a sophisticated, custom-designed feel. The 10% of simple white porcelain decor is the perfect accessory—it doesn’t compete, it just complements. You could easily swap the powder blue for a soft sage green or even a creamy beige and this timeless recipe would still work beautifully.
|
📋 Copy HEX 🔗 Share |
🎯 What Makes It Work
It’s all about that dark wood base. If the entire piece were painted blue, it would be pretty, but it might lack gravitas. The stained, turned legs and lower stretcher bar anchor the hutch, giving it a sense of history and architectural weight. It’s what separates a simple “upcycled” piece from a thoughtfully redesigned heirloom. It shows restraint and a respect for the original craftsmanship. Compare this stunning two-tone effect with the more rustic version in Idea #19.
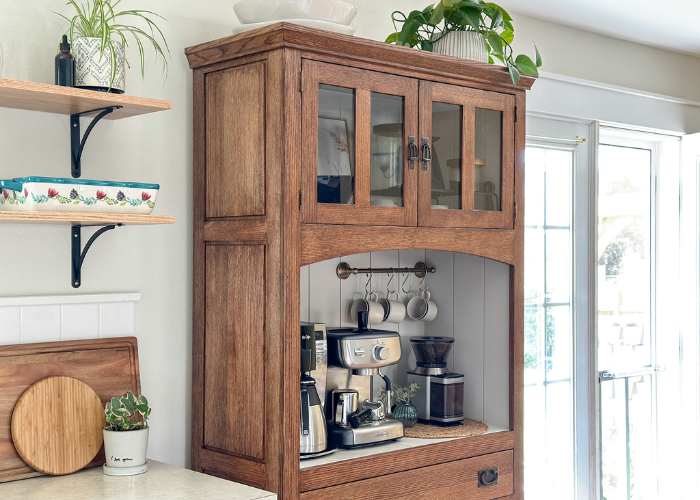
4. Creamy White Bar Cabinet with Ornate Carvings and Gold Trim
Turning an old hutch into a glamorous bar cabinet is one of our favorite transformations. Here’s a realistic look at the costs for a high-quality DIY.
- Thrifted Hutch: $150 – $600
- Paint & Primer: $75 – $150 (don’t skimp here!)
- Gold Leaf or Paint Pen: $20 – $40
- Custom-Cut Mirror Backing: $120 – $350
- Glassware & Decor: $100 – $300
- TOTAL: $465 – $1,440
Budget alternative: Find a simpler cabinet on Facebook Marketplace, use a quality mirror-effect spray paint for the back panel, and thrift the glassware to get this look for under $400.

|
📋 Copy HEX 🔗 Share |
⚠️ Real Talk
A piece with this much ornate detail and presence needs space to command attention. This isn’t a small-space solution. To avoid overwhelming a room, place it in a dining or living area that is at least 150 square feet, ideally with 8-foot-or-higher ceilings. You need at least three feet of “breathing room” around it on all sides. In a smaller room, the carvings and gold accents can feel cluttered and fussy rather than luxurious. For smaller spaces, consider the more streamlined look of Idea #27.
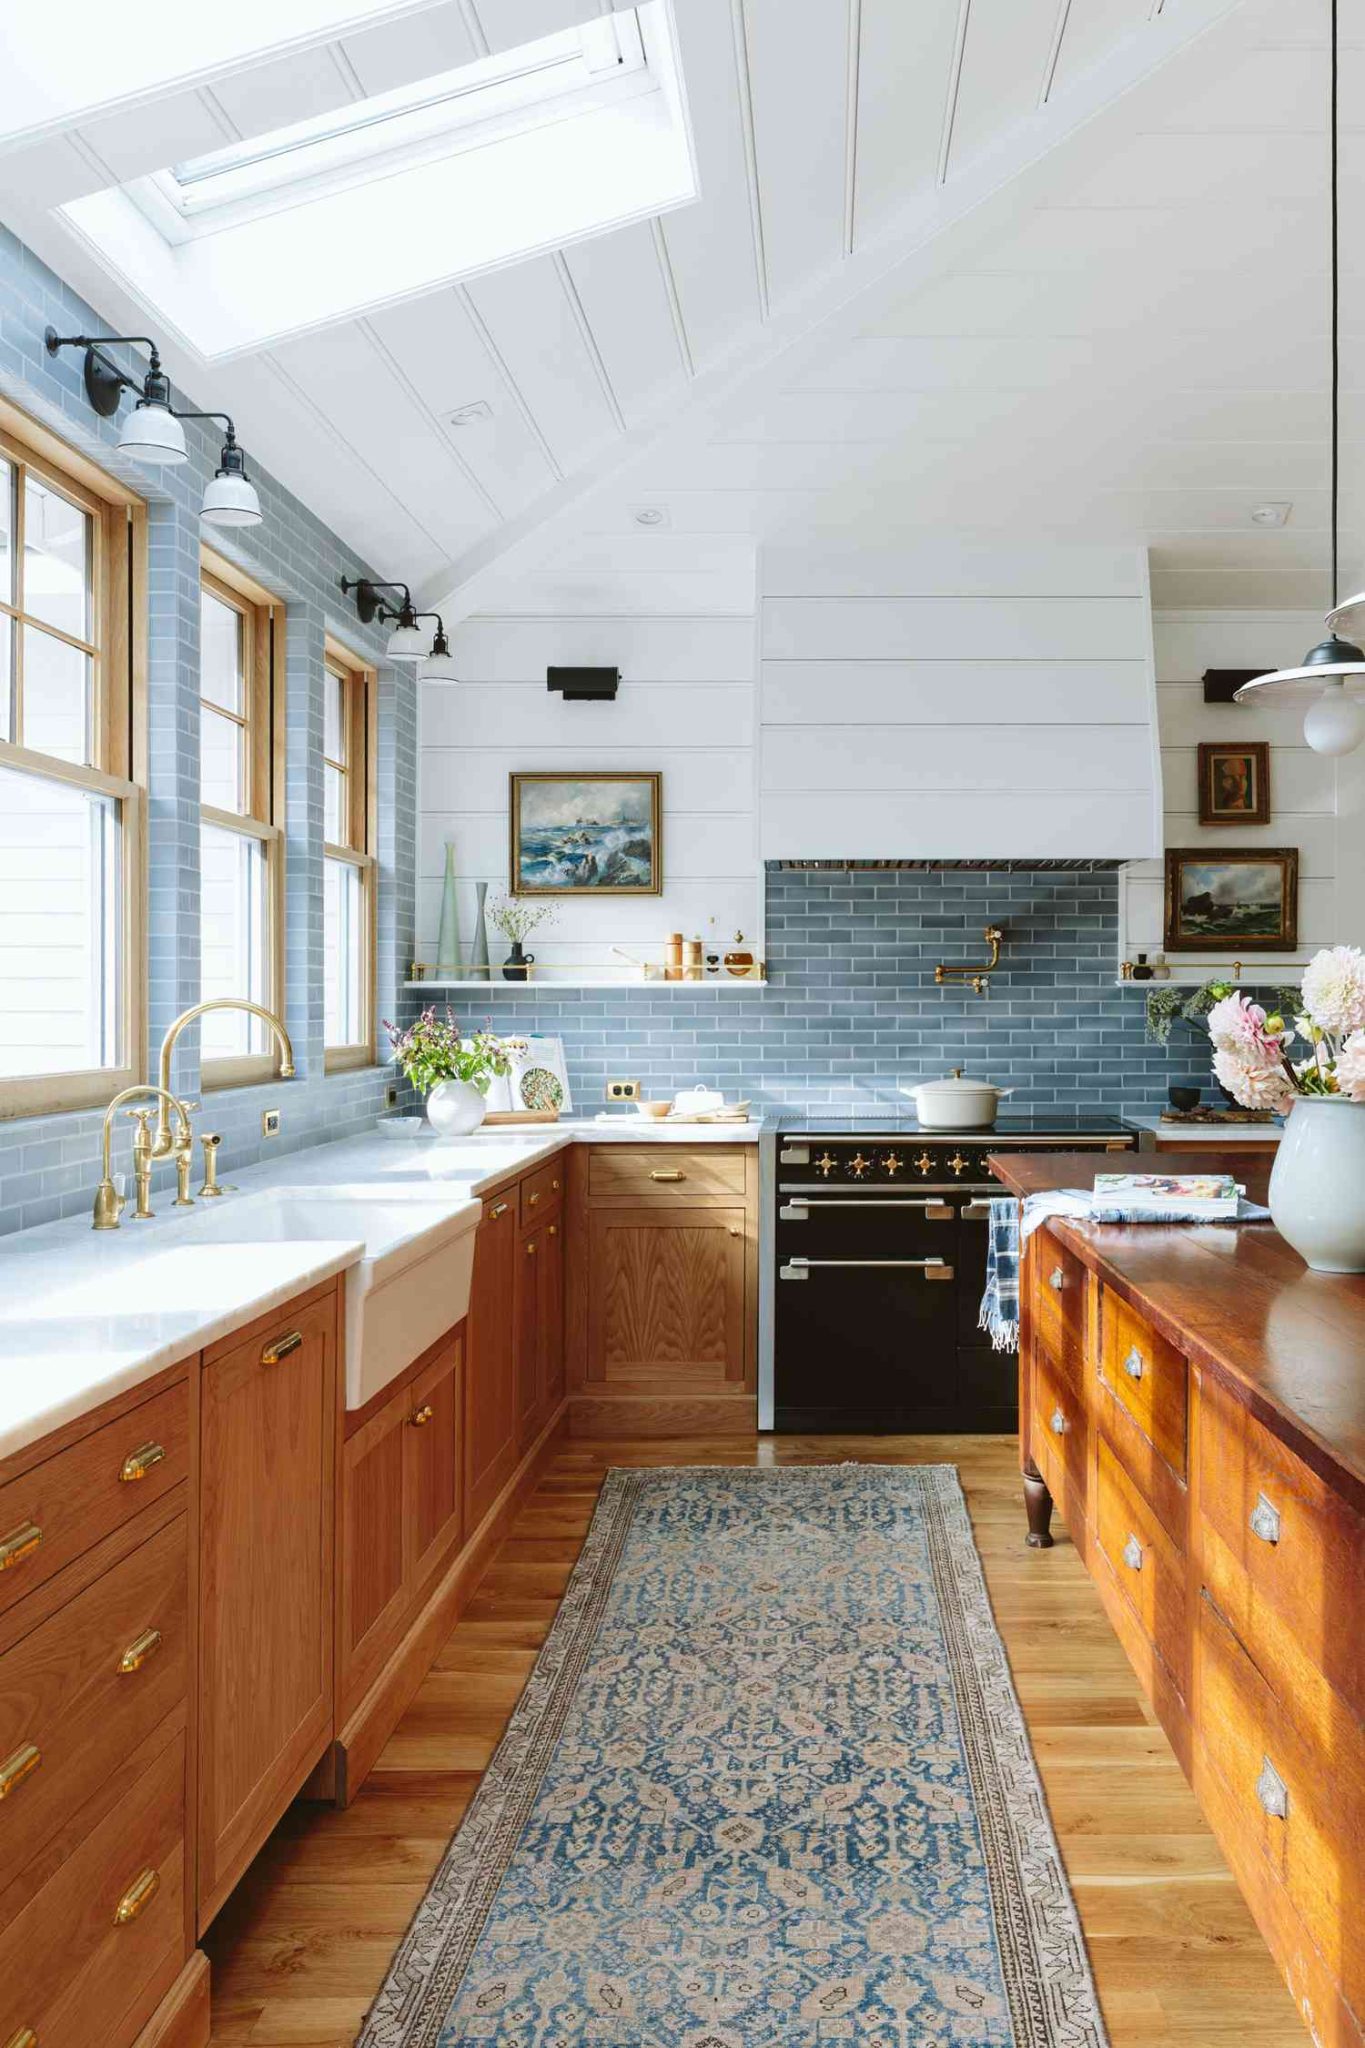
5. Hutch Color Inspiration: Light Blue Tile and Natural Wood
While not a hutch itself, this kitchen is the perfect inspiration board for a two-tone makeover. It masterfully shows why light wood and soft blue is a timeless pairing. The natural warmth of the light oak cabinets prevents the pale blue backsplash from feeling cold. At the same time, the cool blue keeps the wood from looking too yellow or dated. Imagine this on a hutch: a natural wood frame with the back panel painted this exact shade of blue. It creates depth and a custom look with minimal effort.
|
📋 Copy HEX 🔗 Share |
📏 Scale Guide
The key to successfully pairing a paint color with a wood tone is to understand the wood’s undertone. This light oak has a warm, slightly yellow base, which is why it pairs so beautifully with a contrasting cool blue. If your hutch is made of a wood with strong red undertones, like cherry or mahogany, a green-blue or even a deep forest green would create a more harmonious and sophisticated palette. Always grab a few paint swatches and hold them up to your actual piece in the room’s natural light before you commit.
6. Light Oak Cabinetry with a Clean White Countertop
The brass hardware is the single element that elevates this simple, functional cabinet into something special. Without it, the light oak and white countertop would be clean and modern, but perhaps a bit sterile. The warm, glowing brass adds a layer of richness and a touch of classic design. It proves that hardware isn’t just functional; it’s the jewelry of your cabinetry. Notice the mix of a simple round knob on the drawer and slender pulls on the doors—this subtle variation adds a custom, thoughtful feel.

|
📋 Copy HEX 🔗 Share |
🧹 Maintenance Reality
White countertops are beautiful, but they require a dose of reality. Whether it’s quartz, marble, or laminate, white surfaces are prone to showing stains, especially from coffee, red wine, or tomato sauce. For a hutch top that will see real-world use as a coffee bar or serving station, quartz is your most durable and least porous option. If you opt for a painted wood top, use at least three coats of a water-based polyurethane in a satin finish for maximum protection, and be prepared to use coasters and trivets religiously.
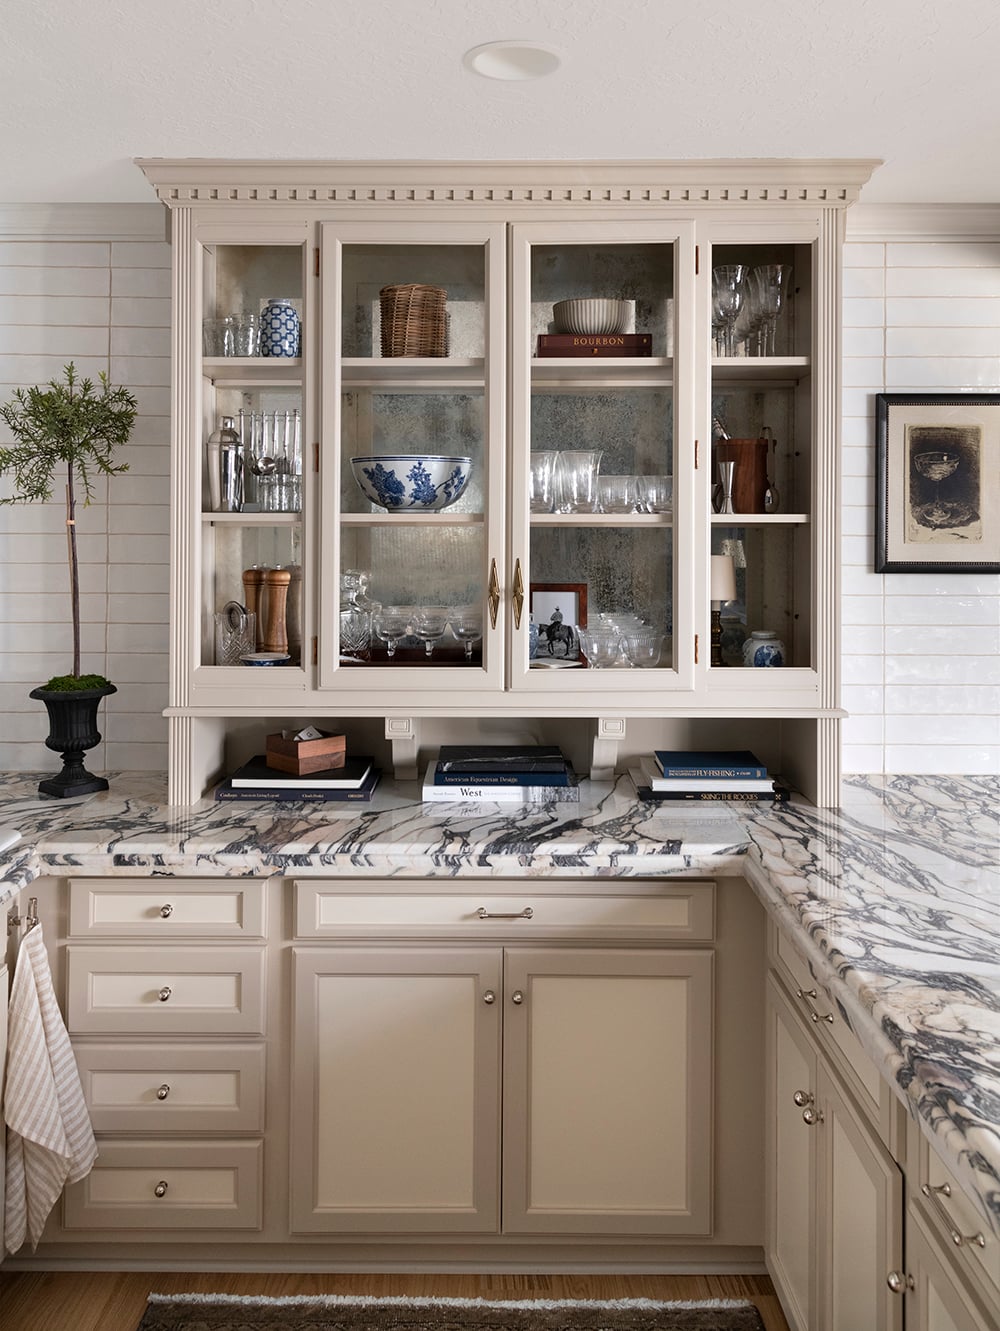
7. Traditional Beige Hutch Framed by a Subway Tile Backsplash
This setup works so well because of its sophisticated layering of neutral tones. The hutch itself is a warm, creamy beige, which stands out beautifully against the crisp white of the subway tile. The countertops introduce a third neutral—a dynamic gray and white marble—that adds pattern and depth without introducing a new color. The final touch is the mirrored back inside the hutch, which bounces light around and keeps the large piece from feeling too heavy. It’s a masterclass in monochrome design.
|
📋 Copy HEX 🔗 Share |
💰 Budget Breakdown
A look this seamless often requires more than just a single piece of furniture. This isn’t just a hutch; it’s part of a larger, built-in or cohesive cabinetry system. Recreating this specific vibe means thinking beyond just the hutch itself. You’ll need to consider the wall treatment behind it (like this tile backsplash) and the surface below it (like the marble countertop). This might involve coordinating with other trades like a tile setter or countertop installer, adding complexity and cost compared to a simple paint-and-place makeover.
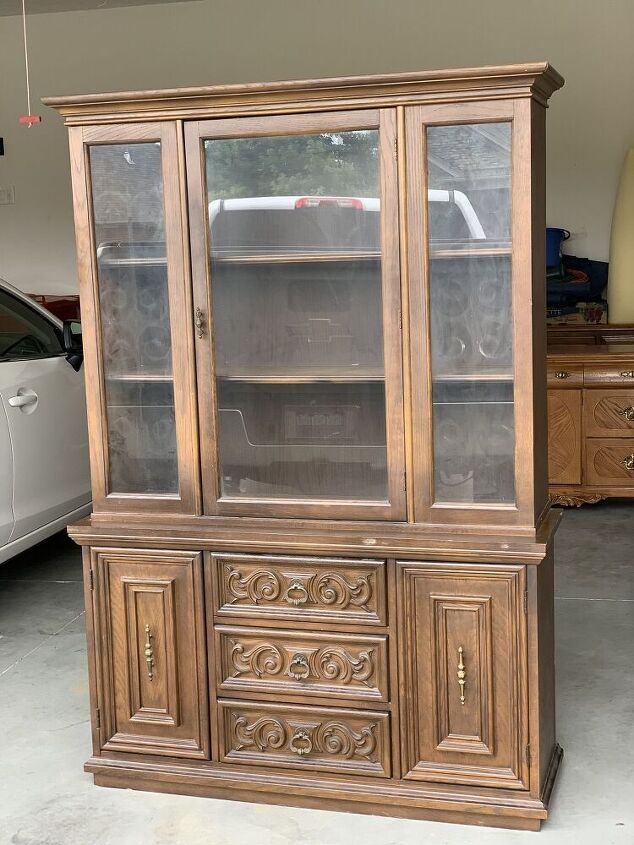
8. Traditional Brown Wood China Hutch with Carved Drawers
You’re seeing pieces like this all over Pinterest and Facebook Marketplace right now, and for good reason. After years of minimalist, mid-century modern dominance, there’s a huge swing back towards “grandmillennial” style and traditional, substantial furniture. People are craving pieces with history and character. A hutch with ornate details like this is the perfect anchor for the trend. It has the weight and craftsmanship that modern, flat-pack furniture just can’t replicate. This isn’t dated; it’s classic, and it’s having a major revival.
|
📋 Copy HEX 🔗 Share |
🔧 How-To Brief
Don’t have the budget for a solid wood antique? You can get this vibe for so much less. Look for a basic, 90s-era oak hutch from a thrift store or on Craigslist for $50-$150. The key is in the finishing. Use a gel stain in a dark walnut finish to give it a richer, more uniform color without the hassle of stripping the old finish. Then, head to a hardware store or Amazon and swap out the basic knobs for some ornate brass or gold-toned pulls. For about $200 and a weekend of work, you can capture the spirit of this piece.
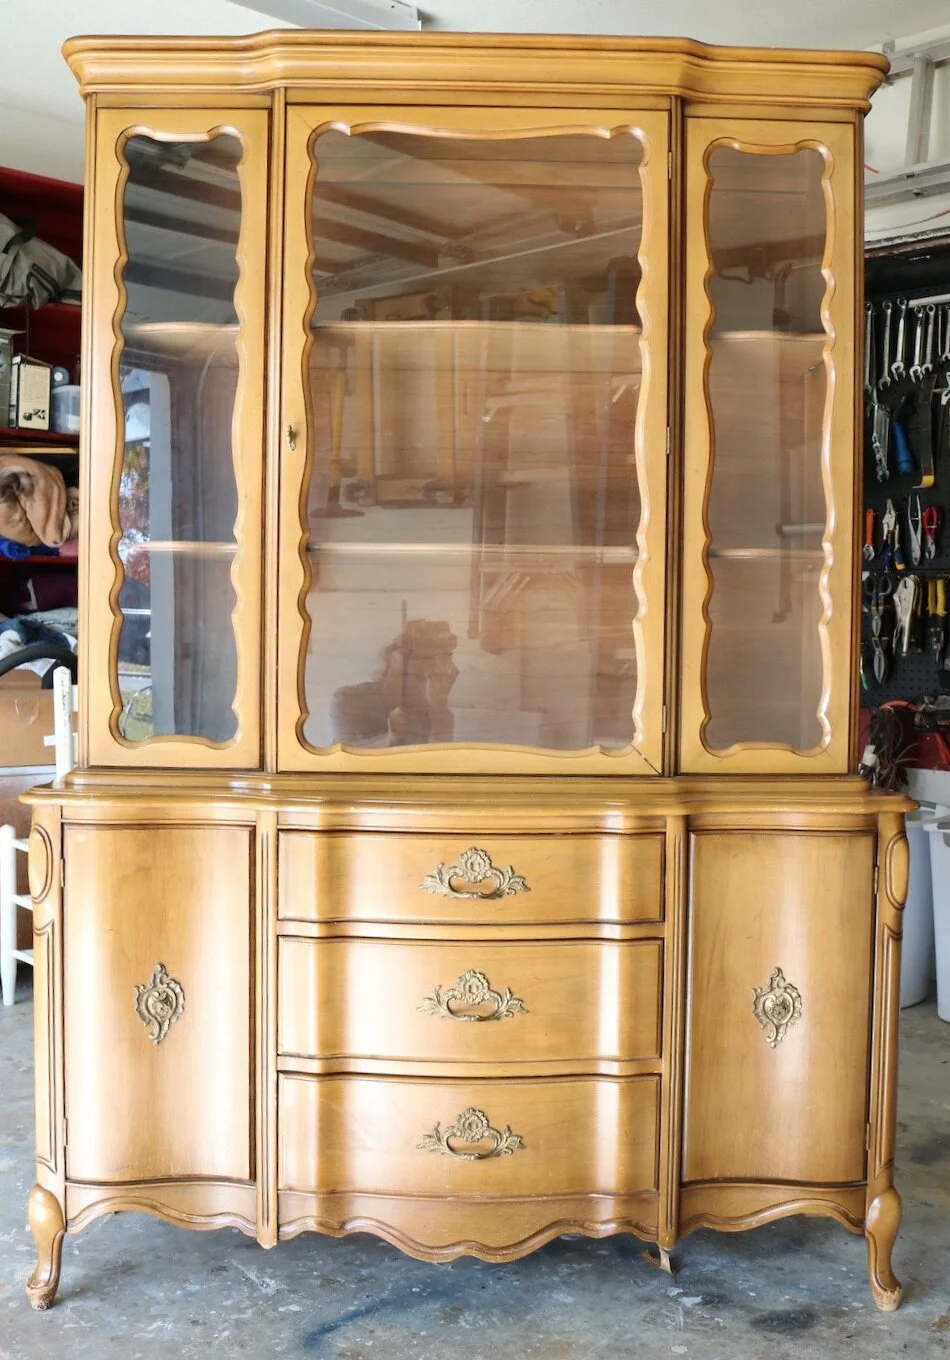
9. Light Caramel Wood Hutch with Gilded Accents and Scalloped Edges
This piece feels special because of its delicate, feminine details. The light caramel color is warm and inviting, but it’s the curves that make it sing. Note the scalloped frames on the glass doors, the bowed fronts of the drawers, and the elegant cabriole legs. These details soften what could be a very large, boxy piece of furniture, giving it a sense of grace and movement. The ornate gilded hardware is the perfect finishing touch, adding a bit of sparkle that catches the eye and highlights the beautiful curves of the drawers.
|
📋 Copy HEX 🔗 Share |
🔥 Trending Context
When you have a piece with intricate hardware like this, resist the urge to remove it for cleaning or polishing if you can avoid it. Often, the aged patina is part of its charm. If you must clean it, use a very gentle method. A simple solution of equal parts white vinegar and water on a soft cloth can remove grime without stripping the finish. For gilded or brass-plated hardware, avoid harsh brass cleaners, as they can remove the thin layer of plating and expose the base metal underneath. A gentle wipe is usually all it needs.
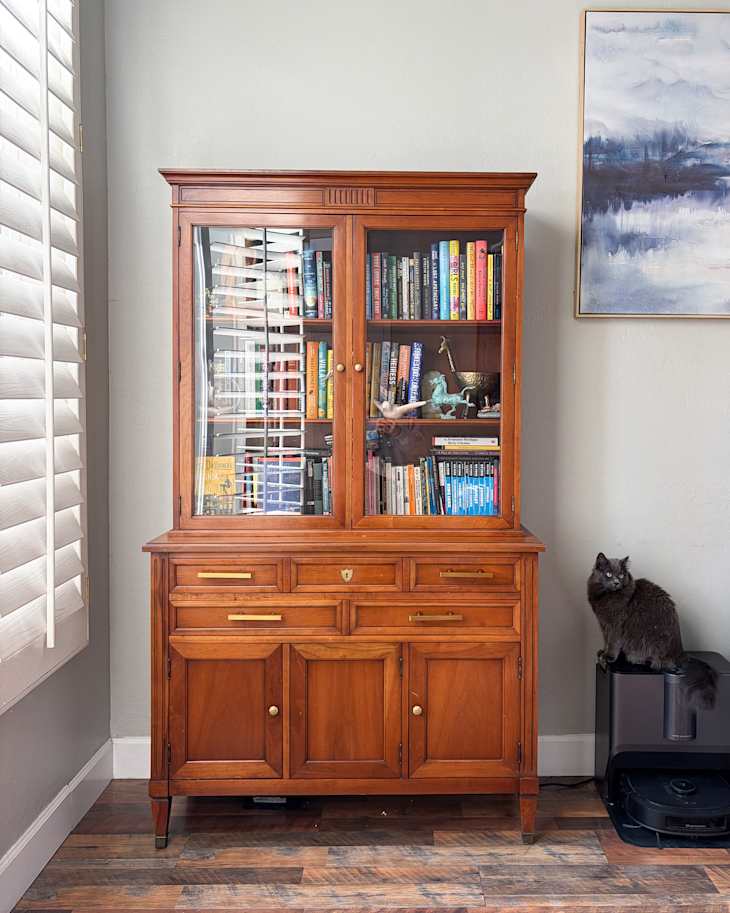
10. Transitional Wooden Hutch with Brass Hardware and Curated Books
This look is a beautiful blend of traditional form and modern styling. The formula is roughly: 50% classic furniture structure + 30% modern hardware + 20% eclectic, personal decor. The hutch itself is timeless, but swapping out old, dated knobs for these clean, brass bar pulls instantly updates it. The key is the styling inside: instead of just fine china, it’s a mix of books, vases, and personal objects, turning it from a storage unit into a display of personality. You can see a similar approach in Idea #17, but with a painted finish.
|
📋 Copy HEX 🔗 Share |
💸 Get This Look For Less
The single most important element here is the curated approach to an old piece. The owner didn’t just fill it with stuff; they treated it like a bookshelf and a display case. By mixing books (arranged both vertically and horizontally) with decorative objects, the hutch feels alive and integrated into the living space, not just a formal piece for the dining room. It’s a simple shift in mindset: a hutch doesn’t have to hold just dishes. It can hold your stories, too. Remove the personal, curated objects, and it’s just a nice, but standard, piece of furniture.
11. Grand Statement Hutch with Geometric Mullions and Curved Drawers
This is a hutch that demands a large room and high ceilings. A piece with this much visual weight and intricate detail is best suited for a formal dining room or great room of at least 200 square feet with ceilings of 9 feet or higher. The dark wood and complex mullion pattern need space to be appreciated. In a smaller, lower-ceilinged room, it would dominate the space, making everything else feel cramped and diminished. It’s designed to be an anchor, so give it the room it needs to do its job properly.
|
📋 Copy HEX 🔗 Share |
⭐ The One Thing
A piece with this many details—glass panels, geometric mullions, curved drawers—is a magnet for dust. To keep it looking its best, plan on a weekly dusting with a microfiber cloth. The glass will need cleaning at least monthly, more if you have kids or pets. The most challenging part is cleaning inside the mullion corners. A soft-bristled brush or a Q-tip is your best friend here. For the wood itself, a quality furniture polish applied every few months will keep the finish rich and protected from drying out.
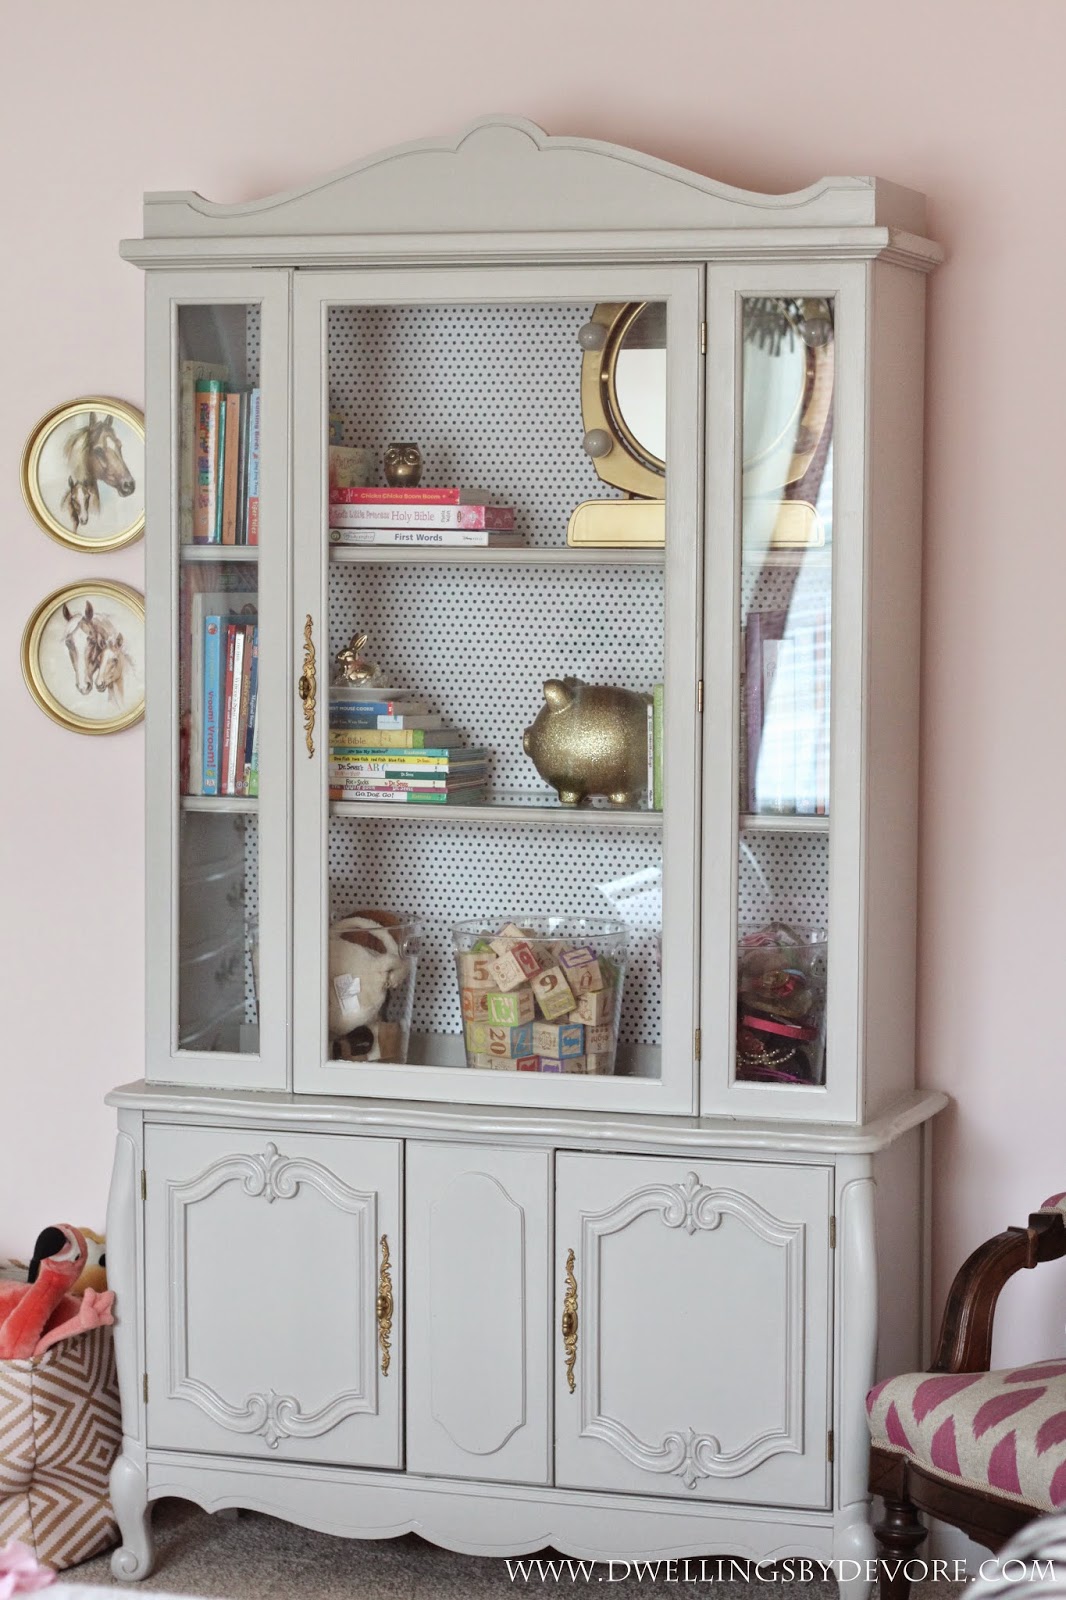
12. Whimsical Grey Hutch with a Dotted Backing and Gold Hardware
The dotted backing is a showstopper, and it’s an easy DIY to replicate. Here’s how to add a patterned back to any hutch:
- Time estimate: 2-3 hours. Cost: Under $50.
- Start by removing the shelves and cleaning the back panel of the hutch thoroughly. If your hutch has a removable back, take it off for easier working.
- Choose your weapon: You can use peel-and-stick wallpaper for an easy, commitment-free option. Or, for a painted look, use a round foam pouncer and acrylic craft paint to create a polka dot pattern.
- If using a pouncer, practice your spacing on a piece of cardboard first. Start in one corner and work your way across, reloading the foam with a small amount of paint for each dot.
- Let it dry completely before reinstalling the shelves. For extra durability on a painted pattern, you can add a coat of clear matte polycrylic sealer.
|
📋 Copy HEX 🔗 Share |
✅ Before You Start
This little hutch is a masterclass in contrasts. The sophisticated, traditional shape of the furniture, with its carved panels and ornate gold hardware, is playfully subverted by the whimsical dotted pattern inside. It’s this tension between formal and fun that makes it so charming. The soft pink wall color enhances the playful vibe, while the light grey paint on the hutch itself acts as a calming neutral, keeping the whole look from becoming too childish. It feels perfect for a nursery or a creative, joyful space.
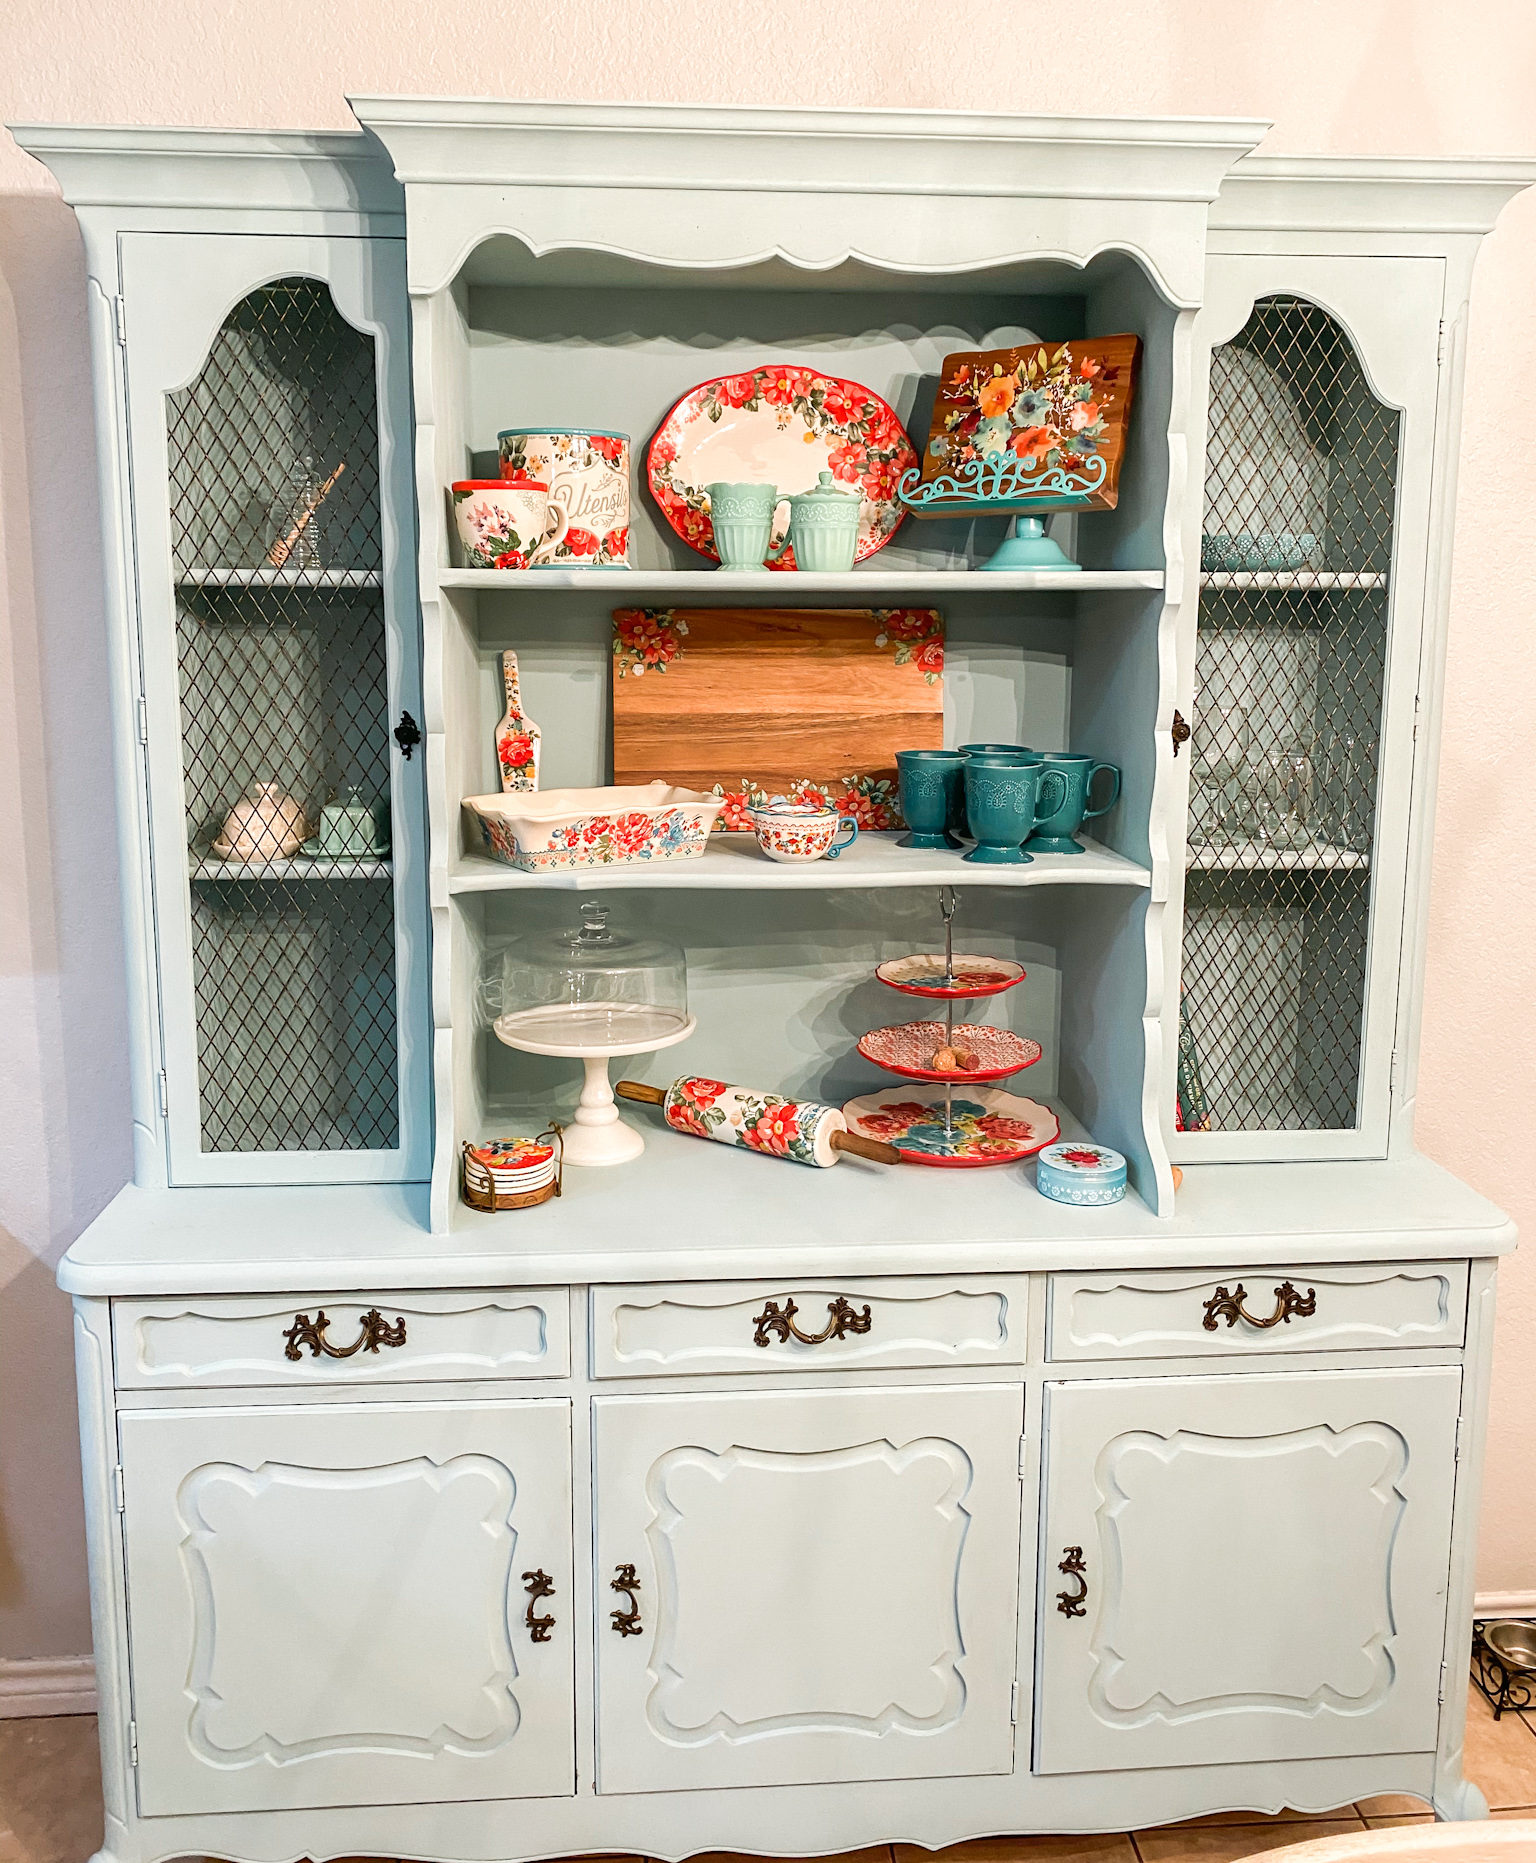
13. Light Blue Hutch with a Lively Floral Cookware Display
The formula for this cheerful, maximalist look is all about confident color layering. It’s about 60% calming base color (the light blue paint) + 40% vibrant, multi-colored pattern (the floral dishware). The success lies in the fact that the dishware itself has a consistent theme—florals—and a repeating color palette of red, orange, and turquoise. This keeps the look cohesive rather than chaotic. The chicken wire doors are a clever rustic touch that keeps the focus on the colorful display inside.

|
📋 Copy HEX 🔗 Share |
📐 Style Math
Displaying your entire dish collection like this is beautiful, but it’s not for everyone. This level of open storage requires a serious commitment to tidiness. Dust will be a constant companion, so you’ll need to either use these dishes regularly (and thus wash them) or budget time for dusting the entire collection every week or two. It also means you have to be confident in your collection’s aesthetic—there’s no hiding that one chipped mug or the mismatched bowl you got for free.
14. Shabby Chic Pastel Hutch with Pioneer Woman Decor
The single element that makes this hutch work so well is the unwavering commitment to a specific aesthetic. This isn’t just a random assortment of dishes; it’s a curated collection from The Pioneer Woman, known for its vibrant, nostalgic, and coordinating patterns. By sticking to one cohesive brand and style, the owner has created a display that looks intentional and artfully composed, even with a riot of color and pattern. It’s a lesson in the power of a strong theme. This is a slightly more decorated version of the same theme seen in Idea #12.
|
📋 Copy HEX 🔗 Share |
💡 Designer Tip
This look taps directly into the “Country-Chic” and “Dopamine Decor” trends we’re seeing everywhere. People are tired of sterile, all-white kitchens and are craving color, personality, and a touch of comforting nostalgia. A shabby chic hutch filled with colorful, accessible kitchenware like this is the perfect embodiment of that shift. It feels personal, joyful, and lived-in. It’s not about impressing guests with expensive china; it’s about creating a home that makes you happy every time you walk into the room.
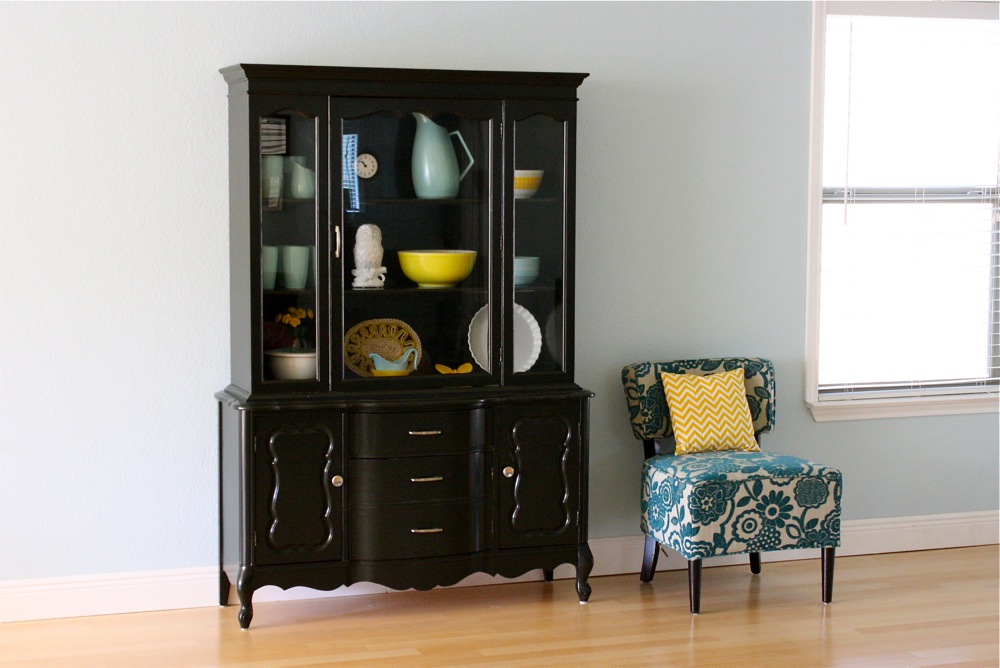
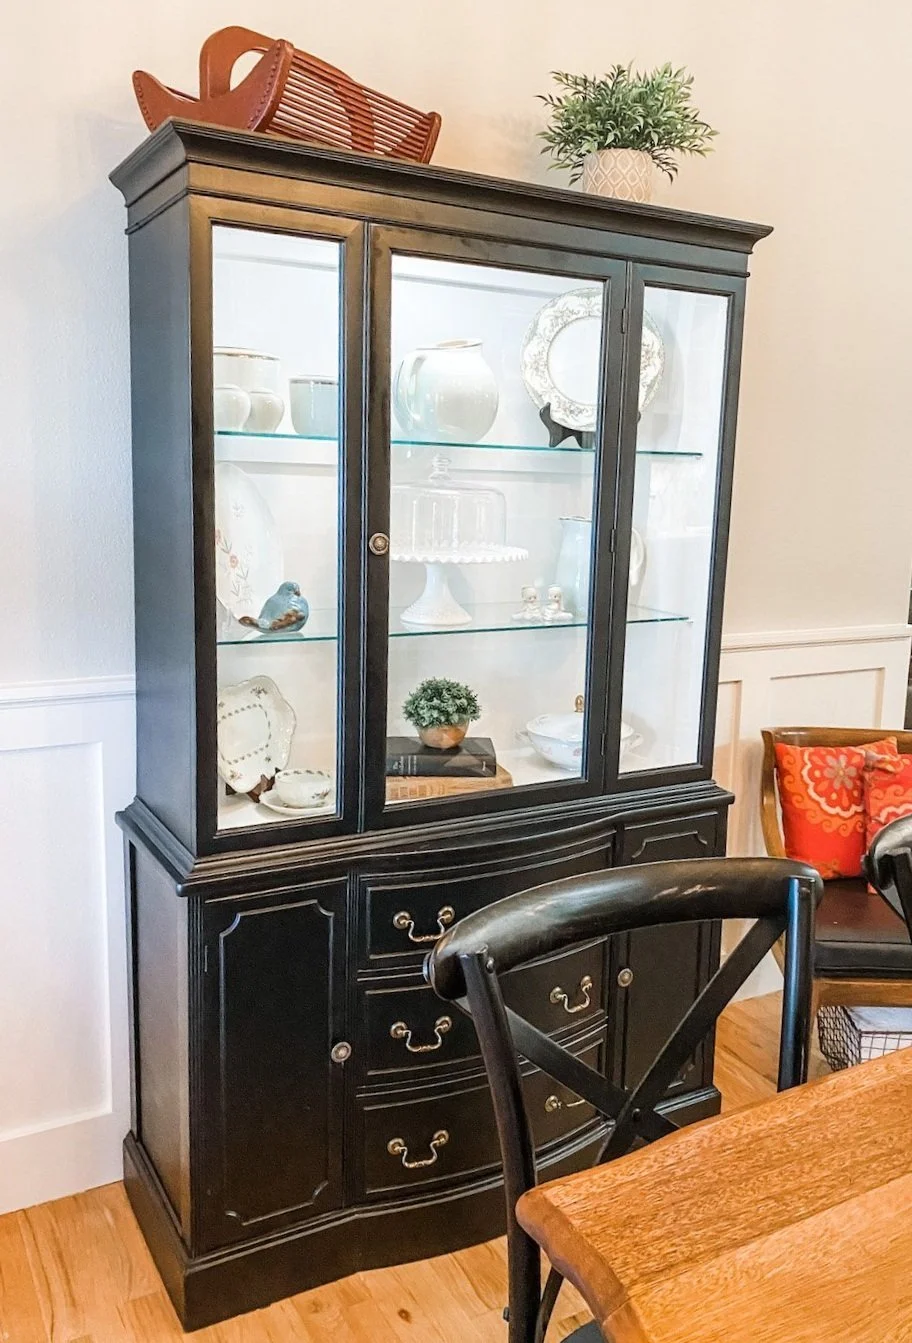
15. High-Contrast Black Hutch with a Playful Teal Armchair
This room is a fantastic example of the 60-30-10 color rule in action. The pale blue walls make up about 60% of the color scheme, creating a calm backdrop. The black hutch and teal floral chair provide the 30% secondary color interest. Finally, that little yellow chevron pillow serves as the perfect 10% accent, a surprising pop of warmth and energy that brings the whole look to life. The black hutch acts as a powerful anchor, grounding the lighter, more playful colors and giving the room a sophisticated edge.
|
📋 Copy HEX 🔗 Share |
🎯 What Makes It Work
Painting a large piece of furniture black can be intimidating. To prevent it from looking like a “black hole” in your room, choose a black paint with a subtle satin or semi-gloss finish. A little bit of sheen helps the piece reflect light, defining its shape and details. Another pro tip is to paint the interior a lighter color, like a soft white or cream. This will make the items you display inside pop and prevent the cabinet from feeling like a dark, uniform mass. The glass doors here are also key to breaking up the solid black.
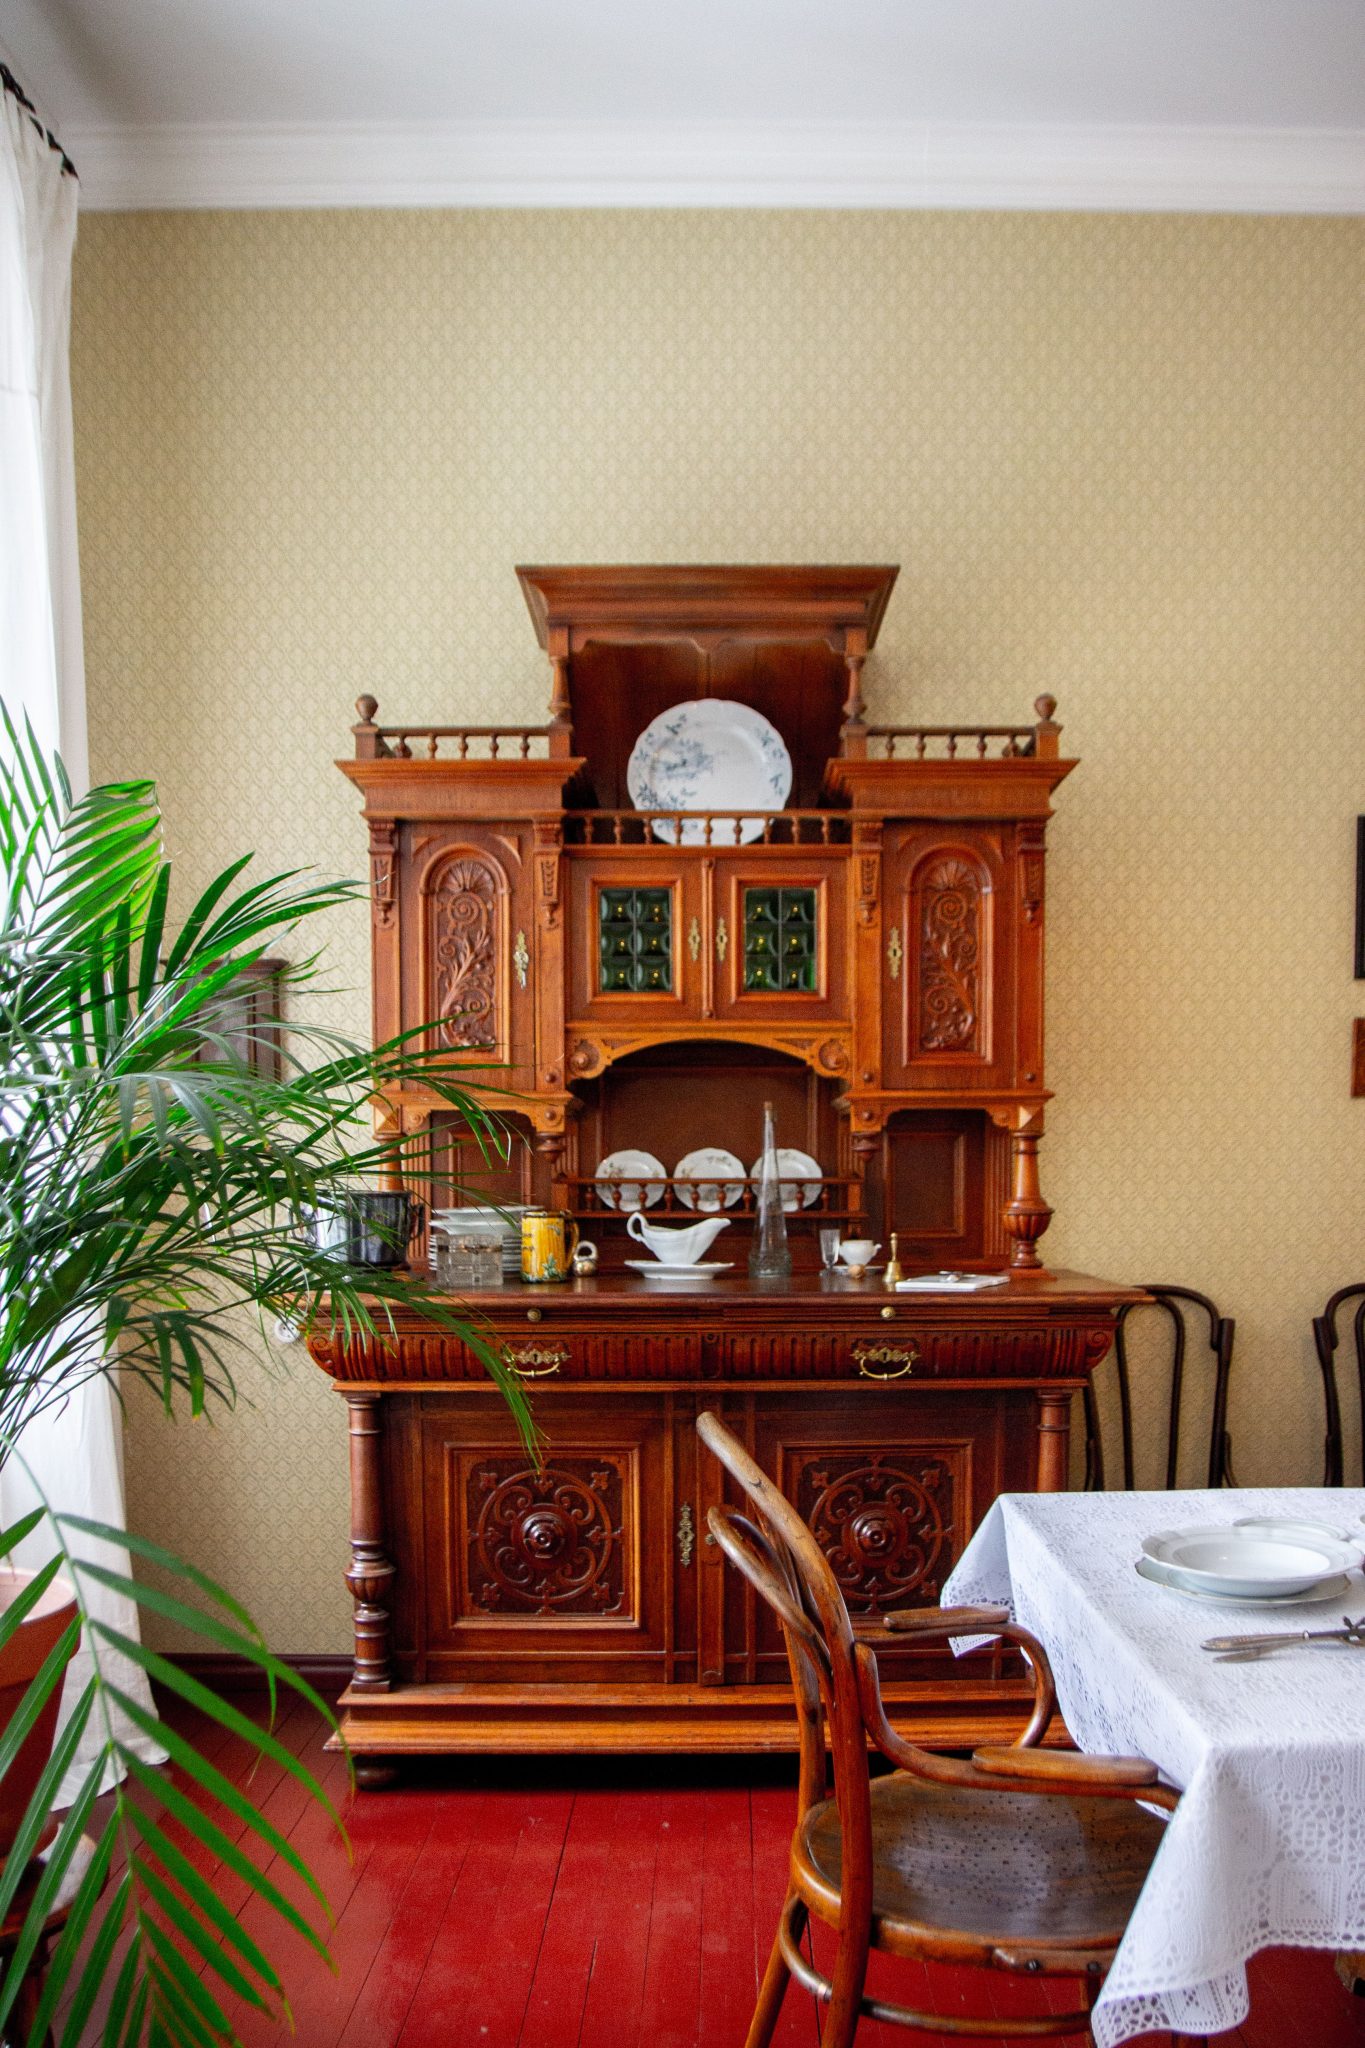
16. Heavily Carved Traditional Wooden Hutch in a Classic Dining Room
An ornate, heirloom-quality hutch like this is built for a grand, traditional dining room. The sheer scale and visual weight of the carvings require a generous footprint to feel balanced. This piece would be perfectly at home in a room that’s at least 14 by 16 feet (224 sq ft) with 9-foot or higher ceilings. The dark red wood floors and patterned wallpaper also suggest a larger space that can handle multiple layers of texture and color without feeling crowded. In a smaller room, this piece would feel less like a feature and more like a fortress.
|
📋 Copy HEX 🔗 Share |
⚠️ Real Talk
The beauty of a heavily carved piece is also its biggest maintenance challenge. Dust loves to settle in all those intricate nooks and crannies. A regular weekly dusting with a soft-bristled brush (like a clean makeup brush) is essential to get into the details. For a deeper clean, a can of compressed air can work wonders to dislodge stubborn dust. Be careful with polishes and waxes; they can build up in the carvings over time, obscuring the detail and creating a gummy residue. Less is more.
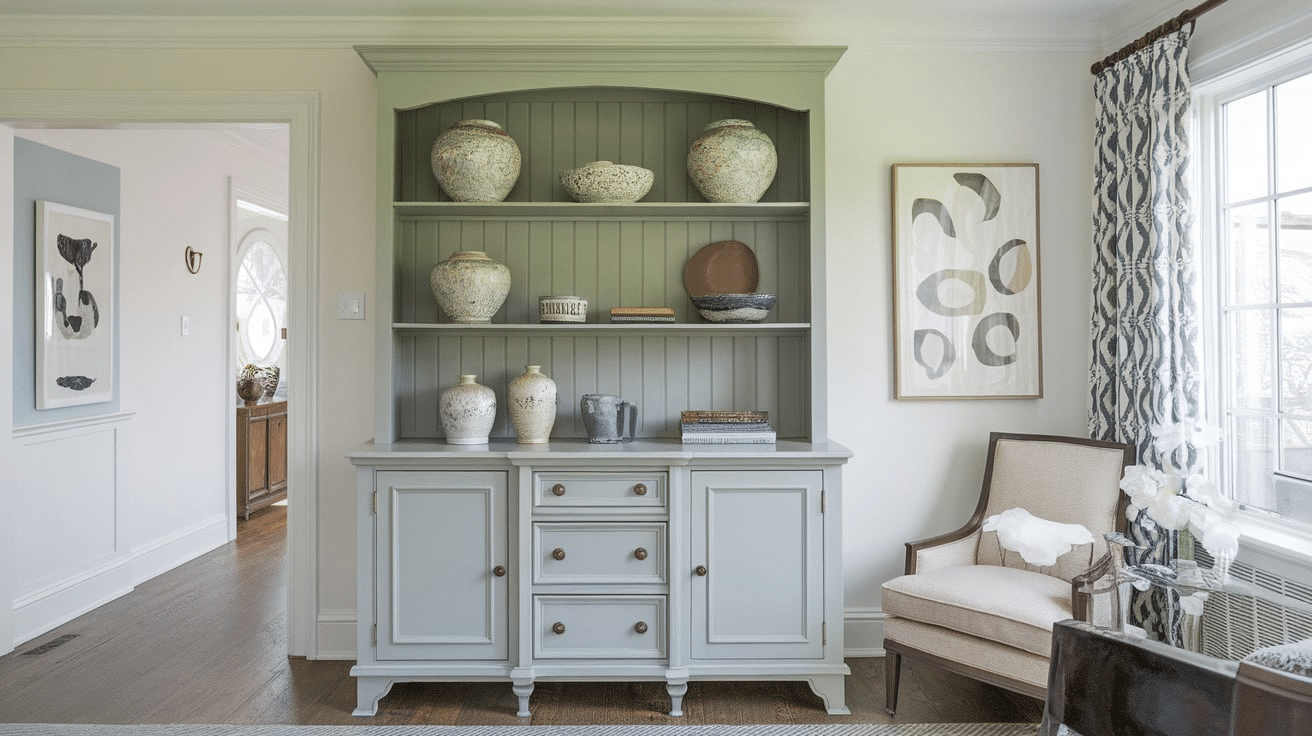
17. Two-Toned Sage Green and Gray Hutch with Collected Ceramics
The success of this makeover lies in its subtle, earthy color palette. The sage green top and light gray base are both muted, low-saturation colors that feel calming and sophisticated. They complement each other without competing. The beadboard backing adds a layer of texture, while the warm brass knobs provide a necessary touch of warmth. This is a great example of how you can create a high-impact look without using bright, loud colors. It’s all about the sophisticated interplay of tones and textures.
|
📋 Copy HEX 🔗 Share |
📏 Scale Guide
that truly makes this hutch shine is the curated collection of ceramics. Notice how they are all in a tight color palette of white, cream, and beige, but vary widely in texture and shape. Some are smooth, some are ribbed, some are matte, some are glossy. This thoughtful collection strategy turns the hutch into a personal gallery. Without the decor, it’s a nicely painted hutch. With the decor, it’s a style statement. You can see a similar curatorial approach, but with books, in Idea #9.
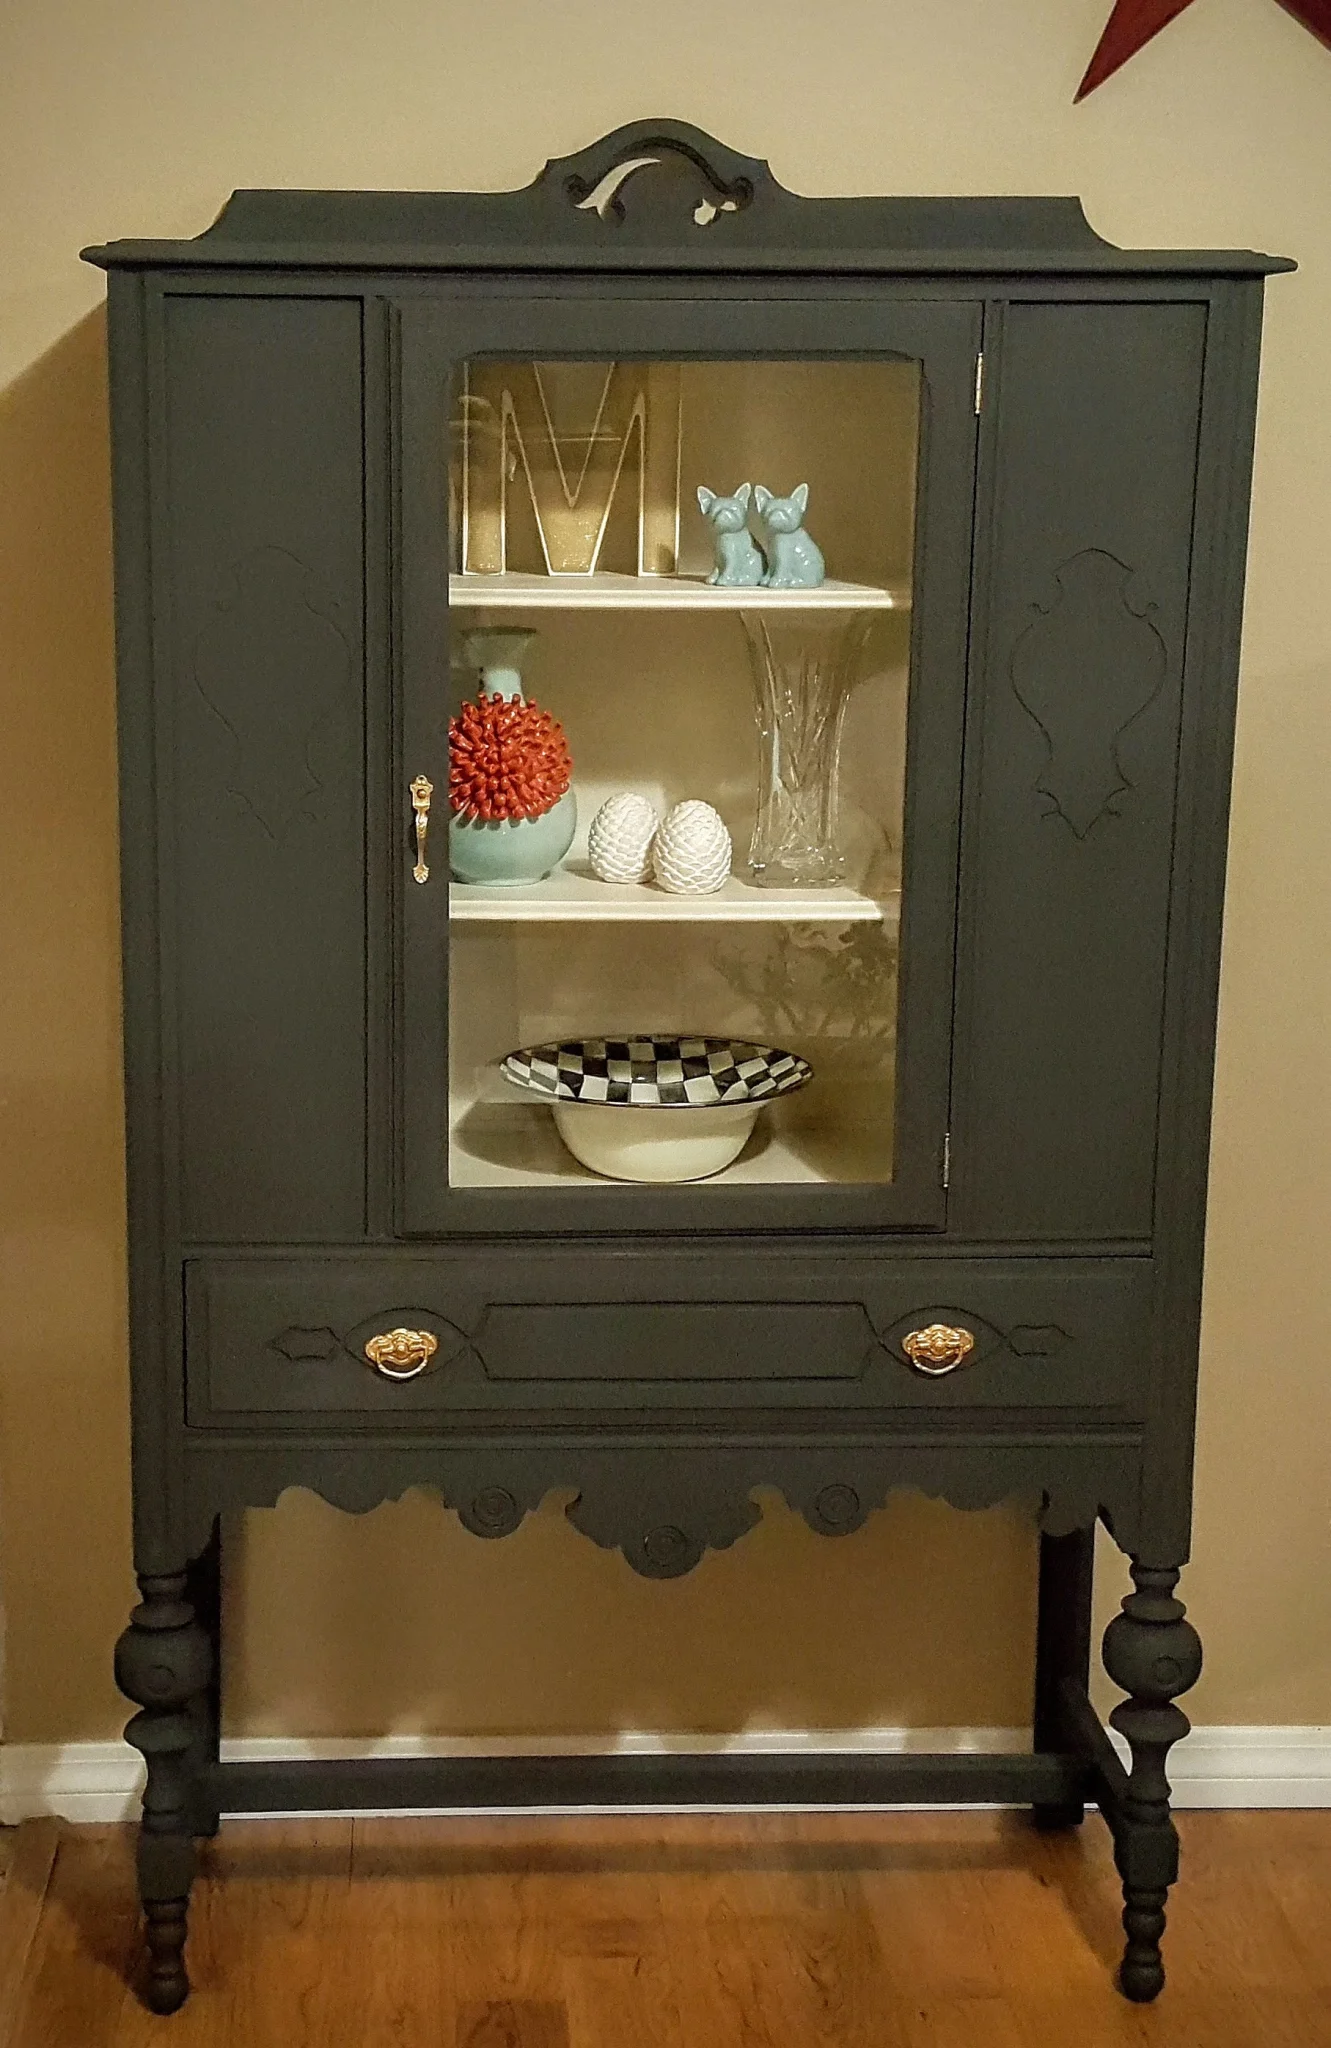
18. Charcoal Gray Antique Hutch with a Bright Interior
The key to making dark paint work on an antique is the high-contrast interior. Here’s a quick guide to achieving that bright, display-ready look:
- Time: 3-4 hours + drying. Cost: ~$60.
- After cleaning and lightly sanding the interior, apply one even coat of a stain-blocking primer. This is non-negotiable, especially on old wood, to prevent tannins from bleeding through and yellowing your light paint.
- Choose an interior color. A creamy off-white or a very light beige often looks richer than a stark, pure white.
- Apply two thin coats of your chosen color in a satin or eggshell finish, allowing ample drying time between coats.
- Once fully cured (wait at least 48 hours), you can re-install your shelves and start styling. The contrast will make everything inside pop.
|
📋 Copy HEX 🔗 Share |
🧹 Maintenance Reality
You don’t need a genuine antique to get this dramatic, revitalized look. Find a dated 80s or 90s hutch with interesting lines—look for carved details or turned legs—for under $100 at a thrift store. The beauty of dark paint, especially chalk paint, is that it’s very forgiving of surface imperfections. A good charcoal or nearly-black paint will instantly hide a multitude of sins. Spend $20 on some new gold or brass hardware from a home improvement store, paint the inside cream, and you can recreate this entire vibe for under $200.
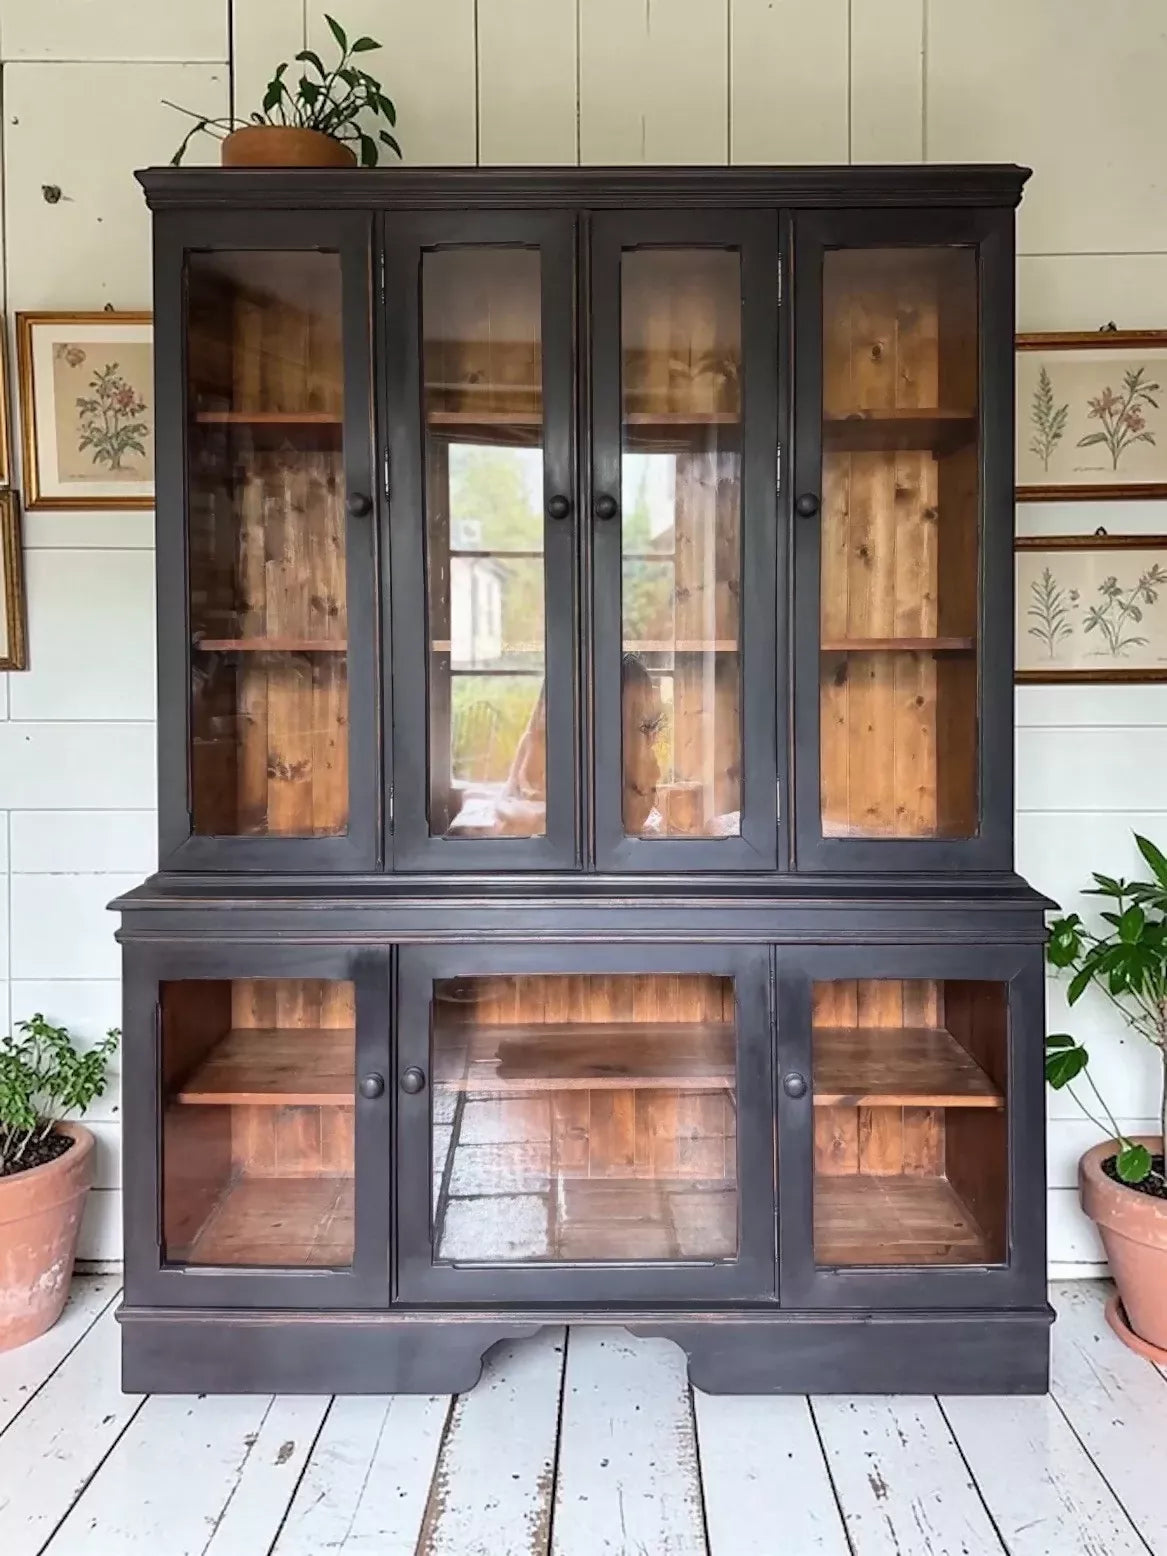
19. Dark Blue Distressed Hutch Against White Shiplap
This is a perfect marriage of rustic texture and bold color. The dark, moody blue of the hutch feels sophisticated and modern, while the distressed finish that lets the original pine peek through adds warmth and character. Setting this against a crisp, white shiplap wall creates a stunning contrast that makes the hutch the undeniable star of the show. The raw pine interior is a clever touch, visually connecting to the distressed wood on the exterior and preventing the inside from becoming too dark.
|
📋 Copy HEX 🔗 Share |
💰 Budget Breakdown
Achieving a “perfectly imperfect” distressed finish is harder than it looks. It’s easy to go too far and end up with a piece that looks damaged rather than gracefully aged. The key is subtlety and thinking about where wear would naturally occur over time—around knobs, along edges, and on raised details. A common mistake is to sand every edge uniformly, which looks artificial. Instead, focus on a few key areas. To get a similar look to this, try painting the piece first, then using a damp cloth to wipe away some of the wet paint from the edges before it dries.
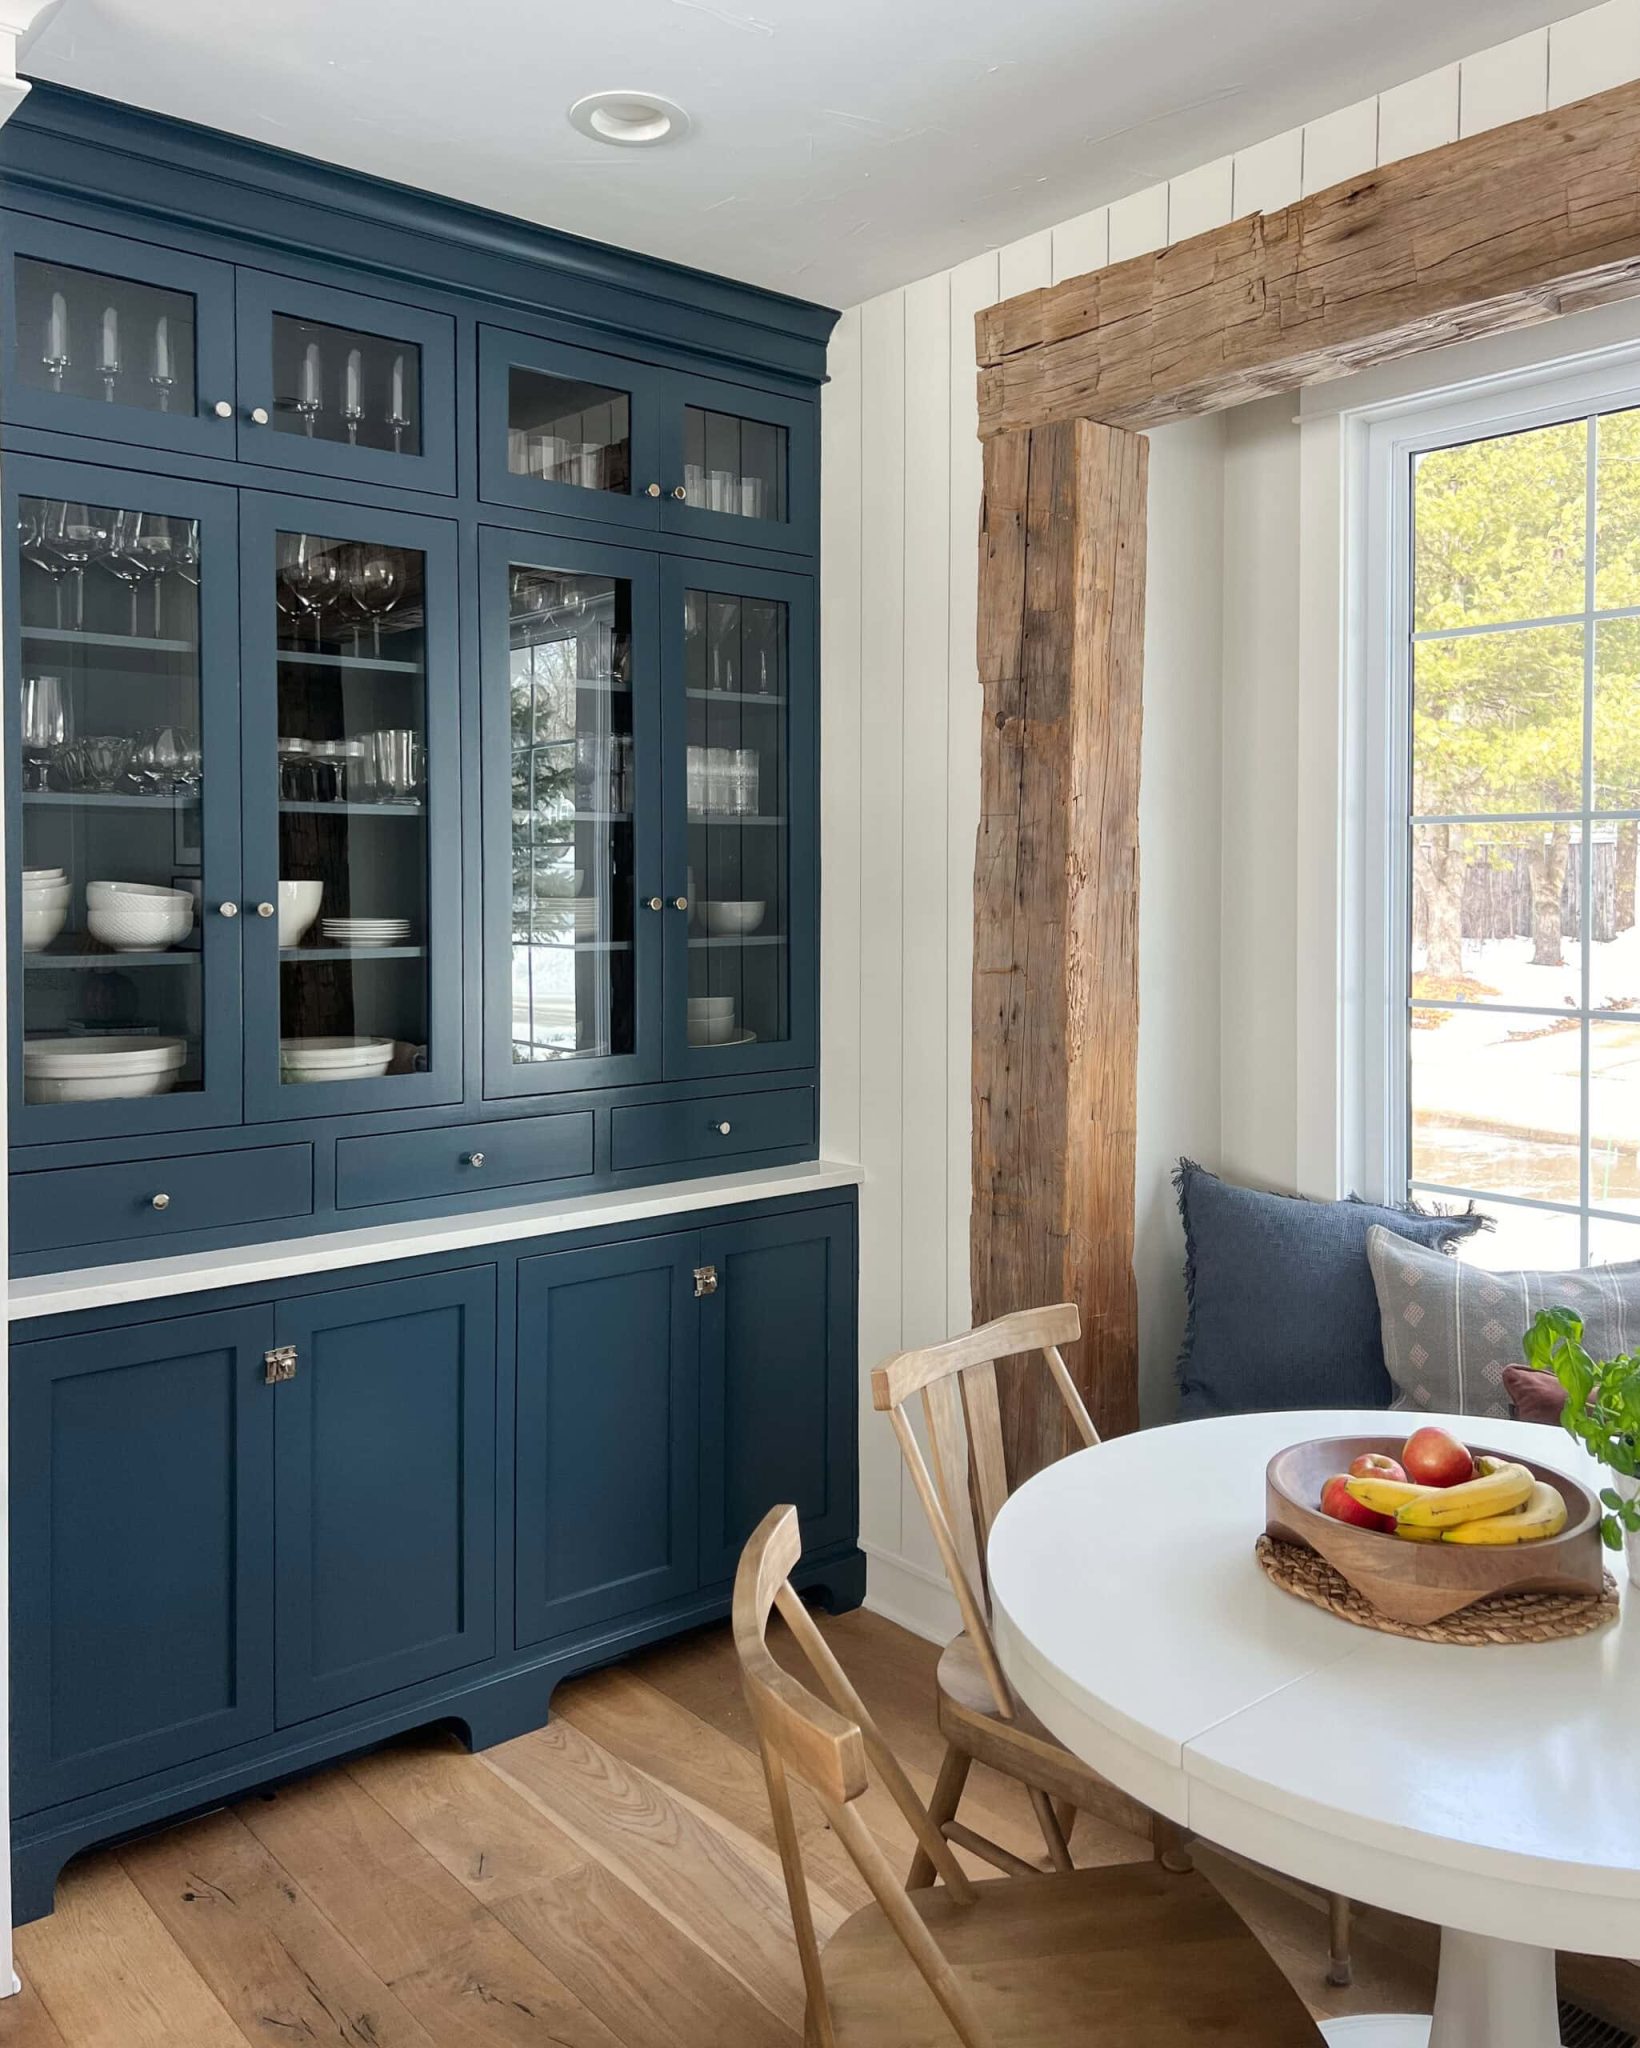
20. Navy Farmhouse Hutch with a Built-in Window Seat
This beautiful dining nook follows a classic farmhouse formula: 40% crisp white shiplap + 30% warm, rustic wood tones + 30% bold, classic color. The white walls and ceiling make the space feel bright and airy, while the rough-hewn beams and natural wood chairs provide essential texture and warmth. The navy blue hutch acts as the perfect, weighty anchor. It’s a deep, saturated color that feels both timeless and completely current. The glass-front upper doors keep it from feeling too heavy and tie back to the windows.
|
📋 Copy HEX 🔗 Share |
🔧 How-To Brief
When you have a complete “moment” like this with a hutch, window seat, and dining set, lighting is crucial. Notice the use of recessed can lights in the ceiling. This provides excellent ambient light for the whole area. If you’re creating a nook like this, consider adding a pendant light over the table for task lighting and a sense of intimacy. For the hutch itself, you could even install interior puck lights on a dimmer to highlight your display in the evenings. Layering your light sources gives you flexibility and makes the space more functional.
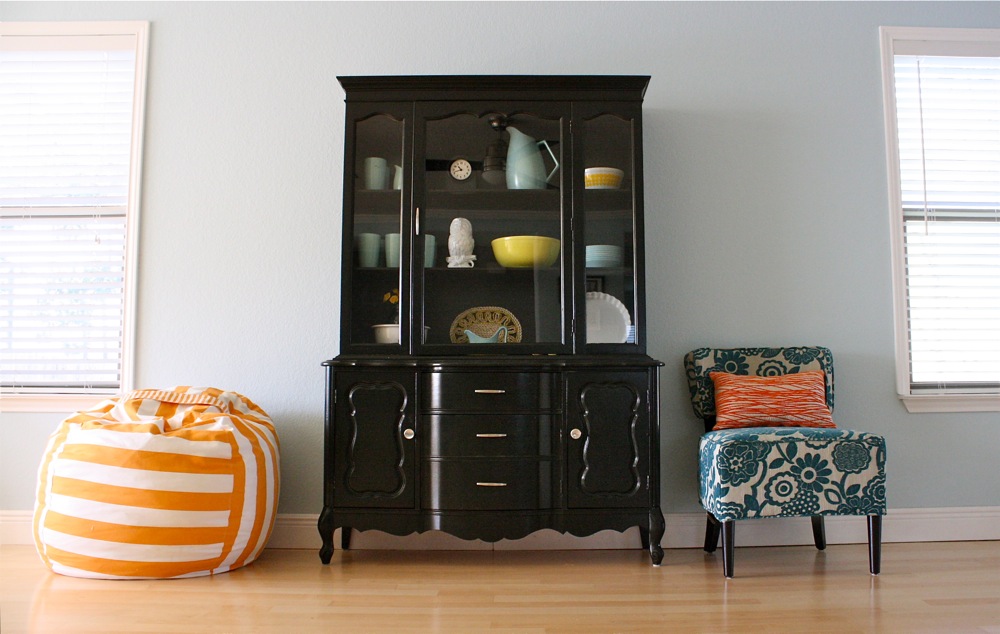
21. Glossy Black Hutch with Colorful, Eclectic Accent Furniture
The glossy black finish on the hutch is the game-changer here. A matte or satin black would have been nice, but the high gloss gives it an almost lacquered, glamorous feel. It reflects light and color from the surrounding room, making it feel dynamic and alive. This bold choice elevates the hutch from a simple storage piece to a major style statement. It’s the perfect, sophisticated anchor for the fun, vibrant colors of the beanbag and accent chair. Without that sheen, the room’s energy would be noticeably different.
|
📋 Copy HEX 🔗 Share |
🔥 Trending Context
This space is all about fearless color coordination. The glossy black hutch acts as the neutral, grounding element in the room. This allows the other pieces—the teal floral chair and the orange-and-white striped beanbag—to really sing. The common thread is the light blue wall color, which is a cousin to the teal in the chair, and the pop of orange in the throw pillow, which ties directly to the beanbag. It feels eclectic and personal, not random, because these color connections are deliberate and confident.
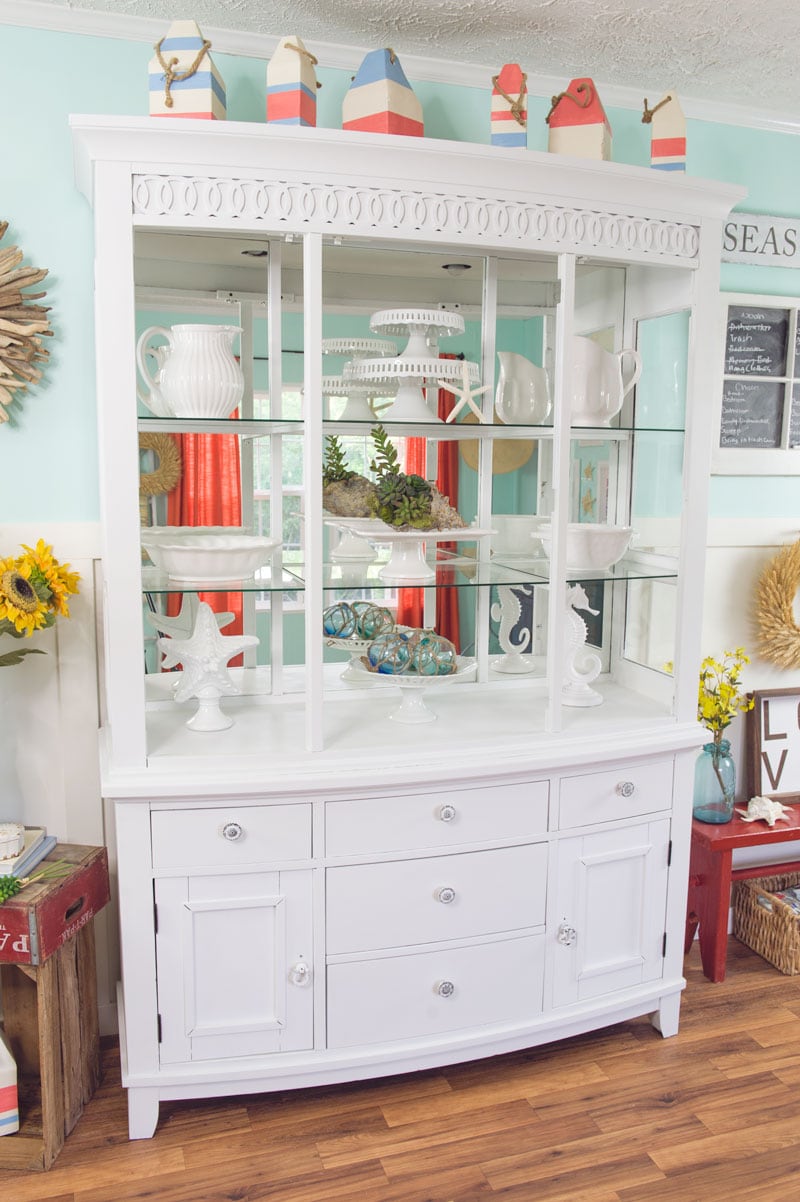
22. Coastal White Hutch with a Mirrored Back and Nautical Decor
The secret weapon in this bright, airy display is the mirrored back. It’s an old designer trick that works every time. A mirror inside a hutch or bookshelf does two things brilliantly: first, it bounces light back into the room, making the whole space feel brighter and larger. Second, it reflects the items on the shelves, creating a sense of depth and fullness without adding clutter. It also allows you to see the back of your display items, adding another layer of interest. It’s especially effective when displaying glassware or white ceramics.
|
📋 Copy HEX 🔗 Share |
💸 Get This Look For Less
You can get this breezy, coastal vibe on a serious budget. Find any old, dated hutch for under $100. A couple of coats of crisp white paint will instantly transform it. For the mirrored back, you don’t need custom-cut glass. You can buy mirrored acrylic sheets or even high-quality, peel-and-stick mirror film online for a fraction of the cost. Style it with affordable white pitchers from IKEA or Target and a few nautical-themed items from a craft store. The buoys on top could even be a fun DIY project using scrap wood and paint.
23. Warm Wood Hutch Transformed into a Functional Coffee Station
Adding a brass rail for mugs is a simple update that adds tons of style and function. Here’s the quick and easy how-to:
- Time: Under 1 hour. Cost: $30 – $70.
- Measure the width of the open space in your hutch. Purchase a brass rail kit (often sold as kitchen rails or cafe curtain rods) that is slightly shorter than this width.
- Use a pencil to mark where your brackets will go. Use a level to ensure your marks are perfectly straight—this is crucial!
- Drill small pilot holes on your marks. This prevents the wood from splitting when you screw in the brackets.
- Screw the brackets into place, slide the rail on, and add your S-hooks. You’re ready to hang your favorite mugs!
|
📋 Copy HEX 🔗 Share |
⭐ The One Thing
This hutch makeover works because it leans into its original warmth while adding modern functionality. Instead of painting over the beautiful warm wood, the owner enhanced it. The beadboard backing adds a touch of farmhouse texture, and the brass rail brings in a hint of modern-day glamour that complements the wood’s golden undertones. By creating a dedicated, open zone for the coffee appliances, the hutch becomes a true workhorse, not just a display piece. It’s a perfect blend of form and function.
24. Modern Black Hutch with Illuminated Glass Display Shelves
When you paint a hutch black, installing internal lighting is a non-negotiable pro move. Without it, the inside becomes a dark cavern where your beautiful decor goes to die. The simplest solution is to use battery-powered, stick-on LED “puck” lights. Place one on the “ceiling” of each shelf section. For a more integrated look, you can drill small holes in the back or base of the cabinet to run wires for a plug-in or hardwired LED strip lighting system. Always choose lights with a warm temperature (around 2700K-3000K) for an inviting glow, not a sterile blue light.
|
📋 Copy HEX 🔗 Share |
✅ Before You Start
Glass shelves look incredibly chic, but they are unforgiving. They show every speck of dust and every fingerprint. To keep them looking crystal clear, plan on wiping them down weekly with a good glass cleaner and a microfiber cloth. The black finish, especially if it’s glossy or satin, will also be prone to showing dust. A weekly pass with a Swiffer or microfiber duster will be necessary. While this look is undeniably elegant, it is not a low-maintenance choice. It’s best for a dining room or formal living area rather than a high-traffic family room.
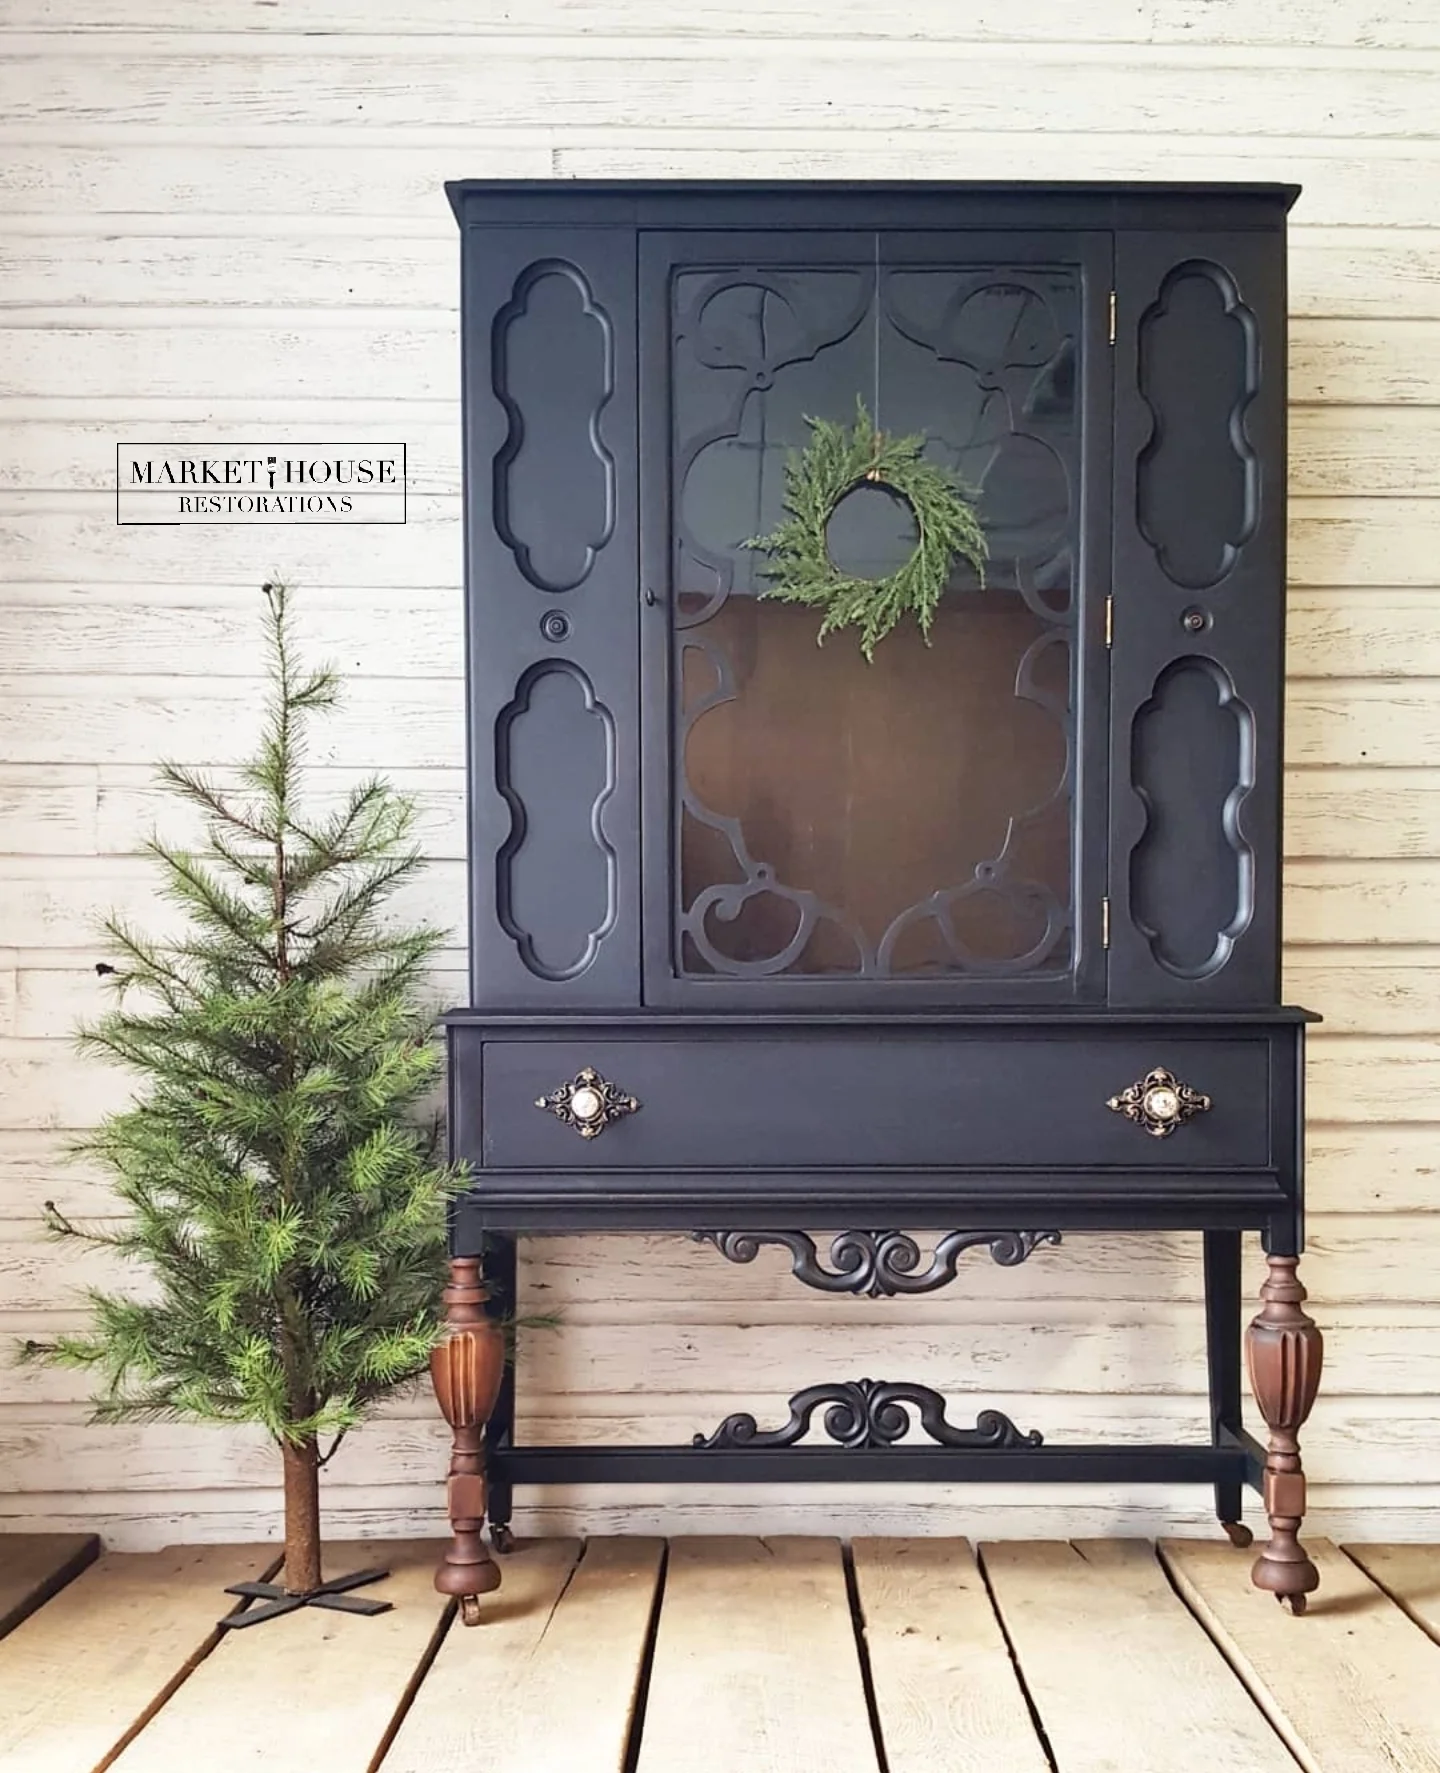
25. Ornate Midnight Blue Hutch with a Holiday Wreath
The ornate bronze and white drawer pull is the unexpected star of this piece. On a hutch this dark and detailed, a simple, modern pull would have been lost. This hardware, however, has presence. Its intricate design echoes the carving on the side panels, and the pop of white in the center of the pull provides a crucial point of light against the deep midnight blue. It feels like a piece of jewelry, thoughtfully chosen to complement the entire outfit. It demonstrates how the right hardware can complete and elevate a makeover.
|
📋 Copy HEX 🔗 Share |
📐 Style Math
This piece is a masterclass in texture and detail. The distressed midnight blue paint provides the primary color, but it’s far from flat. The ornate carved side panels add deep, shadowy texture. The intricate black grille over the glass adds another layer of delicate pattern. The bronze hardware introduces a metallic element. And finally, the simple green wreath brings in a touch of nature. All these elements work together against the clean backdrop of the shiplap wall and light wood floor to create a look that is rich, sophisticated, and deeply personal.
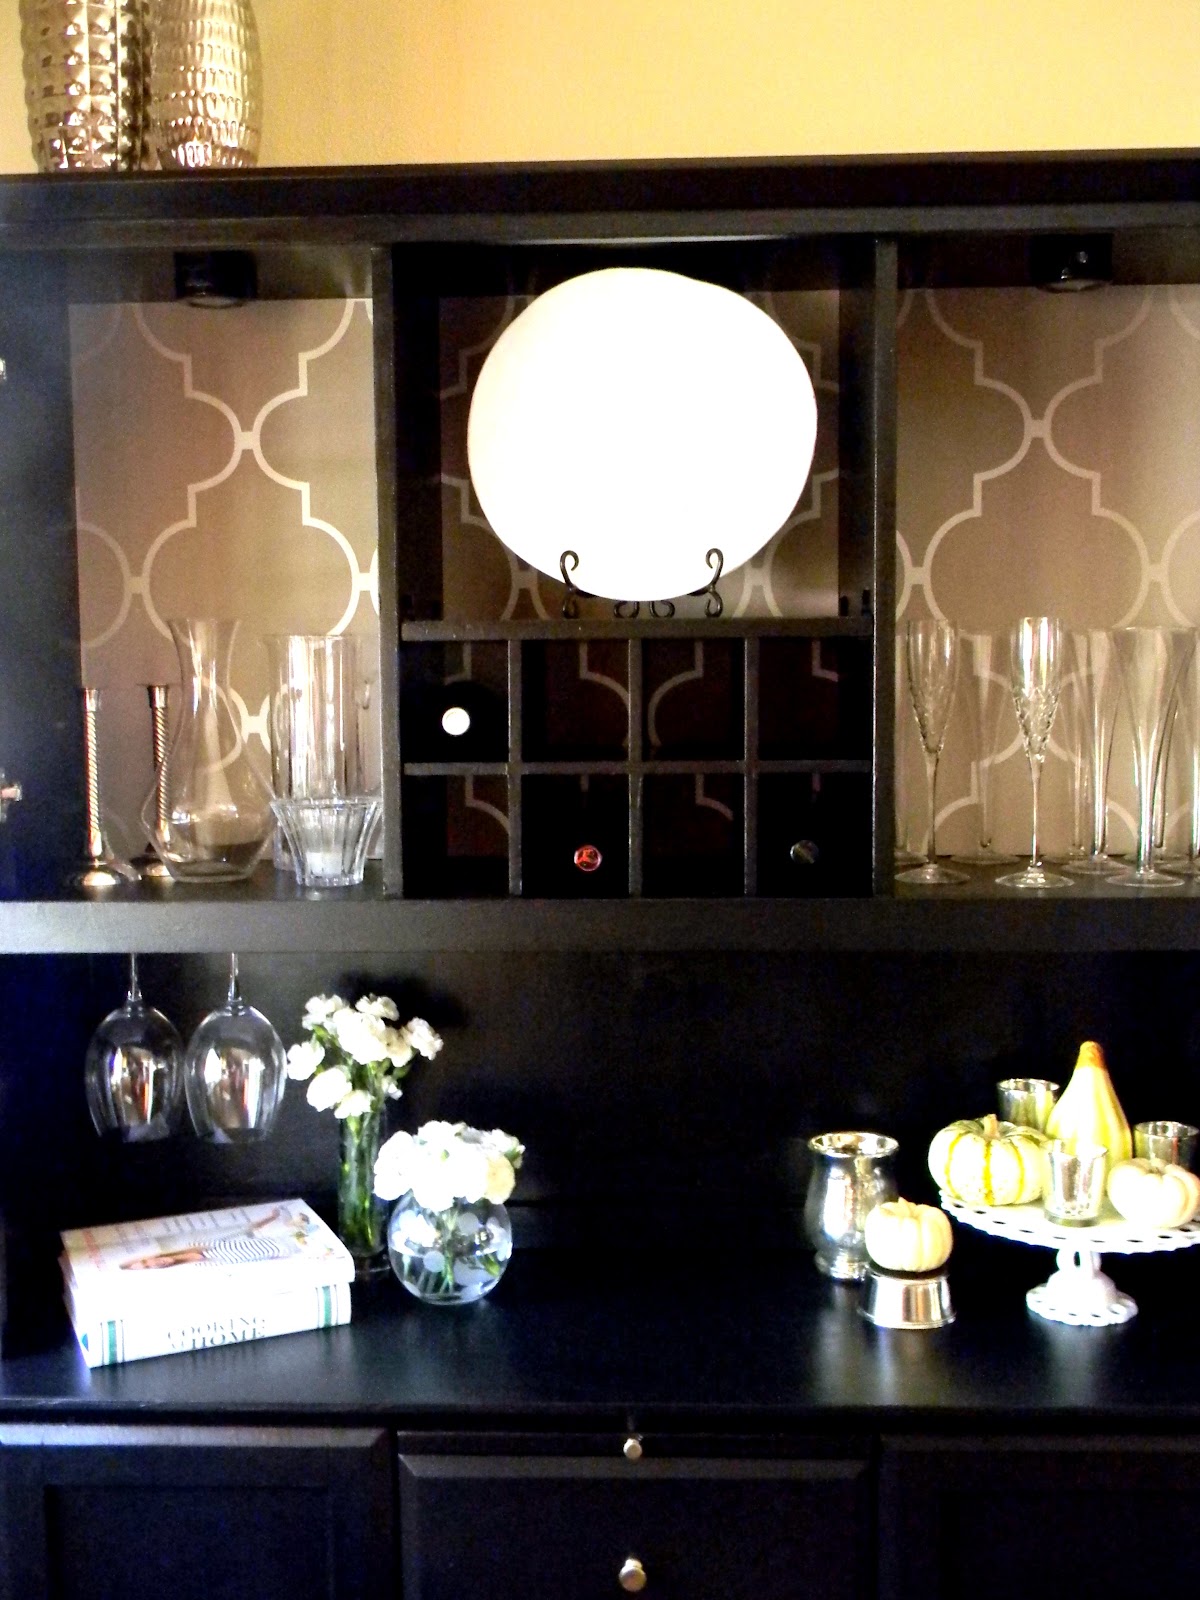
26. Dark Hutch with Geometric Wallpaper Backing and Barware
Applying wallpaper to the back of a hutch is a fantastic way to add custom style. Here’s how you can achieve a similar look:
- Time: 2-3 hours. Cost: $40 – $100.
- First, find a peel-and-stick wallpaper with a pattern you love. For a dark hutch, a lighter pattern with some open space, like this quatrefoil design, works best.
- Carefully measure the height and width of the back panel of each shelf section. It’s often easiest to remove the back panel of the hutch entirely if possible. If not, you’ll be working inside the cabinet.
- Cut the wallpaper to size using a craft knife and a straight edge. It’s better to cut it slightly larger and trim the excess later.
- Peel off a few inches of the backing and align the wallpaper at the top. Slowly peel the backing away while smoothing the wallpaper down with a flat tool (a credit card works) to remove air bubbles.
|
📋 Copy HEX 🔗 Share |
💡 Designer Tip
You don’t need an expensive hutch to create this elegant bar setup. Find a basic, outdated wooden hutch at a thrift store for under $150. A coat of black or dark charcoal paint will instantly modernize it. The real secret is the backing. You can find stylish peel-and-stick wallpaper for as little as $30 a roll. Style it with inexpensive glassware from Target, HomeGoods, or even thrift stores—a collection of mismatched but cohesive clear glass can look very chic. The decorative gourds and flowers are low-cost accents that make it feel complete.
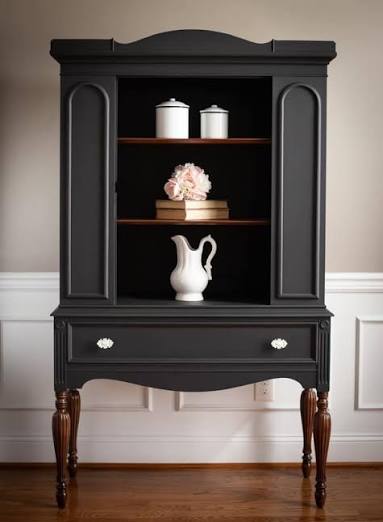
27. Dark Gray Hutch with Light Wood Shelves and Turned Legs
This hutch makeover is successful because it combines three distinct styles into one cohesive piece. The dark gray paint and arched molding are pure classic elegance. The light, natural wood shelves introduce a warm, slightly rustic, or “Scandi” element. And the clean, all-white decor brings in a touch of modern minimalism. The tension and balance between these three styles are what make the piece feel so current and interesting. It doesn’t fit neatly into one box, and that’s why it’s so appealing.
|
📋 Copy HEX 🔗 Share |
🎯 What Makes It Work
If you want to replace the interior shelves of a hutch with a different material, like this light wood, accuracy is key. Here’s a pro tip: don’t just measure the shelf. Create a template. Get a large piece of cardboard and carefully trace one of the old shelves onto it. Cut out the cardboard template and test-fit it inside the hutch. You may need to trim it slightly to account for an older hutch not being perfectly square. Once your template fits perfectly, you can take that to the lumber store to have your new wood shelves cut with confidence.
28. High-Contrast Black Paint with a White Interior
Painting the interior of a dark hutch is the secret to a professional-looking finish. Here’s how to get that crisp, gallery-like interior:
- Time Estimate: 4-6 hours (plus drying). Material Cost: $50-$80.
- Remove shelves and tape off the interior edges where the frame meets the back.
- Lightly sand the back panel and wipe it clean. Apply one coat of a shellac-based primer—this is essential for blocking old wood stains and ensuring a true white finish.
- Apply two thin coats of a high-quality white cabinet or furniture paint. A satin or semi-gloss finish will be more durable and easier to clean.
- Let the paint cure for at least 48 hours before you put the shelves back in. Patience is key!

|
📋 Copy HEX 🔗 Share |
⚠️ Real Talk
Painting a hutch black adds instant drama and sophistication, but it runs the risk of creating a “black hole” where your decor disappears. Painting the interior a bright white completely solves this problem. The white backing acts as a built-in spotlight, making every dish, vase, and object placed inside stand out with clarity. This high-contrast combination is a timeless design choice that works across almost any style, from modern farmhouse to transitional to glam. It looks intentional, polished, and incredibly chic.
Your Hutch’s Next Chapter Starts Here
That heirloom from grandma or that thrift store find doesn’t have to be a design dilemma. As you’ve seen, with a little paint and a clear vision, you can turn any hutch into the centerpiece of your room. We hope these 28 ideas have sparked some serious inspiration for your next weekend project. Now go create something you love, and don’t forget to pin your favorites!