You know that feeling when you finally find the fall bathroom decor that looks exactly right for your space? It’s a little bit magic. But with so many ideas floating around, it’s easy to get overwhelmed. After filtering through hundreds of options across Target, IKEA, and Walmart, we narrowed it down to the looks that actually deliver. Inside, you’ll find 32 curated ideas covering everything from modern minimalist designs to cozy rustic vibes. In 2026, the trend is all about turning utilitarian spaces like bathrooms into personal sanctuaries, and these fall-inspired designs perfectly capture that shift towards warmth and nature. And stay until the end — we break down the most common mistakes that can ruin these looks.
📌 Save this to Pinterest for later — you’ll want to revisit these ideas.
1. Embrace Coziness with Natural Accents and Warm Textiles
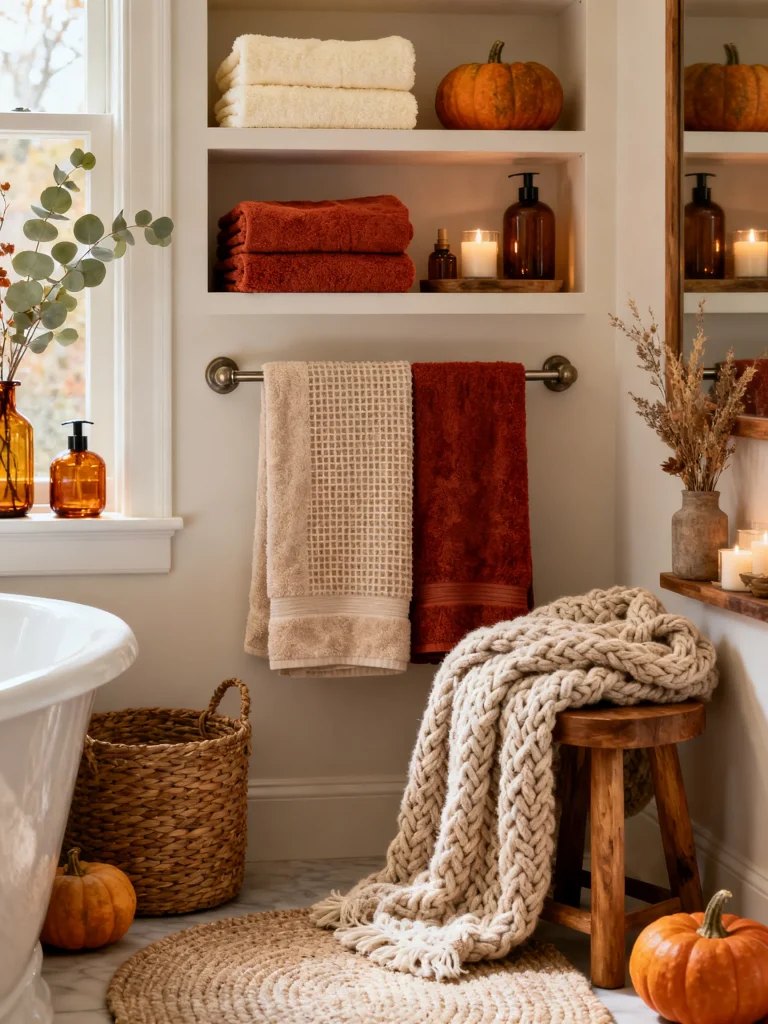
This look is a masterclass in texture. The magic comes from layering different materials that feel warm and inviting to the touch. You have the soft, plushness of the chunky knit throw, the slightly coarse feel of the round woven rug, and the smooth, hard surfaces of the amber glass and wooden stool. This textural variety is what makes the space feel rich and thoughtfully curated, rather than one-note. It’s a sensory experience that signals comfort and relaxation the moment you step inside.
|
📋 Copy HEX 🔗 Share |
💰 Budget Breakdown
You don’t need custom built-ins to get this cozy vibe. Grab a simple ladder shelf from IKEA or Target for under $60. Hunt for unique amber glass bottles at thrift stores or on Facebook Marketplace—you can often find them for just a few dollars each. A similar chunky knit throw can be found at stores like HomeGoods for around $30, and a round jute rug is a budget-friendly staple available at Walmart or Amazon for under $40. It’s all about capturing the color and texture, not the price tag.
2. Create a Rustic Vibe with a Two-Toned Wall and Autumnal Art
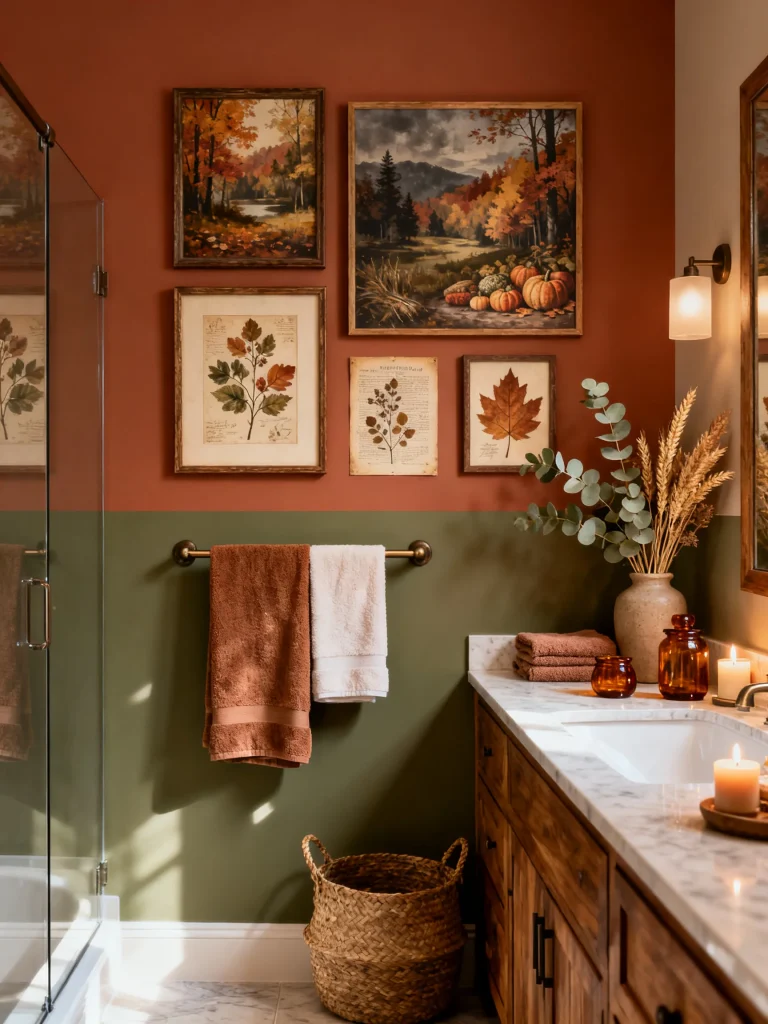
The formula here is beautifully balanced for a warm, rustic feel. Think of it as 50% bold wall color, 30% natural materials, and 20% metallic accents. The two-toned wall in burnt orange and olive green provides a rich, earthy base. The dark wood vanity and woven basket bring in necessary organic texture. Finally, the bronze sconce, towel bar, and other fixtures add that 20% of metallic warmth that ties it all together and prevents the look from feeling too flat or heavy.
|
📋 Copy HEX 🔗 Share |
⭐ The One Thing
When creating a gallery wall, the biggest mistake is hanging the art too high or too far apart. Start with your largest piece and hang it so its center is at eye level, which is roughly 57 inches from the floor. Arrange the other frames around it, maintaining a consistent spacing of 2 to 4 inches between each piece. This creates a cohesive, unified look instead of a random collection of pictures floating on the wall. Lay it all out on the floor first to perfect the arrangement before you grab a hammer.
3. Achieve Serenity with a Modern Wood Vanity and Freestanding Tub
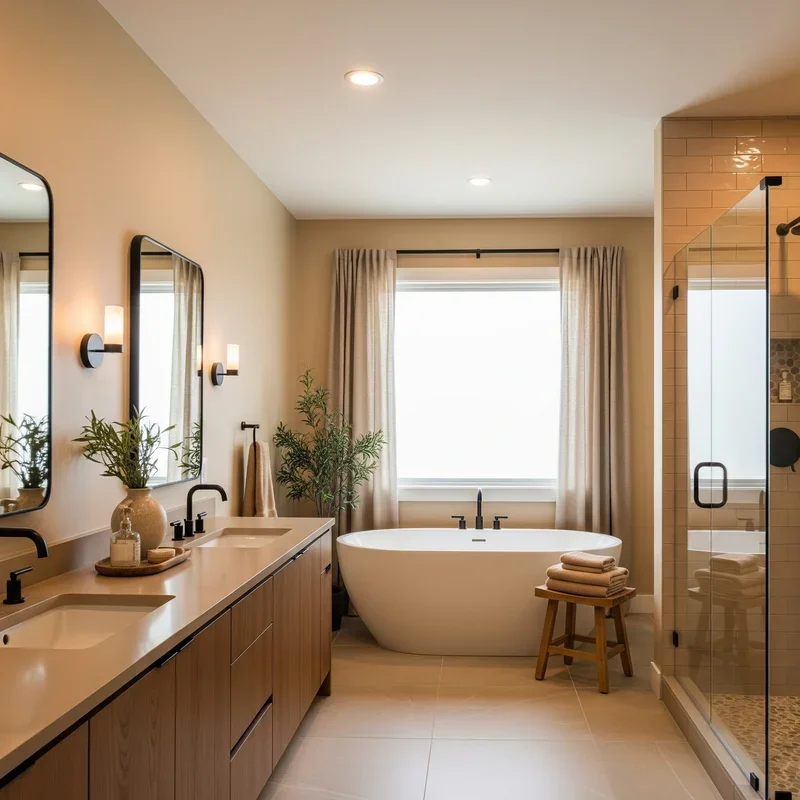
The single element that defines this entire bathroom is the freestanding bathtub. Without it, you’d have a perfectly nice, modern bathroom. But with it, you have a personal spa. It acts as a sculptural focal point, instantly signaling luxury and relaxation. Its placement in front of the large, light-draped window transforms the act of bathing into an experience. Everything else—the clean lines of the vanity, the simple black frames—is designed to support and elevate this central feature.
|
📋 Copy HEX 🔗 Share |
📐 Style Math
A spacious layout with a double vanity and a freestanding tub requires generous proportions. This idea is best suited for a primary bathroom with at least 100 square feet of floor space (e.g., 10’ x 10’). You’ll need a minimum ceiling height of 8 feet to avoid feeling cramped. For this setup to feel airy and not crowded, ensure at least 30-36 inches of clear walkway space around the tub and in front of the vanity. If your space is more compact, check out the smart single-vanity layout in Idea #5.
4. Frame the Season with a Soaking Tub Overlooking Fall Foliage
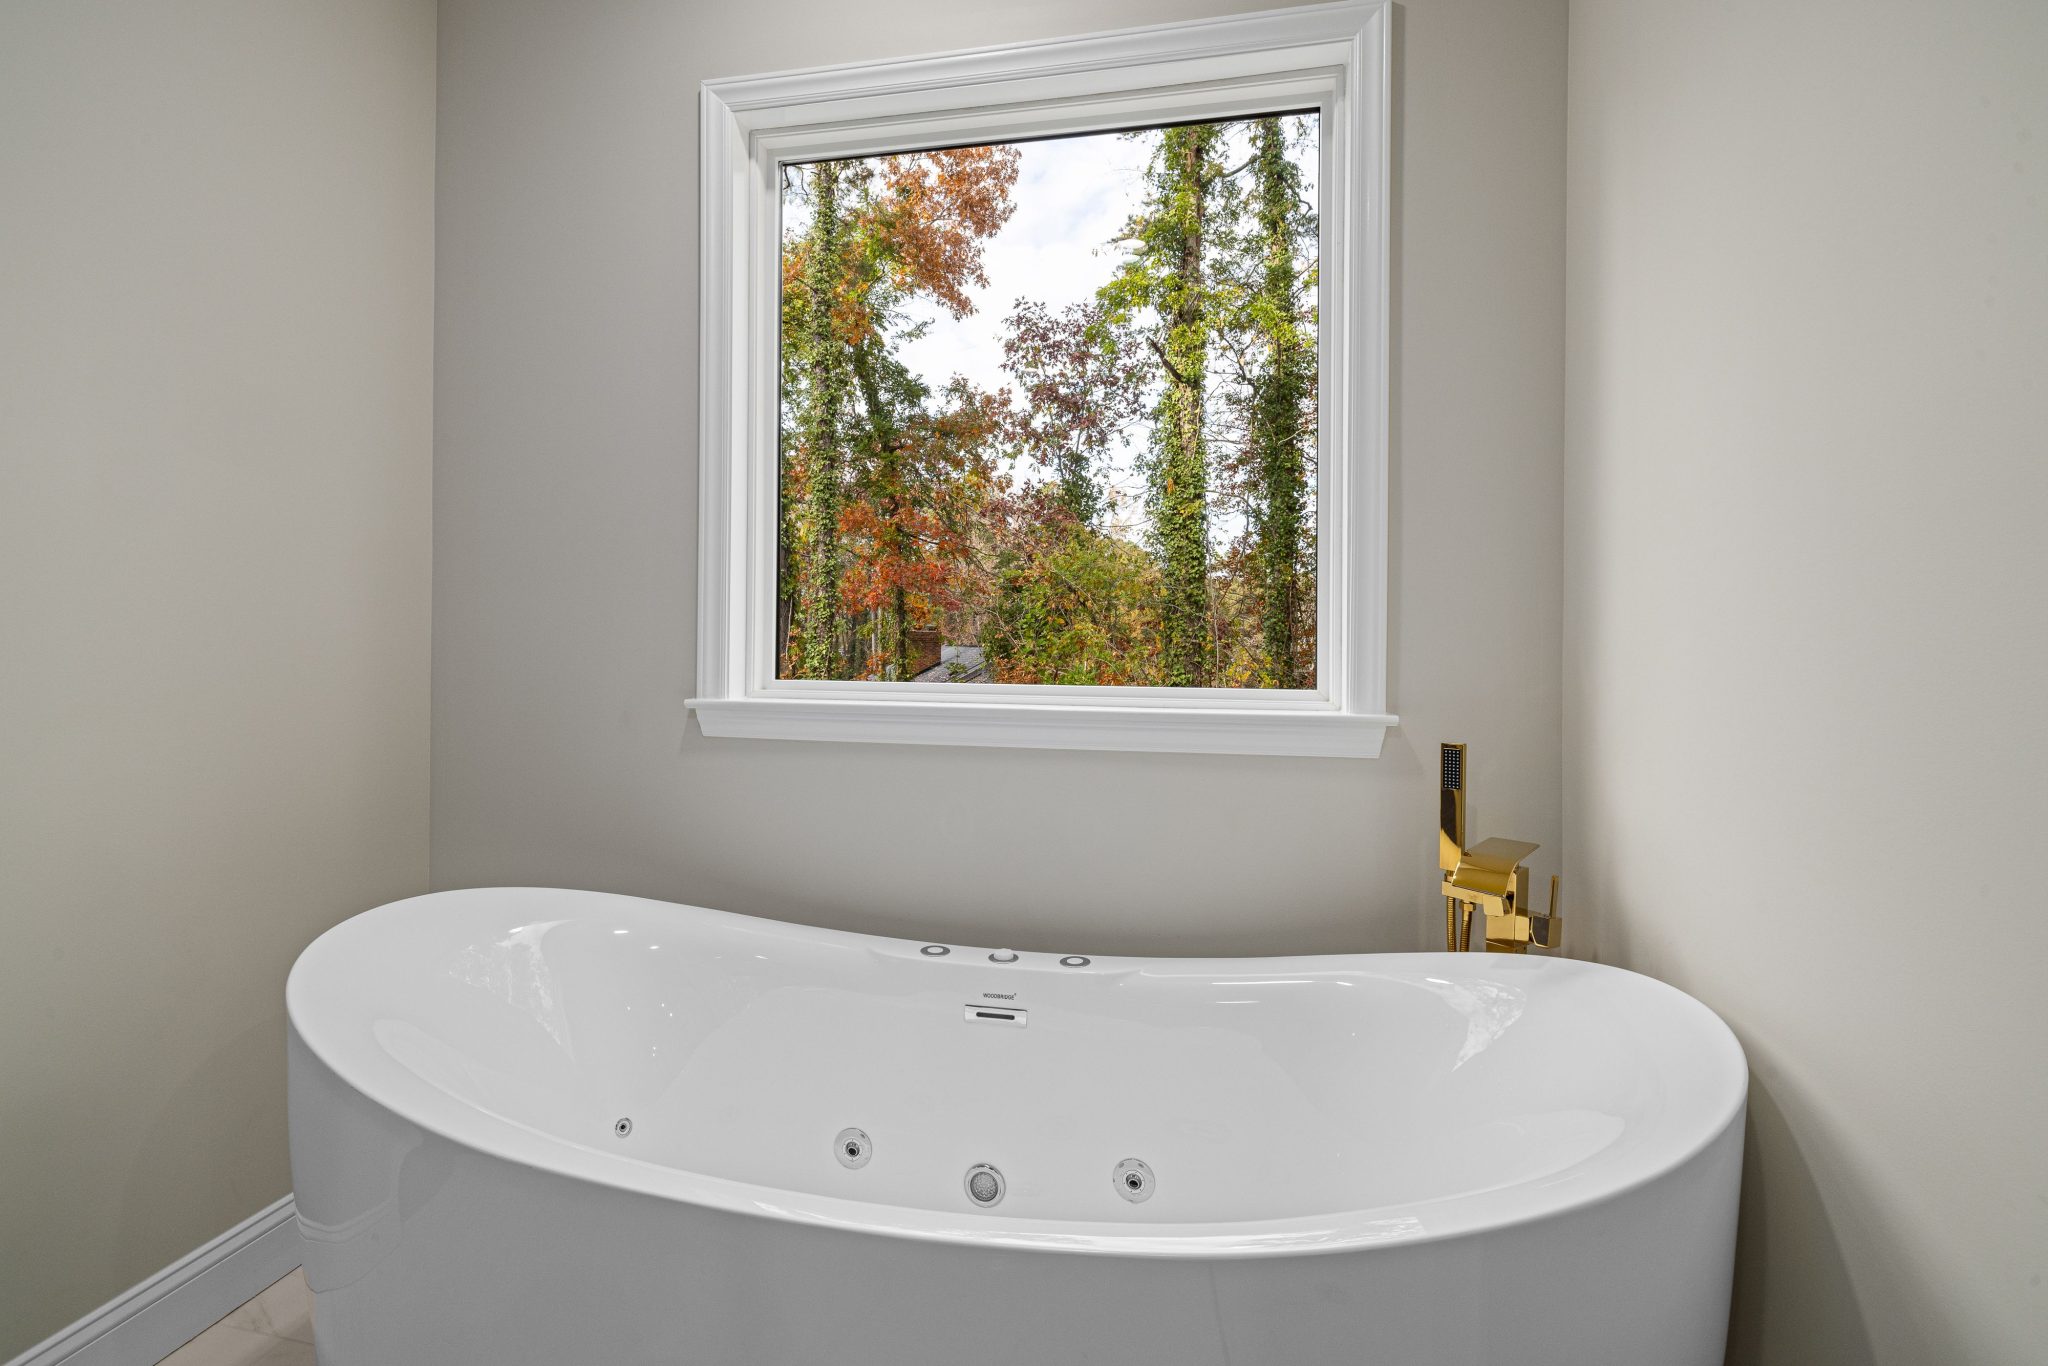
This design’s success hinges on one powerful principle: bringing the outdoors in. The large, unadorned window acts as a living piece of art, perfectly framing the vibrant fall foliage. The interior is intentionally minimalist and neutral—light gray walls, a simple white tub—so that nothing competes with the view. The gold-toned faucet adds a touch of warmth that echoes the colors of the leaves, subtly connecting the indoor space with the natural world outside. It’s a brilliant way to make the season itself the main decorative element.
|
📋 Copy HEX 🔗 Share |
✅ Before You Start
That stunning view is the whole point, but let’s talk privacy. This setup only works if the window overlooks a private, secluded area. If you have neighbors nearby, you’ll need to invest in smart privacy glass or high-quality, top-down/bottom-up blinds that can be adjusted as needed. Also, tubs with jets require regular maintenance. You’ll need to run a cleaning cycle with a specialized solution every month or so to flush out any grime buildup in the plumbing lines.
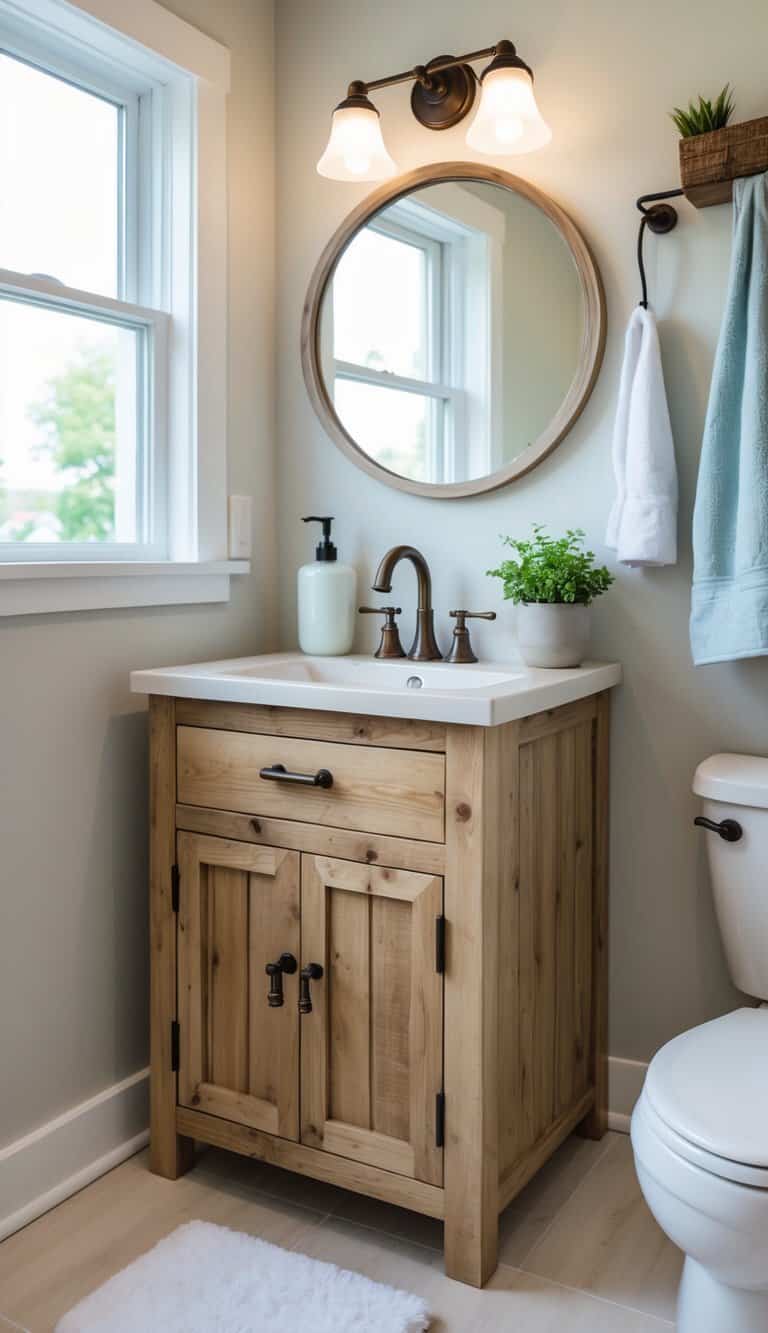
5. Mix Rustic Wood and Bronze Fixtures in a Light Palette
The single element holding this look together is the oil-rubbed bronze hardware. It’s the perfect counterpoint to the light-stained wood and light grey walls. If you were to swap it for chrome or nickel, the vanity would lose its rustic charm and feel much more generic. The bronze finish adds a sense of history and warmth, grounding the light and airy elements and giving the entire space its distinct, modern-yet-rustic character. It proves that faucet and hardware finishes are not afterthoughts—they are defining features.
|
📋 Copy HEX 🔗 Share |
🧹 Maintenance Reality
Mixing metals is a great way to add depth, but it can go wrong. The key is to choose one dominant metal and use others as small accents. Here, oil-rubbed bronze is the star, appearing on the faucet and cabinet pulls. You could add a small secondary metal, like the bronze base of the vanity light, but avoid adding a third. And don’t mix finishes randomly. Try to keep all your main fixtures (faucet, shower head) in the same finish for a cohesive look, and use your accent metal for lighting or mirror frames.
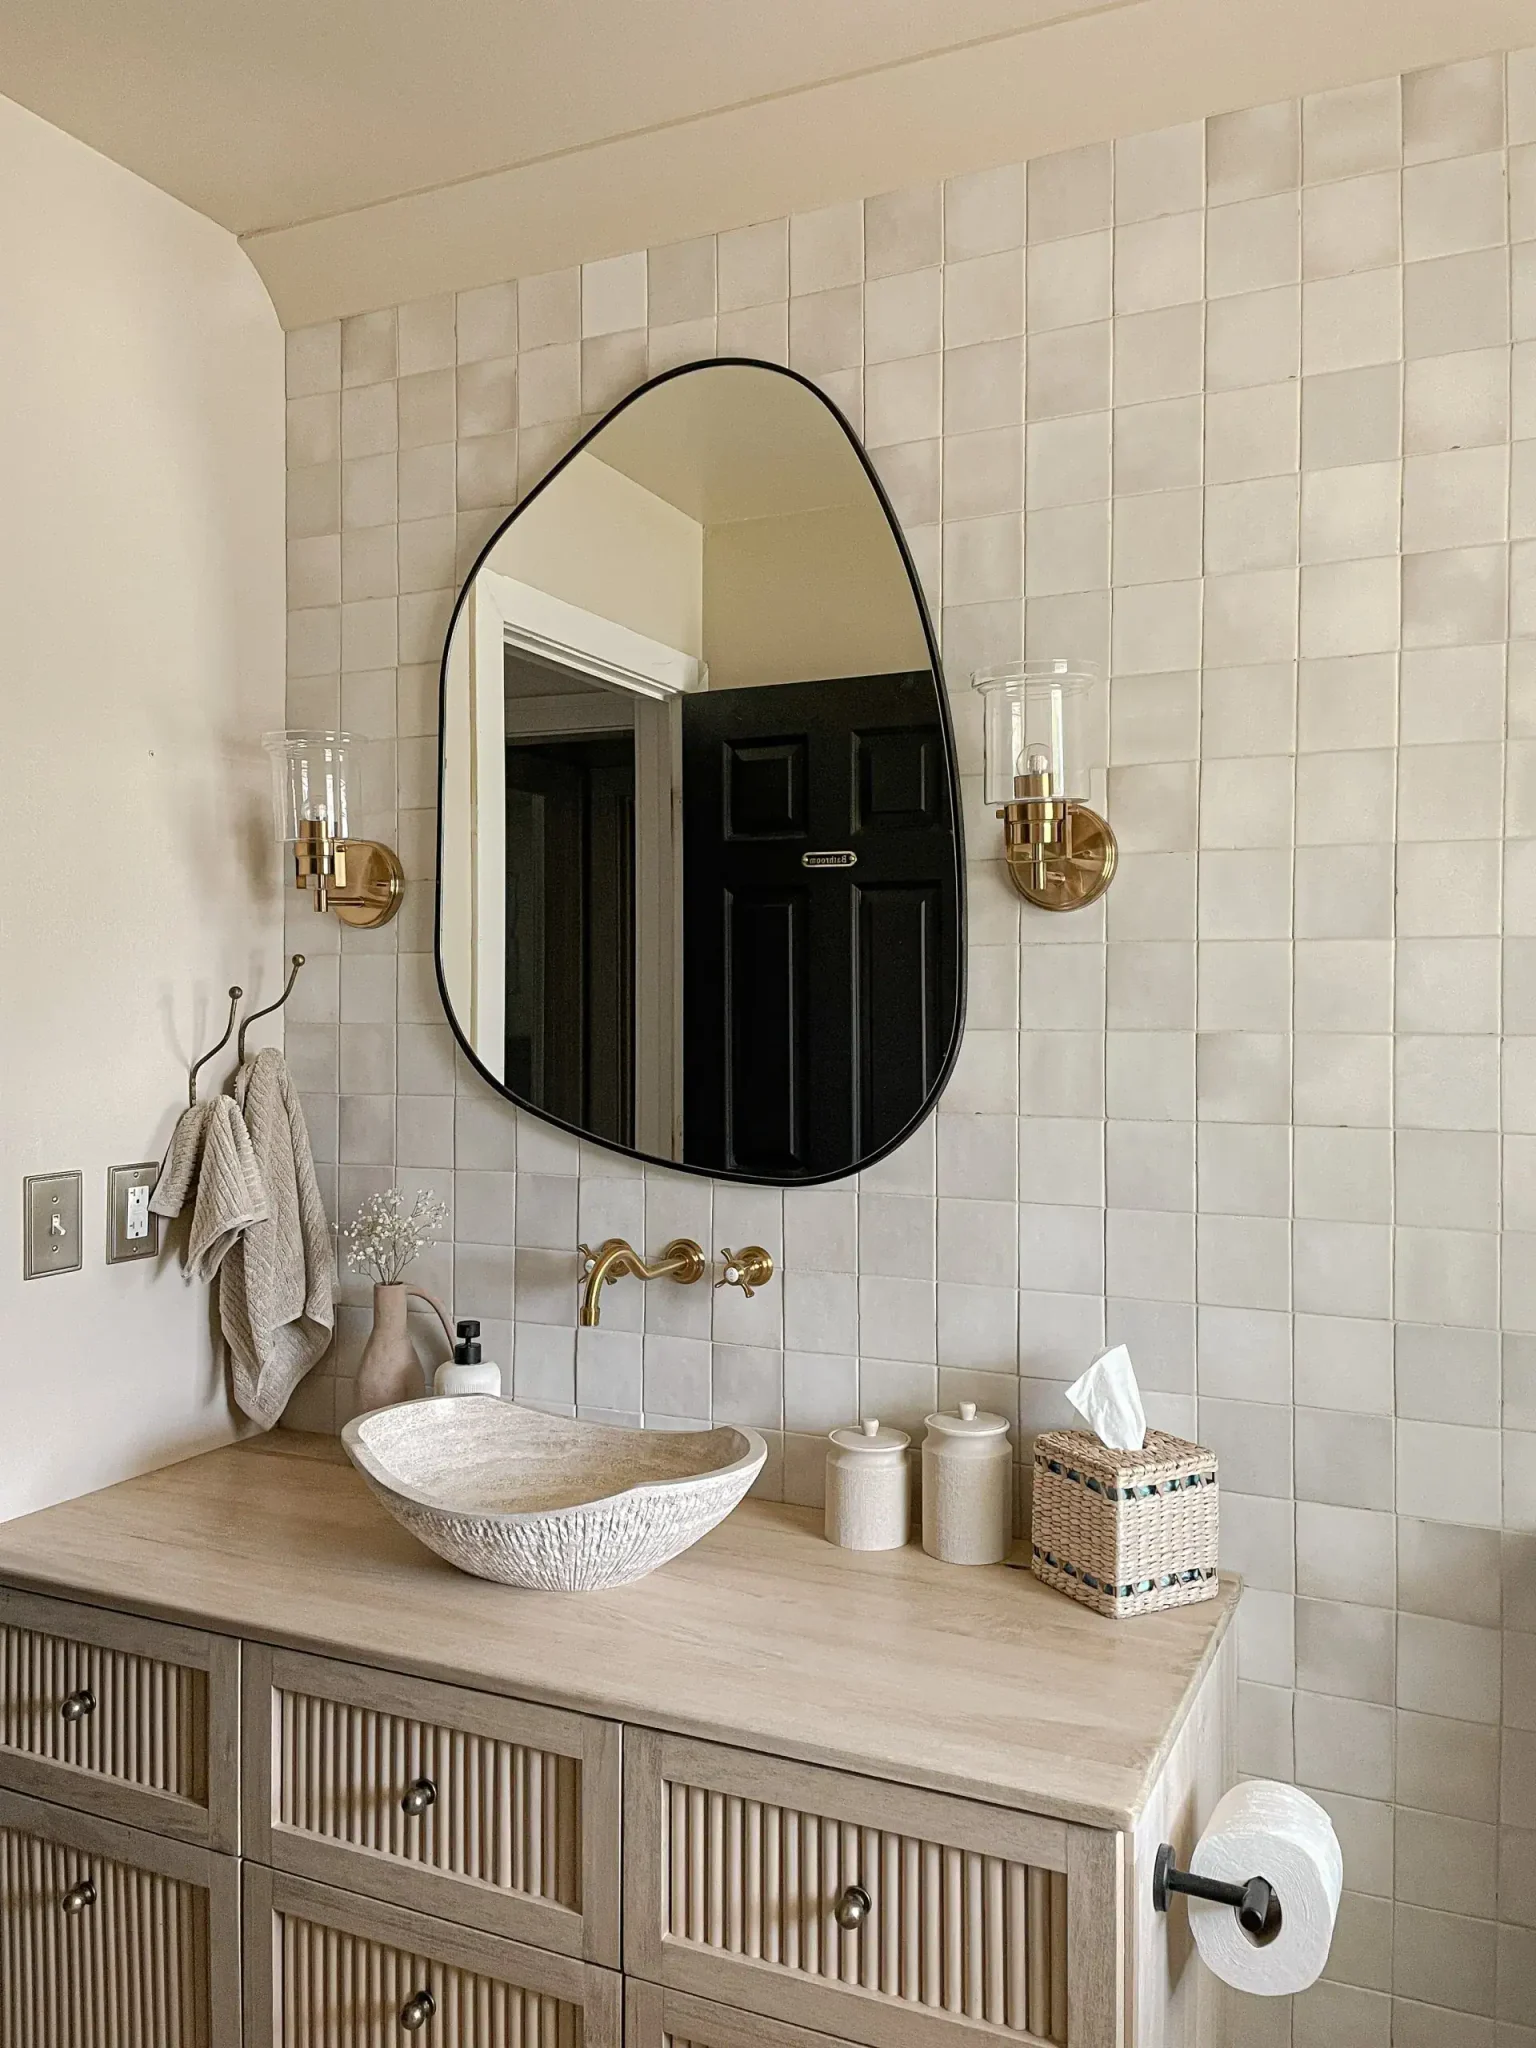
6. Create a Modern Organic Look with Reeded Wood and Brass
The “Modern Organic” style has been gaining momentum on Pinterest for a reason. In a world that feels increasingly digital, we’re craving warmth, texture, and connection to nature in our homes. This bathroom perfectly captures that 2026 zeitgeist. The reeded vanity, the textured stone sink, and the warm brass all speak to a desire for artisanal, handcrafted details over mass-produced uniformity. It’s less about a specific trend and more about a cultural shift towards creating serene, sanctuary-like spaces.
|
📋 Copy HEX 🔗 Share |
🔥 Trending Context
That beautiful textured stone vessel sink is a showstopper, but it requires more care than a standard porcelain undermount. Natural stone is porous and can be susceptible to staining from things like makeup, hair dye, or certain soaps. It needs to be sealed upon installation and resealed every 6-12 months. For cleaning, avoid harsh, acidic, or abrasive cleaners at all costs; use only a pH-neutral cleaner specifically designed for stone to avoid etching the surface.
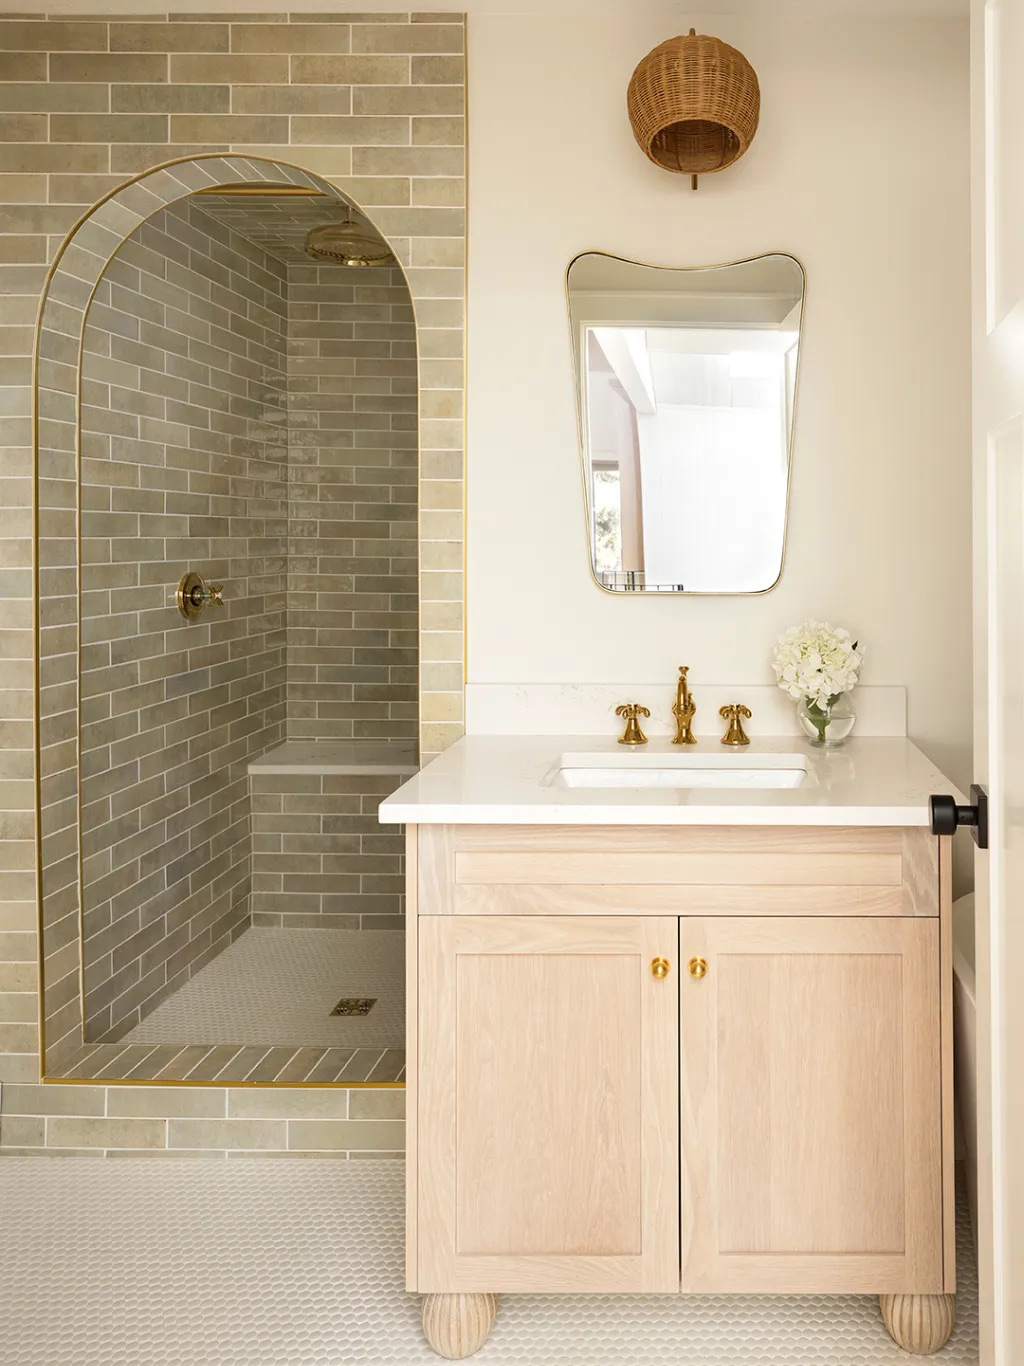
7. Design an Elegant Arched Tiled Shower with Brass Accents
The success of this design lies in its repetition of curves, which creates a soft, elegant flow. The prominent arch of the shower enclosure is the main statement. This shape is then echoed in the curved mirror and the rounded form of the wicker wall sconce. This repetition guides the eye smoothly through the space and softens the harder lines of the vanity and floor tiles. The consistent use of brass for all fixtures further unifies the design, tying the different zones together with a warm, metallic thread.
|
📋 Copy HEX 🔗 Share |
📏 Scale Guide
Want to recreate that high-end look of a tiled shower arch? Here’s a simplified approach for a DIY-savvy homeowner. Time: 2 days. Cost: $200-$500.
- Frame the arch using flexible arch track or by cutting a curve into plywood.
- Cover the frame with cement board, carefully bending it to the curve. Seam and waterproof everything.
- Start tiling from the bottom center of the arch, working your way up and out.
- Use a tile wet saw to carefully cut the tiles that will meet the curve of the arch. This requires precision.
- Apply trim (like the gold accent shown here) to the edge for a clean finish.
- Grout the entire area and seal it once cured.
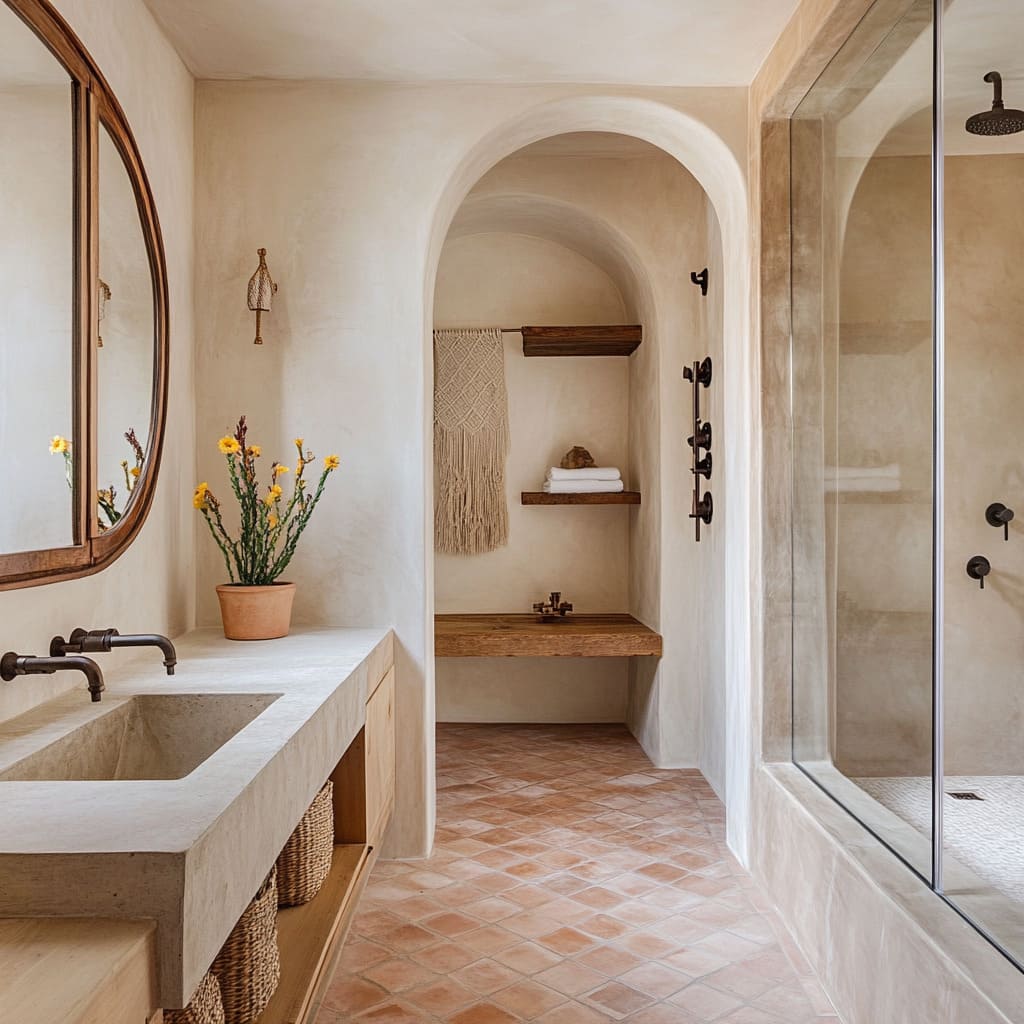
8. Embrace Earthy Warmth with Plaster Walls and Terracotta Floors
This bathroom’s visual formula is pure rustic warmth: 60% smooth, light-colored plaster walls + 30% earthy terracotta floor + 10% dark metal accents. The plaster walls create a soft, light-bouncing backdrop that feels organic and handcrafted. The terracotta tiles ground the space with rich, earthy color and texture. Finally, the dark bronze or black fixtures provide sharp, modern contrast that keeps the look from feeling too dated. You could swap the terracotta for another natural stone, but the ratio of light walls to earthy floor is key.
|
📋 Copy HEX 🔗 Share |
💸 Get This Look For Less
While terracotta tile is incredibly beautiful and durable, it is also highly porous. This means it will absorb moisture and is prone to staining if not properly sealed. You absolutely must apply a high-quality penetrating sealer before and after grouting, and plan to re-seal it every 1-2 years, especially in a wet environment like a bathroom. Unsealed terracotta in a shower is a recipe for mildew and discoloration. The slightly uneven surface can also be tougher to clean than smooth porcelain.
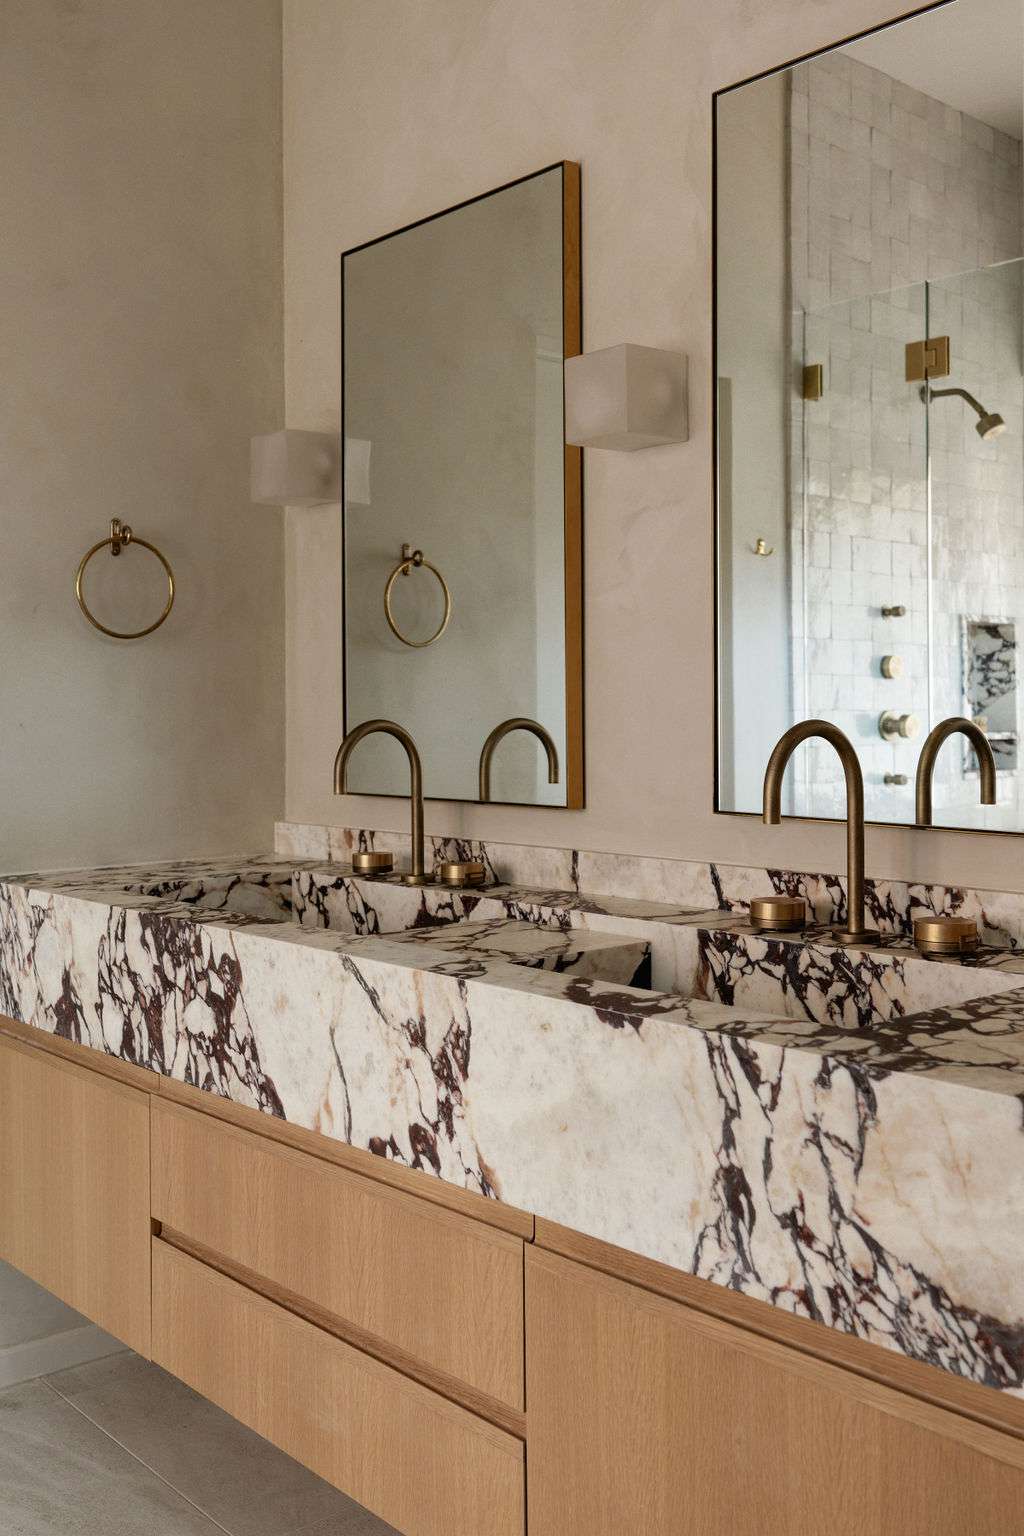
9. Float an Oak Vanity for a Modern, Luxurious Feel
The undisputed star of this bathroom is the stunning white marble countertop with its dramatic, dark veining. While the floating oak vanity is beautiful, it’s the marble that elevates the entire space into luxury territory. It acts as a piece of natural art, creating a bold, high-contrast statement. Removing it would leave you with a nice but far less memorable modern bathroom. The choice to run the bold pattern across the integrated sinks and backsplash makes it even more impactful.
|
📋 Copy HEX 🔗 Share |
🎯 What Makes It Work
A custom-milled oak vanity and a slab of heavily veined marble can cost thousands. To get a similar look for less, start with a stock floating vanity from a big-box store or IKEA. For the countertop, look into laminate or porcelain slab alternatives. Modern laminates offer incredibly realistic marble patterns for a fraction of the cost and are much lower maintenance. You can achieve 80% of this high-end look for about 40-50% of the price with smart sourcing. Check out the more budget-friendly approach in Idea #1 for more inspiration on saving.
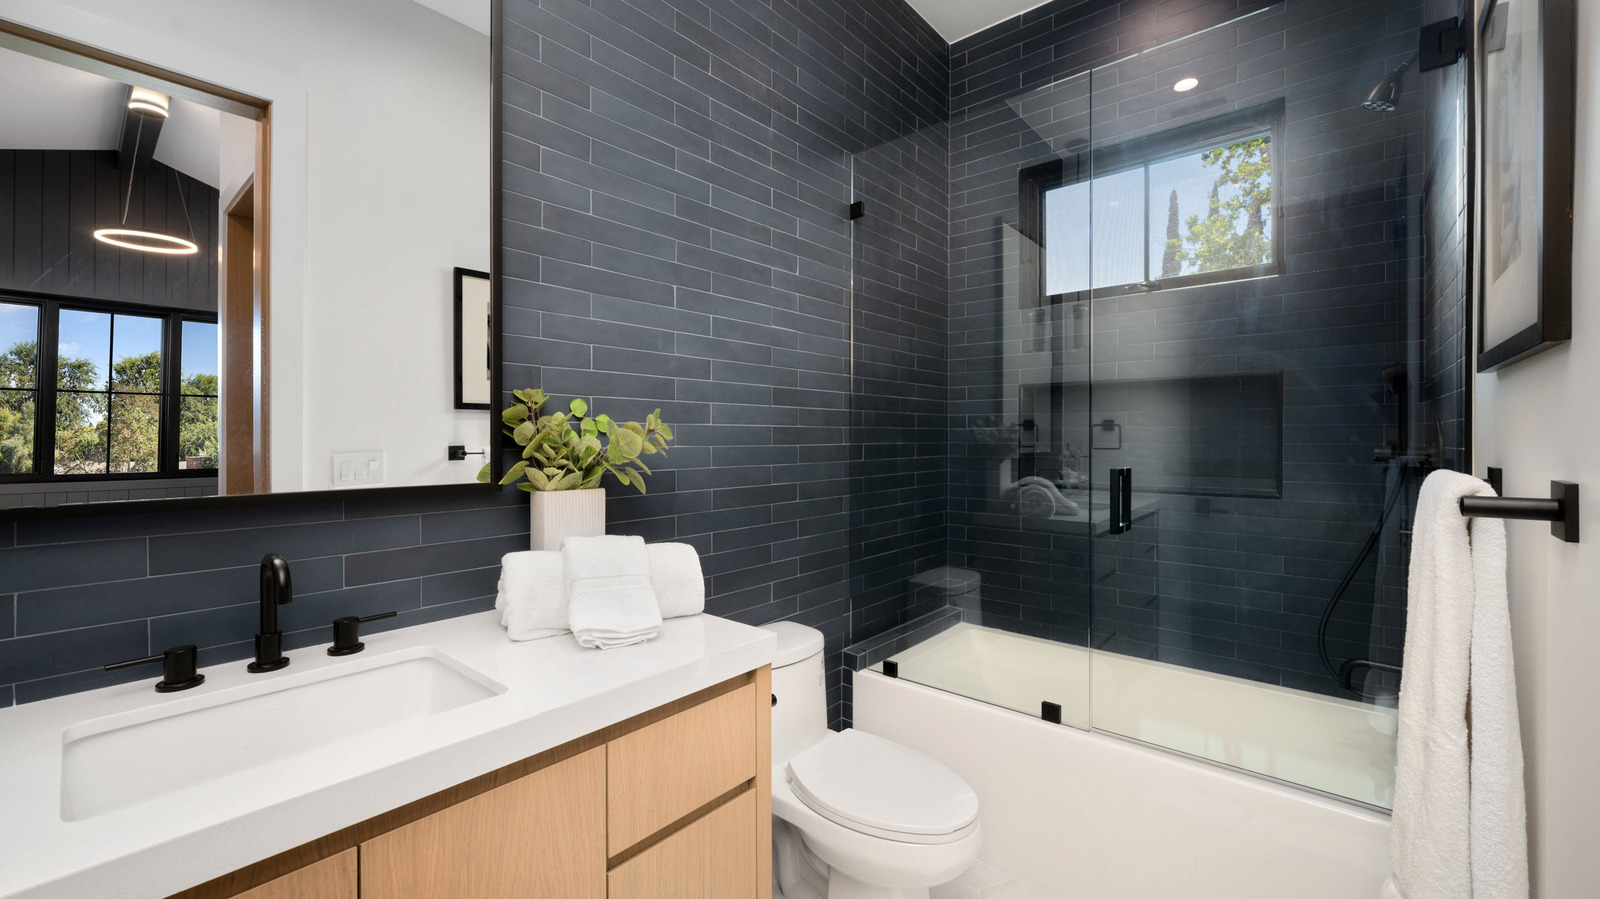
10. Contrast Dark Subway Tile with a Light Wood Vanity
This bathroom is a perfect example of the power of contrast. The dark gray subway tile creates a moody, dramatic backdrop that makes the other elements pop. The light wood vanity and the crisp white countertop appear even brighter and cleaner next to the dark tile. The matte black fixtures blend into the tile, creating a sleek, seamless look, while the glass shower enclosure prevents the dark tile from overwhelming the space. This high-contrast play between dark and light is what gives the room its modern, graphic edge.
|
📋 Copy HEX 🔗 Share |
💡 Designer Tip
Before you commit to a dark, moody tile, tick off these items:
- Check your lighting: Dark tiles absorb light. Do you have ample natural light from a window, plus multiple sources of artificial light (sconces, overhead, shower light)? If not, the room can feel like a cave.
- Measure your space: This look works best in a moderately sized to large bathroom. In a very small, windowless powder room, a full wall of dark tile can feel oppressive.
- Get samples: Bring home a few of the actual tiles. See how they look in your room’s specific lighting throughout the day. The color can change dramatically from the showroom to your wall.
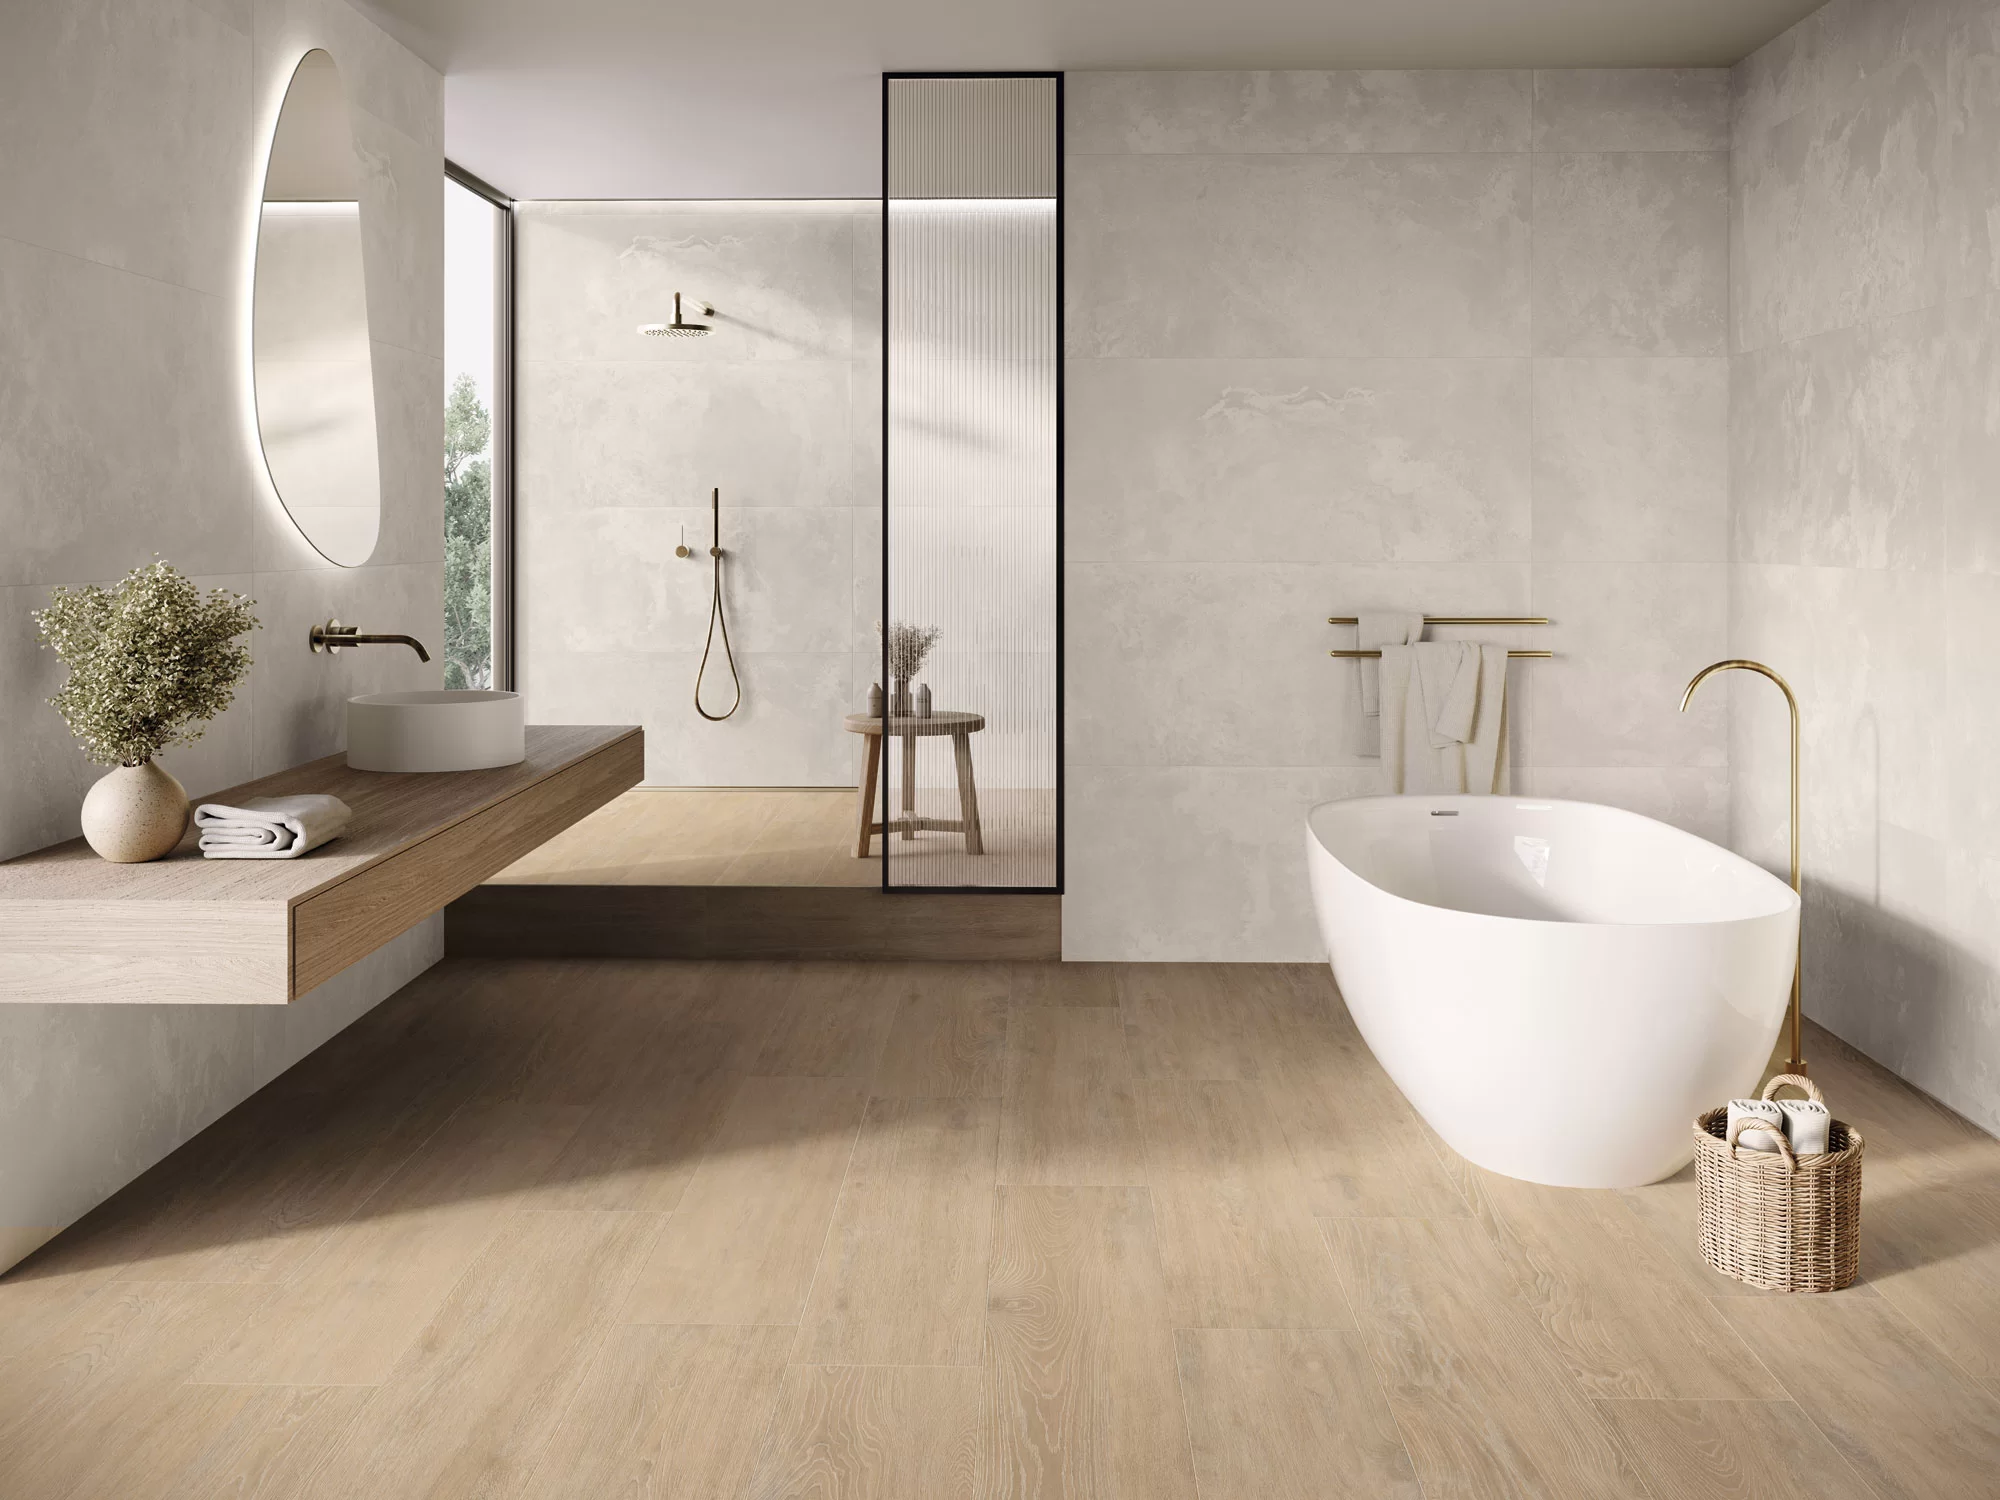
11. Achieve Minimalist Serenity with Light Wood and Stone Textures
This minimalist aesthetic thrives on a sense of openness. It’s ideal for bathrooms of any size, but it’s particularly effective in small to medium spaces (around 50-80 sq ft). The use of large-format wall tiles creates fewer grout lines, making the walls feel expansive and uncluttered. The floating vanity exposes more of the floor, which is a classic trick to make a room feel larger. The freestanding tub, while a luxury, should be chosen to scale—a smaller 60-inch model would fit well in this context without overwhelming the room.
|
📋 Copy HEX 🔗 Share |
🔧 How-To Brief
A minimalist bathroom looks serene because it’s clutter-free, which means upkeep is all about maintaining that look. The fluted glass of the shower partition is beautiful but can be a bit more work to clean than flat glass, as soap scum can collect in the grooves. Use a squeegee after every shower and a soft brush for weekly cleaning. Brass or gold fittings are gorgeous but will show water spots more readily than chrome. Keep a microfiber cloth handy to wipe them down daily to prevent buildup.
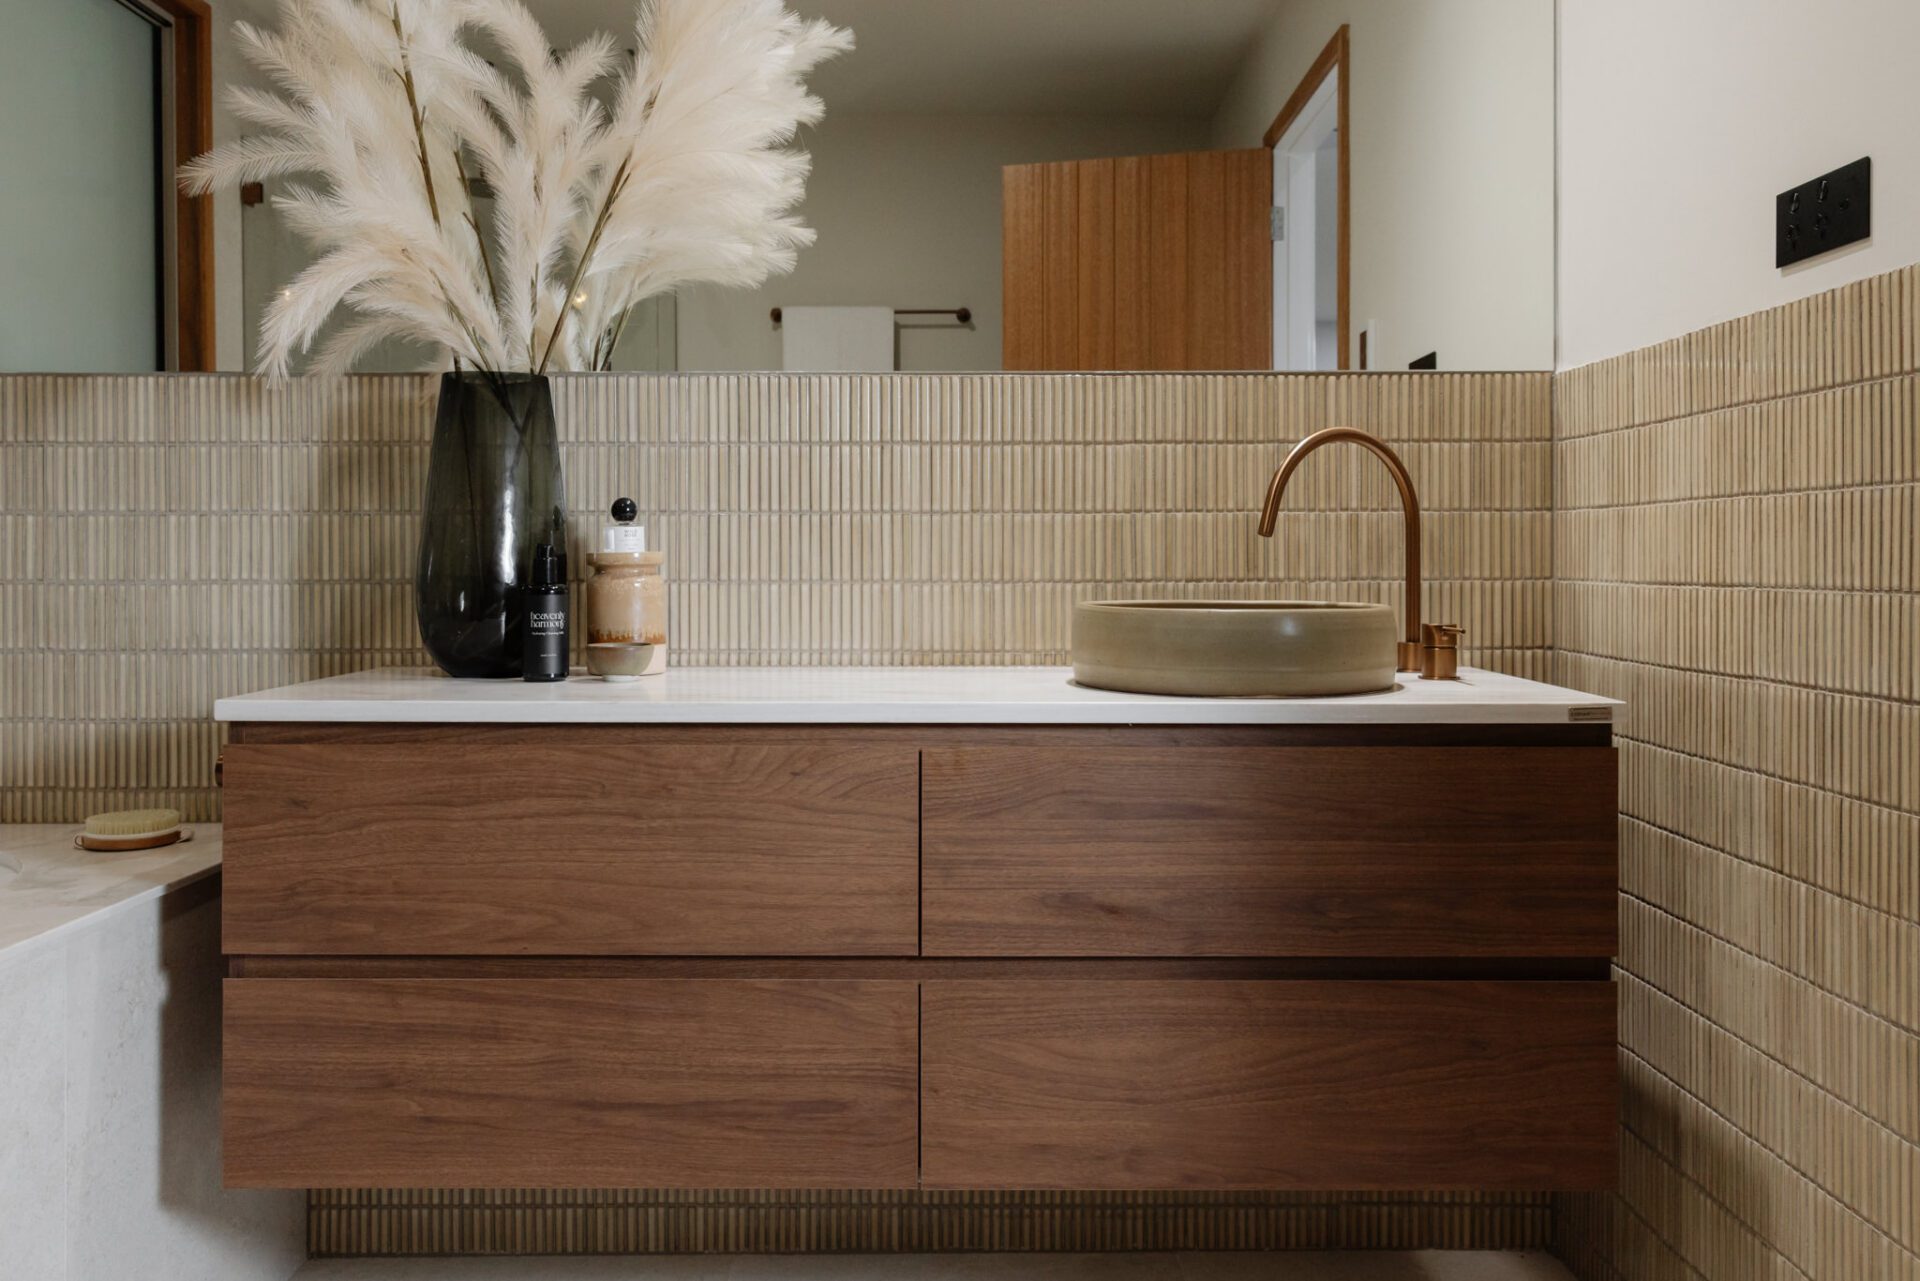
12. Warm Up a Modern Bathroom with a Dark Wood Floating Vanity
When using large format, textured tiles like the beige ones here, choosing the right grout color is critical. You want to match the grout color as closely as possible to the tile color. Using a contrasting grout would create a busy grid pattern that fights with the vertical texture of the tiles. A matching grout color makes the surface look more monolithic and seamless, allowing the tile’s inherent texture to be the star of the show. It’s a small detail that makes a huge difference in achieving a high-end, cohesive finish.
|
📋 Copy HEX 🔗 Share |
⚠️ Real Talk
This room’s inviting modernism comes from a simple but effective formula: 70% warm neutrals + 20% dark wood + 10% color and metallic pop. The textured beige tiles and white countertop create a serene, neutral canvas. The dark wood floating vanity provides a strong, grounding anchor. Finally, the muted green sink and rose gold faucet inject just enough personality and shine to make the space feel unique and custom. You could swap the green for a muted blue or terracotta and the rose gold for brass, and the formula would still work perfectly.
13. Go Lush with Botanical Wallpaper and Green Slat Vanity
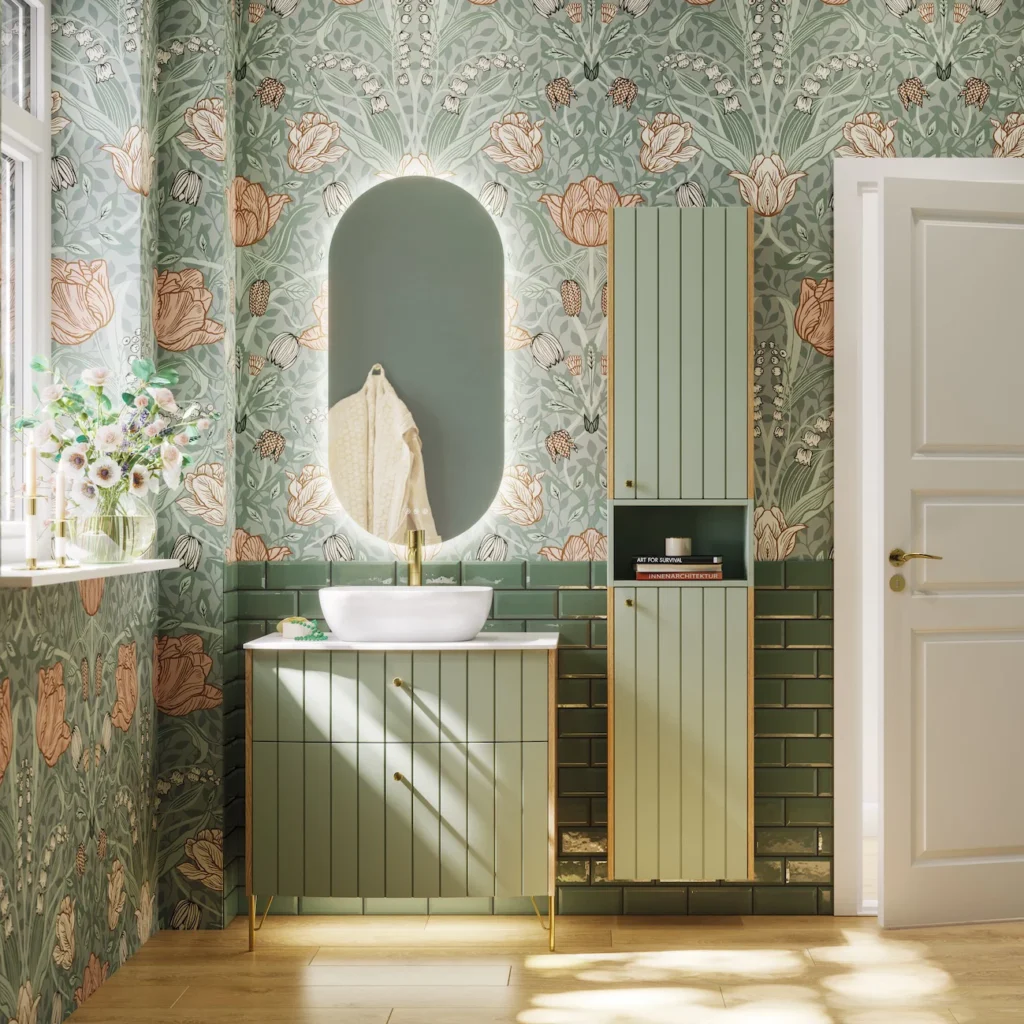
The botanical wallpaper is, without a doubt, the hero of this bathroom. It’s the single element that sets the entire tone, transforming a functional space into a lush, nature-inspired retreat. Every other choice—the muted green of the vanity, the darker green of the subway tile, the gold fixtures—is made to complement and enhance the wallpaper. If you took it away, the room would lose its personality and its story. It’s a bold choice that pays off in spades, creating a truly memorable design.
|
📋 Copy HEX 🔗 Share |
💰 Budget Breakdown
A wallpapered bathroom is stunning, but you have to be practical about moisture. Do not use standard wallpaper in a bathroom with a shower that gets daily use, unless the ventilation is exceptional. Instead, you must use vinyl or vinyl-coated wallpaper specifically designed for high-humidity environments. Even then, it’s best to keep it away from direct splashing. The design shown here is smart—the tile wainscoting protects the lower part of the wall, which is most vulnerable to water damage.
14. Create a Moody Oasis with Deep Green Tile and Marble
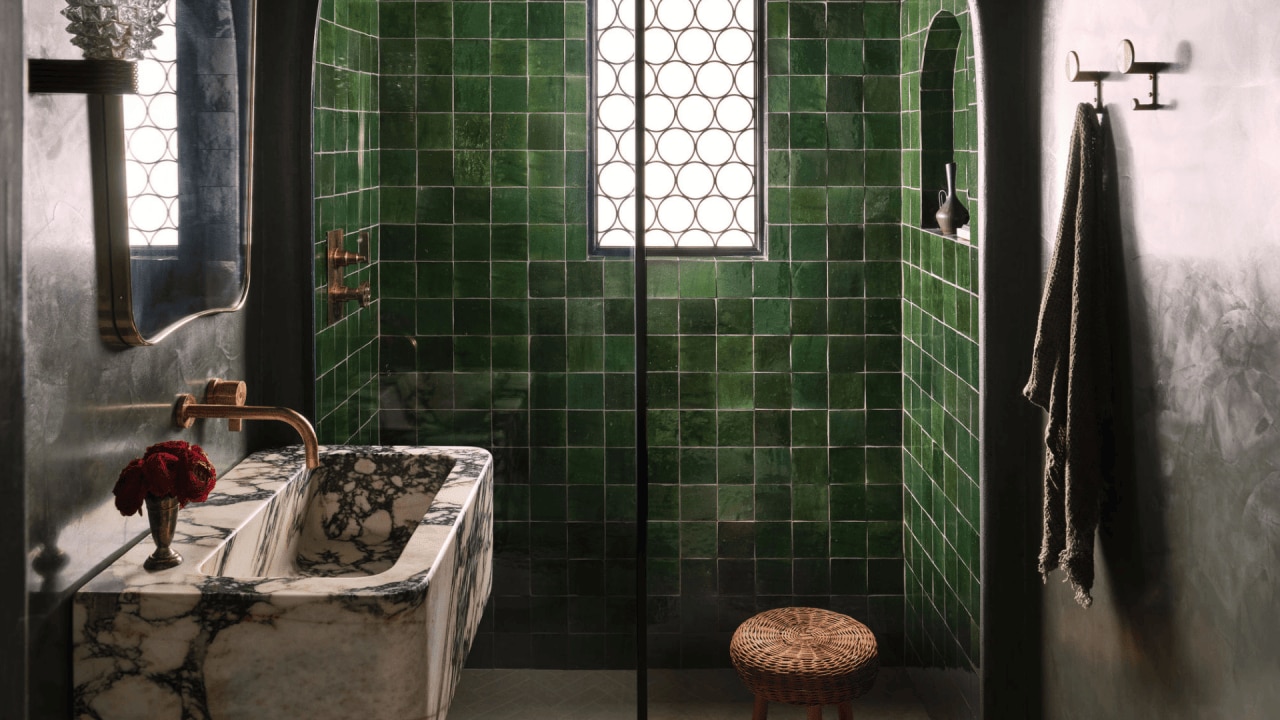
Getting this luxurious, moody look requires investment in a few key materials. The freestanding marble sink is the biggest splurge, but it’s the centerpiece.
- Main Furniture: Freestanding Marble Sink: $2,500 – $6,000
- Tile: Dark Green Square Tiles (for a standard shower): $800 – $2,000
- Fixtures: Brass Wall-Mount Faucet & Shower Controls: $600 – $1,500
- Wall Treatment: Professional Plaster Finish: $1,000 – $3,000
- Decor: Wicker Stool & Accessories: $150 – $400
- TOTAL: $5,050 – $12,900
- Budget alternative: Use a standard pedestal sink ($300), green ceramic tile instead of premium tile ($500), and a high-quality dark grey paint instead of plaster ($200). Total look for ~60% less.
|
📋 Copy HEX 🔗 Share |
⭐ The One Thing
This design works because it masterfully balances color, texture, and light. The deep forest green tiles create a sense of enclosure and opulence, like being in a hidden grotto. This darkness is contrasted by the bright white marble sink with its dramatic black veining, which acts as a focal point. The textured grey plaster walls provide a soft, non-reflective surface that absorbs light, enhancing the moody atmosphere, while the brass fixtures inject a necessary touch of warm, reflective light.
15. Mix White and Terracotta Tiles for a Warm, Functional Space
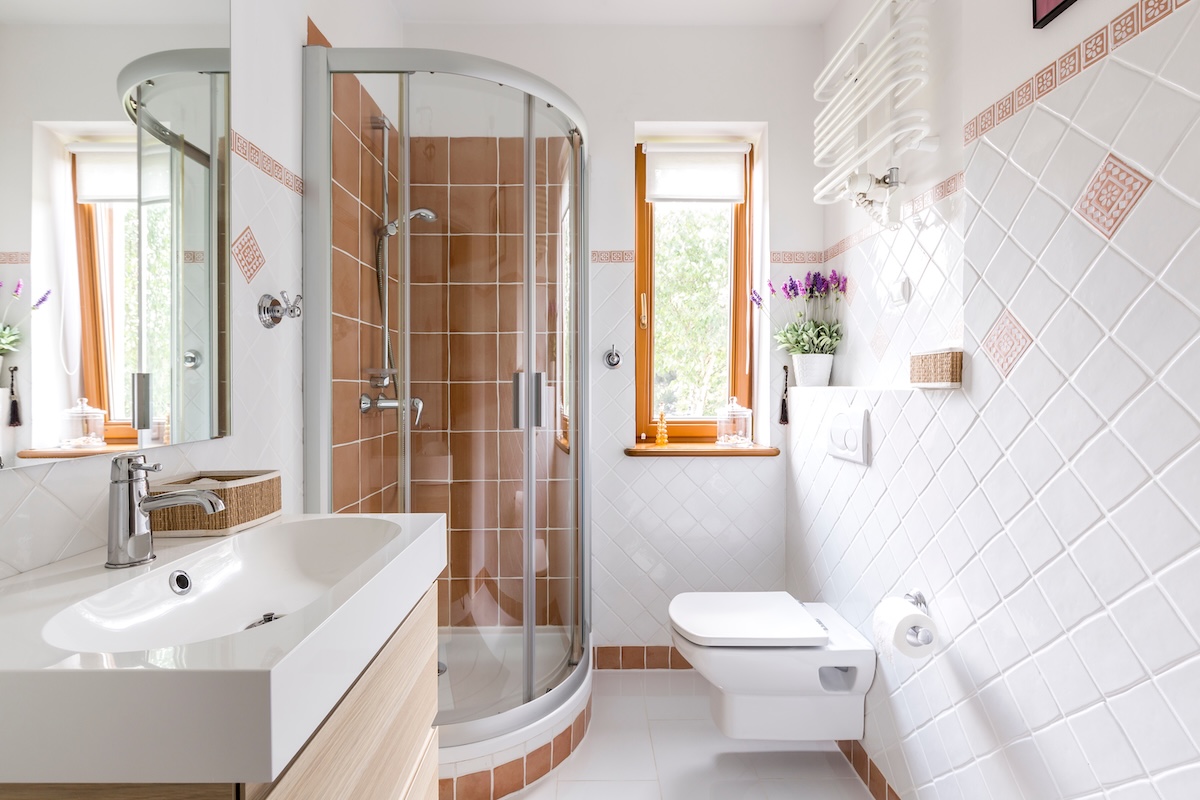
Adding a terracotta accent stripe is a fantastic way to break up a wall of white tile. Time: 2 hours. Cost: $50-$100.
- Plan your accent row before you start tiling the main wall. Use a level and pencil to mark a perfectly straight guideline where the accent will go.
- Tile the wall with your main white tile up to the bottom of your guideline.
- Apply a strip of tile adhesive for the accent row.
- Carefully place your terracotta tiles along the guideline, using tile spacers to ensure even gaps.
- Continue tiling with the white tile above the accent row.
- Once the adhesive is cured, grout the entire wall. Using a grout color that matches the white tile will make the terracotta pop even more.
|
📋 Copy HEX 🔗 Share |
📐 Style Math
This bathroom’s friendly and inviting feel comes from a clean and simple ratio: 70% crisp white, 20% warm terracotta, and 10% natural wood. The white tiles and fixtures create a bright, hygienic base that makes the room feel larger. The terracotta, used both in the accent stripe and as a block of color in the shower, injects earthy warmth and personality. The light wood vanity then adds a soft, organic touch that bridges the gap between the white and the terracotta. It’s a balanced, timeless combination.
16. Achieve Shabby Chic Elegance with Double Vessel Sinks
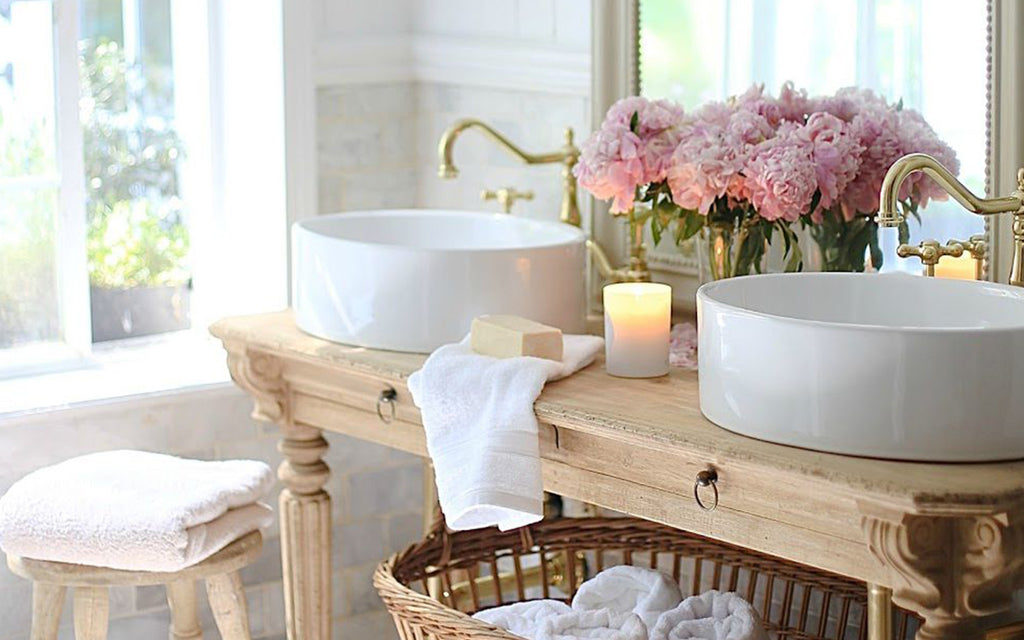
The single element that elevates this bathroom from simply pretty to truly romantic and elegant is the huge vase of fresh pink peonies. It’s a touch of intentional, almost extravagant, beauty. The flowers introduce a soft, organic shape and a vibrant pop of color that contrasts with the clean white sinks and towels. They signal that this isn’t just a utilitarian space; it’s a room designed for pampering and enjoyment. Without the flowers, the candles and vanity are nice, but with them, the space comes alive.
|
📋 Copy HEX 🔗 Share |
✅ Before You Start
While minimalism has dominated for years, we’re seeing a return to softer, more romantic styles like ‘Shabby Chic’ and ‘Grandmillennial’ on platforms like Pinterest and Instagram. After years of clean lines and neutral palettes, people are craving personality, comfort, and a touch of nostalgia. This look, with its converted-furniture vanity, vessel sinks, and fresh flowers, speaks to that desire for a home that feels collected, personal, and unapologetically pretty.
17. Create a Cozy Fall Nook with Pumpkins and Candlelight
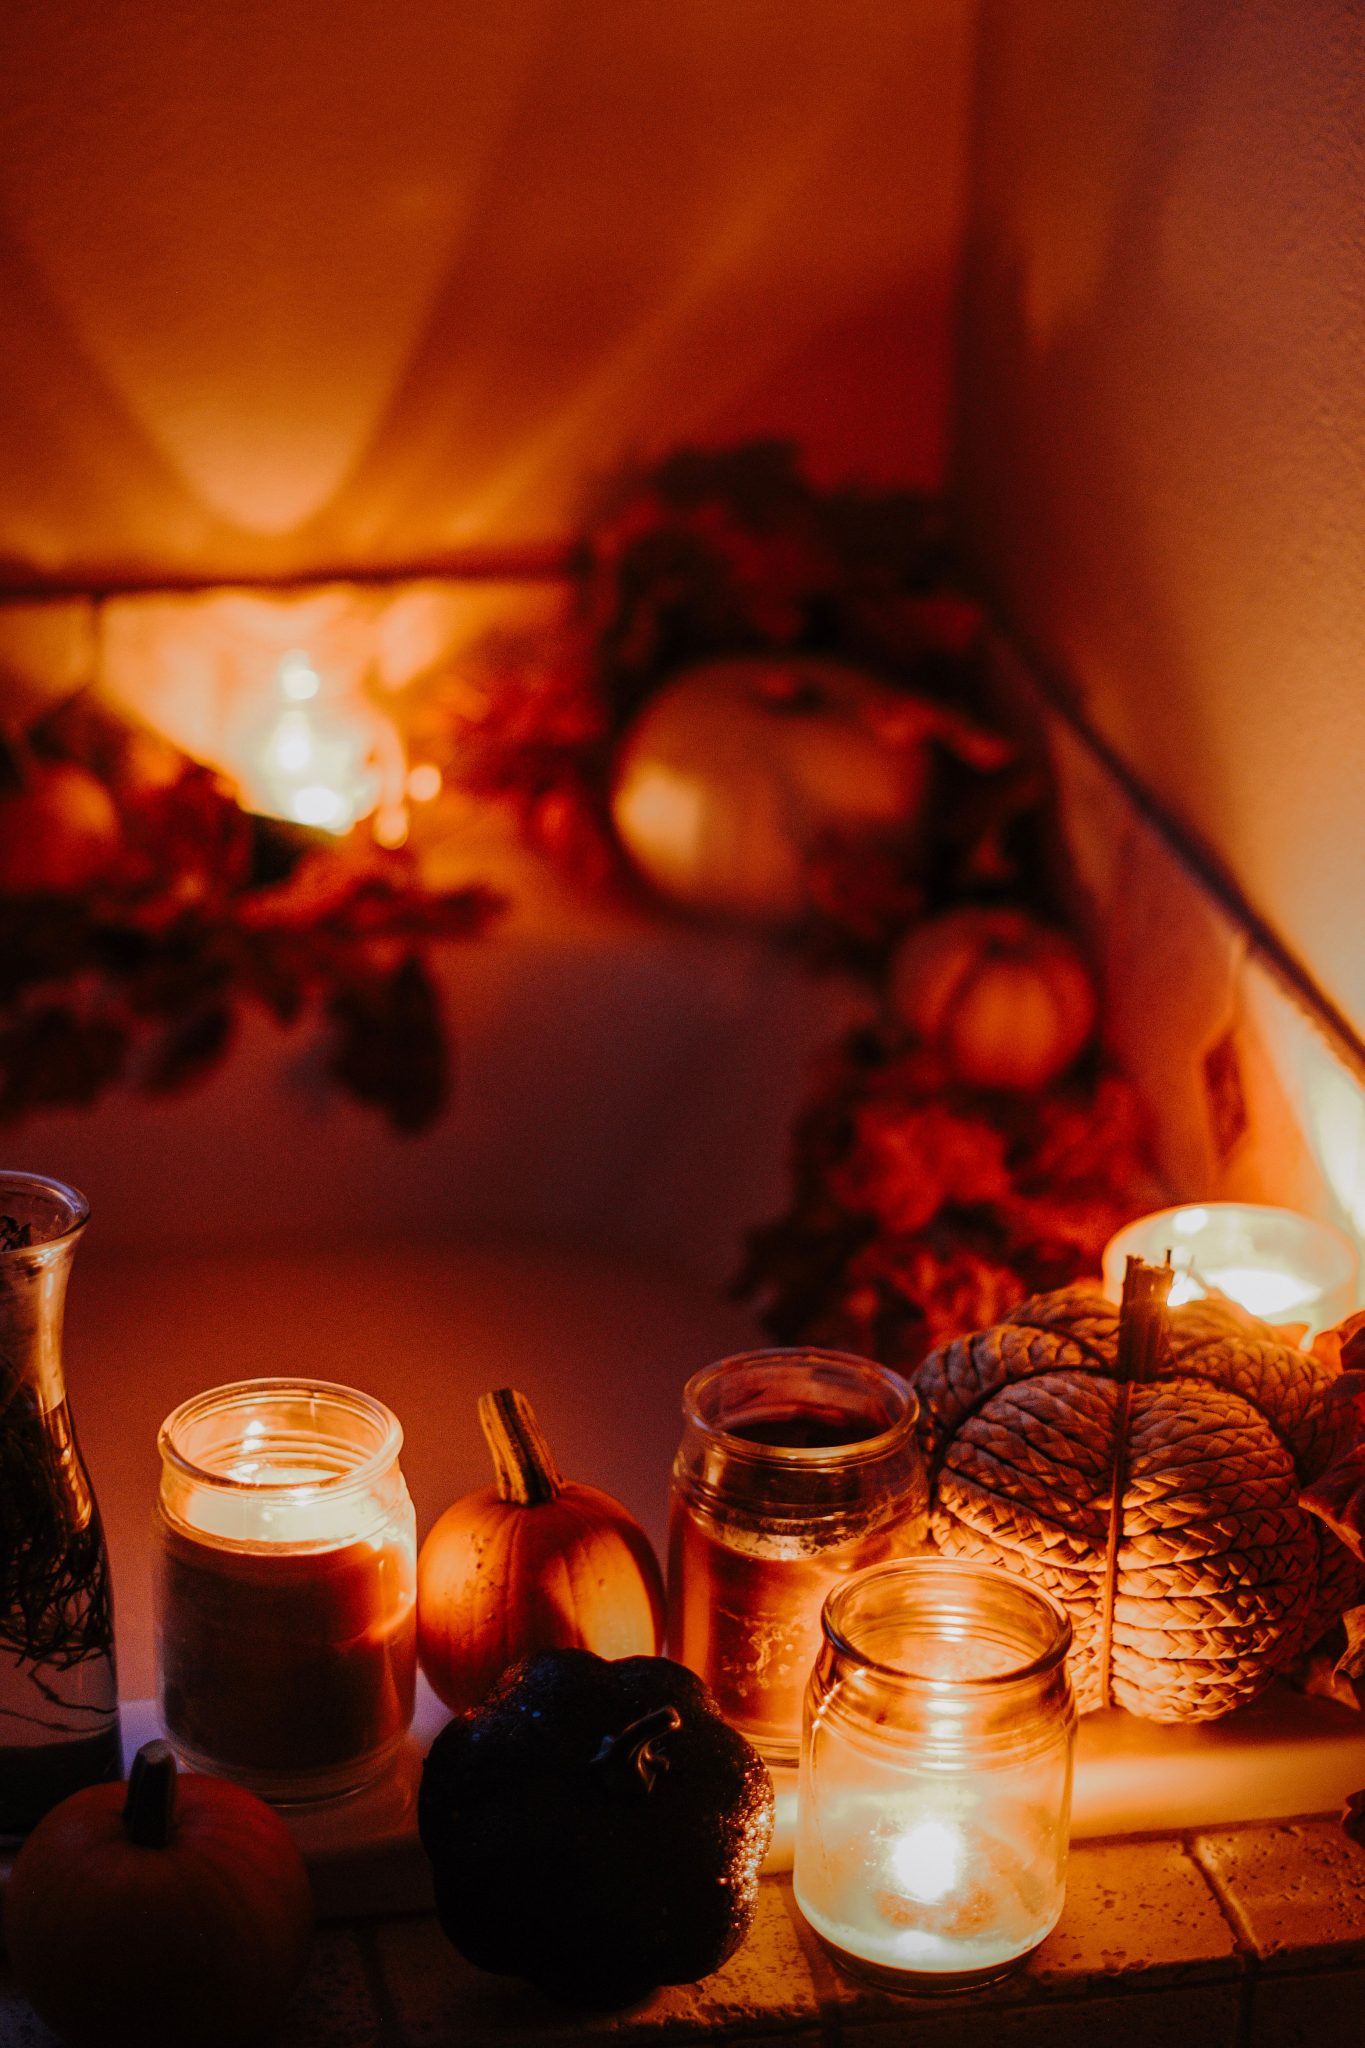
When styling a fall vignette like this, the key is to vary the height and texture of your objects. Notice how there are pumpkins of different sizes, shapes, and materials—some are smooth and orange, one is dark, and another appears to be woven. The candles are also at slightly different levels within their glass jars. This variation creates visual interest and makes the arrangement feel more organic and less staged. Avoid lining things up in a straight row; instead, cluster them in a loose triangle for a more natural look.
|
📋 Copy HEX 🔗 Share |
🧹 Maintenance Reality
The magic of this corner comes down to one thing: warm, layered lighting. The multiple candles, especially with their glow amplified by the glass jars and string lights in the garland, create a soft, flickering ambiance that is impossible to achieve with a single overhead light. This type of lighting instantly signals coziness and warmth. It minimizes harsh shadows and bathes the corner in a golden hue that makes the autumnal colors of the pumpkins and leaves appear richer and more vibrant.
18. Use Dried Baby’s Breath for a Subtle Autumn Feel
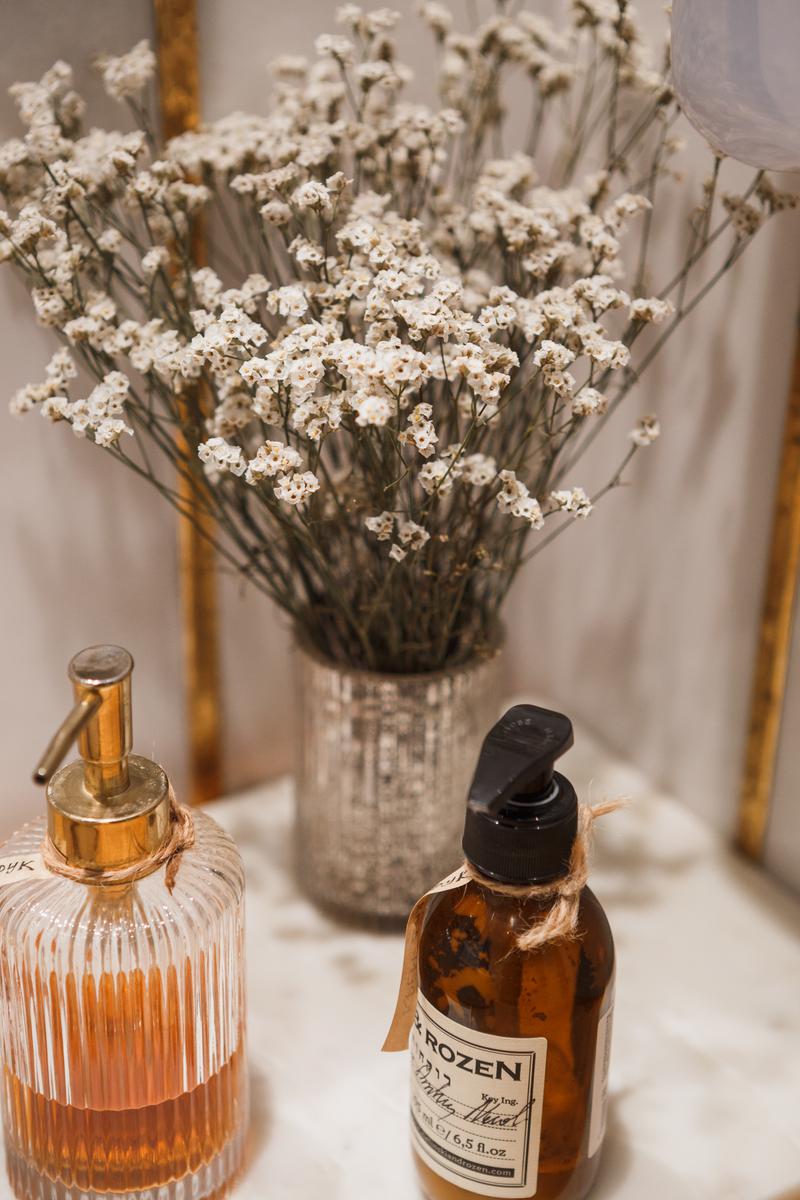
The key to this elegant, understated fall look is the use of dried baby’s breath instead of more obvious autumn florals like mums or sunflowers. The delicate, cloud-like texture of the white flowers provides a soft, ethereal quality that feels special and unexpected for the season. It pairs beautifully with the warm amber and gold tones, creating a look that whispers ‘autumn’ through its color palette rather than shouting it with typical fall motifs. It’s a sophisticated and modern take on seasonal decor.
|
📋 Copy HEX 🔗 Share |
🔥 Trending Context
This high-end boutique look is incredibly easy to recreate on a small budget. A large bunch of dried baby’s breath is often less than $15 online or at a craft store and will last for years. The amber and clear glass soap dispensers are staples at places like Target, Walmart, or HomeGoods, usually for under $10 each. Look for a small marble tray or a ceramic dish at a thrift store or on Facebook Marketplace to complete the vignette for just a few dollars. The entire look can be assembled for under $40.
19. Incorporate Wall-Mounted Wood Planters in a Modern Gray Bathroom
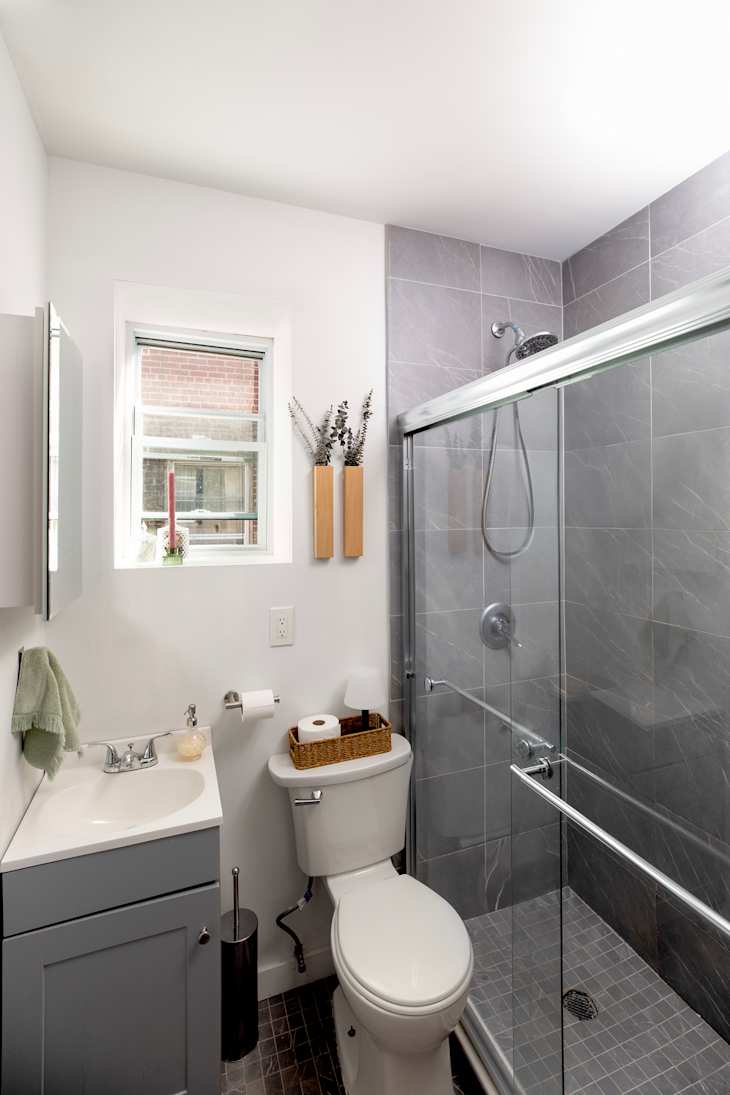
This design successfully avoids the ‘cold and sterile’ trap that many modern gray and white bathrooms fall into. The secret is the introduction of warm, natural textures. The wall-mounted wooden planters and the dried botanicals they hold provide an essential dose of organic warmth and softness. This is further supported by the small wicker basket on the toilet tank. These elements contrast with the smooth, hard surfaces of the tile and porcelain, creating a balanced space that feels both clean and inviting.
|
📋 Copy HEX 🔗 Share |
📏 Scale Guide
Dried botanicals are a fantastic, low-maintenance way to bring nature into a bathroom, but they don’t last forever, especially in a humid environment. The steam from the shower can cause them to droop or even develop mildew over time. Plan to replace them every 6-12 months to keep them looking fresh. Also, be aware that they can become brittle and shed, so place them in an area where they won’t be constantly bumped or brushed against.
20. Add Whimsy with Animal-Themed Art and White Accents
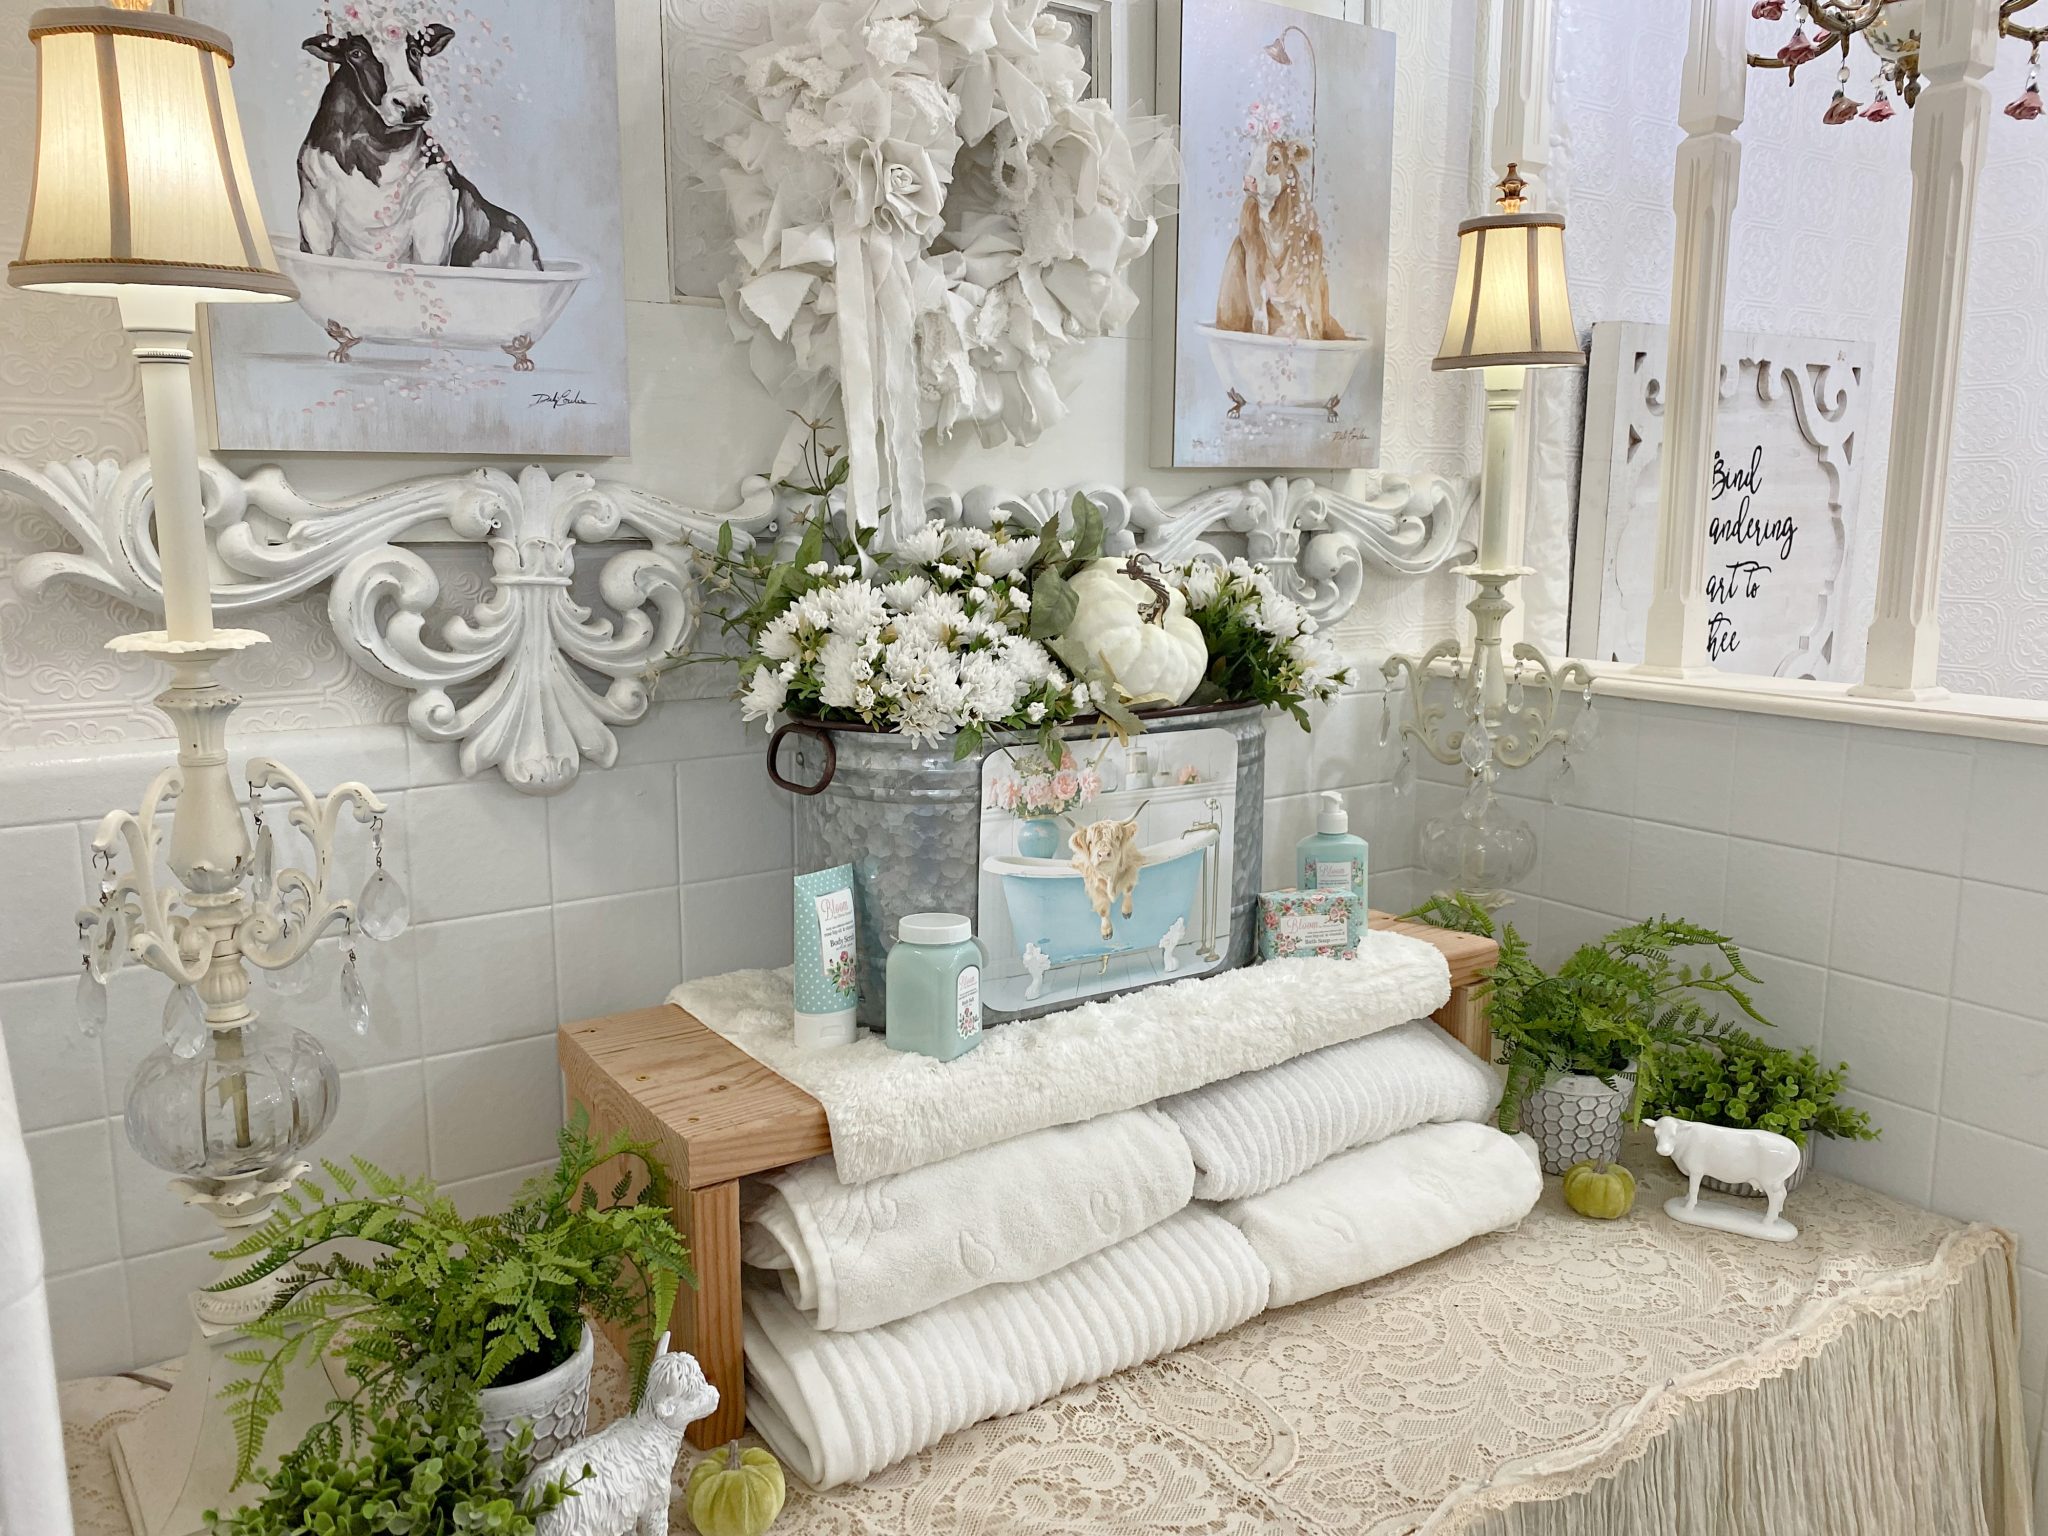
A key trick to making a whimsical theme feel chic and not childish is to stick to a very tight color palette. In this bathroom, the core color is overwhelmingly white. The subway tiles, shelf, towels, flowers, and even the background of the art are all white. This creates a clean, sophisticated canvas that allows the playful animal art and touches of galvanized metal to stand out as charming accents rather than overwhelming the space. The result is elegant, lighthearted, and cohesive.
|
📋 Copy HEX 🔗 Share |
💸 Get This Look For Less
This layered, maximalist shabby chic style is surprisingly versatile. It works wonderfully in a small powder room (around 20-30 sq ft) where the density of decor creates a jewel-box effect. It also works in a larger primary bath, as shown here, where there’s room for benches and freestanding furniture. The key is vertical space. With walls covered in art and shelving, you need at least a standard 8-foot ceiling to prevent the room from feeling cluttered and top-heavy.
21. Connect with Nature via Dark Wood and a Lush Window View
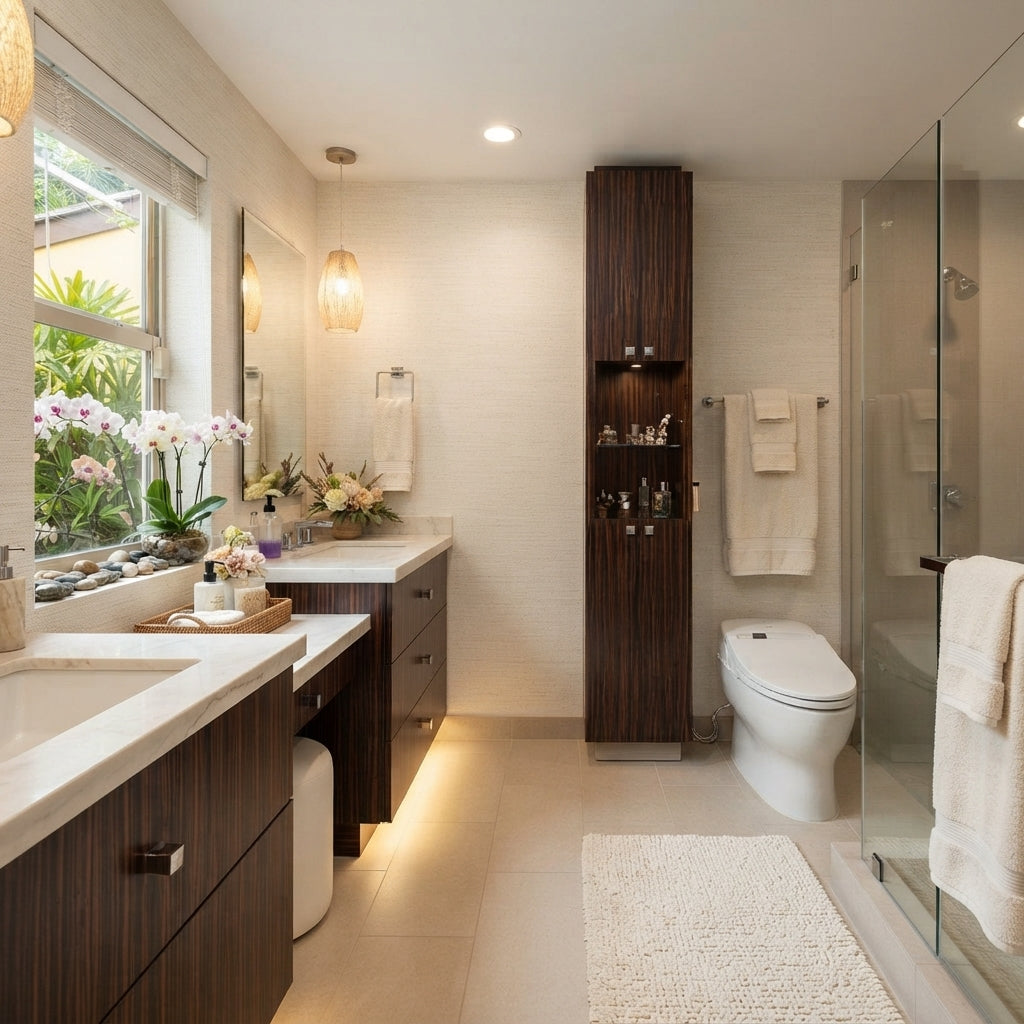
This bathroom design succeeds by creating a seamless transition between the indoor space and the lush greenery outside. The use of natural materials inside—dark wood grain cabinets, marble countertops, and a woven pendant light—mirrors the organic elements seen through the window. The placement of white orchids and river stones directly on the windowsill further blurs the line between inside and out. The warm, layered lighting enhances the feeling of a serene, natural sanctuary.
|
📋 Copy HEX 🔗 Share |
🎯 What Makes It Work
Before investing in dark wood cabinetry, consider these points:
- Assess Your Light: Dark cabinets absorb a lot of light. This look is stunning because of the huge window and supplemental lighting (pendant, under-cabinet strips). Ensure you have enough light to prevent the space from feeling gloomy.
- Consider Scratches: Dark finishes, especially on wood, can show dust, water spots, and scratches more readily than lighter ones. Be prepared for slightly more diligent cleaning to keep them looking pristine.
- Balance the Palette: Dark cabinets need to be balanced with light elements. Notice the light floor tiles, white marble countertops, and white fixtures. This contrast is crucial to keep the room from feeling heavy.
22. Achieve Classic Elegance with Blue Floral Wallpaper and a Dark Vanity
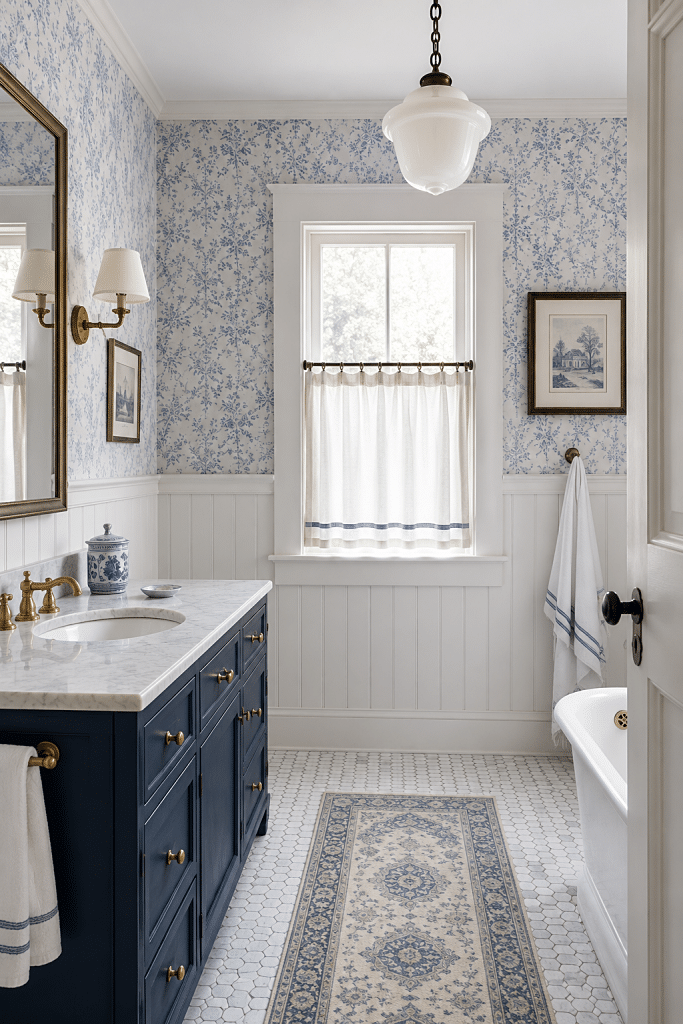
The formula for this timeless look is a careful balance of pattern, solid, and texture. It breaks down to roughly 40% pattern (the floral wallpaper), 40% calming solids (the white wainscoting and tub), and 20% rich accents (the dark blue vanity and patterned rug). The brass hardware acts as the jewelry that ties it all together. By keeping the solids and patterns in equal measure, the room feels vibrant but not overwhelming. The patterned rug works because its scale is different from the wallpaper, and its colors are complementary.
|
📋 Copy HEX 🔗 Share |
💡 Designer Tip
Love this look? Just be sure about that wallpaper. Unlike paint, high-quality wallpaper is a significant investment in both materials and labor. It’s also much more of a hassle to change if you get tired of it in a few years. Before you commit, get a large sample and tape it to the wall. Live with it for at least a week to see how you feel about it in different light and at different times of day. This is not a weekend whim; it’s a design commitment.
23. Achieve Rustic Farmhouse Charm with Shiplap and Autumn Accents
Creating a cozy farmhouse look for fall is all about texture and warmth, and it doesn’t have to be expensive. This is a look you can largely achieve with decor.
- Main Furniture: Rustic Wood Vanity: $400 – $1,500
- Wall Treatment: Shiplap Accent Wall (DIY): $150 – $400
- Textiles: Plaid Hand Towel, Woven Rug: $50 – $120
- Decor/Accessories: Amber Soap Dispensers, Small Sign, Faux Florals: $40 – $100
- Lighting: Farmhouse Sconce: $80 – $250
- TOTAL: $720 – $2,370
- Budget alternative: Find a used vanity on Marketplace ($100), use peel-and-stick shiplap ($100), and find decor at Target/Walmart ($50). Total look for ~70% less.
|
📋 Copy HEX 🔗 Share |
🔧 How-To Brief
Installing a shiplap accent wall behind the vanity is a high-impact weekend project. Time: 1 day. Cost: $150-$400.
- Measure your wall and purchase about 10% extra shiplap boards. Paint them before you install.
- Find and mark the studs in your wall. This is where you will nail the boards.
- Start with your first board at the bottom, ensuring it’s perfectly level. Nail it into the studs.
- Place the next board on top. The shiplap groove creates its own spacing. Nail it into the studs.
- Continue up the wall, cutting boards as needed to fit around outlets and the vanity plumbing.
- Fill nail holes with wood filler, sand smooth, and do a final touch-up with paint.
24. Warm Up a Bathroom with Rattan Mirrors and Brass Fixtures
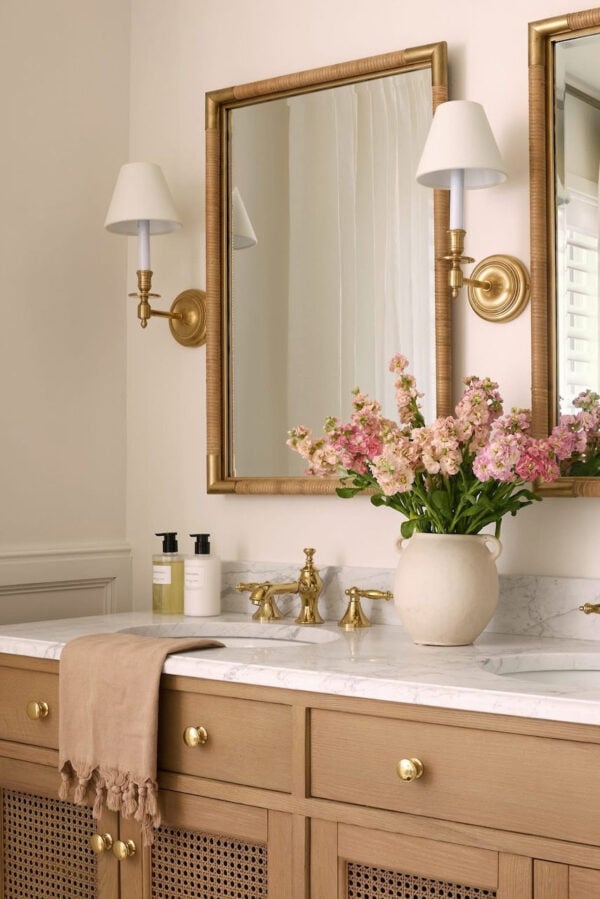
This bathroom feels so warm and inviting because it layers multiple warm tones and natural textures. The light wood of the vanity provides a base layer of warmth. Then, the rattan-wrapped mirrors add another, more textural layer. Finally, the brass sconces and faucets introduce a third layer of warmth, this time with a metallic sheen. This tonal layering, all within the same warm family (yellows, golds, tans), creates a space that feels incredibly cohesive, rich, and sunny. The more formal feel of the marble countertop keeps it from feeling too boho. Compare this warm approach with the cooler, modern vibe of Idea #26.
|
📋 Copy HEX 🔗 Share |
⚠️ Real Talk
When using fabric shades on vanity sconces, pay attention to the direction of the light. Shades that are open on the top and bottom, like the ones shown here, provide both uplighting and downlighting. This washes the wall in a soft, ambient glow while also casting useful task lighting down onto the countertop. Avoid fully enclosed shades, which can make the light too dim for tasks like applying makeup or shaving. Always opt for a warm-temperature bulb (2700K-3000K) to enhance the cozy feel.
25. Combine Light Wood Slats and a Macrame Pendant for Natural Modernism
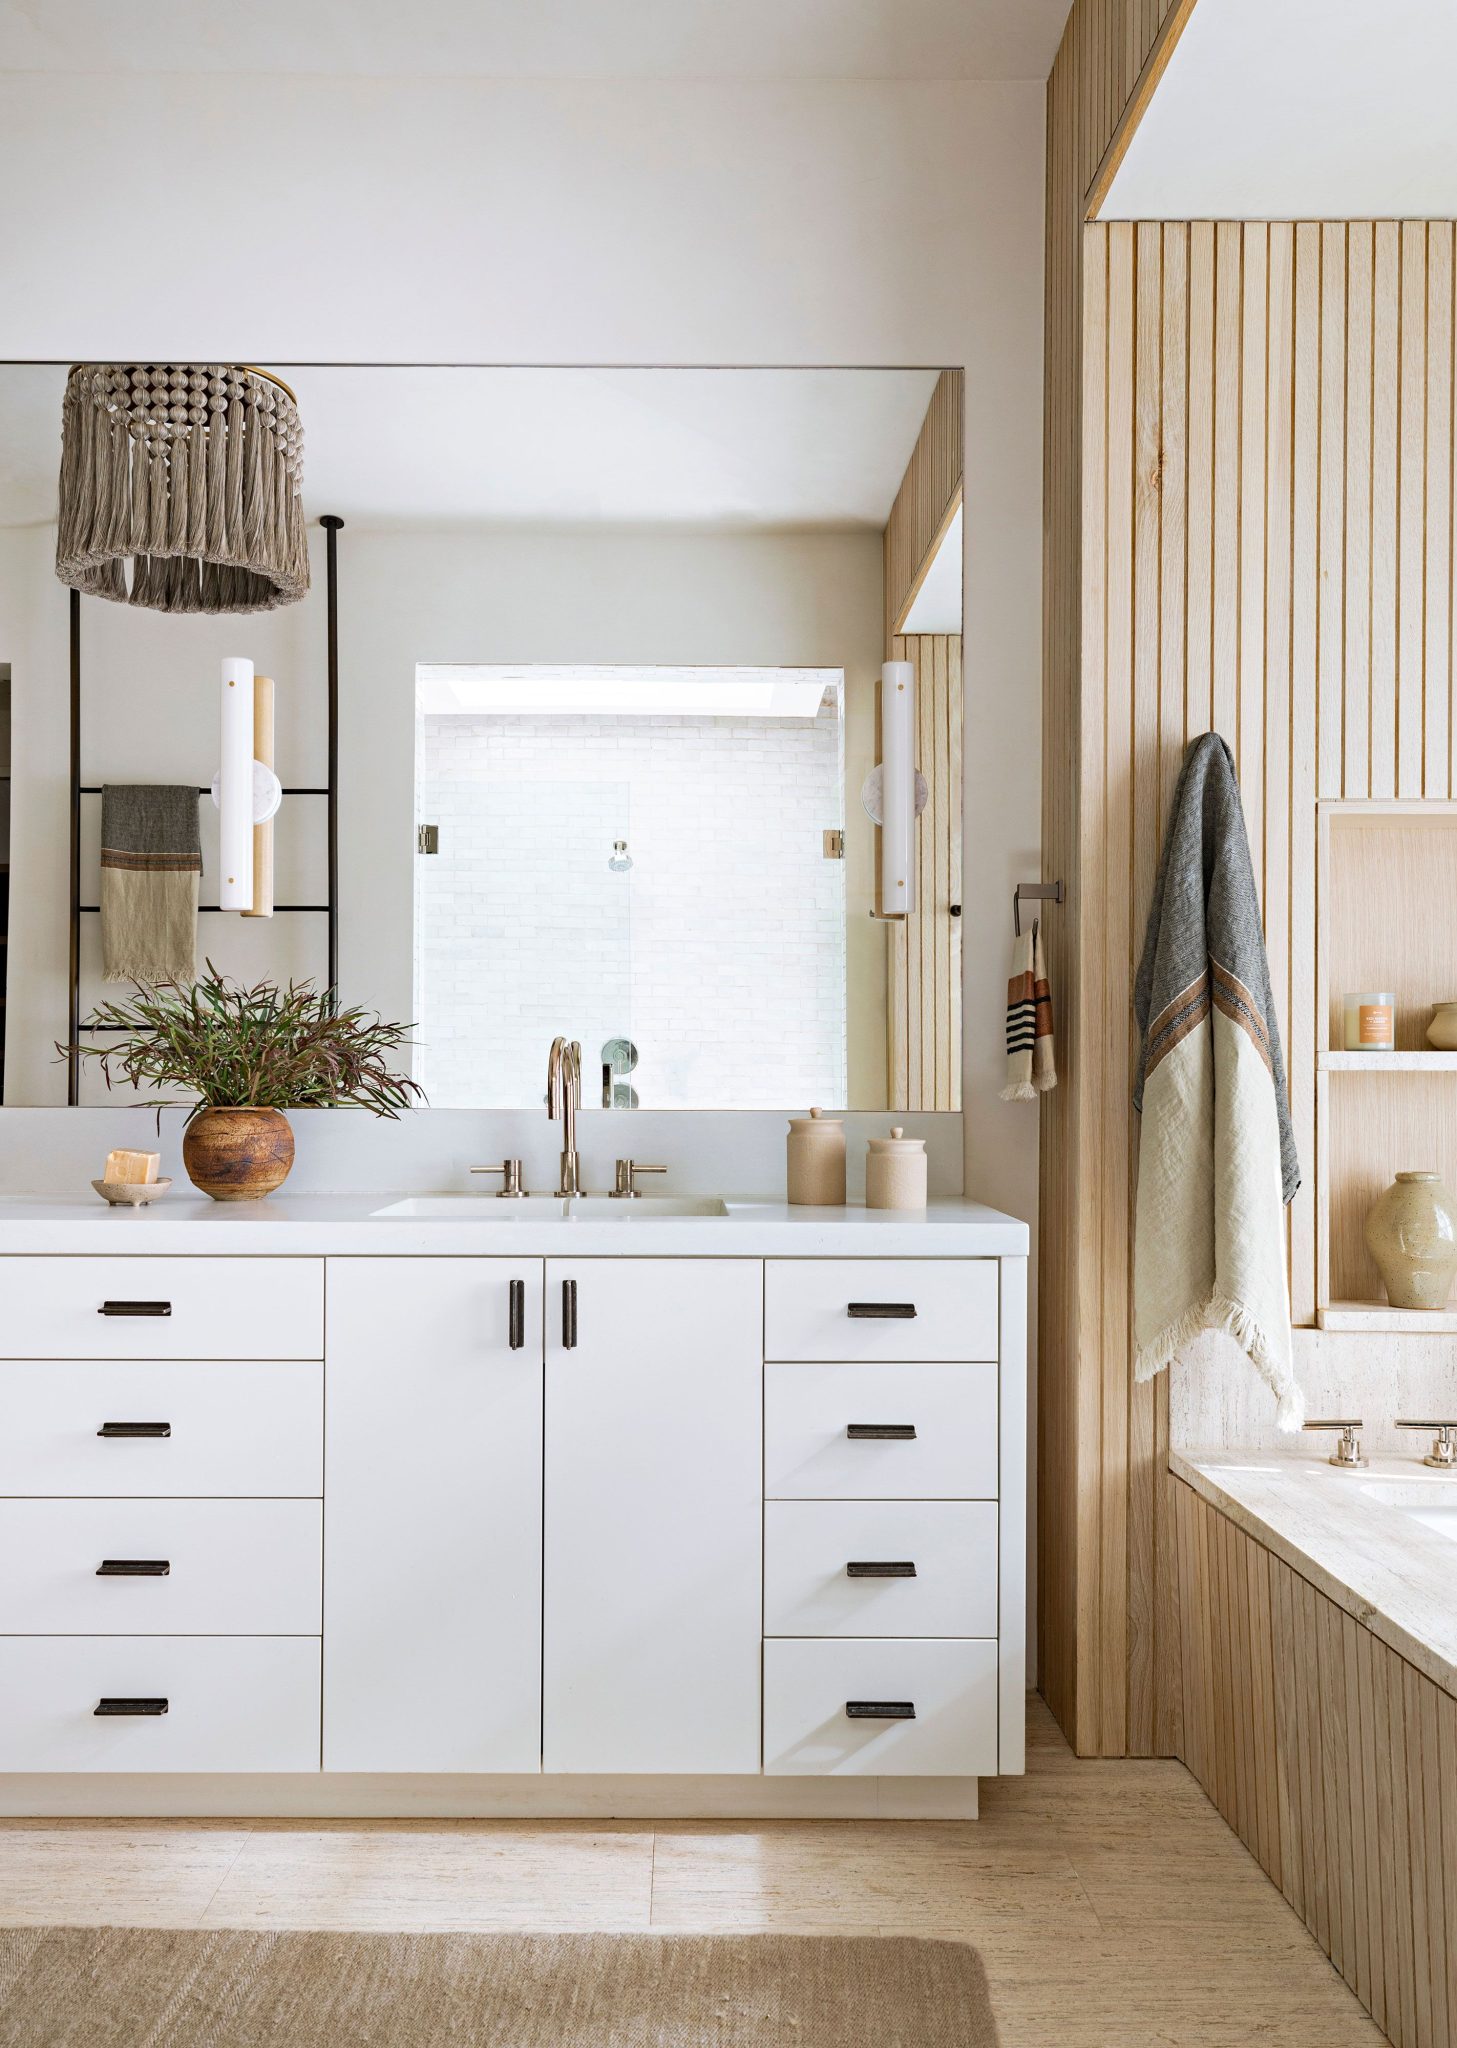
The element that truly gives this bathroom its unique personality is the macrame tassel pendant light. The rest of the design—white vanity, wood slats, subway tile—is a beautiful but fairly common modern combination. The macrame light introduces a soft, bohemian, and textural element that is completely unexpected. It breaks up the clean, hard lines of the vanity and tile, adding a touch of handcrafted charm and whimsy that makes the entire space feel more personal and curated. A generic sconce just wouldn’t have the same impact.
|
📋 Copy HEX 🔗 Share |
💰 Budget Breakdown
A fabric or macrame light fixture in a bathroom? It can work, but you have to be smart about it. This is not a good choice for a small, poorly ventilated bathroom that gets very steamy. The fabric can absorb moisture and potentially develop mildew. This works best in a larger, well-ventilated primary bathroom, and it should be placed away from the shower’s direct steam zone. The one shown here is placed at the far end of the vanity, which is a good compromise.
26. Design a Clean, Modern Space with a White and Dark Wood Palette
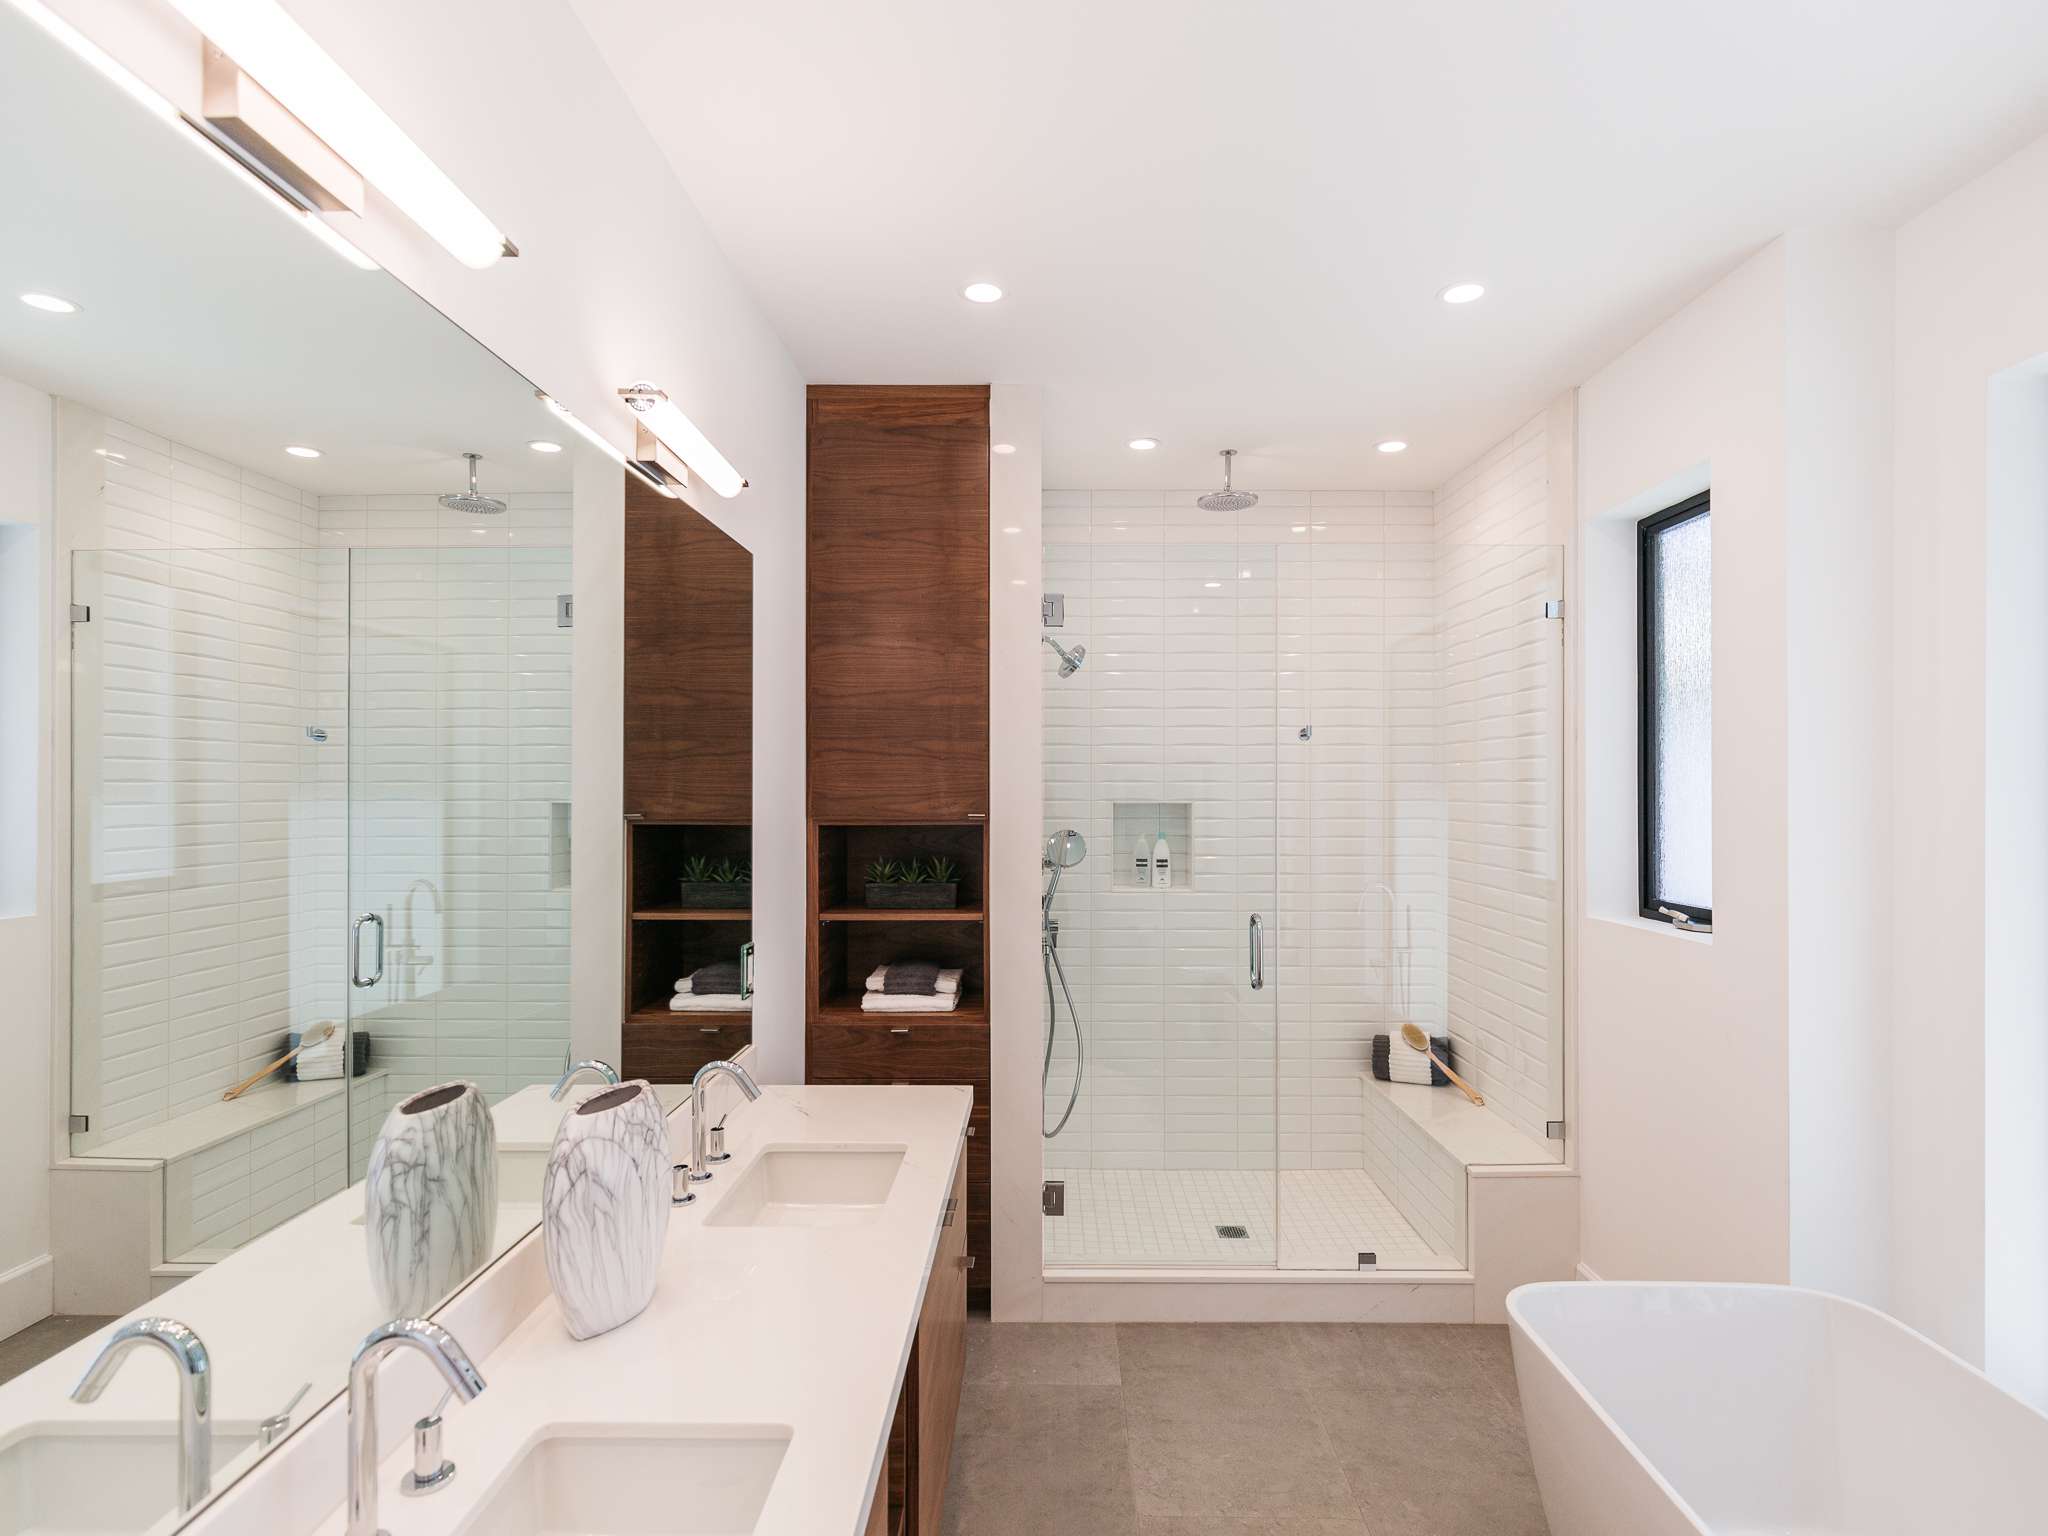
This bathroom’s success lies in its smart use of reflective and transparent surfaces to maximize light and space. The enormous mirror doubles the visual space and bounces light all around the room, making it feel bright and airy. The integrated lighting within the mirror provides a seamless, modern glow. Crucially, the massive glass-enclosed shower maintains this open feeling. If this were a solid, tiled wall or a shower curtain, the room would feel significantly smaller and darker. Glass makes the entire footprint of the shower feel like part of the room.
|
📋 Copy HEX 🔗 Share |
⭐ The One Thing
This layout, featuring a double vanity, a large walk-in shower with a bench, and a freestanding tub, demands a significant amount of space. This is a primary bathroom layout for a room that is at least 120 square feet, and more comfortably, 150+ sq ft (e.g., 10′ x 15′). A design with this many large-scale elements requires high ceilings (9′ or more) to maintain a sense of proportion and avoid feeling crowded. The clear separation between wet (tub/shower) and dry (vanity) zones is a hallmark of a well-planned large bathroom.
27. Pair a Light Wood Vanity with Pastel Green Tiles and Shiplap
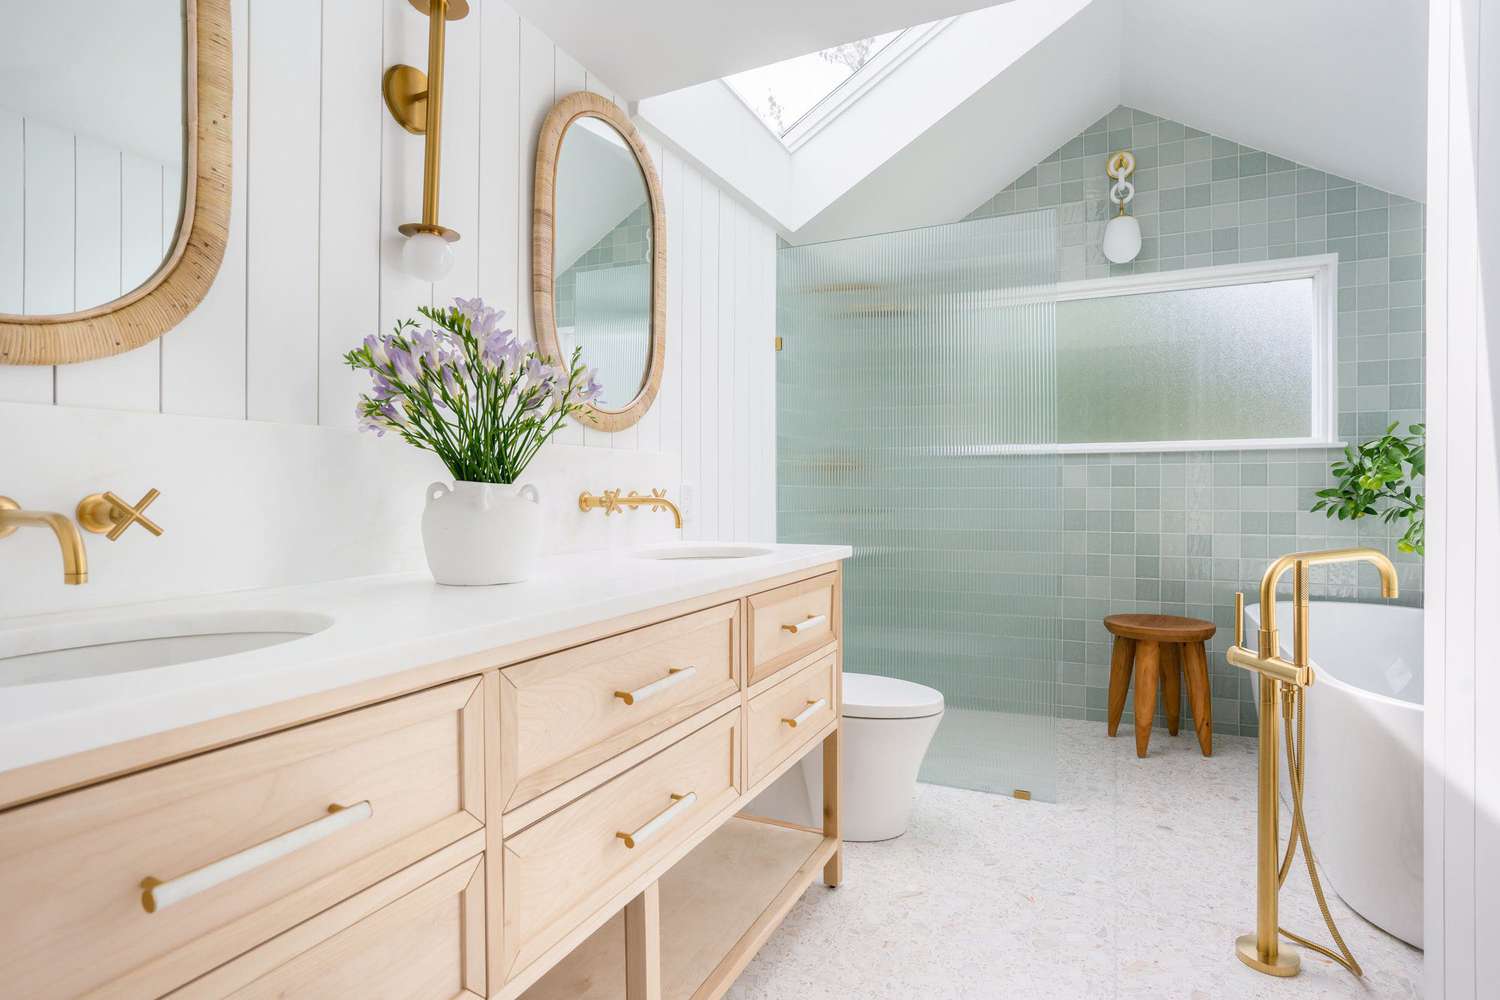
The visual recipe for this bright and airy bathroom is all about texture: 40% smooth surfaces (white shiplap, countertops), 40% natural texture (light wood vanity, rattan mirrors), and 20% glossy texture (the pastel green tiles). This mix is what makes it so interesting. The shiplap provides linear texture, the wood grain is organic, the rattan is woven, and the tiles have a reflective sheen. Keeping the color palette soft and light allows these different textures to be the main story without competing with each other.
|
📋 Copy HEX 🔗 Share |
📐 Style Math
If you’re using multiple wall treatments in one bathroom, as seen here with the shiplap and tile, the transition point is everything. The cleanest way to handle the transition is on an inside corner, where one wall covering ends and another begins. Avoid ending a wall treatment in the middle of a flat wall, as it can look abrupt and unfinished. Here, the tile and shiplap meet perfectly at the corner where the vanity wall and shower wall join, creating a deliberate, clean break.
28. Style a Serene Bathroom with Subway Tiles and Abundant Greenery
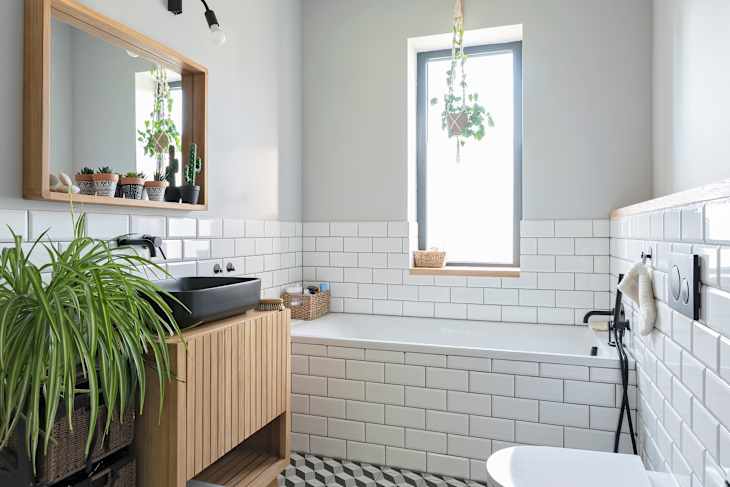
The single most important element making this bathroom feel fresh and alive is the generous use of real, green plants. The clean lines of the subway tile, the wood vanity, and the black fixtures are stylish on their own, but they could easily feel sterile. The plants—draping from shelves, sitting on the vanity, and filling corners—breathe life into the space. They add organic shapes, vibrant color, and a sense of wellness that transforms the room from a purely functional space into a refreshing retreat. This is a great example of biophilic design done right.
|
📋 Copy HEX 🔗 Share |
✅ Before You Start
Want to create a tile wainscoting effect like this one? It’s a classic look that protects walls. Time: 1 Day. Cost: $200-$600.
- Decide on the height. A typical height is 36-42 inches from the floor. Use a level to draw a guideline around the room.
- Paint the upper portion of the wall first. It’s much easier than trying to cut in against fresh tile.
- Apply your tile adhesive below the guideline and begin setting your subway tiles. Use spacers for consistency.
- Install a decorative border tile or bullnose tile at the top edge for a finished look.
- Let the adhesive cure, then grout the tile.
- Caulk the seam where the tile meets the floor and at any corners.
29. Get Cozy with Warm Brass Accents and Natural Decor
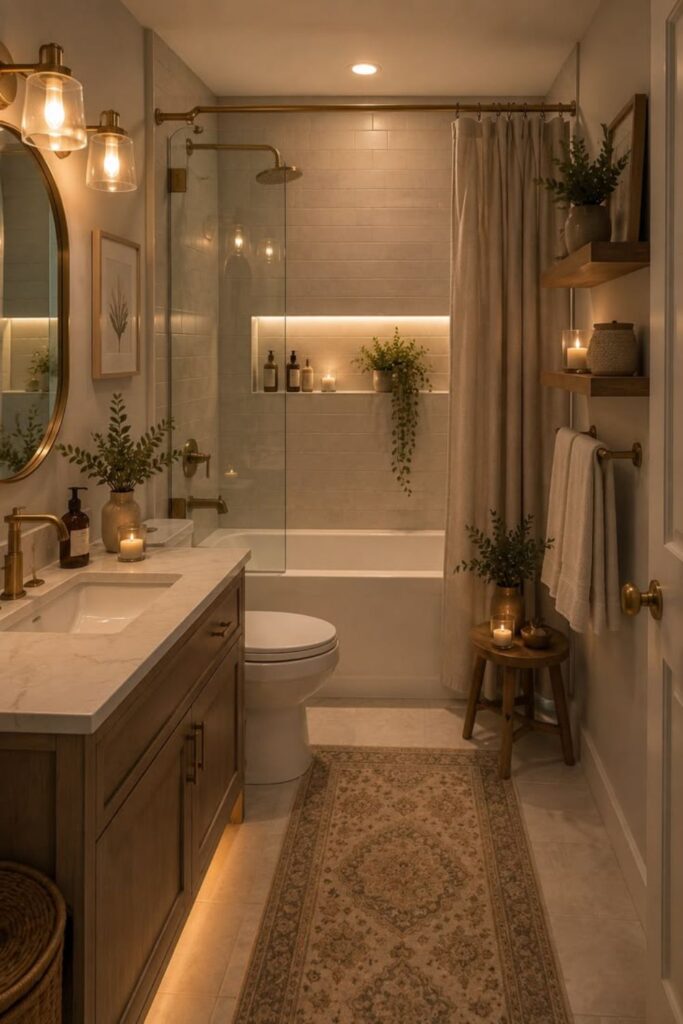
This bathroom feels exceptionally cozy because of its commitment to a warm color palette across different materials. The dominant accent is the warm, unlacquered brass of the light fixtures and hardware. This golden tone is echoed in the warm wood of the vanity and the frame of the botanical art. The cream and beige tones in the marble, shower curtain, and runner rug further reinforce this warmth. By layering these similar tones, the room develops a rich, cohesive glow that feels intentional and incredibly inviting. Compare the warmth here to the cooler tones in Idea #18.
|
📋 Copy HEX 🔗 Share |
🧹 Maintenance Reality
You can capture this warm, inviting aesthetic without a full renovation. The key is textiles and hardware. Start by swapping your current bath mat and shower curtain for versions in warm beige or cream. Find an ornate runner rug on Amazon or Wayfair. Next, replace your cabinet pulls and even your faucet with affordable brass-toned options from a home improvement store. Add a small plant and some botanical art from Etsy or Society6. These small, affordable changes can completely shift the mood of the room.
30. Make a Statement with a Translucent Rust-Colored Bathtub
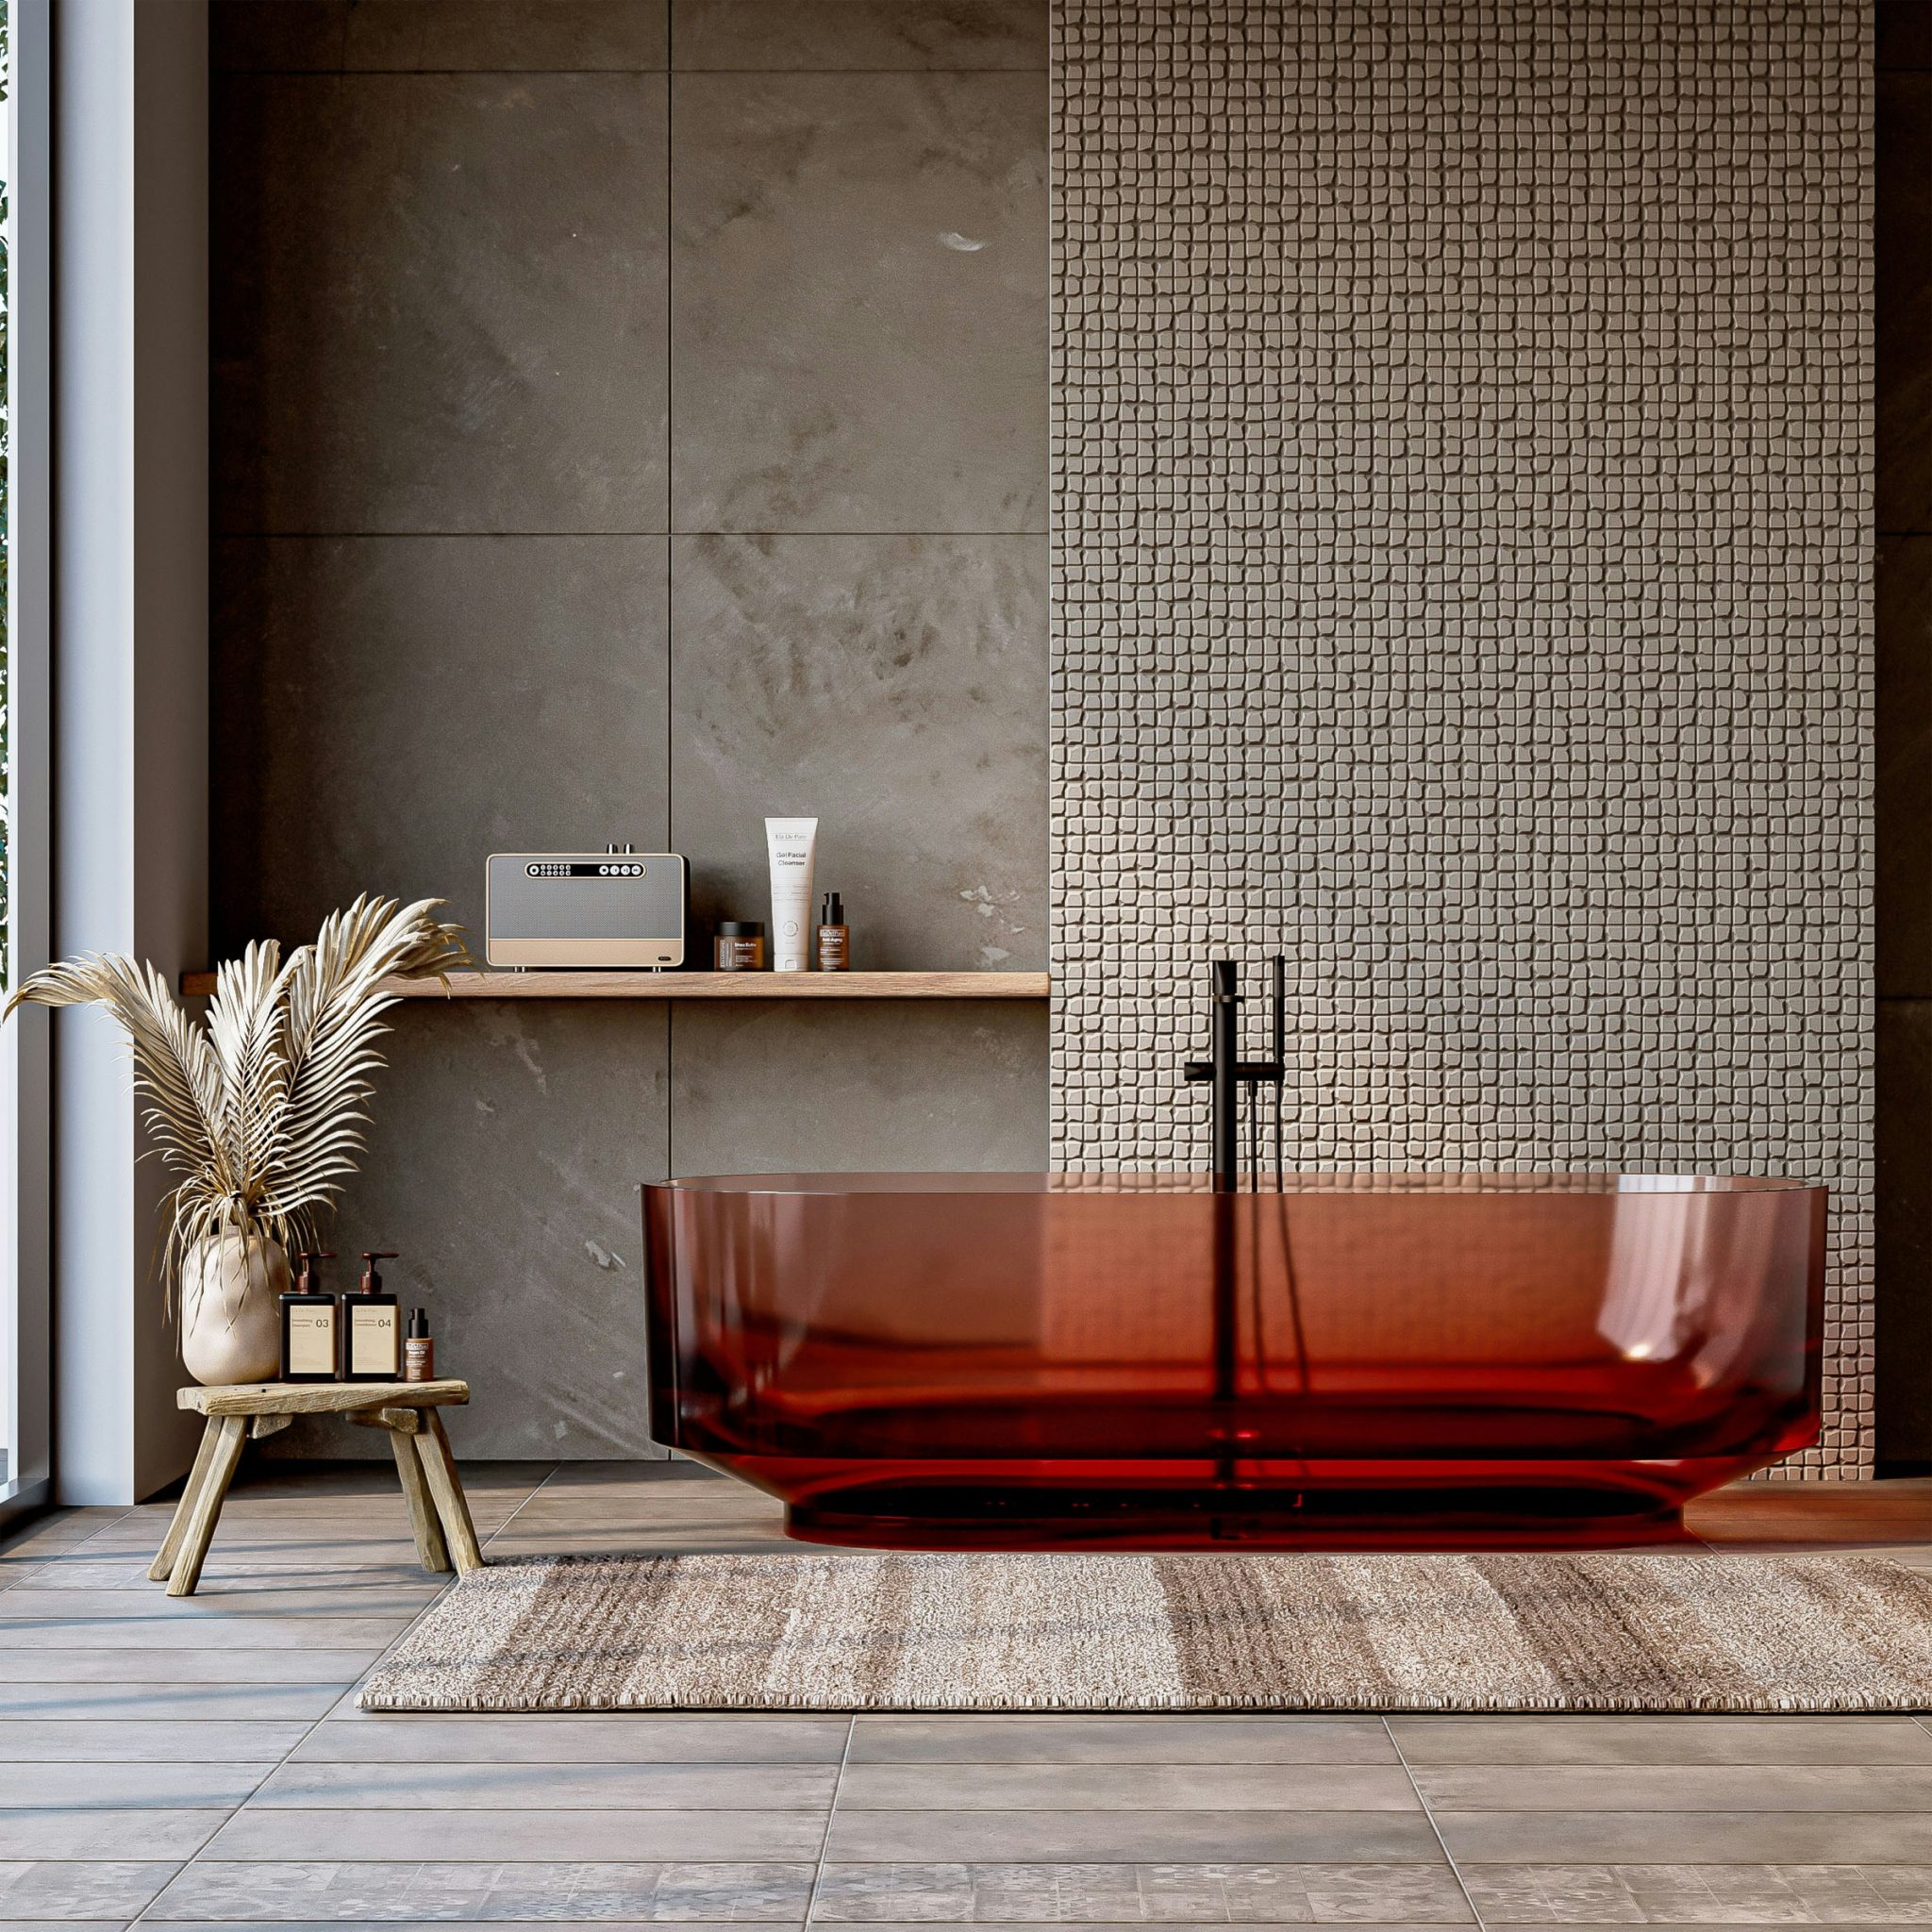
There is no question: the rust-colored translucent bathtub is the entire story here. It is a bold, sculptural, and utterly unexpected choice that instantly elevates the bathroom into a high-design space. The resin material glows when light hits it, creating a focal point that is both a functional object and a piece of art. The rest of the room, with its neutral gray walls and simple wood stool, is deliberately muted to allow the tub to be the undisputed hero. It’s a confident design move that pays off spectacularly.
|
📋 Copy HEX 🔗 Share |
🔥 Trending Context
A resin tub is a stunning centerpiece, but it requires specific care. The material is softer than acrylic or porcelain, so it can be more susceptible to scratching. Avoid abrasive cleaners, scouring pads, or harsh chemicals. Stick to mild soap and a soft cloth for cleaning. Some colored resins can also be sensitive to UV light over time, so if the tub is in direct, sustained sunlight, there could be a risk of fading. It’s best to check the manufacturer’s specific recommendations for cleaning and care.
31. Go for Modern Luxury with a Fluted Wood Accent Wall
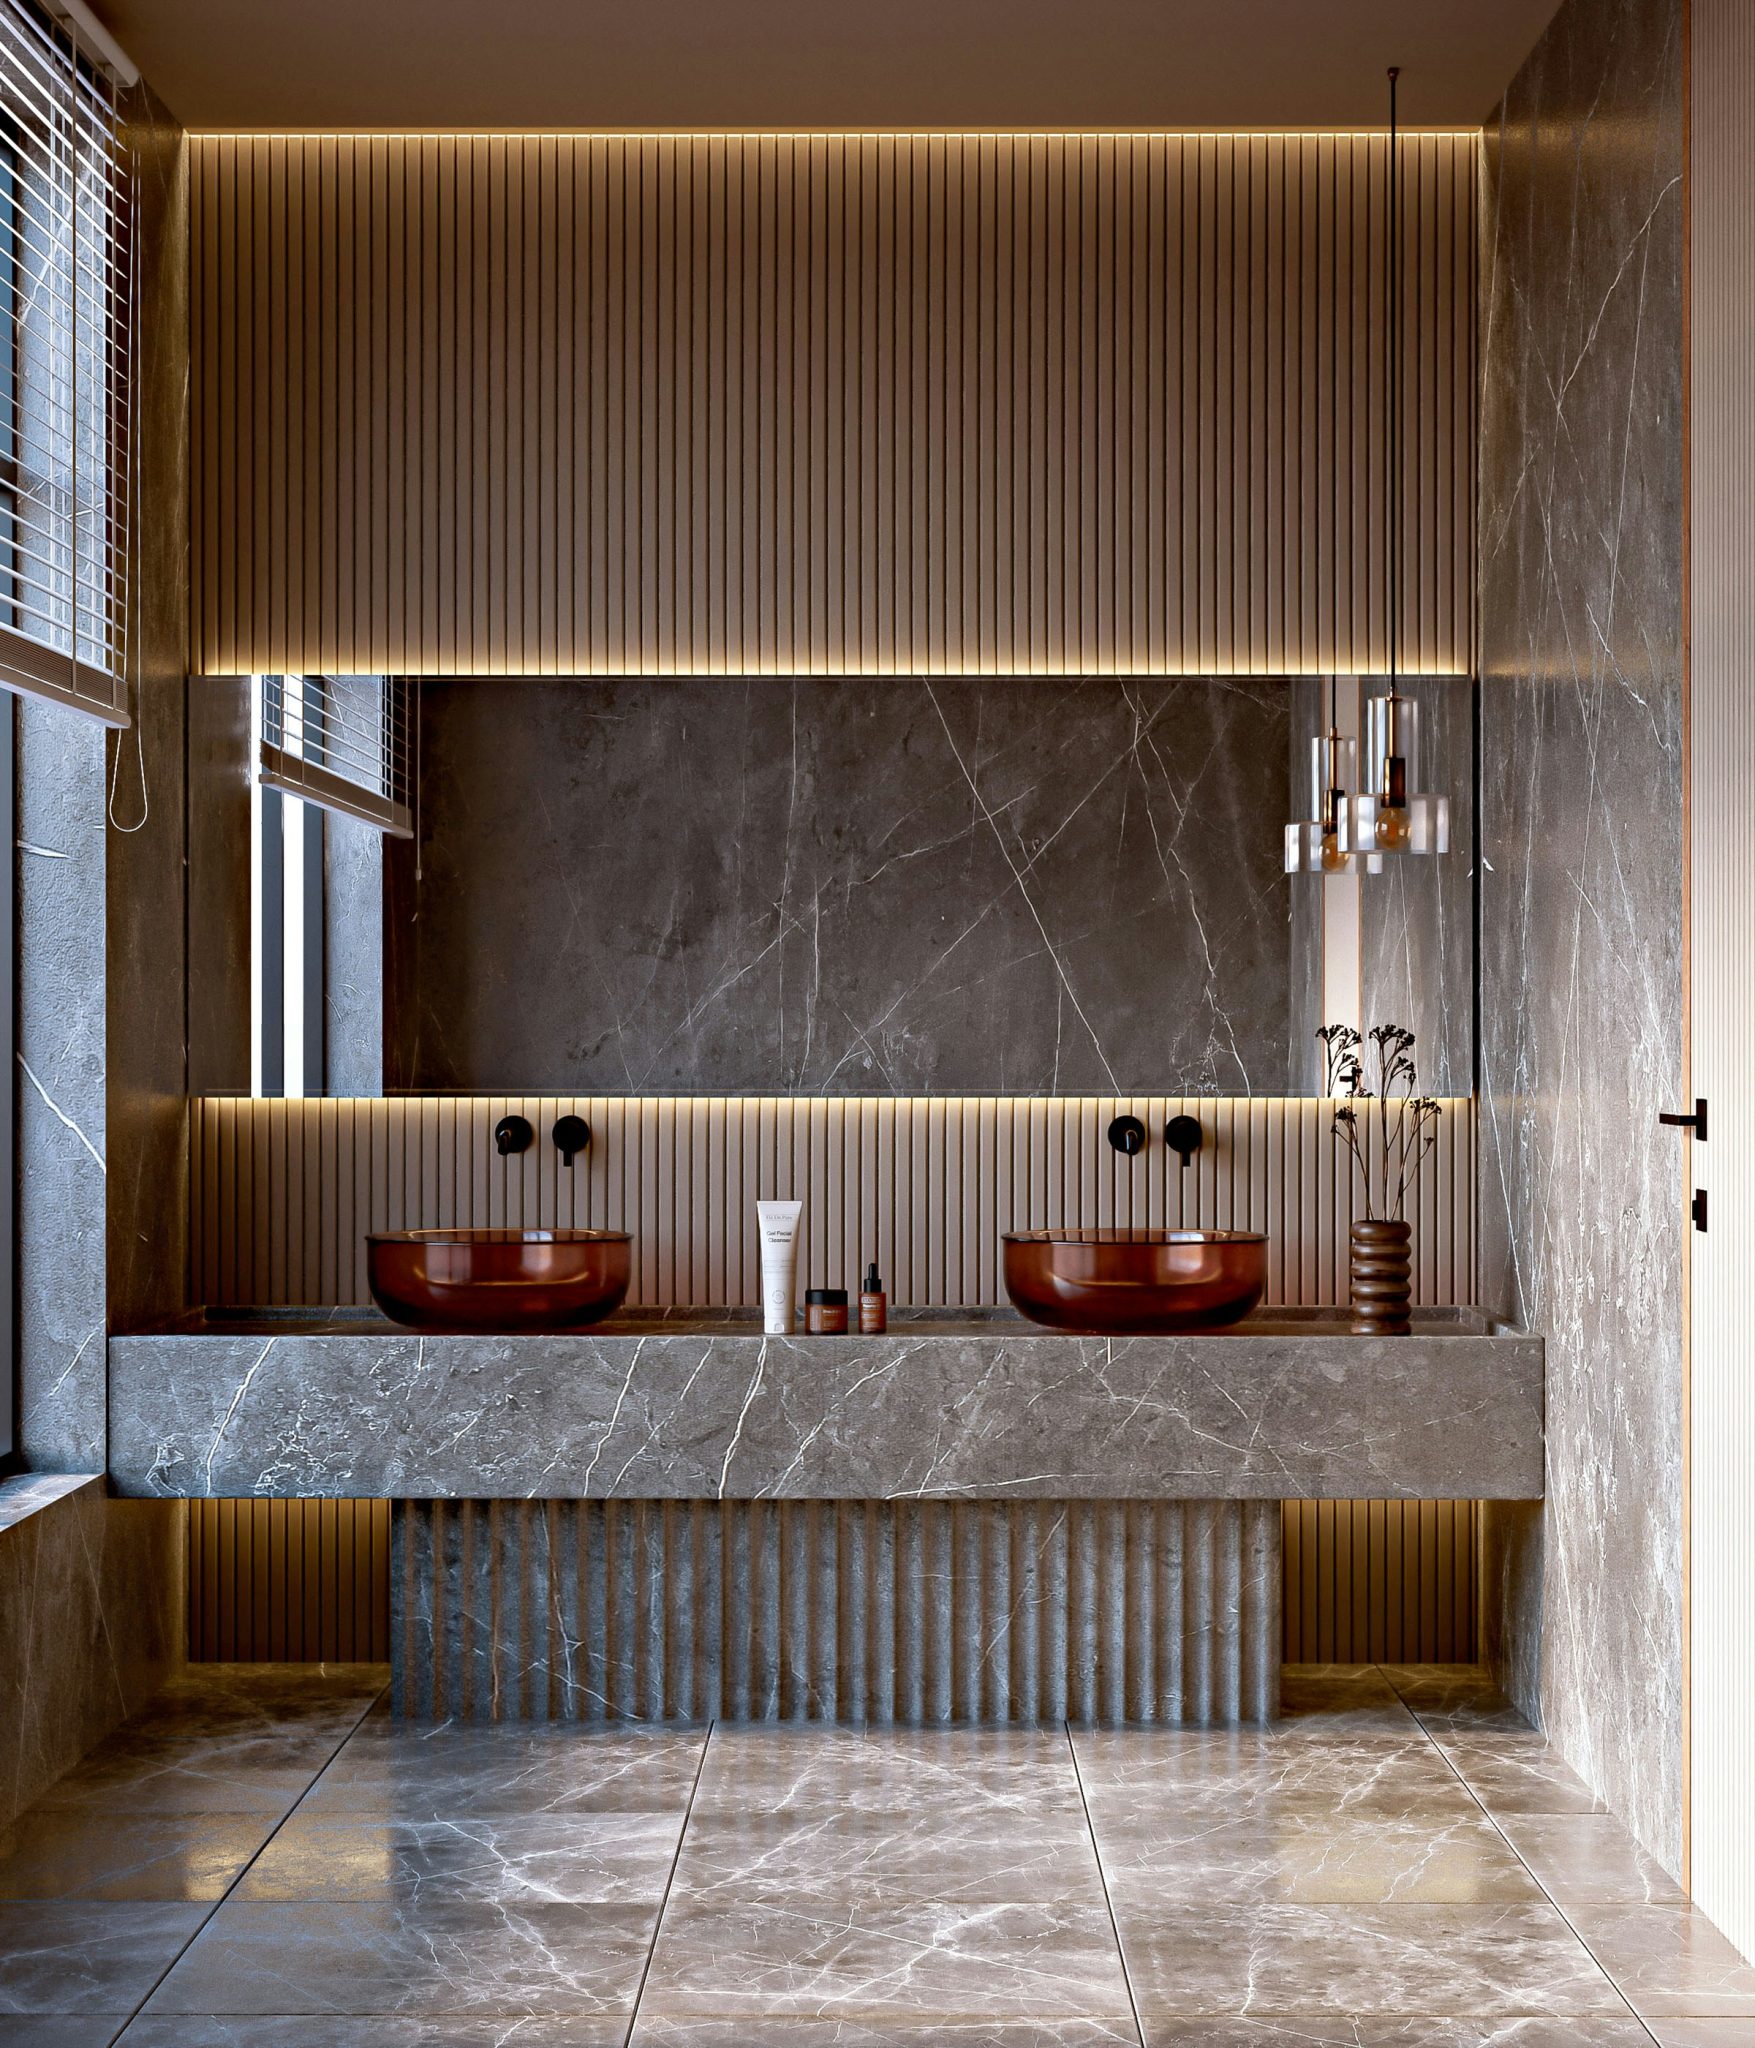
This bathroom achieves its sophisticated, luxurious feel through a masterful mix of textures and lighting. The smooth, cool dark marble provides a dramatic, high-end base. This is contrasted with the warm, linear texture of the fluted wood paneling. The real genius is the integrated strip lighting, which grazes the wood panels and the marble wall, highlighting their textures and creating a soft, ambient glow. The final layer is the pop of matte texture from the terracotta sinks and black faucets, which adds a contemporary, earthy element.
|
📋 Copy HEX 🔗 Share |
📏 Scale Guide
This high-end, modern look comes with a significant price tag, driven by premium materials and custom lighting.
- Wall/Floor Treatment: Dark Grey Marble Slabs & Tile: $5,000 – $15,000+
- Feature Wall: Fluted Wood Paneling & Integrated Lighting: $2,000 – $5,000
- Vanity/Sinks: Custom setup w/ Terracotta Vessel Sinks (2): $1,500 – $4,000
- Fixtures: Wall-Mount Faucets (2) & Pendants (2): $1,200 – $3,500
- TOTAL: $9,700 – $27,500+
- Budget alternative: Use marble-look porcelain tile ($3k), a stock vanity with vessel sinks ($1k), and similar-style fixtures ($800). Total look for ~75% less.
32. Style a Vanity Tray with Amber Glass and a Wood-Lid Candle
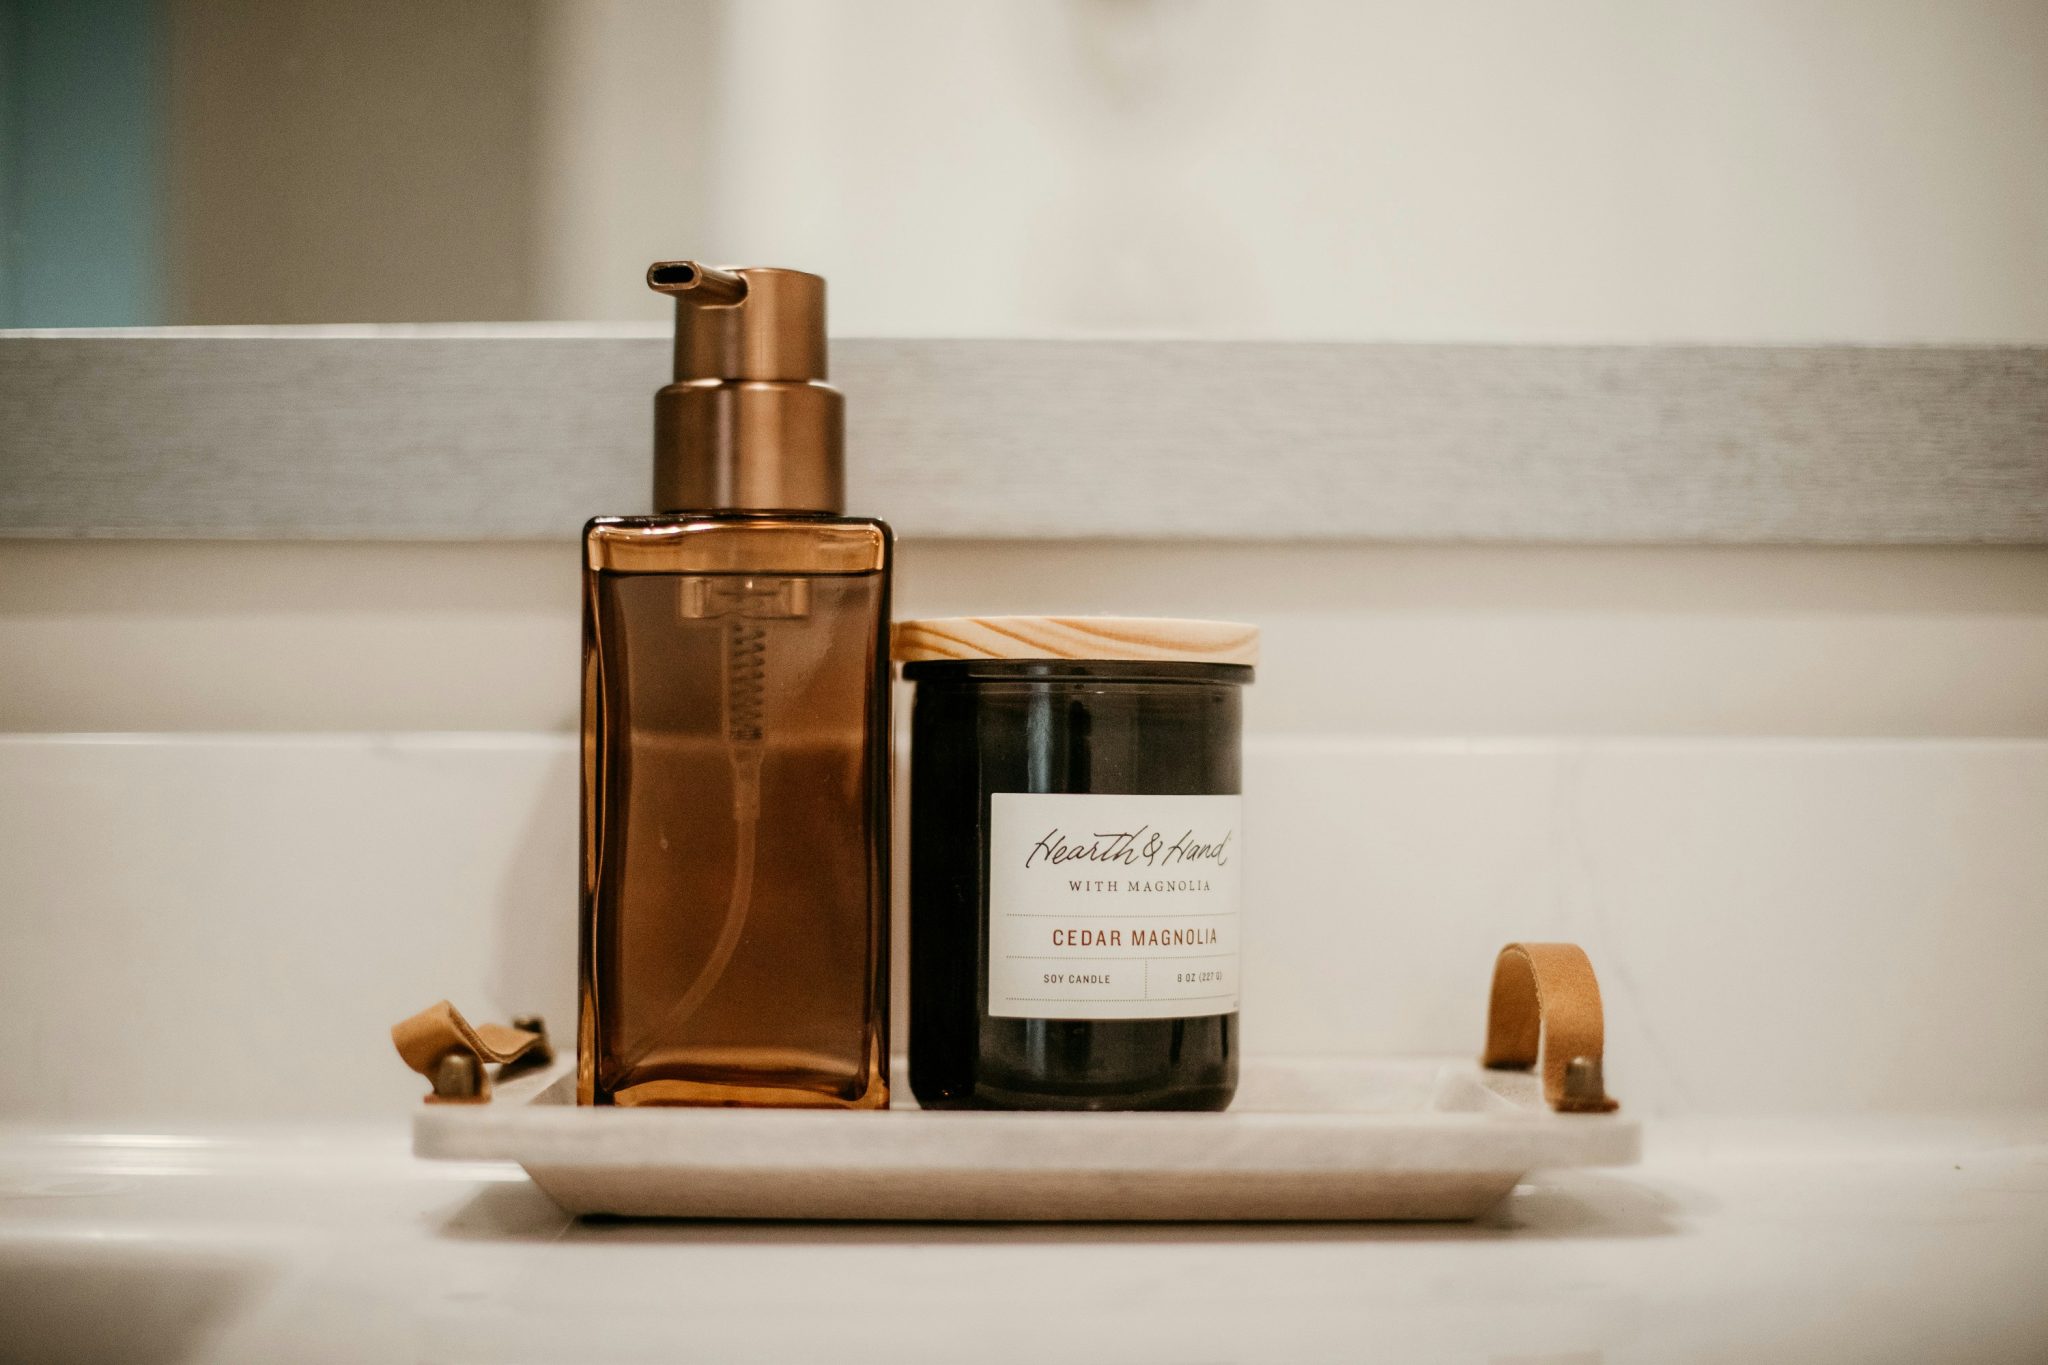
The secret to a beautifully styled vanity tray is the ‘rule of three.’ Grouping items in odd numbers, particularly threes, is more visually appealing and dynamic than even numbers. Notice how this arrangement consists of three core items: the tray, the soap dispenser, and the candle. Within that, vary the height and texture: the dispenser is tall and glossy, the candle is short and dark, and the tray is a flat, veined marble. This simple principle can turn a random collection of items into a chic, intentional vignette.
|
📋 Copy HEX 🔗 Share |
💸 Get This Look For Less
You don’t need to spend a fortune to get this serene and organized look. The key components are widely available at budget-friendly stores. Find a stylish amber glass soap dispenser at Target for around $10. The ‘Black Cedar & Magnolia’ candle aesthetic is popular; look for similar dark glass candles with wood lids at Walmart or HomeGoods for $10-$15. A faux marble tray can be found on Amazon for under $20. You can pull together this entire elegant look for less than $50.
Your Autumn Refresh Starts Here
Now that you’re armed with plenty of inspiration, the next step is making it your own. Pick one or two elements that you truly love and start there—even a small change can make a big impact. A new set of towels, a well-styled tray on the vanity, or a change in lighting can completely transform the feel of your space.
Don’t forget to save your favorites to your Pinterest board to keep the ideas flowing for your next project!