30 Jaw-Dropping DIY Plant Stand Ideas You Need to Try in 2026 That Will Transform Your Indoor Garden
You know that feeling when you finally find the DIY plant stand idea that looks exactly right for your space? After filtering through hundreds of designs on Pinterest and designer portfolios, we narrowed it down to these 30 ideas that actually deliver. You’ll find curated inspiration covering styles from modern minimalist and rustic farmhouse to bohemian and statement sculptural pieces.
In 2026, it’s all about hyper-personalization and sustainability. Creating your own plant stand isn’t just a budget move; it’s a design statement that brings a unique, handmade touch to the spaces we spend so much time in. And stay until the end — we break down the most common mistakes that can ruin these looks.
📌 Save this to Pinterest for later — you’ll want to revisit these ideas.
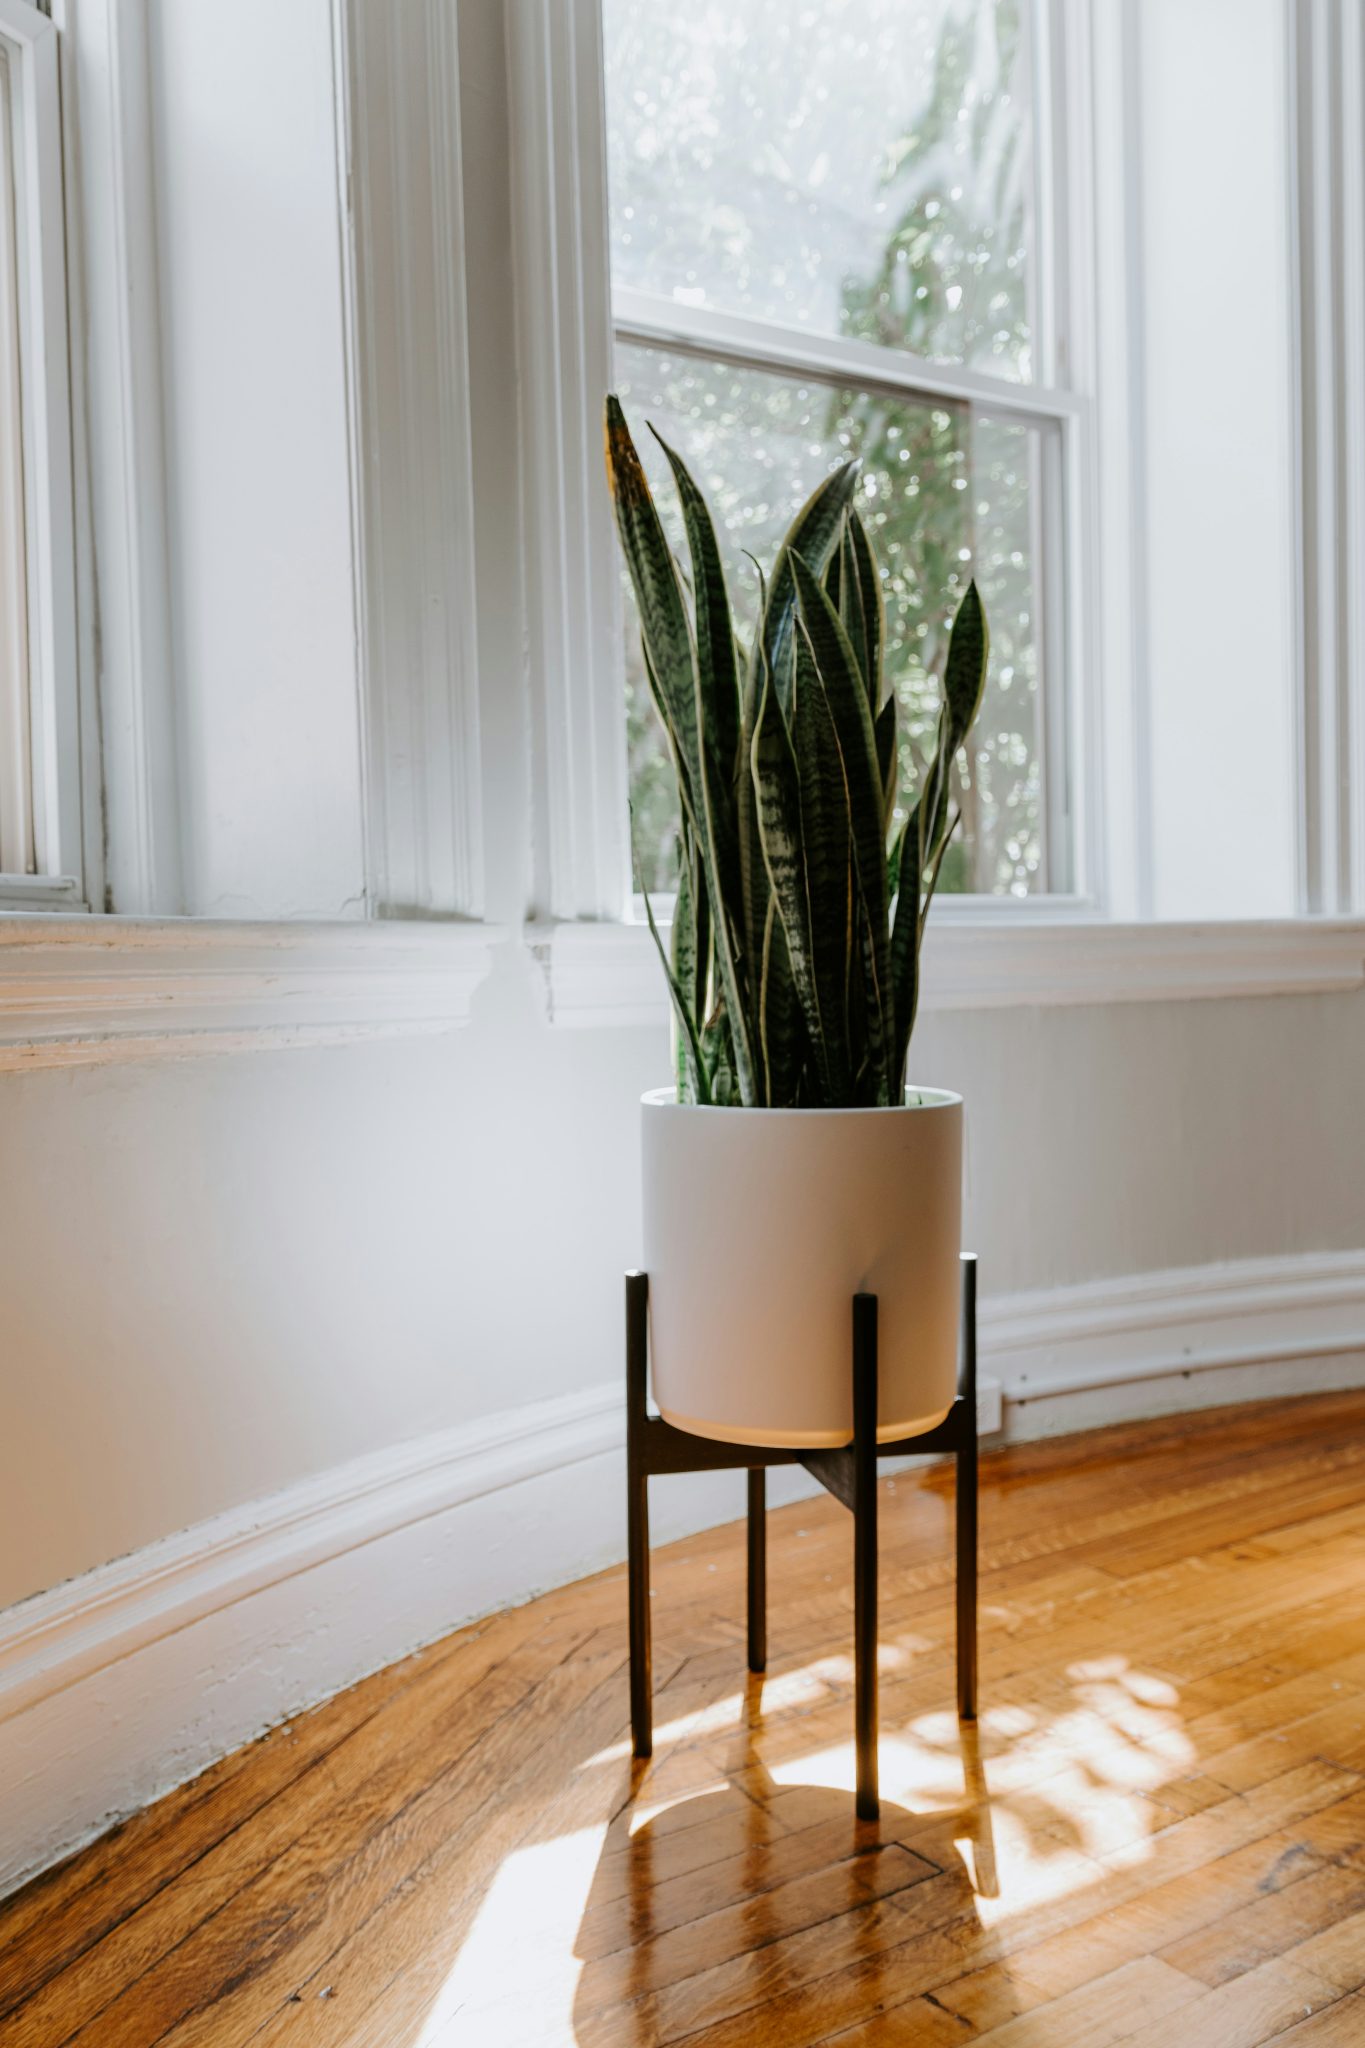
1. A Minimalist Black Stand for a Sun-Drenched Corner
This look is a masterclass in simplicity and contrast. The power comes from the tension between three key elements: the deep green of the snake plant, the crisp white of the cylindrical planter, and the graphic black lines of the metal stand. This isn’t just a plant in a corner; it’s a deliberate composition. The natural light from the large window acts as a spotlight, turning the simple setup into a living sculpture and casting beautiful, long shadows across the light wood floor, adding another layer of visual interest.
|
📋 Copy HEX 🔗 Share |
✅ Before You Start
For a DIY version of a minimalist metal stand, use 1/2-inch square steel tubing. To get crisp, professional-looking welds, you’ll need a simple flux-core or MIG welder, which you can often rent. Before you weld, create a jig out of scrap wood to hold the legs at the perfect angle. This ensures all four legs are identical. For the finish, skip the spray paint. Instead, use a self-etching primer followed by a high-quality matte black industrial enamel for a finish that looks powder-coated and will last for years without chipping.
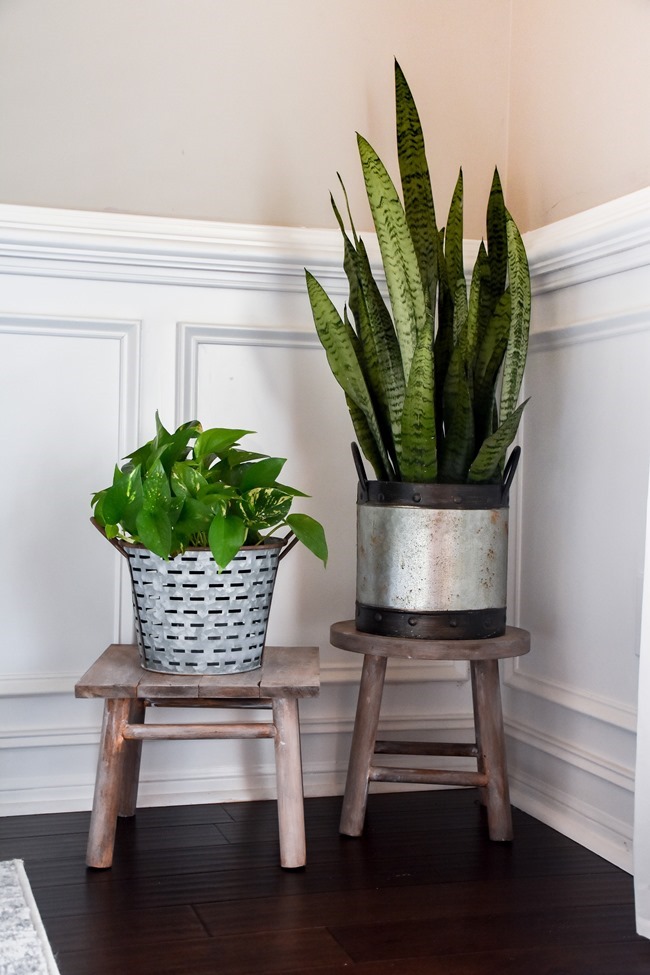
2. Create a Rustic Moment with Wooden Stools
You don’t need a formal plant stand to get this look. The secret here is using everyday objects. Simple, rustic wooden stools are the perfect stand-in. Hunt for them at thrift stores or on Facebook Marketplace—you can often find them for $10-$20 each. The key is to look for stools with some character: nicks, scratches, and a bit of wear tell a story. Pair them with galvanized metal planters, which you can find at any hardware or garden store, to lean into that rustic, found-object vibe. The juxtaposition against the clean white wainscoting keeps it feeling fresh, not junky.
|
📋 Copy HEX 🔗 Share |
💰 Budget Breakdown
Think of this corner as a simple equation: 50% rustic texture + 40% clean lines + 10% metallic accent. The wooden stools provide the rustic, earthy base. The white wainscoting and the simple vertical lines of the snake plant bring in the clean, almost modern element. Finally, the galvanized planters add that small but crucial pop of industrial, metallic sheen. You could swap the galvanized metal for terracotta pots and it would feel more Mediterranean, or use sleek white ceramic pots to lean more modern, but the core formula remains the same.
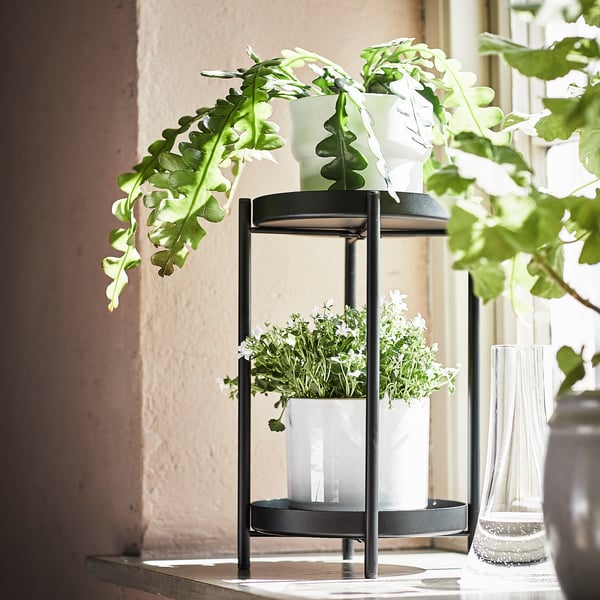
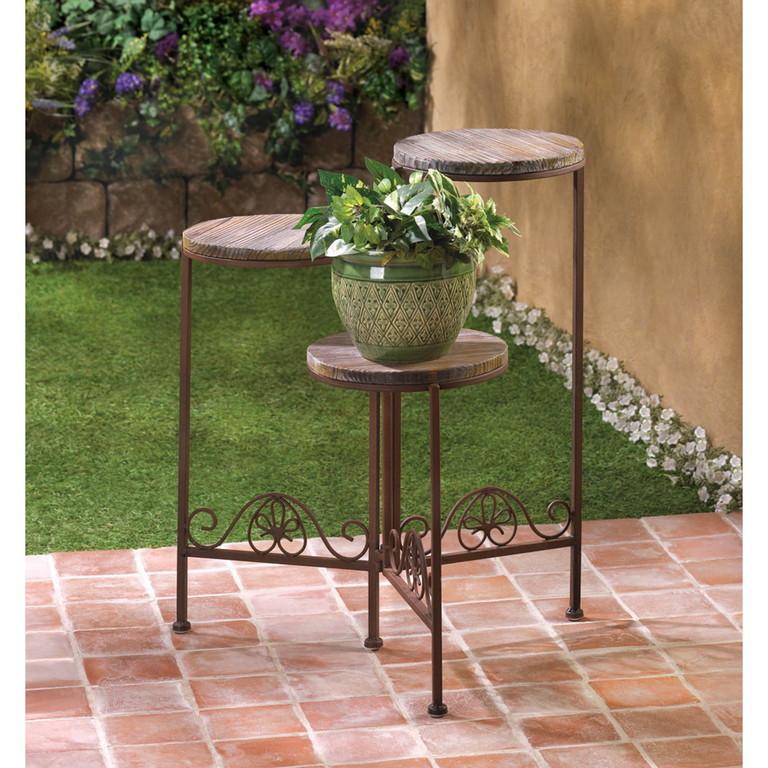
3. A Two-Tiered Black Metal Stand for a Peachy Keen Corner
Tiered stands like this are perfect for small spaces where you want to maximize your plant display without taking up a huge footprint. This design works best in a room with at least 8-foot ceilings, as the verticality helps draw the eye upward. It’s ideal for a corner with a footprint of about 24×24 inches. The open metal frame keeps it from feeling heavy, making it suitable for smaller living rooms or bedrooms where a bulky piece of furniture would feel overwhelming. The stepped design allows light to reach both plants, a practical consideration often missed. Compare its airy feel to the more substantial wood versions in Idea #7.
|
📋 Copy HEX 🔗 Share |
💡 Designer Tip
To DIY the tiered frame, you can use pre-drilled square steel tubing and connectors for a no-weld option. Here’s a quick guide:
- Measure and cut your tubing to create the main rectangular frame and the shorter legs for the bottom tier. Aim for an overall height of about 30 inches.
- Use 3-way corner connectors to join the main frame pieces. A rubber mallet can help seat them securely.
- Attach the bottom shelf supports about 12 inches from the floor.
- For the shelves, use simple wooden rounds or squares. Cut them to size and sand the edges smooth.
- Finish the metal with matte black spray paint and seal the wood shelves before placing your plants.
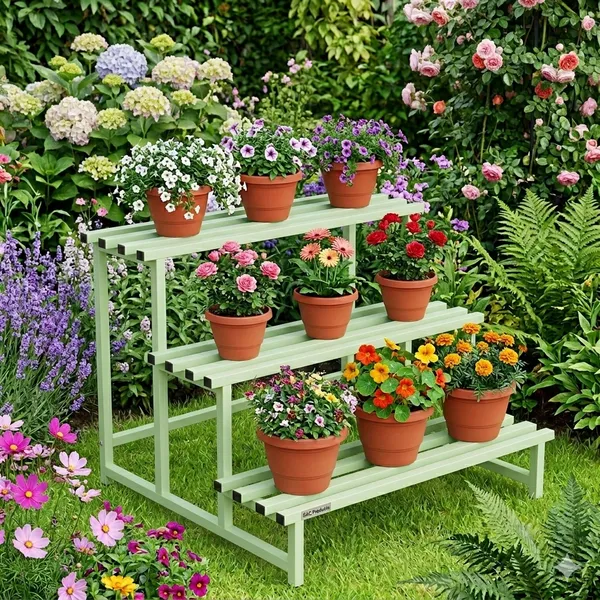
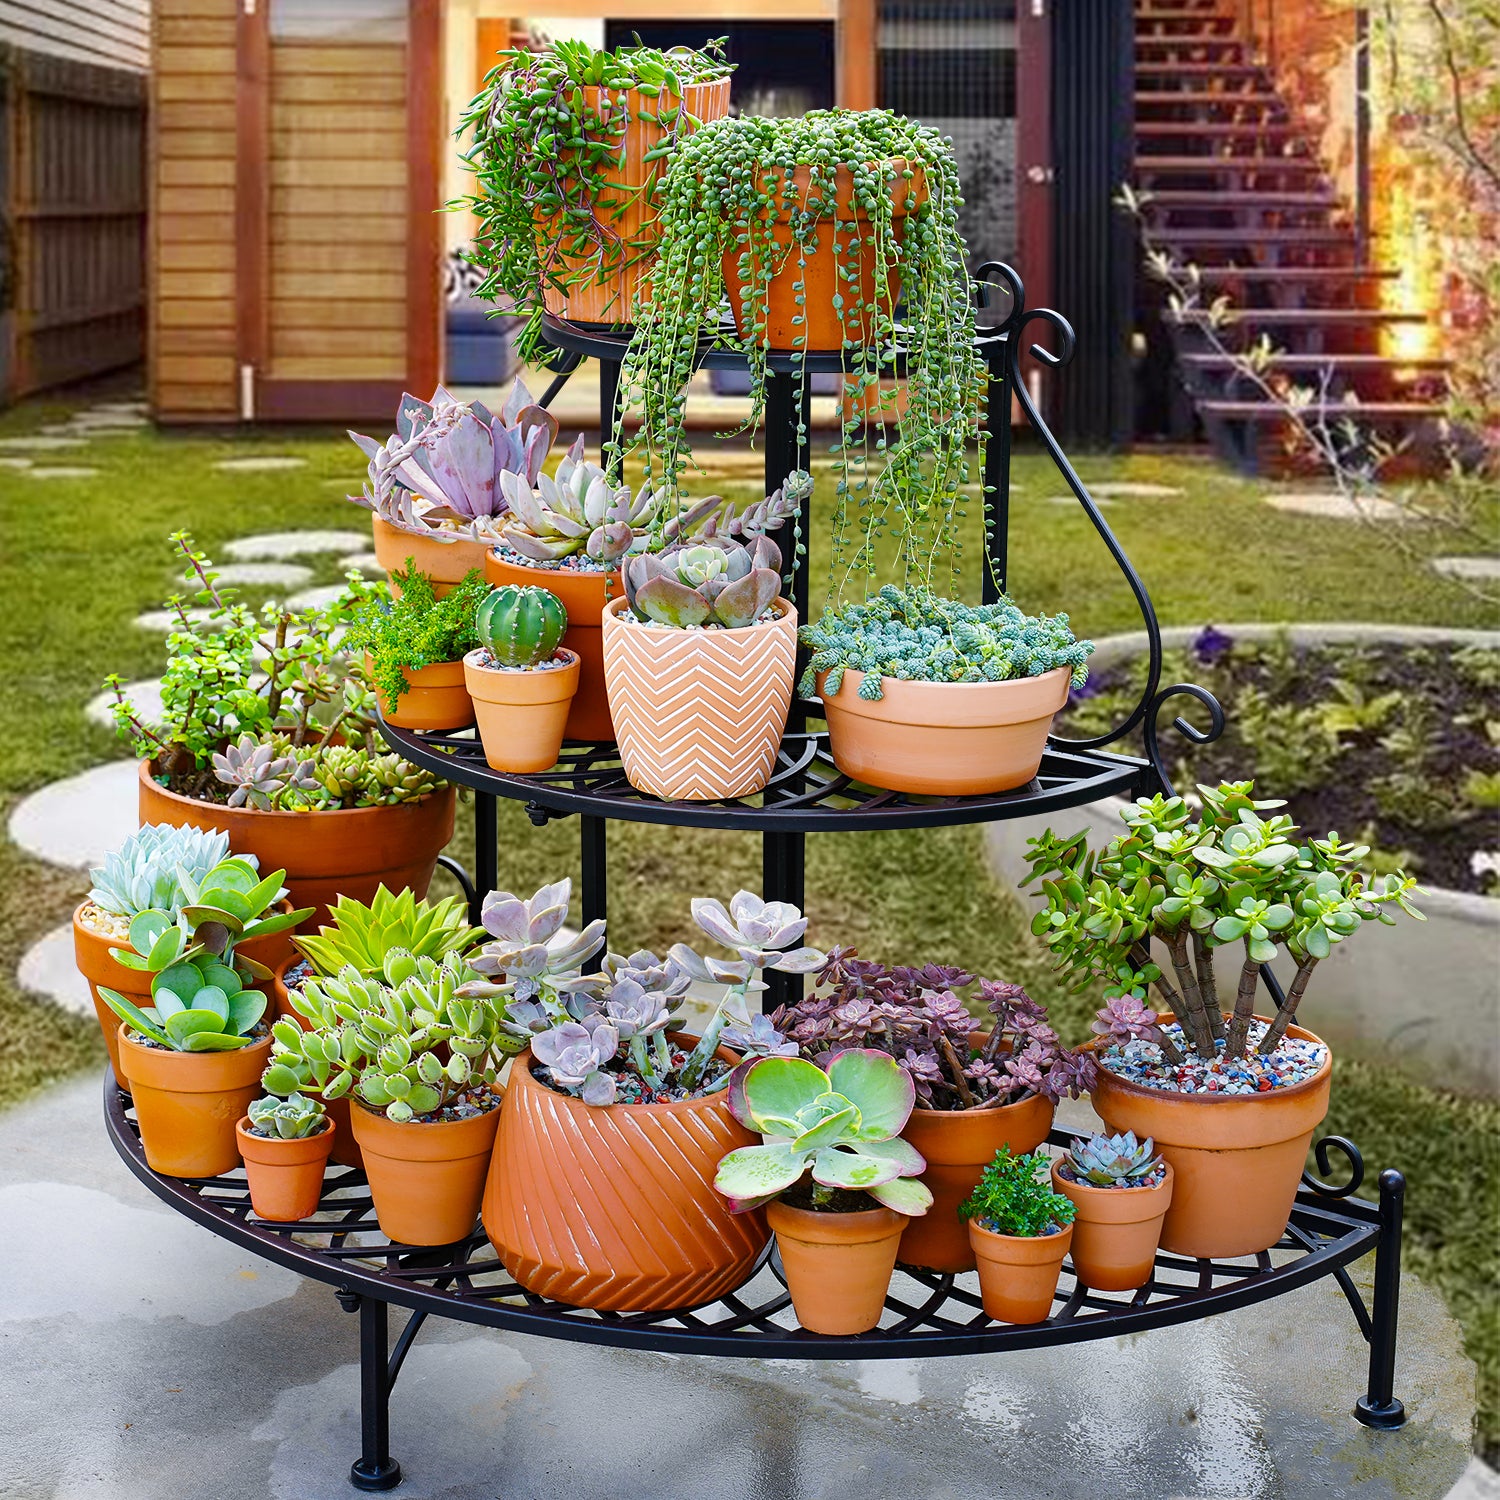
4. Outdoor Tiered Stand Brimming with Terracotta
The single most important element here is repetition. It’s not just one terracotta pot; it’s a whole collection of them. This commitment to a single material is what gives the arrangement its cohesive and intentional look. If you were to mix in plastic, glazed ceramic, and metal pots, the stand would instantly look cluttered and accidental. By sticking almost exclusively to classic terracotta, the focus shifts to the variety of colors and textures of the flowers themselves. The light green of the stand is the perfect complementary color to the warm orange-brown of the pots, making them both pop.
|
📋 Copy HEX 🔗 Share |
📏 Scale Guide
A stand like this, living outdoors, needs attention. The light green painted finish will likely need a touch-up every two years to prevent rust and fading, especially if it’s in direct sun. Terracotta is porous, which is great for plant roots but means the soil dries out very quickly in summer heat, so be prepared for daily watering. In winter, if you live in a climate with freeze-thaw cycles, you must bring the terracotta pots indoors. If left out, water absorbed into the clay will freeze, expand, and crack your pots. It’s a beautiful look, but it’s not a set-it-and-forget-it arrangement.
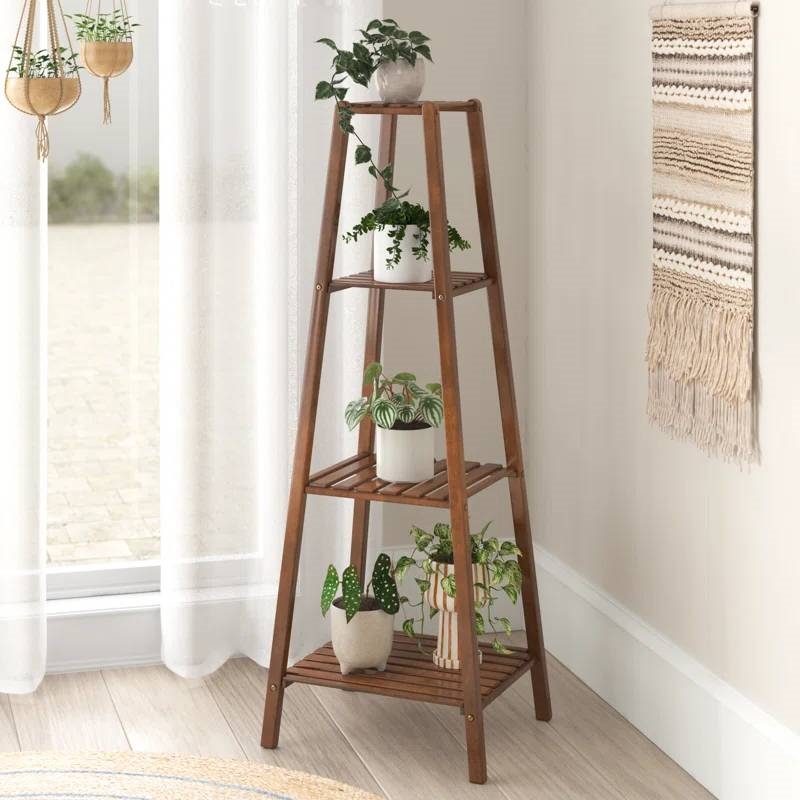
5. The Classic Corner Wood Plant Stand Solution
A corner stand can feel a bit… predictable. Let’s be honest, it’s often a default choice to fill an awkward, empty space. The biggest risk is that it becomes a piece of ‘visual clutter’ rather than an intentional design moment. If the wood tone doesn’t match or complement anything else in the room (floors, furniture), it can stick out like a sore thumb. Also, be mindful of the ‘plant hospital’ syndrome, where a corner stand becomes a sad repository for every struggling plant you own. A corner should be a highlight, not a hideaway.
|
📋 Copy HEX 🔗 Share |
🎯 What Makes It Work
To make a corner stand work, think in threes. The rule of thirds applies to styling, too. Instead of lining up plants of the same height, create a dynamic triangle. Place your tallest plant on the top or bottom shelf, a medium-sized, fuller plant on another, and a small trailing plant on the third to create movement. Ensure your pot sizes and colors are varied but complementary. For a 3-shelf stand, try one large pot (10-12 inches), one medium (6-8 inches), and a few small ones (4-5 inches) grouped together. This creates rhythm and visual hierarchy.
6. A Semi-Circular Stand for a Succulent Collection
This stunning display follows a clear formula: 60% uniform material + 30% varied texture + 10% structural framing. The ‘uniform material’ is the terracotta; using it for nearly every pot creates a powerful, cohesive statement. The ‘varied texture’ comes from the diverse shapes of the succulents and cacti themselves—spiky, smooth, rosette, trailing. This is what keeps the uniform color from feeling boring. The ‘structural framing’ is the minimalist black metal stand, which neatly corrals the collection and gives it presence without stealing the show.
|
📋 Copy HEX 🔗 Share |
💸 Get This Look For Less
Before you commit to a succulent collection like this, here’s a quick checklist to ensure success:
- Sunlight Check: Does this spot get at least 6 hours of direct sunlight per day? Most succulents and cacti will etiolate (stretch and become pale) without it. An east or south-facing patio is ideal.
- Drainage Plan: The stand is on a concrete stone. Is it perfectly level? Will water drain away freely, or will it pool and stain the concrete? Ensure there’s a slight slope away from any walls or foundations.
- Potting Prep: Do you have cactus/succulent-specific soil mix? Regular potting soil holds too much water and will lead to root rot.
7. A Modern Mix of Black Metal and Natural Wood Shelves
The success of this piece hinges on the principle of mixed materials. The black metal frame provides a strong, graphic, and industrial outline. It feels clean and modern. But on its own, it could be cold. The natural wood shelves are the perfect counterbalance. They introduce warmth, organic texture, and a touch of nature that softens the metal’s hard edge. This is the same design trick used in tons of popular furniture—think industrial-style coffee tables or bookcases. It’s a proven combination that feels balanced and contemporary, like a more robust version of the stand in Idea #3.

|
📋 Copy HEX 🔗 Share |
⭐ The One Thing
Recreating this look with a DIY approach is very achievable.
- Main Structure (Steel Tubing/Flat Stock): $40 – $70
- Shelving (Pine or Poplar Boards): $20 – $30
- Hardware (Screws, Brackets): $10 – $15
- Finishing (Matte Black Paint, Wood Sealant): $15 – $25
- TOTAL: $85 – $140
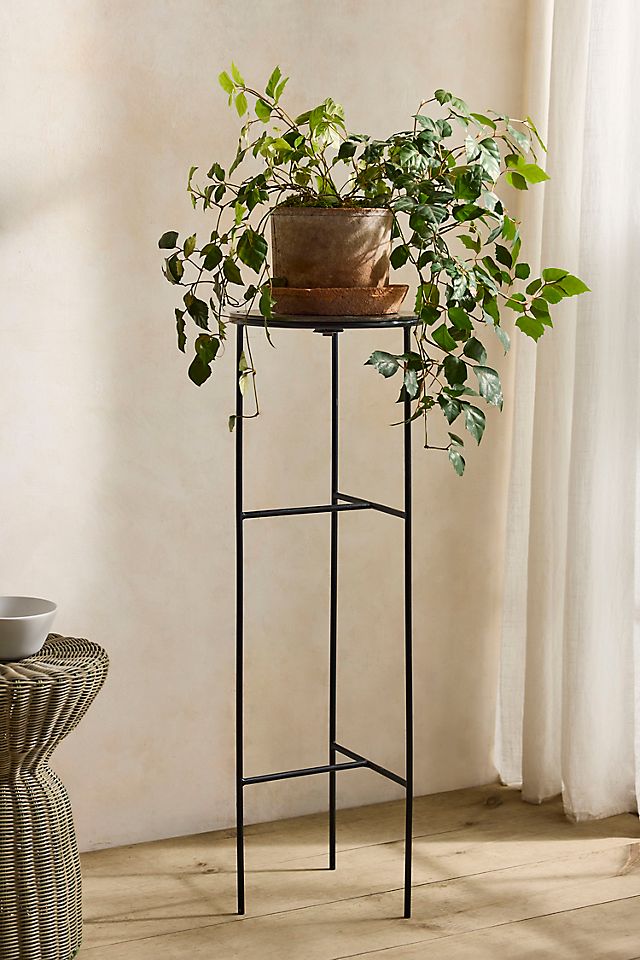
8. The Tall, Slender Black Metal Stand
This type of stand is a small-space superhero. Its incredibly small footprint—likely no more than 10×10 inches—means it can tuck into the tightest of spots: next to a sofa, beside a bed, or in a narrow entryway where a traditional table wouldn’t fit. The magic is in its height. By lifting the plant 24 to 30 inches off the floor, it adds vertical interest without consuming valuable floor space. It’s the perfect solution for apartment dwellers or anyone with a room that feels a bit flat. It works best with ceilings of a standard 8-foot height; in a room with very high ceilings, it might look a bit lost on its own.
|
📋 Copy HEX 🔗 Share |
🔥 Trending Context
that makes this idea work is the choice of plant. A tall, skinny stand needs a plant with a bit of drape or cascade. The way the green leaves of the vining plant spill over the edges of the brown pot is crucial. It breaks up the rigid vertical line of the stand and creates a softer, more organic silhouette. If you were to place a stiff, upright plant like a snake plant here, the composition would feel too severe and stalky. The cascading foliage is what makes the whole vignette feel balanced and alive.
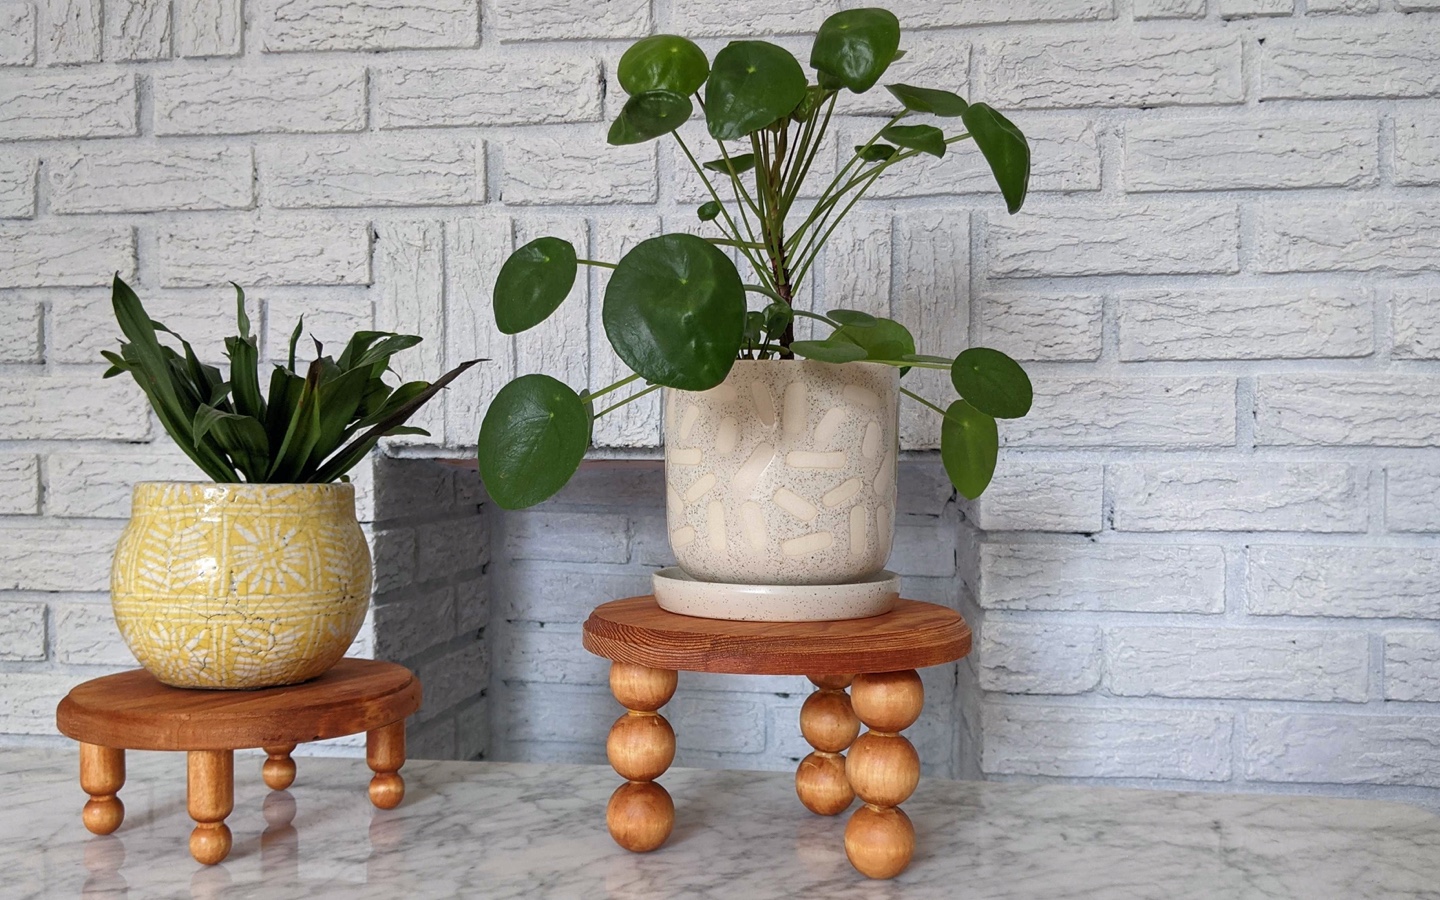
9. Playful Geometry: Turned vs. Stacked Wooden Legs
Let’s make the stand with the stacked wooden balls. It’s surprisingly simple and requires no complex woodworking skills.
- Purchase a set of 3-inch and 2-inch unfinished wooden craft balls online. You’ll also need a 1/2-inch dowel and a round pine plaque for the top (about 10 inches in diameter).
- Drill a 1/2-inch hole through the center of each wooden ball.
- Cut three sections of the dowel to act as the core for your legs.
- Thread the wooden balls onto the dowels, alternating sizes for a playful look. Secure them with wood glue.
- Attach the legs to the bottom of the pine plaque using angle-top hardware plates.
- Seal the entire piece with a clear polyurethane or a natural wax finish.
|
📋 Copy HEX 🔗 Share |
🔧 How-To Brief
When grouping plant stands, the secret is ‘related, not identical.’ These two stands work beautifully together because they share the same DNA—light-colored wood, circular tops—but they aren’t a matched set. One has traditional turned legs, the other has whimsical ball legs. This creates a curated, designer feel. A good rule of thumb for pairing is to ensure the stands share at least two visual characteristics (e.g., material and color) but differ in at least one major way (e.g., height or leg style). This prevents the arrangement from looking like a boring showroom display.
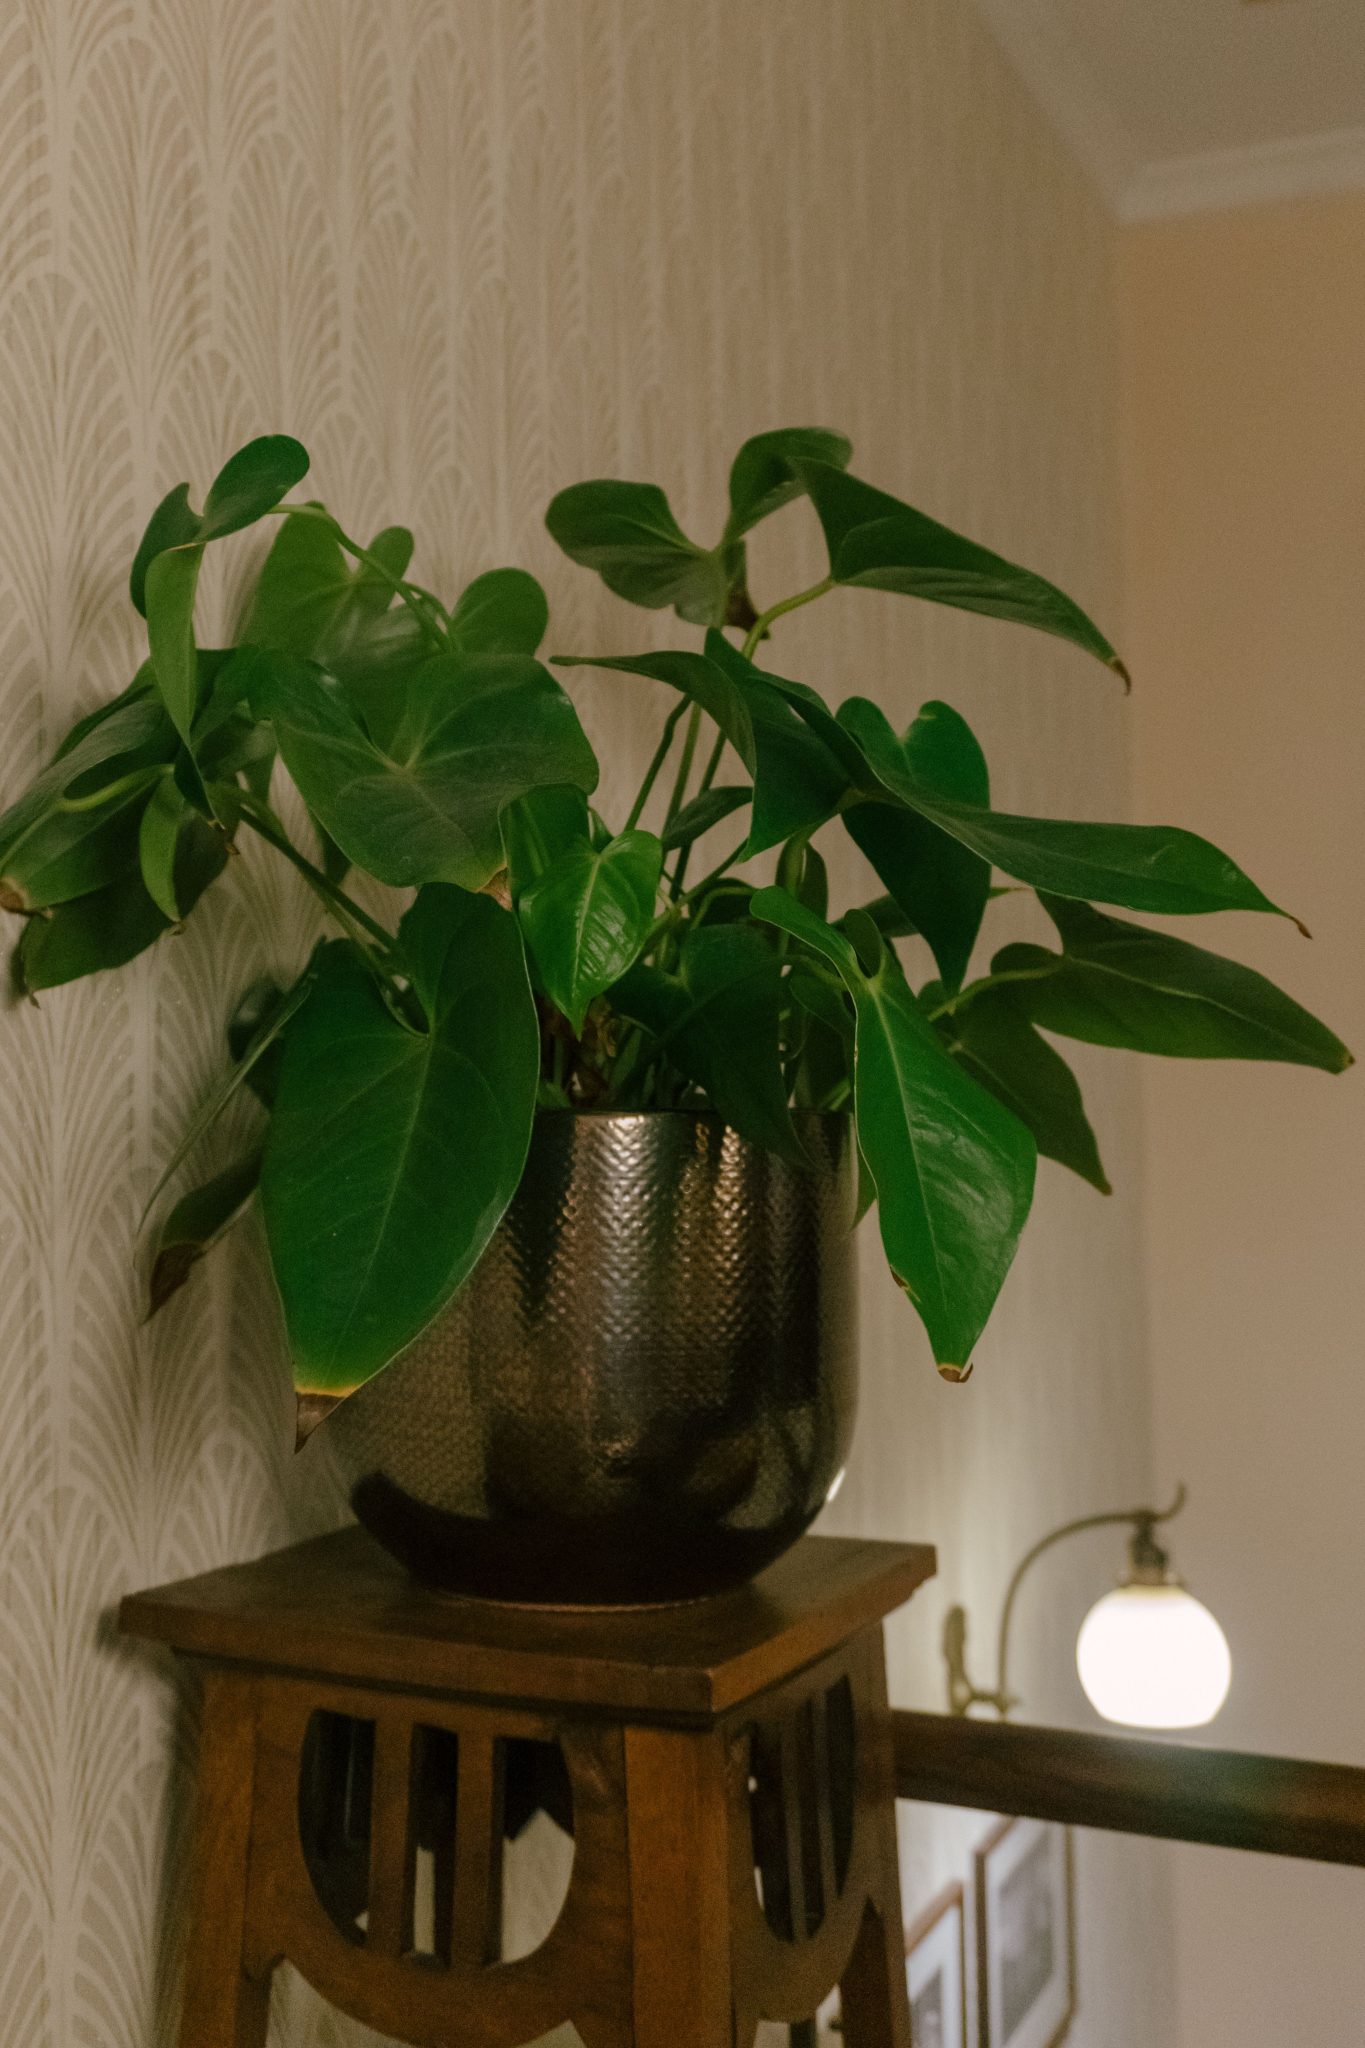
10. An Artistic Dark Wood Stand with a Metallic Planter
We’re seeing a huge move away from the light, Scandinavian-only wood tones that dominated Pinterest for years. This dark, warm wood stand feels right on trend for 2026, tapping into a broader desire for more traditional, elegant, and cozy interiors. It speaks to the ‘Modern Traditional’ or ‘Transitional’ styles, where classic forms and rich materials are given a contemporary twist. The cutout details give it an artisanal, handcrafted feel that people are craving as a counterpoint to mass-produced furniture. This isn’t just a stand; it’s a piece of decorative sculpture.
|
📋 Copy HEX 🔗 Share |
🧹 Maintenance Reality
This vignette works so well because of its sophisticated layering of textures. You have the organic, leafy texture of the plant, the cool, hammered texture of the metallic planter, the smooth, rich texture of the dark wood stand, and finally, the subtle woven texture of the patterned wallpaper in the background. Each material is distinct, yet they all work in harmony. The color palette is also very controlled—shades of green, brown, and metallic gray/brown. This limited palette allows the different textures to take center stage without competing with a riot of color.
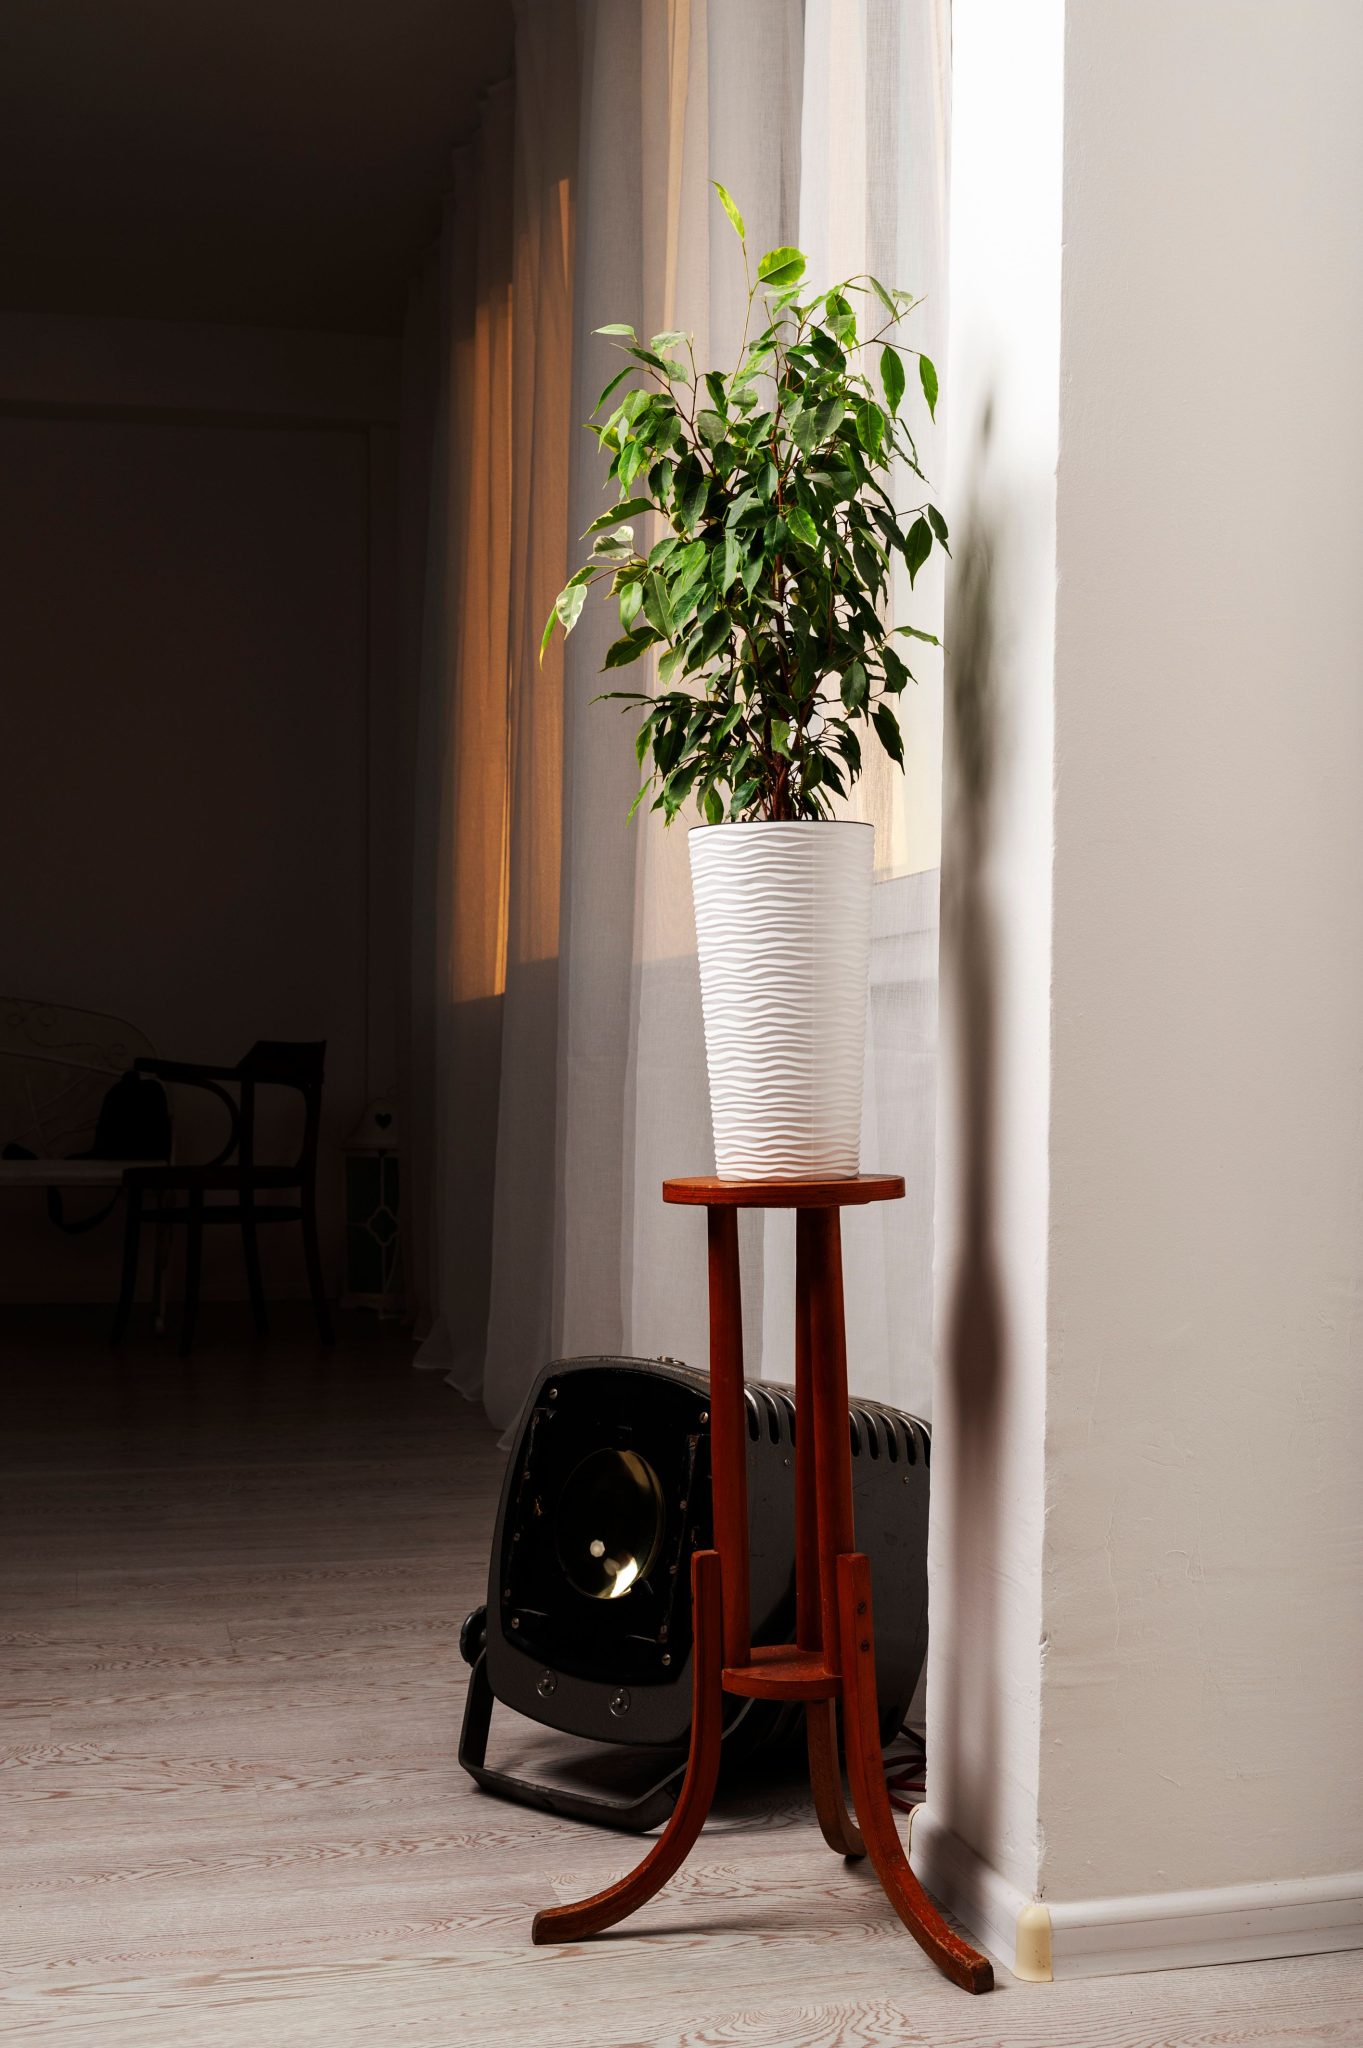
11. Dramatic Lighting for a Ficus on a Dark Wood Stand
The spotlight. Without that single theatrical floor light, this is just a nice plant in a corner. With it, the scene is transformed into a dramatic, high-impact focal point. The light, aimed upwards through the leaves, creates a beautiful play of light and shadow on the translucent curtains and the walls, a technique called ‘uplighting.’ It highlights the plant’s form and turns it into a living sculpture after the sun goes down. This is how you take a simple plant stand and make it part of your home’s lighting design scheme. It’s a bold choice that signals confidence and a flair for the dramatic.
|
📋 Copy HEX 🔗 Share |
⚠️ Real Talk
While this spotlighting effect is stunning, be practical about its placement. That theatrical light on the floor is a major trip hazard, especially in a high-traffic area, or if you have kids or pets. It also means you’ll have a visible power cord running along the floor, which can look messy if not properly managed. You’ll need an outlet very close by or a clever way to hide the cord under a rug or along the baseboard. Also, be sure to use an LED bulb to minimize heat output, as traditional incandescent spotlights can get hot enough to scorch your plant’s leaves or the nearby curtains.
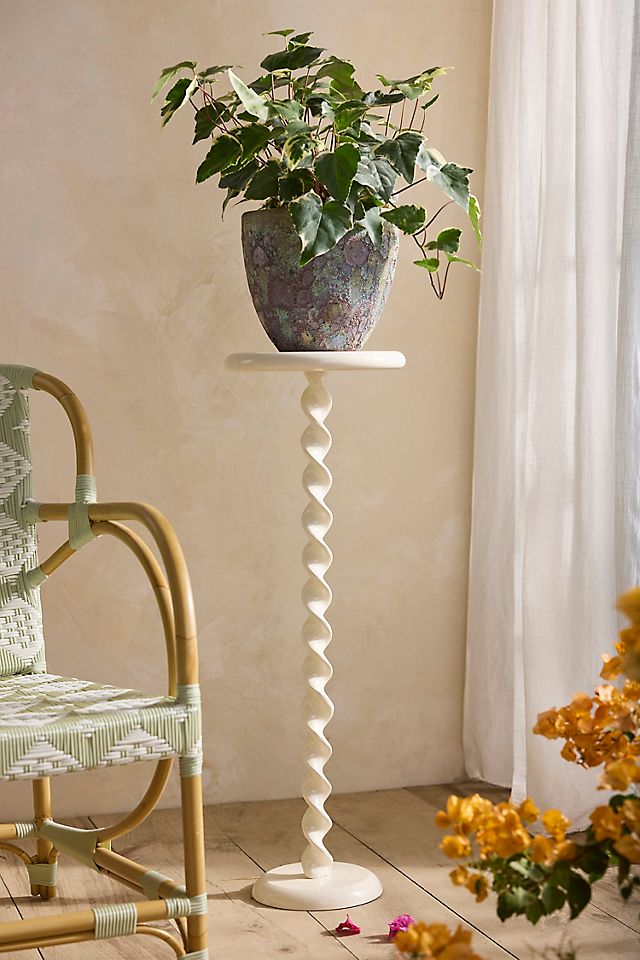
12. A Whimsical Cream-Colored Spiral Pedestal
The spiral column is everything here. It’s a completely unexpected and playful form that injects a huge dose of personality into the room. A standard, straight pedestal would have been functional, but boring. The spiral gives it movement and an almost sculptural quality, turning a simple plant stand into a conversation piece. The soft cream color keeps the unusual shape from being too overpowering, allowing it to blend with the airy, natural vibe of the room while still being a standout element. It feels unique and collected, not something you’d find at a big-box store.
|
📋 Copy HEX 🔗 Share |
📐 Style Math
A vintage spiral pedestal can be a pricey find. For a similar whimsical look on a budget, you can DIY a stacked terracotta pot stand. Get three or four terracotta pots in graduating sizes (e.g., 12″, 10″, 8″, 6″). Paint them all in a single color—a soft cream, a bold teal, or even a matte black. Then, simply stack them upside down, from largest at the base to smallest at the top, securing each layer with strong construction adhesive. You’ll get a quirky, tiered pedestal with lots of personality for under $50. It captures the same playful vibe as this spiral piece or the look from Idea #14.
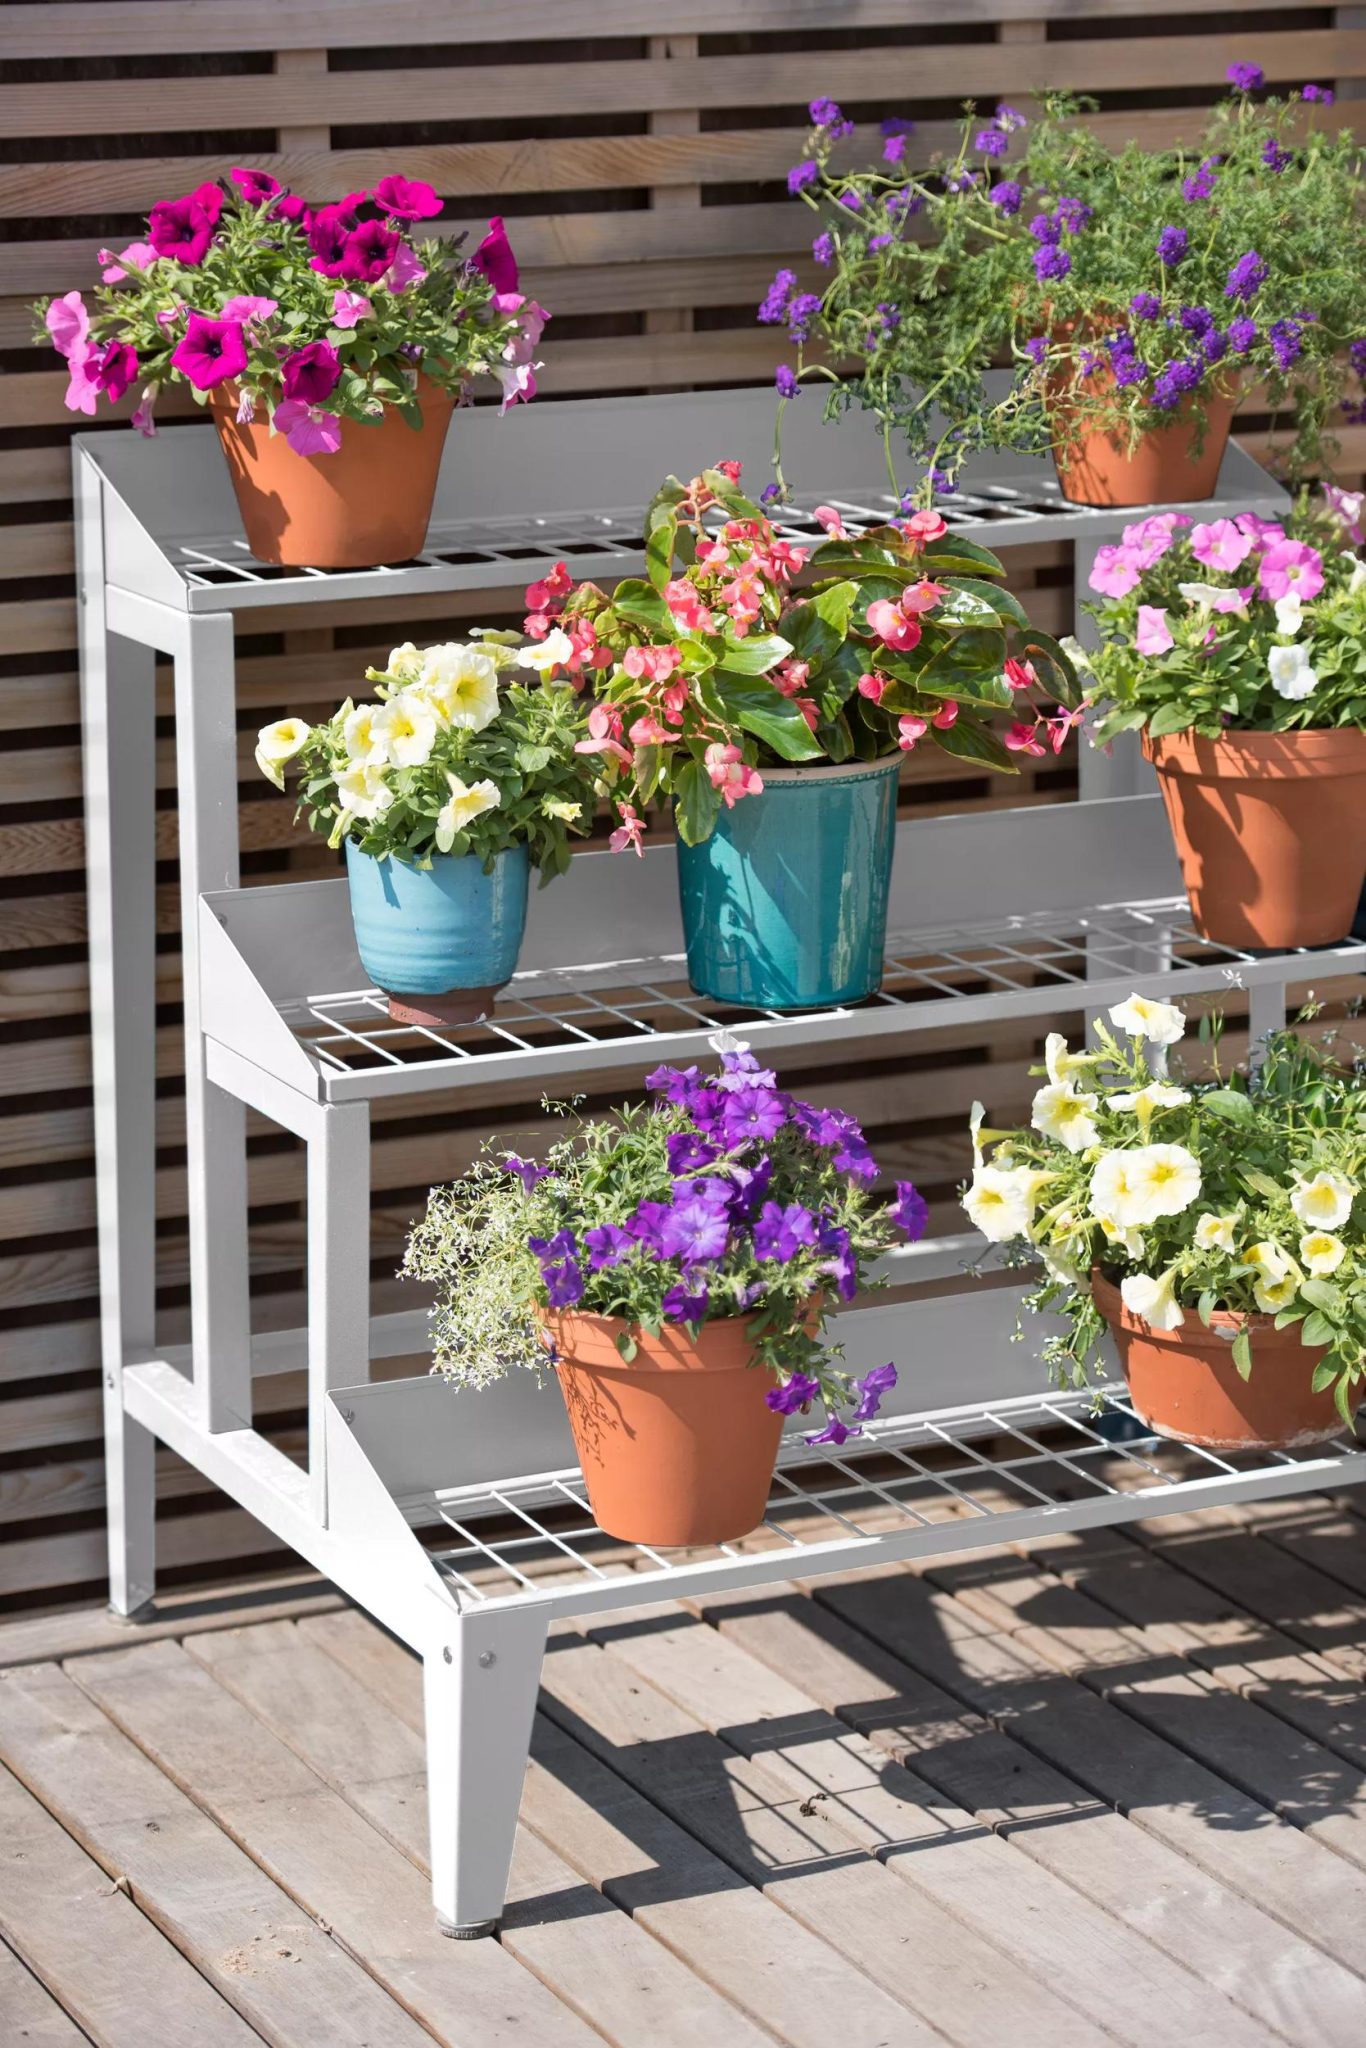
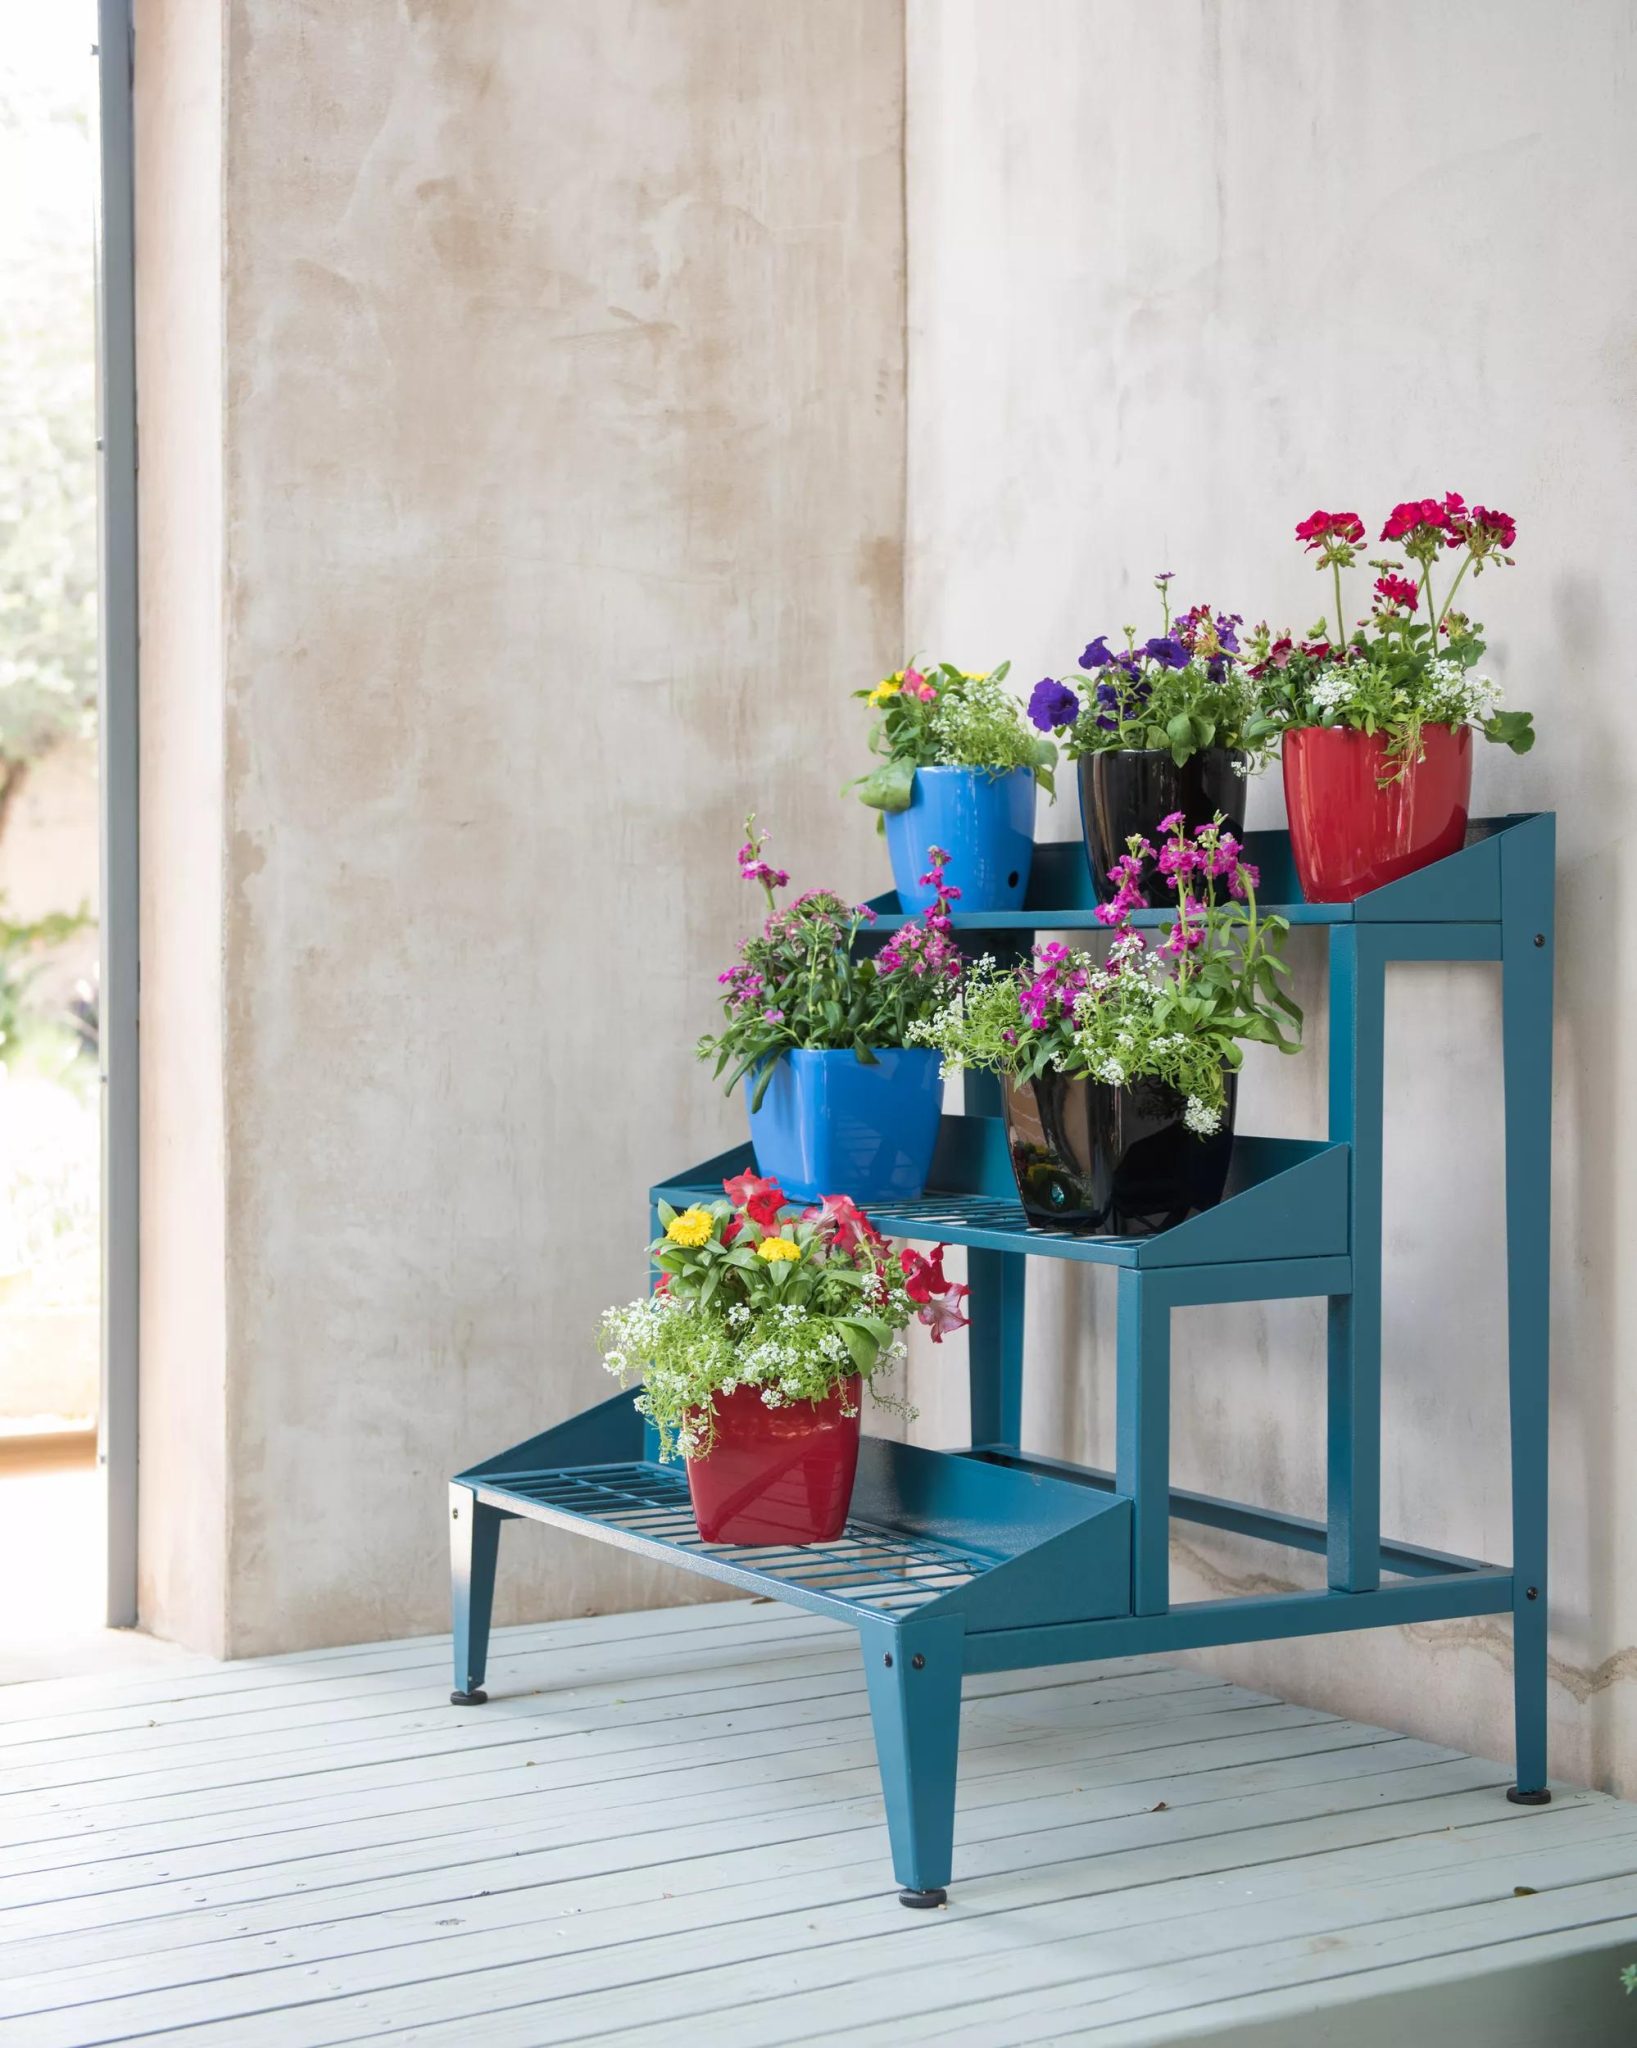
13. White Tiered Stand with a Riot of Colorful Petunias
The formula for this cheerful display is simple: 70% floral color + 20% anchoring neutrals + 10% structural lines. The overwhelming majority of the visual real estate is the explosion of pink, yellow, and purple petunias. This is what gives it that vibrant, ‘English garden’ feel. The anchoring neutrals are the terracotta and blue pots, which ground the colors and add a touch of earthy and cool tones. The final 10% is the white metal stand itself—its thin, grid-like structure provides order to the chaos of the flowers without being visually heavy.
|
📋 Copy HEX 🔗 Share |
✅ Before You Start
Creating this look is easy, but it requires a bit of planning for a full, lush display.
- Choose a 3-tier stand with good drainage. A simple metal one is perfect.
- For the pots, select a mix of terracotta and one other accent color, like the blue shown here. This keeps it from looking too random.
- Buy ‘trailing’ or ‘cascading’ varieties of petunias. They are bred to spill over the edges of pots, which is key for this look.
- Plant one petunia plant per 6-8 inch pot. Don’t overcrowd them initially; they will fill in quickly.
- For the first few weeks, pinch off the first few blooms. It feels wrong, but this encourages the plant to become bushier and produce even more flowers.
- Fertilize weekly with a bloom-boosting formula! Petunias are very hungry plants.
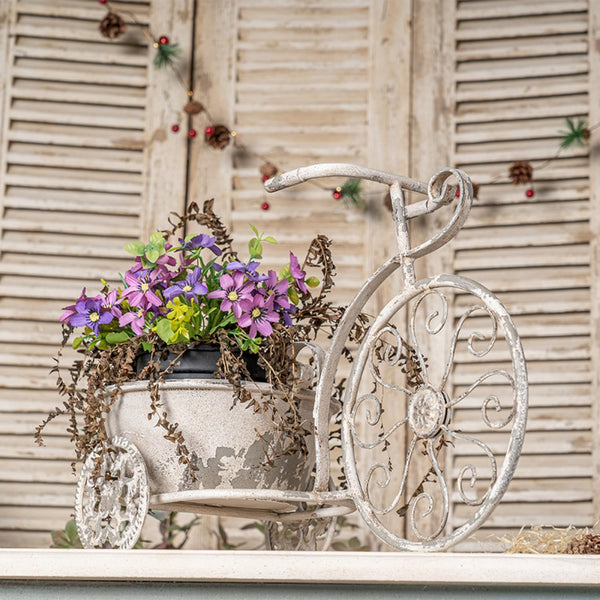
14. A Shabby Chic White Tricycle Plant Holder
This style, often called ‘Shabby Chic’ or ‘Farmhouse,’ had its peak moment in the 2010s, but it’s evolving for 2026. While the full-on distressed-everything look can feel dated, using a single, charmingly rustic piece like this tricycle as an accent is still very relevant. It taps into a desire for nostalgic, whimsical decor that doesn’t take itself too seriously. The key is to treat it like a piece of jewelry in a more restrained setting. Set against the clean lines of the white louvered shutters, it feels quaint and sweet rather than cluttered. It’s a nod to a beloved trend, used with intention.
|
📋 Copy HEX 🔗 Share |
💰 Budget Breakdown
To successfully incorporate a novelty plant holder like this tricycle, the rule is ‘less is more.’ Don’t pair it with a dozen other rustic, distressed items. Let it be the single ‘cute’ moment in the vignette. The second tip is to keep the plant simple. The holder itself is decorative, so an overly fussy plant will create visual chaos. A simple pot of lavender, as shown, or a small ivy or fern is perfect. The goal is for the plant to complement the holder, not compete with it. Finally, consider its context; this works because the color palette is extremely tight—white on white with a pop of purple.
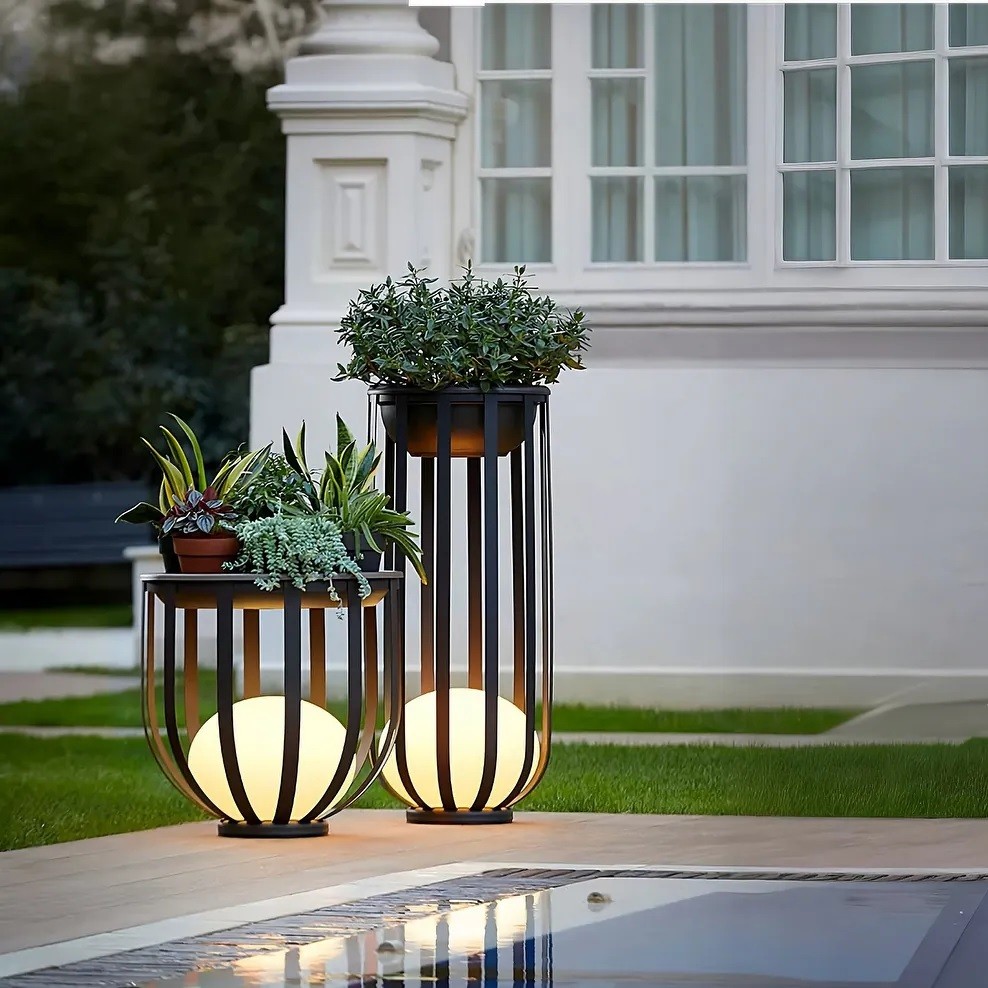
15. Modern Plant Stands with Integrated Orb Lights
This is a high-impact, very modern look, but there are some practicalities to consider. First, electricity. These aren’t solar; you will need access to an outdoor-rated electrical outlet, and you’ll have visible cords to manage. Second, weatherproofing. While the fixtures themselves should be rated for outdoor use (check for a UL Wet Location rating), the transformers or plugs might be bulkier or require more protection. Finally, think about the light quality. The warm glow is beautiful, but will it create unwanted glare through a nearby window at night? Also, be aware that lighted displays can sometimes attract more insects in the evening.
|
📋 Copy HEX 🔗 Share |
💡 Designer Tip
This is definitely a high-end designer look, not a simple DIY. Here’s a rough estimate for purchasing these items ready-made.
- Tall Illuminated Plant Stand: $250 – $450
- Short Illuminated Plant Stand: $200 – $350
- Potted Plants (good quality, mature): $100 – $200
- Installation (if hiring an electrician to add an outlet): $200 – $500
- TOTAL: $750 – $1,500
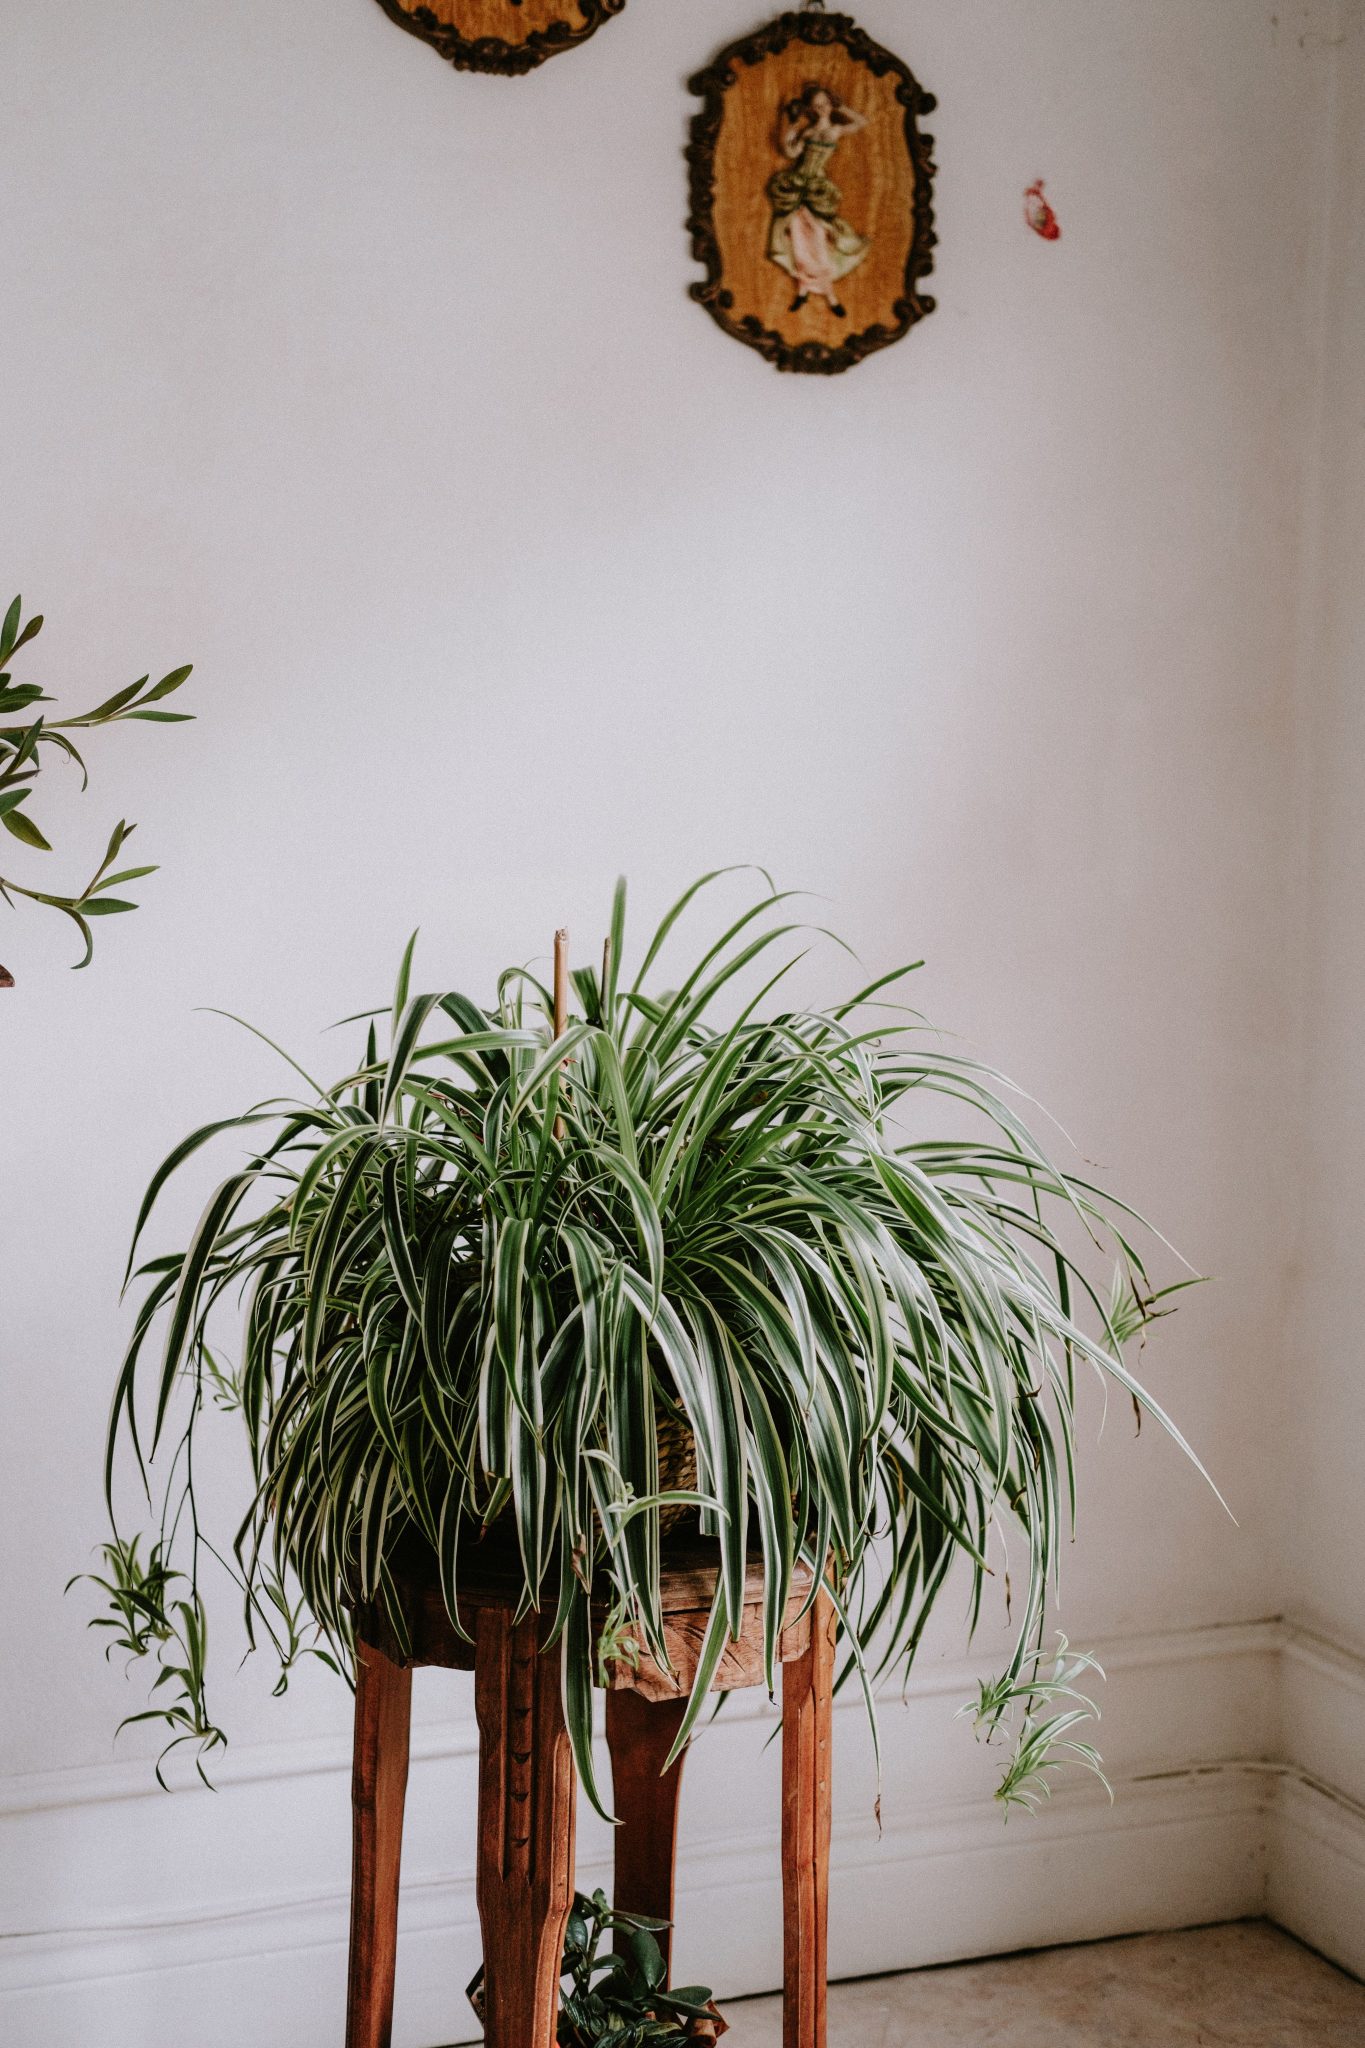
16. A Traditionally Carved Wooden Stand for a Spider Plant
This setup feels so cozy and established because it expertly balances different styles. You have the traditional, almost antique, feel of the carved dark wood stand. Then you have the slightly bohemian, relaxed vibe of the woven pot and the overflowing, wild spider plant. Finally, the carved wooden wall decor adds a global, collected-over-time element. These pieces aren’t from the same ‘set,’ which is precisely why they work. It feels like a corner that has been thoughtfully assembled over years, with pieces that have personal stories. The simple off-white walls act as a quiet backdrop for these character-filled items.
|
📋 Copy HEX 🔗 Share |
📏 Scale Guide
You can find ornate, carved wooden stands at antique shops or estate sales, but they can be pricey. To get a similar ‘traditional with a twist’ feel for less, try this: find a basic, unfinished wooden plant stand from a craft store ($15-$25). Then, buy some decorative wooden appliques or onlays online or at a hardware store—these are pre-carved wooden decorations. Glue them onto the legs and apron of the stand. Once the glue is dry, paint or stain the entire piece a uniform dark walnut color. The result is a custom-looking, ornate stand that looks far more expensive than its parts.
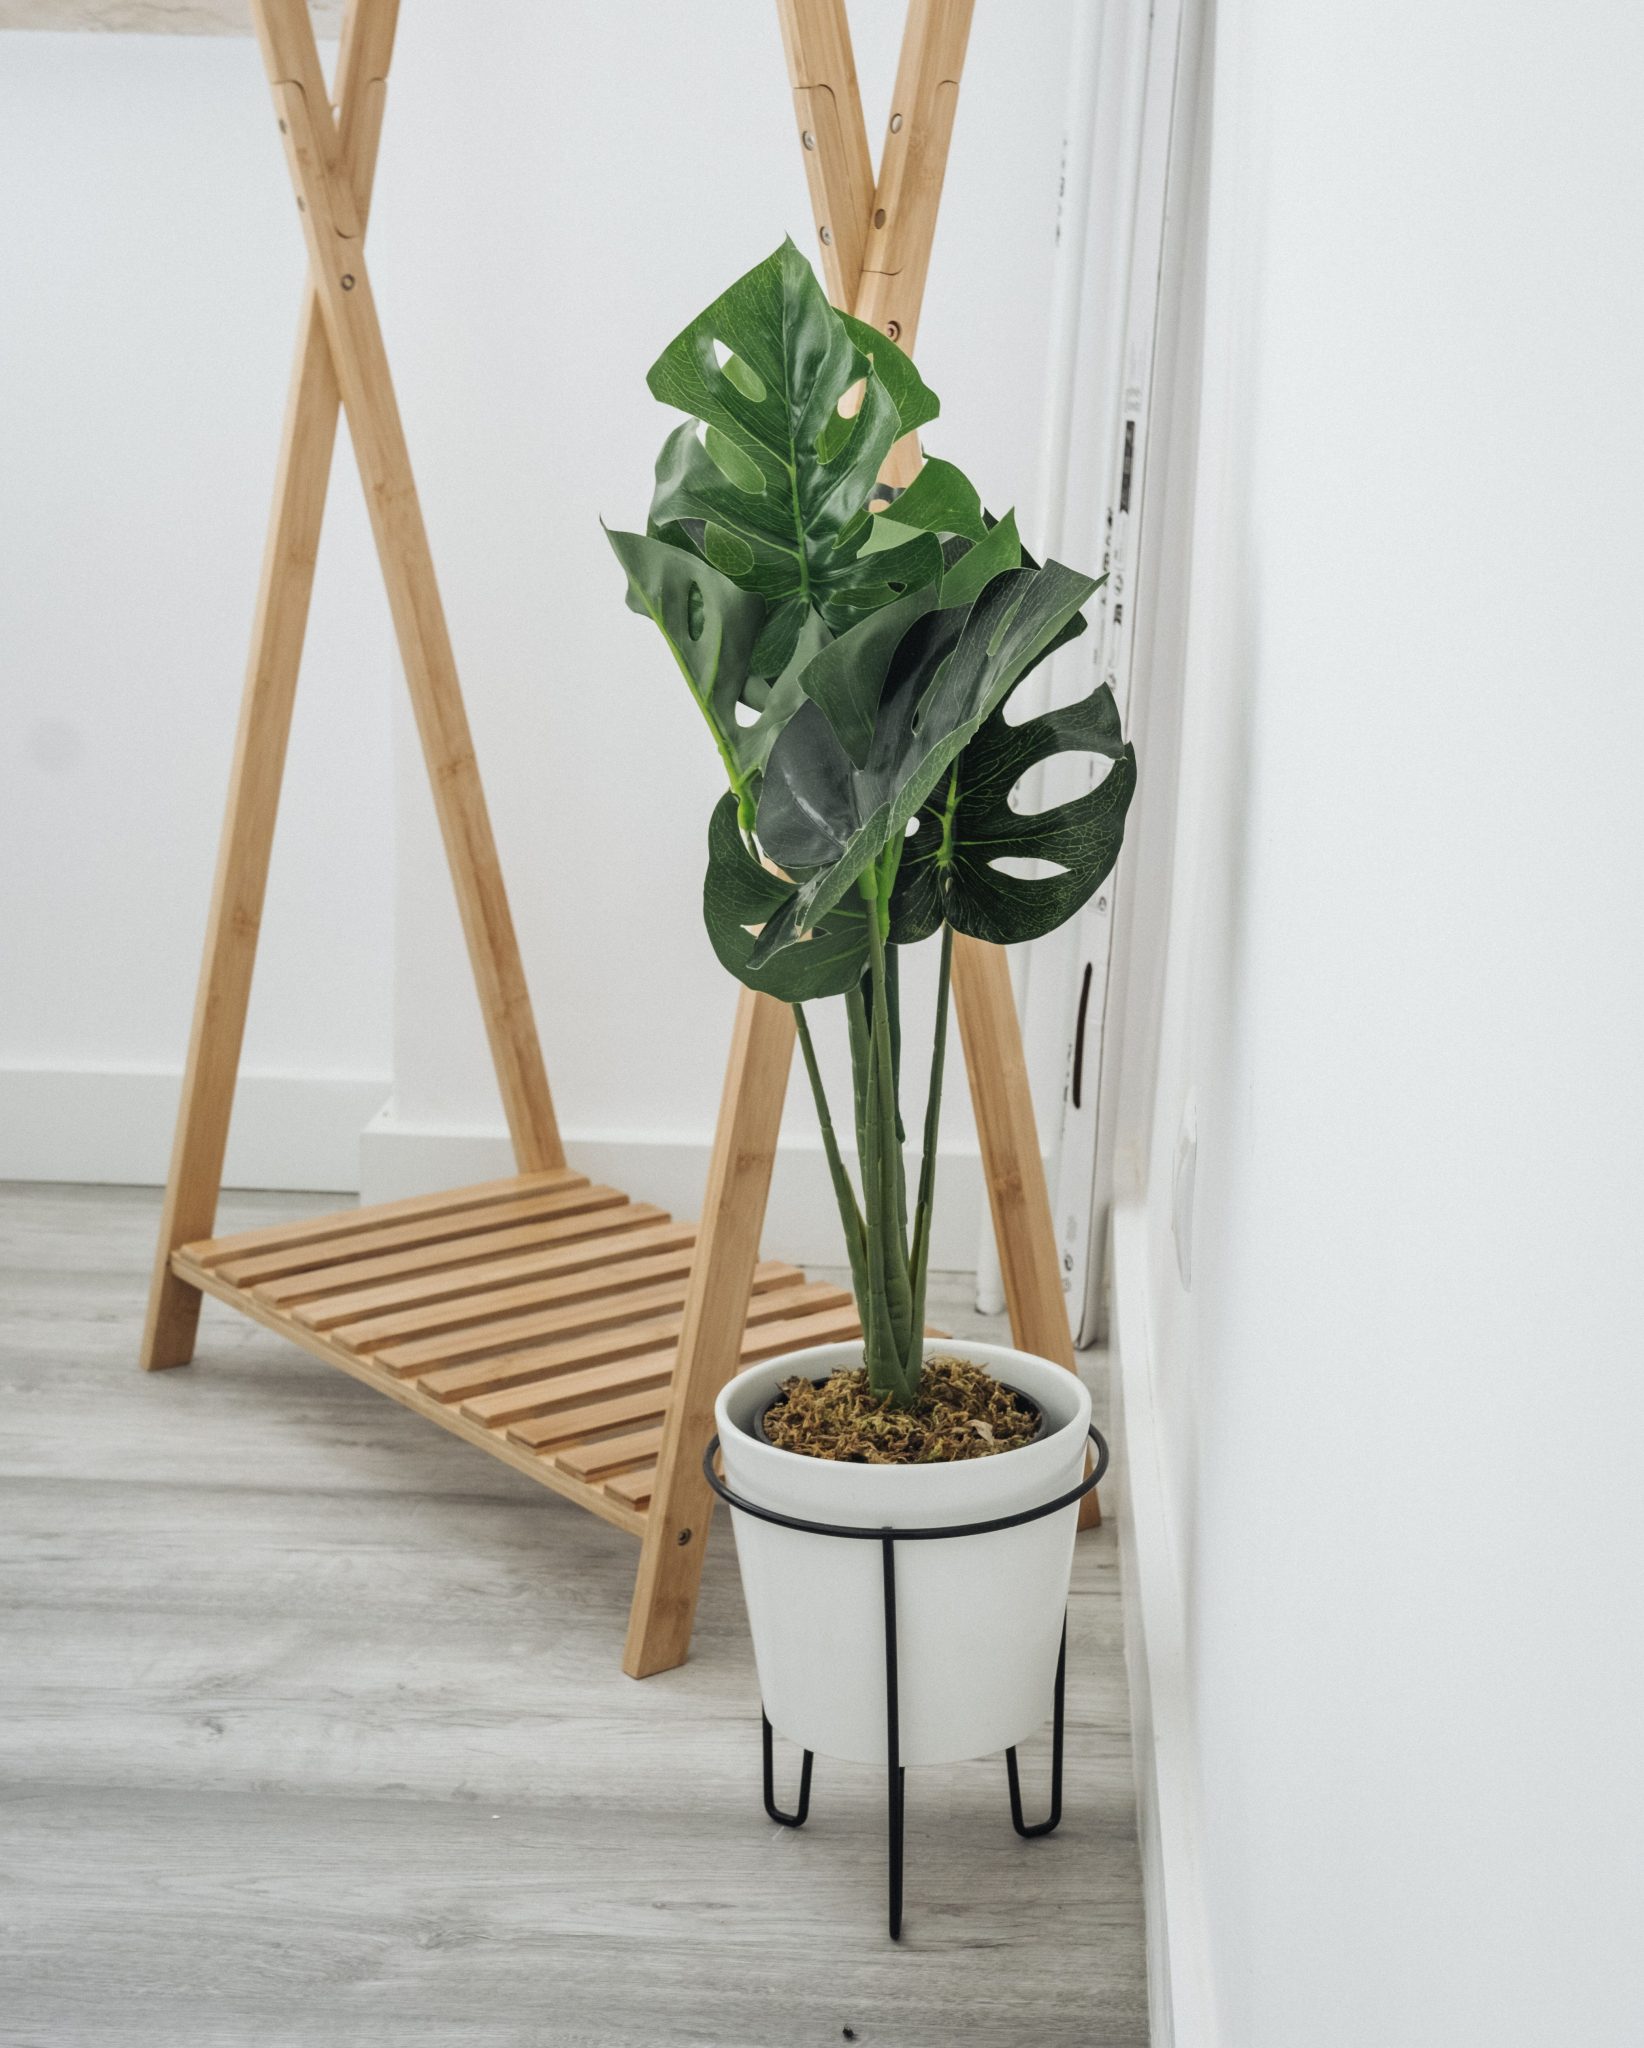
17. The Clean & Simple Stand for a Faux Monstera
This minimalist setup is perfect for tight spaces like entryways, small home offices, or hallways. Because both the stand and the pot have such a slim profile, the entire arrangement has a very low visual weight. It requires a floor footprint of only about 12-14 inches square. The key is that it adds a touch of green and modern style without physically or visually obstructing the path. This is a great choice for areas where you want some decor, but need to maintain a sense of openness and flow. It’s less suited for a large, empty living room where it might feel too insubstantial.
|
📋 Copy HEX 🔗 Share |
🎯 What Makes It Work
The secret ingredient here is the faux plant. A real Monstera of this size would require a much larger, heavier pot to prevent it from tipping over, which would ruin the stand’s delicate, minimalist proportions. It would also need specific light conditions. Using a high-quality fake plant allows you to prioritize aesthetics—you can use a smaller, sleeker pot and place it anywhere in the room, regardless of sunlight. It’s the element that makes this particular combination of a slim stand and a large-leafed plant possible without compromise.
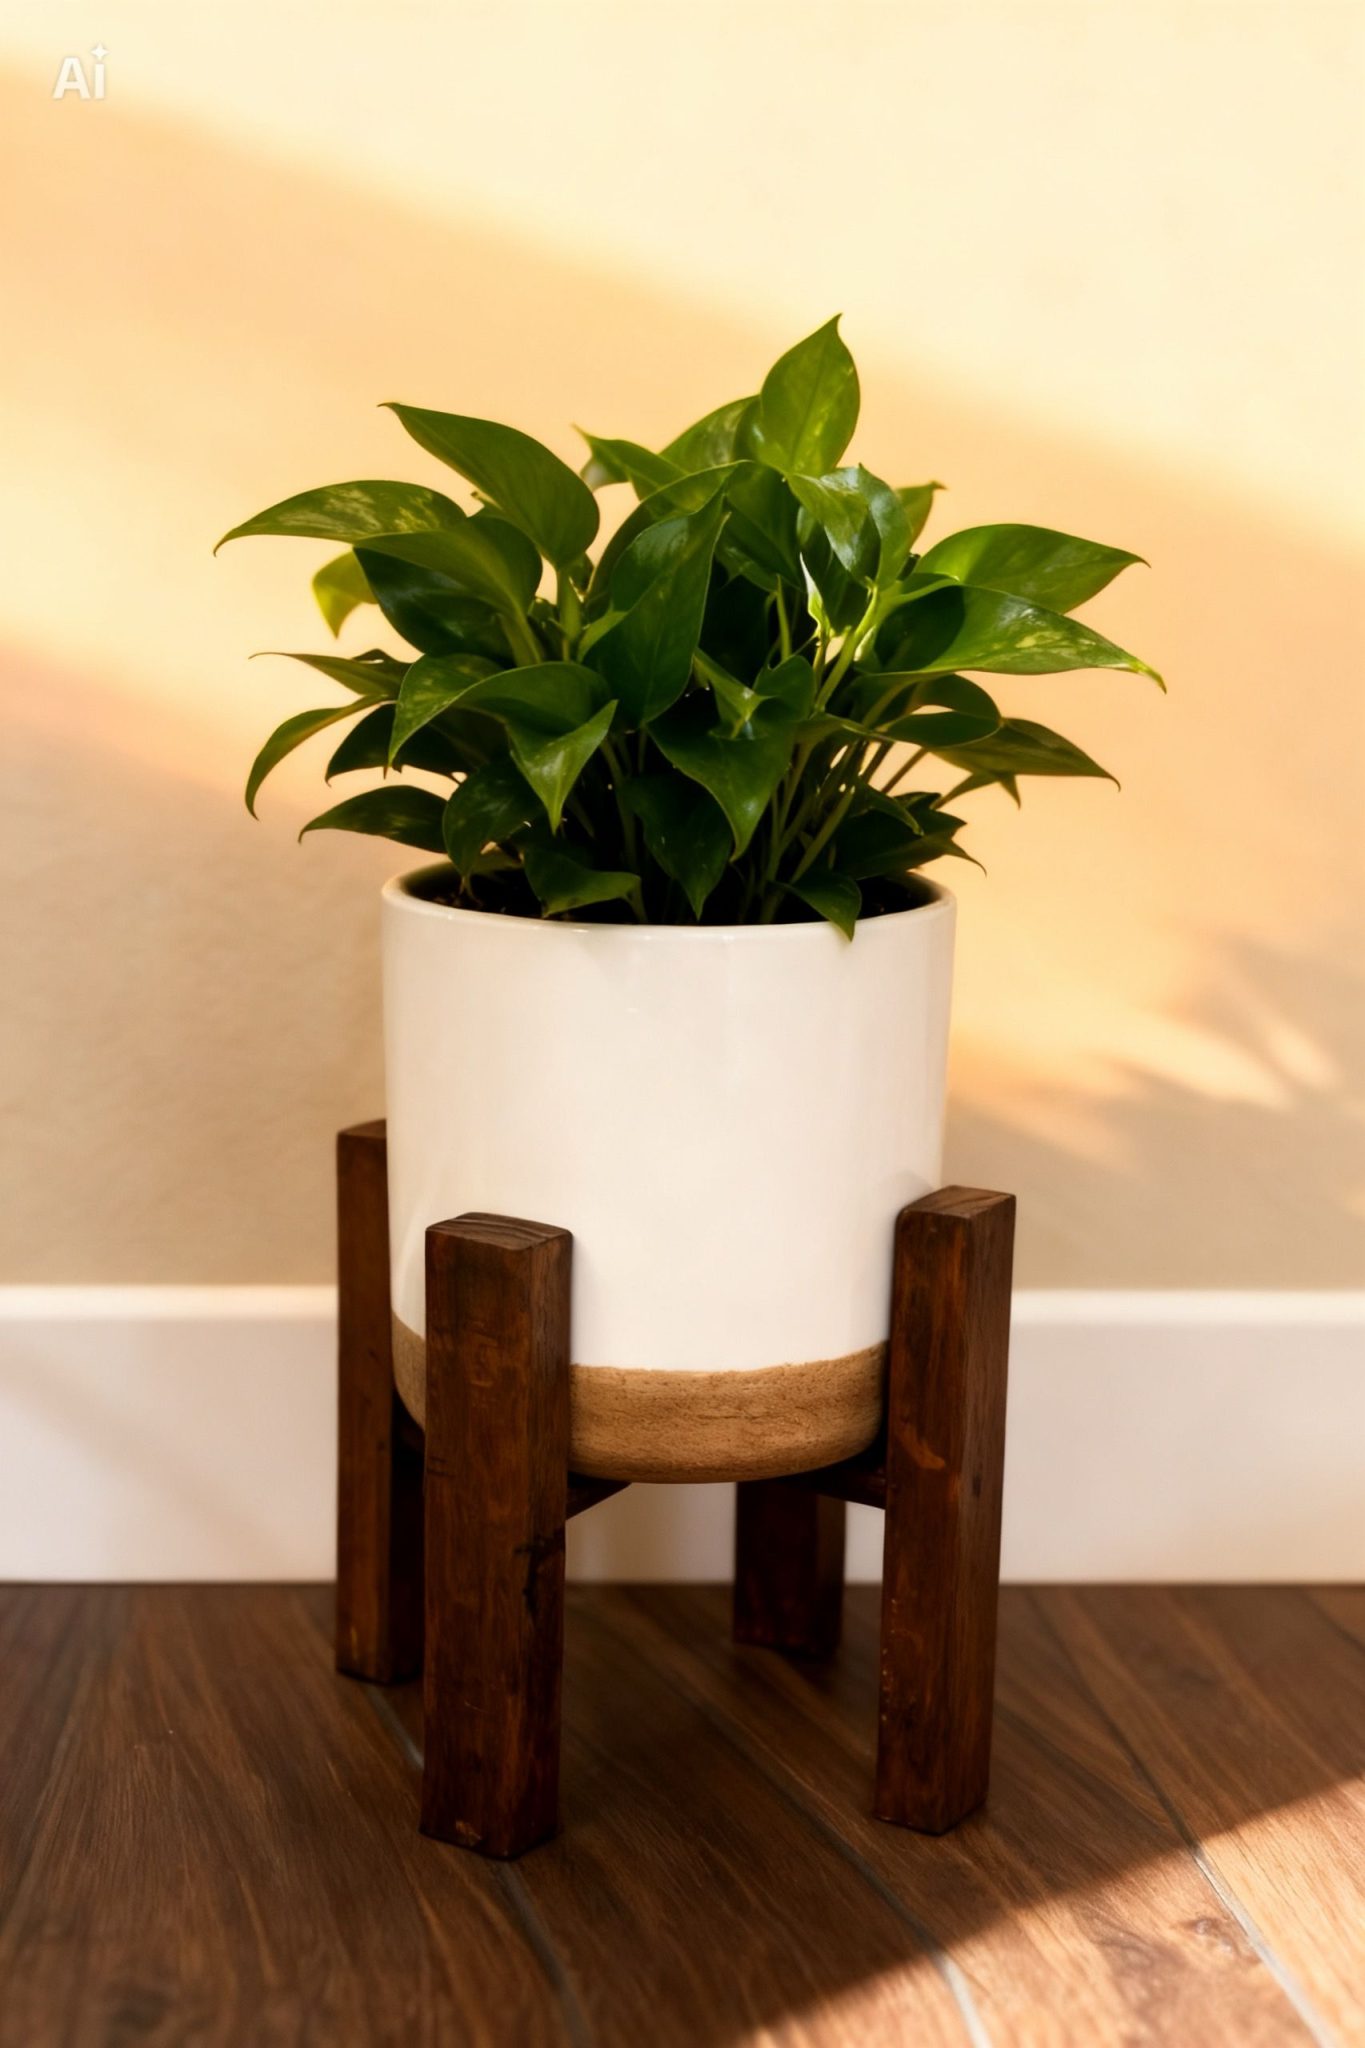
18. A White Planter and Wood Stand on a Dark Floor
This composition is a study in warm minimalism, and its formula is all about tone and contrast. Let’s call it: 50% dark tones + 40% light tones + 10% texture. The dark wood of the floor and the plant stand create a rich, enveloping base. The clean white of the cylindrical planter provides a sharp, bright contrast that draws the eye. The final 10% is that crucial band of brown texture at the bottom of the planter. It’s a small detail, but it cleverly bridges the gap between the dark wood and the stark white, tying the whole look together. The green of the plant acts as a neutral here.
|
📋 Copy HEX 🔗 Share |
💸 Get This Look For Less
Want to recreate this specific look? It’s all about coordinating tones. Before you start, check these points:
- Floor Tone: This works best on very dark or very light floors. On a medium-toned wood floor, the dark stand wouldn’t have the same dramatic contrast and might blend in.
- Wood Stain Match: Are you buying or DIYing the stand? If DIY, bring a photo of your floor to the hardware store to select a stain that is in the same family (e.g., walnut, ebony) for a cohesive, intentional look.
- Wall Color: Notice the warm, almost creamy tone of the wall. A stark, cool white wall would make this feel much colder and less inviting.
19. A Rustic Three-Tier Stand with Scrollwork Details
When styling a tiered stand where the platforms are at different heights and positions, always place your largest and/or most visually ‘heavy’ plant on the lowest tier. This visually anchors the entire piece and makes it feel stable and balanced. The medium-sized plant can go on the middle tier, and your smallest or a trailing plant can go on the top. This follows how our eyes naturally read objects, from the ground up, and prevents the stand from looking top-heavy and precarious. It’s a small detail that makes a huge difference in the overall composition. Compare this to the rustic stools in Idea #2, which offer a simpler approach.
|
📋 Copy HEX 🔗 Share |
⭐ The One Thing
A stand with this kind of intricate, decorative scrollwork base can be a bit of a dust-magnet. Those lovely curves and details are perfect little shelves for dust and debris to settle on, especially if it’s placed outdoors on a patio. It’s not a quick wipe-down situation; you’ll need a duster that can get into all the nooks and crannies, or even a can of compressed air, to keep it looking clean. If you’re a low-maintenance person, a stand with simpler, straight lines might be a better long-term choice for your sanity.
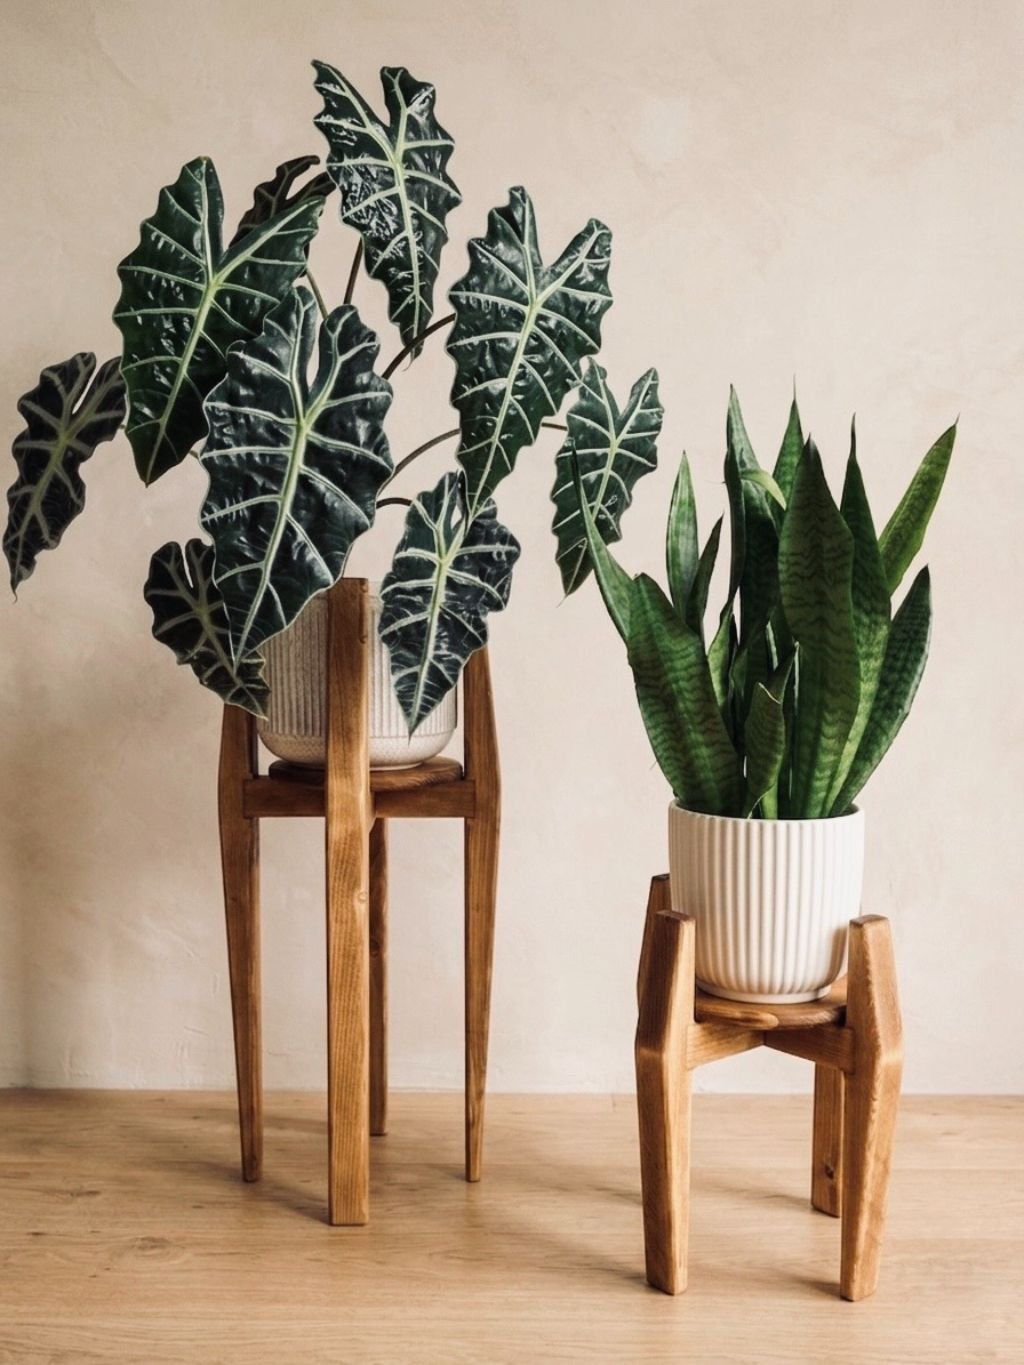
20. Two Distinct Wooden Stands in a Neutral Room
This works because of a design principle called ‘unity with variety.’ The ‘unity’ comes from the shared characteristics: both stands are made of light-colored wood, and both planters are fluted and white. This creates a clear visual connection between the two. The ‘variety’ comes from the differences in height, leg count (three vs. four), and plant type (a large-leafed plant vs. an upright snake plant). This combination of similarities and differences is what makes the pairing feel interesting and curated, rather than random or overly matched. It hits the sweet spot of being coordinating without being boring.
|
📋 Copy HEX 🔗 Share |
🔥 Trending Context
Let’s build that taller, three-legged stand. It’s a classic mid-century modern design.
- Get three 24-inch tapered wooden legs and three straight-mount hardware plates.
- Buy a round wood plaque (10-12 inches in diameter) for the top.
- On the bottom of the plaque, mark out three equidistant points for your legs. Imagine a peace sign to get the spacing right.
- Screw the hardware plates into your marked spots.
- Simply screw the tapered legs into the plates. That’s it!
- You can leave the wood raw for a natural look or seal it with a clear coat.
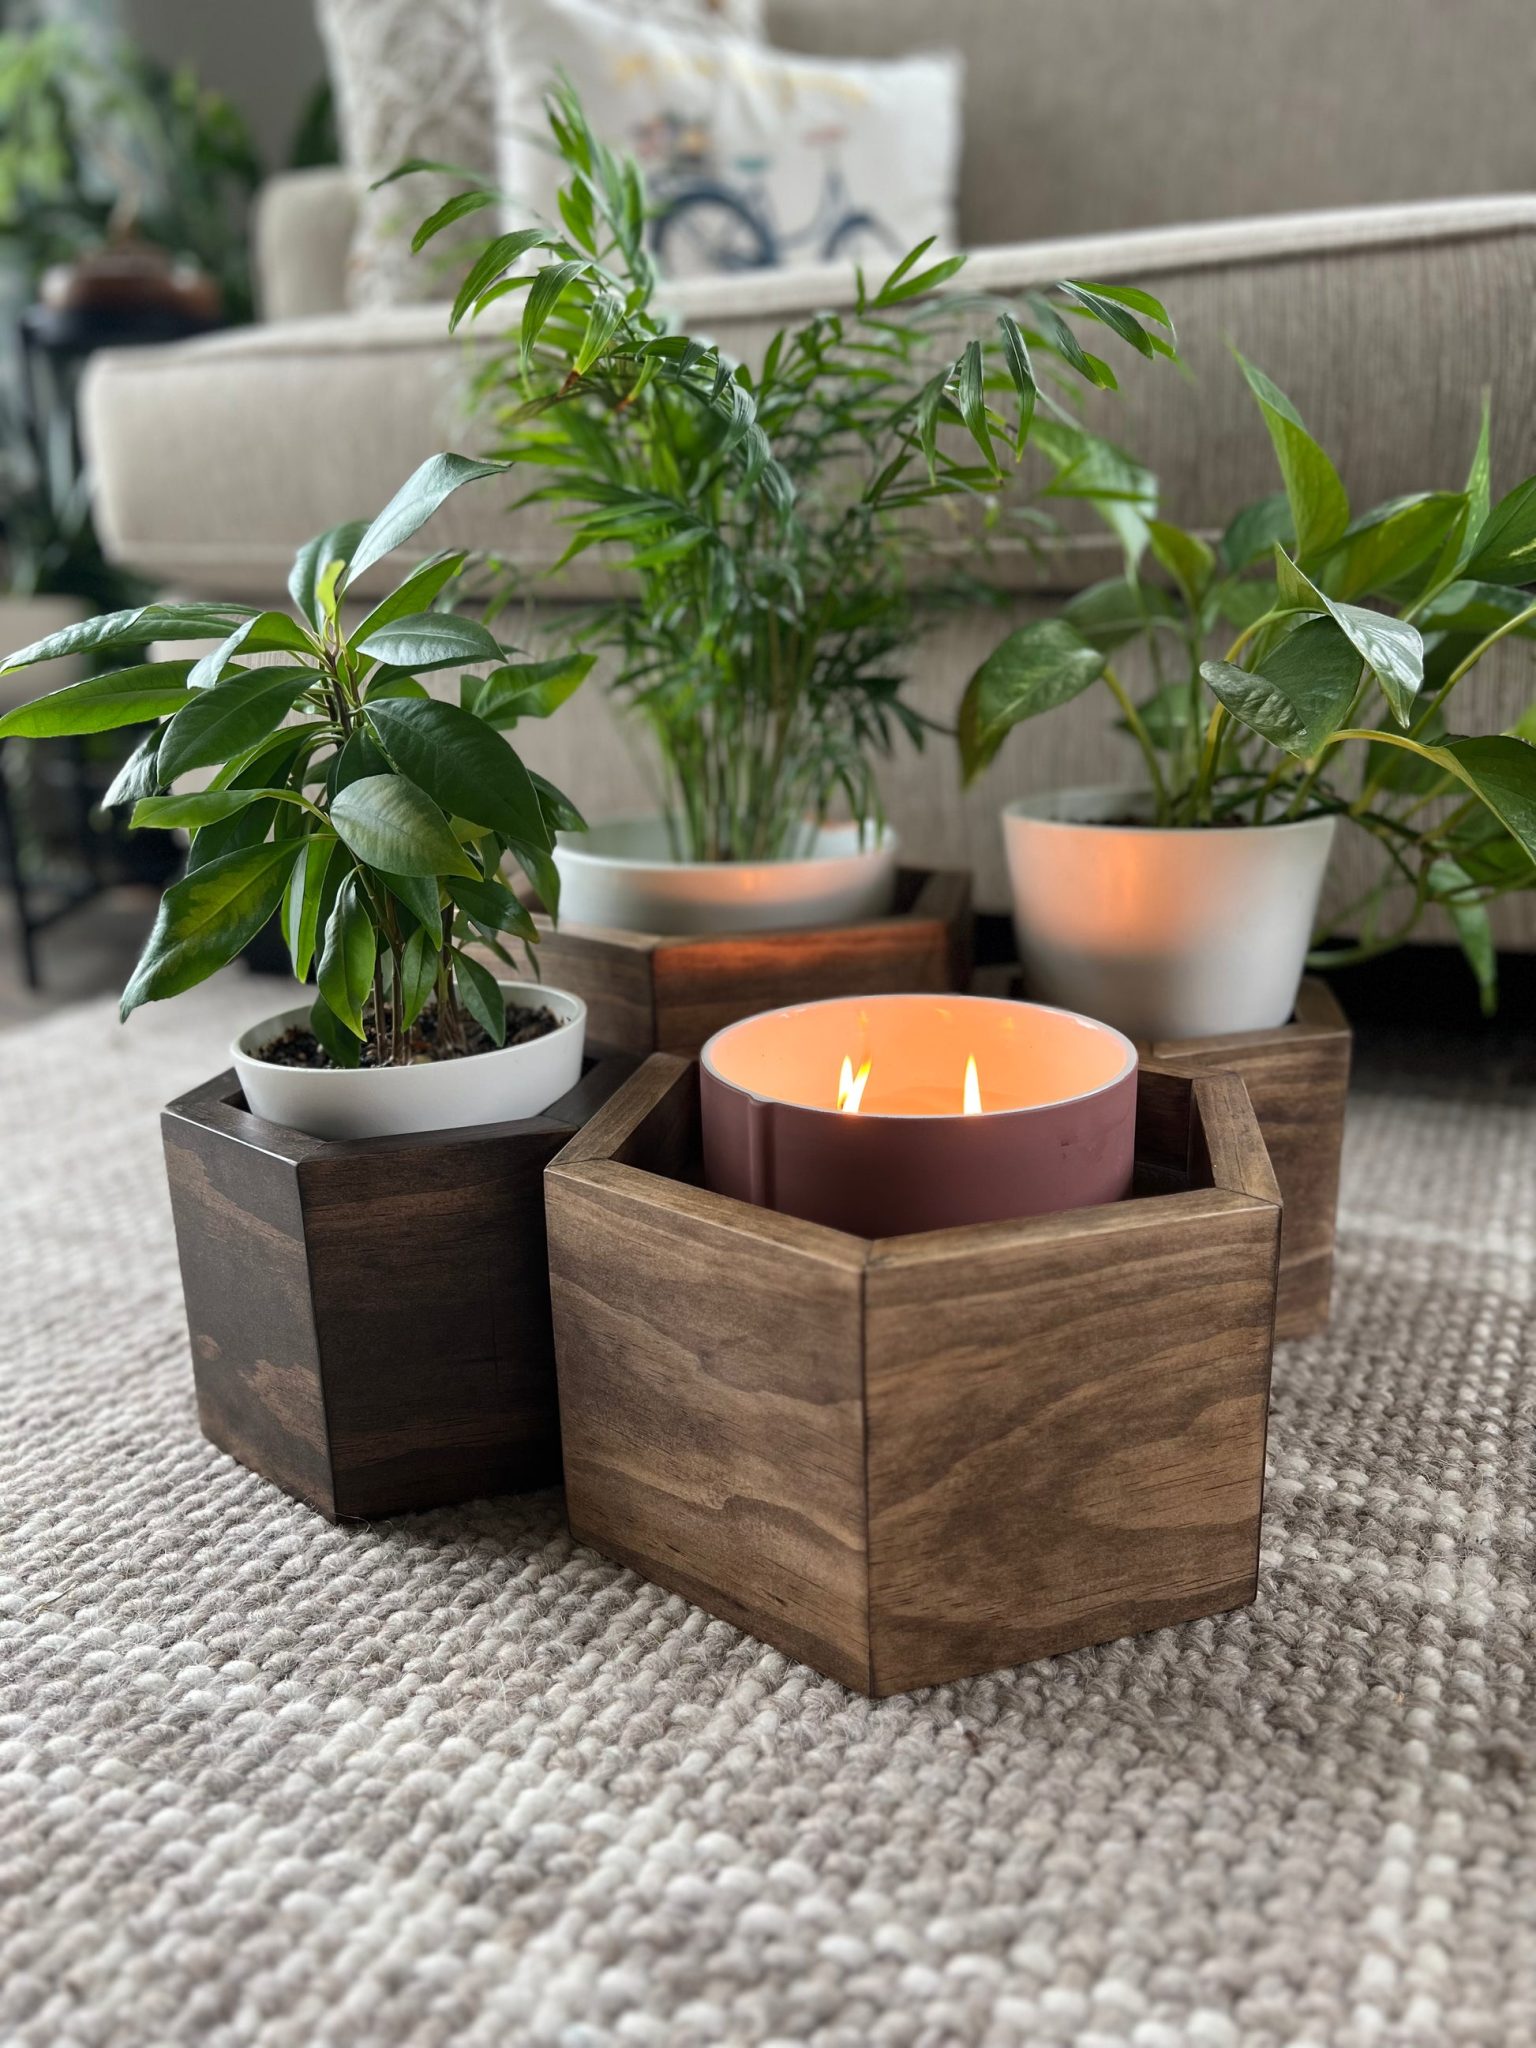
21. A Cozy Cluster of Hexagonal Wooden Planters
The single element that elevates this idea from just ‘plants on the floor’ is the chunky knit rug. It’s the textural foundation that makes the whole arrangement feel cozy, intentional, and inviting. The hexagonal wooden planters are beautiful, but placing them directly on a bare floor would feel stark and unfinished. The rug defines the space, adds a layer of incredible softness and texture that contrasts with the hard wood of the planters, and makes the grouping feel like a deliberate, styled moment. It invites you to get down on the floor and appreciate the details.
|
📋 Copy HEX 🔗 Share |
🔧 How-To Brief
This floor-level arrangement is a fantastic idea for larger rooms where you have open floor space to play with, but it’s not ideal for small or narrow rooms where it would become a tripping hazard. To pull this off, you need a clear area of at least 4×4 feet. It works perfectly in front of a sofa (but pulled out at least 18 inches), in a wide, empty corner, or next to a fireplace. The key is that it needs ‘negative space’ around it to breathe. Cramming this into a tight spot will just make your room feel cluttered and smaller.
22. The Bohemian A-Frame Stand with Macrame Hangers
This dark wood A-frame stand is a popular style, but you can get that bohemian, plant-filled look for much less. The core of this look is simply ‘vertical layers of plants.’ You can achieve the same effect with a simple wooden ladder from a thrift store or flea market (around $20-$30). Just lean it against the wall. Then, use S-hooks to hang plants in simple baskets or macrame hangers from the rungs. You can also place small wooden boards across the rungs to create instant shelves. It’s less structured but achieves the same lush, multi-level display with even more rustic charm.
|
📋 Copy HEX 🔗 Share |
🧹 Maintenance Reality
To get that full, ‘jungalow’ look without it feeling chaotic, stick to a tight color palette for your accessories. Notice how this example works: the stand is dark wood, the curtains and walls are white, and the macrame and woven hangings are all a similar shade of neutral tan/beige. The only real color comes from the green of the plants. By keeping the surrounding elements (pots, hangers, textiles) in a strict neutral palette, you allow the plants to be the star and the overall look feels cohesive and calming, not messy.
23. A Bold Teal Metal Stand on a Blue Floor
This vibrant setup is a lesson in analogous color schemes. The formula is: 60% dominant cool color + 30% adjacent cool color + 10% high-contrast accent. Here, the teal of the plant stand is the star (dominant cool). The light blue of the painted floor is right next to teal on the color wheel (adjacent cool). This creates a harmonious, layered, and immersive color experience. The final 10% comes from the pop of the red pot, which is a warm, high-contrast accent that brings a jolt of energy and keeps the all-blue/green scheme from feeling flat.
|
📋 Copy HEX 🔗 Share |
⚠️ Real Talk
This is an incredibly fun and vibrant look, but a painted metal stand like this requires some real talk about maintenance, especially if it lives outside. The paint will inevitably get chipped and scratched from moving pots around. To keep it looking fresh, you’ll need to sand down any rust spots and do touch-up painting at least once a year. Also, a bright, saturated color like this teal is more prone to fading in direct sunlight than a neutral color. To preserve its vibrancy, try to place it in a spot that gets some afternoon shade.
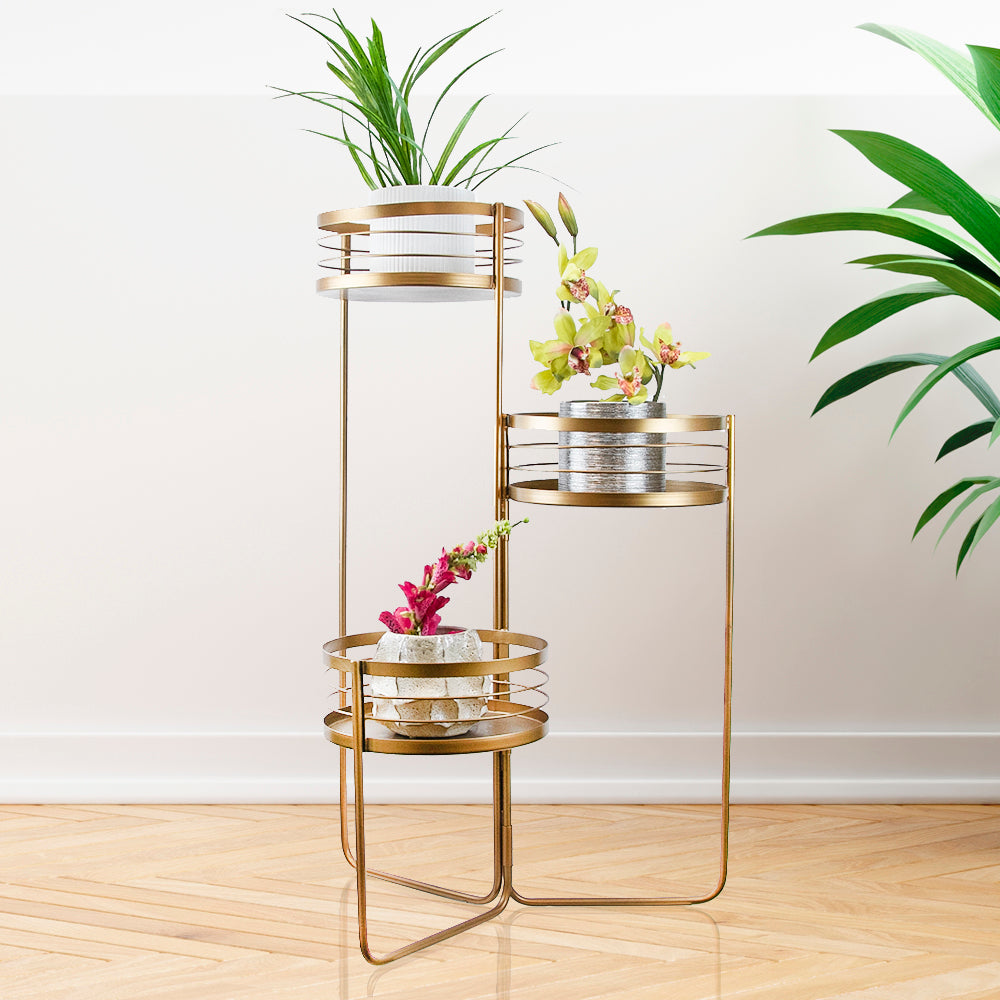
24. A Sunny Yellow Crescent Stand for a Trio of Pots
This arrangement is pure charm, and it works because of the harmony between the stand and the pots. It’s not just a stand holding random pots; they were clearly designed to go together. The light yellow color is repeated in both the metal stand and the ceramic pots, creating instant visual cohesion. The crescent shape of the stand feels special and intentional, cradling the three pots perfectly. The delicate floral and butterfly patterns on the pots add another layer of quaint, decorative detail. This is what separates a simple plant display from a truly curated decorative vignette.
|
📋 Copy HEX 🔗 Share |
📐 Style Math
This is a great small-scale DIY project that you can likely do for very little money, especially if you have some leftover materials.
- Metal Stand (DIY from 1/4″ steel rod, or find a similar shaped object to upcycle): $10 – $25
- Small Terracotta Pots (Set of 3): $5 – $10
- Paint (Yellow spray paint for metal, yellow craft paint for pots): $15 – $20
- Small Plants: $10 – $20
- TOTAL: $40 – $75
25. A Wheeled Wooden Stand with Luxe Gold Accents
The wheels are the game-changer here. They transform this from a static piece of furniture into a flexible, mobile plant display. This is incredibly practical for a few reasons. First, you can easily rotate the entire stand to ensure all plants get even sunlight. Second, you can move it out of the way for cleaning the floor underneath—a huge plus for any plant owner who’s tired of sweeping around furniture legs. Finally, you can wheel it to a different spot in the room (or even a different room entirely) to instantly change up your decor. That mobility is the single element that makes this stand exceptionally functional. A similar grid-like structure is seen in Idea #29, but the wheels add a new level of practicality.
|
📋 Copy HEX 🔗 Share |
✅ Before You Start
Want to add that touch of gold to your own planters? It’s an easy DIY to elevate basic pots.
- Start with simple ceramic or terracotta pots in white or green.
- Use painter’s tape to mask off the areas you want to keep plain. A simple, clean line around the base or the rim works best.
- Press the tape down firmly to prevent the paint from bleeding underneath.
- Apply two thin coats of a high-quality gold metallic spray paint. Our favorite is Rust-Oleum’s ‘Pure Gold’.
- Let the first coat dry completely before adding the second.
- Carefully remove the painter’s tape while the second coat is still slightly tacky for the crispest line.
26. The Modern Vintage Caged Iron Plant Stand
This design’s success lies in its use of ‘negative space.’ The open, airy cage-like structure is more about the space it contains than the metal itself. This allows the plant and pot to be fully visible from all angles, making them the true hero. The stand frames the plant without overwhelming it. This quality makes it perfect for showcasing a particularly beautiful pot or a plant with an interesting architectural form. It feels both modern, due to its clean lines, and vintage, thanks to the classic caged silhouette. It’s a timeless piece that wouldn’t feel out of place in many different decor styles.
|
📋 Copy HEX 🔗 Share |
💰 Budget Breakdown
When you have a plant stand with a strong geometric or sculptural form like this one, choose your plant pairing carefully. Don’t hide the stand’s beautiful lines with a massive, bushy plant that covers everything. Instead, opt for a plant that complements its shape. An upright snake plant would emphasize the stand’s verticality. A plant with a distinct, open structure like a ZZ plant would create an interesting interplay of forms. The idea is to create a dialogue between the plant and the stand, not have one shout over the other.
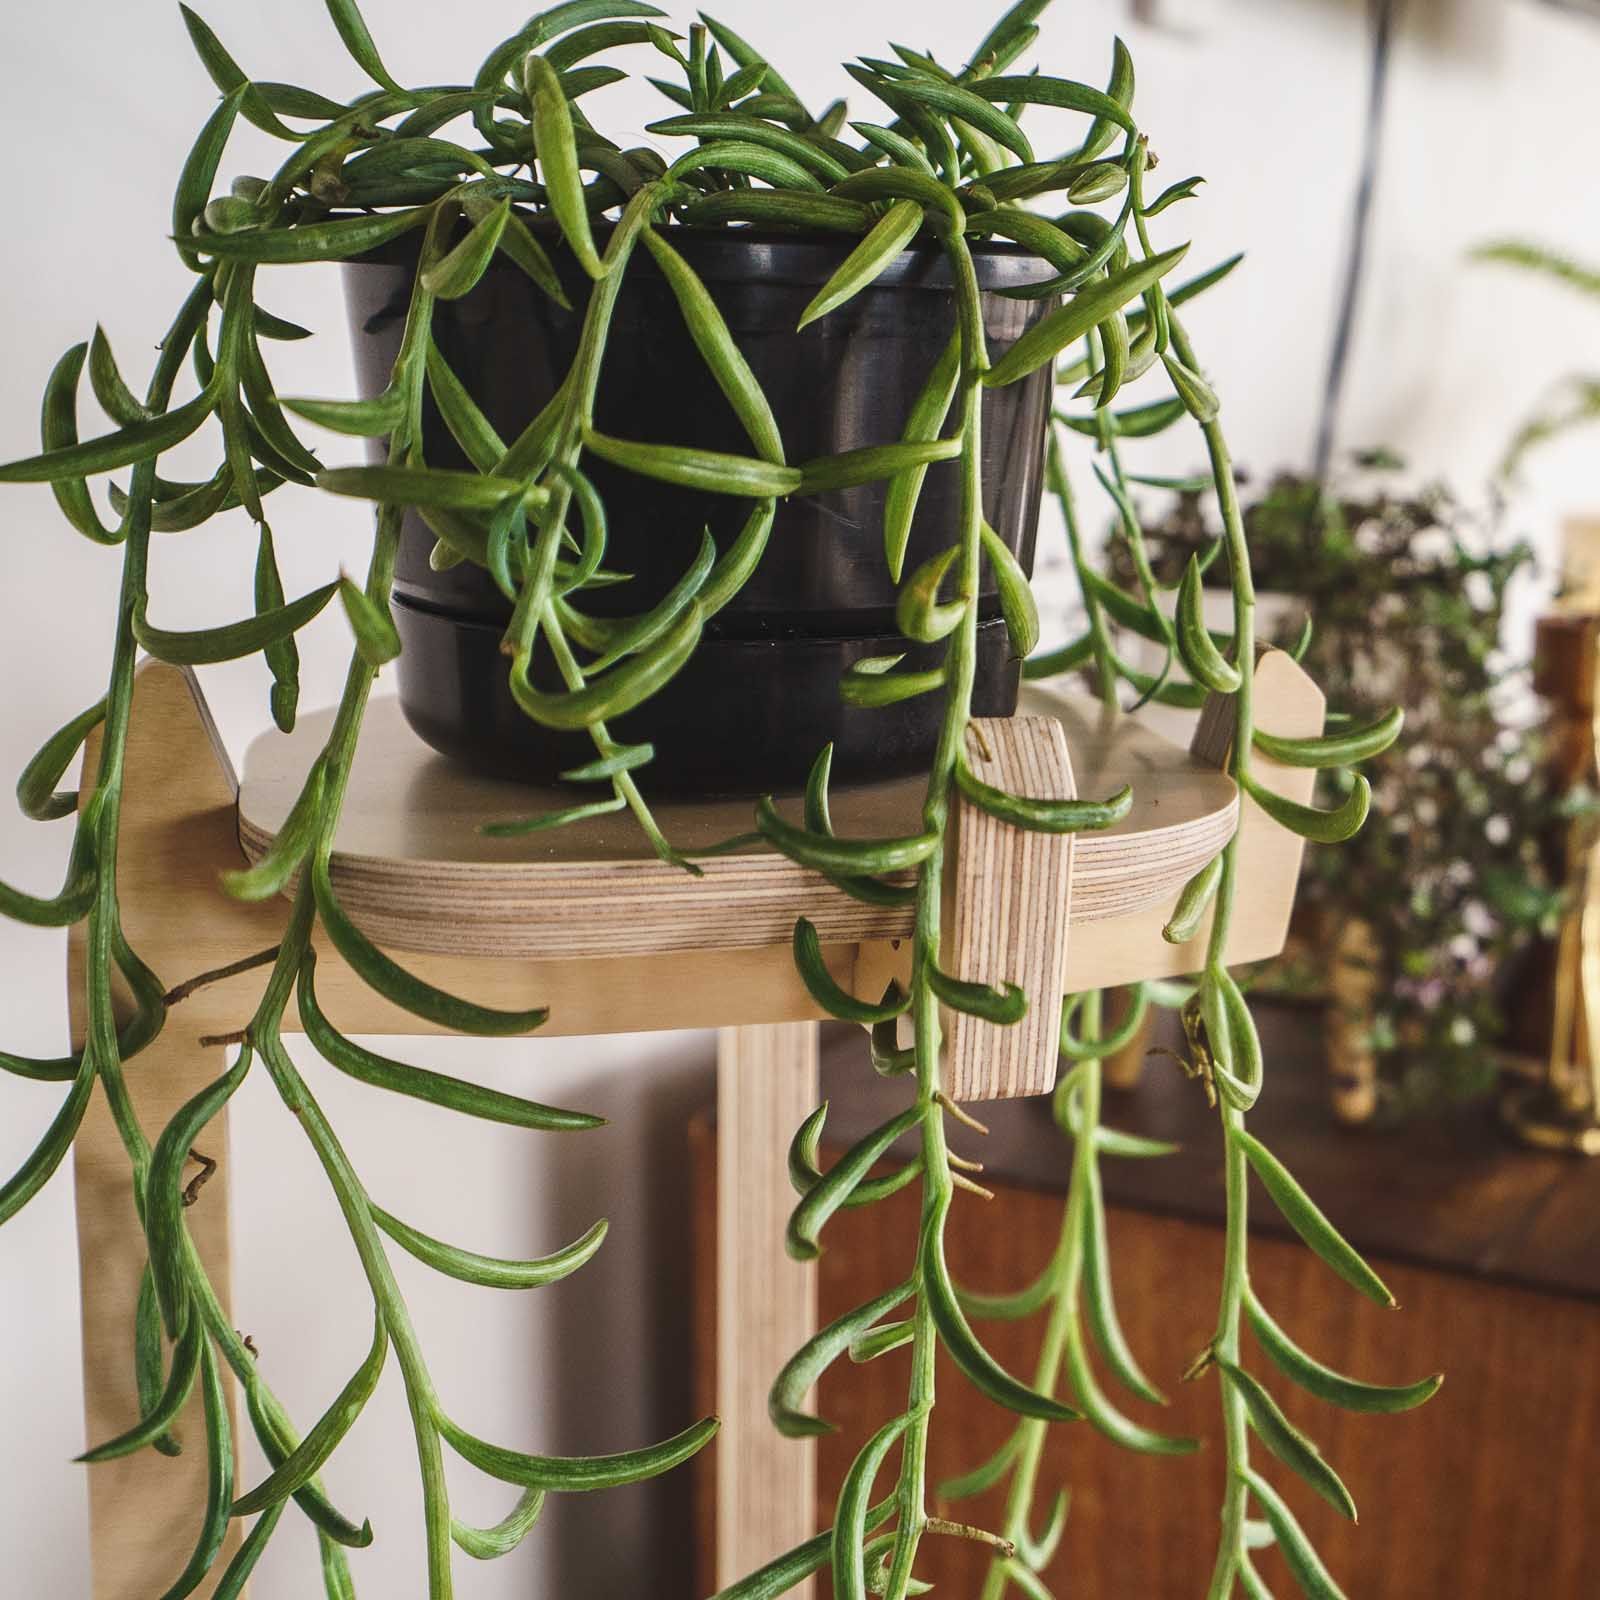
27. A Simple Curved Plywood Shelf for a Trailing Plant
This isn’t a floor stand; it’s a micro-shelf solution perfect for ultra-small spaces. Think about that awkward, narrow strip of wall in a bathroom, a tiny corner in a kitchen, or the space next to a window frame. Because it mounts to the wall, it has a zero-footprint on your floor. It’s designed to hold a single, small pot (no larger than 4-6 inches in diameter). The beauty is its simplicity and ability to add a touch of green to a spot where no other furniture could possibly fit. You could even mount a series of them vertically up a wall to create a living wall effect.
|
📋 Copy HEX 🔗 Share |
💡 Designer Tip
This is a super simple DIY, but success depends on the material. Here’s what to check before you start building:
- Plywood Choice: Use Baltic Birch plywood. It has more layers (plies) than standard plywood, which will give you those beautiful, clean edges and allow for a smoother bend. Don’t use standard construction-grade plywood; it will splinter.
- Bending Method: For a simple curve like this, you can use a technique called kerf bending (cutting shallow slits on the inside of the curve) or steam bending if you’re more advanced. For the easiest route, consider laminating two thin, flexible pieces of 1/8″ plywood together over a curved form.
- Wall Mounting: How will you attach it to the wall? A keyhole hanger routed into the back is the cleanest look. Alternatively, you can use a small, discreet L-bracket underneath.
28. A Circular Wood and Metal Stand on a Small Balcony
Love this look but don’t want to build from scratch? You can hack it. Find an inexpensive, multi-tiered wire plant stand from a big box store or online—the kind with simple wire shelves. Then, go to the hardware store and have them cut three wooden circles from 1/2-inch pine or plywood, in sizes that match the wire shelves. Stain the wood a rich, dark brown. Then, simply place the wooden rounds on top of the wire shelves. You can secure them with a bit of construction adhesive or even strong zip ties. This gives you the same mixed-material, wood-and-metal vibe for a fraction of the effort and cost.

|
📋 Copy HEX 🔗 Share |
📏 Scale Guide
A multi-level stand on a balcony is a fantastic use of vertical space, but be very aware of wind. A tall, top-heavy arrangement like this can easily become a sail in a strong gust. The large, leafy plant on the top tier is especially vulnerable. To prevent a disaster, make sure the base is heavy and stable. You might even consider placing some weights or small pavers on the very bottom shelf to lower the center of gravity. Never place delicate, easily-breakable terracotta pots on the top tier of a balcony stand.
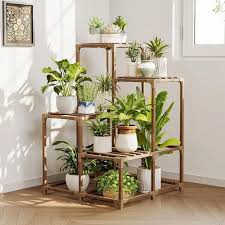
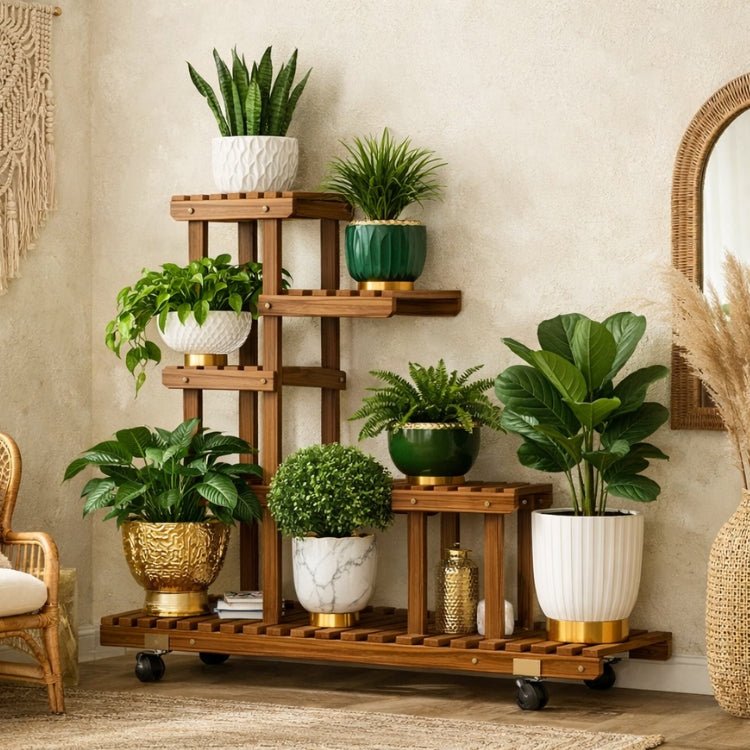
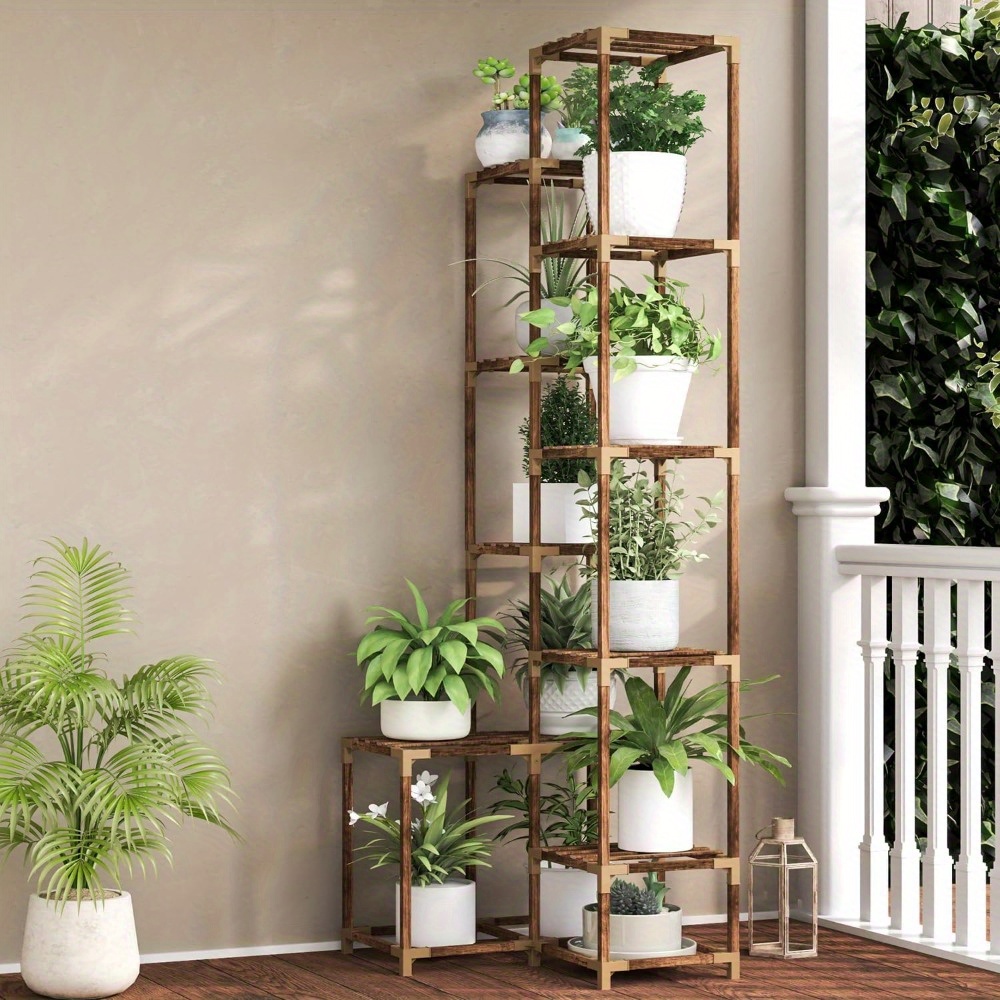
29. A Lush Multi-Tier Wooden Grid Plant Stand
The genius of this stand is its open-grid structure. Unlike a traditional bookcase-style stand with solid sides and back, this design is open on all four sides. This has two major benefits. First, it allows light from the window to pass through the entire structure, reaching plants on all levels and on all sides. This is much healthier for the plants. Second, it keeps the piece from feeling like a heavy, solid block of furniture. It maintains a sense of airiness and doesn’t block the view or the light, making it a perfect room divider or centerpiece. This concept is similar to the wheeled stand in Idea #25, but feels more permanent and architectural.
|
📋 Copy HEX 🔗 Share |
🎯 What Makes It Work
You can build a simple version of this grid using standard lumber.
- Decide on your dimensions. A good starter size is 4 feet tall by 3 feet wide.
- Use 1×2 pine boards for the main structure. Create two ladder-like frames for the front and back.
- Cut shorter 1×2 pieces to act as the horizontal connectors between the two ladder frames. These will also be your shelf supports.
- Assemble the boxy grid structure using wood glue and screws. A corner clamp will be your best friend here.
- For the shelves, cut 1×6 or 1×8 boards to length and simply rest them on the horizontal supports. This makes them removable for cleaning.
- Stain or paint the entire structure to your liking.
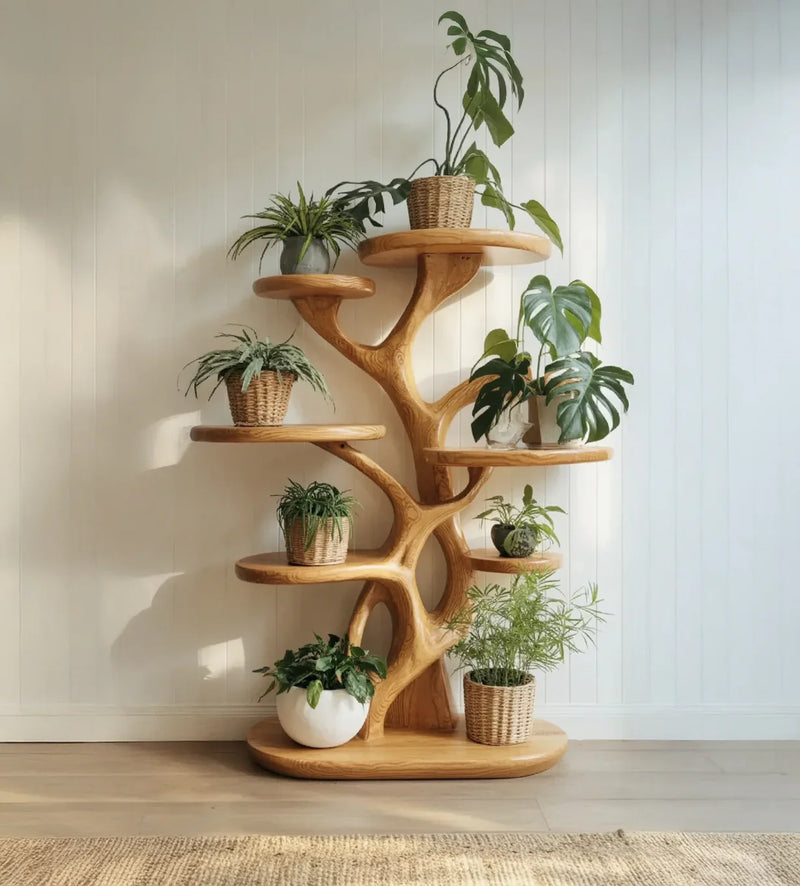
30. A Sculptural, Tree-Like Wooden Plant Stand
In 2026, we are seeing a huge trend towards ‘biophilic design,’ which is all about connecting our homes with nature. This plant stand is the perfect embodiment of that trend. It doesn’t just hold plants; its very form mimics a tree or a branch. This ‘organic-shaped’ furniture, with its irregular shelves and asymmetrical lines, is a direct rejection of the rigid, purely functional furniture of the past. It’s a statement piece that doubles as sculpture, celebrating natural forms and materials. It’s for someone who wants their home to feel calm, serene, and deeply connected to the outdoors.
|
📋 Copy HEX 🔗 Share |
💸 Get This Look For Less
With a sculptural, statement stand like this, the styling is key to making it look sophisticated, not chaotic. The secret is to use pots with a unified texture or material. Notice how almost all the planters here are woven wicker or seagrass baskets. This repetition of texture creates a cohesive story. If the pots were a random mix of shiny ceramic, colorful plastic, and patterned terracotta, the beautiful and unique shape of the stand would be lost in the visual noise. By keeping the pots in the same textural family, you let the stand’s form and the plants’ foliage shine.
Time to Grow Your Own Style
Hopefully, these ideas have sparked some inspiration for your own DIY project. Remember, the goal isn’t just to elevate a plant, but to add a personal, handmade story to your home. Pick an idea that feels like *you* and have fun with it.
Don’t forget to share your finished creations on Pinterest — we’d love to see them!