You know that feeling when you finally find the cabinet photo that looks *exactly* right? That little thrill of possibility for your own kitchen or bathroom? We’ve chased that feeling for you, filtering through hundreds of options to find the makeovers that actually deliver. From IKEA hacks to custom-built beauties, we pulled the best cabinet ideas for 2026 across every price point. Inside, you’ll find 30 curated ideas covering everything from traditional oak and modern minimalist to rustic pine. This isn’t just another inspiration dump; it’s a real-world guide to what works right now. And stay until the end—we break down the most common mistakes that can ruin these looks.
📌 Save this to Pinterest for later—you’ll want to revisit these ideas.
1. Embrace Traditional Oak with Warm Accents
💡 Designer Tip
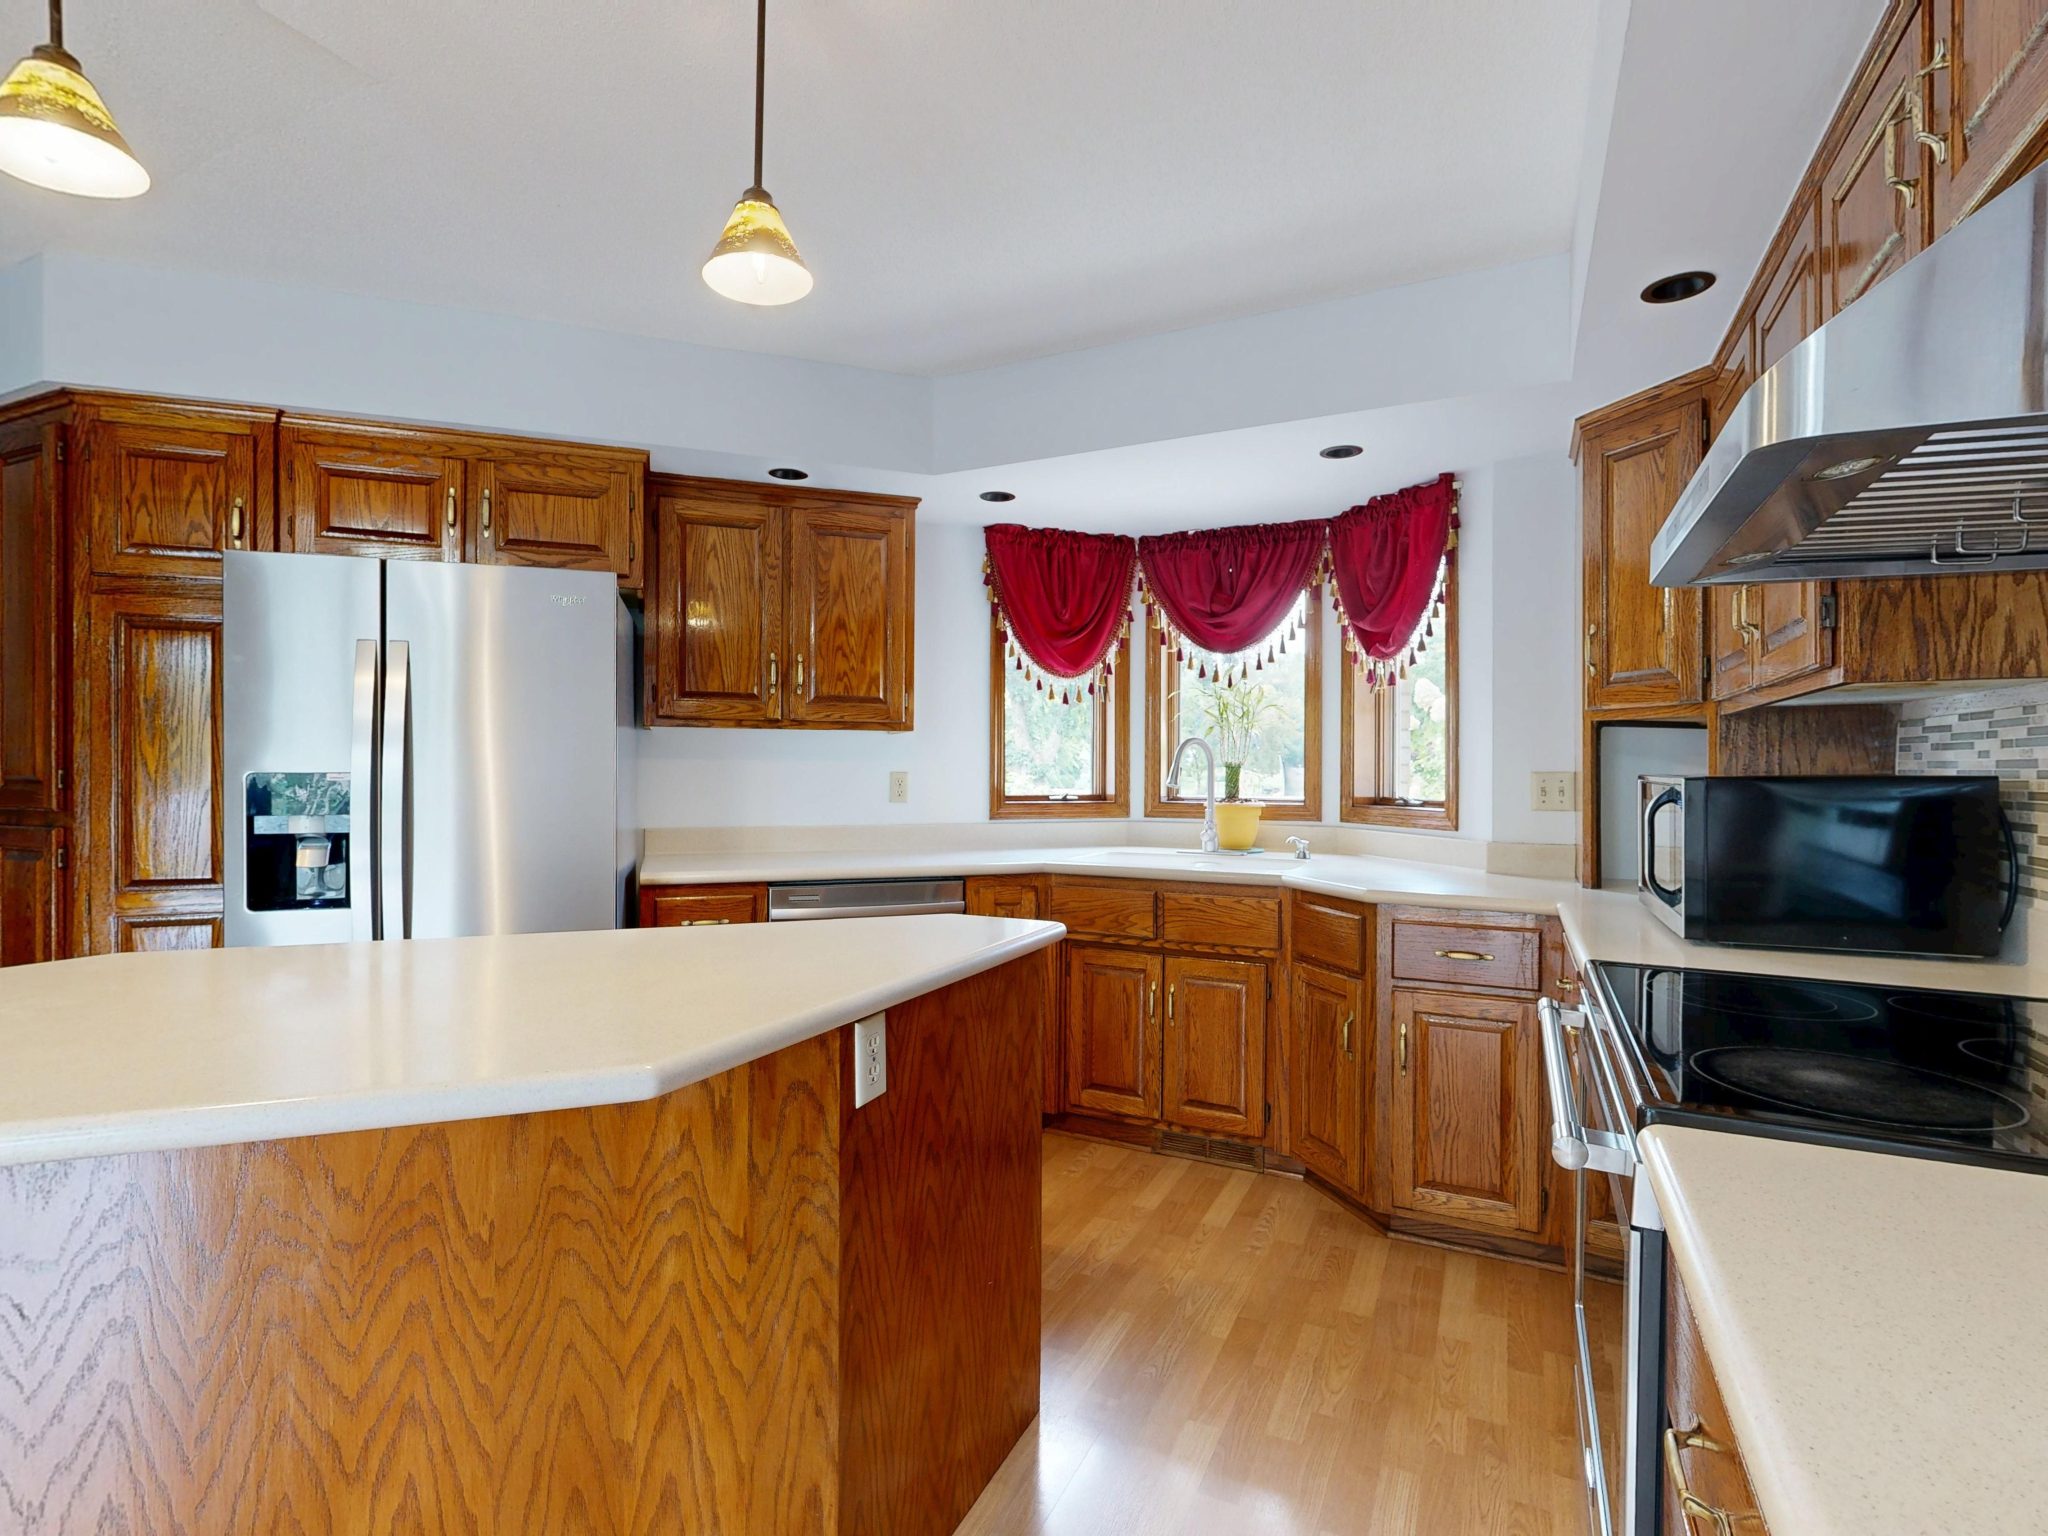
There’s a reason this look feels so familiar and comforting. It’s a classic design formula: warm wood tones (the oak cabinets), a cool metallic (the stainless steel appliances), and a light neutral (the beige countertops). This trifecta creates an easy, livable balance. The pop of red in the window valance is a clever touch; it gives the eye a focal point and injects a dose of personality, preventing the room from feeling like a generic builder-grade kitchen. It draws attention to the natural light from the bay window, making the whole space feel more inviting.
Let’s be honest: oak’s prominent, swirling grain isn’t for everyone. Before you commit to a full kitchen of it, make sure you genuinely love the pattern, as it will be the most dominant visual feature in the room. Also, be aware that older oak cabinetry can yellow or darken over time, especially when exposed to direct sunlight—a real consideration with a large bay window like this one. If you’re refinishing, use a high-quality, UV-resistant sealant to protect the wood’s original tone for as long as possible.
2. Go Full Rustic with Knotty Pine and Exposed Beams
|
📋 Copy HEX 🔗 Share |
✅ Before You Start
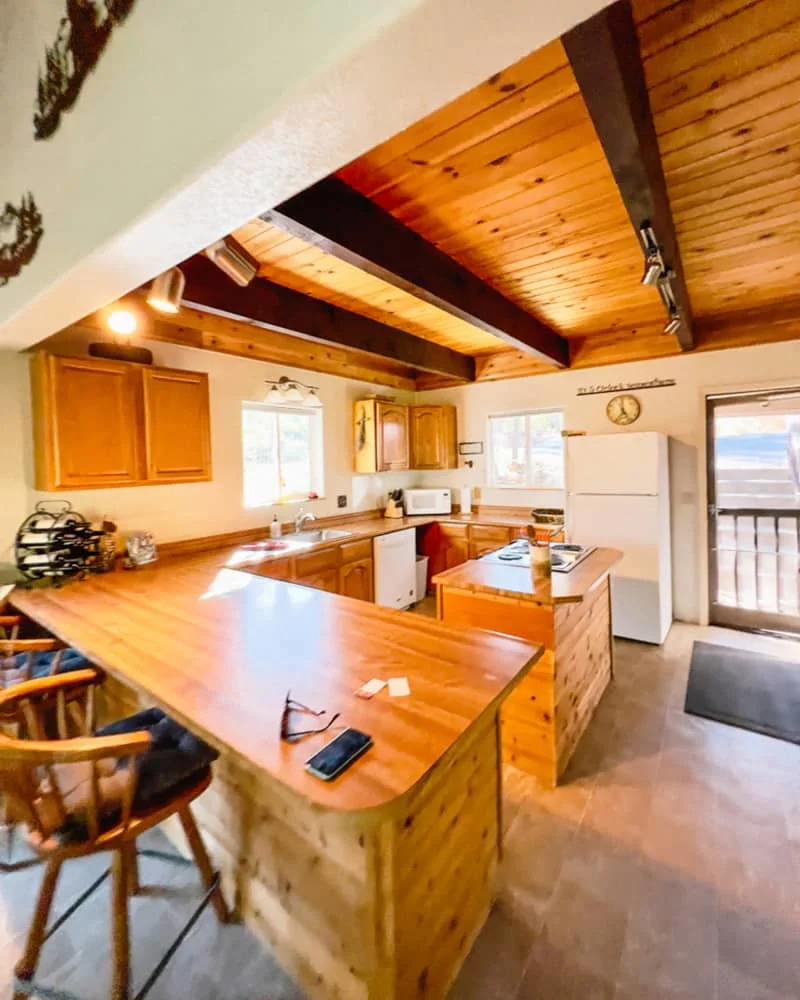
This look, with its heavy wood elements on both the ceiling and cabinets, needs room to breathe. It works best in spaces with a ceiling height of at least 9 feet to prevent the dark beams from feeling oppressive. The U-shaped peninsula requires a generous footprint, ideally in a room that is at least 12×14 feet, to allow for comfortable seating and workflow around it without creating traffic jams. In a smaller kitchen, this much wood texture could easily overwhelm the space and make it feel dark and cramped, regardless of the light stain.
Knotty pine is a soft wood, which means it’s more susceptible to dings, dents, and scratches than harder woods like oak or maple. This is especially true on a high-traffic peninsula where chairs are constantly moving. The deep crevices in the knots can also trap grease and dust, requiring a bit more diligence with cleaning. A wipe-down with a wood-safe cleaner every couple of weeks is a must. The wooden plank ceiling is lower maintenance but will need a good dusting once or twice a year to keep it looking fresh.
3. Add Detail with Arched Glass-Front Cabinets
|
📋 Copy HEX 🔗 Share |
⭐ The One Thing
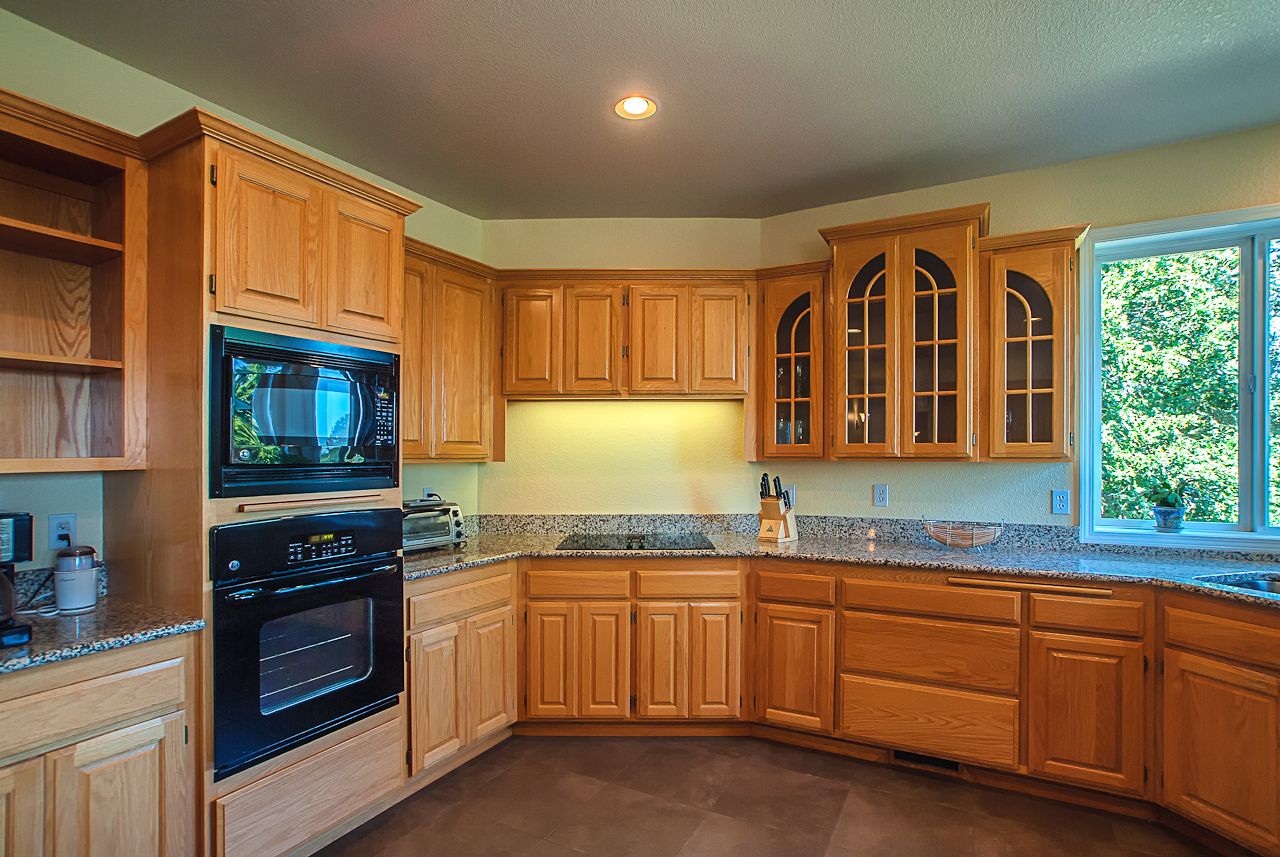
When you have glass-front cabinets, what’s inside becomes part of the decor. To get that curated, intentional look, stick to a strict color palette for your display items. Notice how this kitchen might have benefited from a more edited collection. Choose two or three colors that complement the room (e.g., all-white dishes with a few black accent pieces) and group items by size and shape. Use the top shelves for less-frequently-used decorative items and keep everyday dishes on the more accessible lower shelves. Resist the urge to overfill them!
You don’t need custom cabinetry to get this look. You can create the effect on your existing solid upper cabinets. Remove the doors, carefully cut out the central panel with a jigsaw, and have a local glass shop cut affordable clear or frosted glass inserts to fit the opening. Secure them with clear silicone or small glazier’s points. The whole DIY project would likely cost under $150 and a weekend of your time, giving you that custom, high-end feel seen in a look like Idea #16 for a fraction of the price.
4. Mix Light Oak and Dark Counters for a Classic Contrast
|
📋 Copy HEX 🔗 Share |
🔥 Trending Context
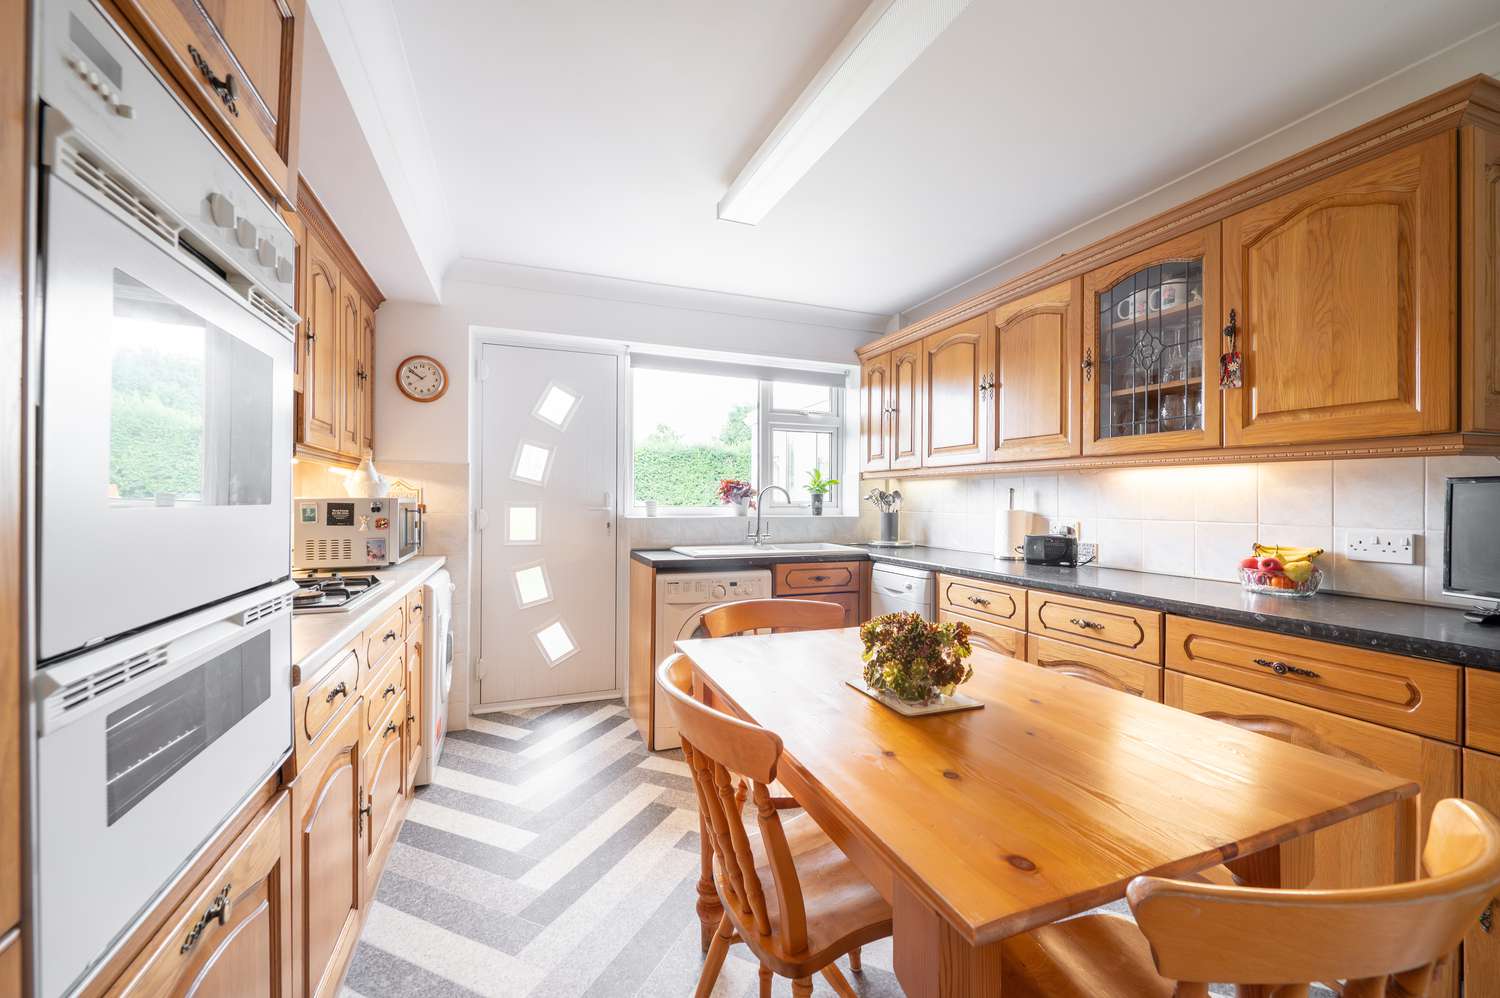
This kitchen succeeds by balancing classic materials with a bold pattern. The light oak shaker cabinets and simple white tile backsplash provide a quiet, neutral canvas. This allows the gray-and-white herringbone floor to become the star of the show without making the room feel chaotic. The dark countertops act as a visual anchor, creating a crisp horizontal line that defines the workspace and adds a touch of modern drama. It’s a smart composition that feels both timeless and fresh.
A herringbone floor is an absolute showstopper, but be prepared for the installation cost and complexity. The number of cuts required means more material waste (budget for 15-20% overage) and higher labor costs compared to a standard tile layout. Also, the high-contrast gray and white pattern will show every crumb, footprint, and speck of dirt. It looks amazing when it’s clean, but it demands regular sweeping and mopping to keep it that way. It’s a high-impact choice with high-maintenance demands.
5. Frame Your Finds with an Arched Black Display Cabinet
|
📋 Copy HEX 🔗 Share |
🔧 How-To Brief
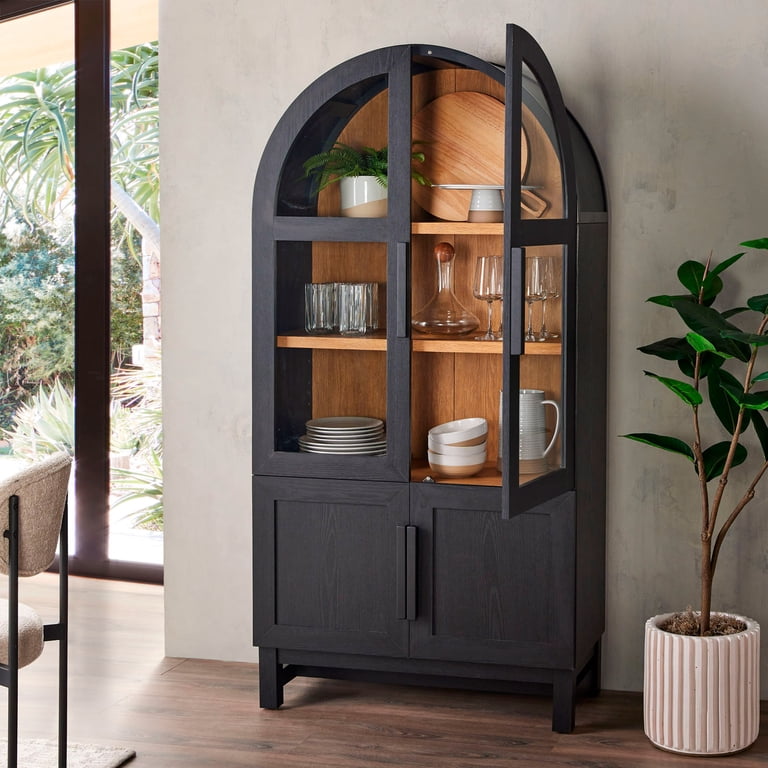
The arch. Absolutely the arch. It’s the single detail that elevates this piece from a simple black cabinet to something special. In a world of square rooms and rectangular furniture, the gentle curve of the top provides immediate visual relief and a touch of architectural grace. It softens the cabinet’s strong, dark silhouette, making it feel more refined and less imposing. Without that arch, it would just be a box; with it, it’s a statement.
To make a display cabinet like this truly shine, use interior lighting. A simple, battery-powered LED puck light or strip placed along the inside top edge is a game-changer. Set it to a warm white (2700K-3000K) to create a soft, inviting glow that highlights your glassware and pottery, especially with those light wood shelves providing a warm backdrop. This little trick gives the piece depth and turns it into a focal point, particularly in the evening.
6. Layer Warmth with Cherry Shaker Cabinets
|
📋 Copy HEX 🔗 Share |
🎯 What Makes It Work
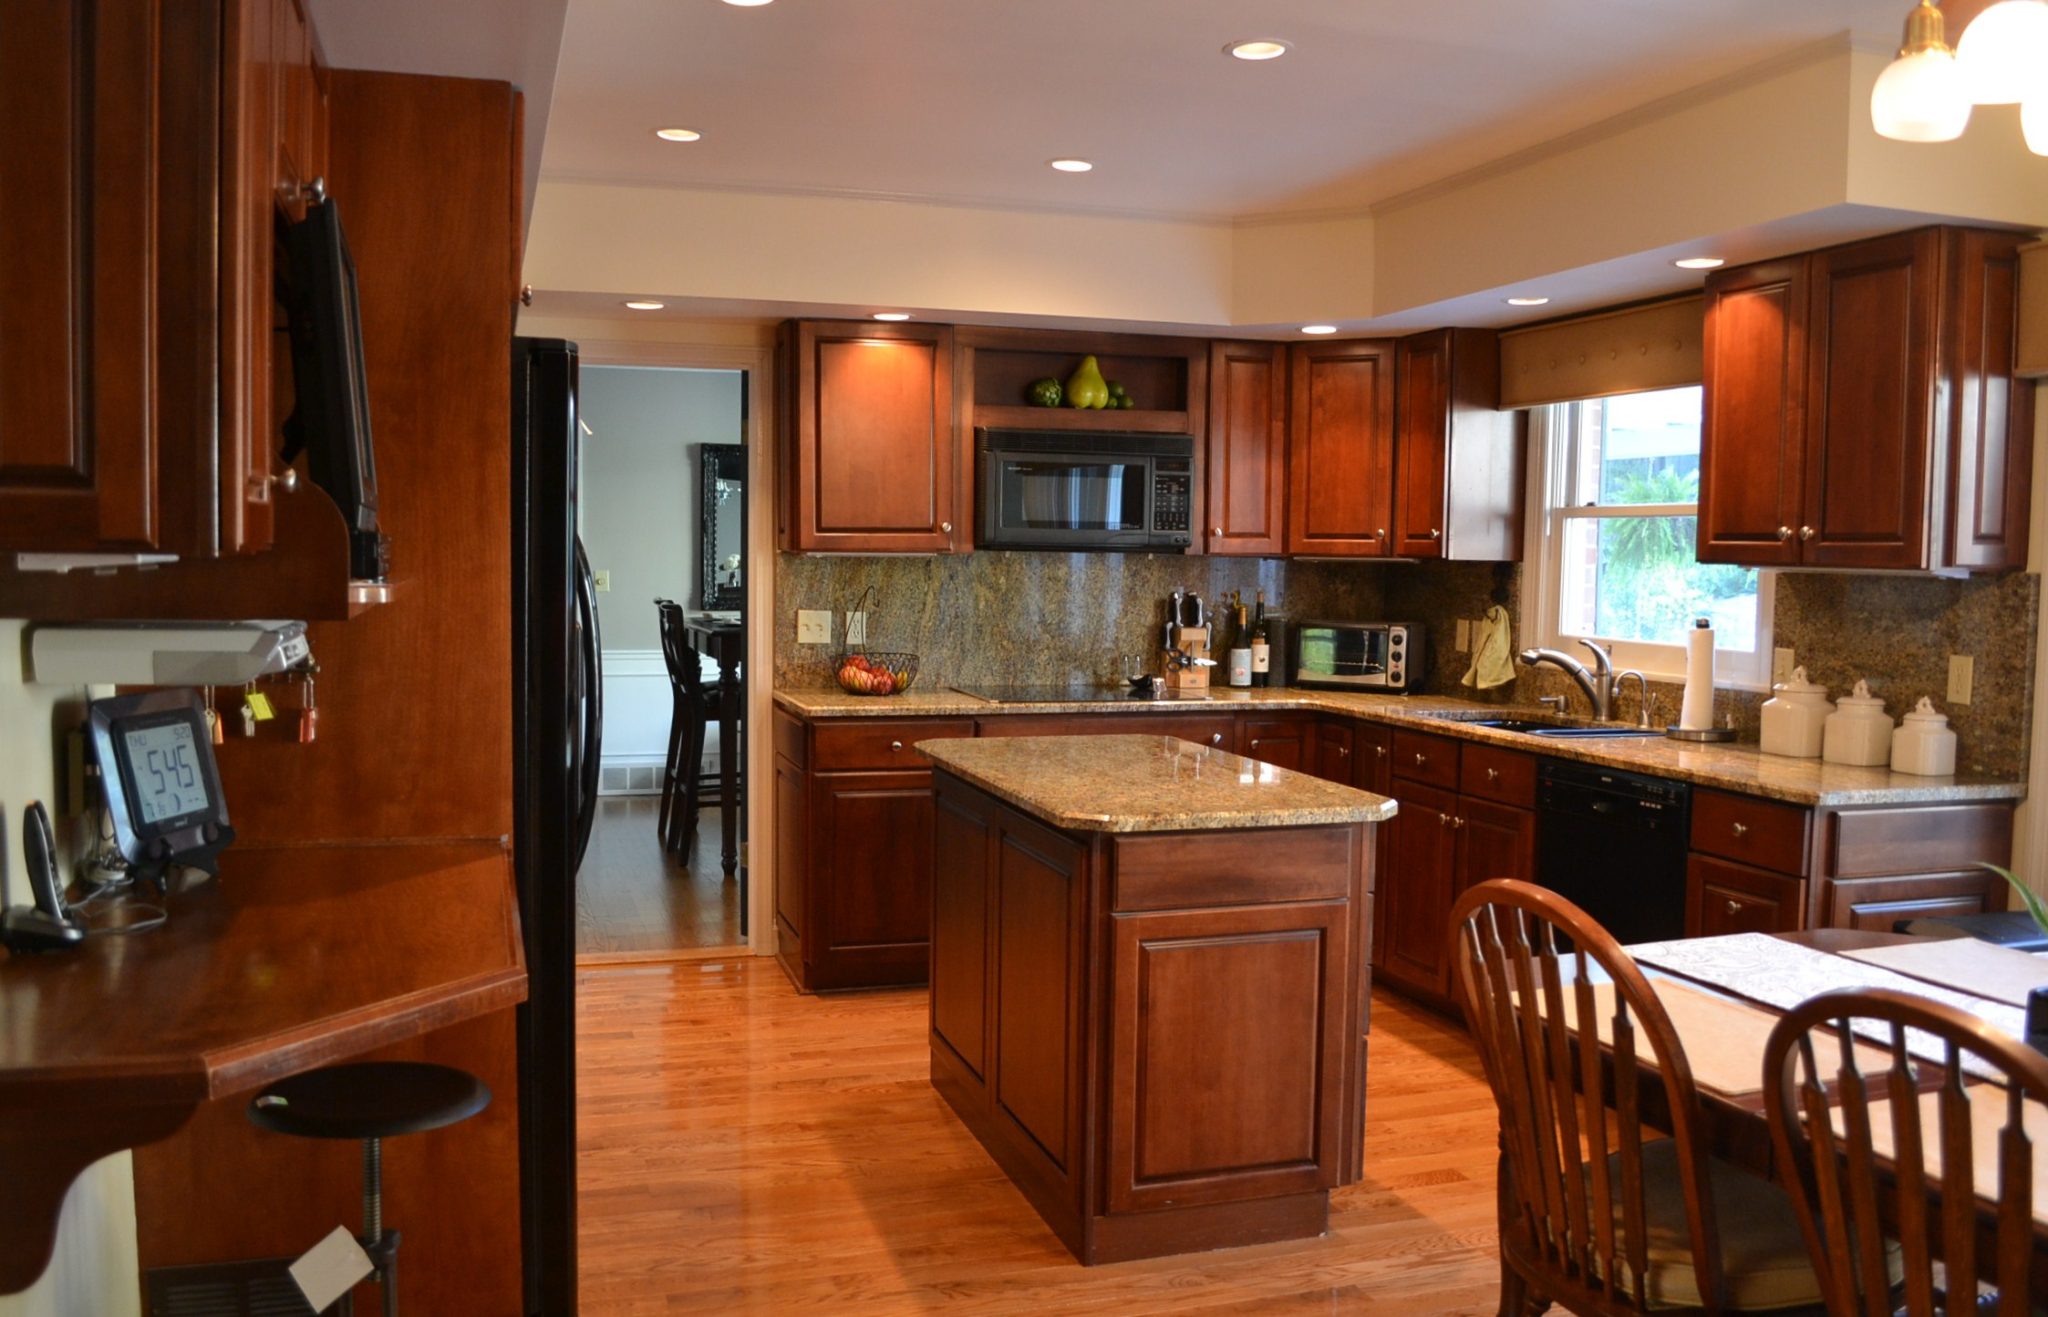
The inviting feel of this kitchen comes down to a simple formula: 60% rich, dominant wood (the cherry cabinets) + 30% textured neutral (the speckled granite) + 10% calm backdrop (the light beige walls). The black appliances add punctuation without disrupting the warmth. You could swap the cherry for a deep walnut or the beige walls for a soft sage green, and the cozy, enveloping vibe would remain because the core ratio of dominant warmth to quiet neutral is still intact.
For years, all-white kitchens dominated Pinterest boards. But we’re seeing a major swing back towards rich, warm wood tones, and cherry is leading the charge. Homeowners are craving spaces that feel cozy, personal, and enveloping, not sterile or clinical. This style, popular in the early 2000s, is being rediscovered for its ability to make a kitchen feel like the true heart of the home. It represents a shift towards durable, long-lasting materials and a rejection of fleeting, high-maintenance fads.
7. A Drab 70s Kitchen Gets a Bright Makeover
|
📋 Copy HEX 🔗 Share |
🧹 Maintenance Reality
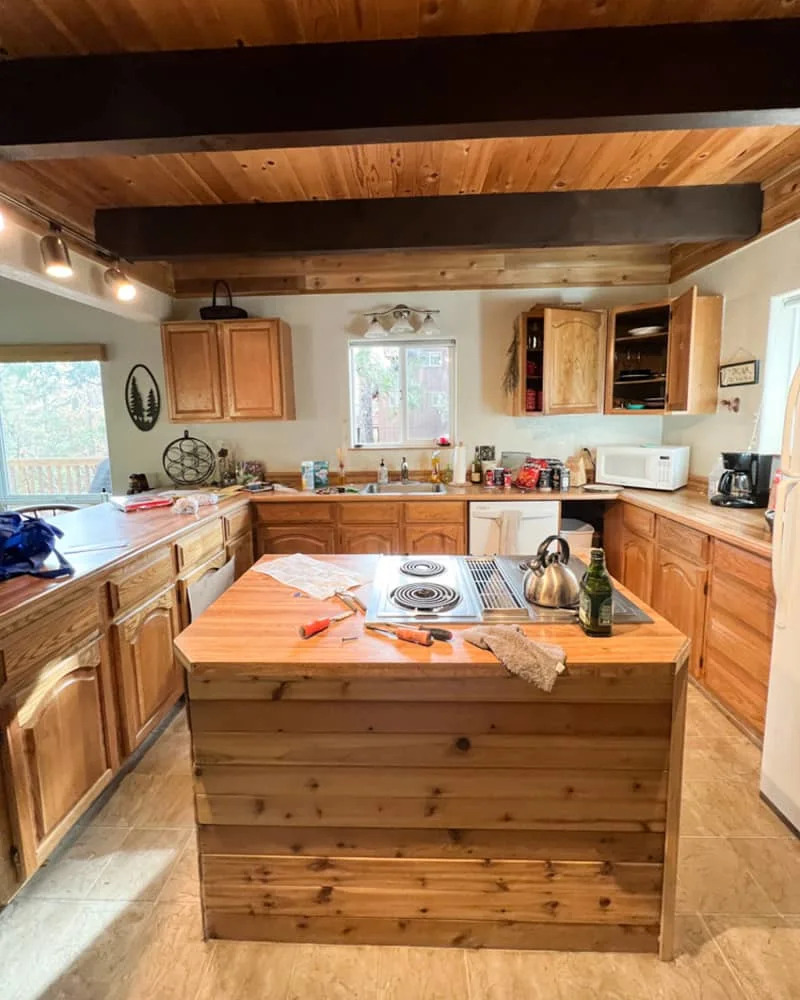
Working with existing knotty pine cabinets can be a huge budget-saver. If you have a kitchen from the 70s, don’t rip it out—refresh it! A thorough cleaning with TSP (trisodium phosphate), followed by a light sanding and a good quality primer (shellac-based primers are great for blocking wood knots and sap), is the key to a professional-looking paint job. A few coats of a durable cabinet paint in a fresh, modern color can completely transform the space for under $300. It’s the ultimate high-impact, low-cost weekend project.
When you see a “before and after” of a knotty pine kitchen, the “after” always looks amazing, but it hides a ton of prep work. Those knots in the pine can “bleed” tannins through latex and acrylic paint over time, creating yellowish-brown stains. You absolutely cannot skip the priming step, and you must use a stain-blocking primer specifically designed for this purpose. It’s a tedious, smelly job, but it’s the only thing standing between you and a beautifully updated kitchen or a blotchy, frustrating mess in six months.
8. Achieve a High-End Look by Painting Knotty Pine
|
📋 Copy HEX 🔗 Share |
📏 Scale Guide
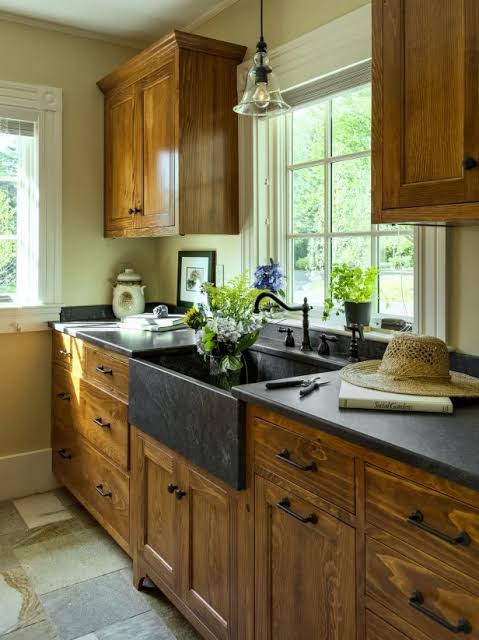
If you’re going to paint over knotty pine, don’t just paint it—fill it. For a truly professional, high-end finish that looks like expensive custom cabinetry, take the extra time to fill the knot holes and deep grain with wood filler before you sand and prime. Use a good quality, sandable wood filler and over-fill slightly. Once it’s dry, sand it perfectly smooth so you can’t feel the knot at all. This step adds a day to your project, but it takes the finish from “obvious DIY” to “did a professional do this?”
The single most important thing that makes a painted pine kitchen look crave-worthy is the finish. Not the color, but the actual quality of the paint job. A smooth, satiny, unblemished surface that hides the wood’s rustic origins is what creates the magic. This is achieved through meticulous prep work—cleaning, sanding, and priming—and the right application, preferably with a paint sprayer rather than a brush or roller, to avoid texture marks. It’s all about creating that flawless, factory-finish illusion.
9. Curate a Coastal Vibe with a White China Cabinet
|
📋 Copy HEX 🔗 Share |
💸 Get This Look For Less
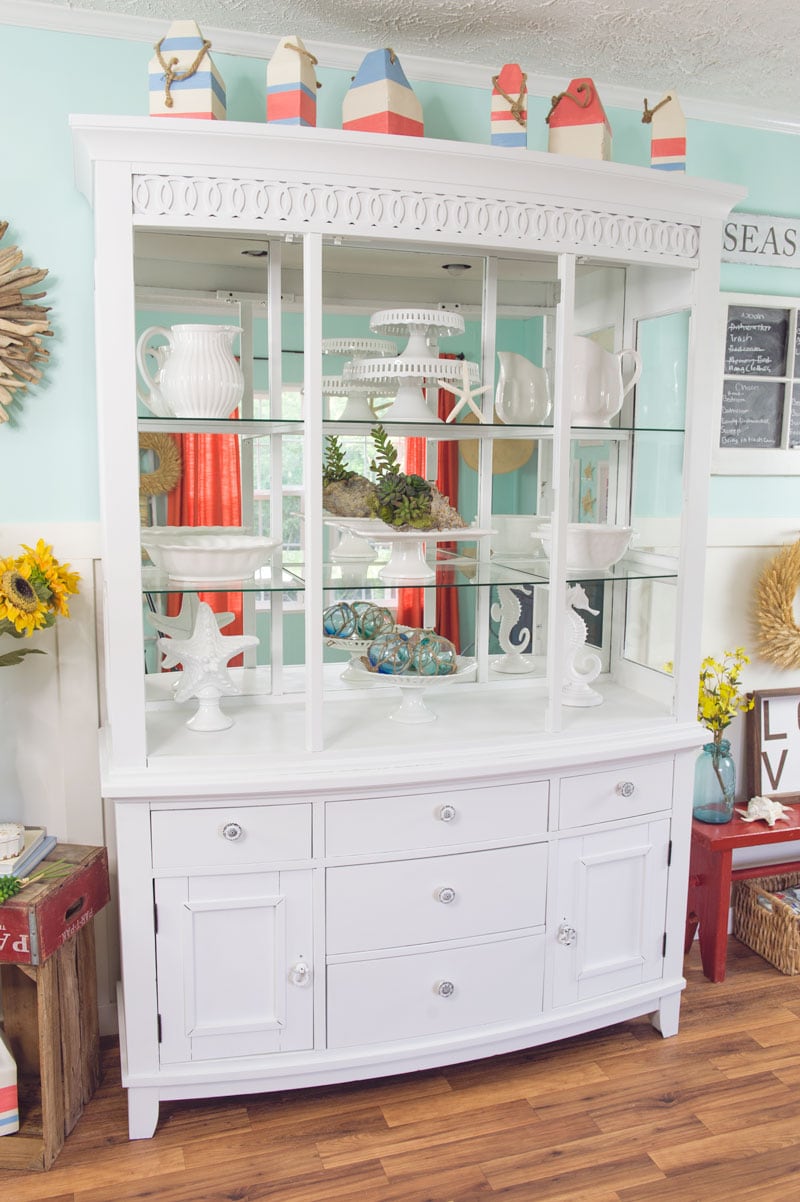
This look is a masterclass in thematic styling. The all-white cabinet acts as a gallery-like backdrop for the curated decor. Sticking to a tight color palette—white, light blue, and pops of coral—creates a cohesive, calming effect. The theme is reinforced at every level, from the painted buoys on top to the subtle aquatic shapes within the glass hutch. It works because it’s disciplined. By not introducing other competing colors or styles, the coastal narrative is clear, bright, and incredibly cheerful.
Before You Start Checklist
- Measure your space: A large piece like this needs breathing room. Ensure you have at least 12 inches of empty wall space on either side to avoid a cramped look.
- Check your collection: Does your dishware or decor fit the color scheme you’re aiming for? A glass-front cabinet puts everything on display, so your stuff is part of the design.
- Confirm lighting: Is the spot you’ve chosen well-lit, either by natural light or a lamp? A dark corner will turn a beautiful white cabinet into a shadowy lump.
- Consider your floor color: The warm wood floor here provides a lovely contrast. Make sure your flooring doesn’t clash with the bright white finish.
10. Create Sleek Contrast with Two-Tone Modern Cabinets
|
📋 Copy HEX 🔗 Share |
📐 Style Math
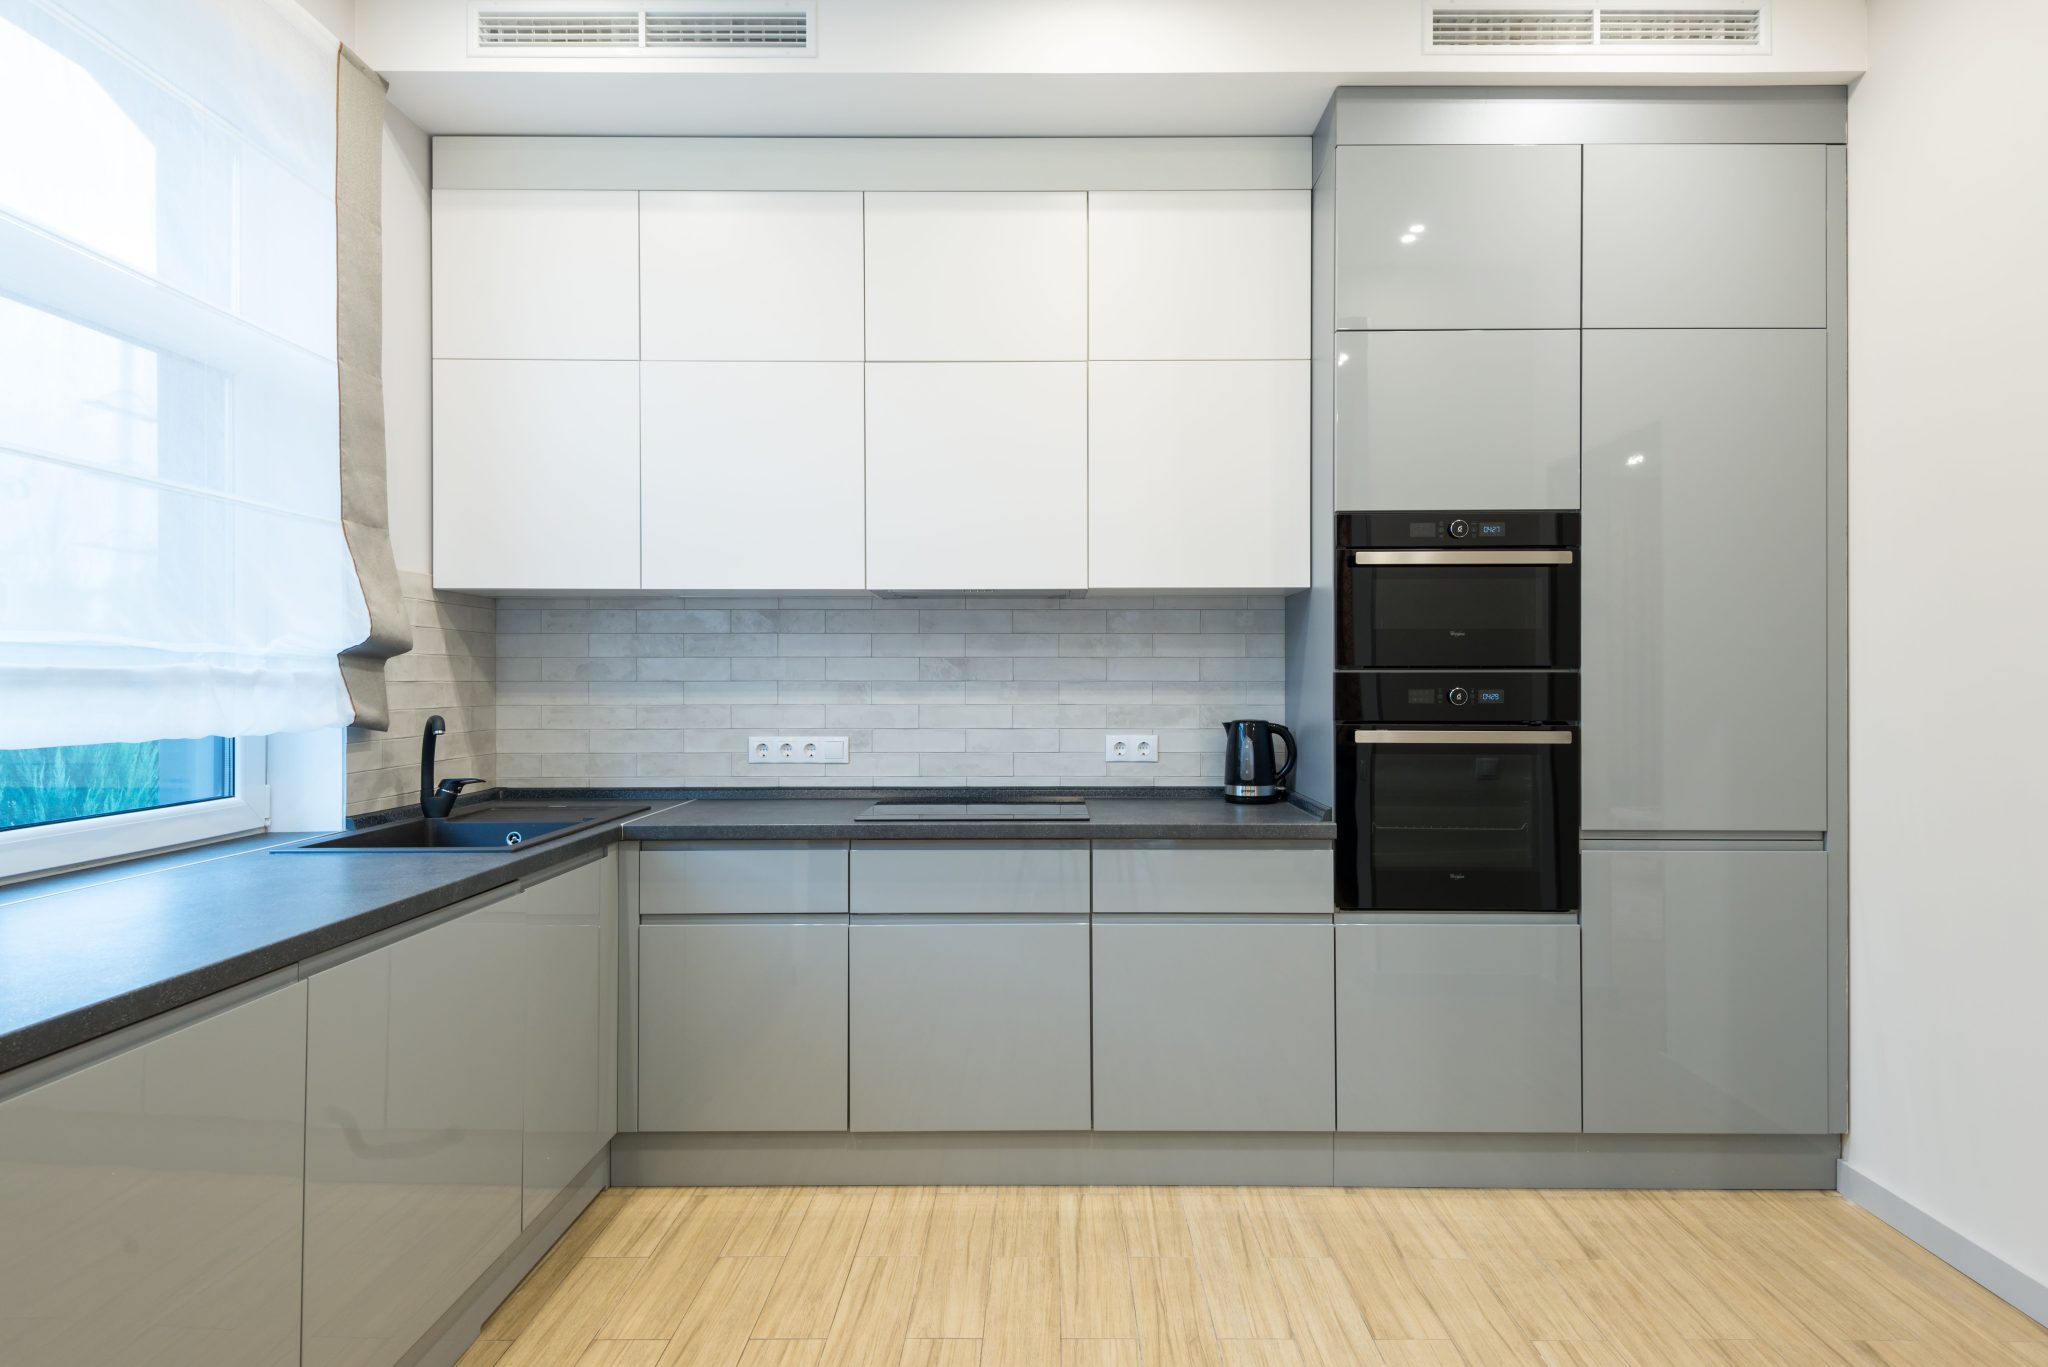
This kitchen’s sleek, minimalist feel is a carefully balanced equation: 50% light elements (matte white uppers, light wood-look floor) + 40% mid-tone elements (glossy gray base cabinets, subway tile backsplash) + 10% black accents (appliances, faucet). The combination of matte and glossy finishes adds subtle texture without adding clutter. This modern look, similar in its clean lines to Idea #22, relies on this strict, clean-lined geometry for its sophisticated and uncluttered appearance.
Glossy cabinets, like the light gray ones here, look stunningly sleek but are absolute fingerprint magnets. Every touch, smudge, and water spot will show up, especially in a busy kitchen. You’ll want to keep a microfiber cloth handy for daily wipe-downs. Matte white uppers are more forgiving on fingerprints but can be prone to scuffs and stains. Meanwhile, dark gray stone countertops are great for hiding crumbs, but can make it hard to spot spills, which can lead to staining if not cleaned up promptly.
11. Classic Light Wood Cabinets for a Functional Kitchen
|
📋 Copy HEX 🔗 Share |
⚠️ Real Talk
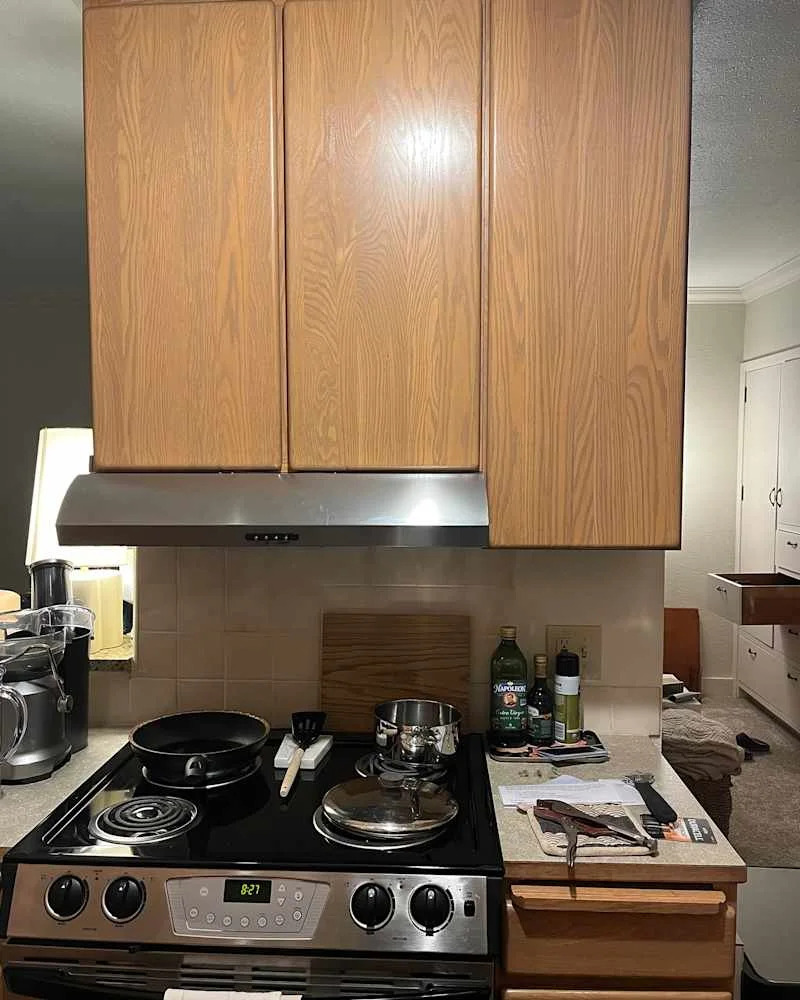
This setup is the definition of functional, no-frills design. The light brown wood grain of the cabinets provides warmth, preventing the stainless steel and black appliances from feeling too cold or industrial. The choice of a simple, neutral beige tile for the backsplash is a practical one—it’s easy to clean and doesn’t compete with the other elements. Everything is designed to be durable and straightforward. It’s not trying to be a showpiece; it’s designed to be a workhorse kitchen, and its strength lies in its honesty and practicality.
If you have dated cabinets, you can achieve this warm, functional look without a total replacement. For a few hundred dollars, you can reface your cabinet boxes with a light wood grain laminate or veneer. Peel-and-stick backsplash tiles in a simple beige or off-white pattern can mimic the look of real tile for under $100. Check appliance outlets or Facebook Marketplace for deals on stainless steel range hoods and stoves; you can often find floor models or lightly used pieces for 40-60% off retail prices.
12. Pair Warm Wood Cabinets with a Sage Green Wall
|
📋 Copy HEX 🔗 Share |
💰 Budget Breakdown
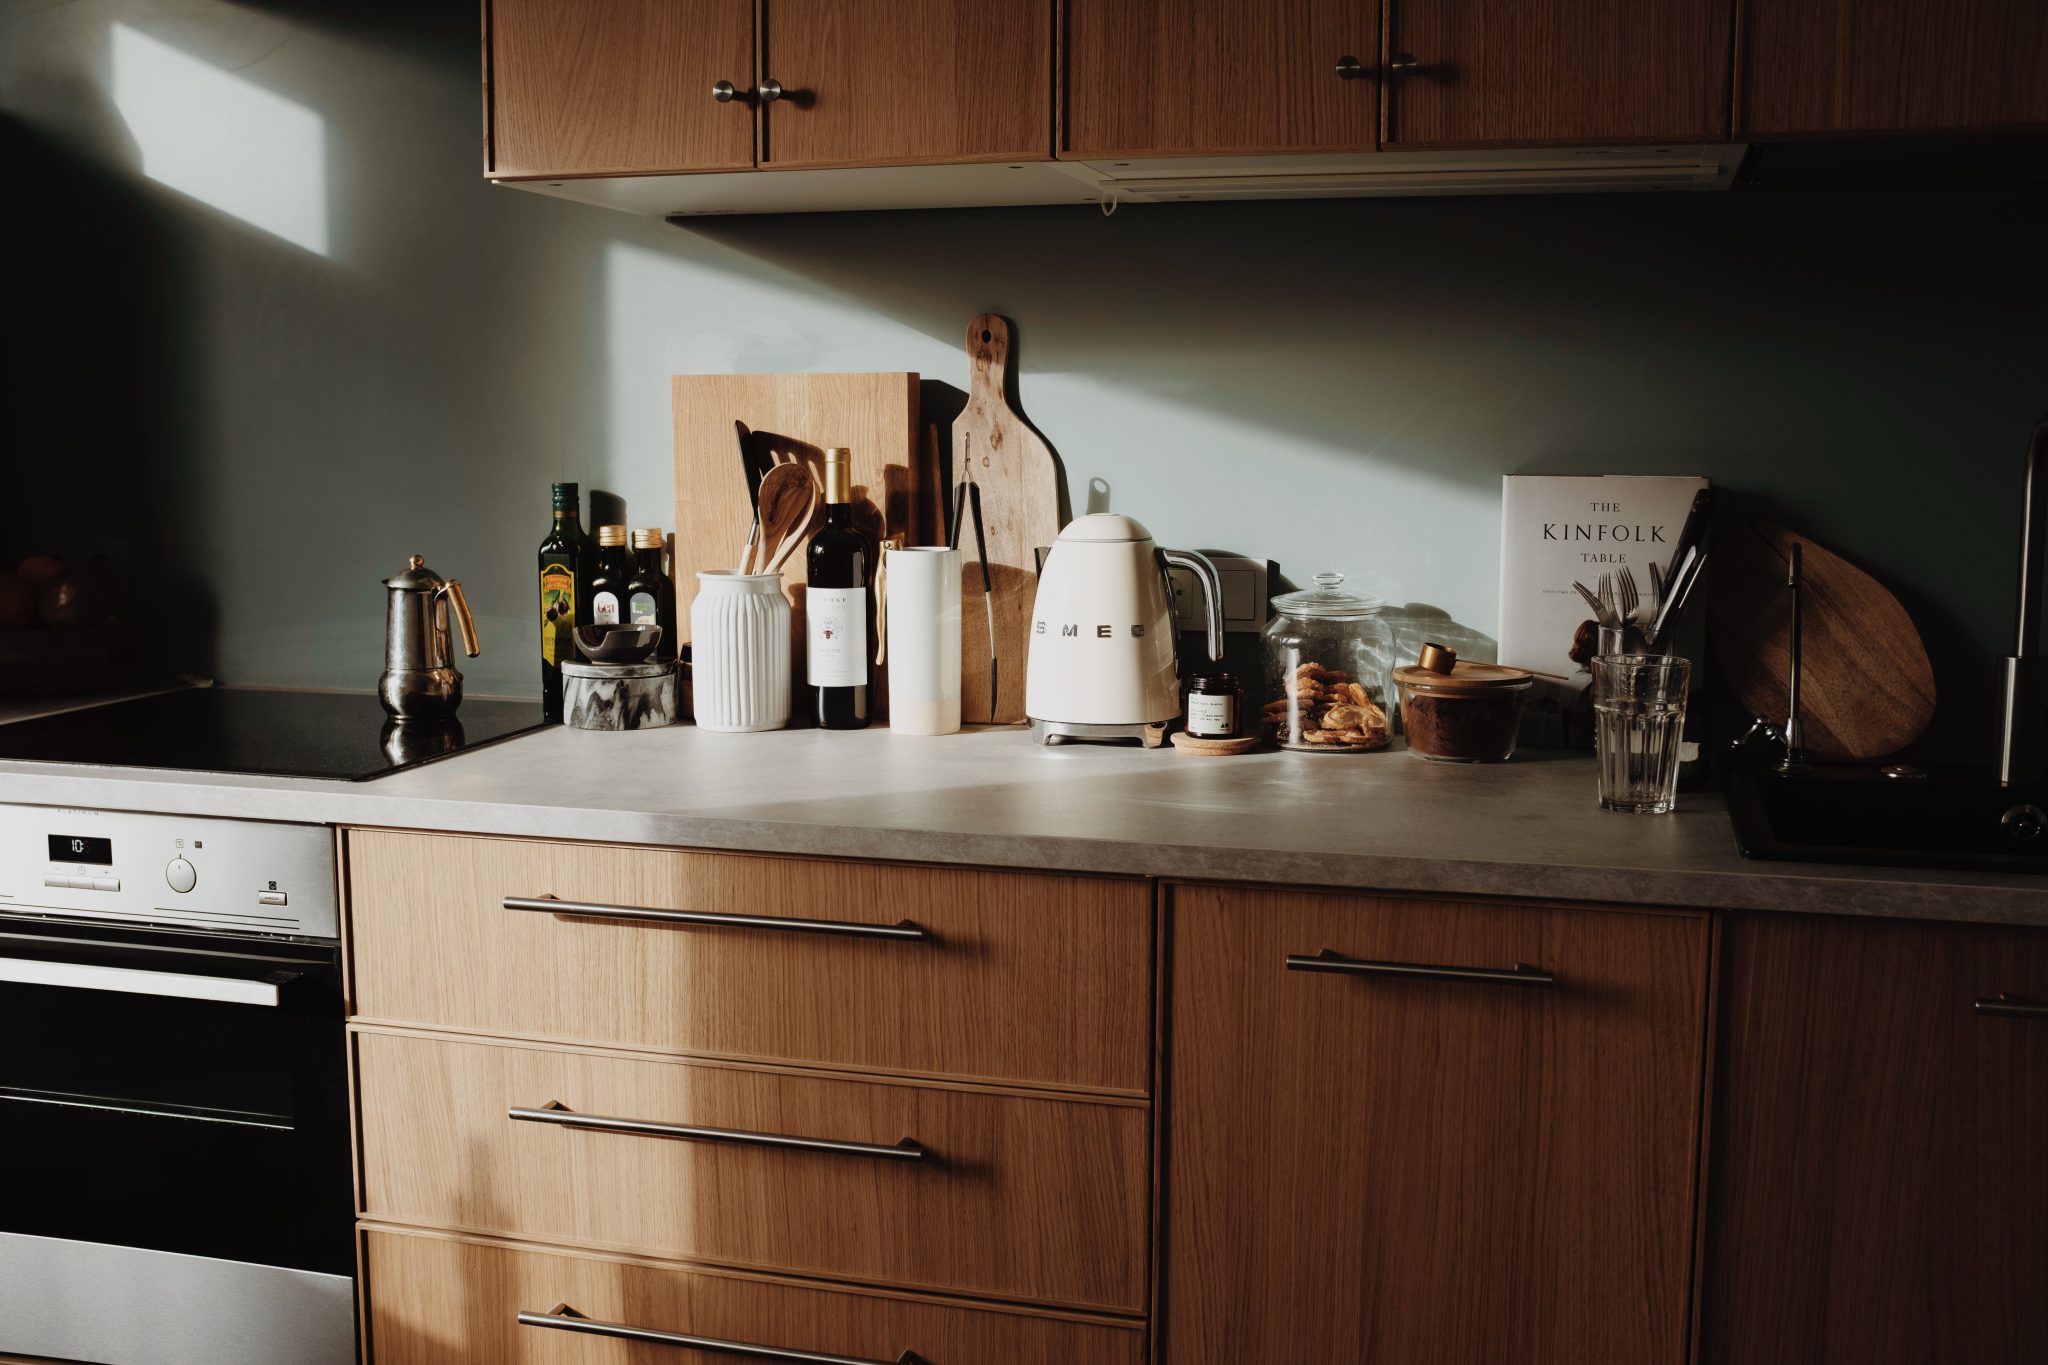
When using open shelving or a feature wall color like this sage green, create “vignettes” to avoid a cluttered look. Group items in threes or fives. Here, the wooden cutting boards lean together, creating a single visual block of texture. The glass jars are grouped by size, and the white kettle is given its own space to shine. Think of it as composing a painting, not just storing your stuff. This thoughtful placement is what makes the space feel styled and organized, rather than messy.
The sage green wall is the element that holds this entire design together. Without it, you’d have standard wood cabinets and a dark countertop—a perfectly fine but uninspired combination. The green introduces a soft, earthy color that bridges the gap between the warm wood and the cool grey countertop. It adds personality and a touch of on-trend color theory, making the whole kitchen feel modern, thoughtful, and custom. It’s a gallon of paint doing the work of a thousand-dollar renovation.
13. Modernize a Bathroom with White Shaker Cabinets
|
📋 Copy HEX 🔗 Share |
💡 Designer Tip
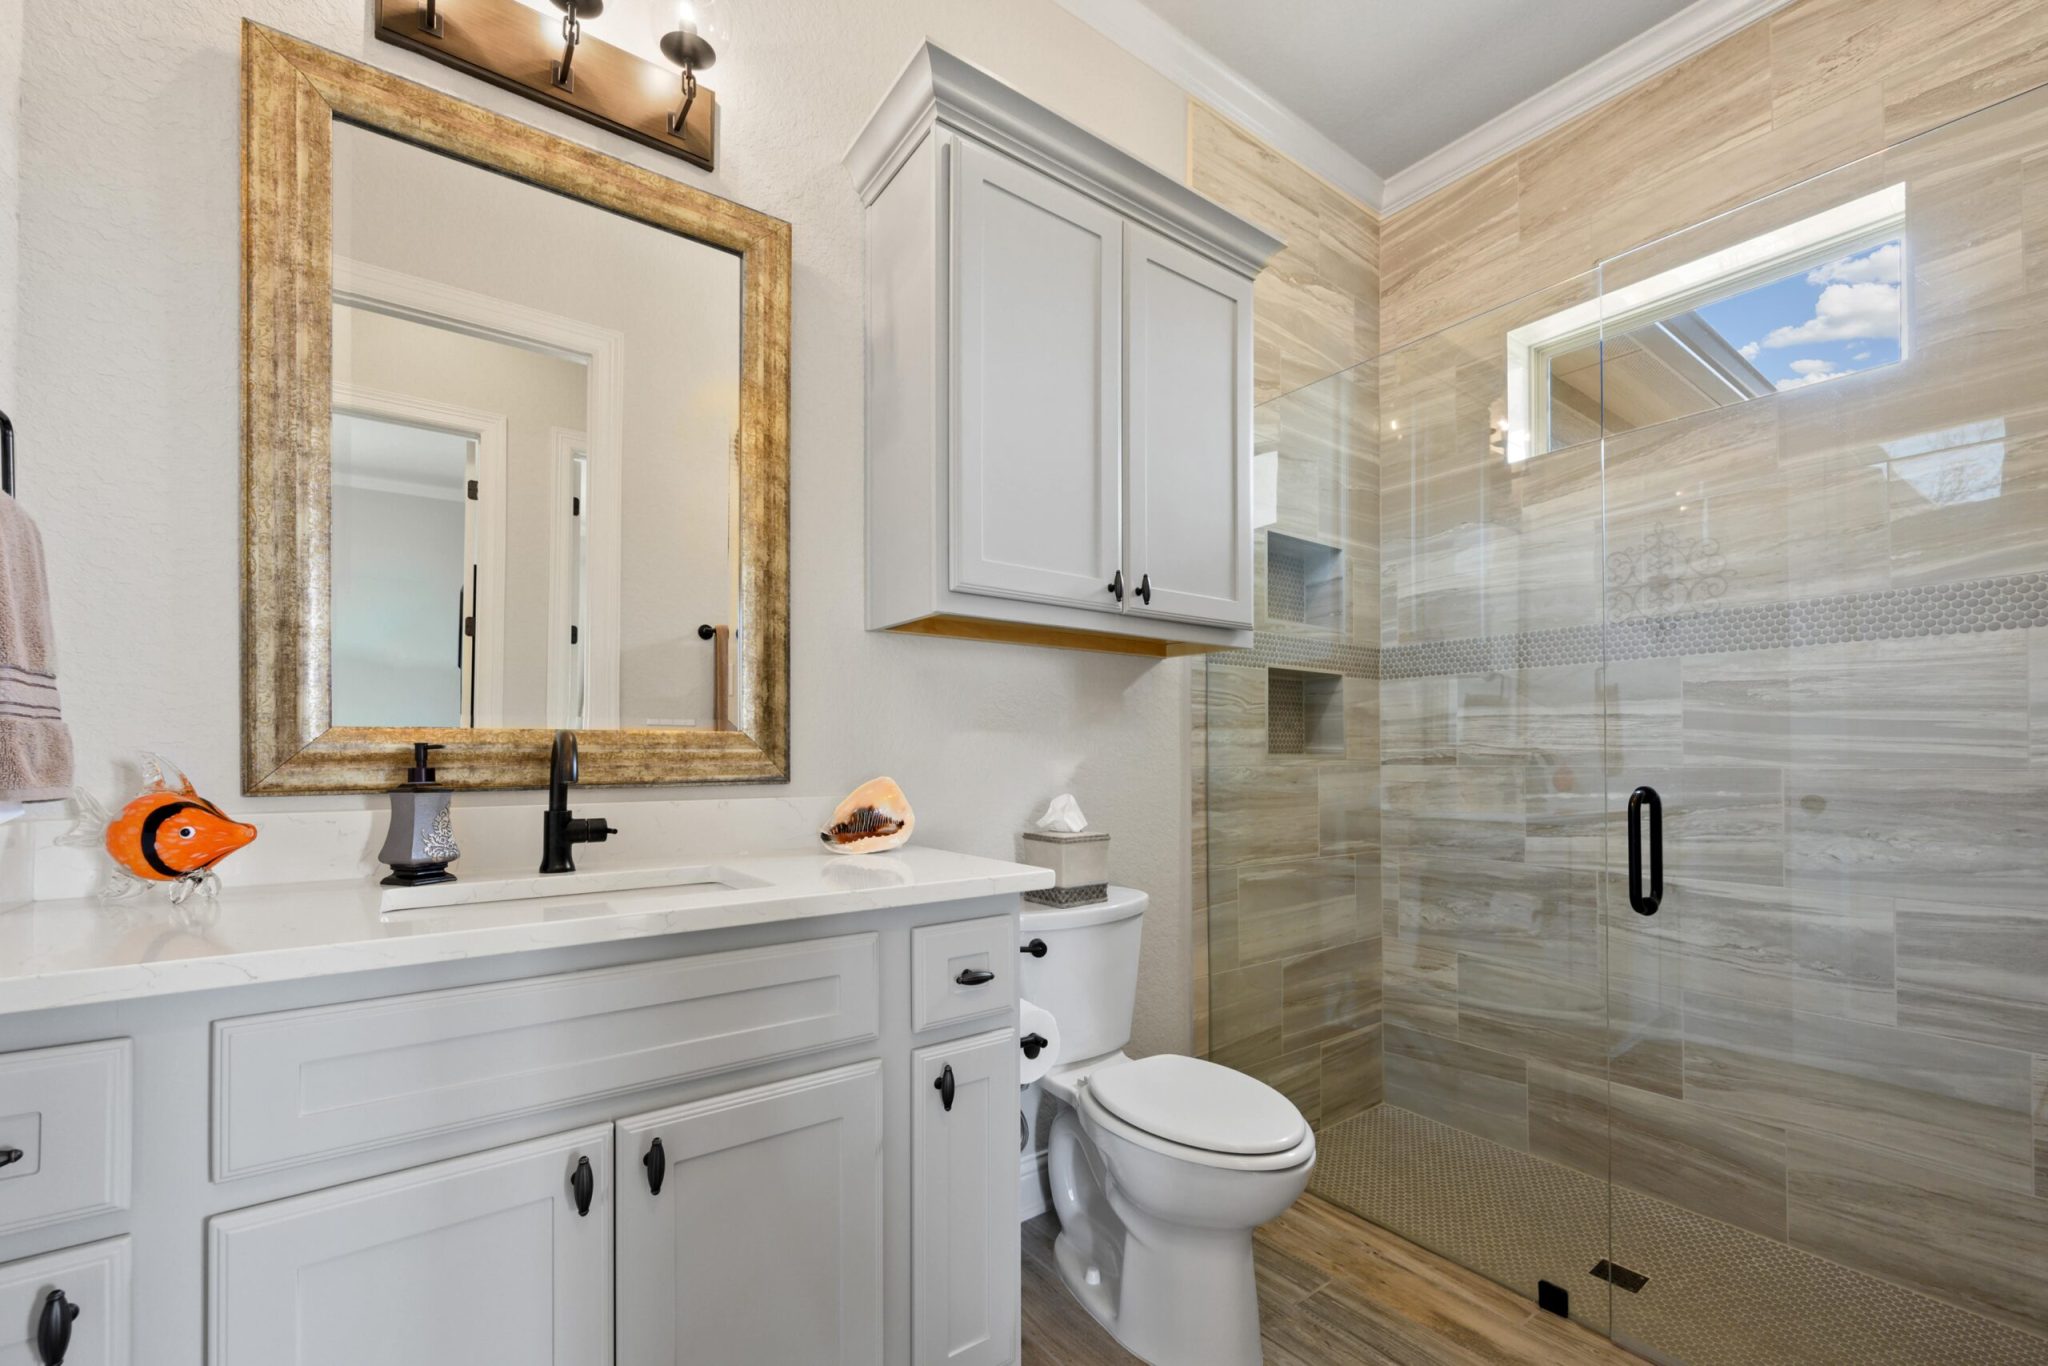
This bathroom design feels so clean and serene because of its smart use of repetition and contrast. The clean, straight lines of the white shaker vanity are echoed in the over-toilet cabinet and even the large format wall tiles. This creates a sense of order. The contrast comes from the textures: the smooth quartz countertop, the matte black hardware, the warm wood-look floor tiles, and the glossy gold mirror frame. Each material is distinct, yet they all work together to create a space that feels layered and sophisticated, not one-note.
This look is incredibly versatile and works well in most standard-sized bathrooms, from a small 5×8 guest bath to a larger master ensuite. The key is the floating vanity and over-toilet cabinet, which keep the floor clear and create an illusion of spaciousness. The large format wall tiles also help make the room feel bigger by reducing the number of grout lines. However, the exact setup with a separate glass shower enclosure would require a footprint of at least 60 square feet to feel comfortable.
14. Add Character with a Scalloped Taupe Corner Cabinet
|
📋 Copy HEX 🔗 Share |
✅ Before You Start
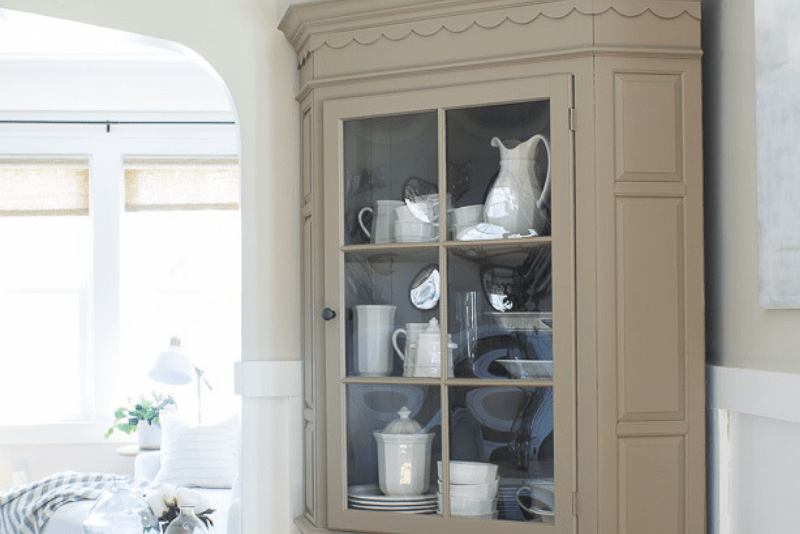
The scalloped trim is, without a doubt, the detail that makes this piece special. It’s a small, whimsical touch that transforms an otherwise traditional corner cabinet into something with personality and charm. This simple, curved detail softens the hard angles of the corner and the cabinet itself, adding a playful, almost handcrafted feel. It’s a perfect example of how one well-chosen decorative element can define the entire character of a piece of furniture and keep it from feeling generic.
The “grandmillennial” trend is all about blending traditional forms with fresh, modern sensibilities, and this cabinet is a perfect example. We’re seeing a huge resurgence of classic furniture details like scallops, curves, and turned legs, but they’re being reinterpreted in modern, muted colors like this sophisticated taupe. It’s a reaction against years of stark minimalism, a move towards creating homes that feel layered, personal, and connected to history, but without feeling stuffy like our grandparents’ houses might have.
15. Display Holiday Decor in a Traditional Cherry China Cabinet
|
📋 Copy HEX 🔗 Share |
⭐ The One Thing
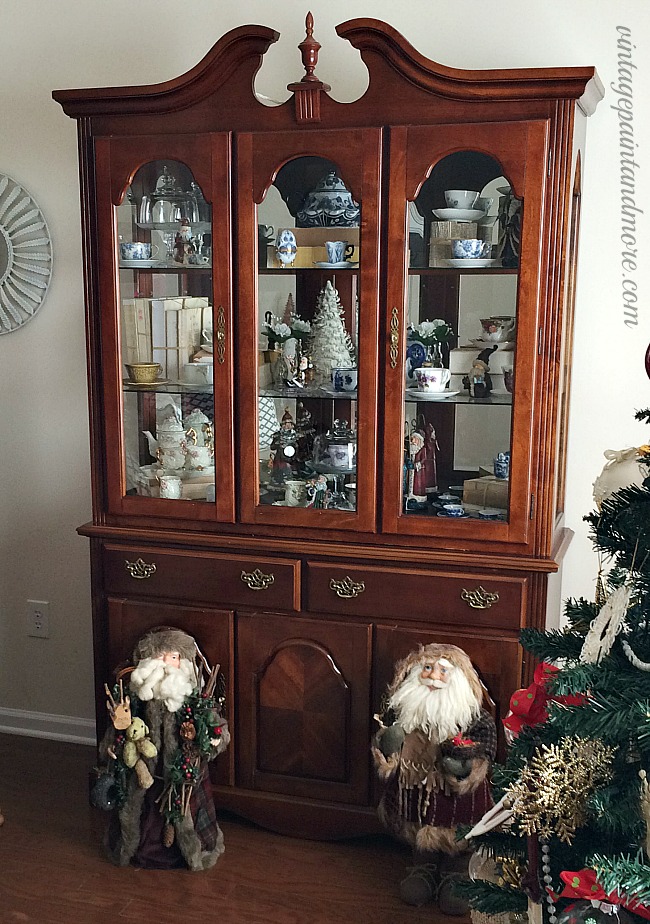
A large, dark wood piece like this cherry china cabinet can be a beautiful, commanding presence, but it demands a lot from a room. It will absorb a significant amount of light, making the space feel darker. It works best in a dining room with ample natural light or multiple sources of artificial light. Also, be mindful of “visual clutter.” A piece this ornate, when filled with many small, disparate items, can quickly look busy and overwhelming, as seen here. A more edited collection would allow the cabinet’s own beauty to shine through.
When styling a traditional china cabinet for the holidays (or any day), think in layers and create a visual path for the eye. Place larger, more significant items (like the teacups or main figurines) first, spreading them out across different shelves. Then, fill in with smaller, complementary items, like the small white trees. Use acrylic risers or stacked books (hidden at the back) to elevate certain pieces, creating variation in height that makes the whole display more dynamic and less like a flat lineup of objects.
16. Mix Wood Tones with a Light Oak Hutch and Dark Dining Table
|
📋 Copy HEX 🔗 Share |
🔥 Trending Context
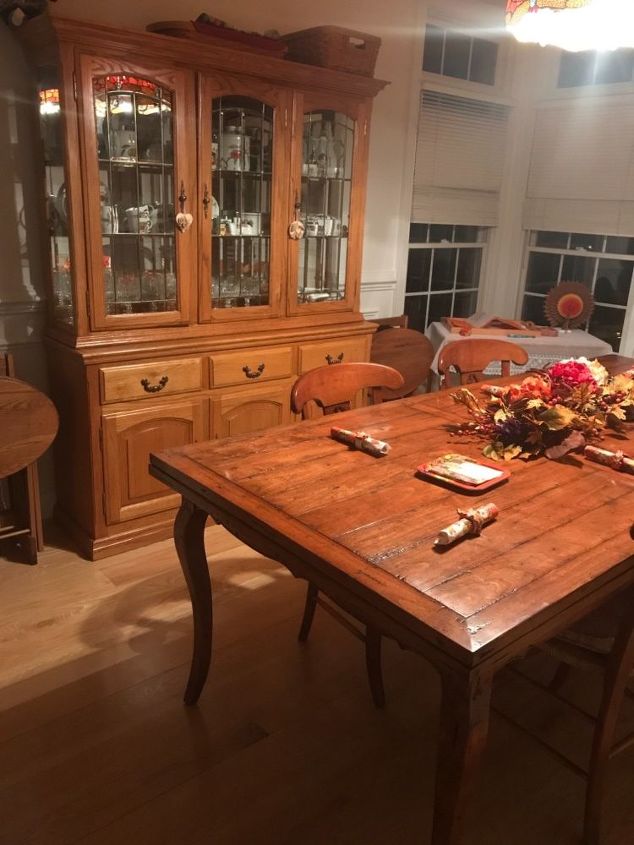
People are often scared to mix wood tones, but this room proves it can be done beautifully. The key is to stick with similar undertones. Here, both the light oak of the hutch and the darker oak of the dining set share a warm, slightly golden undertone. This shared warmth allows them to harmonize rather than clash. The light, neutral walls and blinds provide a quiet backdrop that lets the wood be the star, and the consistency in style (both pieces are solidly traditional) ensures they feel like they belong together.
Recreating this traditional dining room look involves a few key pieces. High-quality, solid wood furniture carries most of the cost.
- Main Furniture: $2,500 – $6,000 (for a solid oak hutch and dining set)
- Lighting: $200 – $500 (for a classic chandelier, not pictured but implied)
- Textiles: $150 – $400 (for window blinds and a potential area rug)
- Decor/Accessories: $100 – $300 (for a centerpiece and hutch contents)
- Budget alternative: Find a mismatched hutch and dining set on Facebook Marketplace or at a thrift store ($400-$800) and unify them with a dark wood stain or chalk paint.
- TOTAL: $2,950 – $7,200
17. Create a Cheerful Vibe with a Dark Hutch and Light Blue Walls
|
📋 Copy HEX 🔗 Share |
🔧 How-To Brief
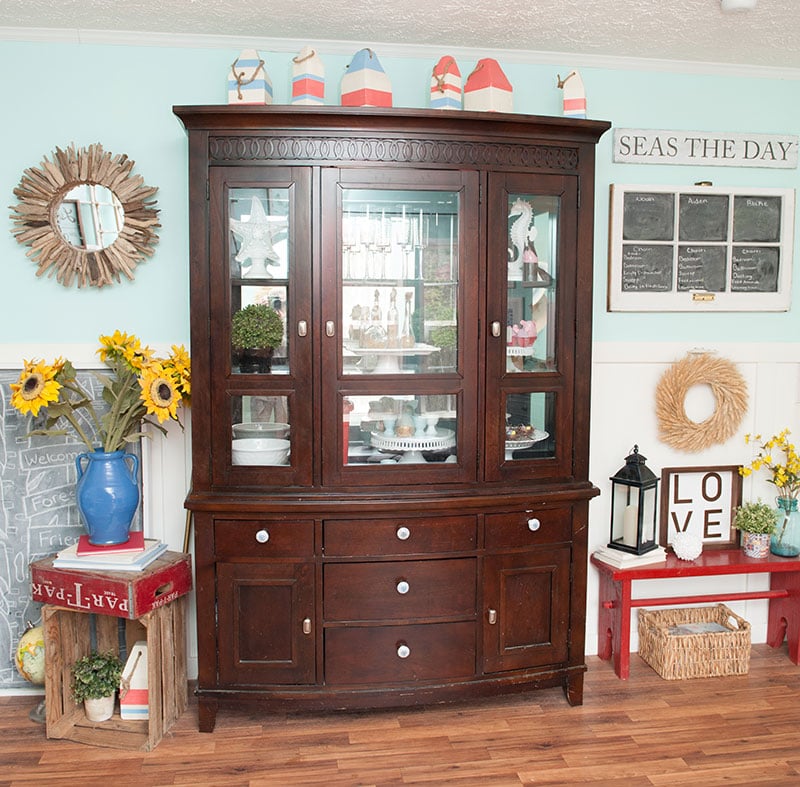
This eclectic room’s happy energy is a formula: 50% classic furniture (the dark wood hutch) + 30% fresh color (the light blue and white walls) + 20% quirky, personal decor (the driftwood mirror, red bench, and sunflower accents). The traditional hutch acts as an anchor, grounding the space and preventing the more playful elements from feeling chaotic or flimsy. It’s a perfect mix of serious and fun, which is the heart of modern farmhouse and coastal styles.
The light blue paint is the game-changer here. Imagine this room with plain white or beige walls—it would be fine, but it wouldn’t sing. That specific shade of soft, watery blue instantly sets a coastal, airy tone. It provides a beautiful, high-contrast backdrop that makes the dark wood of the hutch pop and allows the red and yellow decor accents to feel intentional and vibrant. It’s the single choice that dictates the entire mood of the space.
18. Achieve a Warm, Scholarly Look with a Wood and Glass Cabinet
|
📋 Copy HEX 🔗 Share |
🎯 What Makes It Work
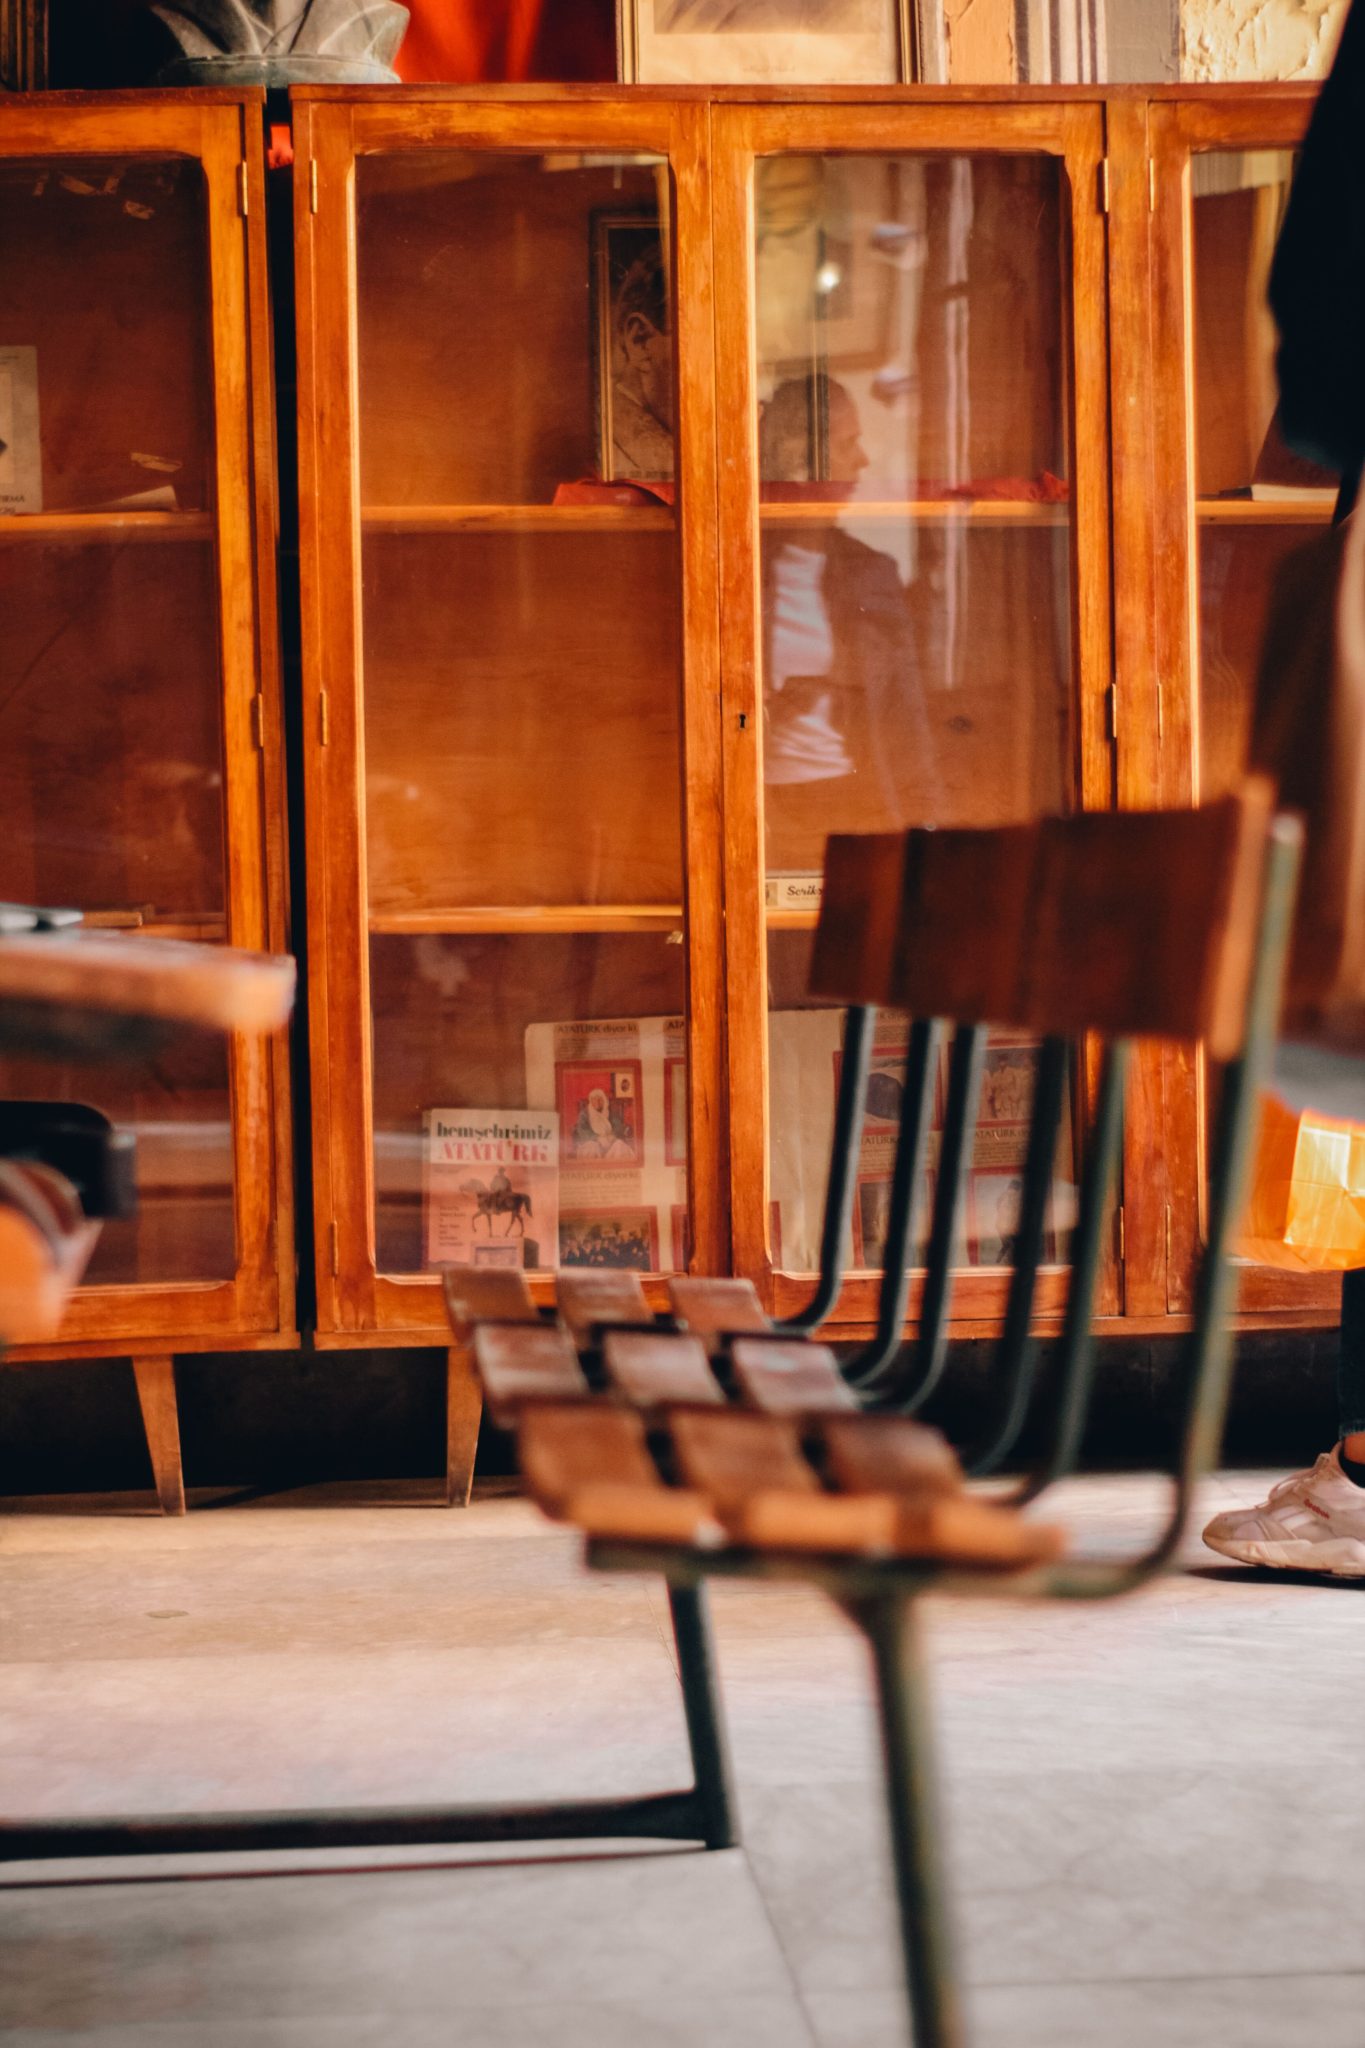
A tall, wide display cabinet like this one is best suited for a room with generous proportions. To avoid overwhelming the space, you need a ceiling height of at least 8.5 to 9 feet. More importantly, ensure you have a long, uninterrupted wall to place it against—at least 8 feet wide a great look. The piece needs visual breathing room on either side to feel integrated rather than shoehorned in. A cabinet of this scale would dwarf a small living room or office, making it feel crowded and unbalanced.
Don’t feel obligated to fill every shelf of a large display cabinet. Negative space is a powerful design tool. Notice how the shelves here are sparsely populated, with just a few books and framed images. This approach turns the cabinet into a gallery for treasured objects rather than just bulk storage. It allows each item to be seen and appreciated. For a cohesive look, try to keep the frames and book spines within a limited color palette to maintain that calm, scholarly mood.
19. Style a Dark Wood Hutch with Rustic Pantry Items
|
📋 Copy HEX 🔗 Share |
🧹 Maintenance Reality
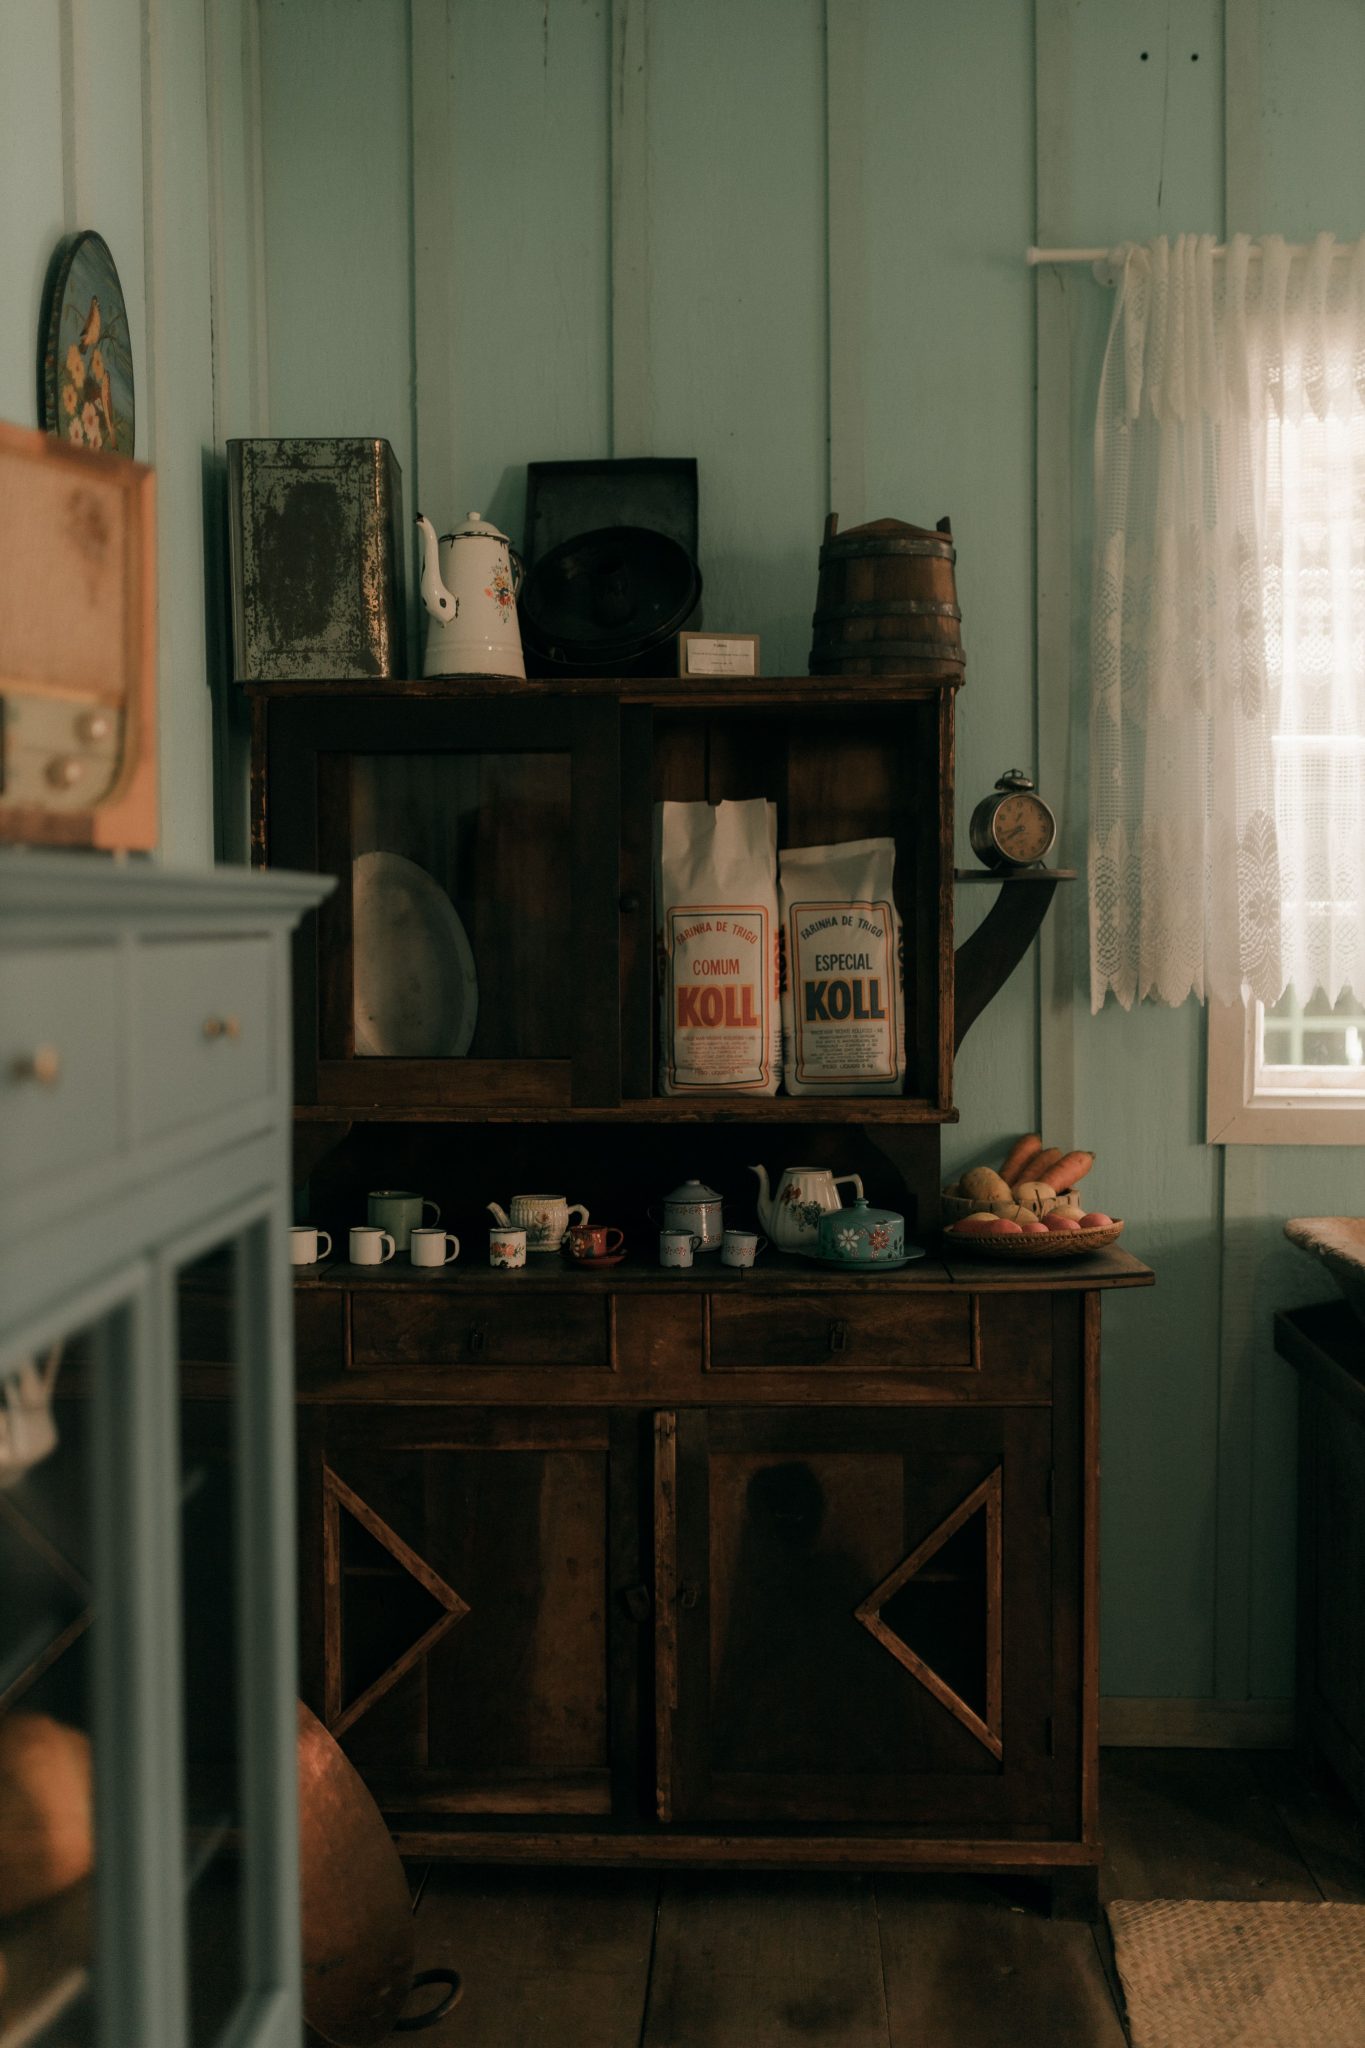
This scene feels so cozy and authentic because it perfectly marries texture and color. The dark, aged wood of the hutch provides a rich, historic backdrop. Against this, the light greenish-blue paneled walls offer a soft, contrasting color that keeps the scene from feeling too heavy. The final layer is the texture of the pantry items themselves: the rough weave of the flour sacks, the smooth glass of the jars, and the delicate pattern of the lace curtain. It’s a symphony of rustic, tactile details.
While styling your hutch with open bags of flour and baskets of produce looks incredibly charming for a photo, it’s not practical for everyday life. Open food storage can attract pests and lead to spoilage. To get this look in a more functional way, use the original packaging as decor but store the actual food in airtight containers nearby. Or, decant items like flour and sugar into large, sealed glass jars that provide the same aesthetic with better food safety and longevity. This is the budget version of the filled cabinet in Idea #20.
20. Curate an Apothecary Look with Dark Wood and Glass
|
📋 Copy HEX 🔗 Share |
📏 Scale Guide
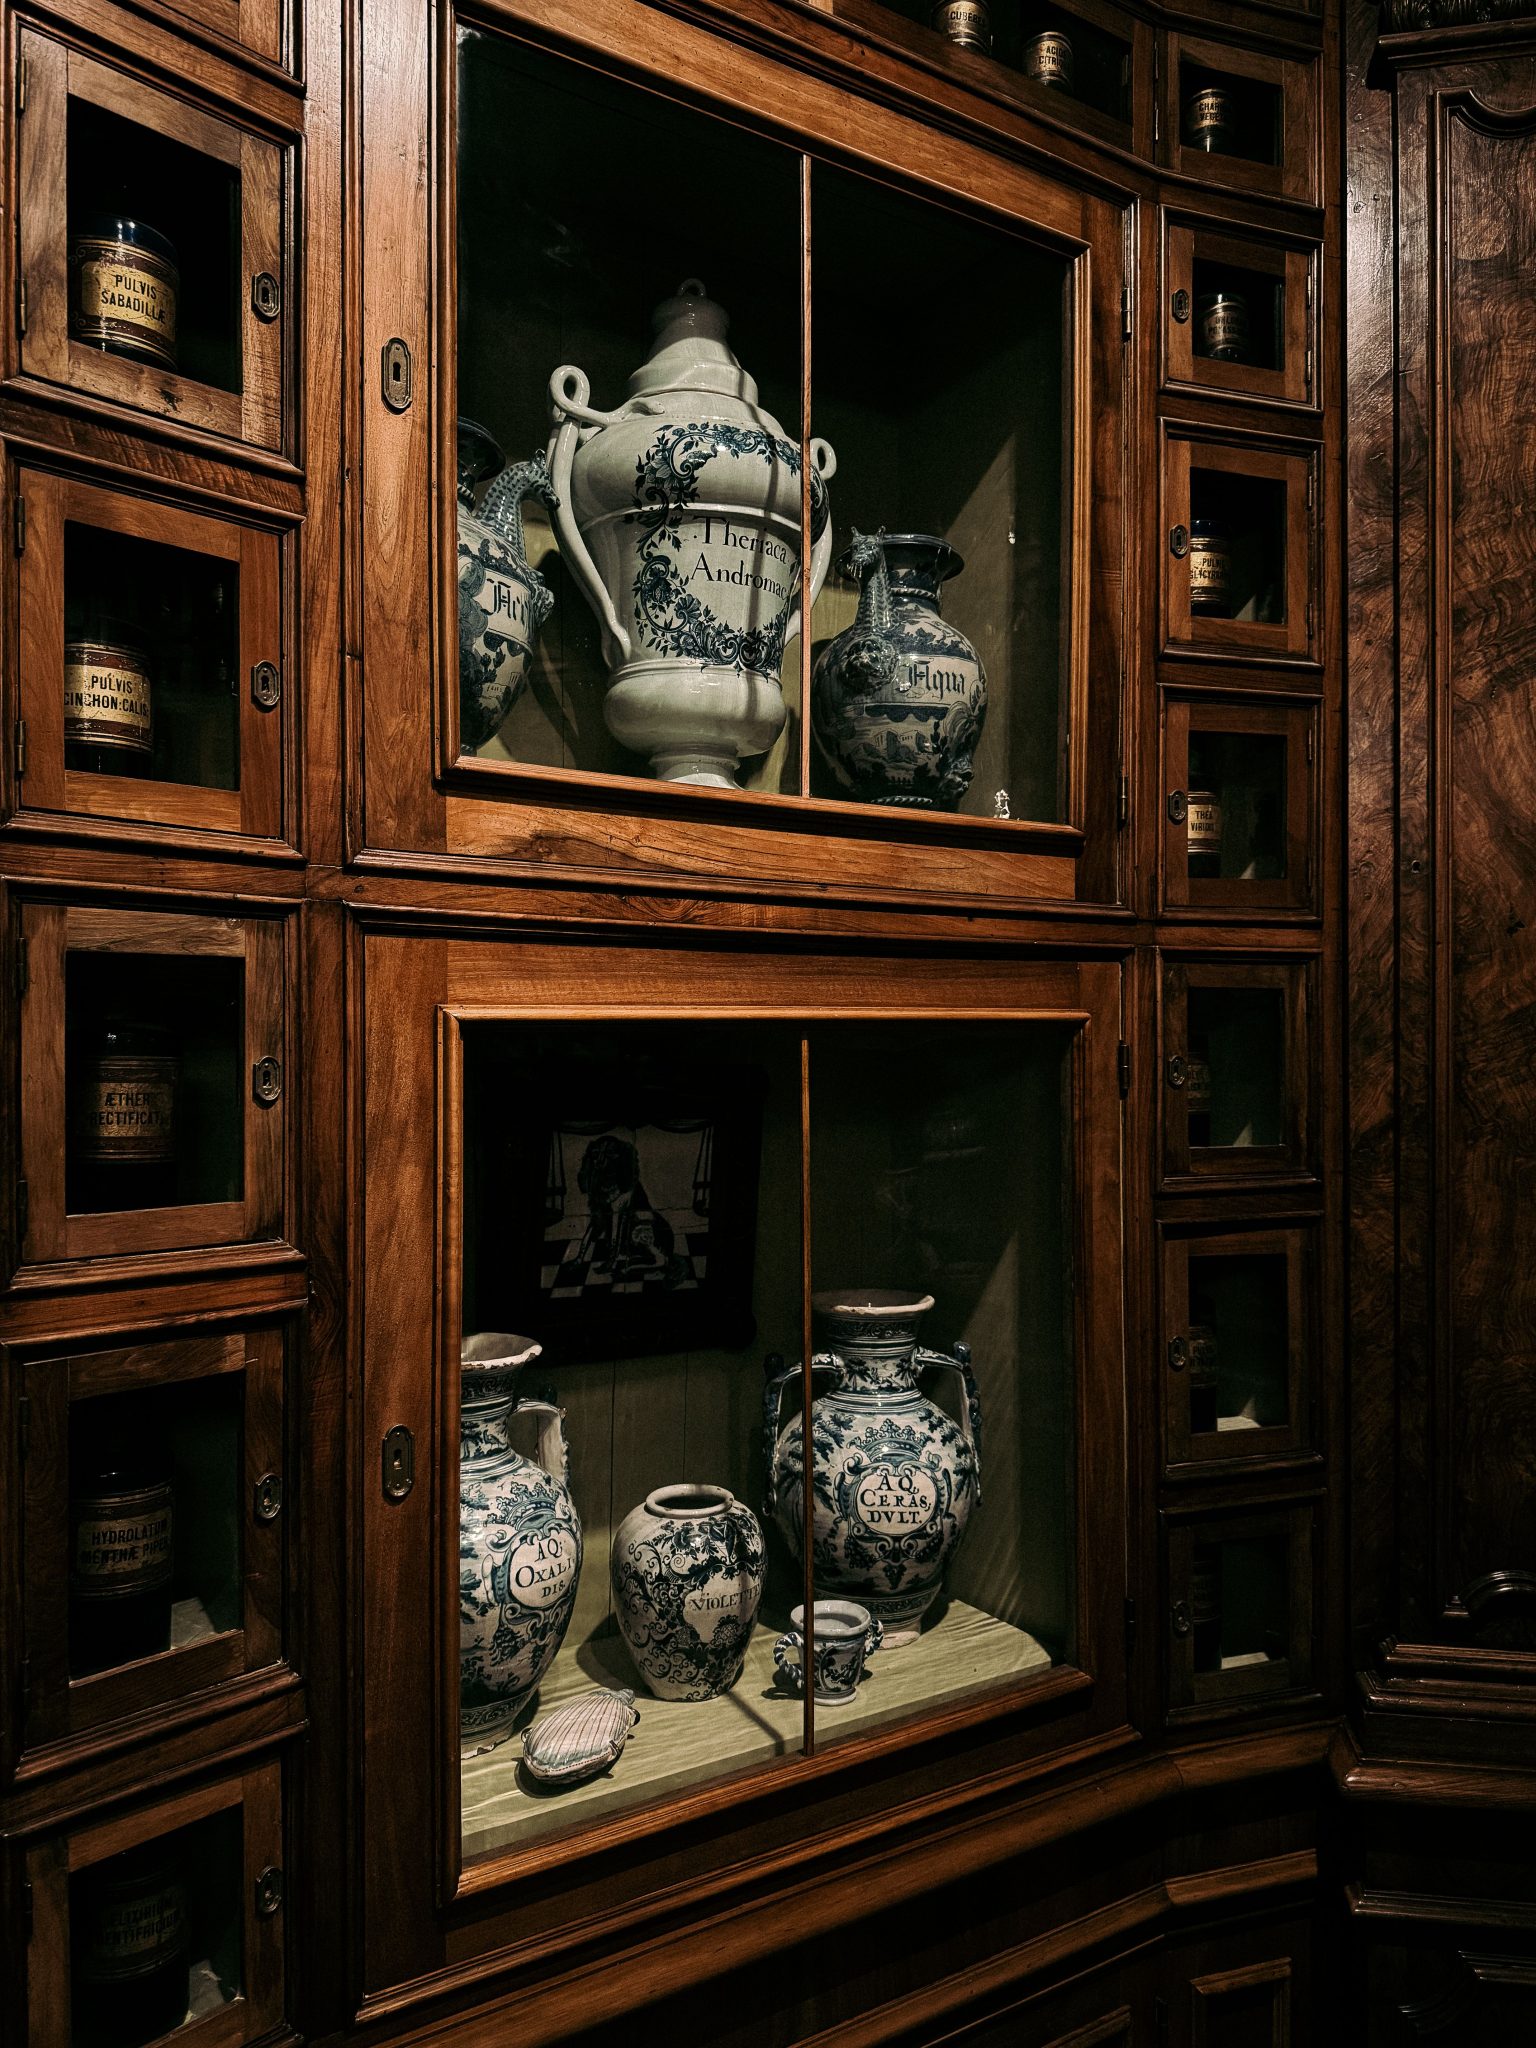
The collection of earthenware and canisters is what brings this entire piece to life. The cabinetry itself is beautiful, but it’s the curated repetition of the blue and white patterned jars and labeled canisters that tells a story. It creates a powerful sense of history and purpose, transforming the unit from a simple display case into what feels like a genuine, functioning apothecary from a bygone era. Without these specific, historically-rich contents, the cabinet would lose its soul.
An intricate piece like this, with its many small compartments, ornate details, and glass panels, is a significant commitment to dusting. Dust will settle on every ledge and in every corner, and cleaning it will be a meticulous, time-consuming task. Plan to spend a good hour every month carefully wiping down all the surfaces, inside and out, to keep it looking its best. The glass will also require regular cleaning to remove fingerprints and haze, especially if the cabinet is in a high-traffic or kitchen area where grease can accumulate in the air.
21. Get a Clean, Modern Look with a Light Wood and White Buffet
|
📋 Copy HEX 🔗 Share |
💸 Get This Look For Less
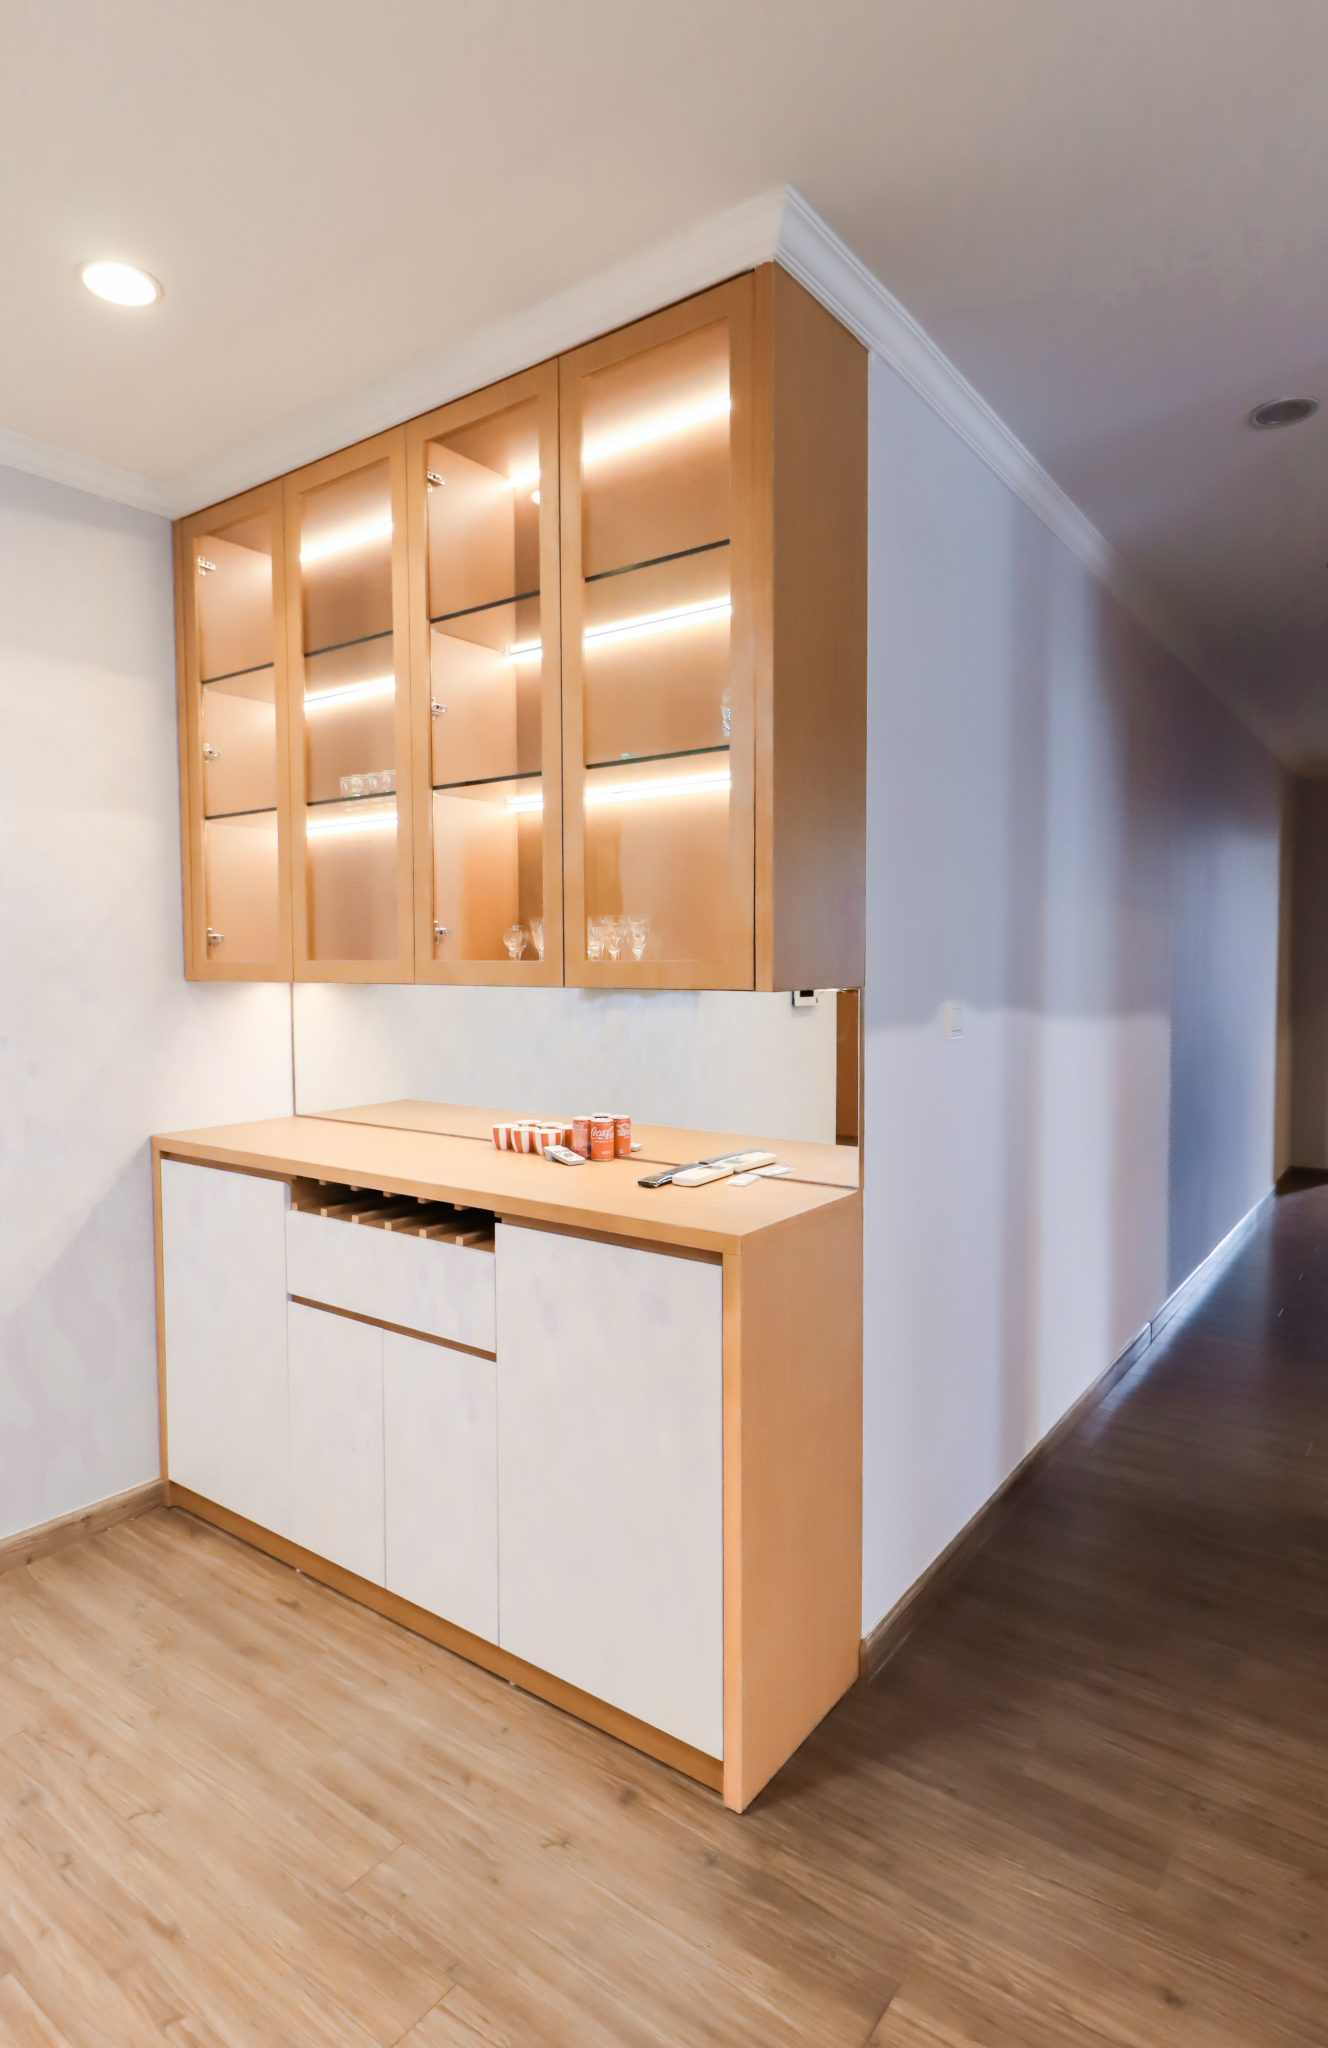
The integrated lighting in the upper cabinets is a pro-level touch that dramatically elevates this buffet. When using strip lighting in glass cabinets, always opt for a channel with a diffuser. This hides the individual LED dots and casts a smooth, even line of light, which looks much more high-end. Also, connect it to a dimmer switch. This allows you to adjust the intensity from a bright, functional light to a soft, ambient glow, making the piece versatile for both dinner parties and quiet evenings. This is a bright, modern counterpart to the more traditional storage seen in Idea #5.
A buffet or credenza of this style typically ranges from 60 to 72 inches in width. It’s best suited for a dining room or living area with a dedicated wall of at least 8-10 feet, allowing for some visual breathing room on either side. Pay close attention to depth; modern pieces like this are often shallower (16-18 inches deep), which makes them excellent for narrower rooms or hallways where you need storage without sacrificing too much floor space. Just ensure it doesn’t obstruct any doorways or major traffic paths.
22. Use Floor-to-Ceiling Wood Panels in a Modern Bathroom
|
📋 Copy HEX 🔗 Share |
📐 Style Math
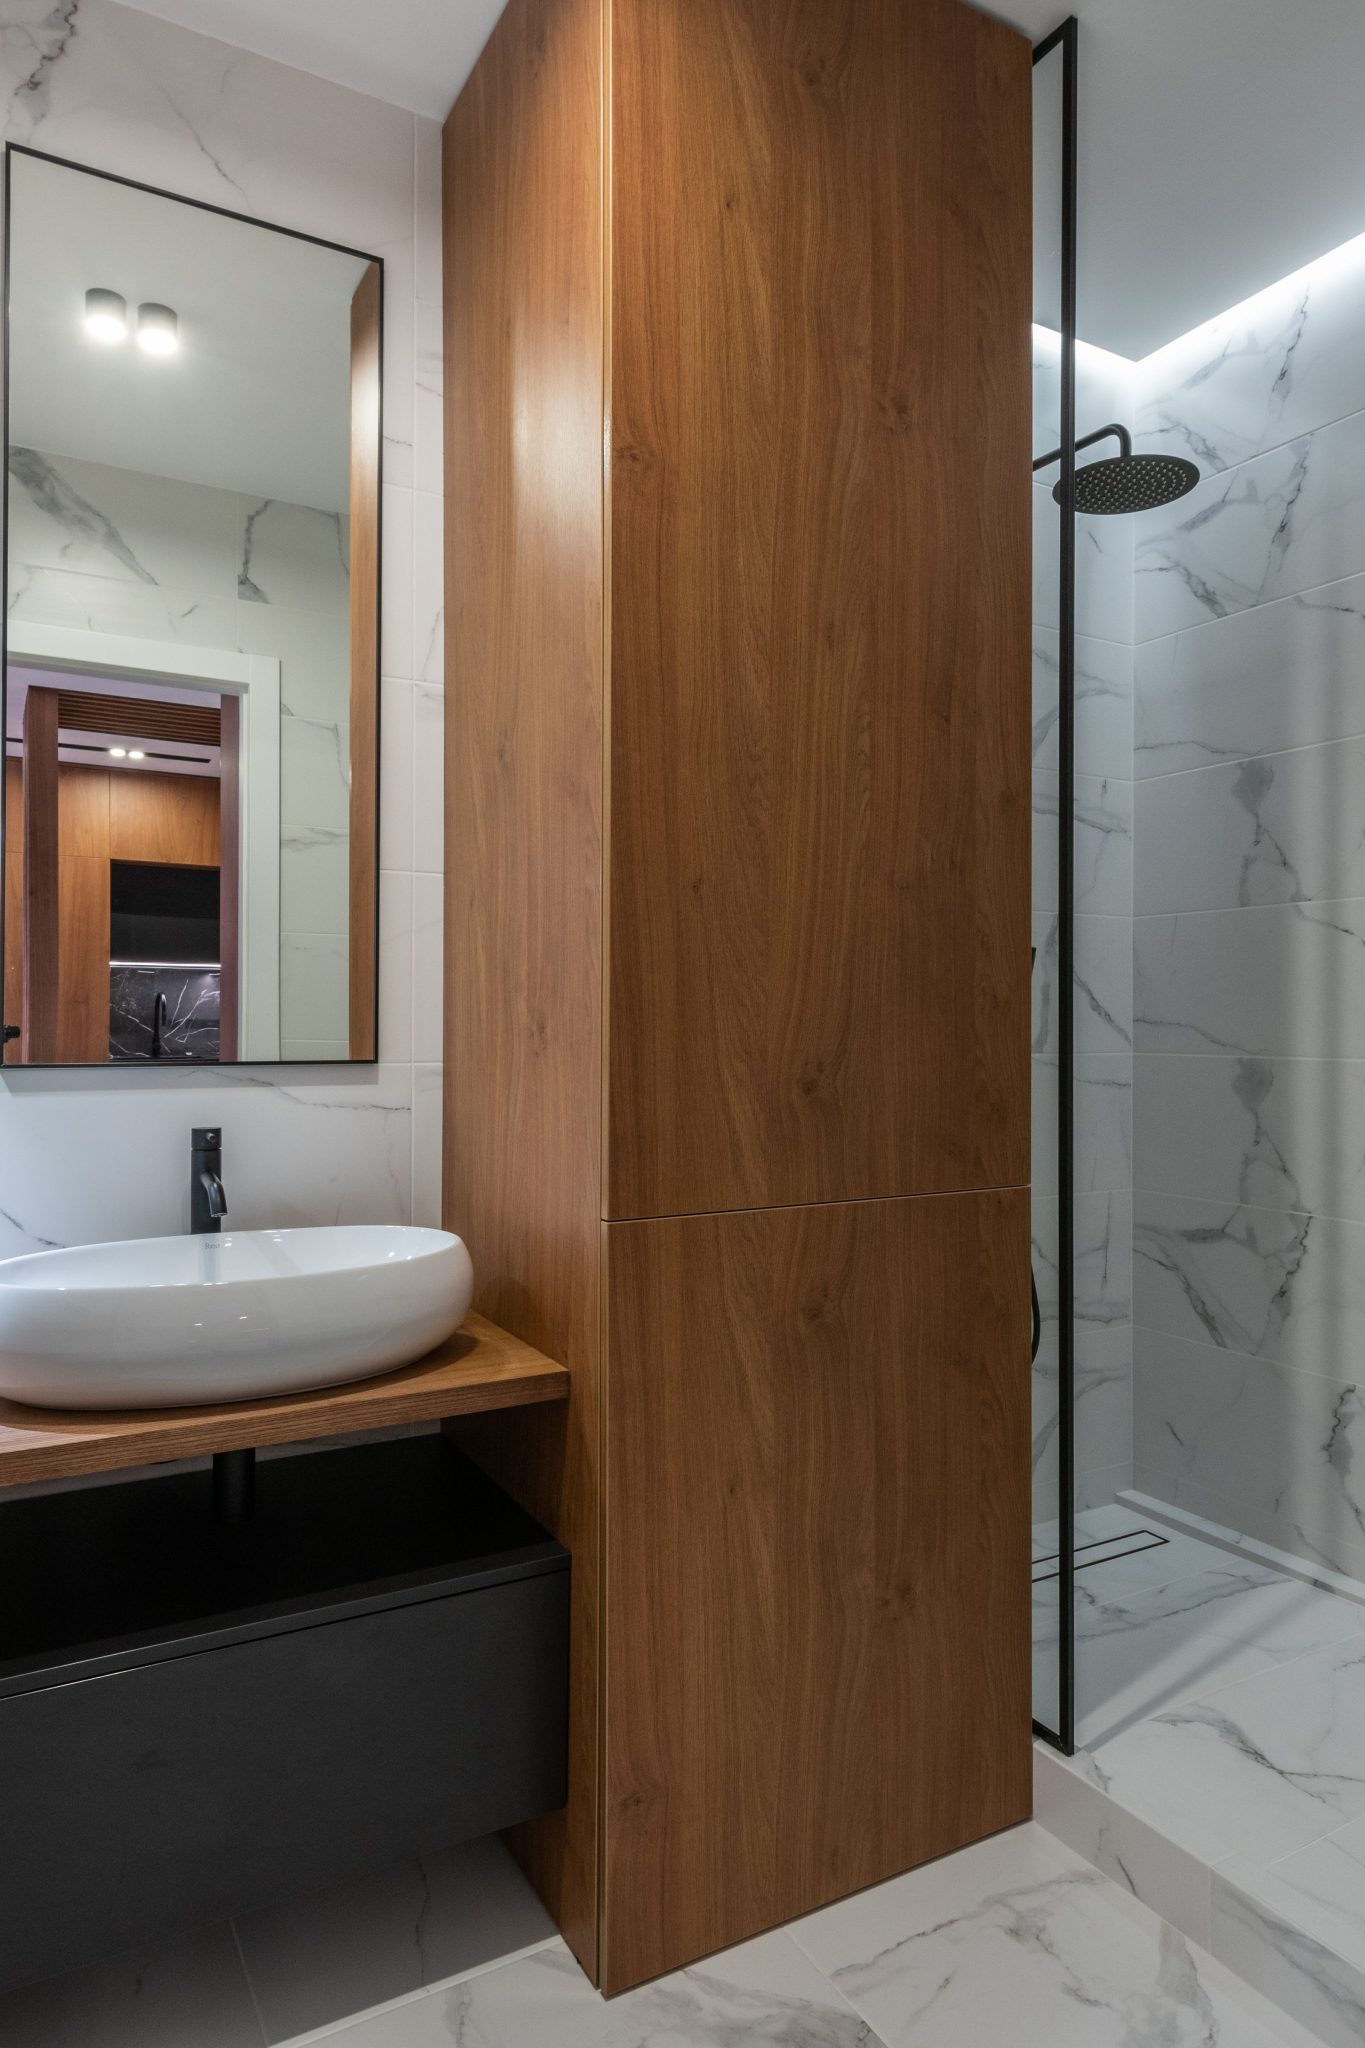
This bathroom is a masterclass in material contrast. The tall, flat-panel wood cabinets provide a swath of organic warmth and verticality. This is set against the horizontal veining of the cool, polished marble-look tiles. The tension between the warm, natural wood and the cool, luxurious stone is where the visual energy comes from. The matte black fixtures act as sharp, graphic punctuation points, grounding the design and adding a final layer of modern sophistication. It feels balanced, bold, and serene all at once.
Wood and water can be a tricky combination. While wood-look panels and veneers used in bathrooms are treated to be moisture-resistant, they are not waterproof. This is not a look for a poorly ventilated bathroom. You must have a powerful and properly functioning exhaust fan to control humidity and prevent warping, peeling, or mildew growth over time. Any nicks or deep scratches in the veneer must be sealed immediately to prevent moisture from getting underneath and compromising the material.
23. Brighten a Kitchen with Light Wood and Mosaic Backsplash
|
📋 Copy HEX 🔗 Share |
⚠️ Real Talk
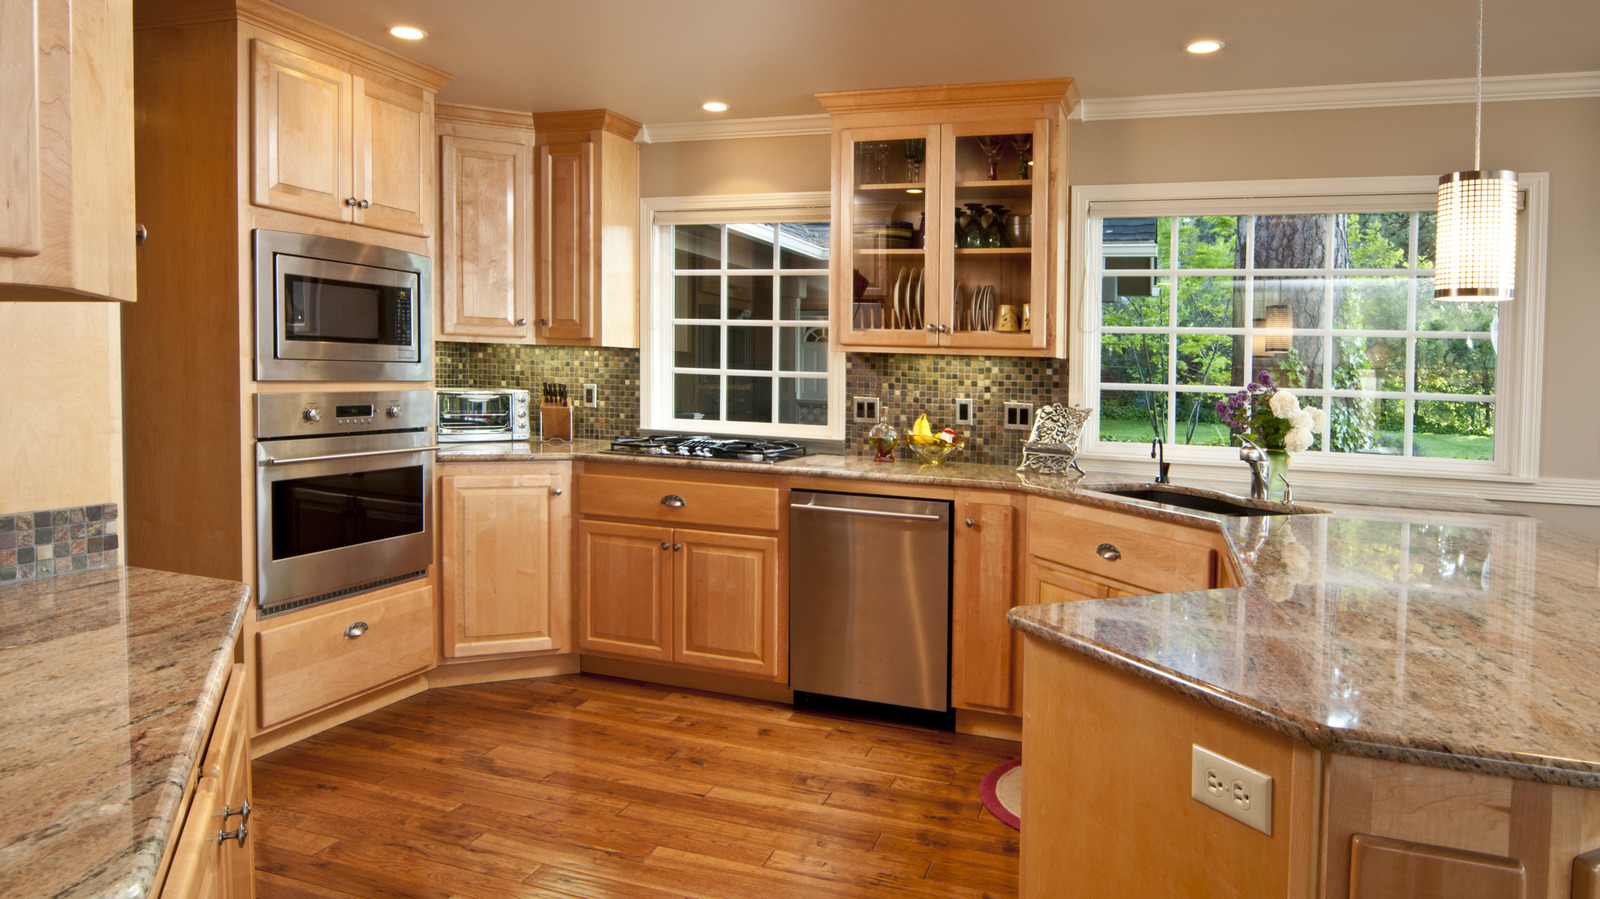
This warm, inviting kitchen follows a “70-20-10” rule of material dominance. About 70% of the visual space is covered in calm, neutral surfaces: the light wood cabinets and creamy walls. About 20% is dedicated to the dynamic, textured elements: the speckled granite and the mosaic tile backsplash. The final 10% is the sleek, metallic accent of the stainless steel appliances. This ratio ensures the space feels lively and interesting from the mosaic tile, but not overwhelmed by it.
After a long period of minimalist, single-material backsplashes (hello, subway tile), we’re seeing a return of intricate, colorful mosaic tiles. Homeowners want to inject more personality and custom detail into their kitchens. Mosaics offer a way to play with color, pattern, and texture on a smaller scale, creating a focal point that feels artisanal and unique. This trend celebrates a more decorated and layered approach to kitchen design, moving away from stark, uniform interiors.
24. Pair a Light Pink Vanity with an Earthy Green Shiplap Wall
|
📋 Copy HEX 🔗 Share |
💰 Budget Breakdown
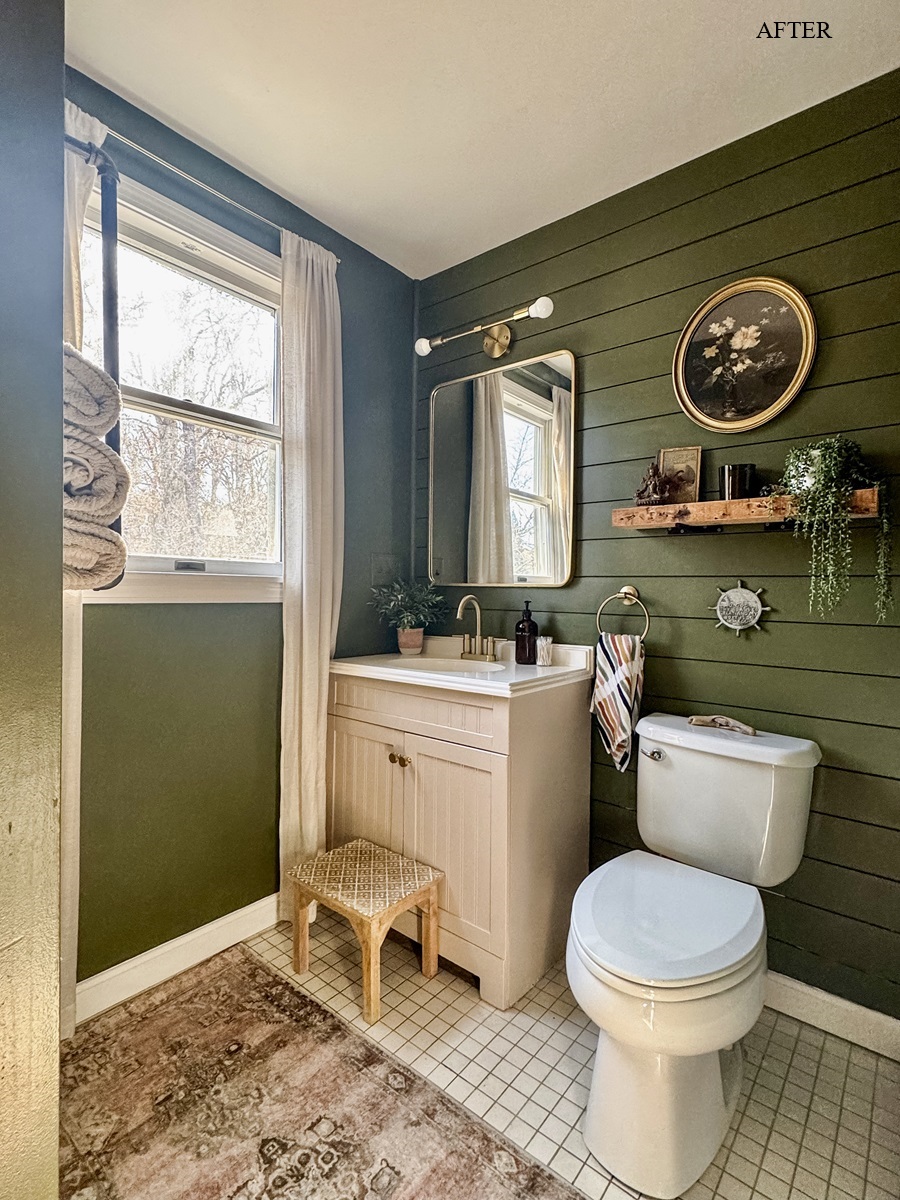
Create your own floating wood shelf for a similar look in an afternoon. (Time: 2-3 hours, Cost: $40-$80)
- Purchase a piece of 2-inch thick solid wood (like pine or oak) and cut it to your desired length.
- Sand the wood smooth, starting with a medium grit and finishing with a fine-grit sandpaper.
- Apply a wood stain in your chosen color, followed by 2-3 coats of a waterproof polyurethane sealer, sanding lightly between coats.
- Install heavy-duty floating shelf hardware onto your wall, making sure to hit the studs.
- Slide the finished shelf onto the hardware rods. Voila! High-end look, DIY price.
The core elements of this design are paint and hardware, which are fantastic for a budget makeover. You can find a basic vanity at IKEA or a hardware store for $150-$300 and paint it with a high-quality furniture paint. A gallon of deep green paint for the wall is about $50. You can find stylish gold knobs and light fixtures on Amazon or at Target for under $100 total. The most expensive part, the gold mirror, can often be found secondhand at thrift stores or on Facebook Marketplace—look for any large mirror and give it a coat of gold spray paint.
25. Combine Natural Wood Cabinets with Light Blue Subway Tile
|
📋 Copy HEX 🔗 Share |
💡 Designer Tip
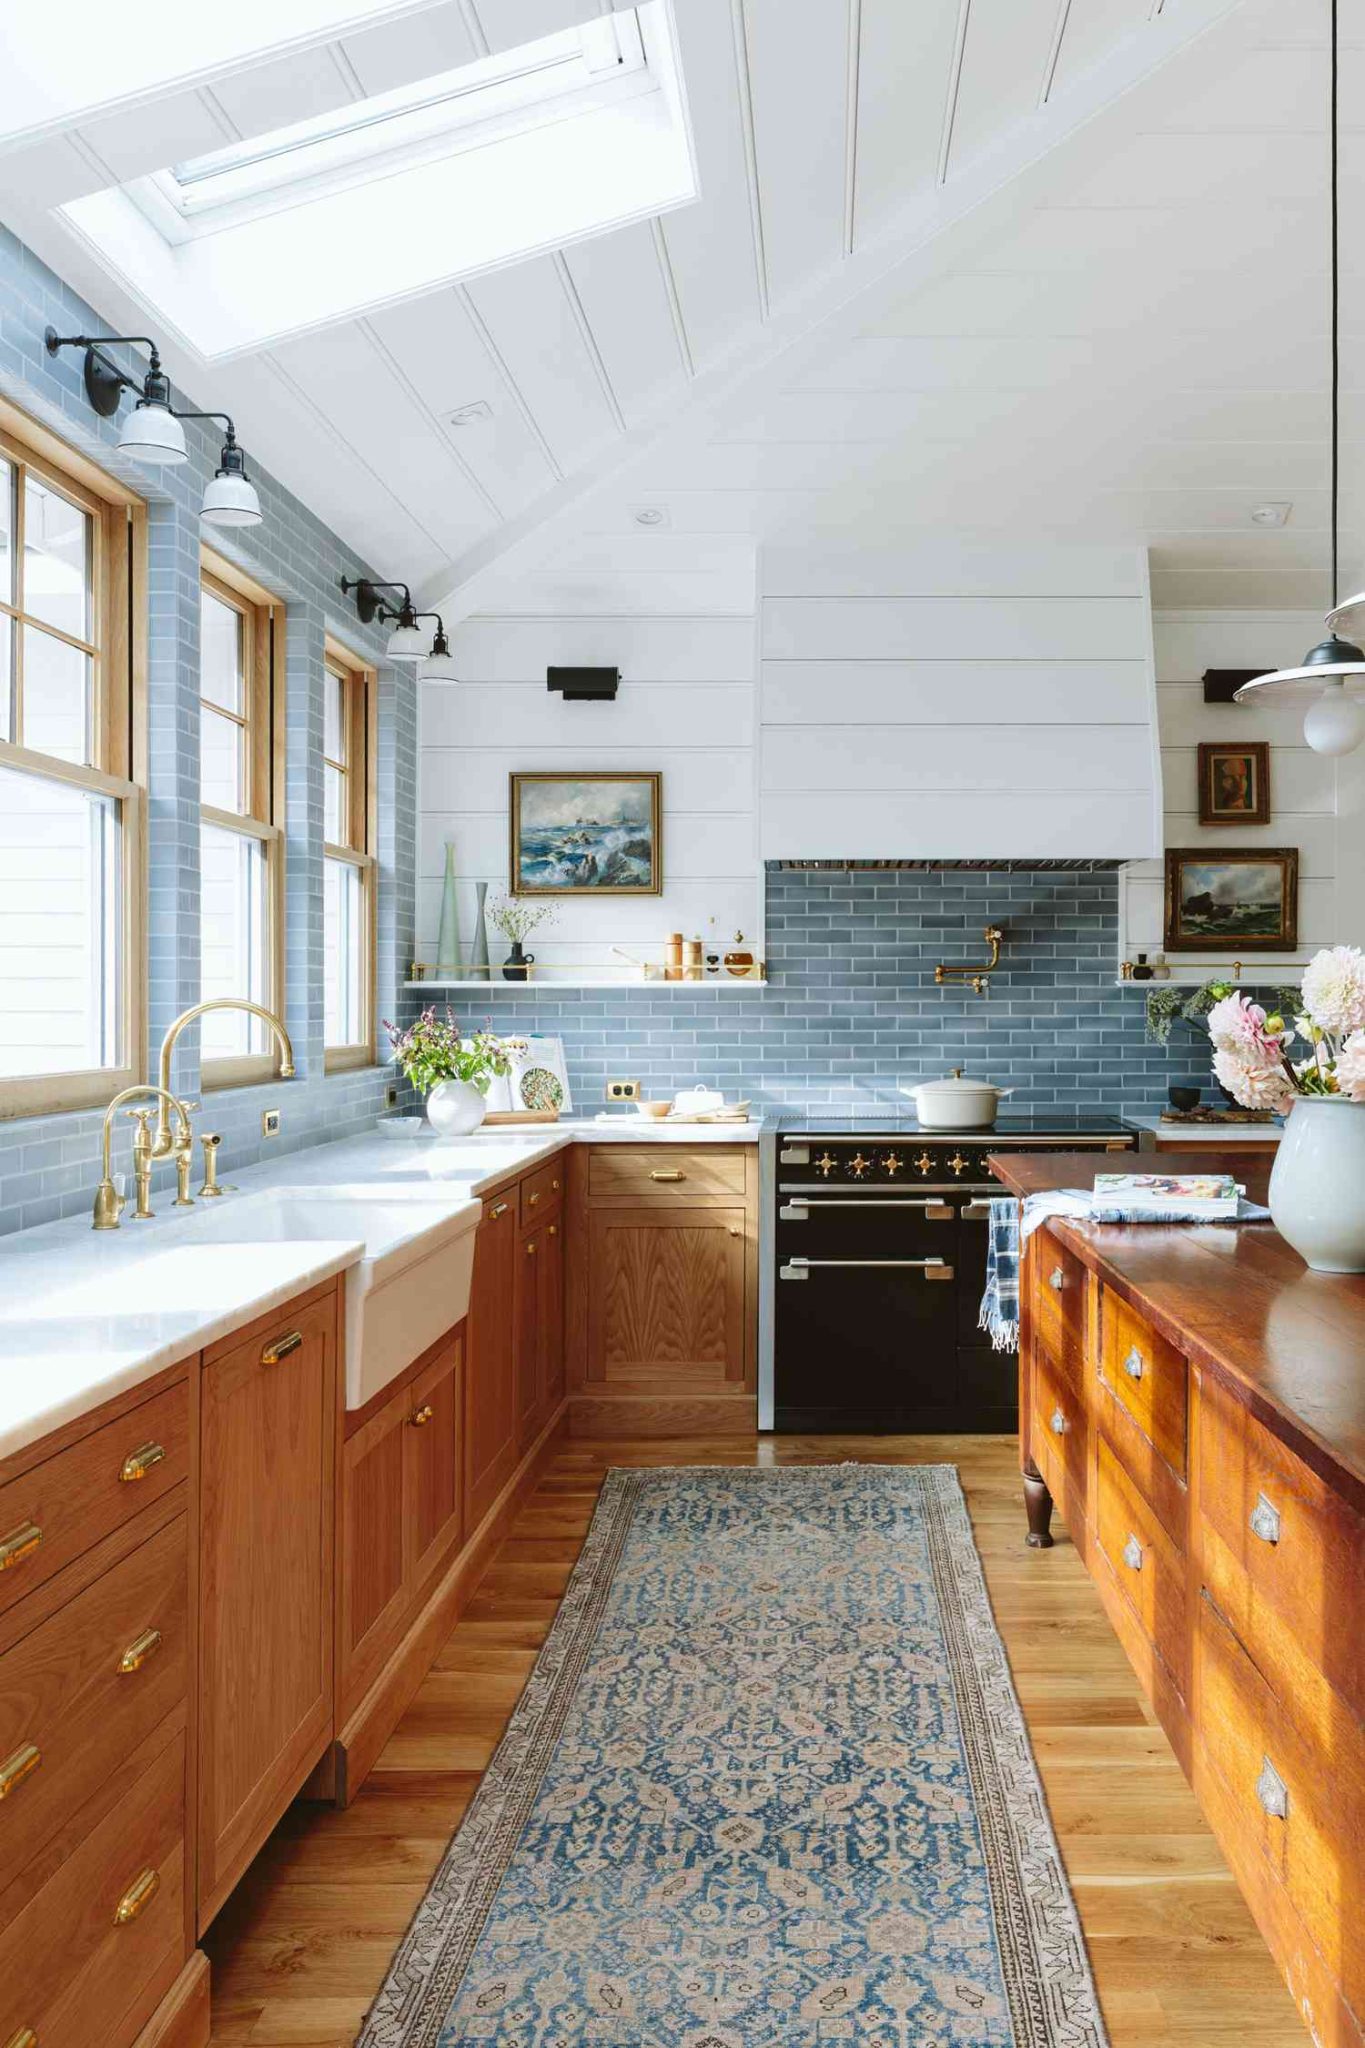
This kitchen feels so bright and welcoming due to the combination of warm and cool tones under abundant natural light. The light natural wood of the shaker cabinets provides organic warmth, which is beautifully contrasted by the cool, glossy light blue of the subway tiles. The brass hardware acts as a bridge between the two, its warm metallic sheen complementing both the wood and the blue. The large skylight and windows flood the space with light, making the colors pop and ensuring the room feels airy and open. Compare the rustic feel of Idea #2 with the bright, airy atmosphere here.
When using a colored subway tile, take it all the way up the wall to the ceiling or the bottom of the upper cabinets, as done here. Stopping the tile in an awkward spot mid-wall can look unfinished and cheap. Extending the tile creates a more intentional, high-impact feature wall. It costs a bit more in materials and labor, but the result is a much more cohesive and professionally designed look that makes the whole room feel more expensive and thoughtfully planned.
26. Craft a Sophisticated Bathroom with Dark Wood and Marble-Look Tile
|
📋 Copy HEX 🔗 Share |
✅ Before You Start
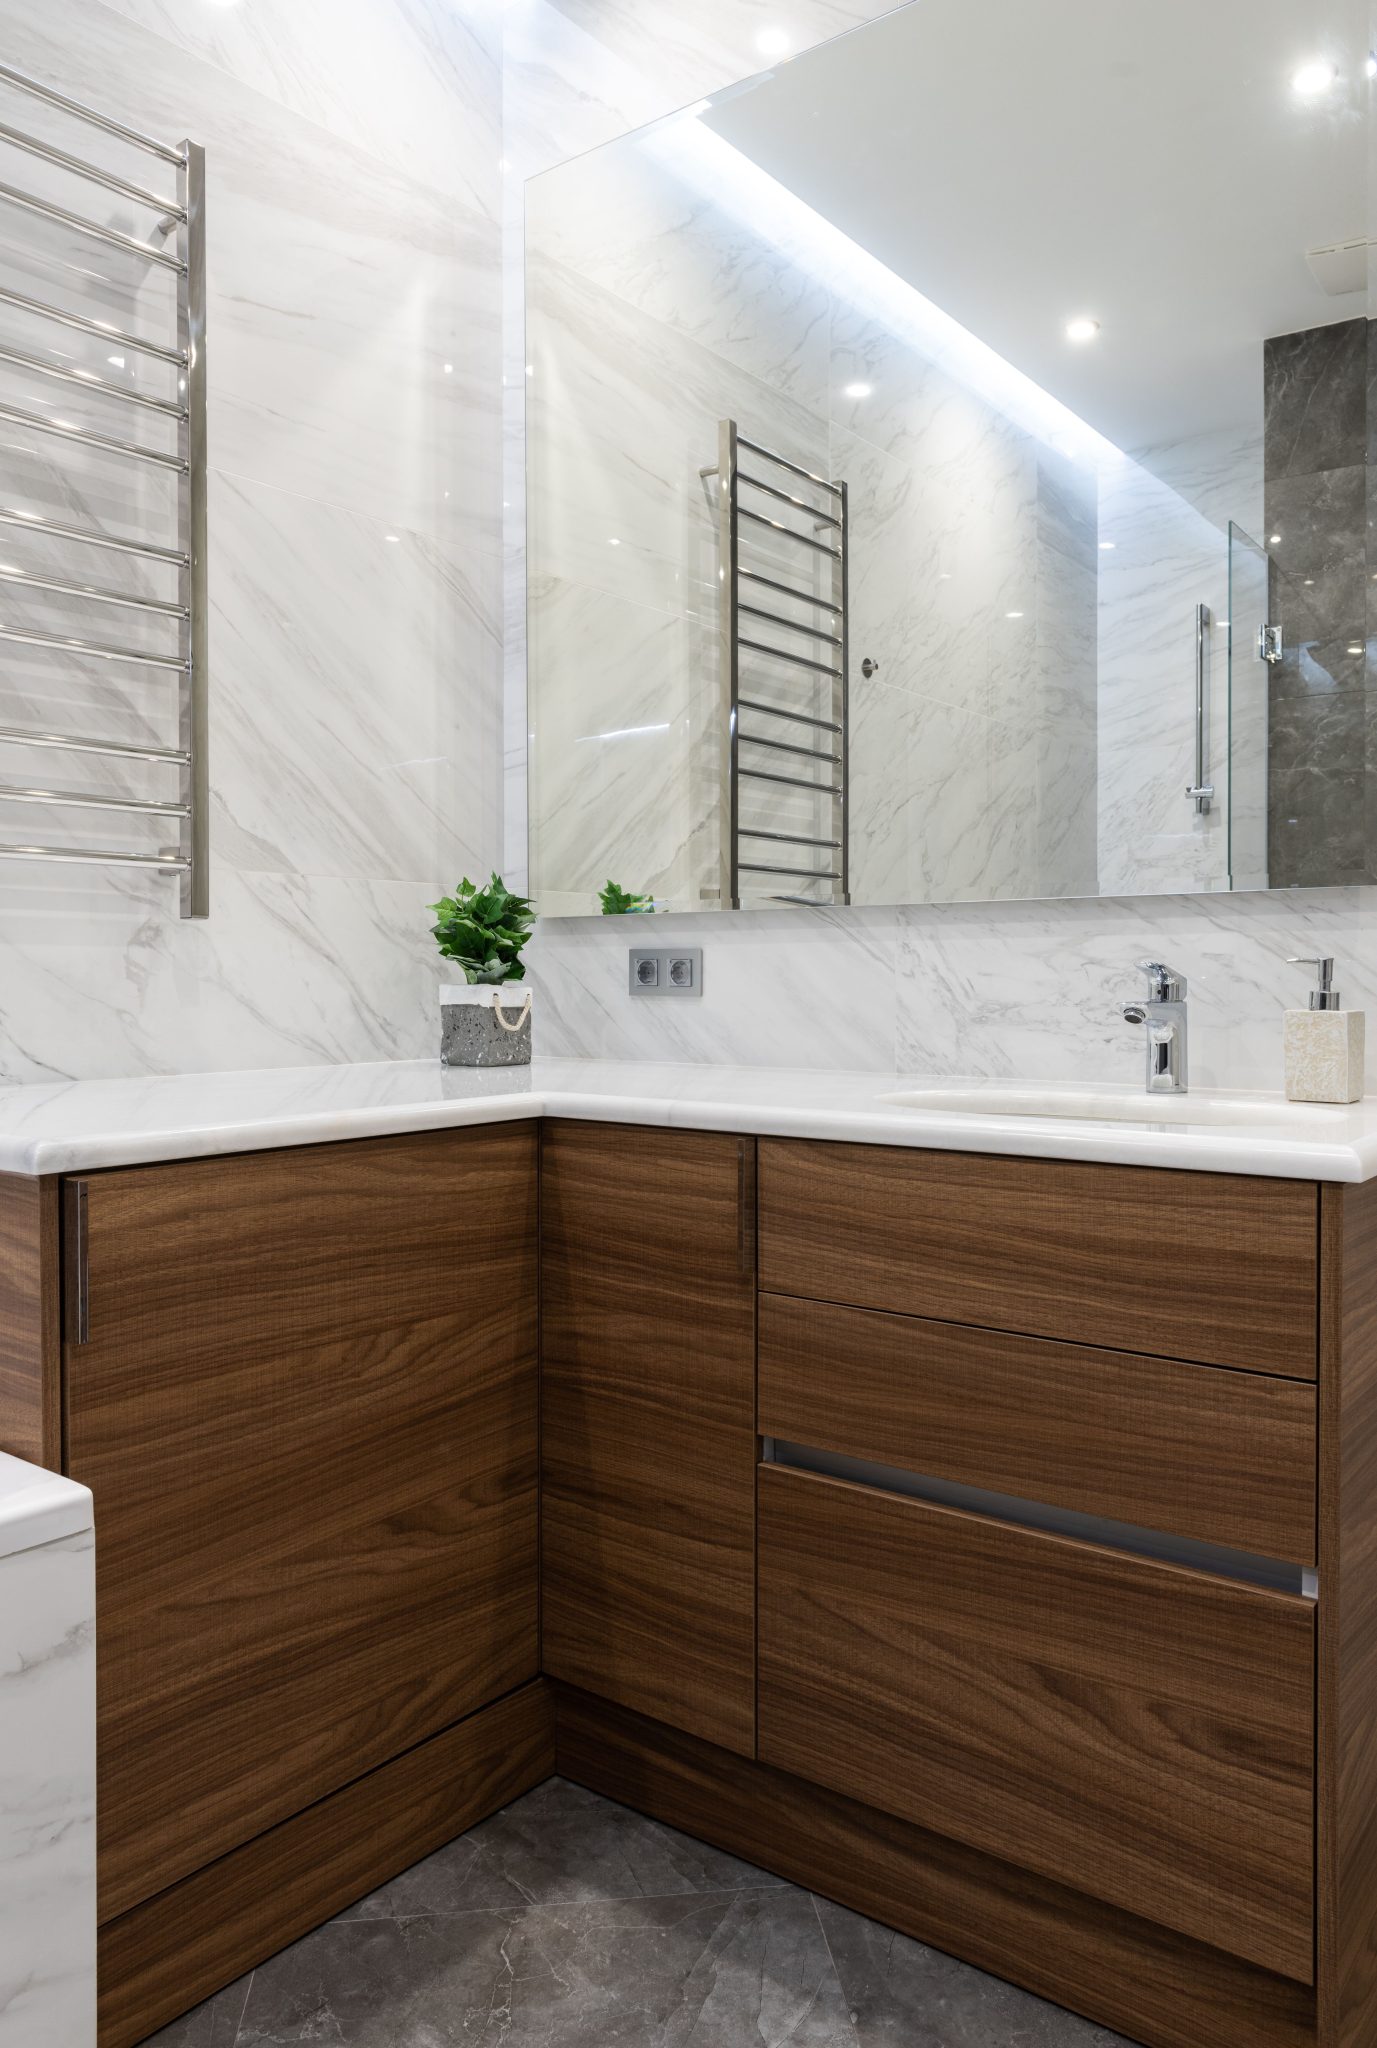
This design, with its large-format wall tiles and dark vanity, is great for making a medium-to-large bathroom feel even more grand. The large tiles mean fewer grout lines, which creates a sense of uncluttered space. The dark wood veneer cabinetry, however, could feel heavy in a very small powder room (under 30 sq ft). It works best in a master or guest bathroom of at least 50 sq ft, where the dark tones of the vanity and floor have enough surrounding light tile and mirror to feel balanced rather than dark.
Polished, marble-look porcelain tiles are a fantastic choice for walls—they are non-porous, easy to wipe clean, and resist mildew. However, on the floor, a polished finish can be extremely slippery when wet, which is a safety concern in a bathroom. The textured grey floor tiles used here are a much safer choice. Be aware that dark wood veneers and dark floor tiles will show every bit of dust, lint, and stray hair, so they will require more frequent sweeping and dusting than their lighter counterparts to look pristine.
27. A Functional Kitchen with Oak Cabinets and Blue Walls
|
📋 Copy HEX 🔗 Share |
⭐ The One Thing
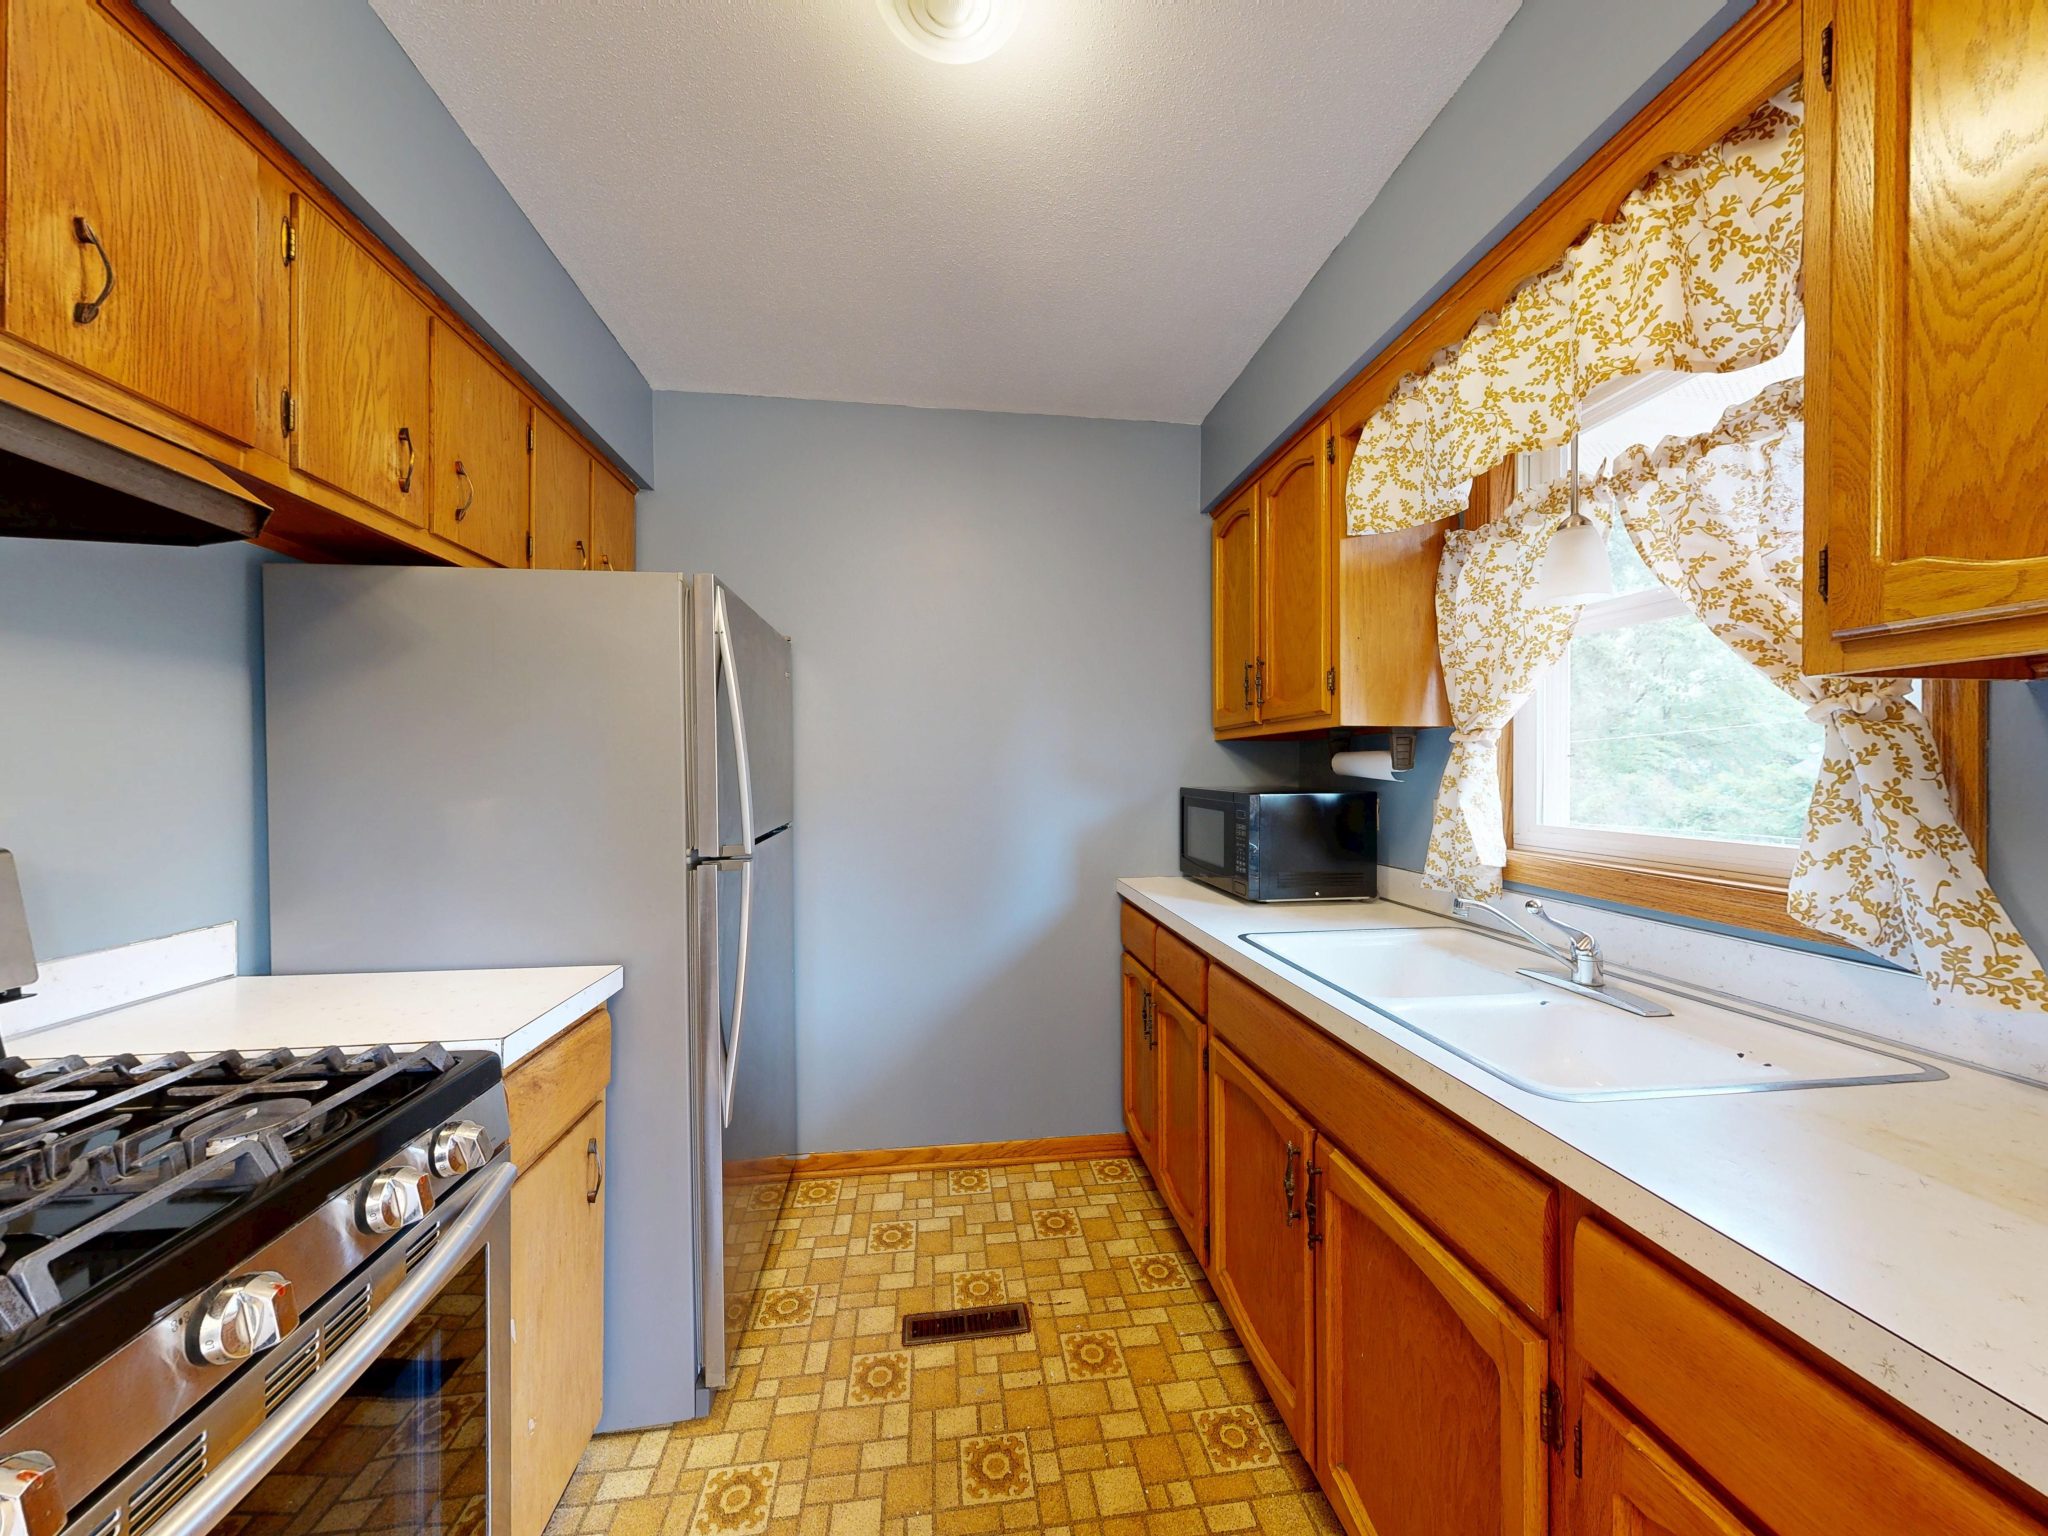
While the individual elements here are functional, the combination feels dated. The mix of light oak cabinets from the 90s, the yellow-and-brown patterned linoleum floor from the 70s, and the light blue walls creates a somewhat disjointed and time-stamped look. The white laminate countertops and floral curtains add to this effect. This kitchen is a prime candidate for a refresh that focuses on creating a more cohesive palette. A simple change, like replacing the flooring, could make a world of difference. To avoid this, review the common pitfalls in our mistakes section.
The great thing about a kitchen like this is that its bones are solid, making it ripe for a budget-friendly cosmetic update. Keep the oak cabinets. For about $2 per square foot, you can cover the patterned linoleum with modern, durable luxury vinyl tile. A countertop refresh kit can transform the white laminate to a faux stone finish for under $100. New hardware for the cabinets costs around $50-$150. With a weekend and a few hundred dollars, you can bring this kitchen into the current decade without a single major demolition.
28. Mix Modern Wood Cabinets with a Dark Green Hexagon Backsplash
|
📋 Copy HEX 🔗 Share |
🔥 Trending Context
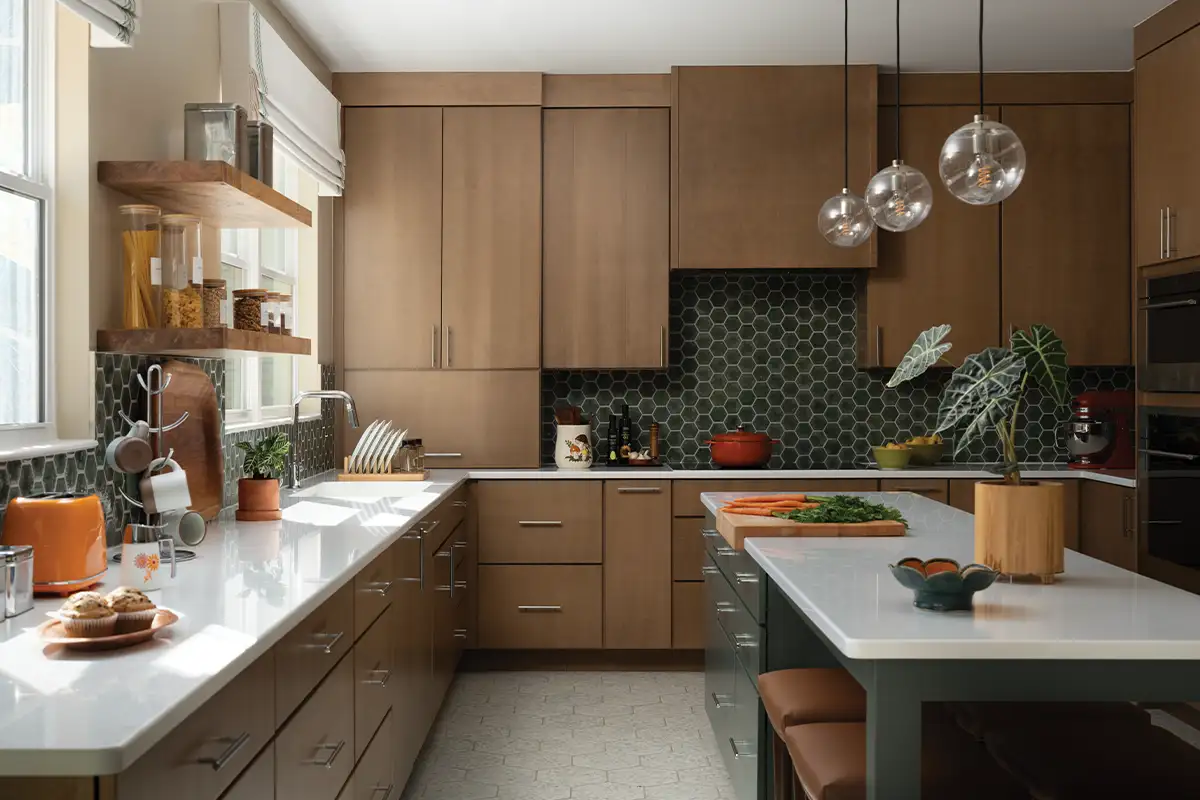
The dark green hexagonal tile backsplash is unequivocally the star of this kitchen. It provides a dramatic, textural, and colorful focal point that elevates the entire design. The geometric pattern is modern and eye-catching, while the deep green color adds a touch of earthy sophistication. Taking the tile all the way to the ceiling around the open shelves is a brilliant move that makes it feel like an intentional, seamless feature wall rather than just a functional backsplash.
This design succeeds by balancing the boldness of the backsplash with otherwise simple elements. The flat-panel light wood cabinets, white countertops, and simple brushed nickel pulls are all intentionally understated. They create a clean, neutral frame that allows the green hexagonal tile to take center stage without competition. The open wood shelves and leather stools echo the warmth of the cabinets, ensuring the modern design still feels inviting and connected.
29. Create a Homey Feel with Oak Cabinets and Wood Counters
|
📋 Copy HEX 🔗 Share |
🔧 How-To Brief
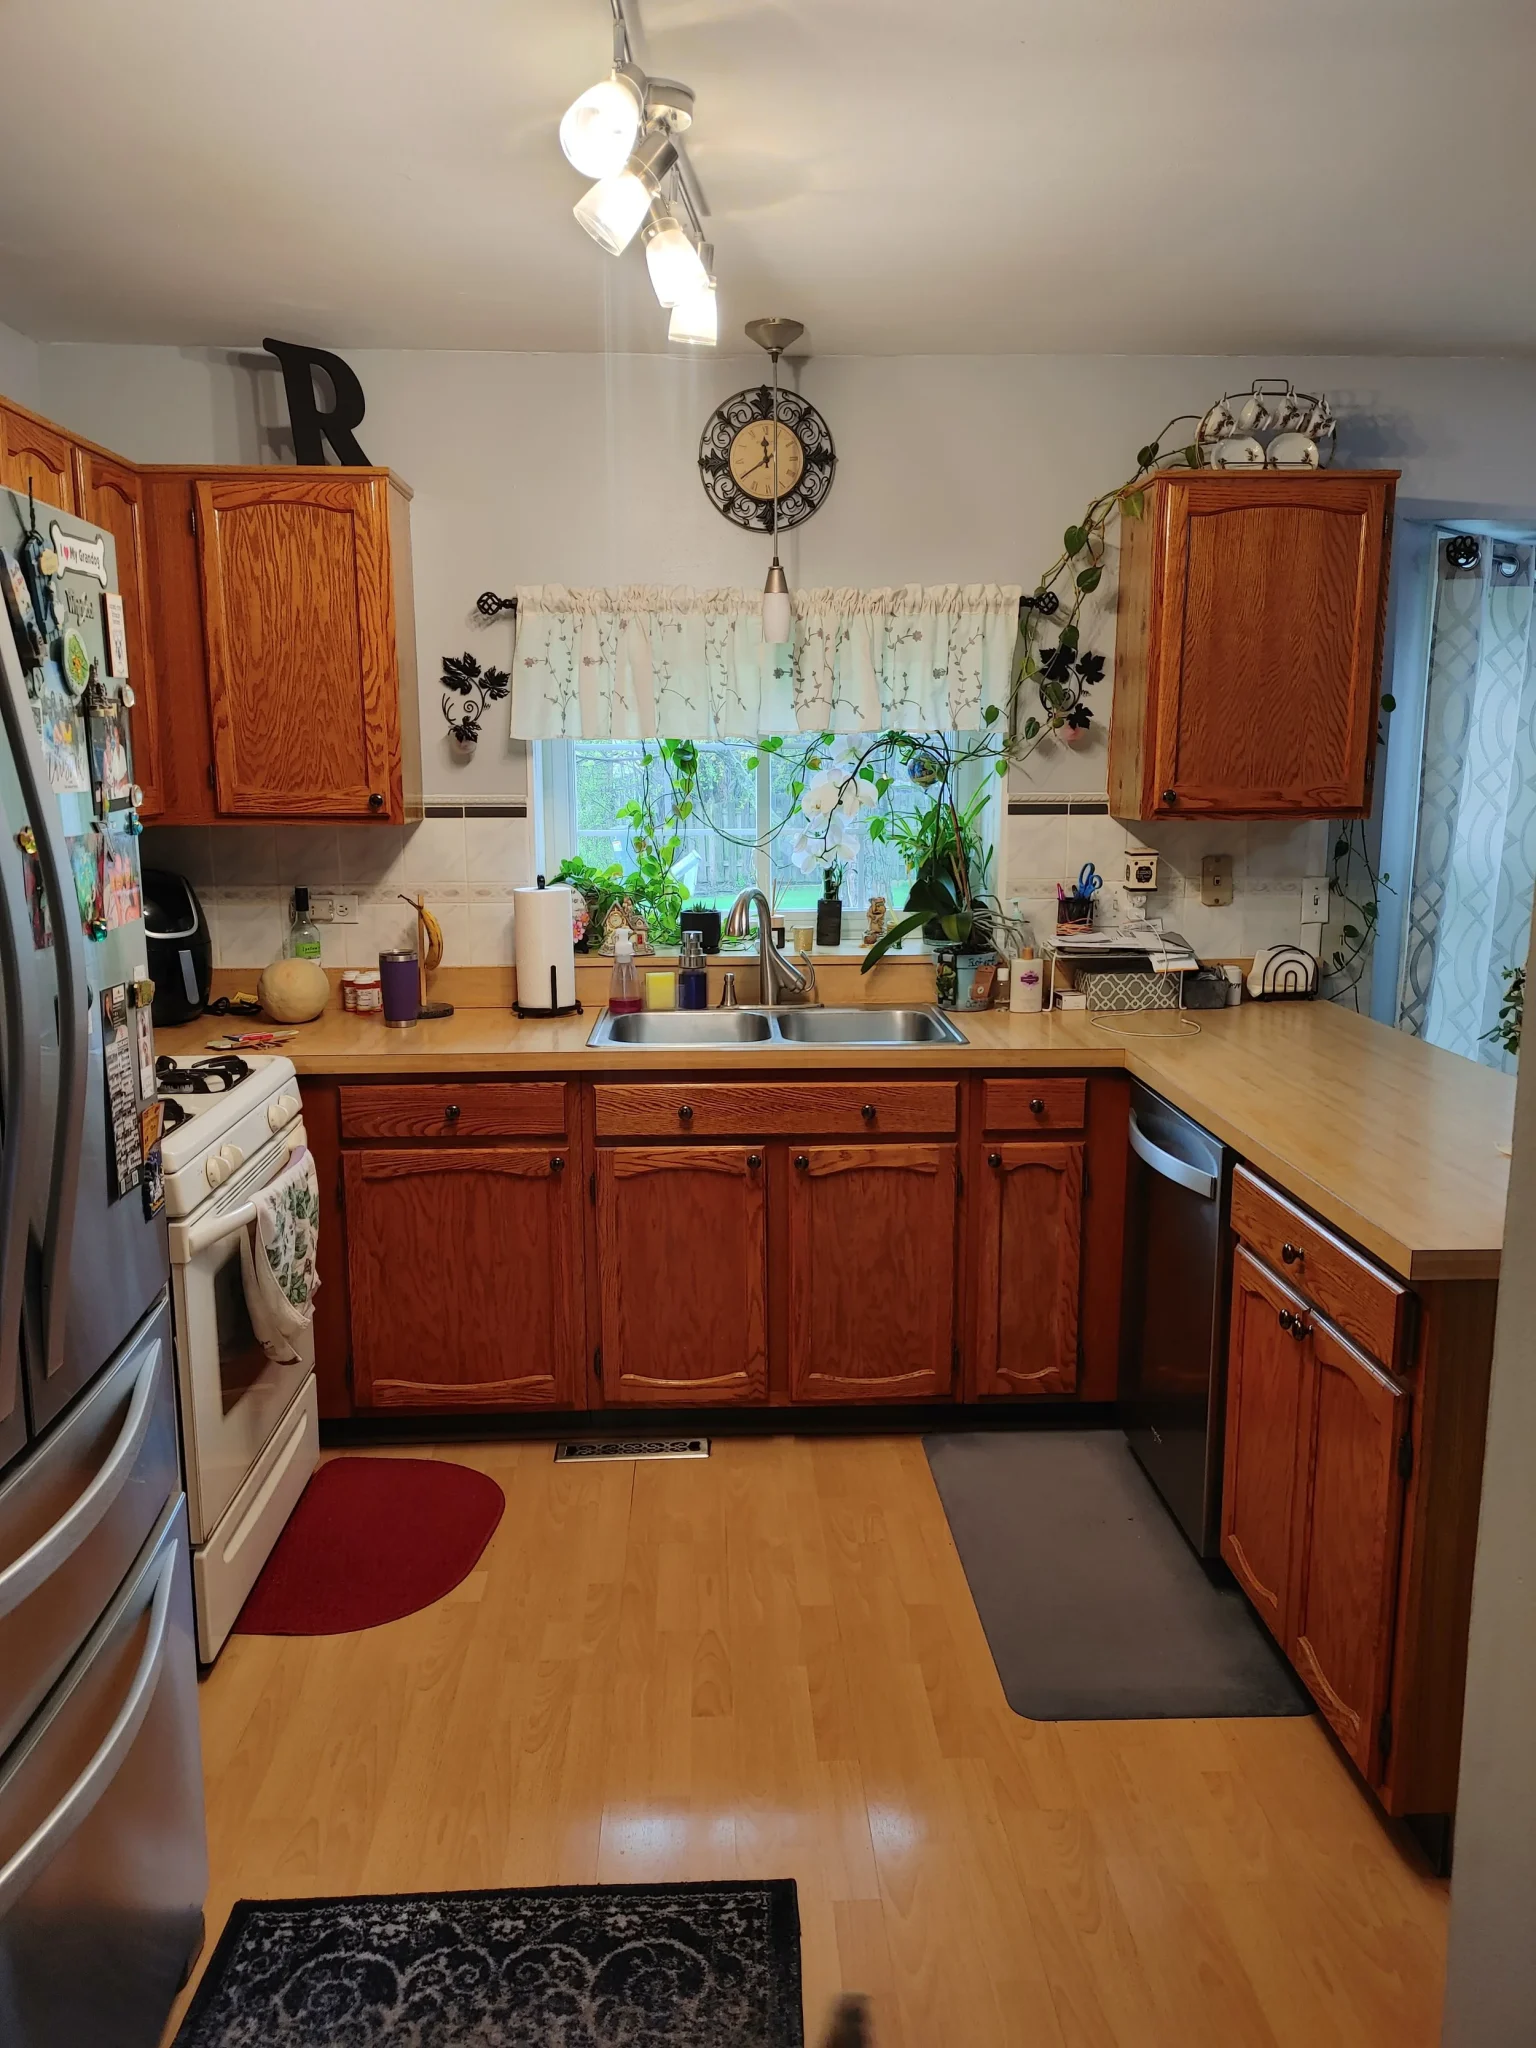
This entire look is a testament to budget-friendly charm. Light oak cabinets are often available secondhand or as an affordable stock option at big-box stores. The real hero here is the wood laminate countertop, which provides the butcher-block look for a tiny fraction of the cost and maintenance. A simple white square or subway tile backsplash is one of the most inexpensive options available. This kitchen proves that you don’t need a five-figure budget to create a warm, functional, and personalized space. For a more formal take on oak kitchens, see the coordinated look in Idea #1.
While wood laminate countertops are incredibly cost-effective, they have their vulnerabilities. The seams can be susceptible to water damage, causing the particleboard underneath to swell if not perfectly sealed. They are also not heat-proof; placing a hot pan directly on the surface will leave a permanent burn mark. And while they are scratch-resistant, a deep cut from a knife can slice through the top layer, revealing the substrate beneath. They are a great budget choice, but they require more careful use than stone or quartz.
30. Modern Farmhouse Kitchen with a Shiplap Island
|
📋 Copy HEX 🔗 Share |
🎯 What Makes It Work
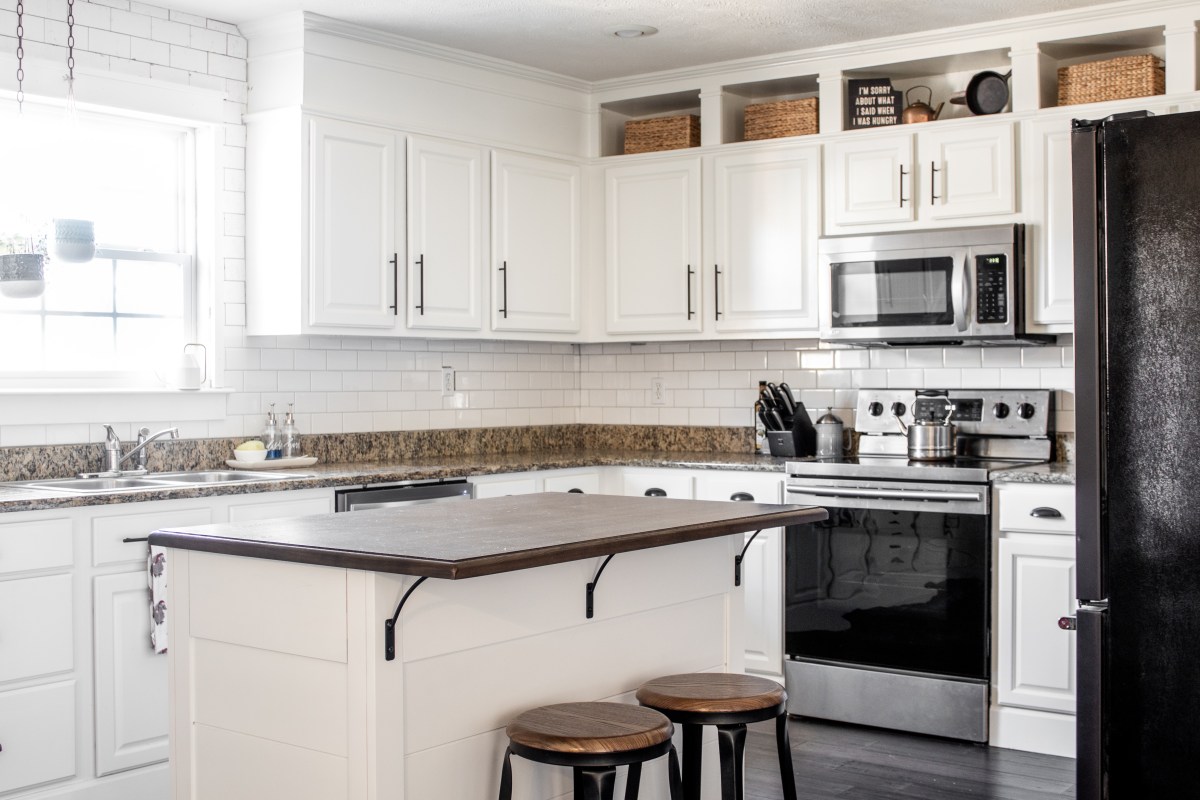
This kitchen nails the modern farmhouse aesthetic by expertly blending textures. The smooth, clean white shaker cabinets provide a modern base. The rustic shiplap siding on the island introduces a classic farmhouse texture. The mottled brown granite adds a natural, earthy pattern, while the simple white subway tile offers a clean, graphic element. Finally, the matte black hardware provides a sharp, industrial contrast. It’s this layering of distinct but complementary textures that gives the room its depth and character.
The island is a great focal point, but be sure to avoid the common mistake of placing hardware unevenly, which can spoil the clean lines. When choosing a countertop for an island with a different base, you can either match the perimeter counters, as seen here with the granite, or introduce a third material. A thick butcher block top on the island would have also worked beautifully here, further enhancing the farmhouse feel and adding even more warmth to contrast with the crisp white cabinets.
From Pins to Plans: Your Cabinet Story Starts Now
You’ve seen the inspiration, you’ve learned the secrets, and you’ve been warned about the pitfalls. The only thing left to do is to start planning your own cabinet makeover. Pick your favorite idea, measure your space, and get ready to create a look you’ll love for years to come.
Feeling inspired? Pin your favorite ideas to your boards so you can find them again when you’re ready to make it happen!