You know that feeling when you finally find a Christmas DIY decoration that looks exactly right for your tree or mantel—not another mass-produced bauble?
After filtering through hundreds of options across Etsy, Michaels, and Target, we narrowed it down to 35 ideas that actually deliver, from $4 to $90. You’ll find 35 curated ideas spanning rustic, traditional, whimsical, and elegant styles, each pulled from a real photo of a real home or crafter.
In 2026, the shift toward tactile, handmade holiday decor is pushing back against Pinterest’s endless neutral minimalism—more people are using fabric, clay, and repurposed materials to make their spaces feel personal.
And stay until the end—we break down the most common mistakes that can ruin these looks. Pin this guide for later—your future self will thank you when it’s time to actually do this. 📌
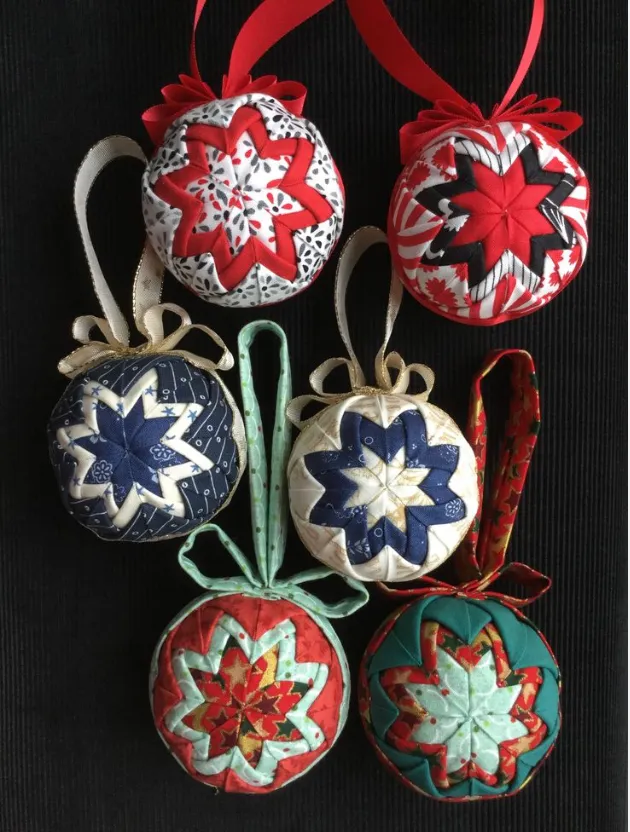
1. Quilted Patchwork Star Ornaments in Red, Navy, and Teal
If you’re sewing these patchwork star ornaments, the trick is to use lightweight cotton or linen scraps and a bit of fabric starch before folding. That gives the star points enough stiffness to hold their shape after the ornament is stuffed. I’d cut five identical squares per star, fold each into a kite shape, and baste them together around a central point before inserting a small foam ball. The red satin ribbons here aren’t just decorative—they add a glossy contrast that makes the quilted texture pop against a dark tree.
|
📋 Copy HEX 🔗 Share |
What makes this ornament special is the mix of high-contrast patterns. The red, navy, teal, and gold fabrics could easily feel chaotic, but the repeating star motif gives your eye a place to land. Each star has the same five-pointed geometry, so even though the prints differ, they read as a set. That repetition is the whole story—without it, you’d have a pile of mismatched fabric balls instead of a cohesive, handmade collection.
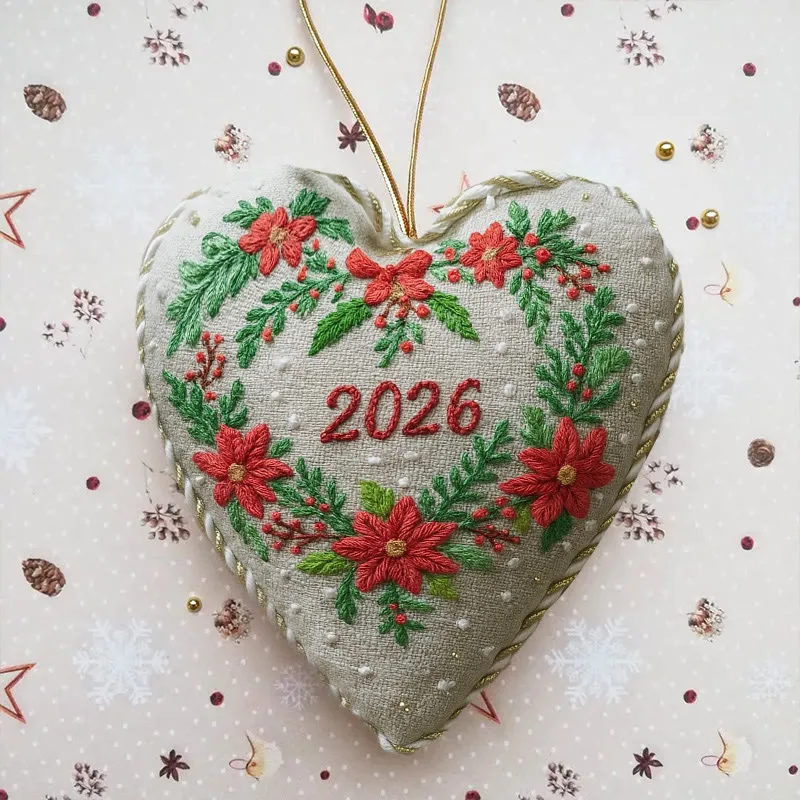
2. Embroidered ‘2026’ Heart Ornament with Poinsettia Wreath
The single element that makes this heart-shaped ornament feel intentional, not just cute, is the stitched ‘2026’ at the center of the wreath. Without that date, you’d have a pretty embroidered heart—nice, but generic. With it, the ornament becomes a keepsake marking a specific holiday. It turns a decorative object into a memory you’ll reach for every year. If you’re making a version of this, spend the extra twenty minutes embroidering the year. That’s the detail your adult kids will actually fight over someday.
|
📋 Copy HEX 🔗 Share |
Personalized, date-stamped ornaments are everywhere on Pinterest right now, and 2026 is a big one for family milestones. Part of it is the handmade movement’s push toward sentimental, one-of-a-kind decor. The other part? People are tired of perfectly coordinated trees that could belong to anyone. An ornament with a year, initials, or family name instantly tells a story, and stores like Etsy are seeing a run on custom embroidery kits and ready-made heart blanks. Expect this trend to stick around—nostalgia never really goes out of style.
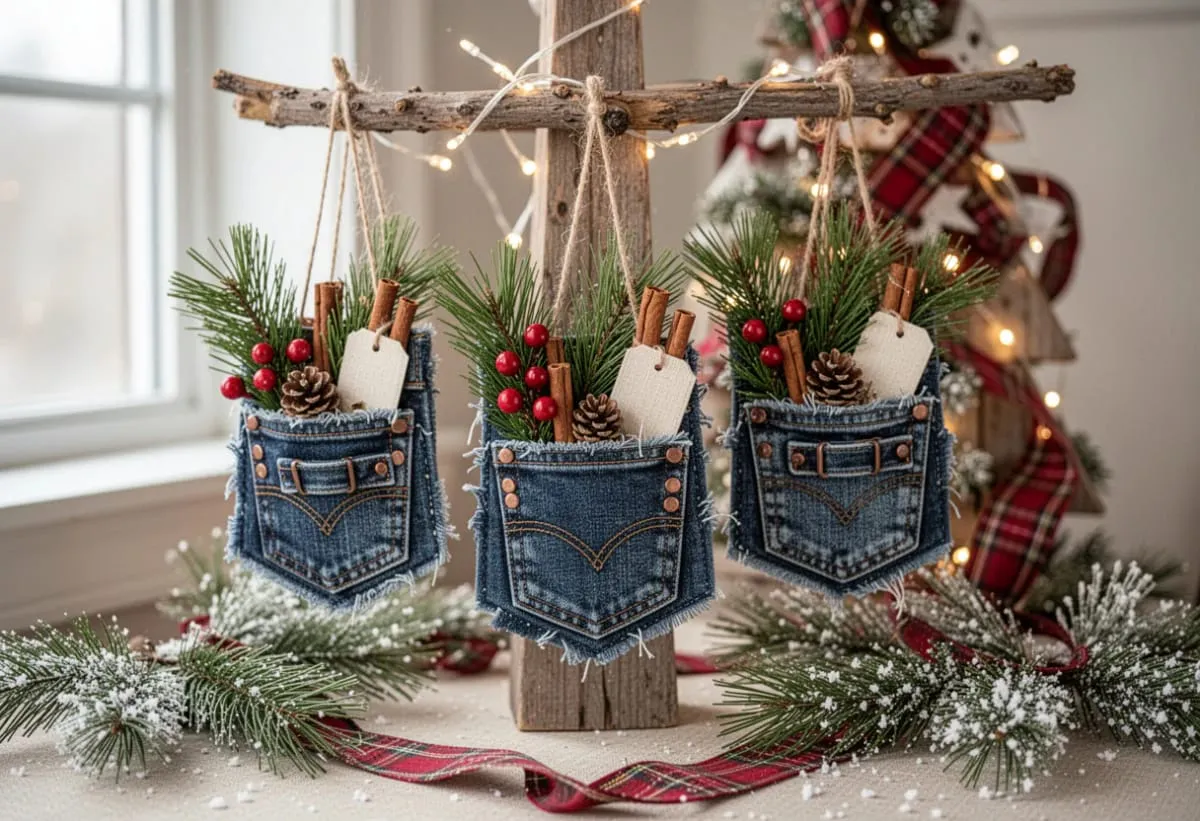
3. Repurposed Denim Pocket Ornaments on a Lighted Rustic Branch
- Cut the back pockets off an old pair of jeans, leaving at least 1 inch of fabric around the edge so the threads don’t unravel.
- Lightly sand the inside of each pocket with fine sandpaper if you want that worn, rustic look.
- Fill each pocket with a small bundle of faux pine, two cinnamon sticks, and a few red berries wired together.
- Thread a length of jute twine through the belt loop or top corners and knot it securely.
- Hang the pockets from a sturdy branch or coat rack, spacing them 6-8 inches apart.
|
📋 Copy HEX 🔗 Share |
Time estimate: about 45 minutes for three pockets. Material cost: roughly $15 if you thrift the jeans and use dollar-store greenery.
I’d warn you about is weight. Denim is thicker and heavier than you think, and once you stuff it with cinnamon sticks and pine, each pocket can weigh half a pound. If you’re hanging them from a thin artificial tree branch or a flimsy curtain rod, it will sag or snap. This setup works because the wooden stand has a solid base and a thick horizontal branch. Use a dedicated display stand, or attach the pockets to a wall-mounted hook that can handle the load. Also, if kids or cats can reach these, the cinnamon sticks will eventually get grabbed—so place them above waist height or make a few extra to rotate in.
4. Plaid-Hat Gnome with Glitter Snowflake and ‘MERRY’ Sign
This flat lay has a design formula you can steal: 60% dark green velvet as the base, 25% red and white accents (the plaid hat, yarn beard, berries), 10% metallic sparkle (the blue glitter snowflake and gold frame), and 5% natural texture from the faux pine. Swap the gnome for a ceramic Santa or the snowflake for a mirrored star, and the balance still holds. The dark green does the heavy lifting—it makes every lighter color feel brighter and prevents the red from turning the whole scene into a holiday cliché.

|
📋 Copy HEX 🔗 Share |
Fair warning: velvet is a dust magnet and yarn beards are basically lint traps. To keep this display looking fresh through January, vacuum the velvet with a brush attachment once a week, and use a lint roller on the gnome’s beard after every gathering. The glitter snowflake will shed a little—seal it with a clear acrylic spray before displaying to stop the sparkle from migrating onto your sofa. If you have pets that think yarn is a toy, keep this one on a high shelf or behind a glass cabinet; otherwise, your adorable gnome becomes a chewable stuffed animal.
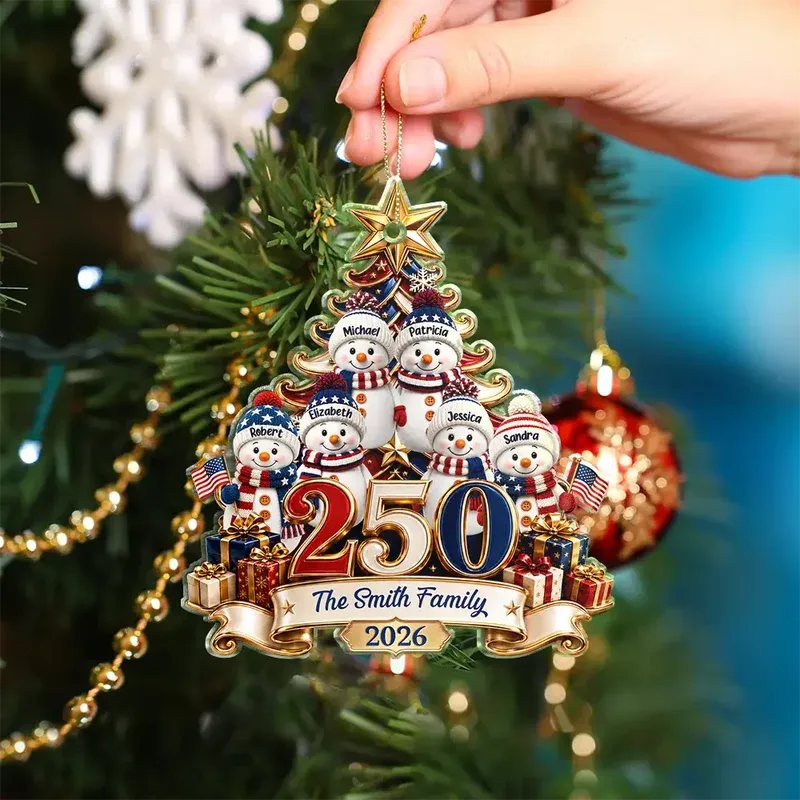
5. Patriotic Snowman Family Ornament with ‘250’ and 2026 Banner
- Main ornament base (blank resin tree or foam shape): $6–$12
- Miniature snowman figures and patriotic hats (pre-made or clay): $5–$10 each, or $15–$30 for six
- Embellishments (mini flags, gift boxes, gold star): $4–$8
- Paint and sealer: $8–$15
- Gold banner and lettering vinyl: $3–$6
- Total: $36–$71
- Budget alternative: Use a ready-made plain ornament from Target ($5) and sticker letters instead of vinyl, plus felt snowmen you cut yourself—total under $20.
|
📋 Copy HEX 🔗 Share |
If you want the ‘2026’ and family name to look crisp, don’t hand-letter with a brush unless you have serious calligraphy practice. Instead, print the text on temporary transfer paper, position it on the ornament, and trace over it with a fine paint pen. Let it dry for a full 24 hours before adding any clear coat. For the miniature flags, use toothpicks and small red, white, and blue paper triangles—dip the tips in glue and push them into the snowmen’s hands. This kind of detail is what separates a tacky craft from a keepsake.
6. Hand-Painted Bird Ornaments in Jewel Tones on a Warm-Lit Tree
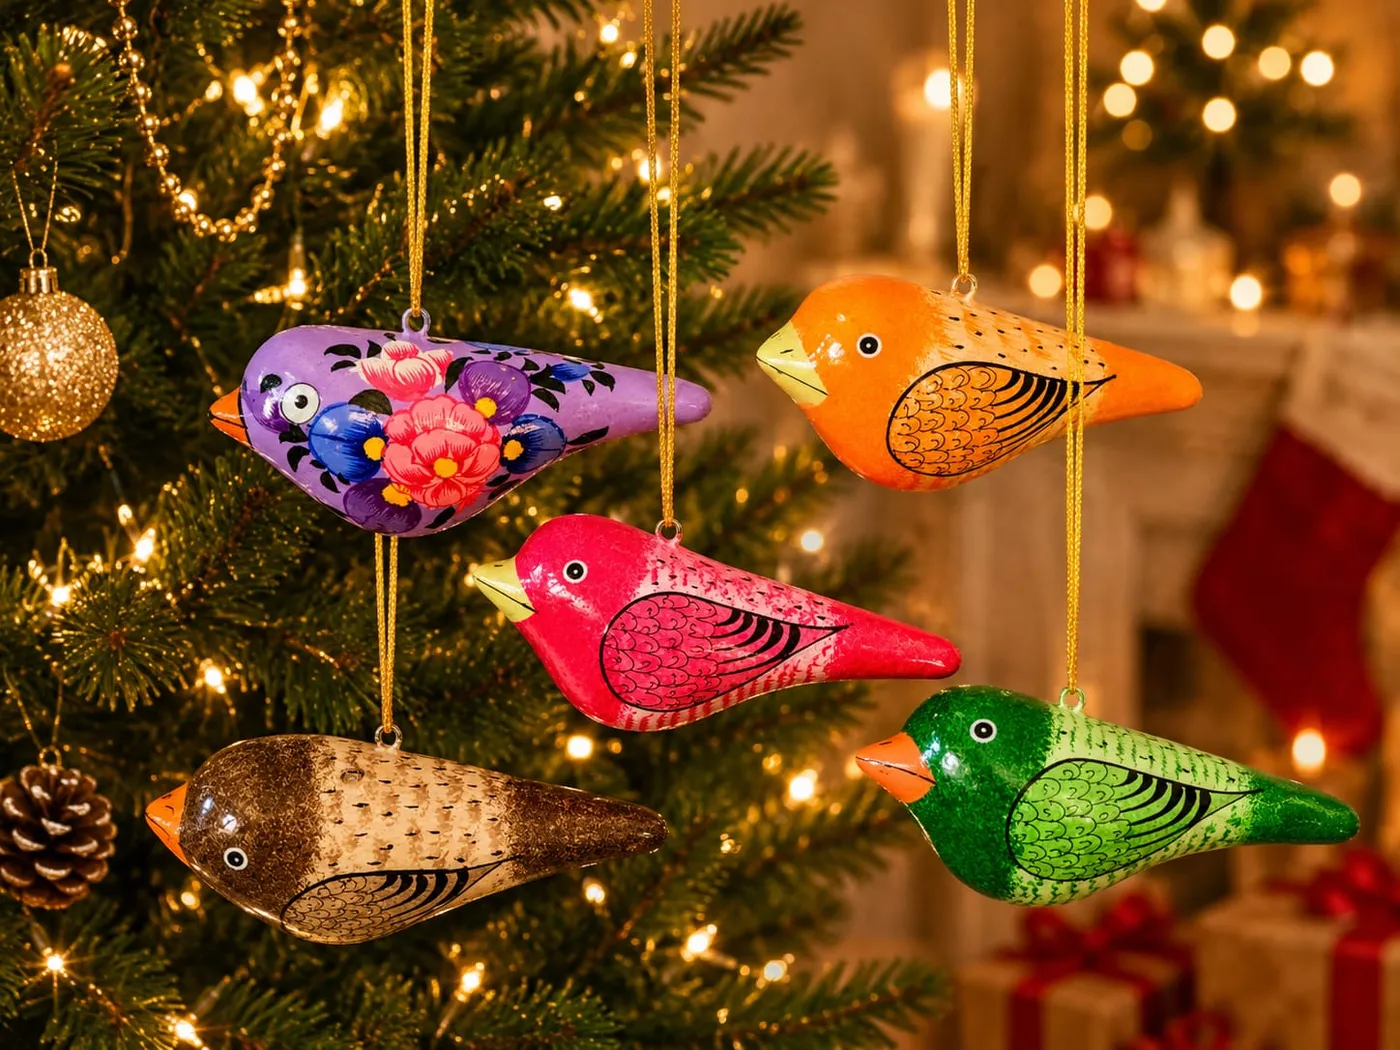
The reason these hand-painted birds jump off the tree is temperature contrast. The green branches sit on the cool side of the color wheel, while the birds’ reds, oranges, and magentas are warm. Your eye naturally seeks warm colors against cool backgrounds, so each bird becomes a focal point without competing with the tree itself. The warm white string lights act as a bridge—they cast a golden glow that softens the cool green and makes the whole tree feel inviting rather than stark. If you swapped the lights for cool white LED, the birds would look harsher and the tree more sterile.
|
📋 Copy HEX 🔗 Share |
This idea works best on a tree that’s at least 5 feet tall with dense branches, so the birds have enough visual weight to balance the golden garland and a mantel behind it. If your tree is under 4 feet or sparsely branched, limit yourself to three birds instead of five to avoid overcrowding. For a smaller space, compare this with Idea #34—that minimalist wooden tree gives the same hand-painted charm without the full-size tree commitment.
7. Burlap and Plaid Baubles in a Light Wooden Bowl
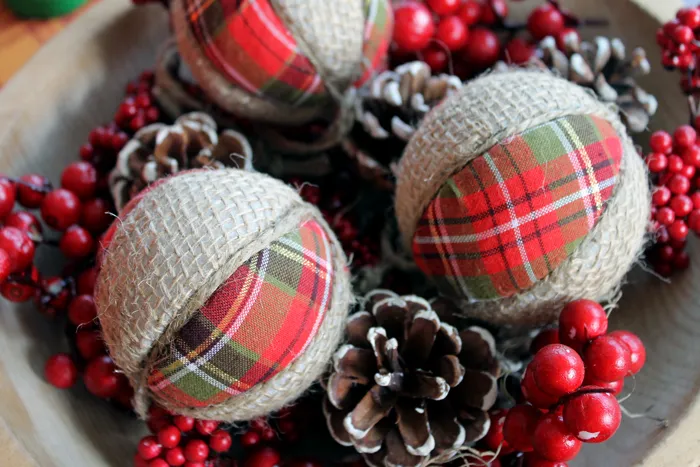
You don’t need to buy expensive ornament-making supplies to get this rustic bowl look. Hit a thrift store for old plaid flannel shirts and cut them into 6-inch squares; use Waverly or Mod Podge fabric stiffener on burlap from the dollar store to wrap foam balls. The pinecones can come from your backyard, and the glossy red berries are sold in bundles for about $3 at Walmart or Michaels. Total cost for a dozen ornaments and a wooden bowl from IKEA? Around $25–30, versus $80+ for a similar set from a boutique.
|
📋 Copy HEX 🔗 Share |
burlap sheds like crazy and those red berries will become a sticky dust collector if you place the bowl near a heat vent. I’d put a clear acrylic sealer on the berries and wrap the burlap balls with a thin layer of tulle before displaying to keep fibers from floating onto your sofa. Also, if you have a toddler who likes to sort things into their mouth, skip the artificial berries entirely—they can pop off the wire stems. Instead, use wooden beads painted red or felt balls, which are both safer and just as festive.
8. Glittered Heart Ornament with Rustic House Illustration and Orange Edge
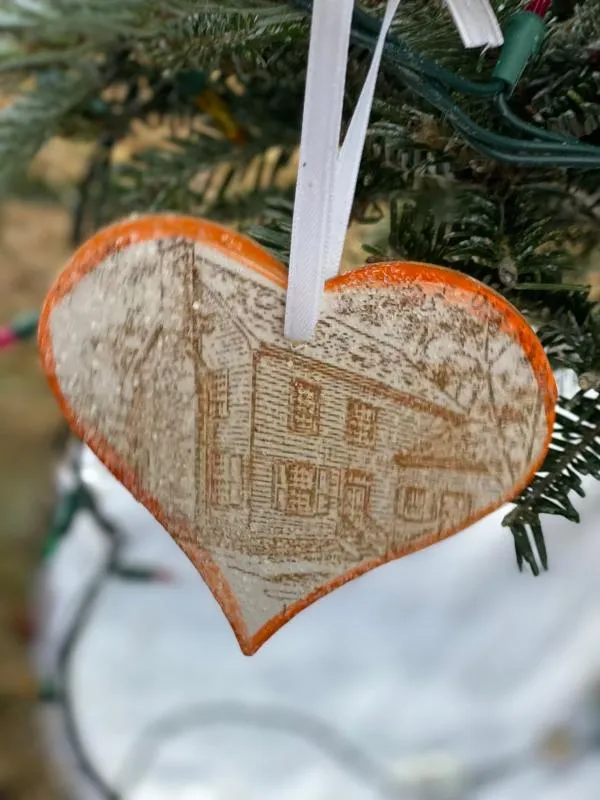
The single element holding this ornament together is that glossy orange band around the edge. It’s a bold, slightly unexpected choice against the white glittered surface and green tree—and that’s exactly why it works. Orange is a holiday accent that’s been gaining traction in 2026, but most people are still using it in dried orange slices or ribbon, not as a thin edge. Remove that orange rim and you have a pretty but forgettable white heart. Keep it, and the ornament feels both nostalgic and fresh. If you’re recreating it, use a high-gloss enamel paint for that glassy, ceramic look.
|
📋 Copy HEX 🔗 Share |
The tiny house illustration with shutters taps into the cottagecore and “home as sanctuary” aesthetics that have dominated Pinterest for the past two years. In 2026, personalized ornaments with a family home, cabin, or first apartment illustration are everywhere—Etsy sellers can’t keep up. It’s a natural extension of the dated-keepsake trend from Idea #2, but this version leans more on a sense of place. That’s why it resonates: it’s not just a decoration, it’s a tiny portrait of where you feel safest.
9. Rolled Paper Bead Heart Ornament with Gold Spacers
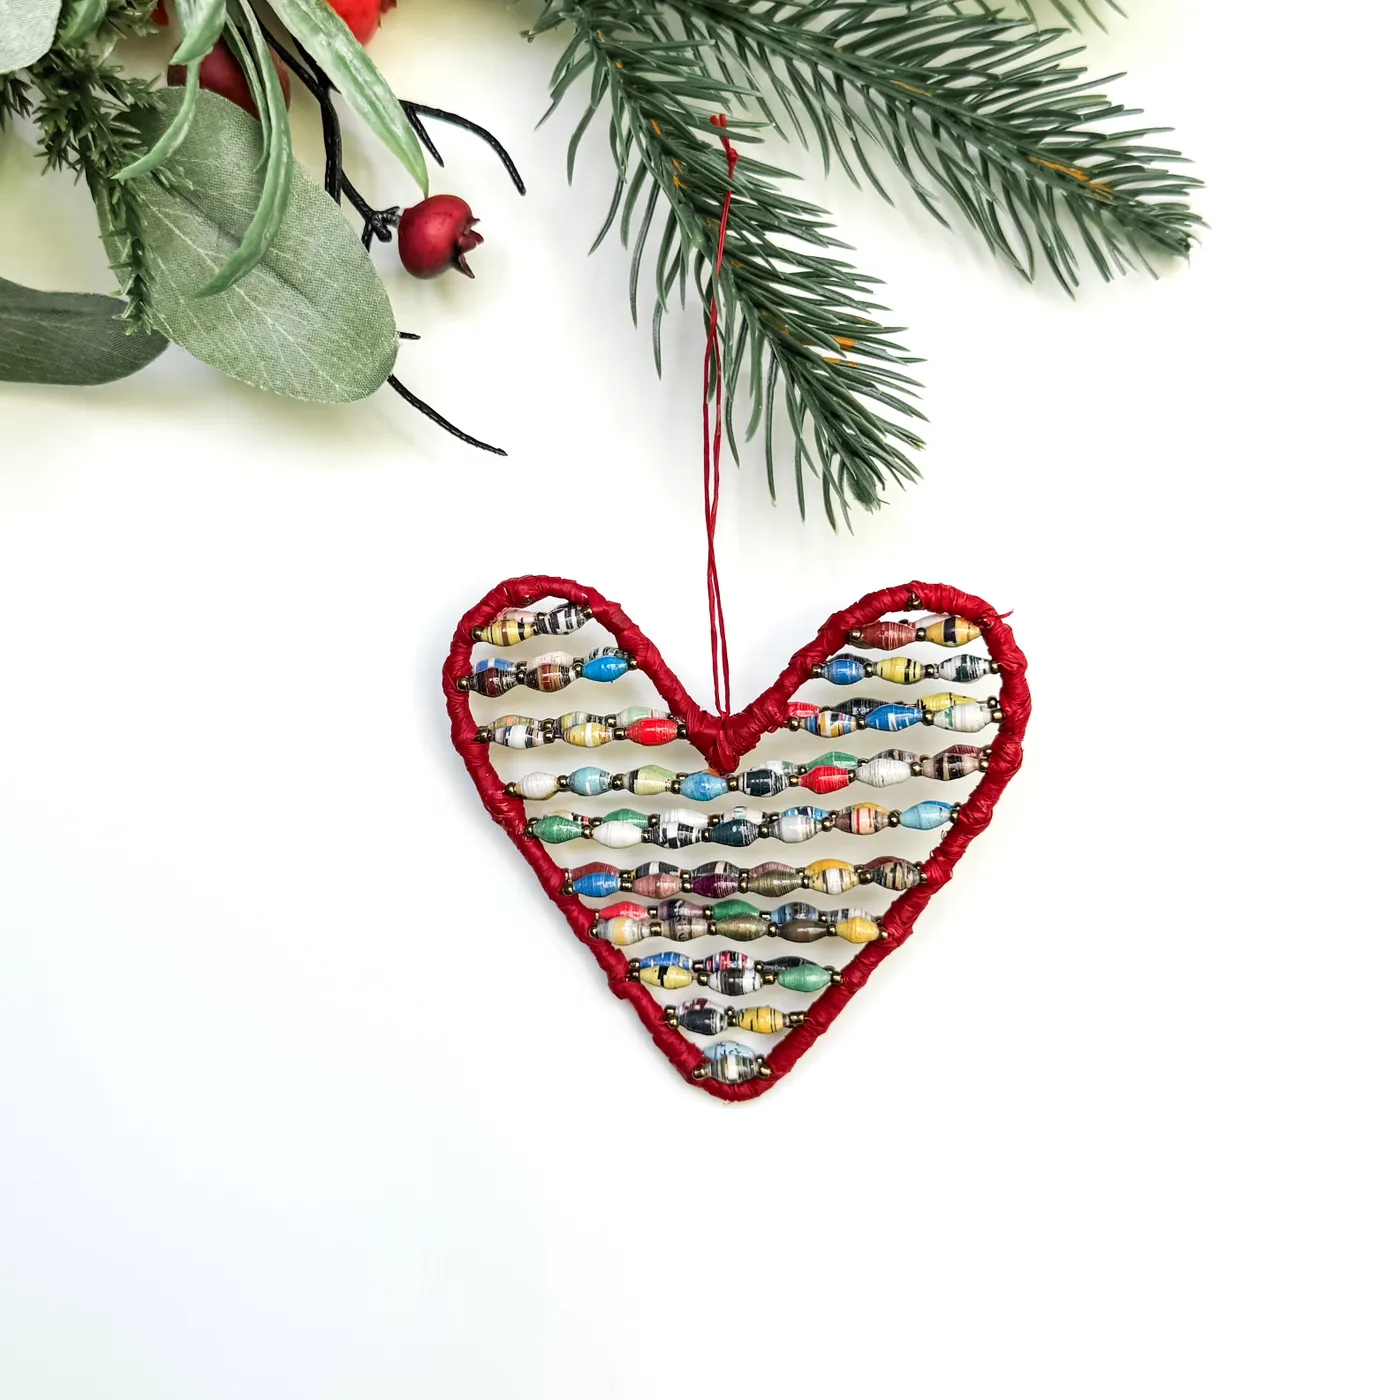
- Cut old magazines or scrapbook paper into long triangles about 1/2 inch wide at the base and 6 inches long.
- Starting at the wide end, roll each triangle tightly around a toothpick, gluing the tip to secure.
- Slide the bead off and coat it with a thin layer of Mod Podge or clear nail polish for durability.
- String the beads onto red cord in rows, alternating with small gold spacer beads.
- Bend a wire or red-wrapped frame into a heart shape and wrap the bead rows around it, knotting the cord at the top.
|
📋 Copy HEX 🔗 Share |
Time: about 2 hours for a heart this size. Materials: under $10 if you reuse paper and buy cord and beads at a craft store.
The rows of multicolored beads create a rhythm, and the gold spacers act like punctuation marks that keep the color from blurring together. The red frame outlines the heart strongly enough that you can read the shape from across the room, while the white background leaves breathing room. It feels handcrafted but not messy, and the gold spacers give it a subtle luxe touch without being flashy.
10. Light Blue Embroidered Heart with ‘2026’ and Gold Trim
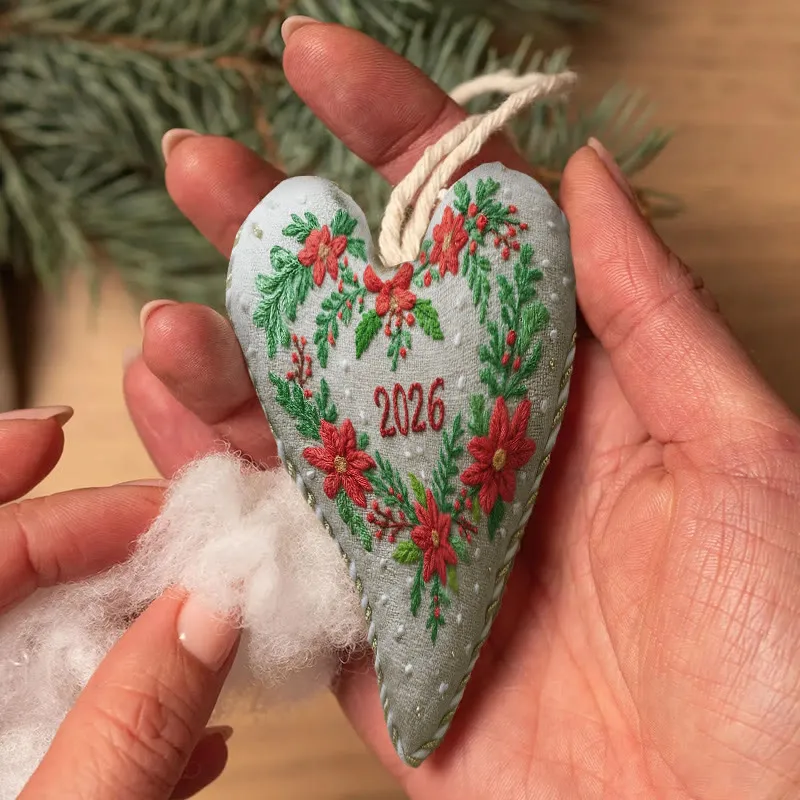
When you’re embroidering on a light blue fabric like this, use a water-soluble stabilizer behind the area where the poinsettia and ‘2026’ will go. That prevents the thread from pulling the fabric into puckers, especially on heart shapes with curved edges. Slip the ornament’s back piece inside before you sew the front, and use a whip stitch with matching thread to close it—then gently pull the stabilizer away. For the gold trim along the edge, a narrow metallic cord glued with fabric glue gives a cleaner finish than trying to stitch it over stuffing.
|
📋 Copy HEX 🔗 Share |
Light blue fabric is gorgeous but it will show every fingerprint, especially if you handle the ornament while decorating. Keep a small bowl of water and a clean cloth nearby to wipe the surface if someone grabs it. The white stuffing peeking out around the seams is intentional here, but if you want a cleaner look, stuff the heart firmly and use a ladder stitch instead of a whip stitch. Store this ornament in acid-free tissue paper—not a plastic bag—to prevent the fabric from yellowing over the years.
11. Stadium Checkerboard Clear Ornament on a Fairy-Lit Tree
The visual formula here is all about transparency: 70% clear glass, 20% orange and white checkerboard print, and 10% warm fairy light glow. The clear ornament lets the tree branch show through, so it feels integrated rather than stuck on. The checkerboard pattern repeats the stadium’s geometry, but on a small scale that doesn’t overwhelm. To recreate it, keep the rest of the tree neutral—warm white lights and a few solid green branches—so the ornament’s two-tone pattern is the loudest thing in view. Swap orange for your team’s colors and the same ratio works.

|
📋 Copy HEX 🔗 Share |
You can make this for under $10 using empty fillable plastic or glass ornaments from Michaels (about $2 each), a printed photo of your favorite stadium’s crowd, and a simple white ribbon hanger. Cut the photo into a circle that fits the ornament’s face, roll it slightly, and slide it inside. A little clear glue at the seam keeps it from shifting. The warm fairy lights do the heavy lifting here—you don’t need expensive metallic baubles or garlands. This is the budget version of Idea #25, where the materials are the show.
12. Teal Floral Hand-Painted Baubles in a Woven Basket
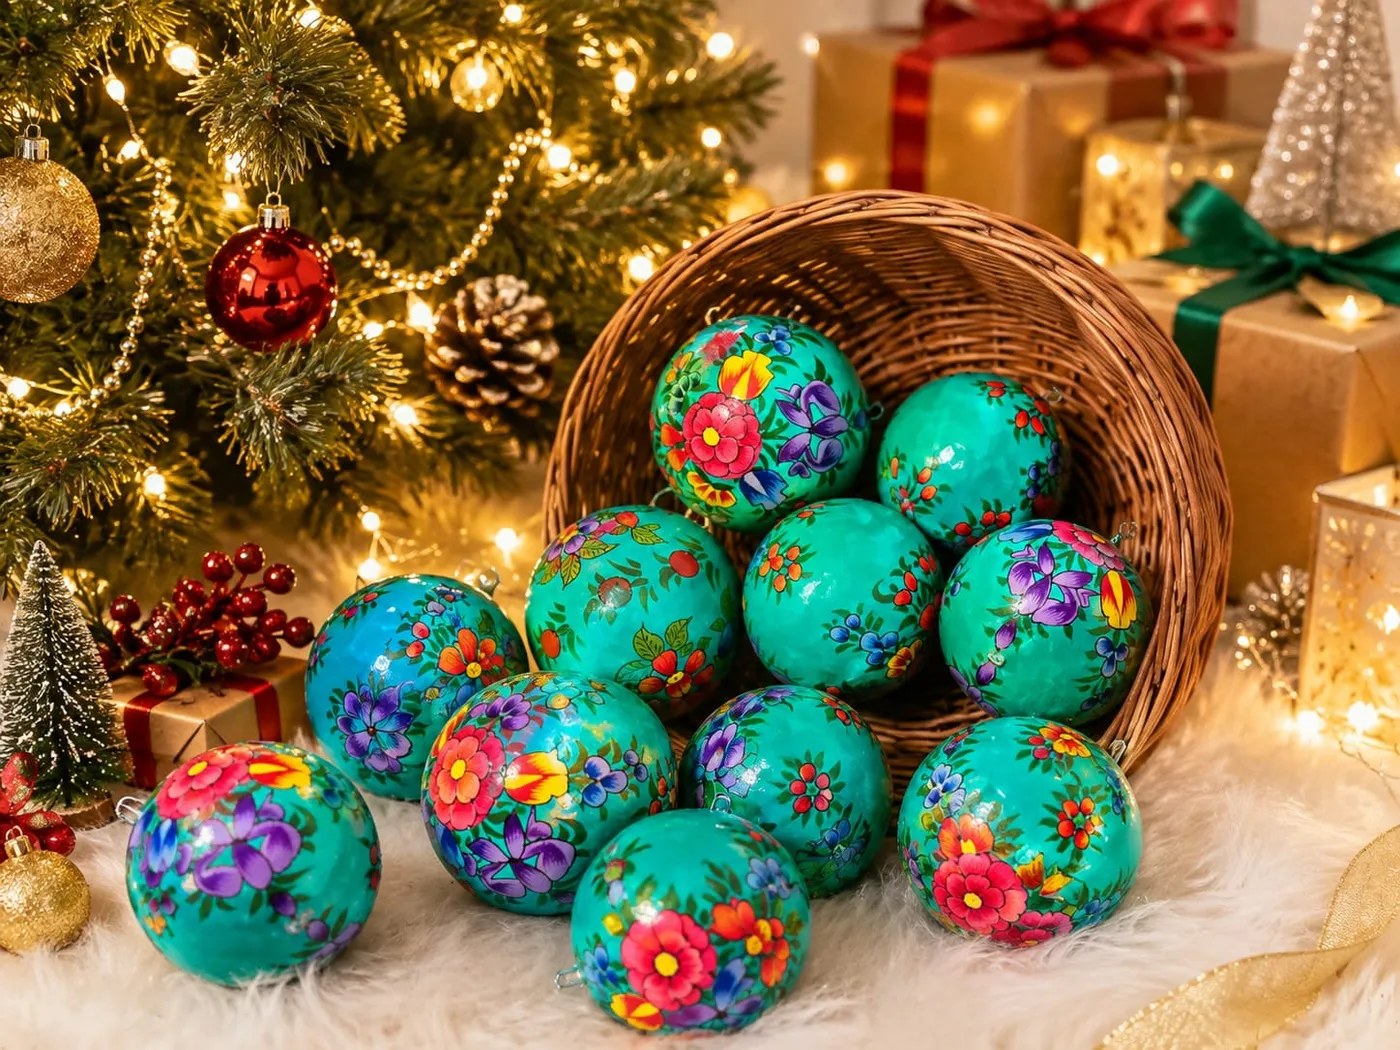
What makes this whole arrangement sing is the teal. Those hand-painted floral ornaments in shades of turquoise and blue act like a cool counterpoint to all the warm gold, red, and green around them. Without that unexpected pop of teal, the tree would read as traditionally festive but a bit predictable. With it, the whole scene feels curated and slightly collected, like someone traveled with these ornaments. If you’re painting your own, don’t match the tree’s existing palette—choose one accent color that lives opposite it on the color wheel and repeat it five or six times.
|
📋 Copy HEX 🔗 Share |
- Check that your blank ornaments are clean and dry—wipe with rubbing alcohol and let air dry for 10 minutes.
- Make sure you have a foam brush or soft round brush for base coats and a fine liner brush for floral details.
- Verify that your paint (acrylic enamel or glass paint) will adhere to the surface; test on a spare ornament first.
- Measure your tree’s branch spacing—ornaments should hang at least 2 inches apart to avoid chipping.
- Have a drying rack or egg carton ready, because hand-painted ornaments need 24 hours to cure before hanging.
13. Dried Orange and Evergreen Wreath Crafting on a Dark Wood Table
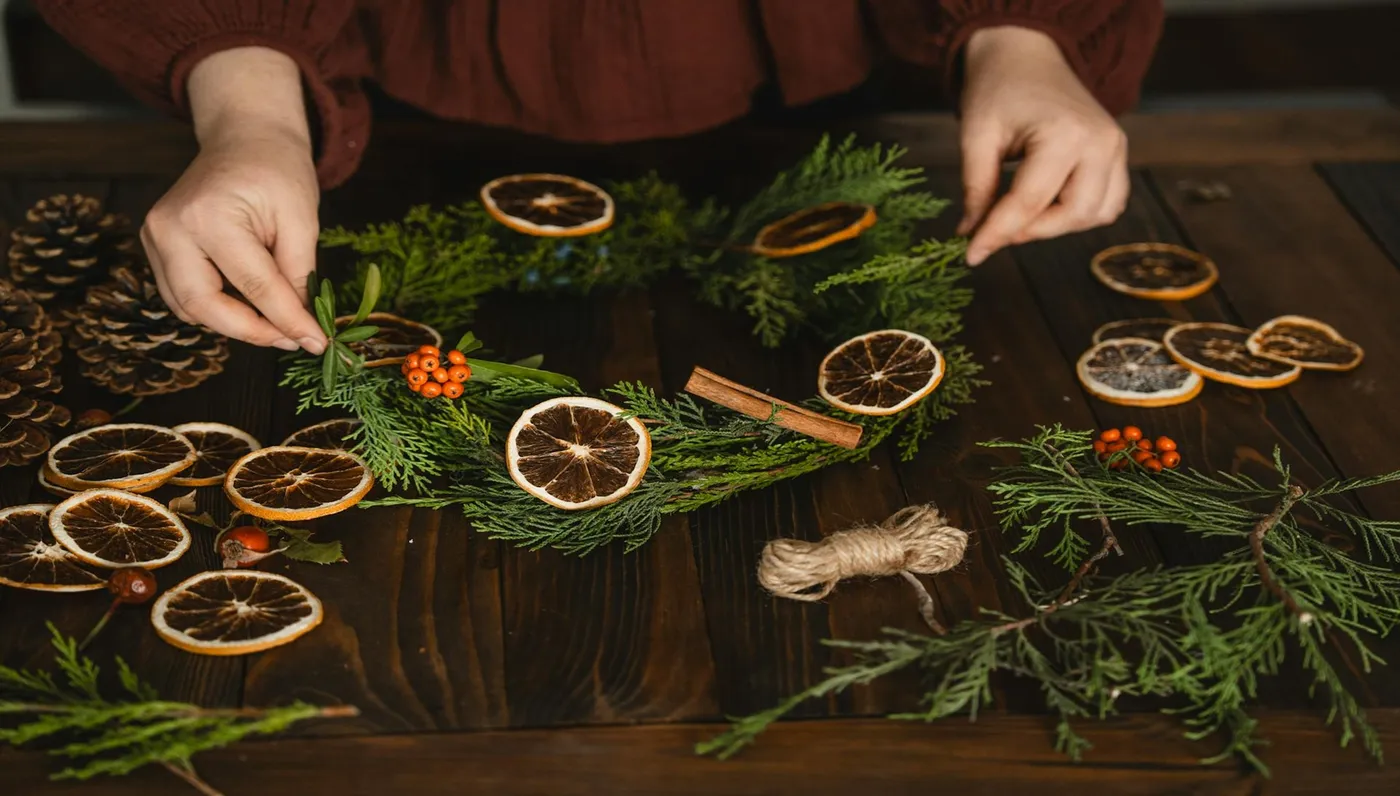
- Soak dried orange slices in a mix of 2 parts water to 1 part glycerin for 20 minutes, then pat dry—this keeps them flexible for wiring.
- Wire 3-4 evergreen sprigs together with floral wire to form a base ring about 12 inches in diameter.
- Layer pinecones and cinnamon sticks into the wreath, securing each with a U-shaped floral pin.
- Tuck the dried orange slices between the greenery, spacing them every 4-5 inches for rhythm.
- Add red berry clusters last, wiring them onto the front where they’ll catch the light.
|
📋 Copy HEX 🔗 Share |
Time: about 90 minutes. Materials: roughly $20 if you buy a fresh evergreen bundle and dried oranges from a craft store.
This wreath works best as a tabletop craft if you have a dark wood surface at least 30 inches wide—the dark backdrop makes the orange slices glow. If your dining table is small, scale down to an 8-inch wreath and use fewer oranges. Compare this with Idea #7 for a similar natural palette in a bowl, which requires almost no assembly space.
14. Knitted Gift Boxes with Velvet Ribbons on a Console Table
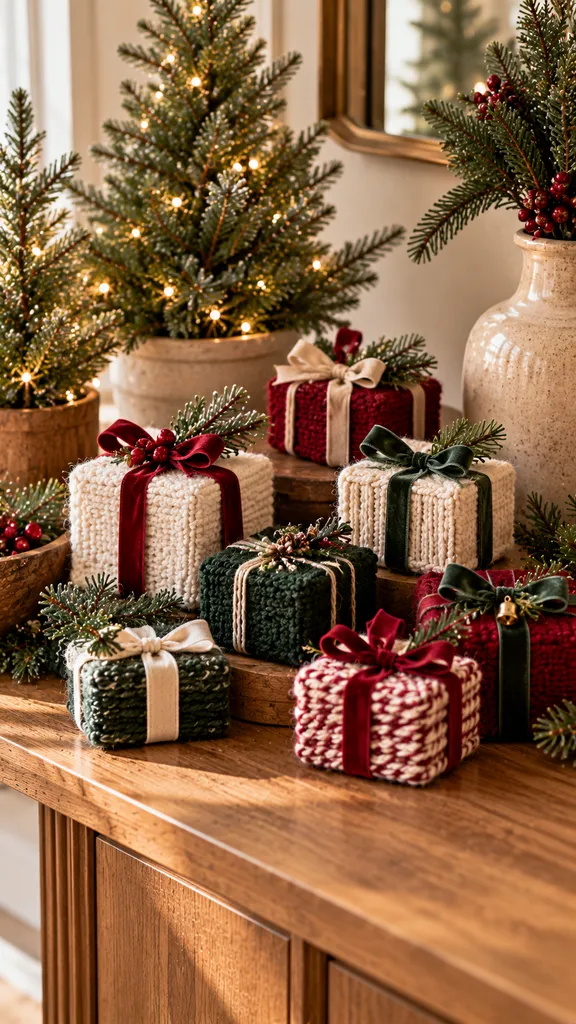
- Knitted gift box covers (yarn and wooden boxes): $10–$15 per box, or $0 if you knit your own from scrap yarn.
- Miniature artificial Christmas trees with lights: $12–$18 each, or $5 each at Target after Christmas sales.
- Velvet ribbon bundles (red, green, cream): $6–$10
- Pine sprigs and red berries (artificial): $8–$12
- Wooden console table styling accessories (ceramic vase, mirror): $25–$50 if thrifted
- Total: $61–$105
- Budget alternative: Cover plain cardboard boxes with chunky yarn from Walmart ($4), skip the lit trees, and use faux fur from an old scarf—total under $25.
|
📋 Copy HEX 🔗 Share |
The rise of “cozy crafting” on TikTok and Pinterest has made knitted and crocheted holiday decor a 2026 mainstay. It’s tied to the broader slow-living movement—people want decorations that feel like they took time, not something that shipped overnight. The mini lit trees and soft velvet ribbons add warmth without overwhelming a console table. Unlike the dark, moody velvet flat lay in Idea #4, this scene reads brighter and more family-friendly, which is why it’s so pin-worthy right now.
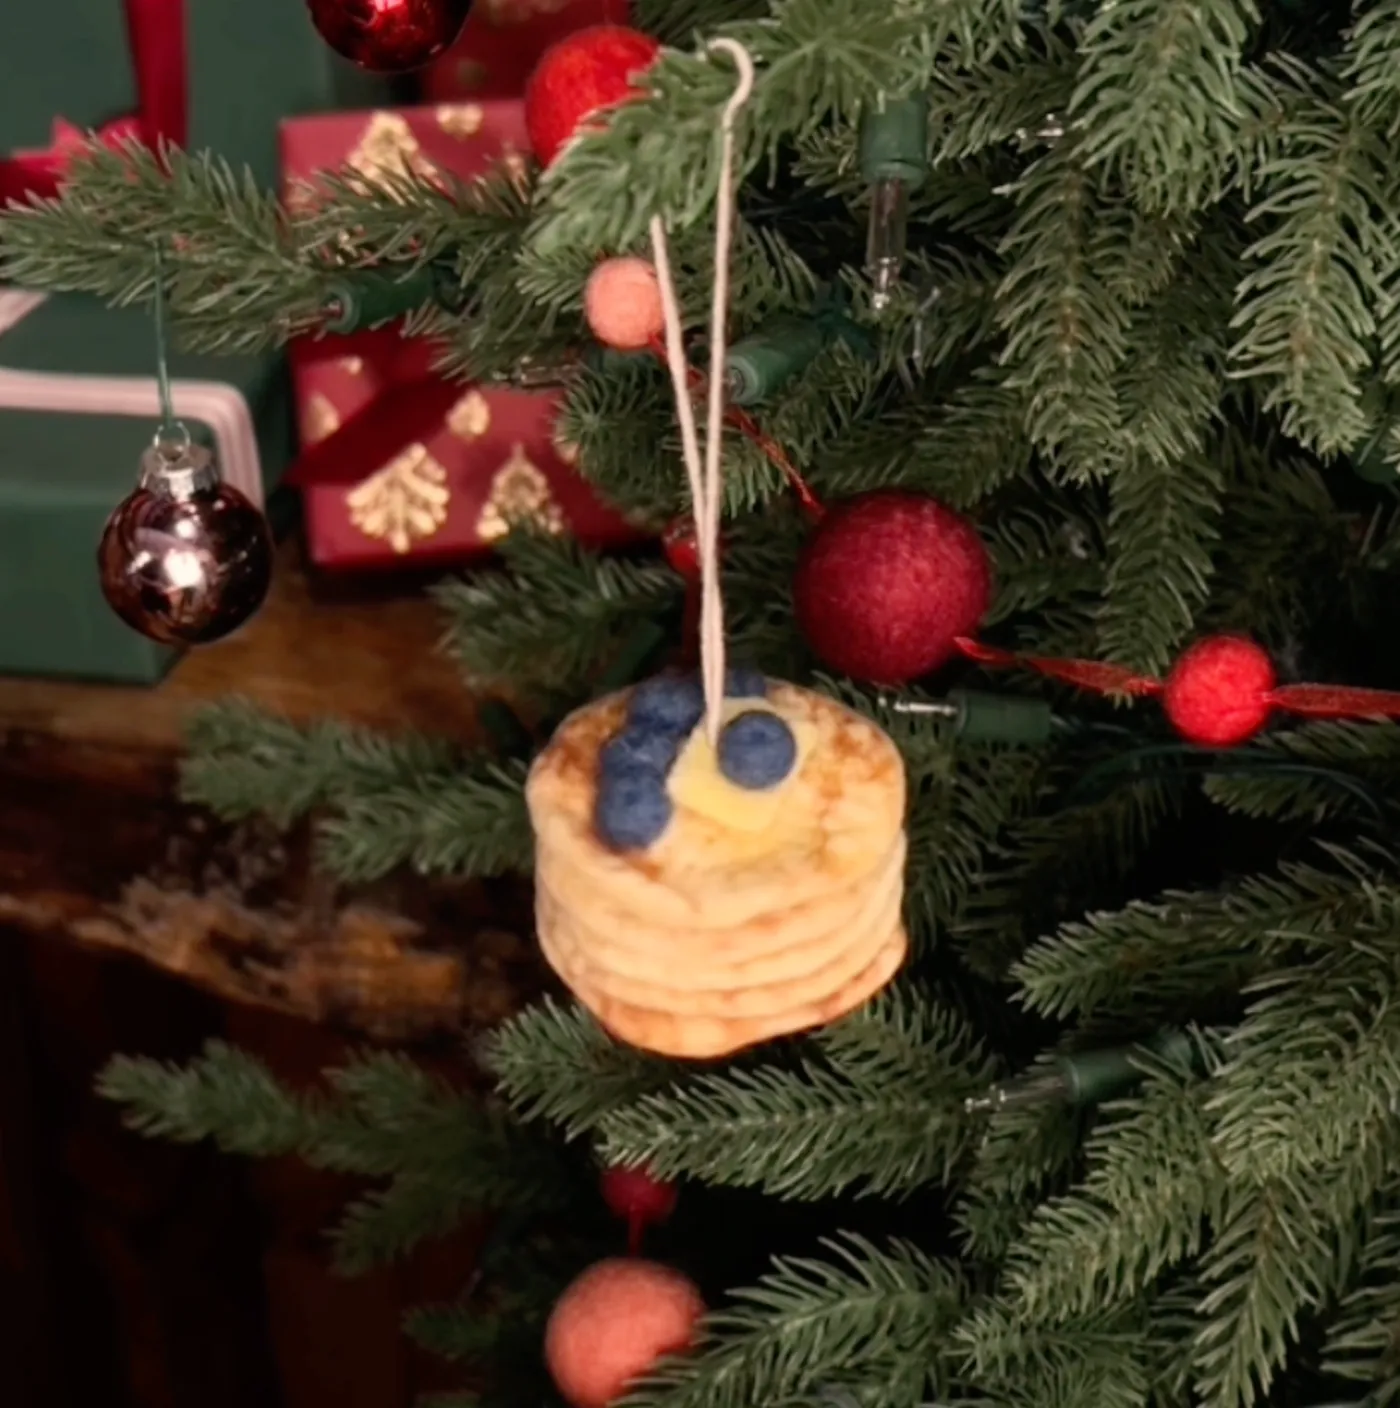
15. Pancake Stack Ornament with Felt Ball Garlands on a Green Tree
The whimsy here comes from defying tree-decorating expectations. A stack of pancakes is not a traditional ornament, but it works because the felt balls and metallic bronze bauble around it anchor the composition in familiar holiday colors. The pancake ornament acts as a conversation starter, while the red and peach felt ball garlands provide soft, matte texture that contrasts with the shiny bauble. The tree itself stays mostly green with a few lights, so the quirky ornament doesn’t have to compete—it gets to be the main event.
|
📋 Copy HEX 🔗 Share |
a pancake ornament with felt blueberries and butter is adorable, but it’s also top-heavy and likely to swing into branches if the tree gets bumped. Hang it closer to the trunk on a sturdy branch, not out on a long tip. Felt ball garlands are surprisingly durable, but they can stretch if you hang heavy ornaments from them—use a separate wire hanger for the pancake. If you have a cat that bats at dangling things, this ornament will become a toy. Place it above the lower third of the tree or accept that the blueberries may go missing.
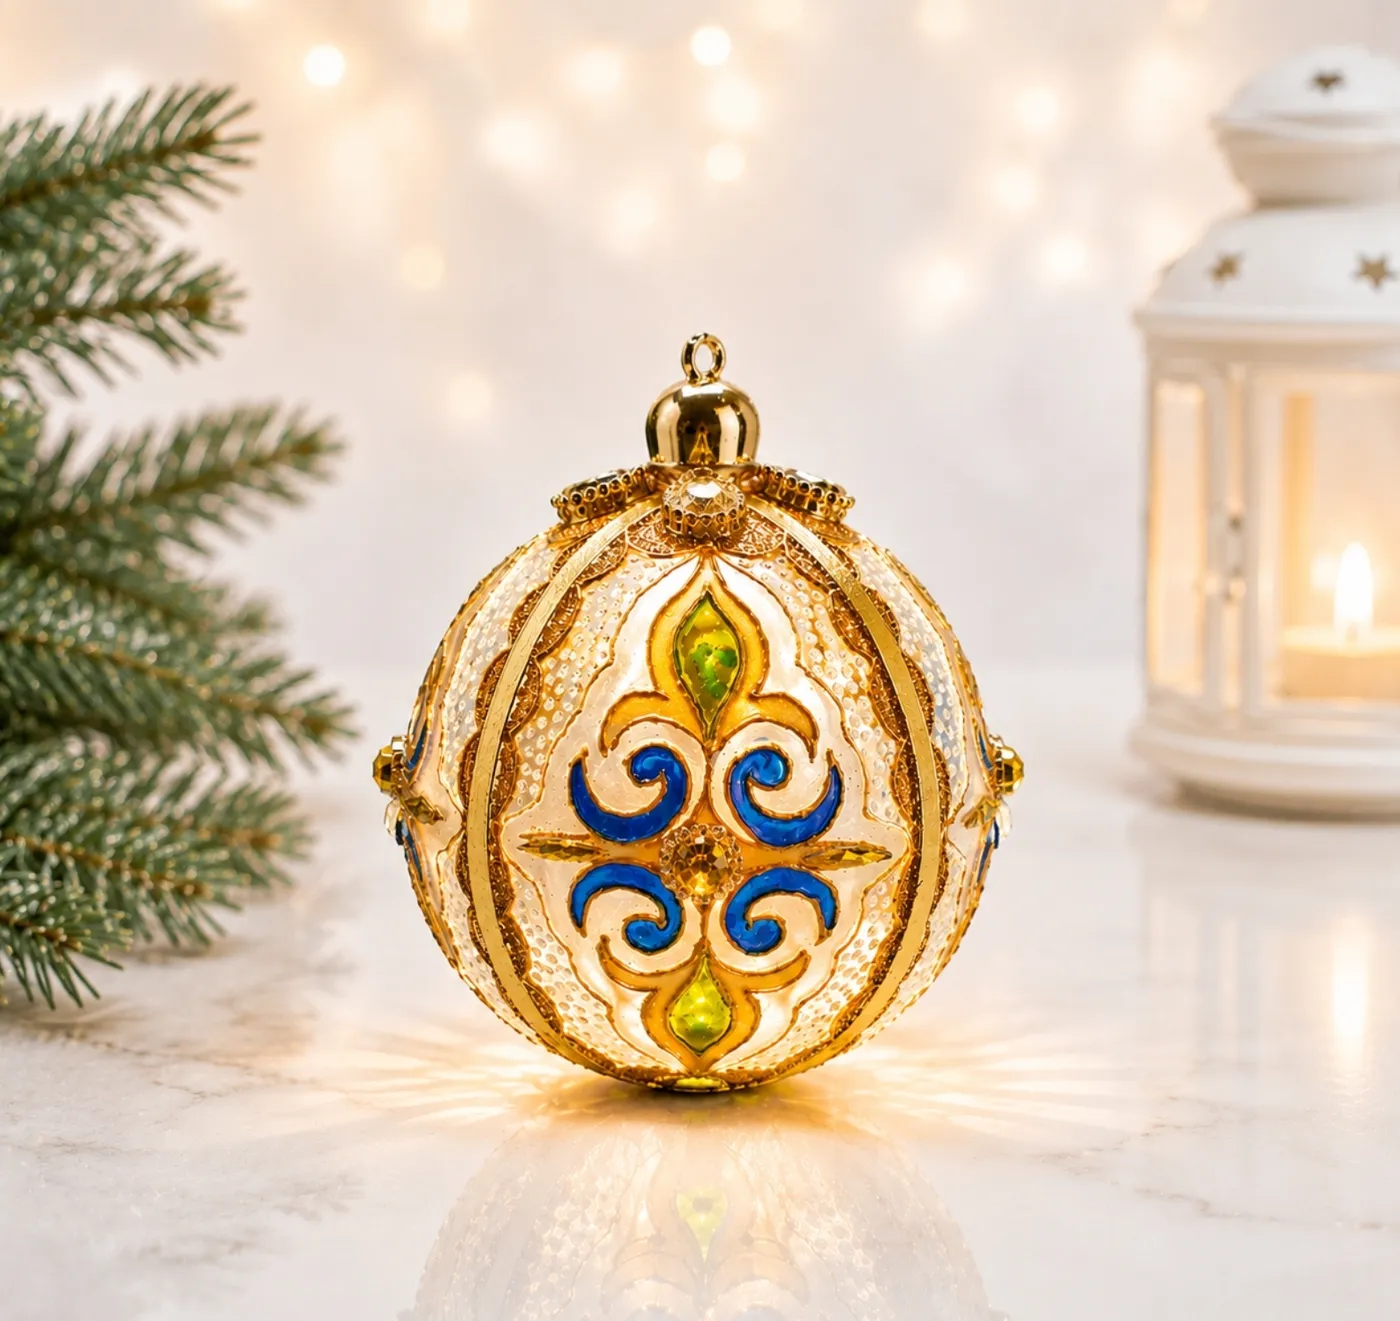
16. Gold and White Illuminated Ornament with Jewel Accents on Marble
For an internally illuminated ornament like this, use a tiny battery-operated LED light, not a Christmas tree bulb. The LED won’t get hot, so it won’t crack the glass or melt any enamel accents. Before you place the light inside, wrap the battery pack in a thin layer of white tissue paper to diffuse the beam; otherwise you’ll get a harsh point of light instead of a soft glow. Set it on a reflective marble or glass surface and the light will bounce down, creating those intricate shadow patterns. Check the battery compartment every week—tiny button batteries die fast, and replacing them in an elaborately decorated ornament is fiddly.
|
📋 Copy HEX 🔗 Share |
This is not a low-maintenance centerpiece. The detailed gold and white pattern will show dust almost immediately, especially on a reflective surface. Wipe it with a soft microfiber cloth once a week, and don’t use water on the enamel accents—they can dull. The internal LED should be replaced seasonally, and if you store the ornament, remove the battery first to prevent corrosion. A simpler, lower-maintenance version with the same vibe would be the metal-look ornaments from Idea #31, which give you shimmer without the internal wiring.
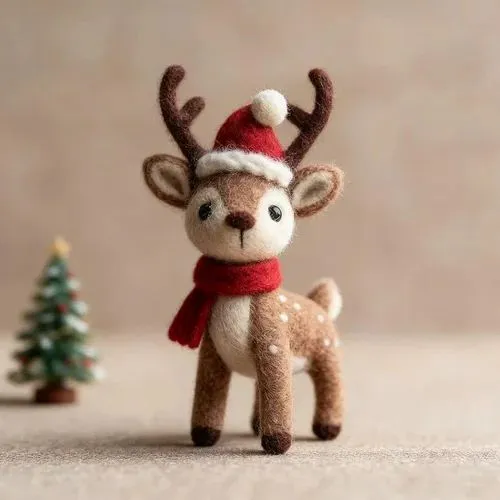
17. Needle-Felted Reindeer with Santa Hat and Red Scarf
The formula for this little reindeer is 50% light brown body, 25% red (Santa hat and scarf), 15% white spots and trim, and 10% dark brown antlers and hooves. That balance keeps the reindeer feeling soft and cozy rather than loud and cartoonish. If you needle-felt one yourself, keep the background plain beige—a busy backdrop would swallow its small scale. The blurry mini Christmas tree behind it adds depth without stealing focus. Swap the red for forest green or navy and the same ratios still work.
|
📋 Copy HEX 🔗 Share |
This felted reindeer is tiny—likely under 4 inches tall—so it needs a small-scale surface. A windowsill, bookshelf, or side table within 12 inches of eye level gives you the best view of the needle-felted texture. Don’t place it on a large mantel by itself; it will get lost. Instead, group it with two or three other small handmade pieces, like the crocheted tree in Idea #27, to create a mini winter vignette. If you have kids, this is a great one for a small display shelf in their room.
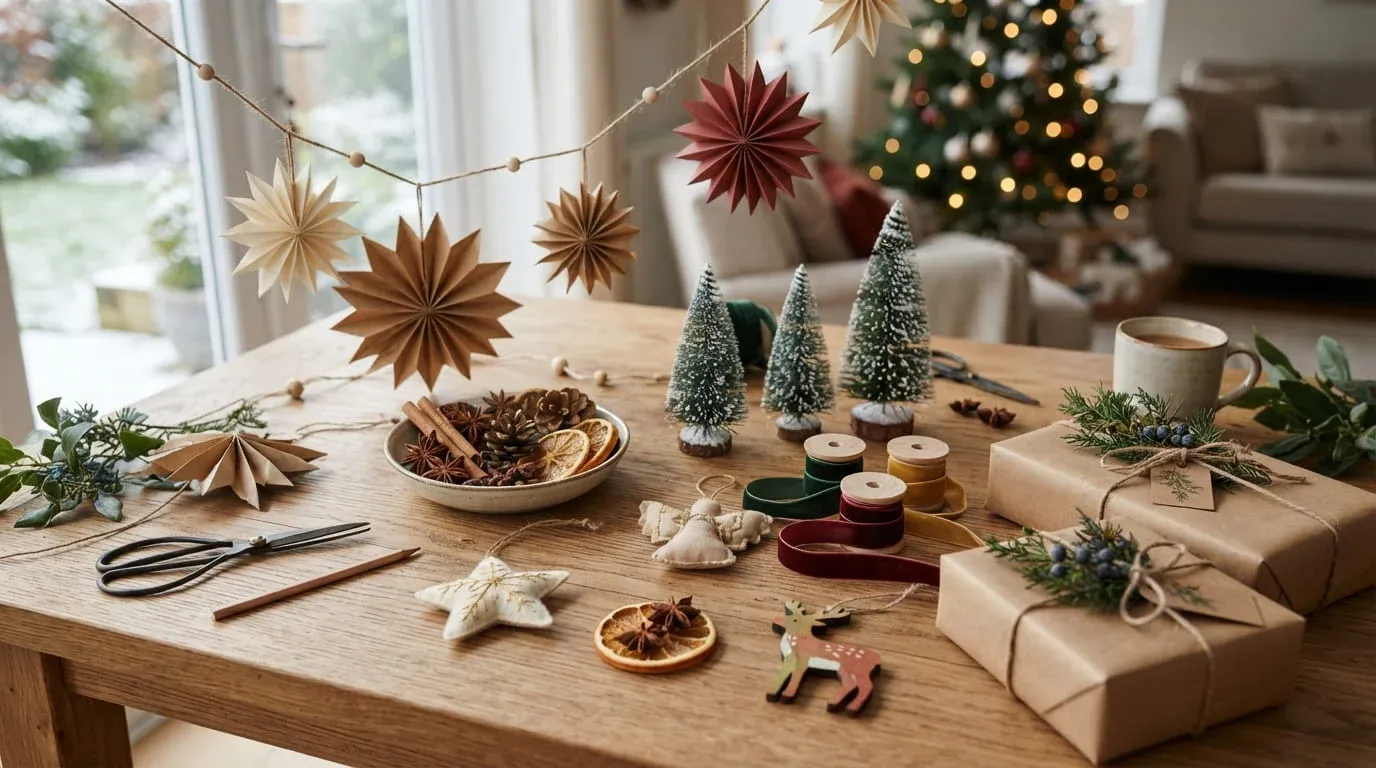
18. Paper Star Garland and Bottle Brush Trees on a Crafting Table
The single element that makes this crafting table feel inviting is the paper star garland draped across the front. It’s light, handmade, and instantly signals that creative work is happening here—not just display. Without it, the table could read as a random pile of supplies. The stars are uncomplicated, but they add movement and a soft, sculptural quality that glass ornaments and bottle brush trees can’t match. If you make only one thing from this photo, make the stars. They work on a tree, over a doorway, or even as a year-round decoration.
|
📋 Copy HEX 🔗 Share |
- Cut cardstock into five-point star shapes, about 3 inches across—use a template to keep them uniform.
- Lightly score a line from the center to each point and fold in half for a slight 3D pop.
- Thread a needle with white cotton string and sew through the center of each star, leaving 4 inches between stars.
- Knot the string at both ends, leaving 8 inches extra for hanging.
- Drape the garland loosely across a table, mantel, or window frame.
Time: 45 minutes for six to eight stars. Materials: under $5 for cardstock and thread.
19. Pale Pink and Silver Baubles with Warm Lights on a Faux Tree
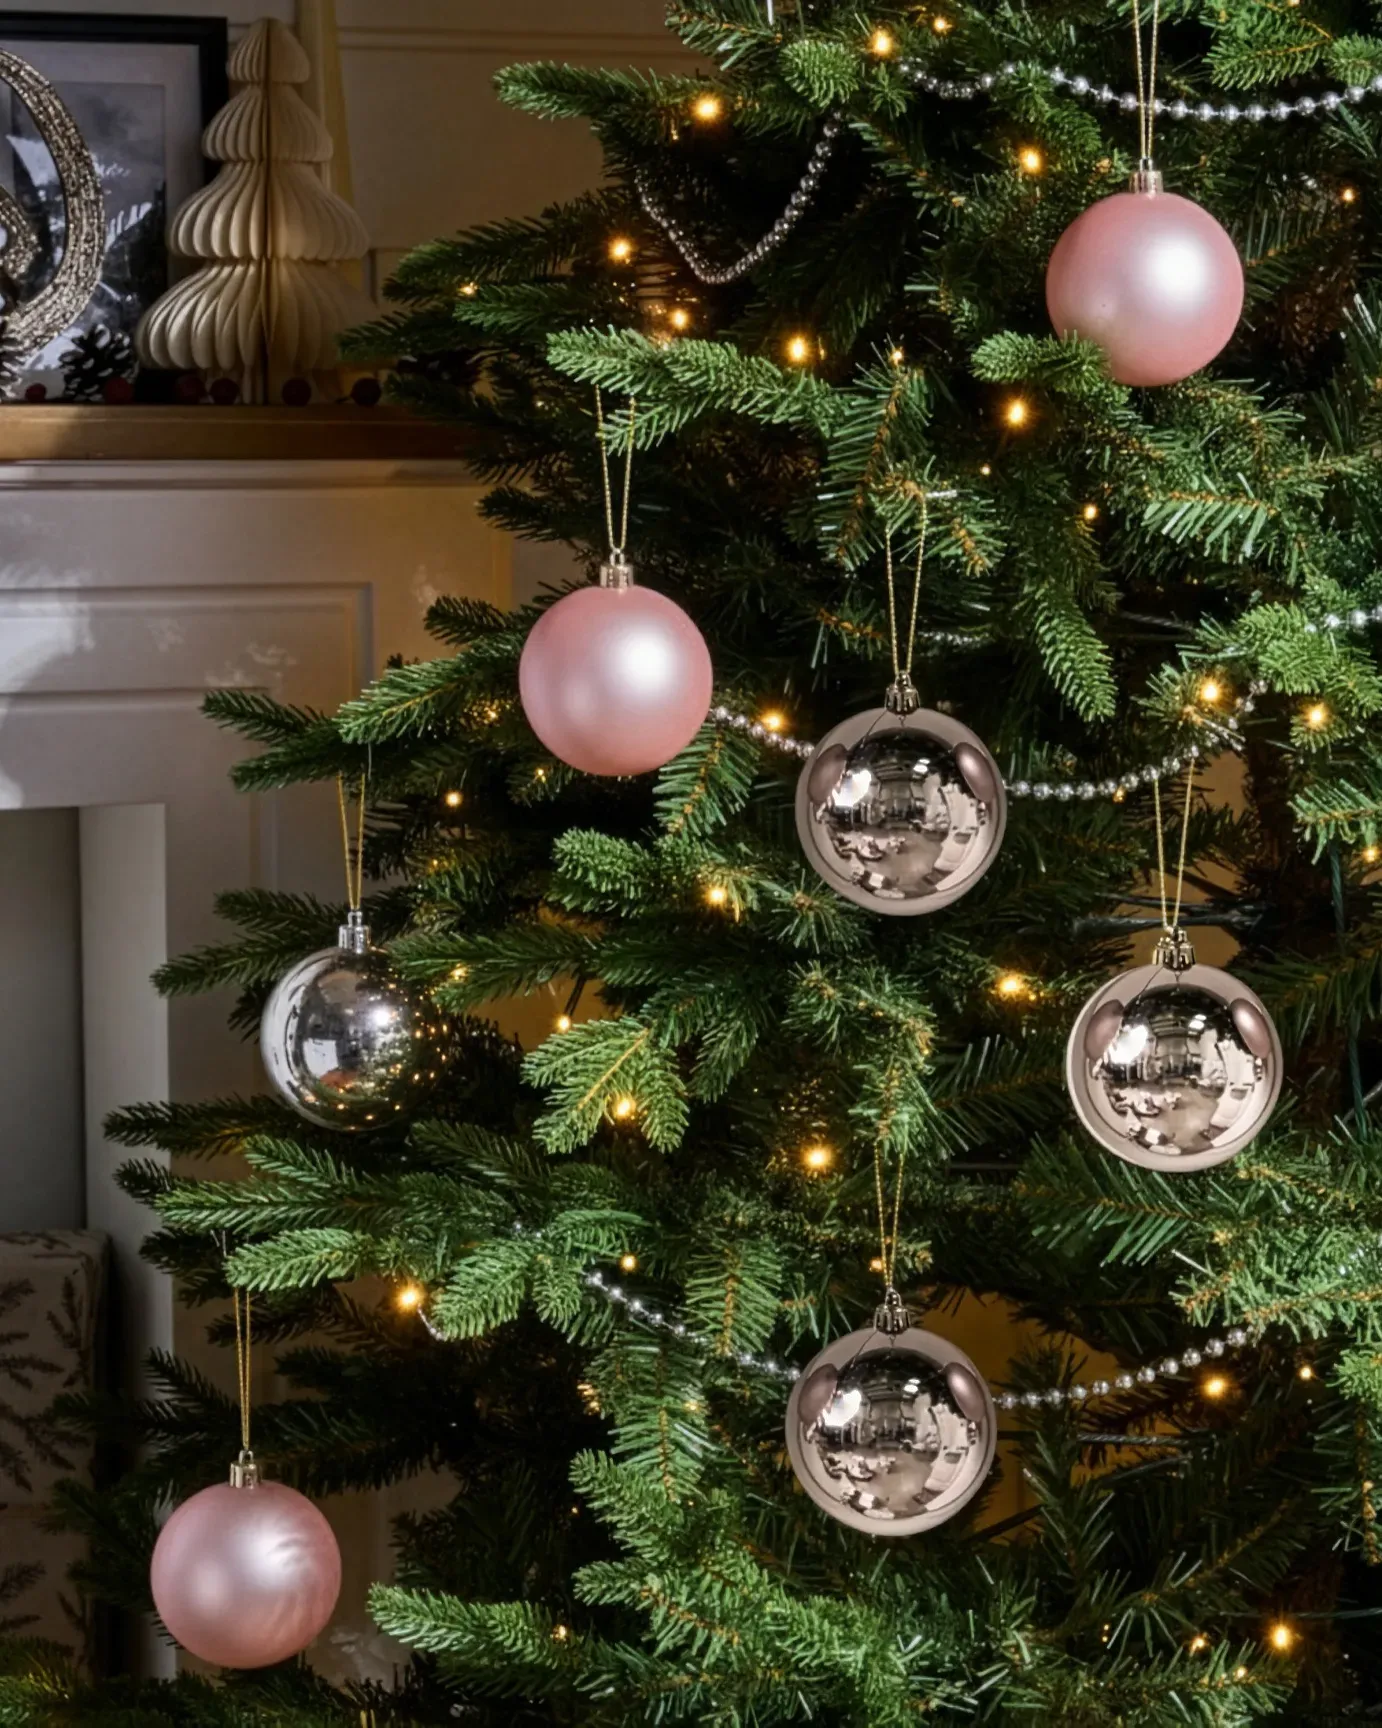
You don’t need a designer budget to get this soft, elegant tree. The matte pale pink baubles are sold in multi-packs at Target and IKEA for around $10–12 per dozen, and reflective silver balls are even cheaper after Christmas. The silver beaded garland is often in the wedding aisle for half the price of the holiday aisle. The warm white fairy lights are the real key—don’t skimp there. Buy one high-quality set with 200 lights and a warm color temperature (2700K) rather than cheap cool LEDs. Total for a 6-foot tree: about $60–80, versus $200+ for a professional holiday styling service.
|
📋 Copy HEX 🔗 Share |
Pale pink Christmas decor has fully crossed over from “non-traditional” to a Pinterest staple in 2026, thanks to the coquette and balletcore aesthetics spilling into home decor. It’s especially popular with renters and young families who want holiday cheer without the heavy red-and-green dominance. This palette also pairs beautifully with the colorful living room in Idea #21—same softness, different energy. Expect this trend to stick around, but I’d keep the pink as an accent layer, not the whole tree, so it doesn’t feel like Valentine’s Day.
20. Cozy Natural Crafting Table with Bottle Brush Trees and Star Garland
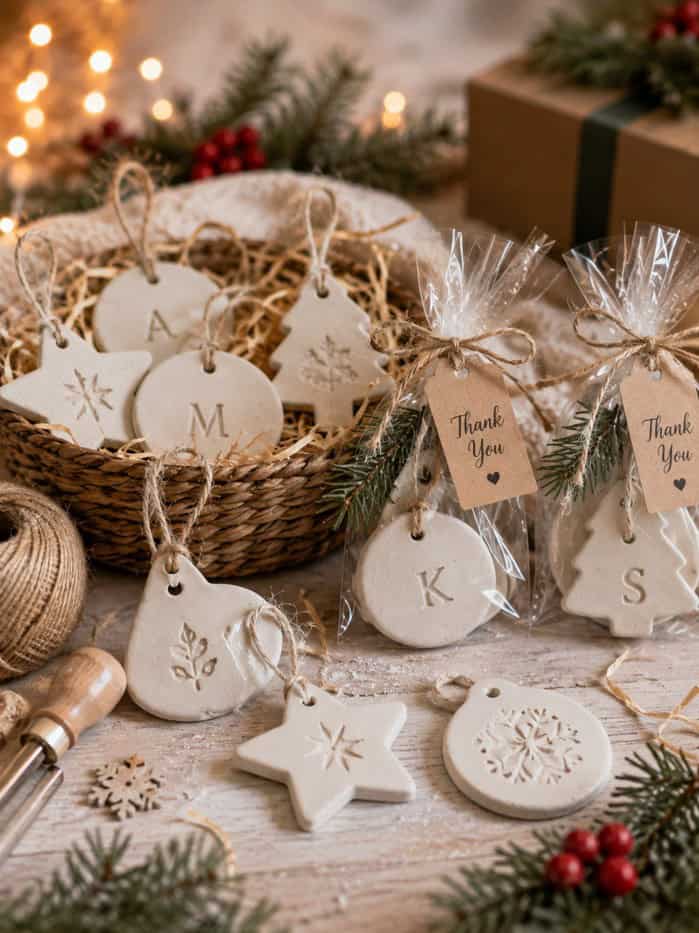
This cozy crafting table needs a real surface—at least 36 inches wide and 20 inches deep—to hold a bowl of potpourri, a paper star garland, bottle brush trees, and wrapped gifts without feeling like a garage sale. The light wood tone works best in a room with white or cream walls and a window nearby for warm natural light. If your table is smaller, choose just two elements: the paper star garland and the bowl of dried oranges, then rotate the rest out. This is a tabletop scene, not a full room design, so it needs breathing room around it.
|
📋 Copy HEX 🔗 Share |
this look can slide into “craft explosion” fast. The only reason it feels cohesive is that the color palette is tight—kraft paper brown, forest green, burgundy red, and cream. Introduce one bright blue or neon gift tag and the whole scene tips into chaos. When arranging, keep a clear zone in the center for actual crafting; don’t cover every inch with decor. If you have young kids, the small bottle brush trees and dried orange slices will end up on the floor—put the delicate items at the back and leave a sacrificial bowl of pinecones up front.
21. Colorful Living Room with Red-Striped Stockings and Paper Fans
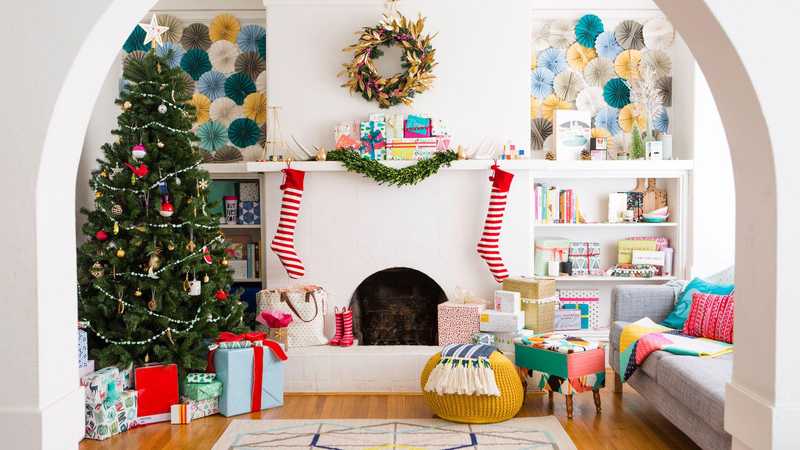
The room holds together because the colors repeat everywhere: the teal from the sofa pillows shows up in the paper fans and gift wrap, the red from the stockings reappears as tree ornaments, and the gold wreath ties into the garland. That repetition across the tree, mantel, and shelves makes the room feel designed, not just decorated. The white fireplace and built-ins act as a neutral backdrop, so the colors never fight each other. The yellow knitted pouf and patterned ottoman add a playful counterpoint, keeping the room from being too matchy-matchy.
|
📋 Copy HEX 🔗 Share |
Steal this formula: 50% white (walls, mantel, shelves), 25% the room’s existing neutral grey from the sofa, 15% three accent colors—red, teal, and gold—used in equal measure, and 10% pattern from the paper fans and ottoman. Swap the teal for blush pink and you end up with the softer palette in Idea #19. The key is not adding a fourth accent color; three is the magic number. Any more and the eye doesn’t know where to rest.
22. Wood Slice String Art Ornaments on a Fir Branch
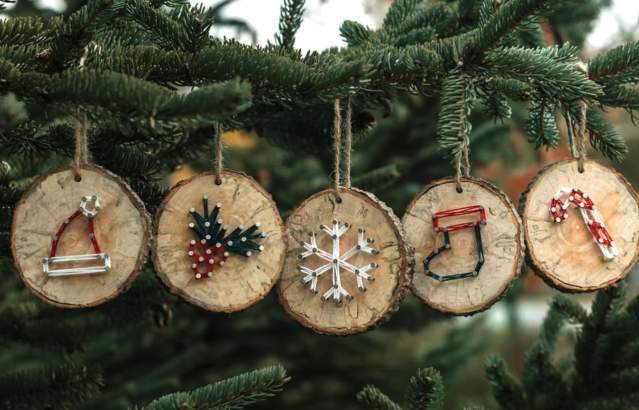
- Choose wood slices about 3–4 inches in diameter and sand the surface smooth with 220-grit paper.
- Print a simple Christmas shape (star, tree, snowflake) and tape it centered on the wood.
- Hammer small nails along the outline, spacing them 1/4 inch apart, then tear away the paper.
- Knot colored thread around one nail and wind it back and forth across the shape, filling the center with a web-like pattern.
- Loop jute twine through a hole drilled at the top and knot it for hanging.
|
📋 Copy HEX 🔗 Share |
Time: about 30 minutes per ornament. Materials: under $2 each if you already have thread and nails.
To keep the wood slice from splitting when you hammer in nails, place the slice on a piece of scrap carpet or a folded towel—never directly on a hard table. Use a small craft hammer and small 1/2-inch nails; if the wood is very thin, pre-drill tiny holes with a pushpin. For a neater back, glue a small felt circle over the nail points after stringing. This is one of those crafts that looks much harder than it is, which makes it perfect for gifting.
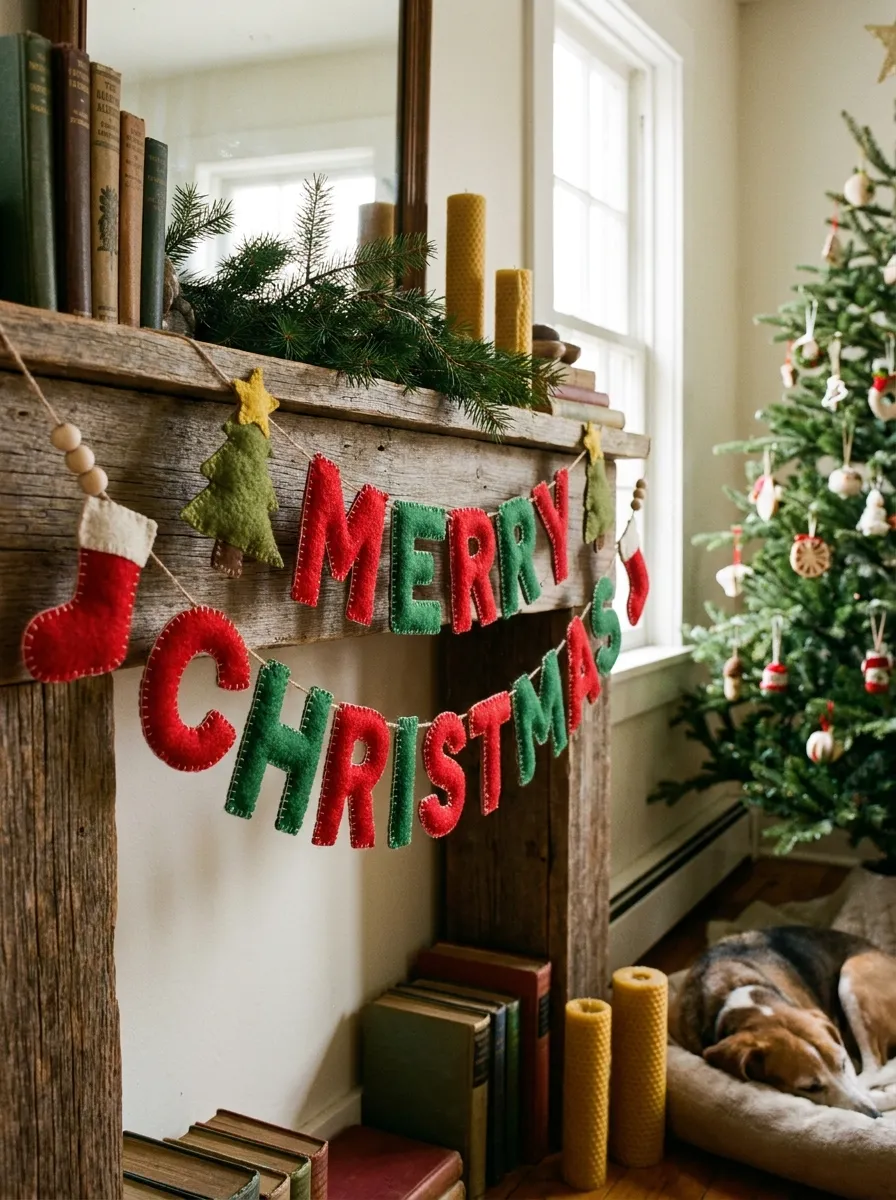
23. Felt ‘MERRY CHRISTMAS’ Banner on a Rustic Wooden Mantel
yellow pillar candles near a dog bed and a tree is a fire risk waiting to happen. The visual is cozy, but if you have a dog that thumps around, keep the candles in glass hurricanes or switch to flameless LED pillars. The felt banner is safe, but it will collect dust and pet hair because felt is a magnet. Vacuum it with a brush attachment once a week. Also, the stacked vintage books beneath the mantel may invite chewing if your dog is young—move them to the shelves above if that’s a concern. Cozy shouldn’t come at the cost of a vet bill.
|
📋 Copy HEX 🔗 Share |
that gives this scene its cottage character is the felt ‘MERRY CHRISTMAS’ banner. It’s not just decor—it anchors the entire mantel and ties the rustic wood, green garland, and candles together. Remove it and the mantel becomes a generic holiday arrangement. The handmade felt letters feel warmer than painted wood or paper, and they soften the hard lines of the reclaimed wood. If you’re making it, cut letters from stiffened felt and sew or glue them to a thick twine, leaving 2 inches of space on each side.
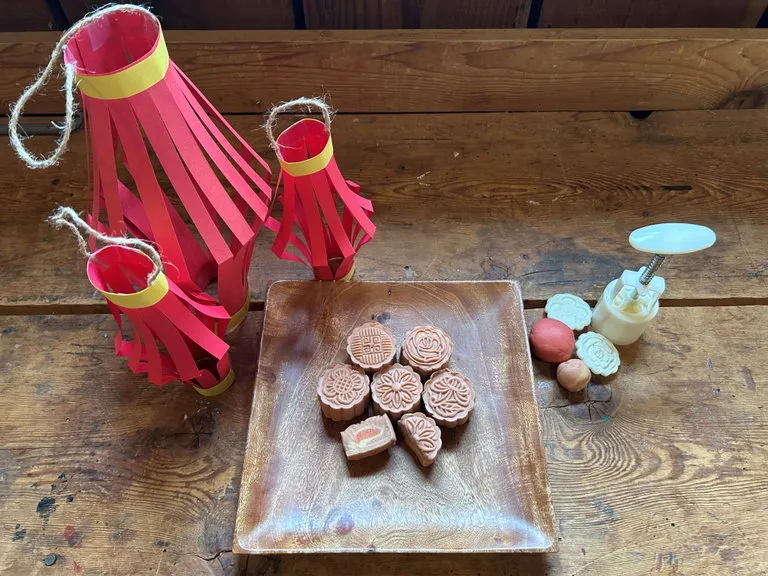
24. Red Paper Lanterns with Yellow Trim and Patterned Cakes
Those red paper lanterns are easier to make than they look. Buy red cardstock from the dollar store, cut it into strips, and use a simple accordion fold technique—there are dozens of free templates online. The yellow trim is just paper cut into thin strips and glued along the edges. Twine handles come from a $3 spool at any hardware store. For the patterned cakes, you don’t need a bakery; they look like DIY steamed or rice cakes stamped with a cookie mold. You can replicate the whole scene for under $15, which is way less than buying pre-made lanterns.
|
📋 Copy HEX 🔗 Share |
paper lanterns attract dust and are basically single-use if they get crushed. Store them flat in a zippered bag with tissue paper between layers, and don’t hang them near a doorway where coats or bags will knock them. The cakes are edible decorations, not lasting decor—this is a one-day or one-week display. If you want the same rustic, handmade vibe for the whole season, swap the cakes for wooden or felt faux cakes and the paper lanterns for sturdier fabric versions. This is a craft-project photo, not a long-term centerpiece.
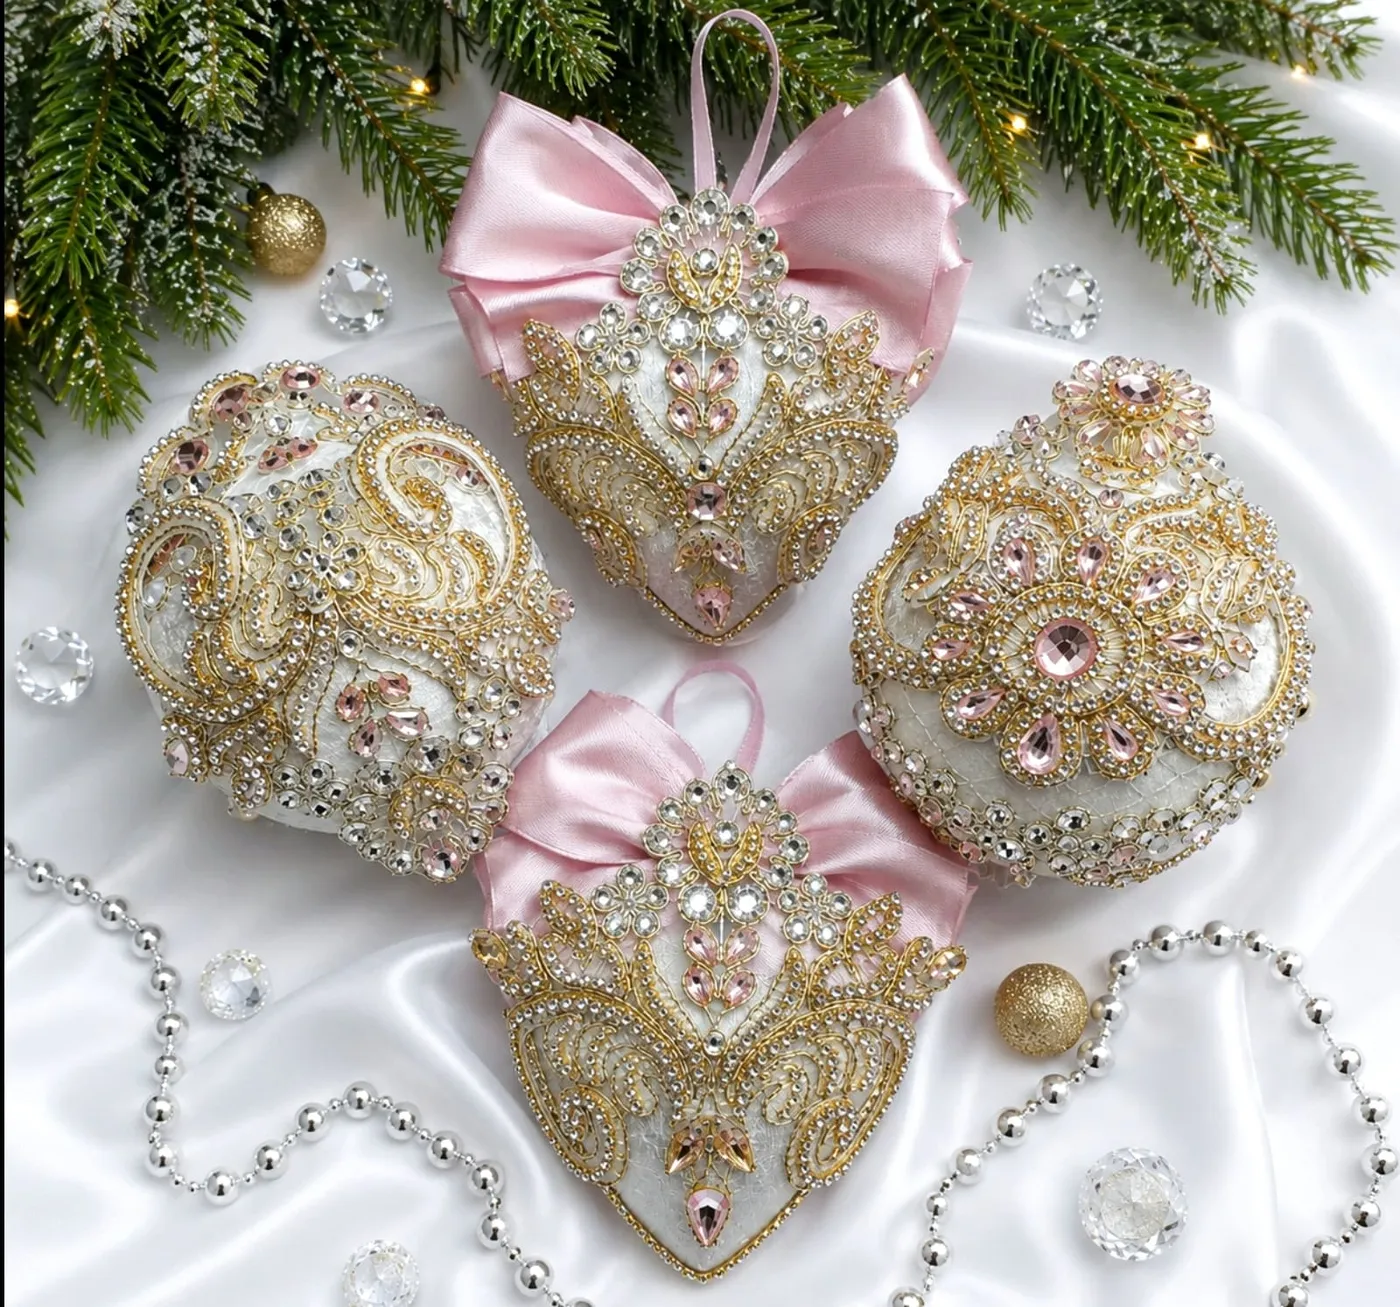
25. Pink and Gold Bejeweled Ornaments with Satin Bows on White Satin
These pink and gold bejeweled ornaments are part of the “grandpa chic” and maximalist holiday trend that’s exploded on Pinterest in 2026. After years of stark neutral trees, people are craving opulence—layered gold beadwork, satin bows, rhinestones, and frosted pine. This style feels special and a little indulgent, like a jewelry box spilled onto a tree. It has staying power because it pairs with heirloom ornaments and handed-down treasures, not just new pieces. If you love sparkle but worry about tackiness, this is the trend for you.
|
📋 Copy HEX 🔗 Share |
The formula: 40% gold beadwork and rhinestones, 30% pink faceted gems, 20% white satin and cream base, and 10% green frosted pine. The white satin backdrop is crucial—it reflects light and keeps the pink from feeling bubblegum-sweet. Swap pink for ruby red or emerald green and the same ratio gives you a different jewel-toned mood. Notice how the satin bows on the heart ornaments soften the hard edges of the beads. Without that soft texture, the design would feel too precious. If you’re recreating this on a tree, hang these as statement pieces every 6–8 inches, not clustered tightly.
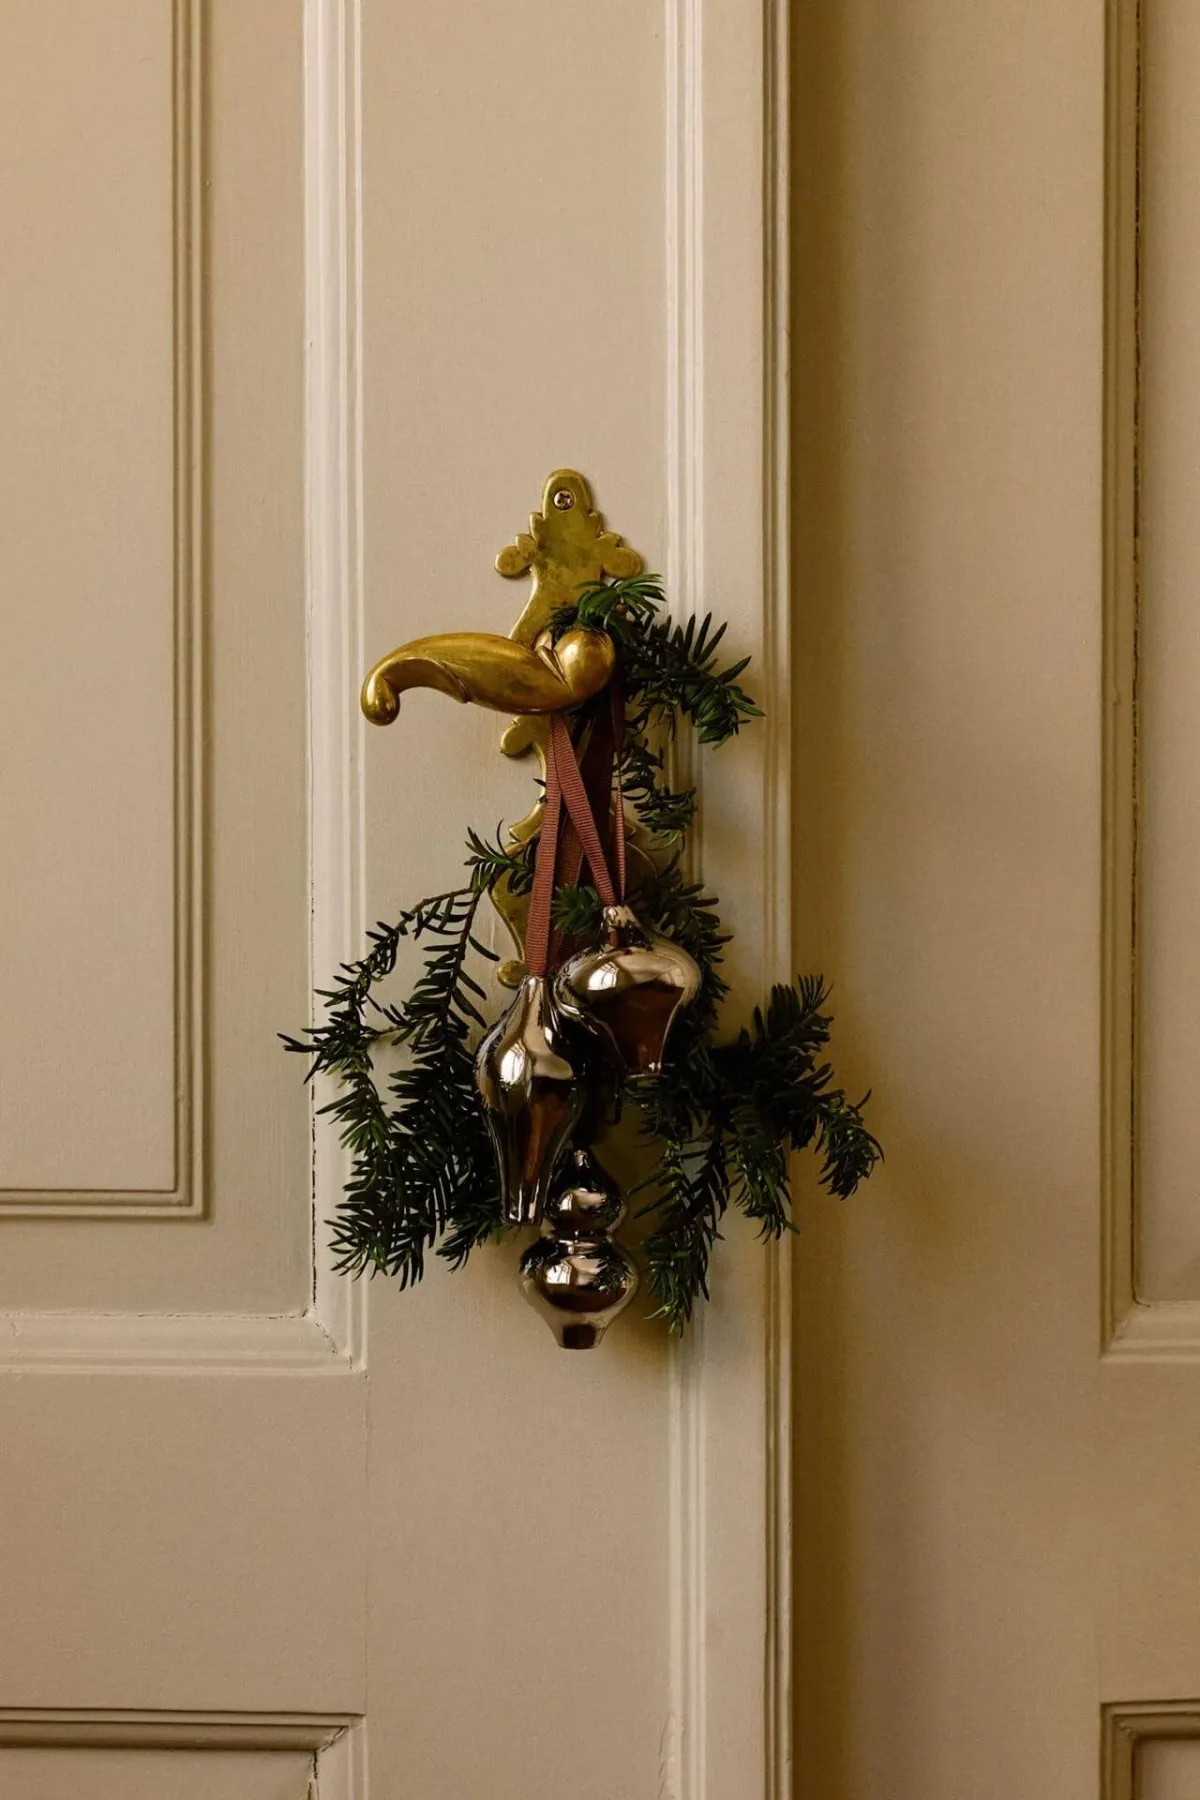
26. Brass Door Handle with Mercury Glass Ornaments and Evergreen
When decorating a door handle like this, use a small clear Command hook or a magnetic hook behind the door to support the greenery—don’t wrap wire directly around the brass handle, which can scratch it. Use fresh evergreen sprigs with pliable stems, and bundle them with green floral tape before attaching. The three mercury glass ornaments should hang at slightly different heights (2-inch stagger) to create a natural cascade. The brown ribbons blend with the wood tones, but you could swap in black or navy for a modern twist.
|
📋 Copy HEX 🔗 Share |
- Cut three or four fresh evergreen branches, each about 8–10 inches long.
- Wire the stems together into a small bundle, with the fullest greenery at the bottom.
- Attach a small hook 4 inches above the door handle, or use a magnetic hook if the door is metal.
- Hang the greenery bundle so it drapes over the handle slightly, then tie it loosely with ribbon.
- Hang three mercury glass ornaments from the ribbon at staggered heights.
Time: 20 minutes. Materials: under $12 if you gather greenery from your yard and thrift the ornaments.
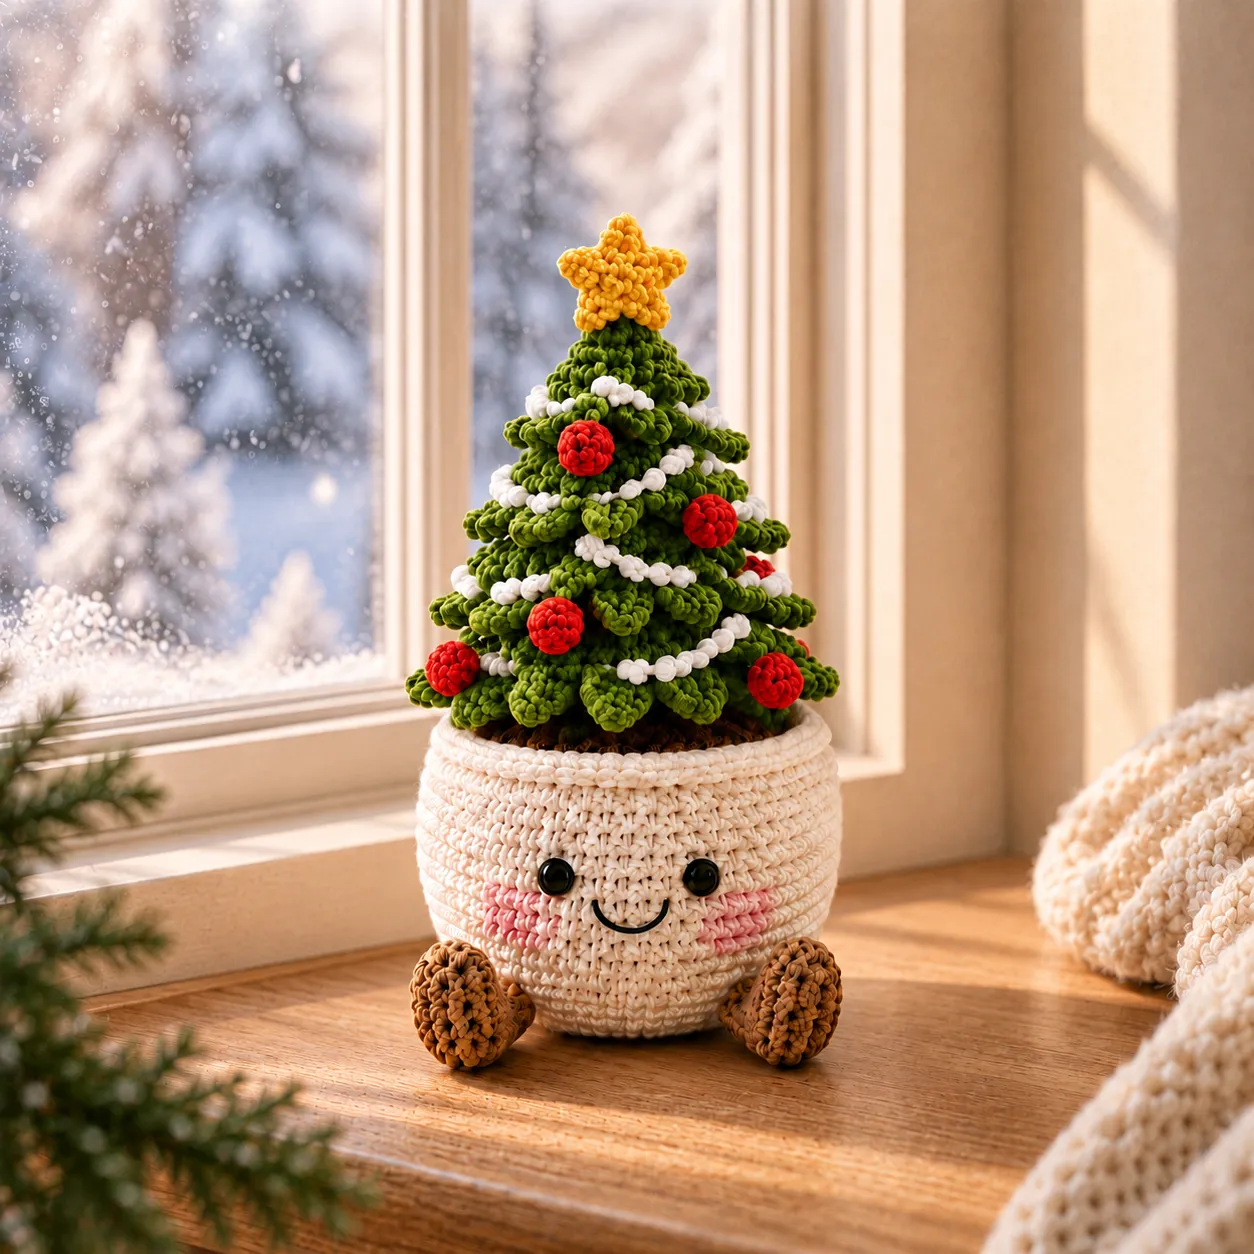
27. Crocheted Mini Tree in a Smiling Pot on a Wooden Windowsill
The smiley face on that crocheted pot is the small detail that transforms this from “cute crochet project” to “object that makes you smile back.” Without the face and little brown feet, the mini tree would be sweet but static. The face gives it personality and a bit of playful humor, which is exactly what a windowsill decoration needs. The white bead garland and red baubles keep the tree reading as Christmas, while the yellow star adds a happy pop. It’s a masterclass in tiny details having big impact.
|
📋 Copy HEX 🔗 Share |
The whole composition works because the scale is spot on: the tree and pot together are maybe 5–6 inches tall, sitting on a wooden windowsill with a snowy outdoor scene behind. That contrast between the tiny handmade object and the cold exterior makes the crocheted tree feel extra cozy. The cream and green colors are calm enough that the red baubles don’t fight with the outdoor view. If you’re placing something similar, keep the backdrop simple—a busy curtain or cluttered sill would bury the charm.
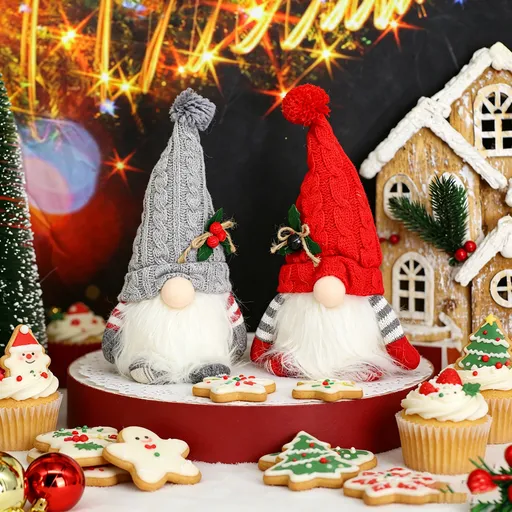
28. Knitted Gnomes with Iced Cookies and a Mini Gingerbread House
This festive scene needs a small round display surface—think a cake stand or round side table about 10–14 inches in diameter. The red circular base keeps everything contained, so it reads as an intentional vignette rather than a pile of sweets. It works best in a kitchen or dining room near warm string lights, which reflect off the icing and make the cookies look even more tempting. If your counter is crowded, place it on a tray and move it to a coffee table after dinner.
|
📋 Copy HEX 🔗 Share |
You can recreate this without spending much. Plush gnomes with pom-pom hats are sold at Dollar Tree and Walmart for under $8 each, or you can knit your own using scrap yarn. The iced cookies are the real cost saver—bake a batch of gingerbread men and trees, then decorate with a simple powdered sugar and milk icing. A mini gingerbread house can be assembled from a $10 kit. Total for the whole display: about $25, versus $60+ for bakery versions. The warm lights do the rest of the work.
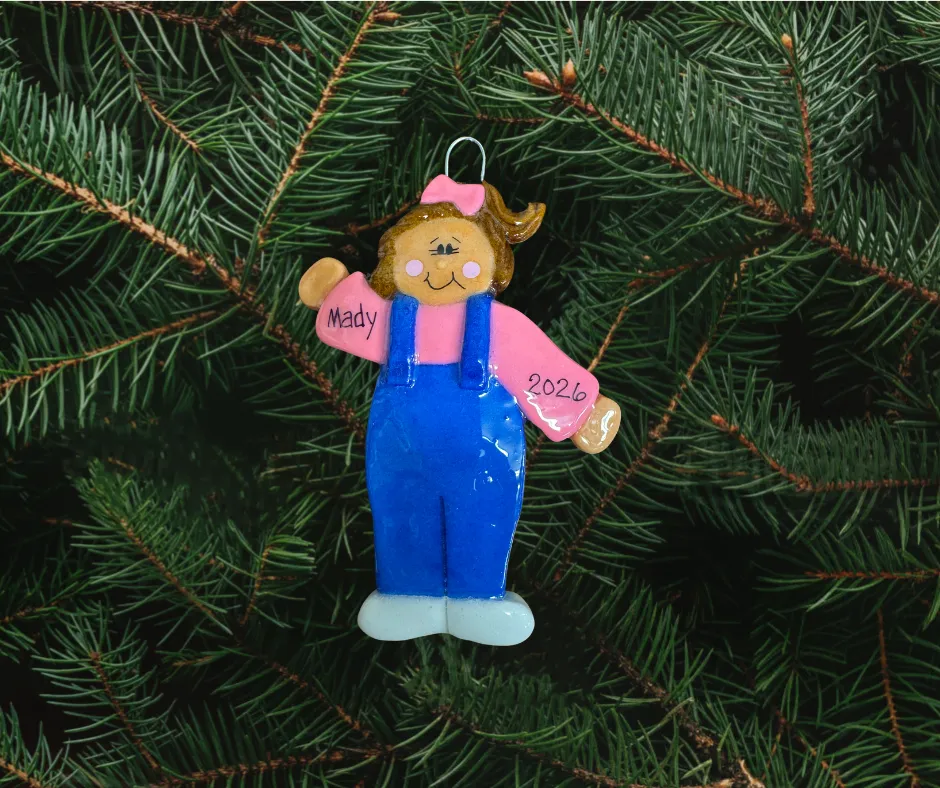
29. Glossy ‘Mady’ Child Figure Ornament with 2026
The glossy finish on this child figure ornament is lovely, but it will show every fingerprint and smudge the moment little hands grab it. Wipe it with a soft, dry microfiber cloth after handling, and avoid using glass cleaner—some sprays can cloud the glossy coating. The name and year details are painted on, so they can chip if the ornament bangs against other hard ornaments on the tree. Hang it on a branch with a soft ribbon loop rather than a metal hook to reduce scratching. Store it in its own small box to keep the personalized details intact.
|
📋 Copy HEX 🔗 Share |
a personalized ornament with a child’s name and the year is a keepsake more than a decoration. If this is for a child named Mady, it will become a thing you reach for every December—and possibly get emotional over. That means you should make two if you suspect siblings may want one later. The little blue overalls and pink bow are painted details that can fade if exposed to direct sunlight, so keep the tree out of a south-facing window or rotate the ornament’s position. If the child is under four, they’ll want to hold it constantly; let them, but accept that the bow might need a touch-up.
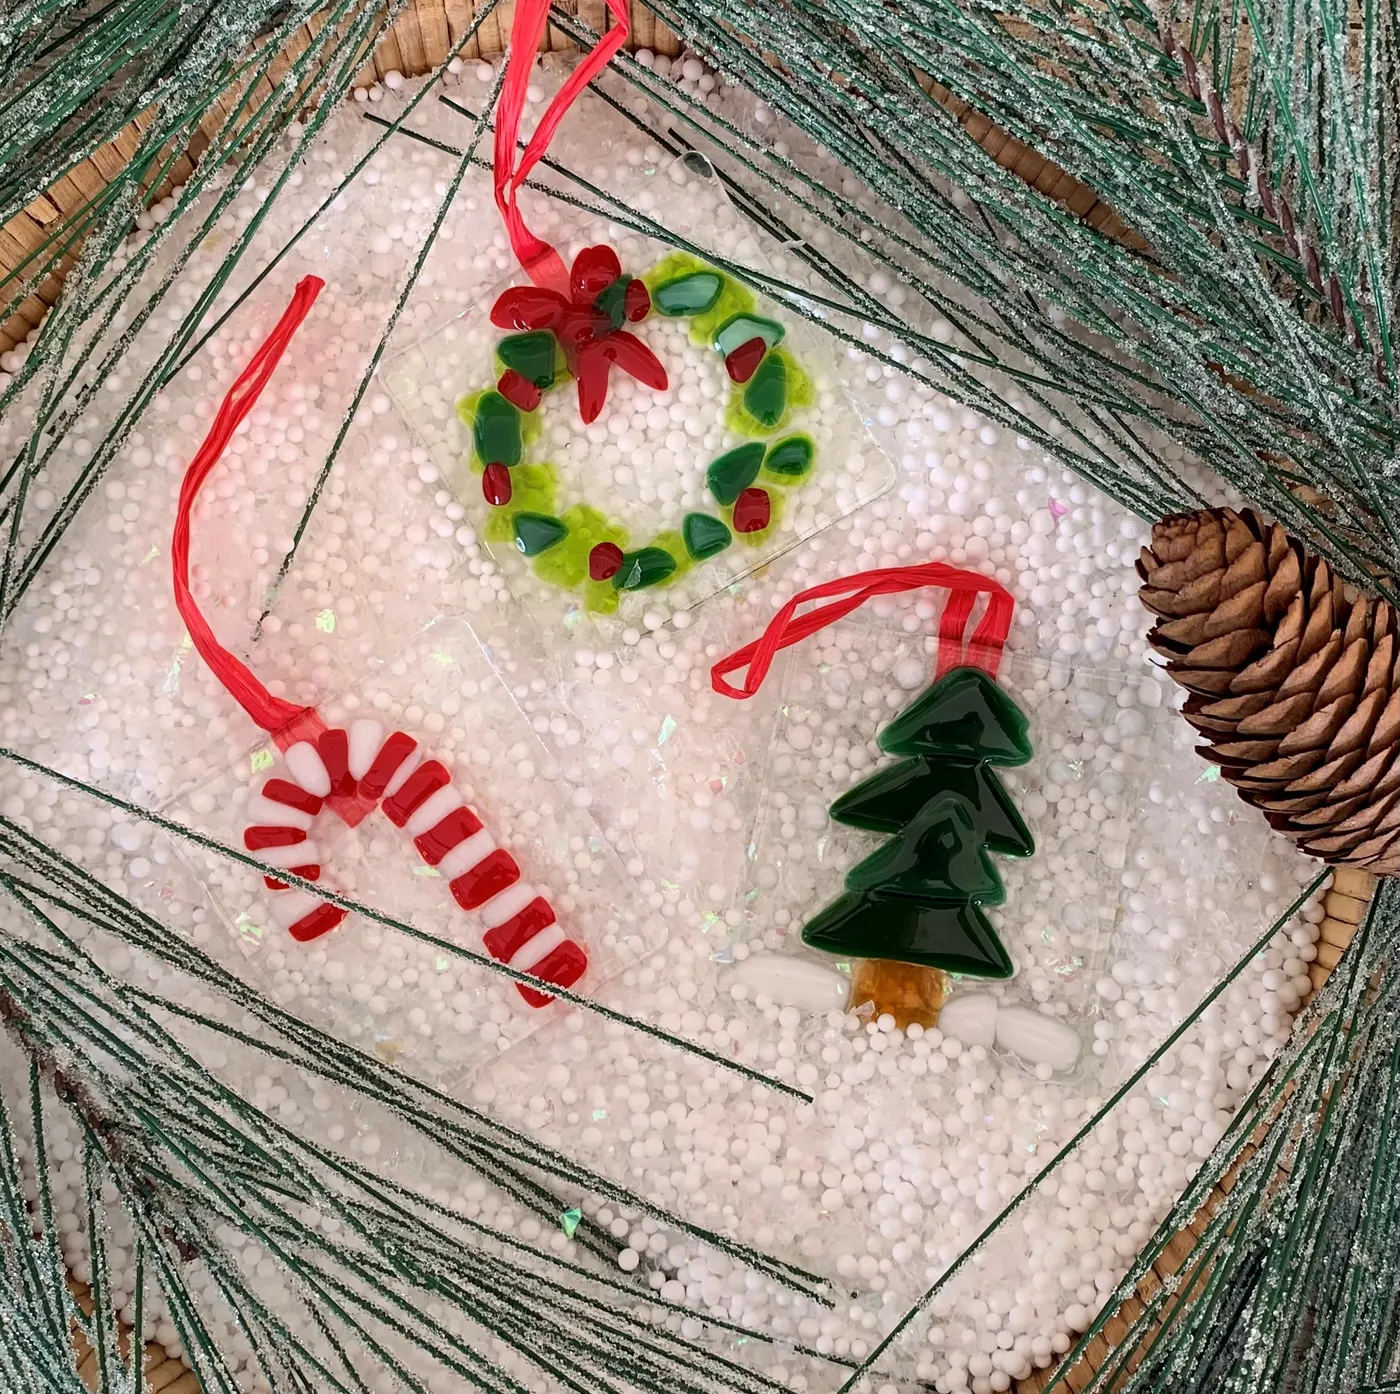
30. Fused Glass Wreath, Candy Cane, and Tree Ornaments on Foam Beads
- Fill a shallow wooden tray or basket base with white foam beads (or fake snow) to a depth of about 1 inch.
- Arrange artificial pine needles dusted with clear glitter around the edges of the tray, securing them with hot glue.
- Place three clear fused glass ornaments—a wreath, a candy cane, and a tree—on top of the foam, spacing them 2 inches apart.
- Tuck a natural pinecone between the ornaments for earthy contrast.
- Thread red ribbon through each ornament’s hanger and let the ends trail onto the foam.
|
📋 Copy HEX 🔗 Share |
Time: 15 minutes. Materials: under $20 if you buy the glass ornaments from a craft store or make them with a kiln kit.
Handcrafted glass ornaments are having a moment in 2026 because they’re one of the few decorations you can’t mass-produce identically. The texture and slight imperfections make them feel artisanal, not factory-made. This scene on a woven basket base leans into the “winter terrarium” trend—small, contained displays that bring the outdoors in. It pairs beautifully with the natural wreath crafting in Idea #13, but with a more delicate, glassy finish.
31. Golden Fabric Flowers and Glittered Baubles on a Dark Green Tree
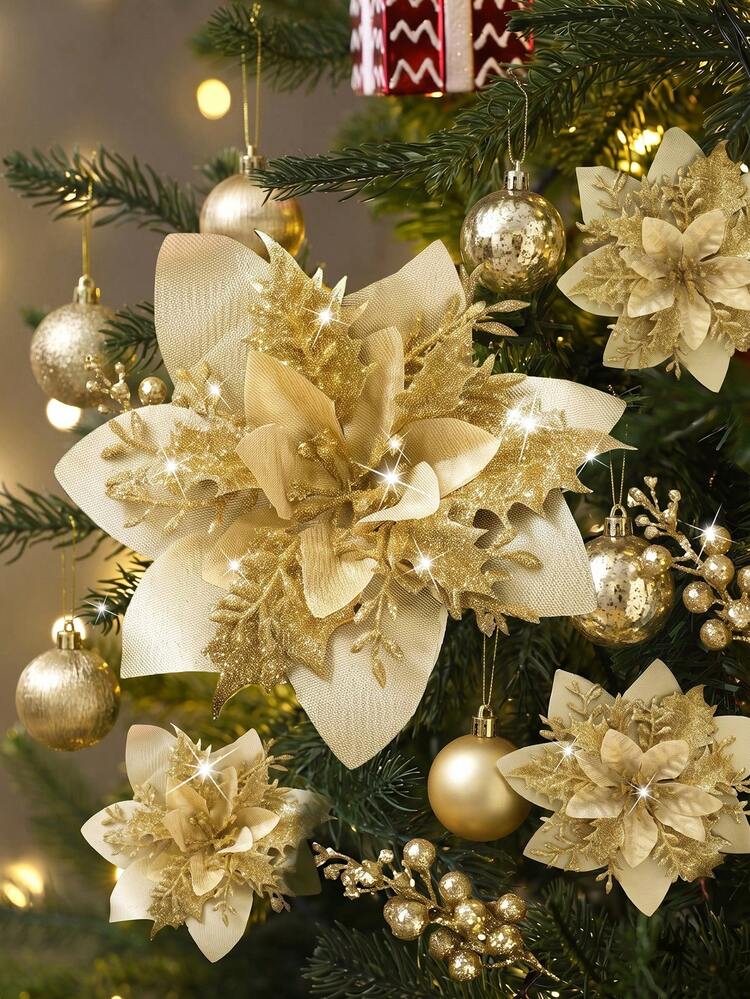
For those large golden fabric flowers, the secret is using a stiffened fabric like organdy or taffeta and folding petals in layers around a felt center. Cut petal shapes in three sizes, singe the edges with a lighter to prevent fraying, then glue them in concentric circles. The glittered centers are just craft foam or cardstock dipped in gold glitter and attached with hot glue. Vary the texture of your gold baubles—some shiny, some matte, some antique—to keep the tree from looking like a solid block of metal. The dark green branches are your best friend here; they create depth.
|
📋 Copy HEX 🔗 Share |
What makes this look luxurious rather than gaudy is near-total color restraint. The palette is 80% gold, 15% cream/off-white from the flower petals, and 5% dark green from the tree, with only a hint of red if any. That monochromatic gold against deep green reads as opulent because there’s no competition. The glittered berry sprays catch the light from every angle, adding movement. If you add red baubles, do it sparingly—one small red accent per three gold pieces. This is a tree for people who want to commit to a single, dramatic idea.
32. Felt and Fabric Angel with Gold Halo and Red Reindeer Skirt
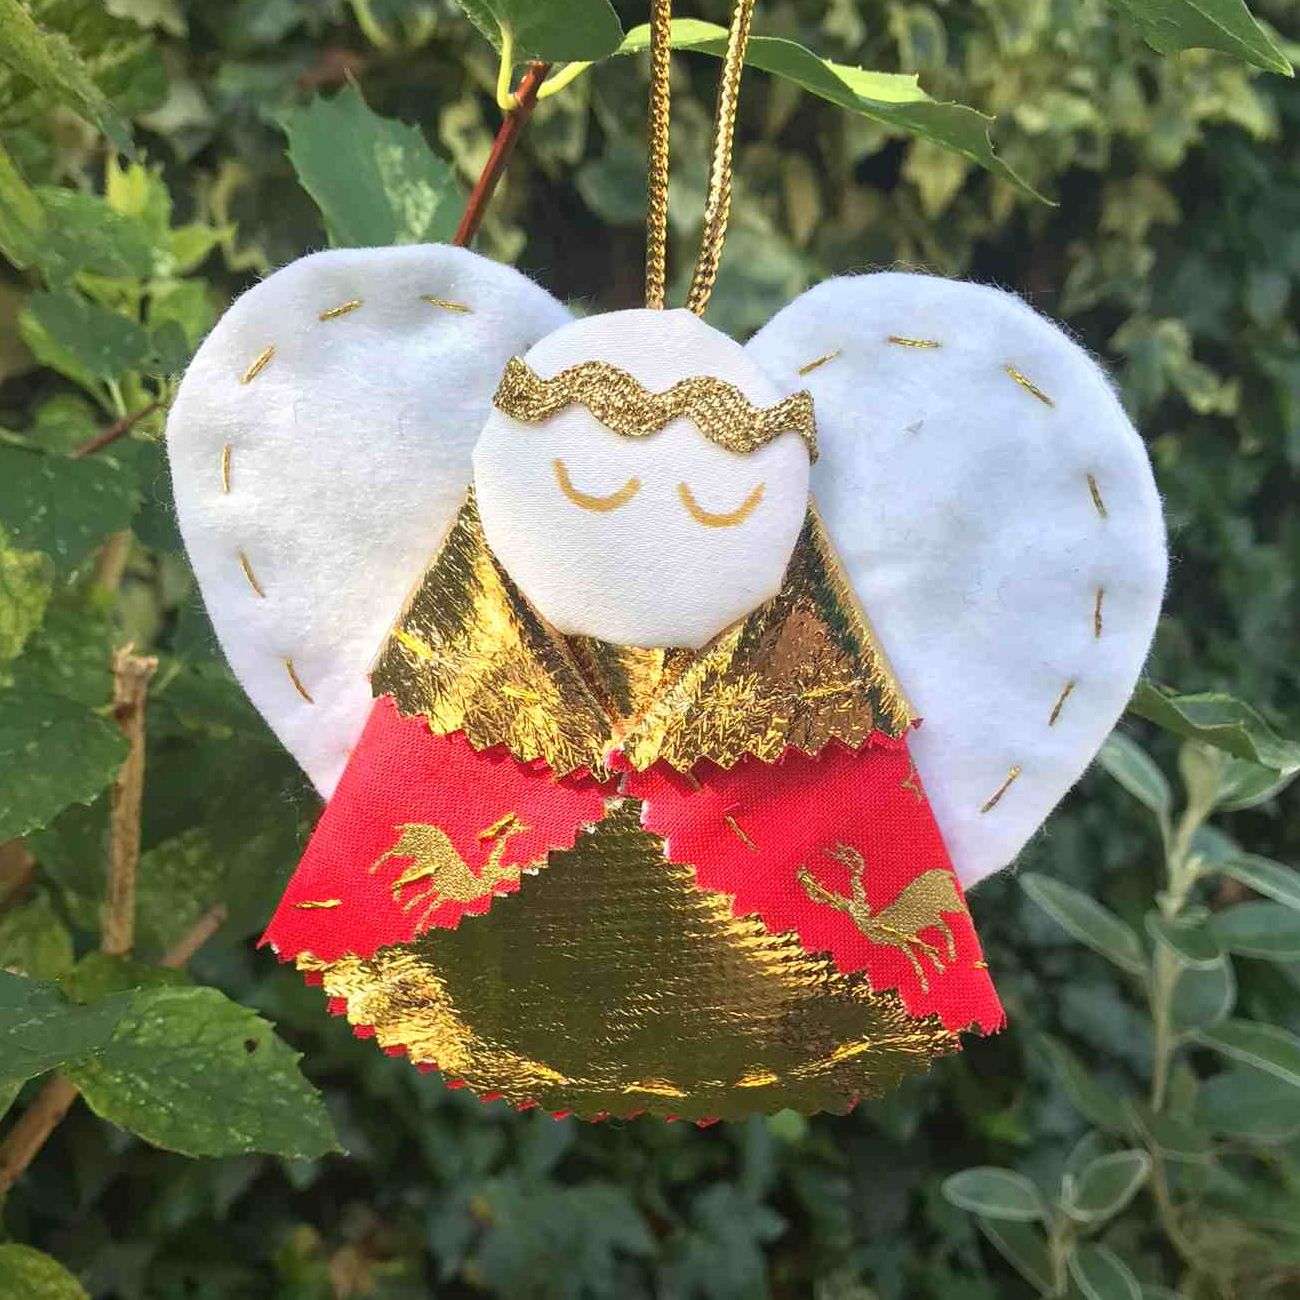
The wavy gold halo is the detail that makes this angel feel divine rather than just homemade. It frames the white felt face and draws your eye upward, even though the red skirt with gold reindeer is the largest element. Without that halo, the angel would read as a cute fabric doll. With it, the whole ornament takes on a sense of reverence and tradition. If you’re making this, use a thin gold cord or wire wrapped in gold thread so it holds the wavy shape; a straight pipe cleaner won’t give the same organic curve.
|
📋 Copy HEX 🔗 Share |
The proportions here follow a clear formula: 40% red skirt, 30% white felt (head and wings), 20% gold (halo, bodice, stitching), and 10% green from the blurred background foliage. The red provides the visual weight, the white keeps it bright, and the gold acts as the sparkle. Swap the red skirt for deep green and the gold for silver, and you get a completely different but equally traditional angel. The trick is keeping the background green—it makes the white and gold pop against the tree.
33. Layered Paper Reindeer with Santa Hat on Speckled Pine
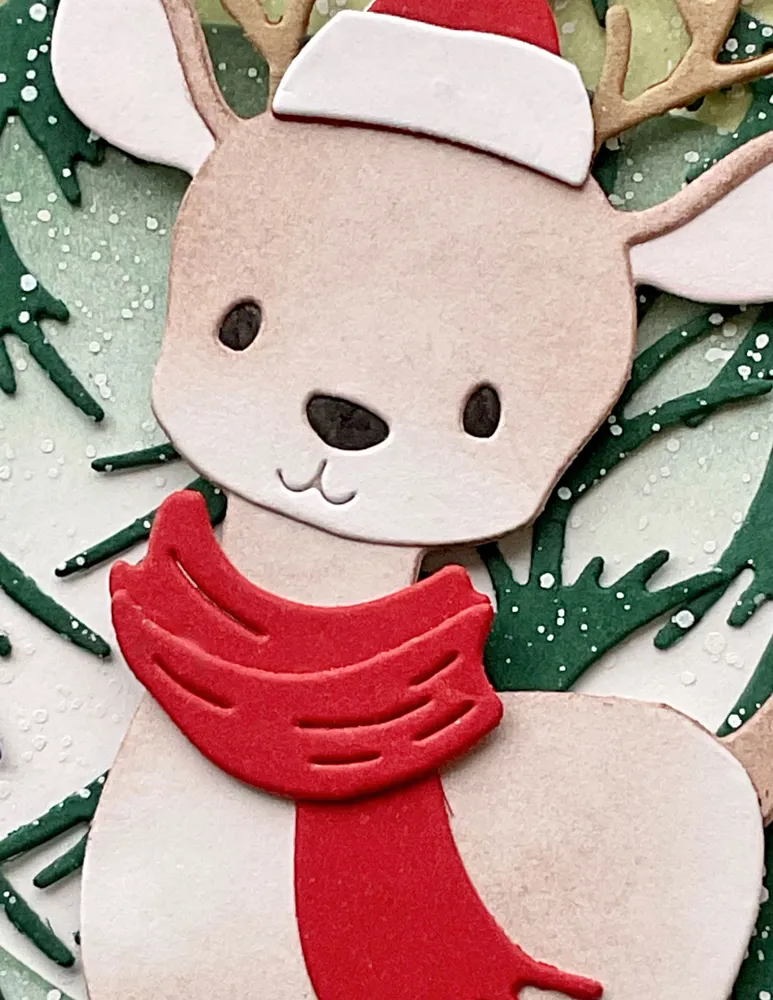
This layered papercraft reindeer costs almost nothing to make. Use a Cricut or a simple X-Acto knife with cardstock from a craft store—$3 for a 50-sheet pack of light beige, red, and dark green paper. The textured red scarf can be a scrap of felt or even a slice of an old sweater. The speckled pine branches are just dark green paper cut with fringe scissors and splattered with white paint. Total project cost: under $8, and you can make five or six reindeer from one pack of cardstock. The most expensive part is the glue gun sticks.
|
📋 Copy HEX 🔗 Share |
paper decorations are delicate, and this one will not survive being handled by kids or hung on a high-traffic tree branch. The antlers and Santa hat edges can tear if someone grabs them. Display it in a shadow box, on a shelf away from doorways, or as a gift topper where it’s admired but not touched. Also, paper fades in direct sunlight—keep it out of south-facing windows. If you want a more durable version, trace the same shapes onto felt and layer with fabric glue; it will last for years and still look handmade.
34. Minimalist Wooden Tree with Tiny Wrapped Presents
This miniature wooden tree works in spaces as small as a studio apartment or a dorm room. At maybe 18–24 inches tall, it fits on a console table, nightstand, or even a kitchen counter. The light wood tone and plain white wall make it feel airy, so it won’t shrink a room the way a full-size tree can. It needs about 12 inches of clear space around it to shine, so don’t crowd it with photo frames or lamps. If you have a larger space, pair it with Idea #6‘s full-size tree for a layered effect.
|
📋 Copy HEX 🔗 Share |
the wooden branches and tiny ornaments collect dust quickly because of the open structure. A quick pass with a feather duster every other week keeps it looking intentional. The miniature wrapped presents are probably paper, so if you have a cat, they’ll be batted to the floor. Use tiny felt or wooden gifts instead for a more durable option. The subtle string lights may have a visible wire—tuck it behind the trunk or use battery-operated micro lights so you can move the tree around without hunting for an outlet.
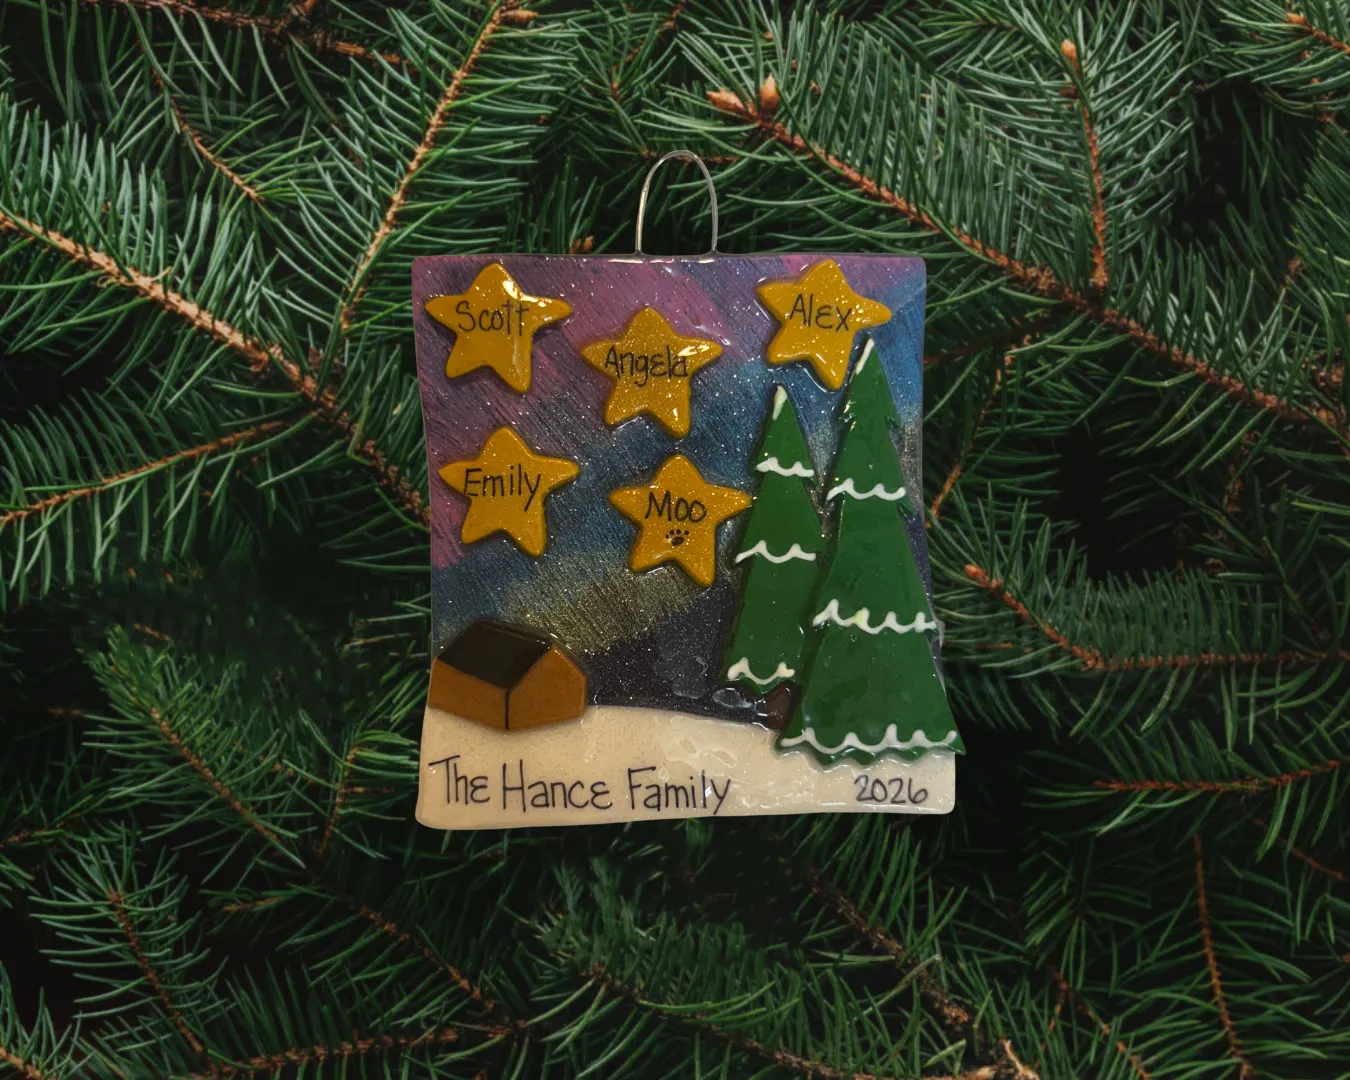
35. Night Sky Family Ornament with Glitter Stars and House Silhouette
Personalized family ornaments like this one are the fastest-growing segment of holiday decor in 2026, driven by a desire for meaningful, non-generic decorations. The deep blue and purple gradient sky with glitter stars and a brown house silhouette feels like a custom family portrait in ornament form. It’s part of the larger “sentimental Christmas” movement that’s replacing mass-produced red-and-green themes. This trend has staying power because it grows with your family—adding a new star or name each year becomes a tradition in itself.
|
📋 Copy HEX 🔗 Share |
If you’re designing a similar ornament, start by placing the house silhouette and family name first, then build the star field around them. Use a fine-tipped white or yellow paint pen for the names, and a silver wire hanger that matches the cool night palette. The snow at the bottom grounds the whole scene and gives the eye a resting place. For a crisp finish, seal everything with a clear acrylic spray before adding the hanger. This is not a quick craft—budget three hours for painting and drying time, but the result is a keepsake that will outlast any store-bought ornament.
Your Handmade Holiday Starts at the Craft Table
Whether you’re folding fabric stars, painting teal florals, or stringing paper beads, the best Christmas DIY decorations are the ones that tell your family’s story. Pick two or three ideas that match your energy level and skill, then let the rest be inspiration for next year.
Save this guide to Pinterest so you can find your favorite ornament when the holiday rush hits—and tag us when you make your own version. Happy making!
