You know that feeling when you finally find the wainscoting style that looks exactly right for your space? That perfect photo on Pinterest that makes you stop scrolling and just say, ‘That’s it.’ Well, we’ve done the scrolling for you. After filtering through hundreds of options across Wayfair, Home Depot, and bespoke millwork shops, we narrowed it down to the looks that truly work in 2026. Inside, you’ll find 32 distinct wainscoting ideas, from traditional raised panels and modern board-and-batten to unexpected materials you haven’t even considered. In 2026, it’s all about adding architectural character and texture back into our homes, and wainscoting is the fastest way to do it with intention. And stay until the end — we break down the most common mistakes that can ruin these looks. 📌 Save this to Pinterest for later — you’ll want to revisit these ideas.
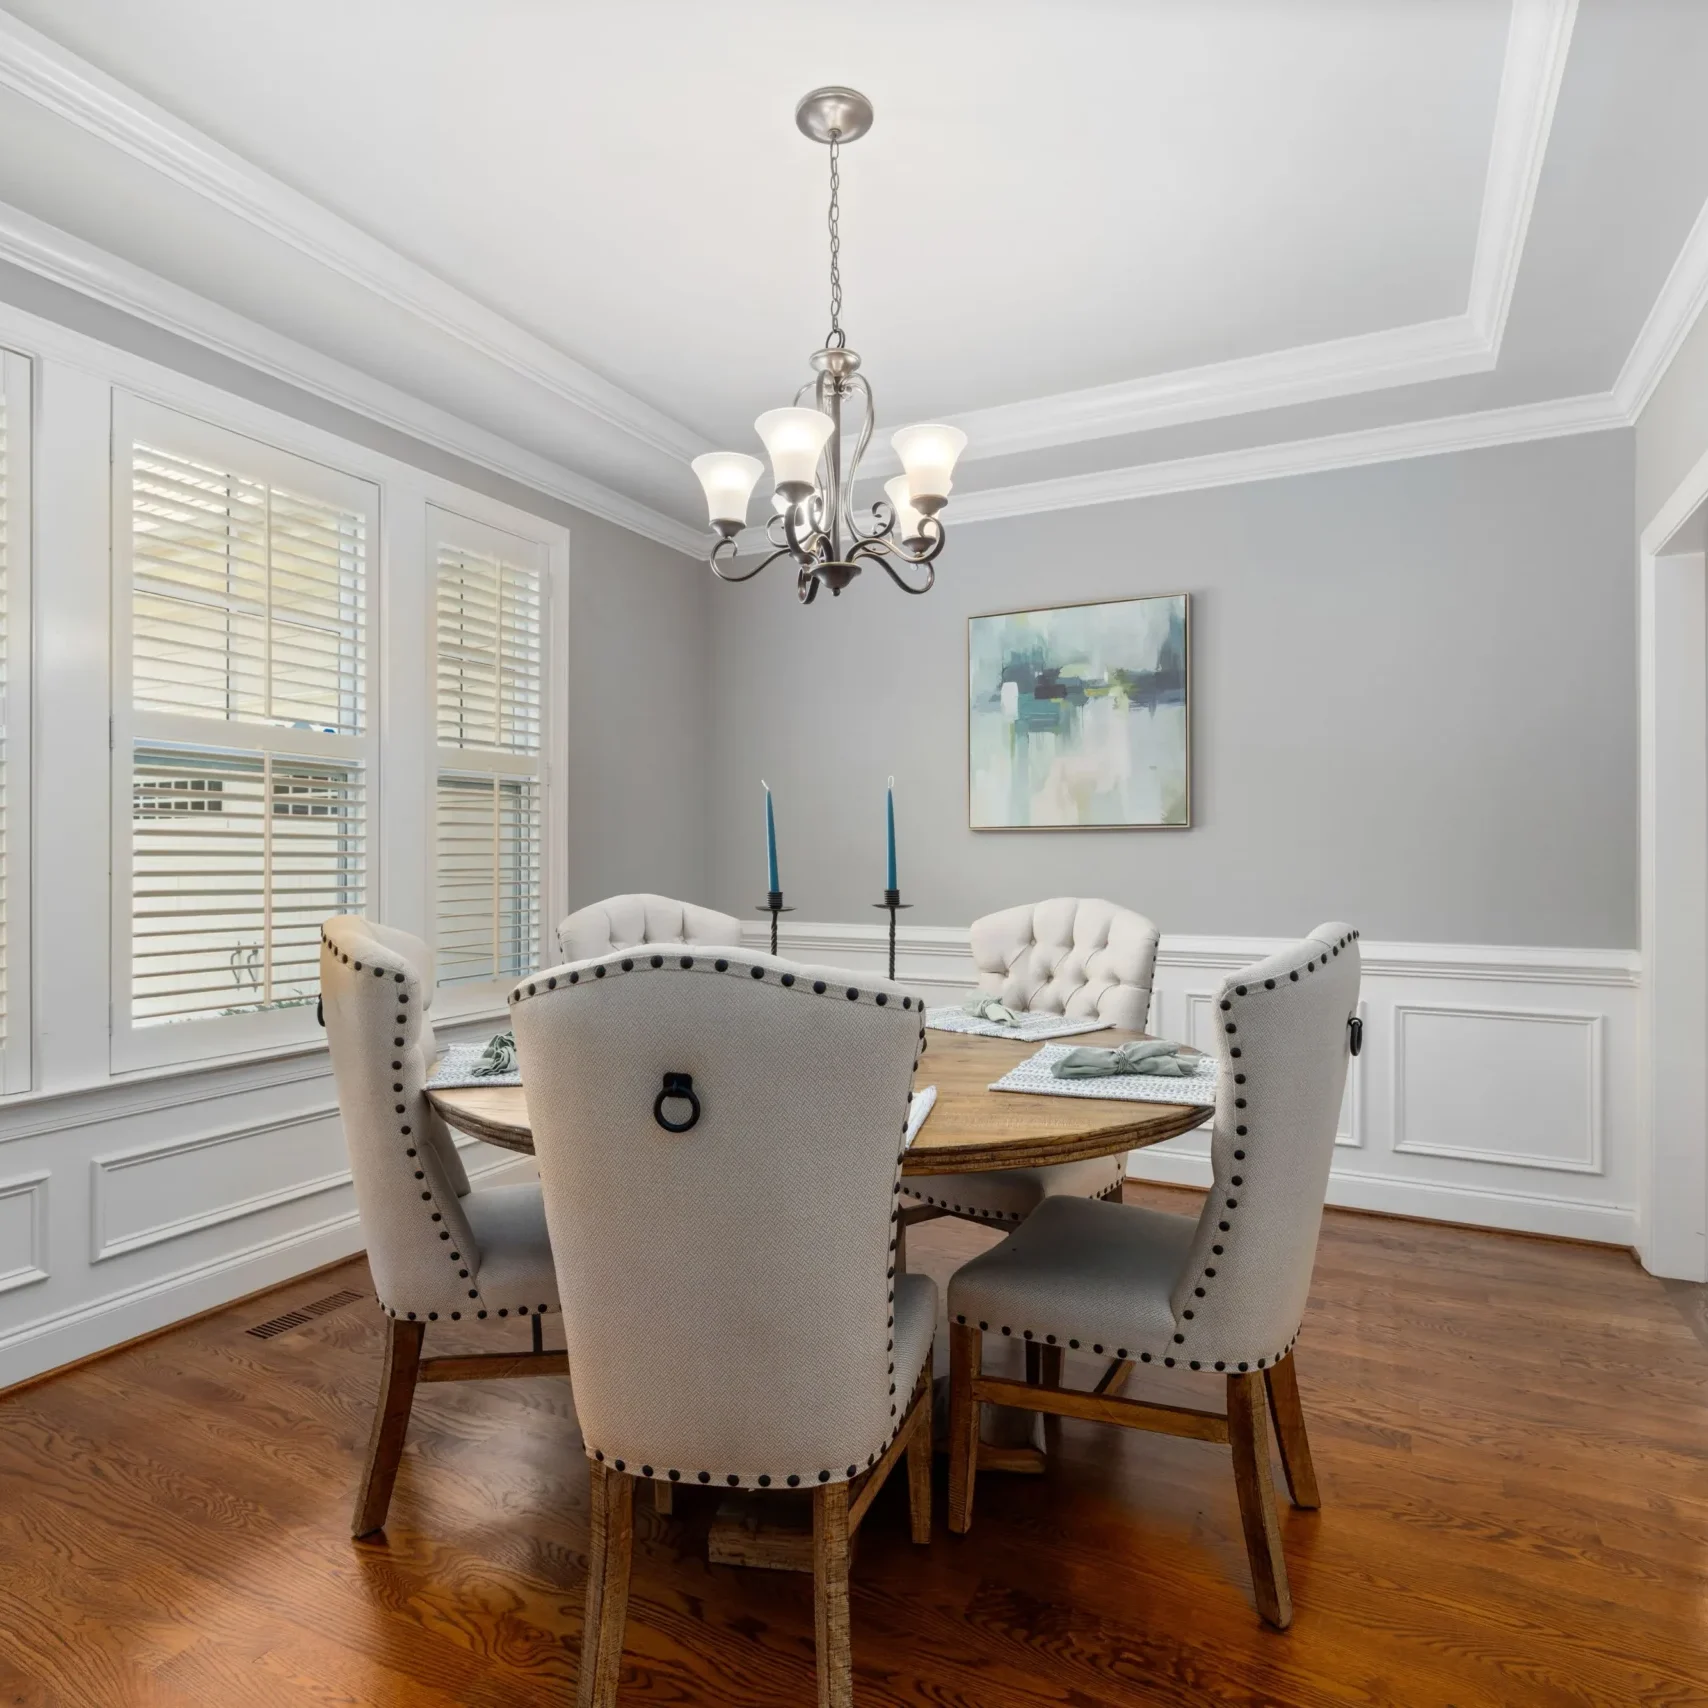
1. Classic White Picture Frame Wainscoting in a Formal Dining Room
This look is the definition of timeless for a reason. It works because of a principle called ‘the golden ratio’ or rule of thirds. The wainscoting takes up the bottom third of the wall, creating a pleasing, balanced proportion that feels just right. The contrast between the crisp white molding and the soft grey walls adds depth without being overwhelming. The repetition of the rectangular ‘picture frames’ provides a quiet rhythm that makes the room feel structured and serene, allowing the round pedestal table and tufted chairs to soften the space.
|
📋 Copy HEX 🔗 Share |
💡 Designer Tip
Here’s a look at what it might cost to get this formal dining room style. Prices are estimates for a standard 12′ x 14′ dining room and quality, mid-range furnishings.
- Main Furniture (Table, 4 chairs): $2,500 – $6,000
- Wall Treatment (Wainscoting materials & paint): $800 – $2,500
- Lighting (Chandelier): $400 – $1,500
- Window Treatment (Plantation shutters): $600 – $1,800
- TOTAL: $4,300 – $11,800
Budget alternative: Source a dining set from Facebook Marketplace and use pre-made molding boxes from a home improvement store to achieve this look for around $1,500 – $3,000.
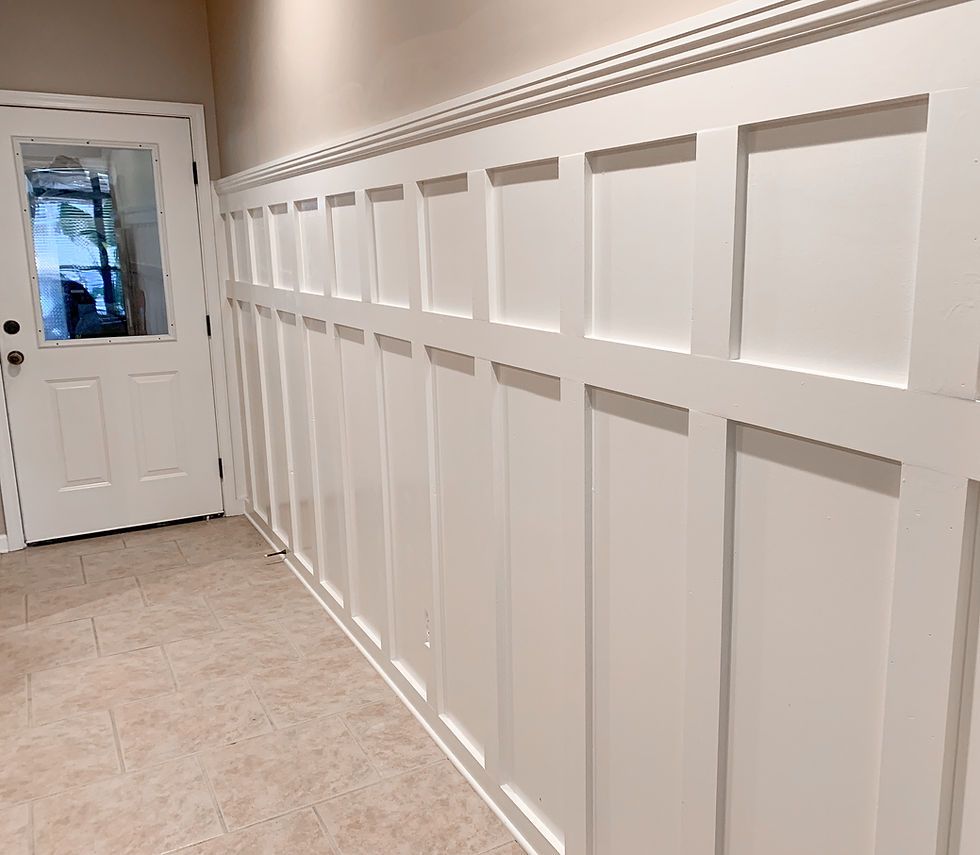
2. High-Profile Grid Wainscoting for a Polished Entryway
When installing grid or shaker-style wainscoting, the ‘reveal’—the space between your stiles (vertical boards) and rails (horizontal boards)—is everything. For a classic, high-end look, don’t make your grid squares too large or too small. A good rule of thumb is to aim for a reveal of about 3/4 inch to 1 inch around each panel. This creates a subtle shadow line that reads as custom and intentional, rather than a flat, stuck-on grid. Use a spacer block to ensure every reveal is perfectly consistent during installation.
|
📋 Copy HEX 🔗 Share |
⚠️ Real Talk
This style of substantial, high-profile wainscoting works best in spaces with ceilings that are at least 9 feet high. In a room with standard 8-foot ceilings, this look can feel a bit heavy and visually lower the ceiling. It’s perfect for entryways, hallways, and formal living spaces where you want to make an architectural statement. For a smaller room or one with lower ceilings, consider the more delicate picture frame molding seen in Idea #0, which adds detail without the visual weight.
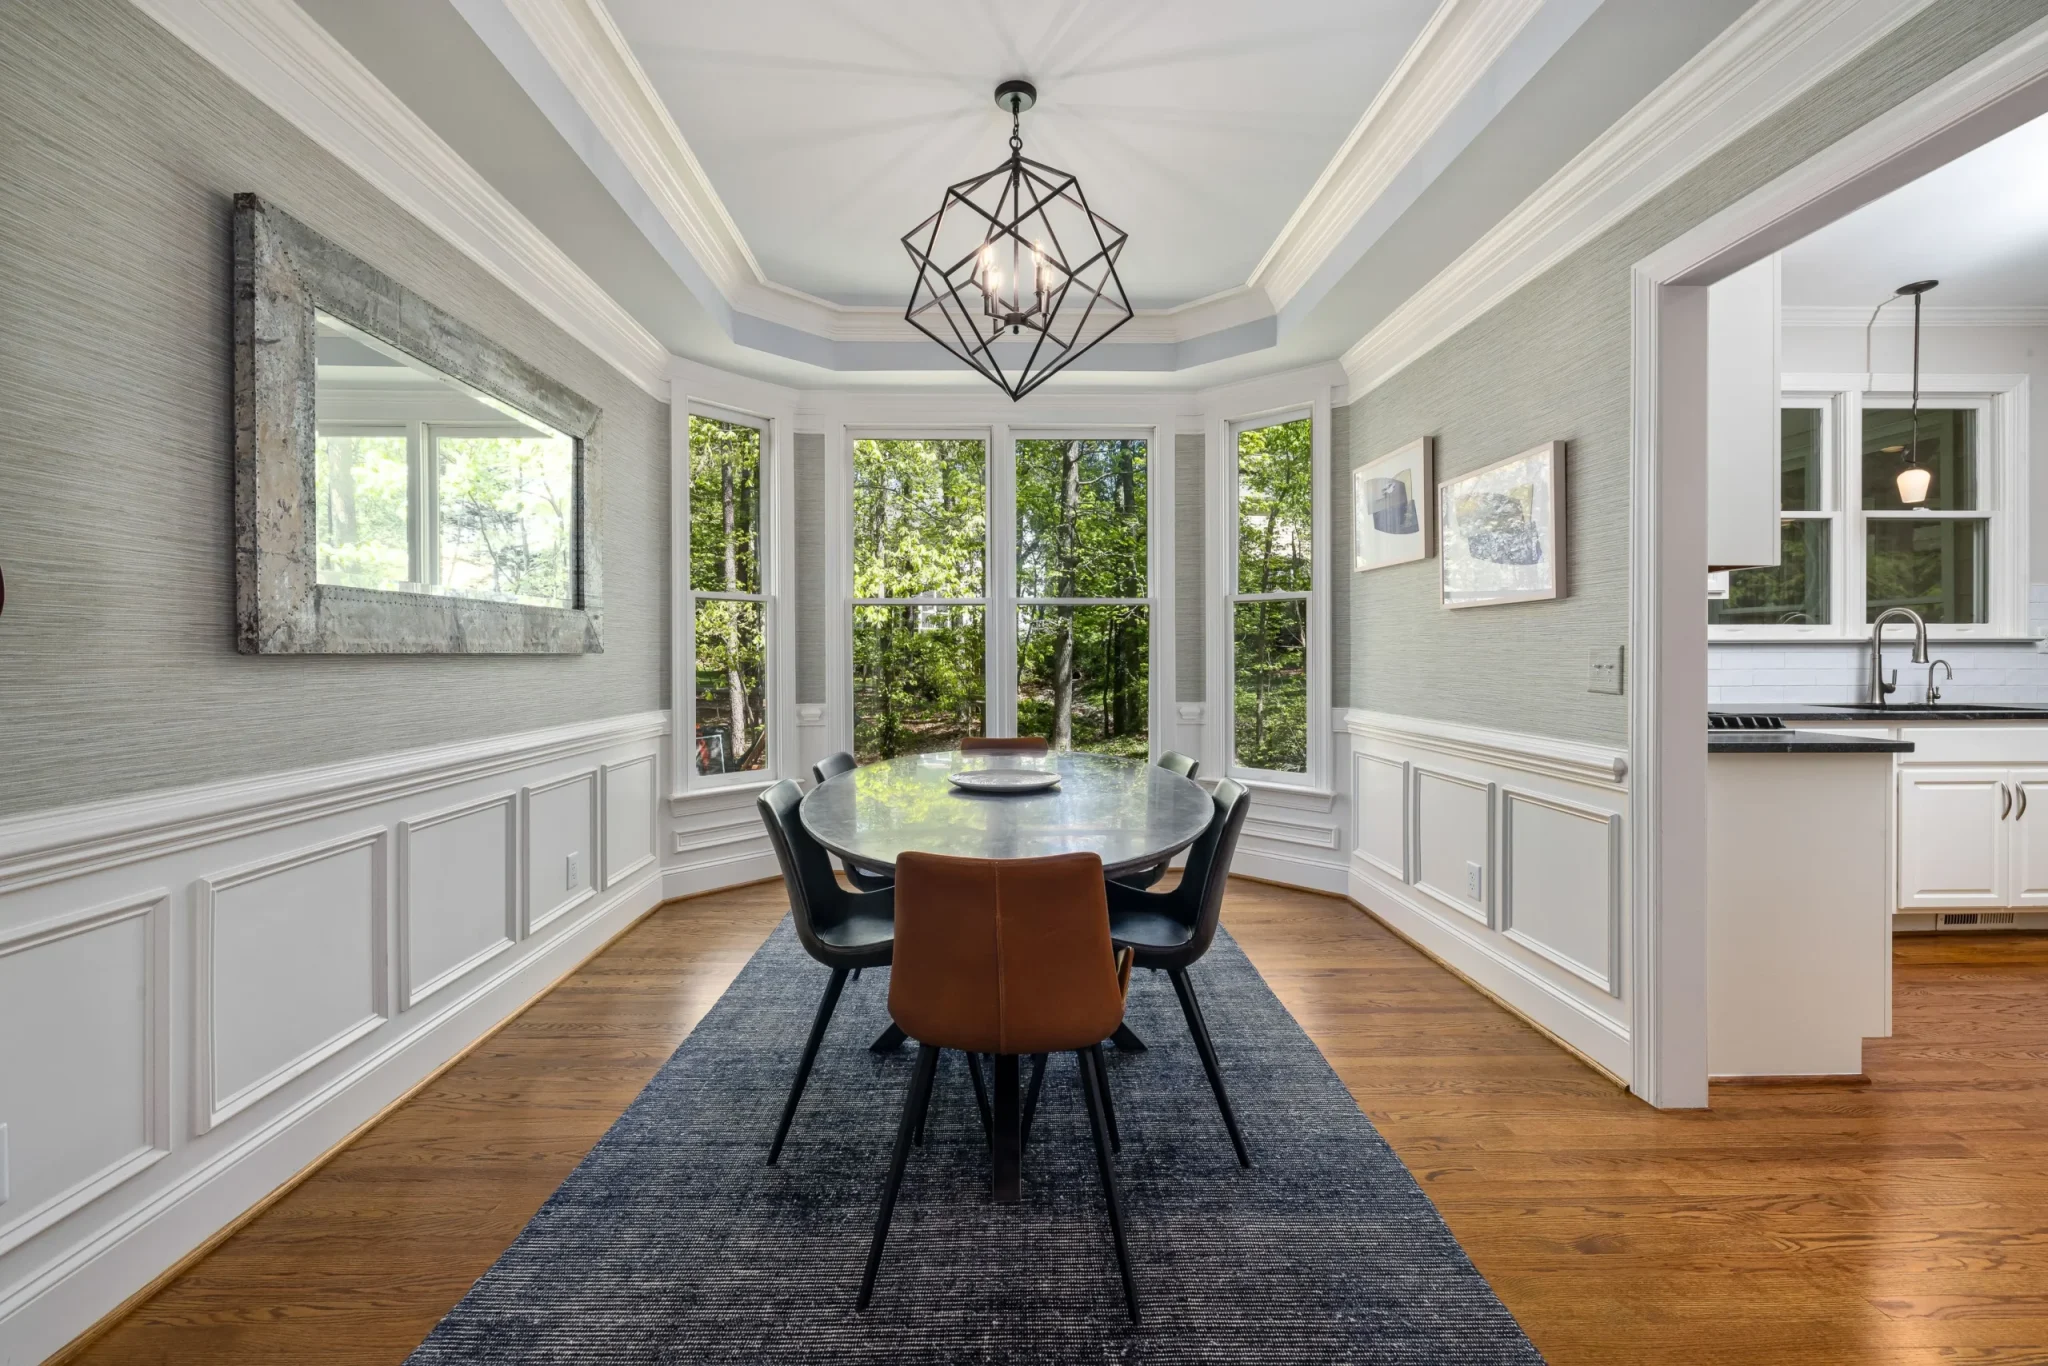
3. Pair Raised Panel Wainscoting with Textured Sage Wallpaper
The formula here is a beautiful balance of classic and contemporary. Think of it as 50% Traditional Structure + 40% Natural Texture + 10% Modern Polish. The raised panel wainscoting provides the timeless, sturdy base. The horizontal-textured sage wallpaper brings in an organic, almost handcrafted feel, breaking up the formality. The final 10% comes from the clean lines of the geometric pendant light and metallic mirror, which keep the room feeling current. You could swap the sage for a textured linen or grasscloth wallpaper in another earthy tone and still achieve the same effect.
|
📋 Copy HEX 🔗 Share |
⭐ The One Thing
that makes this room sing is the textured wallpaper. Without it, you’d have a perfectly nice, traditional dining room. But with the subtle, horizontal-striped sage wallpaper, the entire space is elevated. It introduces a tactile quality that begs you to get closer. It softens the hard lines of the wainscoting and provides a sophisticated, layered backdrop that feels both calming and incredibly chic. It’s the element that bridges the gap between classic and contemporary.
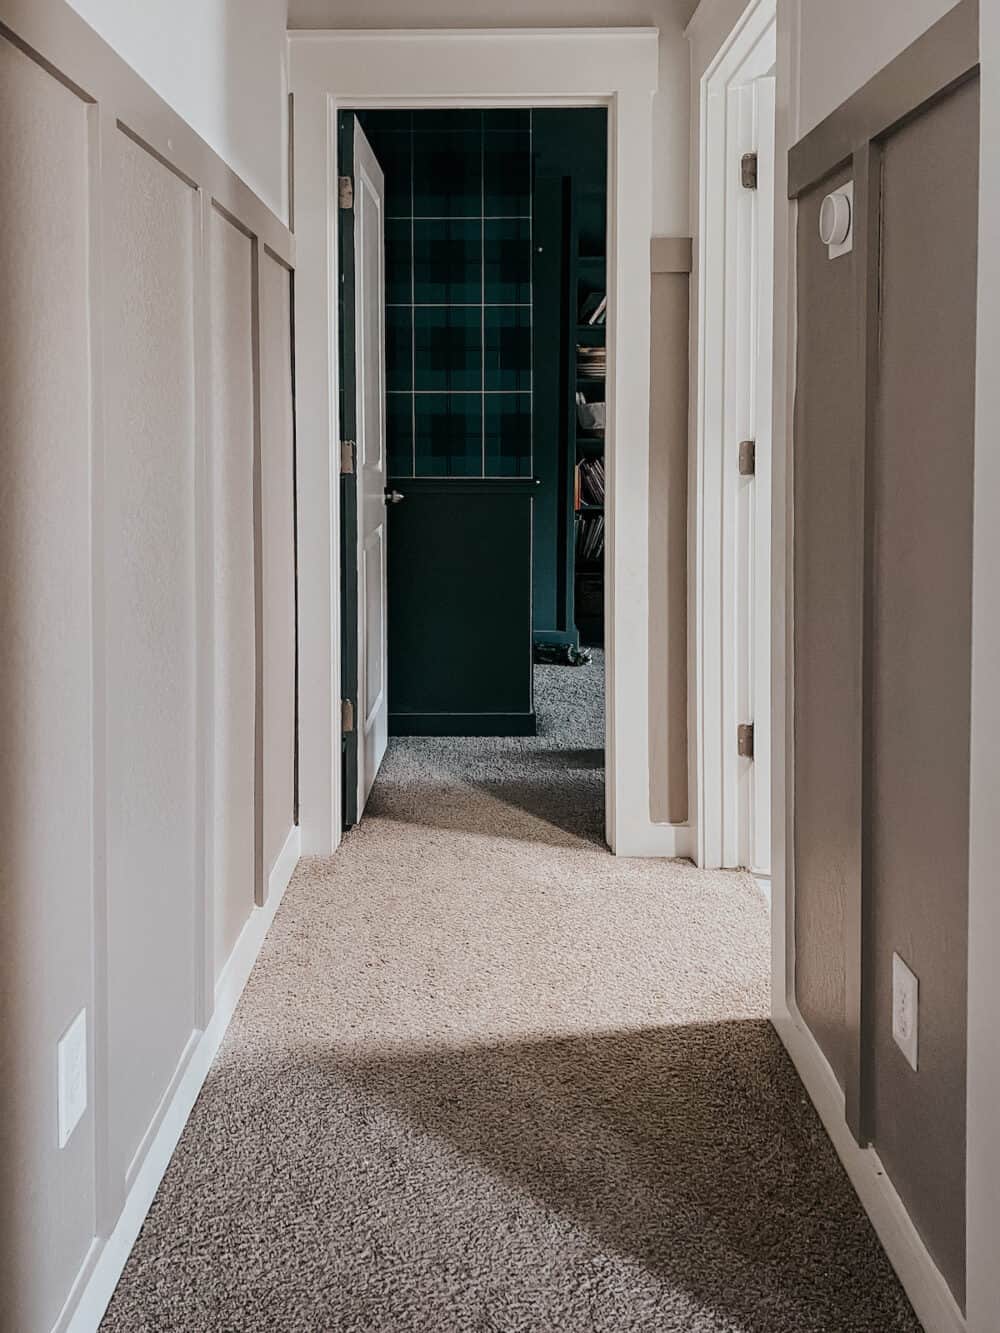
4. Taupe Board and Batten Creates a Dramatic Hallway Vista
A word of caution with this near-full-height board and batten in a narrow space: it can make a hallway feel even narrower. The vertical lines draw the eye up, which is great, but the physical depth of the boards (usually 3/4 inch) on both sides will literally steal a couple of inches from the width of your hall. If your hallway is already tight (less than 42 inches wide), this might create a slightly claustrophobic effect. In that case, consider a treatment with a lower profile, like simple applied molding.
|
📋 Copy HEX 🔗 Share |
📏 Scale Guide
We’re seeing this ‘color drenching’ trend, where trim, walls, and paneling are all painted the same shade, take over Pinterest. This taupe hallway is a perfect example of why. It creates a seamless, architectural look that feels incredibly custom and calming. By painting the board and batten the same color as the wall above it (or a very similar tone), you emphasize the texture and shadow lines rather than the color contrast. It’s a move away from the high-contrast farmhouse look and toward something more muted, sophisticated, and immersive.
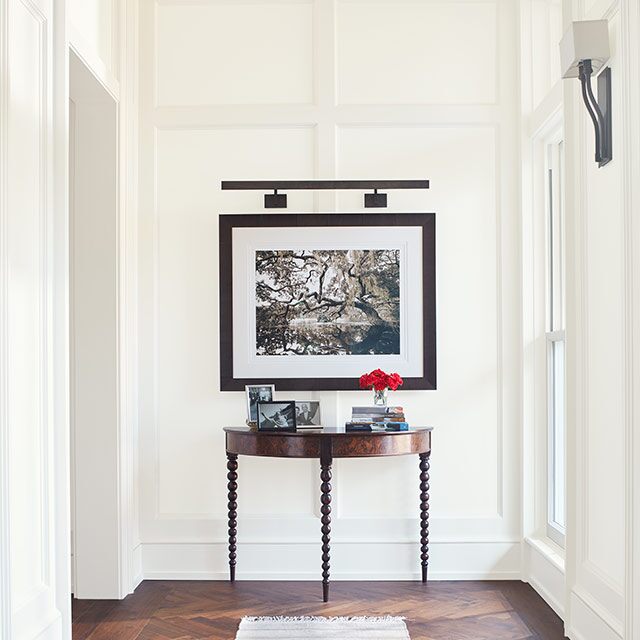
5. Go Floor-to-Ceiling with White Grid Paneling
Full-wall paneling like this is stunning, but let’s talk dust. Every single horizontal ledge of that beautiful grid is a natural dust collector. Especially in a high-traffic area like an entryway, you’ll need to commit to a regular cleaning routine. A microfiber duster or the brush attachment on your vacuum will be your best friend. Plan on a quick once-over every week or two to keep it looking crisp. White paint, especially in a matte or eggshell finish, can also show scuffs easily. A magic eraser can handle most marks, but having touch-up paint on hand is a must.
|
📋 Copy HEX 🔗 Share |
🧹 Maintenance Reality
You don’t need a custom millworker to get this gallery-inspired look. The key is using thin, flat-stock MDF or pine boards (typically 1x2s or 1x3s) applied directly to your drywall. A weekend, a miter saw, a nail gun, and some patience are all you really need. Get your supplies from Home Depot or Lowe’s for under $400 for a typical accent wall. The trick is in the prep work: careful measuring, a level, and lots of wood filler and caulk before you paint. Compare this more accessible grid style to the half-wall version in Idea #1.
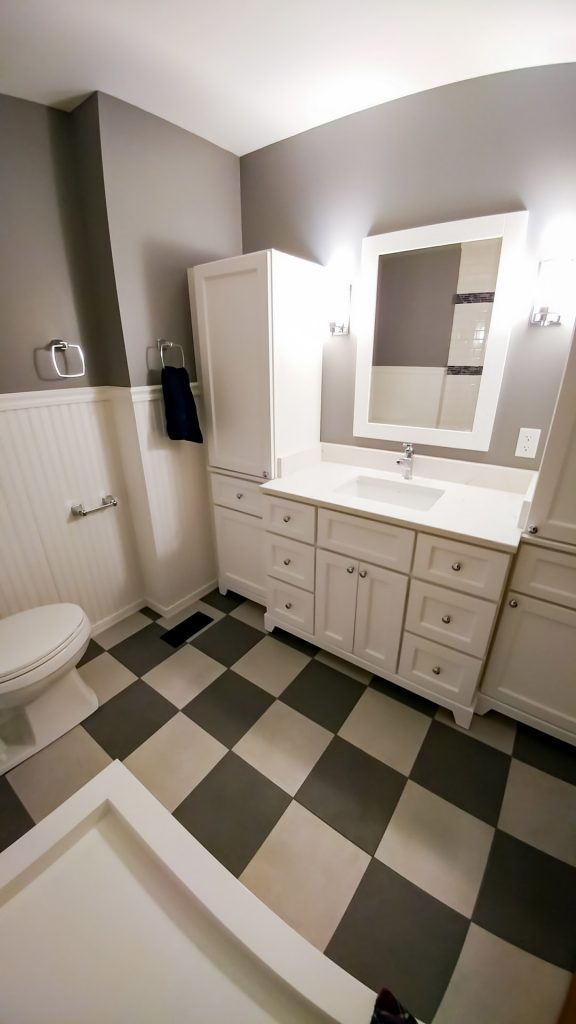
6. Try Vertical Beadboard with a Classic Checkerboard Floor
You can install beadboard wainscoting yourself in a weekend. Here’s a quick guide for a small bathroom. (Time: 6-8 hours, Cost: $150-$300)
|
📋 Copy HEX 🔗 Share |
🔧 How-To Brief
- Measure and mark your desired wainscoting height (typically 32-42 inches) around the room with a level.
- Cut your beadboard panels to size. Use a jigsaw to cut out openings for outlets and plumbing.
- Apply construction adhesive to the back of the panels and press them against the wall. Secure with a few brad nails into the studs.
- Install the top cap/chair rail molding. Miter the corners for a clean fit.
- Install the baseboard molding over the bottom of the beadboard.
- Caulk all seams, fill nail holes with wood putty, and apply 2-3 coats of semi-gloss paint.
This design is a masterclass in using classic patterns. The tight, vertical lines of the beadboard contrast beautifully with the bold, graphic squares of the checkerboard floor. One pattern is subtle and textural, the other is large-scale and high-contrast. This opposition creates visual energy and keeps the eye moving. The simple, solid gray on the upper wall acts as a resting place, preventing the two patterns from competing and making the room feel too busy. It’s a balanced composition that feels both dynamic and orderly.
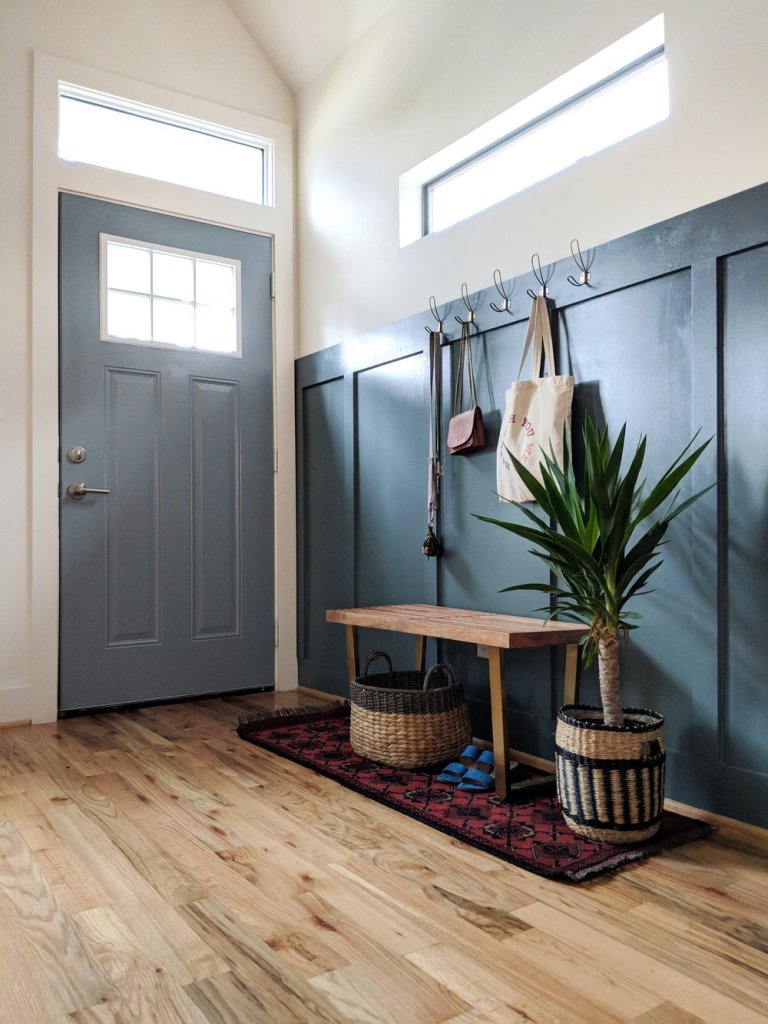
7. Make a Statement with Dark Teal Board and Batten
Thinking of going bold with a color like this dark teal? Run through this checklist first:
|
📋 Copy HEX 🔗 Share |
✅ Before You Start
- Lighting Check: Does the space get enough natural light? Dark colors can make a poorly lit entryway feel like a cave. The transom windows here are key.
- Sample, Sample, Sample: Paint a large poster board with your chosen teal and tape it to the wall. Observe it at different times of day to ensure you love how it looks in morning, noon, and evening light.
- Flow and Cohesion: What other rooms are visible from this space? Make sure the bold color choice feels connected to, or is a deliberate and pleasing contrast with, the rest of your home’s palette.
- Sheen Selection: For a high-traffic area like a mudroom, choose an eggshell or satin finish. It’s more durable and easier to clean than a matte finish.
The success of this space comes down to a simple but effective recipe: 60% Moody Color + 30% Natural Texture + 10% Metallic Pop. The dark teal board and batten sets a sophisticated, enveloping tone. The slatted wood bench and woven seagrass baskets provide warmth and a connection to nature, preventing the dark color from feeling cold. Finally, the small touches of metallic silver on the coat hooks and hardware add just a bit of shine and reflection, lifting the whole look and giving it a polished finish. It’s a formula that feels both grounded and stylish.
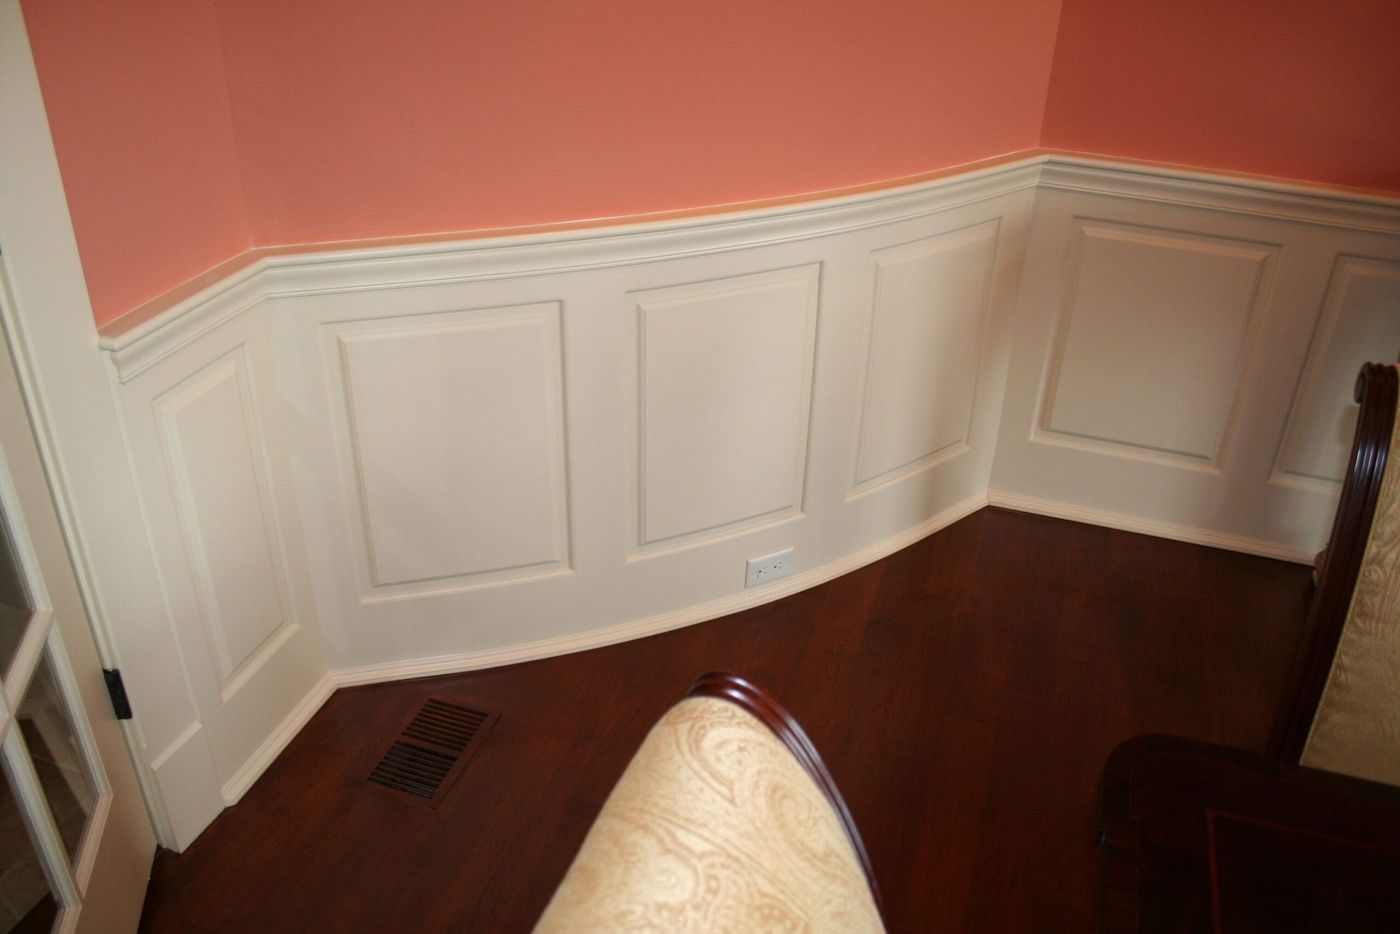
8. Embrace Curves with Raised Panel Wainscoting
Installing wainscoting on a curved wall is not a DIY for the faint of heart, but the secret is using flexible molding. Companies like Flex Trim or Trimster make polyurethane resin moldings that can be bent to fit the exact radius of your wall. You’ll need to create a template of the curve (a large piece of cardboard works well) and order the molding pre-curved to your specs. For the flat panels themselves, you can use thin 1/8″ or 1/4″ MDF or plywood, which have enough give to conform to a gentle curve when properly secured.
|
📋 Copy HEX 🔗 Share |
🎯 What Makes It Work
This application is all about celebrating unique architecture. It’s a perfect solution for formal dining rooms, grand entryways, or staircase landings that feature curved walls. Standard ceiling heights of 8 or 9 feet work well, as the traditional chair-rail height of the wainscoting maintains classic proportions. Avoid this in very small rooms (under 100 sq ft) where the complexity of the curved molding might feel overwhelming. The key is having enough space for the architectural statement to breathe.
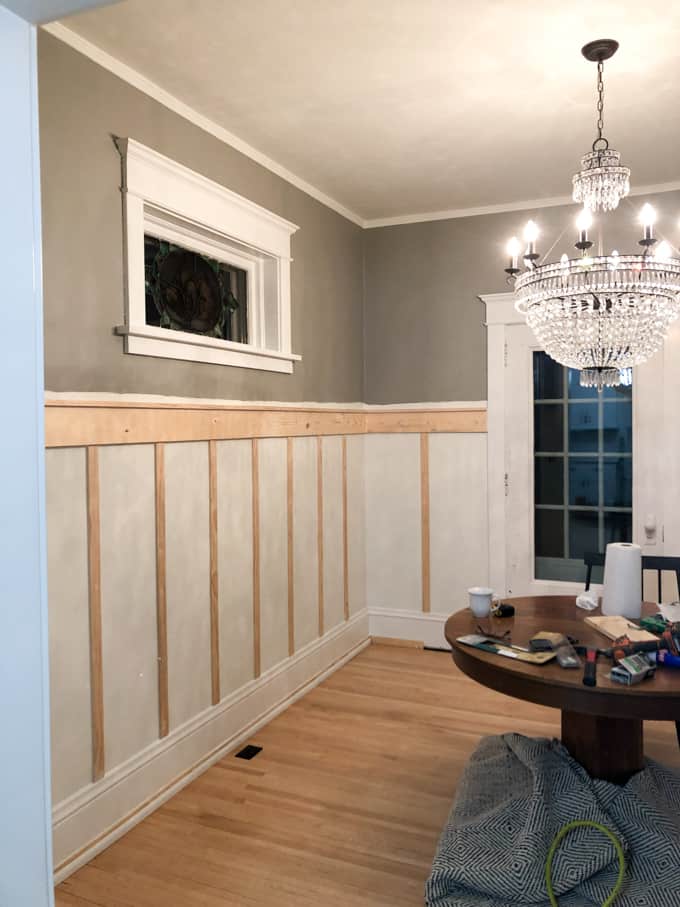
9. The In-Progress Look: Unfinished Board and Batten
While the raw, unfinished wood look has a certain rustic, ‘deconstructed’ charm, it’s not practical for the long term. Unsealed pine or MDF is a magnet for dirt, oils from hands, and moisture. Over time, it will discolor, warp, and look grimy. If you love the natural wood tone, you absolutely must seal it with at least two coats of a clear, non-yellowing polyurethane in a matte or satin finish. This will protect the wood while preserving the organic, in-progress vibe you’re going for. Don’t skip this step!
|
📋 Copy HEX 🔗 Share |
💸 Get This Look For Less
What makes this image so compelling isn’t just the wainscoting itself, but the juxtaposition of the raw, humble materials against the refined elegance of the crystal chandelier. It’s the high-low mix that creates tension and interest. The unfinished pine boards feel hardworking and authentic, while the chandelier is pure glamour. Removing either one would collapse the story. It’s a reminder that great design often comes from unexpected pairings—the rough with the smooth, the rustic with the refined.
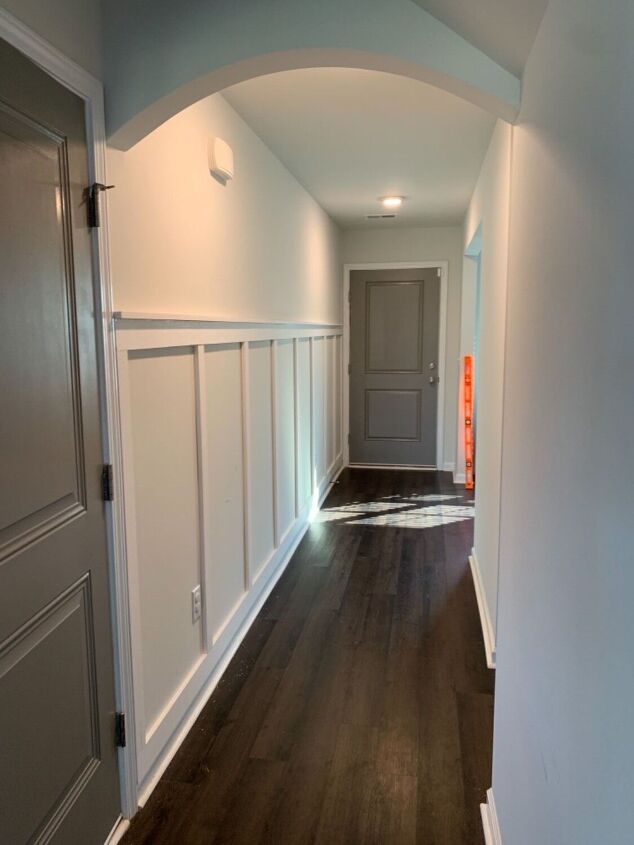
10. Create High Contrast with White Board and Batten and Dark Doors
This hallway feels so crisp and intentional because of the strong use of contrast. It’s not just about light and dark; it’s about the interplay of lines. The vertical lines of the white board and batten are abruptly met by the strong horizontal line of the chair rail. Then, the bold, dark rectangles of the shaker-style doors punctuate the white walls, creating a graphic, almost rhythmic pattern. The dark floors ground the entire space, ensuring the white doesn’t feel like it’s floating away. It’s a simple palette that relies on geometry for its impact. Compare this to the softer look of Idea #15.
|
📋 Copy HEX 🔗 Share |
📐 Style Math
Love the high-contrast look but don’t have the budget for custom doors and flooring? Paint is your best friend. A gallon of high-quality paint in a deep charcoal or black (like Benjamin Moore’s ‘Wrought Iron’ or Sherwin-Williams’ ‘Tricorn Black’) can completely transform your existing standard doors for under $100. Pair that with a simple DIY board and batten wall treatment using affordable MDF from a big-box store, and you can achieve this dramatic, architectural look for a fraction of the cost of a full renovation.
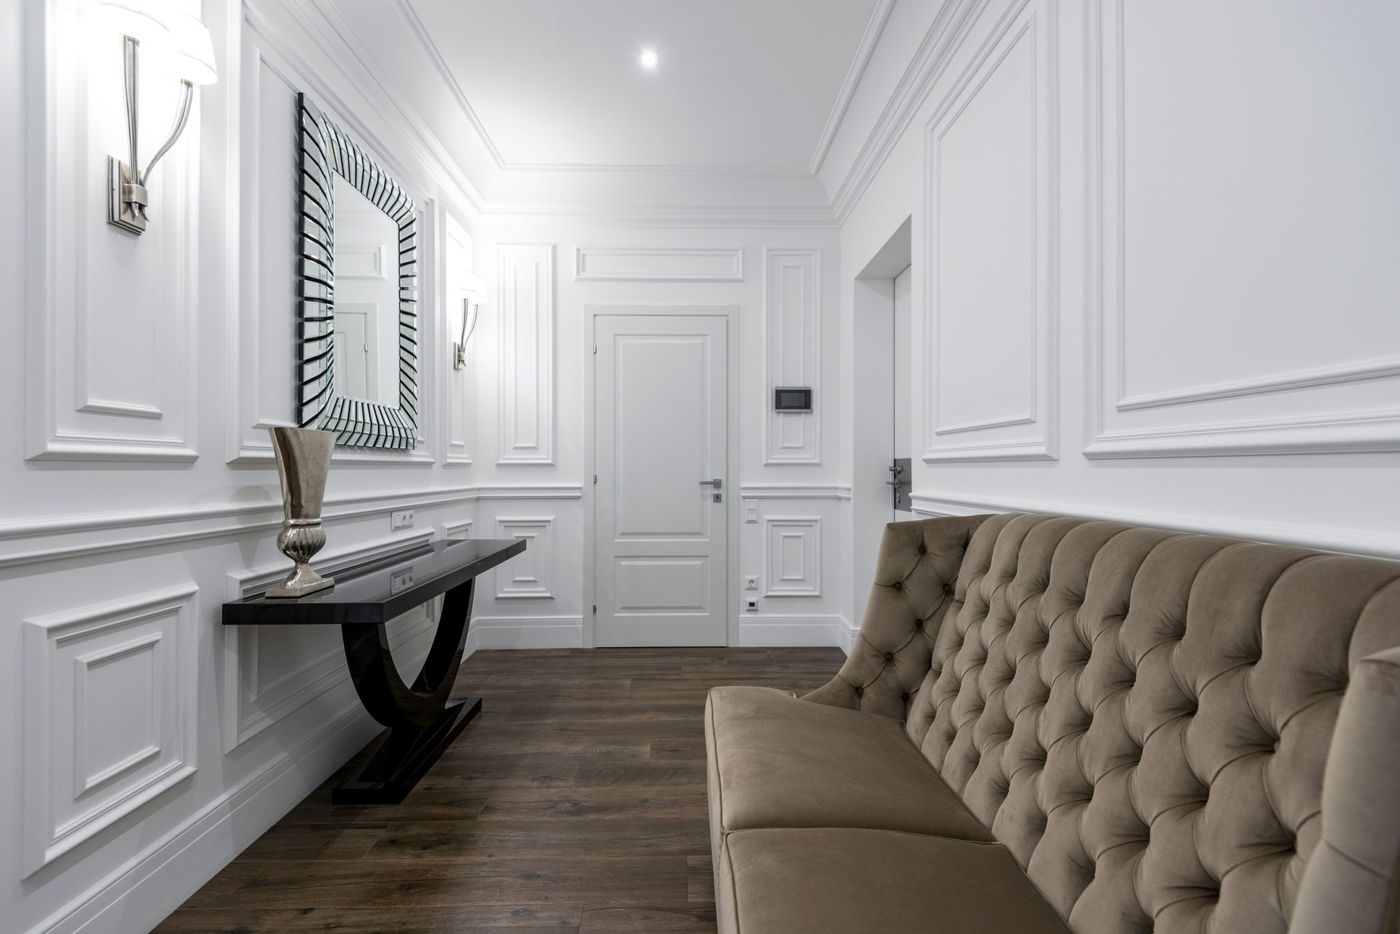
11. Achieve Formal Elegance with Full-Height Raised Paneling
When using full-height paneling, the key to avoiding a monotonous look is varying the size and orientation of your rectangles. Notice how there are larger vertical rectangles on the bottom two-thirds of the wall and smaller, horizontal rectangles on the top third. This breaks up the wall and creates a visual hierarchy that’s similar to a classic column (base, shaft, capital). For a 9-foot ceiling, a good proportion is to have the top rail of the lower, larger panels hit at around the 72-inch mark.
|
📋 Copy HEX 🔗 Share |
🔥 Trending Context
This look is the epitome of elegance, but it demands care. All those beautiful raised edges are prime real estate for dust. A weekly pass with a feather or microfiber duster is essential. Because it’s a high-touch area (especially in a hallway), choose a paint with a satin or semi-gloss finish. These sheens are significantly more durable and scrubbable than matte or eggshell, so you can easily wipe away fingerprints, scuffs, and smudges without damaging the finish. Expect to do minor paint touch-ups once a year to keep it looking pristine.
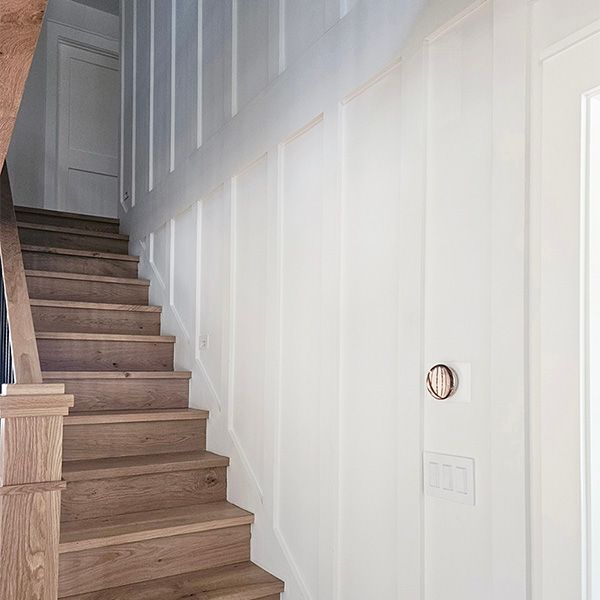
12. Modernize a Staircase with Full-Height Board and Batten
The formula for this clean, bright look is surprisingly simple: 80% Crisp Vertical Lines + 20% Natural Wood Warmth. The dominant element is the floor-to-ceiling white board and batten, which creates a strong sense of height and order. Its clean, graphic quality feels modern and bright. This is perfectly balanced by the natural oak of the stair treads and newel post, which injects just enough warmth and organic texture to keep the space from feeling sterile. It’s a high-contrast recipe that feels both modern and inviting.
|
📋 Copy HEX 🔗 Share |
💰 Budget Breakdown
Full-height vertical paneling like this is a fantastic solution for staircases in homes with standard 8 or 9-foot ceilings. The strong vertical lines draw the eye upward, creating the illusion of a taller, more voluminous space. It’s especially effective in narrow or enclosed stairwells where you can’t add visual interest with furniture or art. The clean, uncluttered look helps the space feel bigger and brighter. For double-height foyers, consider a paneling style that stops at a chair rail to avoid an overwhelming or dizzying effect.
13. Combine White Raised Panels with Bold Blue Bathroom Walls
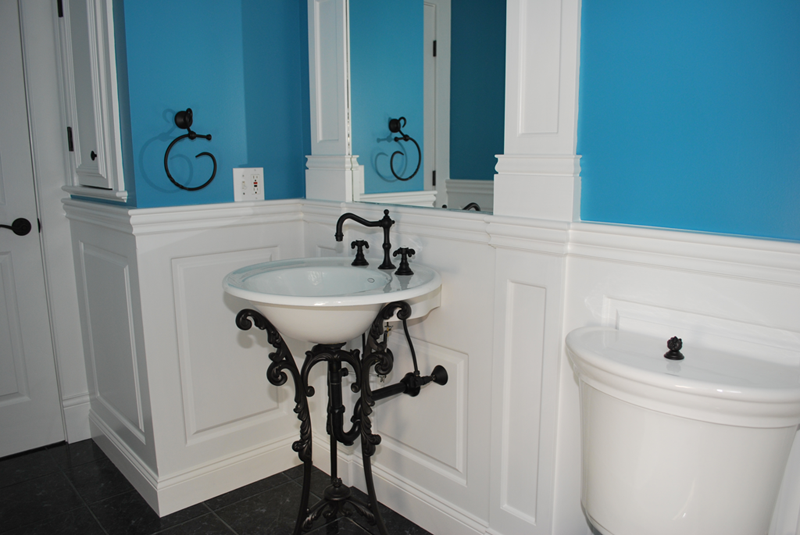
The single element that defines this bathroom is the ornate, black metal pedestal sink. It’s a bold, sculptural choice that stands in stark contrast to the classic, crisp white wainscoting. If you replaced it with a standard white porcelain pedestal sink, the room would still be lovely, but it would lose its personality and edge. The black metal base introduces an almost industrial-chic element into a very traditional setting, creating a tension that is modern, unexpected, and completely memorable.
|
📋 Copy HEX 🔗 Share |
💡 Designer Tip
After years of all-white-everything, homeowners are craving color, and bathrooms are the perfect place to experiment. A bold, saturated hue like this cobalt blue feels fresh and confident. It’s a trend known as ‘new traditional,’ where classic elements like raised panel wainscoting are updated with contemporary color choices and fixtures. This isn’t your grandmother’s formal bathroom; it’s a vibrant, personality-filled space that feels both timeless and perfectly of-the-moment for 2026.
14. A Minimalist Approach: Unfinished Wood Molding on White Walls
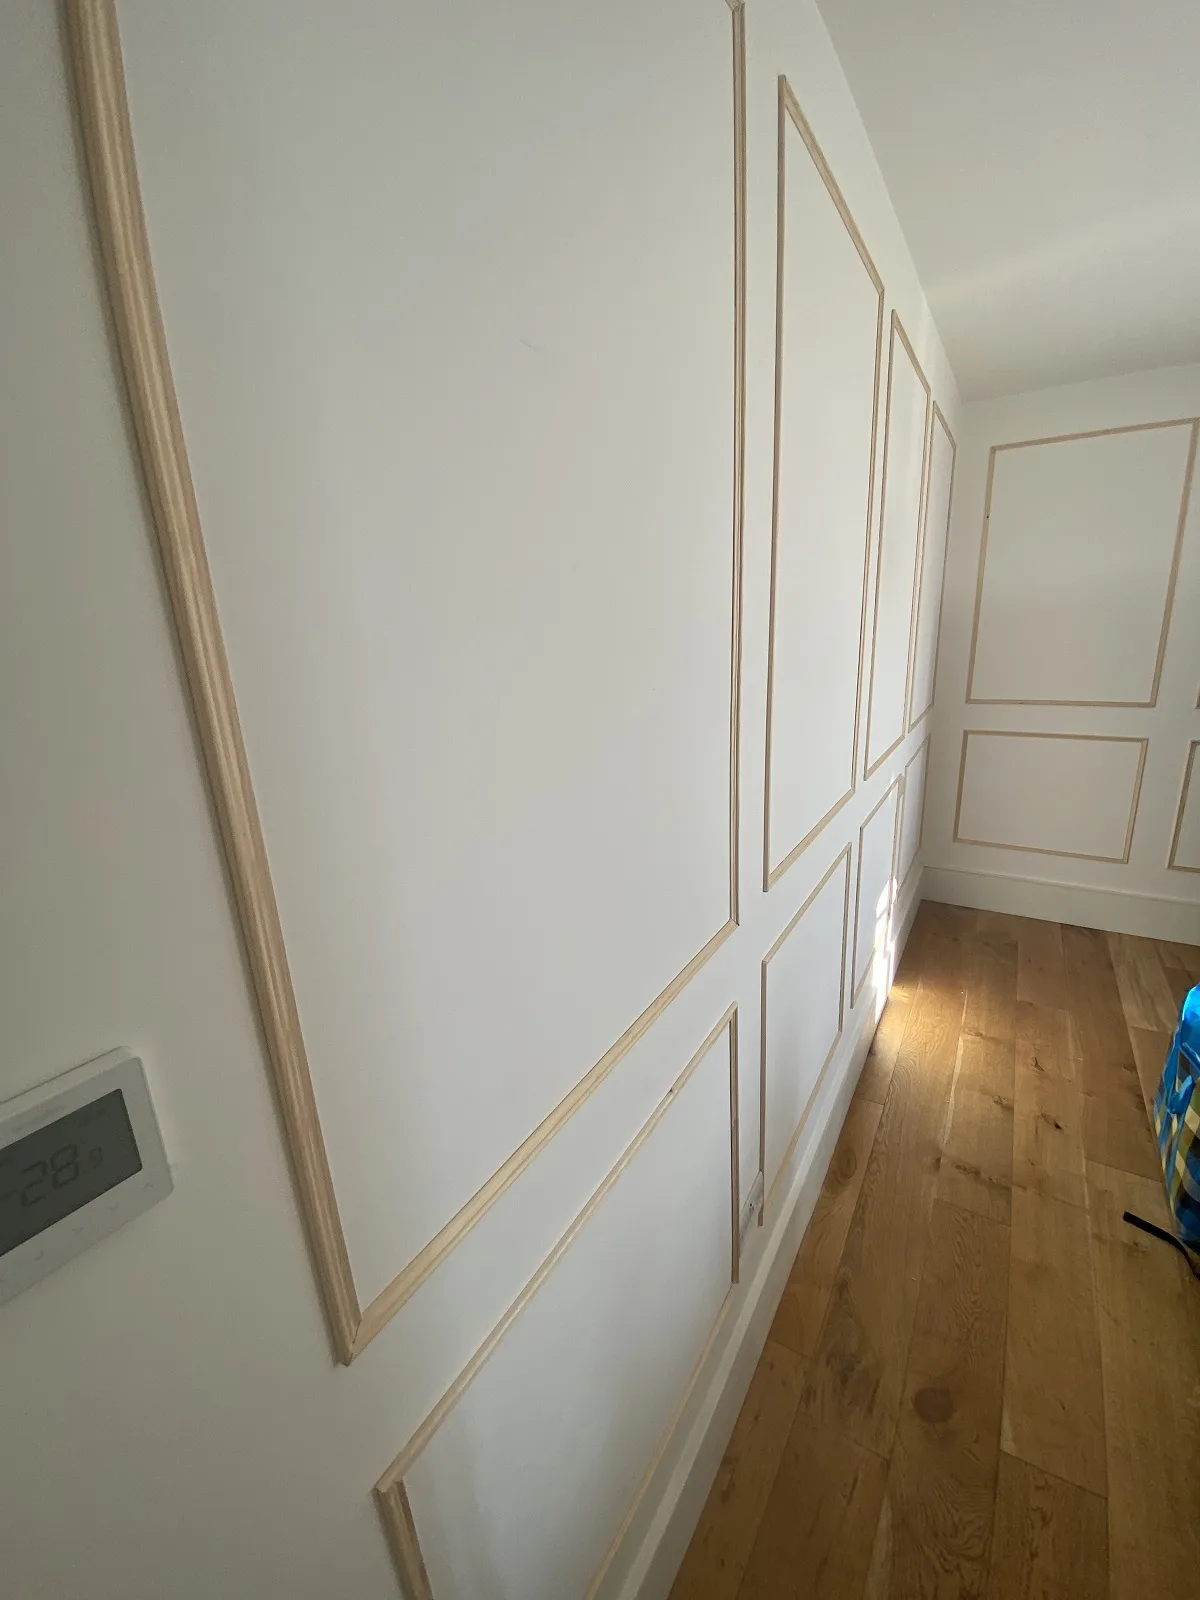
This is the ultimate budget wainscoting. You’re looking at simple, inexpensive pine or poplar trim from a place like Home Depot, applied directly to the drywall. There’s no backer board, no complex joinery. For a 12-foot wall, you could likely buy all the materials for under $75. The real savings, however, is in labor. This is a very approachable DIY project that only requires a miter box or saw, a level, a tape measure, and a brad nailer. It delivers a huge amount of architectural character for a minimal investment, proving you don’t need a huge budget to make an impact. This is a fantastic low-cost alternative to the more formal look in Idea #0.
|
📋 Copy HEX 🔗 Share |
⚠️ Real Talk
While the raw wood look is beautiful, leaving wood trim completely unfinished is risky. Pine, in particular, can yellow or darken unevenly over time when exposed to sunlight. It’s also porous and will easily absorb stains from fingerprints or splashes. To maintain this light, natural look while protecting the wood, apply a water-based, non-yellowing polycrylic sealer in a matte finish. It will provide crucial protection without adding the warm, amber tone of traditional oil-based polyurethane, keeping the look minimalist and modern.
15. Graphic and Chic: Vertical Pinstripe Wall Paneling
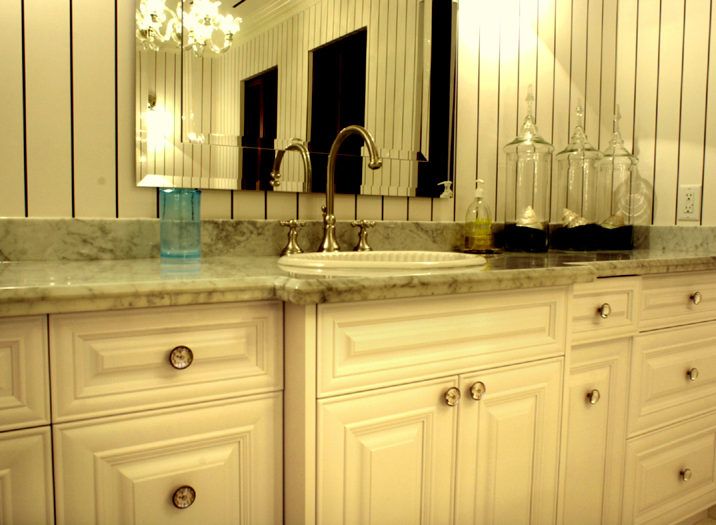
This design succeeds by creating a dynamic visual rhythm. The thin, repeating vertical lines of the pinstripe paneling create a sense of height and a formal, structured backdrop. This strong linear pattern is then softened and contrasted by the organic, swirling veins of the Carrara marble countertop. The pairing of a man-made, graphic pattern with a natural, random one creates a sophisticated tension. The simple, clean lines of the shaker-style vanity provide a quiet middle ground, allowing the two star materials to shine.
|
📋 Copy HEX 🔗 Share |
⭐ The One Thing
When using a strong vertical pattern like this, whether it’s paneling, tile, or wallpaper, pay close attention to your fixture placement. The faucet and sconces should be perfectly centered within the stripes or panels to maintain the room’s sense of order and symmetry. In this case, the arched antique brass faucet is perfectly aligned with the center of the vanity doors below. This thoughtful alignment is a subtle detail that signals high-quality design and prevents the overall look from feeling chaotic.
16. Airy Hallway with White Board and Batten and a Light Wood Rail
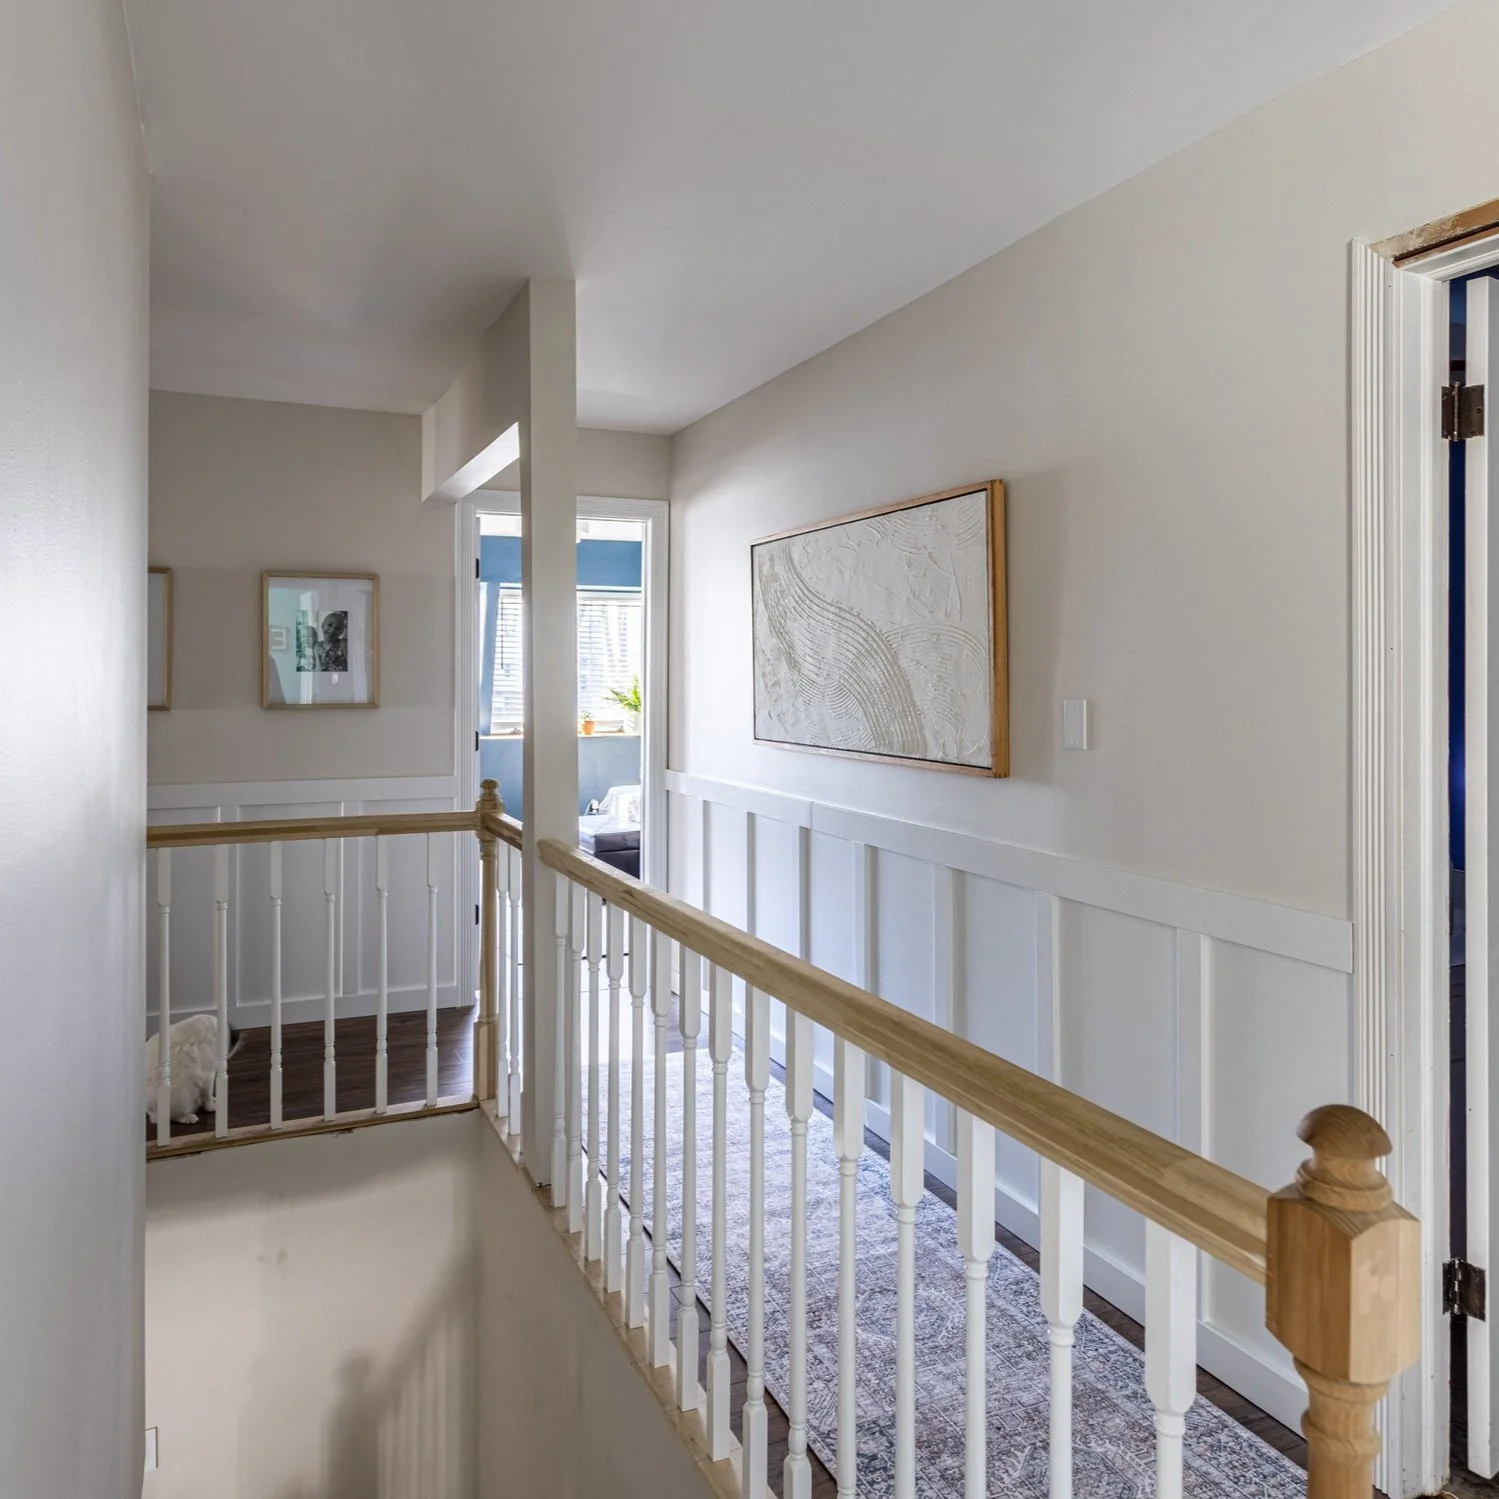
The visual recipe for this light and airy transitional look is 70% Classic White + 20% Natural Wood + 10% Soft Texture. The white board and batten and balusters form a clean, bright foundation that makes the hallway feel spacious. The light oak handrail and dark wood floors inject warmth and an organic element. Finally, the textured wall art and the subtle texture of the beige upper wall add a layer of softness and depth, preventing the space from feeling too stark or cold. It’s a balanced mix that feels both timeless and relaxed.
|
📋 Copy HEX 🔗 Share |
📏 Scale Guide
Recreating that perfectly smooth finish on board and batten is all in the prep work. Here’s how the pros do it:
- After installing your boards, fill every single nail hole with a dab of wood filler. Overfill slightly.
- Once dry, sand the wood filler flush with the board using 220-grit sandpaper.
- Apply a thin, continuous bead of paintable caulk to every seam where wood meets wood or wood meets wall.
- Smooth the caulk bead immediately with a damp finger or a caulking tool for a seamless transition.
- Once the caulk is fully cured, prime the entire installation, then apply at least two coats of your finish paint.
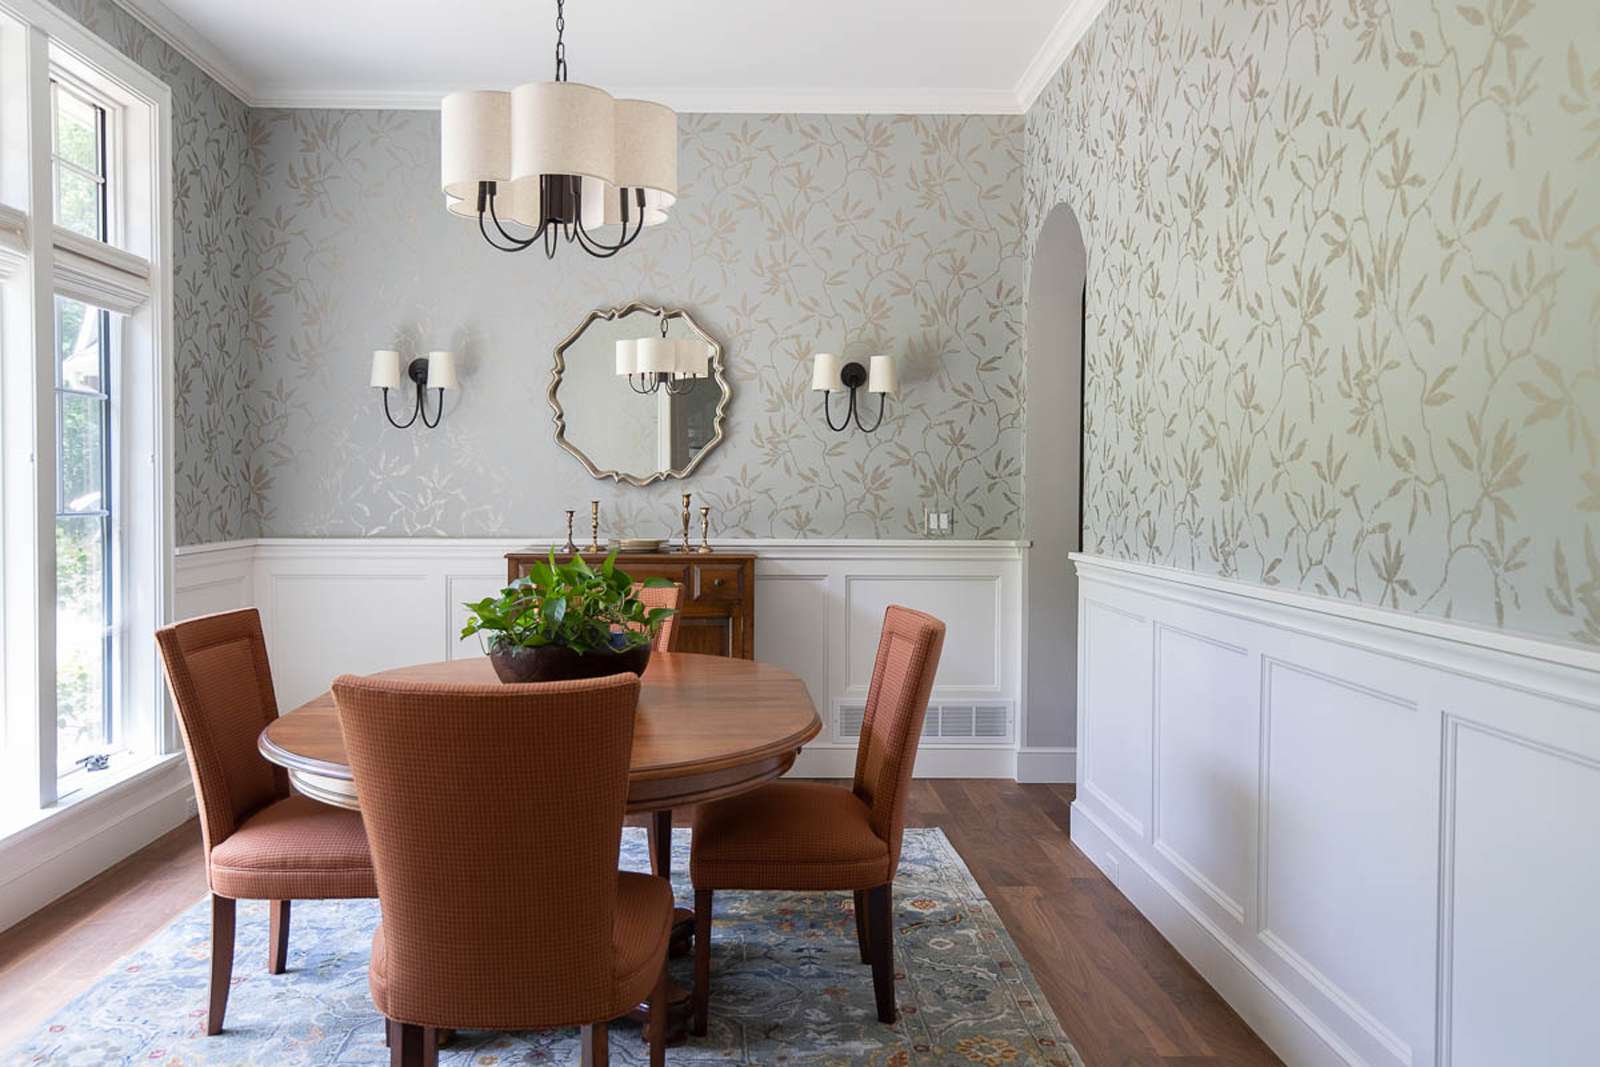
17. Traditional Wainscoting in a Classic Dining Room
A classic, formal dining room with traditional wainscoting is a timeless investment in your home’s character. Here’s a general cost estimate to bring this traditional elegance to life in a standard dining space. Prices can vary widely based on location and whether you hire a professional or tackle it as a DIY project.
|
📋 Copy HEX 🔗 Share |
🧹 Maintenance Reality
- Wainscoting Materials (MDF or Poplar): $500 – $1,500
- Professional Installation Labor: $1,000 – $3,000
- Paint and Supplies: $200 – $500
- Dining Furniture (Table & Chairs): $2,000 – $7,000+
- TOTAL (pro-installed wainscoting): $3,700 – $12,000+
Budget alternative: Using pre-fabricated PVC picture frame molding kits and sourcing secondhand furniture can bring the total project cost down to the $1,000 – $2,500 range.
The single element that anchors any traditional wainscoting project is the chair rail. It’s more than just a decorative trim piece; it’s the primary horizontal line that defines the proportions of the entire room. It dictates the height of the wainscoting and creates the visual separation between the architectural lower half and the decorative upper half of the wall. Getting the height and profile of the chair rail right is the most critical decision you’ll make for this style. Everything else is built around it.
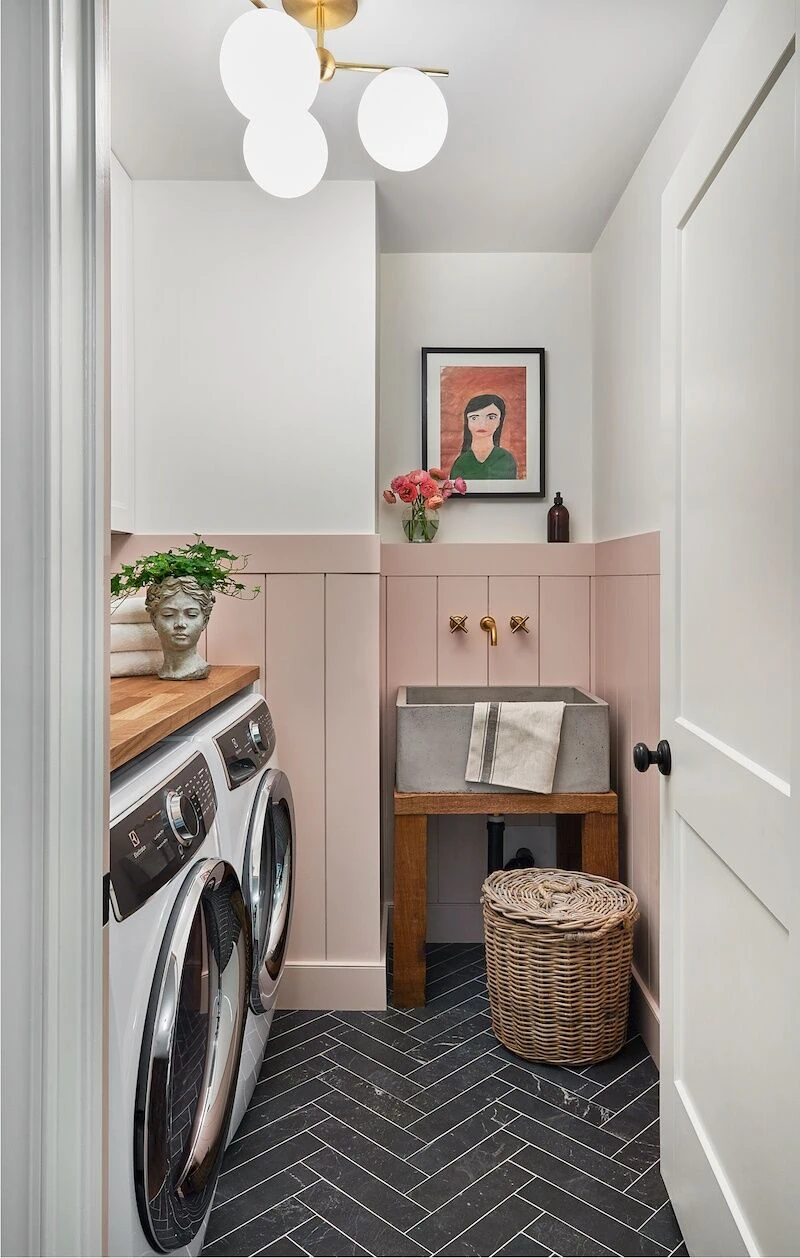
18. Playful Pink Vertical Paneling for a Functional Laundry Room
A concrete utility sink is a fantastic, durable choice with a cool industrial-farmhouse vibe. However, be aware that unsealed concrete is porous. It can stain from things like spilled wine, coffee, or even certain detergents if they are left to sit. It can also develop small hairline cracks over time, which are part of its character but can be alarming if you’re not expecting them. To keep it looking its best, it should be sealed upon installation and then resealed annually with a food-safe concrete sealer.
|
📋 Copy HEX 🔗 Share |
🔧 How-To Brief
You can get this charming, custom look without the high-end price tag. The vertical paneling can be achieved with affordable beadboard or V-groove MDF panels from Lowe’s or Home Depot. For the countertop over the washer/dryer, instead of a custom butcher block, an IKEA kitchen countertop like the ‘SALJAN’ or ‘EKBACKEN’ offers a similar look for a fraction of the cost. Pair it with simple wood legs from a hardware store, and you have a stylish, functional laundry space with a high-end feel on a real-world budget. This is a great example of being resourceful, like the simple molding in Idea #13.
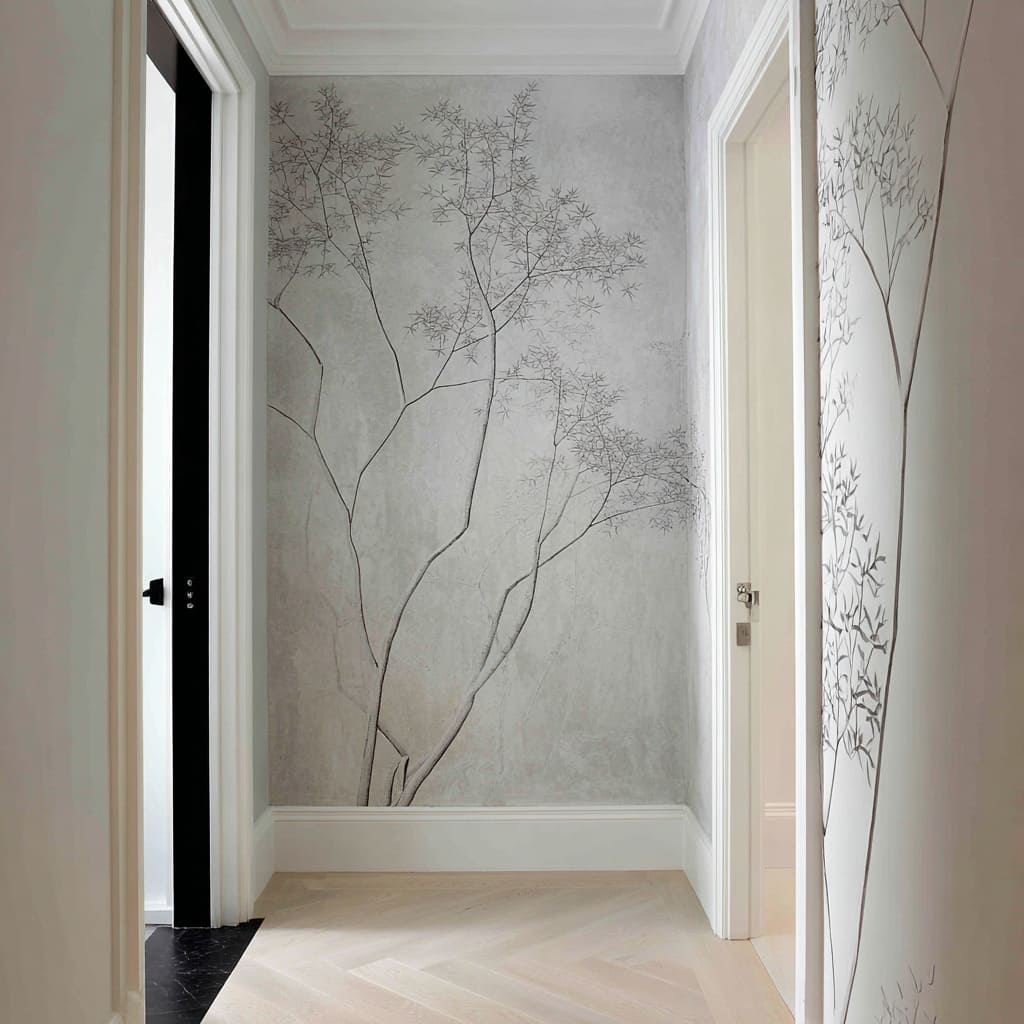
19. Think Beyond Panels: A Sculptural Tree Wall Relief
This wall treatment is captivating because it plays with texture and light in a way that flat panels cannot. The raised, organic tree branch pattern creates subtle highlights and shadows that shift throughout the day as the light changes. This dynamic quality makes the wall feel alive. The design works by contrasting this organic, flowing texture with the crisp, rigid geometry of the herringbone floor and the high baseboard molding. This balance between natural forms and clean lines creates a space that is both serene and sophisticated.
|
📋 Copy HEX 🔗 Share |
✅ Before You Start
This look taps directly into the ‘biophilic design’ trend, which is all about bringing the patterns and textures of the natural world indoors. After years of sharp, geometric modernism, people are craving softness and a connection to nature in their homes. This sculptural wall acts as permanent art, providing the calming, organic feel of a forest canopy. It’s a move toward more tactile, sensory experiences in interior design, where the way a surface feels is just as important as how it looks.
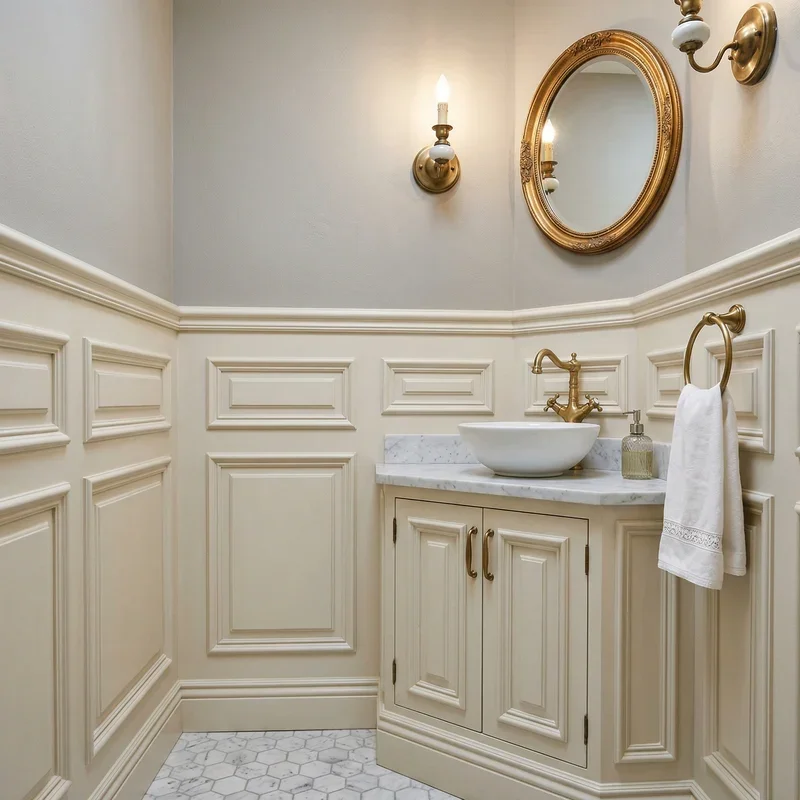
20. Warm Up a Bathroom with Cream Wainscoting and Brass Fixtures
When painting wainscoting a color other than bright white, like this soft cream, the paint sheen is critical. In a bathroom, moisture is a given. You must use a paint formulated for kitchens and baths, and choose a satin or semi-gloss finish. A matte or eggshell finish will absorb moisture and be nearly impossible to clean, leading to water marks and mildew growth. The higher sheen of satin or semi-gloss creates a durable, wipeable surface that will protect your investment and keep the paneling looking fresh for years.
|
📋 Copy HEX 🔗 Share |
🎯 What Makes It Work
Unlacquered brass, often used for high-end fixtures like the faucet seen here, is beautiful but it’s a ‘living finish’. This means it will tarnish and develop a unique patina over time as it reacts with oxygen and moisture. Some people love this evolving, aged look. If you prefer your brass to stay bright and shiny, you have two options: commit to regular polishing with a product like Brasso, or specifically choose lacquered brass fixtures, which are sealed to prevent tarnishing. Be honest with yourself about how much maintenance you’re willing to do.
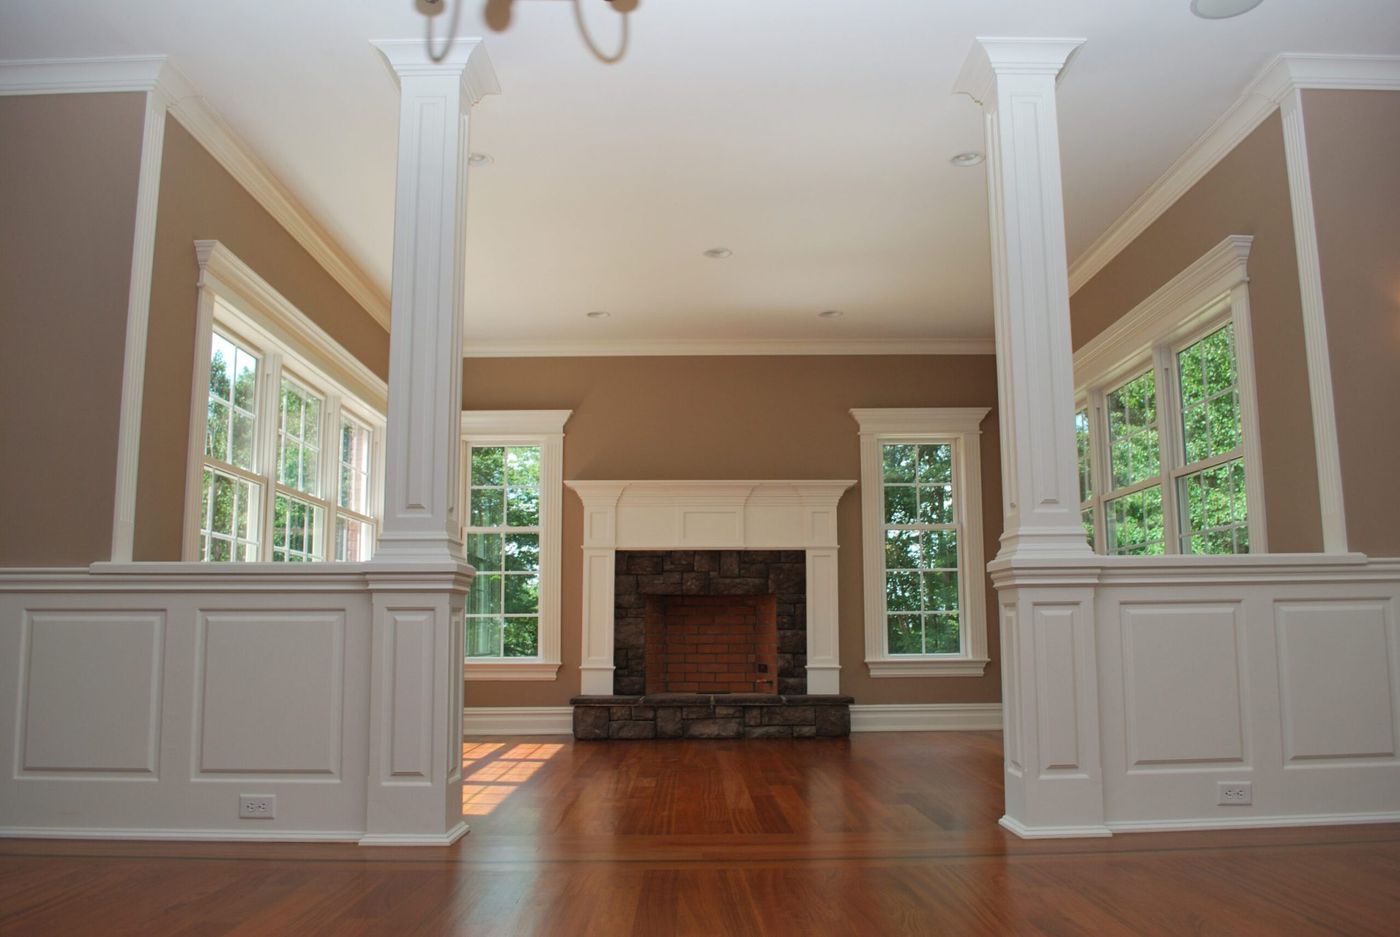
21. Integrate Architectural Columns with Raised Panel Wainscoting
This is a look for a grand space. To successfully incorporate full-height architectural columns and a substantial fireplace, you need both floor space and ceiling height. This design works best in rooms that are at least 250-300 square feet with ceilings of 10 feet or higher. In a smaller room, the combination of columns, a heavy mantel, and detailed wainscoting would feel crowded and over-the-top, shrinking the perceived size of the space. This is all about creating a sense of formal, traditional grandeur, which requires room to breathe.
|
📋 Copy HEX 🔗 Share |
💸 Get This Look For Less
that makes this entire design cohesive is the consistent use of crisp white paint across all the architectural elements. The wainscoting, the fluted columns, the fireplace mantle, and the crown molding are all painted in the same shade and sheen. This unifies a set of very strong, distinct architectural features into a single, harmonious statement. If the columns were a different color, or the mantle was stained wood, the room would feel disjointed and fussy. The monochromatic choice is what makes it feel intentional and elegant.
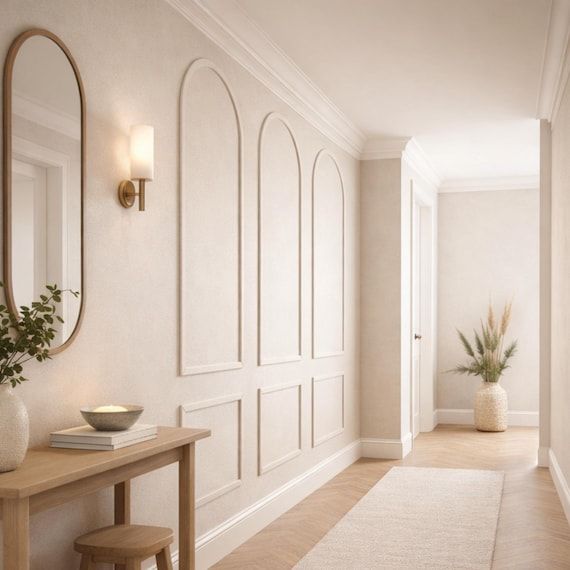
22. Sophisticated Arches: Tone-on-Tone Panel Molding
This hallway is a masterclass in subtlety. The design works because it relies on shadow and form rather than color. By painting the walls, trim, and arched molding all in the same warm beige, the focus shifts to the gentle curves and clean lines of the paneling itself. The soft shadows created by the molding add depth and a sense of history without overwhelming the narrow space. The herringbone floors and brass sconce then add just enough warmth and pattern to keep the monochromatic scheme from feeling flat. It feels sophisticated because it’s whispering, not shouting.
|
📋 Copy HEX 🔗 Share |
📐 Style Math
This serene look follows a simple equation: 70% Monochromatic Architecture + 20% Organic Wood Tones + 10% Warm Metallic. The arched paneling, crown molding, and walls all in one beige color create the seamless, structural base. The light oak of the console table, mirror frame, and herringbone floors brings in natural warmth. Finally, the single brass wall sconce provides a point of light and a touch of handcrafted elegance. You could change the beige to a soft grey or even a pale sage and the formula would still hold perfectly.
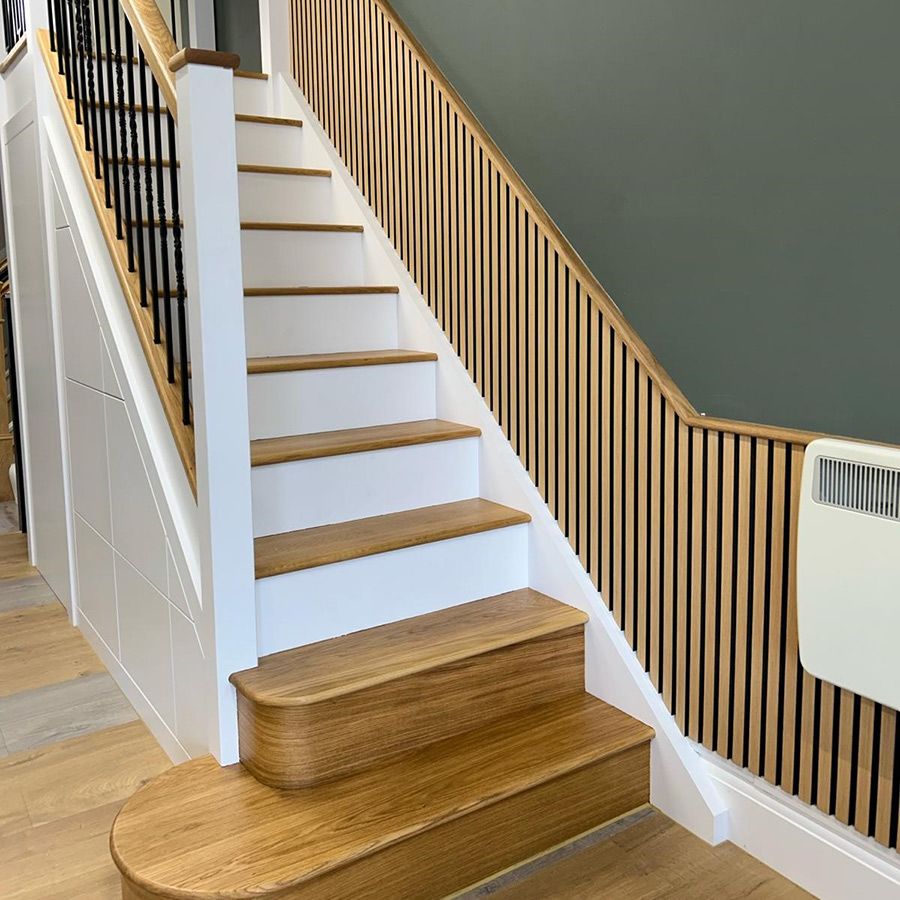
23. Modern Slatted Wood Paneling for a Textural Staircase Wall
When installing slatted wood paneling, the spacing between the slats is a critical design decision. For a modern, airy feel like this, aim for a gap that is either equal to or slightly smaller than the width of the slat itself. For example, if you are using 1.5-inch wide slats, a gap of 1 to 1.5 inches will look balanced. A wider gap can start to look like a fence, while a much smaller gap can look too busy. Use a custom-cut spacer block to ensure perfect consistency as you install the slats up the wall.
|
📋 Copy HEX 🔗 Share |
🔥 Trending Context
Achieving this high-end slatted look doesn’t have to break the bank. Instead of custom-milled solid oak slats, you can get a very similar effect using off-the-shelf lumber. Look for 1×2 select pine or poplar boards at a big-box store. They are straight, have crisp edges, and are relatively inexpensive. A light sanding and a coat of clear matte or satin polyurethane will protect them and bring out their natural warmth. This DIY approach can give you a stunning architectural feature wall for a few hundred dollars.
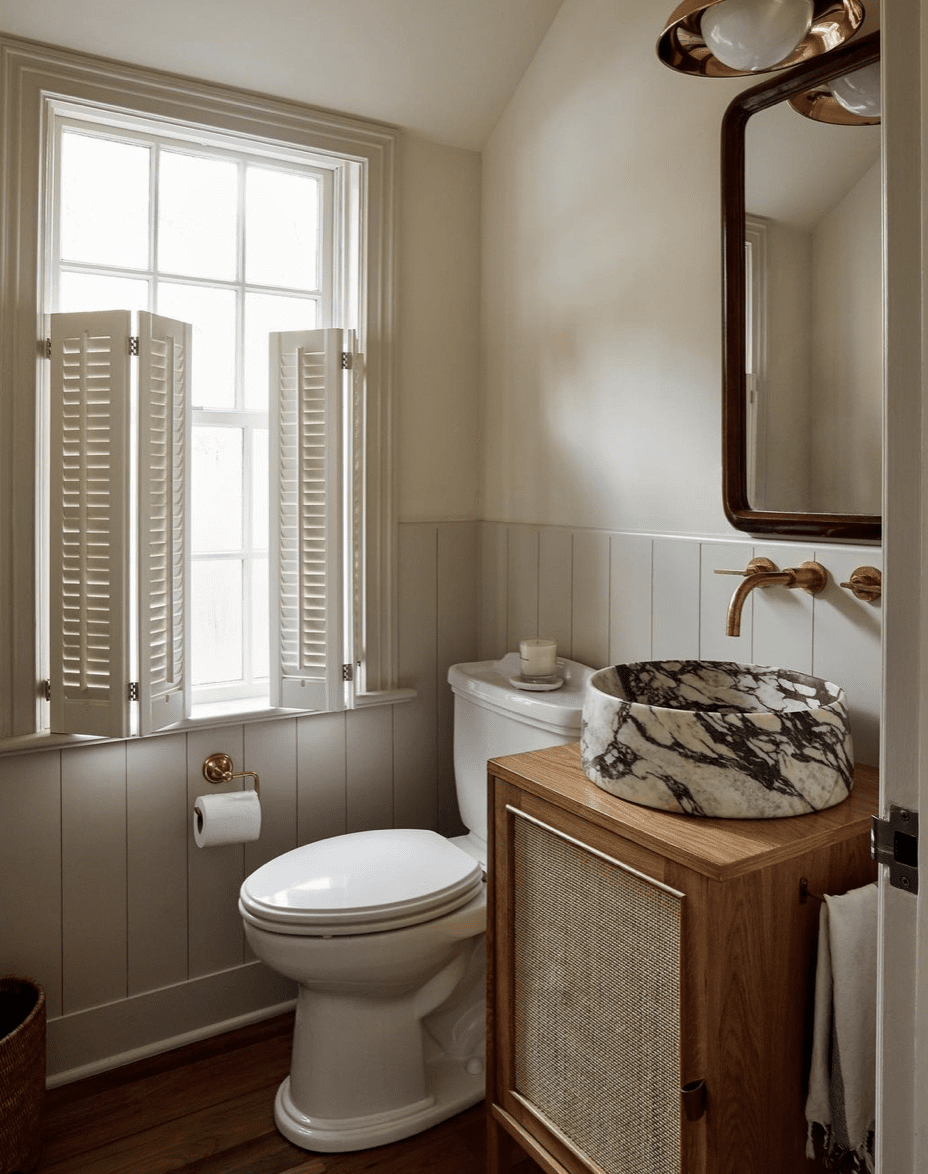
24. Organic Modern with Greige Vertical Planks and a Cane Vanity
That beautiful cane-inlay vanity is a major style statement, but it requires some specific care, especially in a humid bathroom. Cane is a natural fiber that can sag or become brittle if it gets too wet. It’s best to wipe away any water splashes immediately. It can also be a bit of a dust trap. A quick vacuum with a soft brush attachment is the best way to clean it. While it’s incredibly stylish, if you have young kids who love to splash, you might consider a solid wood or MDF vanity front for easier maintenance.
|
📋 Copy HEX 🔗 Share |
💰 Budget Breakdown
Let’s be honest about wall-mounted faucets. They look incredibly sleek and free up counter space, which is a huge plus. However, the installation is much more complex and expensive than a standard deck-mounted faucet. All the plumbing and valve work has to be done inside the wall before any tile or paneling goes up. If a valve ever fails or a leak develops down the road, you’ll have to open up the wall to fix it. It’s a significant commitment, so be sure you love the look and are prepared for the added installation cost and potential future repair complexity.
25. Create Wainscoting with Horizontal Wavy Textured Tile
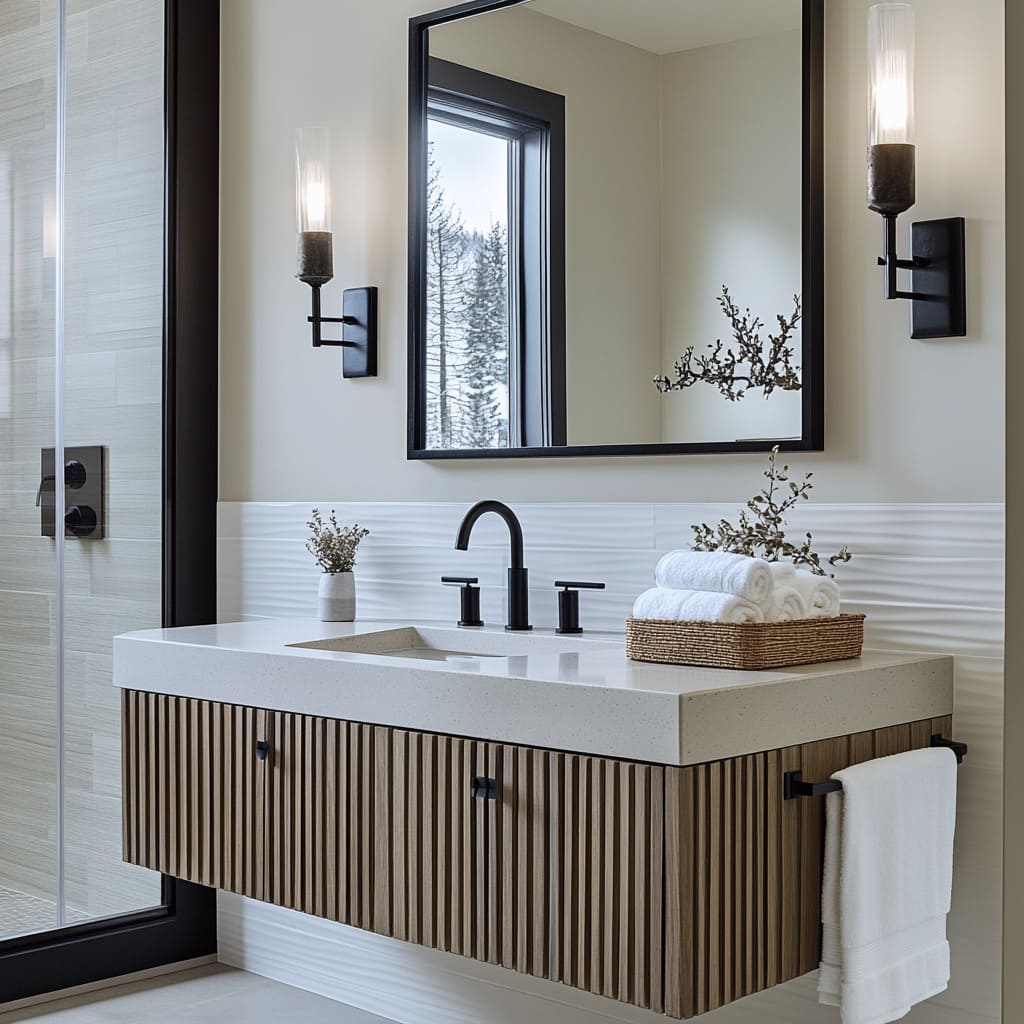
The single element that defines this bathroom is the wavy white tile. It completely reinvents the concept of wainscoting. Instead of wood and paint, it uses texture and light to divide the wall. The undulating surface catches the light in a dynamic, shifting way that feels both organic and incredibly sophisticated. It proves that wainscoting doesn’t have to be traditional; it can be any material that creates a distinct lower-wall treatment. This choice transforms a simple bathroom into a serene, spa-like retreat. For a more traditional tile wainscoting look, check out the classic bathroom in Idea #5.
|
📋 Copy HEX 🔗 Share |
💡 Designer Tip
Creating a clean transition between a tile wainscot and a painted wall is key. Here’s how to get that crisp line:
- First, install your tile up to your desired height. Let the thin-set and grout fully cure.
- Apply a high-quality schluter edge or pencil liner tile trim along the top edge of the tile. This provides a clean, finished border.
- Tape off the top of the tile trim with painter’s tape, pressing firmly to create a seal.
- Prime and paint the upper portion of the wall.
- Once the final coat of paint is dry to the touch, carefully score the edge of the tape with a utility knife and pull it off at a 45-degree angle for a perfect line.
26. Pair Beadboard Wainscoting with Bold Botanical Wallpaper
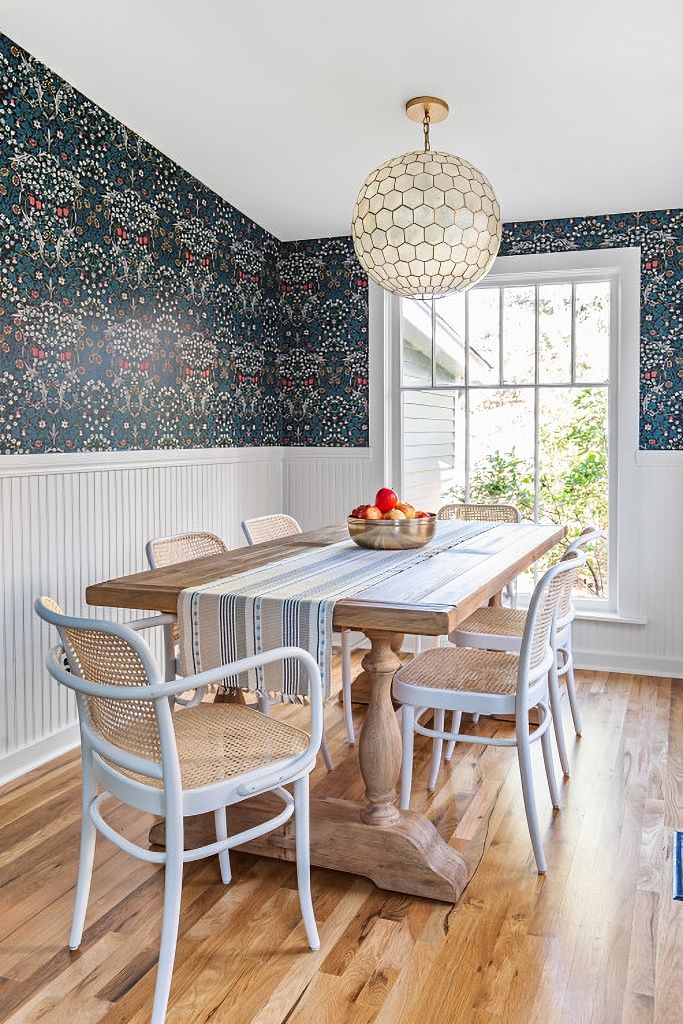
This room’s cozy, updated-traditional formula is 40% Rustic Foundation + 40% Graphic Pattern + 20% Classic Form. The rustic trestle table and simple beadboard provide a solid, unpretentious base. The dark, dramatic botanical wallpaper introduces a layer of sophisticated, graphic storytelling. Finally, the classic bentwood-style chairs with their woven cane seats offer timeless shapes and textures that tie everything together. It’s a perfect blend of farmhouse comfort and English country house charm.
|
📋 Copy HEX 🔗 Share |
⚠️ Real Talk
This combination works so well because of the balance between simple and complex. The beadboard wainscoting is a very simple, repetitive vertical pattern. It’s quiet and structural. This provides the perfect calm foundation for the wildly complex and organic pattern of the botanical wallpaper. The white of the beadboard and chairs also acts as a visual break, preventing the dark, busy wallpaper from completely overwhelming the space. It’s a classic design trick: pair one busy pattern with one simple one.
27. Classic Contrast: Navy Walls Above White Beadboard Wainscoting
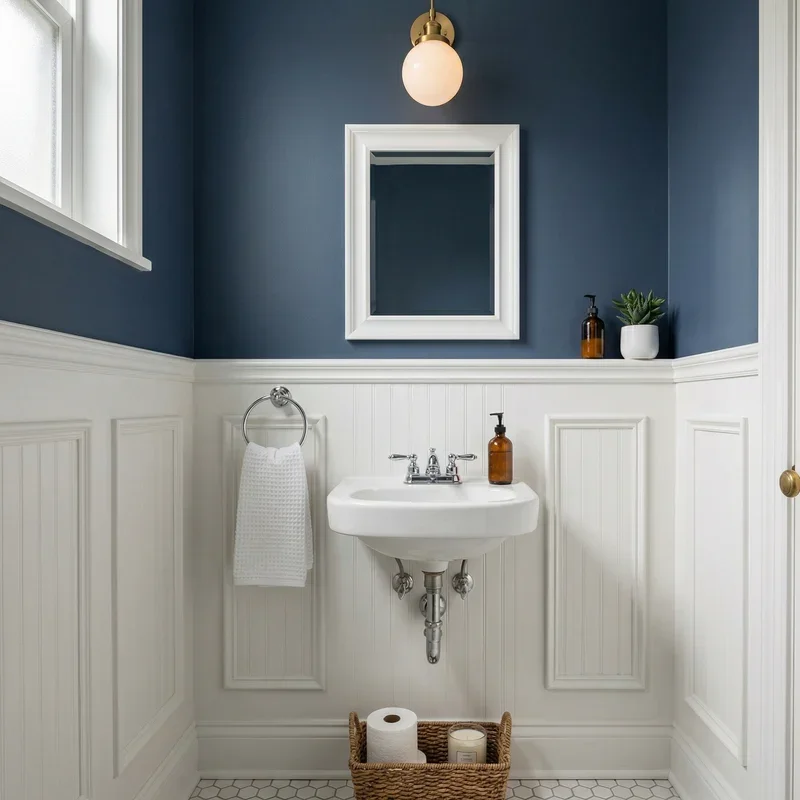
When pairing a dark wall color like navy with white wainscoting, the finish is everything. Paint the wainscoting in a semi-gloss or satin finish. This gives it a subtle sheen that reflects light and makes it easy to clean. For the navy wall above, use a matte or eggshell finish. The lack of sheen will make the color feel deeper and more velvety, absorbing light and creating a beautiful contrast with the reflective trim below. This difference in sheen adds a layer of professional polish that makes the whole design feel more expensive.
|
📋 Copy HEX 🔗 Share |
⭐ The One Thing
This high-contrast, classic look is one of the most budget-friendly updates you can make to a bathroom. Beadboard wainscoting is available in large, easy-to-install 4×8 sheets at any home improvement store for a very reasonable price. A gallon of navy paint and some new chrome hardware for an existing sink are also inexpensive upgrades. For under $300 and a weekend of work, you can completely transform a dated powder room into a crisp, timeless space with tons of personality.
28. Moody and Traditional: Burgundy Beadboard and Toile Wallpaper
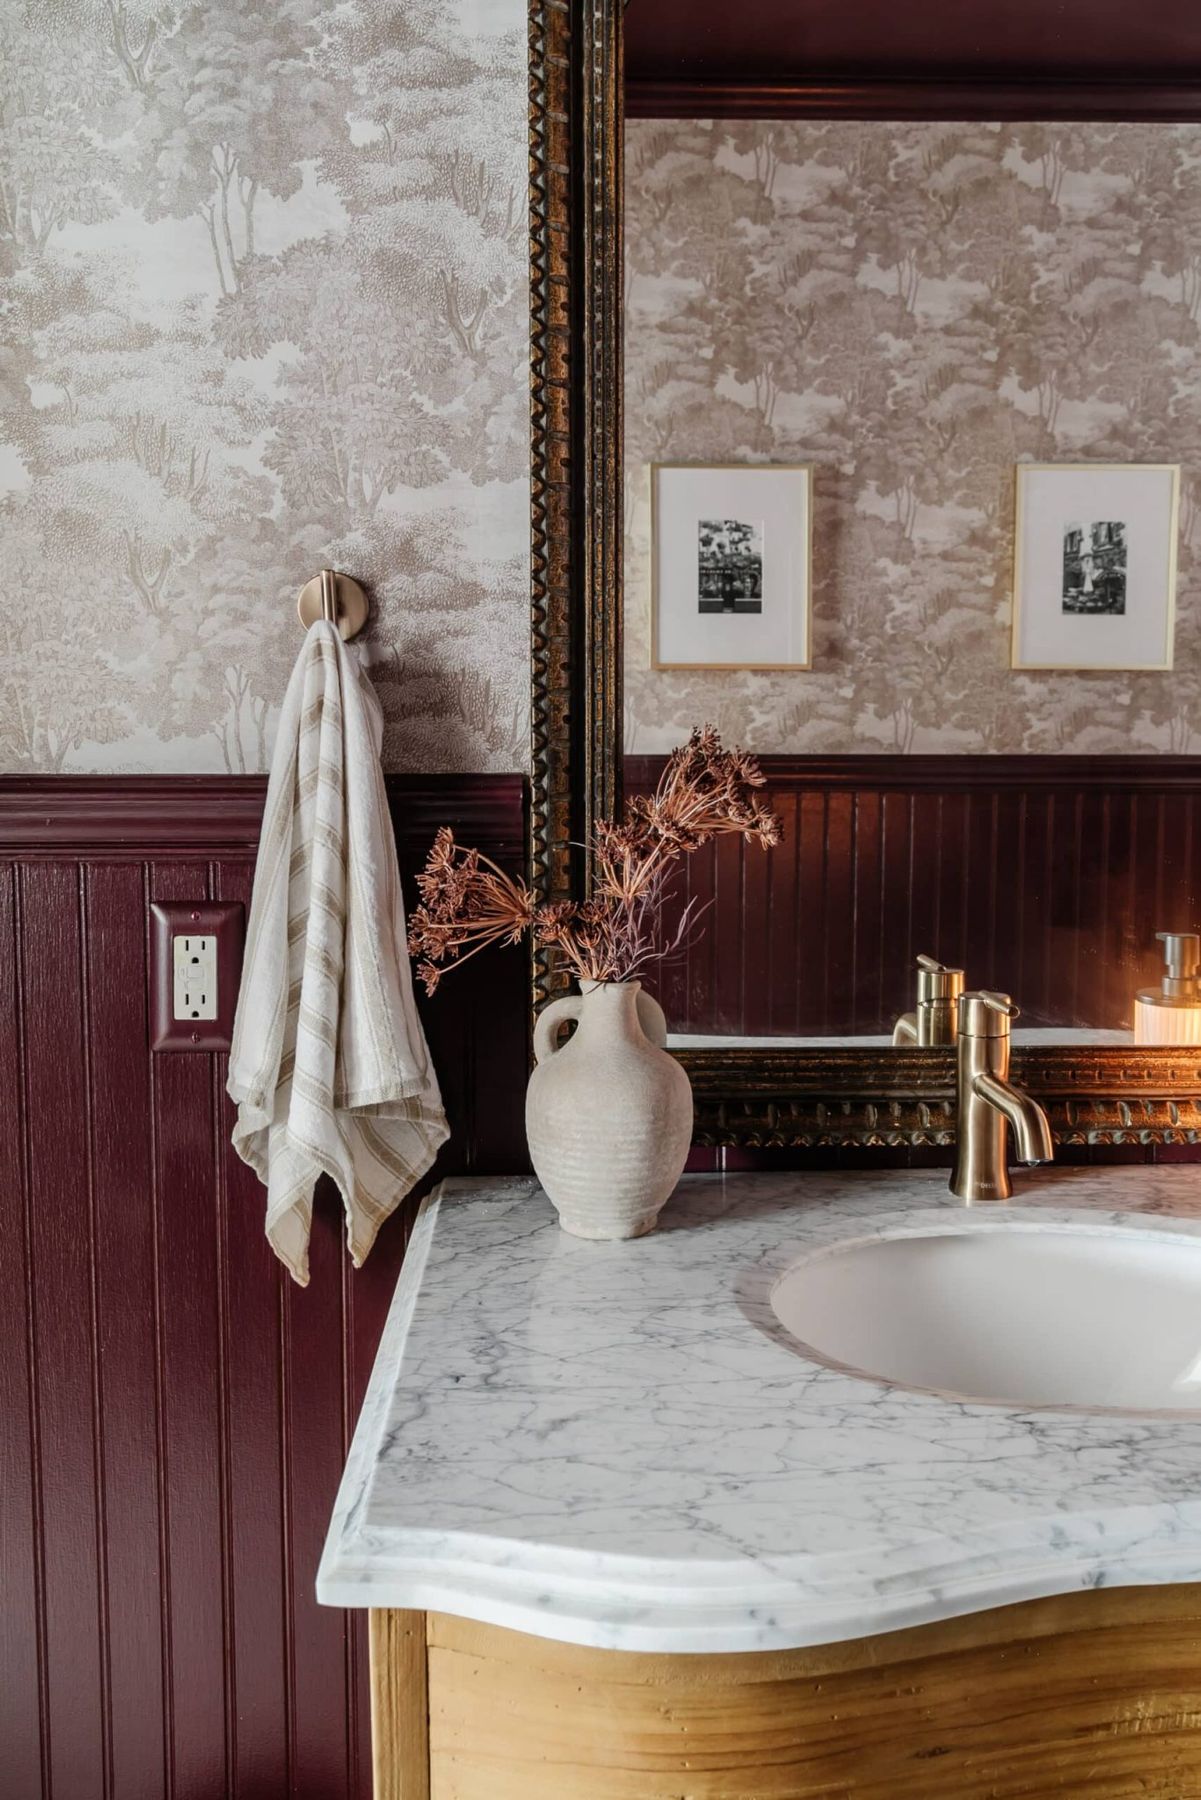
This look is part of the ‘dark academia’ and ‘grandmillennial’ trends that are huge on Pinterest and Instagram. It’s a move away from the light, airy, and minimalist styles of the past decade and a full-on embrace of color, pattern, and history. The deep burgundy, the classic toile, the ornate gold mirror—it all speaks to a desire for spaces that feel layered, personal, and steeped in a bit of romantic nostalgia. It’s about creating a cozy, moody sanctuary that feels collected over time. Compare the moody vibe here to the playful color in Idea #17.
|
📋 Copy HEX 🔗 Share |
📏 Scale Guide
A glossy finish on wainscoting, like this rich burgundy, is stunning but it is not forgiving. High-gloss paint reflects a lot of light, which means it will highlight every single imperfection on the surface underneath. Every ding, bump, and uneven seam will be magnified. To get a perfect finish, your prep work has to be flawless. This means meticulous sanding, caulking, and priming to ensure the surface is perfectly smooth before the first coat of color ever goes on. It’s a high-impact look, but it demands perfection.
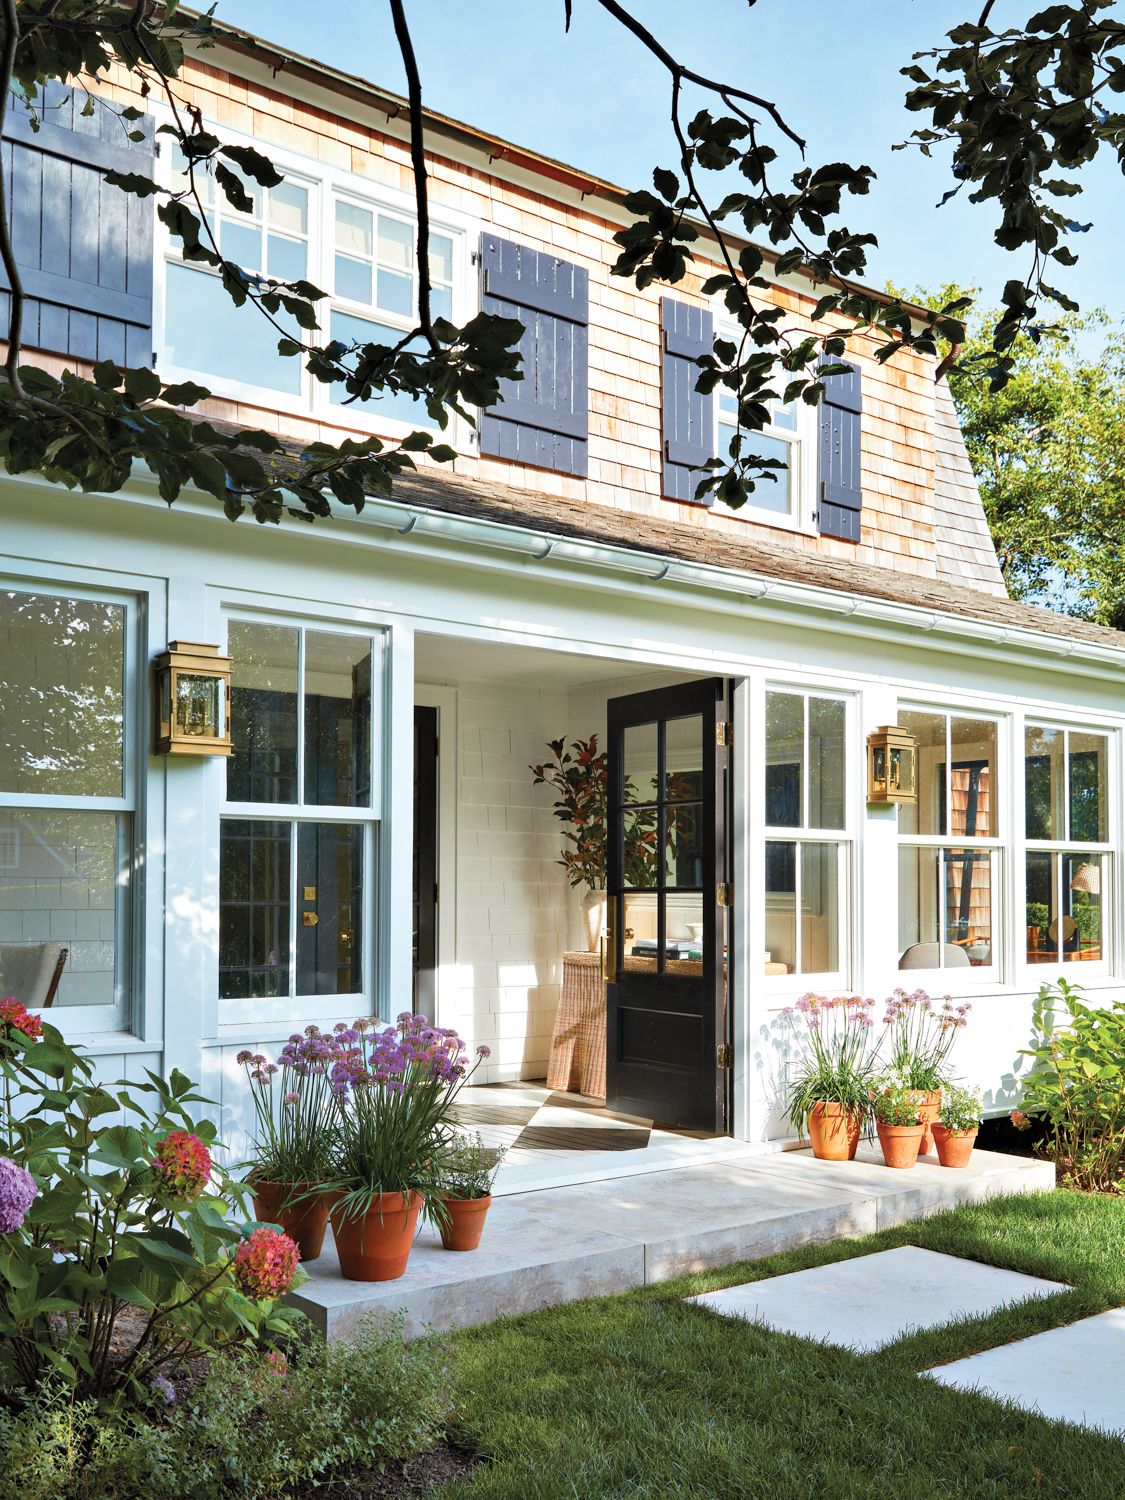
29. Bring Exterior Shingle Style Inside for a Coastal Feel
Okay, let’s address the elephant in the room: this is exterior siding. While bringing outdoor materials inside is a cool, textural look, you can’t just nail cedar shingles to your living room drywall. Real exterior shingles are thick, rough, and designed for weather, not interiors. To get this look inside, you would use a much thinner, smoother interior-grade shingle panel or create the look with carefully cut and layered luan or plywood strips. It’s also a major dust collector and can be difficult to clean. It’s a high-commitment look, and not one to take on lightly. For an architectural look that’s easier to maintain, check out the other ideas in this article or review the common issues in our mistakes section.
|
📋 Copy HEX 🔗 Share |
🧹 Maintenance Reality
that sells this as a cohesive design is the strict, high-contrast color palette. The crisp white of the siding, the deep charcoal/black of the door frame and shutters, and the warm brass of the lanterns create a timeless and graphic combination. This limited palette allows the different textures—the horizontal siding, the wood shingles, the smooth trim—to stand out without competing. If other colors were introduced, the look could quickly become messy and lose its crisp, classic appeal.
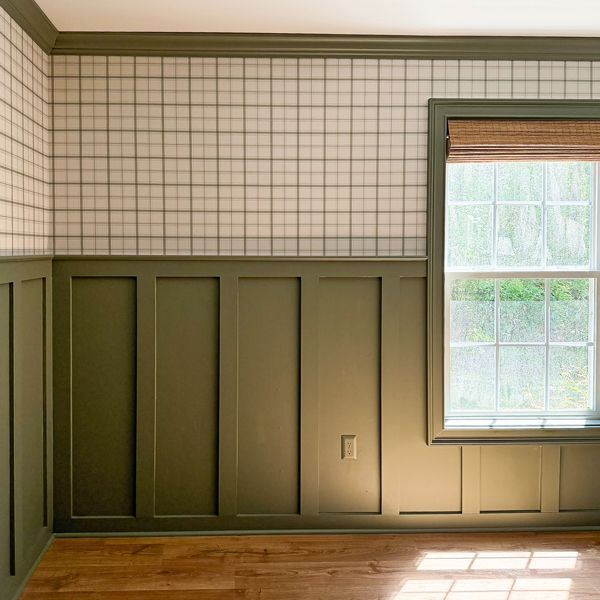
30. Layer Patterns with Olive Board and Batten and Grid Wallpaper
This is a masterclass in pattern mixing. It works because the two patterns operate on different scales. The board and batten is a large-scale, architectural pattern defined by the wide spacing of the vertical boards. The wallpaper, on the other hand, is a small-scale, delicate pattern with its thin grid lines. By pairing a large, bold pattern with a small, subtle one, you create a layered look that is visually interesting but not overwhelming. The shared olive green color in the molding and the paneling ties it all together into one cohesive statement.
|
📋 Copy HEX 🔗 Share |
🔧 How-To Brief
When painting wainscoting, trim, and crown molding to match, as seen here with the olive green, buy all of your paint at the same time and from the same batch if possible. Even with computerized color matching, there can be very slight variations between different cans of paint. Using paint from the same batch for the whole project ensures a perfectly uniform color across all the different architectural elements, creating that seamless, custom-built look.
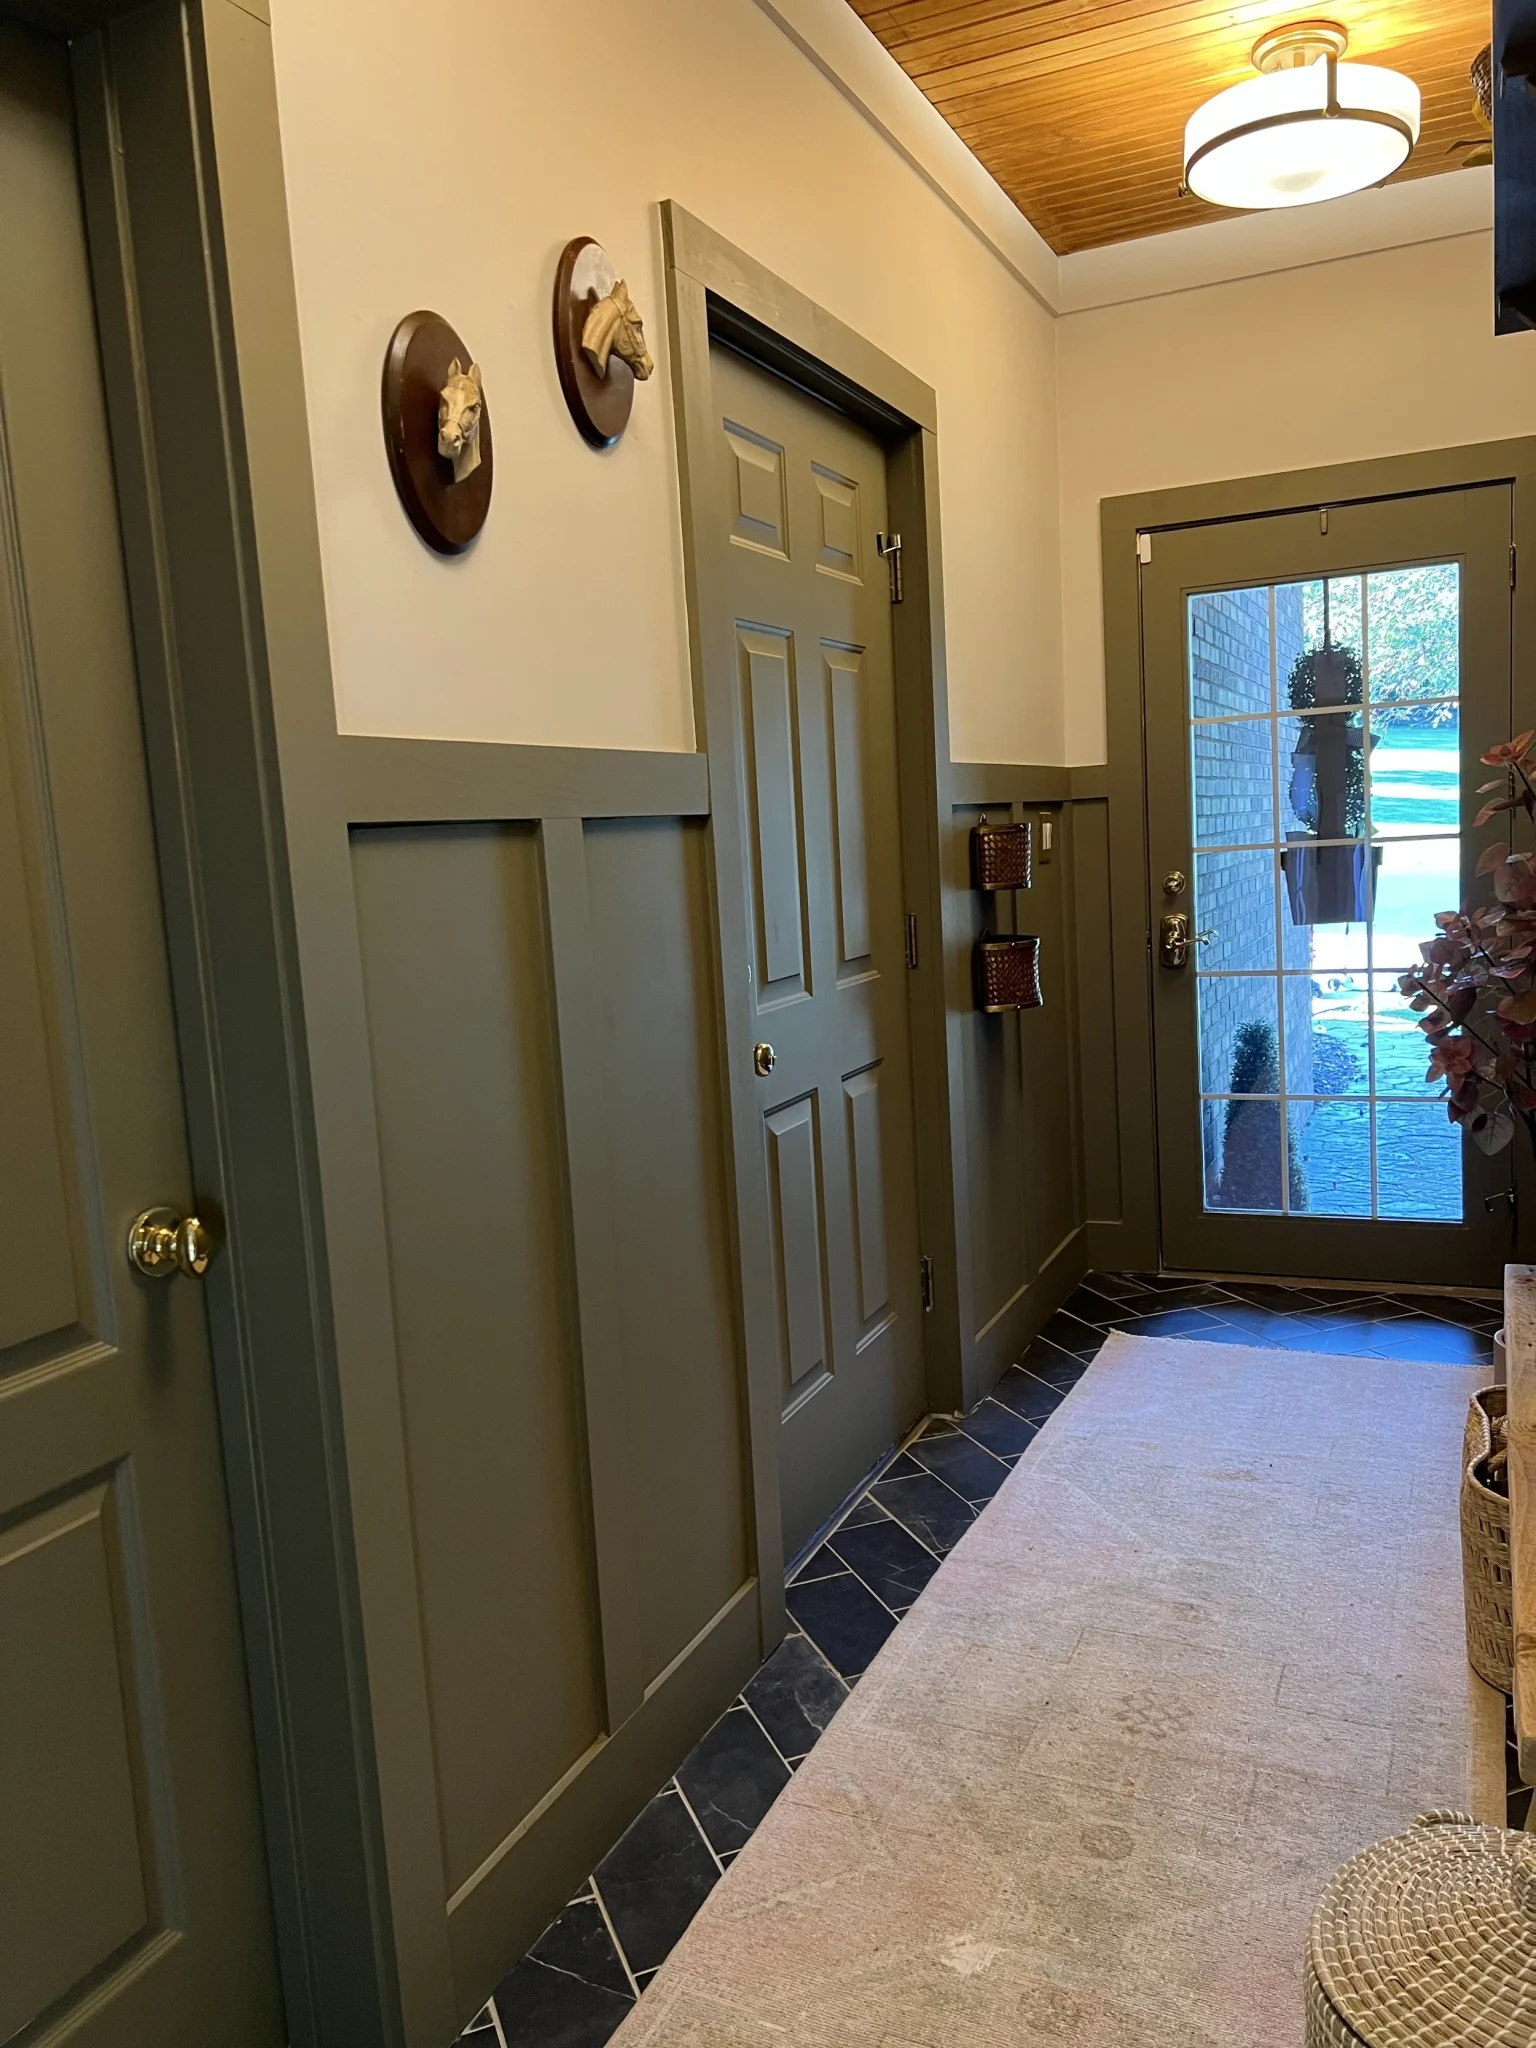
31. Earthy Olive Board and Batten with a Natural Wood Ceiling
The formula here is grounded in natural elements: 50% Earthy Color + 30% Natural Wood + 20% Graphic Contrast. The olive green board and batten provides the main color story, feeling calm and connected to nature. The tongue-and-groove wood ceiling brings in warmth and organic texture, enhancing the cozy feeling. Finally, the dark geometric floor tiles and brass hardware provide the necessary contrast and structure, keeping the space from feeling too rustic and adding a touch of modern polish.
|
📋 Copy HEX 🔗 Share |
✅ Before You Start
This style of floor-to-ceiling board and batten is incredibly versatile. It works well in entryways, mudrooms, and hallways of almost any size. The key is the transition to a lighter color on the upper portion of the wall. This prevents the space, especially if it’s narrow, from feeling too dark or closed in. The wood ceiling here adds visual interest upwards, making it a great choice for rooms with standard 8 or 9-foot ceilings where you want to add character without sacrificing the feeling of height.
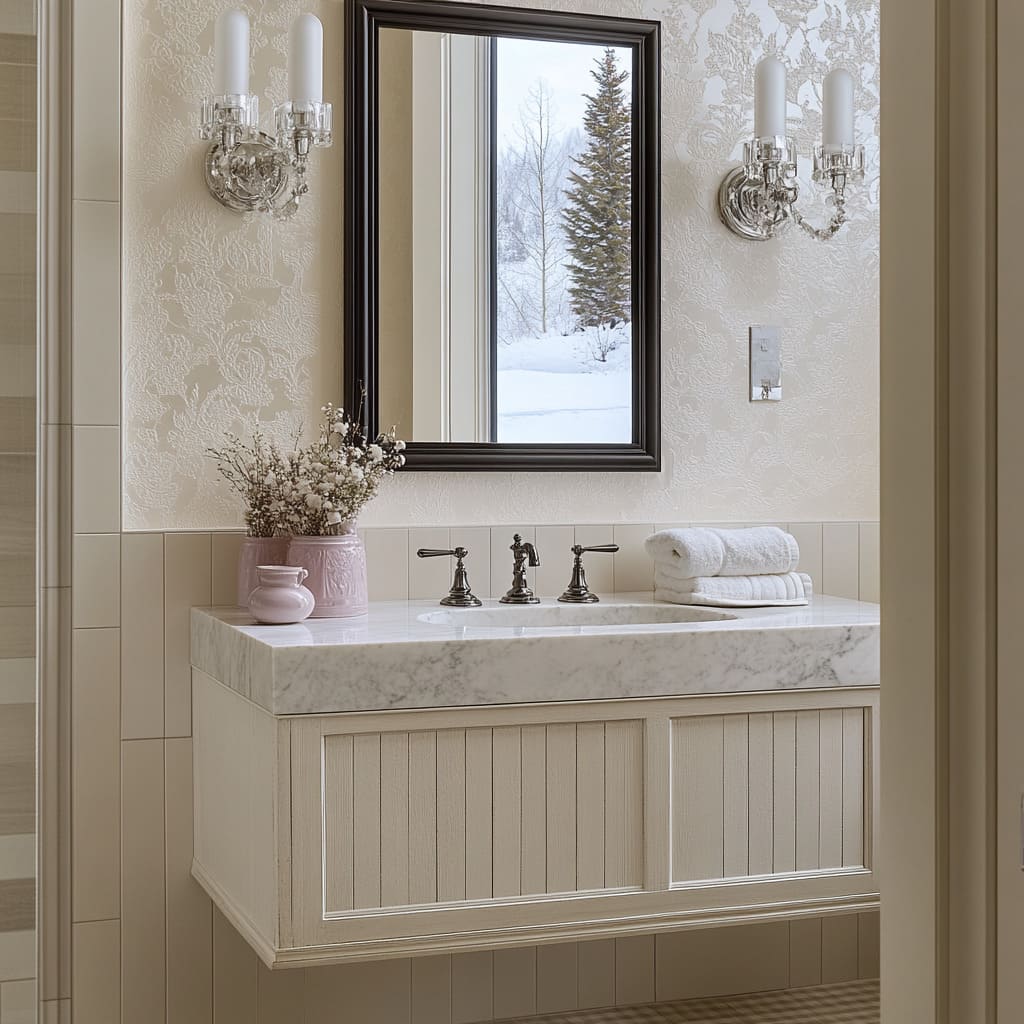
32. Elegant and Serene: Beige Vertical Boards and a Floating Vanity
Creating this serene, custom-vanity look involves several trades and higher-end materials. Here’s a potential breakdown for a primary bathroom.
|
📋 Copy HEX 🔗 Share |
🎯 What Makes It Work
- Floating Vanity (Custom or semi-custom): $1,500 – $4,000
- Marble Countertop & Installation: $1,200 – $3,500
- Wall Treatment (Vertical boards & wallpaper): $700 – $2,000
- Plumbing (Faucet & moving plumbing for floating vanity): $800 – $2,500
- Lighting & Mirror: $500 – $1,500
- TOTAL: $4,700 – $13,500
Budget alternative: Find an IKEA vanity, add your own vertical trim to the doors, use a high-quality laminate countertop that mimics marble, and opt for peel-and-stick wallpaper to get a similar vibe for under $2,000.
A floating vanity is a fantastic choice for making a bathroom feel larger, but it requires some planning. Before you commit, make sure you’ve covered these points:
- Wall Structure: Is the wall strong enough? A floating vanity needs to be anchored directly to wall studs. You may need to add extra blocking inside the wall for support.
- Plumbing Placement: The water supply and drain lines need to come out of the wall at the correct height, not up from the floor. This may require hiring a plumber to move your existing plumbing.
- Storage Needs: Floating vanities offer less storage than traditional floor-standing ones. Be honest about how much space you need for toiletries and towels.
More Than Just a Wall Treatment
Wainscoting is a powerful tool for defining a room and telling a story. Whether you go for a classic look or a modern twist, the right wall treatment adds a layer of depth and intention that paint alone can’t achieve. Now go find the style that speaks to you and save your favorites to your Pinterest board—your next project is waiting!