32+ Stunning Outdoor Patio Lighting Ideas That Will Transform Your Backyard Oasis This Season
You know that feeling when you finally find the outdoor lighting idea that looks *exactly* right for your space? That little thrill when you picture your own patio finally looking as magical as the ones you’ve been saving on Pinterest? We live for that feeling. After filtering through hundreds of options at stores like Target, IKEA, and Lumens, we narrowed it down to the 32 ideas that actually deliver on that promise, with options from $50 to over $1,500. This isn’t just another list of pretty pictures; these are real, achievable lighting strategies for every style, from modern minimalist to cozy boho. In 2026, it’s all about creating an outdoor room that feels as intentional as your indoor ones, and lighting is the key. And stay until the end—we break down the most common mistakes that can ruin these looks.
This post may contain affiliate links. As an Amazon Associate, we earn from qualifying purchases at no extra cost to you.
📌 Save this to Pinterest for later—you’ll want to revisit these ideas.
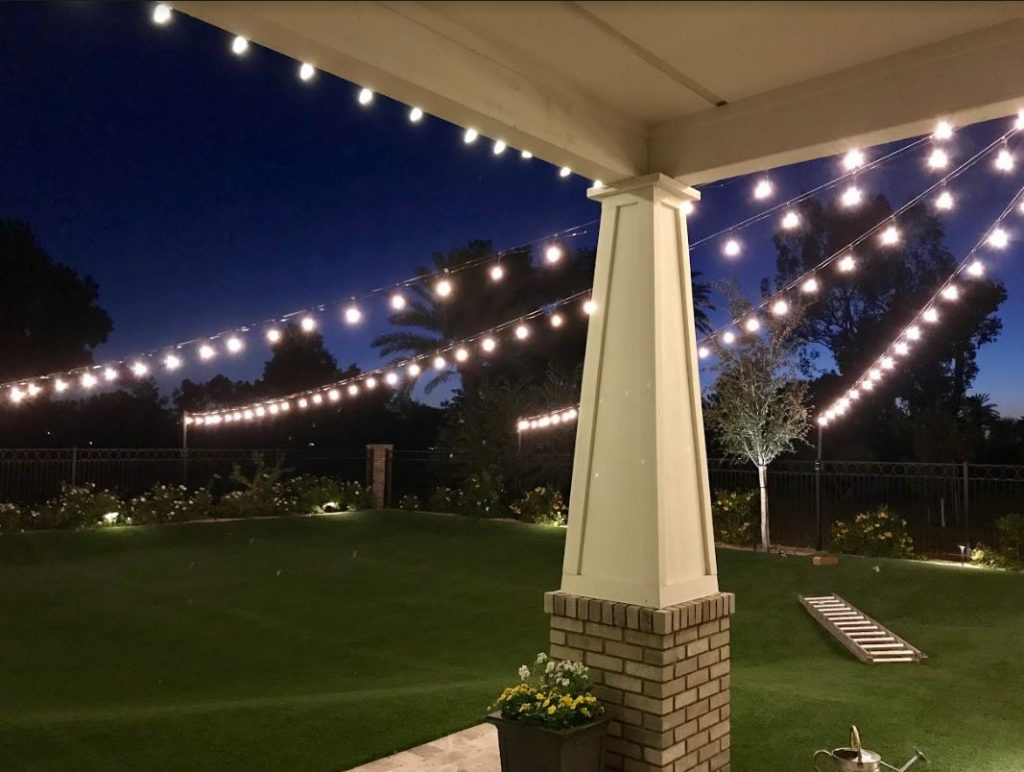
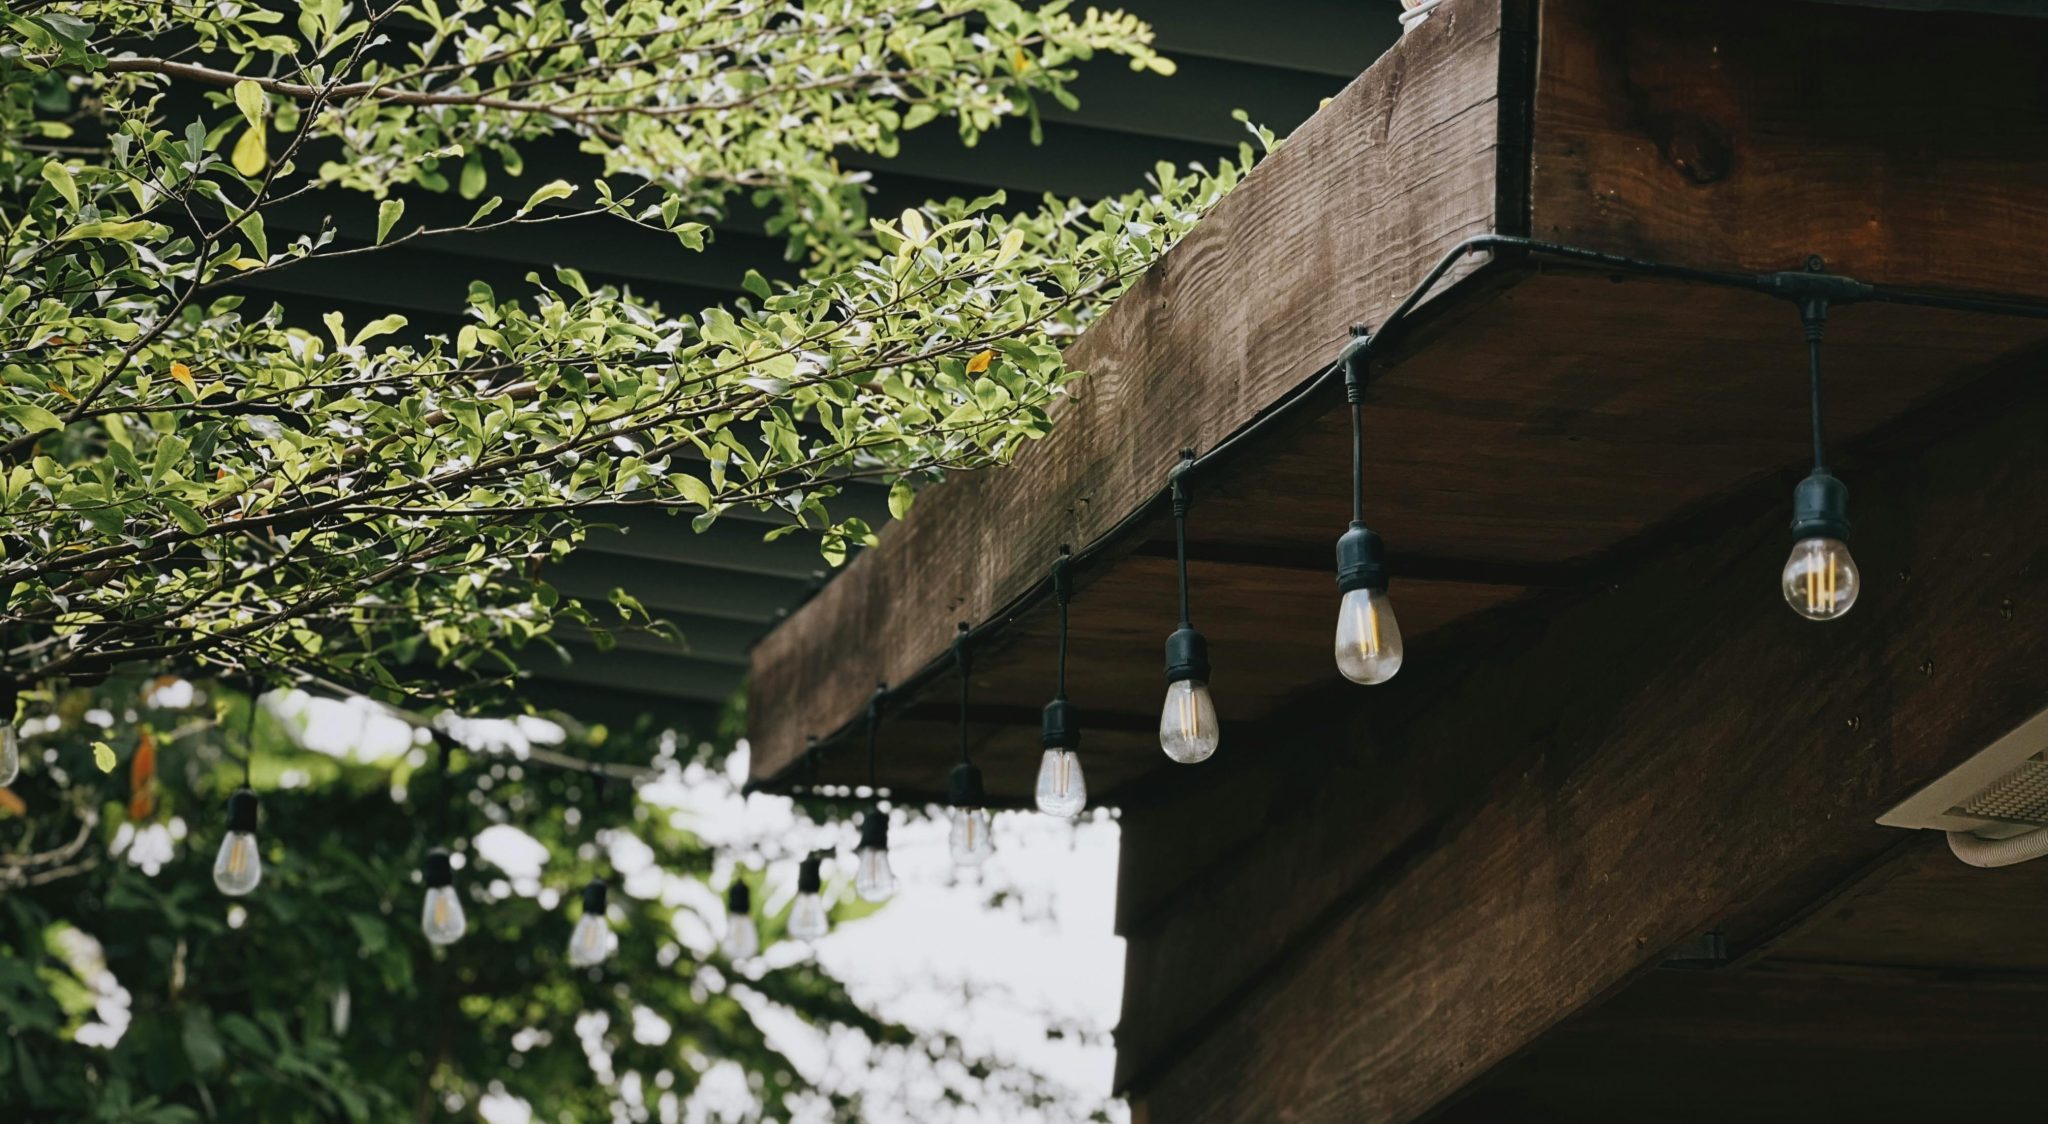
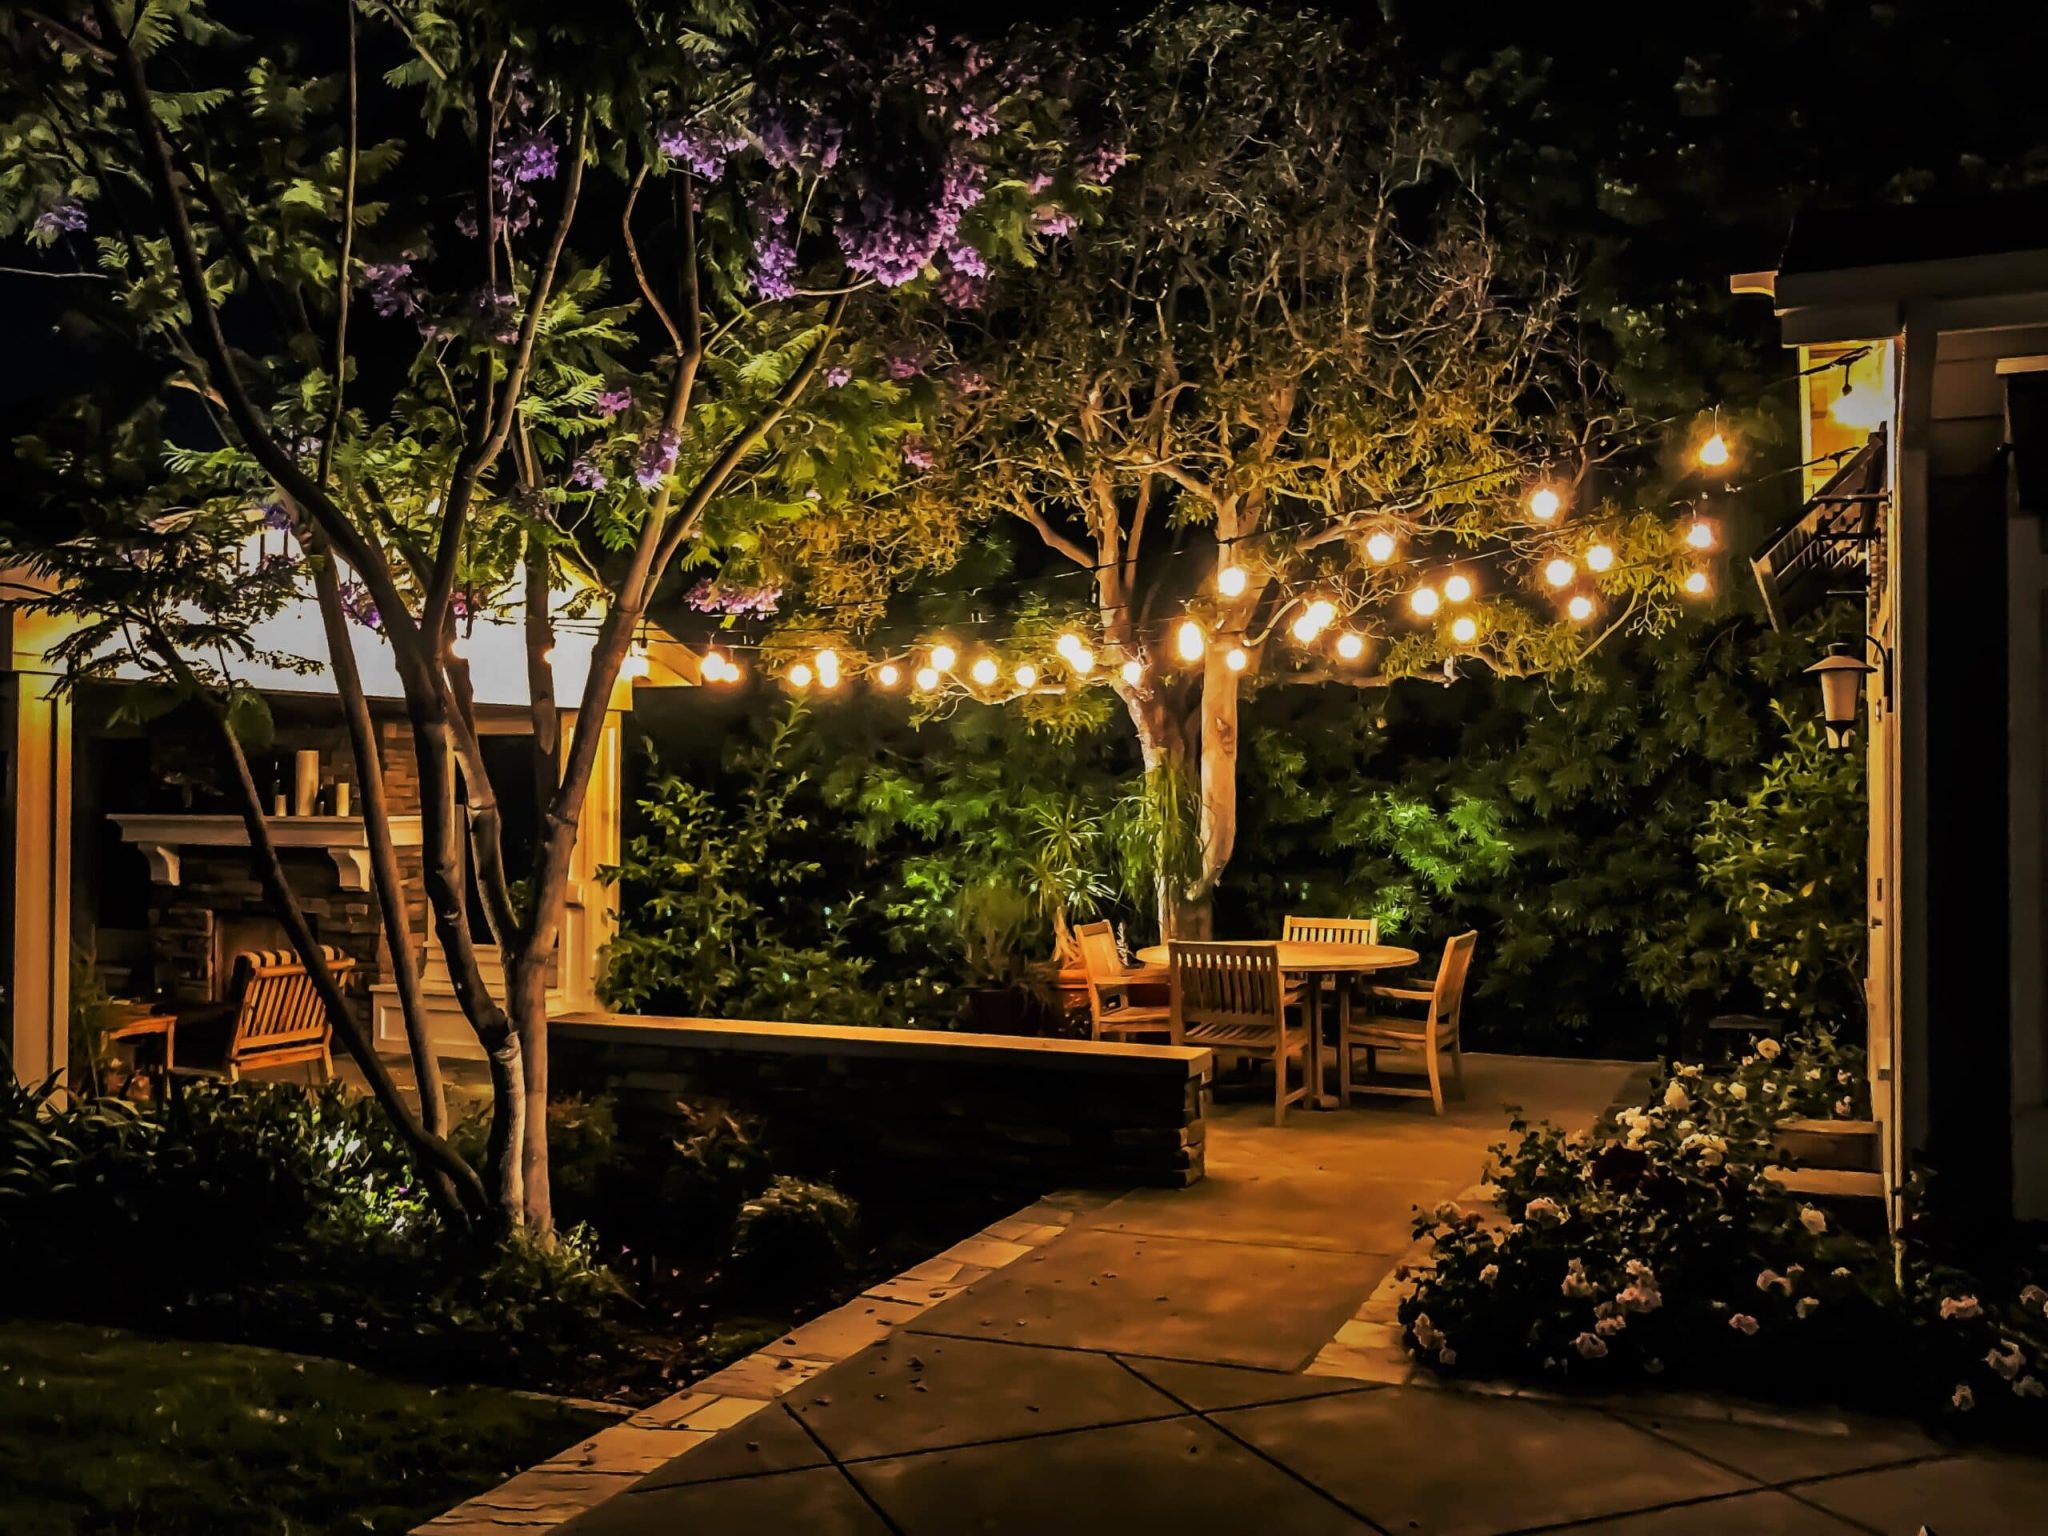
1. Drape a Glowing Canopy Over Your Patio and Garden
This setup works because it uses multiple layers of light. The overhead string lights create a warm, inviting canopy for the main patio area, defining it as a distinct ‘room.’ Meanwhile, the subtle ground-level lights in the garden beds add depth and prevent the surrounding yard from feeling like a dark void. This layering technique makes the entire space feel larger and more magical.
|
📋 Copy HEX 🔗 Share |
|
$192.00
|
$7.88
|
$30.00
|

🔧 How-To Brief
When draping string lights, aim for a clearance of at least 8 feet above the main walking paths to avoid anyone having to duck. For a gentle, scalloped drape effect, space your anchor points (like the column and house eaves) about 10-15 feet apart. Any further and you risk too much sagging, which can look messy and be a hazard in high winds.
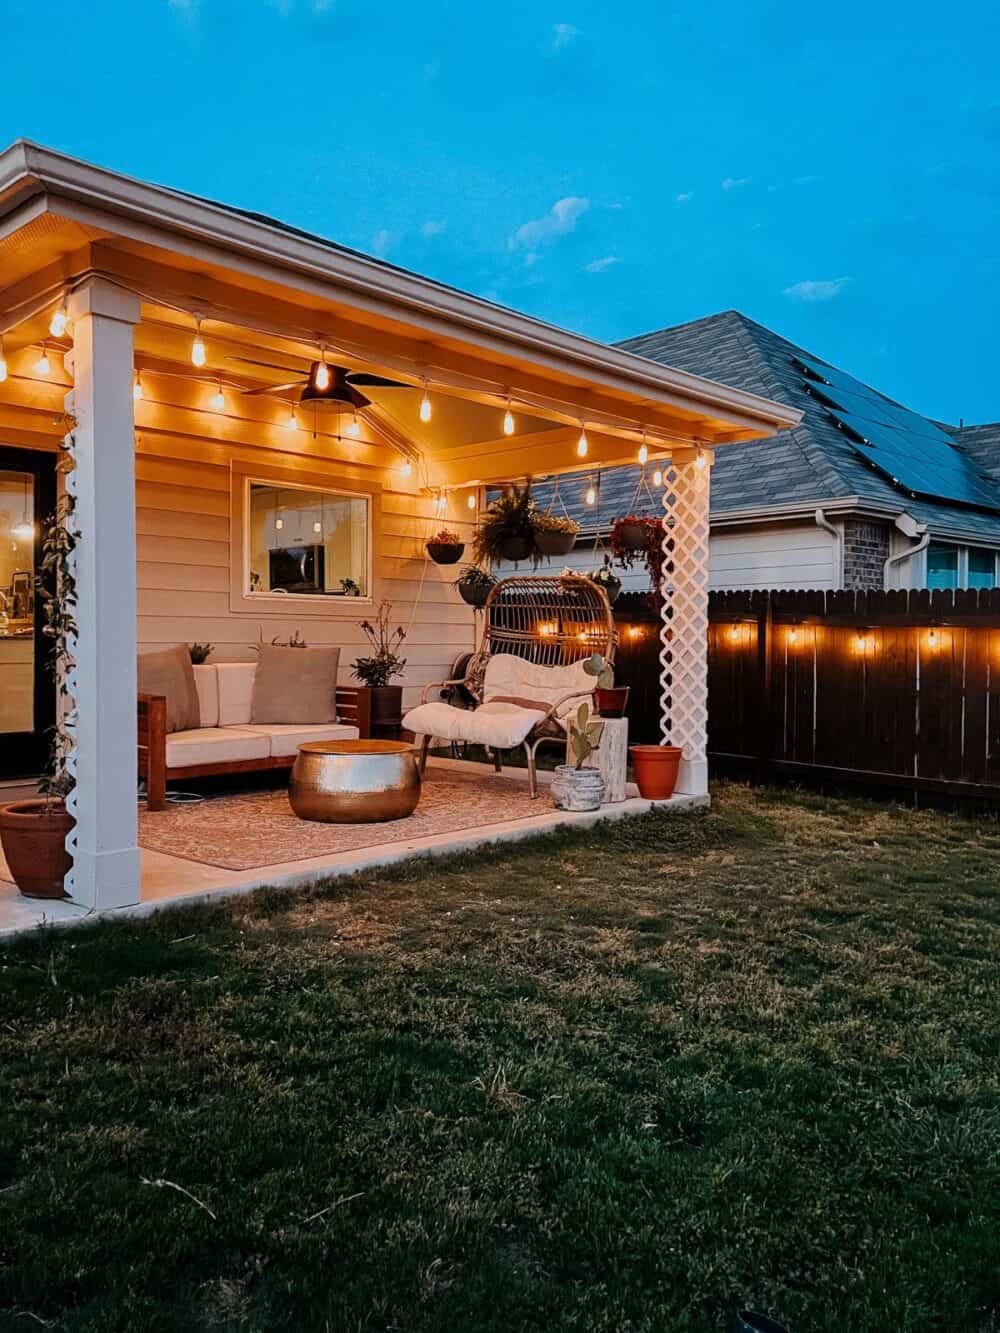
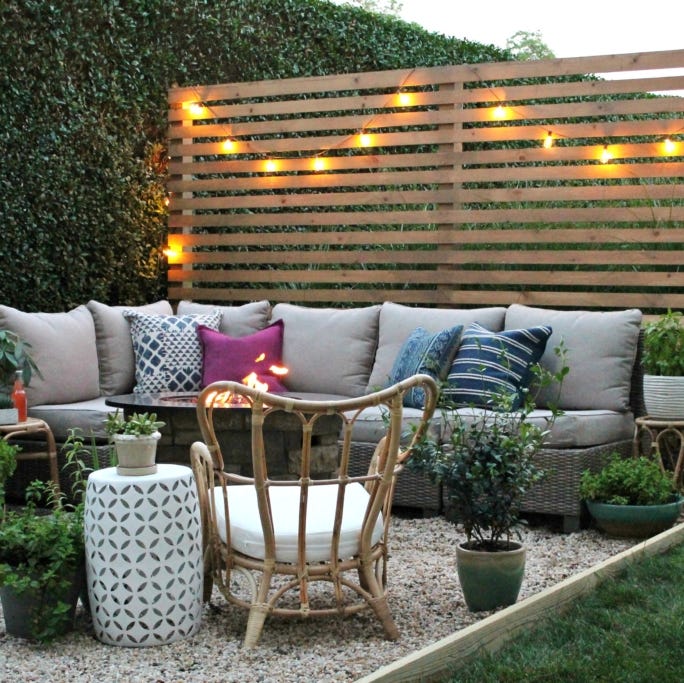
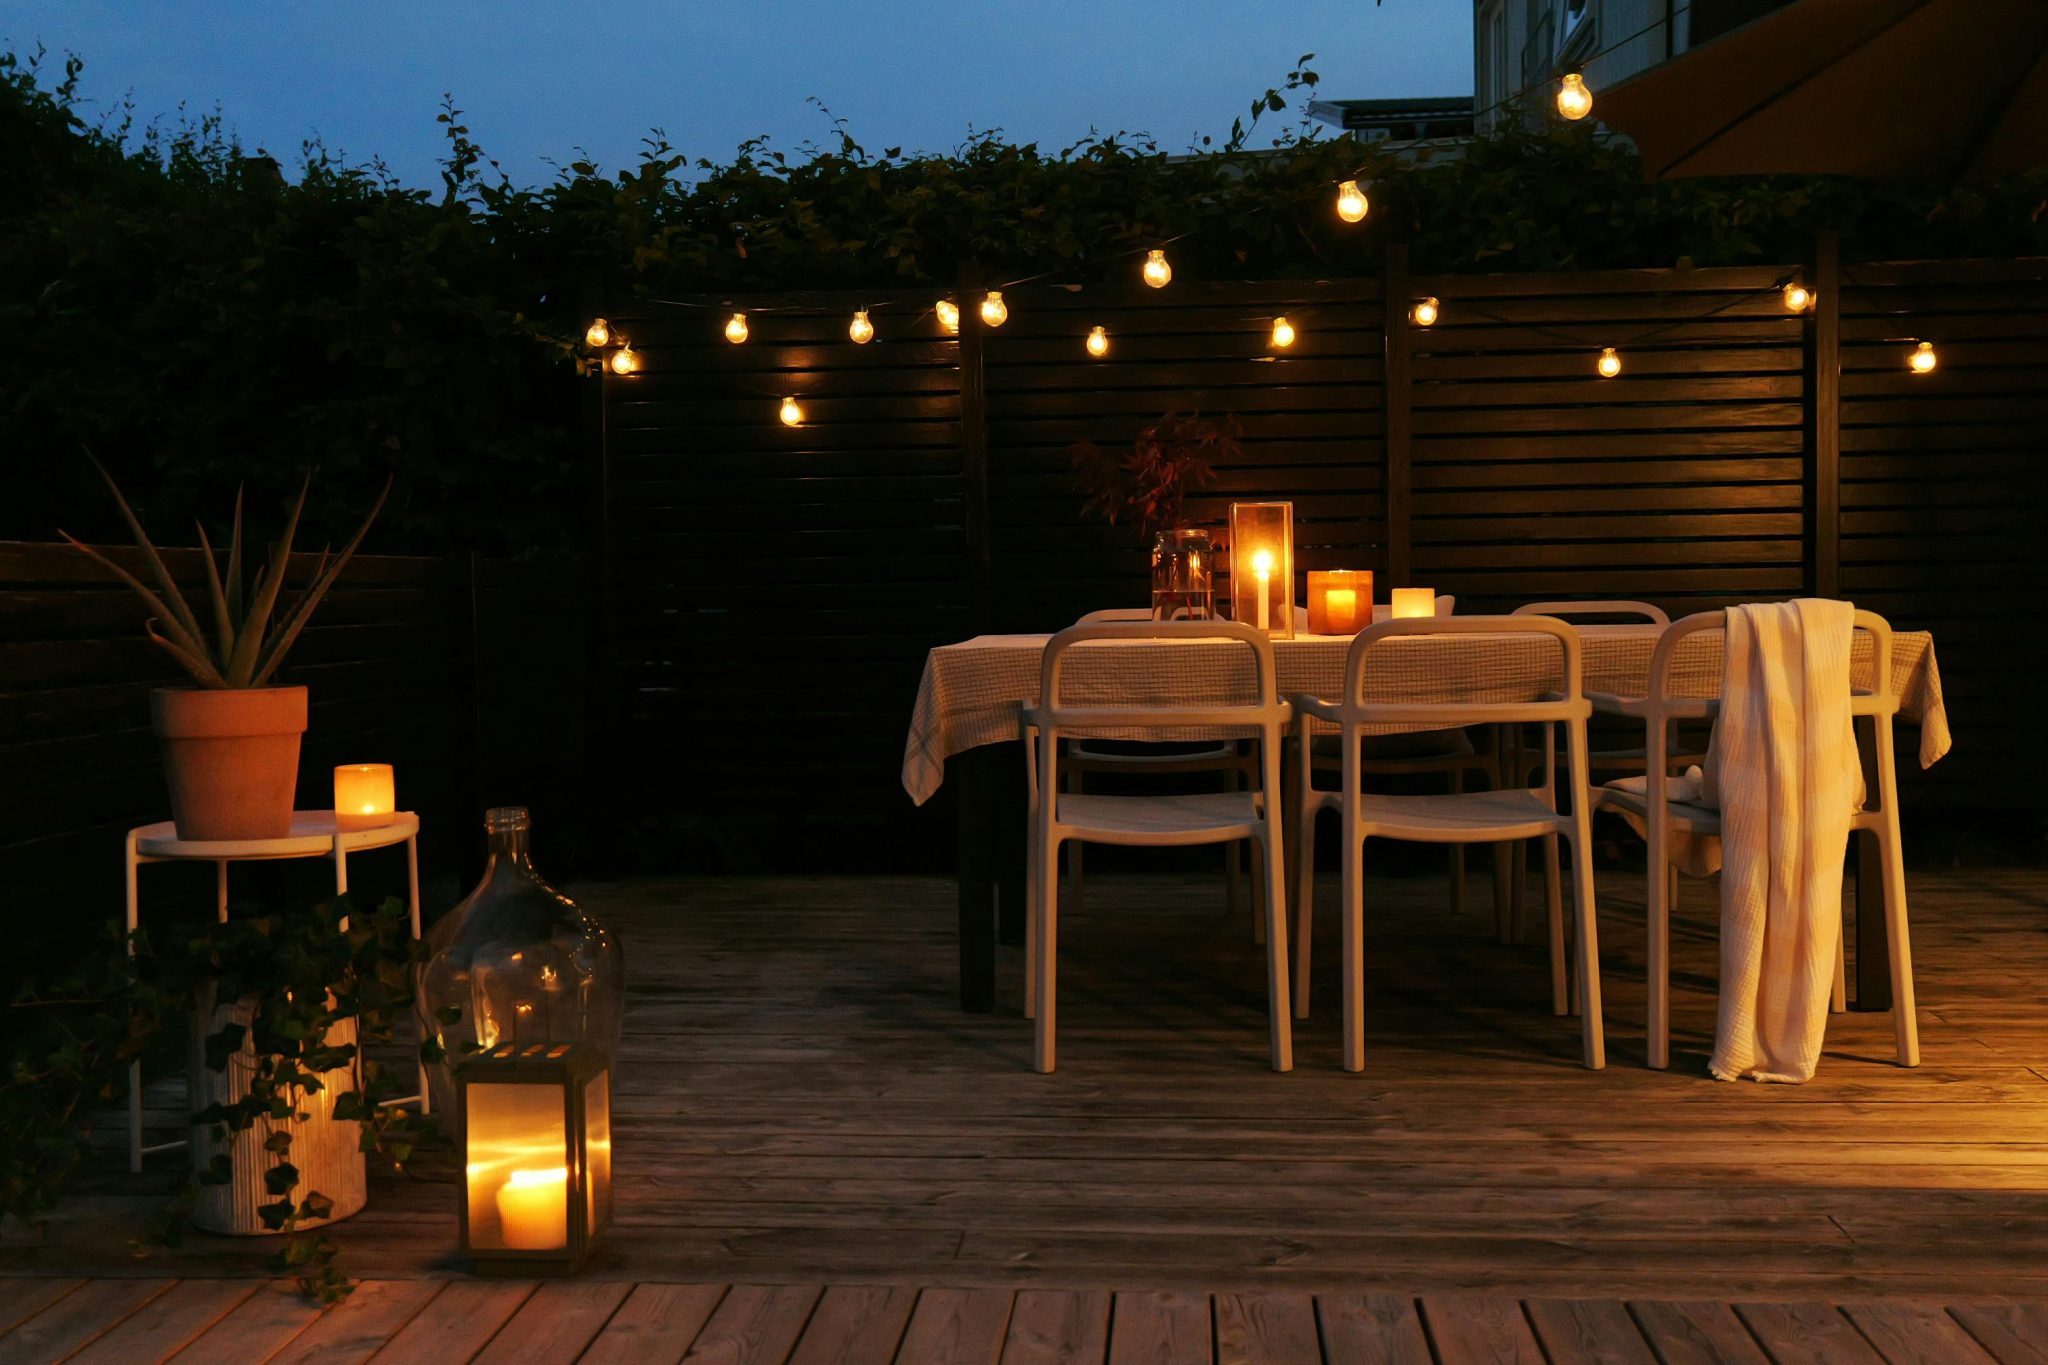
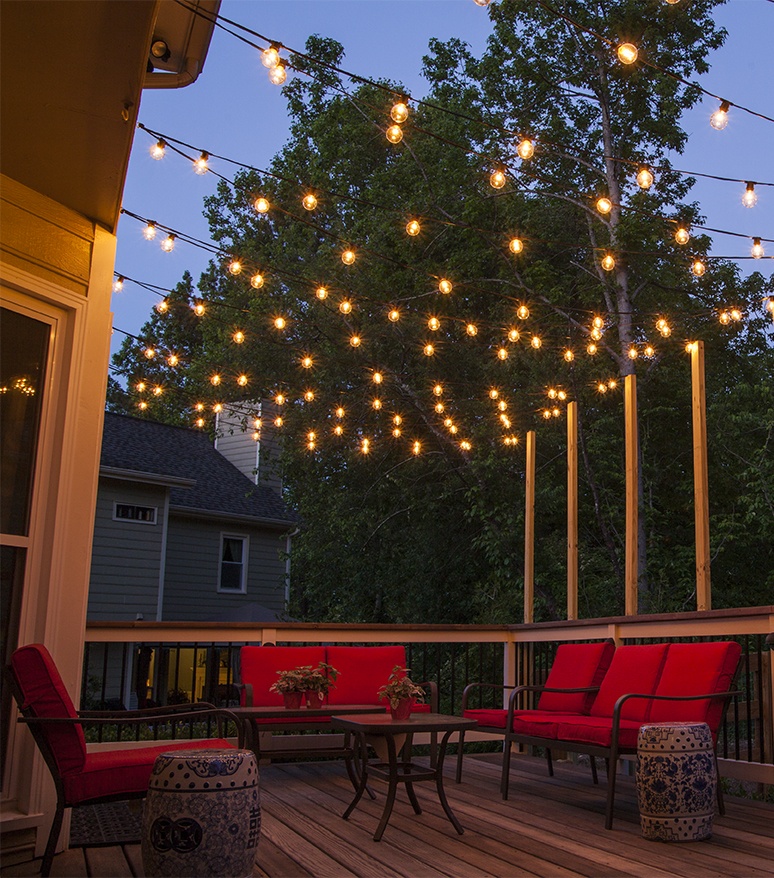
2. Layer String Lights on a Fence and Covered Patio Ceiling
The formula here is simple but effective: 50% ambient ceiling lights + 30% background fence lights + 20% natural textures. The main overhead lights provide the functional glow for the seating area, while the lights on the dark wooden fence create a beautiful, soft backdrop that adds immense depth. The final 20% comes from the wicker hanging chair, wooden sofa, and rug, ensuring the space feels cozy and grounded, not just bright.
|
$99.00
|
$833.00
|
$387.99
|


📐 Style Math
A look this cozy is amazing, but remember that outdoor textiles need care. The cushions, rug, and even the wicker chair will be happiest if they are rated for outdoor use to resist fading and mildew. Even then, consider investing in some waterproof covers to throw over them before a storm, or a storage box to tuck cushions away. It adds a minute to your cleanup, but it will dramatically extend the life of your soft furnishings.
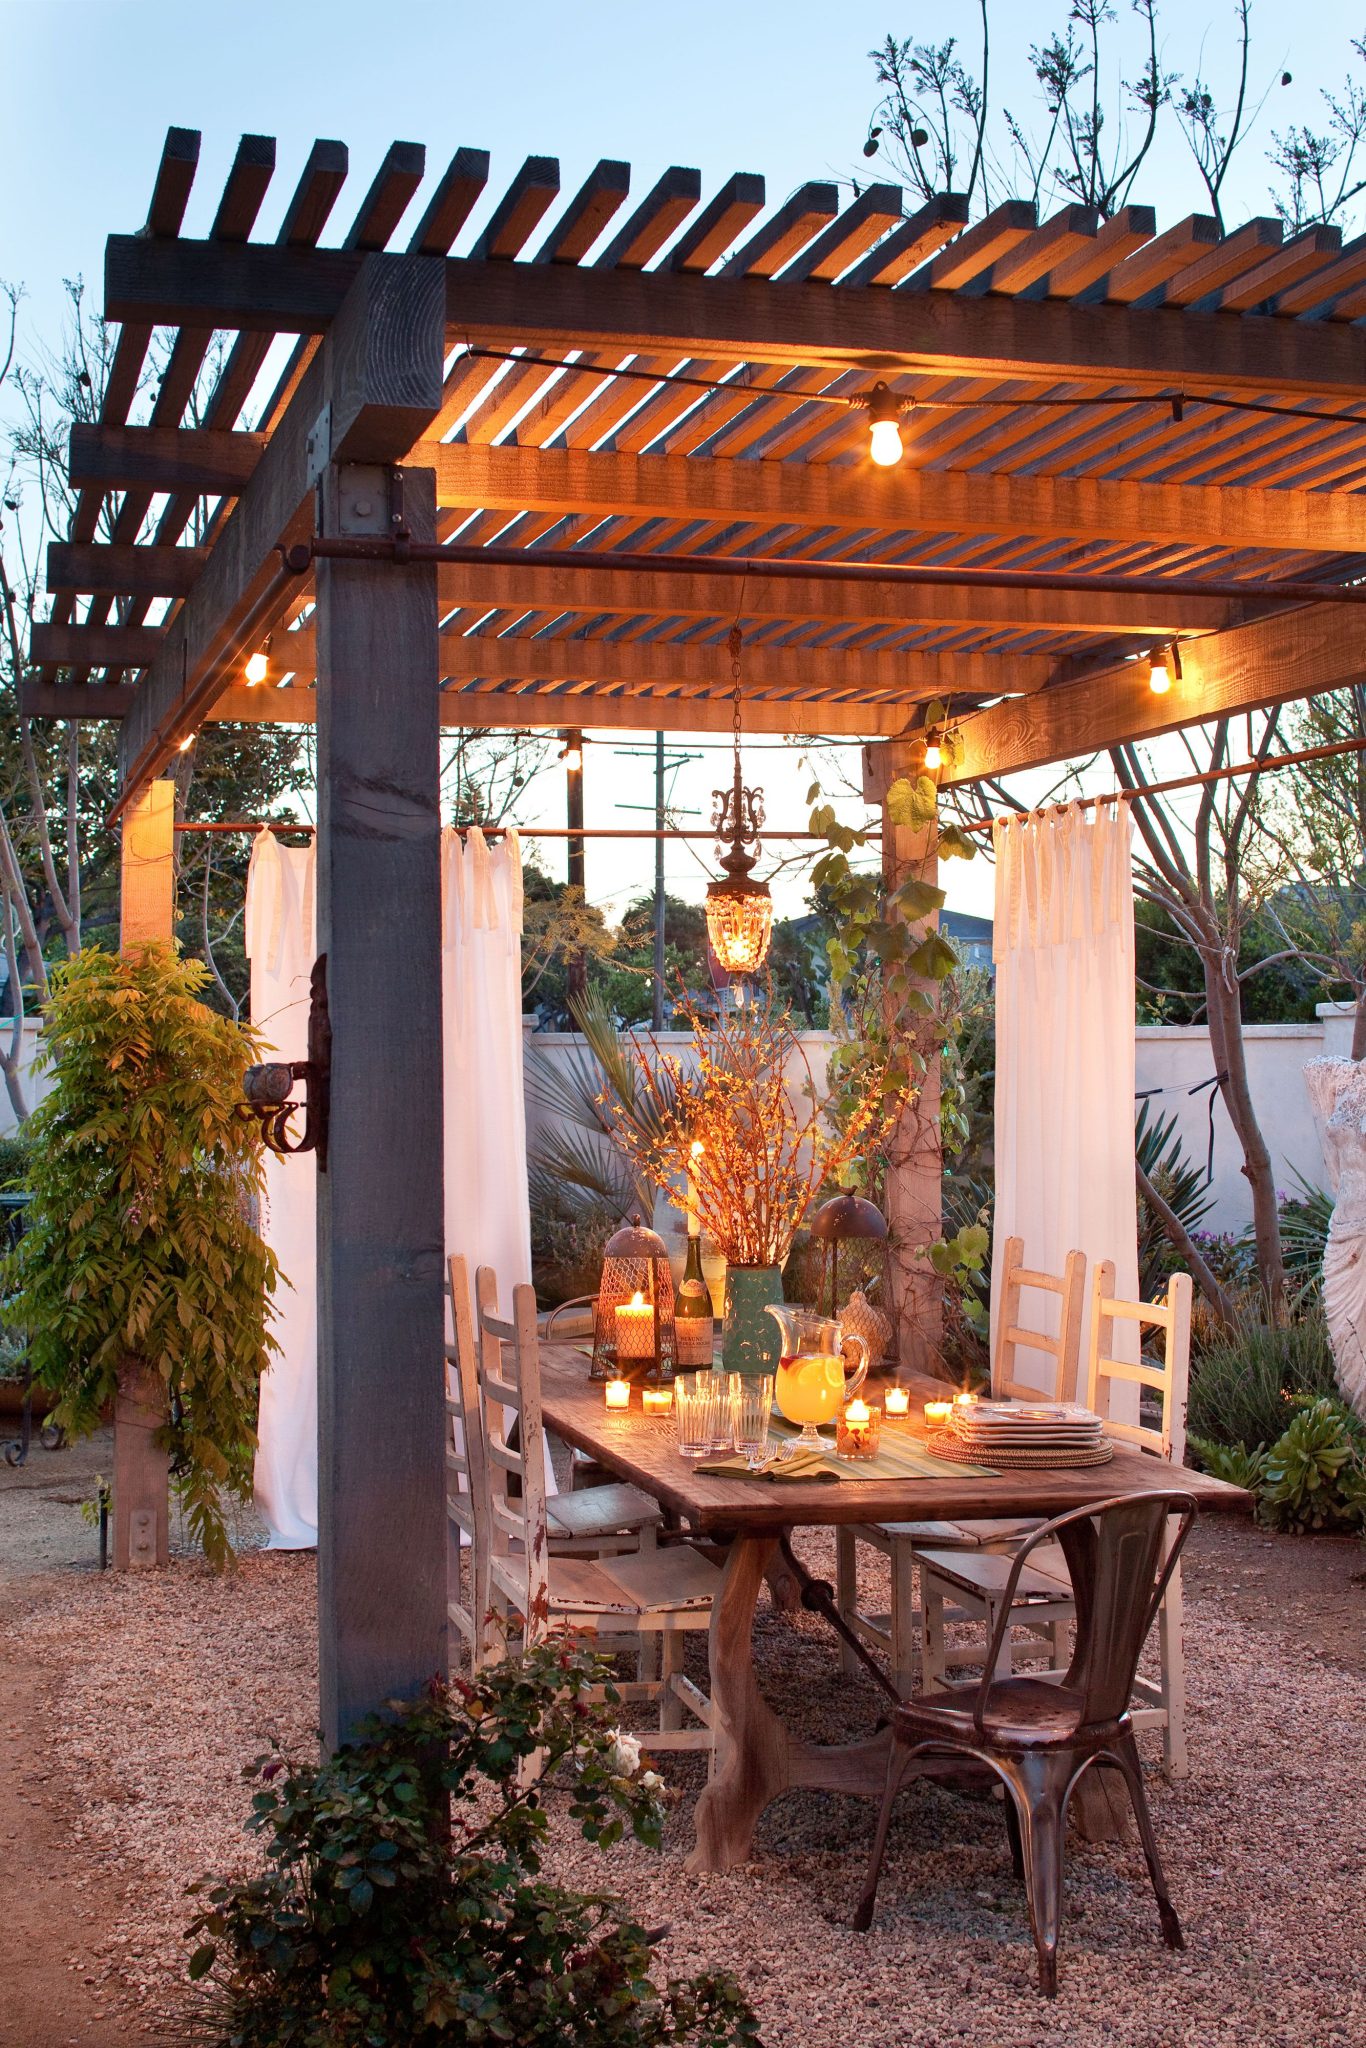
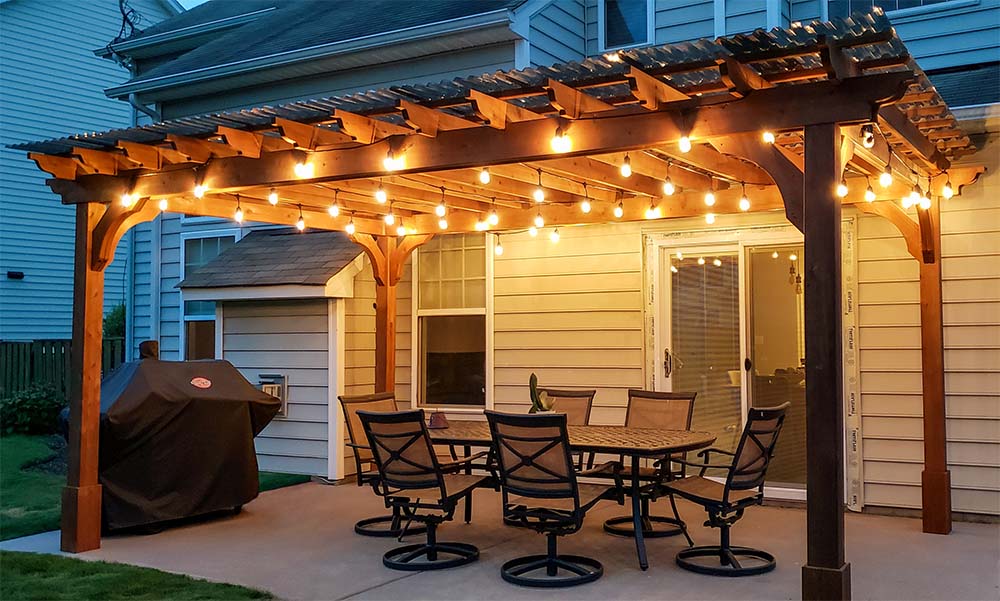
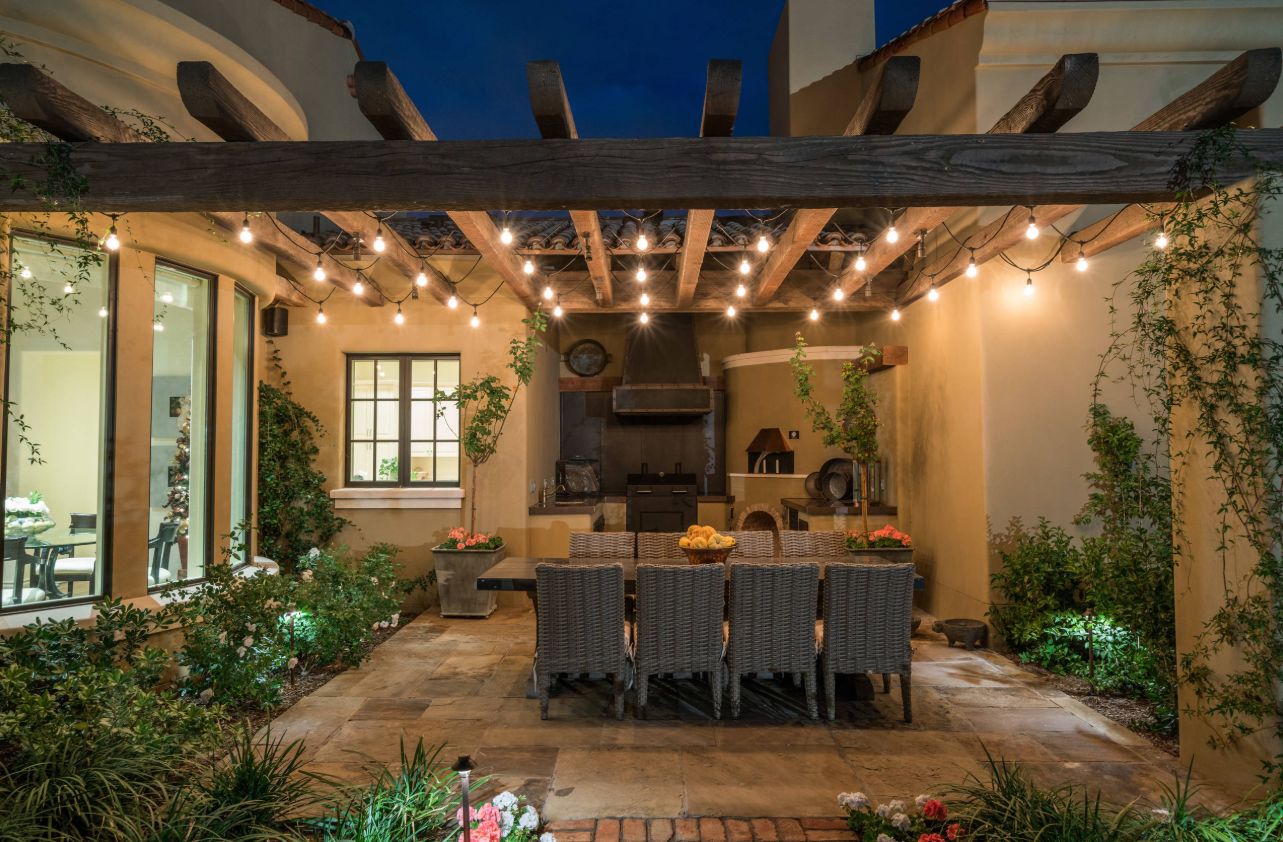
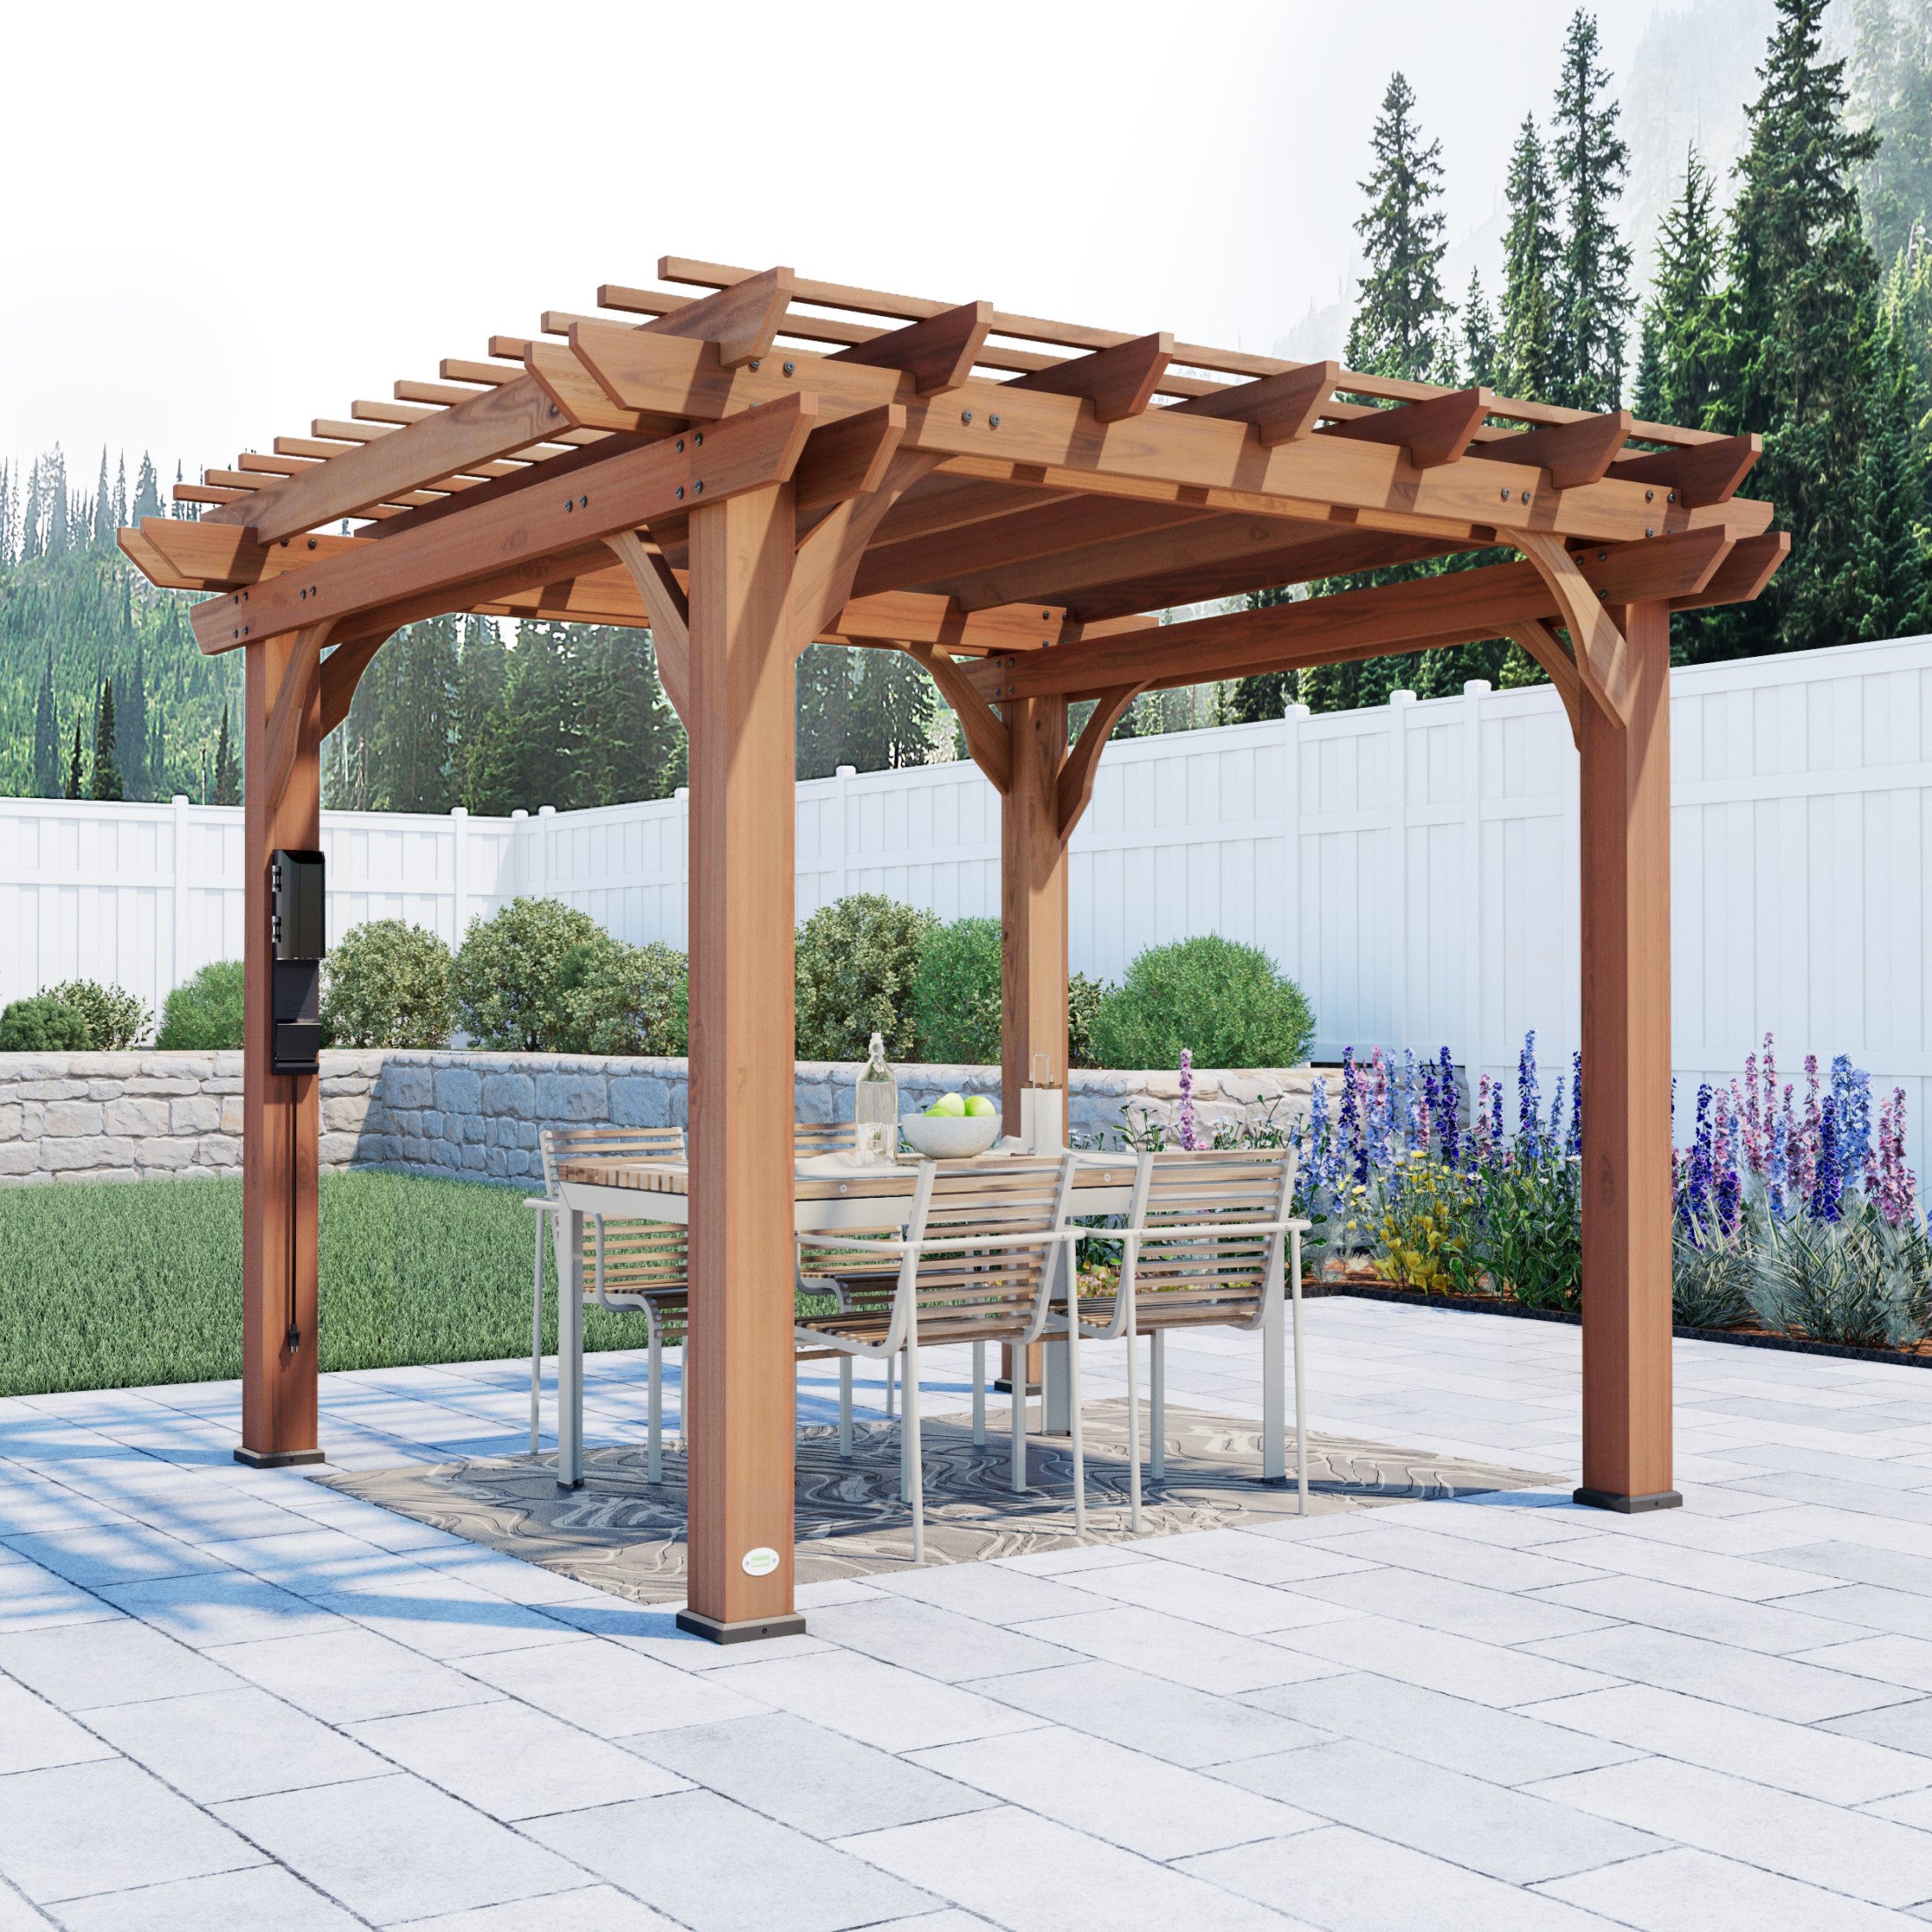
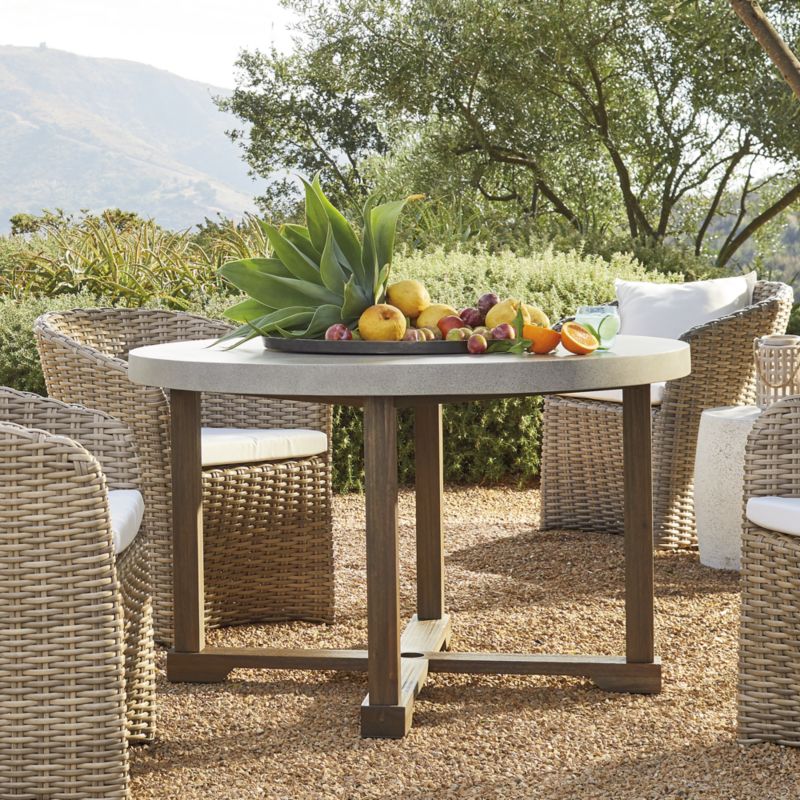
3. Frame a Pergola Dining Area with Lights and Curtains
- Wooden Pergola Kit: $800 – $3,000
- String Lights & Chandelier: $150 – $400
- Outdoor Curtains & Hardware: $200 – $500
- Dining Table & Chairs: $700 – $2,500
- Decor (Lanterns, Votives): $100 – $250
- TOTAL: $1,950 – $6,650
- Budget alternative: Build a simpler pergola frame with standard lumber, use thrifted chairs painted a uniform color, and opt for more string lights instead of a chandelier for a total look under $900.
|
📋 Copy HEX 🔗 Share |
|
$690.00
|
$1,199.00
|
$37.99
|
$14.97
|


⚠️ Real Talk
That dreamy, breezy look of white outdoor curtains comes with a bit of work. They will catch every bit of pollen, dust, and rain splatter. Plan to take them down and machine wash them at least twice a season—once in late spring and again in late summer. Use a gentle cycle with a mild detergent and a splash of vinegar to combat any mildew. Also, ensure your pergola’s wood is sealed every 2-3 years to prevent water damage and rot, especially in damp climates.
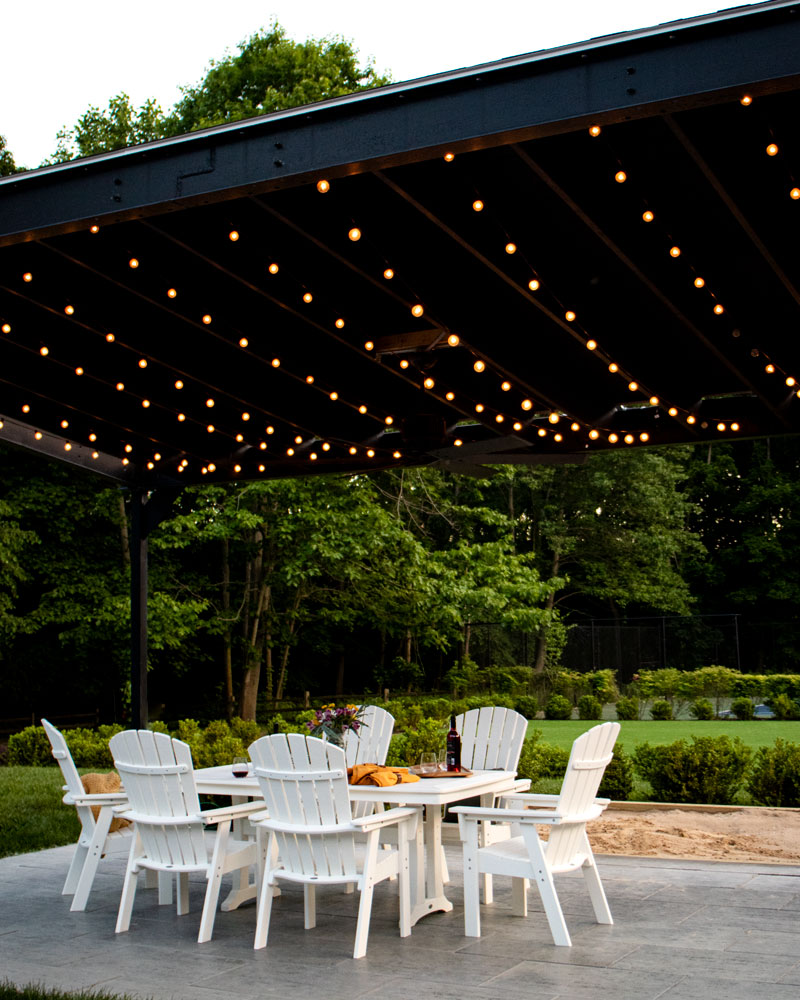
4. Create a Starry Ceiling with Cafe Lights Under a Black Pergola
that makes this design spectacular is the sheer density of the lights. Instead of one or two strands loosely draped, dozens of cafe string lights are arranged in tight, parallel lines. This transforms the pergola’s underside from a simple structure into a solid ceiling of light. It feels less like an accent and more like a deliberate, architectural feature, providing brilliant, even illumination for the dining area below.
|
$3,394.99
|
$1,699.00
|

💰 Budget Breakdown
This high-density lighting effect works best with pergolas that are at least 10×10 feet. Anything smaller and the parallel lines might feel cramped. The key is to have enough length for the ‘runway’ effect to take hold. Ensure your pergola has a ceiling height of at least 8 feet to keep the bulbs from feeling too low or hot for diners seated at the table. For a more rustic take on a lighted pergola, see Idea #3.
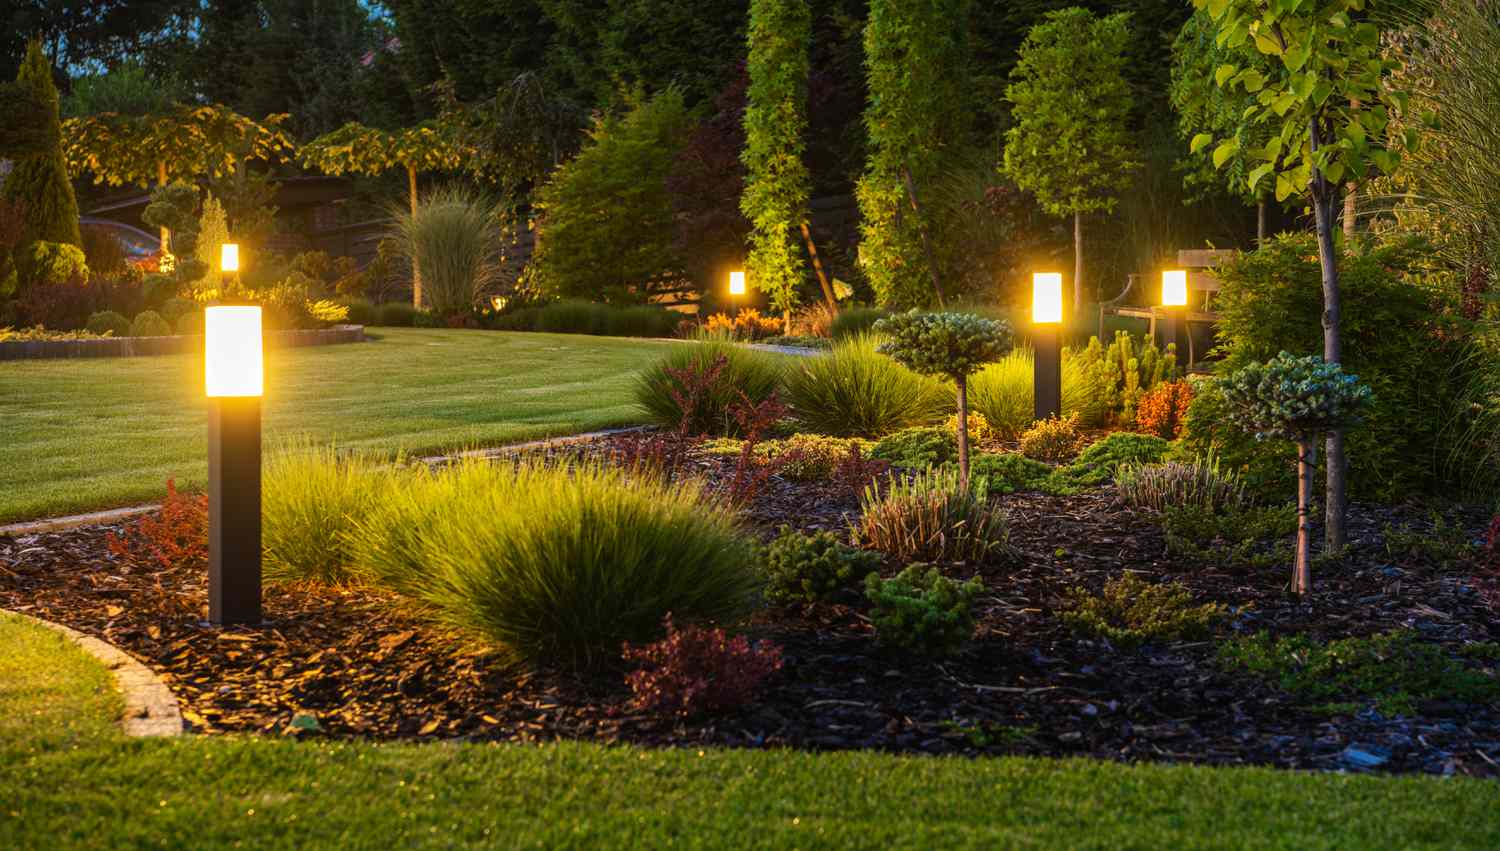
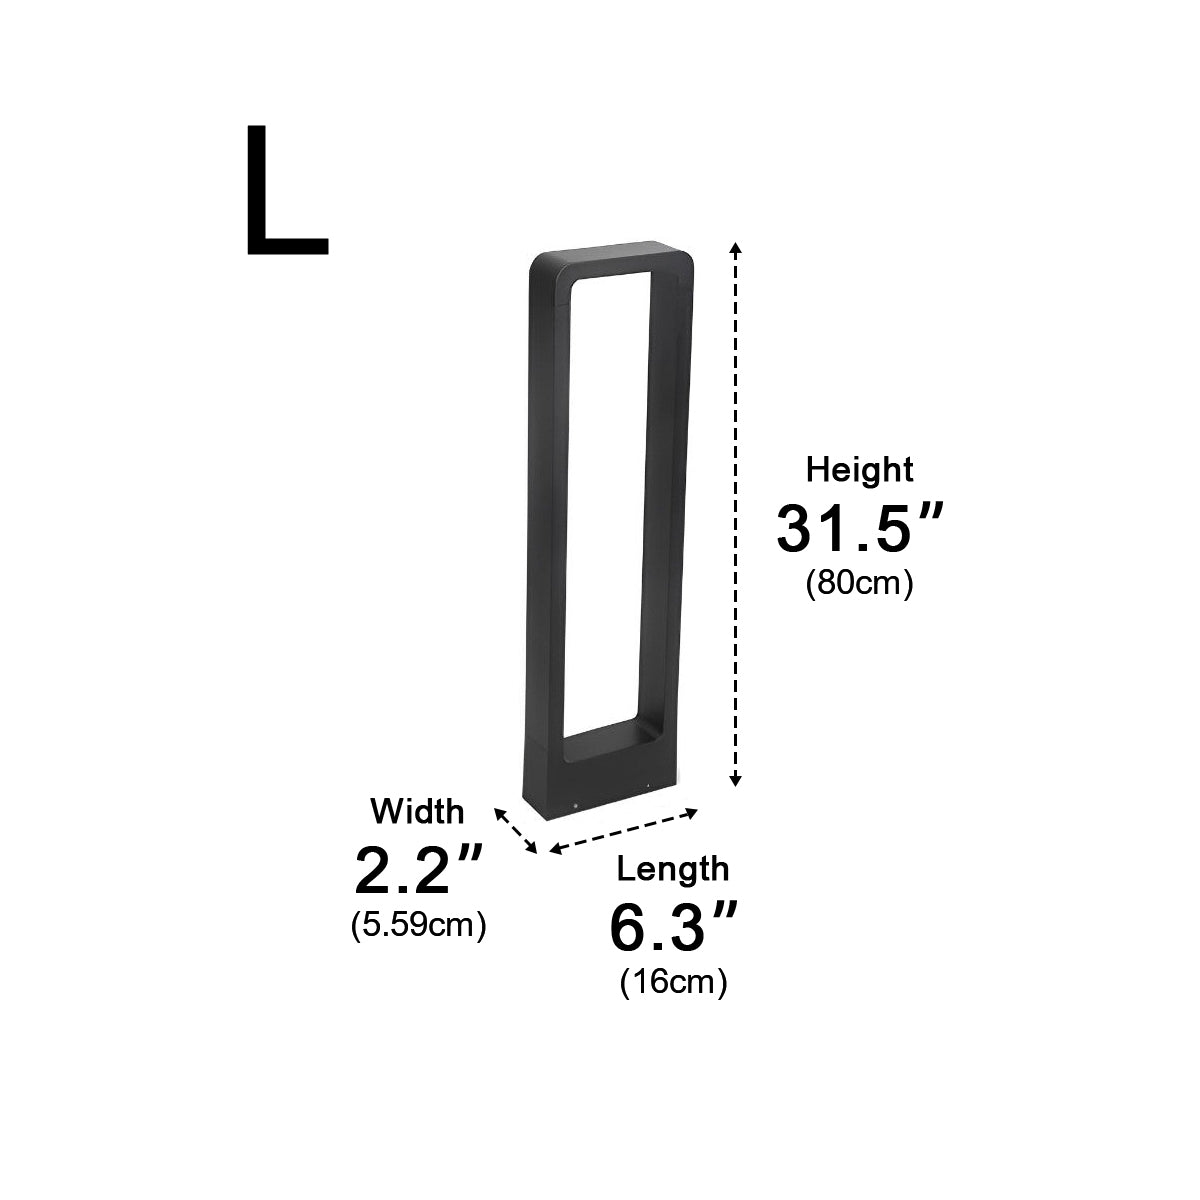
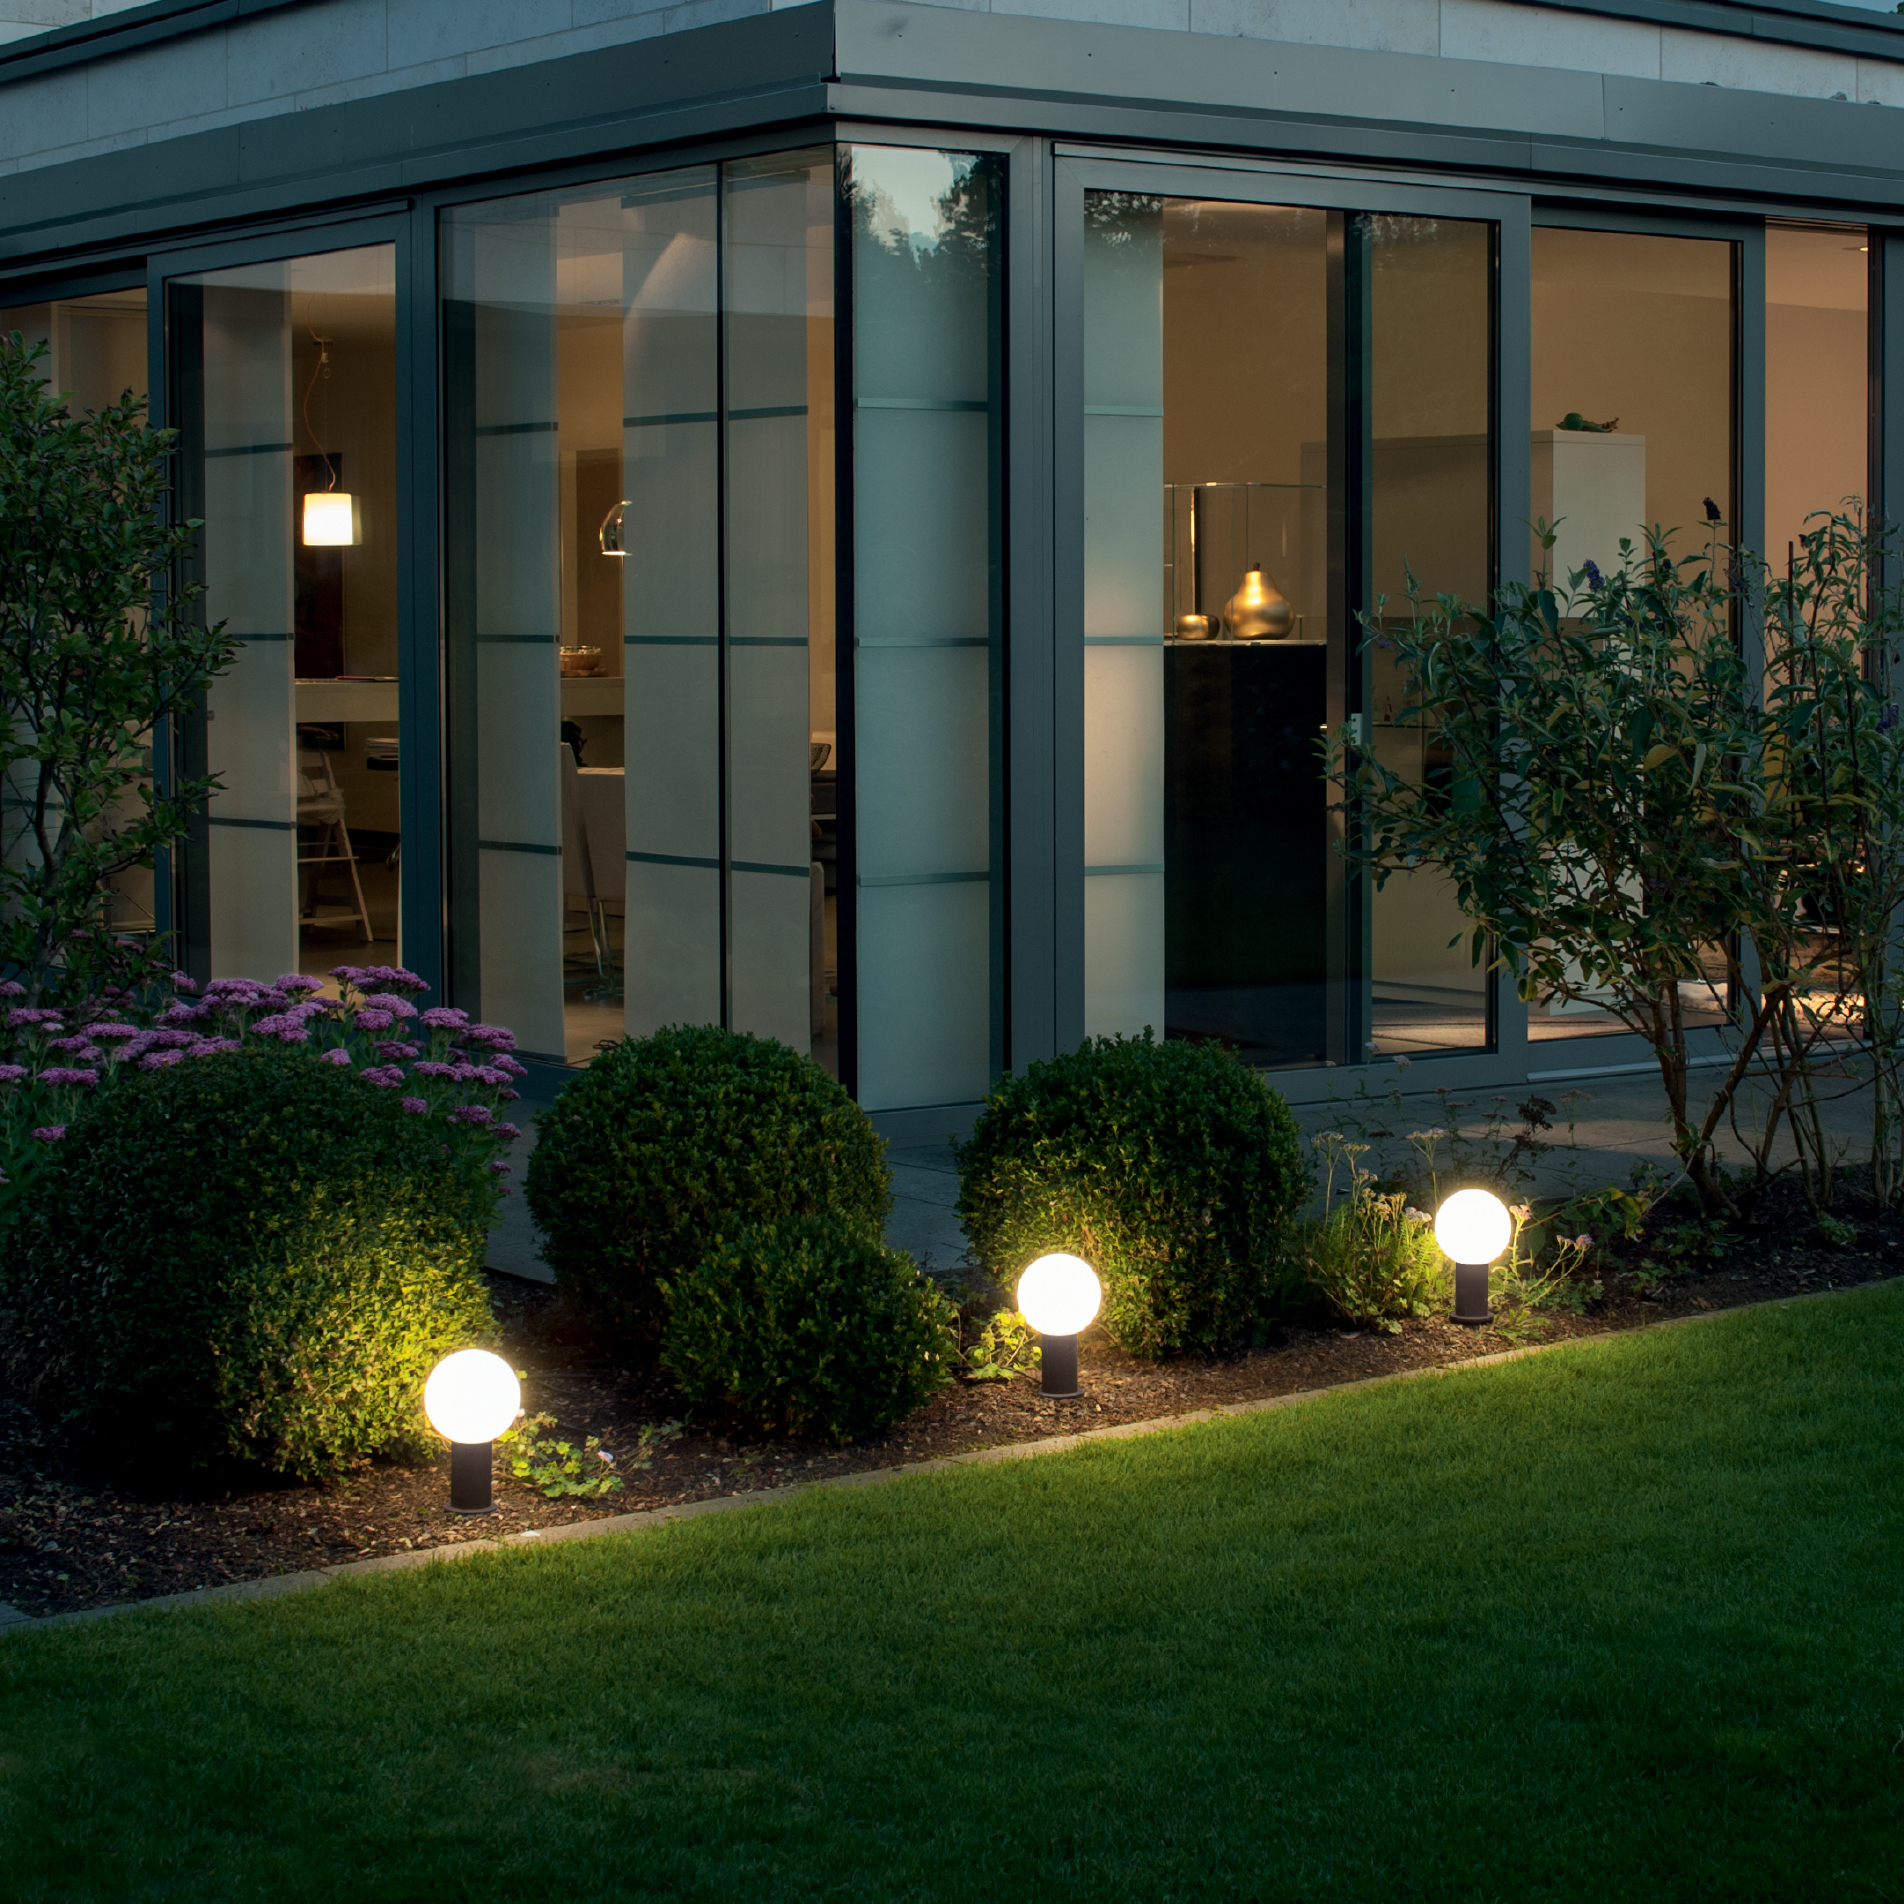
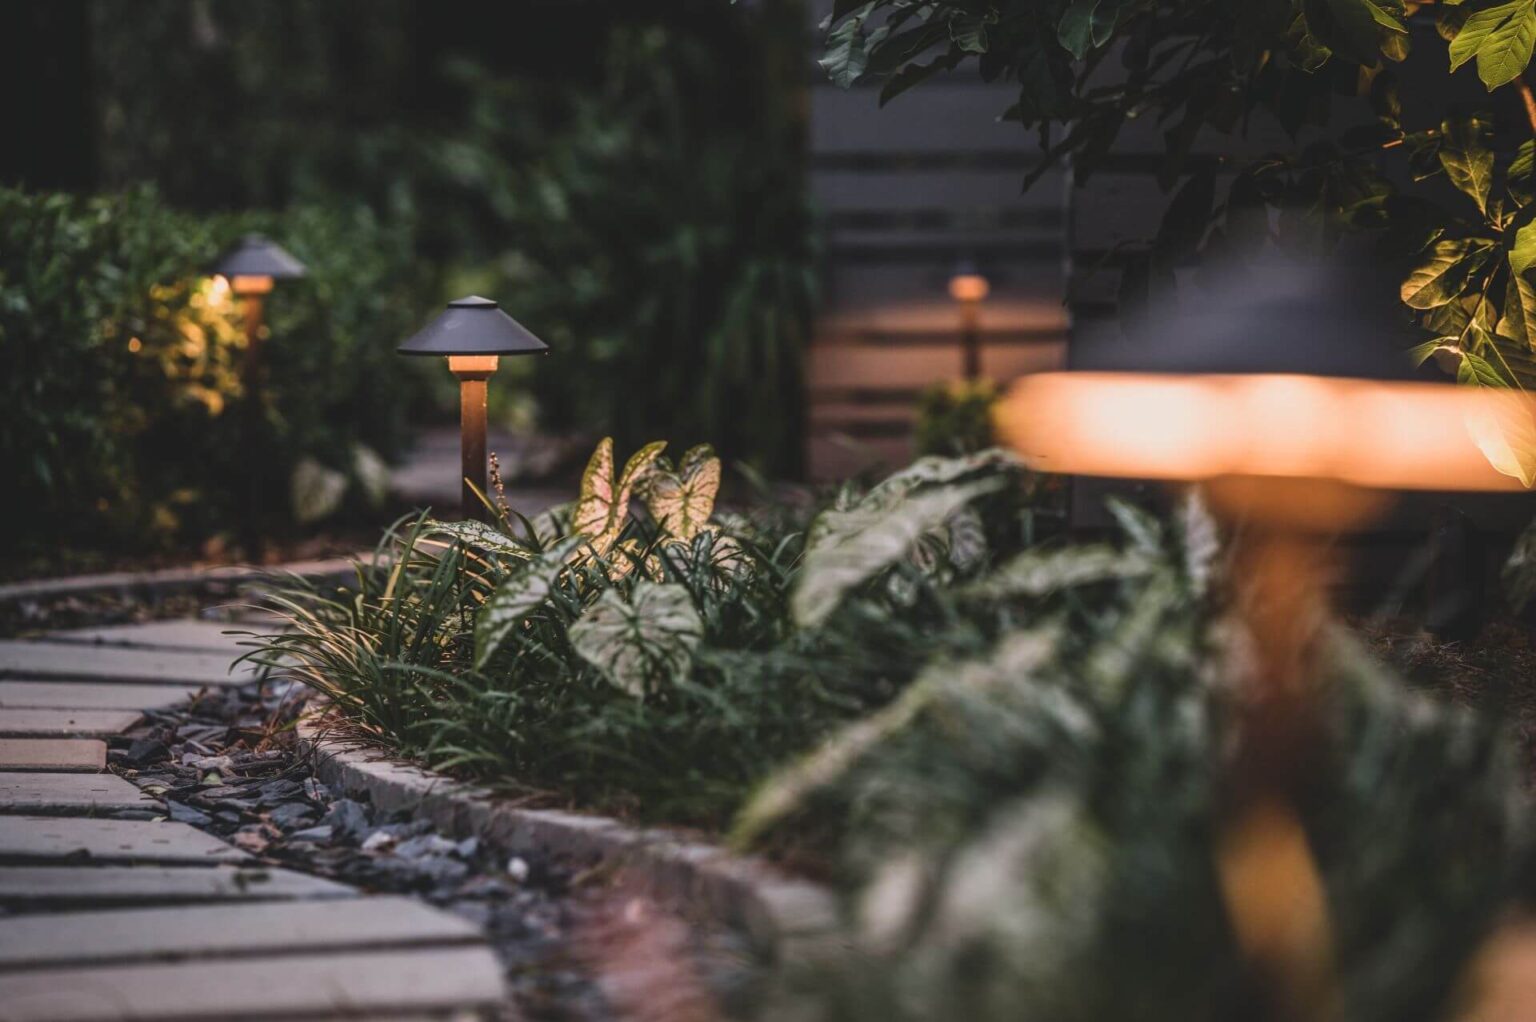
5. Define Garden Beds with Modern Bollard Lights
These modern bollard lights succeed by combining form and function. Their clean, rectangular shape adds a contemporary architectural element that contrasts beautifully with the soft, organic forms of the plants. By placing them within the garden beds rather than just along a path, they illuminate the foliage from within, creating a warm, ambient glow instead of just lighting the ground. The warm light on the greens and reds of the plants makes the colors pop against the night sky.
|
📋 Copy HEX 🔗 Share |
|
$167.99
|
$9.98
|

✅ Before You Start
- Decide on your power source: Will you use low-voltage wiring connected to a transformer (more work, more reliable) or individual solar-powered units (easier, less consistent)?
- Map your layout: Walk the garden at dusk and place temporary markers (like sticks) where you want lights. Check the view from your patio and windows.
- Measure the distance: If using low-voltage, measure the total cable run to ensure you buy the right gauge wire and a powerful enough transformer.
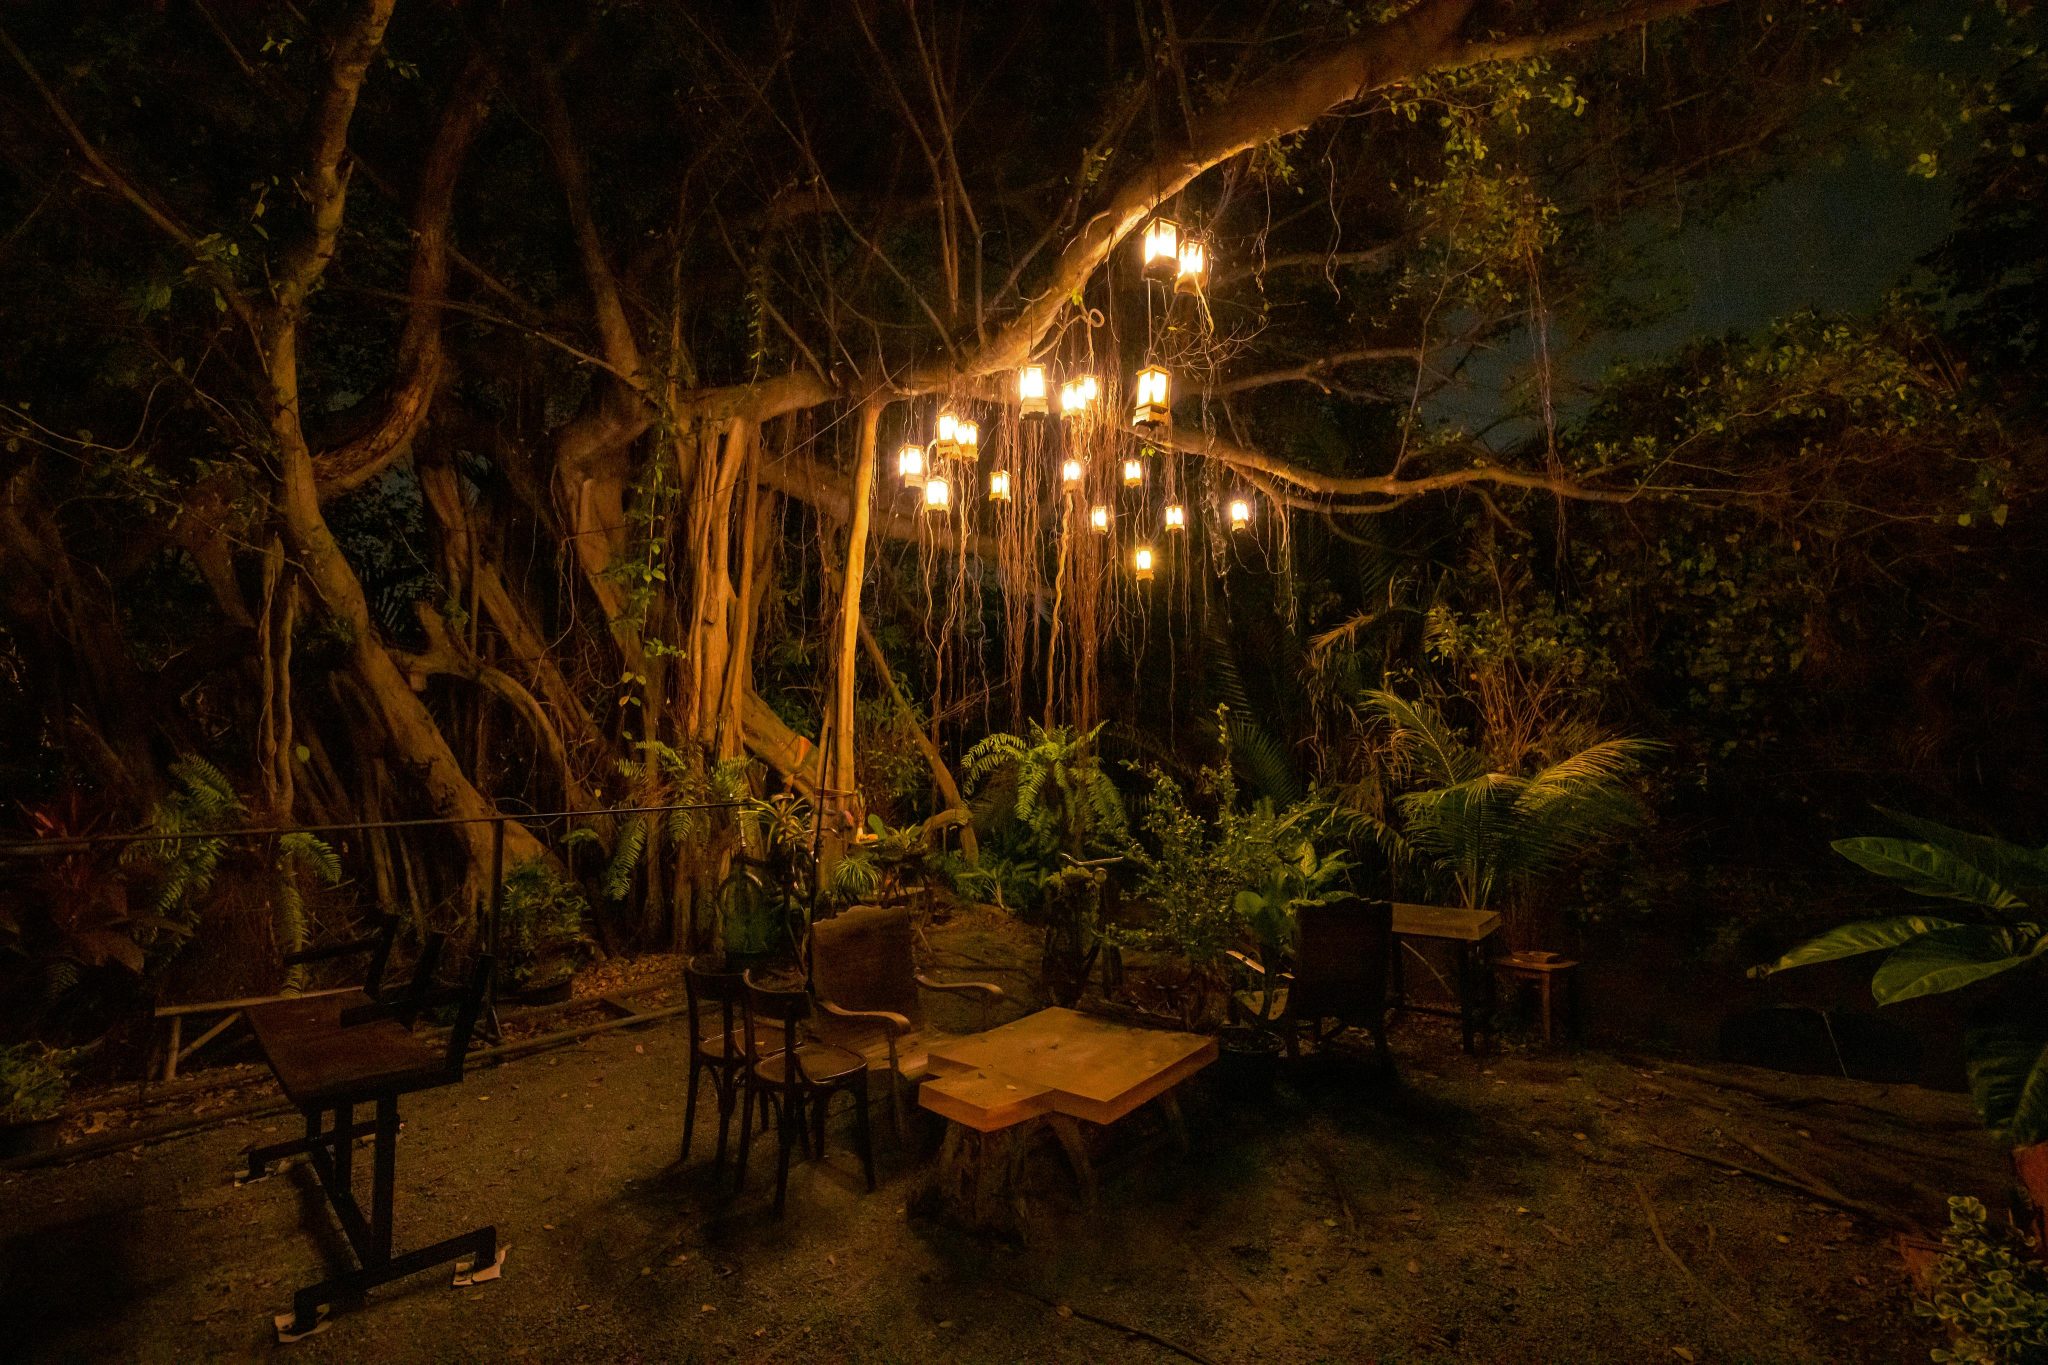
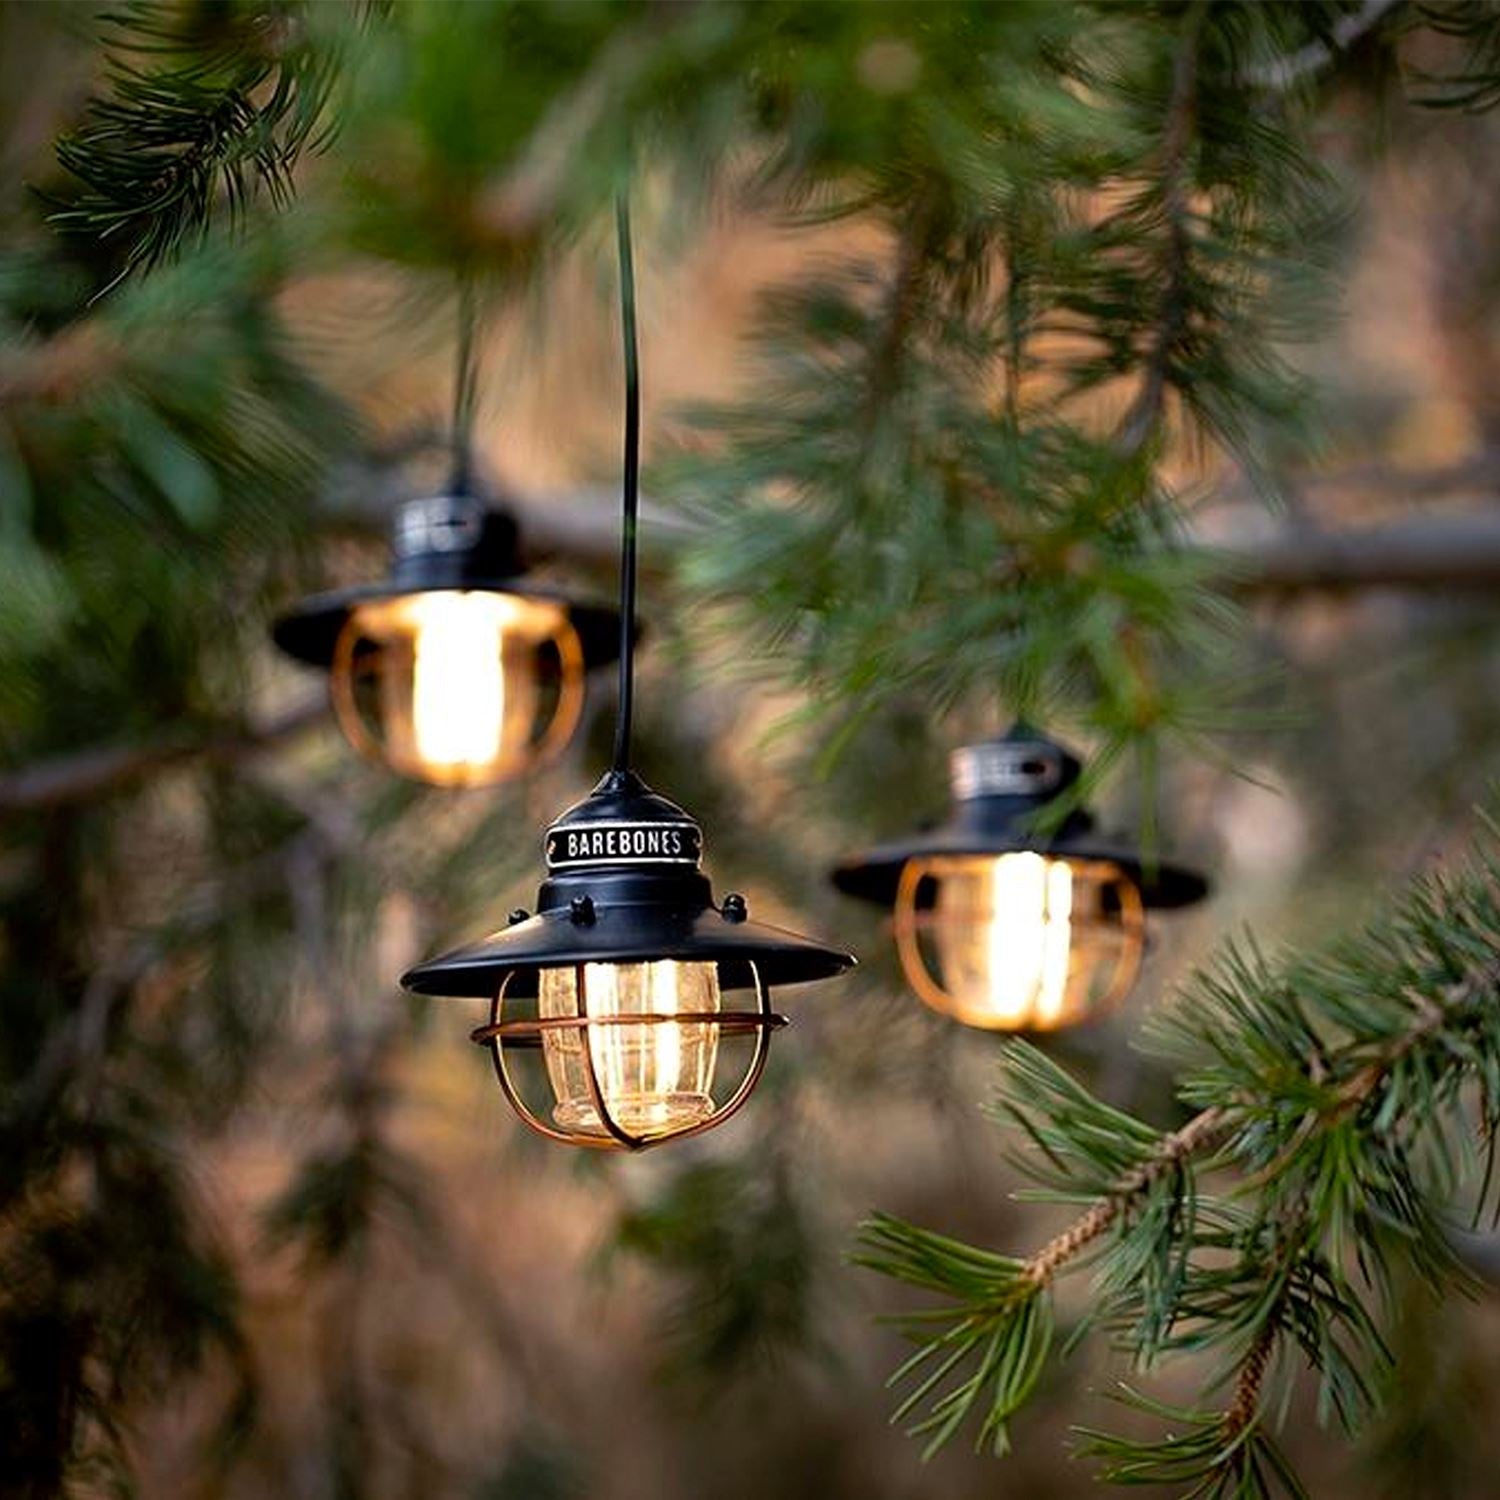
6. Hang Square Lanterns from Tree Branches for an Enchanted Forest Vibe
Create your own magical hanging lanterns in an afternoon. Time: 2 hours. Cost: $50-100.
|
$179.99
|
$23.97
|


🔥 Trending Context
- Gather your materials: You’ll need several small, lightweight lanterns (solar or battery-powered LED are safest), strong twine or fishing line, and a step ladder.
- Choose your branches: Select sturdy, living branches that can handle the minimal weight. Avoid dead or weak limbs.
- Vary the heights: Hang lanterns at different heights, from 6 to 9 feet, to create a layered, organic look.
- Secure the knots: Use a secure knot like a bowline or a double half-hitch to attach the line to the branch and the lantern.
- Check the effect: Wait for dusk and turn them on. Adjust any lanterns that are too bright, too dim, or poorly placed.
This ‘enchanted forest’ look is part of a larger trend called ‘biophilic design,’ which is all about strengthening the connection between our homes and the natural world. Instead of just placing lights *next* to nature, this idea integrates them *into* it. It’s popular because it creates an experience—a mystical, transportive mood that feels like an escape from the everyday. It’s less about pure illumination and more about creating a feeling of wonder in your own backyard.
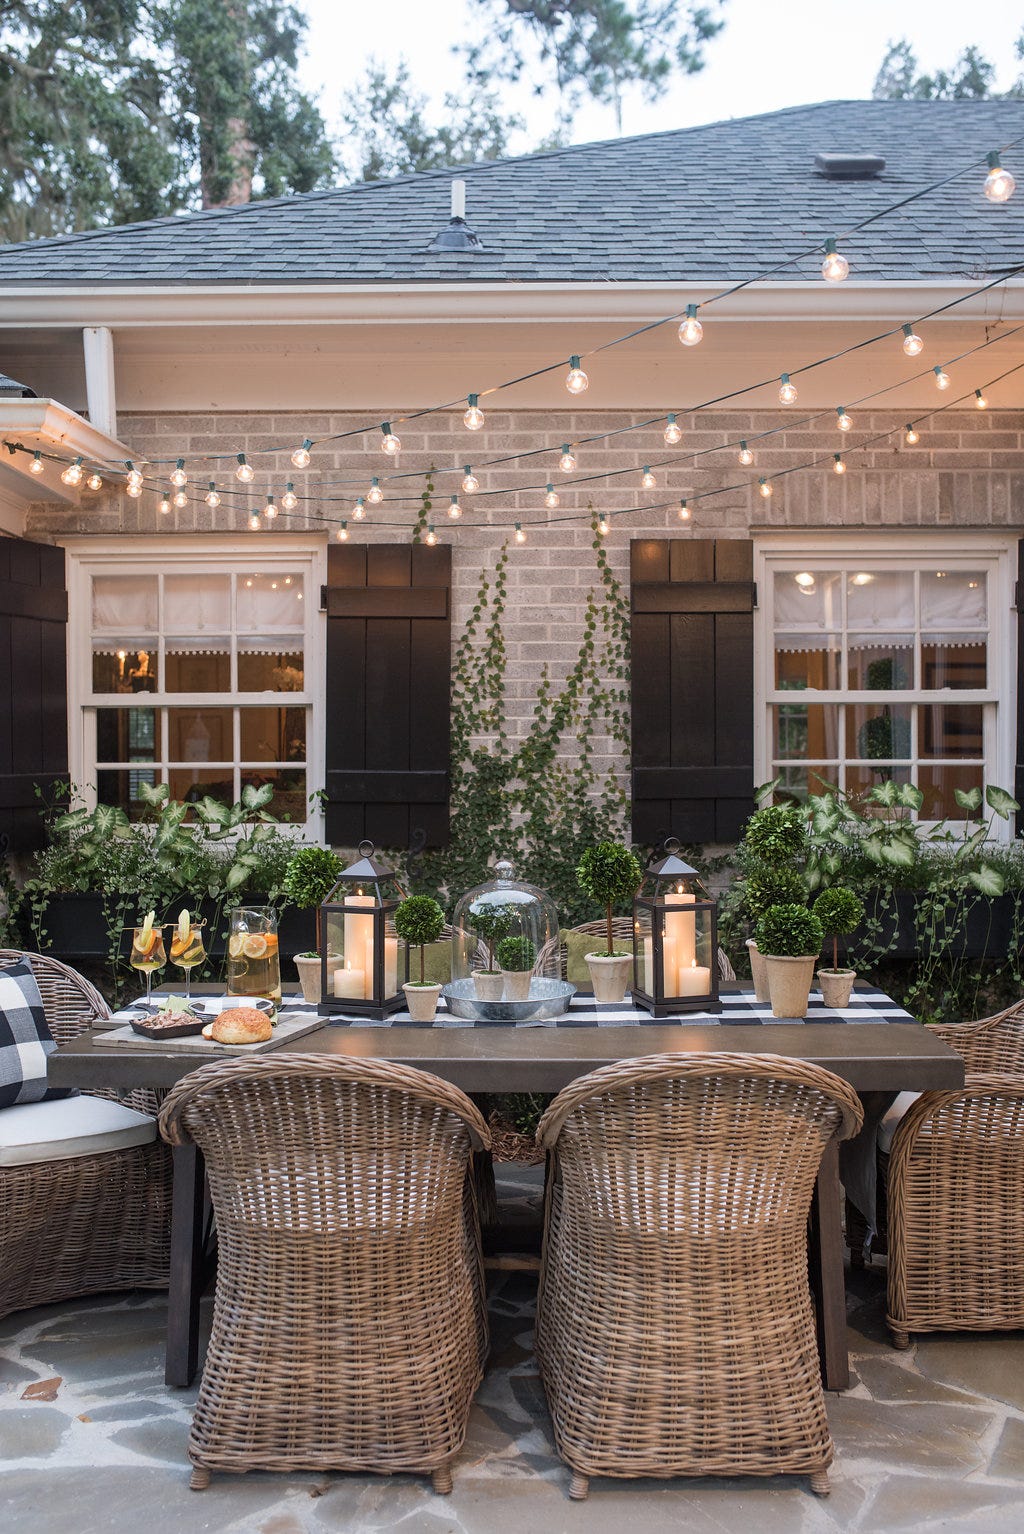
7. Combine String Lights and Tabletop Lanterns for a Cozy Dining Nook
You don’t need a huge budget to get this layered, inviting look. The overhead string lights are the biggest workhorse, and a good set costs as little as $30-50 at Target or Walmart. For the tabletop, skip expensive lanterns and use simple glass hurricanes with pillar candles from the dollar store, or find unique candle holders at a thrift store for under $20. The key is mixing ambient overhead light with the intimate, flickering glow of candles on the table. It’s all about the layers of light, not the price tag of the fixtures.
|
📋 Copy HEX 🔗 Share |
|
$519.48
|
$74.99
|
$189.99
|
$32.47
|


⭐ The One Thing
This look follows a classic 60/30/10 rule. 60% of the light is the warm, ambient glow from the overhead string lights. 30% is the focused, intimate task lighting from the two large pillar candles in the lanterns on the table. The final 10% is texture and pattern—the woven wicker chairs, the striped table runner, and the ivy on the brick wall. You could swap the wicker for metal chairs, but you’d need to add pillows to bring that textural 10% back.
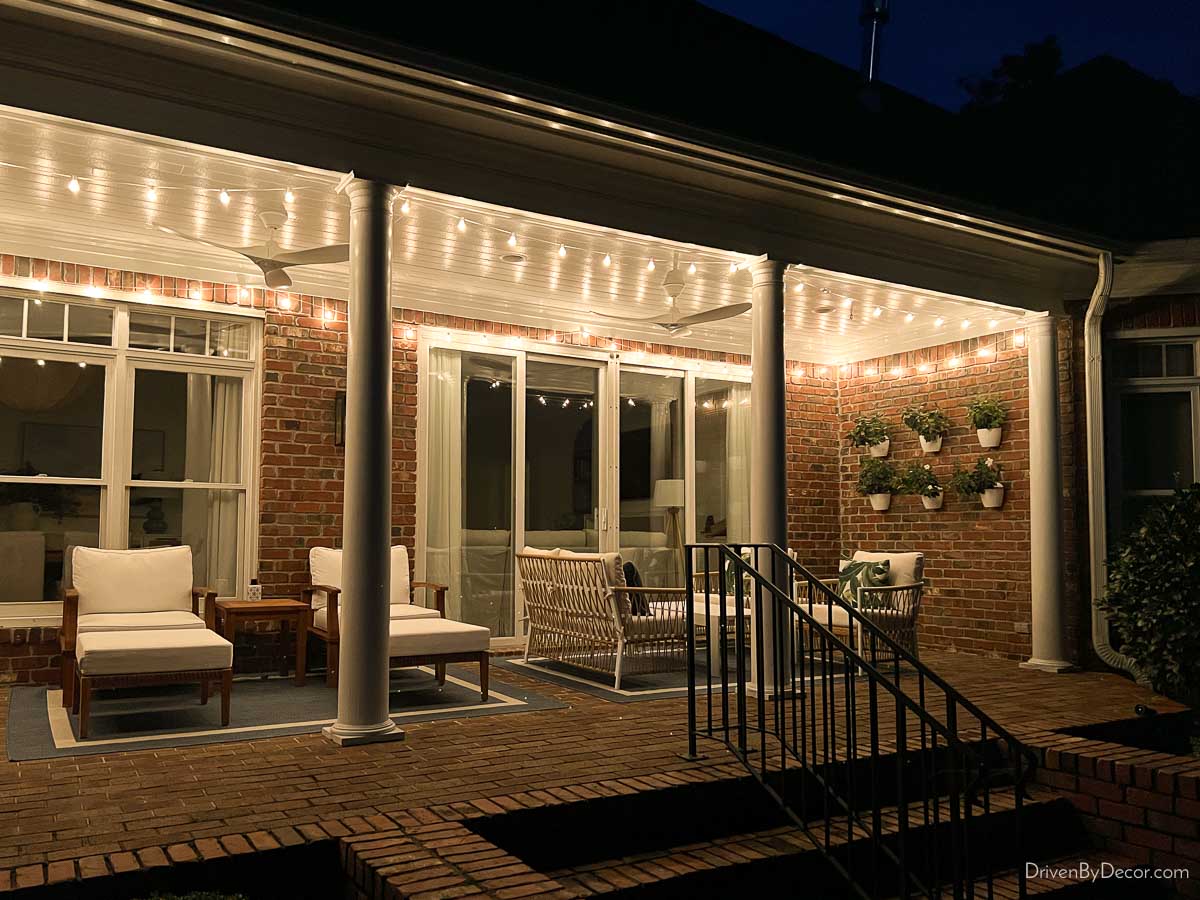
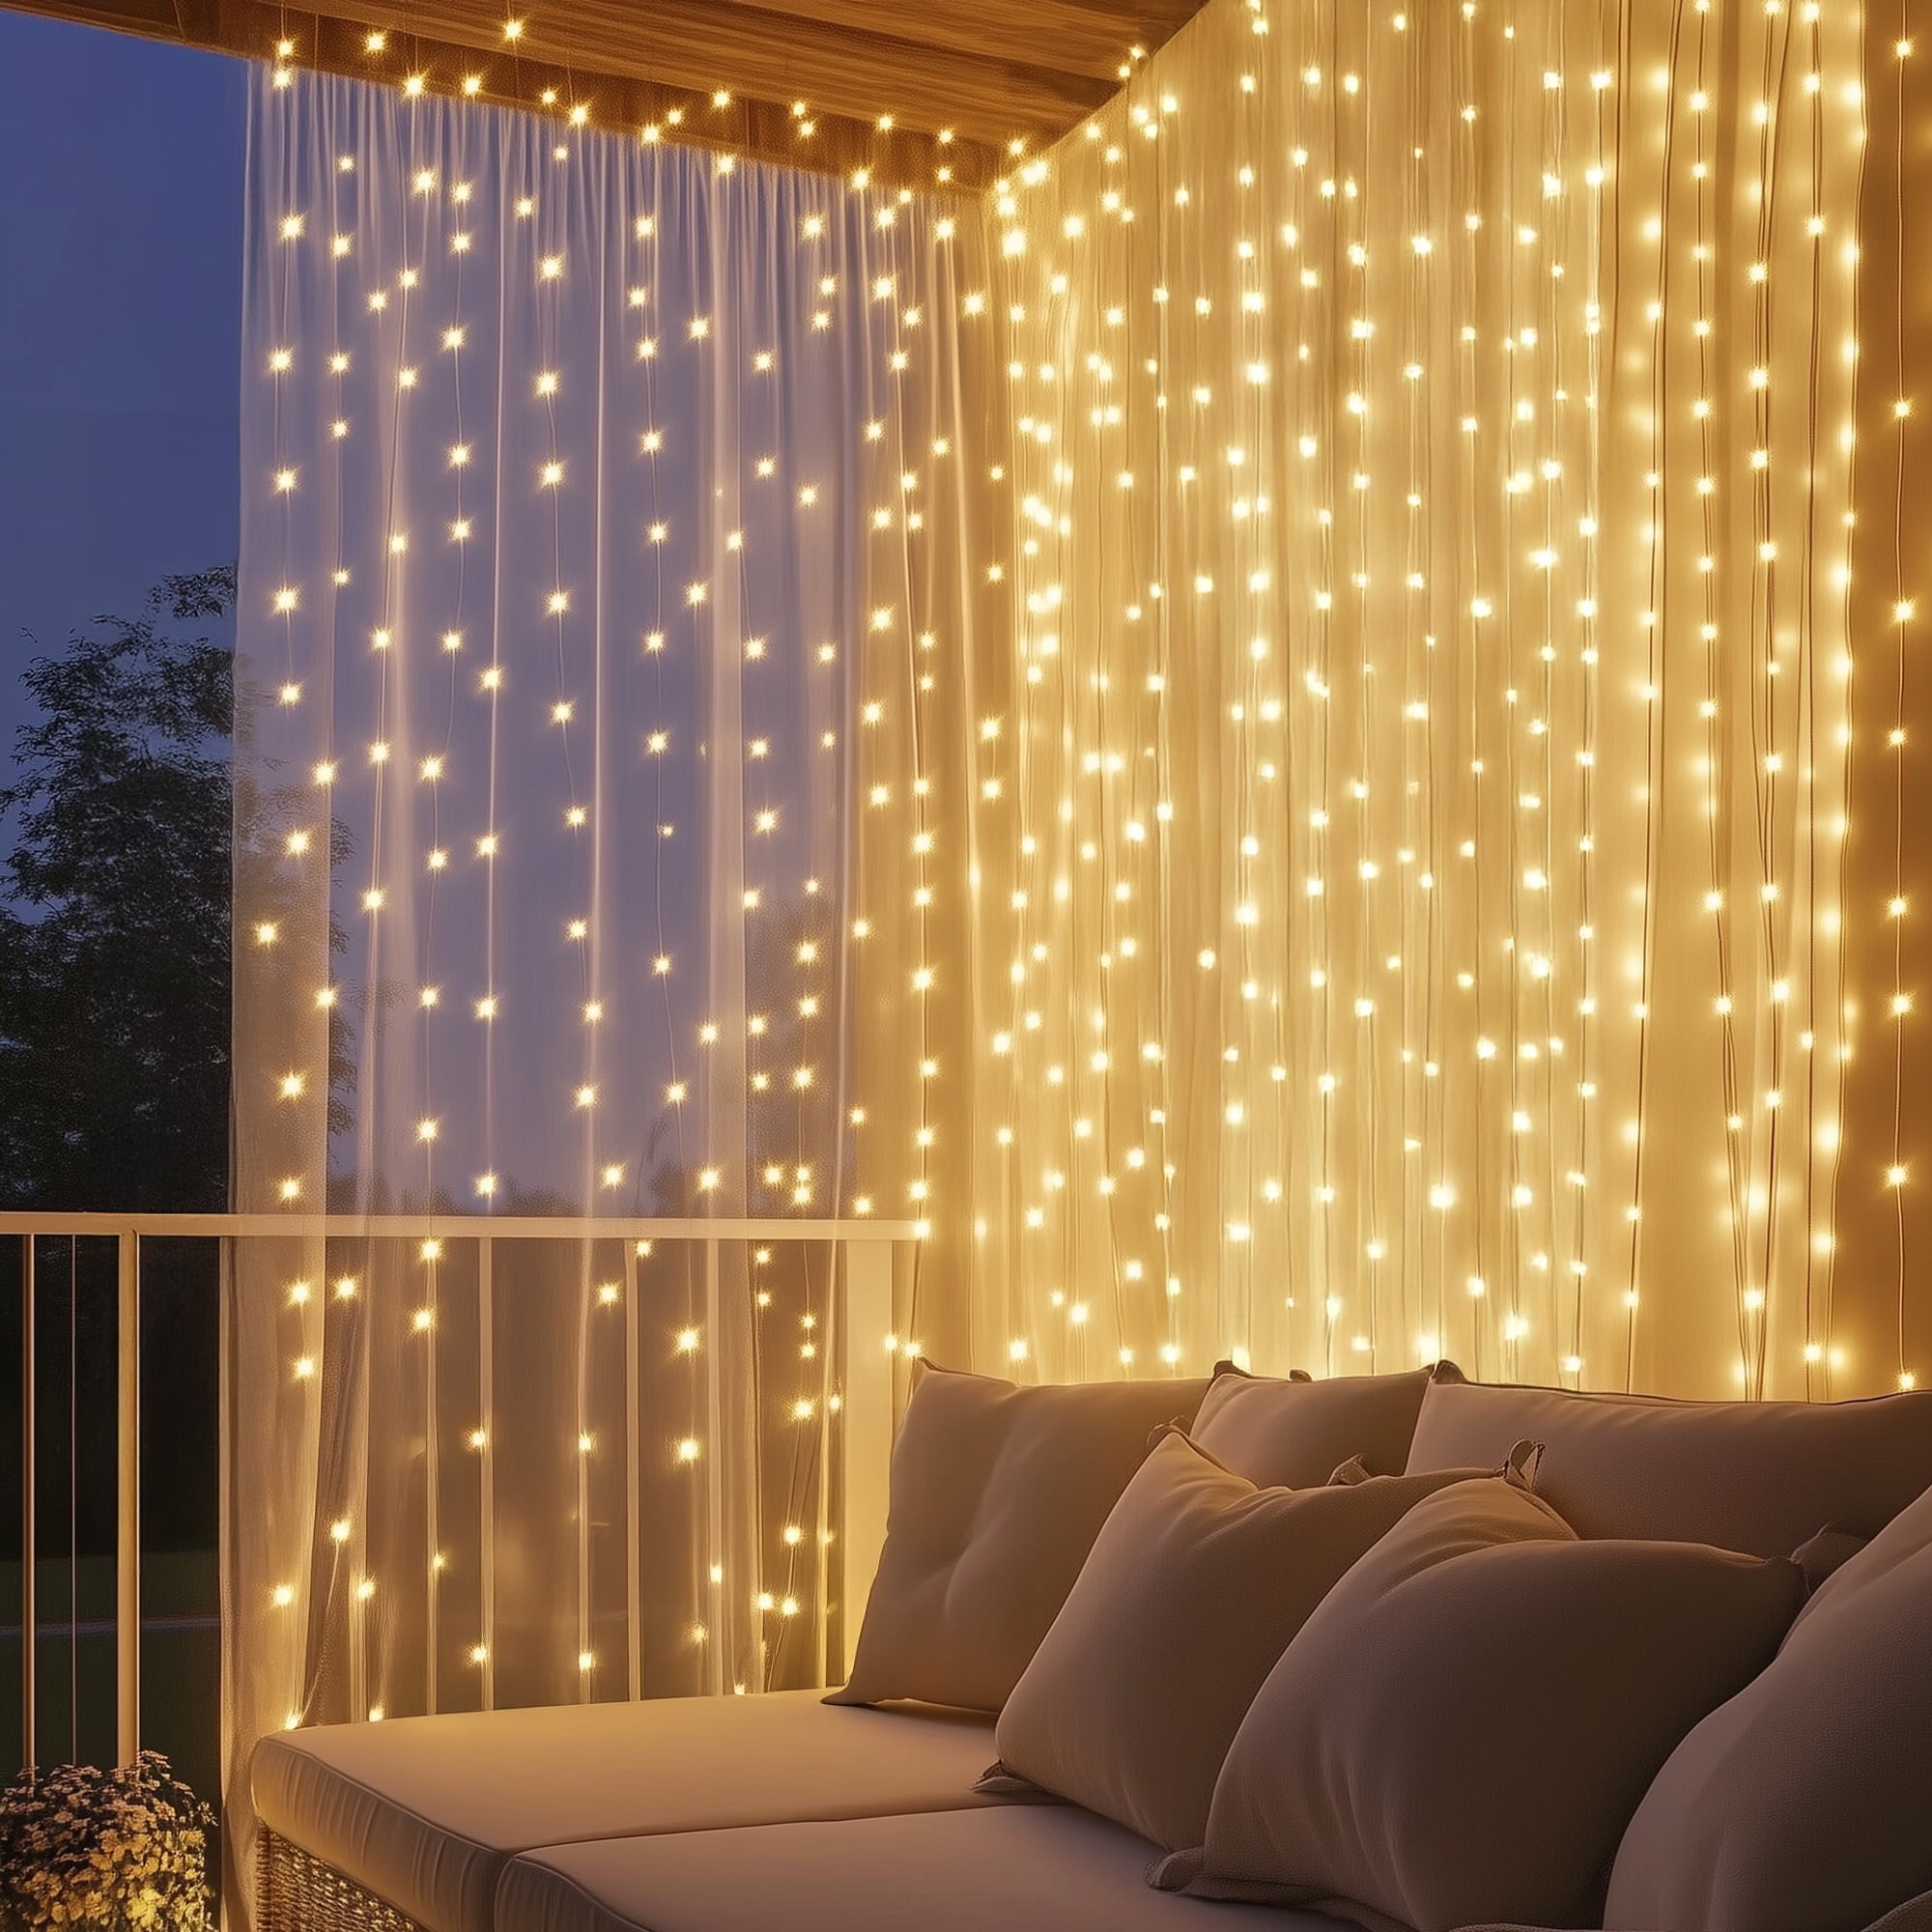
8. Suspend White String Lights Across a Covered Brick Patio
When hanging lights under a covered ceiling, use white wire lights if the ceiling is white or a very light color. The white wires will blend in seamlessly during the day, making the bulbs appear to float. Black wires, by contrast, would create a distracting ‘spiderweb’ effect. Use small, insulated cable clips or white cup hooks screwed into the ceiling joists every 24-36 inches to create clean, straight lines and prevent sagging.
|
$266.99
|
$47.20
|
🧹 Maintenance Reality
Brick is incredibly durable, but it’s also porous. On a covered patio, it’s susceptible to mildew in shady corners and can collect a surprising amount of dust and pollen. Plan to give it a good scrub once a year. A stiff-bristled brush, water, and a bit of dish soap are usually enough. For stubborn mildew stains, a specialized brick cleaner or a diluted vinegar solution can work wonders. This annual cleaning keeps the red-brown color rich and the air fresh.
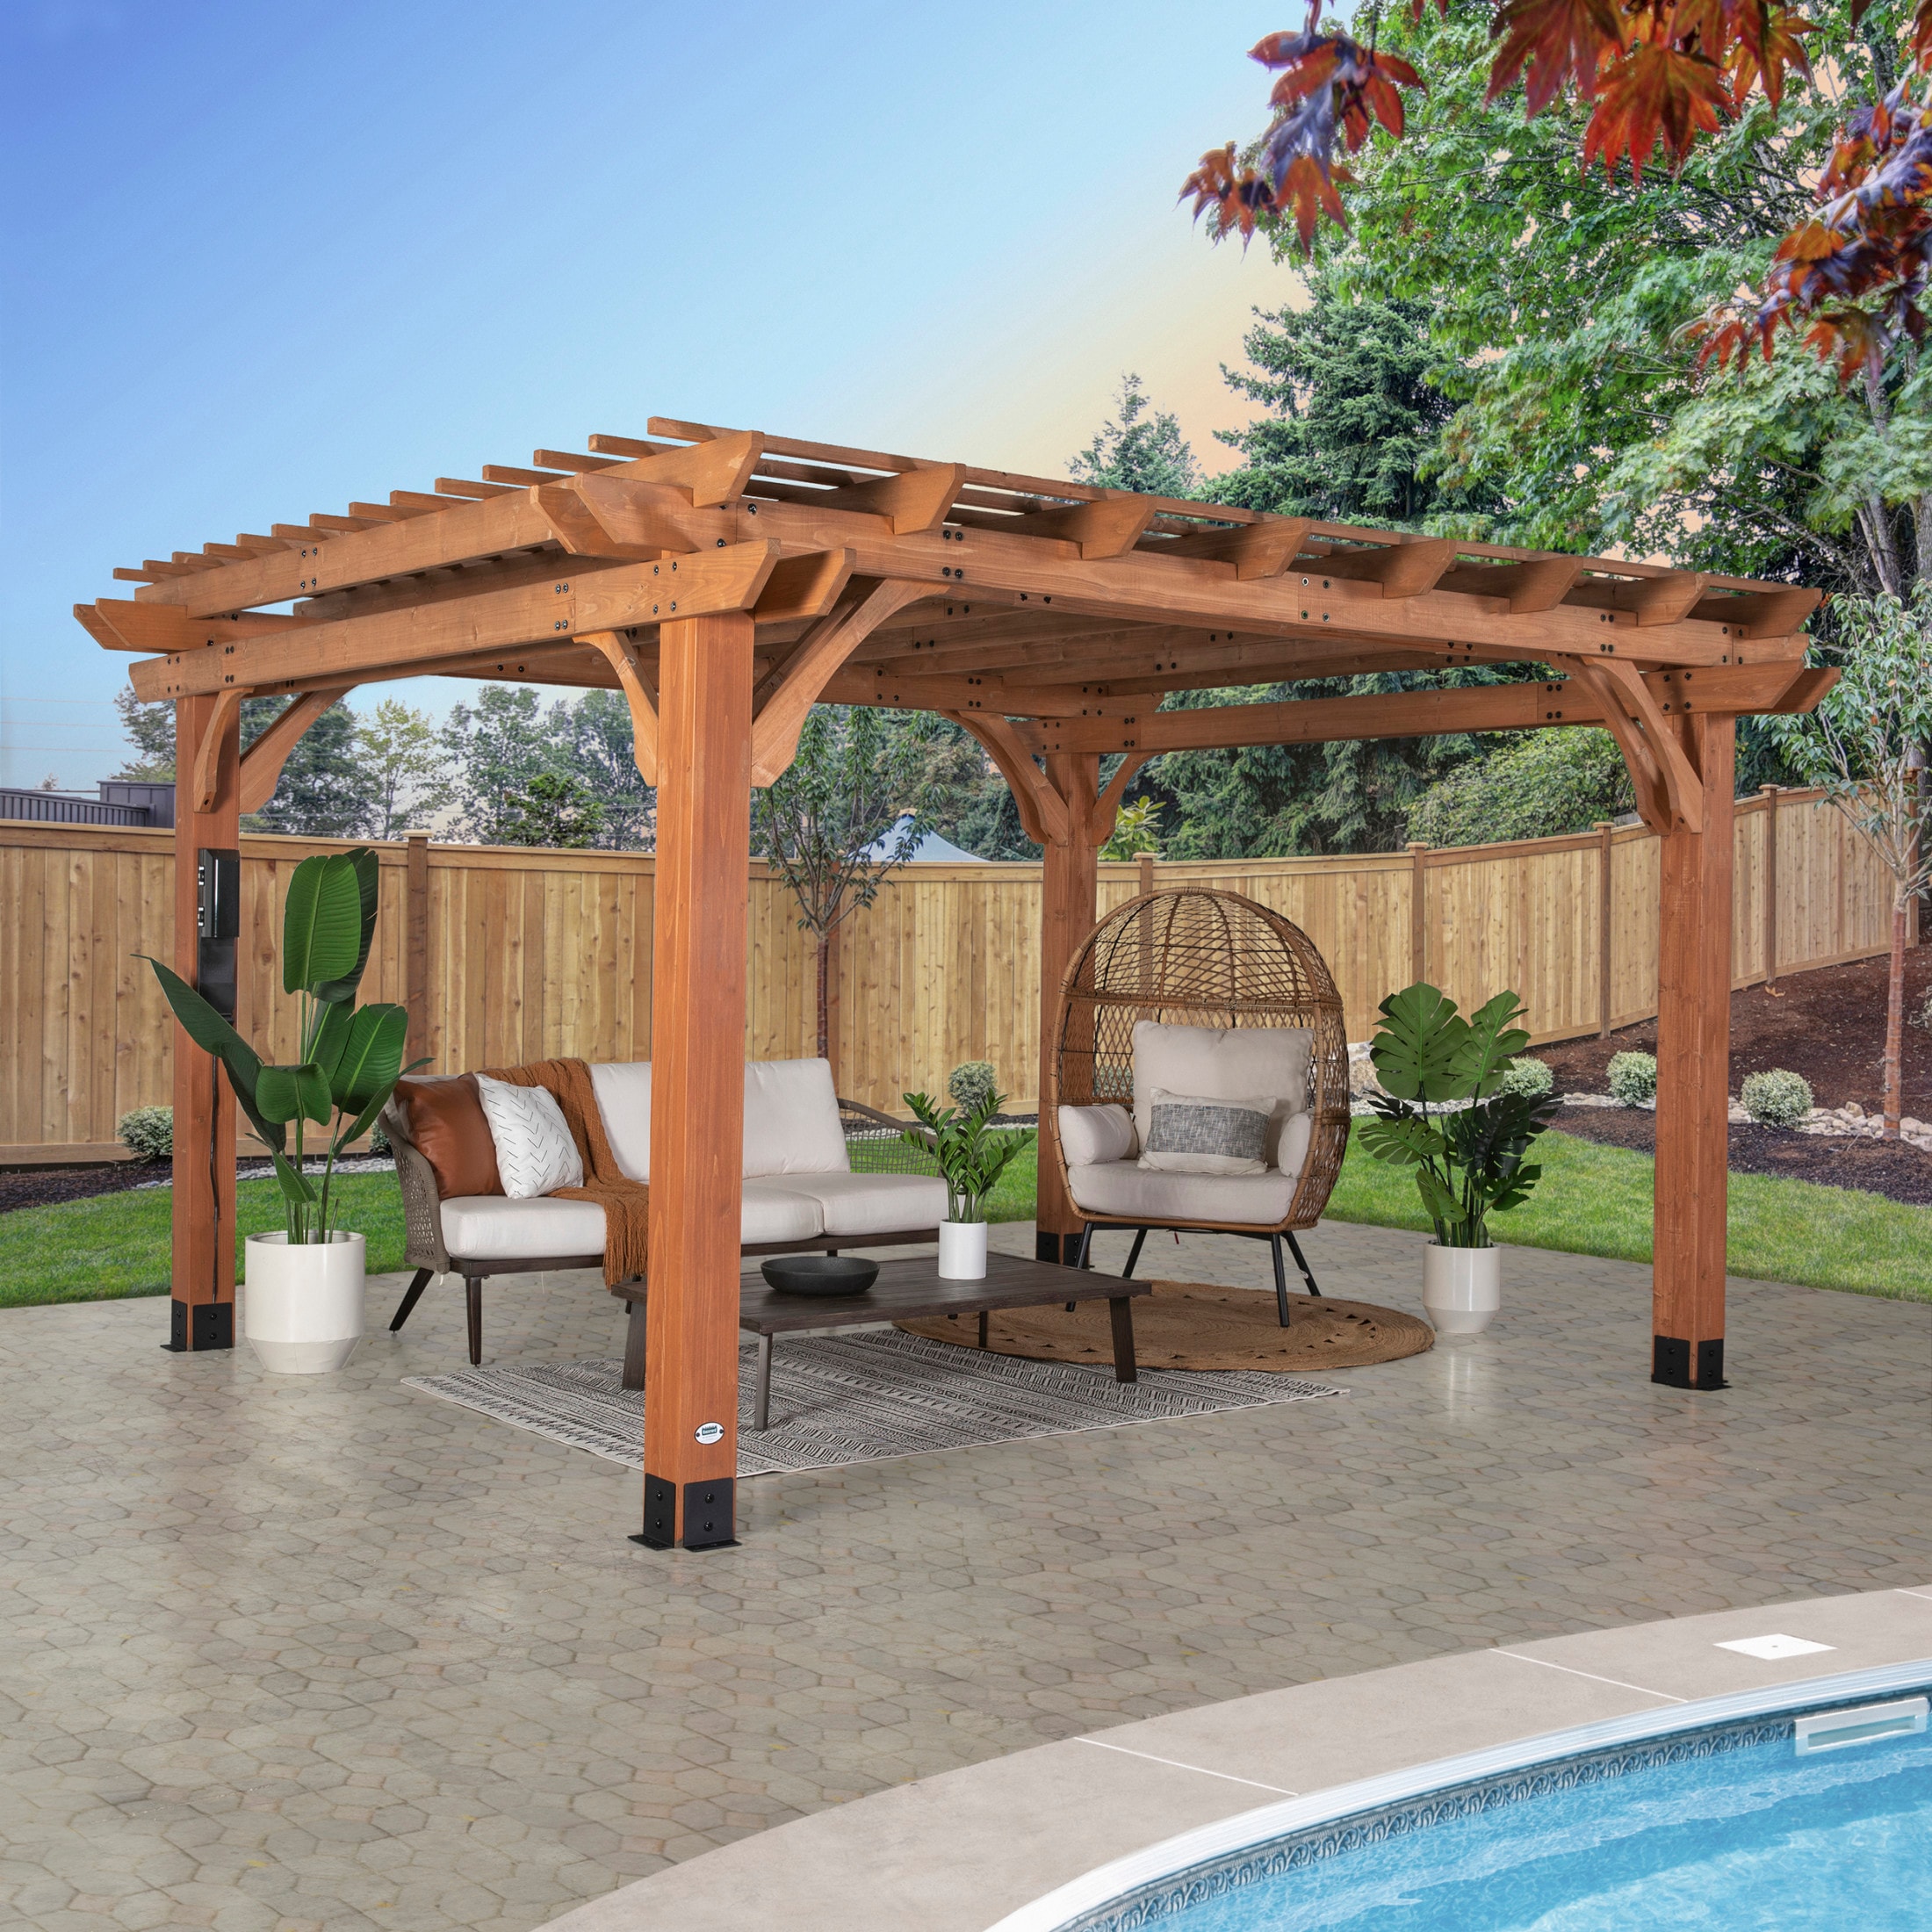
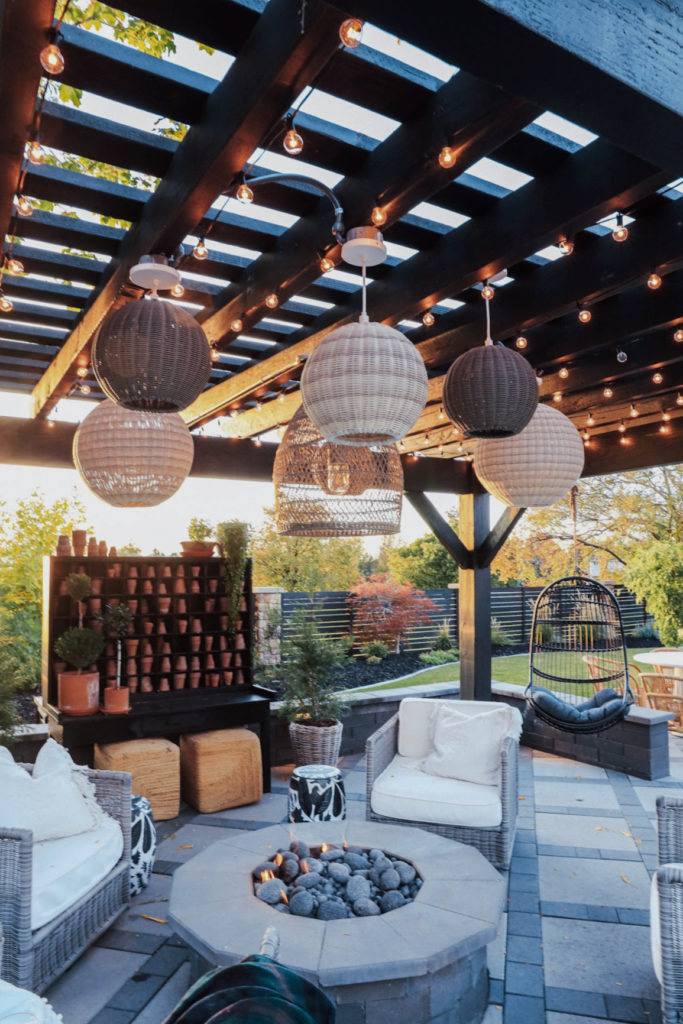
9. Layer Woven Pendants and String Lights Under a Pergola
The single element that elevates this entire patio is the cluster of large, woven pendant lights. The string lights provide a great ambient base layer, but the pendants add a crucial decorative and stylistic touch. They introduce a different scale, texture, and shape, making the lighting feel curated and designer-driven. Without them, the pergola would be nicely lit; with them, it becomes a stunning focal point. Compare this with the simpler lighting in Idea #23 to see the difference pendants make.
|
📋 Copy HEX 🔗 Share |
|
$534.99
|
$410.27
|
$50.00
|
🎯 What Makes It Work
- Pergola Structure: $1,500 – $4,000
- Woven Pendant Lights (set of 3-4): $600 – $1,500
- String Lights: $100 – $250
- Fire Pit & Seating: $1,500 – $5,000
- TOTAL: $3,700 – $10,750
- Budget alternative: Find woven baskets at a thrift store, cut a hole in the bottom, and pair them with a simple, outdoor-rated pendant light kit. Use more string lights for ambient glow and build a DIY fire pit from concrete blocks to bring the total cost under $1,200.
10. Illuminate a Privacy Screen with Warm Bulb String Lights
Attach string lights to a wood screen for a perfect glow. Time: 30 minutes. Cost: $40-80.
|
$689.98
|
$108.67
|
$28.86
|
$19.97
|
💸 Get This Look For Less
- Choose your lights: Opt for commercial-grade string lights with shatterproof bulbs, as they’ll be in a higher-traffic area.
- Plan your pattern: Decide if you want a simple zig-zag, a draped scallop, or a more random pattern.
- Install hooks: Screw in small cup hooks or use a staple gun with insulated staples along the top and side supports of your screen. Place one at each point where the string will change direction.
- String the lights: Starting at the end closest to your outlet, loop the light cord over the hooks. Don’t pull it too taut; a little slack is good.
- Secure the cord: Use zip ties or cord clips that match the wood color to secure any loose parts of the wire neatly against the frame.
This cozy corner vibe is totally achievable on a shoestring. The slatted wood screen is a classic IKEA move (check their outdoor section) or a simple DIY project with standard lumber for under $150. For seating, a used L-shaped outdoor sofa from Facebook Marketplace can be had for a few hundred dollars—new cushions can make it look brand new. The star, the string lights, are inexpensive everywhere. The fire pit can be a simple, portable metal bowl from Target for under $100 instead of a custom stone build.
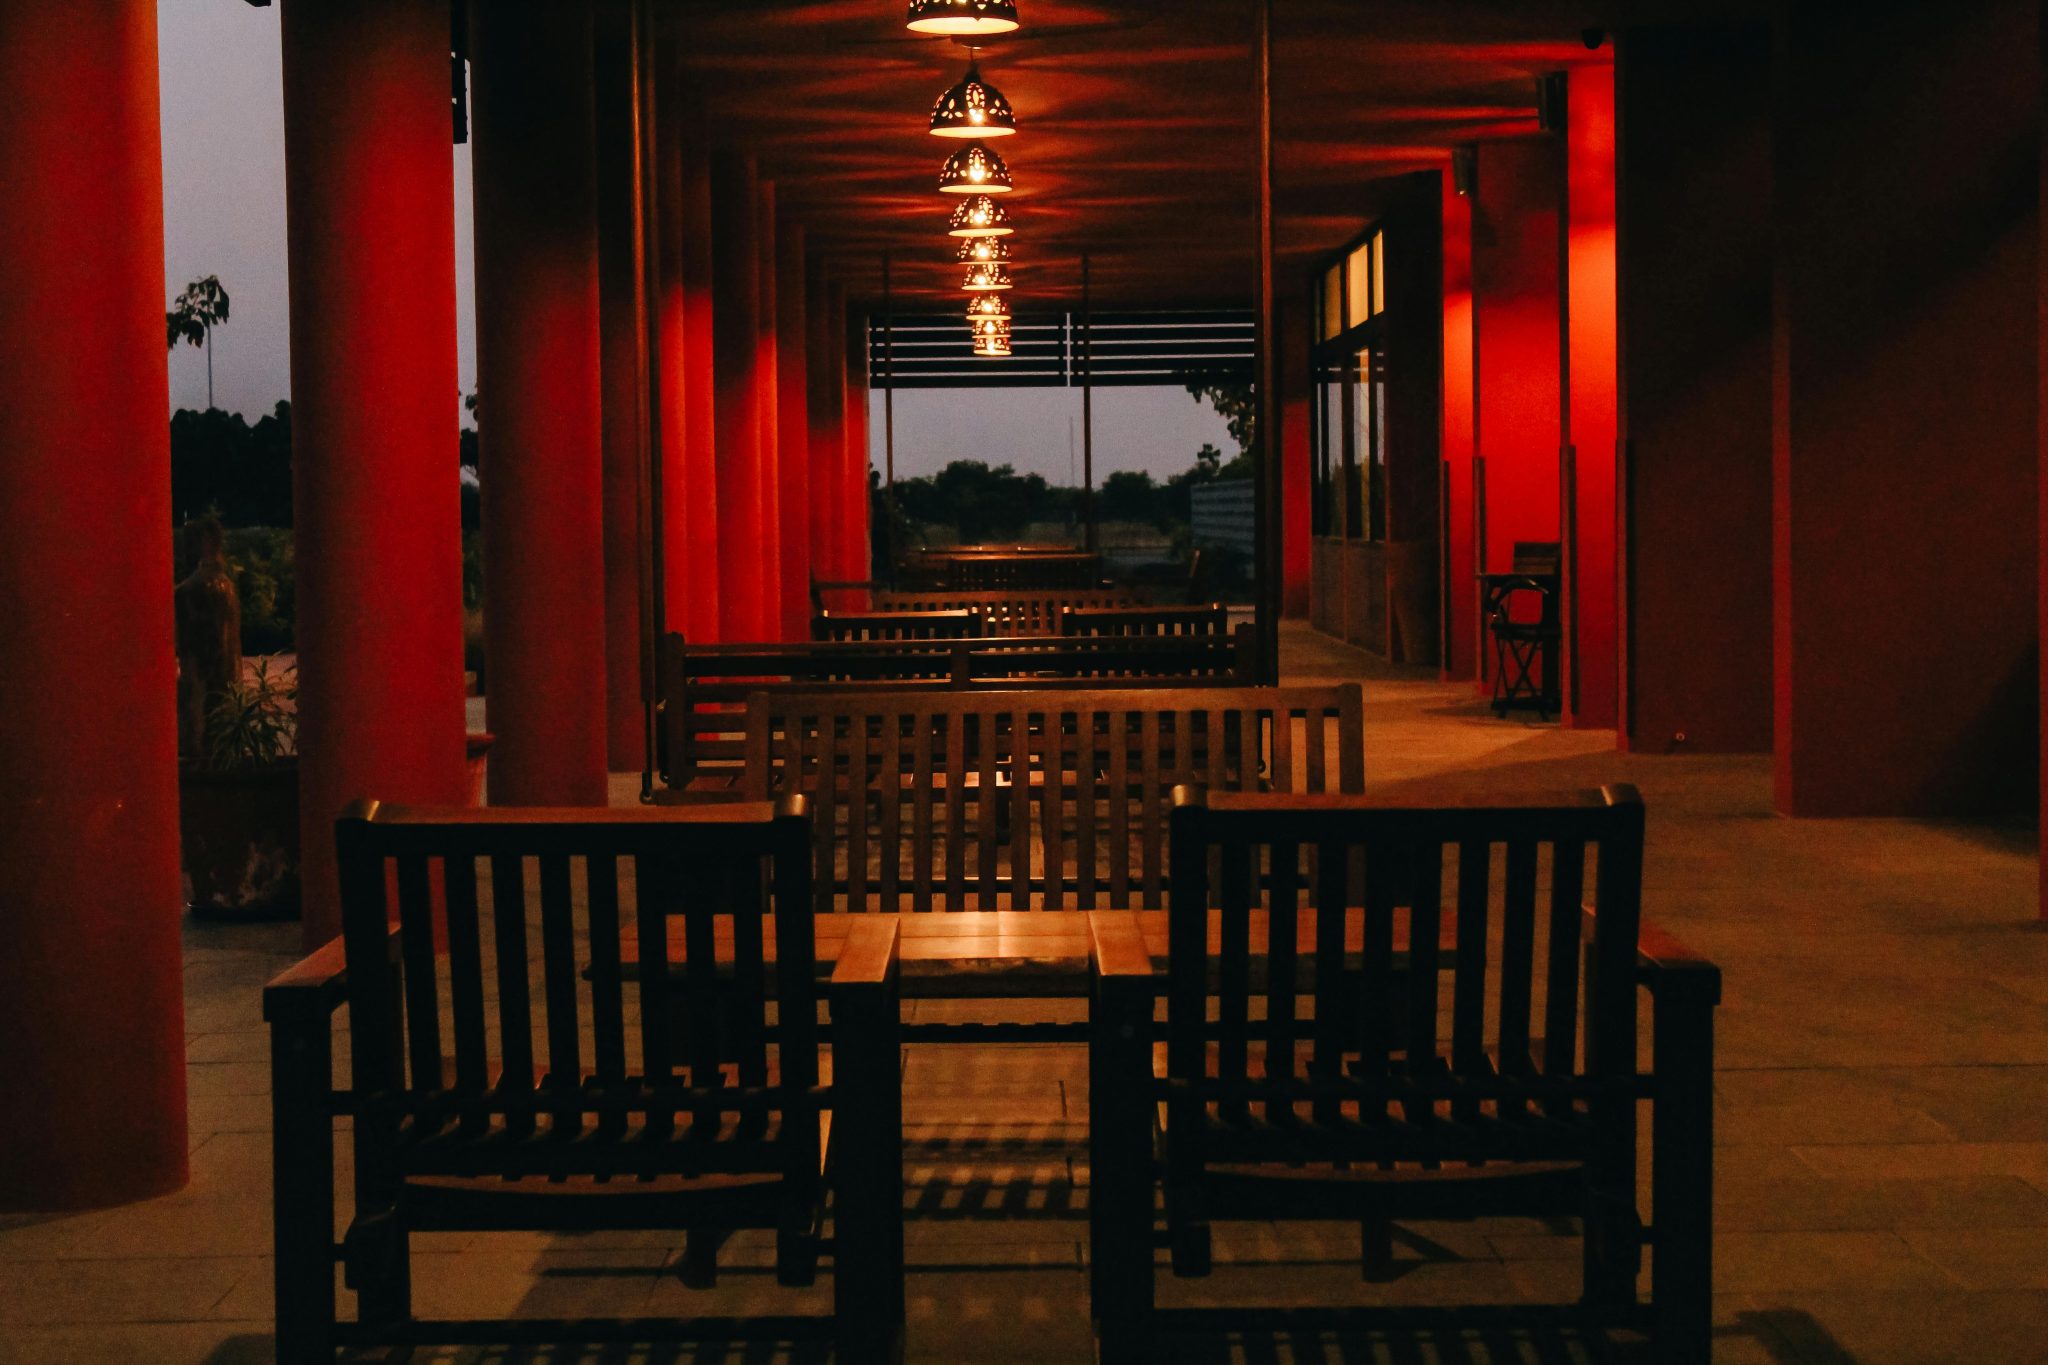
11. Hang a Row of Ornate Moroccan Pendants in a Corridor
This design’s power comes from repetition and shadow. Lining up a series of identical, intricate pendants creates a strong visual rhythm that draws the eye down the corridor, making the space feel longer. The ornate metalwork isn’t just decorative; it’s functional, casting complex, beautiful patterns of light and shadow on the reddish-orange columns and slatted benches. This transforms a simple walkway into a dramatic, immersive experience.
|
📋 Copy HEX 🔗 Share |
|
$220.00
|
$111.00
|
$292.00
|
$169.99
|

💡 Designer Tip
A look this specific, bold, and dramatic is a major commitment. Those reddish-orange columns are the heart of the design; without them, the Moroccan lanterns would feel out of place. This isn’t a style you can dabble in. You need to embrace the rich color, the dark wood, and the bold geometry wholeheartedly. Be honest with yourself: Do you love this enough to design the entire space around it? If not, a single lantern as an accent piece might be a better, safer choice.
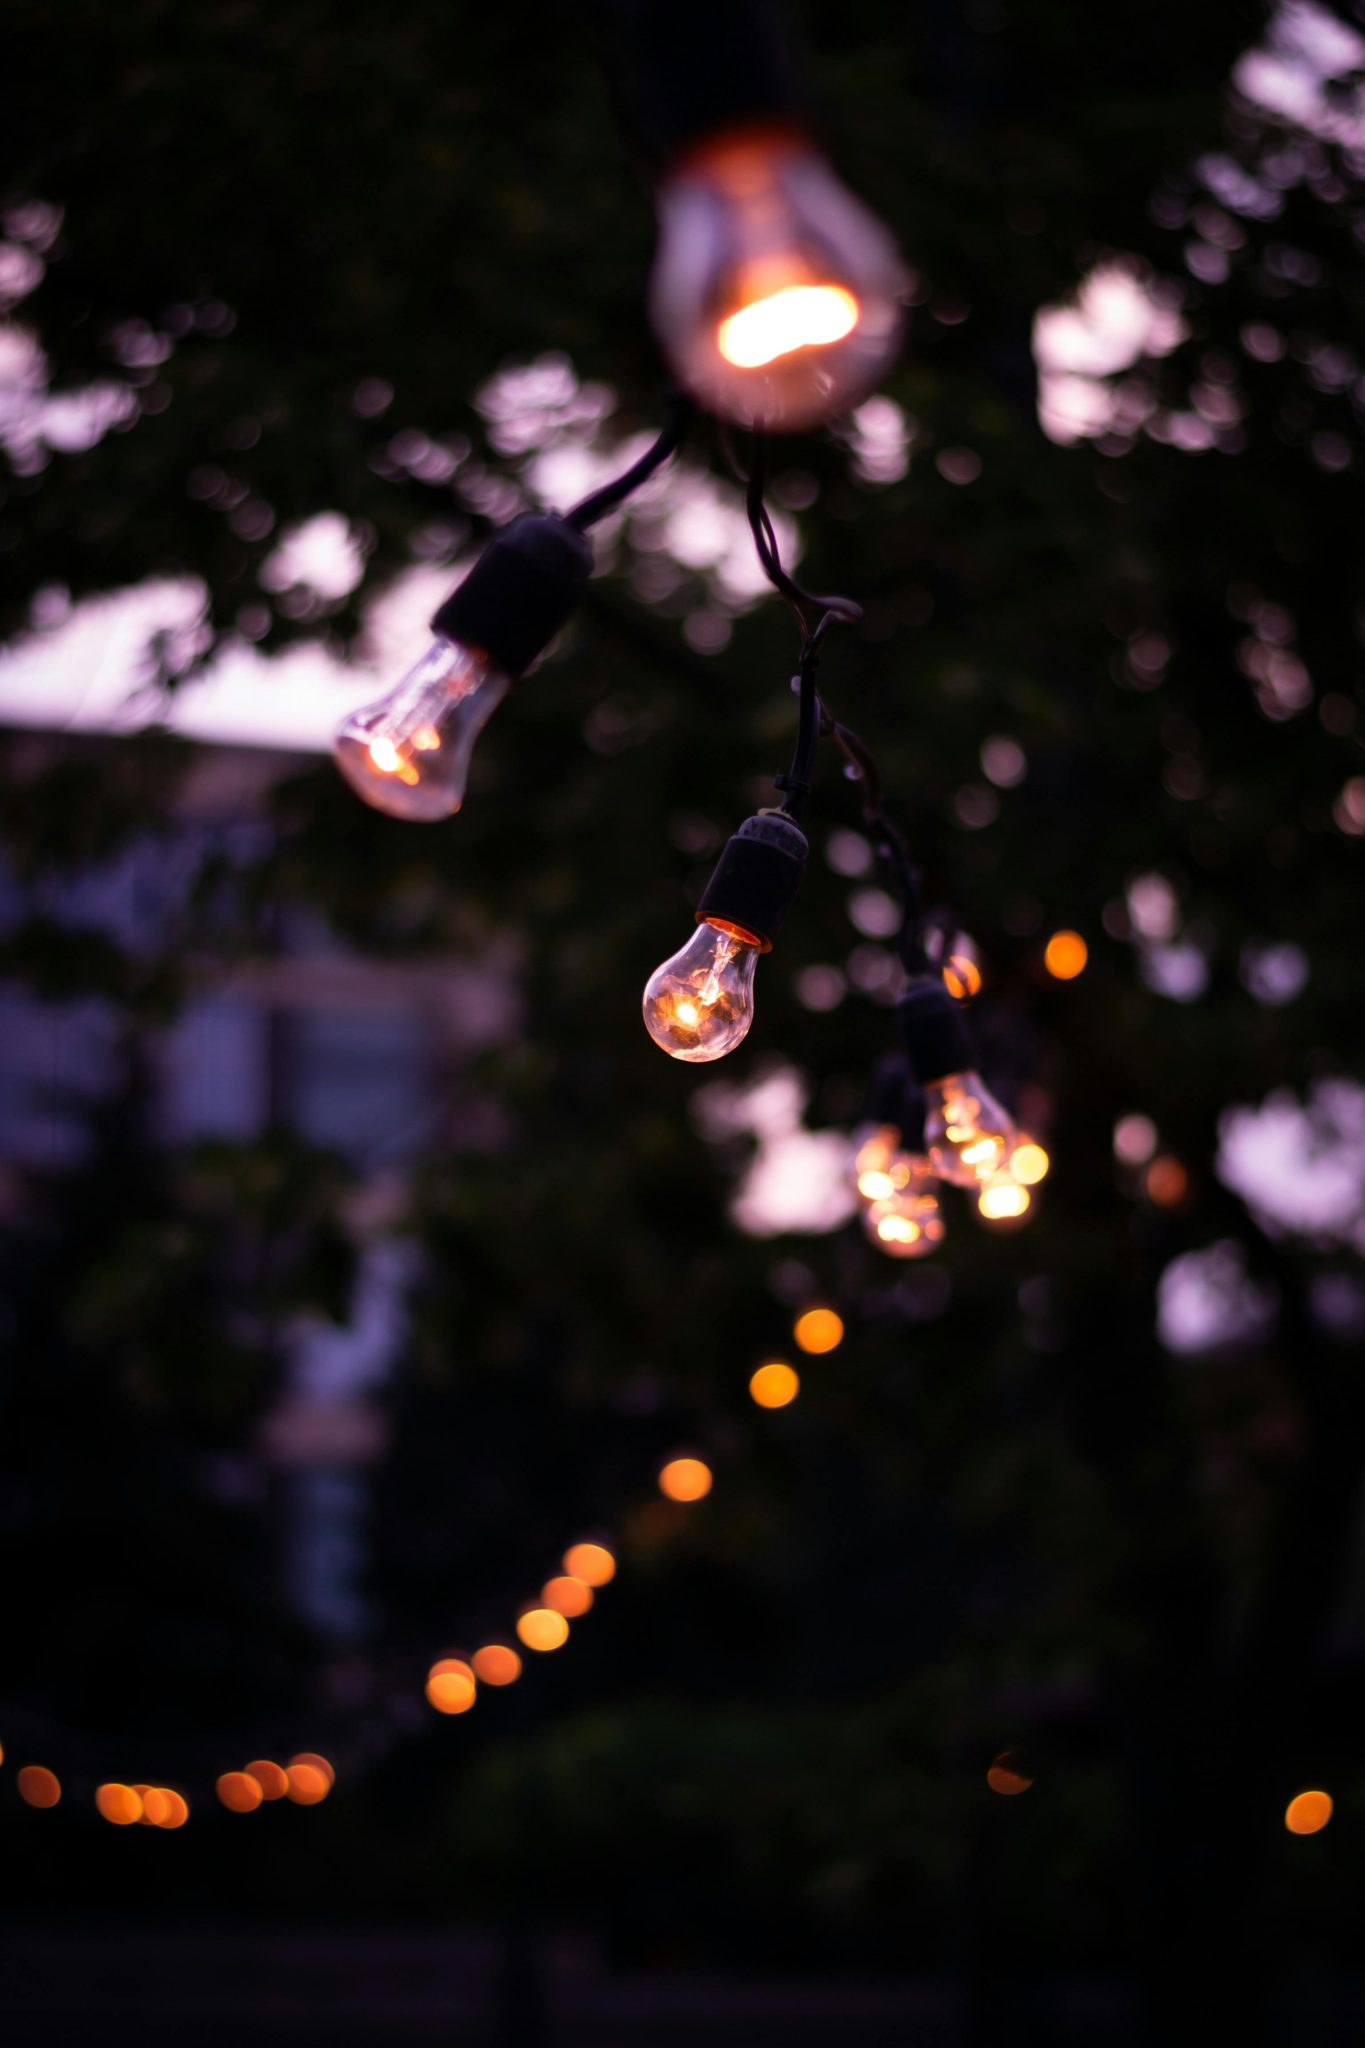
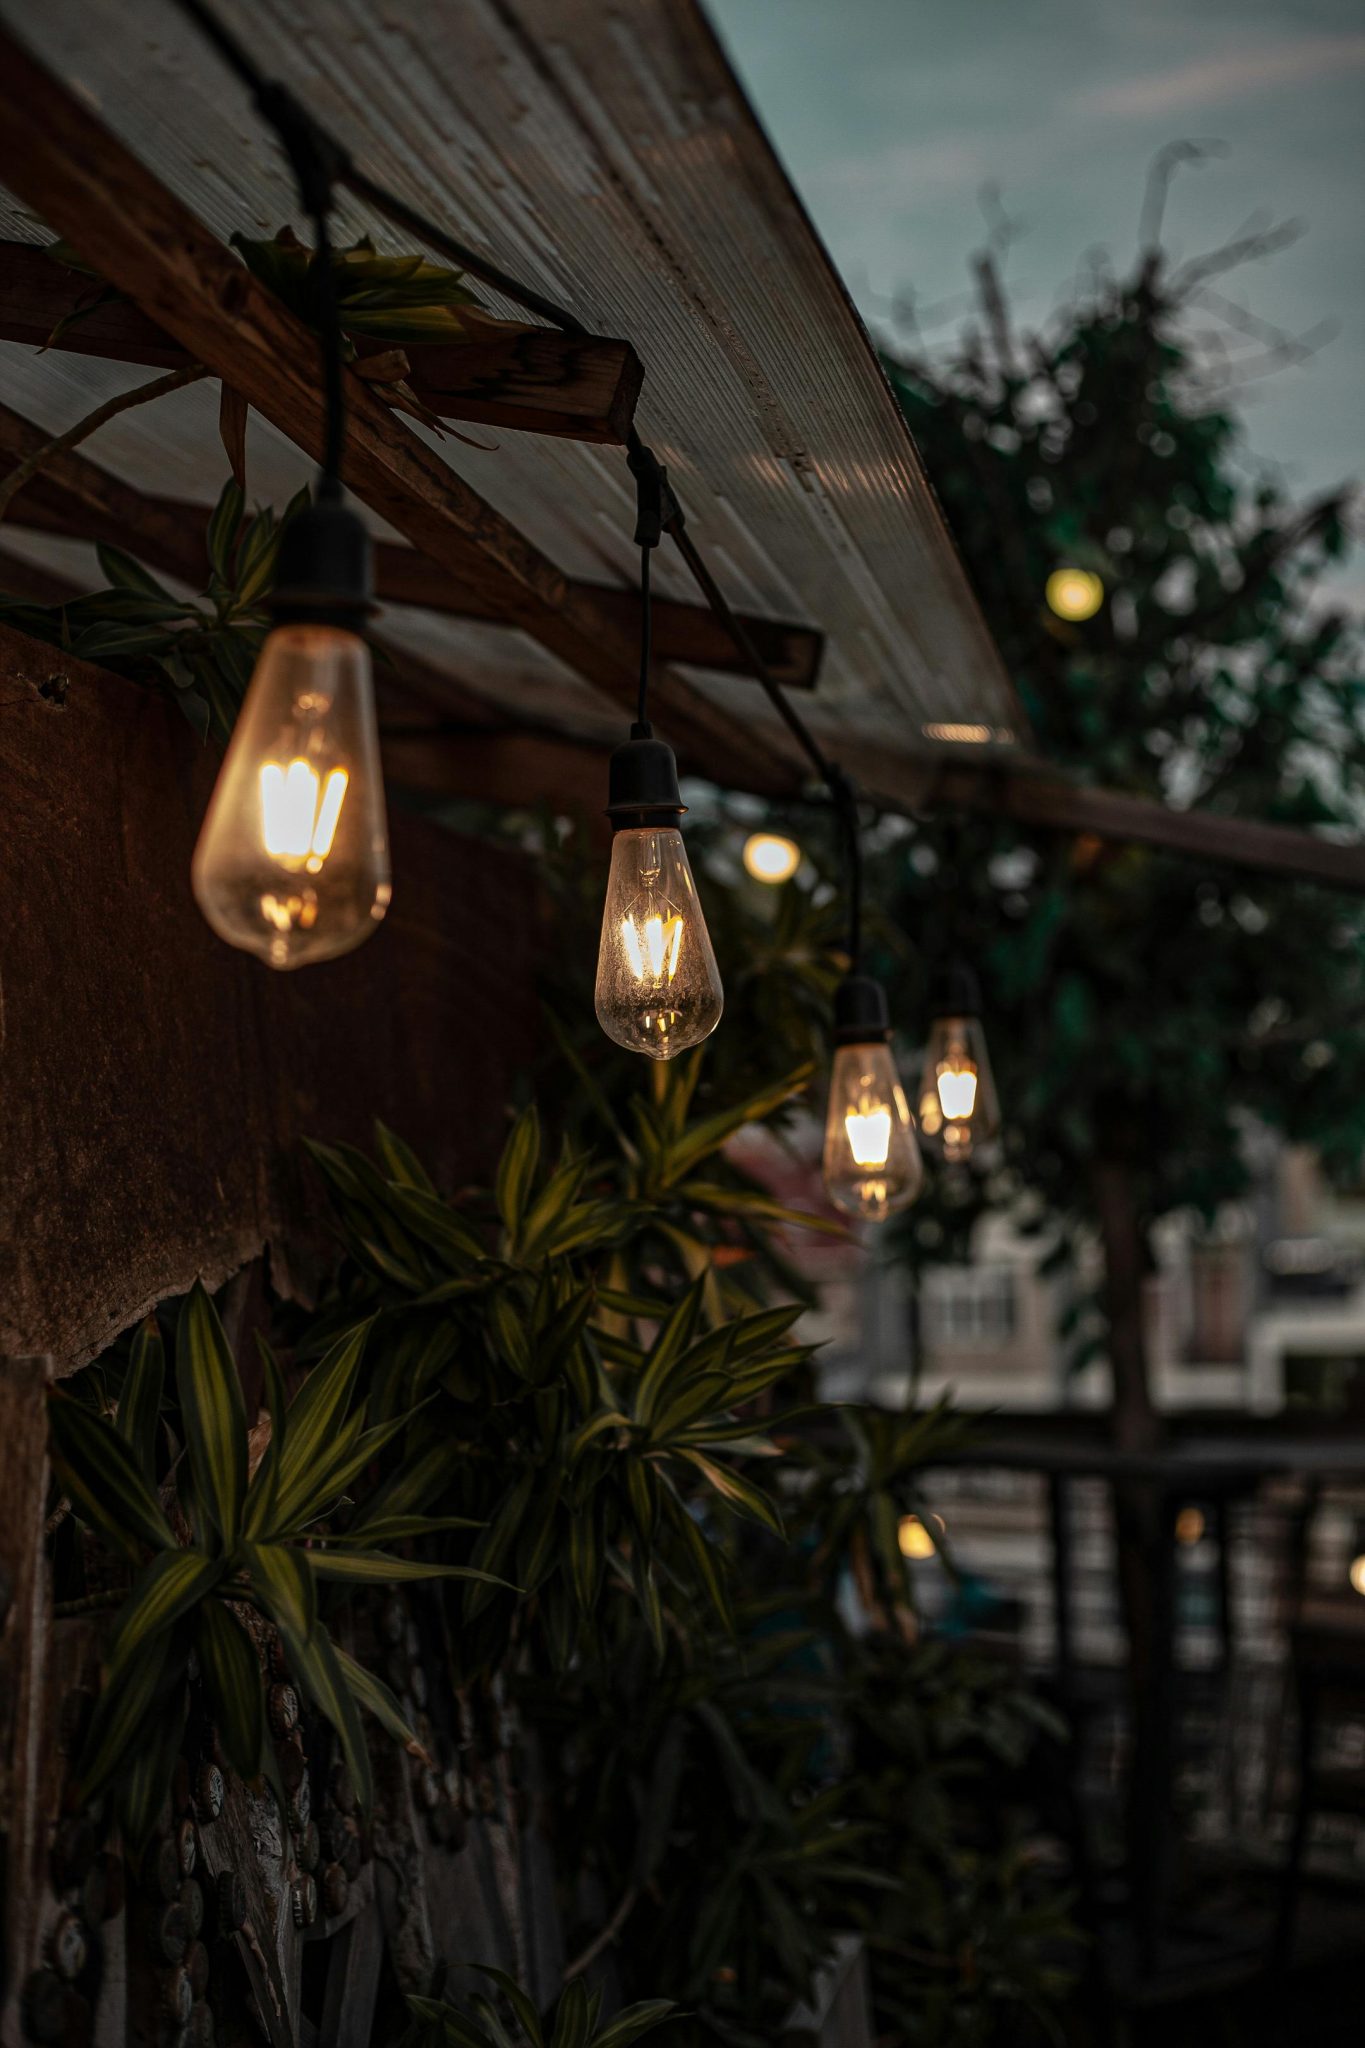
12. Use Edison Bulb String Lights for a Warm, Serene Patio
The key to this scene’s serene, cozy mood is the visible filament in the Edison-style bulbs. Unlike frosted or plain clear bulbs, these filaments glow with a distinctly warm, almost amber light that feels softer and more nostalgic. This choice instantly signals ‘relax,’ turning the simple wooden deck into an intimate retreat. The warm light is especially flattering to wood tones and human skin, making everyone and everything look better.
|
$99.98
|
$172.79
|

📏 Scale Guide
When using string lights as your primary light source, connect them to a dimmer switch. This is a game-changer. Full brightness is great for cleanup or finding a dropped fork, but for 90% of the time, you’ll want them dimmed down to about 60-70% for the perfect ambient glow. An outdoor-rated plug-in dimmer costs about $20-$30 and gives you complete control over the mood, from festive to intimate.
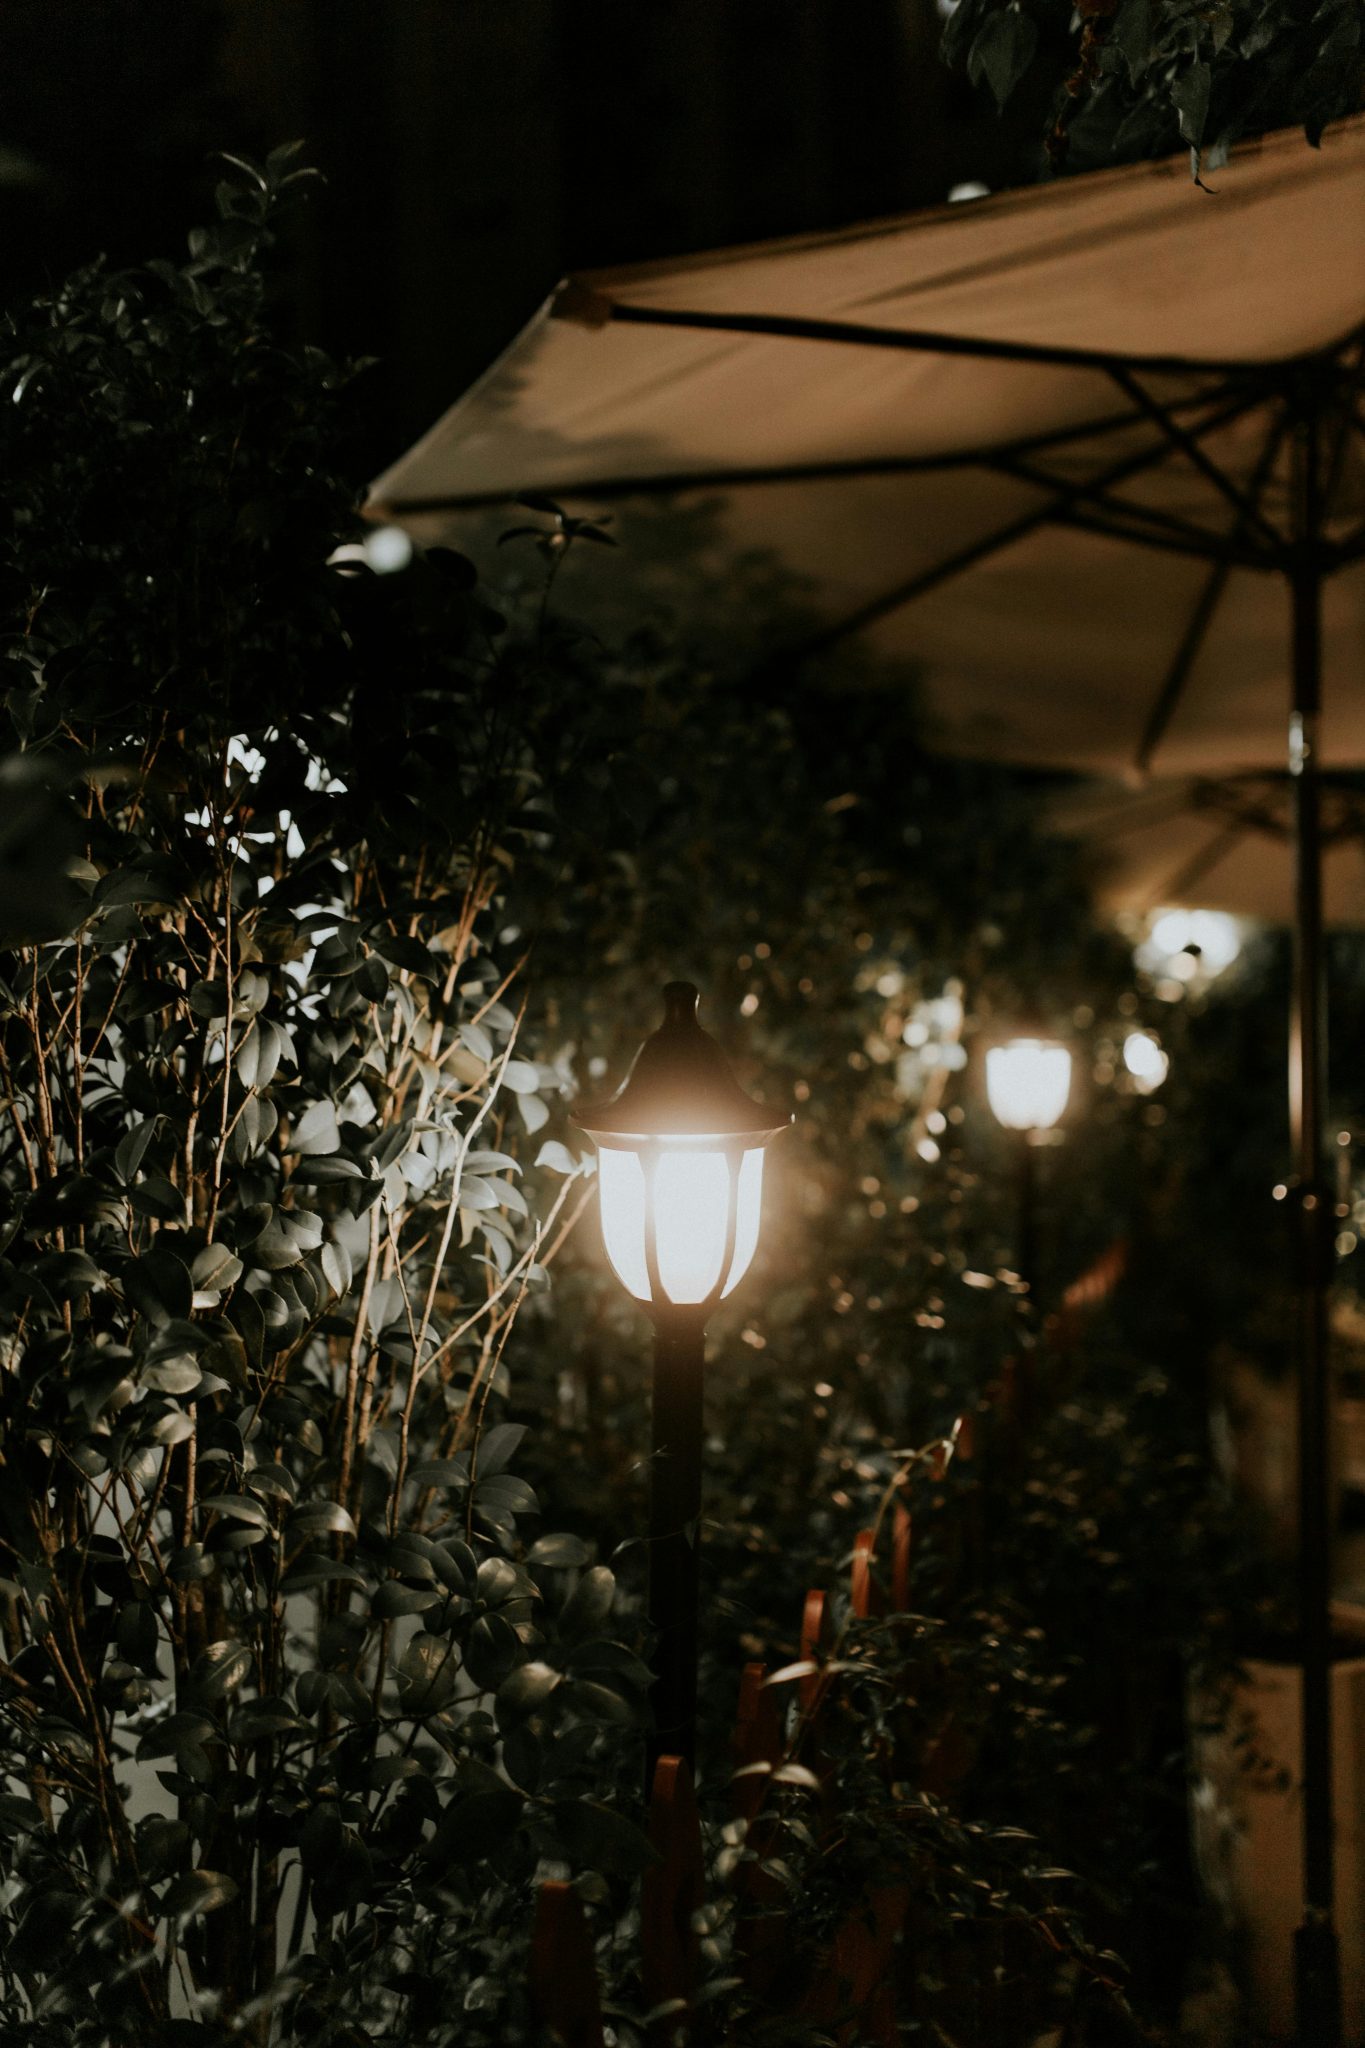
13. Intersperse Glowing Pedestal Lanterns in Lush Greenery
This works by creating pockets of light from within the foliage. By placing the light source—these classic pedestal lanterns—down in the garden beds, the light radiates outwards, illuminating the leaves and stems from below. This is a far more natural and gentle effect than top-down lighting, which can flatten a scene. It creates depth, mystery, and highlights the beautiful textures of the different plants, making the garden feel alive at night.
|
📋 Copy HEX 🔗 Share |
|
$89.98
|
$42.99
|


🔧 How-To Brief
This technique is perfect for small to medium-sized patios or garden corners. The pedestal lanterns are typically 18 to 30 inches tall, so they need to be surrounded by foliage of a similar or slightly taller height to feel nestled in. It’s an ideal solution for lighting up borders, planter boxes, or the area around a small seating nook. In a vast, open yard, this subtle effect might get lost. See Idea #1 for a strategy better suited to large spaces.
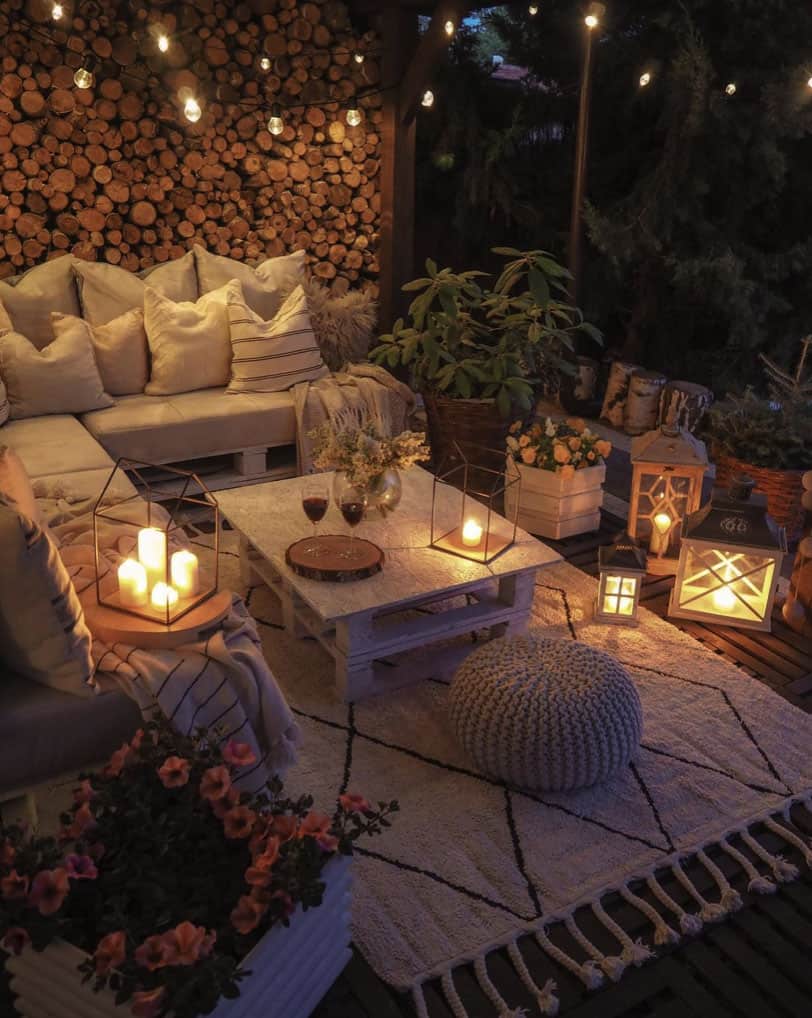
14. Layer Multiple Light Sources for a Rustic Lounge
The formula for this ultra-cozy space is a mix of light types: 40% high ambient light (string lights), 40% low mood light (floor and table lanterns), and 20% flickering candlelight. This variety is crucial. The string lights provide the general, usable light, while the lanterns and candles create intimacy, focus, and movement. Swapping out any one of these for more of the others would flatten the mood—it’s the combination that creates this rich, layered effect.
|
$5,097.00
|
$137.00
|
$369.91
|
📐 Style Math
All those cozy textiles—the rug, the cushions, the throw pillows—are what make this pallet sofa look so inviting. But unless you live in a very dry climate, leaving them out 24/7 is a recipe for a mildewy mess. Be realistic about your lifestyle. Are you the kind of person who will diligently bring cushions in every night or before it rains? If not, invest in an outdoor storage chest and make it part of your evening routine to tuck everything away. It’s a small hassle that preserves your investment.
15. Set an Intimate Mood with String Lights and Abundant Candles
This design masterfully blends two different qualities of light. The string lights provide a steady, warm, ambient glow that defines the space and makes it functional. But the real magic comes from the candlelight. The dynamic, flickering light from the various candles on the table and floor adds movement and life, creating a deeply intimate and romantic atmosphere. The stable-plus-flicker combination is a classic recipe for coziness. For a similar multi-source look, check out Idea #14.
|
📋 Copy HEX 🔗 Share |
|
$89.99
|
$217.62
|
$169.00
|


⚠️ Real Talk
This look is incredibly budget-friendly. The most expensive part is a basic set of outdoor string lights ($30-60). The rest of the mood is pure, inexpensive candlelight. Stock up on pillar candles, votives, and tea lights from a craft store or even a dollar store. Scour thrift stores and Facebook Marketplace for mismatched glass hurricanes, lanterns, and candle holders. The more eclectic the collection, the better. A simple white tablecloth can make any old table look elegant. You can create this entire vibe for under $100.
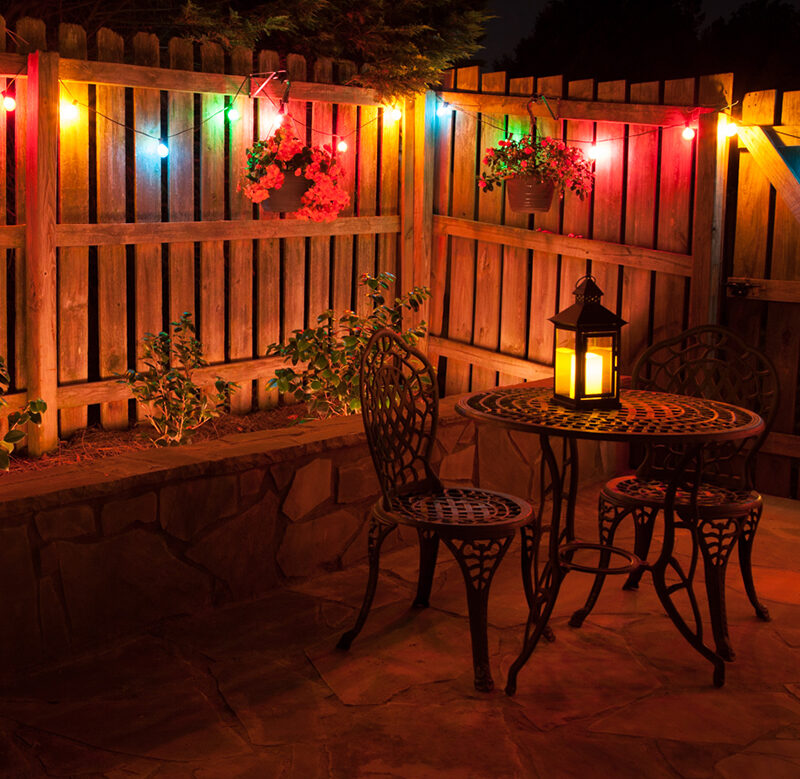
16. Decorate a Corner Bistro Set with Colorful String Lights
The single element making this small corner feel special is the use of *colorful* string lights. In a tight space, a bold choice can have a huge impact. While warm white lights are lovely, the multi-colored bulbs here inject a sense of fun, festivity, and personality. They turn a simple bistro set into a deliberate, cheerful destination. It’s a reminder that you don’t need a lot of space to make a big statement.
|
$41.99
|
$191.99
|
$14.26
|
$109.99
|

💰 Budget Breakdown
This idea is tailor-made for small spaces. It excels on a tiny apartment balcony, a small deck corner, or a narrow side yard that’s just big enough for a two-person bistro set (typically a 24-30 inch table). The key is to keep the scale intimate. Using just one or two strands of lights along a fence or railing is enough to define the zone without overwhelming it. This focused approach wouldn’t be as effective in a large, open backyard.
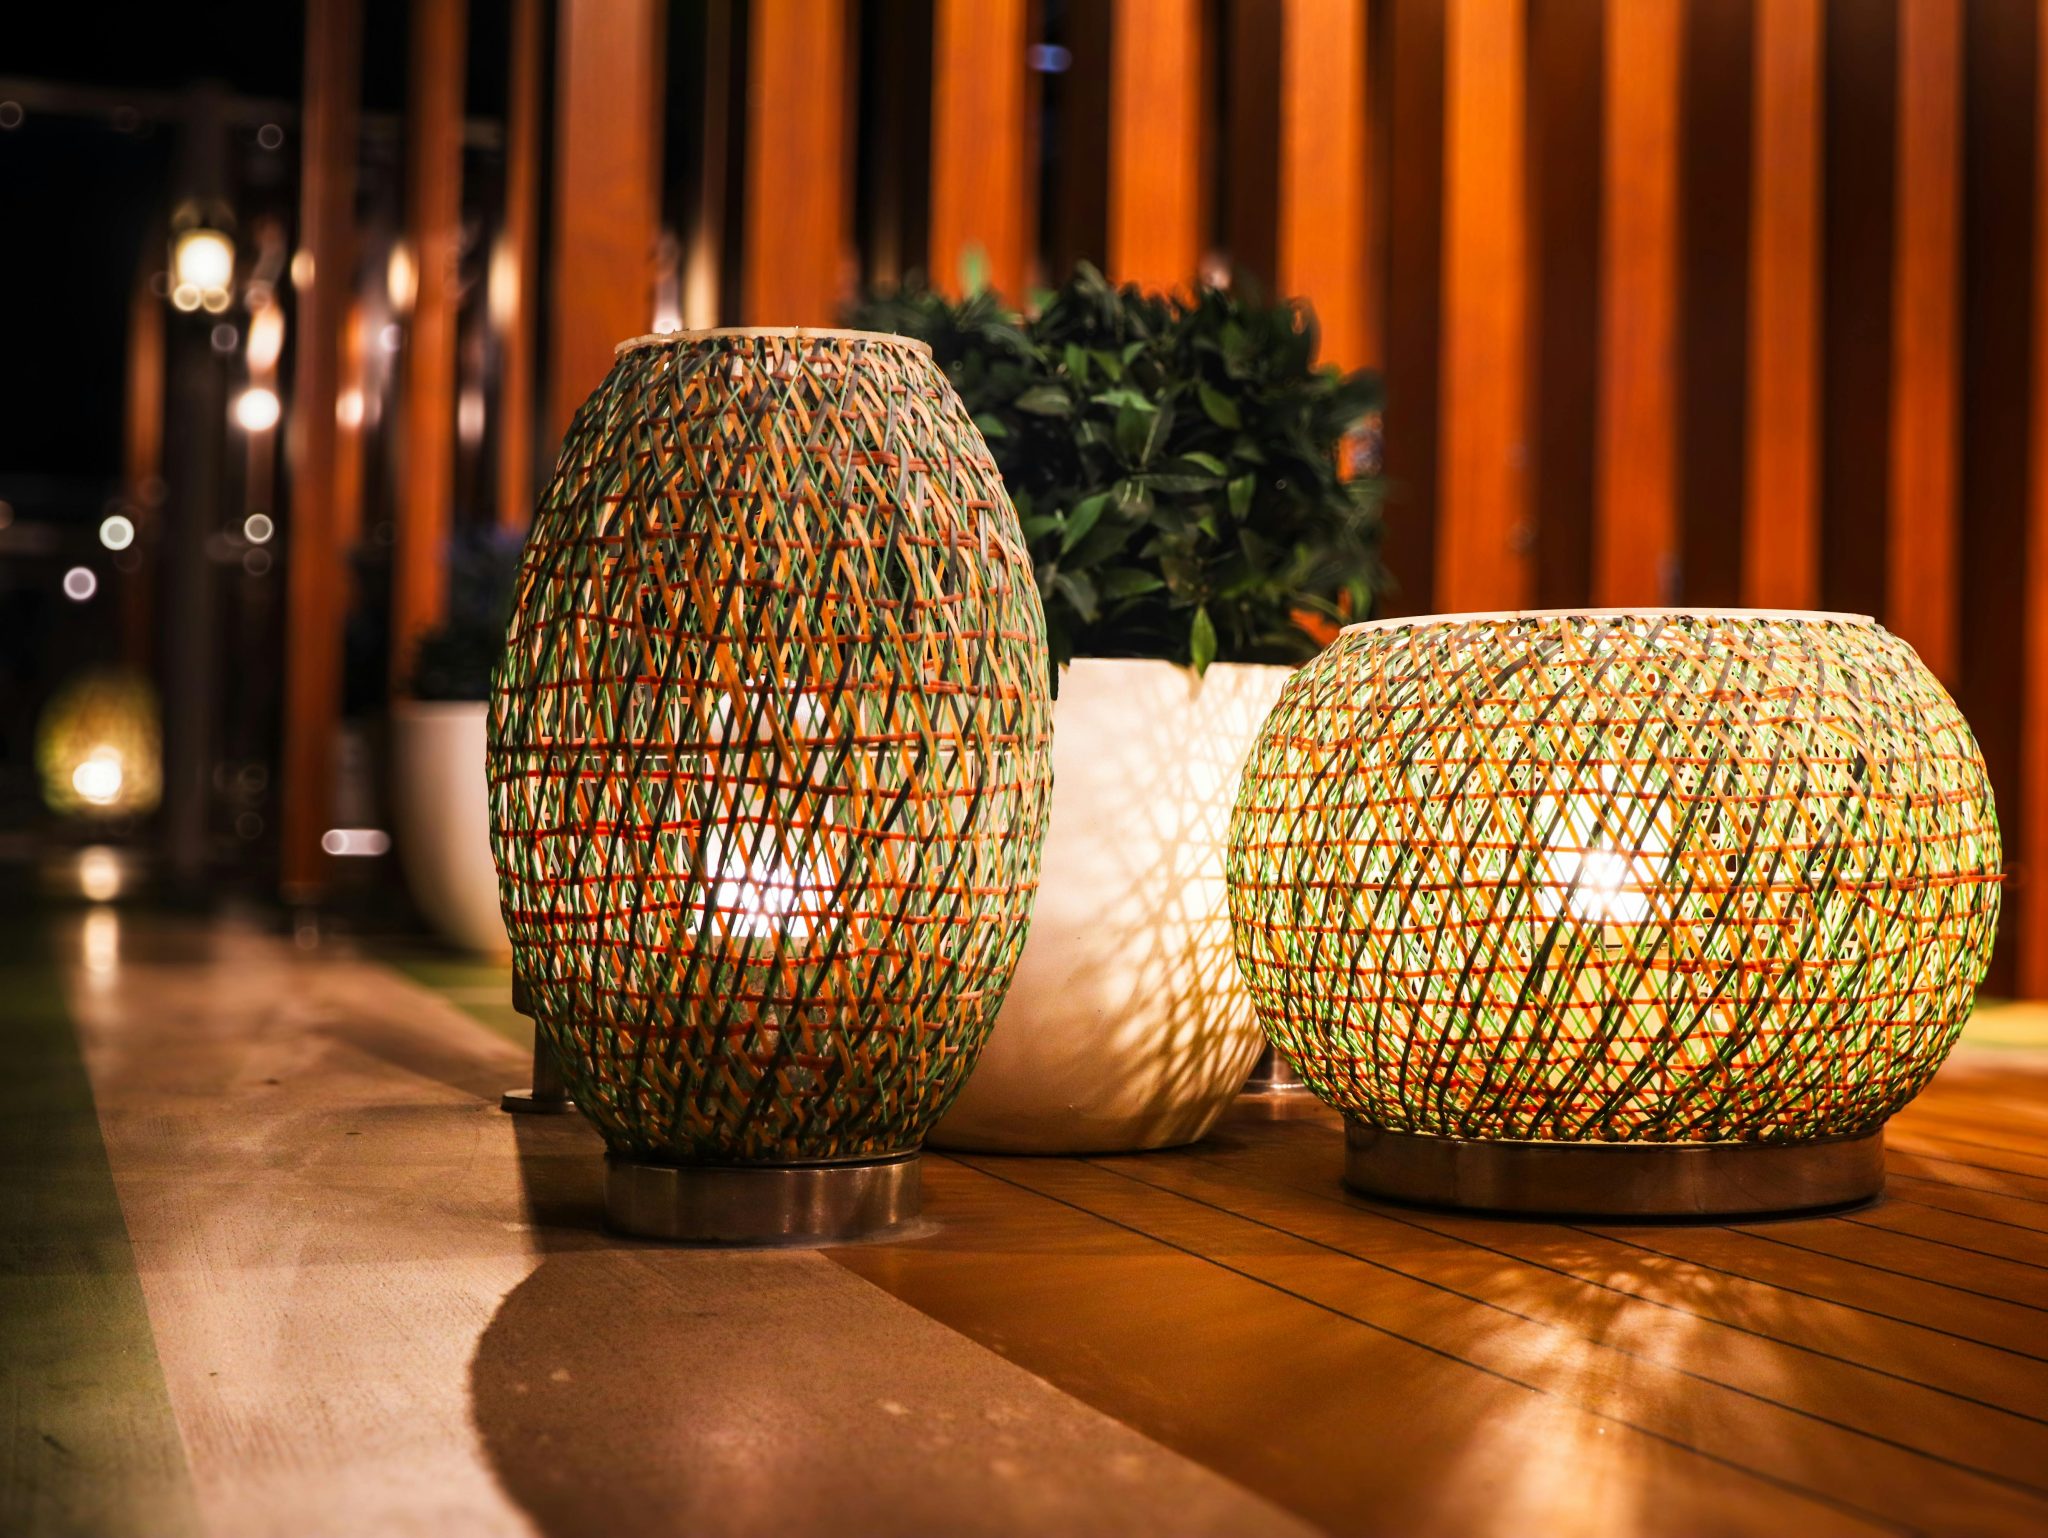
17. Create Textured Light with Woven Bamboo Lanterns
The beauty of these woven lanterns lies in the interplay of light and shadow. The bamboo acts as a natural diffuser, softening the glare of the bulb within. More importantly, the gaps in the weave cast intricate, striped patterns onto the surrounding surfaces—the wall, the floor, and the planters. This adds a layer of texture and movement to the light itself, making the illumination as decorative as the fixture.
|
📋 Copy HEX 🔗 Share |
|
$24.99
|
$17.24
|
$29.99
|
$49.98
|


✅ Before You Start
Natural materials like bamboo or rattan are beautiful, but they aren’t immortal, especially outdoors. To keep these lanterns looking good, they need to be in a covered area, like a porch or covered patio, shielded from direct rain. Even then, humidity can take a toll. Once a season, wipe them down with a dry cloth to remove dust and pollen. If they start to look dry or faded, a very light application of tung oil or a specialized wood preserver can help restore their luster and protect them.
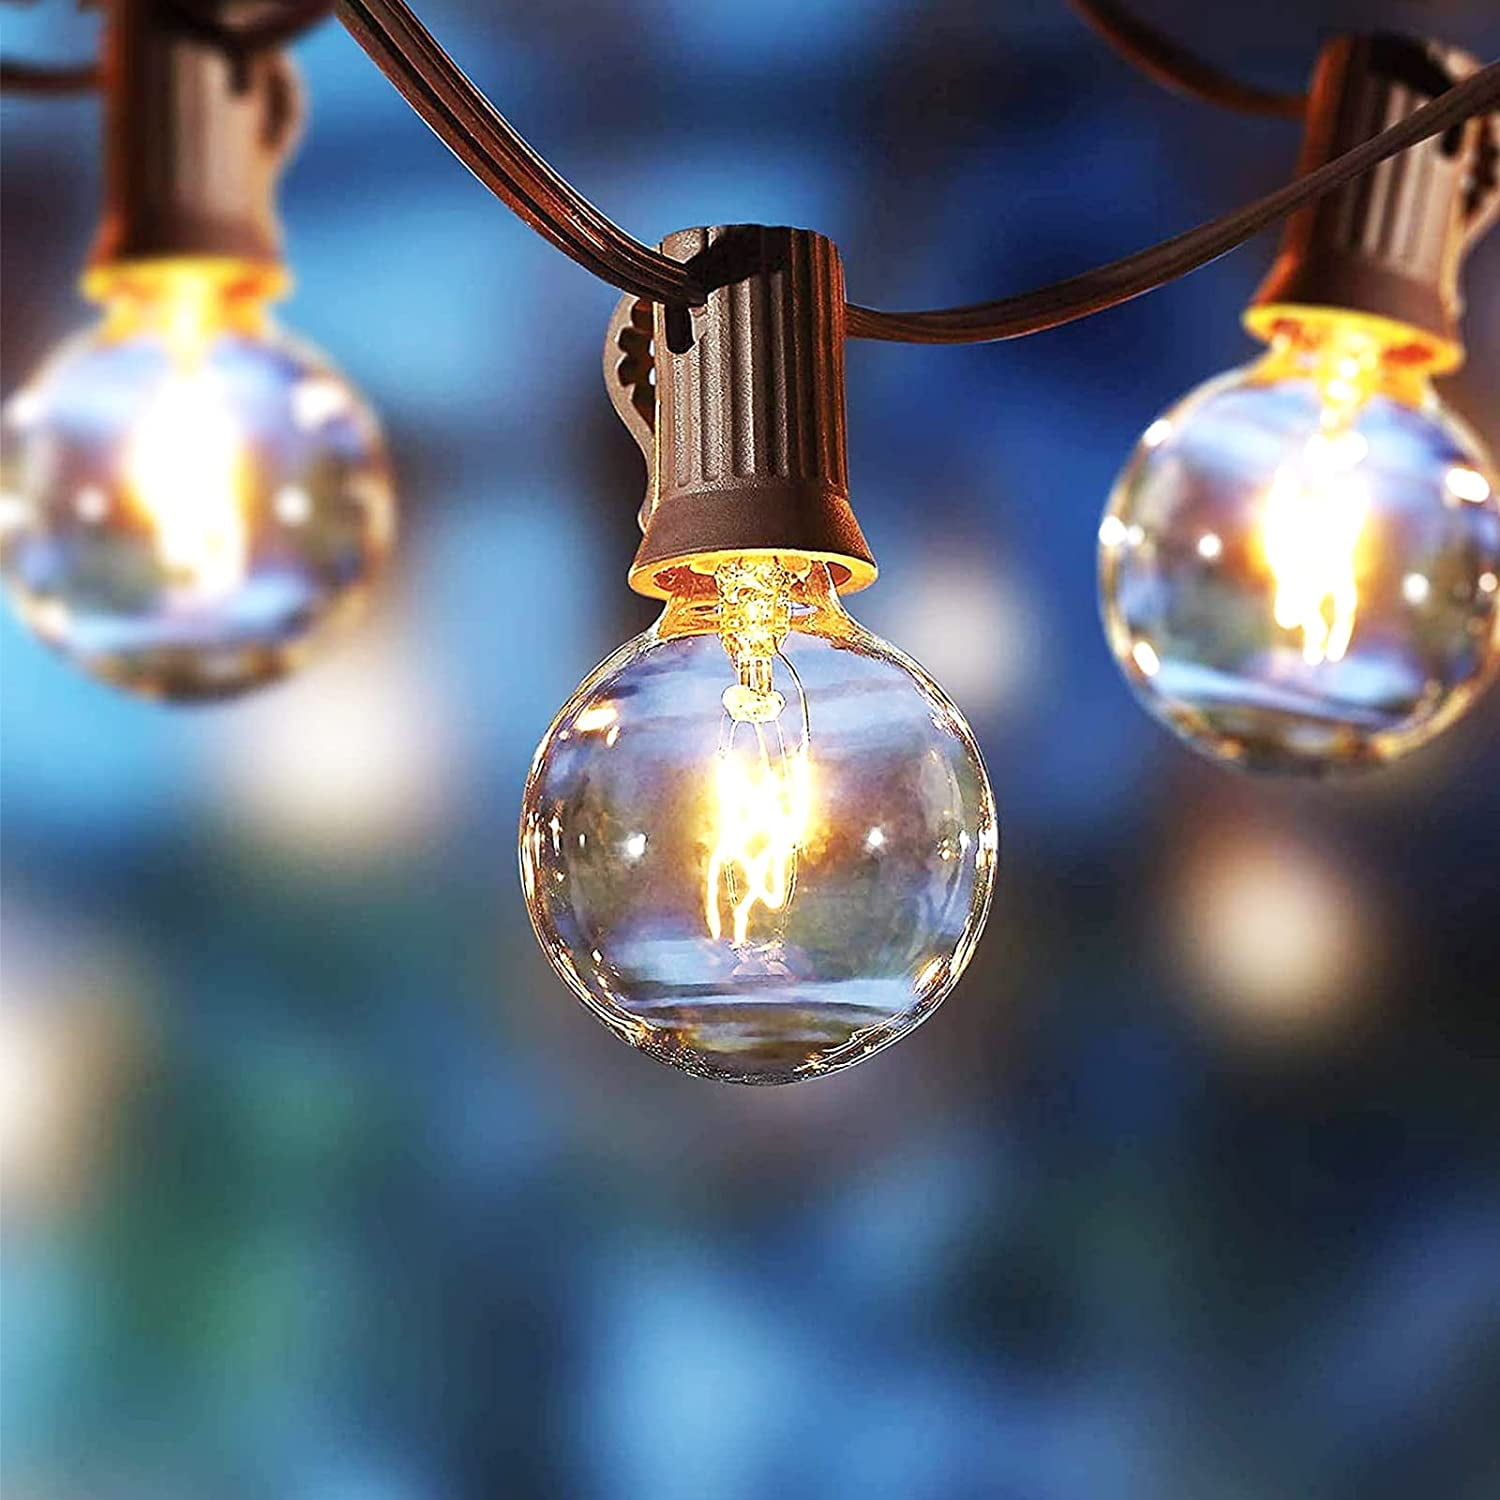
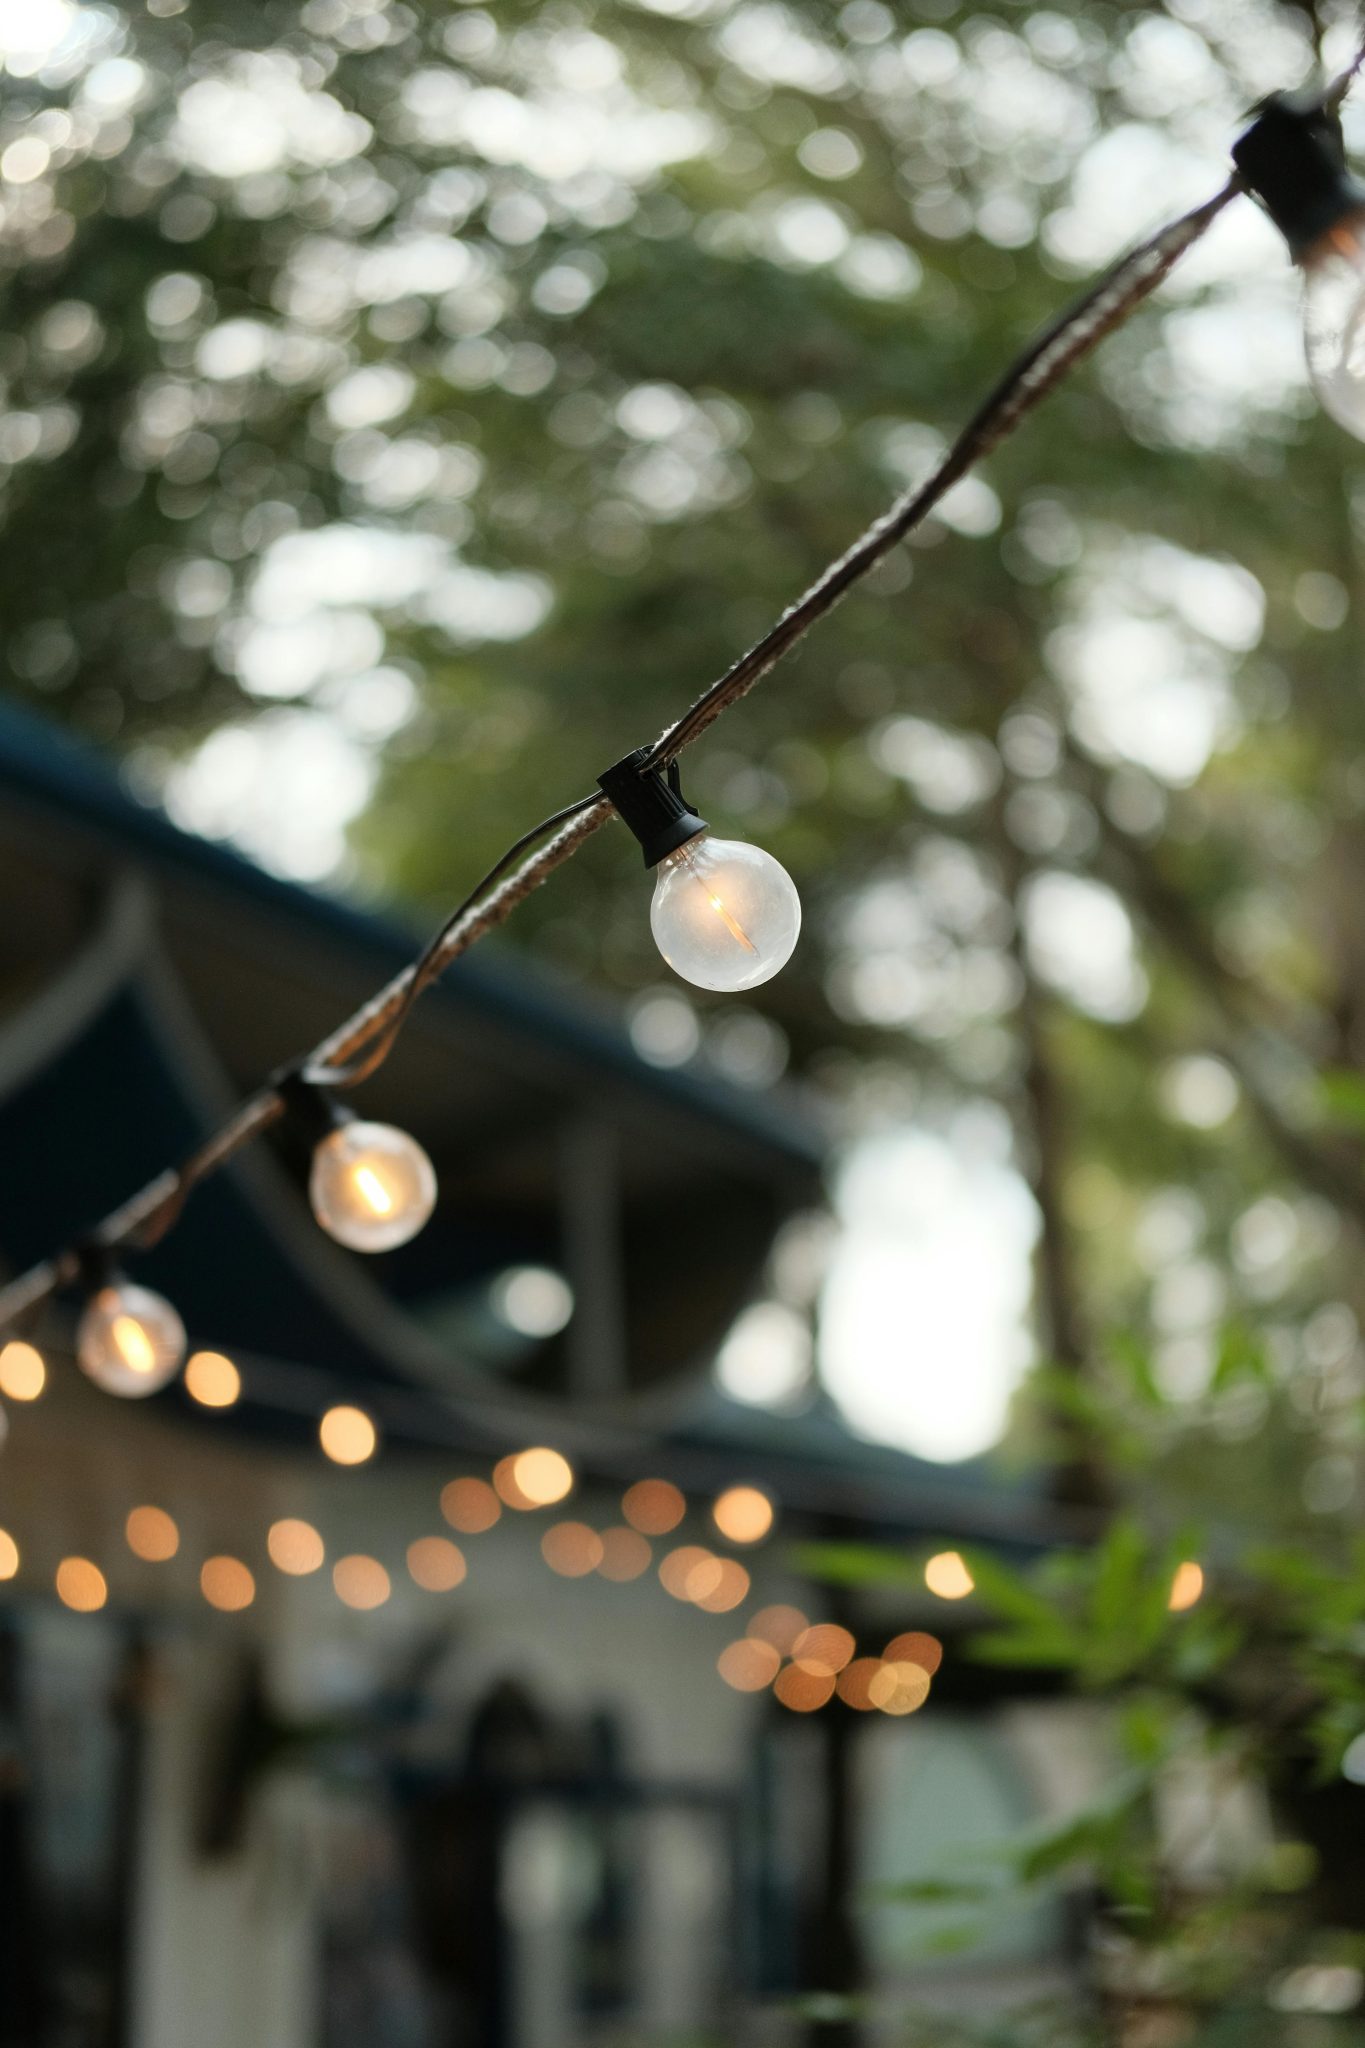
18. Focus on Classic Globe Lights for a Soft, Inviting Ambiance
When using globe lights with visible filaments, the bulb itself is the star. Don’t distract from it. Choose a simple, dark-colored cord (black or dark brown) that will recede into the background at night. The goal is to make the warm, glowing bulbs appear as if they are floating in the air. A thick or brightly colored cord would ruin this magical illusion.
🔥 Trending Context
That beautiful ‘bokeh’ effect—the soft, blurry circles of light in the background—is lovely in photos, but it’s important to remember what it signifies: your background will be out of focus. This look is perfect if your string lights are hung in front of a lush, dense wall of greenery. However, if the view beyond your lights is a less-than-lovely wall, a neighbor’s window, or a messy storage area, this style of lighting will still frame that view, even if it’s slightly blurred.
19. Combine Rustic Wood Beams and Edison String Lights
This look is a perfect equation for rustic charm: 60% rough texture (the dark, heavy wooden beams) + 30% warm vintage light (the Edison bulbs) + 10% soft nature (the draping green foliage). The rough wood provides a strong, grounding element, while the delicate glow of the filaments offers a soft counterpoint. The greenery is the final touch that keeps the whole scene from feeling too heavy or industrial, ensuring it stays firmly in the ‘cozy oasis’ category.
|
📋 Copy HEX 🔗 Share |
|
$292.23
|
$21.96
|

⭐ The One Thing
There’s a reason the ‘modern farmhouse’ and ‘rustic industrial’ aesthetics have dominated Pinterest for years. This look speaks to a desire for authenticity and craftsmanship. The combination of raw wood, vintage-style technology (Edison bulbs), and living plants feels honest and substantial. It’s a direct reaction against the sleek, minimalist styles of the past, offering a sense of warmth, history, and connection to natural materials that people are craving in 2026.
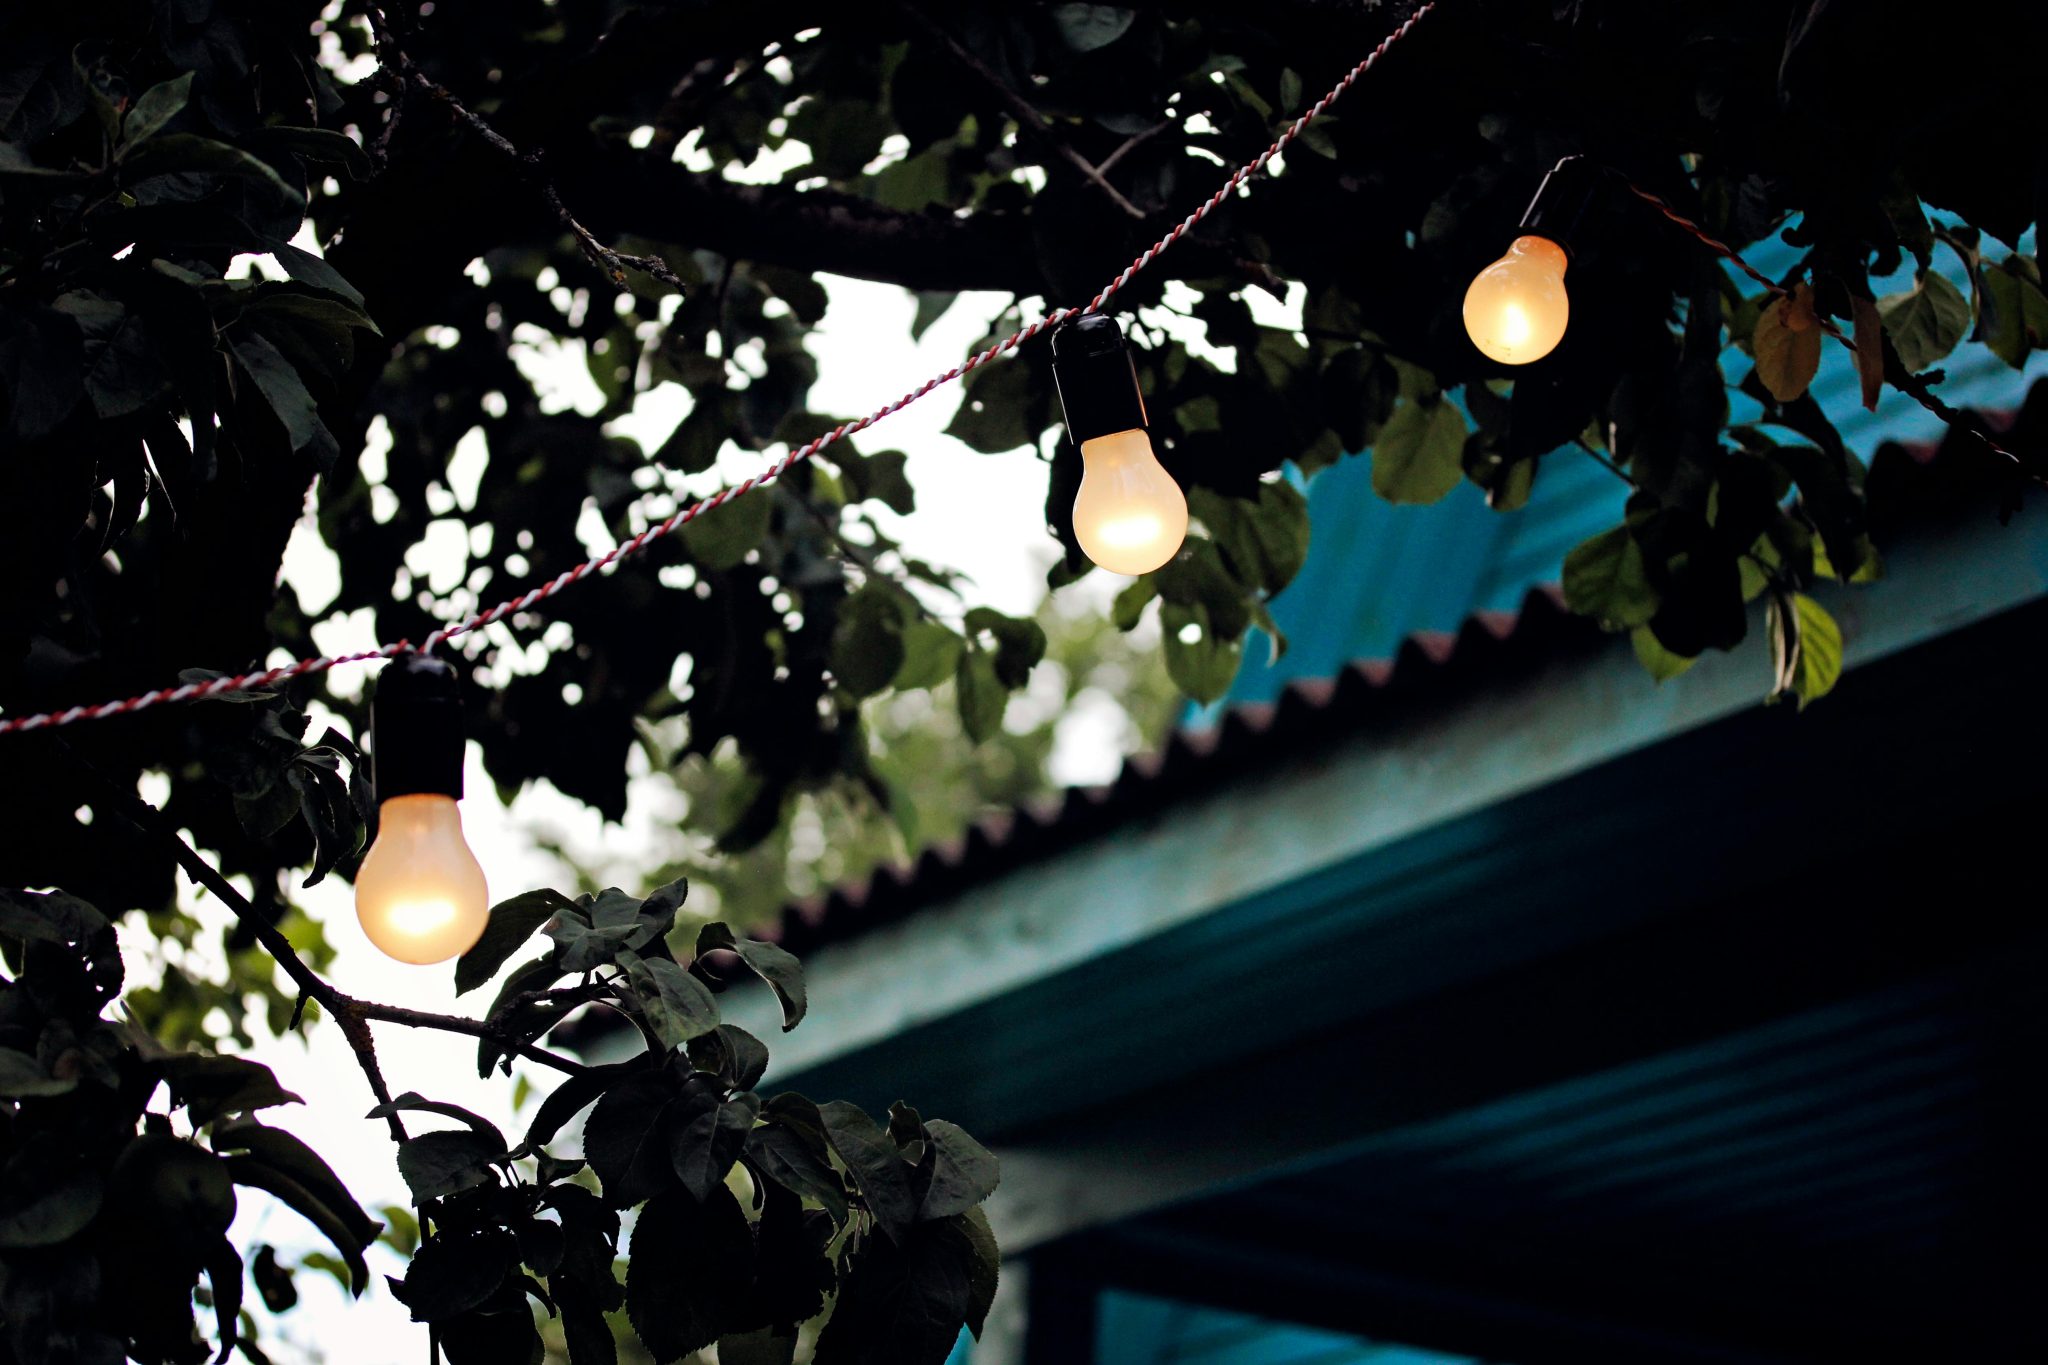
20. String Warm Lights Through Dark Foliage for a Pop of a Glow
The power of this simple idea is contrast. The bright, warm yellow of the lit bulbs against the deep, dark green of the foliage creates a dramatic visual pop. Your eye is immediately drawn to the light. It’s a high-impact look that requires minimal effort. Just two strategically placed strands of light can transform a dark, uninteresting bush or trellis into a beautiful nighttime feature.
🧹 Maintenance Reality
Safely weave lights into a plant or bush. Time: 15 minutes. Cost: $20-40.
- Choose lights rated for outdoor use. LEDs are a great choice as they don’t get hot and won’t scorch leaves.
- Start with the lights unplugged. Find the end of the string opposite the plug.
- Gently weave the cord through the foliage, draping it over branches rather than wrapping it tightly. A loose drape is more natural and healthier for the plant.
- Distribute the bulbs evenly for a consistent glow.
- Run the power cord down the back of the plant or a main stem, using a plant tie to secure it if needed.
- Plug it in and enjoy the glow!
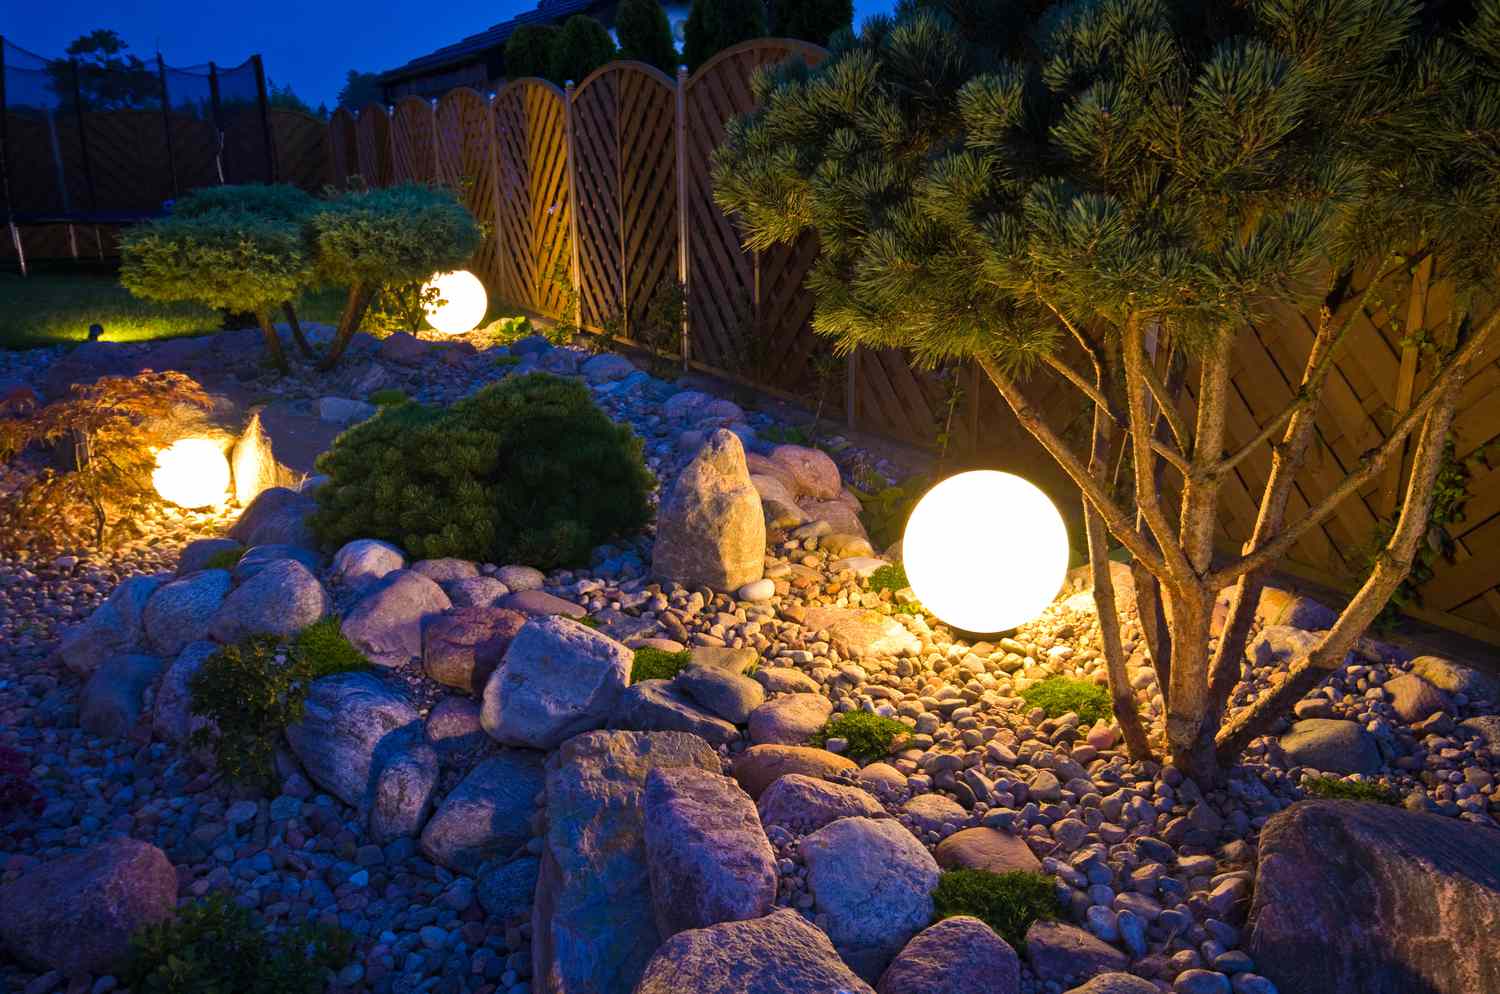
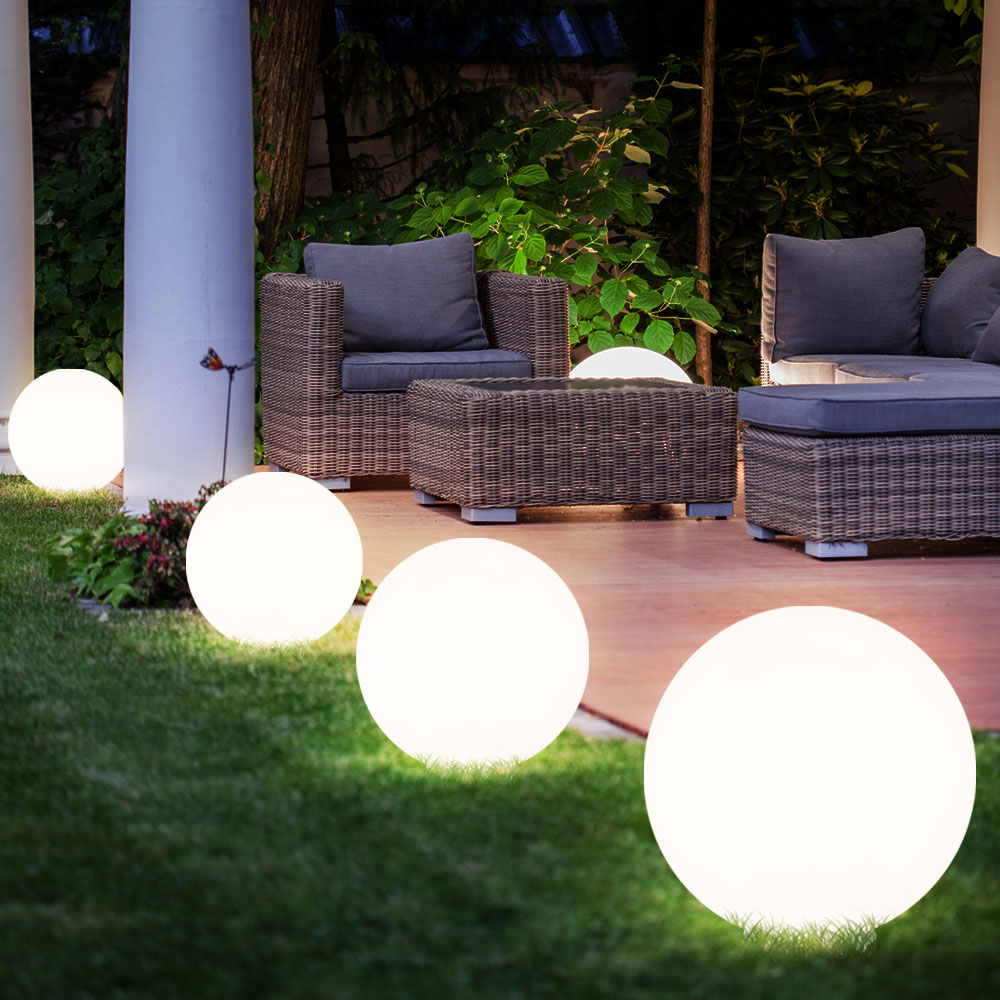
21. Place Glowing Spheres in Garden Beds for a Magical Look
This lighting works by mimicking nature, but with a magical twist. The spherical shape of the lights feels organic, like a strange, glowing fruit or a collection of moons that have fallen to earth. Placing them directly on the pebble-covered ground among the rocks and shrubs integrates them into the landscape. They don’t feel like they were just added on top; they feel like part of the scenery. This creates a serene, otherworldly ambiance that is both beautiful and calming.
|
📋 Copy HEX 🔗 Share |
|
$79.89
|
$56.99
|
$20.00
|

🎯 What Makes It Work
Designer spherical garden lights can be pricey, sometimes running $100 or more per globe. For a similar effect on a budget, look for solar-powered versions online or at big-box stores, where you can often get a set of 2-3 for under $50. Another great hack is to buy inexpensive spherical glass shades from a lighting store or flea market and place a simple, outdoor-rated LED ‘puck’ light or even a battery-powered candle inside each one.
22. Line a Modern Garden Path with Spherical Bollard Lights
For pathway lighting, focus the light where you need it: on the path. The glow should be directed downward and outward to illuminate the walking surface and the immediate edge. A common mistake is using lights that are too bright or aim upwards, which creates glare and ruins your night vision. These spherical bollards cast a soft, low, 360-degree glow, perfect for visibility without being blinding. Space them about 6-8 feet apart for a continuous, welcoming line.
|
$21.02
|
💸 Get This Look For Less
Bollard lights, which typically stand 2-3 feet tall, are best suited for lighting the edges of lawns, pathways, or wider garden beds. Their height allows them to cast light over low-lying shrubs and groundcover. For very narrow flower beds or tight spaces, this style might be too large. In that case, consider the smaller, in-ground mushroom lights shown in Idea #26, which take up less visual and physical space.
23. Hang Dense Rows of String Lights Under a Pergola Roof
that makes this idea work so well for a functional space like a dining area is the sheer number of lights. By hanging many strands parallel to each other, you create a brilliant, even plane of light. This provides enough illumination to actually see your food and companions clearly, moving beyond purely ambient mood lighting into effective task lighting. It’s the difference between a decorative glow and a truly usable outdoor room.
|
📋 Copy HEX 🔗 Share |
|
$1,125.00
|
$442.46
|


💡 Designer Tip
More lights means more electricity. While a few strands of LED string lights use very little power, dozens of them can add up. More importantly, be sure you’re not overloading a single circuit. A standard 15-amp outdoor circuit can handle a lot, but it’s not infinite. Add up the wattage of all your light strands (it’s printed on the box) to make sure you’re well within the safe limit (typically around 1,440 watts for a 15-amp circuit with a continuous load).
24. Define an Outdoor Bar with a Lighted Pergola
This design cleverly uses a lighted pergola to create zones in an open patio space. The structure acts as a ‘ceiling,’ visually separating the bar and its stools from the more relaxed sofa area next to it. The string lights reinforce this division, drawing attention to the bar as a primary destination. The addition of uplighting in the stone walls adds another layer of sophistication and depth, making the entire space feel custom and high-end.
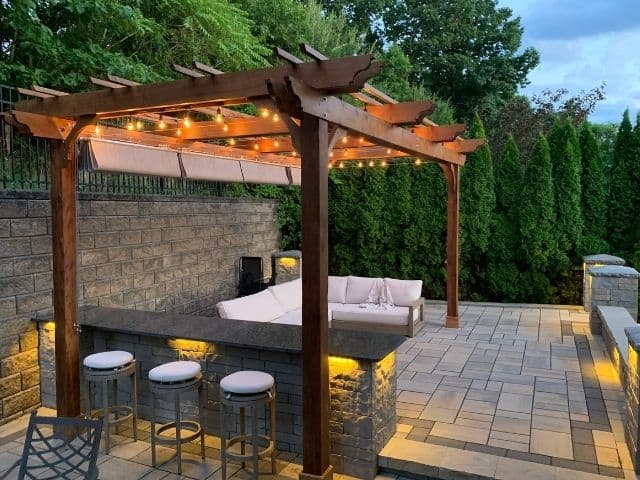
|
$180.19
|
$1,878.45
|
$688.99
|

📏 Scale Guide
- Check local codes: Does your municipality require a permit to build a pergola structure? Better to know before you start.
- Confirm your power source: Where will the string lights plug in? Ensure a GFCI-protected outdoor outlet is within reach or plan to have one installed.
- Measure for clearance: Ensure the pergola height allows for at least 8 feet of headspace, and that the lights won’t hang too low over the bar where people will be standing and sitting.
25. Use Warm Edison Bulbs for an Intimate, Blurry Backdrop
This soft-focus, intimate look is wildly popular on Pinterest and Instagram for a reason. It taps into our craving for ‘hygge’—that Danish concept of cozy, comfortable contentment. The warm, almost flame-like glow of the Edison bulbs combined with the dreamy, out-of-focus background creates a feeling of being in a safe, magical bubble. It’s less about seeing perfectly and more about feeling perfectly relaxed. It transforms any space into a private, serene retreat.
|
📋 Copy HEX 🔗 Share |
🔧 How-To Brief
To recreate this specific soft-focus, bokeh-rich photography look, you need a camera with a wide aperture (like f/1.8). But to create the *feeling* in real life, the trick is layering and distance. Hang your primary string of lights closest to your seating area. Then, if possible, hang a second strand further away in the background. The greater the distance between the two layers of light, the more of that dreamy, blurry effect you’ll perceive with your own eyes.
26. Illuminate a Paver Pathway with Mushroom-Style Lights
The low-profile design of these mushroom-style lights is what makes them so effective. The ‘cap’ directs all the light downward onto the path, where you need it for safe walking. This prevents upward glare that can spoil your view of the stars. The warm orange glow makes the grey pavers look inviting, and by being nestled right next to the foliage, they provide just enough spillover light to highlight the texture of the plants without lighting up the whole yard.
|
$2.50
|
$24.99
|

📐 Style Math
Pathway lights live a tough life down in the dirt and mulch. They’re prone to getting kicked, covered by overgrown plants, or tilted by shifting soil. At least a few times per year, walk the path and do a quick check. Wipe any dirt or hard-water stains off the lenses, straighten any lights that have gone askew, and trim back any foliage that’s starting to block the light. This five-minute task will keep your pathway looking sharp and well-lit.
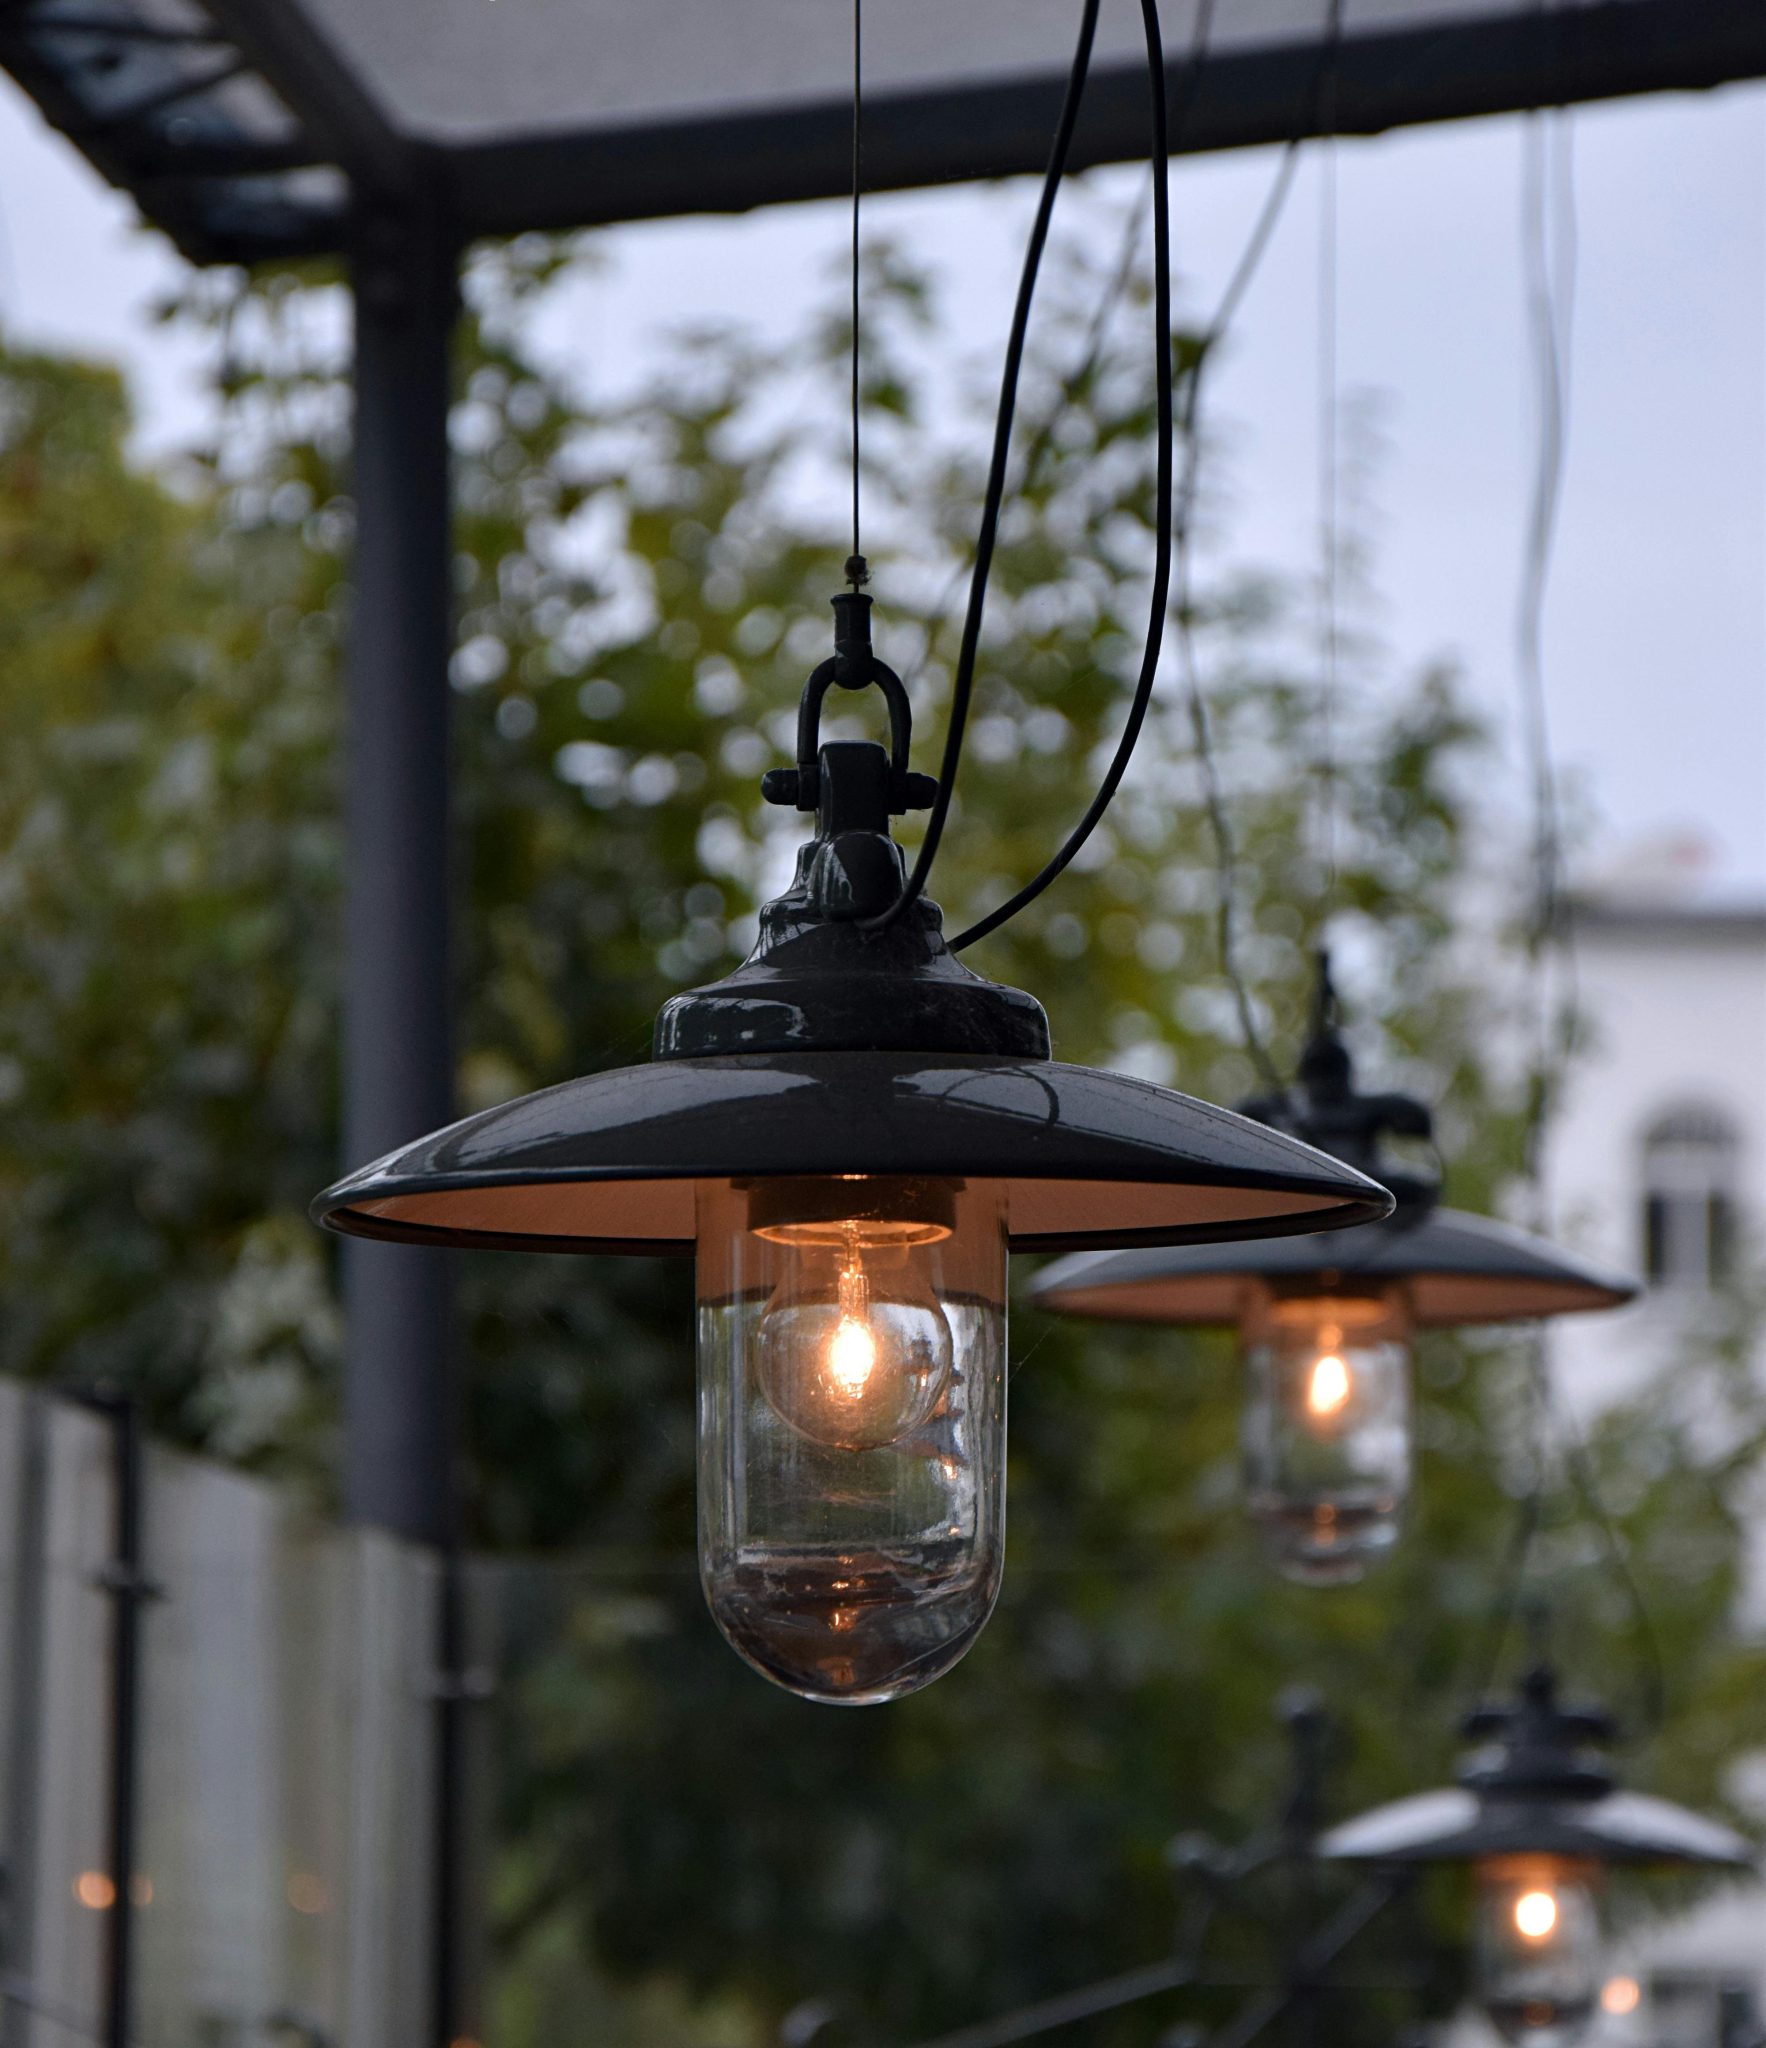
27. Hang Industrial-Style Lanterns for a Modern Farmhouse Look
The formula here is: 40% clean industrial metal (the dark bell shades) + 40% vintage warmth (the exposed filament bulbs) + 20% soft nature (the blurred green background). This combination is the essence of the popular ‘modern farmhouse’ or ‘rustic industrial’ styles. The clean lines of the fixtures keep it feeling contemporary, while the old-school bulb and natural setting provide the warmth and soul. It’s a balance of hard and soft, old and new.
|
📋 Copy HEX 🔗 Share |
|
$199.20
|

⚠️ Real Talk
These lights are gorgeous, but their downward-facing, shaded design means they provide focused pools of light rather than broad, ambient illumination. They are perfect for hanging over a dining table, a bar, or a specific seating arrangement. They are not, however, a good solution for lighting up an entire patio. Think of them as spotlights for specific zones. You will need to supplement them with other light sources, like string lights or uplights on plants, for a complete lighting scheme.
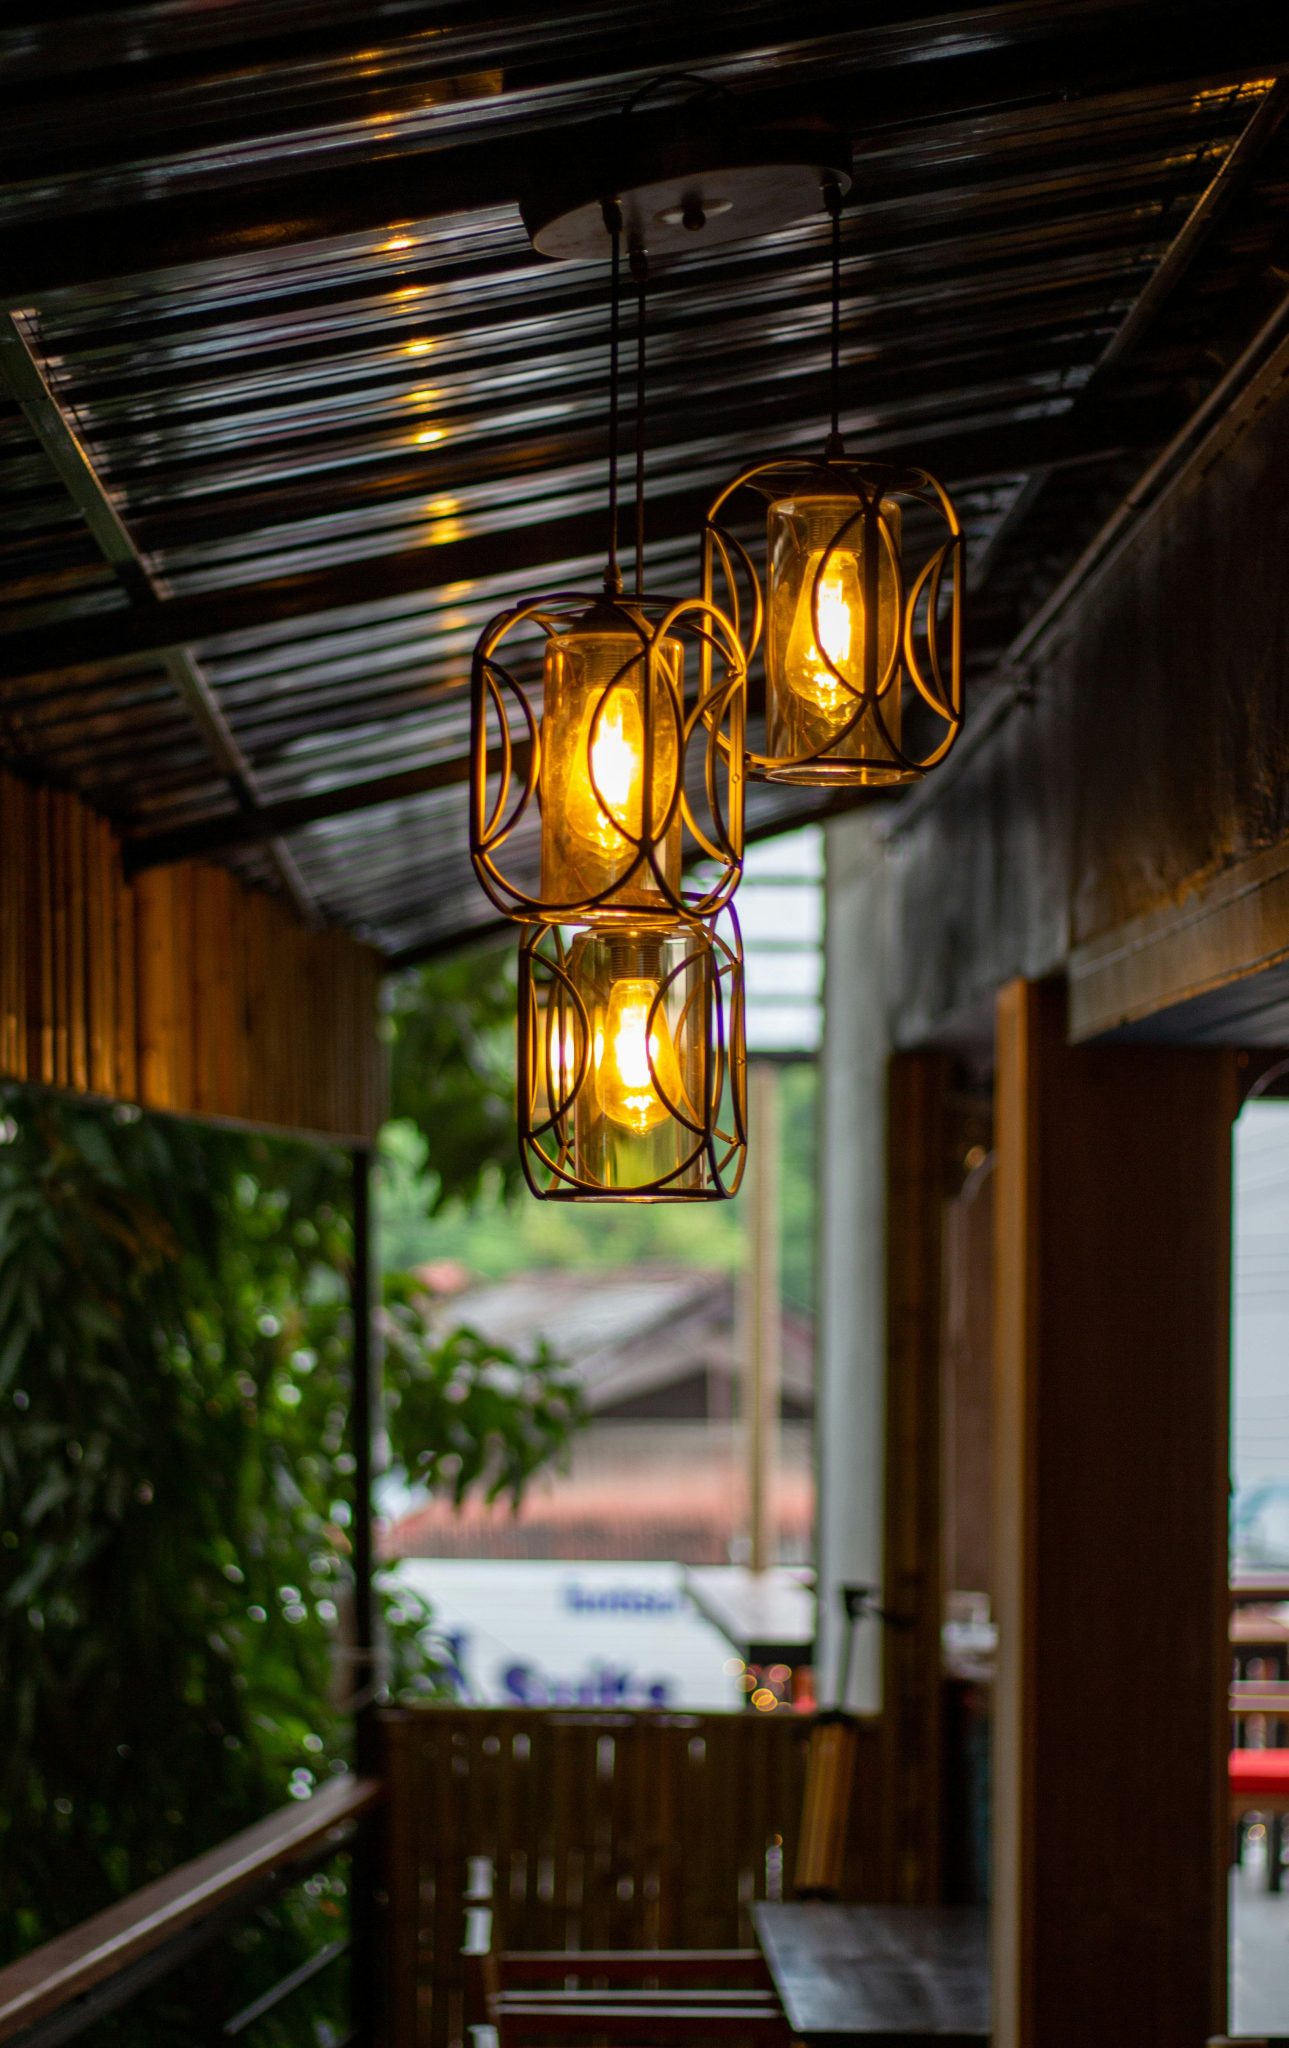
28. Install a Triple-Pendant Cage Fixture for an Industrial Touch
The single element that defines this look is the geometric metal cage. It’s what firmly places the fixture in the ‘industrial’ category. The cage adds a layer of visual complexity and a rugged, functionalist aesthetic. The warm Edison bulb inside provides a soft contrast, but it’s the dark, angular metalwork that makes the statement. This is a perfect example of a fixture that looks just as interesting when it’s off as it does when it’s on.
💰 Budget Breakdown
A multi-pendant fixture like this has significant visual weight and works best in a space with a tall ceiling. It’s ideal under a covered patio, a pergola, or a covered balcony with at least 9-foot ceilings. The goal is to have the bottom of the lowest pendant hang about 30-36 inches above a tabletop or about 7 feet above the floor in a walkway. In a space with a standard 8-foot ceiling, it would likely hang too low, creating a head-bumping hazard.
29. Combine Pergola String Lights with Shrub Uplighting
This is a sophisticated, multi-layered lighting scheme that professionals use. It works by combining two types of light. The string lights on the pergola provide the ‘ceiling’ of light, creating a warm, inviting zone for people. The uplighting on the shrubs and vines provides the ‘wall’ of light, defining the patio’s edge and adding depth. This one-two punch makes the space feel like a complete outdoor room, both cozy and expansive.
|
📋 Copy HEX 🔗 Share |
|
$229.99
|
$2,599.00
|
$1,329.00
|

✅ Before You Start
- Wooden Pergola: $1,000 – $3,500
- Commercial Grade String Lights: $150 – $400
- Low-Voltage Uplighting Kit (4-6 lights + transformer): $200 – $500
- Outdoor Dining Set: $800 – $2,500
- TOTAL: $2,150 – $6,900
- Budget alternative: Forgo the pergola and run string lights from the house to poles set in planters. Swap the expensive low-voltage uplights for a few well-placed solar-powered spotlights ($50-100 for a set) to achieve a similar layered effect for a fraction of the cost.
30. Drape String Lights Over Trees for a Natural Canopy
When hanging lights from trees, embrace imperfection. Don’t try to create perfectly straight lines or uniform scallops. The beauty of this look comes from its organic, almost random feel. Drape the strands casually from branch to branch, letting them sag naturally. The goal is to make it look like the lights have always been there, a part of the tree’s natural form. This casual approach is what creates the effortless, magical ambiance.
|
$209.00
|
$79.00
|

🔥 Trending Context
Using trees as your anchor points is a fantastic, natural way to hang lights, but remember that trees grow. Don’t wrap wires tightly around branches or trunks, as this can girdle and kill the branch over time. Use loose loops or, even better, a wider, flexible strap (like a rubber tree tie) as a buffer between your hook and the bark. Check the lights annually and adjust any areas that have become tight due to tree growth.
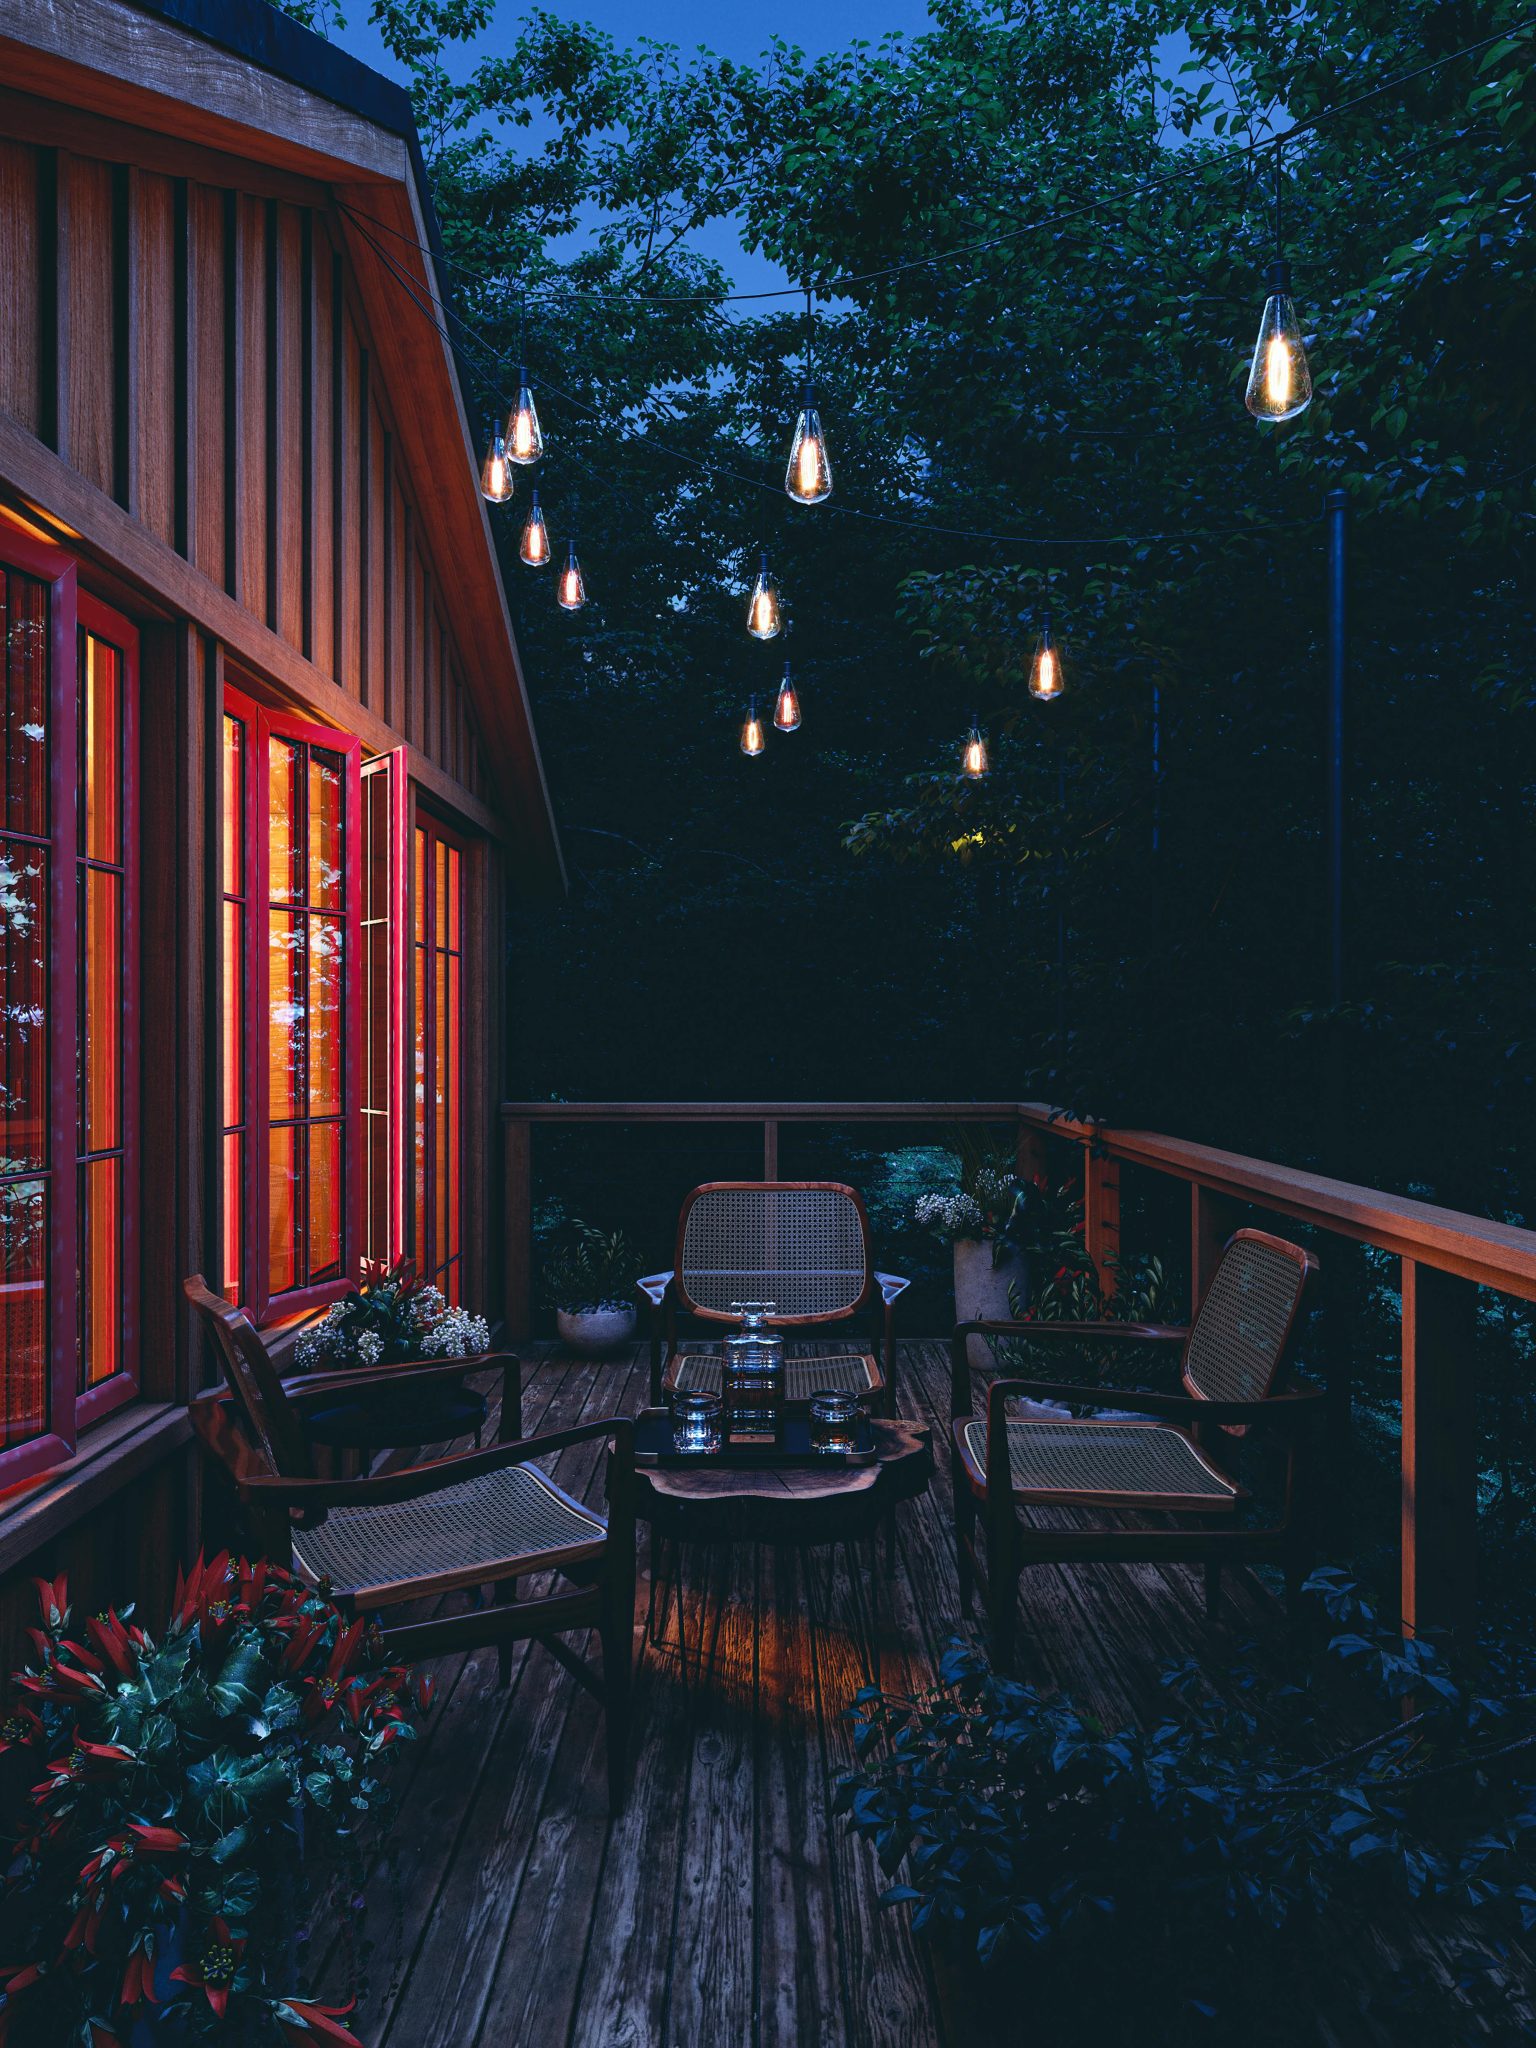
31. Run Edison Lights Under a Translucent Roof for a Moody Glow
This setup works because it combines different diffusions of light. The Edison bulbs themselves provide a direct, warm, downward-facing glow. Above them, the translucent corrugated roof catches the ambient light from the sky and the upward spill from the bulbs, creating a second, softer, more diffuse layer of illumination. This combination of direct and diffuse light makes the space feel cozy and moody, but still bright enough to be functional.
|
📋 Copy HEX 🔗 Share |
|
$79.99
|
$598.00
|
$37.79
|
$180.00
|


⭐ The One Thing
A translucent roof is great for letting in light, but it shows every bit of dirt, pollen, and fallen leaf. To keep that soft, diffuse glow, you’ll need to clean it at least once a year, maybe more if you live under a lot of trees. A long-handled soft-bristle brush, a hose, and some mild soap are your best friends here. It’s a bit of a chore, but the difference between a clean and a dirty translucent roof is, quite literally, night and day.
32. Create a Starlight Canopy Over a Large Wooden Deck
Install tall wooden posts for your light canopy. Time: 4 hours. Cost: $150-300.
|
$151.86
|
$143.00
|
$369.99
|

🧹 Maintenance Reality
- Get your materials: You’ll need 4×4 or 6×6 pressure-treated wood posts (10-12 feet long), quick-set concrete, and large, heavy planters or post-hole diggers.
- Choose your method: For a permanent solution, dig a 2-3 foot deep hole and set the post in concrete. For a less permanent option, place the post inside a large, heavy planter and fill it with concrete.
- Set the posts: Make sure each post is perfectly plumb (vertical) using a level on two adjacent sides before the concrete sets.
- Add hardware: Once the concrete is cured (24-48 hours), screw heavy-duty eye hooks or cleats near the top of each post to serve as anchor points.
- String your lights: Run the lights from the house to your new posts to create your canopy!
This ‘canopy of lights’ technique is perfect for large, open decks or patios that are 15×15 feet or larger. The expanse is what makes it feel so grand and festive. In a smaller space, the numerous posts and crisscrossing wires can feel cluttered and visually shrink the area. If your deck is small, consider the simpler, single-direction lighting shown in Idea #8 instead.
Let Your Patio Shine On
Now that you’re armed with 32 brilliant ideas—and the wisdom to avoid the most common pitfalls—it’s time to stop scrolling and start planning. Your patio has so much potential, and the right lighting is the final, magical touch to unlock it. Pick an idea that speaks to you, take one small step, and get ready to enjoy your own illuminated oasis.
Don’t forget to save your favorites to your Pinterest boards so you can find them again when you’re ready to bring your vision to light!
Photo credits: Better Homes & Gardens, Polywood, Pergola Depot, Homedit, Country Living Magazine, Outdoor Lighting, Yard Envy, One Kindesign, Love & Renovations, Miller Outdoors, Southern Living, Driven by Decor, Nesting With Grace, Pergola Kits USA.com, Illuminated Concepts, Christmas Lights, Etc, BEGA / Web, Jony Costa, Pixabay, Darshak Pandya, Sight See-RR, Thông Nguyễn, Fabian Cooper, Alexander Mass, Balazs Simon, Duong Son, CharlieBrown, Augustinus Martinus Noppé, Elviss Railijs Bitāns, Nik Solohub / Pexels