You know that feeling? You’ve been scrolling through Pinterest for hours, saving dozens of gorgeous DIY home decor ideas, but your own space still feels… blah. It’s easy to feel like a high-end look is out of reach, especially when you’re on a budget. But what if we told you the secret to a beautifully decorated home could be found in the aisles of your local Dollar Tree? After filtering through hundreds of projects, we’ve narrowed it down to the 30 best DIY ideas that actually look chic and expensive.
We’ve focused on projects that are stylish, achievable, and easy on the wallet, with most costing between $5 and $25 to create. In this guide, you’ll find 30 incredible projects covering everything from rustic holiday decor to modern organizational hacks and festive seasonal crafts. The era of believing that great style has to come with a hefty price tag is officially over. For 2026, it’s all about smart, creative, and personalized decor that reflects you. And stay until the end — we break down the most common mistakes that can ruin these looks.
📌 Save this to Pinterest for later — you’ll want to revisit these ideas.
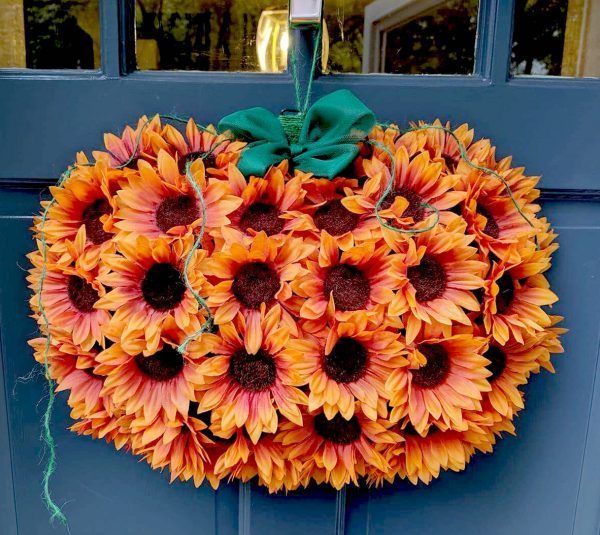
1. Craft a Faux Sunflower Wreath in a Unique Pumpkin Shape
This wreath is a showstopper because it plays with expectations. The surprising pumpkin silhouette, crafted entirely from autumnal sunflowers, creates an instant focal point. What makes it work so well is the sophisticated color theory at play: the warm oranges and browns of the flowers pop beautifully against the cool, dark blue of the door. This is a classic example of using complementary colors to create visual excitement. The simple green bow adds a touch of rustic charm without competing for attention, letting the floral form remain the star of the show.
|
📋 Copy HEX 🔗 Share |
💰 Budget Breakdown
- Gather Your Supplies: You’ll need a pumpkin-shaped wire wreath form, about 40-50 faux sunflower heads, a hot glue gun, and a roll of green ribbon. (Estimated Cost: $10-15)
- Prepare the Flowers: Pop the sunflower heads off their plastic stems. You want the base to be as flat as possible for easy gluing.
- Attach the Flowers: Starting from the outer edge of a pumpkin section, apply hot glue to the base of each sunflower and press it firmly onto the wireframe. Work your way inward, packing the flowers tightly together to create a full, lush look.
- Repeat and Finish: Continue gluing flowers until the entire pumpkin form is covered. Loop a long piece of green ribbon through the top of the wreath form, tie a generous bow, and it’s ready to hang! (Estimated Time: 45 minutes)
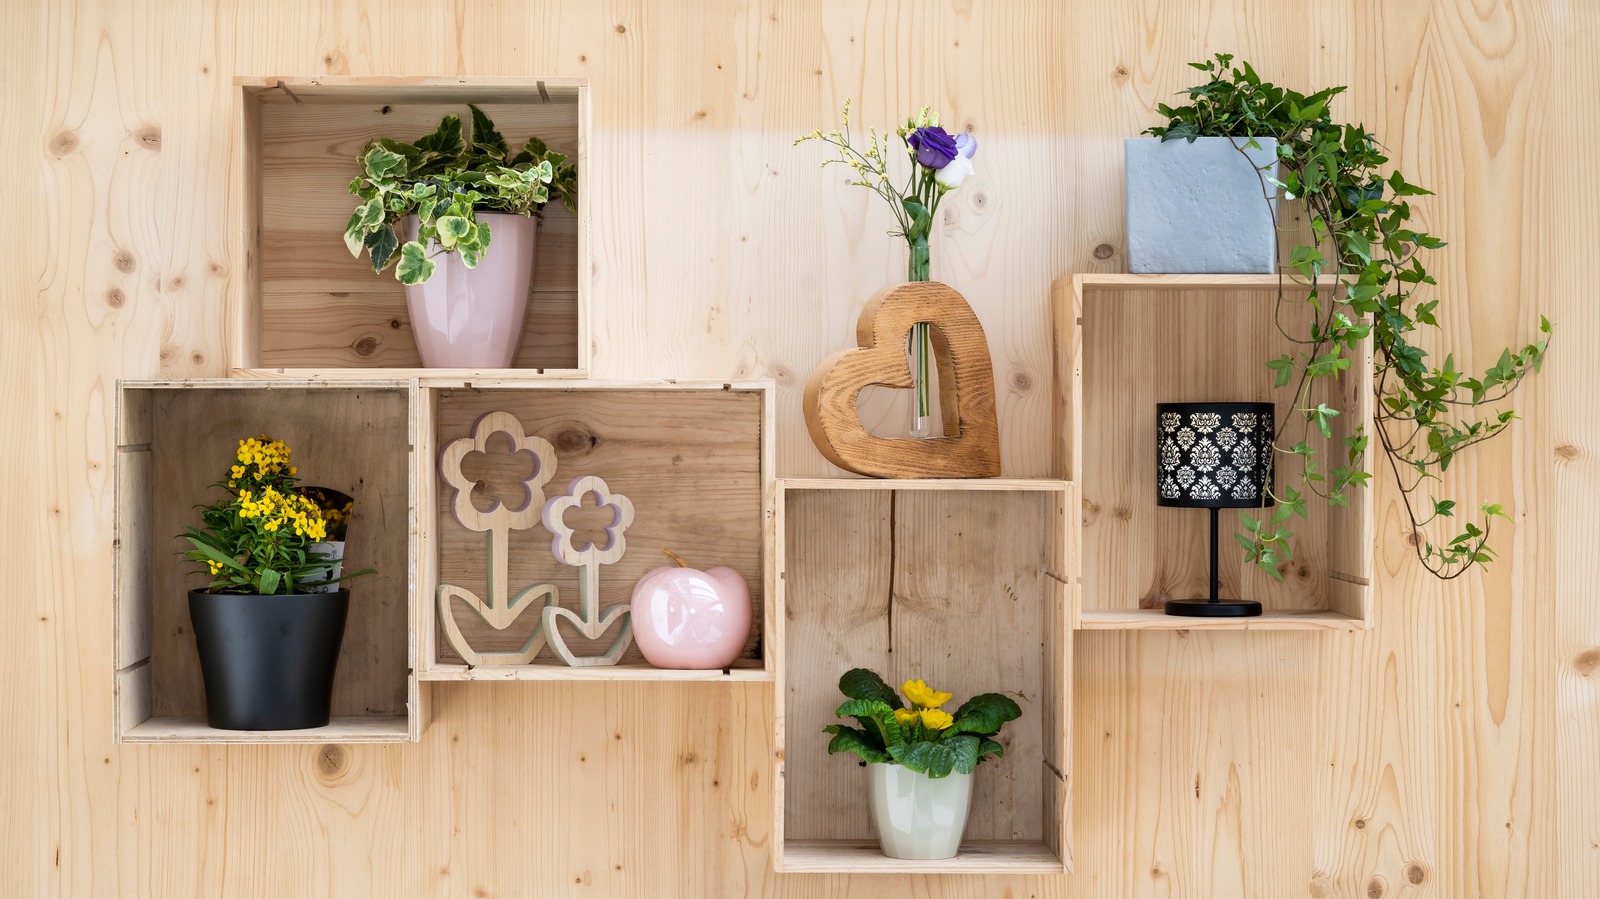
2. Arrange Light Wooden Crates as Floating Wall Shelves
The charm of this display lies in its beautifully balanced formula. Think of it as 60% natural texture + 30% organic elements + 10% curated accents. The light wood of the crates and the wall paneling provides a warm, neutral base. Lush potted plants and yellow flowers inject life and color, making up the crucial organic component. The final 10% comes from personal touches like the ceramic apple and the small lamp, which add personality. You could easily swap the plants for books or the lamp for candles, but keeping that 60/30/10 ratio will maintain the organized, fresh-from-a-magazine feel.
|
📋 Copy HEX 🔗 Share |
⭐ The One Thing
Let’s be honest: while these wooden crates from the craft section are fantastic for display, they are not heavy-duty shelving. Before you dream of loading them with your entire book collection, know that they are best for lightweight decorative items. Always mount them directly into wall studs for security. If studs aren’t available, use appropriate drywall anchors rated for more than you plan to display. Also, consider the placement. In a high-traffic hallway, they might get bumped easily. They work best in a corner or above a piece of furniture that provides a natural buffer.
3. Craft a Vibrant Wreath of Red Blossoms and Fresh Greenery
The single element that breathes life into this project is the color contrast. Without the pops of brilliant red, the wreath would be a lovely but simple circle of green. Those red buds, however, create a dynamic visual tension. They draw the eye, add a layer of sophistication, and prevent the design from feeling monotonous. It’s the difference between something just being “nice” and something being truly memorable. The scattered petals on the wooden surface below only amplify this effect, suggesting a story of fresh creation.

|
📋 Copy HEX 🔗 Share |
🔥 Trending Context
When working with faux florals, the secret to a professional-looking arrangement is variation in texture and scale. Don’t just buy one type of green leaf. Combine at least three different leaf shapes—for example, a broad, smooth leaf, a feathery fern-like stem, and something with a bit more structure like faux eucalyptus. For the flowers, mix tiny white “filler” flowers with the bolder red buds. This layering technique mimics how plants grow in nature and instantly makes your DIY wreath look more expensive and realistic.
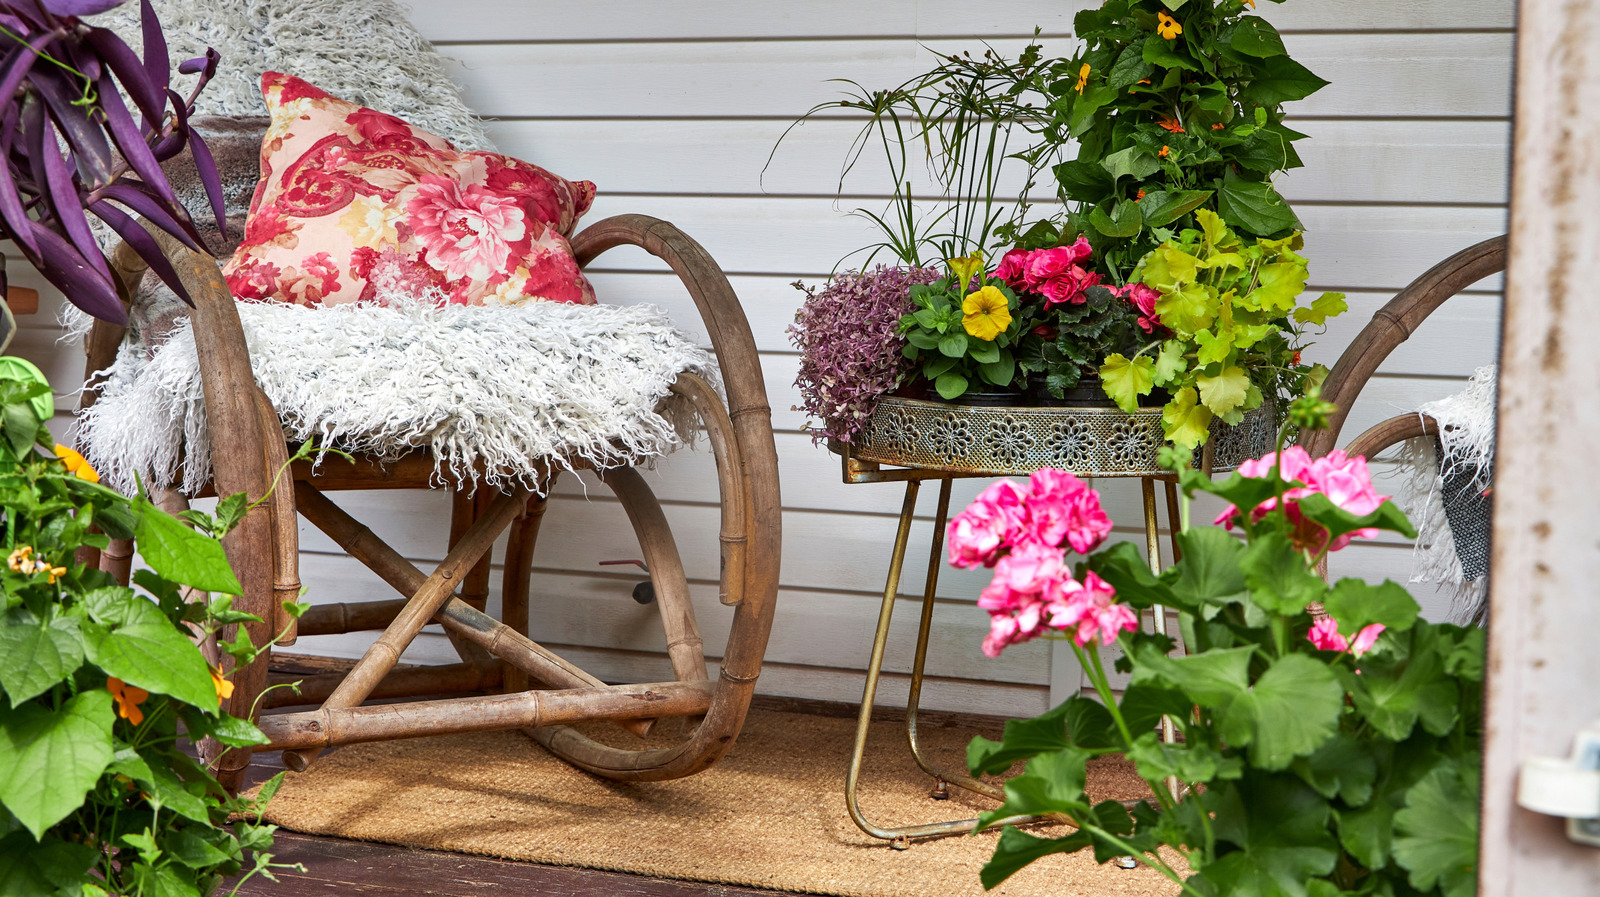
4. Create a Cozy Nook with a Bamboo Chair and a Tiered Plant Stand
You don’t need to splurge on a high-end patio set to get this relaxed, bohemian vibe. Find a similar bamboo or rattan-style chair on Facebook Marketplace or at a thrift store—these often go for $30-$50. A can of spray paint can unify a mismatched set. For the plant stand, look in the garden section of Walmart or Target for simple tiered stands, or even use stacked wooden crates from Dollar Tree painted gold. The key is the abundance of plants. Pack your stand with a mix of affordable houseplants and colorful annuals to get that lush look for a fraction of the cost.
|
📋 Copy HEX 🔗 Share |
⚠️ Real Talk
This little corner feels so inviting because of its masterful use of texture and verticality. The shaggy white cushion, the smooth floral pillow, the woven bamboo of the chair, and the natural fiber mat all create a rich tactile experience. Your eye wants to touch everything. Secondly, the gold plant stand draws the eye upward, making the small space feel taller and more intentional. The vibrant colors of the flowers against the neutral white wall act as a living piece of art, providing a powerful focal point that makes the entire setup feel deliberate and designed.
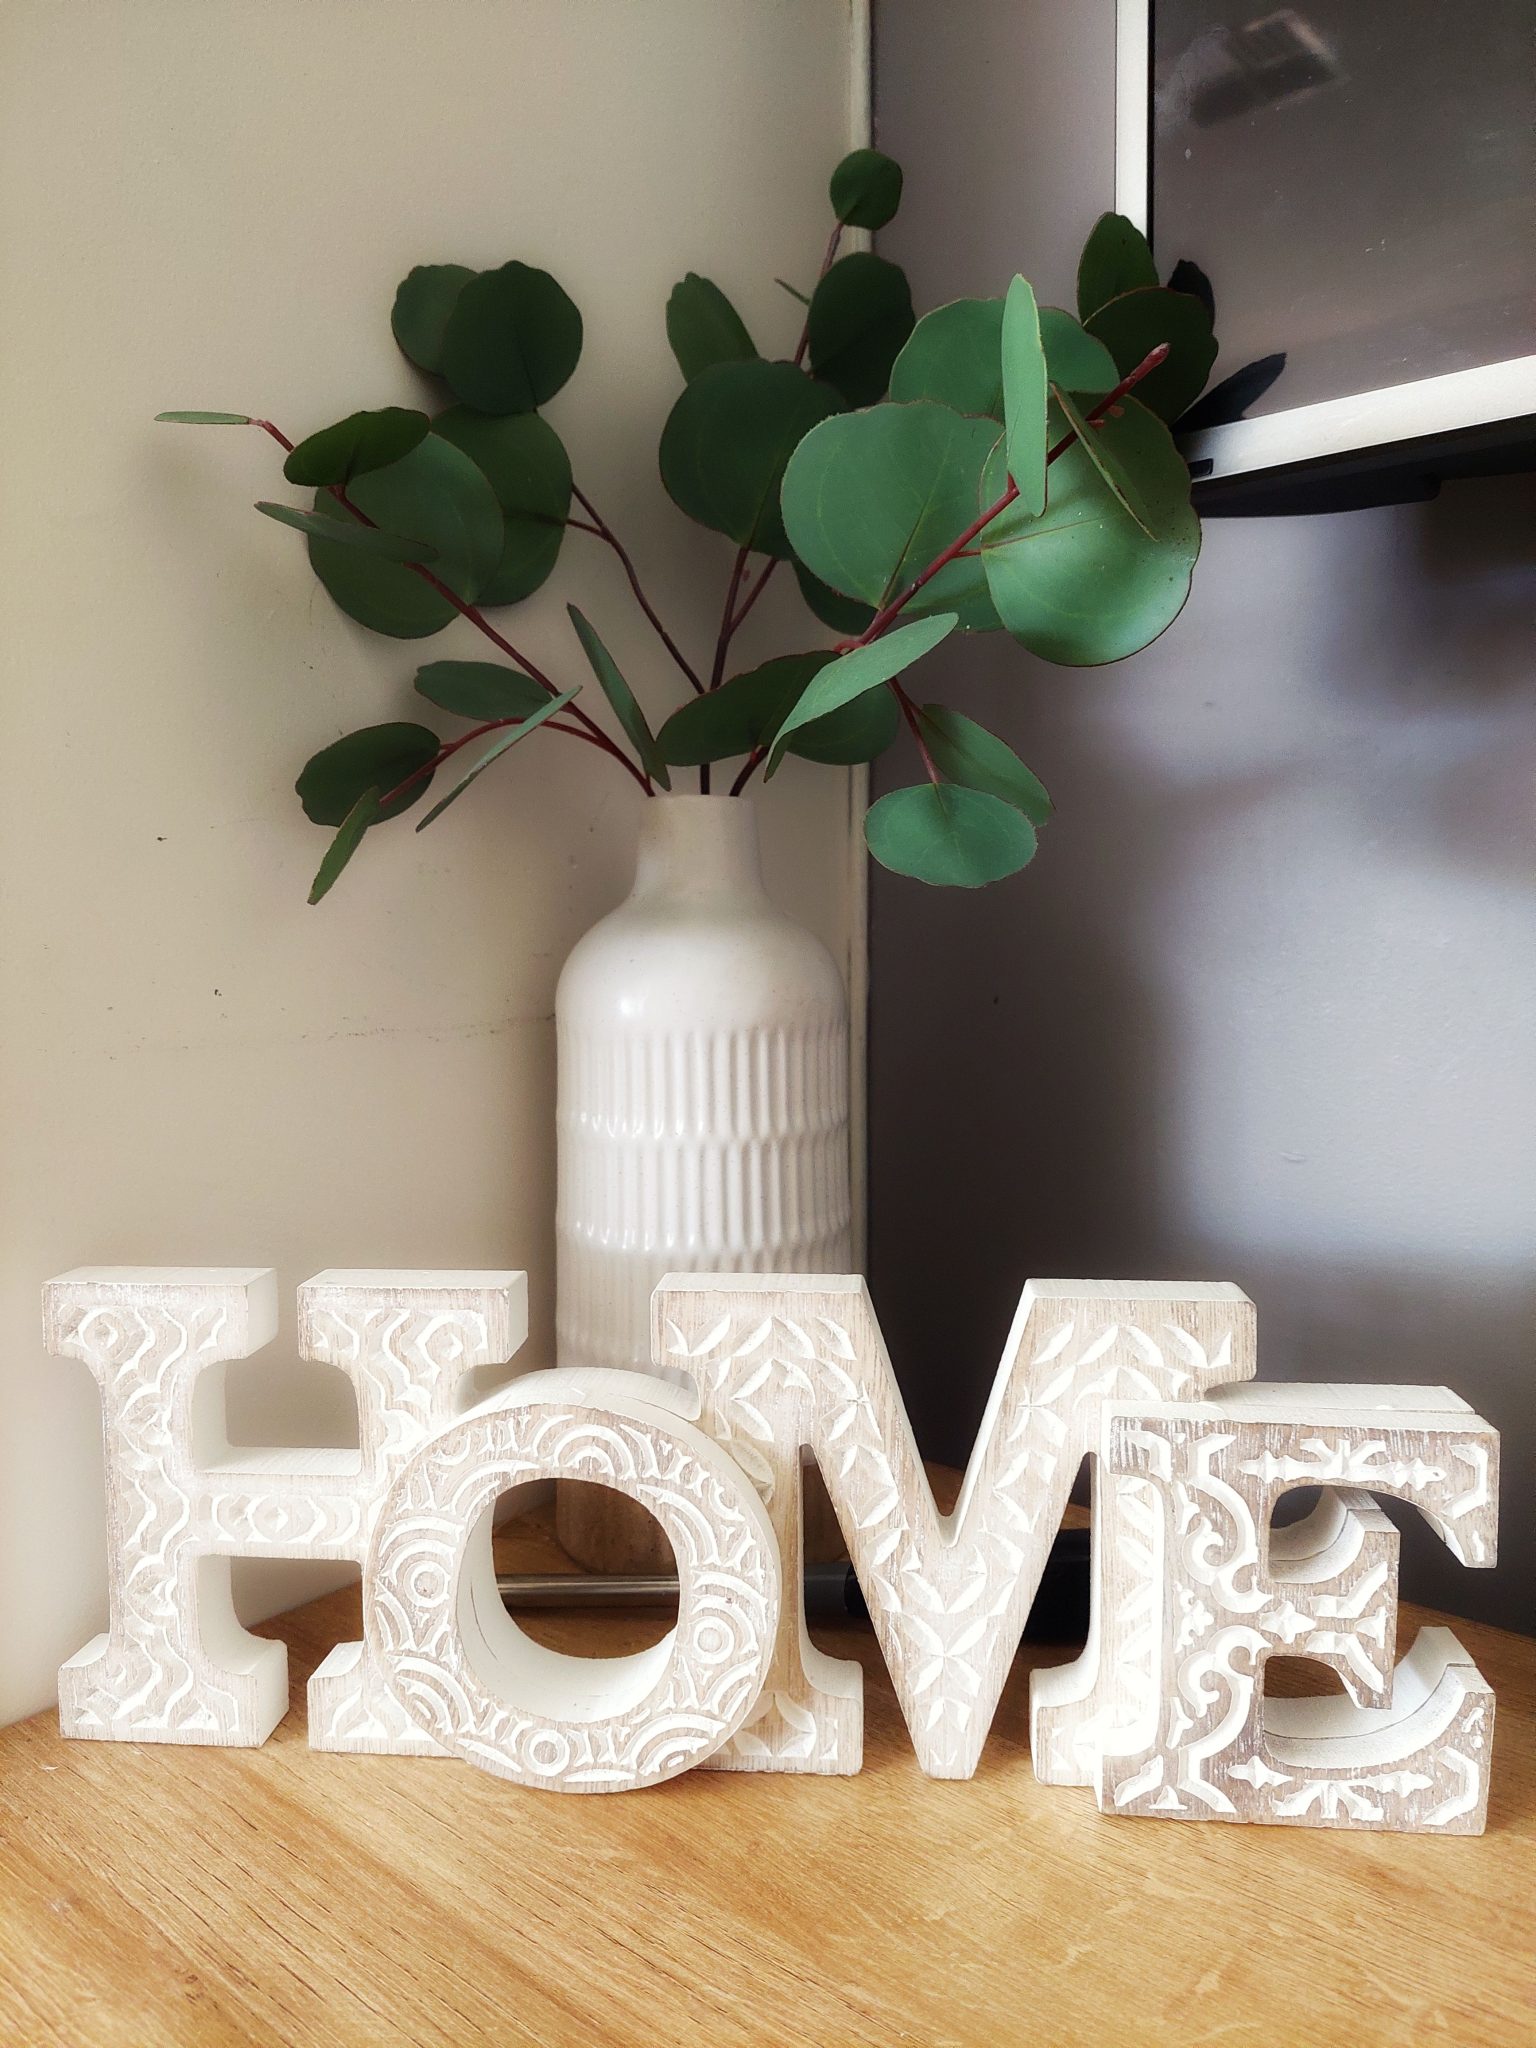
5. Style a ‘HOME’ Sign with Eucalyptus in a Ribbed Vase
Before you commit to this rustic-chic look, run through this quick checklist to make sure it will fit your space and style.
- Measure your surface: This arrangement has a significant footprint. Make sure the shelf, mantel, or console table you have in mind is deep enough to hold the letters and the vase without looking cramped. You’ll want at least 8 inches of depth.
- Check your lighting: This setup shines in bright, indirect natural light, which highlights the texture of the vase and the carved letters. In a dark corner, the details might get lost.
- Assess your existing decor: The off-white and natural wood tones work best with farmhouse, rustic, or transitional styles. If your home is ultra-modern or minimalist, this might feel out of place unless you adapt the colors.
|
📋 Copy HEX 🔗 Share |
✅ Before You Start
The beauty of using faux eucalyptus is its zero-maintenance elegance. Real eucalyptus dries out, becomes brittle, and loses its scent and color over time. These high-quality faux stems will look fresh for years. To keep them looking their best, just give them a quick dusting every month or so. You can use a hairdryer on a cool, low setting to blow off any accumulated dust. The ribbed ceramic vase can be wiped down with a damp cloth. This is a “set it and forget it” arrangement, perfect for busy households or those of us without a green thumb.
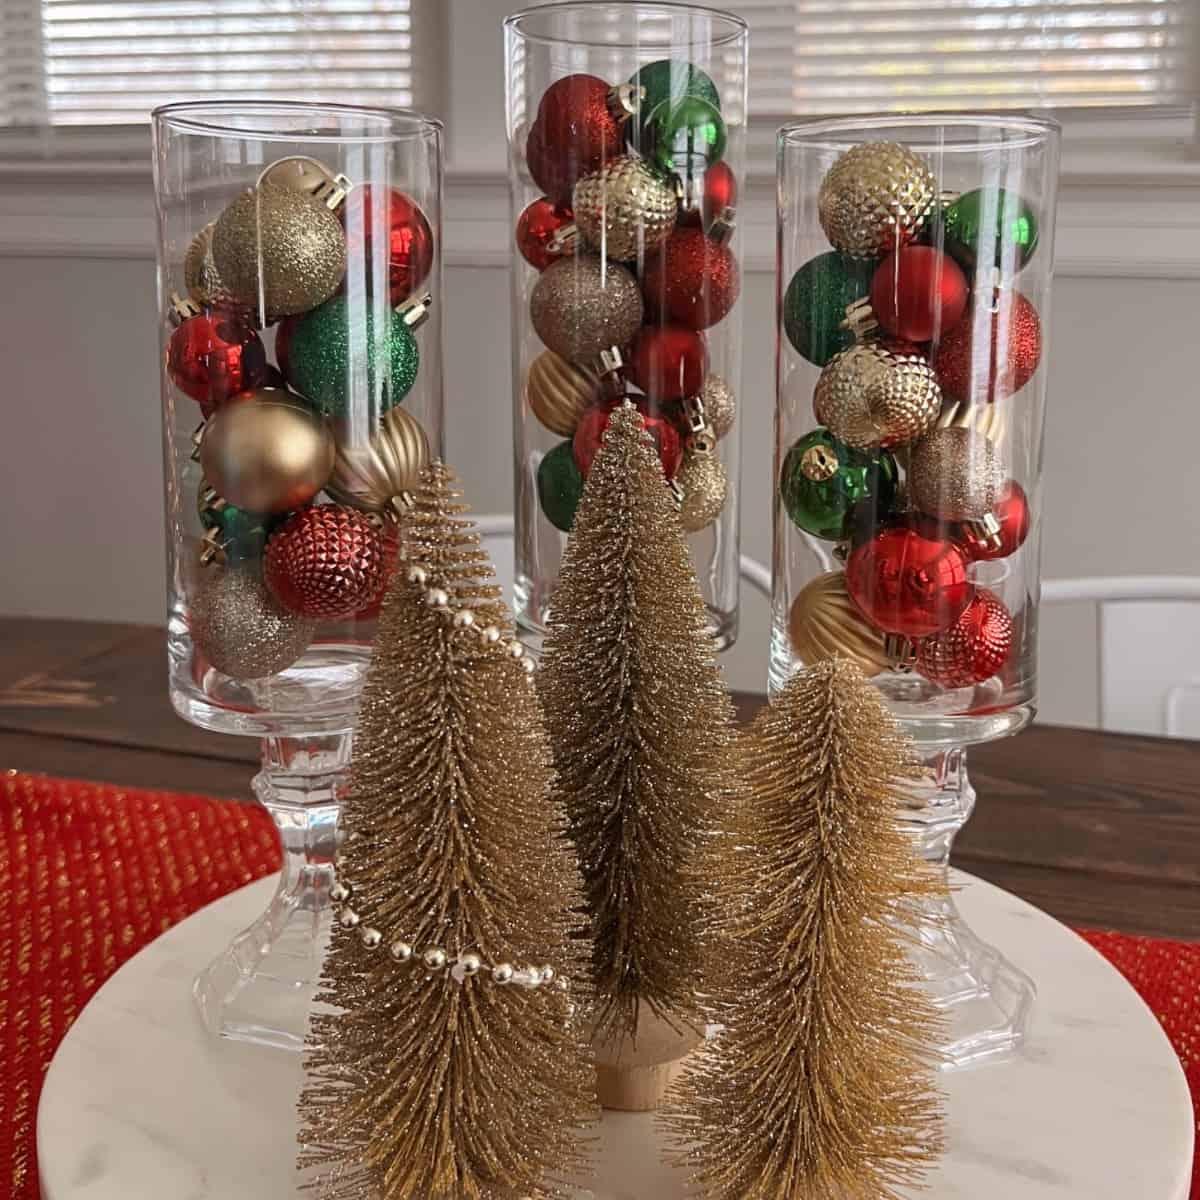
6. Fill Hurricane Vases with Ornaments and Glittering Trees
Recreating this festive centerpiece is surprisingly affordable, relying on just a few key Dollar Tree finds.
- Hurricane Vases (3): $3.75 ($1.25 each)
- Christmas Ornaments (3-4 tubes): $3.75 – $5.00
- Glitter Bottle Brush Trees (3): $3.75
- Marble-Patterned Tray (or contact paper on a plate): $1.25
- Pearl Bead Garland (optional): $1.25
- TOTAL: $13.75 – $15.00
Budget alternative: For an even cheaper version, skip the pedestaled vases and use any large glass jars or thrifted vases you have on hand. A simple white ceramic plate can stand in for the marble tray.
|
📋 Copy HEX 🔗 Share |
💡 Designer Tip
To make this look like it came from a high-end catalog, the secret is in the fill. Don’t just dump the ornaments into the vases. For a more curated look, place a cardboard tube (from an empty paper towel roll) in the center of each vase first. Then, carefully arrange the ornaments *around* the tube. This uses fewer ornaments, saving you money, and also prevents the ones in the middle from being hidden. It creates an illusion of fullness while keeping the arrangement light and airy. For the final touch, add the string of pearl beads to just one of the trees; this subtle asymmetry makes it feel more dynamic.
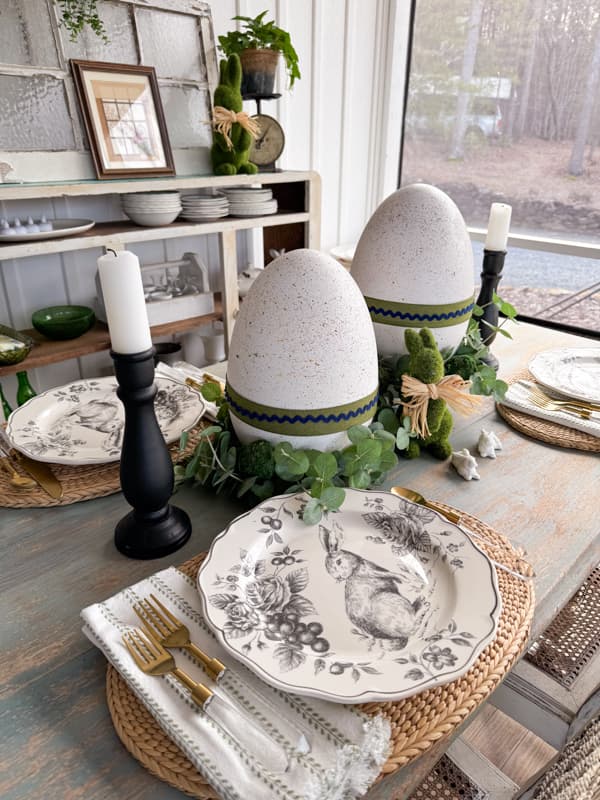
7. Set a Rustic Easter Table with Bunny Plates and Speckled Eggs
This tablescape is so successful because it perfectly balances rustic charm with whimsical details. The distressed wood table, woven placemats, and linen napkins provide a natural, earthy foundation. This allows the playful elements—the bunny-emblazoned plates and mossy figurines—to shine without overwhelming the scene. The tight color palette of neutrals, green, and black is key. It keeps the look cohesive and sophisticated, proving that a theme can be elegant. The gold cutlery adds a final touch of warmth and unexpected glamour. Compare this to the brighter, more colorful look of Idea #8.
|
📋 Copy HEX 🔗 Share |
📏 Scale Guide
This layered, detailed tablescape is best suited for a standard dining table that is at least 36 inches wide. You need enough space to accommodate the woven placemats (typically 14-15 inches in diameter), the plate stack, cutlery, and a glass, plus at least 10-12 inches of free space down the center for the decorative runner of eggs and bunnies. For a smaller bistro table or breakfast nook, this exact setup would feel too crowded. In that case, scale down by using only the bunny plates and a single moss bunny as a more minimal centerpiece.
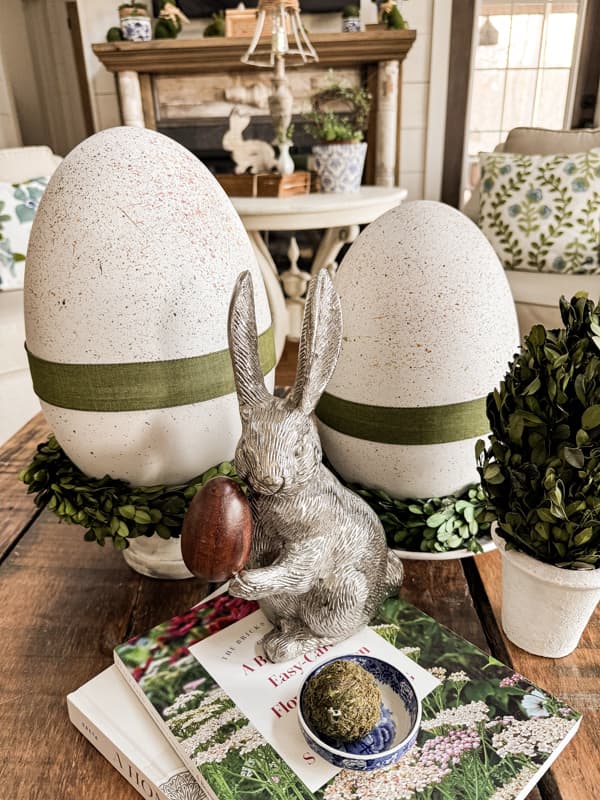
8. Create an Easter Vignette with Speckled Eggs and a Silver Bunny
We’re seeing a big shift away from single-use, disposable holiday decor. People want pieces that feel special and can be brought out year after year. This vignette hits that mark perfectly. It combines natural elements like the boxwood wreaths and wooden books with more timeless decorative objects like the silver bunny and ceramic eggs. It’s festive for Easter, but the core components can be restyled for spring or even year-round. This move toward sustainable, reusable decor is huge on Pinterest right now, as people look to invest in pieces with more longevity, even when they’re DIY.
|
📋 Copy HEX 🔗 Share |
💸 Get This Look For Less
The element that truly elevates this entire display is the metallic finish of the silver bunny. Surrounded by natural textures—wood, greenery, speckled eggs—the cool, reflective surface of the bunny provides a necessary point of contrast. It catches the light and adds a touch of modern sophistication that prevents the arrangement from looking too rustic or crafty. If you were to swap it for a wooden or moss bunny, the whole vignette would feel flatter and less dynamic. It’s the unexpected pop of glamour that makes everything else look more intentional.
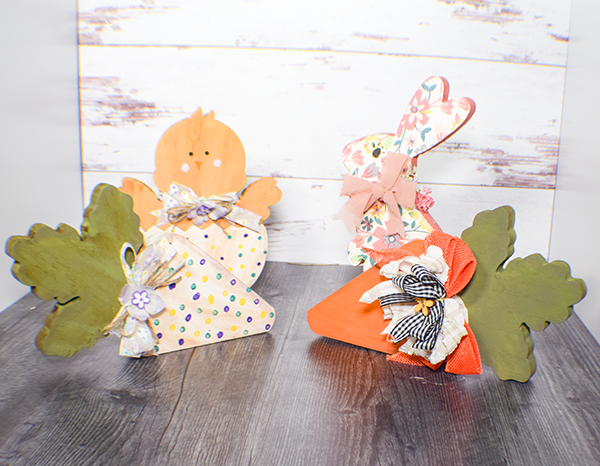
9. Display Wooden Chick and Bunny Cutouts for Spring
A quick word of caution: the charm of these wooden cutouts is their rustic, handmade feel. However, that also means they can easily look a bit *too* crafty if not styled carefully. The key is context. Placed against the distressed white wood backdrop, they look intentional. But if you just plop them on a cluttered kitchen counter, they might look more like a preschool art project. Make sure you give them a “home”—a dedicated spot on a shelf, mantel, or entryway table—and pair them with more neutral items to let their playful patterns shine without creating visual chaos.
|
📋 Copy HEX 🔗 Share |
📐 Style Math
The real cost savings here is making these yourself versus buying pre-made holiday decor from a boutique. Head to Dollar Tree’s craft aisle and grab blank wooden shapes (they often have bunnies, chicks, and eggs leading up to Easter) for $1.25 each. A small set of craft paints is about $5-$8 at Walmart or a craft store, and you’ll have tons left over for other projects. This entire duo could be made for under $10, whereas a similar pre-made set from a home goods store could easily cost $30-$40. It’s a perfect weekend craft with a high-end look.
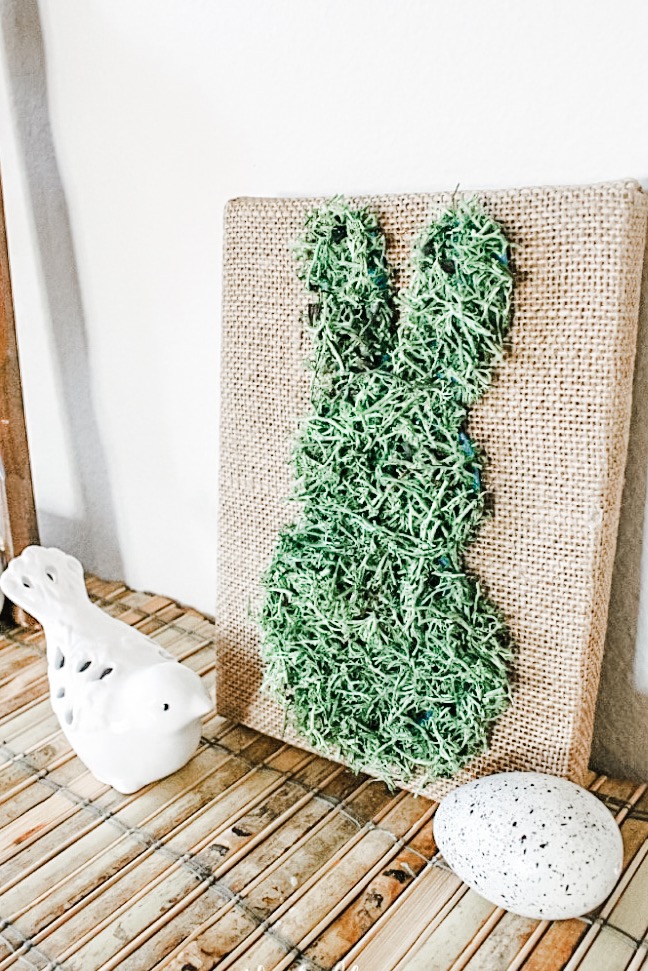
10. Design a Moss Bunny Silhouette on a Burlap Canvas
- Gather Materials: You’ll need a small burlap-wrapped canvas, a bag of preserved green sheet moss, a bunny silhouette stencil or cookie cutter, a pencil, and a hot glue gun. (Estimated cost: $8)
- Trace Your Shape: Place your stencil onto the burlap canvas and lightly trace the bunny shape with a pencil.
- Apply the Moss: Working in small sections, apply a thin layer of hot glue inside your traced outline. Immediately press a piece of the green moss firmly onto the glue.
- Trim the Edges: Continue until the entire bunny shape is filled with moss. Use small scissors to carefully trim any moss that overhangs your pencil line for a clean, crisp silhouette.
- Style Your Vignette: Let it dry completely, then prop it up with other spring decor like the ceramic bird and speckled egg. (Estimated time: 20 minutes)
|
📋 Copy HEX 🔗 Share |
🎯 What Makes It Work
This simple DIY is so effective because of its brilliant use of texture and minimalism. The coarse, rustic weave of the burlap canvas provides the perfect backdrop for the soft, vibrant texture of the preserved moss. The contrast is both visual and tactile. Furthermore, the design is confident in its simplicity. By using just a silhouette, it feels more like a piece of modern art than a traditional, cutesy Easter decoration. It allows the viewer’s imagination to fill in the details, which is a hallmark of sophisticated design.
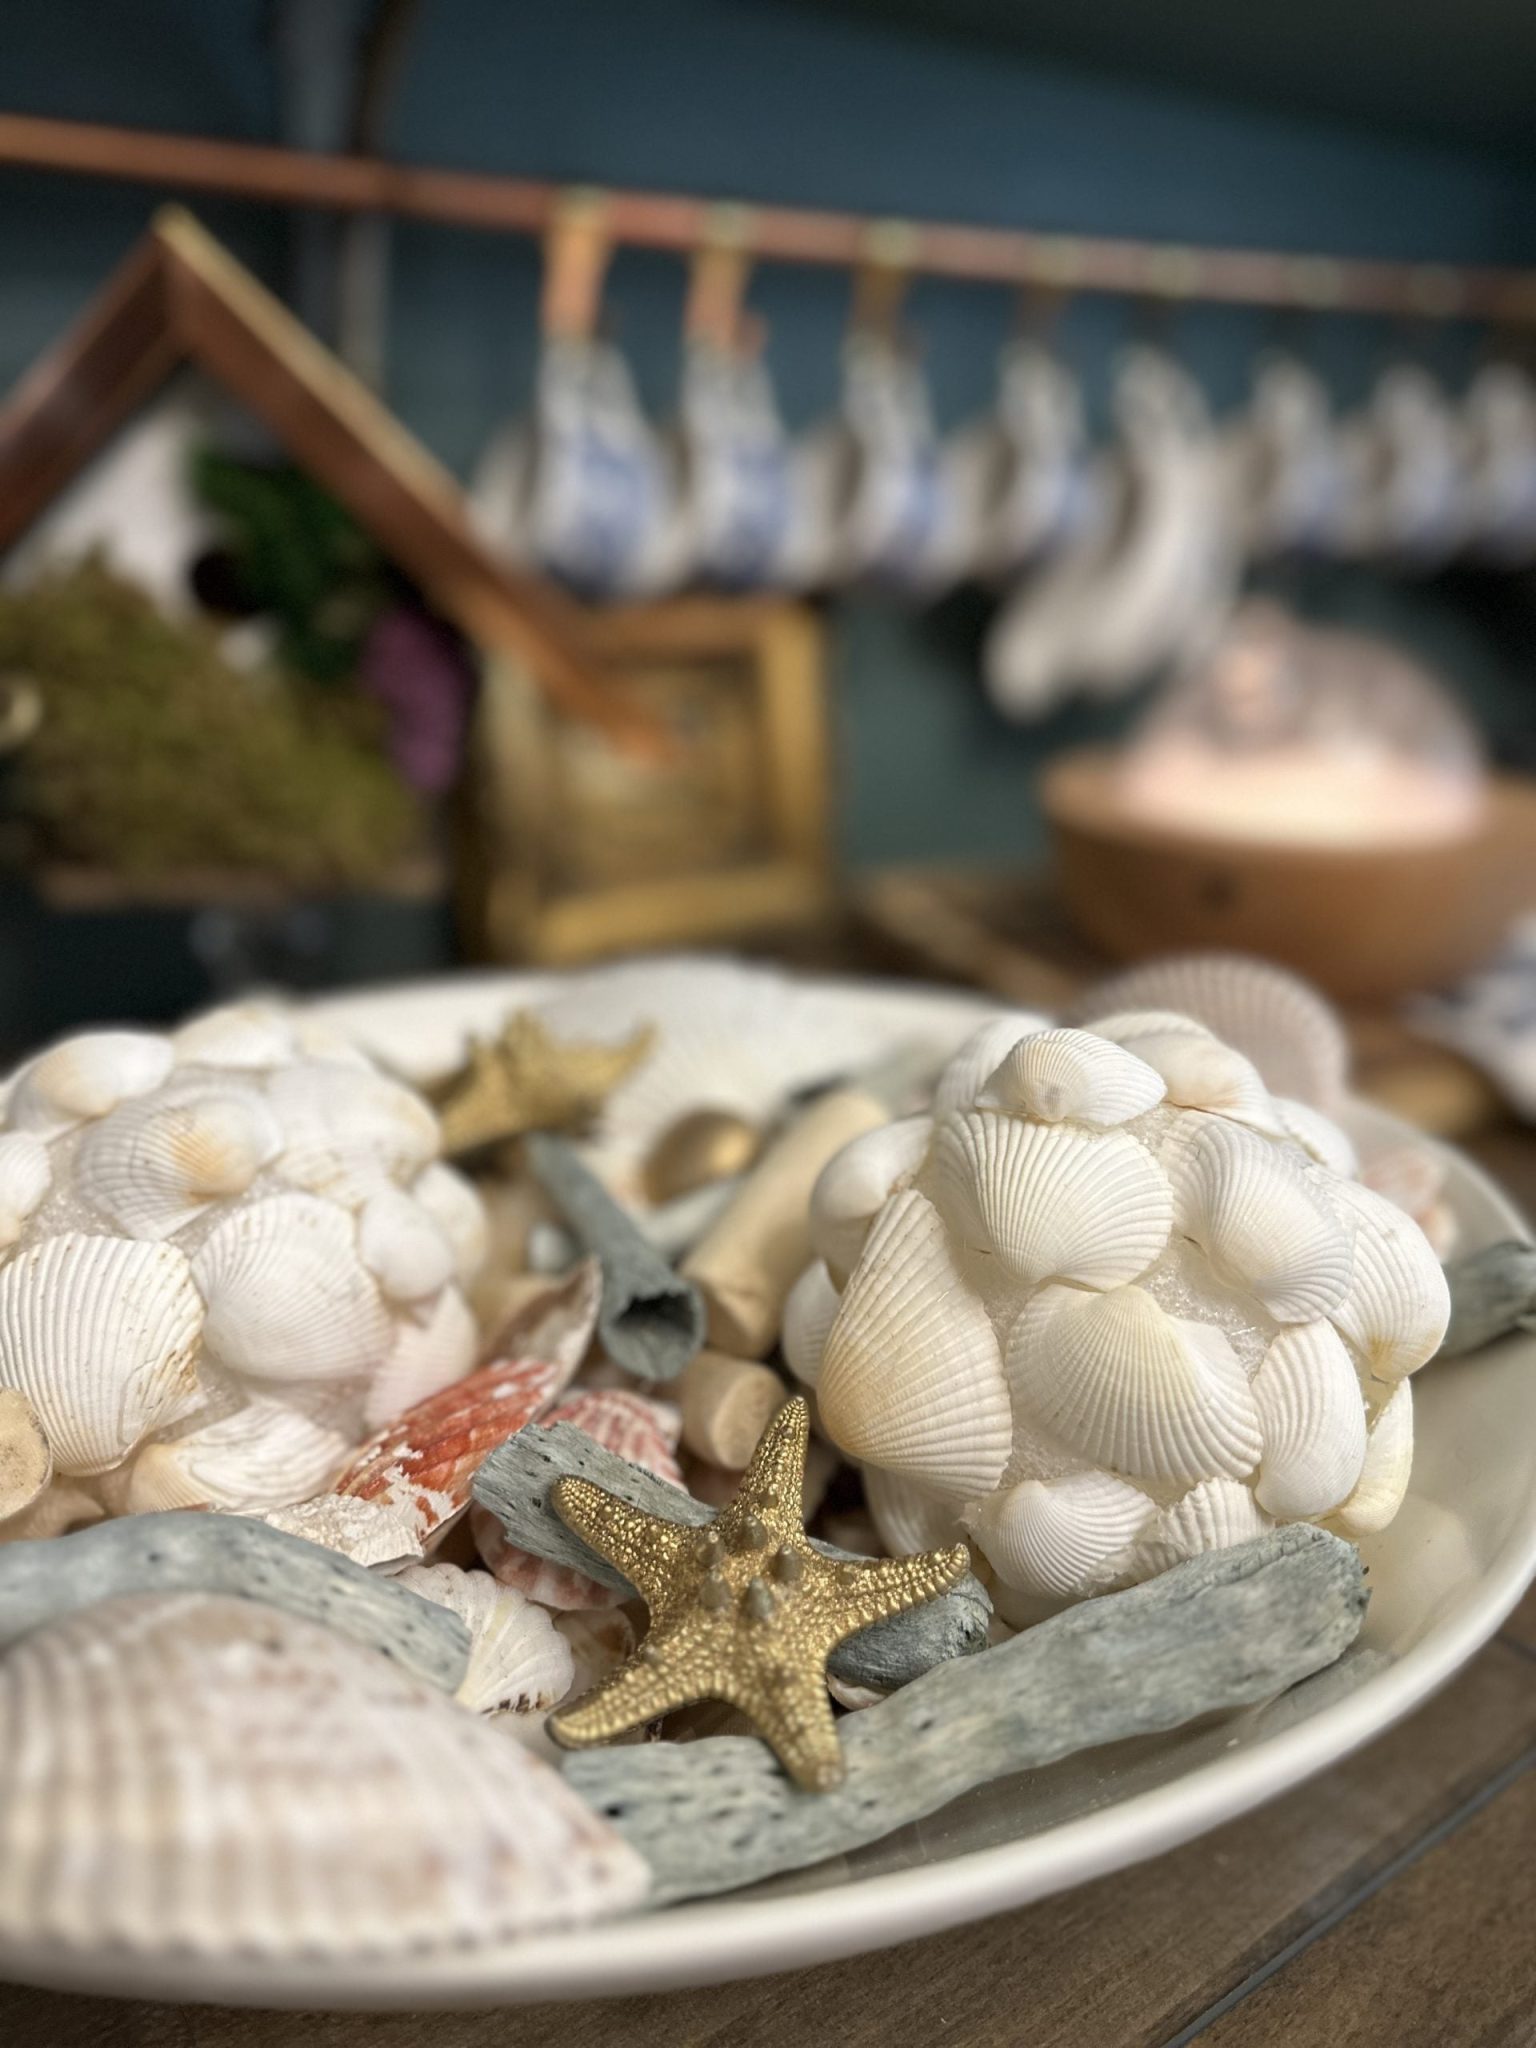
11. Assemble a Coastal-Inspired Bowl with Shells and Golden Starfish
The serene, beachy vibe of this bowl follows a simple but effective recipe: 50% Neutral Base + 30% Natural Finds + 20% Glam Accent. The white bowl and the large, handmade scallop shell balls form the neutral, textural foundation. Then, assorted seashells and pieces of weathered driftwood are layered in, providing organic shapes and a genuine coastal feel. The crucial finishing touch is the pop of metallic gold from the starfish. This “glam accent” elevates the whole piece, preventing it from looking like a simple collection of beachcombings and turning it into a curated decorative object.
|
📋 Copy HEX 🔗 Share |
🧹 Maintenance Reality
While beautiful, this kind of open decorative bowl is a natural dust collector. To keep it looking fresh, you’ll need to dust it weekly. The most effective way is to use a can of compressed air (like you’d use for a keyboard) to blow dust out of the tiny crevices of the shells and driftwood. For a deeper clean once or twice a year, you can remove all the items, wash the bowl, and wipe down each individual piece with a soft, dry cloth before reassembling. Avoid using water on the driftwood and starfish, as it can damage their finish.
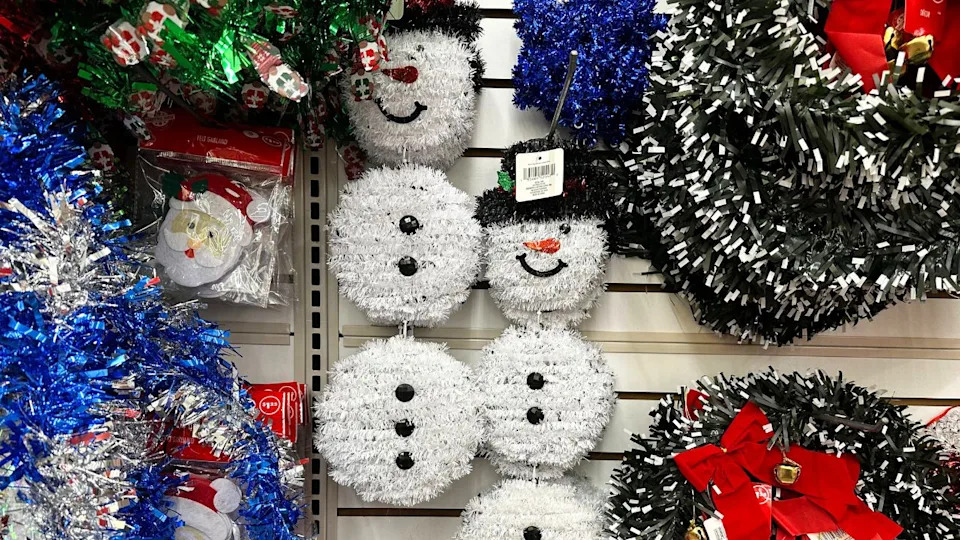
12. Find Festive Tinsel Christmas Decor in Every Color
There’s a huge wave of nostalgia washing over holiday decor, and this tinsel is riding it perfectly. For years, the trend was muted, minimalist, farmhouse-style Christmas. But now, people are craving the joyful, unapologetic sparkle of holidays they remember from childhood. This shiny, colorful tinsel—in bright blues, greens, and classic reds—is a direct throwback to the 70s and 80s. It’s fun, it doesn’t take itself too seriously, and it’s incredibly budget-friendly, which is a trio that’s driving a lot of design choices in 2026.
|
📋 Copy HEX 🔗 Share |
🔧 How-To Brief
Here’s the truth about tinsel: a little goes a long way, and there is a fine line between “festive nostalgia” and “tacky mess.” The key to using these bold pieces is balance. Don’t deck out your entire house in shiny blue tinsel. Instead, use one tinsel wreath on an interior door or hang a few of the tinsel snowmen on a tree that also has more classic, simple ornaments. Think of these as your statement pieces, your “pop of fun,” rather than the main theme. This allows them to feel intentional and stylishly retro instead of overwhelming.
13. Create Charming Christmas Gnomes from Jars and Fabric Scraps
The single detail that gives these gnomes their irresistible personality is the oversized, patterned hat. The body is just a simple jar, the nose a plain wooden bead, and the beard a swatch of faux fur. But the hat is where the magic happens. The jaunty angle, the festive patterns (snowflakes, stripes), and the sheer scale of it in proportion to the “body” are what transform the collection of simple craft supplies into a character. Without the hats, you’d just have fuzzy jars. With them, you have a whole family of cheeky holiday gnomes.

|
📋 Copy HEX 🔗 Share |
💰 Budget Breakdown
- Build the Body: You’ll need a clean glass jar (like a pickle or sauce jar), a piece of festive fabric, and faux fur. Wrap and glue the fabric around the jar to cover it.
- Craft the Hat: Cut a quarter-circle shape from a piece of patterned felt or fabric. Roll it into a cone that fits snugly over the top of your jar. Secure the seam with hot glue.
- Add the Beard & Nose: Cut a triangle or U-shape from the faux fur for the beard. Glue it to the front of the jar, near the top. Then, glue a small wooden bead right at the top edge of the beard, so it peeks out from under the hat.
- Assemble: Place the hat on top, pulling it down so it just covers the top of the beard and nose. Add any embellishments like the poinsettia. (Estimated time: 30 minutes per gnome)
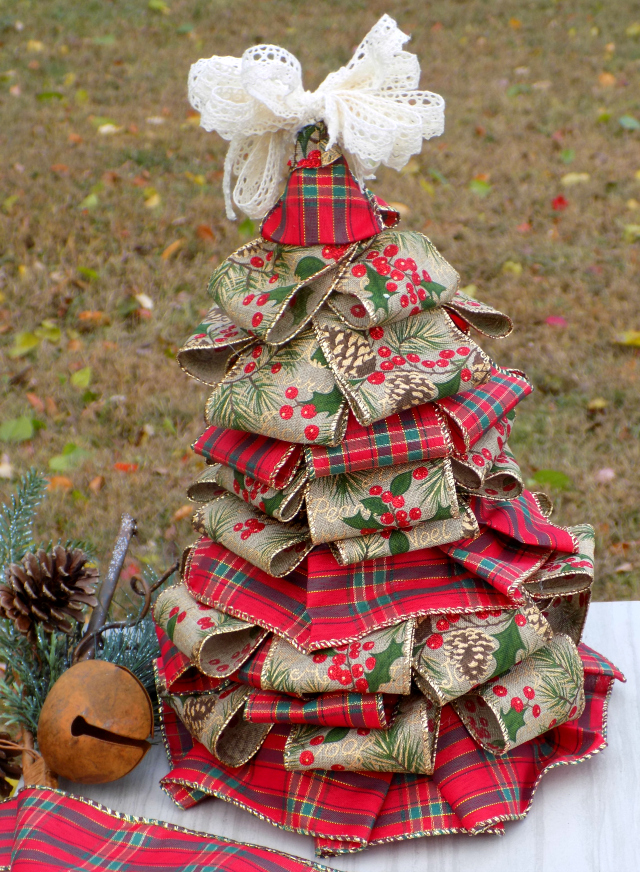
14. Fashion a Mini Christmas Tree from Plaid and Holiday Ribbons
To achieve those perfect, crisp pleats, the trick is to use wired ribbon. This is non-negotiable. The thin wire hidden in the edges allows you to shape the ribbon and ensures your “branches” will hold their form and not droop over time. When attaching the ribbon to your cone base (a styrofoam cone works best), don’t just glue it flat. Create a small fold or “pleat” every 1.5 to 2 inches as you work your way around. This creates the volume and texture that makes the tree look so full and expensive.
|
📋 Copy HEX 🔗 Share |
⭐ The One Thing
This tree’s charm comes from a well-defined visual formula: 50% Traditional Pattern + 40% Novelty Pattern + 10% Unifying Trim. The red plaid ribbon provides a classic, recognizable Christmas feel. The beige ribbon with its holly print adds a layer of detailed, illustrative charm. The key that holds it all together is the metallic gold edge on *both* ribbons. This consistent “unifying trim” ensures that even though the patterns are different, they feel like they belong together. You could swap the plaid for a solid red or the holly for snowflakes, but as long as you keep that unifying element, the design will work.
15. Display Flocked Mini Trees in Galvanized Metal Buckets
This trio is a masterclass in combining textures to create a cohesive look. You have the soft, snowy texture of the flocked trees, the cold, industrial feel of the galvanized metal buckets, the glossy shine of the red ornaments, and the woven linen of the striped runner. It’s a rich sensory combination that feels layered and thoughtfully composed. The simple, rustic color palette—green, white, grey, and a pop of red—is classic and timeless, ensuring the display feels festive without being garish. It’s a perfect example of the popular “modern farmhouse” style.

|
📋 Copy HEX 🔗 Share |
🔥 Trending Context
This look is incredibly versatile, but there are a few things to check before you start buying supplies.
- Consider Your Surface: This arrangement works best on a horizontal surface like a console table, a mantel, or as a dining table centerpiece. Ensure you have a long enough space for the three trees to sit side-by-side with a little breathing room. A length of at least 24-30 inches is ideal.
- Check for Balance: The “Rule of Three” is in full effect here. Using an odd number of items is almost always more visually appealing than an even number. If you have a very long table, consider using five trees instead of four.
- Power Source: If you plan to add lights to your trees, make sure your chosen location is near a power outlet or plan to use battery-operated fairy lights.
16. Decorate a Flocked Tree with Red, Teal, and Striped Accents
The single element that makes this Christmas tree design feel fresh, modern, and totally unique is the use of teal. Red and white are classic Christmas staples, but the injection of that vibrant, unexpected blue-green hue is what takes this look from traditional to trendy. It adds a playful, contemporary twist and proves that you don’t have to stick to a rigid red-and-green color scheme to be festive. The teal ornaments, especially the mix of matte and glossy finishes, create depth and a joyful, whimsical energy that’s absolutely contagious.
|
📋 Copy HEX 🔗 Share |
⚠️ Real Talk
Flocked trees are stunning, but they come with one messy reality: fallout. The white “snow” powder is notorious for shedding, especially on a new tree or when you’re first fluffing the branches and decorating. Be prepared for a light dusting of white powder on your floor and even on your clothes as you work. The best strategy is to lay down a tree skirt or an old sheet *before* you start decorating to catch the mess. A quick vacuum afterward will take care of the rest. The shedding lessens over time, but it’s an unavoidable part of the beautifully snowy look.
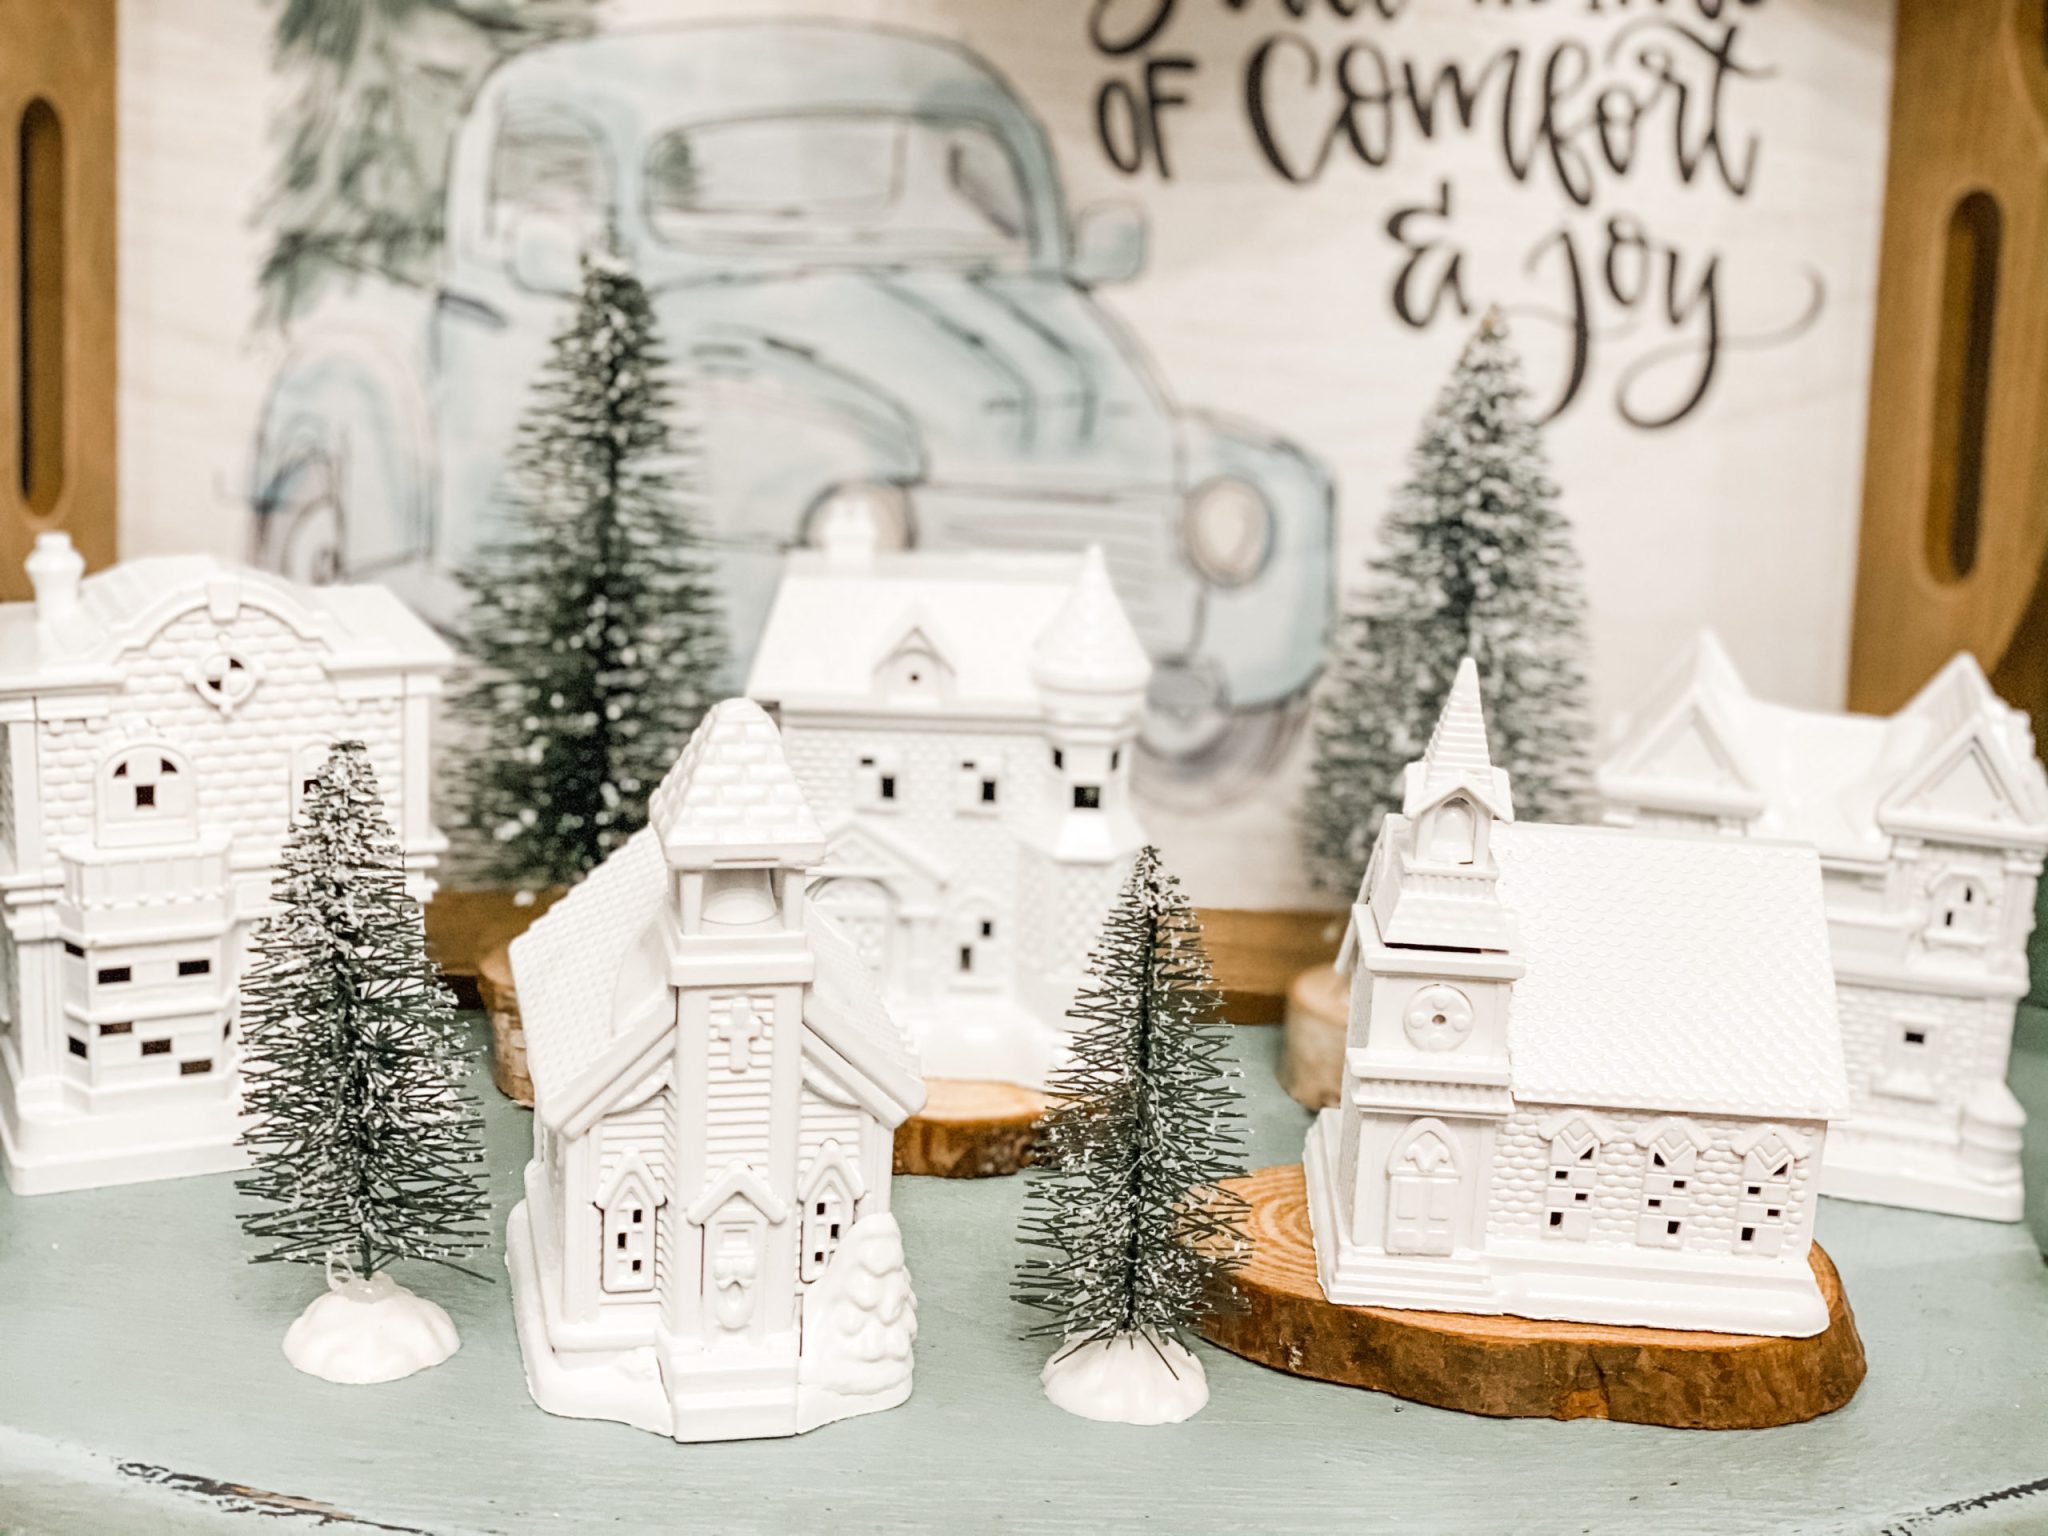
17. Assemble a Winter Village with White Houses and Green Felt Trees
Creating this charming winter wonderland scene is a perfect example of how a few simple Dollar Tree items can be combined for a high-impact look.
- Miniature White Houses (3-4): $3.75 – $5.00
- Green Felt Trees (DIY from felt sheets): $2.50
- Faux Red Berry Sprigs (1-2 stems): $1.25 – $2.50
- Bottlebrush Trees (1 pack): $1.25
- Artificial Snow/Glitter: $1.25
- TOTAL: $10.00 – $12.50
Budget alternative: Instead of buying pre-made houses, you can often find unpainted ceramic or wood houses in the craft aisle for $1.25 each. A quick coat of white craft paint will give you the same look for less.
|
📋 Copy HEX 🔗 Share |
✅ Before You Start
The secret to making a miniature village look dynamic and not like a flat row of toys is to create varying levels. Notice how some elements in this display are taller than others? Replicate this by using small, unobtrusive objects as risers. A stack of two or three checkers, a small block of wood, or even an inverted bottle cap hidden under a blanket of faux snow can elevate a house or tree just an inch or two. This simple trick adds depth and a sense of realism, guiding the eye through the scene instead of just across it.
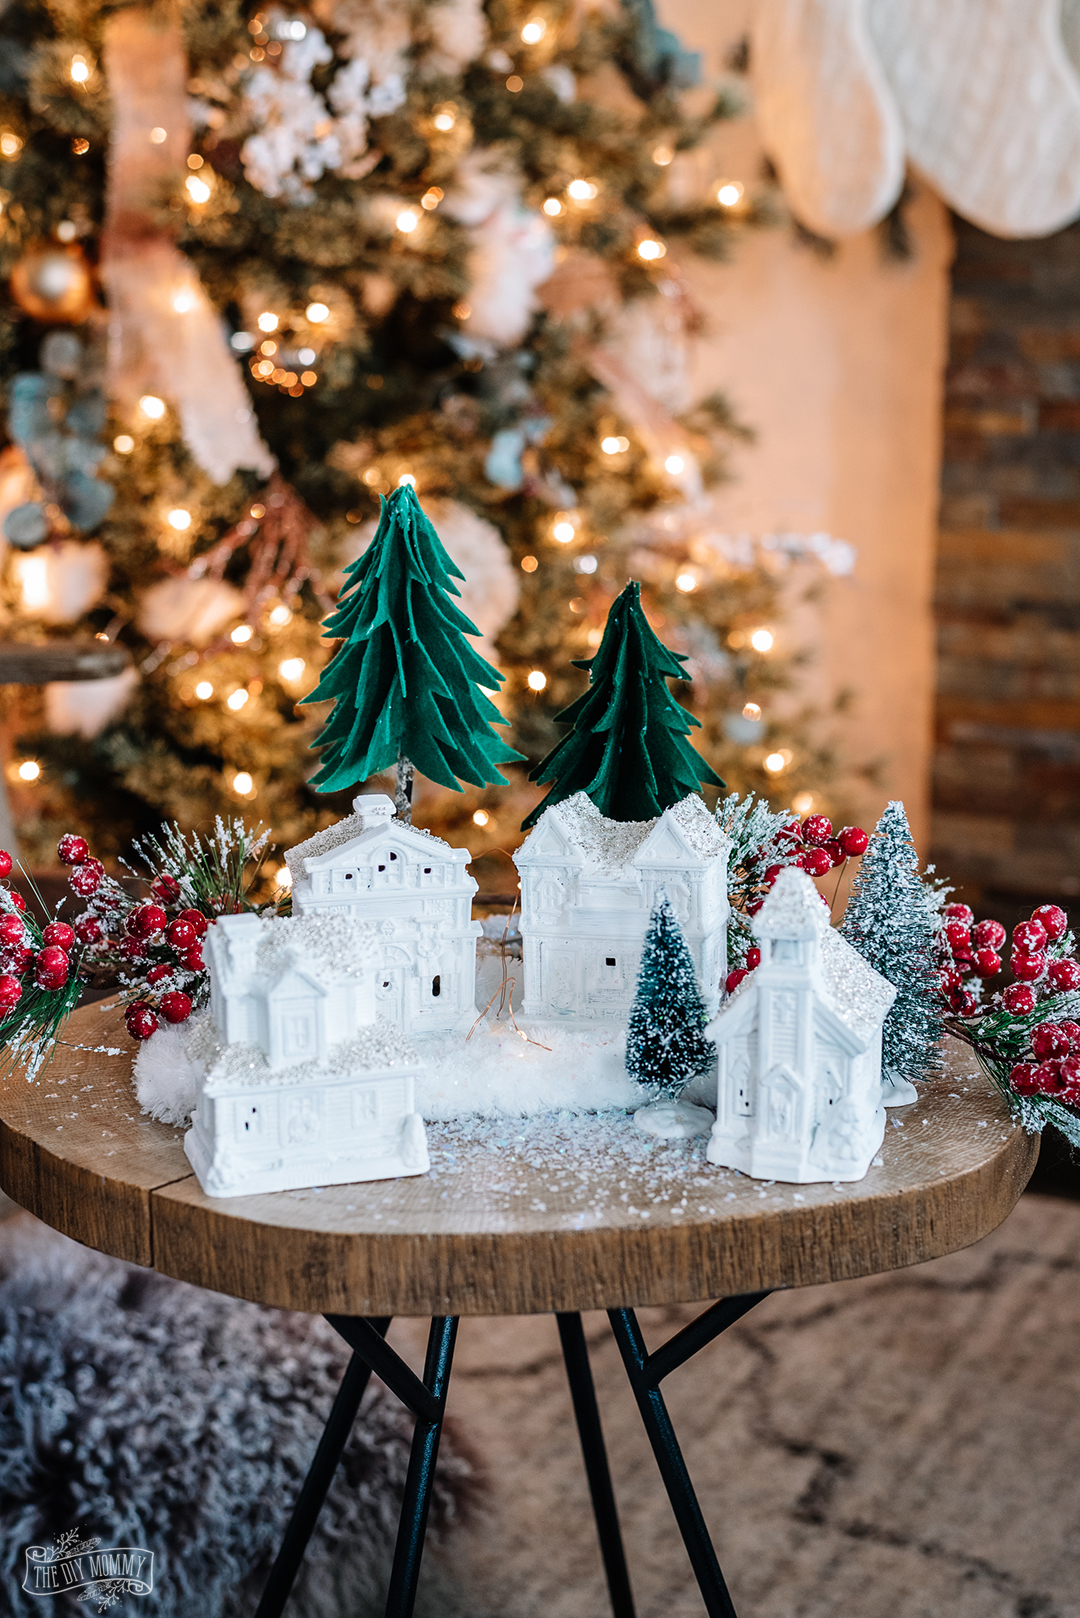
18. Stage a Tiered Winter Village with Ceramic Houses and Wood Slices
This display feels so serene and thoughtfully curated due to its strict adherence to a cool, limited color palette. The crisp white of the ceramic houses, the pale green surface, and the frosted trees create a peaceful, snowy atmosphere. The natural wood slices are the only source of warmth, and they serve to ground the arrangement and prevent it from feeling too sterile. The use of elevation, with some houses placed on the wood slices, creates a simple but effective visual hierarchy that leads the eye through the “village.” For a similarly peaceful vibe, check out the coastal decor in Idea #11.
|
📋 Copy HEX 🔗 Share |
💡 Designer Tip
This type of miniature display is perfect for smaller spaces. It would work beautifully on a mantelpiece, a deep windowsill, or a narrow entryway console table. The entire arrangement likely takes up a space of about 24 inches wide by 8-10 inches deep. It’s an ideal solution for bringing festive cheer to an apartment or a room that doesn’t have space for a full-sized Christmas tree. For this idea to work, you need a minimum ceiling height of about 15-20 inches above the surface to give the taller trees and church steeple enough visual “breathing room.”
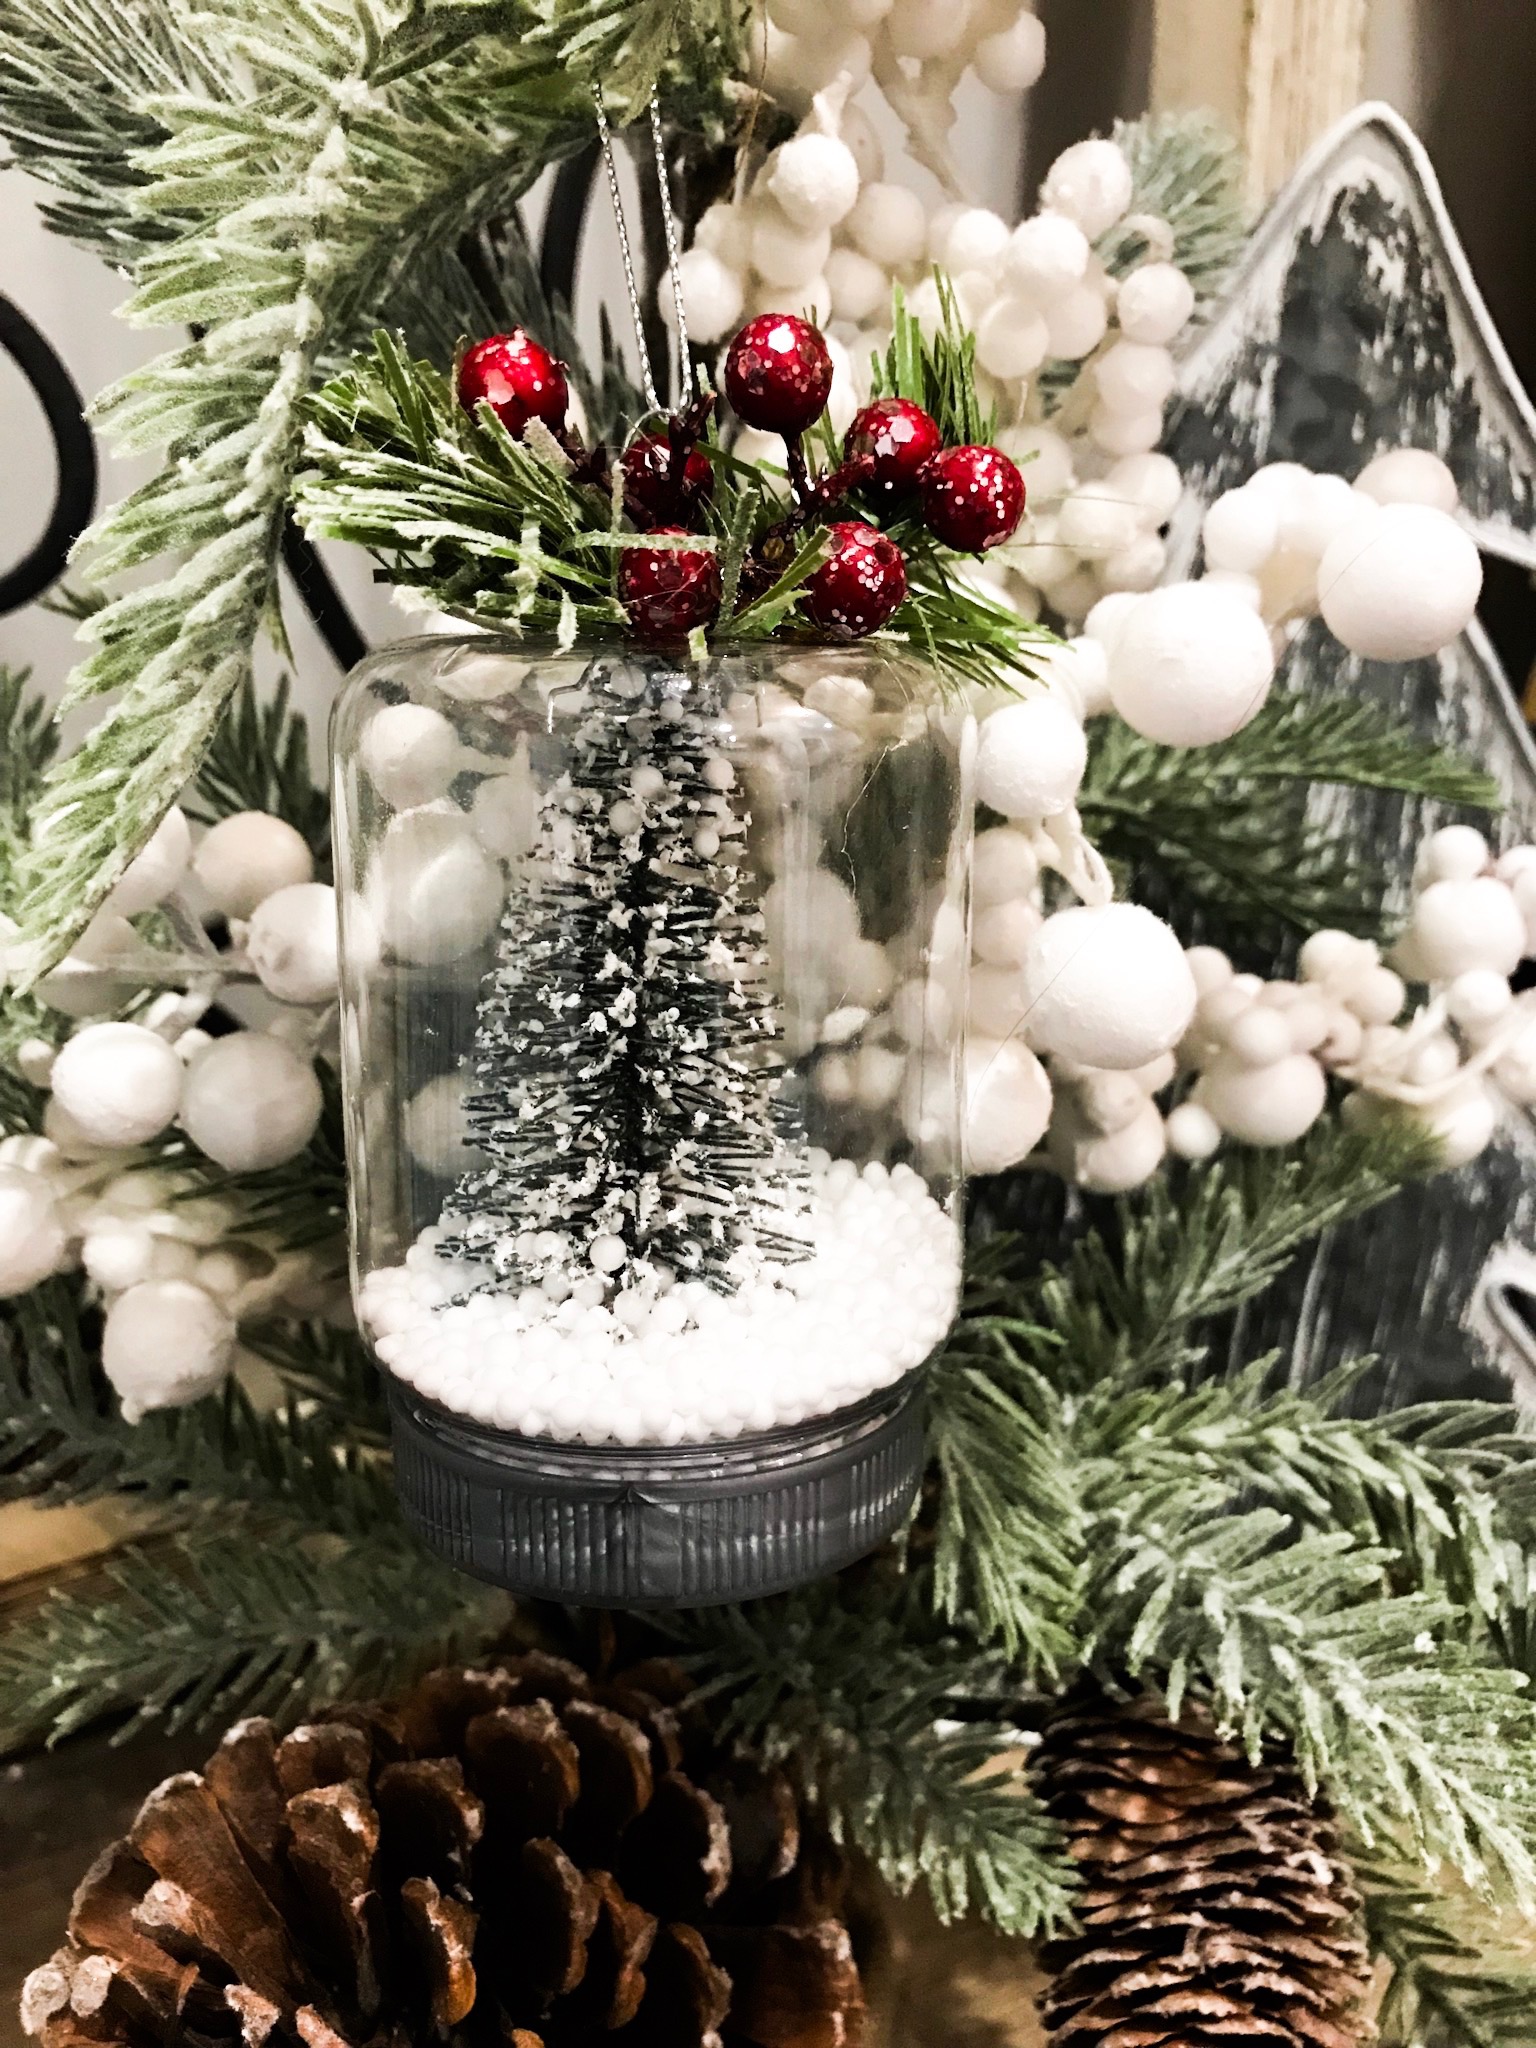
19. Craft a Winter Wonderland Ornament from a Glass Jar
- Find Your Jar: Start with a small, clean glass jar. Baby food jars or small spice jars are a perfect size for a tree ornament.
- Create the Scene: Pour a small amount of faux snow or white glitter into the bottom of the jar. “Plant” a miniature frosted bottle brush tree firmly into the “snow.” Use a dab of hot glue on the bottom of the tree for extra stability if needed.
- Decorate the Lid: Using a hot glue gun, attach a small cluster of faux evergreen sprigs and glittery red berries to the top of the jar’s lid.
- Add a Hanger: Glue the ends of a loop of ribbon, twine, or a silver chain to the sides of the lid to create a hanger. Screw the lid tightly onto the jar. (Estimated Time: 15 minutes)
|
📋 Copy HEX 🔗 Share |
📏 Scale Guide
The single most important element in this DIY is the choice of a *glass* jar. The transparency is everything. It transforms a simple collection of festive items into a tiny, self-contained world, like a miniature snow globe. The glass catches the light, magnifies the details inside, and creates a sense of preciousness. If this were done in an opaque container, it would lose all its magic. The ability to see inside to the tiny tree and sparkling snow is what makes this ornament so charming and captivating.
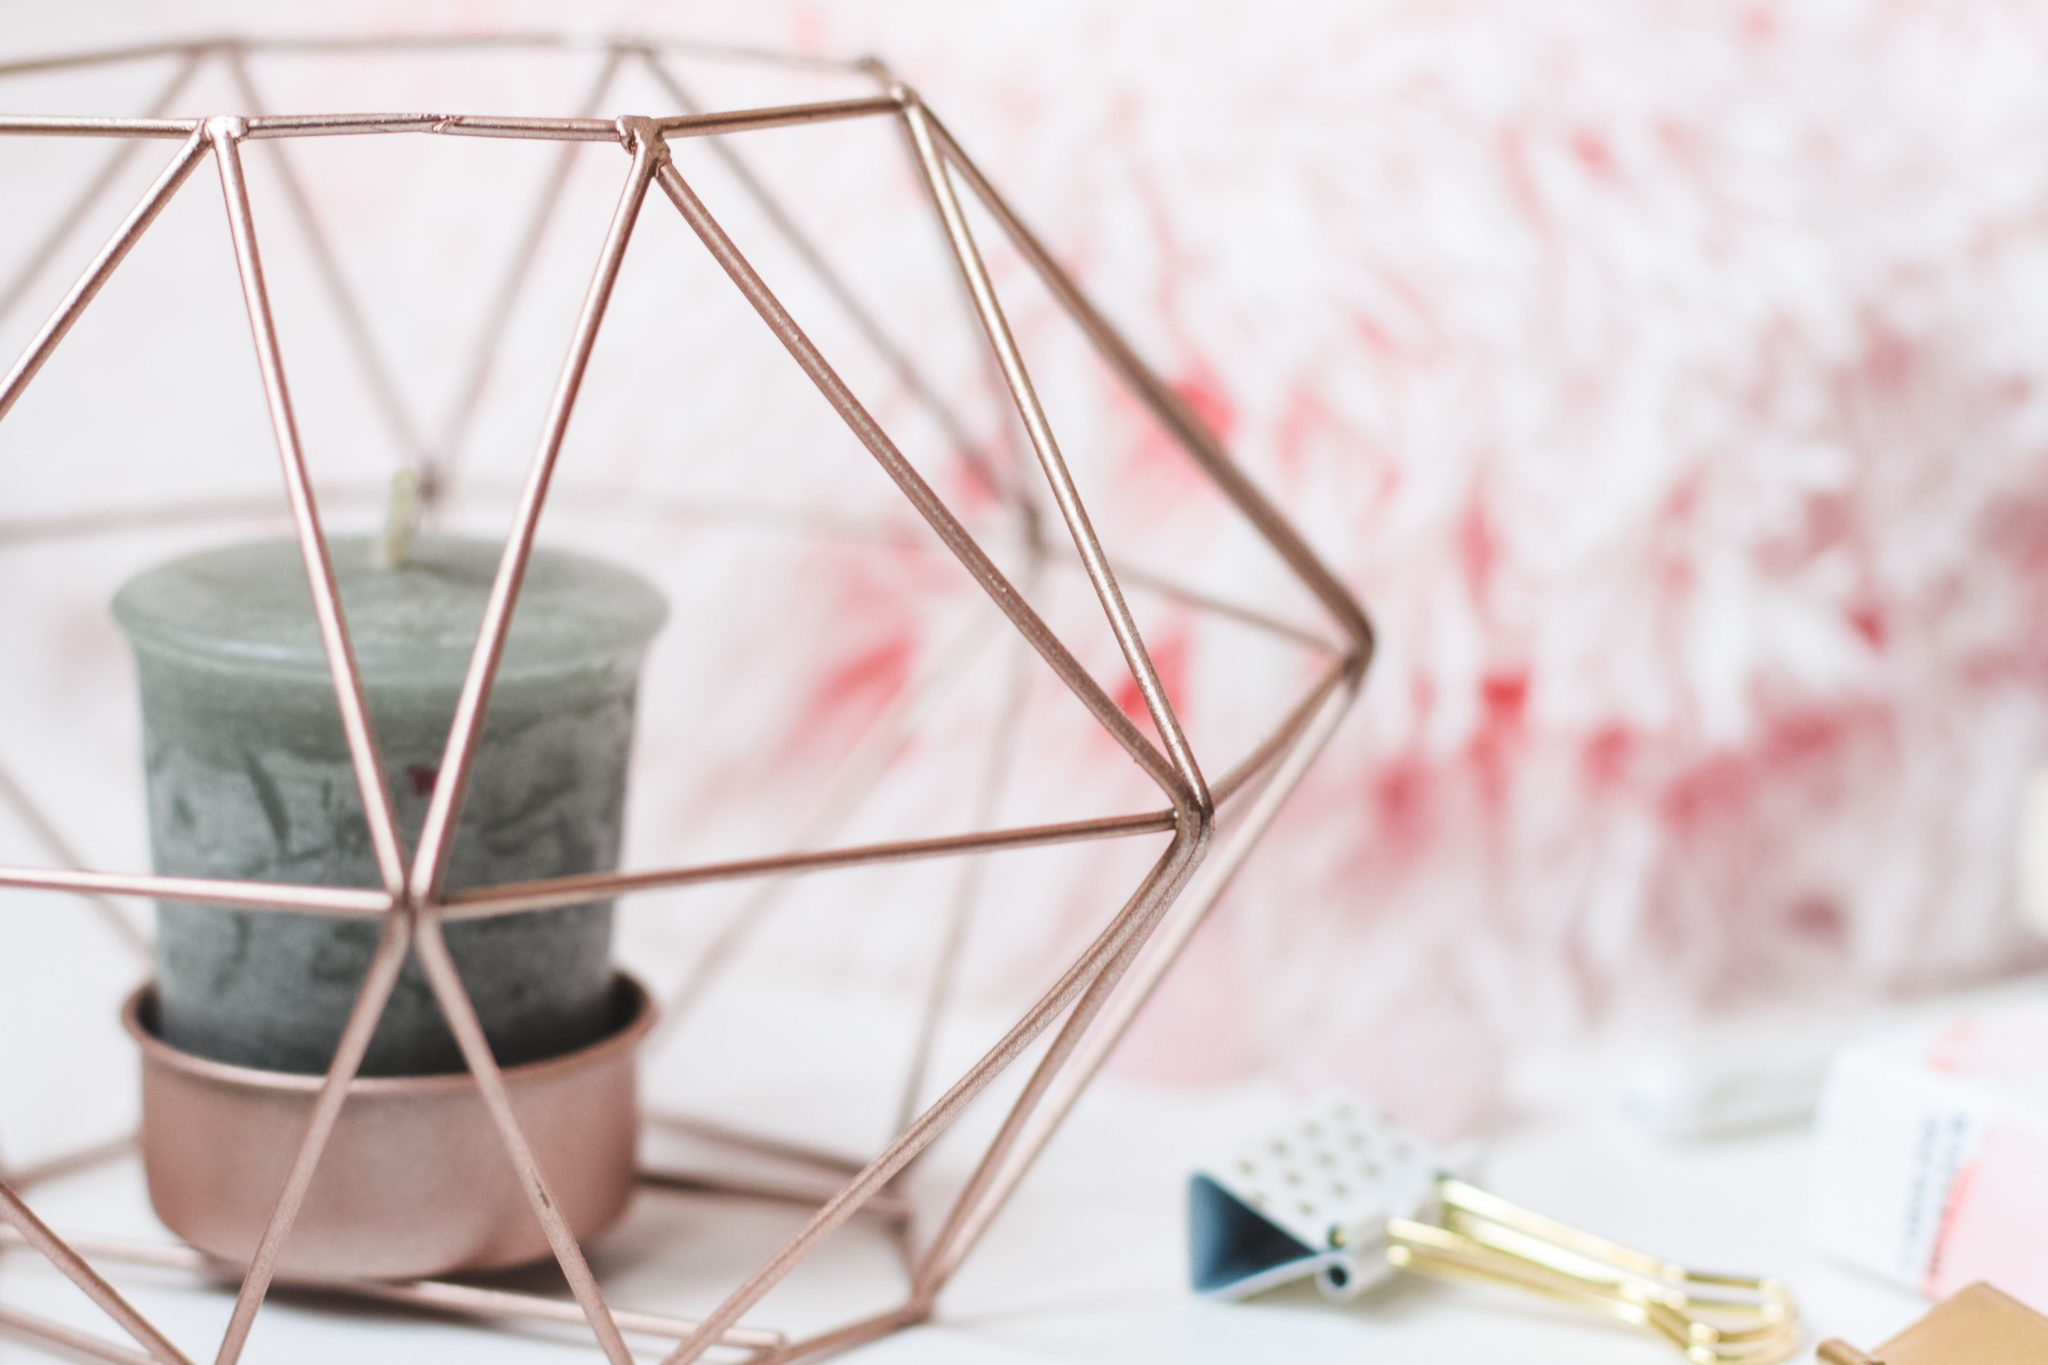
20. Style a Geometric Rose Gold Candle Holder with Soft Textures
This look is all about the modern “soft glam” aesthetic, and its formula is simple: 60% Sleek Modernism + 30% Soft Texture + 10% Muted Color. The rose gold geometric candle holder provides the clean lines and metallic finish that anchor the look in modern design. The fluffy pink and white decor in the background introduces a crucial layer of softness and touchability, preventing the scene from feeling too cold or stark. The cool gray of the pillar candle adds a sophisticated, muted color element that complements the rose gold without competing with it. A perfect, minimalist combination.
|
📋 Copy HEX 🔗 Share |
💸 Get This Look For Less
Rose gold has been a dominant trend for several years, but its application is shifting. In 2026, we’re seeing it used less as a primary, all-over finish and more as a sophisticated accent. Paired with soft textures and muted colors like gray and blush pink, it feels less “trendy” and more timeless. This subtle, curated use shows the finish has real staying power. It adds warmth and a touch of luxury without the formality of traditional gold, making it perfect for creating a space that feels both modern and inviting.
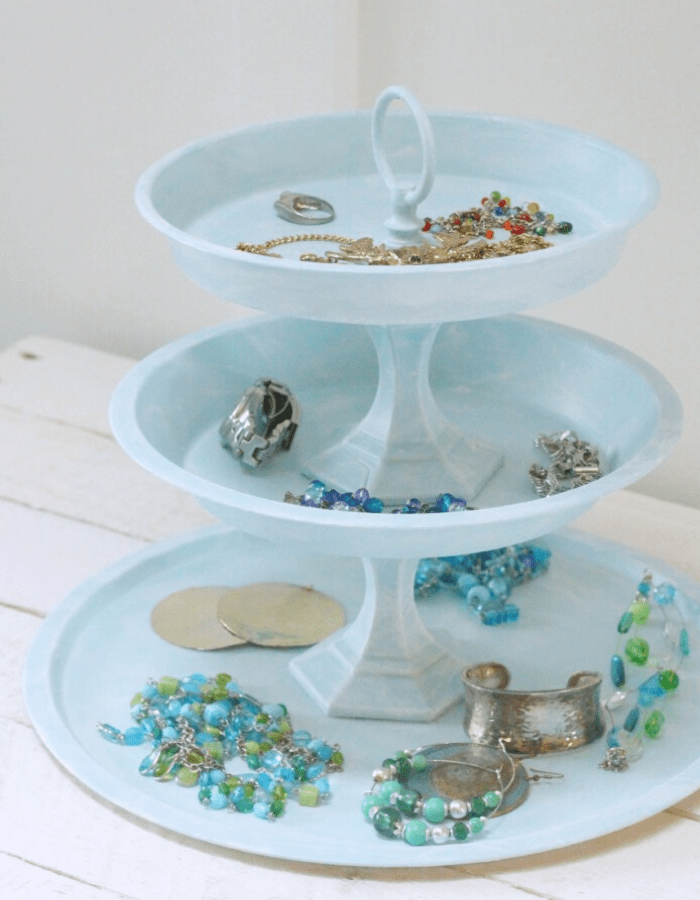
21. Organize Your Jewelry on a Three-Tiered Stand
To make your jewelry organizer look like a styled boutique display, follow the “cascade and cluster” method. Hang your longest necklaces from the top tier, allowing them to cascade down. Use the middle tier for shorter necklaces and bracelets. Finally, use the bottom tray to cluster smaller items like rings and earrings. Don’t overcrowd it! Leave some empty space on each tray. This negative space is crucial; it allows each piece to be seen and prevents the stand from looking like a tangled mess. Curate your display, showing off your favorite pieces.
|
📋 Copy HEX 🔗 Share |
📐 Style Math
While a tiered tray is a fantastic way to get your jewelry out of a tangled box and into the open, it’s not the best solution for your most valuable or delicate pieces. Exposure to air and sunlight can cause some metals, especially silver and plated jewelry, to tarnish more quickly. This type of open storage is ideal for your everyday, fashion, and costume jewelry—the pieces you reach for often. For fine jewelry or sentimental heirlooms, a traditional closed jewelry box is still the best option to protect them from dust and oxidation.
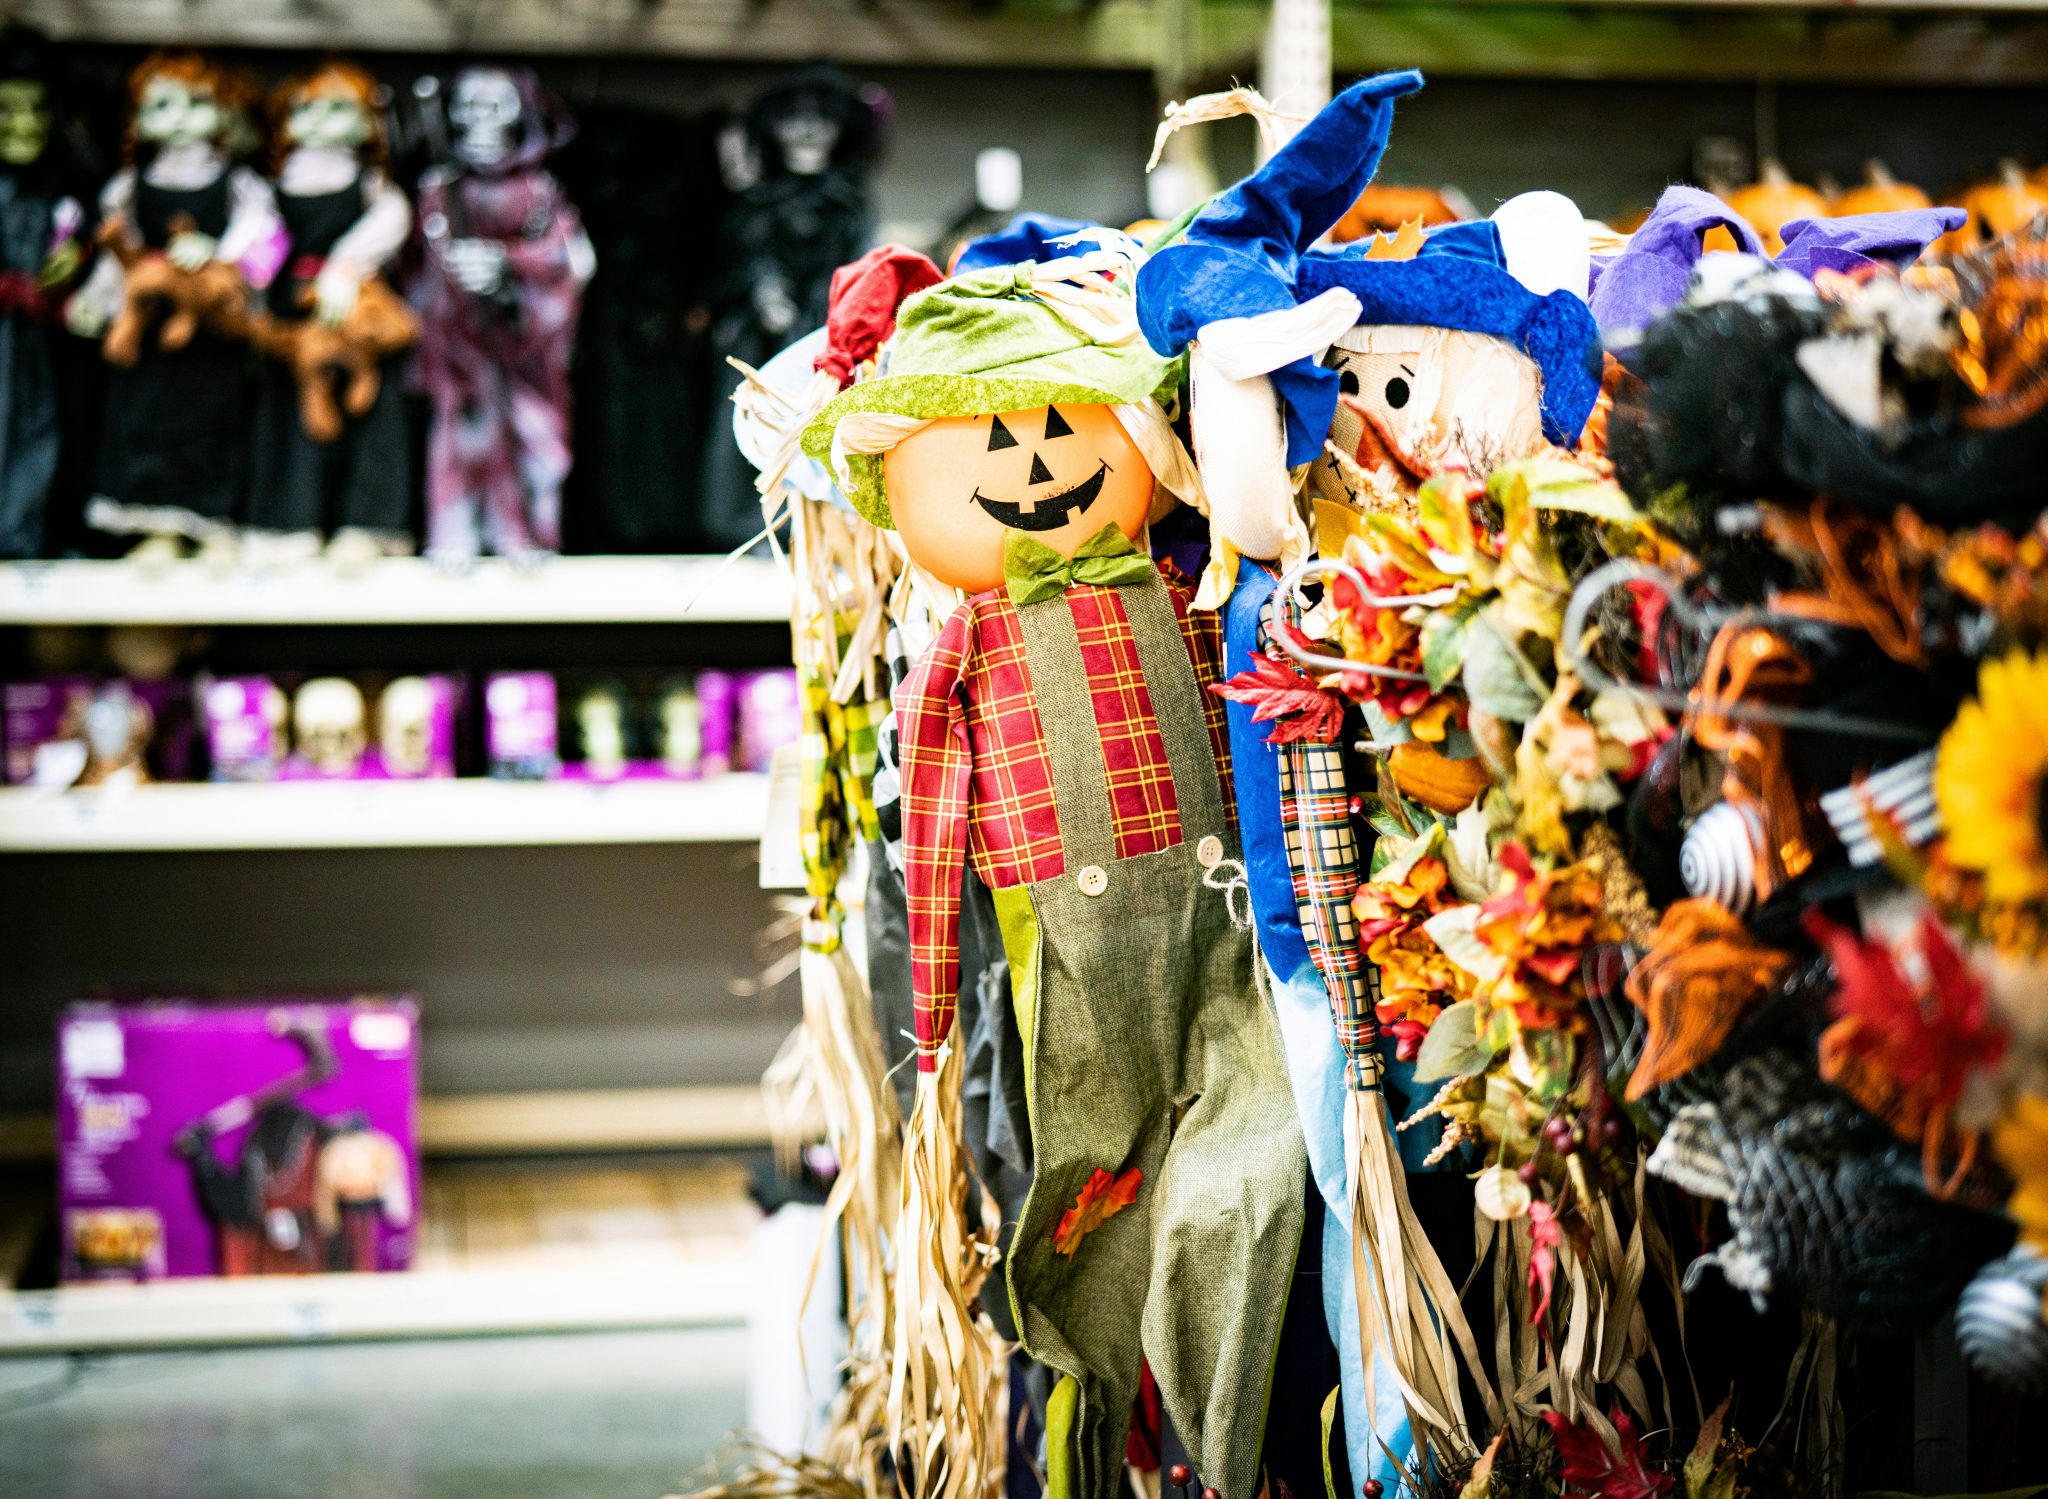
22. Display a Pumpkin-Head Scarecrow for a Playful Halloween
This Halloween display works because it leans into a “more is more” philosophy while staying within a defined theme and color story. The repetition of scarecrow figures and autumnal motifs creates a cohesive and immersive feel. The key is the layering: the pumpkin-headed figure is the star, but he’s supported by other fabric figures, colorful leaves, and berries. This creates a rich visual texture. The bright, classic Halloween palette of orange, red, green, and blue against a dark background makes all the elements pop, resulting in a display that is abundant and festive, not just cluttered.
|
📋 Copy HEX 🔗 Share |
🎯 What Makes It Work
A dense, layered display like this needs a dedicated space to truly shine. It’s perfectly suited for a fireplace mantel, a wide bookshelf, or the top of a console or buffet table. You need a surface with a depth of at least 10-12 inches to allow for the layering of larger figures in the back and smaller accents in the front. For a smaller space, like a narrow floating shelf, you’d want to edit this down significantly. A “lite” version might be just the main pumpkin-head scarecrow paired with a small scattering of autumn leaves, like the pared-back approach in Idea #27.
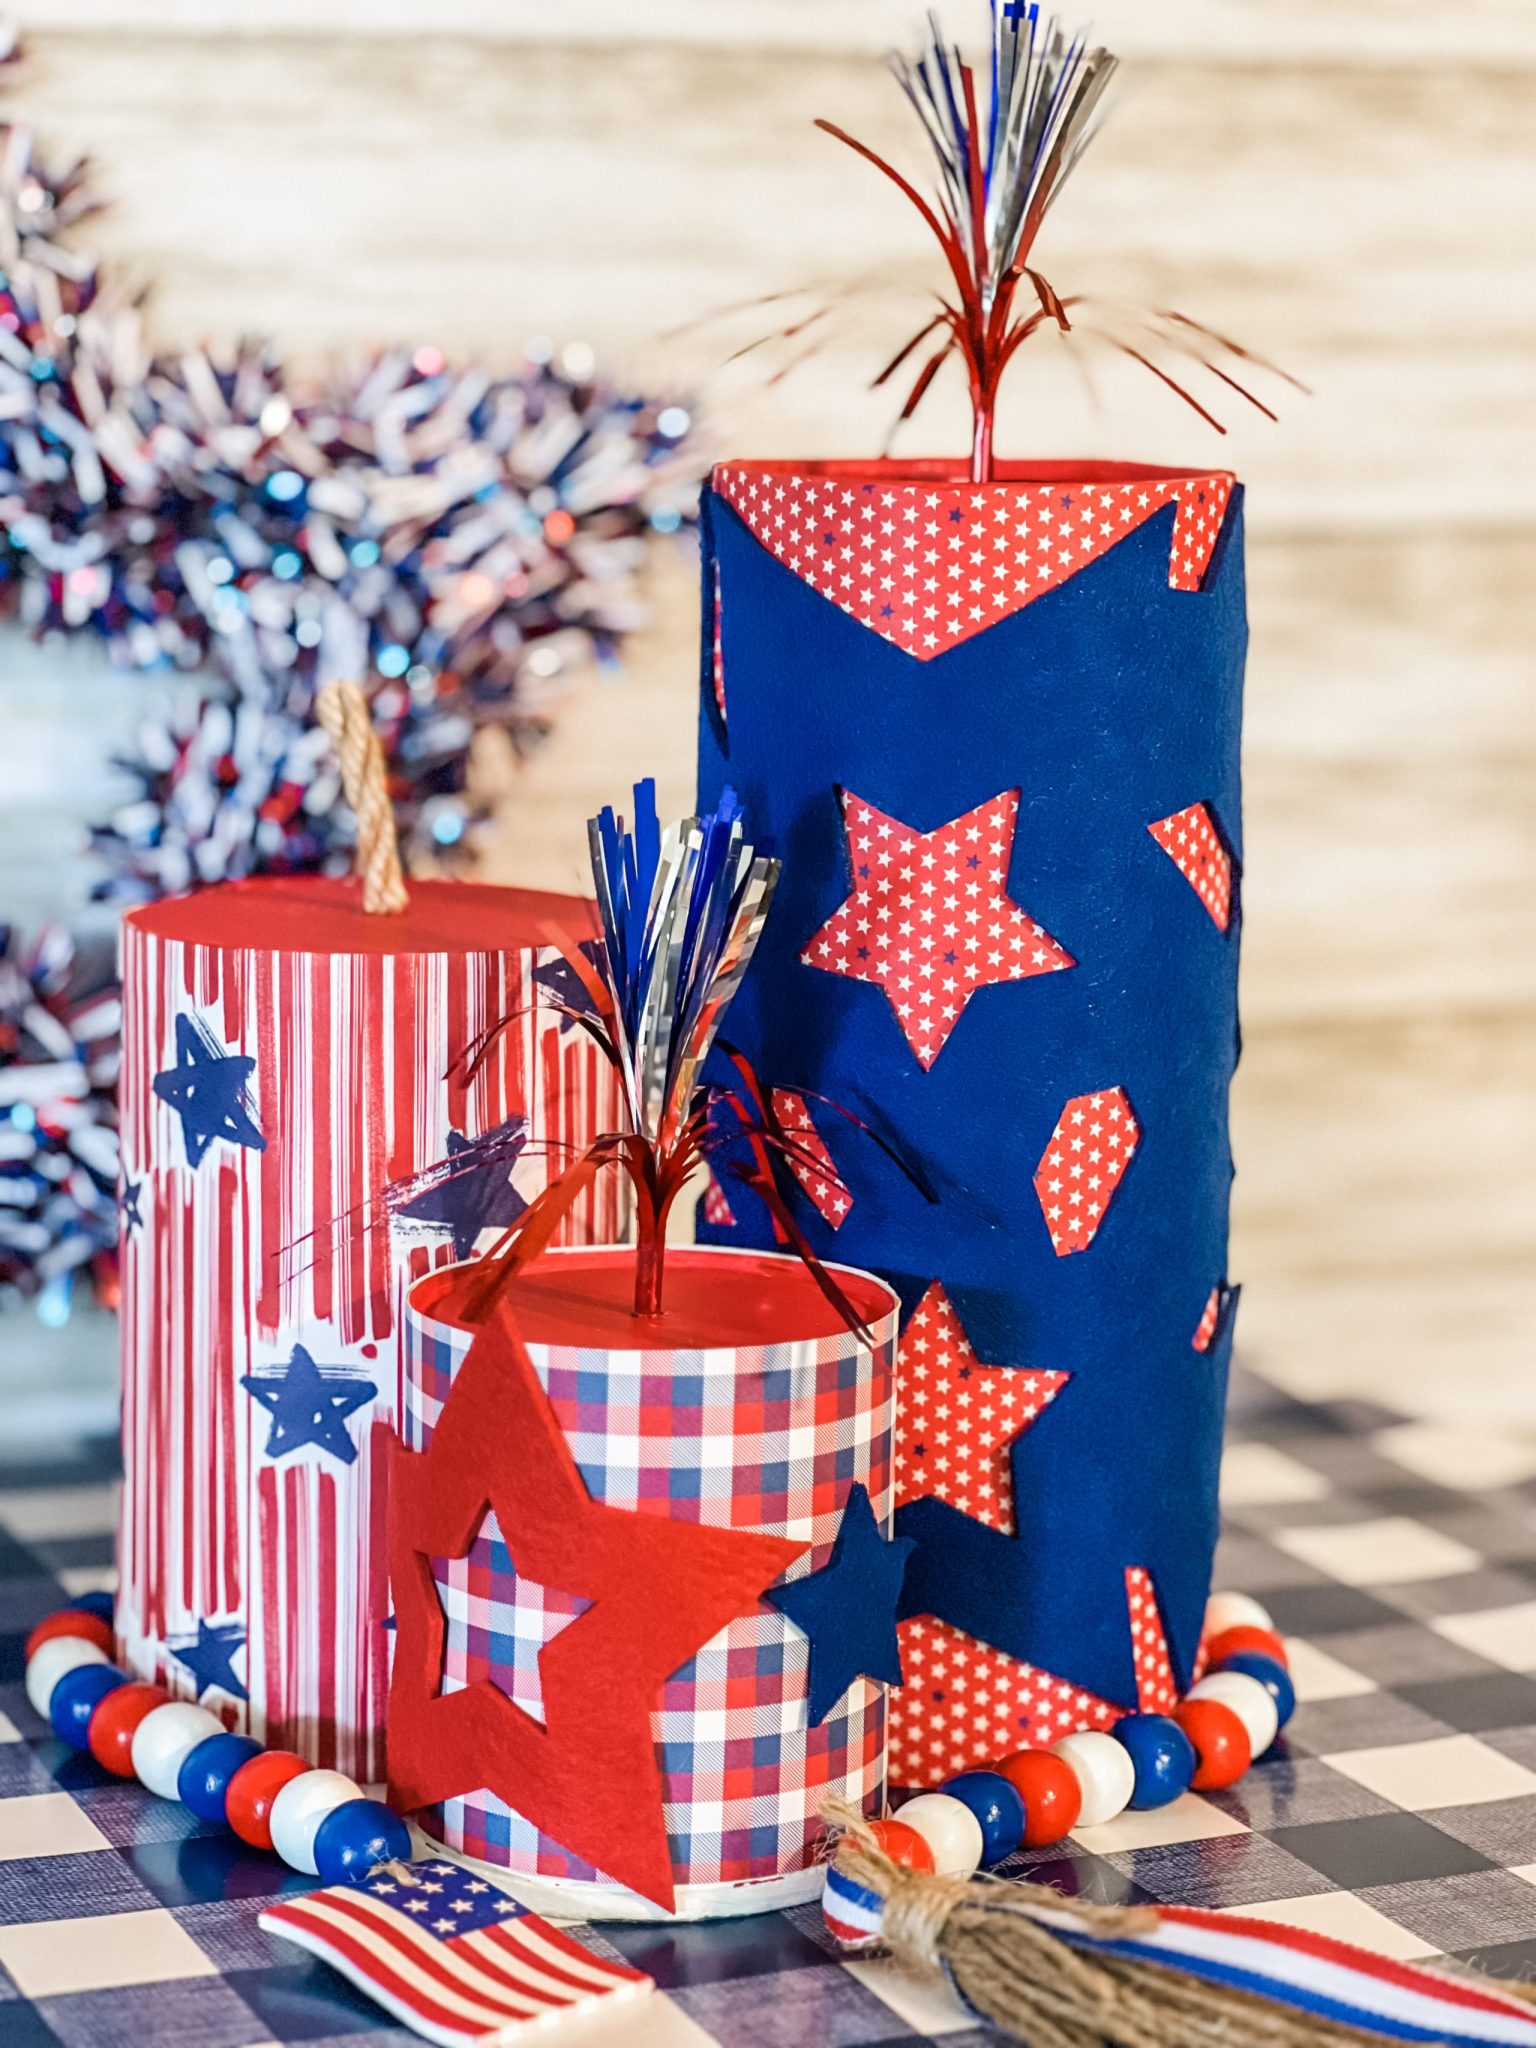
23. Craft Patriotic Firecrackers from Cardboard Tubes
This is the epitome of a budget-friendly holiday craft. The core structure is just empty cardboard tubes from paper towels or toilet paper rolls! Instead of buying expensive patterned paper, you can find patriotic scrapbook paper or even printable patterns online for a dollar or two. Tinsel pipe cleaners from Dollar Tree make for perfect “fuses.” The entire project can easily be made for under $5, especially if you’re using recycled tubes. It’s a fantastic way to create a big, festive impact for patriotic holidays like the 4th of July or Memorial Day without spending much at all.
|
📋 Copy HEX 🔗 Share |
🧹 Maintenance Reality
The single detail that sells the “firecracker” story here is the tinsel topper. Without it, you would just have a collection of patriotically decorated cylinders. But the sparkly, explosive burst of tinsel at the top instantly communicates the idea of a firework. It adds a crucial element of texture, sparkle, and playful movement to an otherwise static display. It’s a small, simple addition, but it’s the visual cue that brings the entire concept to life and makes it immediately recognizable and fun.
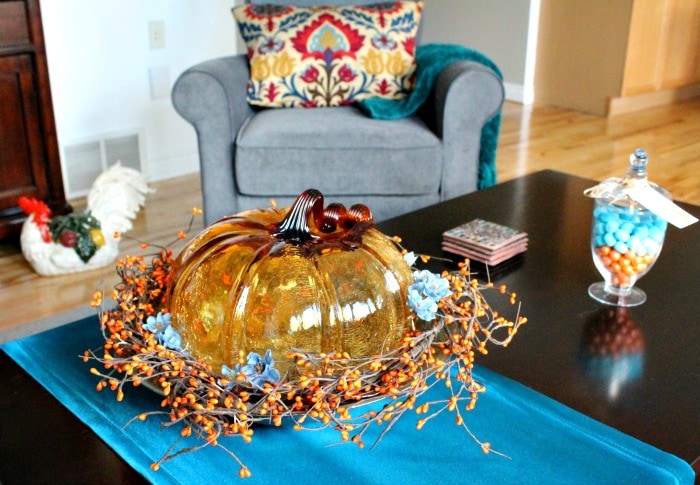
24. Create a Centerpiece with a Glass Pumpkin and Turquoise Accents
This stunning fall arrangement follows a daring but effective design formula: 60% Traditional Autumn + 40% Unexpected Pop. The amber glass pumpkin and orange berry wreath provide the classic, warm foundation we associate with fall. But the magic happens with the injection of the vibrant turquoise table runner and small blue flowers. This unexpected cool tone creates a stunning contrast that feels modern and incredibly stylish. It proves that fall decor doesn’t have to be a sea of only red, orange, and brown. Keeping the “pop” color to around 40% ensures it feels intentional, not random.
|
📋 Copy HEX 🔗 Share |
🔧 How-To Brief
When creating a centerpiece, think in layers, starting from the table surface up. The first layer is the turquoise runner, which defines the space. The next is the orange berry wreath, which adds texture and a circular frame. The final, top layer is the amber glass pumpkin, the focal point. This layering of color, texture, and shape is what gives the arrangement professional-looking depth. Don’t just place an object on a table; build a scene around it. This is a powerful technique that works for any seasonal display.
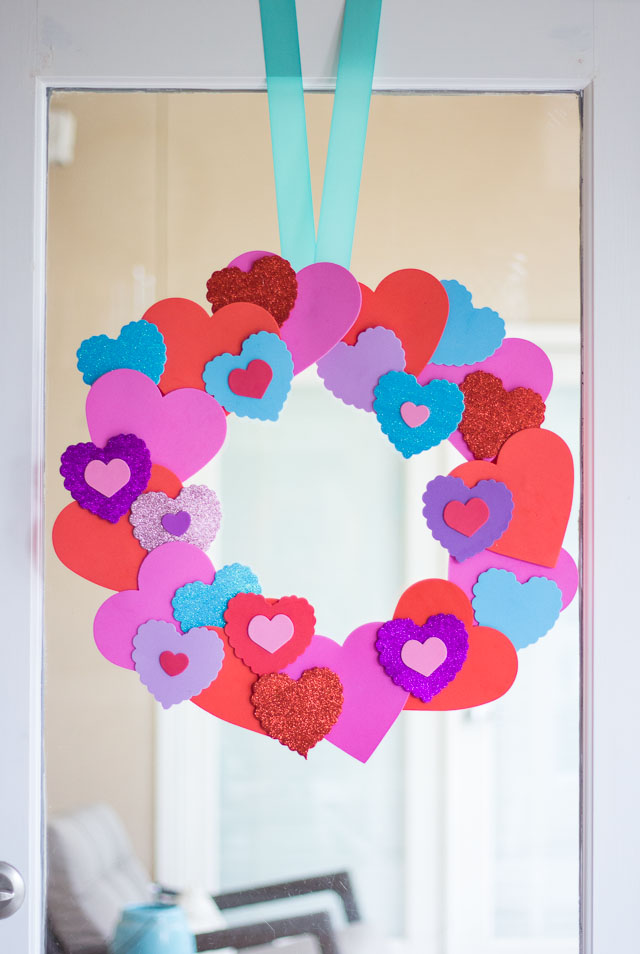
25. Make a Layered Heart Wreath for Valentine’s Day
The success of this wreath lies in its delightful explosion of texture and color. By layering hearts of different sizes, finishes (matte, glitter), and edge styles (smooth, scalloped), the design gains a ton of visual interest and a playful, three-dimensional quality. It’s not just a flat collection of hearts; it’s a composition. The vibrant color palette of pink, red, purple, and turquoise feels joyful and celebratory. Hanging it with a contrasting turquoise ribbon was a smart choice that ties the whole look together and makes it pop against the door.
|
📋 Copy HEX 🔗 Share |
💰 Budget Breakdown
This is a fun and easy project, but a quick check will save you some headaches.
- Choose Your Base: This wreath appears to be built on a larger heart-shaped cutout. You can buy these from Dollar Tree or a craft store, or cut one from cardboard. Make sure it’s sturdy enough to support the other layers.
- Gather a Variety of Hearts: The key to this look is variation. Before you start gluing, make sure you have at least 3-4 different types of hearts in your arsenal—different colors, sizes, and textures are a must.
- Plan Your Layout: Briefly arrange the hearts on your base *before* you glue them down. This allows you to ensure a balanced composition and check for any awkward gaps. A little planning goes a long way!
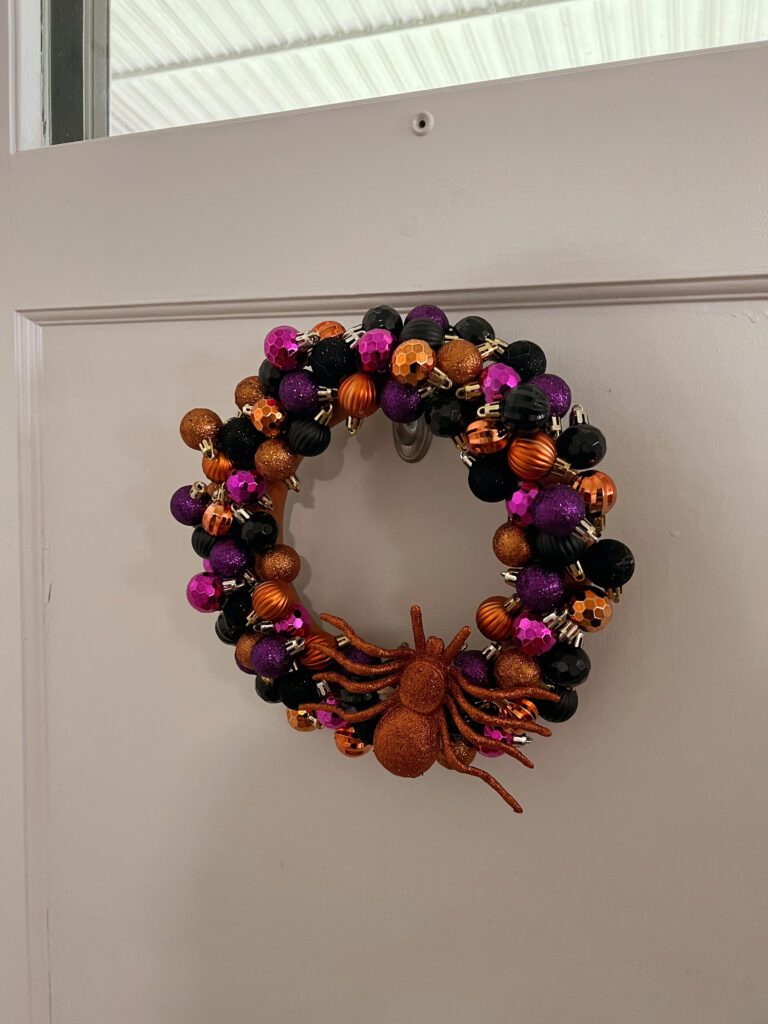
26. Construct a Spooky-Chic Halloween Wreath from Beaded Ornaments
A word to the wise: a wreath made of this many small, glued-on items can be delicate. This is definitely an indoor-only wreath. Rain or high humidity could weaken the hot glue bonds, and direct sun could cause the colors on the plastic ornaments to fade over time. It’s also not the most durable creation. Store it carefully after the season is over, lying it flat in a box rather than hanging it, to prevent gravity from pulling the ornaments off over time. Think of it as a beautiful but temporary piece of holiday fun.
|
📋 Copy HEX 🔗 Share |
⭐ The One Thing
This wreath is surprisingly easy to care for during its time on display. Because the ornaments have a smooth, non-porous surface, a quick dusting with a feather duster or a soft-bristled paintbrush is all it needs to stay looking vibrant. If it gets a little dusty, a blast of cool air from a hairdryer will do the trick. The glittery spider is the most delicate part; avoid touching it directly, as glitter has a tendency to shed. When packing it away, wrap it loosely in tissue paper to protect the spider and prevent ornaments from scratching each other.
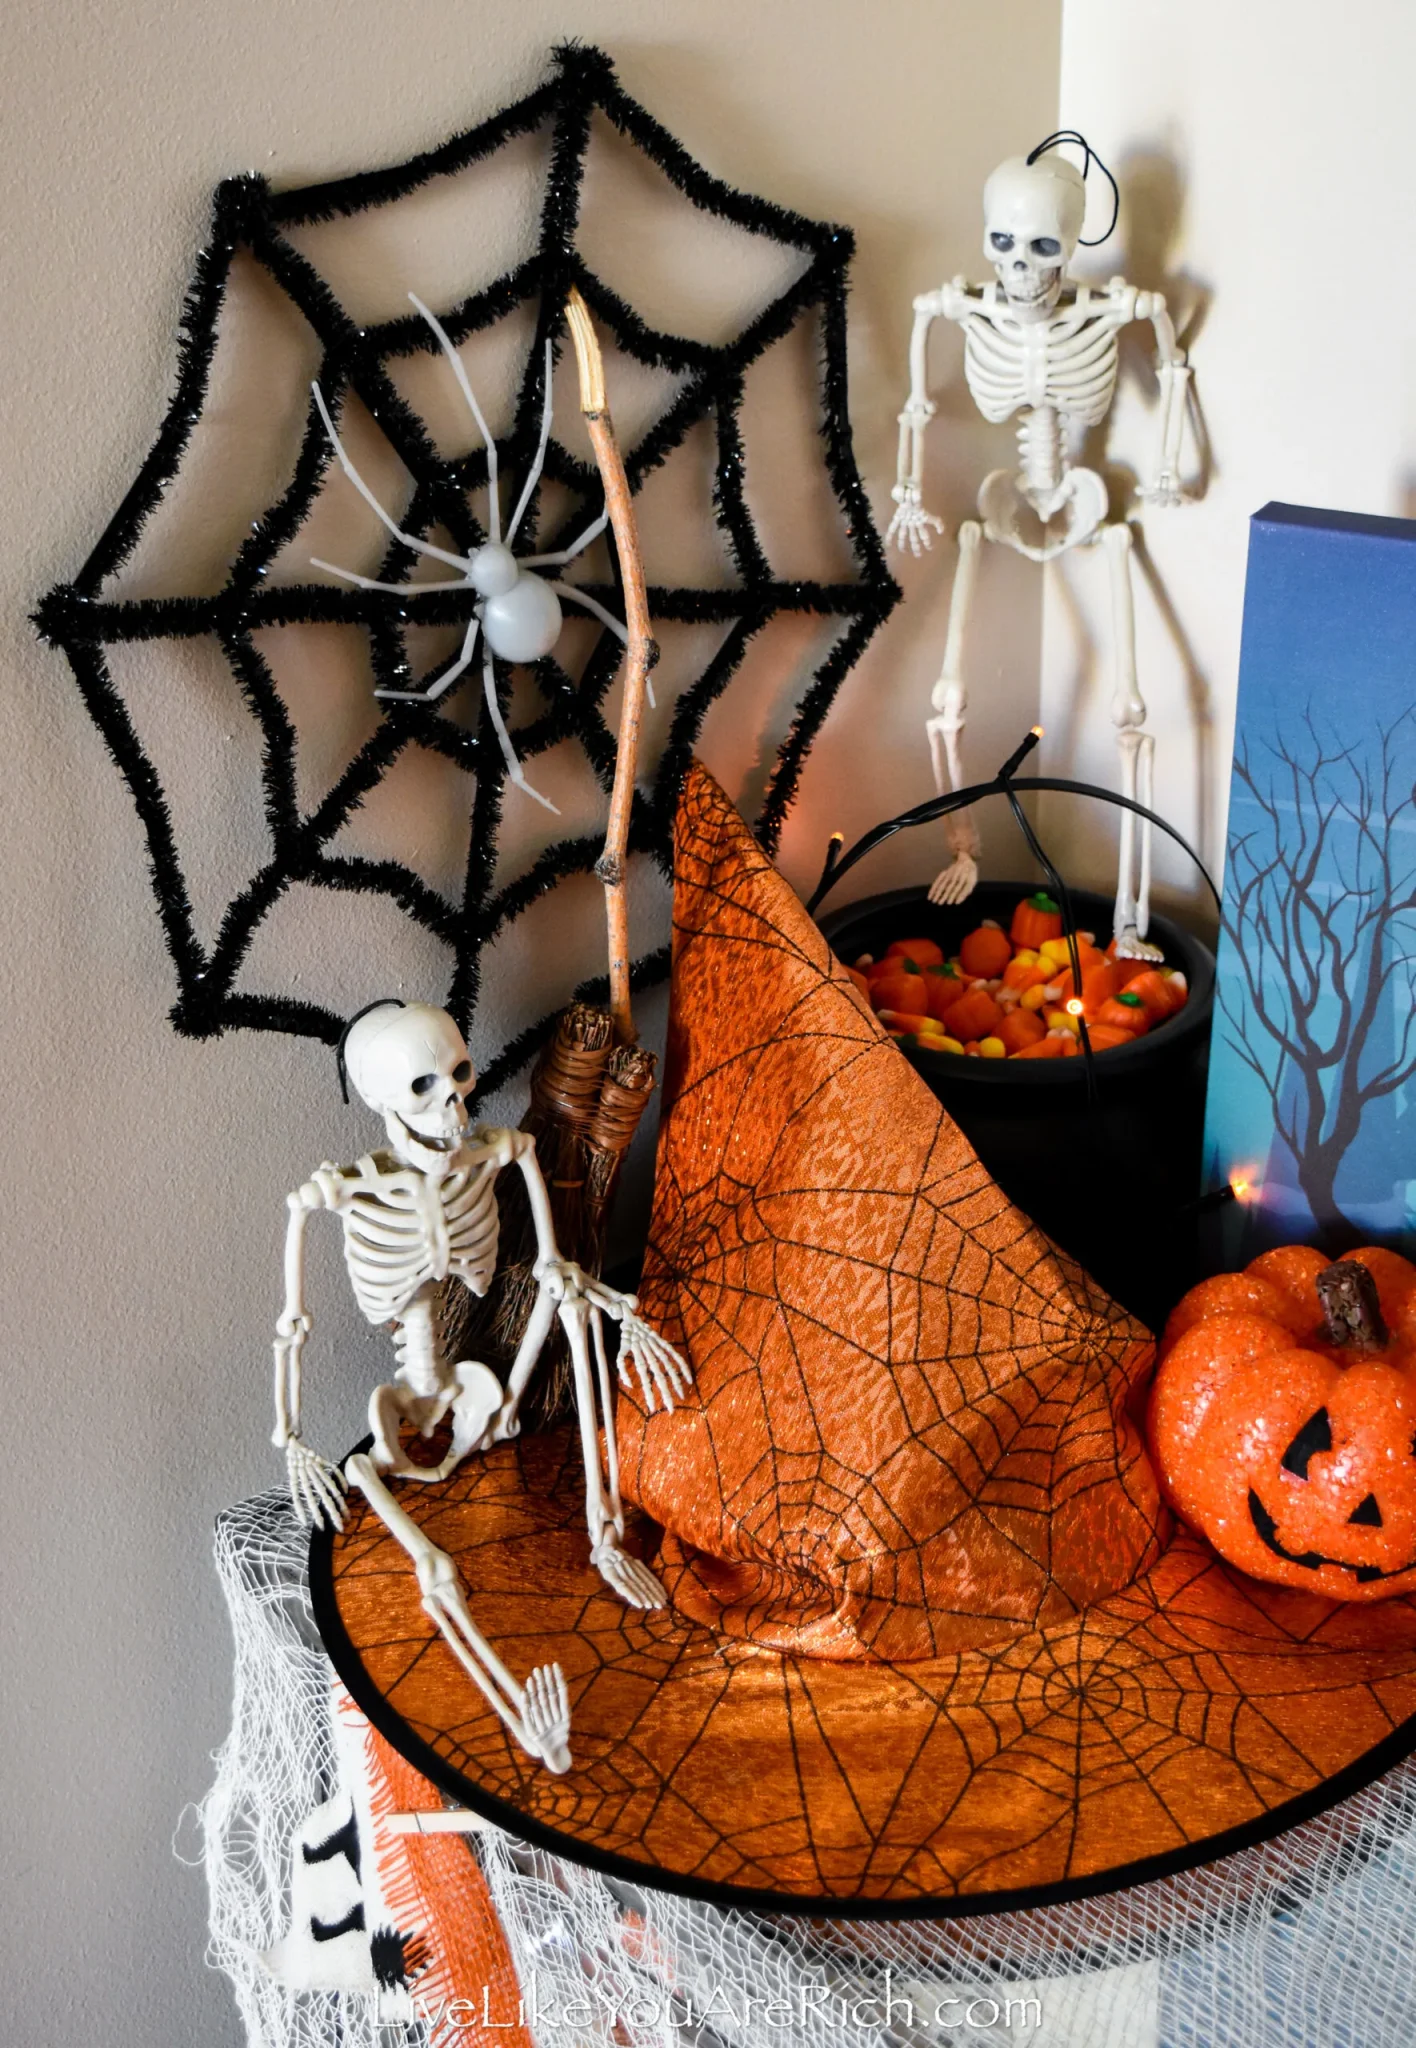
27. Style a Spooky-Cute Corner with Skeletons and a Tinsel Web
This fun and spooky setup is perfect for small spaces that need a dose of Halloween spirit. It’s ideal for a corner, the end of a hallway, or next to a fireplace. The entire display occupies a relatively small footprint, roughly 2 feet by 2 feet. The verticality of the witch’s broom and the climbing skeletons helps draw the eye upward, making the most of the compact area. This is a great example of how to create a high-impact seasonal display without taking over an entire room. It proves you don’t need a huge house to have fun with holiday decor.
|
📋 Copy HEX 🔗 Share |
🔥 Trending Context
Getting this playful Halloween corner look is incredibly affordable, with nearly every item available at Dollar Tree during the spooky season.
- White Plastic Skeletons (2): $2.50
- Black Tinsel Spiderweb & Plastic Spider: $1.25
- Orange Witch’s Hat: $1.25
- Small Black Cauldron: $1.25
- Bag of Candy Corn/Pumpkins: $1.25
- Small Witch’s Broom: $1.25
- Orange Glitter Pumpkin: $1.25
- TOTAL: $10.00
Budget alternative: The most expensive part of this is buying all the separate pieces! You can get a similar vibe for even less by focusing on a few key items: one skeleton, the web, and the cauldron would give you the same spooky-fun feel for under $5.
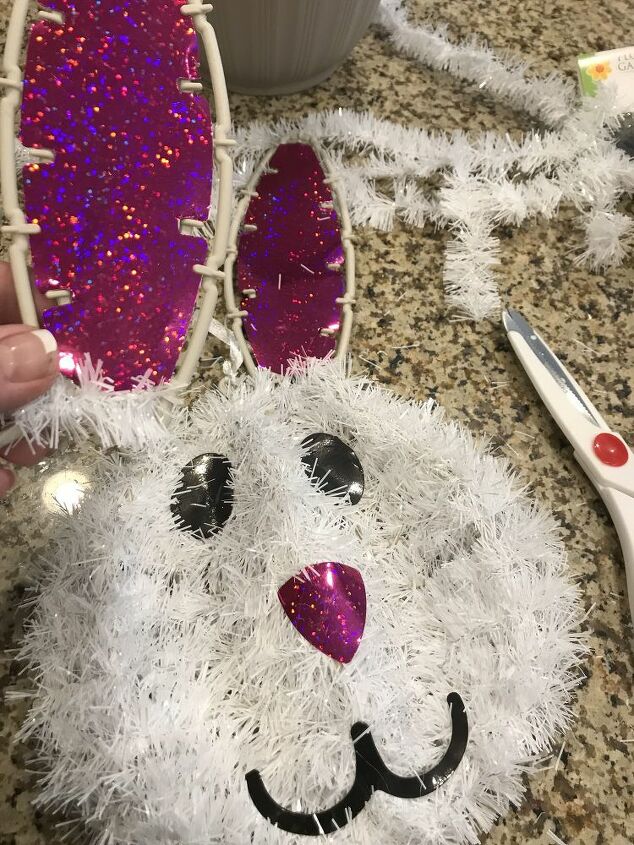
28. Craft a Fluffy Bunny Head with Glittery Magenta Ears
The single element that elevates this from a simple craft project to something truly eye-catching is the unexpected pop of magenta glitter. White, black, and pink are standard bunny colors. But the choice of a bold, sparkly magenta for the nose and inner ears adds a jolt of modern, playful energy. It’s a contemporary twist on a classic motif. That choice of color and texture single-handedly gives the bunny its sassy personality and makes it feel fresh and fun rather than sweet and traditional.
|
📋 Copy HEX 🔗 Share |
⚠️ Real Talk
This DIY craft is successful because it masterfully plays with contrasting textures. The incredibly soft, fluffy white material used for the bunny’s face begs to be touched, creating an immediate sense of comfort and fun. This is placed in direct contrast with the slick, sparkly texture of the magenta glitter details. The final contrast is the hard, smooth surface of the black plastic eyes. This combination of soft, sparkly, and smooth is what makes the final product so visually and texturally engaging. It’s a simple but powerful design lesson.
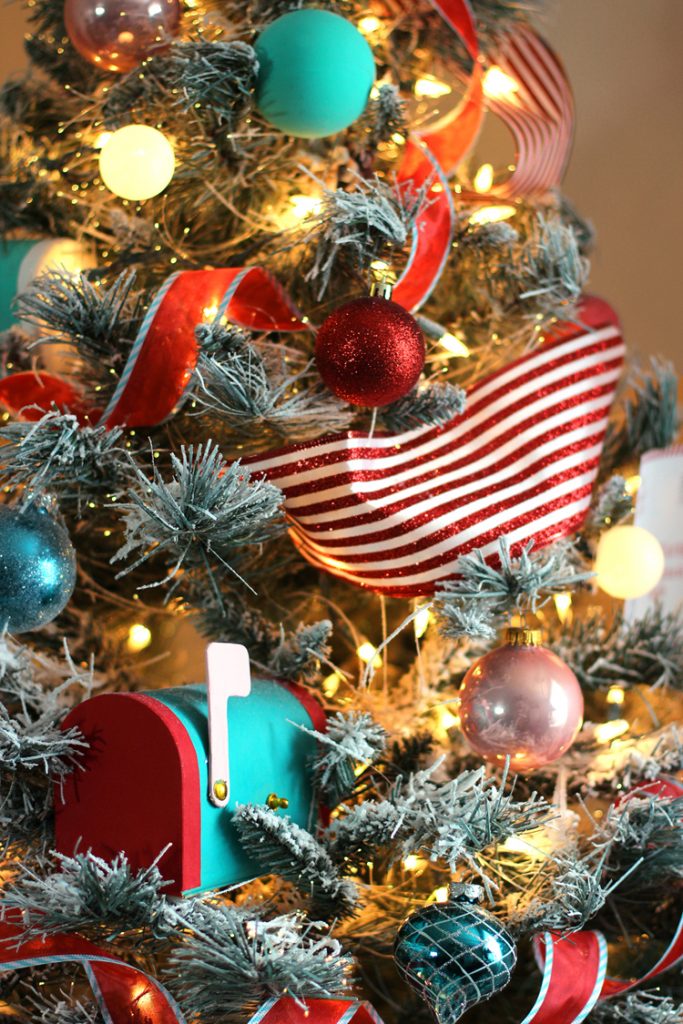
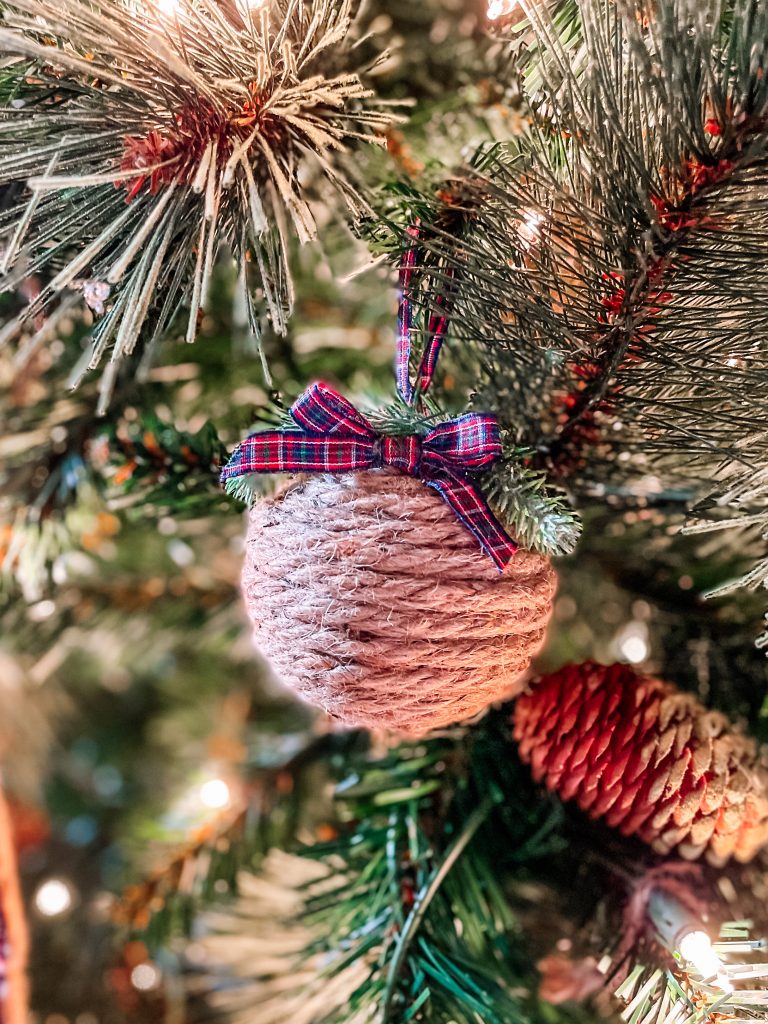
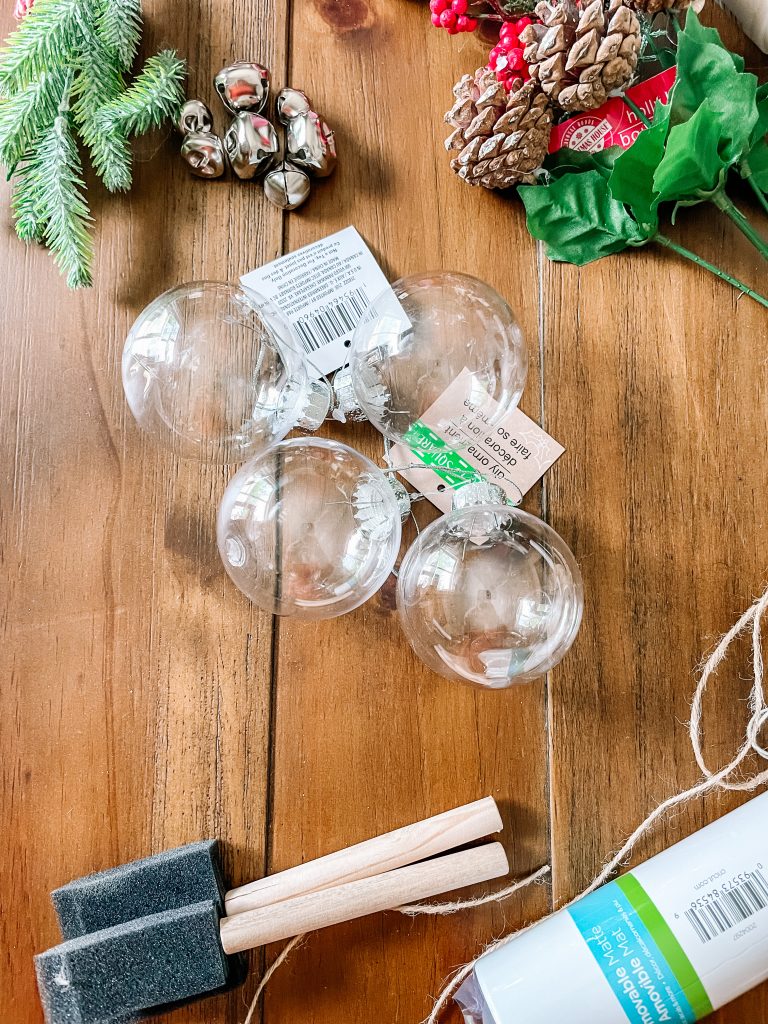
29. Create Custom Ornaments with Clear Plastic Globes
You don’t need to buy expensive, pre-made designer ornaments to get a custom look for your Christmas tree. Dollar Tree sells packs of clear plastic ornament globes that you can fill with anything. Create a coastal theme with sand and tiny seashells. For a rustic look, use small pinecones and faux snow. For a glam tree, fill them with gold glitter or sequins. A bag of faux snow and a pack of mini bottlebrush trees can create a whole set of beautiful ornaments like the one in Idea #19 for just a few dollars, creating a coordinated look for pennies.
|
📋 Copy HEX 🔗 Share |
✅ Before You Start
- Get Your Supplies: You’ll need clear, fillable plastic or glass ornaments, and your chosen filler. Let’s use mini pom-poms for a colorful, kid-friendly version. Total cost: ~$3.
- Open the Ornament: Carefully remove the metal top from the ornament. The plastic ones usually come in two halves that snap together.
- Fill ‘Er Up: This is the fun part! Fill the ornament with your colorful pom-poms. Don’t pack them too tightly; you want them to have a little room to move.
- Seal and Hang: Once you’re happy with the contents, replace the metal cap or snap the two halves together securely. Add a ribbon or an ornament hook, and you’re ready to decorate. (Estimated Time: 5 minutes per ornament)
30. Design Hand-Painted Wooden Slice Christmas Ornaments
The secret to making simple wooden slice ornaments look polished and professional is to prep the surface. The wood slices from the craft store can be a bit rough. Before you paint, take a piece of fine-grit sandpaper (220 grit is perfect) and give both sides a quick, gentle sanding. This smooths out any splintery bits and allows your paint pen or brush to glide on smoothly, resulting in much cleaner lines. After painting, seal your design with a thin coat of matte Mod Podge to protect it and give it a finished look.
|
📋 Copy HEX 🔗 Share |
💡 Designer Tip
The trend towards natural, rustic, and personalized holiday decor is still going strong, and these ornaments are right in the sweet spot. People are moving away from mass-produced, uniform decorations and craving items that tell a story or show a personal touch. Hand-painting ornaments—with names, dates, or simple winter scenes like snowflakes and trees—is a perfect way to tap into this desire for authenticity. They make fantastic, heartfelt gifts and add a layer of warmth and personality to your own tree that you just can’t buy in a big-box store.
Your Home, Your Style, Your Budget.
And there you have it—30 ways to bring beautiful, personalized style into your home without breaking the bank. The best part about DIY is that it’s not just about saving money; it’s about creating a space that is uniquely you. So pick a project that sparked your imagination and make it your own!
Don’t forget to save your favorite ideas to your Pinterest boards so you can find them later. Happy crafting!