You know that feeling when you scroll through hundreds of fall wreath DIY photos, saving pin after pin, but still feel completely stuck on where to actually start? It’s a special kind of crafty paralysis. After filtering through endless options at Michaels, Dollar Tree, and Target, we narrowed it down to 30 ideas that truly deliver for 2026. This isn’t just another list; it’s a curated collection of stunning DIY fall wreaths covering every style, from rustic farmhouse and natural foraging to colorful deco mesh, with options from $5 all the way to $75.
In 2026, the biggest trend we’re seeing on Pinterest is hyper-personalization—moving away from generic, store-bought looks and embracing unique designs that tell a story about your home. And stay until the end — we break down the most common mistakes that can ruin these looks. 📌 Save this to Pinterest for later — you’ll want to revisit these ideas.
1. Vibrant Fall Florals Meet Cool Blue-Green on a Gray Door
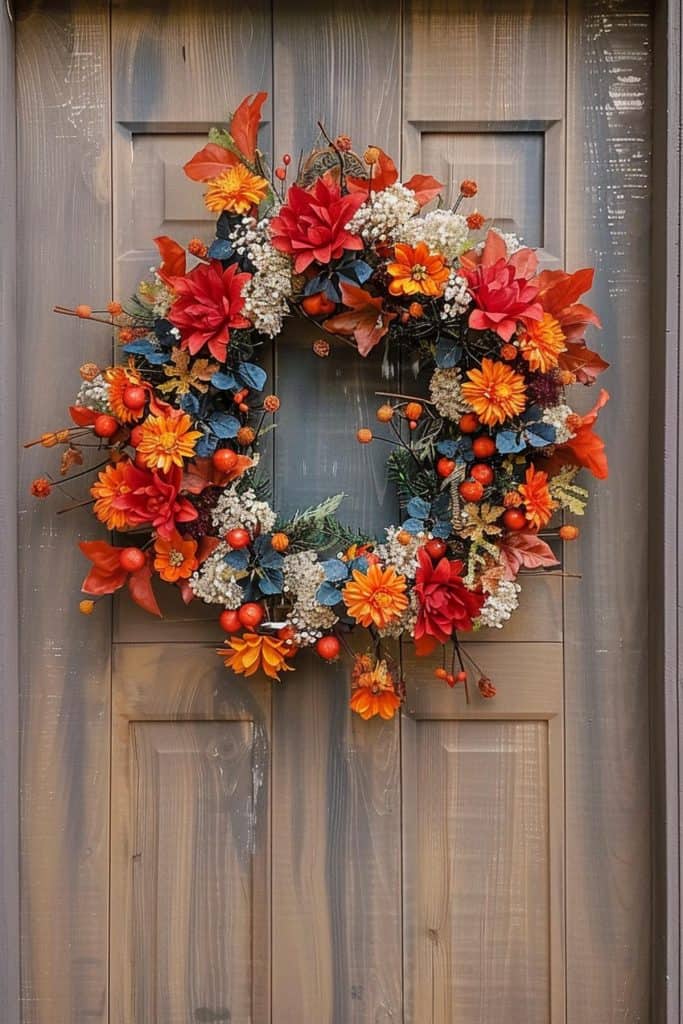
What makes this wreath so striking is the smart use of color theory. The deep, warm oranges and reds of the dahlia-like flowers create a beautiful tension against the cool, blue-green tones in the faux leaves. This is a classic complementary color scheme—orange and blue are opposites on the color wheel, so they make each other appear more vibrant. The neutral gray door acts as the perfect canvas, allowing both the warm and cool tones to pop without competing with the background.
|
📋 Copy HEX 🔗 Share |
💰 Budget Breakdown
When working with a dual-temperature palette like this, aim for a 70/30 split. Here, about 70% of the wreath is composed of warm tones (reds, oranges, rust), while the remaining 30% is the cool blue-green accent. This keeps the design feeling intentionally autumnal but adds a layer of visual sophistication. If your base foliage is mostly warm, a smaller, strategically placed cool-toned element will have a much bigger impact than a 50/50 split, which can look chaotic.
2. Lush Eucalyptus and Roses Pop Against a Bold Red Door
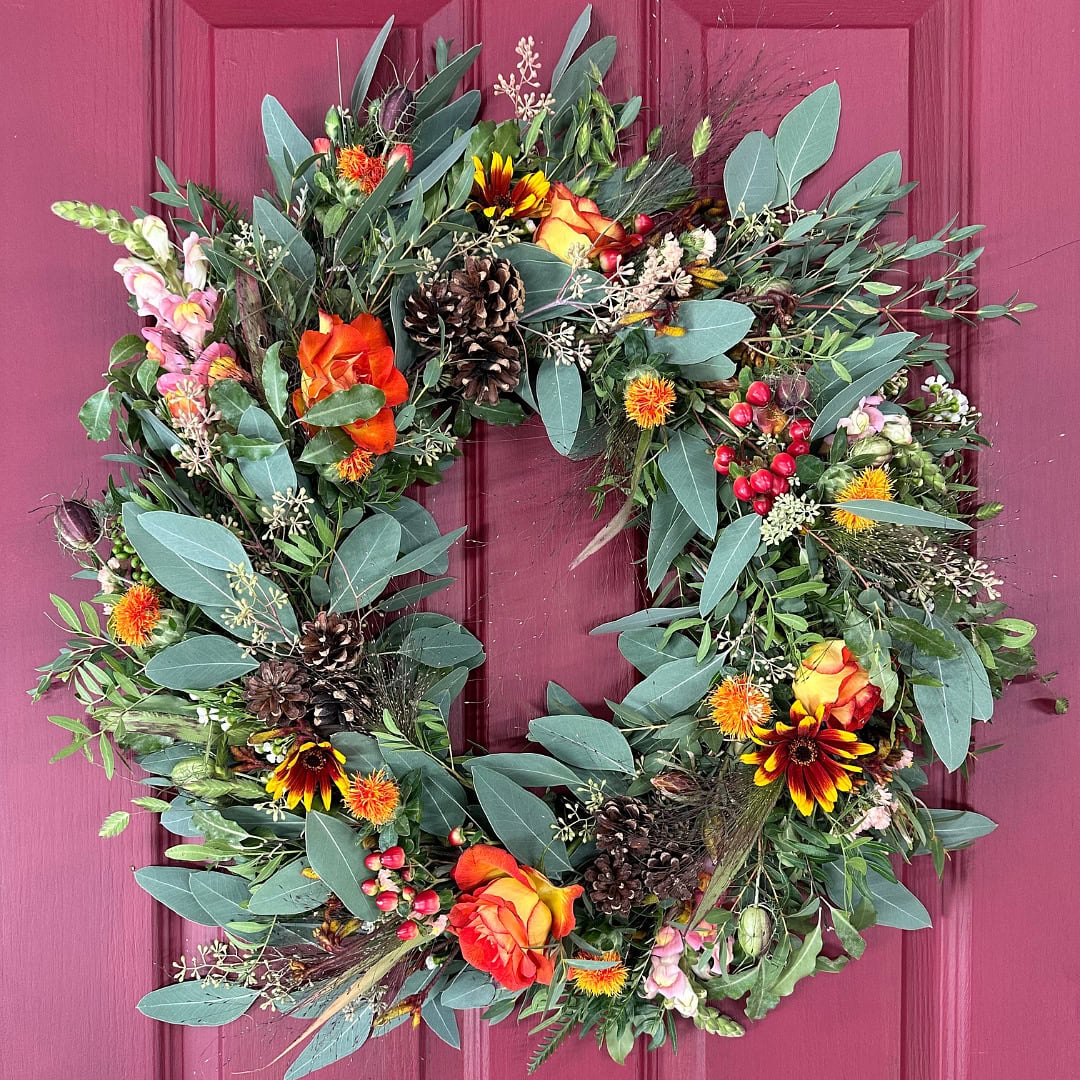
To recreate this abundant, natural look, think in layers and proportions. The formula is roughly 60% mixed green foliage + 20% natural textures + 20% floral color. Start with a base of varied greenery like sage and forest green eucalyptus. Then, add in your textural elements—pinecones and feathery grasses. Finally, place your focal point flowers, like the orange and yellow roses, in clusters rather than scattering them evenly. This creates a more organic, less calculated feel.
|
📋 Copy HEX 🔗 Share |
⚠️ Real Talk
A wreath this full and lush is gorgeous, but let’s be honest about the logistics. If you’re using real foliage like eucalyptus and fresh flowers, it will be quite heavy and will require a very sturdy, oversized wreath hanger to avoid damaging your door. It will also have a very short lifespan—a week at most before it starts to wilt and droop. For a longer-lasting version that won’t require constant upkeep, stick with high-quality faux botanicals. Compare this to the more durable dried botanical look in Idea #12.
3. Cozy Up with Velveteen Pumpkins and Faux Berries
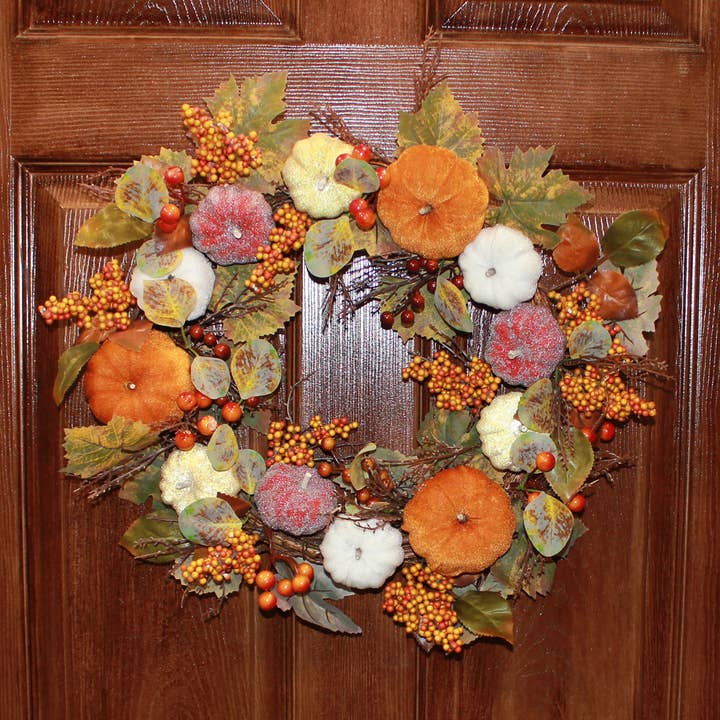
The single element that elevates this wreath from standard to special is the texture of the velveteen pumpkins. While standard plastic or foam gourds can sometimes look a bit cheap, the soft, matte finish of velvet adds a touch of luxury and coziness. It invites a closer look and provides a wonderful tactile contrast to the glossy berries and papery faux leaves. If you removed the velvet pumpkins and replaced them with shiny ones, the wreath would lose its unique warmth and feel much more generic.
|
📋 Copy HEX 🔗 Share |
🔥 Trending Context
You don’t need a big budget to get this cozy, textural look. This is a perfect project for Dollar Tree or craft store finds. A simple grapevine wreath form costs about $5-$8. Bags of faux maple leaves and berry clusters can be found for a few dollars each. The star of the show, the mini velveteen pumpkins, are often sold in multipacks at stores like Walmart or Michaels for under $10 during the fall season. You can easily recreate this entire wreath for under $25.
- Grapevine Wreath: $5-$8
- Faux Leaves & Berries: $10-$15
- Velvet Pumpkins: $5-$10
- Total: Under $30
4. Layered Deco Mesh with Plaid and a Velvet Pumpkin
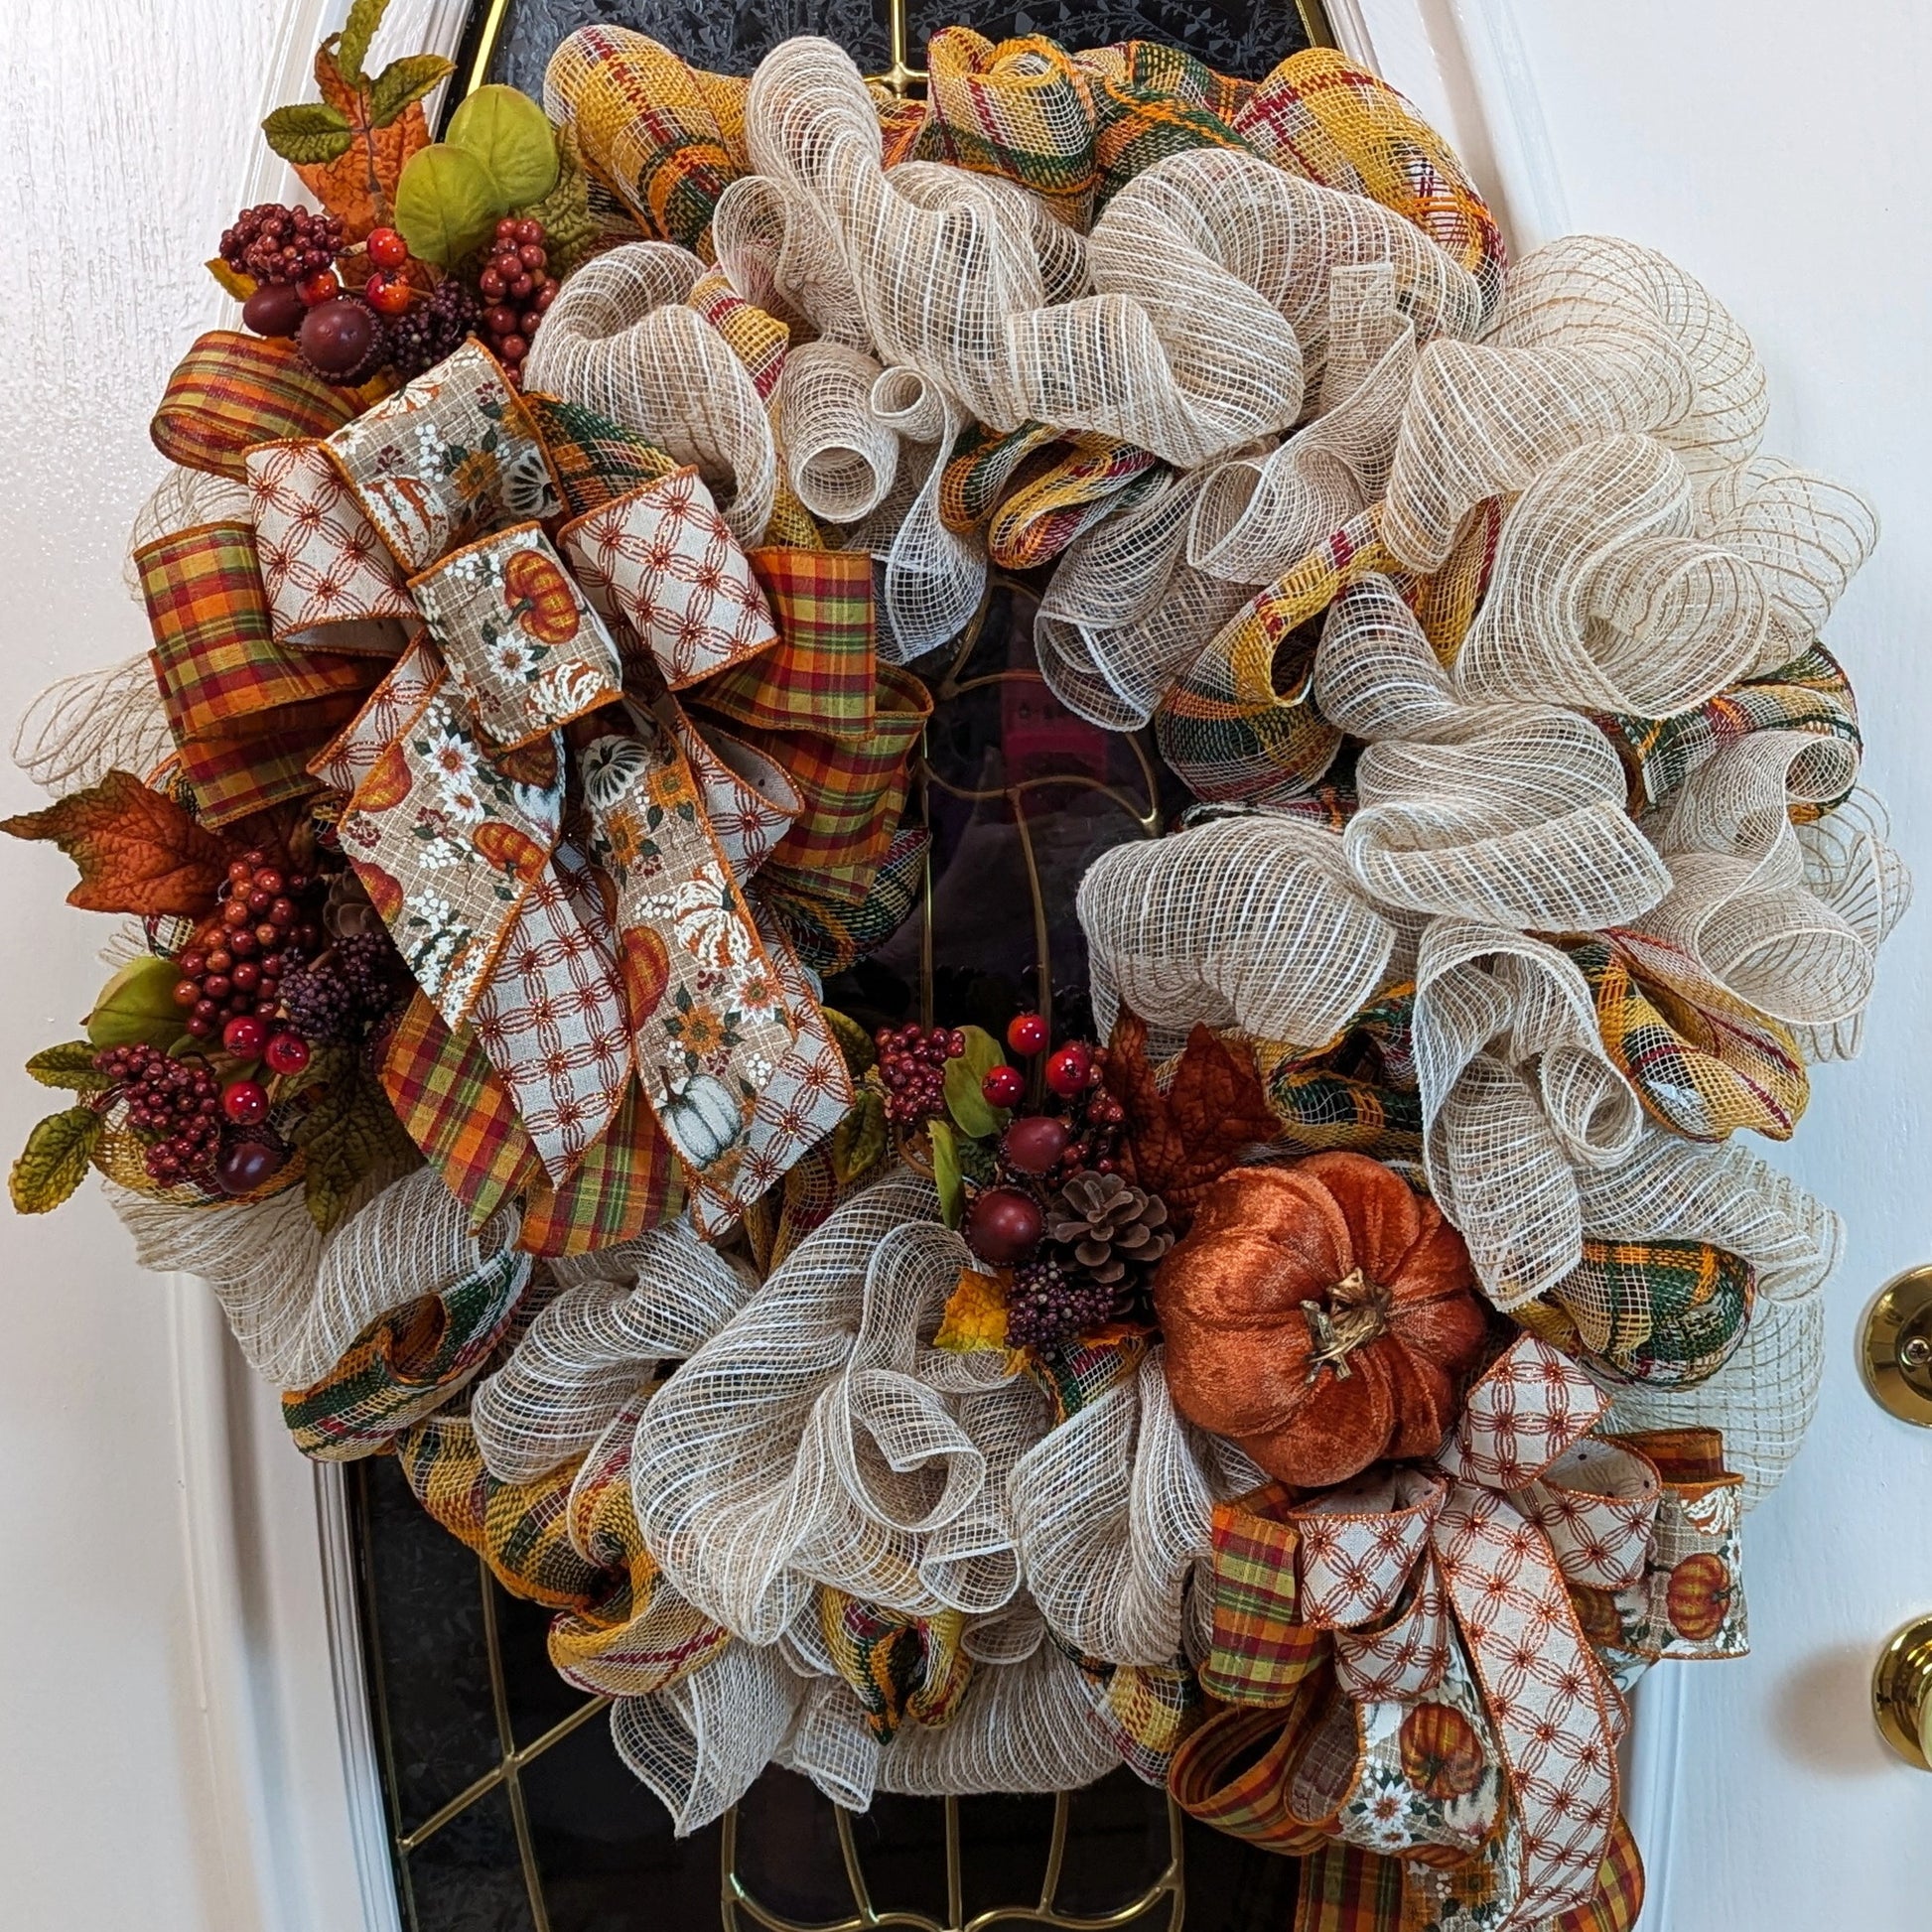
Creating a full deco mesh wreath is easier than it looks. This method takes about 45 minutes and costs around $25 for materials.
- Start with a 16-inch wire wreath frame and two 10-inch rolls of deco mesh in your base color (here, beige).
- Create a “pouf” by pinching the end of the mesh, securing it to the inner ring of the frame with a pipe cleaner.
- Move down about 10 inches, bunch the mesh, and secure it to the next section of the frame. Repeat all the way around, then do the same on the outer ring.
- Cut 12-inch strips of your accent ribbons (plaid, pumpkin pattern). Pinch them in the middle to create V-shapes and attach them to the frame using the pipe cleaner ends.
- Fluff the mesh and ribbons to hide the frame.
- Hot glue your central pumpkin and other accents into place.
|
📋 Copy HEX 🔗 Share |
📏 Scale Guide
While deco mesh is weather-resistant, it’s not invincible, especially against direct sunlight. The vibrant oranges, reds, and even the beige base can fade significantly over a single season if your door gets several hours of direct sun each day. To keep your wreath looking fresh for years to come, consider spraying it with a UV-resistant clear coat, available at any craft or hardware store. It’s an extra $8 step that can triple the life of your creation.
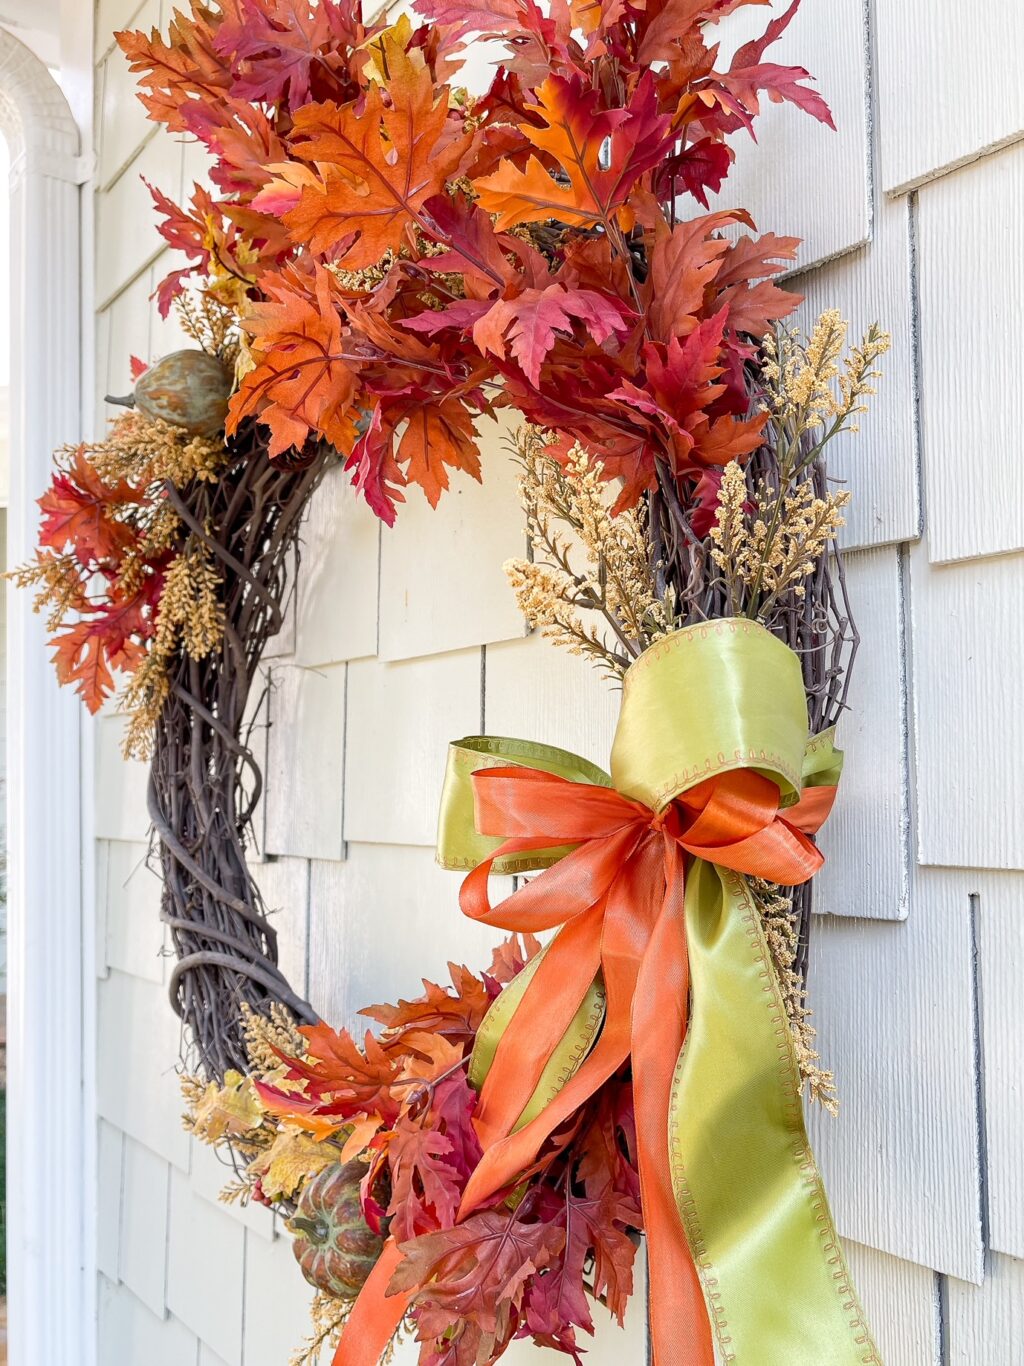
5. An Unexpected Twist: Lime Green Ribbon on a Classic Fall Wreath
This wreath is a perfect example of how one unexpected element can completely energize a traditional design. The core components—grapevine, orange leaves, dried flowers—are classic fall. But the introduction of a zesty lime green ribbon is a delightful surprise. It works because green is adjacent to yellow and orange on the color wheel, so it feels related, but the bright, acidic tone provides a jolt of modern energy that prevents the design from feeling dated. It’s a small choice that makes a huge difference.
|
📋 Copy HEX 🔗 Share |
📐 Style Math
When creating a bow with two different ribbons, the key is to vary the widths. Use a wider ribbon (around 2.5 inches) for the base loops—in this case, the lime green. Then, layer a slightly narrower ribbon (about 1.5 inches) on top for the second set of loops and tails. This ensures that the bottom color creates a strong visual foundation and the top color acts as a true accent, preventing the two from competing and looking messy.
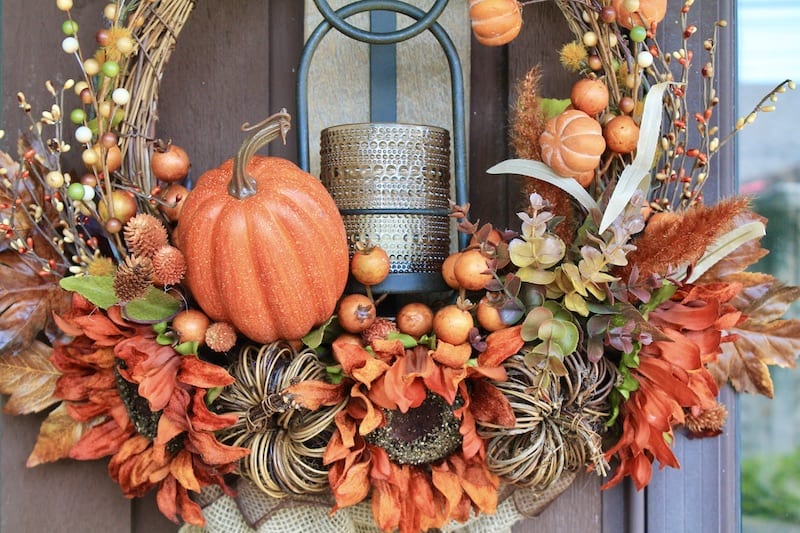
6. Go Big with a Large Pumpkin, Sunflowers, and a Mini Lantern
This look is all about abundance, and the budget reflects the number of large-scale elements involved. The key is to invest in the focal points.
- Main Furniture (Large Pumpkin & Sunflowers): $25 – $40
- Lighting (Decorative Mini Lantern): $15 – $25
- Textiles (Ribbons/Woven Elements): $10 – $15
- Decor/Accessories (Berries, Small Gourds): $15 – $20
- Wreath Base (Grapevine or Rattan): $10 – $18
- TOTAL: $75 – $118
Budget alternative: Get a similar vibe for about 50% less by using a cluster of three smaller pumpkins instead of one large one and sourcing faux florals from a dollar store.
|
📋 Copy HEX 🔗 Share |
🧹 Maintenance Reality
A word of warning: a wreath loaded with this many heavy items needs serious reinforcement. A large foam pumpkin, big sunflower heads, and a metal lantern add significant weight. Don’t rely on hot glue alone. Use floral wire to securely fasten each heavy element directly to the grapevine or rattan frame, wrapping it around multiple times and twisting it tightly at the back. This will prevent your beautiful decorations from sagging or, even worse, falling off entirely the first time a strong wind blows.
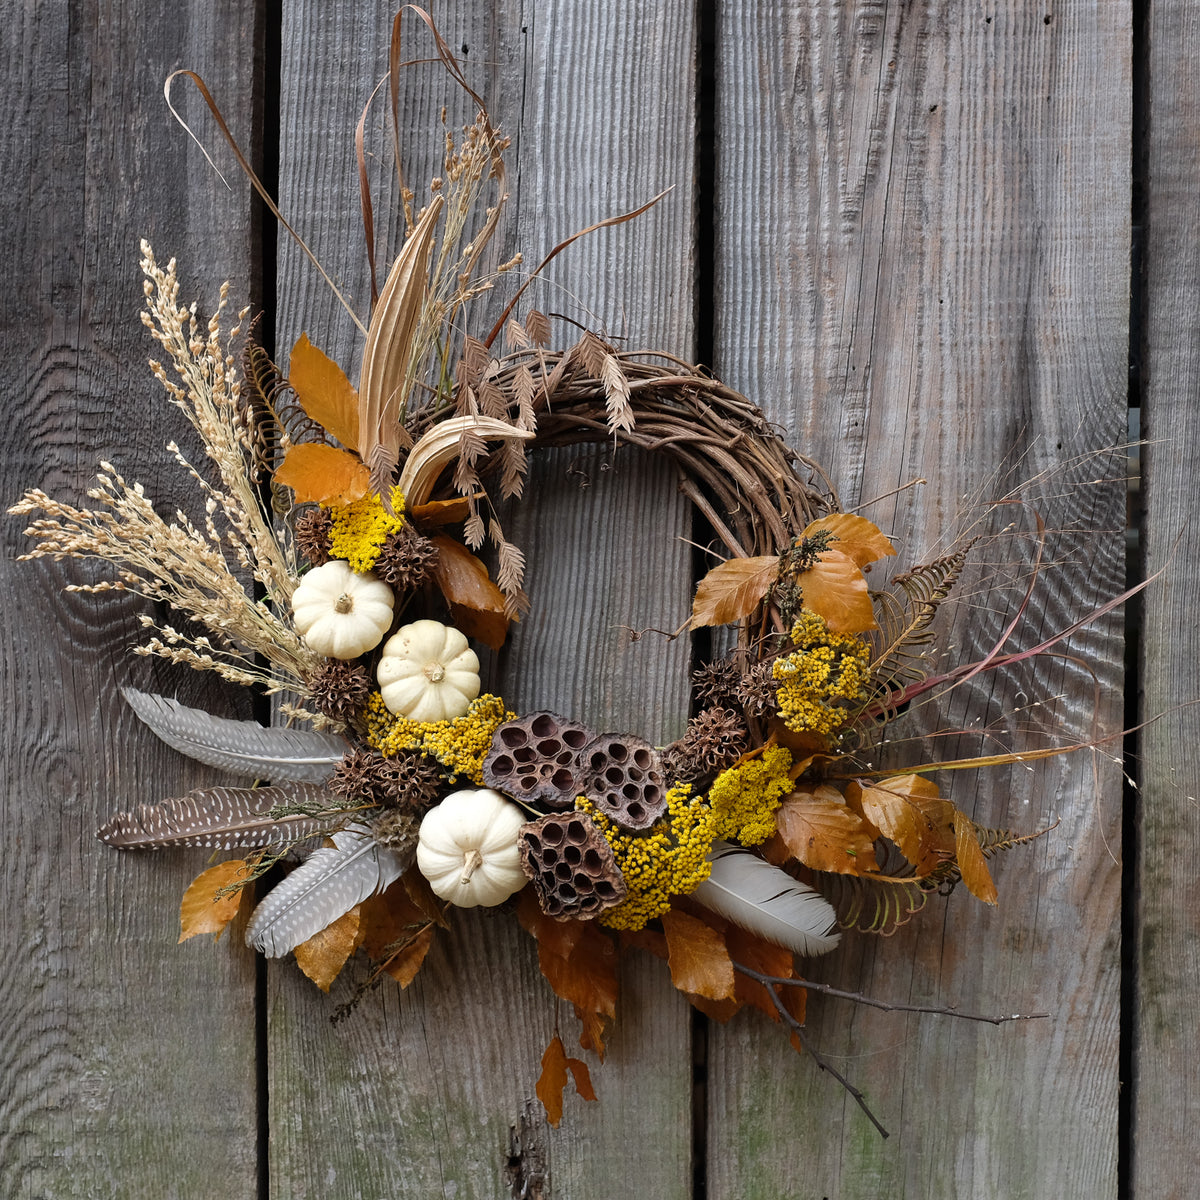
7. Earthy and Natural: A Grapevine Wreath with White Pumpkins and Feathers
While the white pumpkins are lovely, the single element that truly defines this wreath’s personality are the speckled feathers. They introduce a soft, slightly wild texture that you can’t get from foliage or gourds alone. They break up the solid forms of the pumpkins and leaves, adding movement and a delicate, rustic touch that feels authentically natural. Without the feathers, it would just be a nice fall wreath; with them, it tells a story of a walk in the woods on a crisp autumn day.
|
📋 Copy HEX 🔗 Share |
🔧 How-To Brief
This wreath’s delicate, natural style is perfectly suited for smaller spaces where a massive, bold wreath might feel overwhelming. It would look fantastic on an apartment door (typically 30-32 inches wide) or used as an interior accent, perhaps hanging on a pantry door or a wall in a cozy reading nook. The minimum square footage isn’t a concern, but the viewing distance is. Its subtle details, like the feathers and seed pods, are best appreciated up close, unlike the bold, graphic statement of Idea #15.
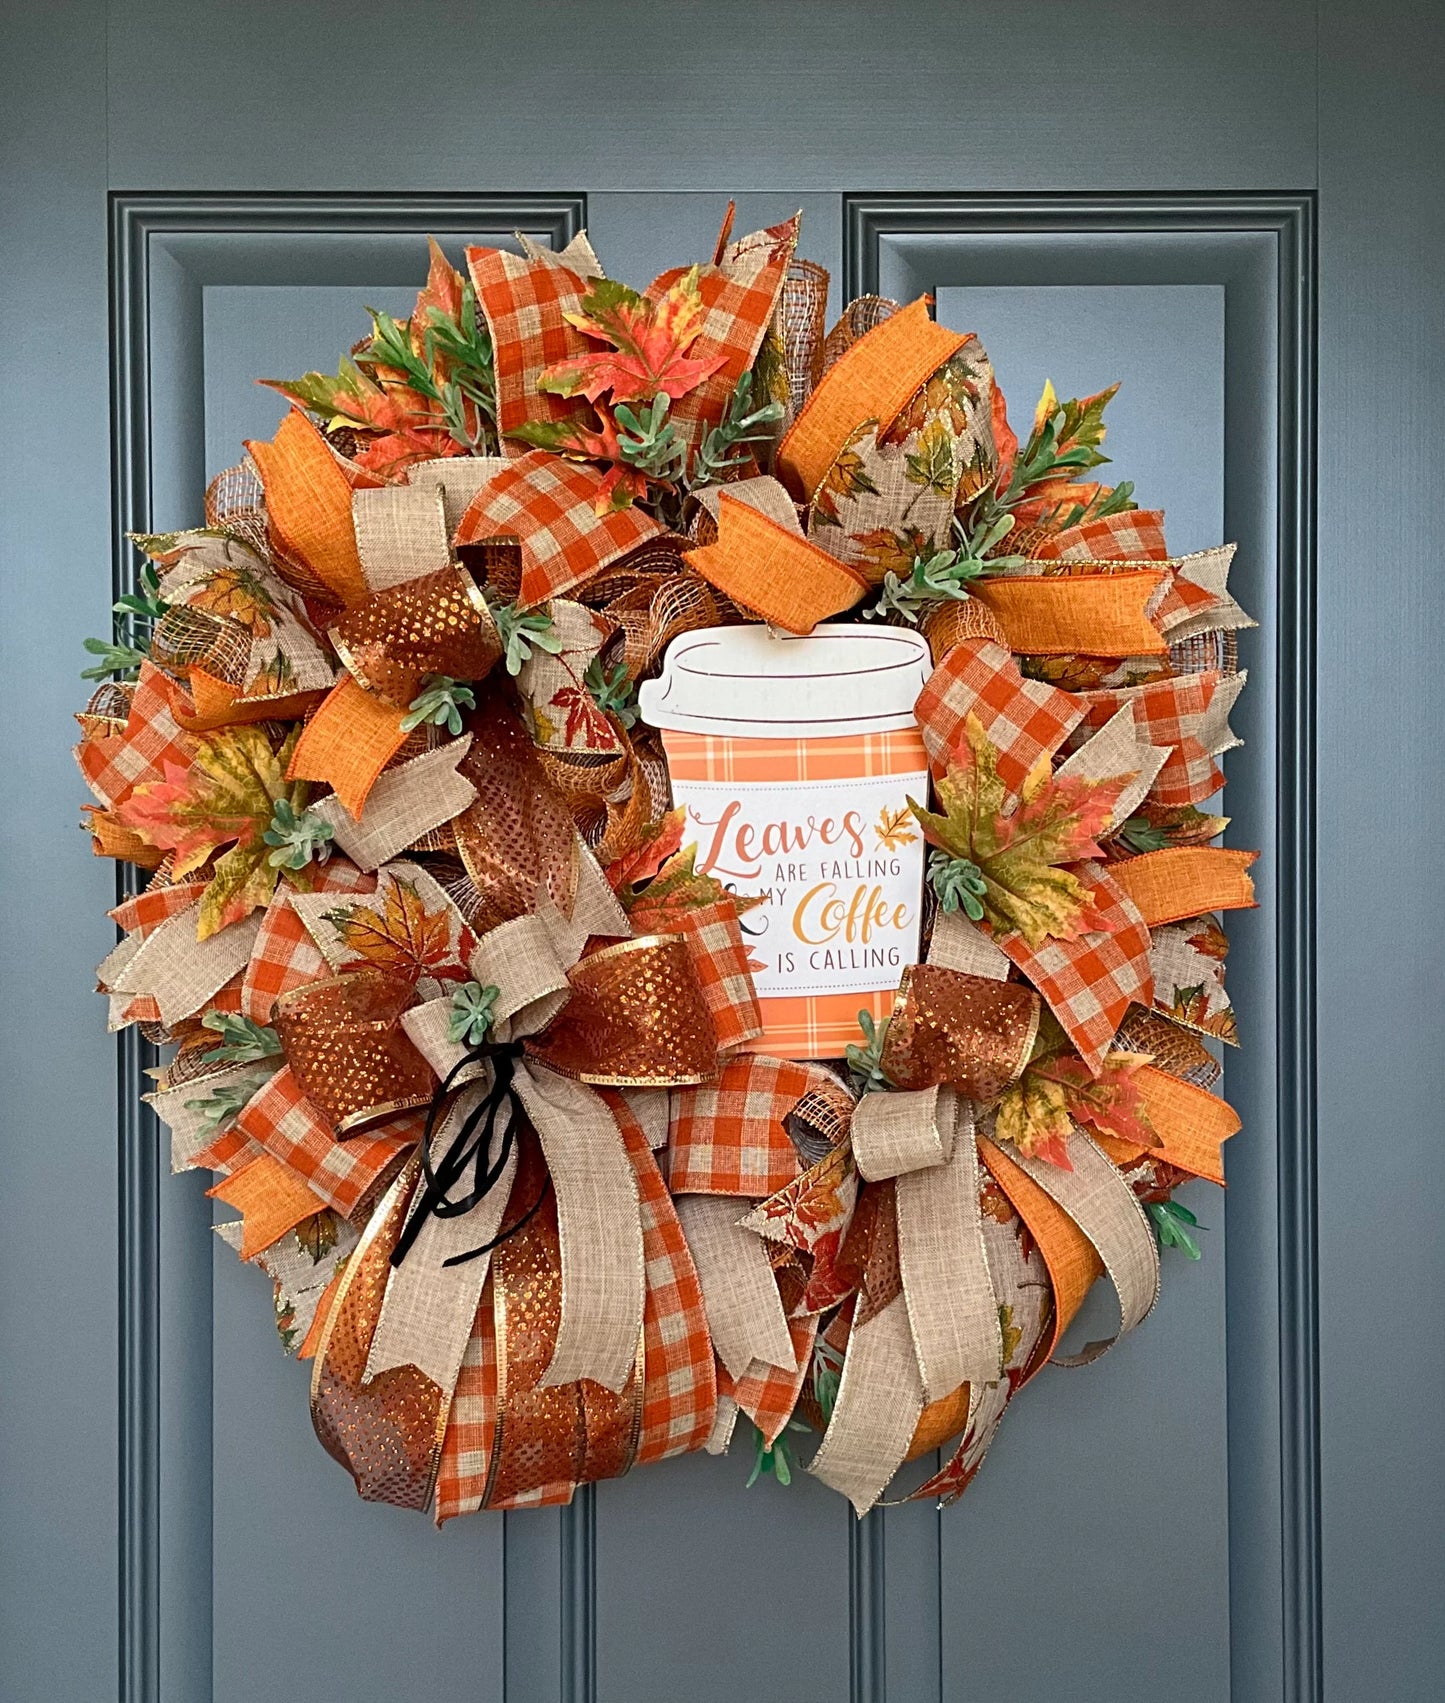
8. Your Morning Coffee, But Make It a Wreath
We’re seeing a huge movement towards hyper-specific, personalized decor, and this wreath is a perfect example. Ten years ago, a wreath was about leaves and pumpkins. Today, it’s about expressing your personality. The coffee cup sign taps directly into the cozy, “Pumpkin Spice Latte” culture that dominates fall aesthetics on social media. It’s fun, it’s a little quirky, and it immediately communicates a sense of warmth and hospitality. This trend has staying power because it’s less about a specific motif and more about making your home uniquely *yours*.
|
📋 Copy HEX 🔗 Share |
⭐ The One Thing
The visual recipe for this welcoming design is straightforward. It’s about 60% base material + 30% ribbon accents + 10% novelty focal point. The full, fluffy deco mesh provides the main canvas. The variety of plaid, burlap, and glitter ribbons adds texture and color. Finally, the coffee cup sign takes up about 10% of the visual real estate but provides 100% of the personality. You could easily swap the sign for a monogram, a witty saying, or another seasonal shape to keep the formula but change the theme.
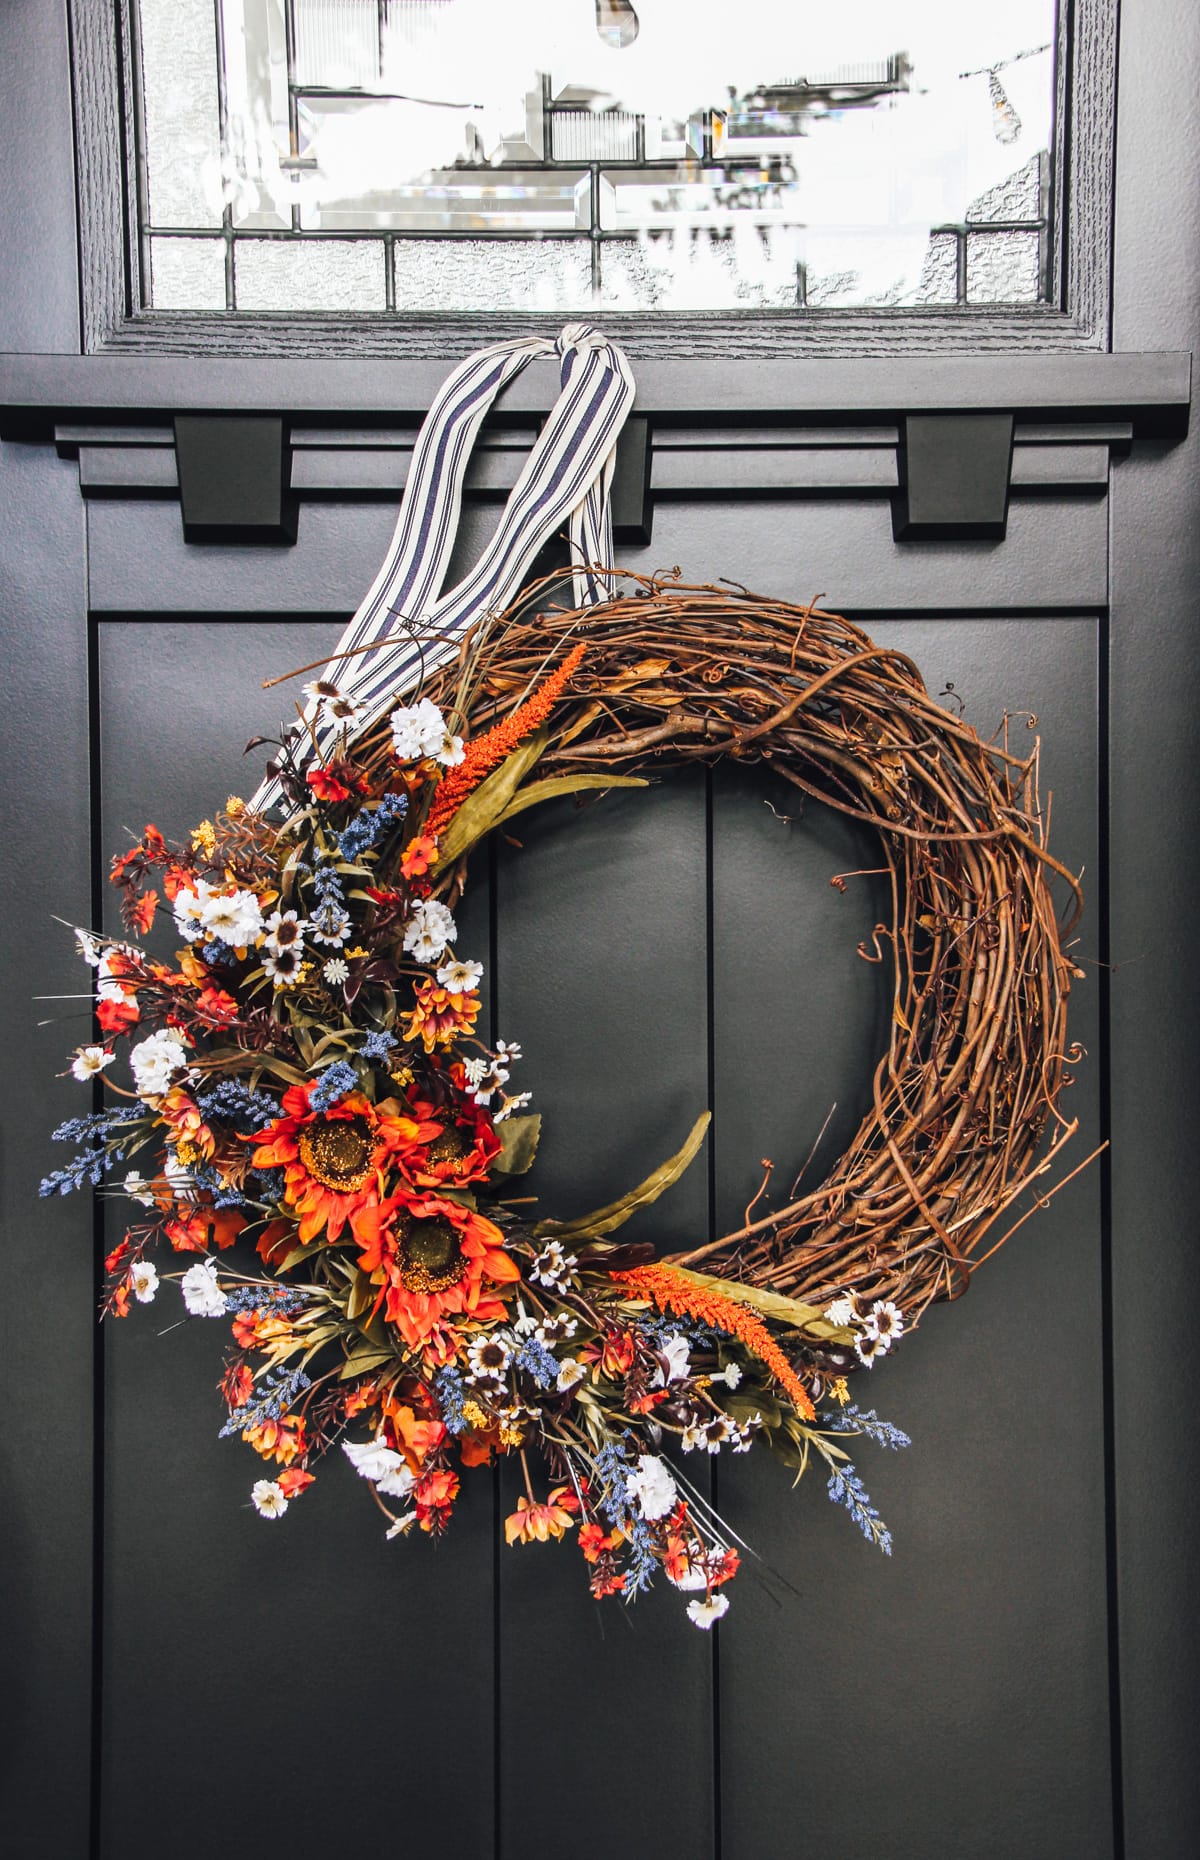
9. A Pop of Cornflower Blue in a Sunflower and Daisy Wreath
The beauty of this design lies in its fearless use of complementary colors. The bright, cheerful orange of the sunflowers is directly opposite blue on the color wheel. Placing the small, vibrant blue lavender-like flowers right next to them makes both colors sing. The white daisies act as a neutral buffer, giving the eye a place to rest and preventing the orange-and-blue combination from feeling too overwhelming. The dark door then provides a dramatic backdrop that makes the entire arrangement pop. For another take on the orange-and-blue pairing, see Idea #1.
|
📋 Copy HEX 🔗 Share |
✅ Before You Start
You can absolutely get this high-contrast, rustic look on a shoestring budget. A grapevine wreath is a few dollars at any craft store. The real savings come from the faux florals. Check your local Dollar Tree or Walmart’s craft aisle. You can often find bunches of faux sunflowers, daisies, and various blue or purple stems for $1.25-$3.00 each. You might need 3-4 bunches in total, bringing your floral cost to around $10. With a wreath form and some hot glue, you can have this entire project finished for under $20.
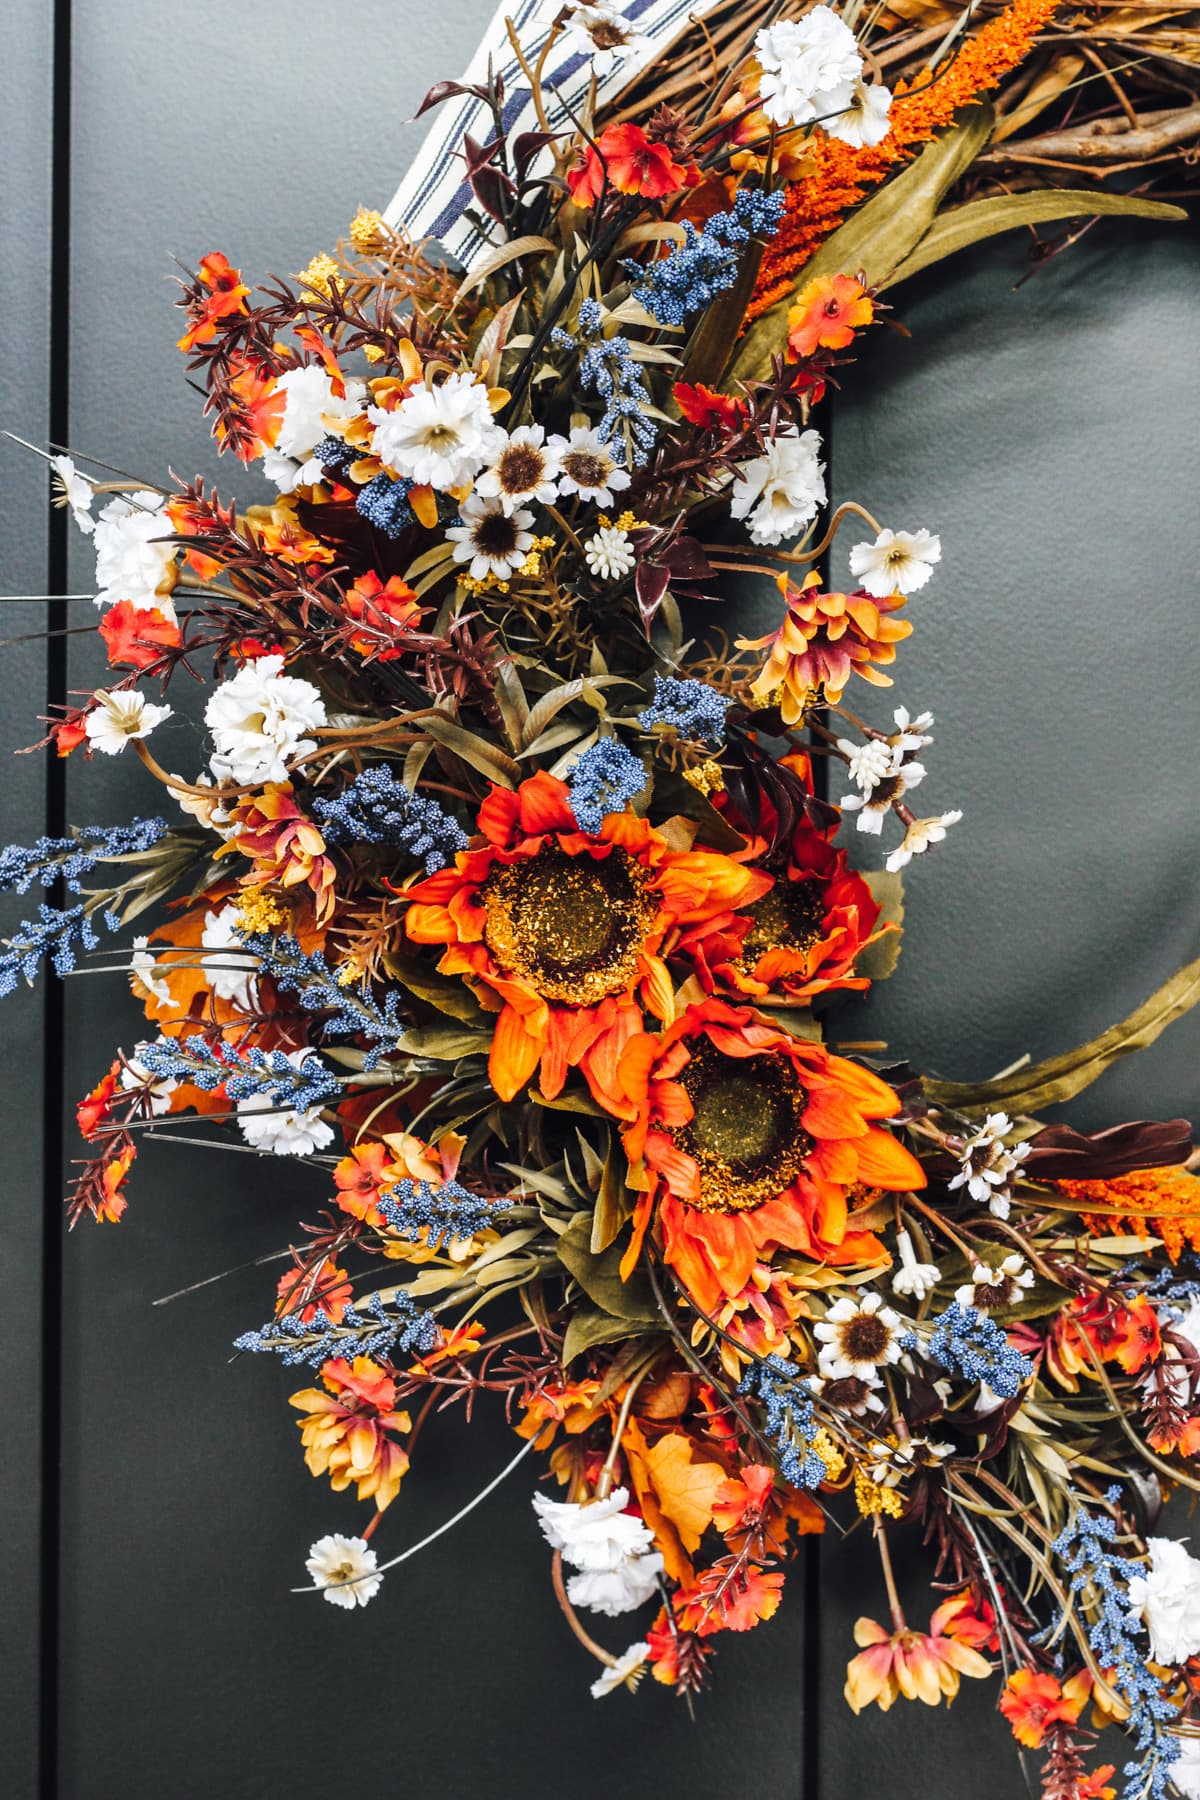
10. Country Charm: Striped Ribbon, Sunflowers, and Blue Berries
Mixing patterns, like the bold stripes of the ribbon and the organic shapes of the flowers, can be tricky. The secret is scale. The ribbon’s stripes are simple, graphic, and repetitive, while the flowers are complex and varied in shape and size. Because the patterns are so different in nature, they don’t compete. The ribbon acts as a structured, geometric frame for the wild, natural cluster of florals. If you were to use a busy floral ribbon, the whole design would become a chaotic mess.
|
📋 Copy HEX 🔗 Share |
🎯 What Makes It Work
If this wreath is destined for your front door, pay close attention to the type of ribbon you buy. That beautiful, crisp fabric ribbon with a wired edge is perfect for shaping bows, but not all fabric is created equal. A standard cotton or satin ribbon will absorb moisture, becoming droopy and sad after the first rain. Look for ribbons specifically marketed as “outdoor” or “weather-resistant.” They are typically made from polyester or nylon blends that repel water and resist fading, ensuring your wreath looks just as charming in November as it did in September.
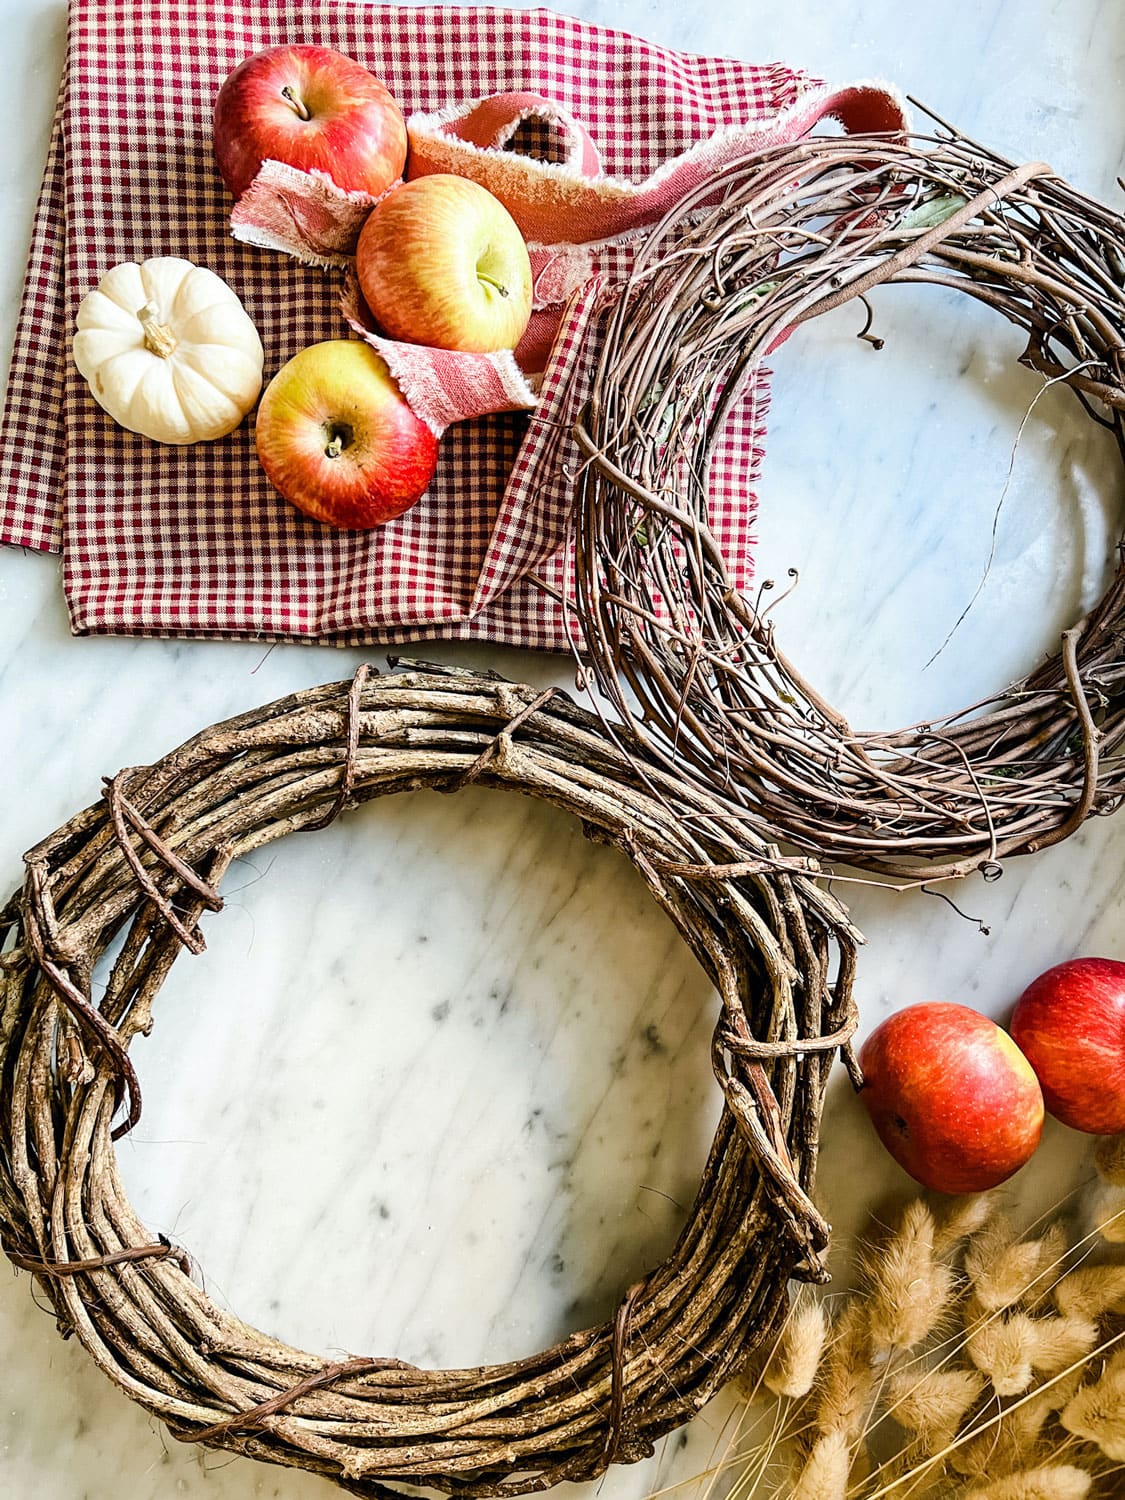
11. The Anatomy of a Farmhouse Wreath: Apples, Gingham, and Twigs
Before you dive into creating a wreath with fresh or natural elements, run through this quick checklist:
- Have you sourced your materials? For this look, you’ll need a twig base, fresh apples, a white pumpkin, dried grasses, and gingham fabric.
- Do you have the right tools? Floral wire and a hot glue gun are essential for securing heavier items like apples.
- Where will you display it? A wreath with fresh fruit will not last long in direct sun or harsh weather. This is best for a sheltered porch or indoor display.
- What’s your timeline? Fresh elements will only look good for about a week, so plan to assemble this right before you want to display it.
|
📋 Copy HEX 🔗 Share |
💸 Get This Look For Less
Securing fresh, heavy items like apples to a wreath requires more than just glue. Here’s a quick guide, which should take about 15 minutes.
- Cut a piece of sturdy floral wire (about 20-gauge) 12 inches long.
- Carefully push the wire all the way through the bottom third of the apple, from one side to the other.
- Center the apple on the wire.
- Position the apple on the twig wreath base.
- Feed both ends of the wire through the branches to the back of the wreath.
- Pull the wire tight and twist the ends together securely to hold the apple in place. Trim any excess wire.
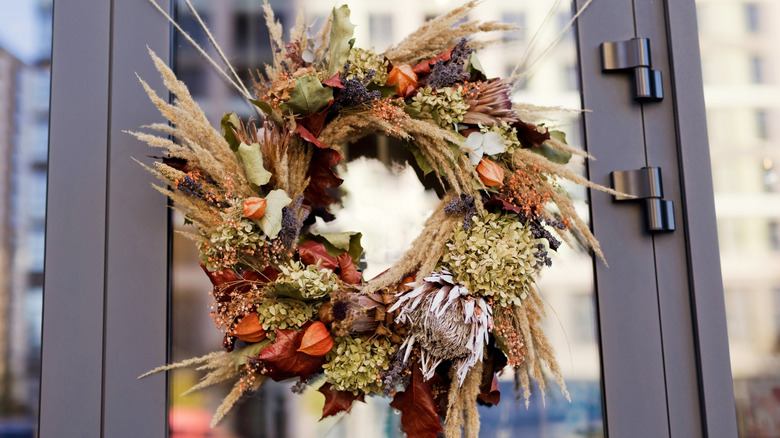
12. Sophisticated and Earthy: A Wreath of Dried Botanicals
A wreath made of dried botanicals is absolutely stunning, but it comes with a reality check: it is incredibly fragile. Elements like pampas grass, dried hydrangeas, and seed pods will shed, and they can shatter with just one accidental bump. This is not a wreath for a high-traffic front door, especially if you have kids or pets. It’s an indoor-only piece, meant to be hung somewhere it won’t be disturbed. To minimize shedding, you can give it a light coat of unscented hairspray or a special floral sealant.
|
📋 Copy HEX 🔗 Share |
💡 Designer Tip
Because of its delicate nature and sophisticated, earthy aesthetic, this wreath works best in interior spaces where its textures can be appreciated up close. It’s perfect for hanging on a dining room wall, over a fireplace mantel, or on a large mirror in an entryway. It needs a calm, protected environment. A standard 36-inch interior door or a wall space of at least 4×4 feet would be an ideal canvas to give this textured piece the breathing room it deserves. It’s a statement of quiet, natural beauty.
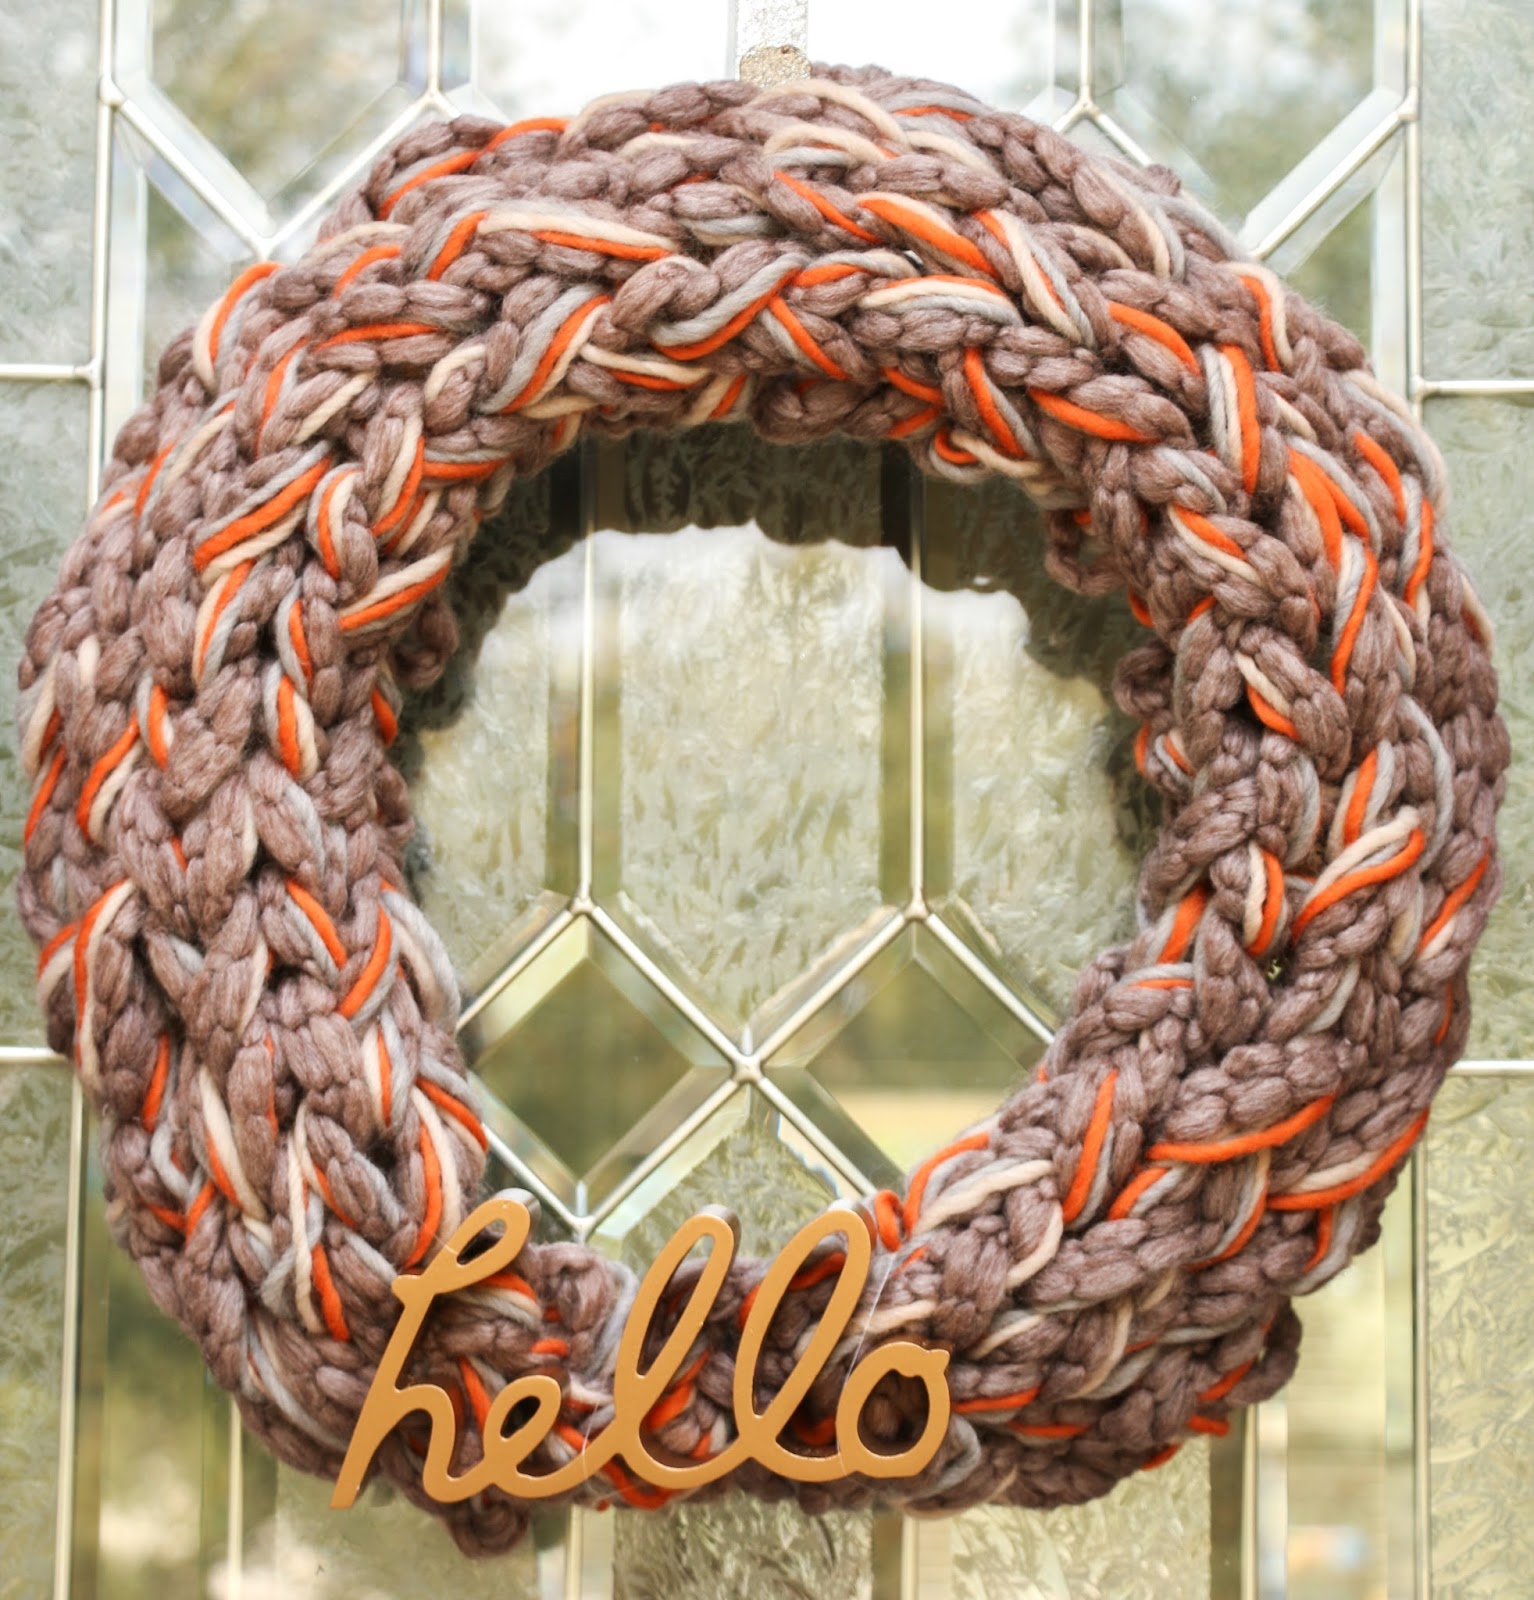
13. Say ‘Hello’ with a Cozy, Chunky-Knit Yarn Wreath
You can make this cozy wreath in under an hour, even if you don’t know how to knit. The technique is a simple finger-knitting or arm-knitting method.
- Start with a 14- or 16-inch foam wreath form and one skein of super chunky yarn.
- Tie the end of the yarn to the wreath form in a tight knot.
- Wrap the yarn around the form, making sure each new loop sits snugly next to the last, completely covering the foam.
- When you get back to the start, tie off the end and trim any excess.
- For the braided look shown, finger-knit a long chain of a contrasting yarn color and wrap it around the finished wreath.
- Attach your “hello” sign with a bit of hot glue or thin wire.
|
📋 Copy HEX 🔗 Share |
💰 Budget Breakdown
The magic of this wreath is all in that chunky, oversized knit texture. It immediately signals warmth, comfort, and coziness—everything we crave in the fall. The mix of autumnal colors is lovely, but it’s the exaggerated scale of the yarn itself that makes the design feel modern and fun. If you were to use standard worsted-weight yarn, you’d get a similar color effect, but you would completely lose the playful, inviting personality that makes this piece so special.
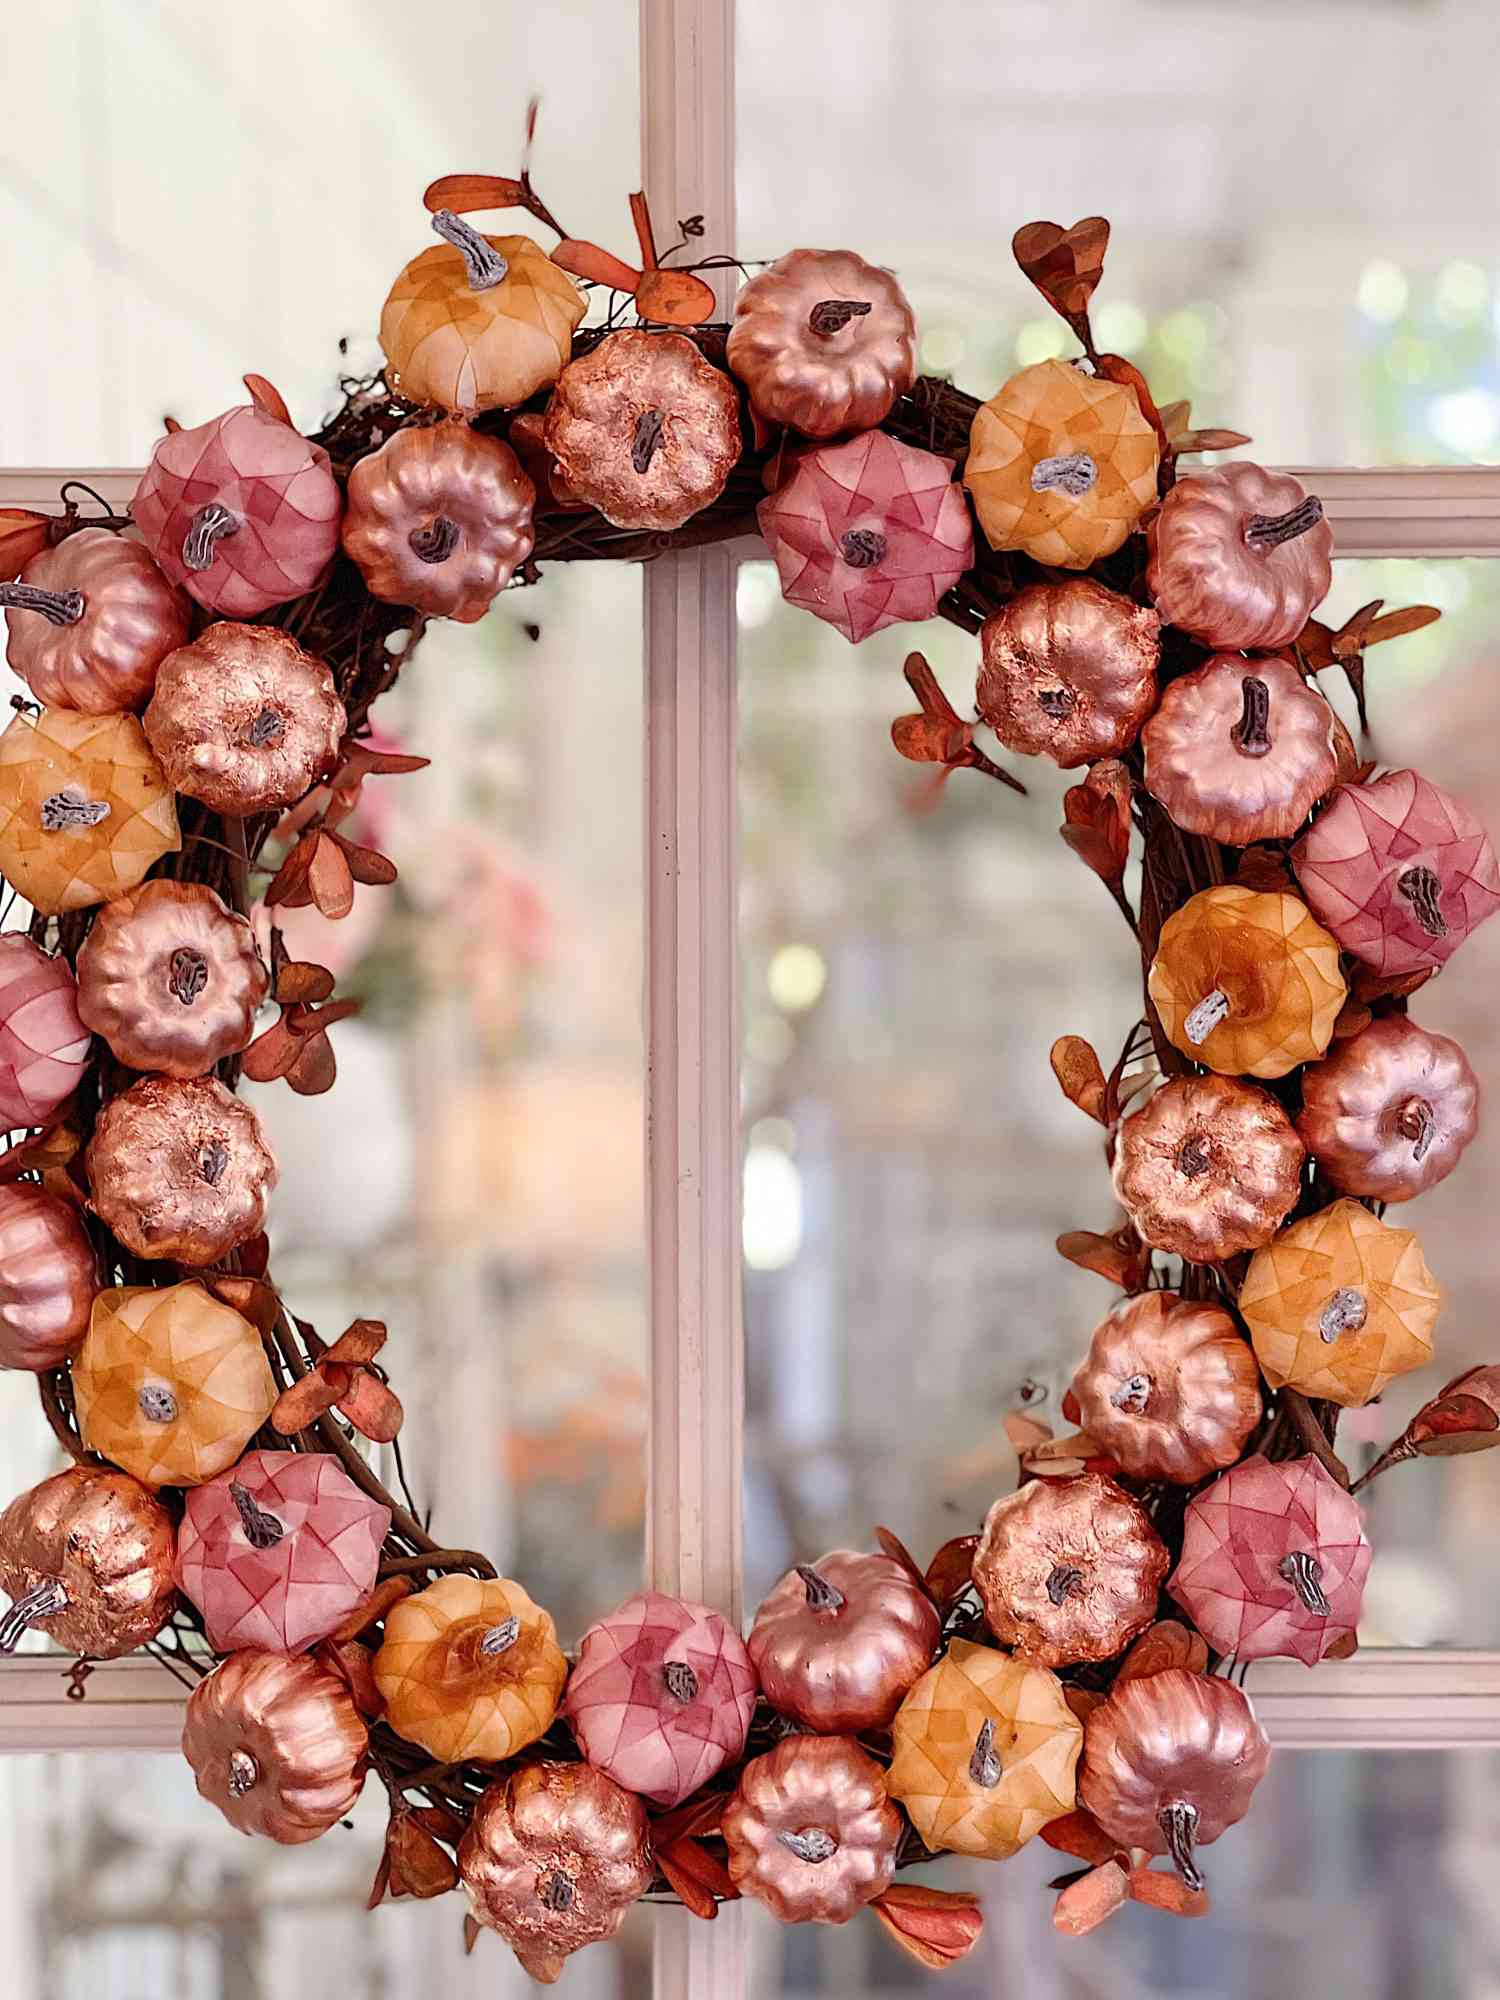
14. A Touch of Glam: Rose Gold and Pink Pumpkins on a Grapevine Base
This wreath is a perfect example of the “blush autumn” trend that’s been gaining momentum on Pinterest. It moves away from the traditional rustic oranges and browns and embraces a softer, more modern palette of pinks, mauves, and metallics. It’s a bit romantic, a bit glamorous, and feels fresh and unexpected for the season. This look has staying power because it’s adaptable—it works well with the popular neutral and blush tones found in contemporary home decor year-round, making it an easier seasonal transition.
|
📋 Copy HEX 🔗 Share |
⚠️ Real Talk
The success of this design comes from a well-balanced formula: 50% rustic base + 30% soft texture + 20% metallic shine. The bare, earthy grapevine wreath provides a necessary rustic foundation, keeping the look grounded. The fabric-wrapped pumpkins in muted orange and pink add softness and color. Finally, the strategic placement of the metallic rose gold pumpkins adds that crucial 20% of glam and light-reflection, elevating the entire piece from simply “pretty” to “chic.”
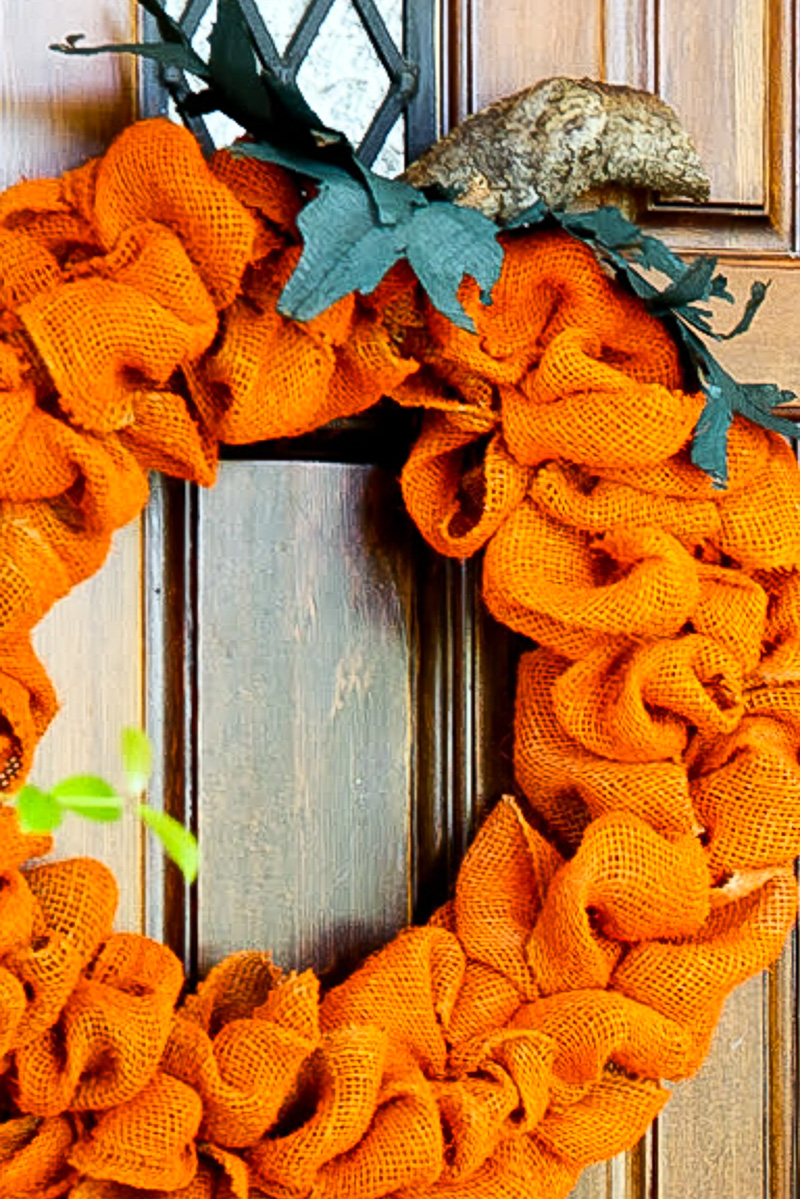
15. Craft a Whimsical Pumpkin Shape Using Orange Burlap
This is the quintessential high-impact, low-budget fall DIY project. The materials are famously inexpensive and readily available at stores like Dollar Tree, Walmart, or any craft store. You’ll need a pumpkin-shaped wire wreath form (around $3-$5), a few rolls of orange burlap or deco mesh ($5-$10 total), and a bit of green for the leaves. With a total cost of under $15, you get a large, dramatic piece of door decor that looks far more substantial and expensive than it actually is. It’s a testament to the power of a simple, clever idea.
|
📋 Copy HEX 🔗 Share |
🔥 Trending Context
This design works because it leans into the power of a single, iconic shape. It isn’t a circle *decorated* with pumpkins; it *is* the pumpkin. The ruffled texture of the burlap adds dimension and visual interest, but the immediate readability of the pumpkin silhouette is what provides the instant charm and impact. The simple green leaves and brown stem are just enough detail to complete the image without cluttering the strong, graphic form. It’s simple, bold, and unmistakably festive.
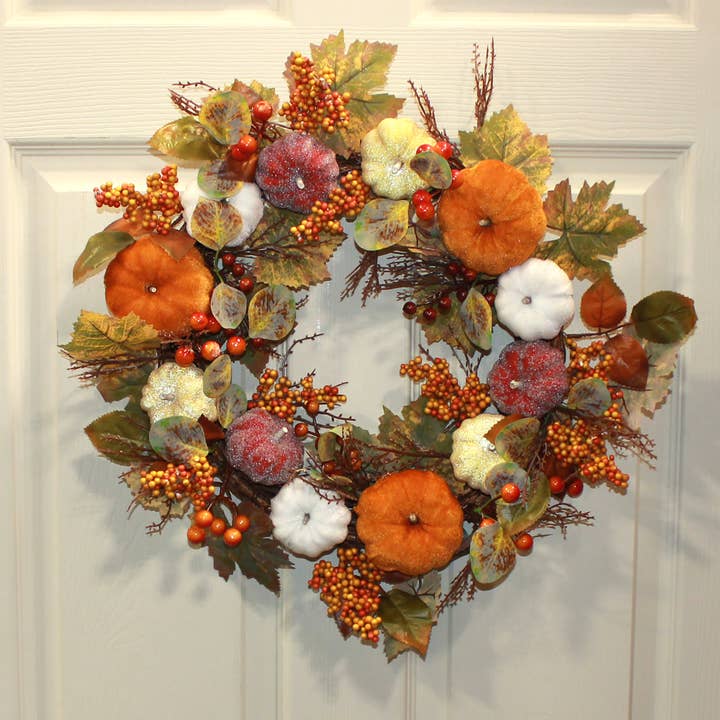
16. Velvet Pumpkins and Red Berries Against a Crisp White Door
When your backdrop is a clean, neutral white, you have a golden opportunity to make your colors intensely vibrant. To maximize this effect, choose colors that have a high saturation level, like the deep oranges and rich reds seen here. Then, add a variety of sheens. The matte finish of the velvet pumpkins absorbs light, making their color look deep and rich, while the glossy berries reflect light, adding a lively sparkle. This mix of matte and gloss against the flat white door creates a dynamic, multi-layered look. Compare this to the similar wreath on a brown door in Idea #3.
|
📋 Copy HEX 🔗 Share |
📏 Scale Guide
Let’s have a frank conversation about velvet outdoors. While it looks incredibly luxe, most craft-store velvet is not designed to withstand the elements. Rain can cause it to become matted and discolored, and direct sun can lead to significant fading. If your door is on a completely covered and protected porch, you might be fine. But if it’s exposed to any rain or sun at all, consider this an indoor-only wreath or seek out special marine-grade or outdoor-rated velvet fabric, which is much more expensive but will hold up to the weather.
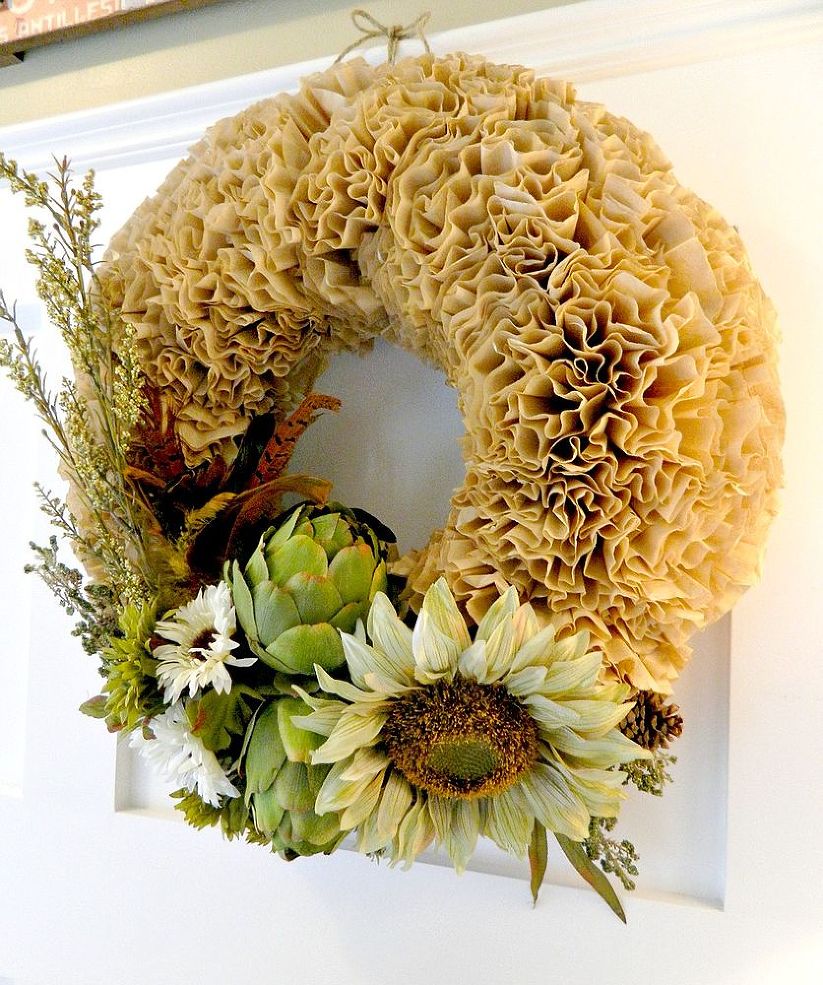
17. An Unbelievably Chic Wreath Made from Coffee Filters
Yes, you can get this incredibly chic, ruffled look using standard paper coffee filters. It takes time, but it’s very low-cost.
- You’ll need about 200-300 basket-style coffee filters. To get the tan color, you can use unbleached filters or dye white ones by soaking them in cooled coffee or tea, then letting them dry completely.
- Take a single filter, fold it in half, then in half again to form a cone.
- Add a dot of hot glue to the pointed tip of the cone.
- Press the glued tip firmly onto a foam or cardboard wreath form.
- Repeat, placing the filters close together to create a full, ruffled texture. Work in sections until the entire form is covered.
- Finally, add your embellishments like the artichokes and flowers to one side.
|
📋 Copy HEX 🔗 Share |
📐 Style Math
The single element that makes this wreath a showstopper is the unexpected and brilliant use of the artificial artichokes. The coffee filter base is beautiful and textural, but it’s a neutral backdrop. The artichokes, with their unique shape, architectural quality, and muted green color, provide a sophisticated focal point that is completely surprising. They elevate the craft from a simple DIY project to a piece of botanical art. Without them, it’s a pretty wreath; with them, it’s a conversation starter.
18. Classic Autumn Style with Plaid Ribbon, Acorns, and Wheat
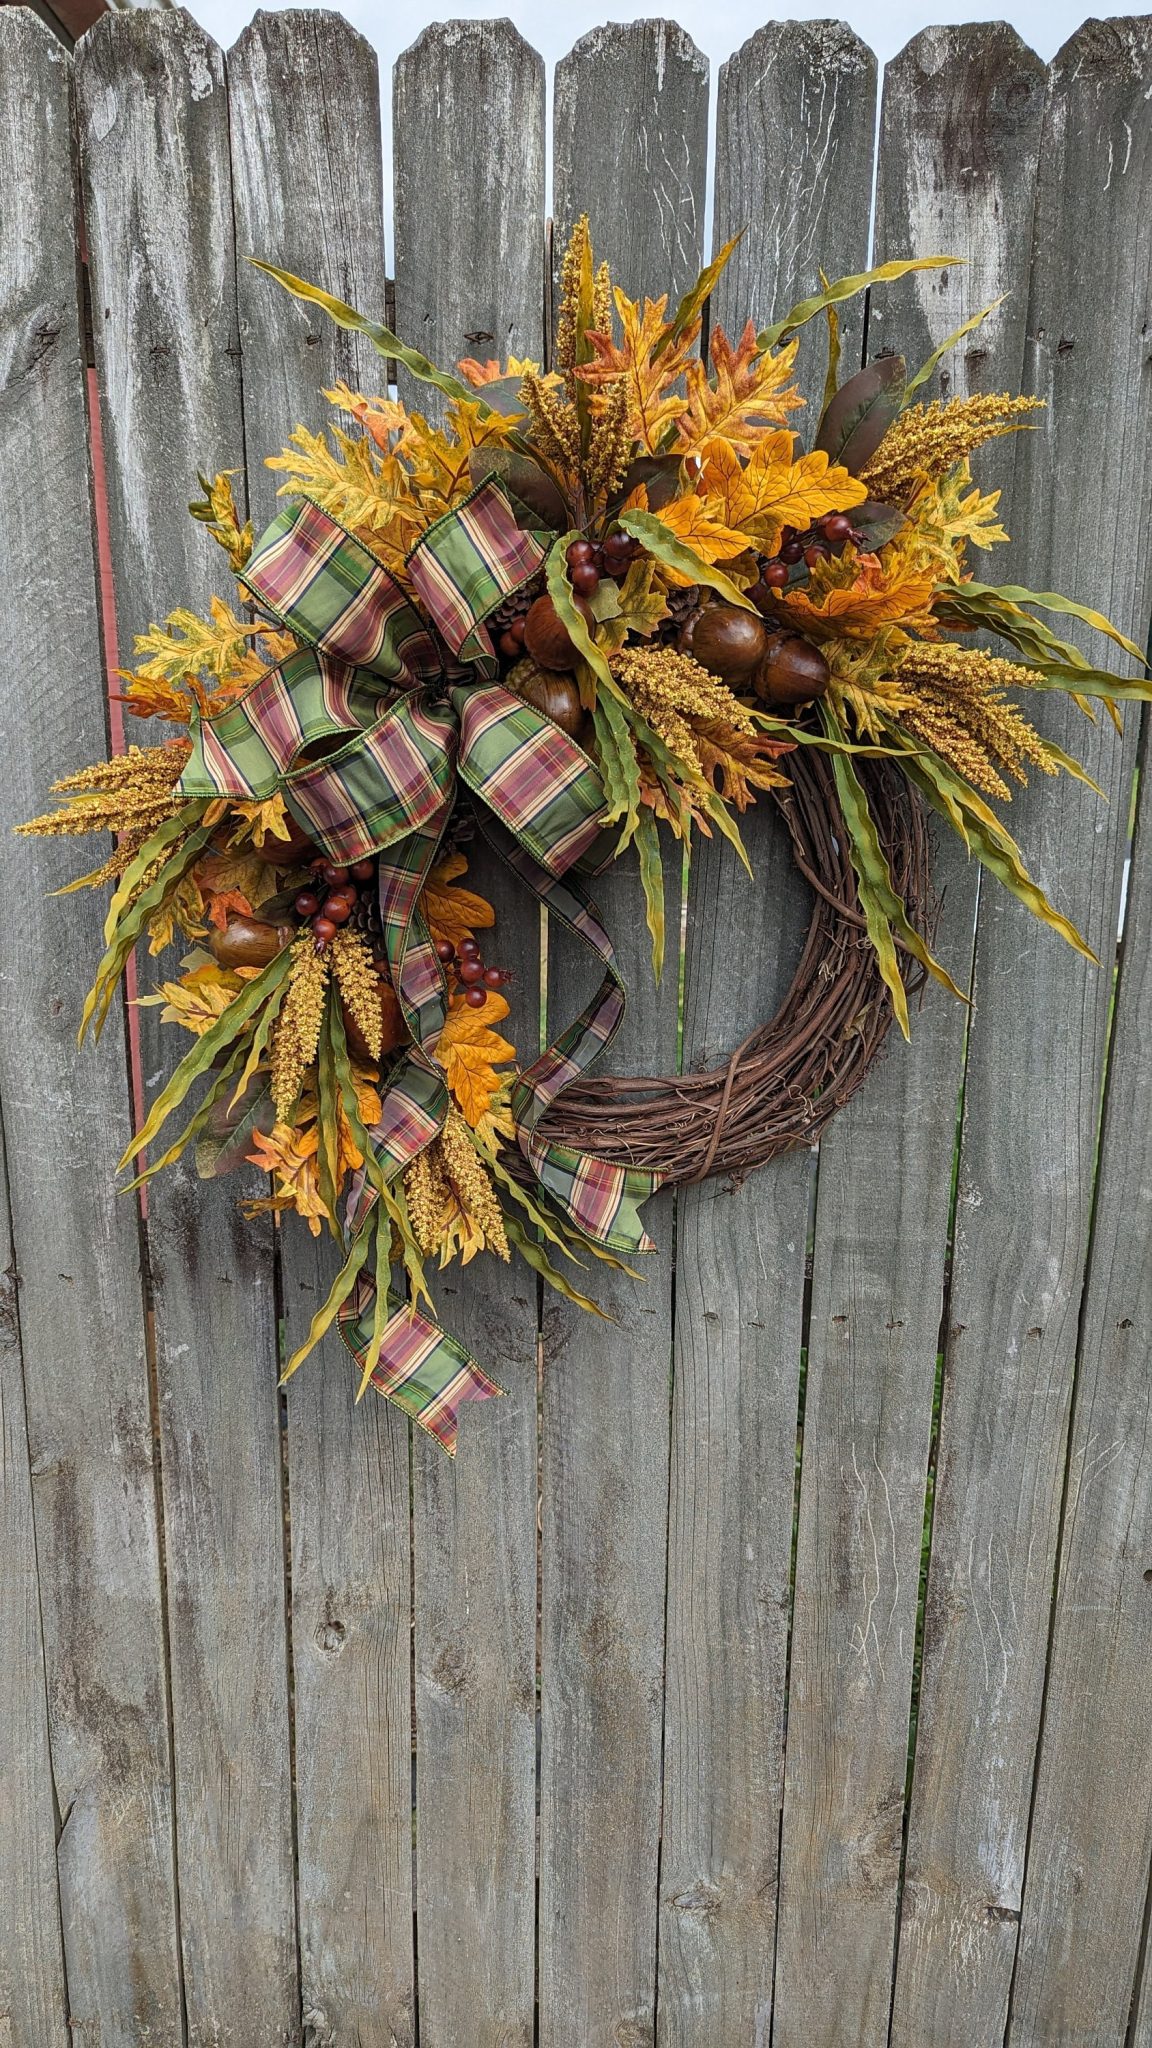
This wreath achieves its timeless, classic fall look by perfectly balancing its components. The formula is approximately 40% Natural Elements + 40% Colorful Foliage + 20% Fabric Accent. The natural elements, like the grapevine base, acorns, and wheat heads, provide a rustic, textural foundation. The colorful faux leaves in yellow, orange, and brown bring the vibrant autumn palette. Finally, the plaid ribbon, making up the last 20%, ties all the colors together and adds a touch of cozy, traditional pattern.
|
📋 Copy HEX 🔗 Share |
🧹 Maintenance Reality
A wreath this full and classically styled is designed to make a statement on a standard American front door, which is typically 36 inches wide. The ideal wreath diameter for a door this size is between 24 and 28 inches. This ensures the wreath looks substantial and intentional, not like a tiny, lost speck. This design would also work beautifully on a large, blank wall in an entryway or above a fireplace mantel, where its traditional charm and rich textures can be fully appreciated.
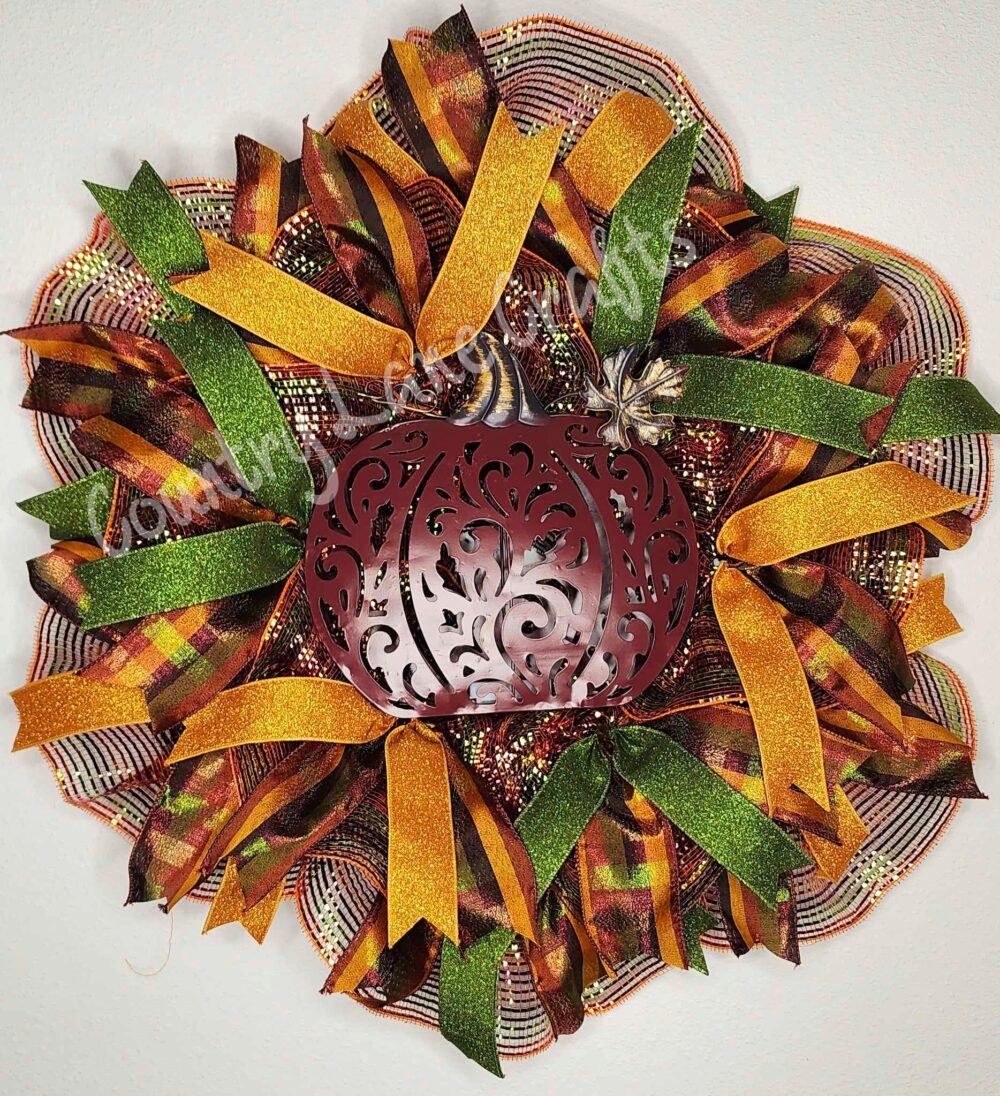
19. Go for the Glitz: A Glitter Mesh Wreath with a Metal Pumpkin
This wreath is a masterclass in texture mixing. It successfully combines multiple materials that could easily clash in the wrong hands. The key is that each material occupies its own distinct textural space. You have the airy, glittery deco mesh base, the soft, traditional plaid ribbon, the slick and shiny solid glitter ribbons, and the cool, smooth, hard surface of the cutout metal pumpkin. Because each element is so different, they create a rich, layered effect rather than a chaotic jumble. The eye is constantly discovering new surfaces.
|
📋 Copy HEX 🔗 Share |
🔧 How-To Brief
Here’s the honest truth about glitter: it’s the herpes of the craft world. Once you bring a wreath like this into your home, you will be finding flecks of orange and gold glitter on your floors, your clothes, and your pets until spring. A light misting of a clear acrylic sealer or even hairspray can help lock some of the glitter in place, but be prepared for some fallout every time the door opens and closes. It’s the price you pay for this level of festive sparkle.
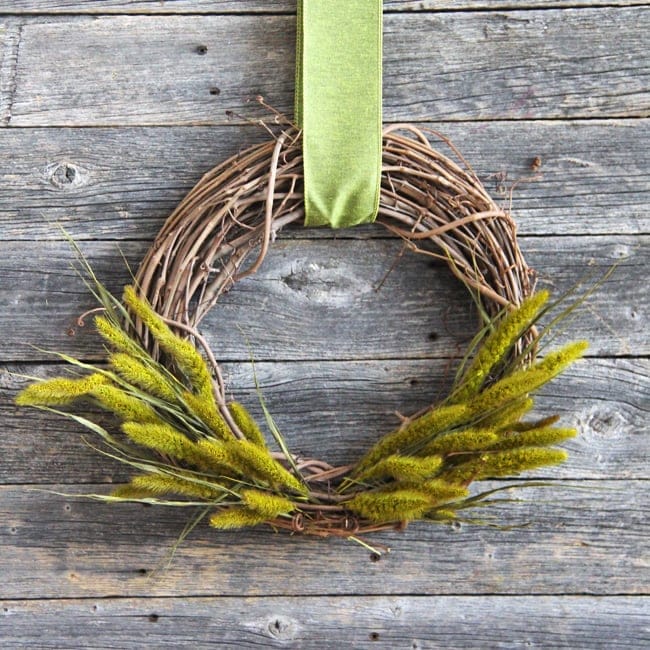
20. A Jolt of Chartreuse: Foxtail Grass on a Simple Grapevine Wreath
The undisputed star of this show is the shocking, vibrant chartreuse of the foxtail grass. On a simple, rustic grapevine wreath, this color is completely unexpected for a fall arrangement. It’s electric. By keeping the rest of the design minimal—just the grass, a few green blades, and a coordinating ribbon—the focus remains squarely on this bold color choice. It proves that you don’t need a dozen different elements to make a huge impact. Sometimes, one daring choice is all it takes.
|
📋 Copy HEX 🔗 Share |
⭐ The One Thing
This wreath is a fantastic example of using asymmetry to create visual interest and a more modern, organic feel. Instead of distributing the grass evenly around the entire circle, it’s clustered on the lower half. The bright green ribbon is then used to hang the wreath, creating a strong vertical line that balances the horizontal sweep of the grass. When designing your own, resist the urge to make everything symmetrical. A focal point placed off-center is often more dynamic and professional-looking.
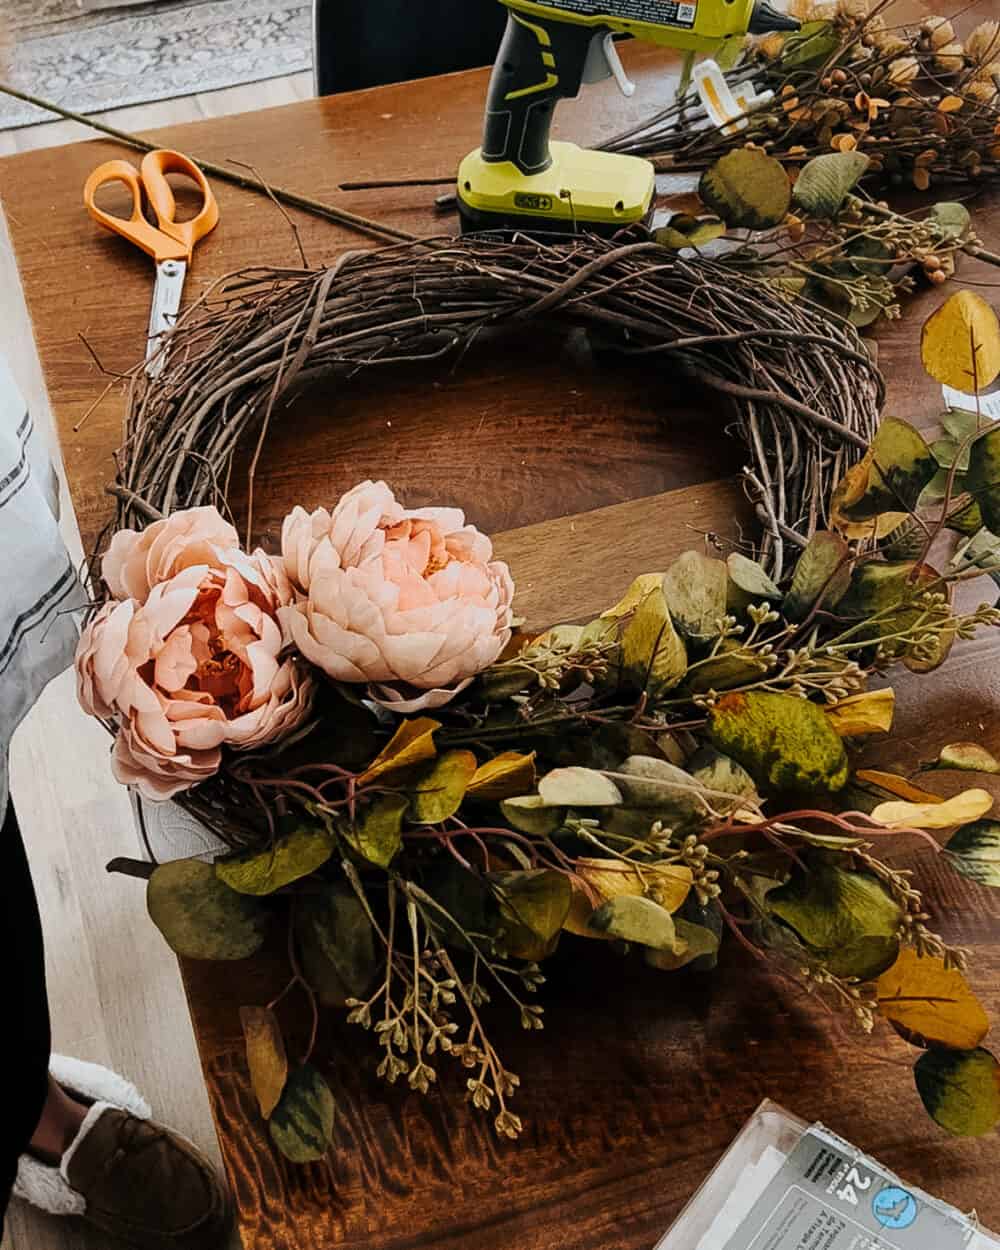
21. DIY in Progress: Pairing Peach Peonies with a Grapevine Base
Before you sit down with your glue gun, take a moment to plan your design. A good wreath has a clear focal point.
- Lay your largest flowers (the peonies) on the wreath first. Arrange them in a loose cluster, not a perfect line.
- Tuck your secondary foliage and smaller leaves around the big blooms, following the natural curve of the wreath.
- Don’t cover the entire wreath! Leaving a good portion of the grapevine exposed, as seen here, adds to the rustic charm and makes your floral cluster pop.
- Once you’re happy with the layout, *then* you can start gluing everything down permanently.
|
📋 Copy HEX 🔗 Share |
✅ Before You Start
Creating this soft, romantic fall wreath is an affordable afternoon project. The key is investing in a few high-quality focal flowers.
- Main Flowers (3-4 Large Peach Peonies): $15 – $25
- Supporting Greenery (Mixed Faux Foliage): $10 – $15
- Wreath Base (18-inch Grapevine): $8 – $12
- Tools & Supplies (Hot Glue, Wire): $5
- TOTAL: $38 – $57
Budget alternative: Look for multi-flower bushes at craft stores instead of single stems. You get more variety for your money and can cut them apart to build your arrangement.
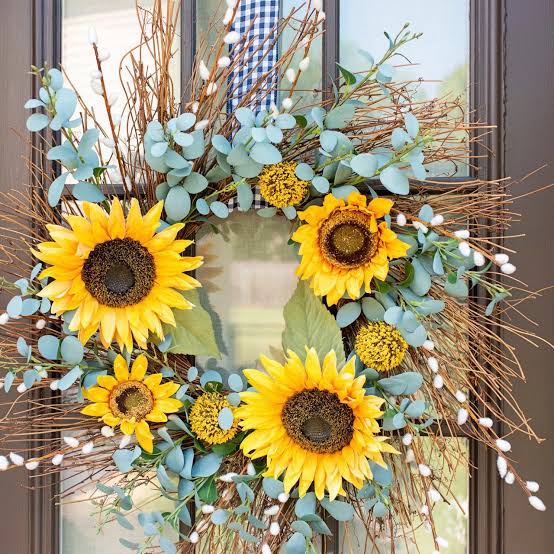
22. The Essence of Simplicity: A Minimalist Fall Hoop Wreath
Minimalist designs like this work because they understand the power of negative space. The bare metal hoop isn’t just a frame; it’s a key part of the design. By clustering the few sprigs of eucalyptus and ribbon to one side, the empty space of the hoop and the wall color showing through become a deliberate visual element. This creates a sense of balance and lightness that you can’t achieve with a full, dense wreath. It’s a confident, understated approach to seasonal decor.
|
📋 Copy HEX 🔗 Share |
🎯 What Makes It Work
This look is the epitome of chic on a dime. You can create this for well under $15. All you need is a simple metal hoop from a craft store (often in the macrame or floral section) for about $5-$7. Then, grab one or two stems of faux eucalyptus or other greenery for a few dollars. The rest is just a scrap of ribbon. This project proves that good design isn’t about how much you spend, but about how thoughtfully you use your materials. It’s a perfect project for a beginner DIYer.
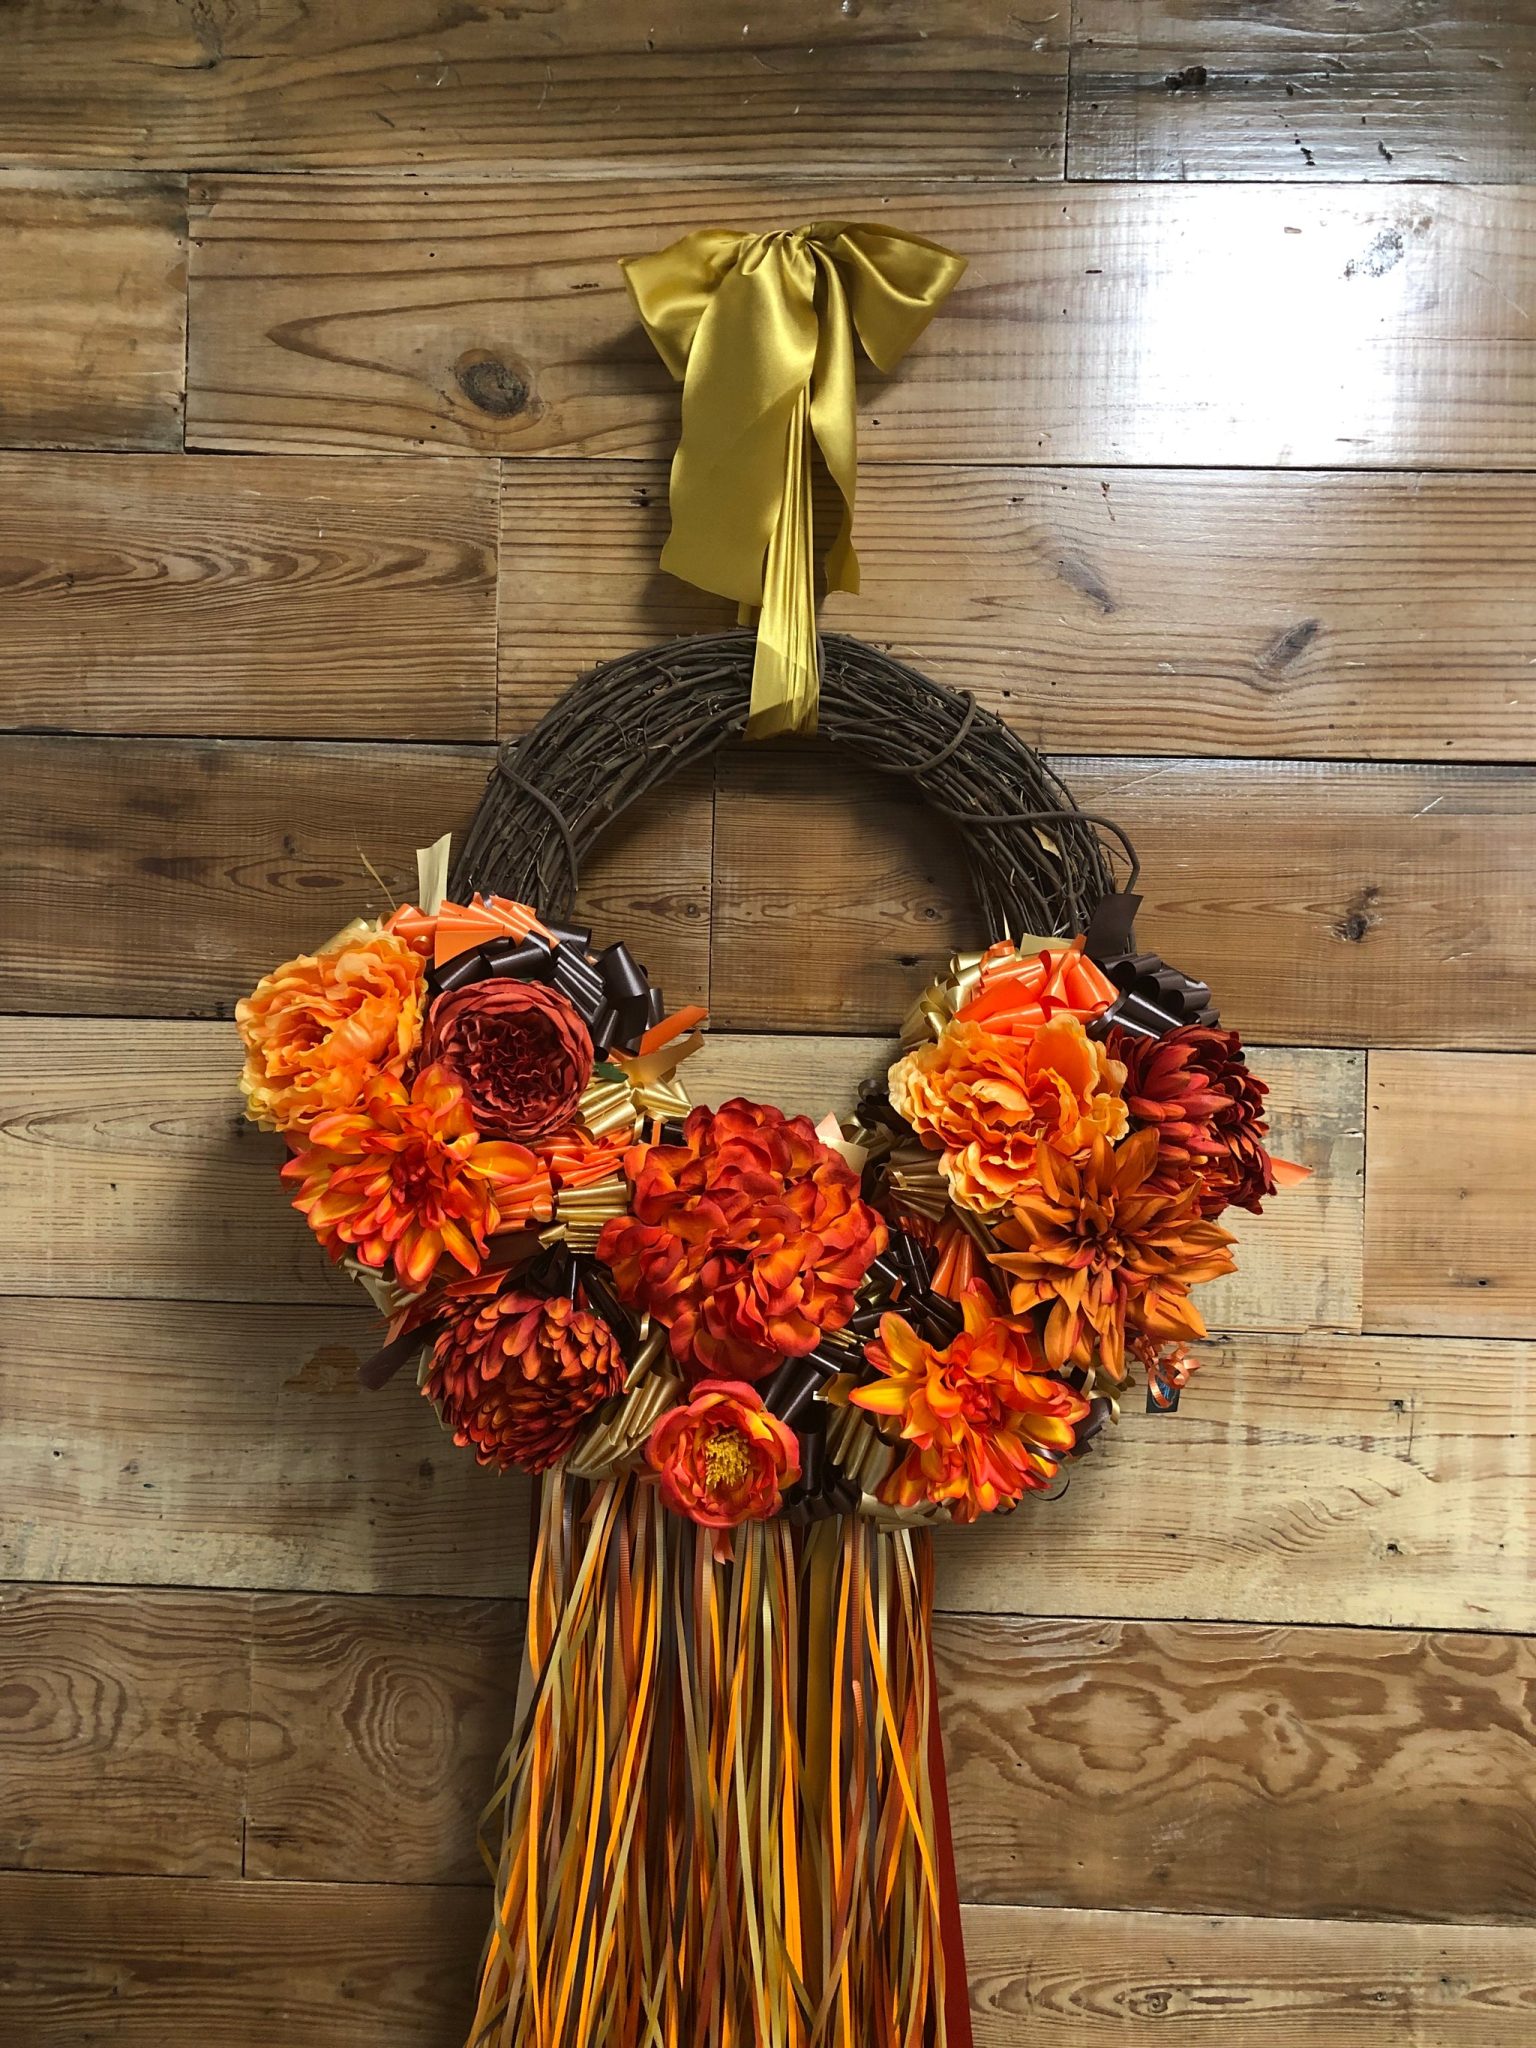
23. More is More: A Cascade of Ribbons and Bright Florals
The key to a successful ribbon cascade is variation. Don’t use just one type of ribbon. This design uses at least five different ribbons in varying widths, textures, and colors (satin, sheer, patterned). Cut them to different lengths, from 12 inches to 36 inches. Attach the ribbons in clusters at the base of the floral arrangement, letting them hang freely. This creates a much more luxurious and dynamic effect than a few sad, matching streamers. The variety makes it look intentional and abundant.
|
📋 Copy HEX 🔗 Share |
💸 Get This Look For Less
Be practical about where you hang a wreath with long, trailing ribbons. On a front door that sees a lot of wind, these beautiful cascades can quickly become a tangled, frustrating mess. They can get caught in the door, whipped into knots, or even torn. This style is best suited for a very sheltered front porch, or even better, as an indoor decoration. Hang it on a wall, a mirror, or an interior door where you can enjoy the dramatic look without fighting the elements. For a more wind-proof design, check out the compact look of Idea #29.
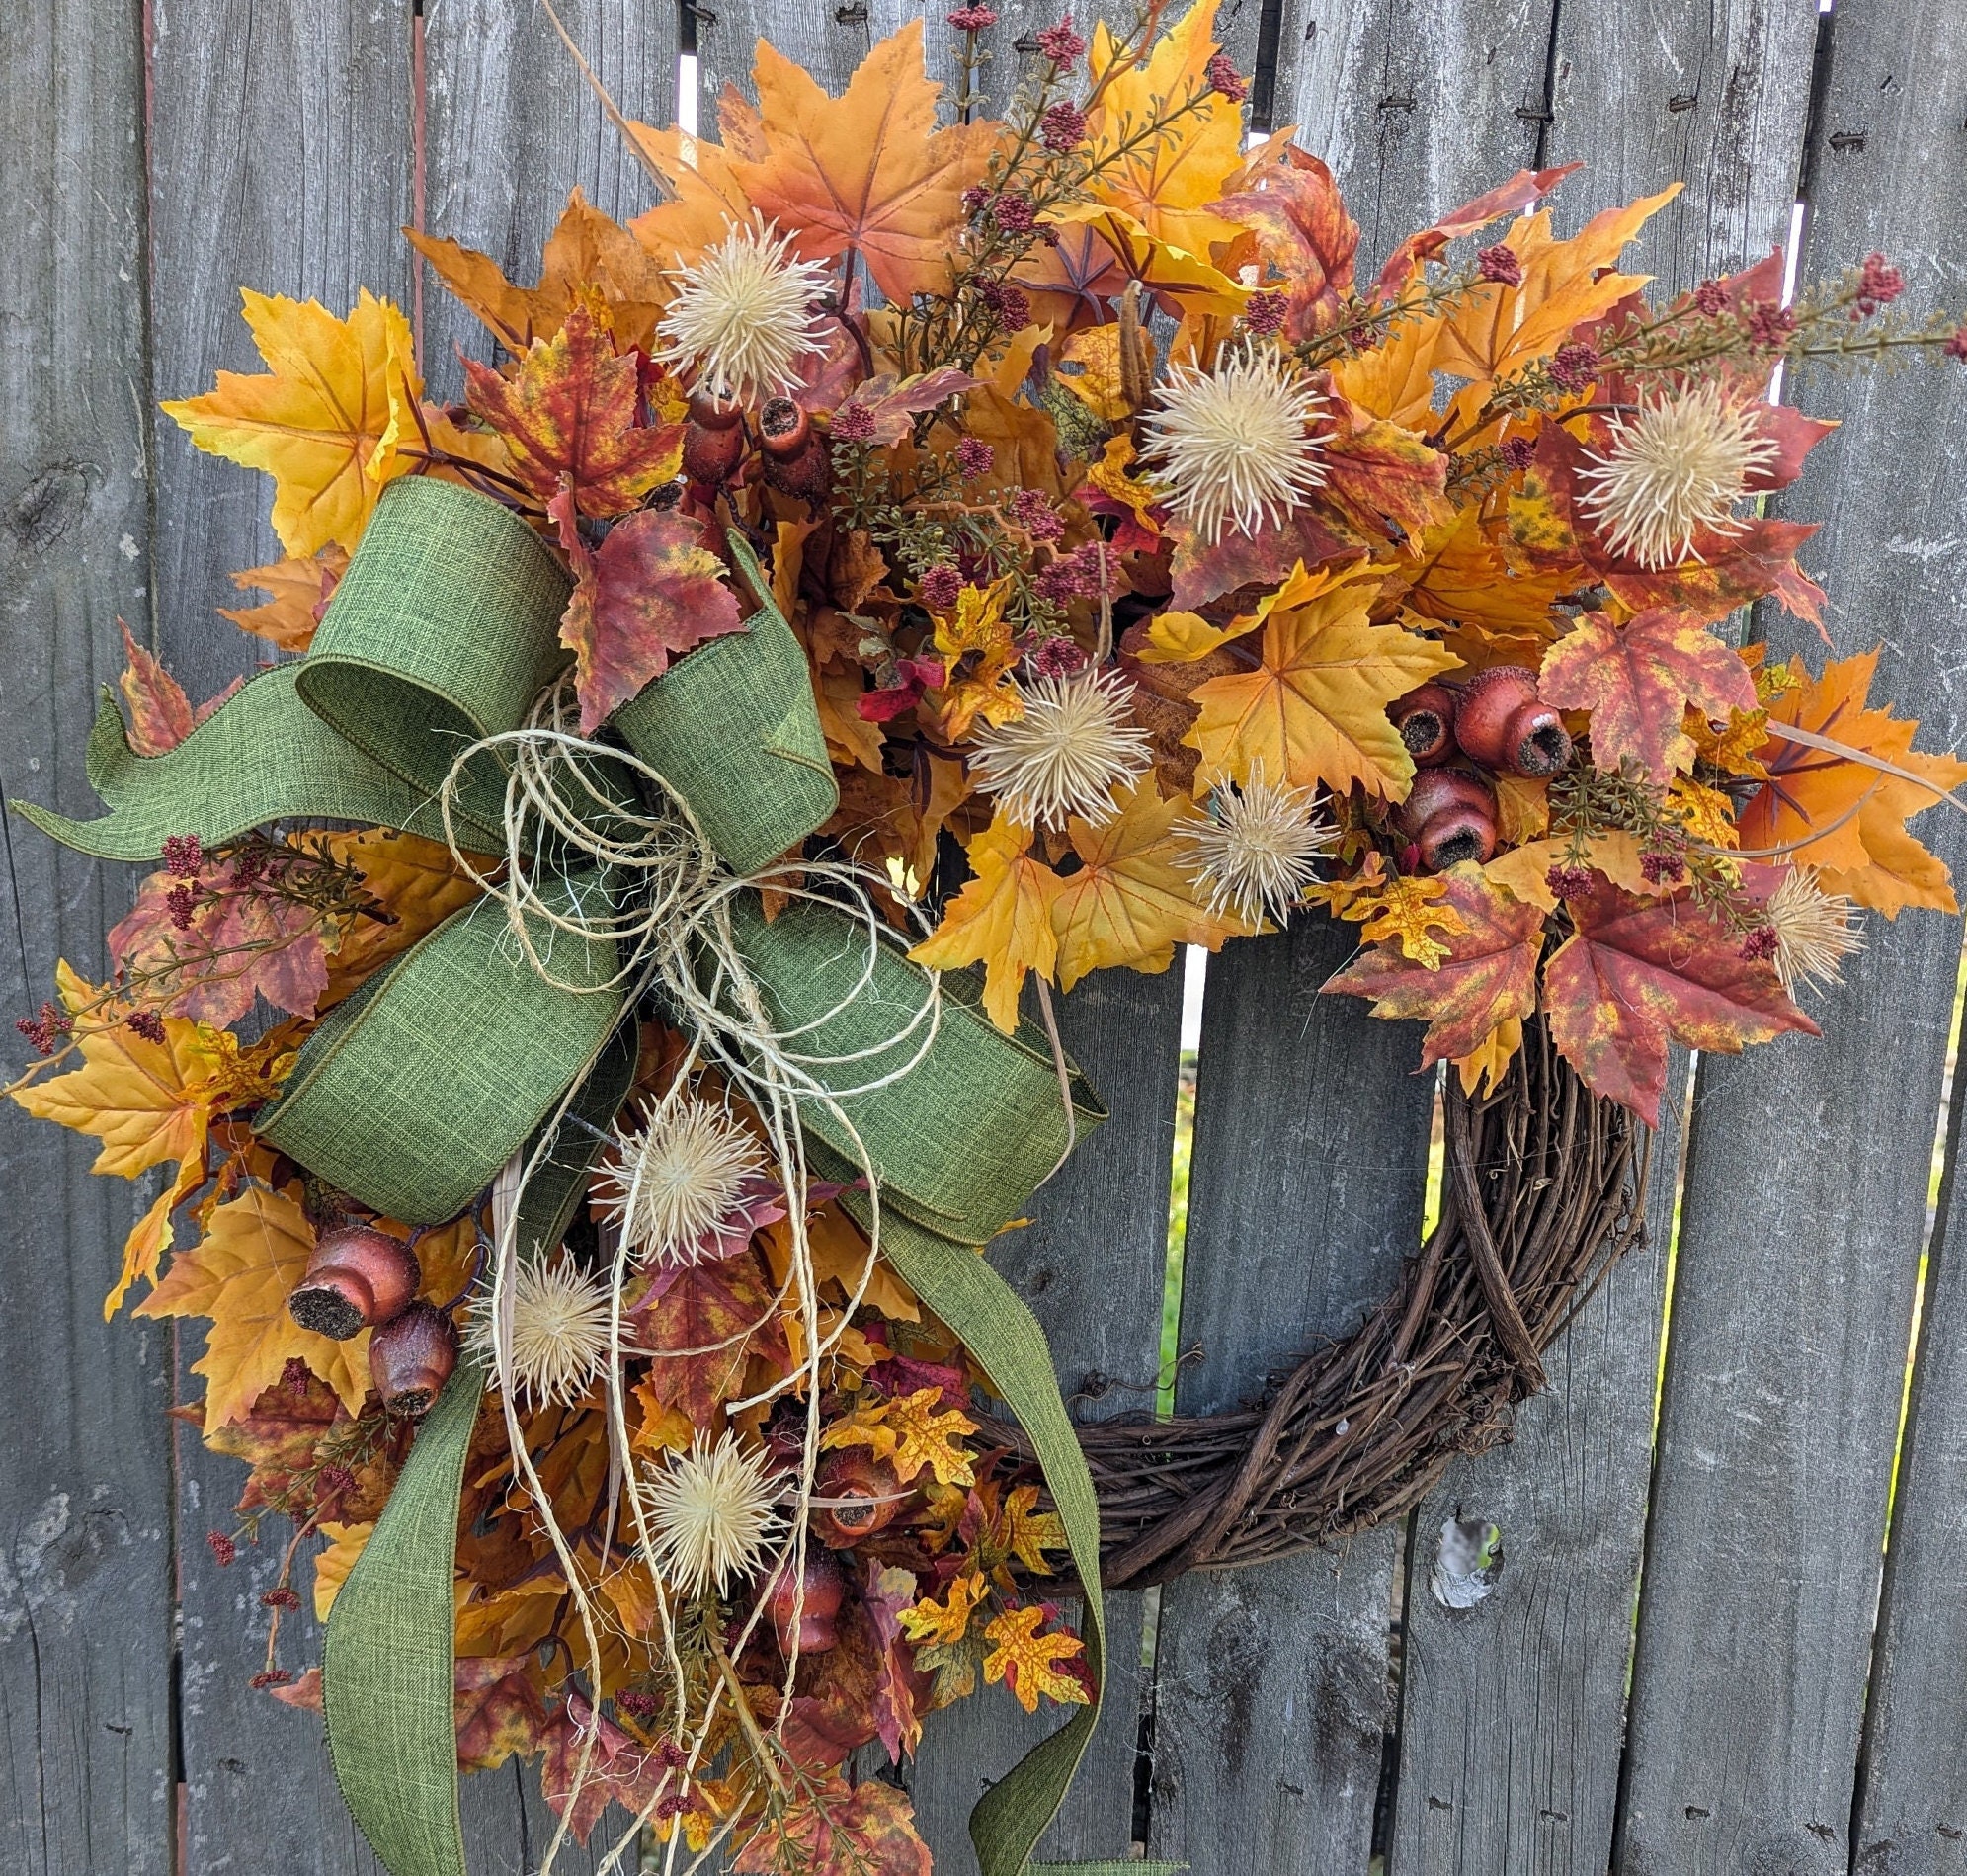
24. A Bold Green Burlap Bow on a Field of Orange Leaves
This wreath is a powerful lesson in color blocking. The formula is incredibly simple but effective: 70% warm color field + 30% cool color accent. The dense layer of orange, yellow, and red leaves creates a unified, warm background. The large, dark green bow is then placed boldly on top. Because green is a complementary color to red/orange, it creates maximum contrast and visual excitement. The twine detail on the bow adds a bit of rustic texture, tying it into the woven branch base.
|
📋 Copy HEX 🔗 Share |
💡 Designer Tip
The fullness of this wreath, combined with the large scale of the bow, gives it significant visual weight. This design needs space to breathe. It would look best on a standard or oversized front door (36 inches or wider). On a smaller door or in a narrow entryway, it could feel cramped and overwhelming. If you love the concept but have a smaller space, consider scaling it down: use a smaller wreath base and a bow that takes up closer to 20% of the visual real estate instead of 30%.
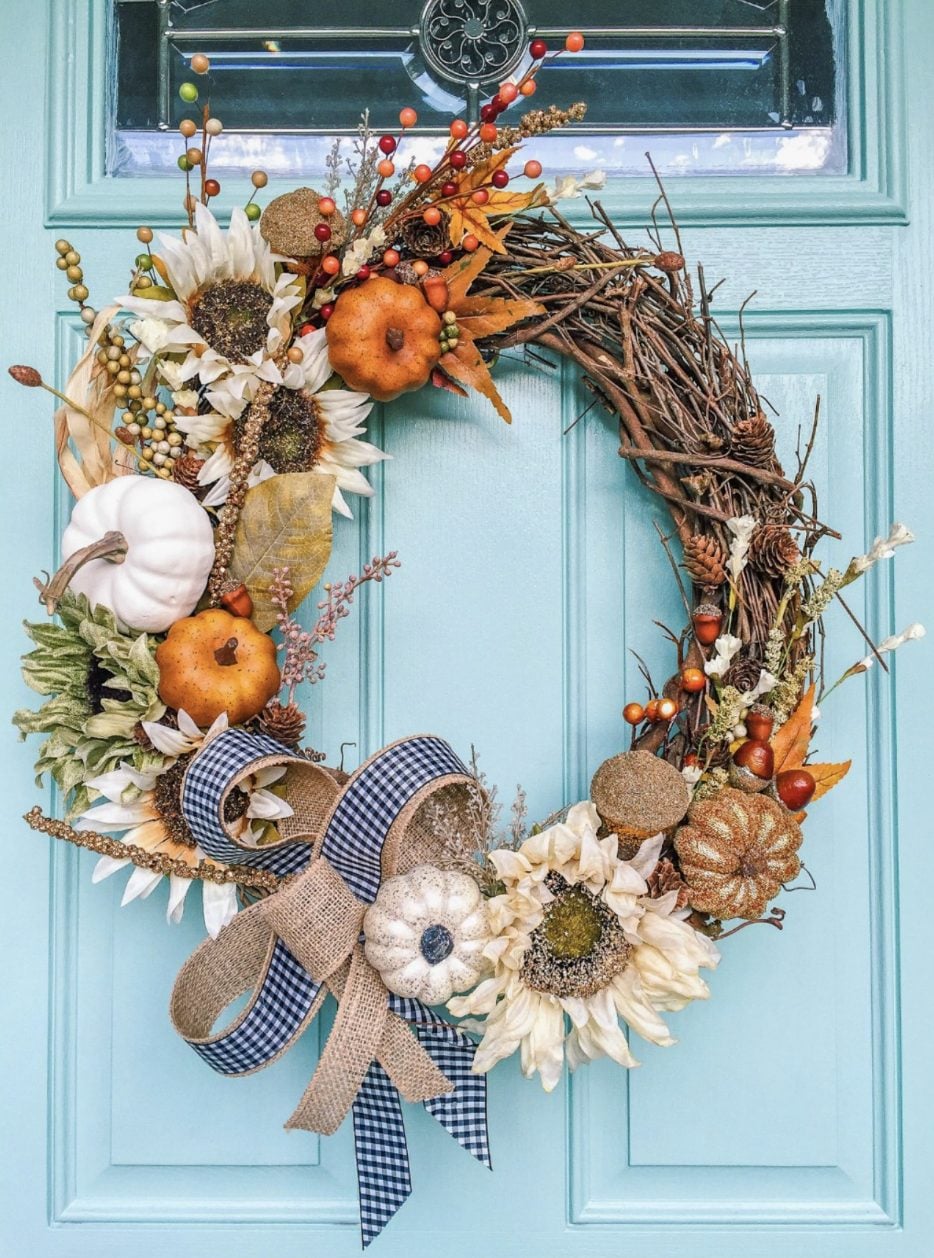
25. Cheerful Gingham and Sunflowers on a Teal Front Door
This bountiful, rustic look is packed with charming details, and the cost reflects the number of elements. Let’s estimate what it would take to build this yourself.
- Wreath Base (Large Wicker/Grapevine): $15 – $22
- Focal Flowers (Sunflowers): $10 – $15
- Accents (Pumpkins, Berries, Pinecones): $20 – $30
- Ribbon (Burlap & Gingham): $8 – $12
- TOTAL: $53 – $79
Budget alternative: Buy a plain grapevine wreath and add only a bow and one type of flower (like the sunflowers) for a simplified version that still captures the cheerful spirit for under $30.
|
📋 Copy HEX 🔗 Share |
💰 Budget Breakdown
What makes this wreath work so beautifully with the door is the clever use of analogous colors. The light teal of the door and the dark blue in the gingham ribbon are neighbors on the color wheel. This creates a harmonious, pleasing color story that feels coordinated but not overly matched. The pop of complementary orange from the pumpkins then provides the perfect point of contrast. It’s a thoughtful color choice that shows a real designer’s eye. This is a great example of working *with* your existing door color.
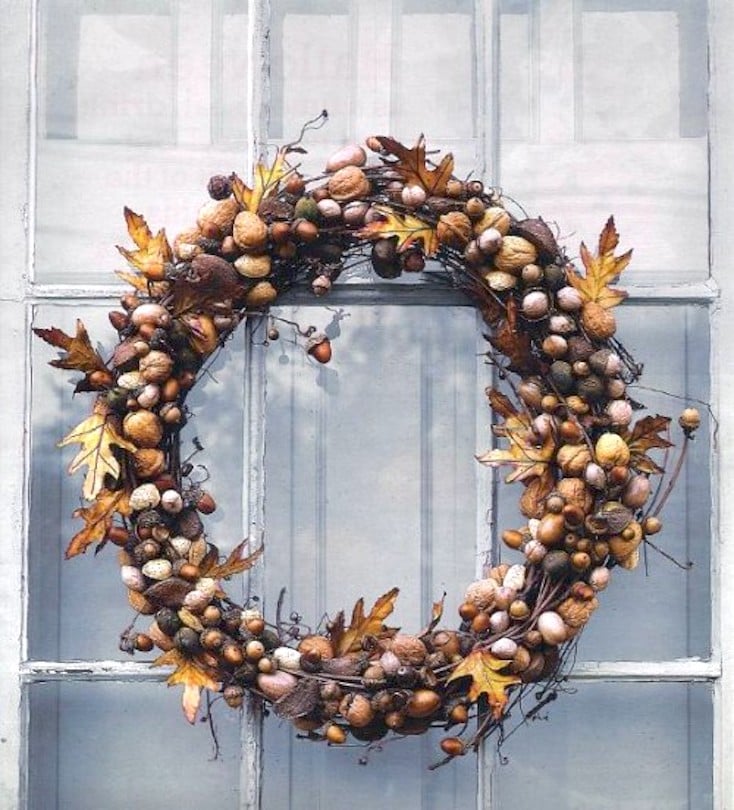
26. A Forager’s Dream: A Wreath Made Entirely of Nuts and Acorns
If you’re using foraged nuts and acorns, you must prepare them properly to prevent mold and critters. This process can take a few days but is crucial.
- Wash all your nuts and acorns in soapy water to remove dirt and any lingering bugs.
- Spread them in a single layer on a baking sheet.
- Bake them in the oven at the lowest possible temperature (usually 170-200°F) for 2-3 hours with the oven door slightly ajar. This will dry them out completely and kill any insect larvae.
- Let them cool completely.
- To get the glossy look, you can spray them with a clear acrylic sealer before gluing them to your wreath form.
|
📋 Copy HEX 🔗 Share |
⚠️ Real Talk
Let’s be real: a wreath made of actual food is a dinner bell for squirrels, chipmunks, and other wildlife. Even with sealant, the scent can attract curious critters who may try to pry your decorations off for a snack. This is a strictly indoor-only project. Hang it on a dining room wall, in the kitchen, or above a mantelpiece where you can enjoy its unique, natural texture without inviting unwanted furry guests to dismantle your hard work overnight. For a durable outdoor option, consider the burlap leaf design in Idea #28.
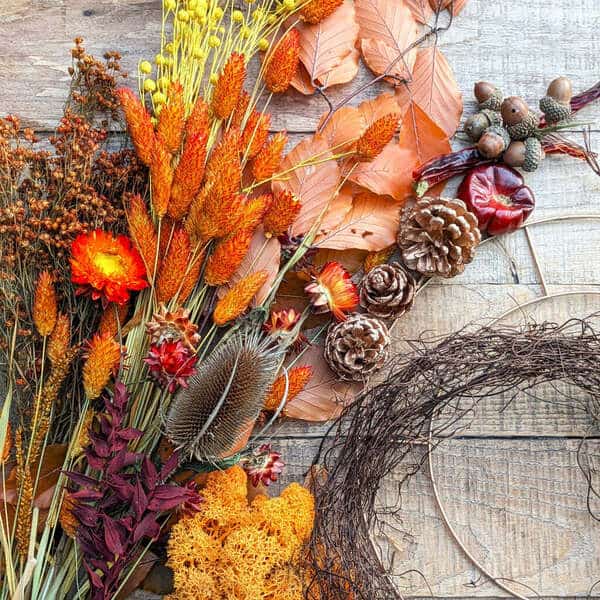
27. Your DIY Toolkit: Dried Botanicals and a Simple Twig Base
Before you begin your foraged-style wreath, gather and organize your materials. A little prep makes the creative process much smoother.
- Lay out all your dried elements on your work surface. Group them by type: leaves, grasses, flowers, pinecones.
- Have your tools ready: a sturdy twig or grapevine wreath base, a hot glue gun with plenty of extra glue sticks, and floral wire for heavier items.
- Decide on a general shape. Will you cover the whole wreath, or create an asymmetrical crescent shape?
- Start with your largest elements first to create the basic structure, then fill in with smaller, more delicate items.
|
📋 Copy HEX 🔗 Share |
🔥 Trending Context
This image perfectly captures the spirit of the “cottagecore” and natural crafting trends that continue to dominate DIY spaces. There’s a growing desire to disconnect from digital life and engage in tactile, hands-on activities. Crafting a wreath from foraged or natural materials is a direct expression of this movement. It’s about celebrating the beauty of the natural world, finding joy in a slow, creative process, and making something for your home that is personal and imperfect. It’s less about a flawless product and more about the authentic experience.
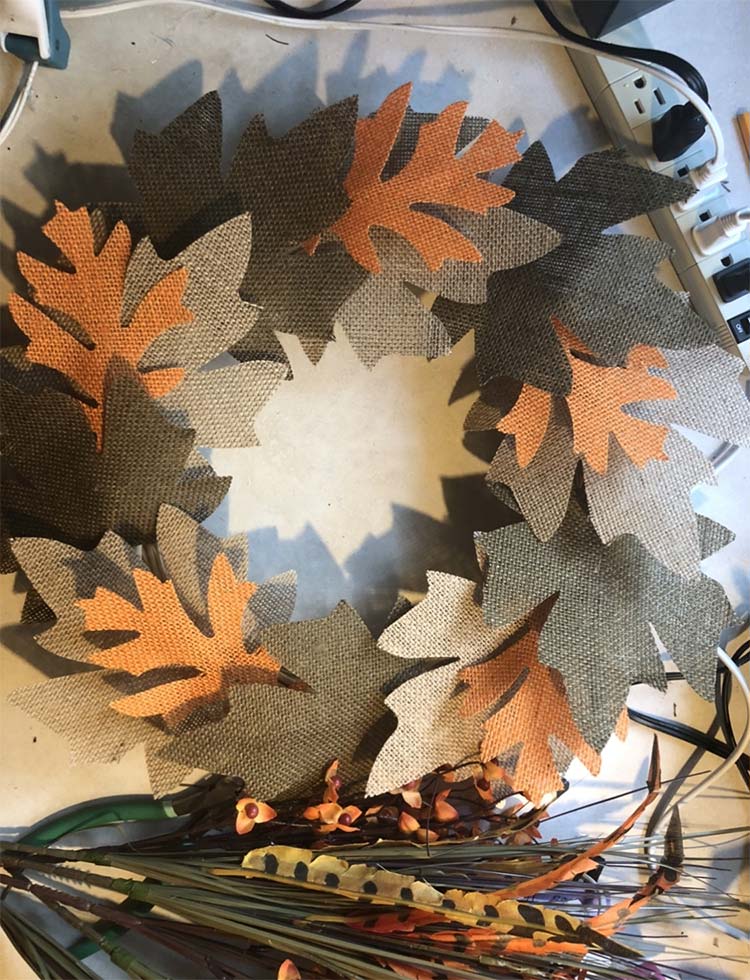
28. Create Stunning Texture with Layers of Burlap Leaves
The genius of this wreath lies in its layered construction. It’s not just about using burlap; it’s about how the burlap leaves are cut and overlapped to create a rich, fringed texture that mimics real foliage. The subtle variation in the grey-green and beige tones adds depth, while the pops of orange provide that essential autumnal warmth. If you simply wrapped the wreath form in a single piece of burlap, you would lose all of the sophisticated, feathery texture that makes this design so unique and compelling.
|
📋 Copy HEX 🔗 Share |
📏 Scale Guide
This is a project where a small budget can yield huge results. Burlap is one of the most inexpensive craft materials available, often selling for just a few dollars per yard. You can buy it in several colors or even dye your own. You can cut the leaf shapes by hand or use a die-cutting machine if you have one. A simple wire wreath form is also very affordable. For less than $20 and a bit of time, you can create a large, highly textural wreath that looks like it came from a high-end boutique.
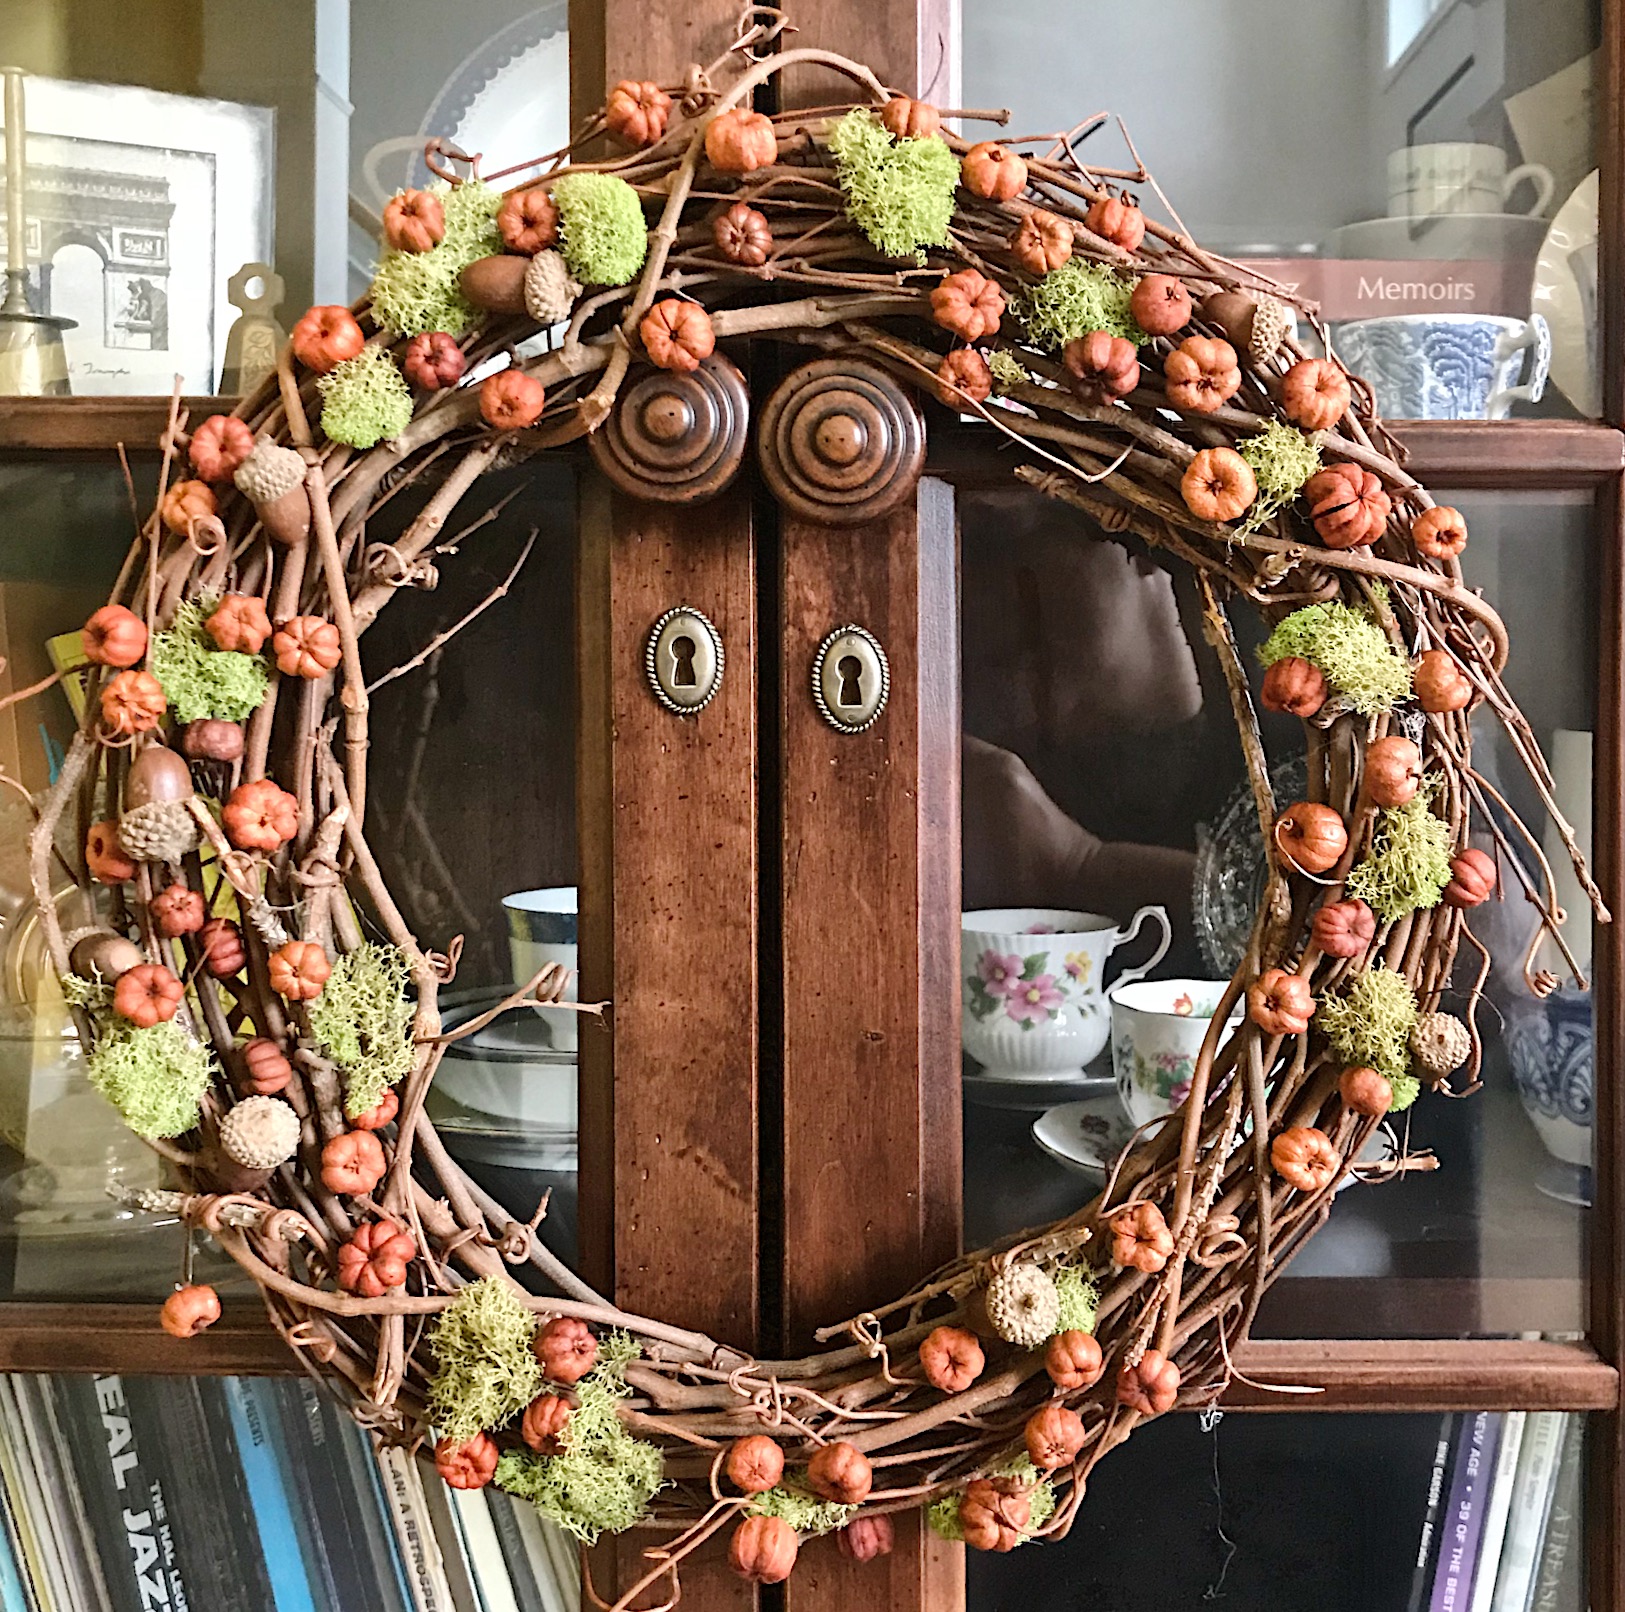
29. An Indoor Accent: A Mini-Pumpkin Wreath on a Vintage Cabinet
Don’t limit your wreaths to the front door! A beautifully crafted fall wreath can be a powerful piece of interior decor. Hanging a wreath on a piece of furniture, like this vintage cabinet, instantly adds a layer of seasonal charm and creates a strong focal point in a room. It breaks up the hard lines of the wood and adds a pop of color and texture. Try this on armoires, bookcases, large mirrors, or even on the pantry door in your kitchen for an unexpected touch of fall.
|
📋 Copy HEX 🔗 Share |
📐 Style Math
This idea highlights the charm of using a smaller-scale wreath (likely 12-16 inches) as an accent piece. A wreath of this size would be too small for a front door, but it’s perfectly proportioned for this cabinet door. The rule of thumb is to choose a wreath that is about half the width of the door or panel it’s hanging on. This ensures it looks like a deliberate accent, not an afterthought. For a comparison of a large-scale wreath, look at Idea #18 which is designed for a full-sized door.
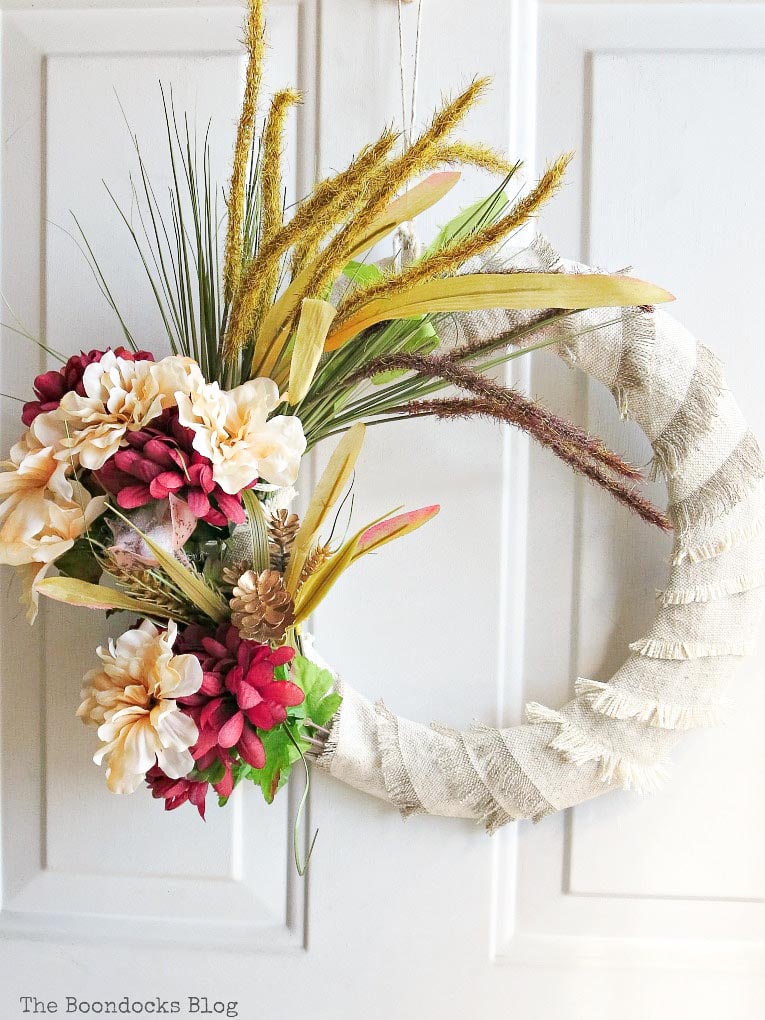
30. Elegant Burlap: Crimson Florals and Golden Pinecones
This design masterfully blends rustic and refined elements. The formula is approximately 60% Rustic Burlap + 30% Elegant Florals + 10% Gilded Accent. The fringed, natural burlap provides a humble, textural base. The deep crimson and cream flowers add a layer of classic elegance and rich color. Finally, the small, gold-painted pinecones provide a tiny bit of sparkle and luxury, tying the whole look together. This high/low combination is what makes the wreath feel so sophisticated.
|
📋 Copy HEX 🔗 Share |
🧹 Maintenance Reality
This wreath succeeds by creating a beautiful tension between textures and styles. The rough, humble burlap is a perfect foil for the soft, velvety petals of the crimson flowers. One is rustic, the other is romantic. The natural, organic shape of the ornamental grasses contrasts with the glint of the metallic gold pinecones. This high-low mix—pairing something very plain with something quite elegant—is a classic interior design trick that always creates a more interesting and expensive-looking result.
Your Front Door’s Story Starts Here
Don’t just make a wreath, make a statement. Each of these ideas is a starting point for your own unique creation. Let your personality shine through, have fun with the process, and welcome the season in style. Now head over to Pinterest and start creating your own fall inspiration board!