It’s a familiar story: you have a Pinterest board overflowing with gorgeous built-in storage, but your own walls are still stubbornly blank. That’s because translating inspiration into a real-life plan can be the hardest part. After sifting through hundreds of designs from top-tier custom shops to clever IKEA hacks, we’ve curated 29 truly inspiring—and achievable—built-in ideas that solve real-world storage problems. Inside, you’ll find everything from cozy reading nooks to hyper-organized closets, covering styles like modern minimalist, classic traditional, and warm transitional. And stay until the end—we break down the most common mistakes that can ruin these looks. 📌 Save this to Pinterest for later — you’ll want to revisit these ideas.
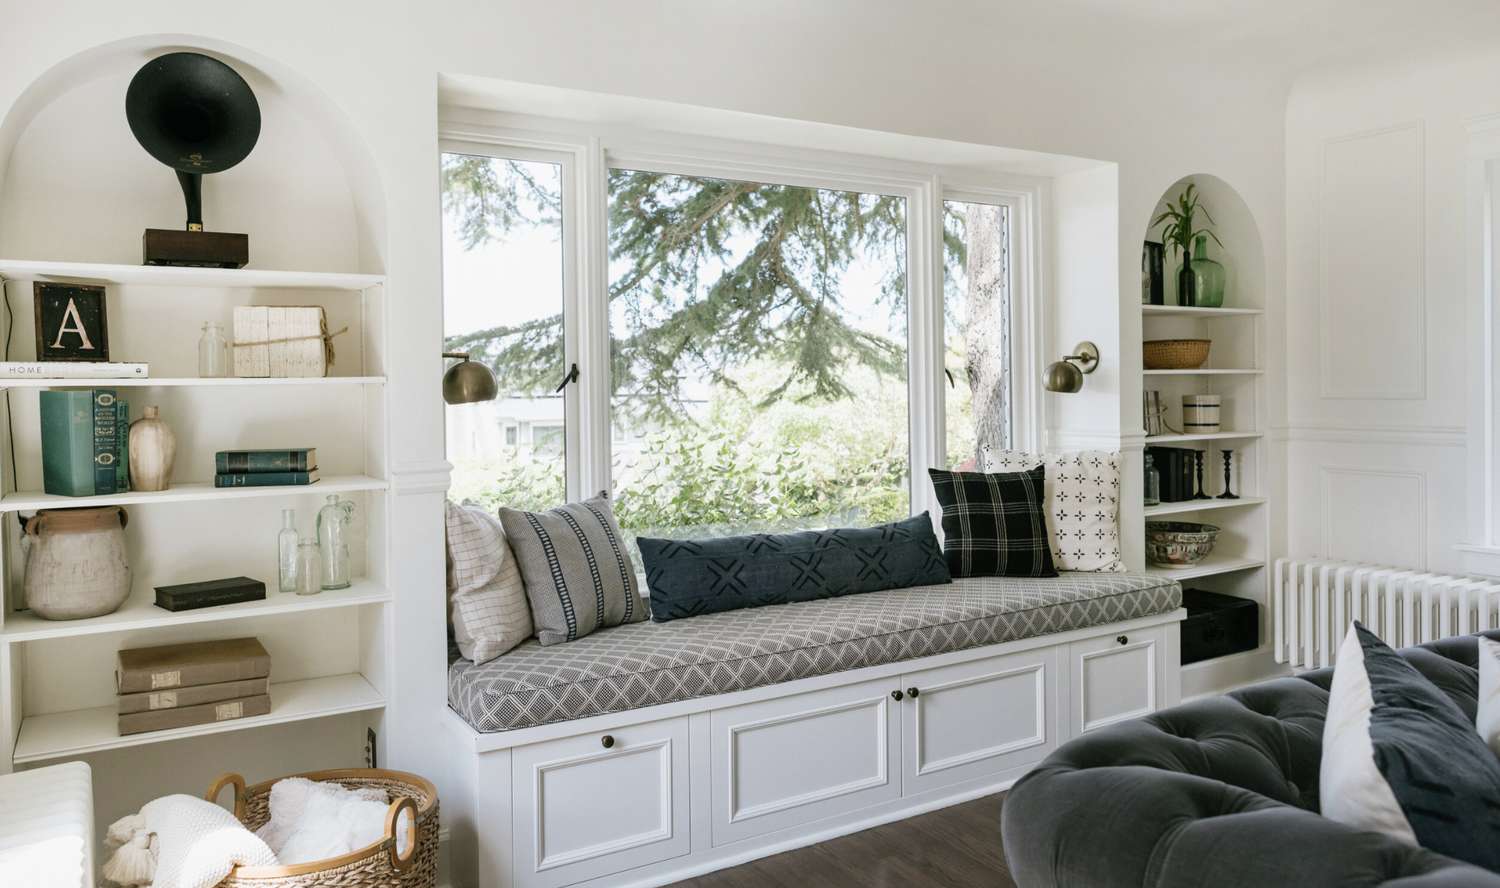
1. Frame a Bay Window with Symmetrical Arched Bookshelves
This design is a masterclass in using built-ins to create a focal point. The perfect symmetry of the arched bookshelves flanking the window seat creates a feeling of calm and order, drawing your eye right to the view outside. The arches themselves are a brilliant touch; they soften what could otherwise be a very boxy, imposing wall of cabinetry. That curve adds a hint of classical architecture, making the whole setup feel timeless and elegant rather than just functional.
|
📋 Copy HEX 🔗 Share |
💰 Budget Breakdown
You don’t need a five-figure budget to get this look. Start with two IKEA BILLY bookcases. You can find pre-made MDF arch tops online or at specialty hardware stores that can be attached and painted to match. For the base, an IKEA STUVA or SMÅSTAD bench provides ready-made seating and storage. A custom-sewn cushion using fabric from a local store and a couple of affordable brass sconces from Amazon or Target will complete the scene for around $800, a fraction of the cost of custom millwork.
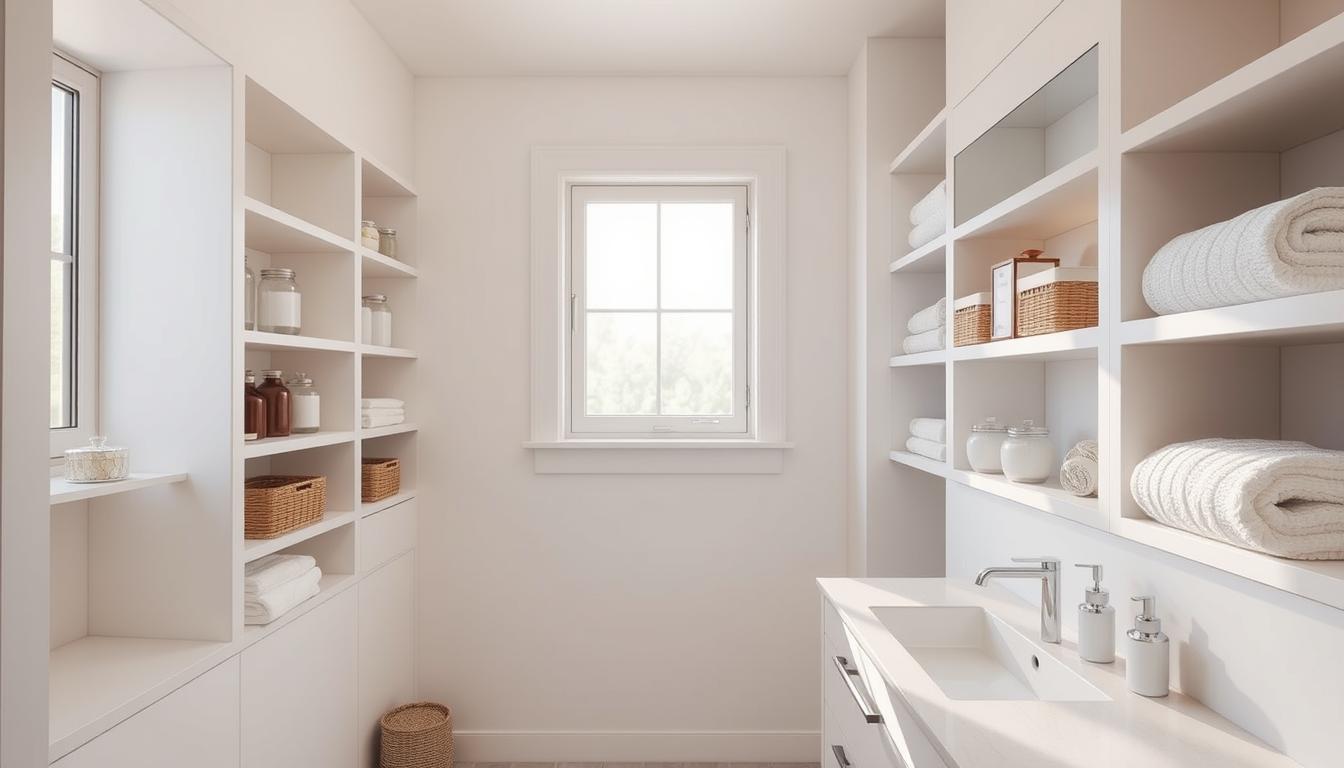
2. Maximize Bathroom Space with Wall-to-Wall White Shelving
When you’re designing bathroom shelving, depth is everything. For storing folded towels, aim for a shelf depth of at least 14 inches, but no more than 16 inches. Anything deeper and you risk items getting lost in the back. For smaller items like toiletries, jars, and baskets, a depth of 8-10 inches is perfect. By varying the depth based on function, you create a more dynamic look and keep everything accessible. Here, the deeper cabinets below provide hidden storage, while the upper open shelves feel light and airy.
|
📋 Copy HEX 🔗 Share |
💡 Designer Tip
The visual recipe here is about clean lines and subtle texture. It’s roughly 70% crisp white surfaces (cabinetry, walls, sink) + 20% natural texture (woven baskets) + 10% metallic accent (chrome fixtures). This formula creates a serene, spa-like atmosphere. You could easily swap the accents to change the mood while keeping the core balance. For instance, switching to matte black fixtures and dark wood baskets would lend a more modern, dramatic feel without altering the fundamental design.
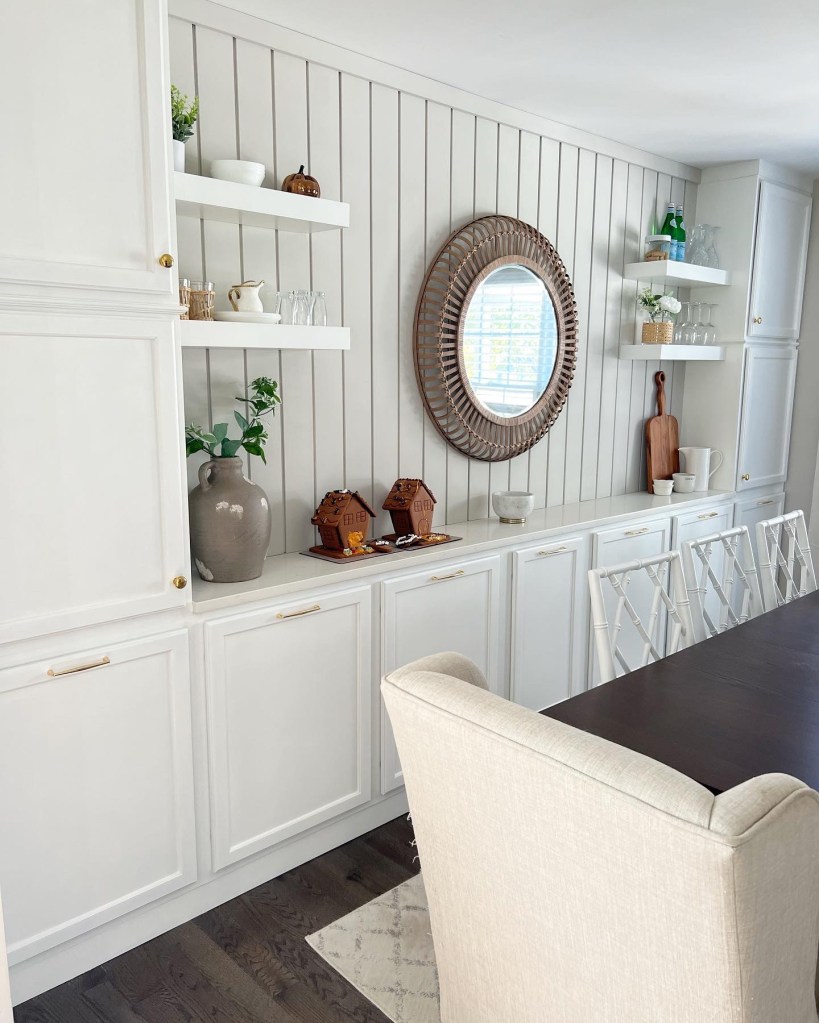
3. Mix Shaker Cabinets with a Vertical Paneled Accent Wall
The single element that elevates this entire wall is the light gray vertical paneled section. Without it, you’d have a perfectly nice, but standard, wall of white Shaker cabinets. That central paneling adds texture, depth, and a subtle focal point. It breaks up the visual monotony of the cabinet fronts and provides a beautiful backdrop for the floating shelves and round mirror. It’s a designer move that adds custom character and prevents the built-in from feeling like a generic flat-pack installation.
|
📋 Copy HEX 🔗 Share |
⭐ The One Thing
Thinking of adding a feature like this? Run through this quick checklist first:
- Measure your wall width and ceiling height precisely. You need to plan the proportions of the side towers versus the central open space.
- Locate your wall studs. Floating shelves carrying any significant weight must be anchored directly to studs.
- Confirm your color palette. Get paint and material samples (wood, countertop, hardware finish) and view them in the room’s actual light at different times of day.
- Finalize your storage needs. Are you displaying decor or storing heavy dinnerware? This will dictate the shelf material and bracket requirements.
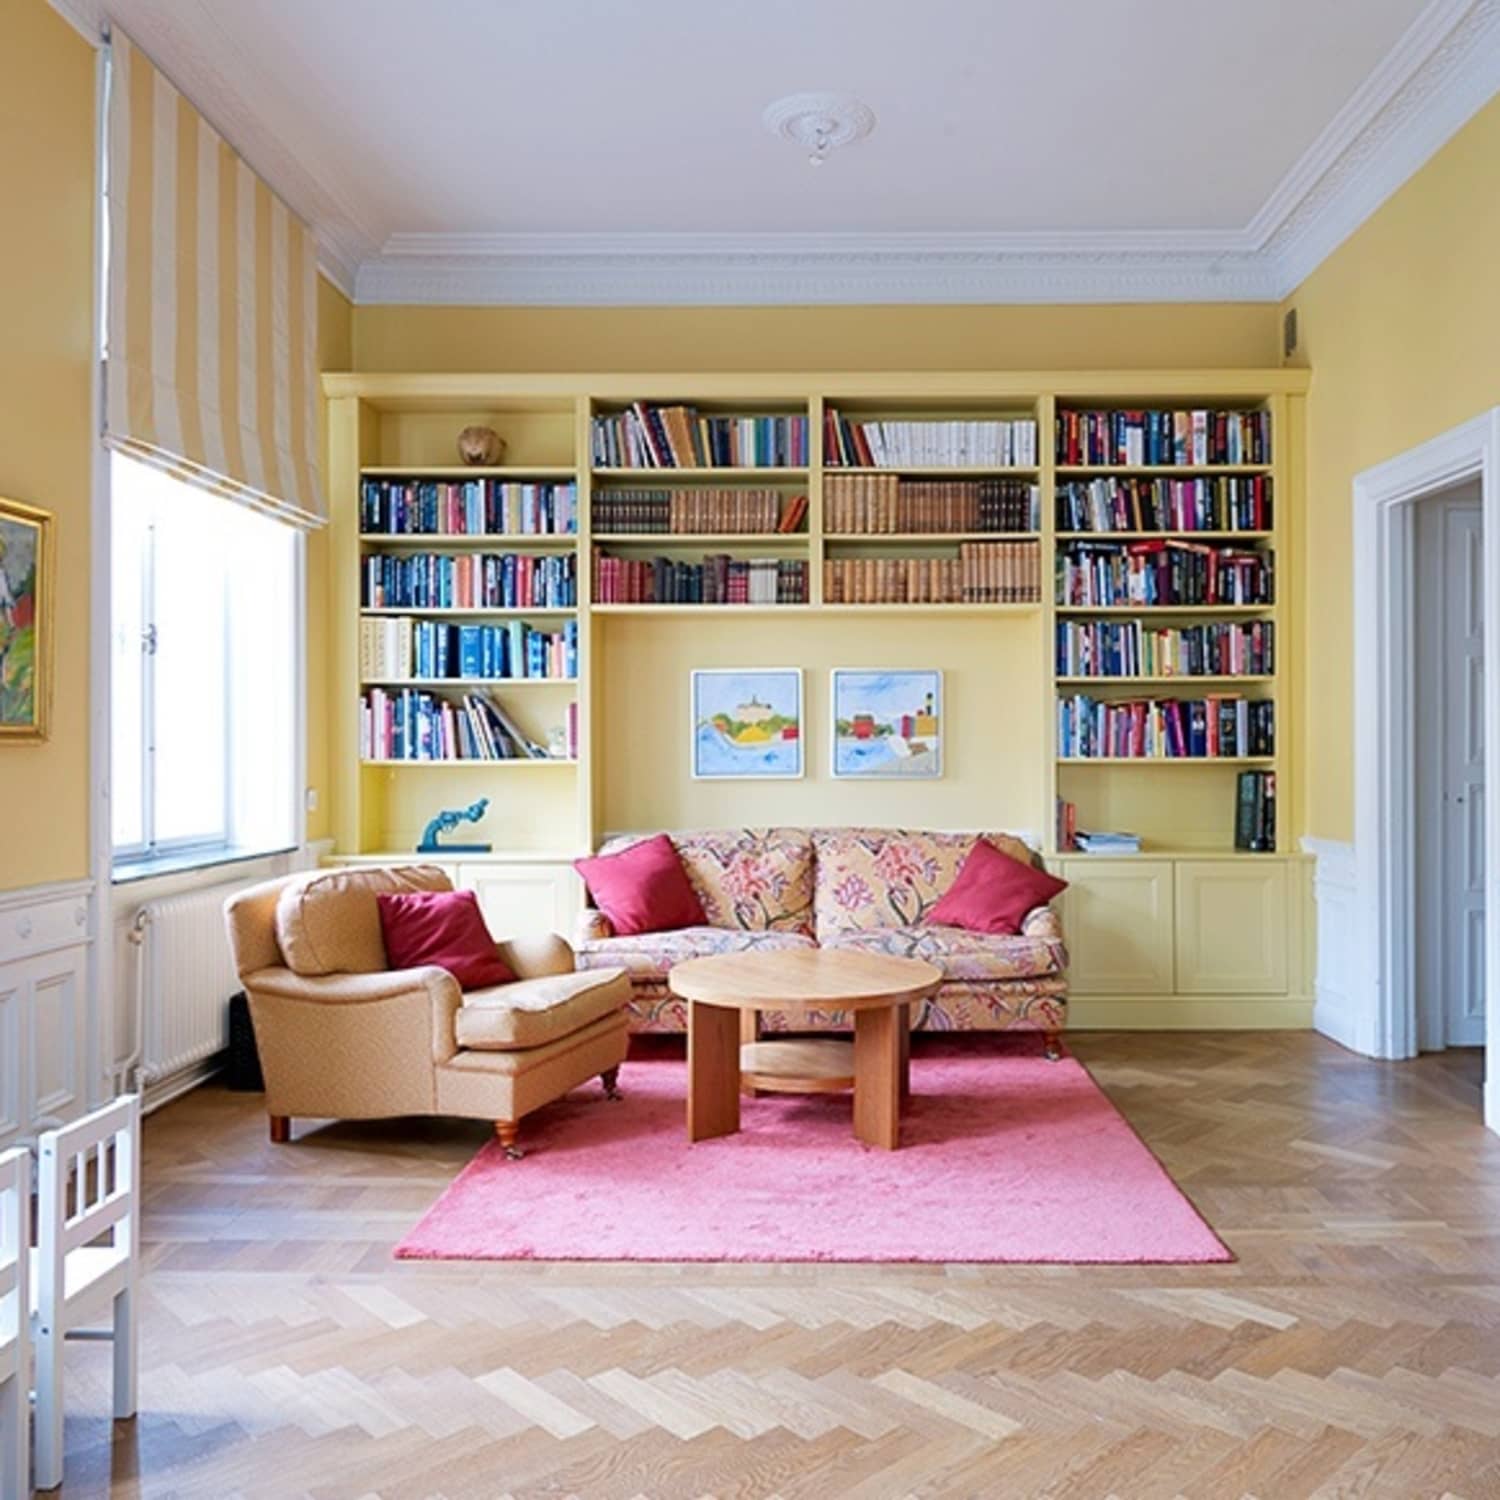
4. Go Bold with Floor-to-Ceiling Bookshelves in Pale Yellow
This room works because of a brave use of color and a commitment to a single purpose. Painting the massive bookshelf unit the same pale yellow as the walls is a brilliant move. Instead of appearing as a bulky piece of furniture, the built-in merges with the architecture of the room, feeling both expansive and cohesive. This monochromatic approach allows the varied colors of the book spines themselves to become the primary pattern and decoration, turning everyday objects into art.
|
📋 Copy HEX 🔗 Share |
🧹 Maintenance Reality
A wall of books looks incredible, but let’s be honest about the upkeep. A floor-to-ceiling unit like this is a major dust magnet. You’ll need to commit to a weekly dusting routine, likely with a microfiber extender duster, to keep it looking fresh. Also, consider the weight. A wall completely filled with books is incredibly heavy; the unit must be professionally secured to the wall studs to prevent any risk of tipping, especially in a home with children or pets.
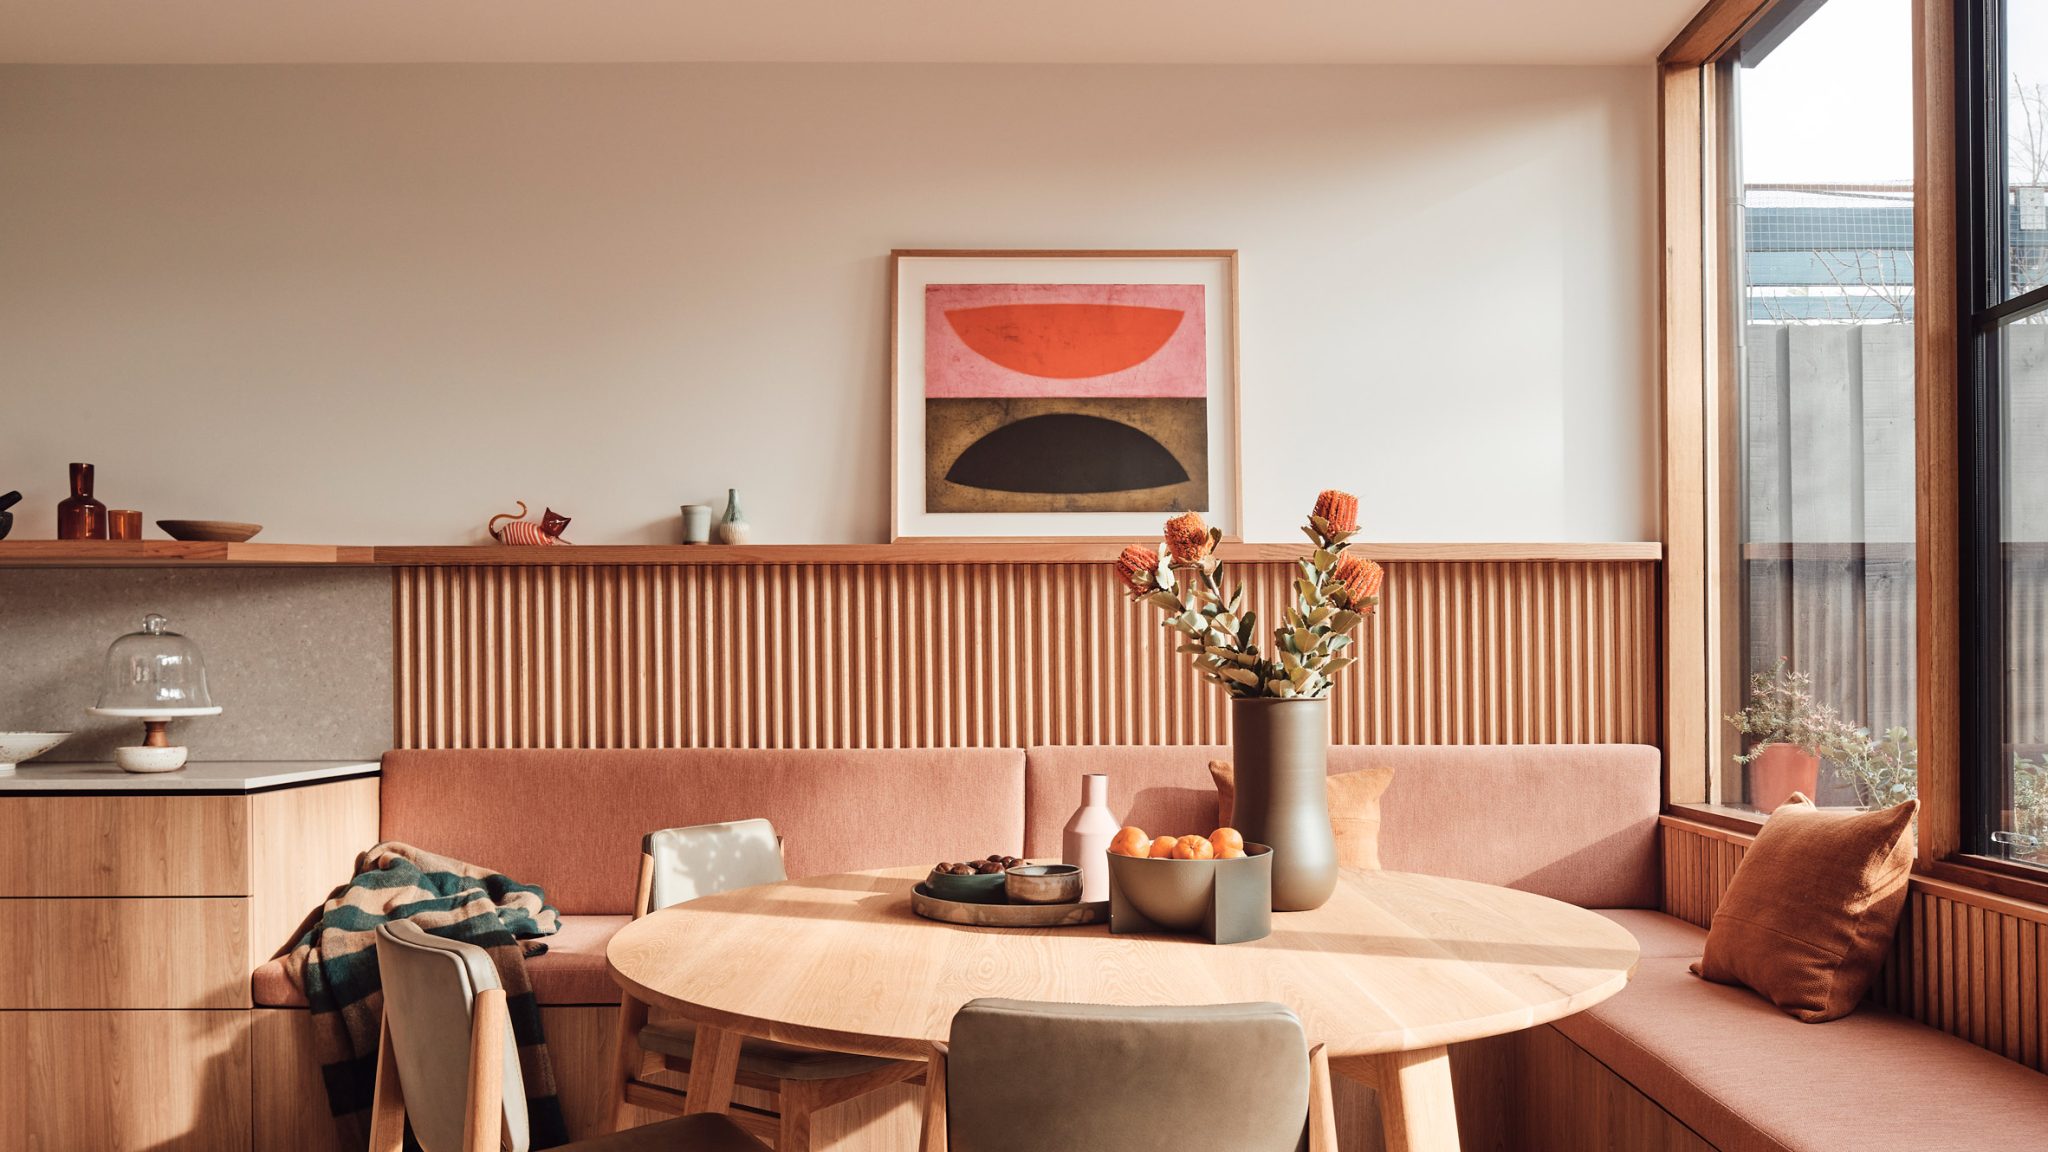
5. Integrate a Banquette with Fluted Wood Paneling
Fluted wood paneling is having a huge moment, and this is the perfect example of why. It adds instant texture and architectural interest without overwhelming a space with color or pattern. This trend is a direct response to years of flat, minimalist surfaces; people are craving warmth and tactile details. It’s a nod to Art Deco and mid-century design, but the light wood tone and clean lines keep it feeling fresh and modern. It’s a trend with staying power because it’s rooted in classic architectural detailing.
|
📋 Copy HEX 🔗 Share |
✅ Before You Start
A fabric banquette in a dining area looks chic, but it’s a high-traffic spot for spills. Opting for a high-performance fabric (like Sunbrella or Crypton) is non-negotiable here. These textiles are engineered to be stain-resistant and easy to clean, which is essential for a dining seat. For the fluted wood, a simple wipe-down with a dry microfiber cloth is usually enough. For an occasional deeper clean, a slightly damp cloth followed by a dry one will handle any smudges without damaging the wood finish.
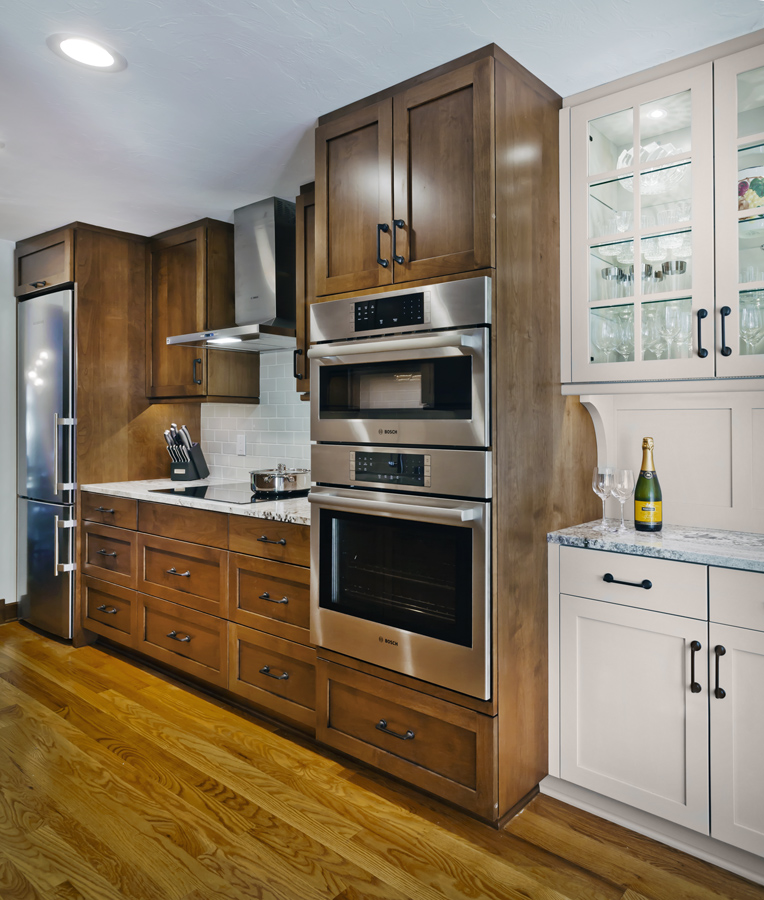
6. Streamline Your Kitchen with Contrasting Wood and Cream Cabinetry
When integrating appliances, the goal is to make them part of the cabinetry, not just things stuck in a hole. Pay attention to the reveals—the small gaps around the appliances. Aim for a consistent reveal of 1/8 to 1/4 inch on all sides. This creates a clean, intentional look. Also, ensure the faces of your appliances sit perfectly flush with the surrounding cabinet fronts. This might require your cabinetmaker to build out the appliance box slightly, but the seamless result is worth the effort.
|
📋 Copy HEX 🔗 Share |
🔥 Trending Context
A full wall of built-in cabinets, including integrated ovens and a refrigerator, is best suited for kitchens with at least one long, uninterrupted wall of 10 feet or more. The ceiling height should be a standard 8 feet or higher to avoid a top-heavy, crowded feeling. This approach is fantastic for galley kitchens or open-plan spaces where you want to consolidate the main “working” elements onto one wall, leaving more open space elsewhere. If your space is smaller, consider the more open feel of Idea #8.
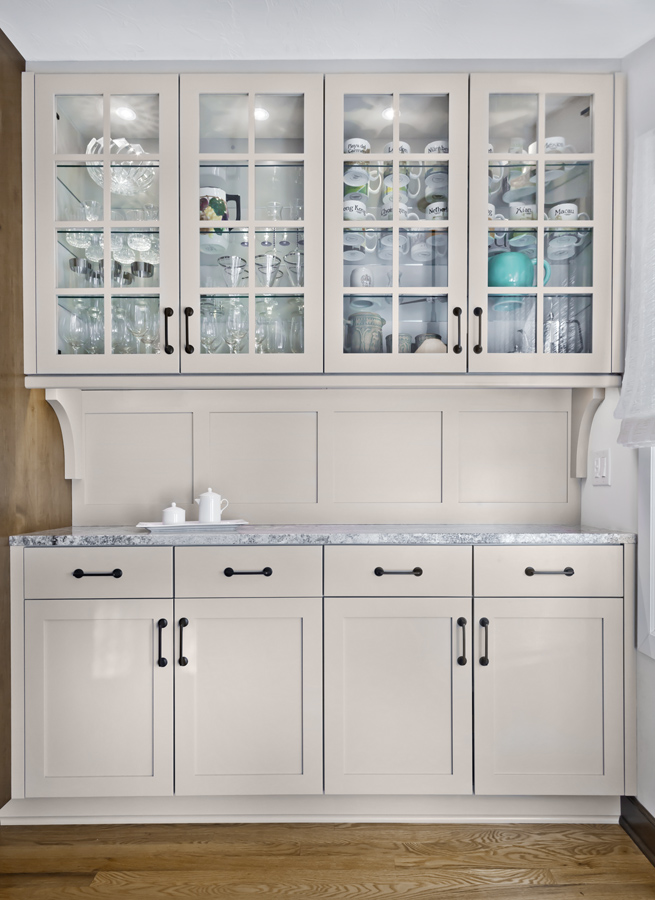
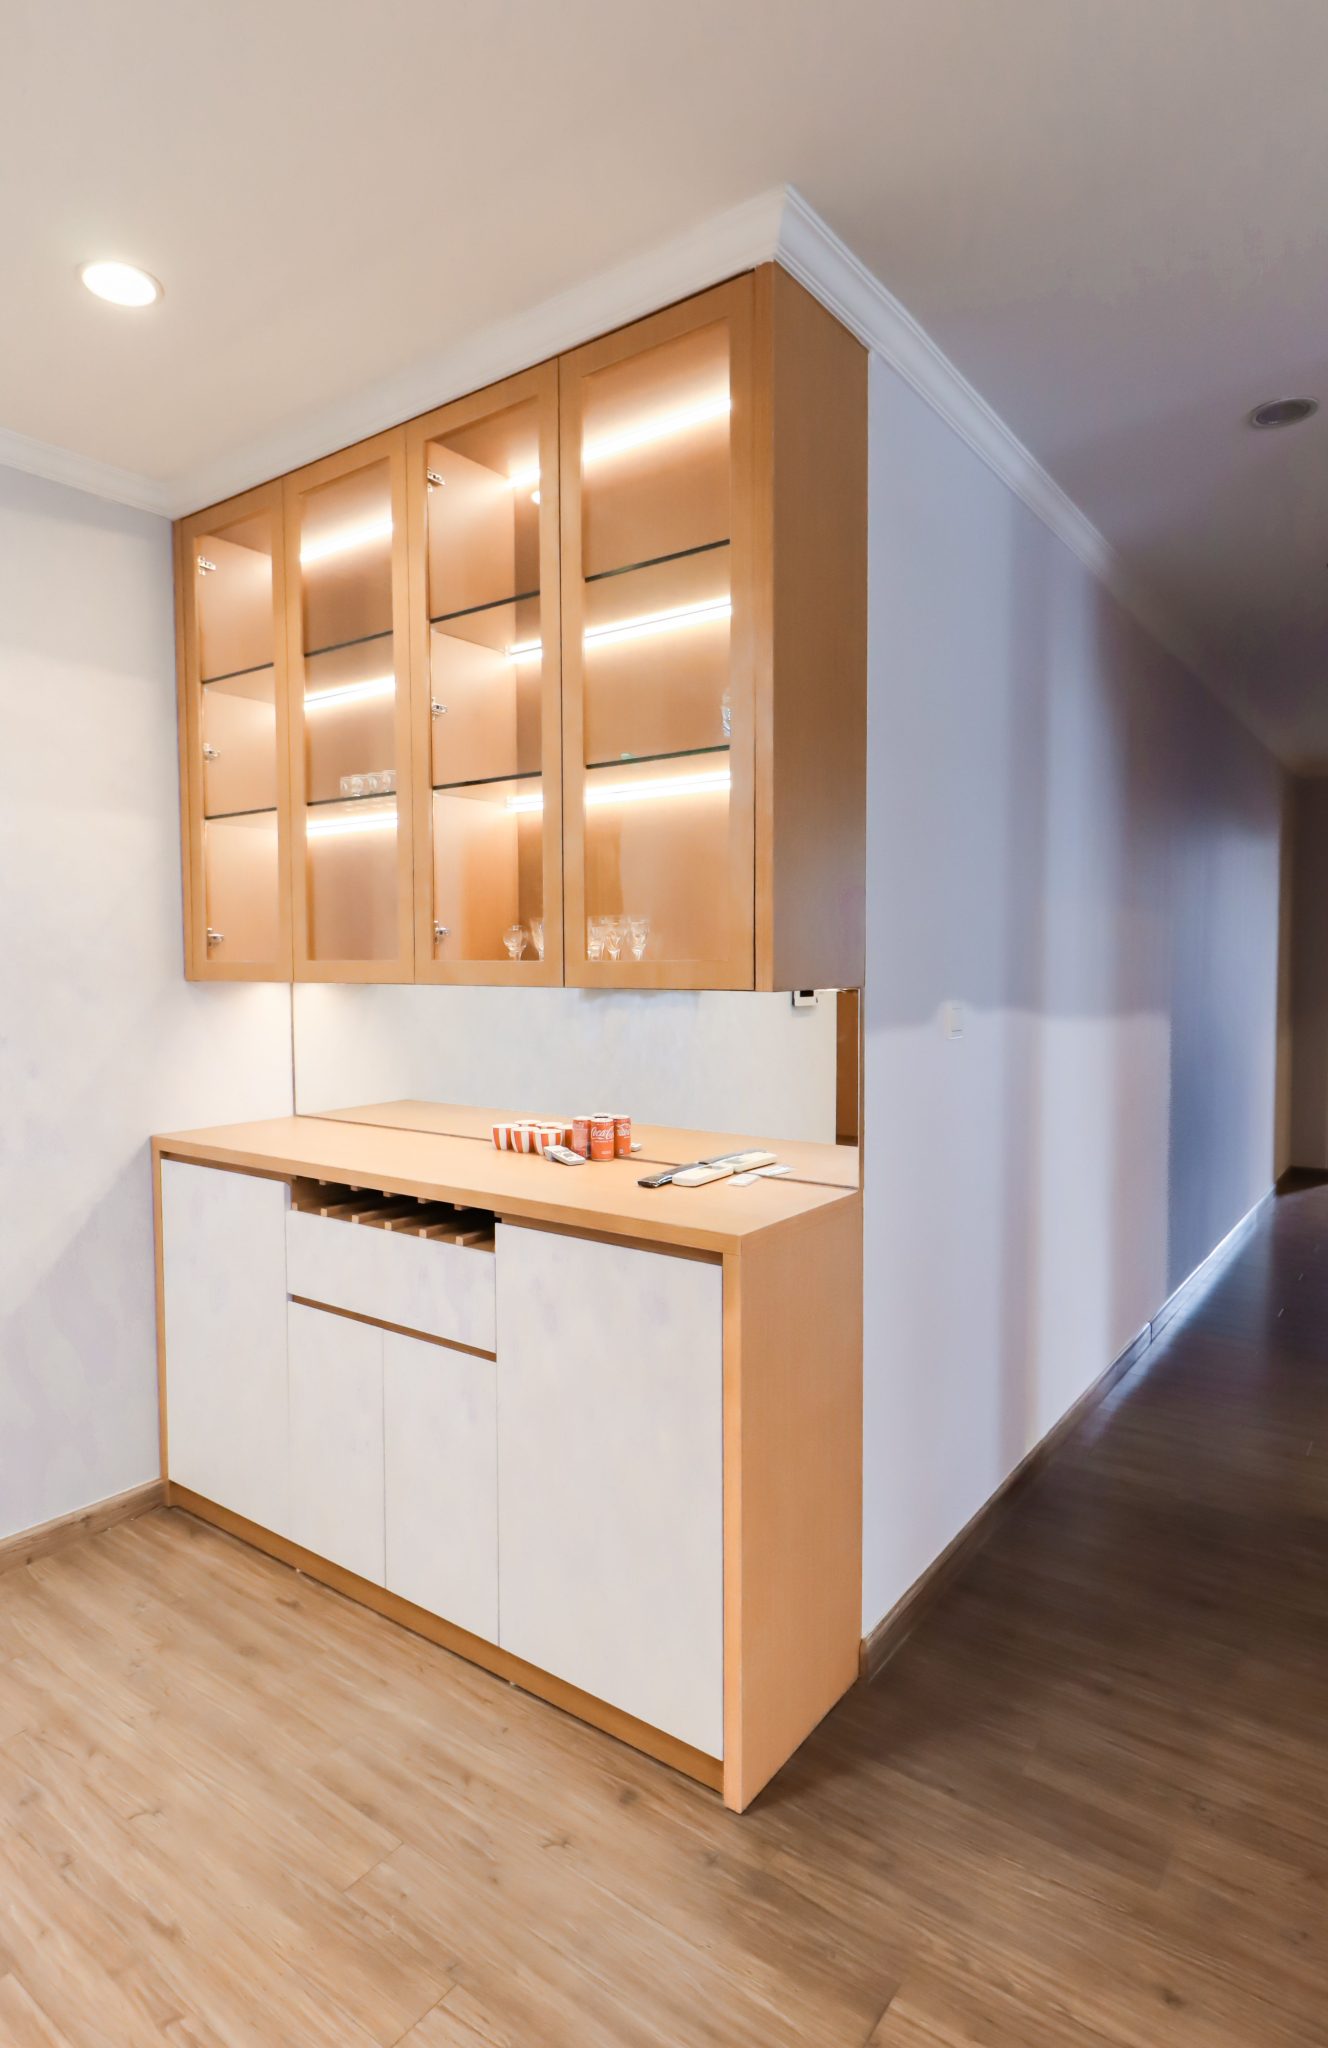
7. Add a Classic Touch with a Light-Colored Buffet and Glass-Front Cabinets
Installing internal cabinet lighting can elevate a standard built-in to a high-end feature. Here’s a quick guide to adding it yourself:
- Choose your light: Opt for low-profile LED tape or puck lights (12V or 24V). Tape provides a more even glow.
- Plan the wiring: Drill small holes in the back or bottom corners of the cabinet to run the low-voltage wires. Plan a path down to the power source, usually hidden in the lower cabinet.
- Install the lights: Most LED tape has an adhesive back. Run a strip along the inside front face of the cabinet on each side, facing inward. This illuminates the contents without creating glare.
- Connect to power: Wire the lights to a transformer, which then plugs into a standard outlet. For a cleaner look, have an electrician hardwire it to a switch.
Total time: 2-3 hours. Cost: $50 – $150.
|
📋 Copy HEX 🔗 Share |
🔧 How-To Brief
Recreating this lighted buffet involves several key costs:
- Base Cabinets (semi-custom): $1,500 – $3,000
- Upper Glass-Front Cabinets (semi-custom): $1,200 – $2,500
- Countertop (quartz or granite): $800 – $2,000
- Hardware & Lighting: $200 – $500
- Installation: $1,000 – $2,000
- TOTAL: $4,700 – $10,000
Budget alternative: Use IKEA base cabinets with custom glass-front doors from a company like Semihandmade. A butcher block countertop and off-the-shelf LED lighting could bring the total project cost down to $2,000 – $4,000.
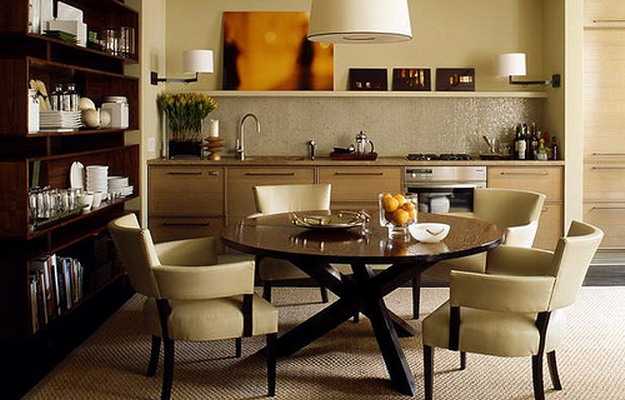
8. Contrast Dark Open Shelving with a Natural Wood Kitchenette
This design succeeds by creating distinct zones through material choices. The tall, dark wood shelving unit acts as a handsome, library-like anchor for the dining area. It feels like a piece of furniture. Next to it, the light natural wood and pale tiles of the kitchenette create a bright, functional work zone. The contrast is bold but effective; it helps define the different functions within a compact space, preventing it from feeling like one monotonous block of storage.
|
📋 Copy HEX 🔗 Share |
💸 Get This Look For Less
Open shelving looks effortlessly chic in photos, but it requires a commitment to curation. These shelves are not for your mismatched Tupperware. They force you to be organized and intentional about what you display, as every item contributes to the room’s overall aesthetic. If you’re not naturally tidy, or if you have a lot of practical-but-not-pretty kitchenalia, this might become a source of visual stress. A mix of open and closed storage, like in Idea #3, might be a more practical solution.
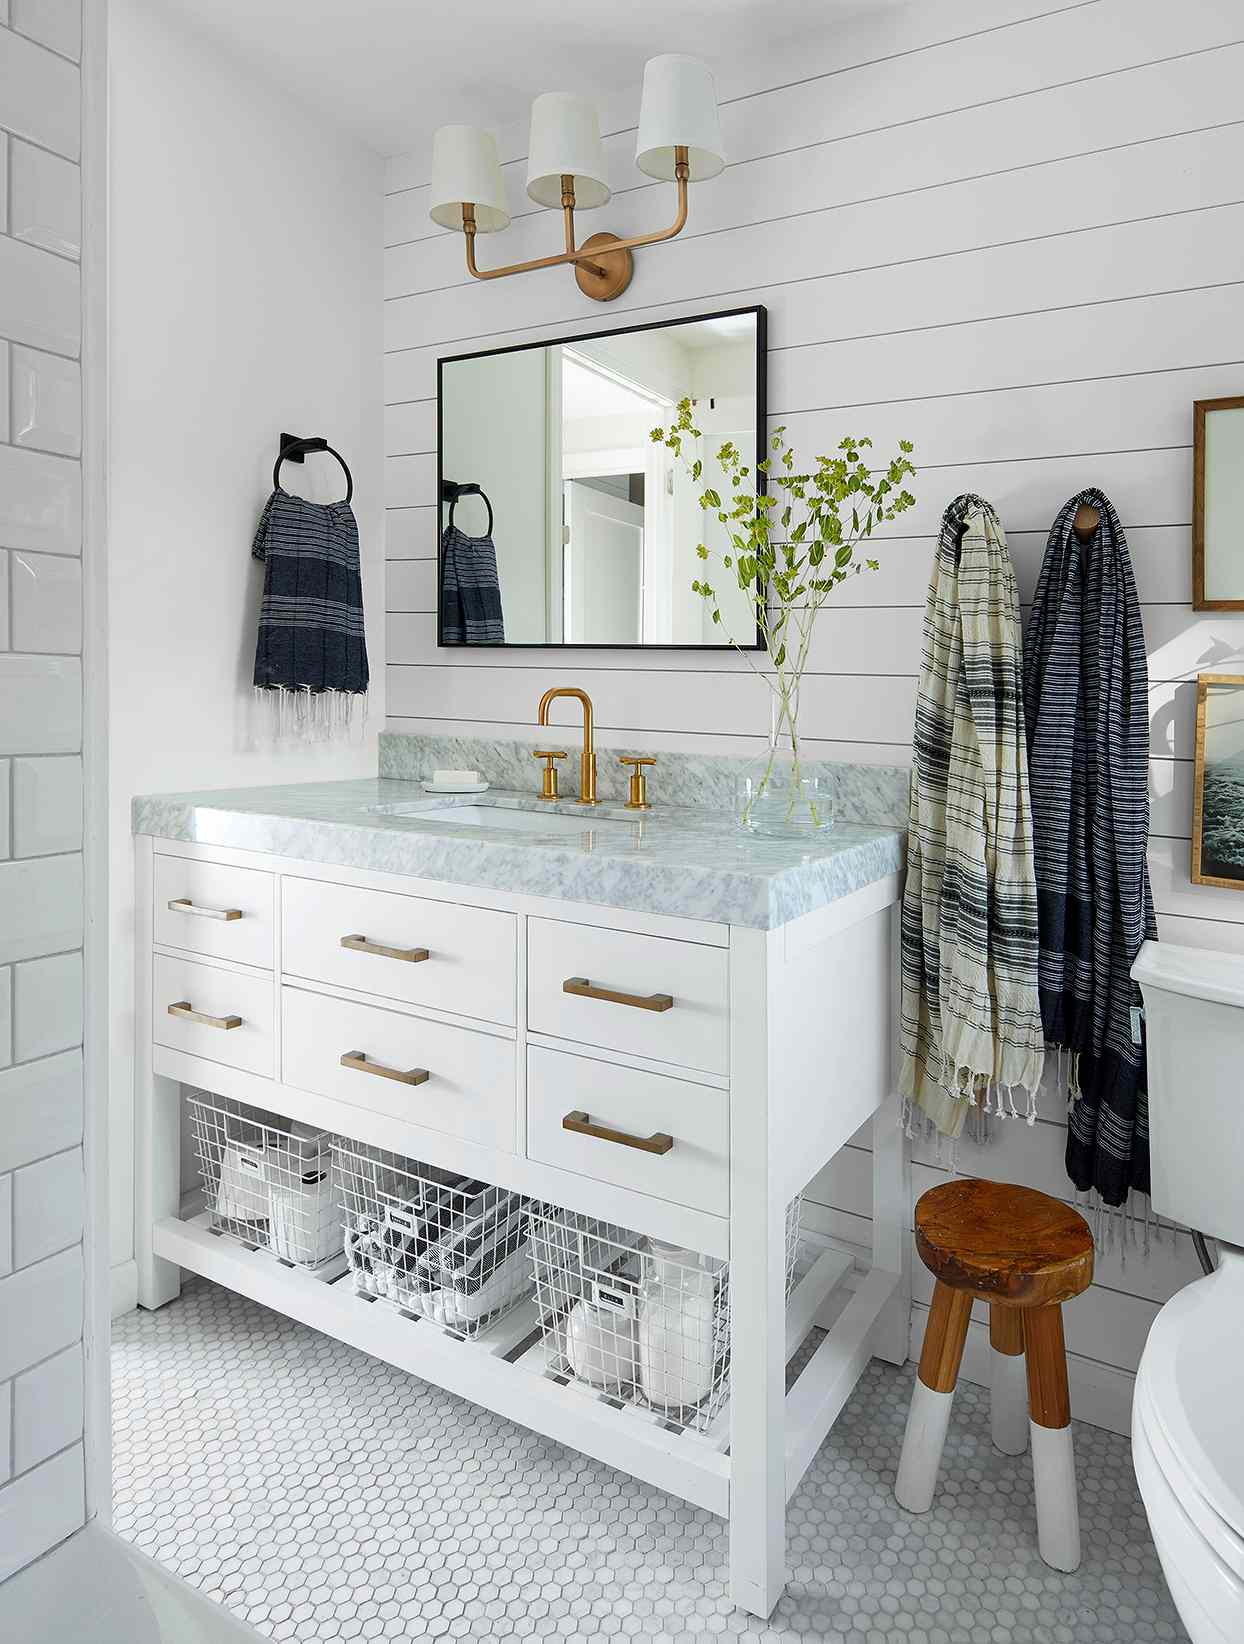
9. Combine Drawers and Open Storage in a Bathroom Vanity with Wire Baskets
The open shelf with wire baskets is the key feature that makes this vanity feel fresh and less formal. A standard vanity with only closed doors and drawers can feel heavy and blocky. By opening up the bottom section, the design introduces a lighter, airier element. It also offers incredibly practical, grab-and-go storage. The wire baskets keep things contained and tidy while still allowing you to see the contents at a glance—perfect for guest towels or extra bath supplies.
|
📋 Copy HEX 🔗 Share |
📏 Scale Guide
While the white wire baskets look crisp and clean, they can be a bit of a nuisance to maintain. Dust and bathroom condensation can accumulate on the wire grid, requiring more detailed cleaning than a solid-sided bin. Regular wipe-downs are a must. Also, be mindful of what you store in them. Small items can fall through, and if you overstuff them, the contents can look messy and defeat the purpose of the organized aesthetic. They are best used for neatly rolled towels or larger items.
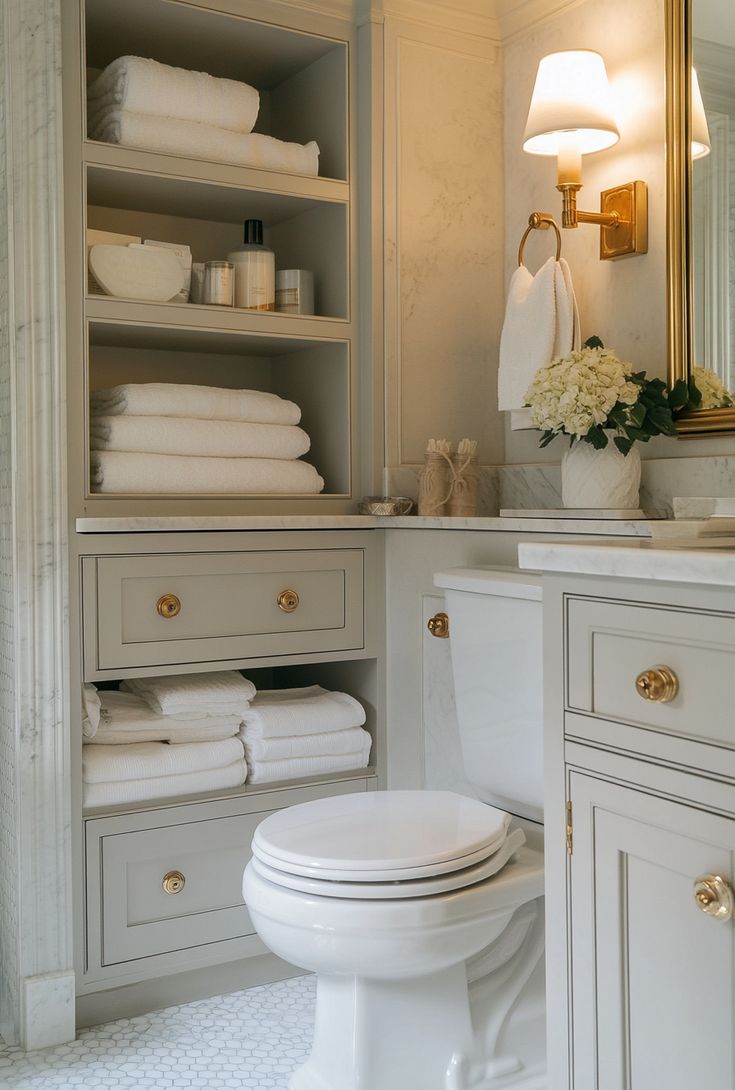
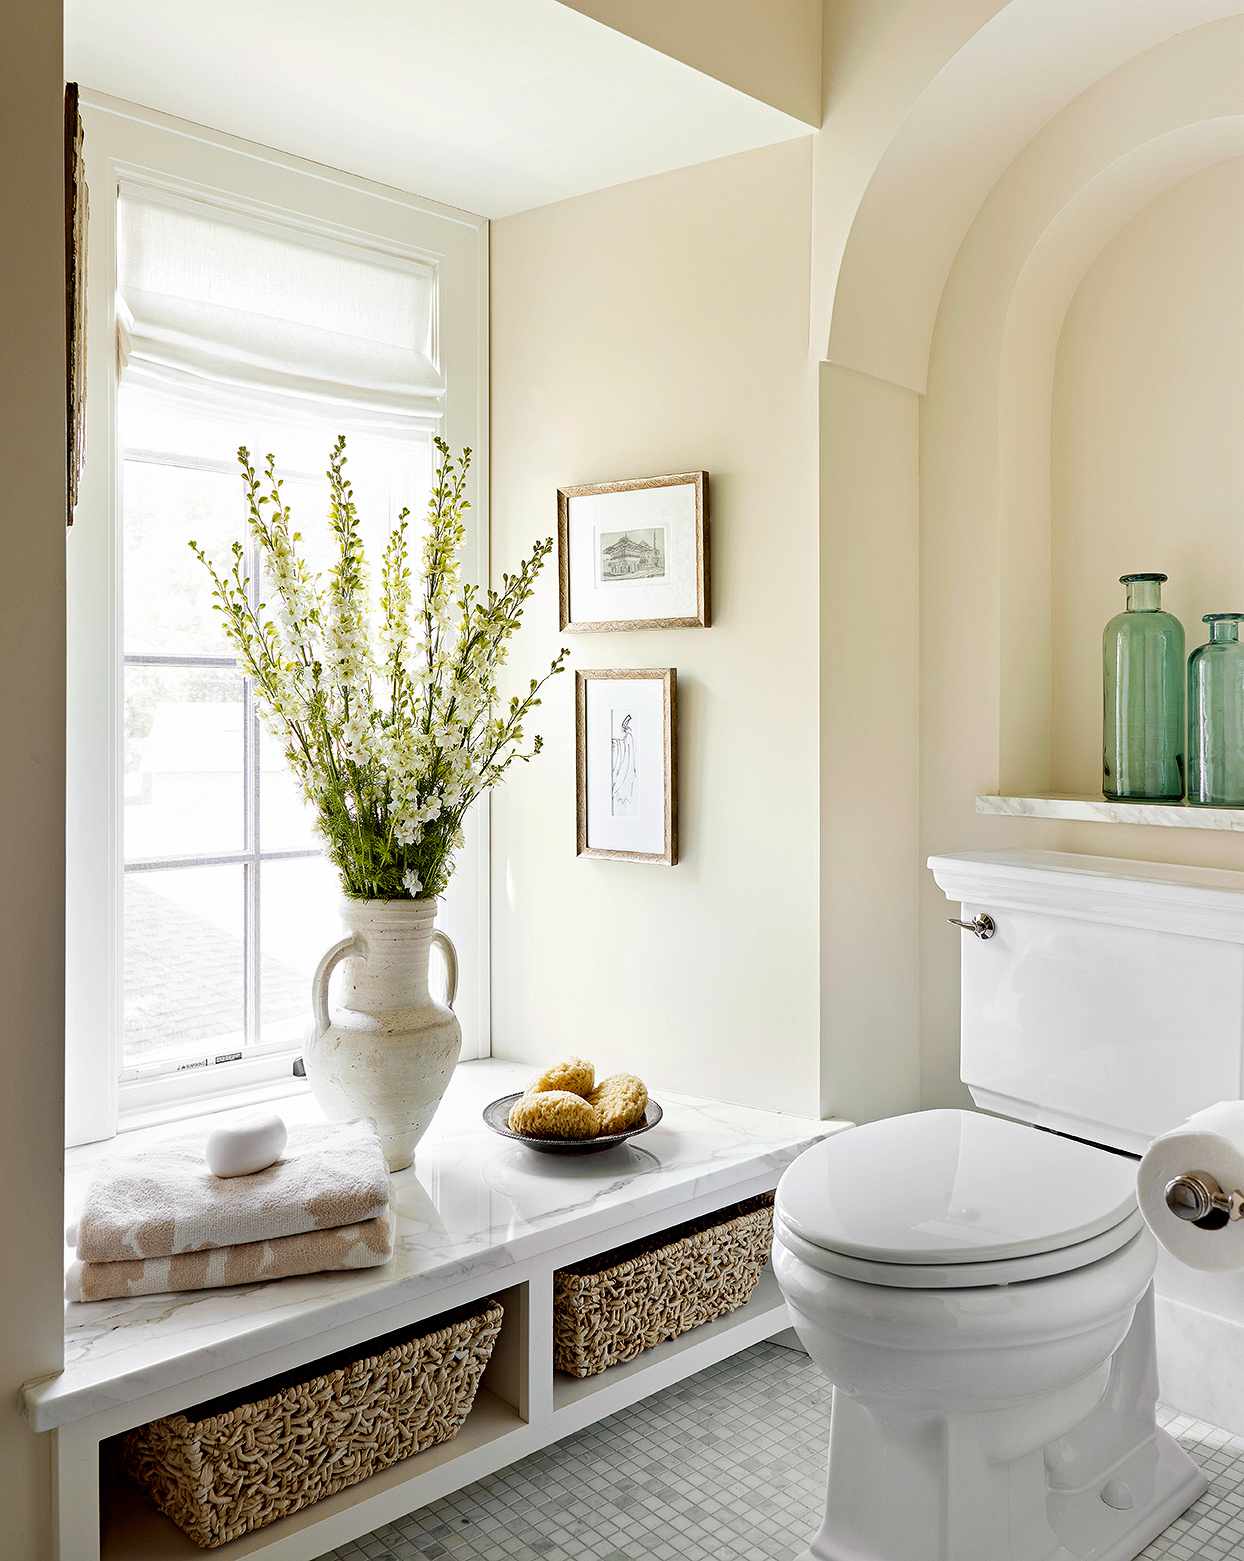
10. Build Sleek, Neutral Cabinetry Around a Toilet
When building storage around a toilet, clearance is key to avoiding a cramped, awkward space. Ensure you have at least 15 inches of clear space from the centerline of the toilet to any cabinetry or wall on either side (a 30-inch total width is standard). For over-the-toilet storage (like the open shelves here), the bottom of the unit should be at least 24 inches above the toilet tank to allow for easy access for maintenance and cleaning without hitting your head.
|
📋 Copy HEX 🔗 Share |
🎯 What Makes It Work
This type of over-and-around-the-toilet built-in is an ideal solution for small to medium-sized bathrooms or powder rooms where floor space is at a premium. It works best in a space that is at least 5 feet wide, which allows for the standard 30-inch toilet clearance plus two 15-inch deep cabinet towers on either side. In a narrower bathroom, you might feel too boxed-in. For truly tiny spaces, consider a low-profile solution like the one seen in Idea #27.
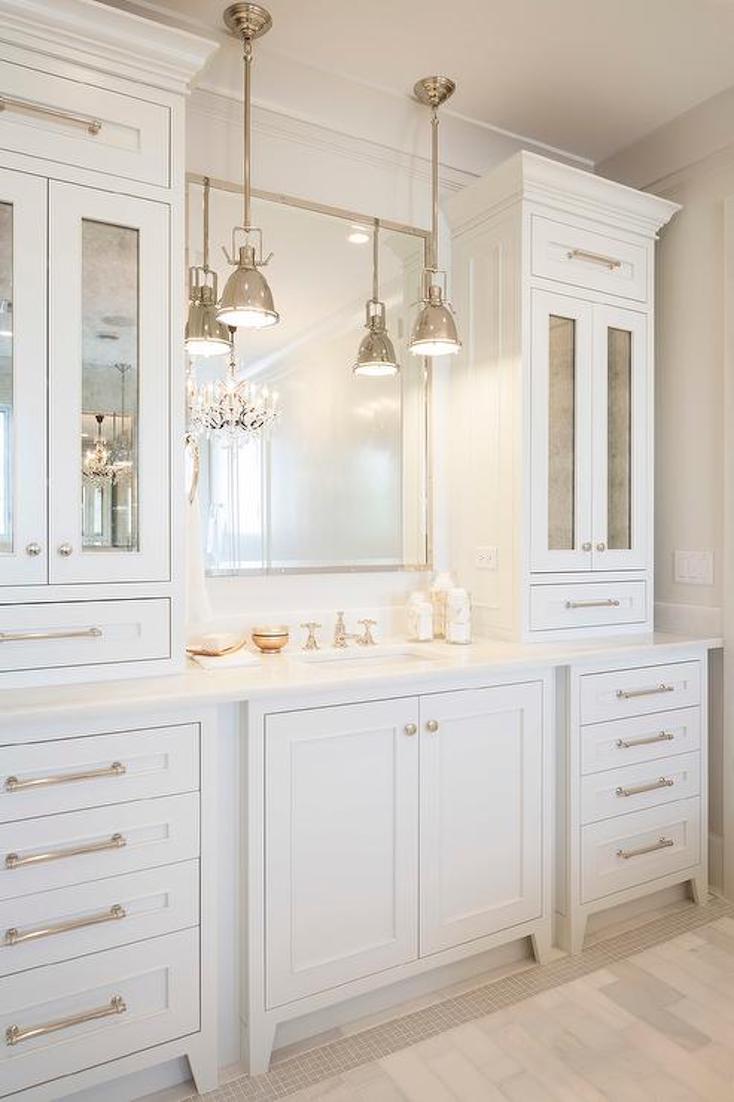
11. Flank a Mirror with Tall, Mirrored Cabinets for a Classic Look
This bathroom’s luxurious feel comes from a formula of layered elegance: 60% clean white cabinetry provides a bright, structural base. 20% reflective surfaces (the large central mirror, polished nickel fixtures, and mirrored cabinet inserts) bounce light around and add a touch of glamour. 20% subtle pattern and texture (the marbled countertop) brings in a natural, organic element. This balance of simple structure, shine, and pattern is a hallmark of timeless, high-end design.
|
📋 Copy HEX 🔗 Share |
📐 Style Math
All those mirrored surfaces look stunning, but they are unforgiving. They will show every single fingerprint, water splash, and speck of dust. If you’re a stickler for a spotless look, you’ll be cleaning these surfaces constantly. The polished nickel hardware is also prone to showing water spots and fingerprints more than a brushed or matte finish would. It’s a high-maintenance look that requires daily wipe-downs to keep it looking its best. Be honest with yourself about your tolerance for cleaning before committing!
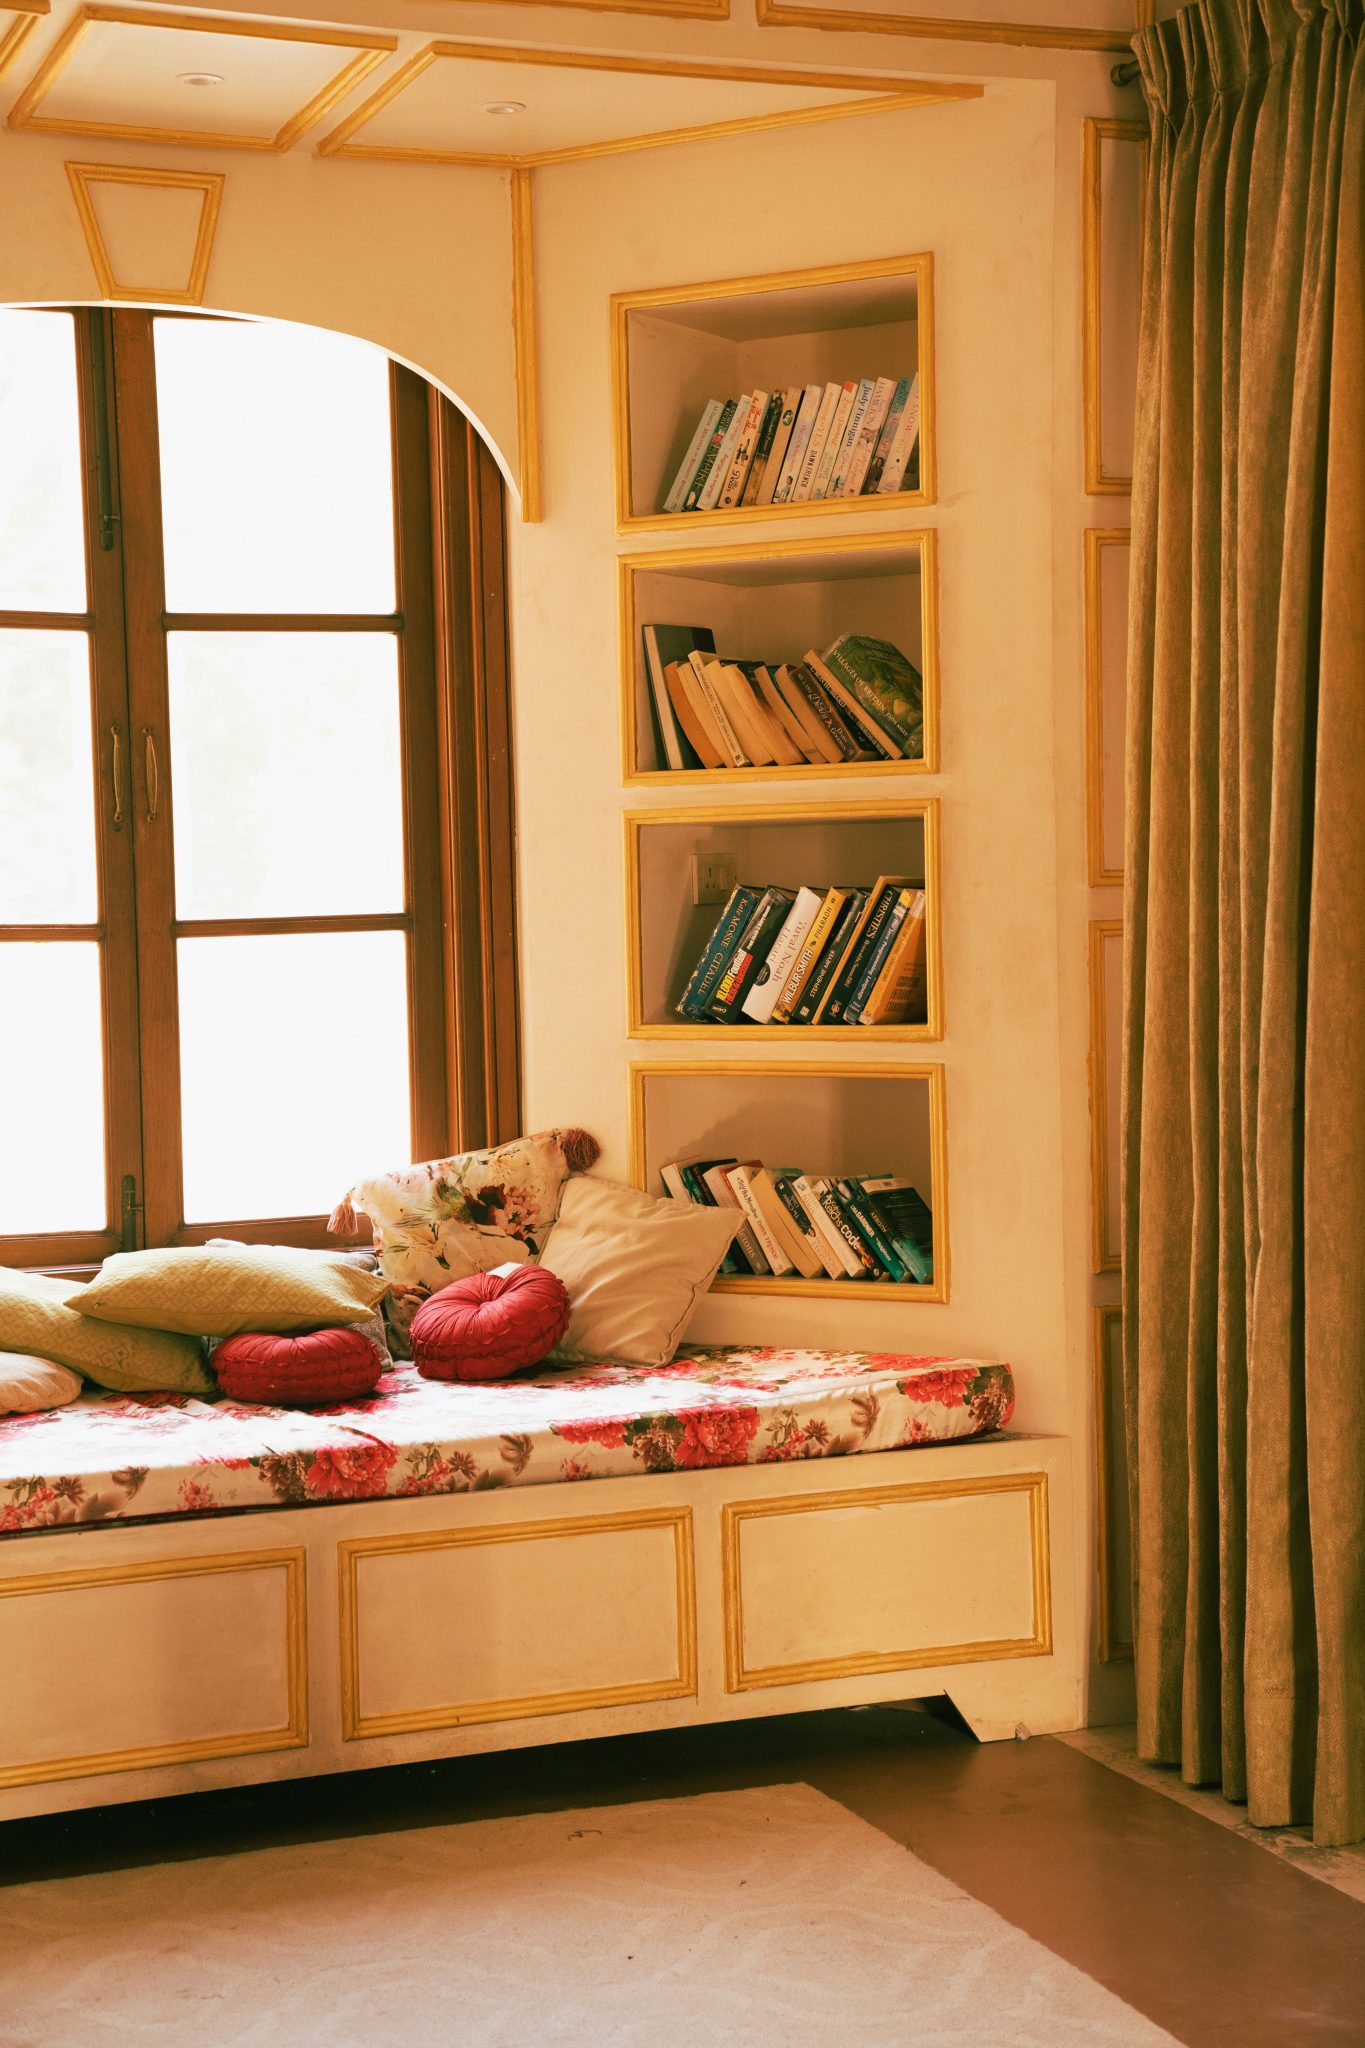
12. Create a Cozy Nook with an Arched Window Seat and Gilded Bookshelves
The magic here is the masterful layering of textures and finishes. You have the soft floral fabric of the cushion, the rich dark wood of the window frame, the shimmer of the gold trim on the shelves and walls, and the matte texture of the book pages. This rich combination creates a space that feels deeply personal, collected over time, and incredibly inviting. The ornate gold trim, in particular, prevents the built-ins from feeling modern and instead leans into a warm, vintage, almost storybook-like quality.
|
📋 Copy HEX 🔗 Share |
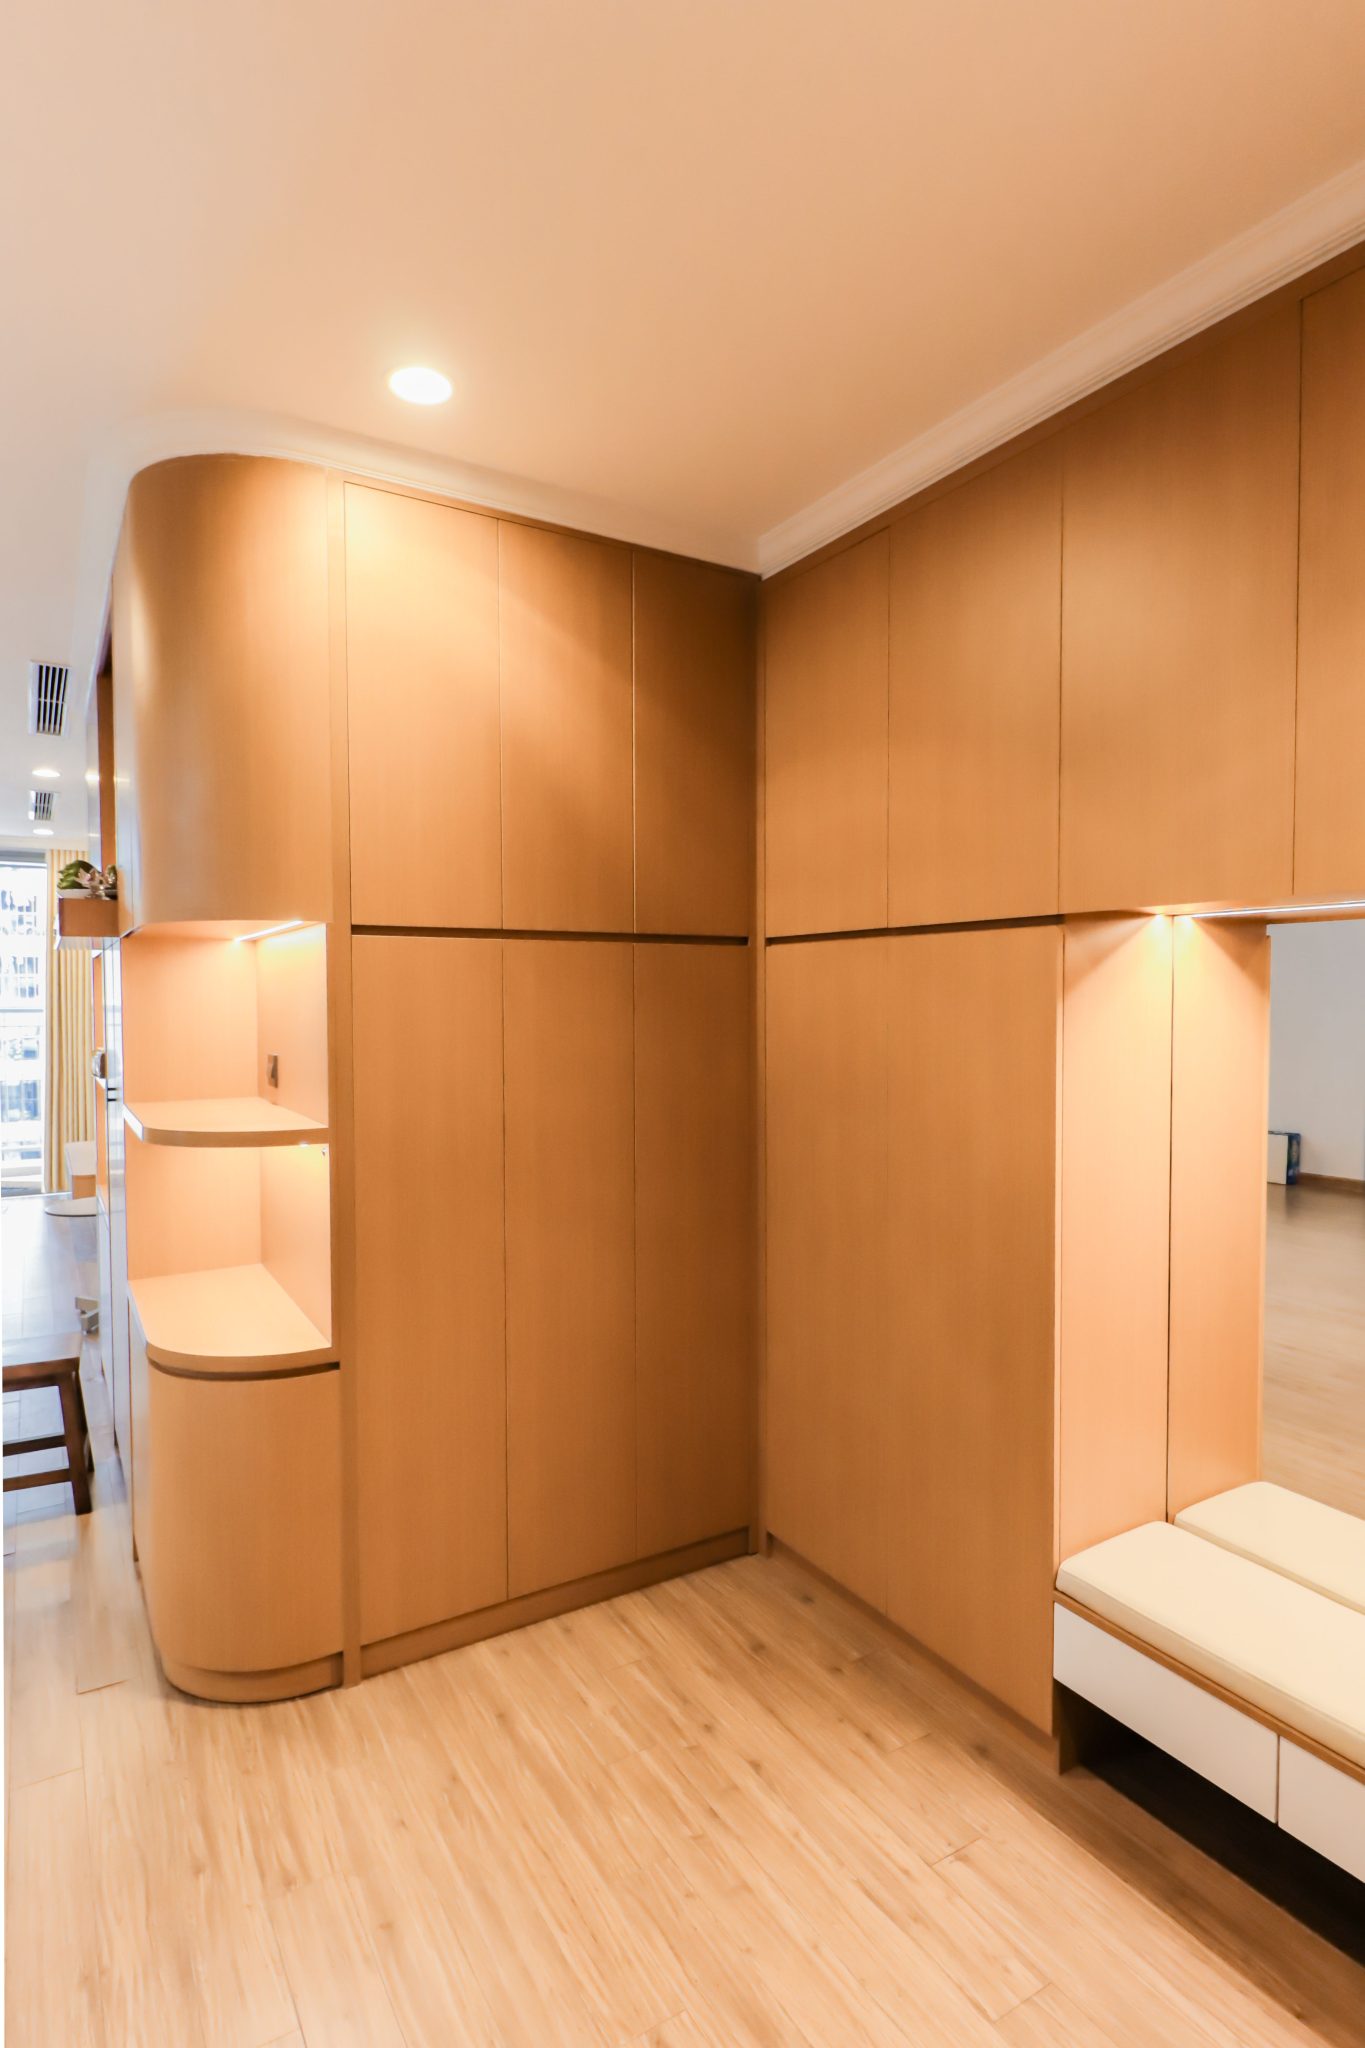
13. Achieve a Seamless Look with Floor-to-Ceiling Light Wood Storage
The single most impactful element here is the seamless integration. By using the same light wood for the floor-to-ceiling cabinets, the curved display niche, the built-in bench, and even the flooring, the entire entryway feels like a single, cohesive architectural statement. There are no jarring transitions or competing materials. This material unity is what creates the serene, modern, and incredibly spacious feel. Removing any one of these matching elements would break the spell and make it feel like a collection of separate parts.
|
📋 Copy HEX 🔗 Share |
💰 Budget Breakdown
When designing full-wall built-ins, breaking up the monolithic surface is crucial. Here, the curved open shelves serve that purpose perfectly. To get this right, the radius of your curve matters. A gentle, sweeping curve with a radius of at least 18-24 inches will feel more graceful and high-end than a tight, small curve. Also, integrating strip lighting inside the curve, as shown here, not only highlights your decor but also emphasizes the architectural detail, turning a storage unit into a true feature.
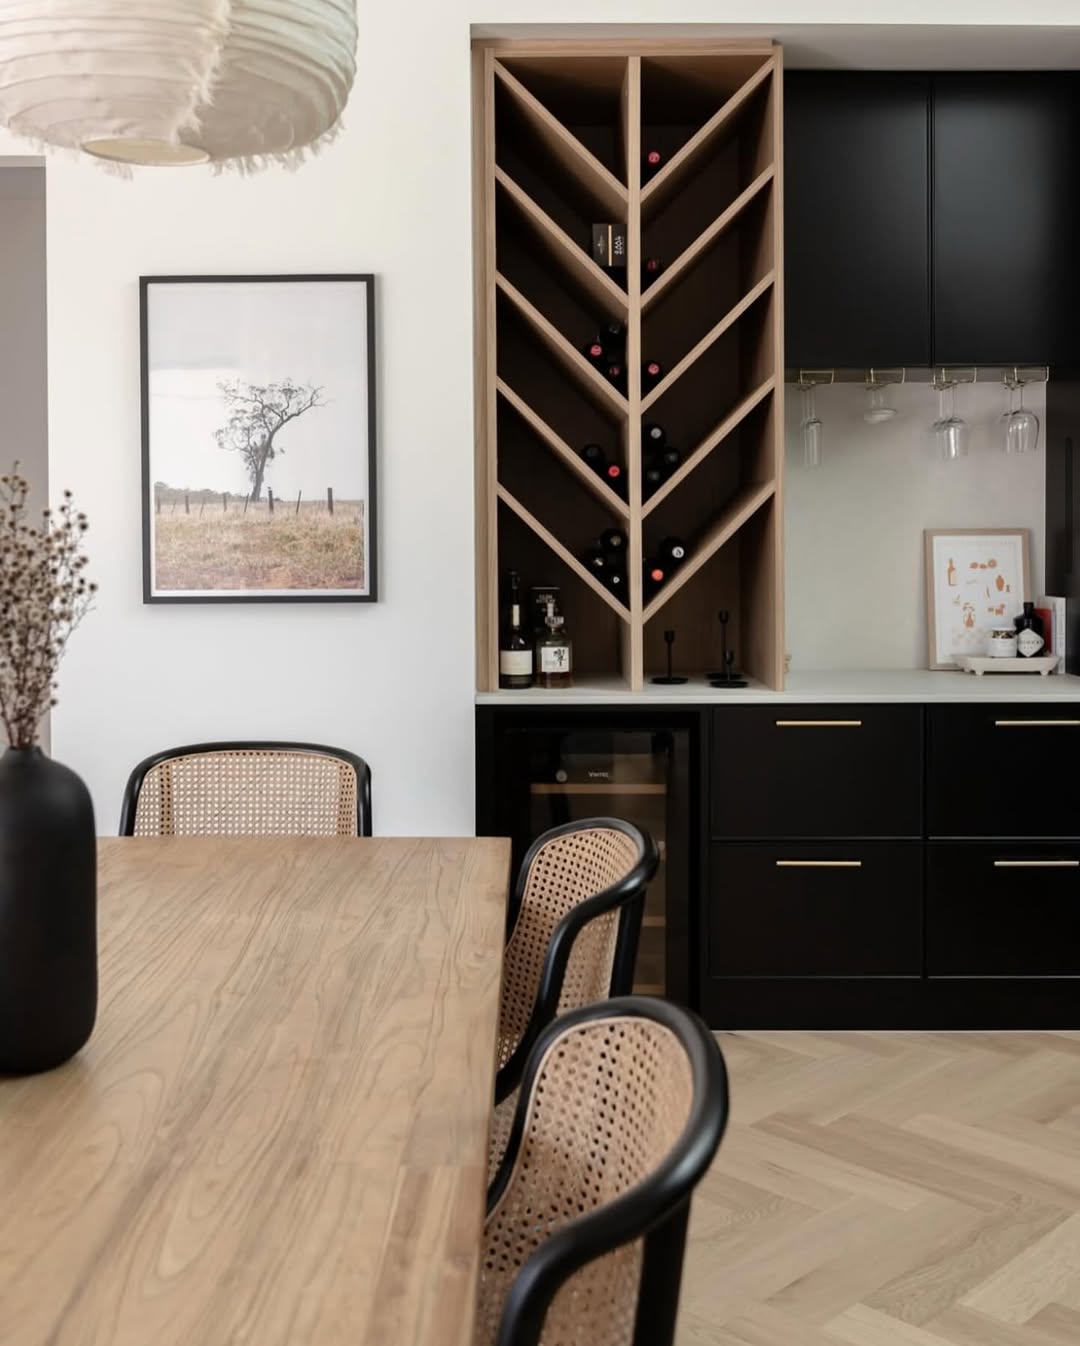
14. Carve Out a Modern Wine Nook with a V-Pattern Rack
A built-in wine cooler is a fantastic feature, but be aware of the technical requirements. These appliances generate heat and need proper ventilation to function correctly. You can’t just slide one into a tight cabinet space. Ensure your design includes adequate clearance around the unit (check the manufacturer’s specs, but typically 1-2 inches on each side and the back) and a ventilation channel, often through the toe-kick at the bottom. Improper ventilation can lead to the unit overheating and failing prematurely.
|
📋 Copy HEX 🔗 Share |
💡 Designer Tip
This sophisticated nook follows a simple but powerful formula: 50% Natural Wood + 40% Matte Black + 10% Metallic Accent. The light wood of the V-pattern rack provides warmth and organic texture, forming the main visual event. The matte black cabinetry creates a strong, modern anchor, grounding the space. Finally, the slim gold hardware and the gleam of the wine bottles provide that crucial 10% of sparkle and refinement. You could swap the wood for a dark walnut for a moodier vibe, and it would still work beautifully.
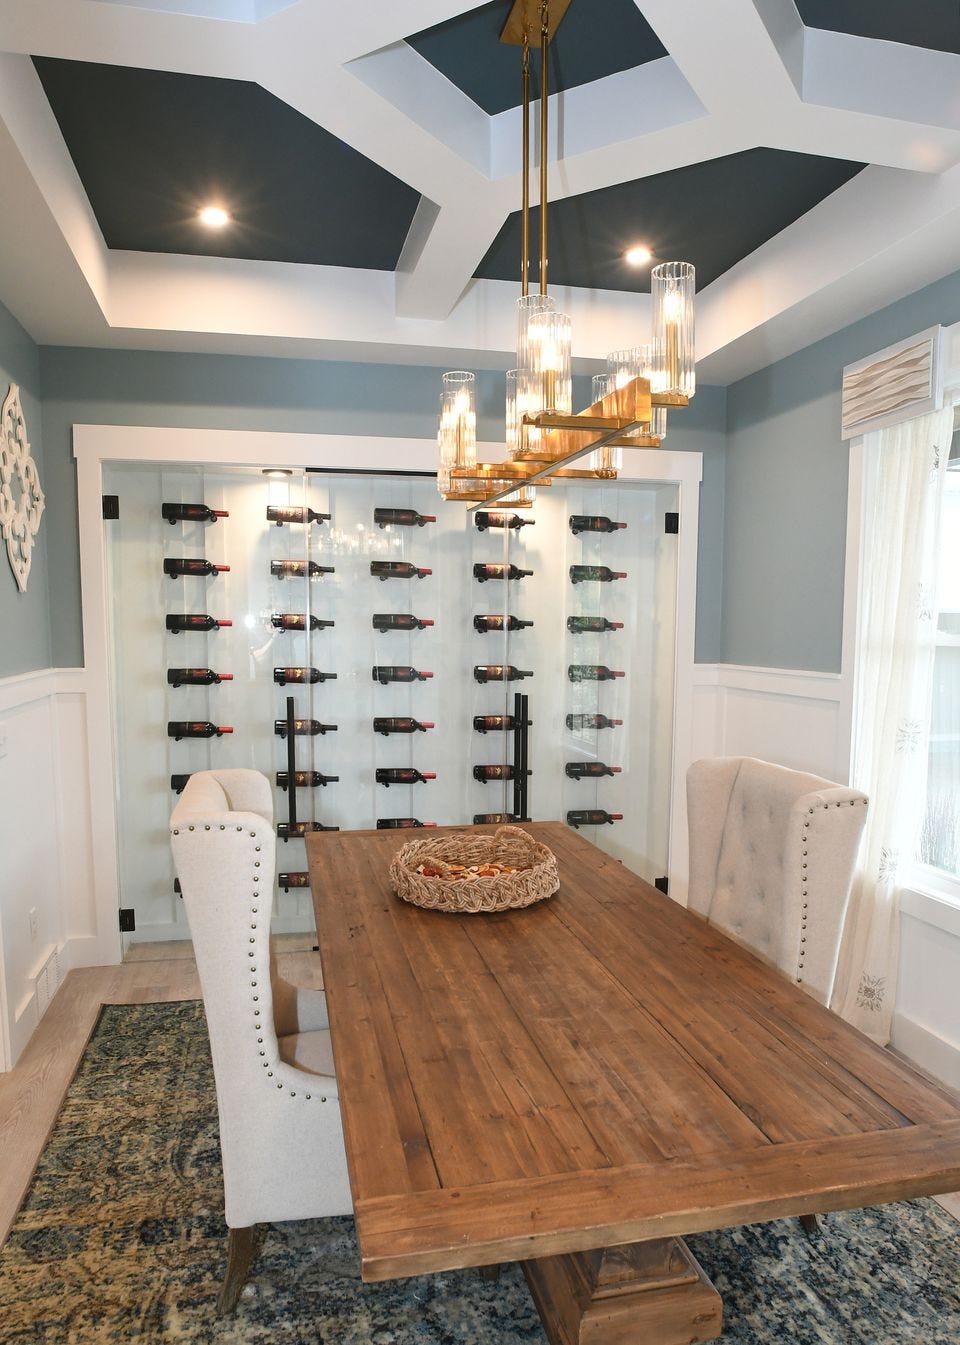
15. Integrate a Glass-Enclosed Wine Cellar into a Dining Room Wall
A conditioned, glass-enclosed wine wall is a luxury feature with a significant price tag. Here’s a general breakdown:
- Climate Control System (cooling unit): $3,000 – $7,000
- Frameless Glass Panels & Door (installed): $4,000 – $10,000
- Custom Wine Racking (metal or wood): $2,000 – $8,000
- Insulation, Vapor Barrier & Electrical: $1,500 – $3,000
- TOTAL: $10,500 – $28,000+
Budget alternative: For a purely decorative effect without climate control, you can build a glass-front cabinet with non-UV-rated glass and off-the-shelf racking for under $5,000. Just don’t store your investment-grade bottles in it!
|
📋 Copy HEX 🔗 Share |
⭐ The One Thing
Before you commit to a built-in wine cellar, ask yourself these questions:
- What is my primary goal? Is it for long-term, temperature-controlled aging of fine wines, or is it for stylish, room-temperature display and storage? The two require vastly different systems and budgets.
- Is the location suitable? The wall should not receive direct sunlight, which can heat the enclosure and damage the wine.
- Do I have the budget for ongoing costs? A climate control system will add to your monthly electricity bill.
- Is my collection large enough to justify this? A large, empty cellar can look a bit sad.
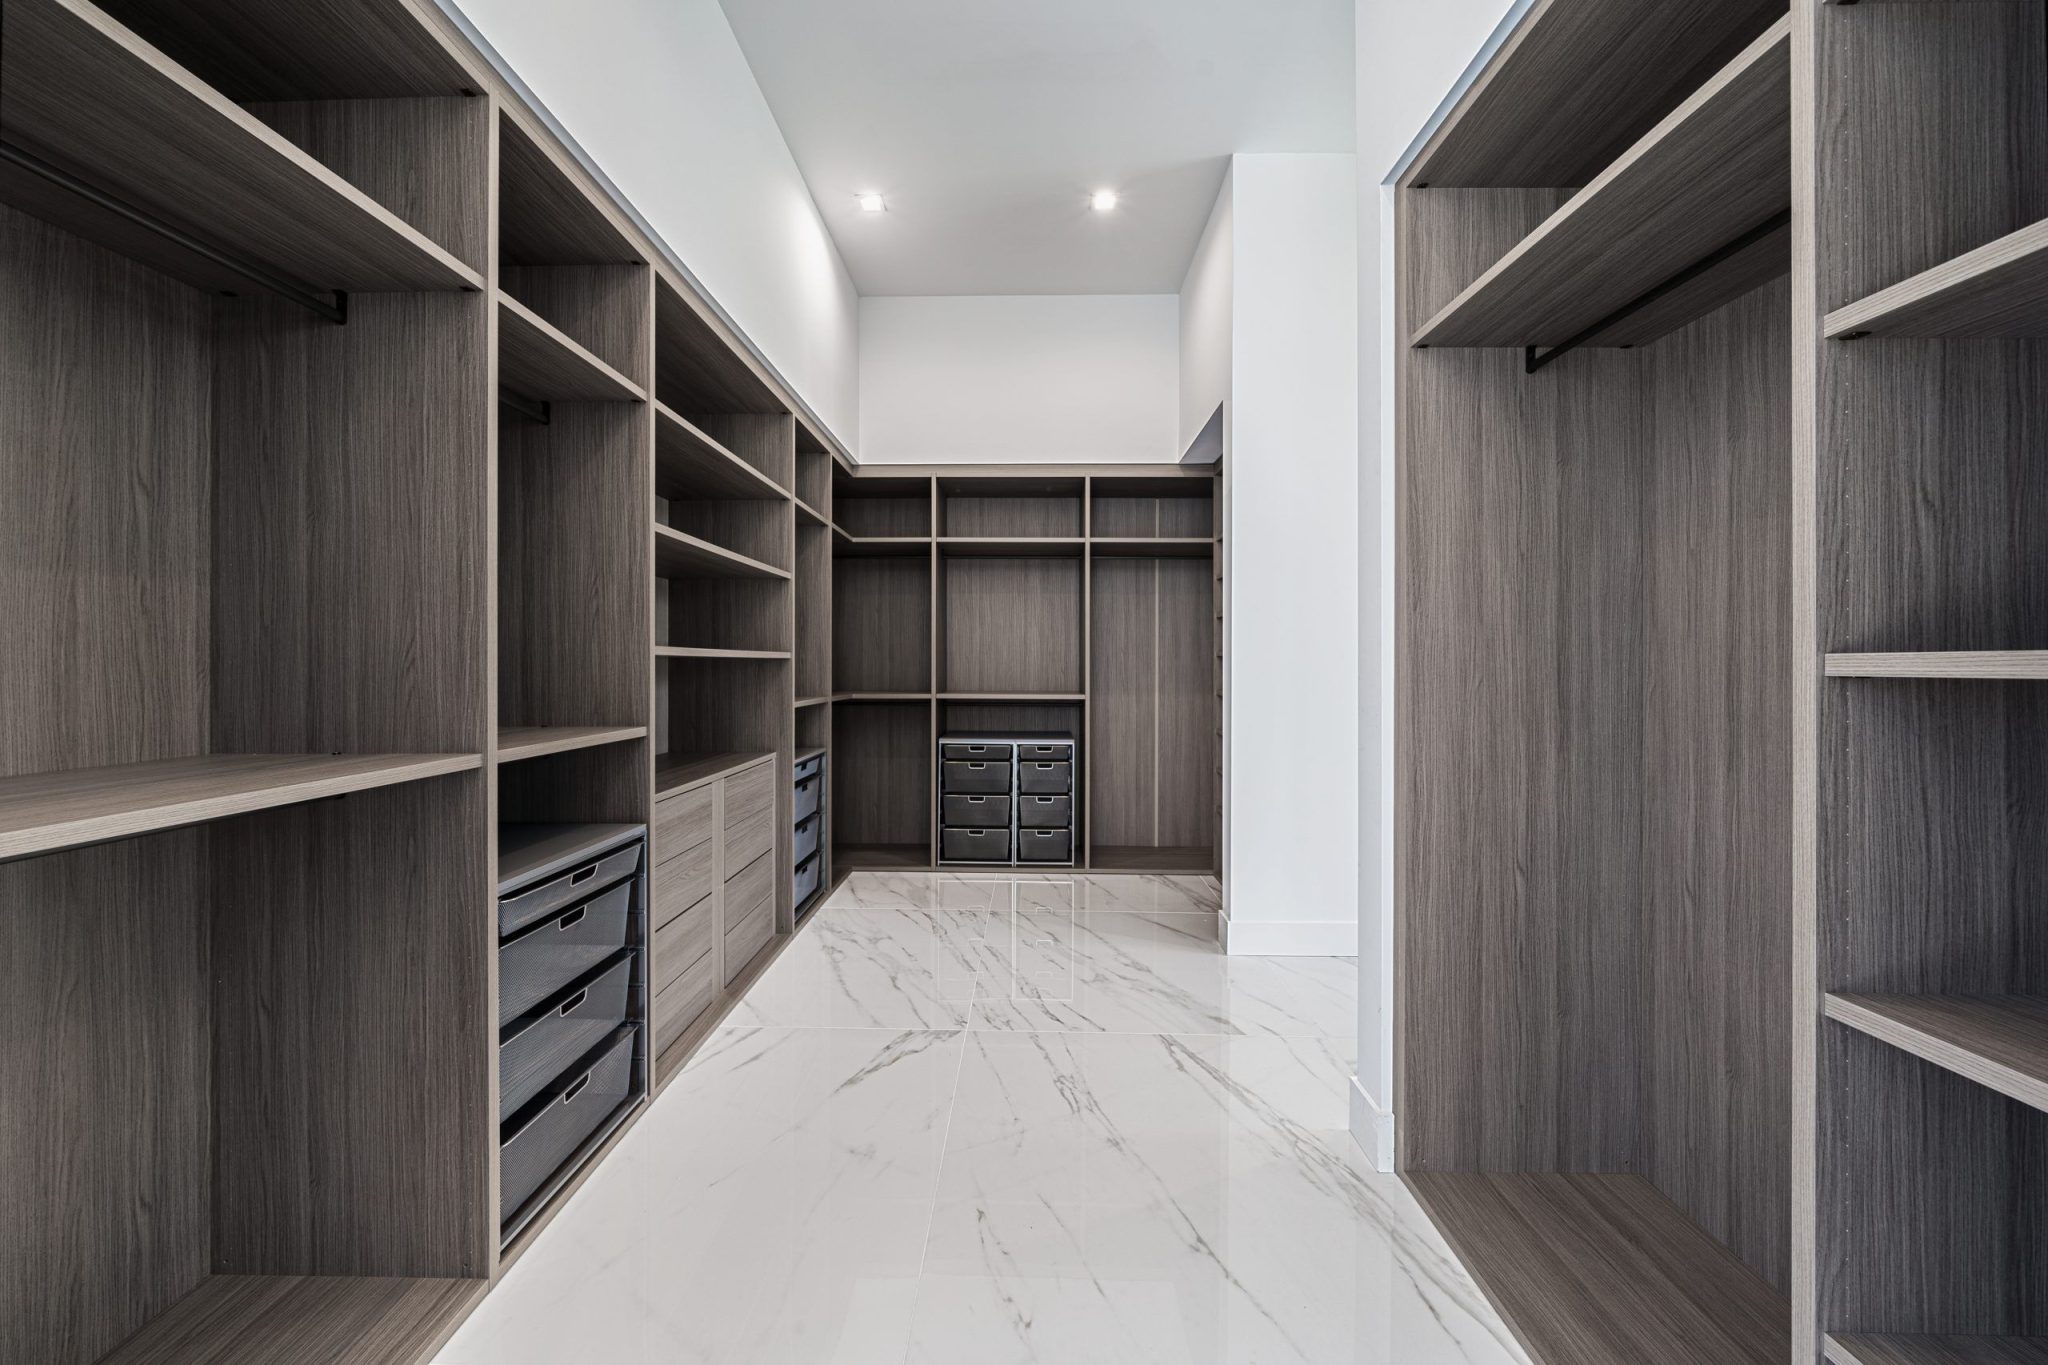
16. Design a Modern Walk-In Closet with Dark Woodgrain Built-ins
The key to a truly functional walk-in closet is variety in storage types. Don’t just install endless hanging rods. A successful design includes a mix of single-hang (for dresses, coats), double-hang (for shirts, pants), open shelving (for sweaters, jeans), drawers (for socks, undergarments), and even specialized storage like the mesh baskets seen here (great for gym clothes or scarves). A good ratio is 40% hanging space, 30% shelves, and 30% drawers. This ensures every item has a proper home.
|
📋 Copy HEX 🔗 Share |
🧹 Maintenance Reality
A full walk-in closet with storage on three sides needs more space than you might think. For comfortable access, you need a clear walkway of at least 36 inches down the center. With standard 18-inch deep shelving units, this means the room itself should have a minimum width of 72 inches (6 feet). For a truly luxurious feel with a central bench or island, you’ll want a width closer to 10-12 feet. This layout is a great use of a spare small bedroom or a large, underutilized master suite space.
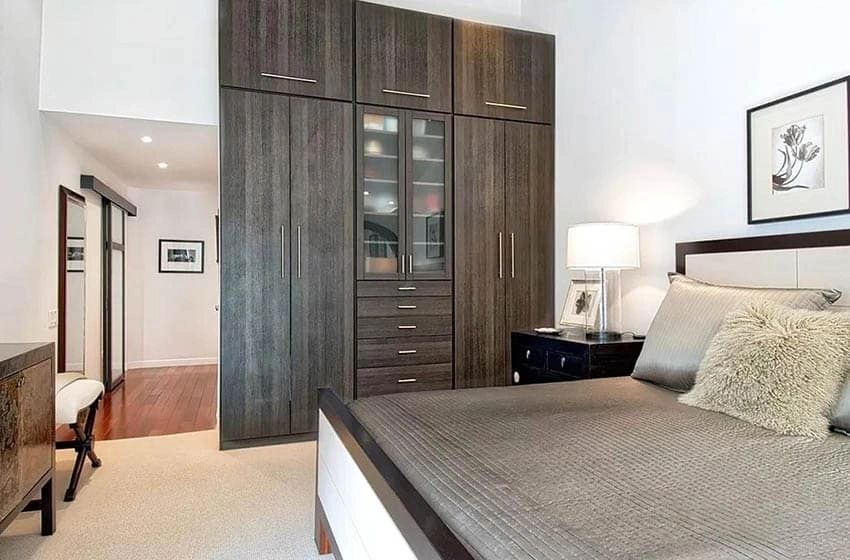
17. Maximize Bedroom Storage with a Floor-to-Ceiling Woodgrain Wardrobe
This wardrobe feels upscale and integrated because it was clearly designed with intention. The variation in door sizes, combined with the central glass-front display section and the row of drawers, breaks up what could have been a monolithic block of woodgrain. This thoughtful composition creates visual rhythm and designated zones for different types of storage. The long, linear handles further emphasize the horizontal lines, making the unit feel wider and more grounded in the space.
|
📋 Copy HEX 🔗 Share |
✅ Before You Start
You can achieve a similar floor-to-ceiling look using IKEA’s PAX wardrobe system. The key is to plan it carefully on their online design tool. Combine different frame widths and heights to create a custom feel. To get the high-end, built-in appearance, add a custom MDF baseboard that matches your room’s trim and a filler strip at the top to close the gap to the ceiling. Companies like Semihandmade offer premium doors, including glass-front options, that fit PAX frames, giving you a custom look for a fraction of the price. If you DIY the installation, a full wall unit could cost between $1,500 and $3,000.
18. Brighten a Room with a Paneled Wardrobe and Integrated Mirrors
The integrated mirrored doors are undeniably the hero of this design. In a bedroom, they serve a dual purpose: functionally, they provide a full-length mirror without taking up extra wall or floor space. Aesthetically, they are a game-changer. They bounce light around the room, making the entire space feel larger, brighter, and more open. By breaking up the run of solid paneled doors, the mirrors add depth and a touch of glamour, preventing the wall of storage from feeling too heavy or oppressive. The room would feel significantly smaller and darker without them.

|
📋 Copy HEX 🔗 Share |
🔥 Trending Context
Light-colored, matte-finish wardrobes and plush grey carpet create a serene and luxurious feel, but they require mindful maintenance. The light gray wardrobe doors will show scuffs and fingerprints more readily than a darker or woodgrain finish. A magic eraser can be your best friend for minor marks. Plush, high-pile carpet feels wonderful underfoot but can be difficult to vacuum effectively and is more prone to trapping dust and allergens. A vacuum with a high-quality filter and an adjustable-height beater bar is essential.
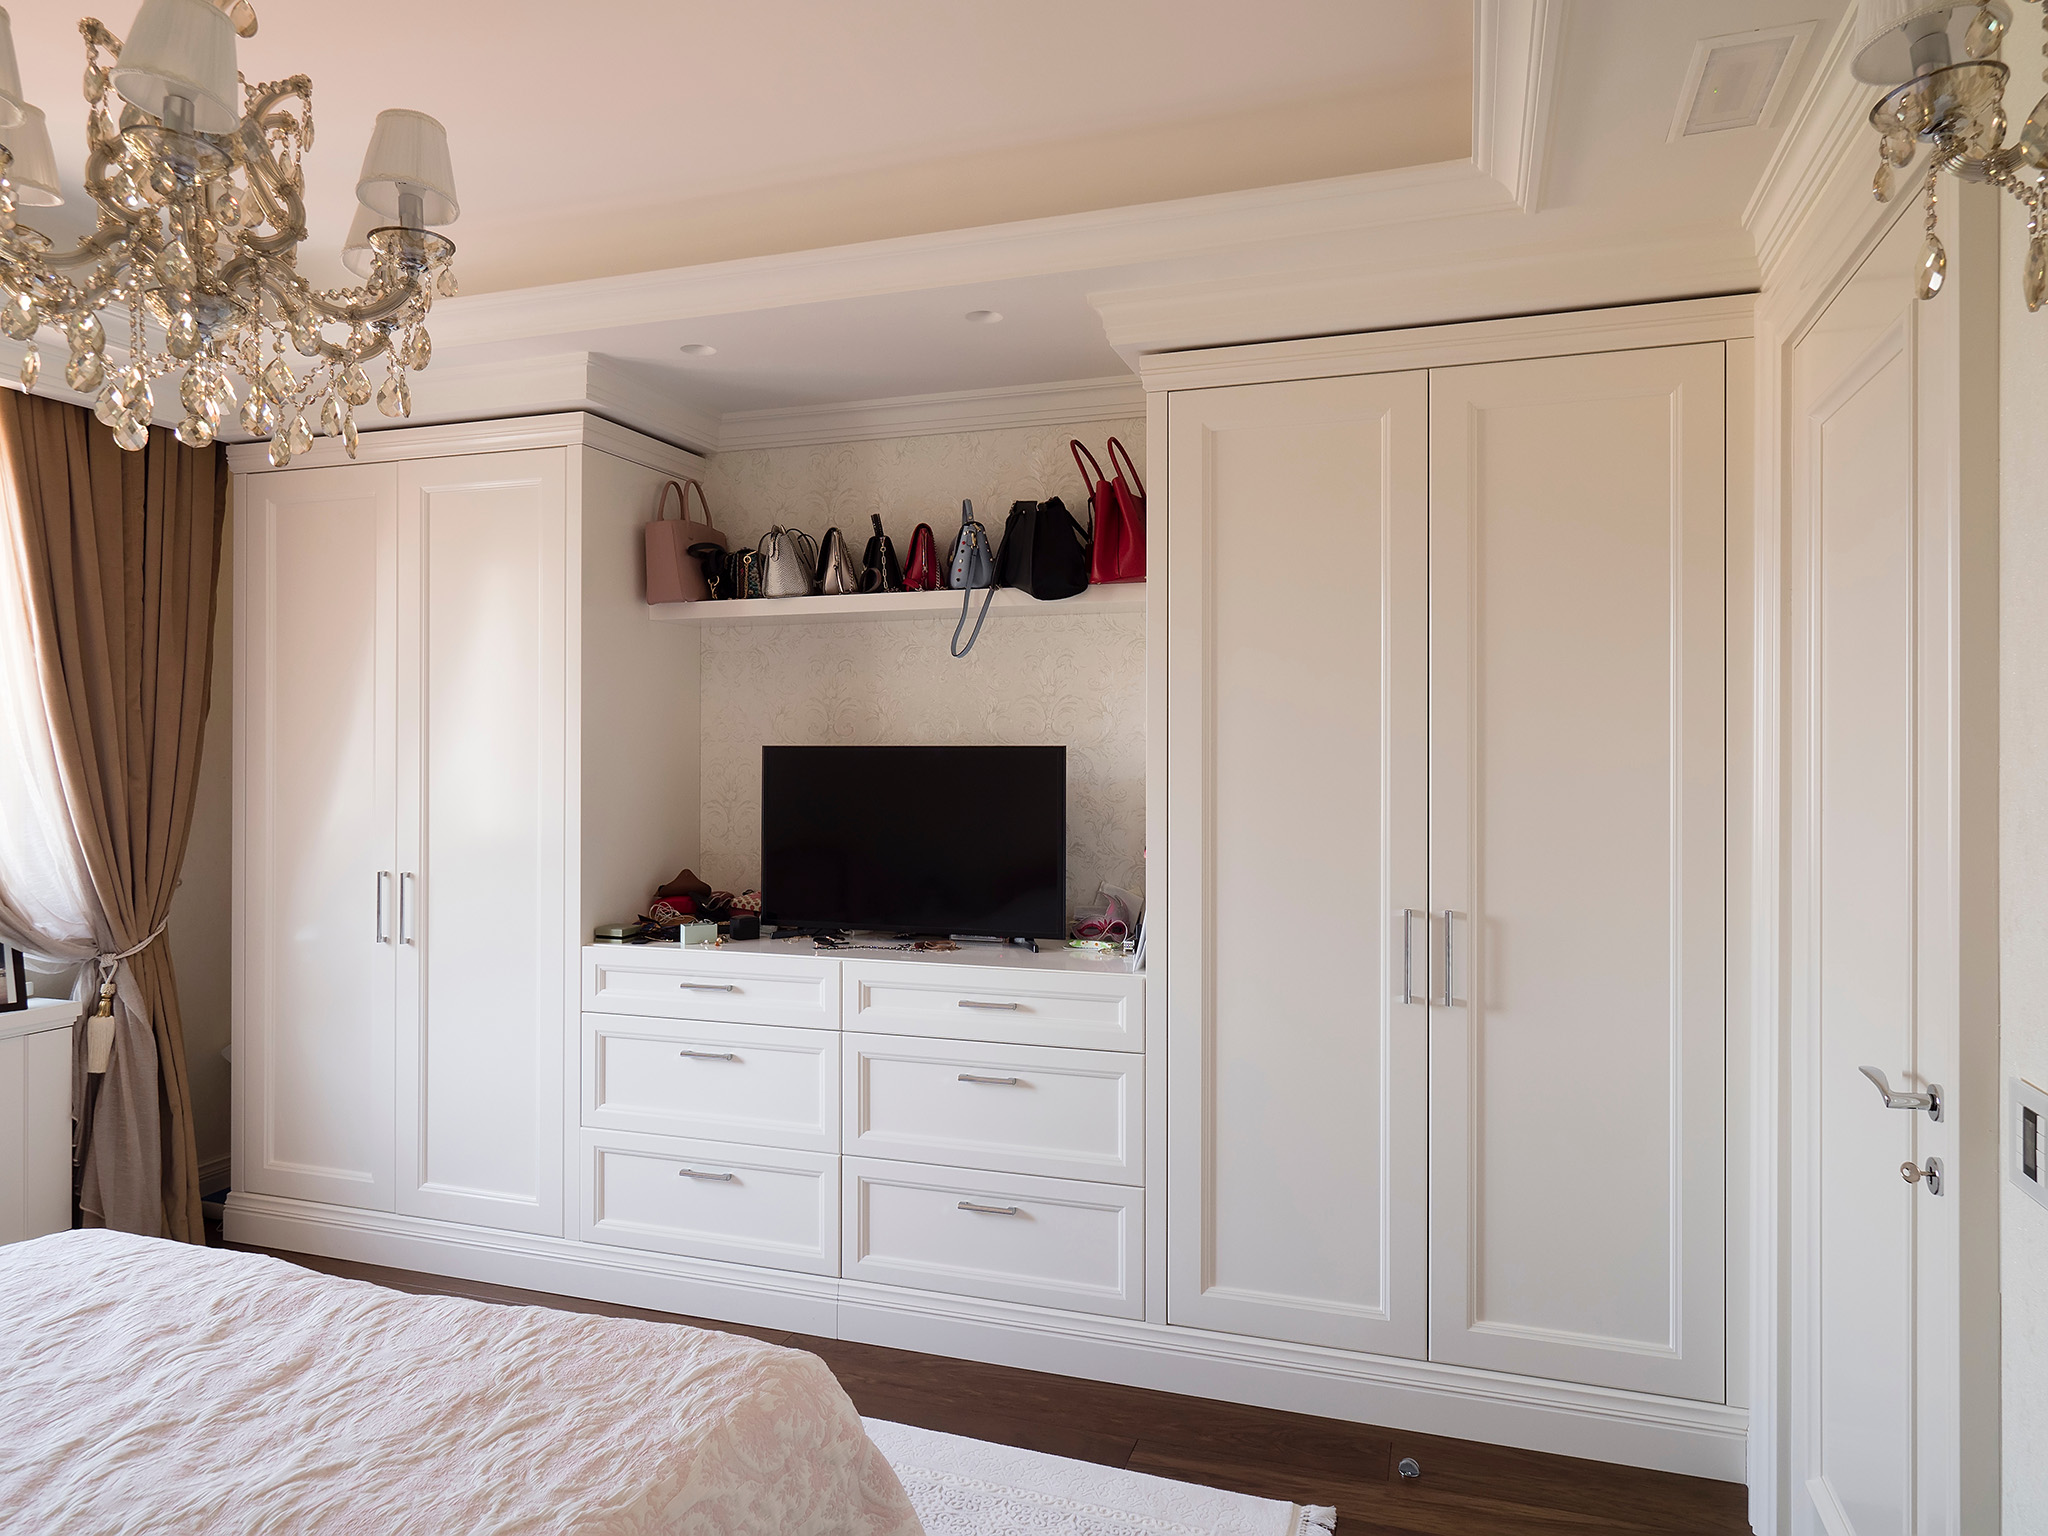
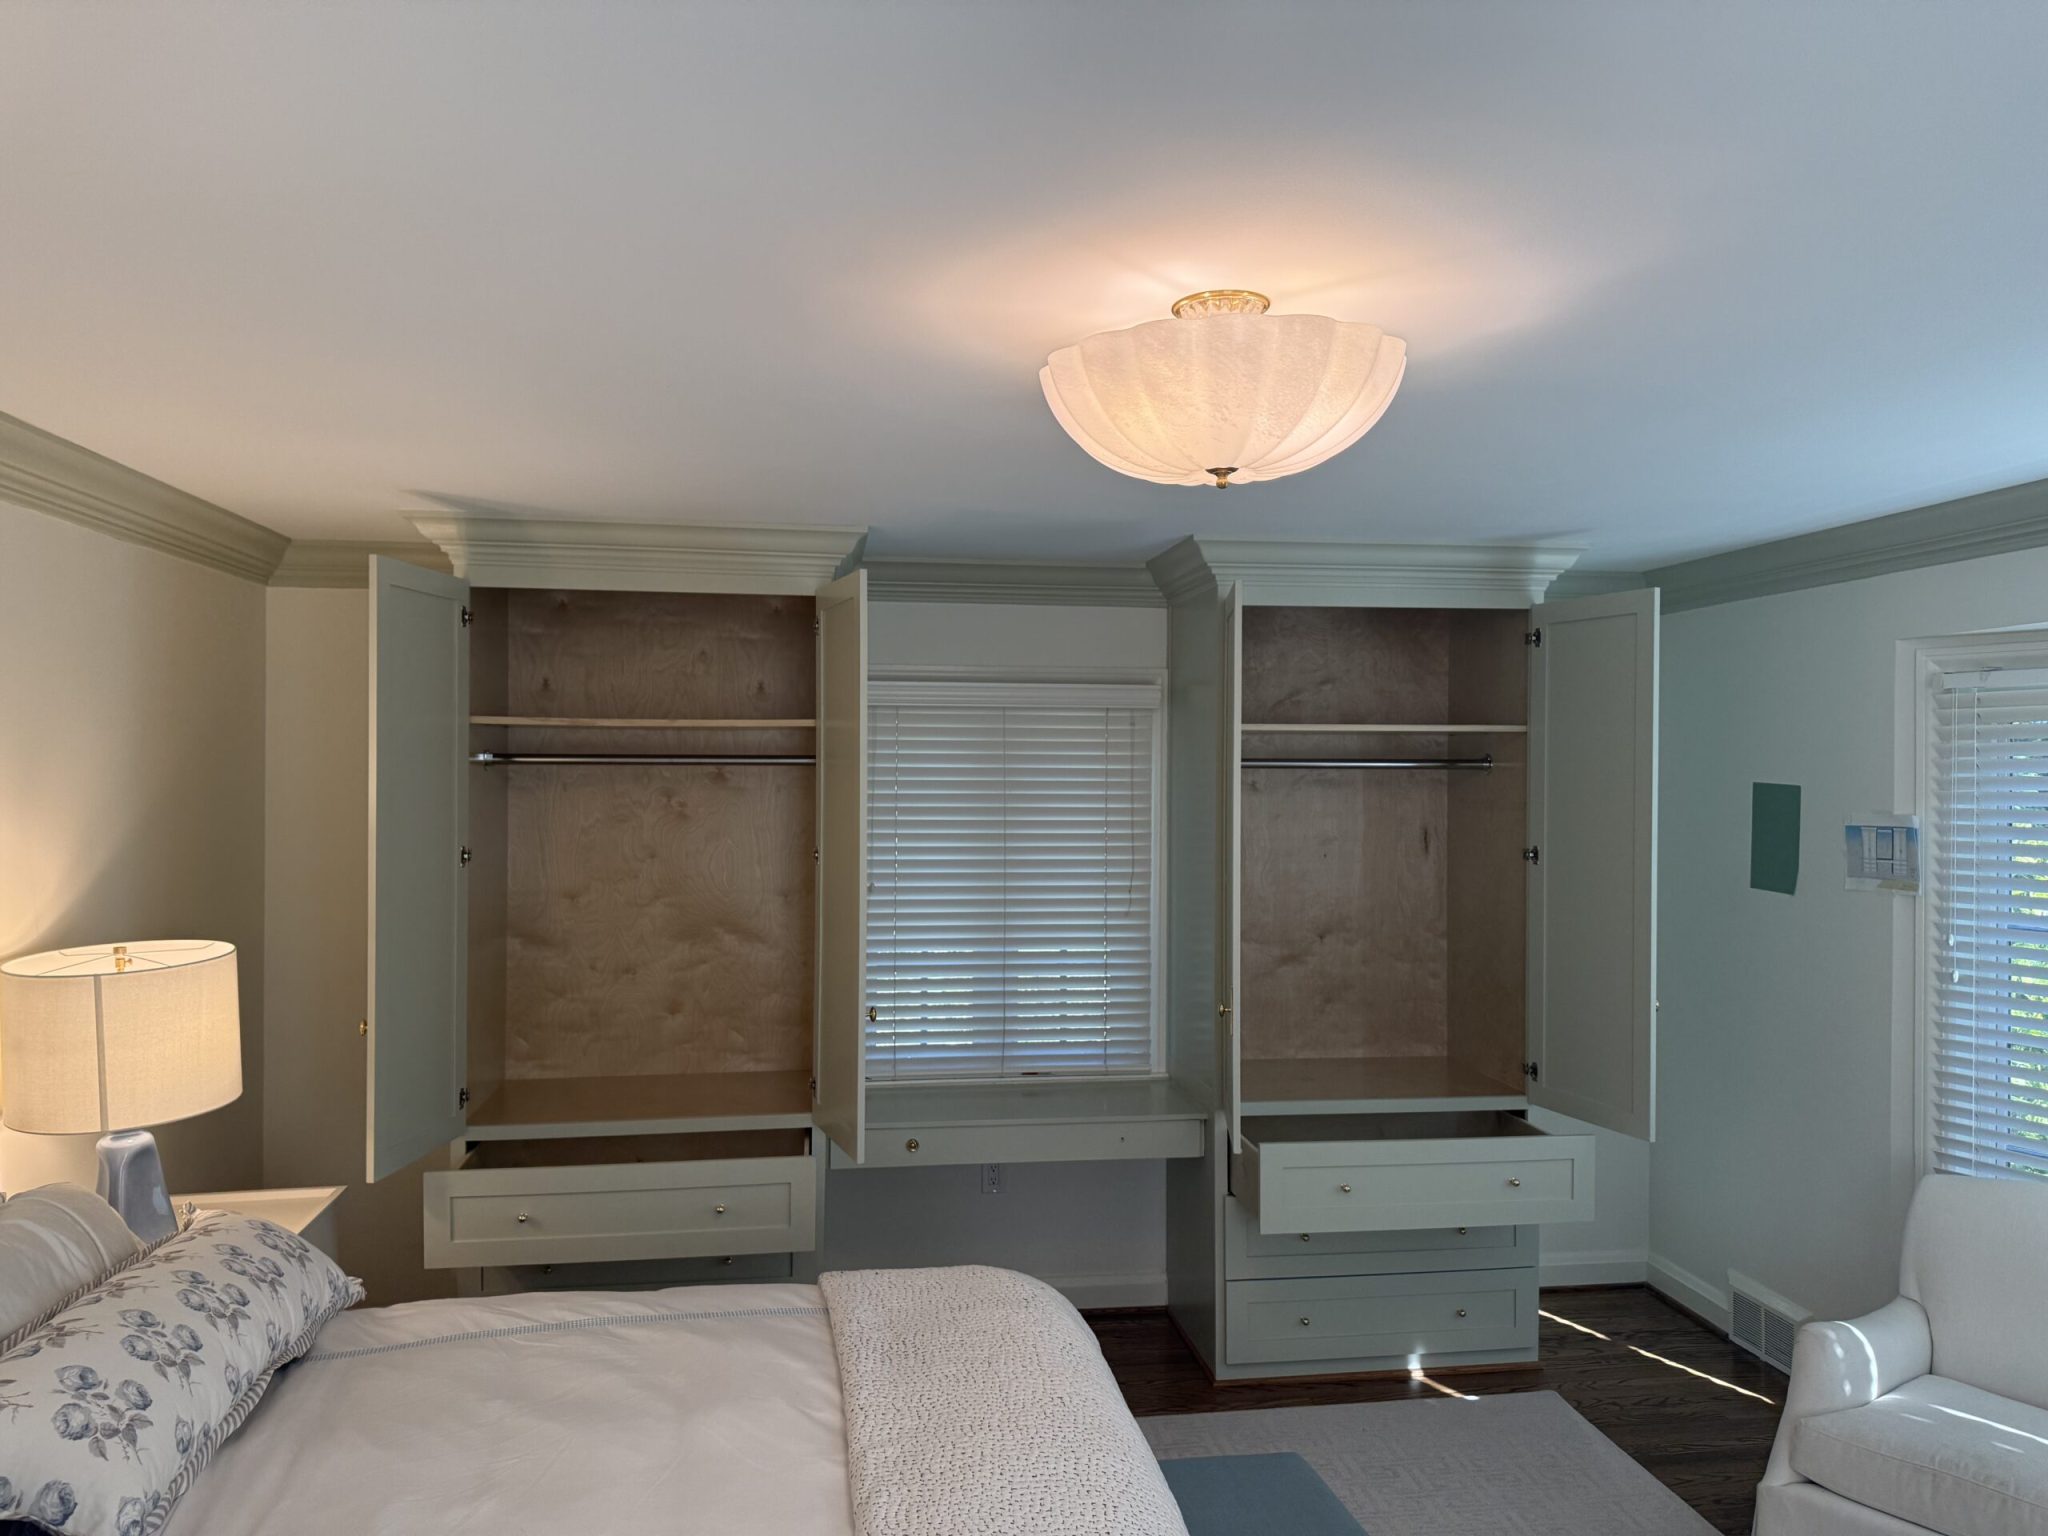
19. Center Your Bedroom with a White Built-In Wardrobe and TV Niche
When designing a niche for a television within a built-in, plan for the future. Don’t just measure your current TV. Give yourself at least 2-3 inches of clearance on all sides. This provides ventilation for the electronics and, more importantly, accommodates a potentially larger TV down the road. Also, ensure you plan for cable management. A recessed outlet and a conduit or channel hidden in the wall behind the niche will allow you to run power and HDMI cables without any unsightly wires dangling down.
|
📋 Copy HEX 🔗 Share |
🔧 How-To Brief
A built-in that combines a TV, open display, and closed storage can be a fantastic space-saver, but it locks in your room’s layout. Once it’s built, the bed and TV placement are permanent. Before committing, use masking tape on the floor to mock up the footprint of the built-in and your other furniture. Live with it for a few days to ensure you’re happy with the traffic flow and the viewing angles. This is a very expensive thing to regret later. Compare with the flexibility of Idea #16, where the units are more modular.
20. Plan a Functional Corner Closet with Shelving and Hanging Rods
This empty closet shell illustrates a fundamental principle of good closet design: maximizing vertical and corner space. By running shelves up the wall and placing hanging rods at different heights (a higher one for dresses/coats, a lower one for shirts/pants), you can effectively double your storage capacity compared to a single-rod setup. The corner shelving makes use of what is often a dead zone, turning an awkward angle into valuable storage for folded items or bins.

|
📋 Copy HEX 🔗 Share |
💸 Get This Look For Less
Creating this exact setup is a classic DIY project. All the components—wire shelving, adjustable brackets, and hanging rods—are available at any big-box home improvement store like Home Depot or Lowe’s. A full system like this can be purchased for $150 – $300. To recreate the look, simply install vertical tracks on the wall studs, then clip in the brackets and shelves at your desired heights. This type of system is also easily adjustable as your storage needs change over time.
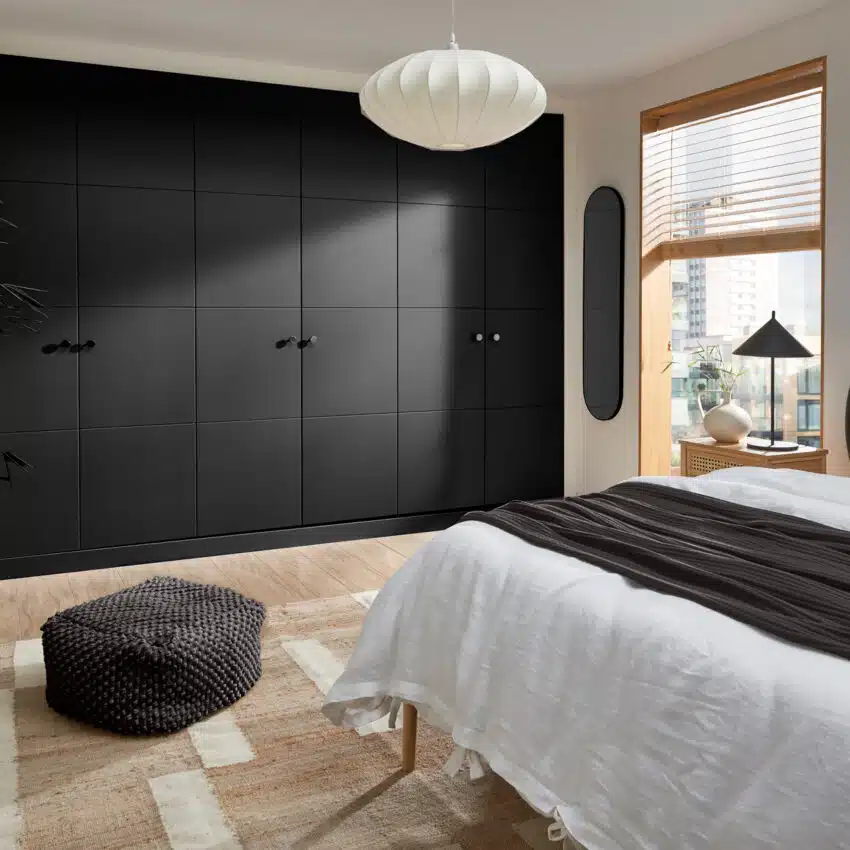
21. Make a Statement with a Floor-to-Ceiling Seamless Black Wardrobe
The single most important element here is the commitment to the matte black finish. It’s an incredibly bold choice that completely defines the room’s character. A white or wood-tone wardrobe would be functional, but the seamless, floor-to-ceiling black turns the storage wall into a dramatic, monolithic architectural feature. It’s sophisticated, minimalist, and creates a sense of depth and intimacy in the bedroom. This isn’t just storage; it’s a mood.
|
📋 Copy HEX 🔗 Share |
22. Combine Sage Green Wardrobes with an Integrated Desk Nook
The calming, studious vibe here is all about a balanced material palette. Think of it as 60% Soft Color (the sage green cabinetry) + 30% Natural Wood (the desk surface and wardrobe interiors) + 10% Crisp White & Metal (the window blinds and silver hardware). The soft green is the dominant, personality-defining element, while the wood adds warmth and an organic touch. The hits of white and silver keep it feeling fresh and light. This formula is perfect for creating a space that feels both organized and serene.
|
📋 Copy HEX 🔗 Share |
🎯 What Makes It Work
You can create this integrated look by flanking a window with two pre-made wardrobe units and bridging them with a custom-cut desktop. Here’s a brief how-to:
- Purchase two wardrobe units (like IKEA’s PAX) and assemble them, leaving space in between for the desk.
- Measure the opening between the units and have a piece of thick plywood or a butcher block countertop cut to size at a hardware store.
- Install support battens. Screw 1×2 wood strips horizontally onto the inner sides of the wardrobes at your desired desk height (usually 29-30 inches).
- Secure the desktop. Place the desktop onto the battens and screw it in from below for a clean, floating look.
- Finish it off. Add coordinating crown molding across the top of both units to create a seamless, built-in appearance.
Total time: 4-6 hours. Cost: $800 – $1,500.
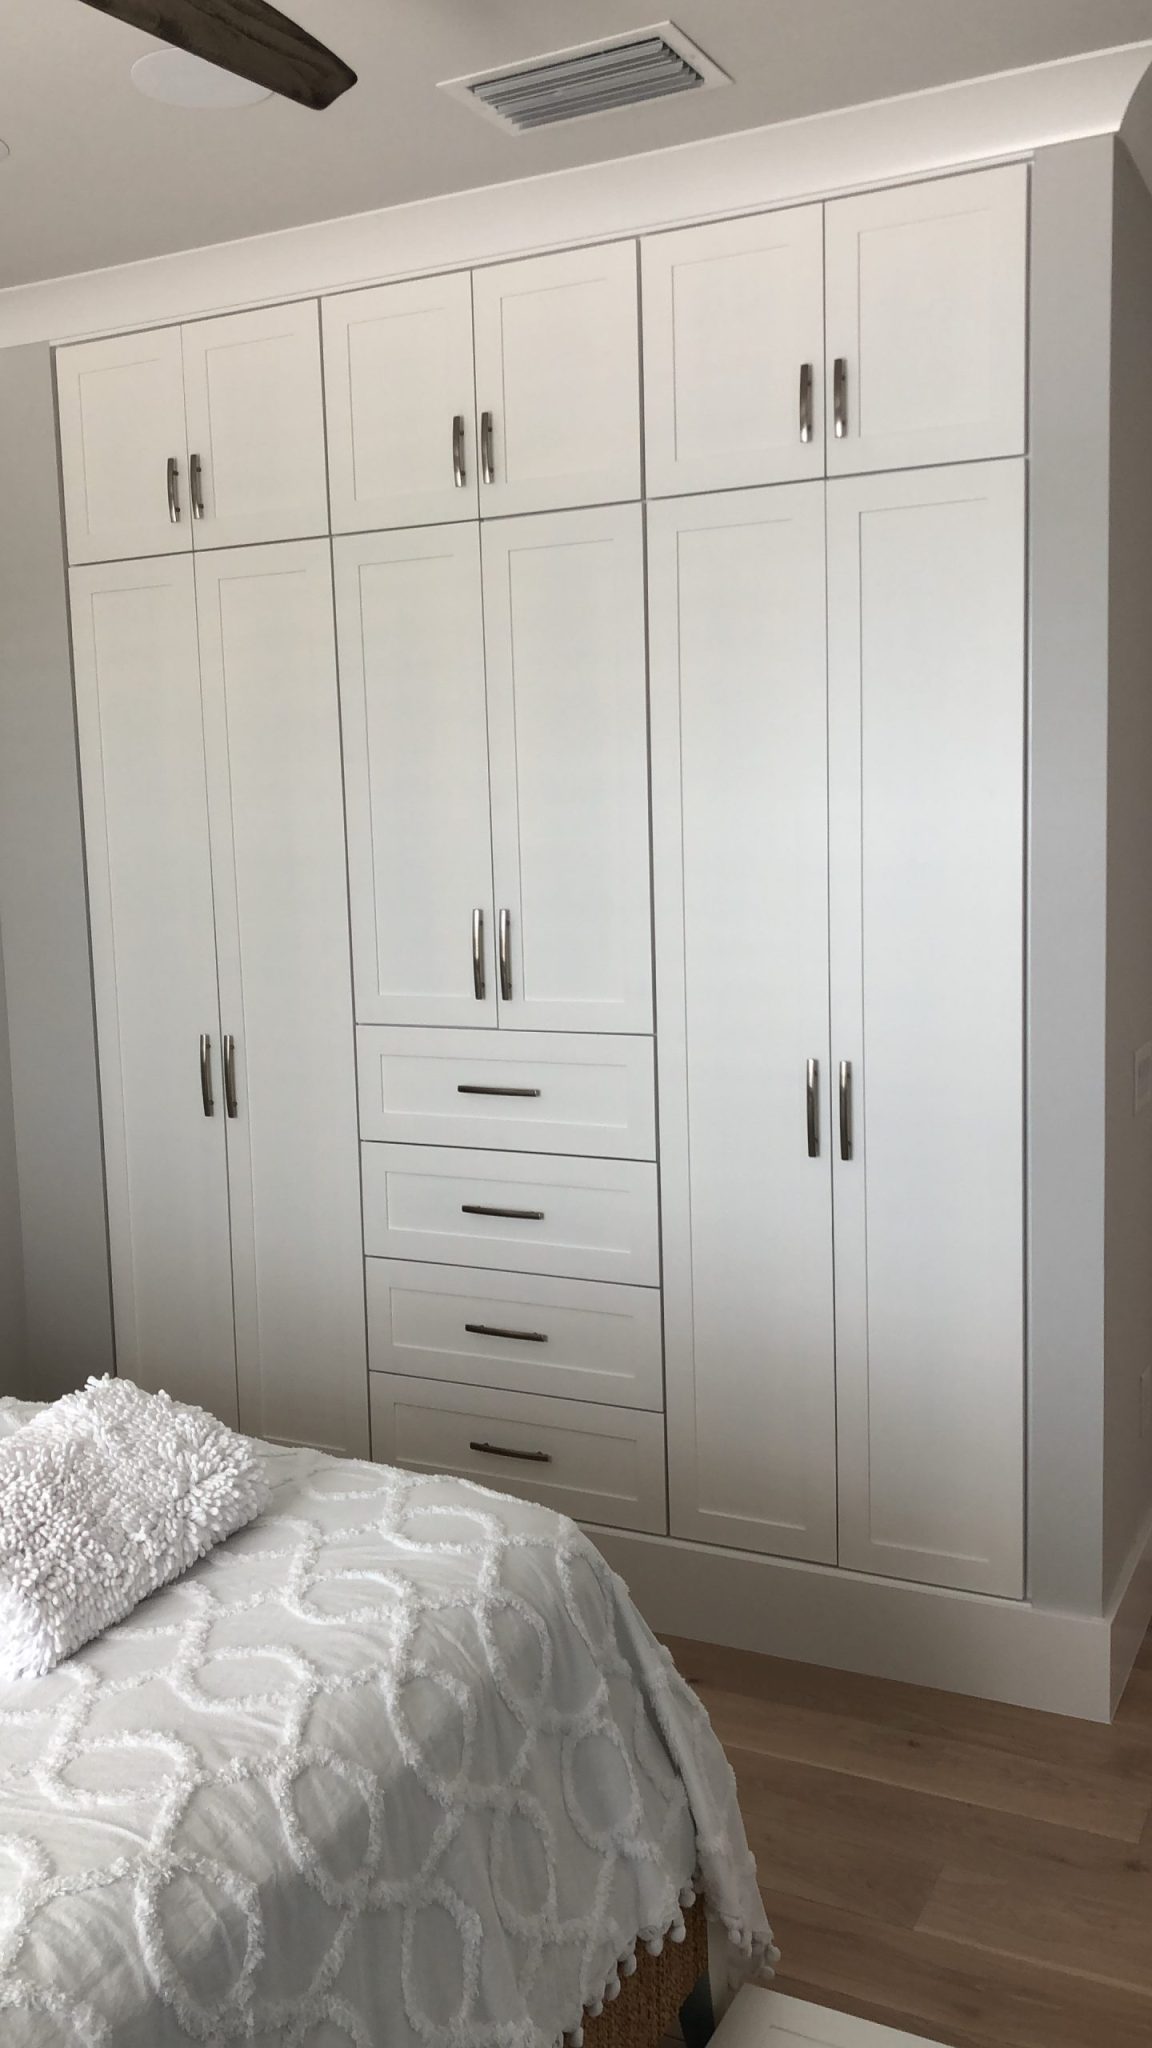
23. Achieve a Clean Look with Floor-to-Ceiling White Shaker-Style Storage
This design’s success lies in its simplicity and consistency. The use of classic Shaker-style doors across the entire unit, from the tall cabinets to the lower drawers, creates a cohesive and timeless look. Painting it all a crisp white and running it from floor to ceiling allows the large unit to blend into the wall, maximizing storage without visually overwhelming the room. The polished silver bar pulls add a touch of modern sleekness that keeps the traditional Shaker style feeling current.
|
📋 Copy HEX 🔗 Share |
📐 Style Math
For a highly affordable version of this, the IKEA PAX system is your best friend. Choose the white BERGSBO or GRIMO door styles to get a similar Shaker-inspired look. You can combine wardrobe frames of different widths to fit your wall perfectly. The key to the built-in feel is to frame it out with MDF trim at the floor, ceiling, and any side gaps. Paint the trim to match the wardrobe doors exactly. With IKEA frames and doors, plus some hardware and trim, you could replicate a 10-foot wide unit for about $1,200-$1,800.
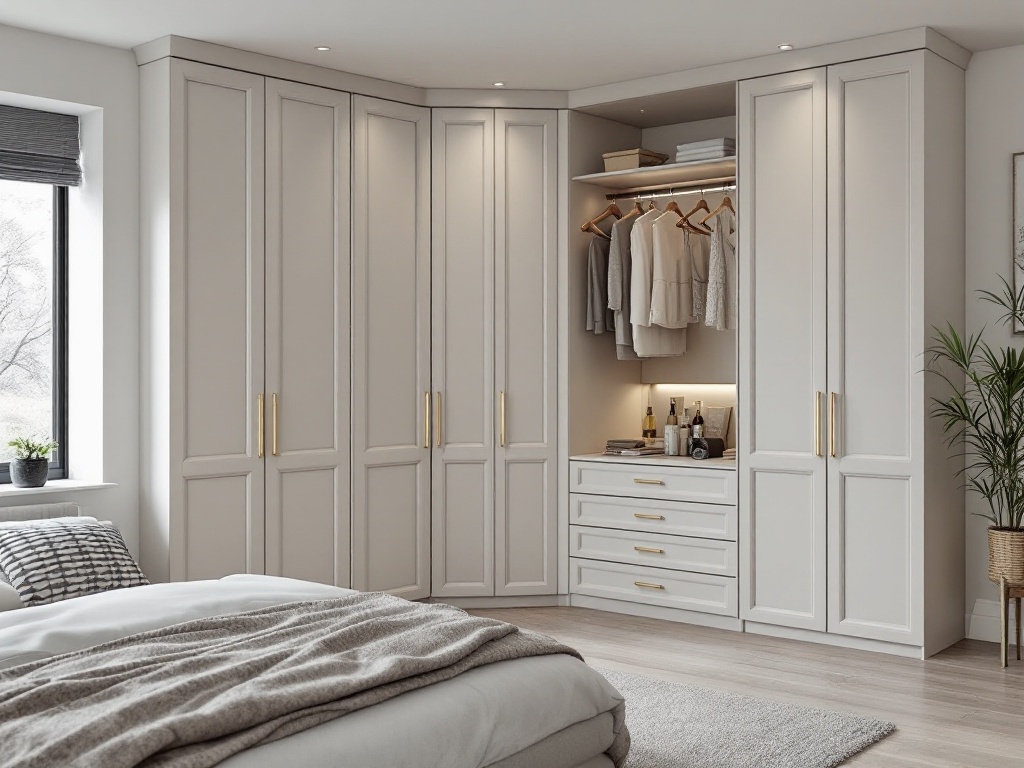
24. Design a Modern L-Shaped Wardrobe with an Illuminated Open Section
The open, illuminated section is what transforms this from a standard corner closet into a piece of display furniture. Tucking it into the corner of the ‘L’ is a brilliant use of what can be an awkward, hard-to-reach space. It breaks up the wall of gray doors, creates a boutique-like display for your favorite items, and provides a convenient surface for daily essentials. The integrated strip lighting is the final touch, adding warmth and a high-end feel while making it easy to see what’s inside.
|
📋 Copy HEX 🔗 Share |
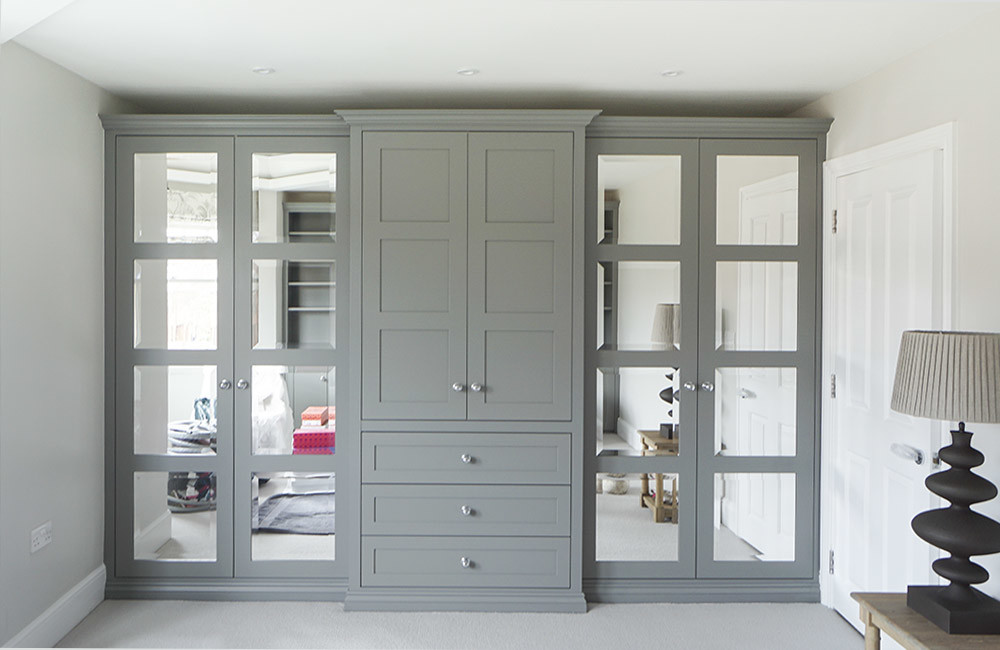
25. Create an Elegant Gray Wardrobe Wall with Paneled and Mirrored Doors
A full wall of custom built-ins is a major investment and a permanent architectural feature. Unlike a freestanding wardrobe, you can’t take it with you when you move. Before you commit, be absolutely sure that the style, color, and configuration are timeless enough to appeal to future buyers. A neutral gray like this is a safe bet, as is the classic paneled design. Highly personal or bold color choices might be a harder sell down the line. It’s an upgrade that should add value, but only if it’s done thoughtfully.
|
📋 Copy HEX 🔗 Share |
💰 Budget Breakdown
The formula for this classic, elegant look is about balance: 50% solid paneled doors + 30% mirrored doors + 20% functional drawers. The solid doors provide the main structure and classic feel. The mirrored sections are crucial for breaking up the solid mass and reflecting light, making the room feel larger (a trick we also saw in Idea #18). The row of drawers grounds the unit and provides accessible storage for smaller items. This thoughtful distribution prevents the large wardrobe from feeling like a monolithic block.
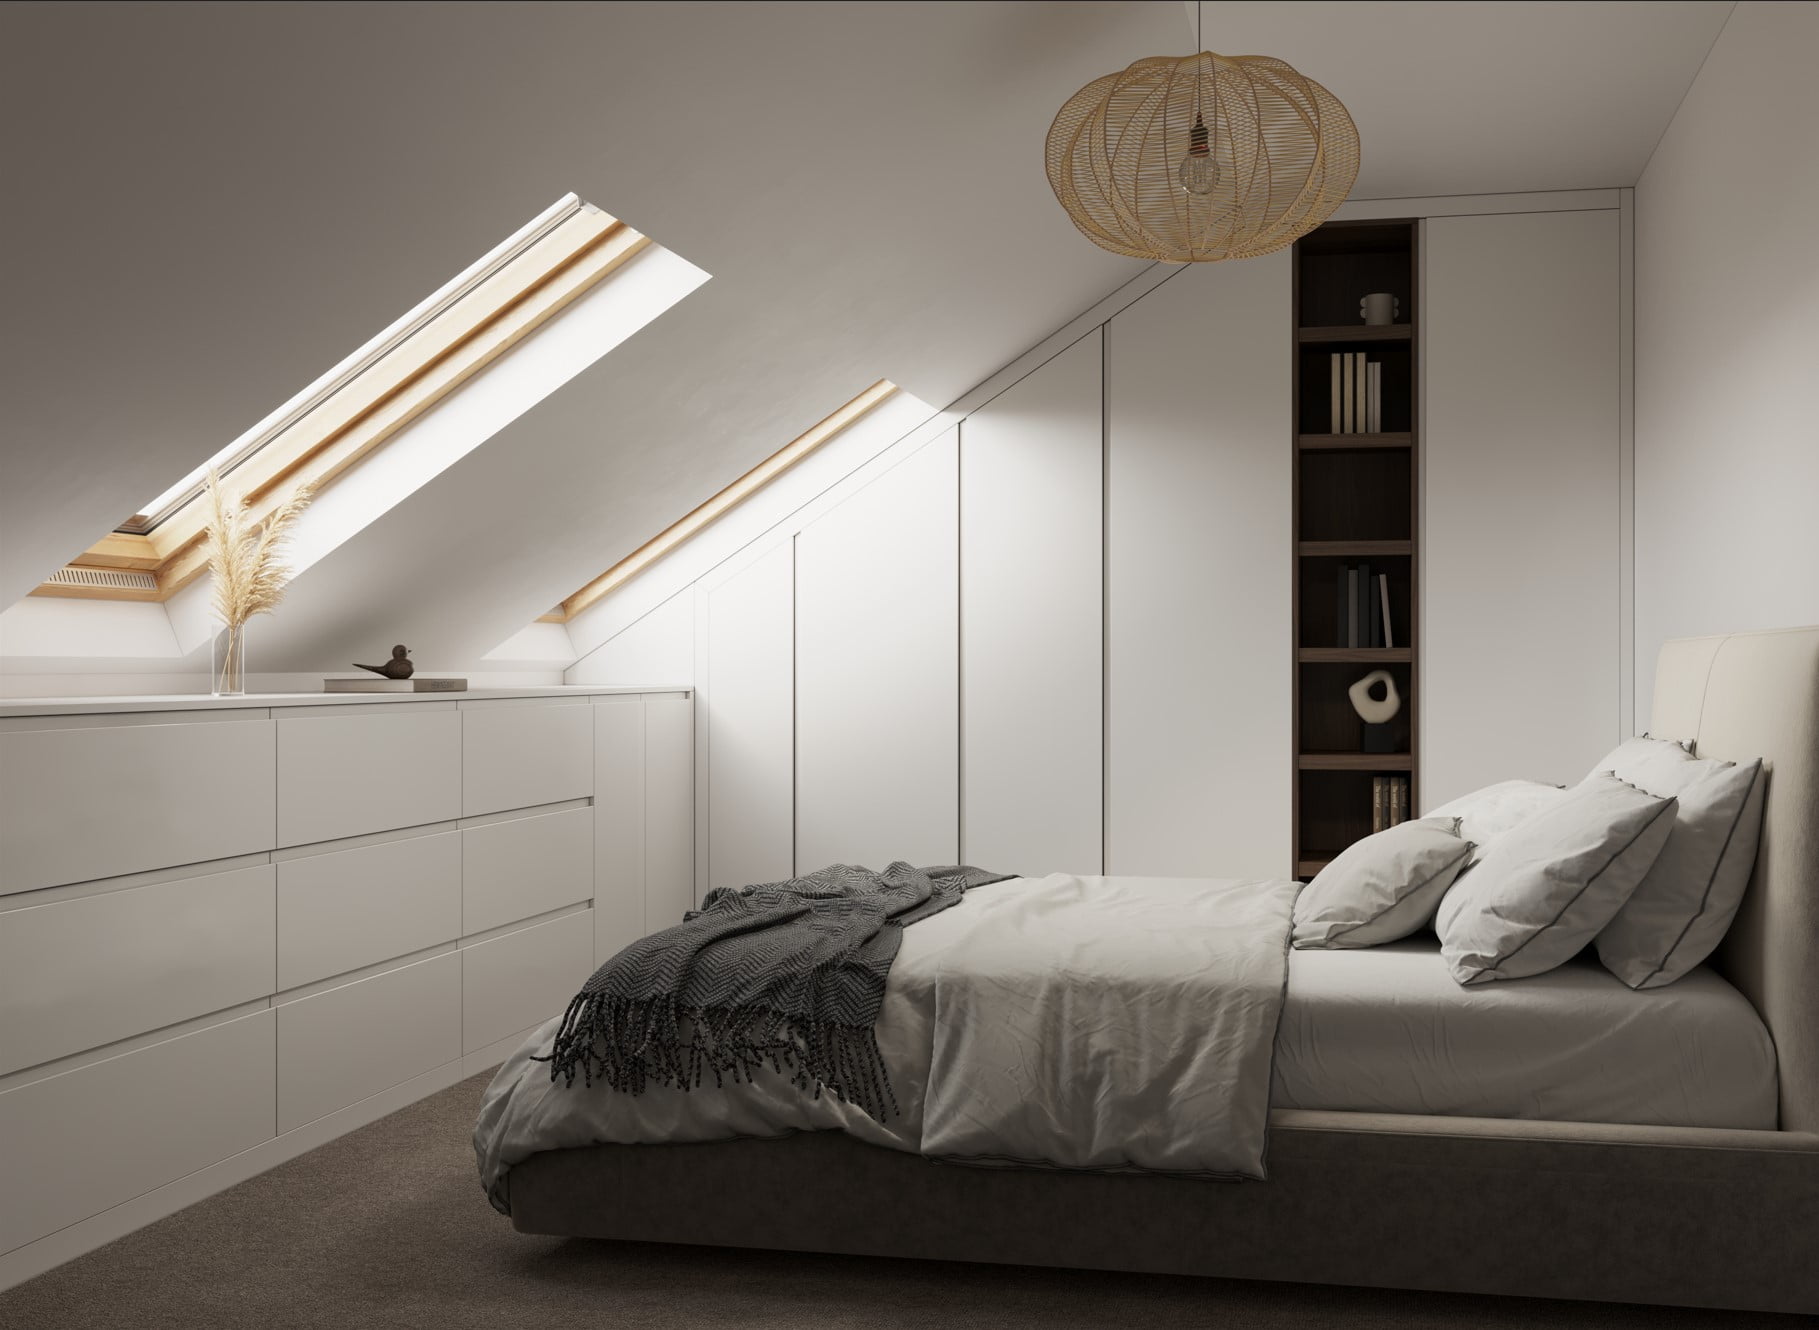
26. Utilize Sloped Attic Walls with Custom White Built-Ins
This room is a brilliant example of turning an architectural challenge into a design feature. Instead of fighting the sloped ceilings, the built-ins embrace them, tucking neatly into the attic eaves. This creates a cozy, den-like feeling and utilizes every inch of what would otherwise be awkward, unusable space. Painting most of the units white helps them blend in with the walls, making the room feel more spacious, while the dark wood recessed shelf adds a point of contrast and warmth right next to the bed.
|
📋 Copy HEX 🔗 Share |
💡 Designer Tip
The single element that makes this room feel intentionally designed is the recessed dark wood open shelving. In a sea of practical, white-painted storage, this small niche provides a crucial moment of visual relief and warmth. It breaks the monotony, adds a touch of organic texture, and creates the perfect spot for personal items right by the bed. It signals that this space is not just about cramming in storage, but about creating a calm, personal sanctuary. It’s the detail that adds soul.
27. Add a Low Marble Counter with Open Basket Storage in a Bathroom
This low-profile storage solution is perfect for small bathrooms or awkward spaces where a full-height cabinet would be overwhelming. It works exceptionally well under a window, as seen here, or along a narrow wall in a powder room. The minimum practical depth for a counter like this is about 12 inches—enough to hold a standard woven basket. The height is also key; keeping it at or below 30 inches ensures it feels like a console or bench, not a full vanity, maintaining an open and airy feeling.
|
📋 Copy HEX 🔗 Share |
⭐ The One Thing
Here’s a look at the costs to create this charming feature:
- Custom Cabinetry/Shelving Unit (painted MDF): $500 – $1,200
- Marble Countertop Remnant (ideal for small projects): $300 – $800
- Woven Storage Baskets: $60 – $150
- Labor/Installation: $400 – $800
- TOTAL: $1,260 – $2,950
Budget alternative: Build the base yourself from plywood and paint it. Use a pre-made laminate countertop with a marble effect and find similar baskets at Target or HomeGoods. This could bring the total project cost down to $400 – $700.
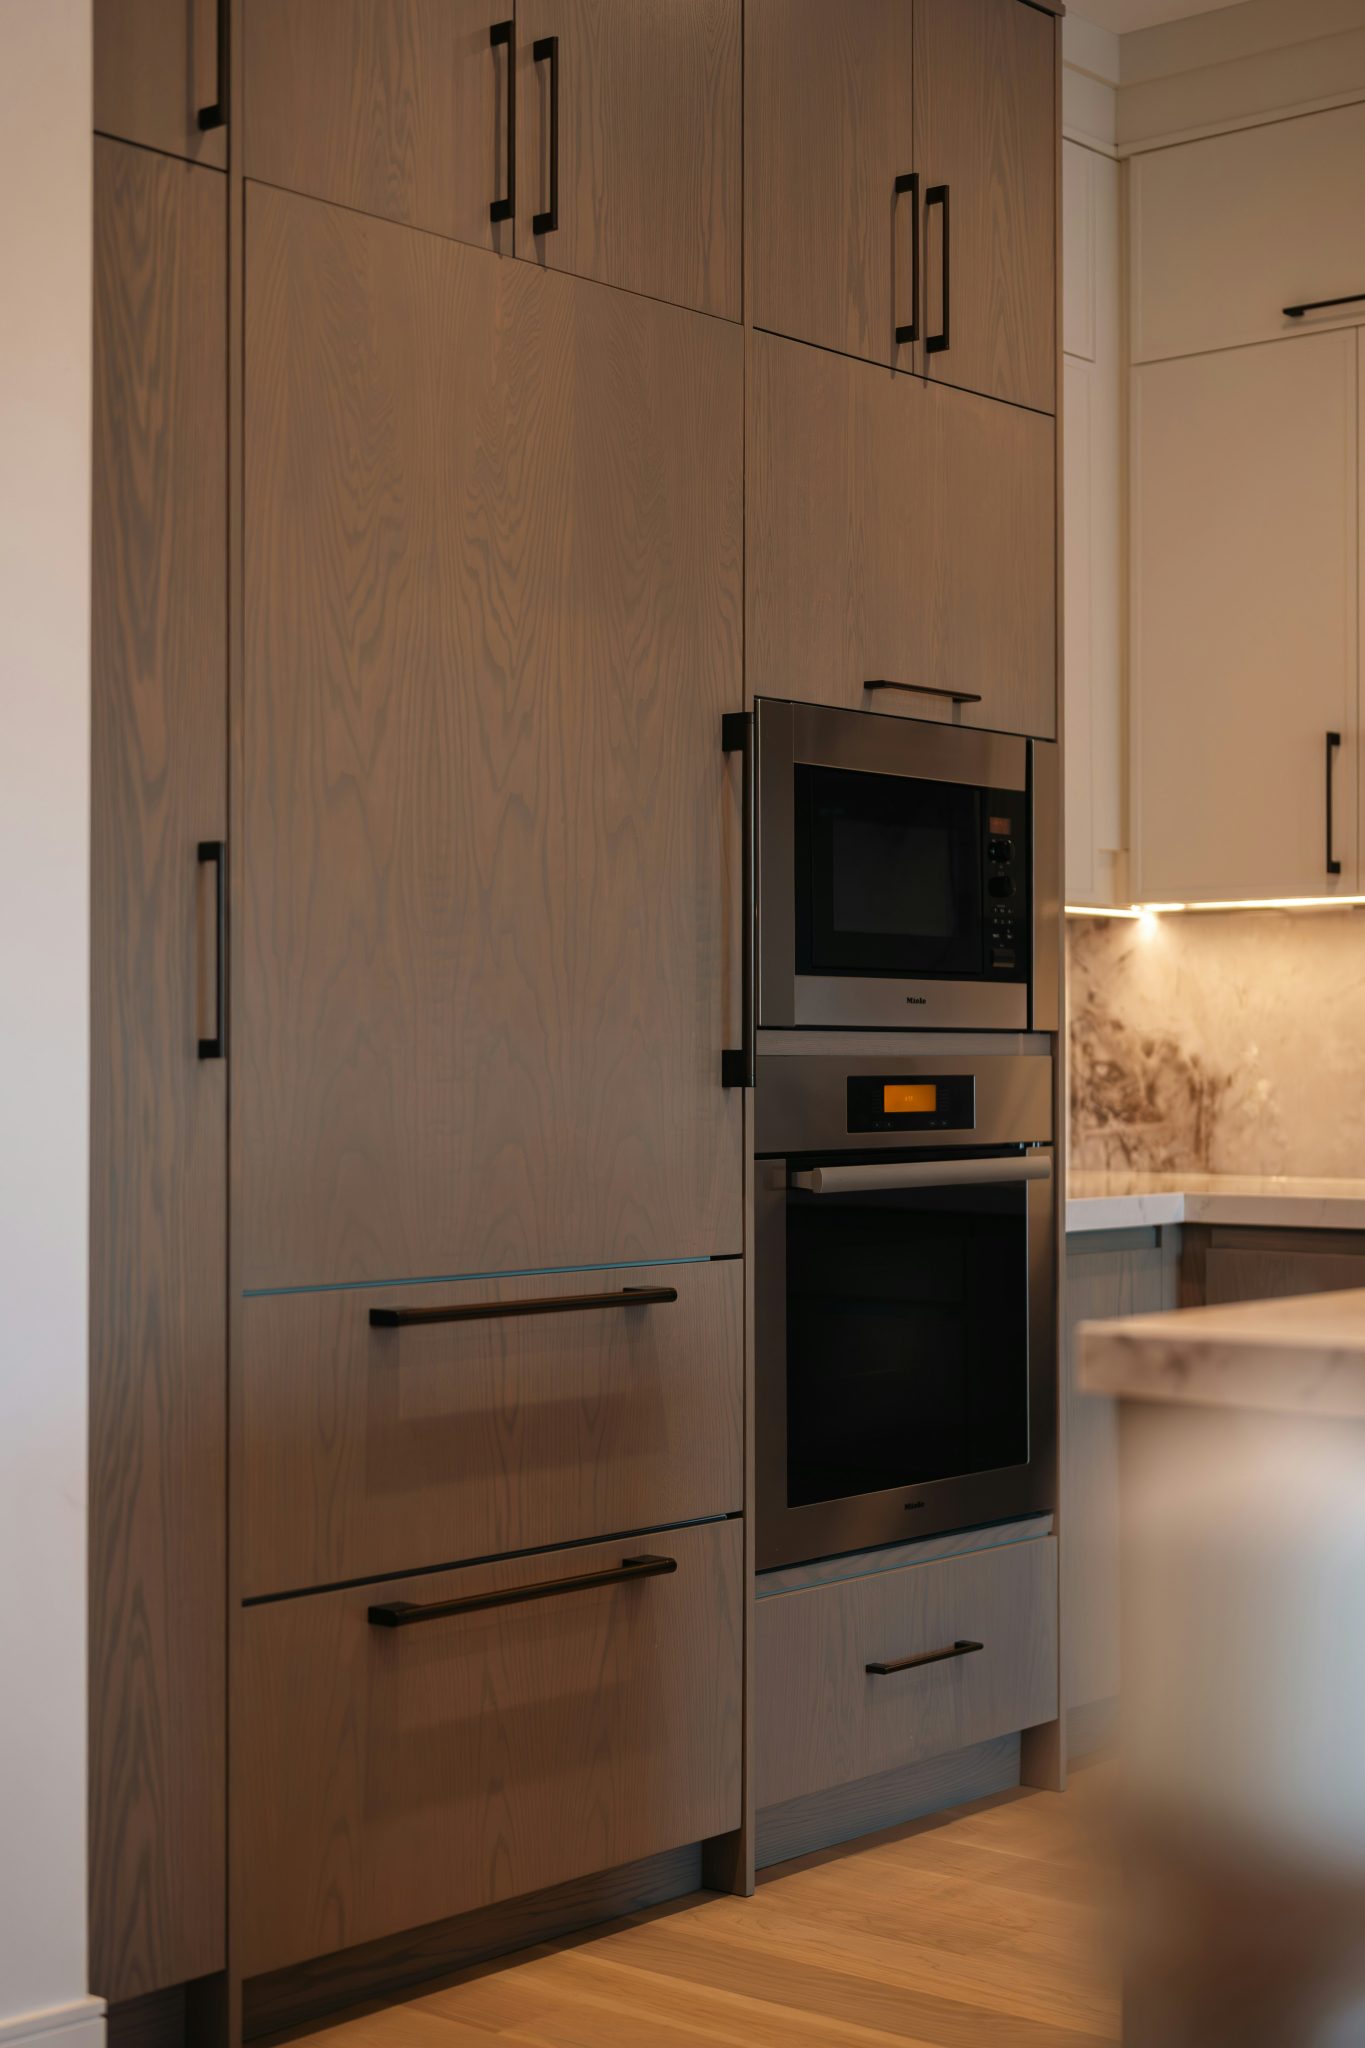
28. Go Sleek with Floor-to-Ceiling Wood Grain Appliance Cabinets
The success of this design lies in its verticality and material consistency. By running the light grey-brown wood grain cabinets from the floor to the ceiling, the eye is drawn upward, making the kitchen feel taller and more spacious. Integrating the stainless steel appliances into this vertical grid creates a clean, unbroken plane. The choice to use sleek, minimal black hardware adds to the modern aesthetic without interrupting the clean lines established by the cabinetry’s wood grain.
|
📋 Copy HEX 🔗 Share |
🧹 Maintenance Reality
Textured laminate or wood veneer cabinets like these are great at hiding fingerprints compared to their matte or glossy painted counterparts. However, be mindful of cleaning. Always wipe in the direction of the grain using a soft, damp cloth. Using an abrasive cleaner or scrubbing against the grain can cause micro-scratches that will dull the finish over time. Stainless steel appliances require their own specific cleaners to avoid streaks; a simple microfiber cloth with a bit of white vinegar often works best.
29. Combine an Illuminated Glass Display with a Buffet Cabinet
For glass display cabinets, the type of glass shelf makes a big difference. Standard 1/4-inch thick glass shelves can begin to bow under the weight of heavy dishware over time. For a 24-30 inch span, upgrade to 3/8-inch thick tempered glass. It’s significantly stronger, safer if it ever breaks, and has a more substantial, high-end look. Also, having the edges polished will catch the internal light beautifully, adding to the sparkle and overall refinement of the display.
|
📋 Copy HEX 🔗 Share |
✅ Before You Start
You can create a very similar look starting with an IKEA BESTÅ storage combination for the base. Choose a mix of white doors and open frames to mimic the layout. For the upper section, use wall-mounted kitchen cabinets with glass doors, like the ENKÖPING or JUTIS styles. Add under-cabinet LED light strips (like the MITTLED series) to illuminate the display. For the mirrored backsplash, you can have a custom mirror cut at a local glass shop and apply it to the wall with adhesive. This DIY approach would cost approximately $900 – $1,400.
Your Walls Are Waiting for Their Story
With 29 distinct approaches to built-in storage, the next step is to find the one that truly resonates with your home and your life. Whether you’re craving a cozy reading nook or a hyper-organized command center, the right design is here. Choose your favorite, start planning, and get ready to transform that blank wall into something beautiful and hardworking.
Ready to start? Pin your favorite ideas to your board and make it happen!