Outdoor string lights have become one of the most searched home décor elements on Pinterest, and for good reason. They transform patios, backyards, and porches into warm, inviting spaces that feel like permanent vacation spots. As we move into 2026, homeowners across America are looking for creative, functional ways to hang these lights without hiring electricians or spending a fortune. Whether you’re planning a summer wedding, upgrading your deck, or simply want to enjoy evening meals outside, the right string light setup can completely change how you use your outdoor space. This guide covers 22 practical, beautiful ideas that work for real homes and real budgets.
1. Pergola-Draped Café Style Lights
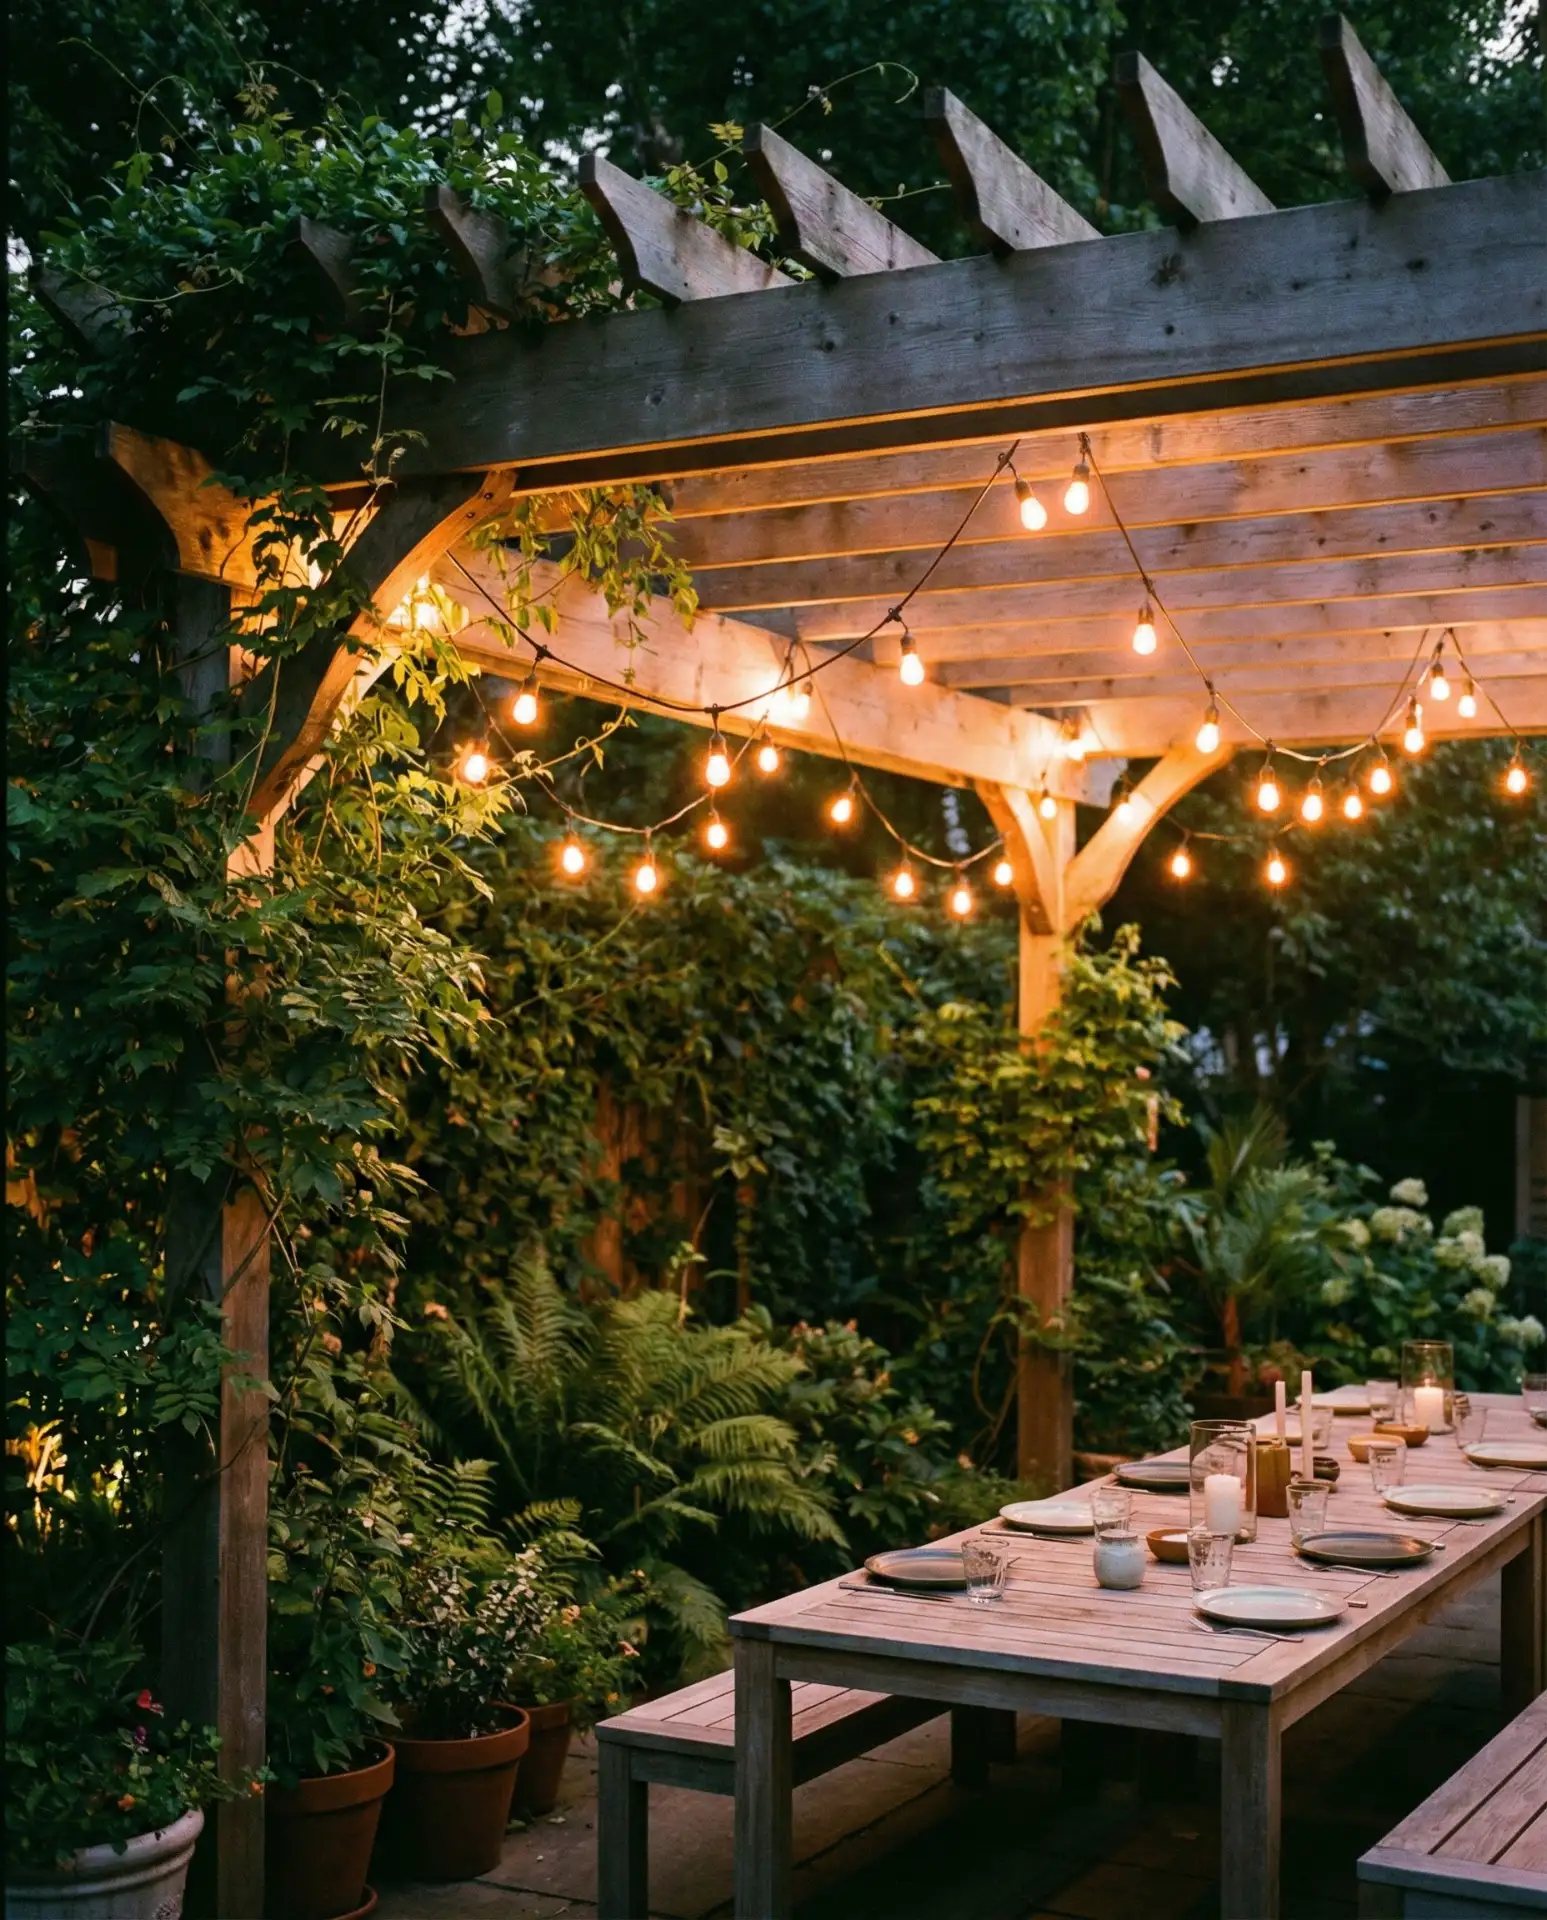
A pergola offers the perfect framework for hanging café-style bulbs in graceful swoops. The structure eliminates the need for additional poles or complicated installations, making it one of the easiest ways to create an intimate patio atmosphere. The overhead beams provide natural anchor points, and the lights can be arranged in parallel lines or draped in loose curves depending on your aesthetic preference. This setup works especially well for dining areas where you want consistent, flattering overhead lighting. 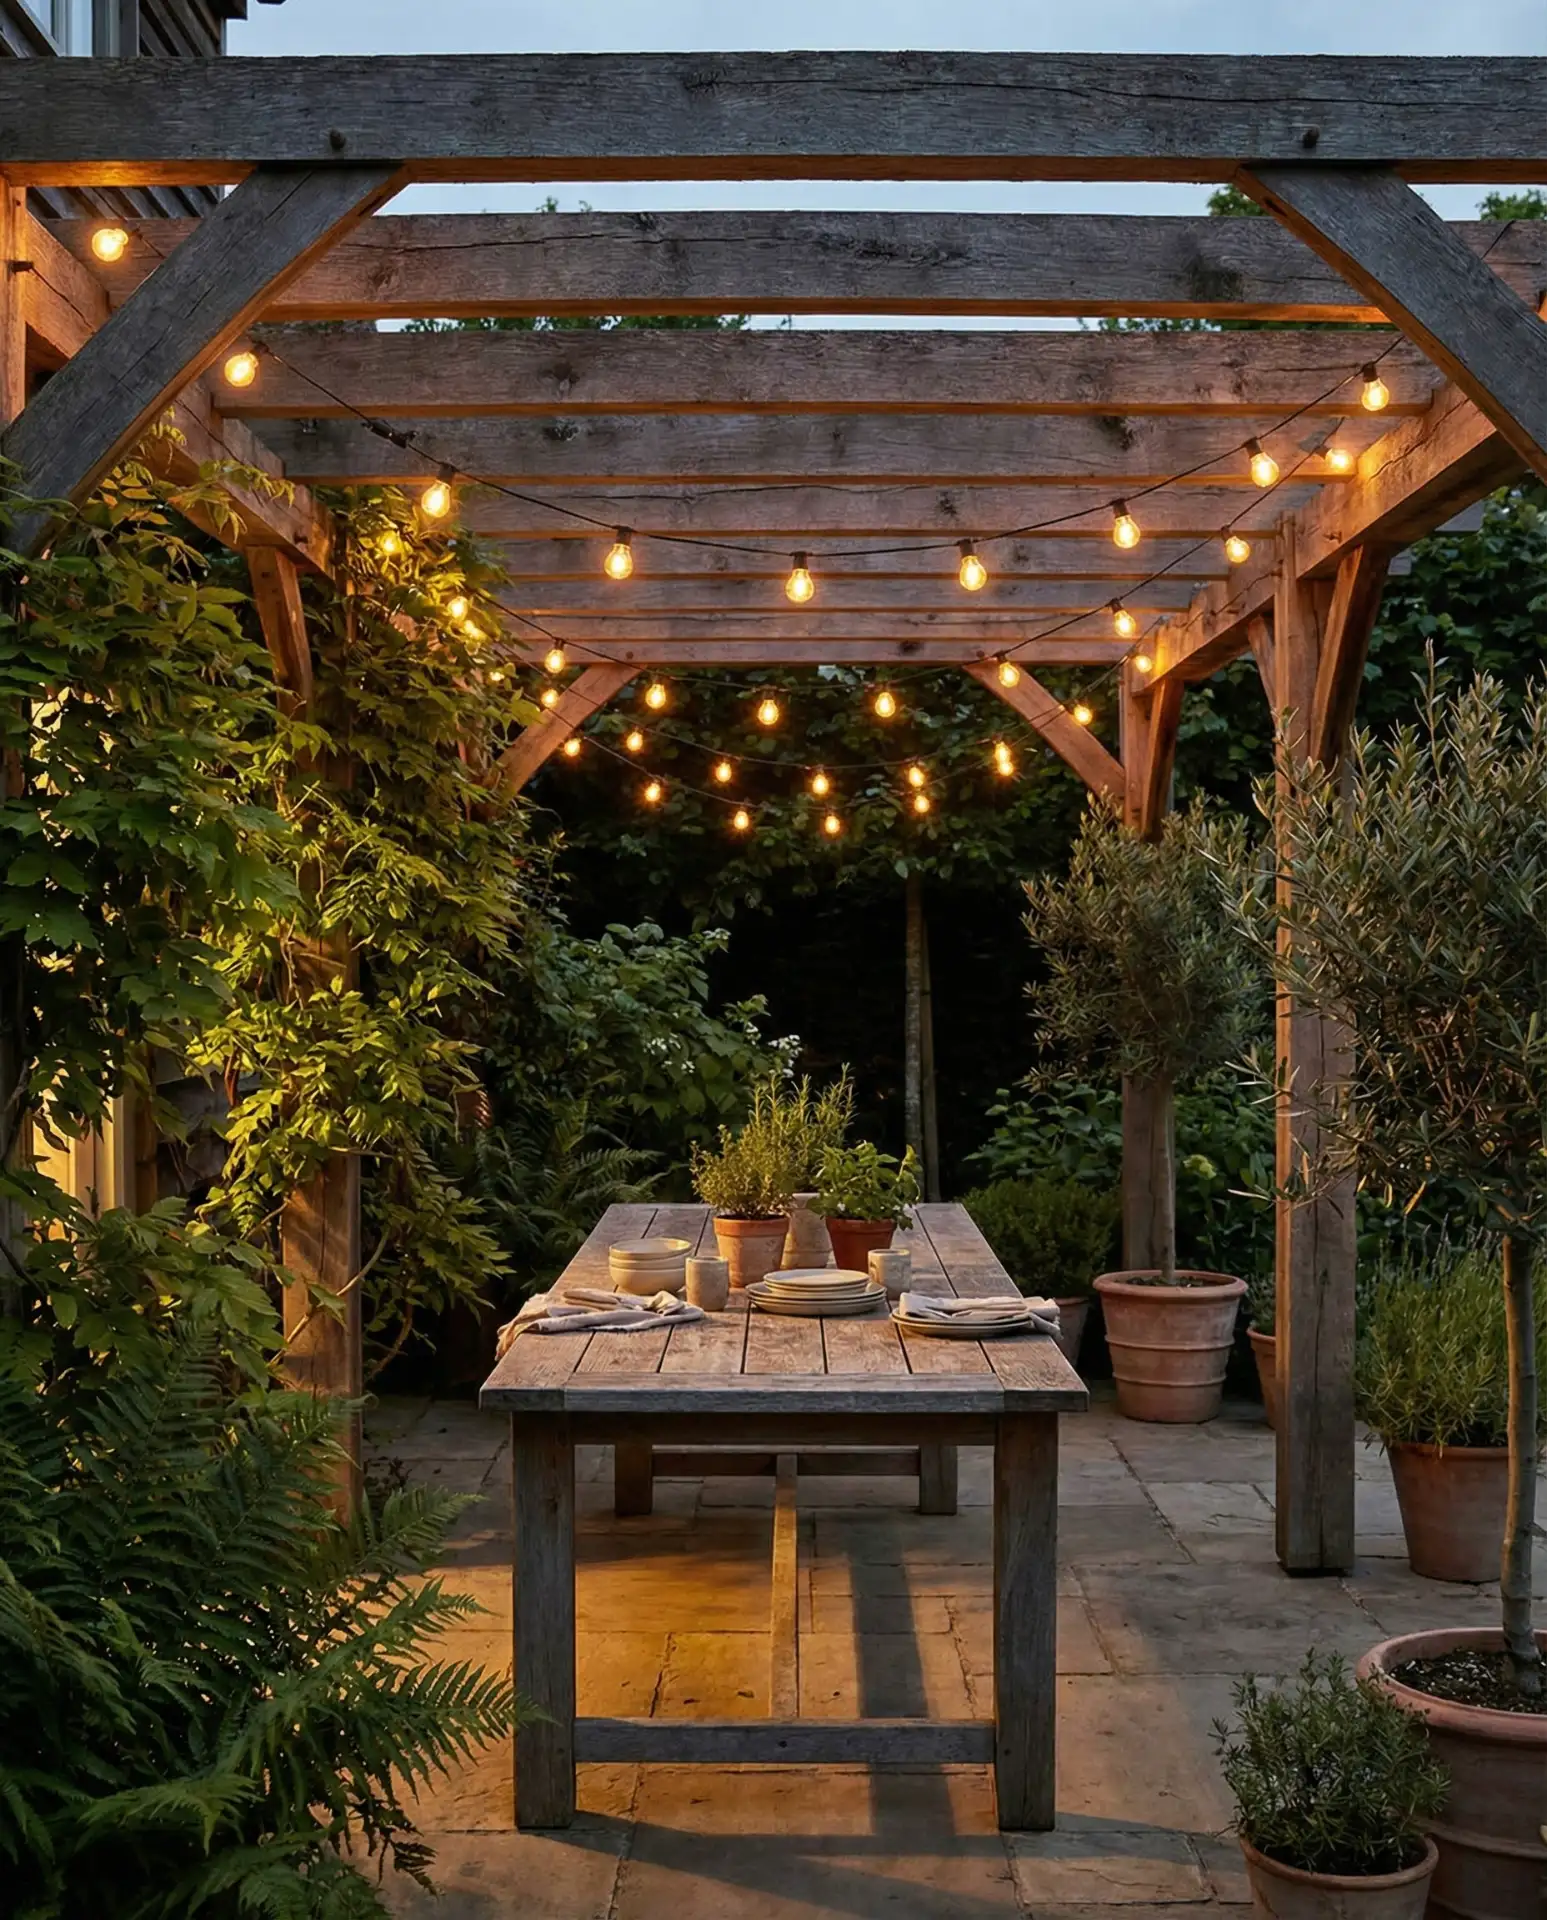
This approach works best in backyards with existing pergola structures, though freestanding pergola kits from hardware stores start around $300. The key is spacing bulbs about 18 inches apart for even illumination without creating harsh shadows. Many homeowners in the Southwest and Pacific Northwest use this method year-round, as the pergola provides partial weather protection. If your pergola has a retractable canopy, run the lights along the outer beams so they remain visible whether the fabric is extended or not.
2. Fence-Mounted Linear Installation
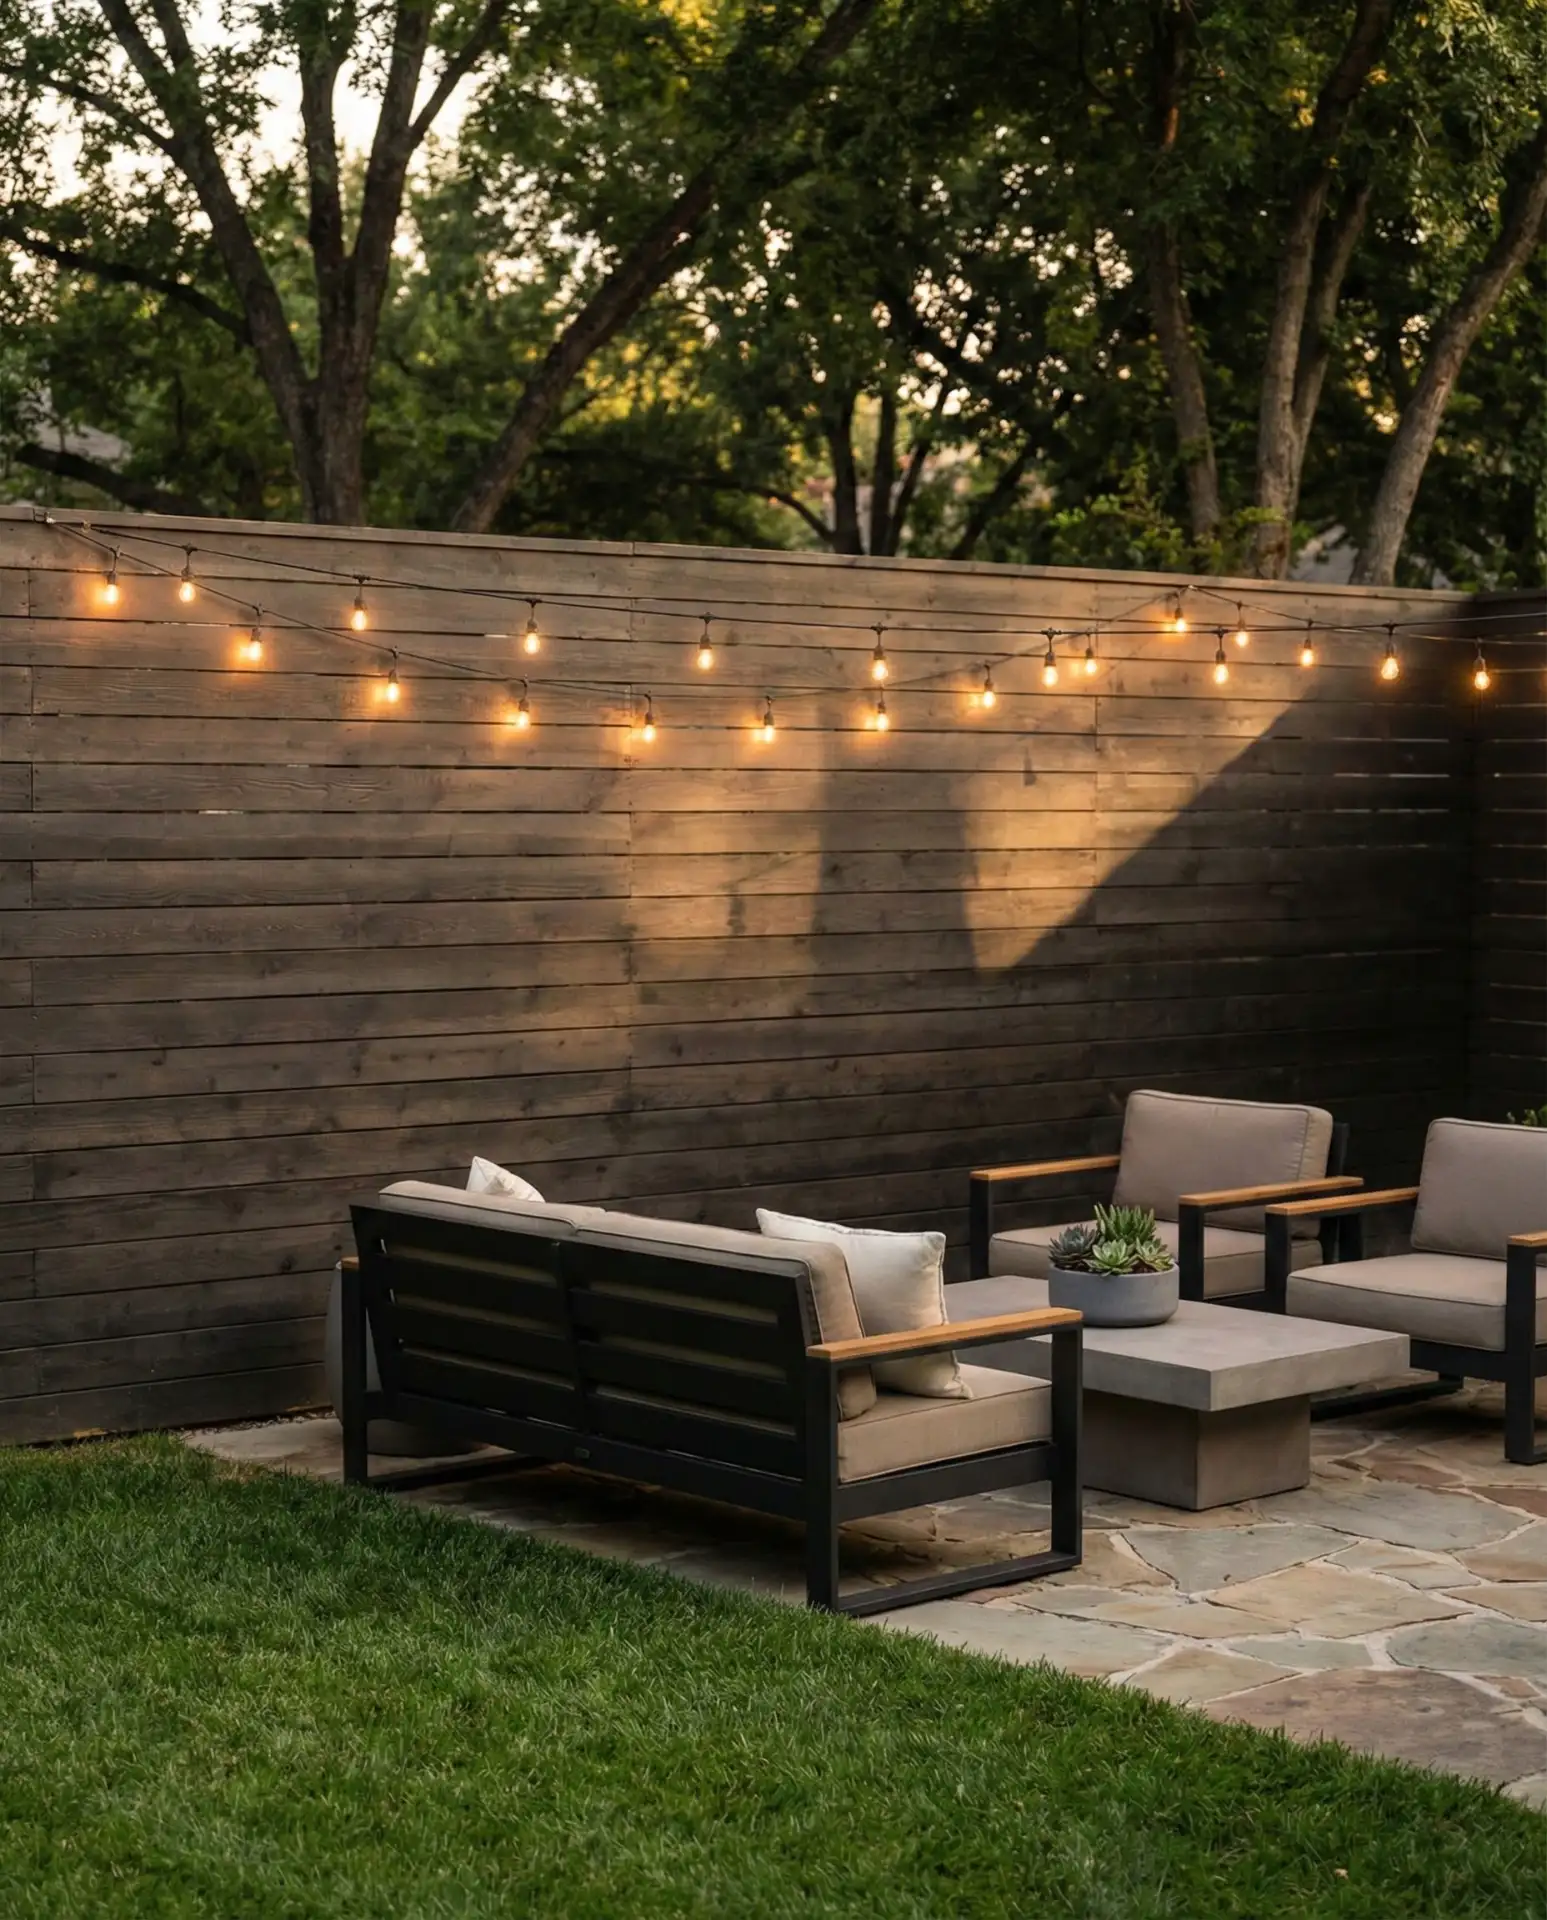
Mounting string lights directly along a fence line creates a clean, modern perimeter glow that defines outdoor boundaries beautifully. Use weatherproof hooks or adhesive clips designed for exterior surfaces, spacing them every two feet to prevent sagging. This method works particularly well for backyard spaces where you want ambient lighting without obstructing sightlines. The linear arrangement provides consistent illumination along walkways and seating areas while maintaining a minimalist aesthetic. 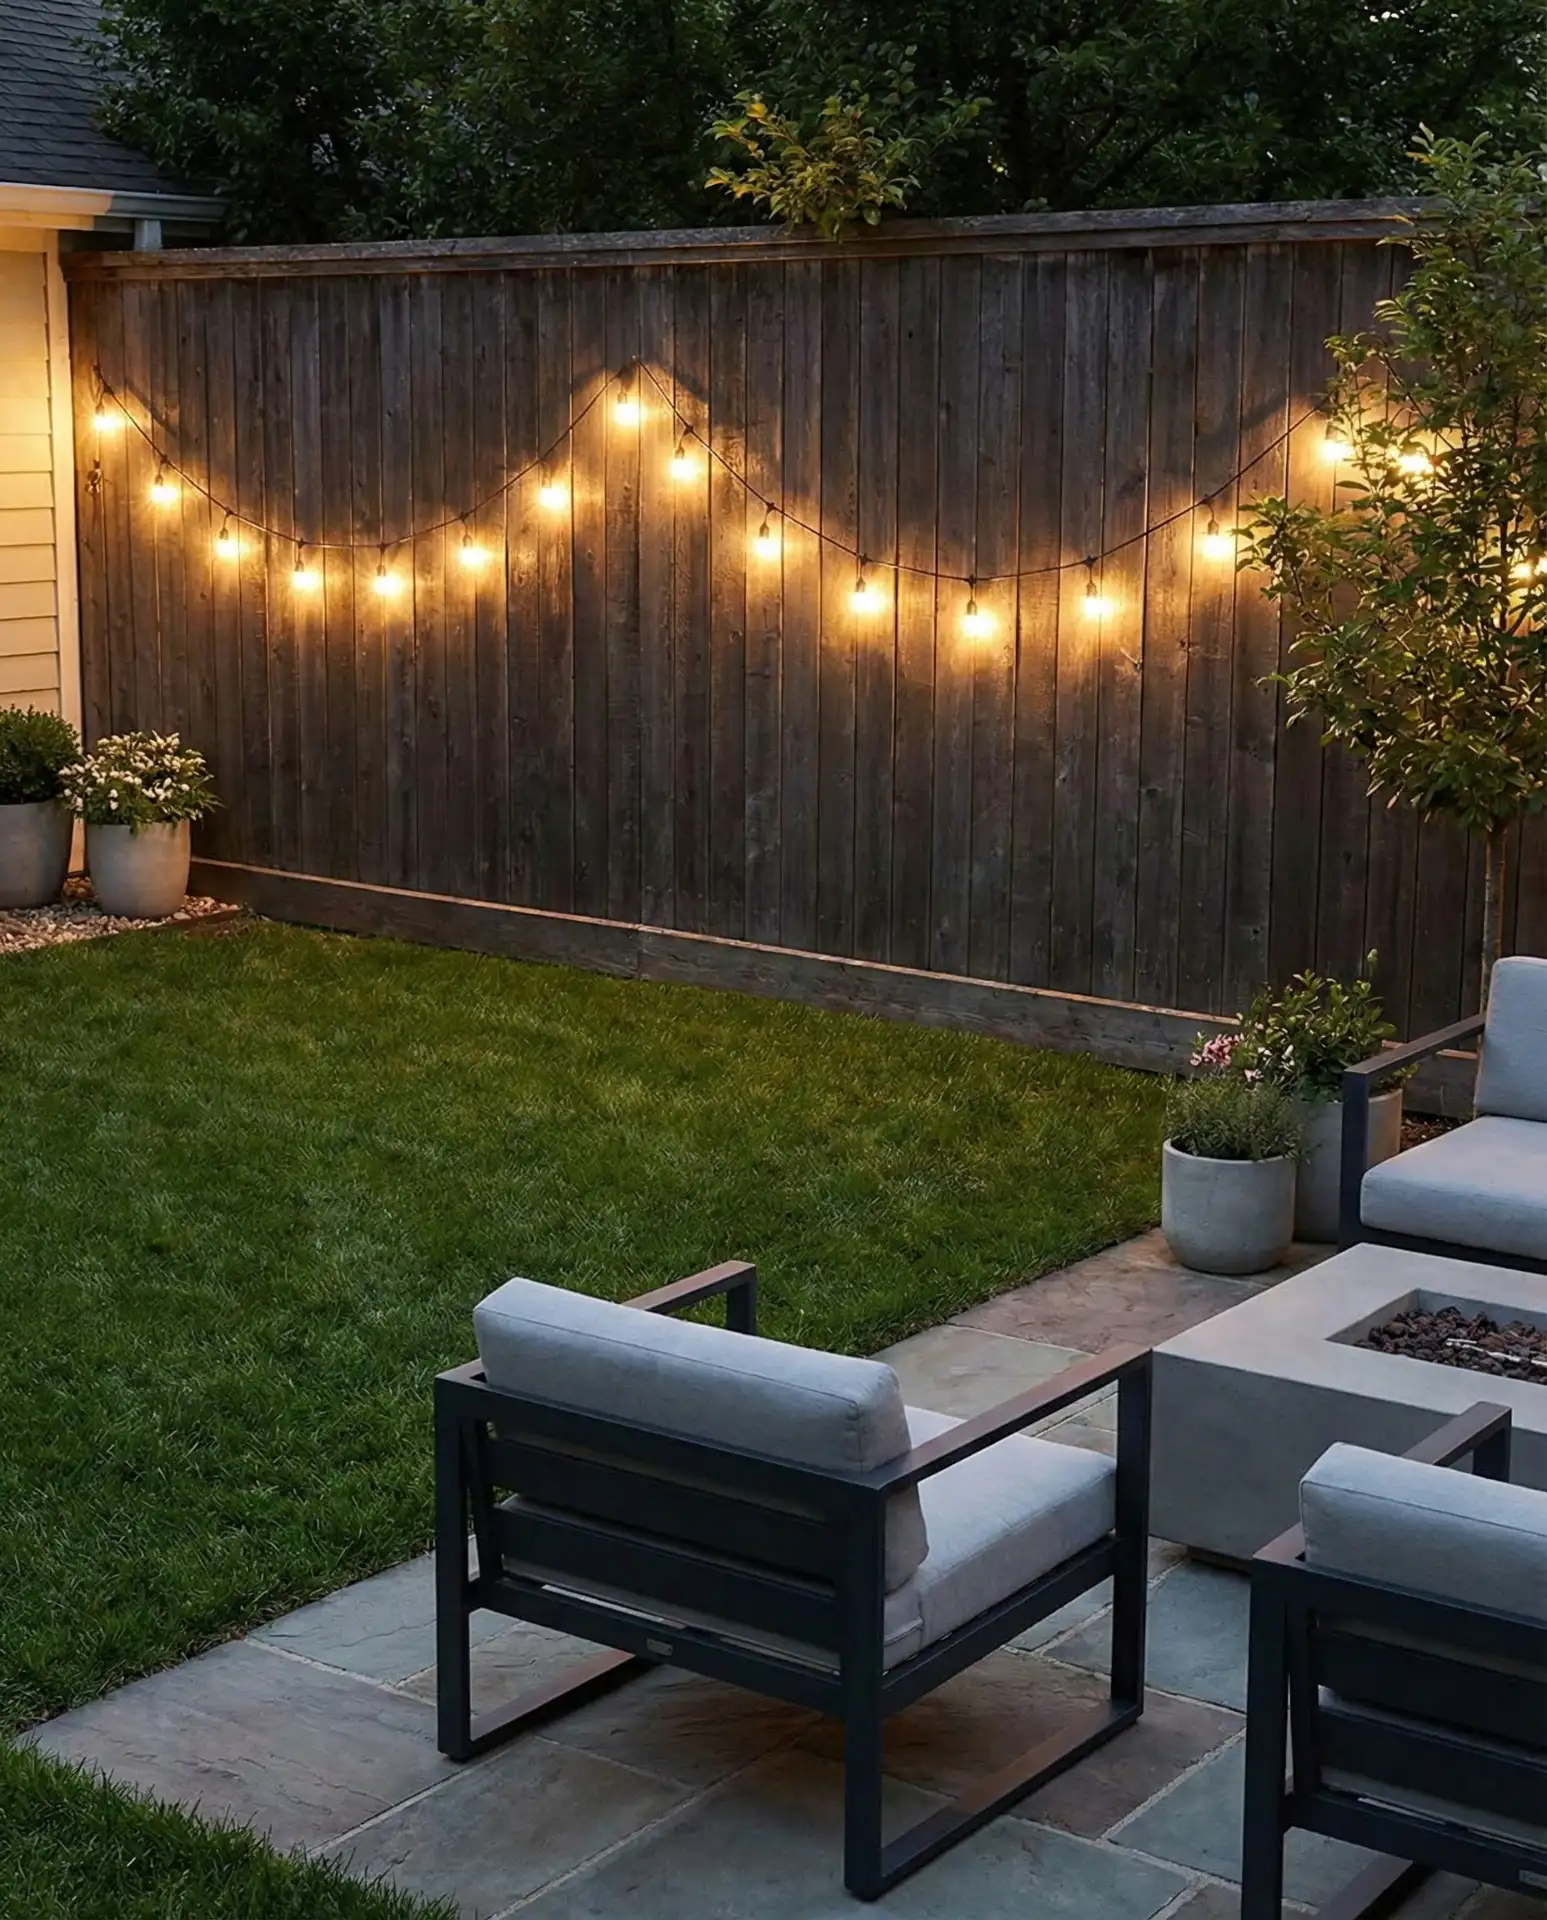
In suburban neighborhoods, this setup has become especially popular because it doesn’t require drilling into house siding or installing permanent poles. Most homeowners complete the installation in under an hour using vinyl-safe hooks that won’t damage fence materials. The lights stay secure even in moderate wind, and the straight-line design complements both traditional and modern architectural styles. For added stability in windy climates like Texas or the Plains states, use cup hooks screwed directly into wooden fence posts at regular intervals.
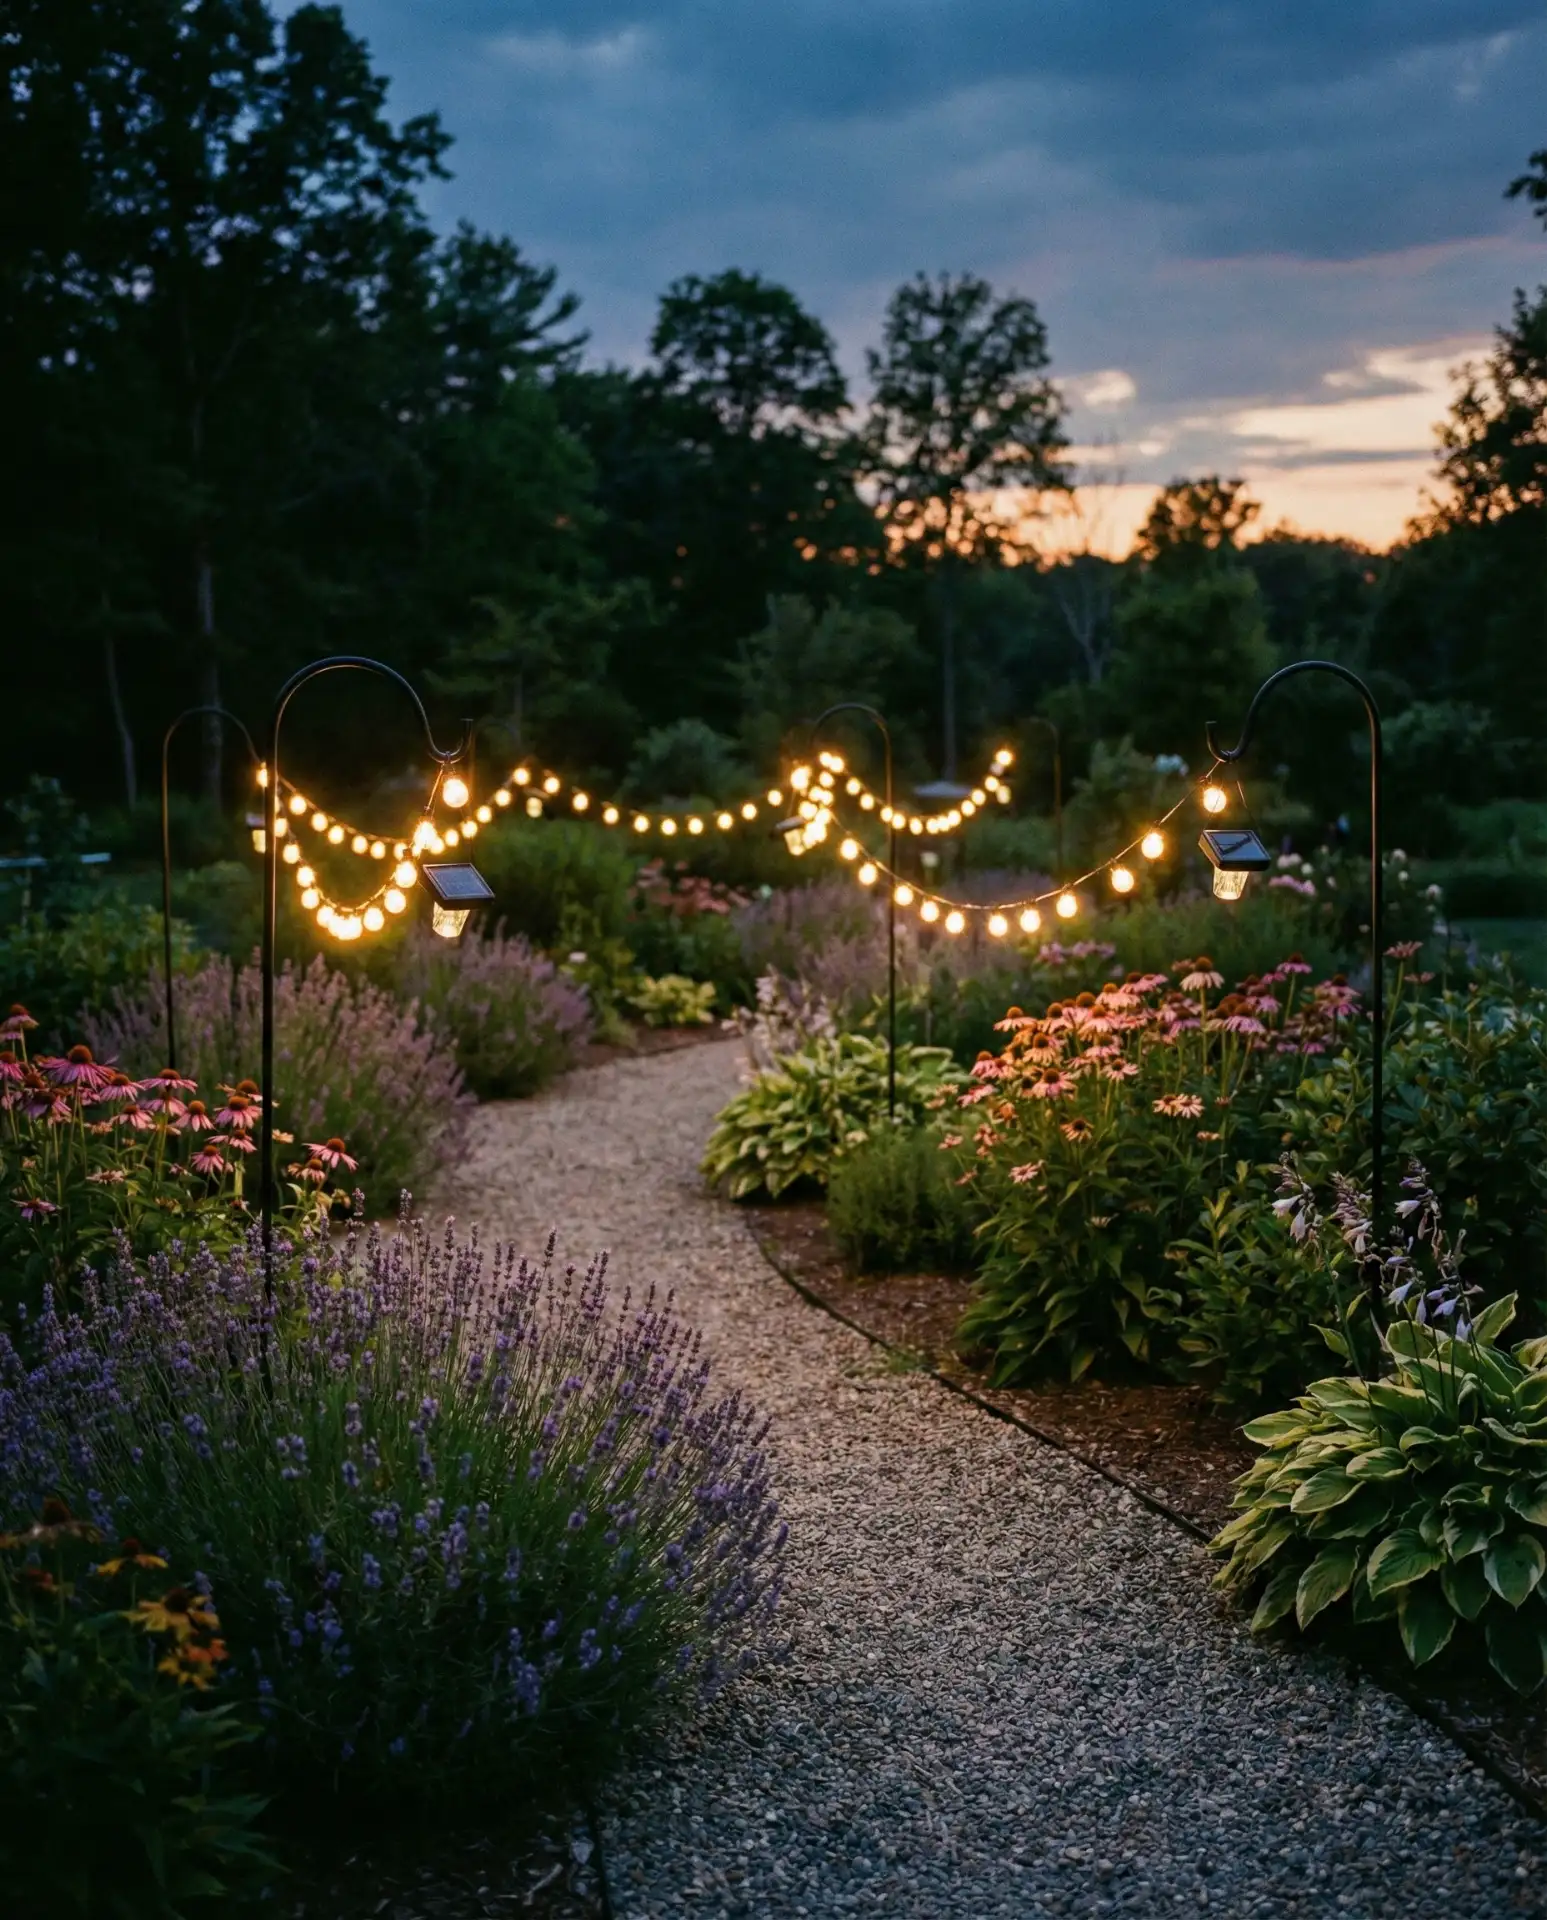
3. Shepherd’s Hook Pathway Lighting
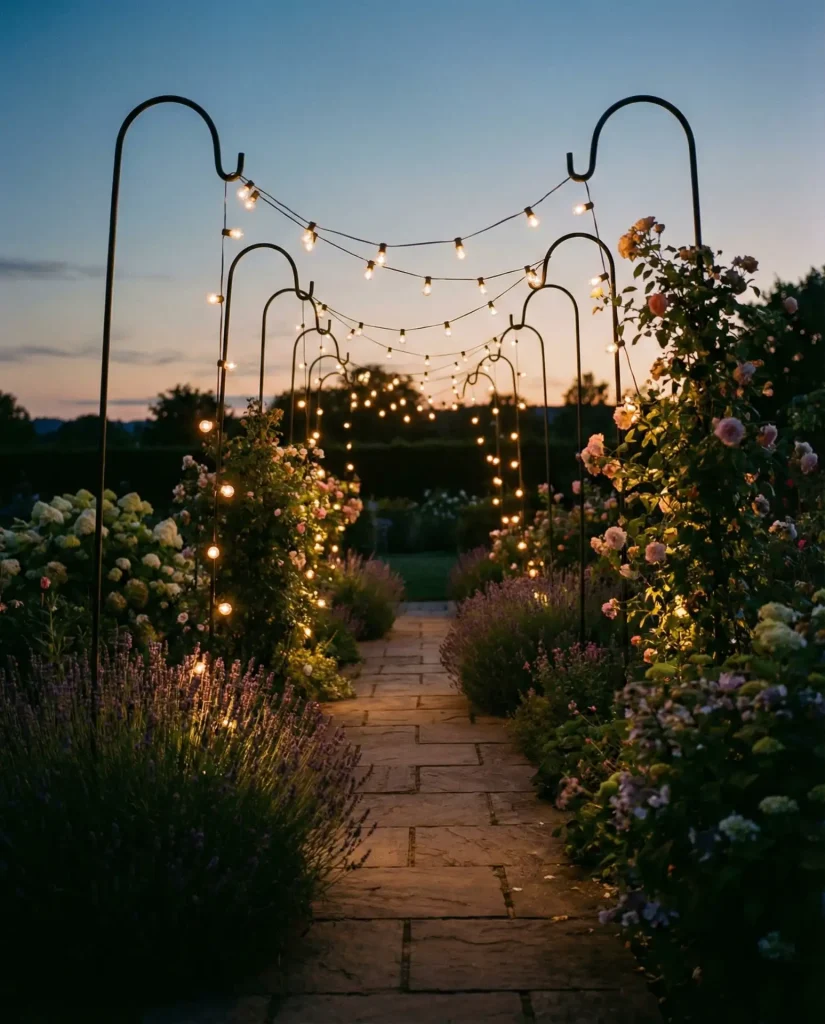
Shepherd’s hooks create portable anchor points that let you design flexible string light configurations without permanent installations. Space them along garden paths or around patio edges, then drape lights between hooks to form elegant arches. This way to hang lights works beautifully for renters or anyone who wants to reconfigure their outdoor lighting seasonally. The hooks push easily into soft soil and can be relocated as landscaping changes throughout the year. 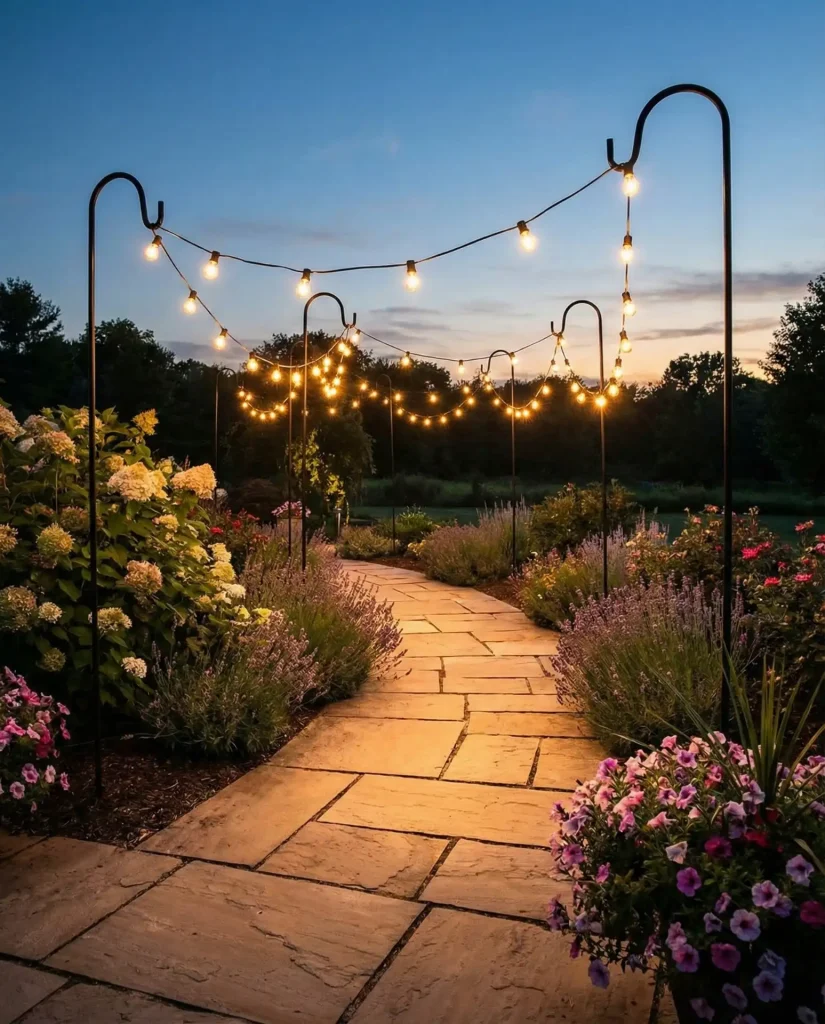
A common mistake is choosing hooks that are too short—opt for six-foot models to achieve proper draping height without lights hanging too low. The pathway lighting approach works especially well in cottage-style gardens or for outdoor events where you need temporary but elegant illumination. Standard shepherd’s hooks cost $15-25 each at garden centers, making this one of the most budget-friendly options for covering large areas. In regions with hard clay soil like the Southeast, pre-water the ground or use a metal rod to create pilot holes before inserting hooks.
4. Tree-to-Tree Canopy Weave

Mature trees with sturdy branches provide natural support for creating magical overhead canopies of light. Wrap weatherproof rope or cable around main branches, then attach string lights using carabiners or S-hooks that won’t damage bark. This creates a backyard environment that feels like an enchanted forest, with lights filtering through leaves during summer and creating dramatic patterns against bare branches in winter. 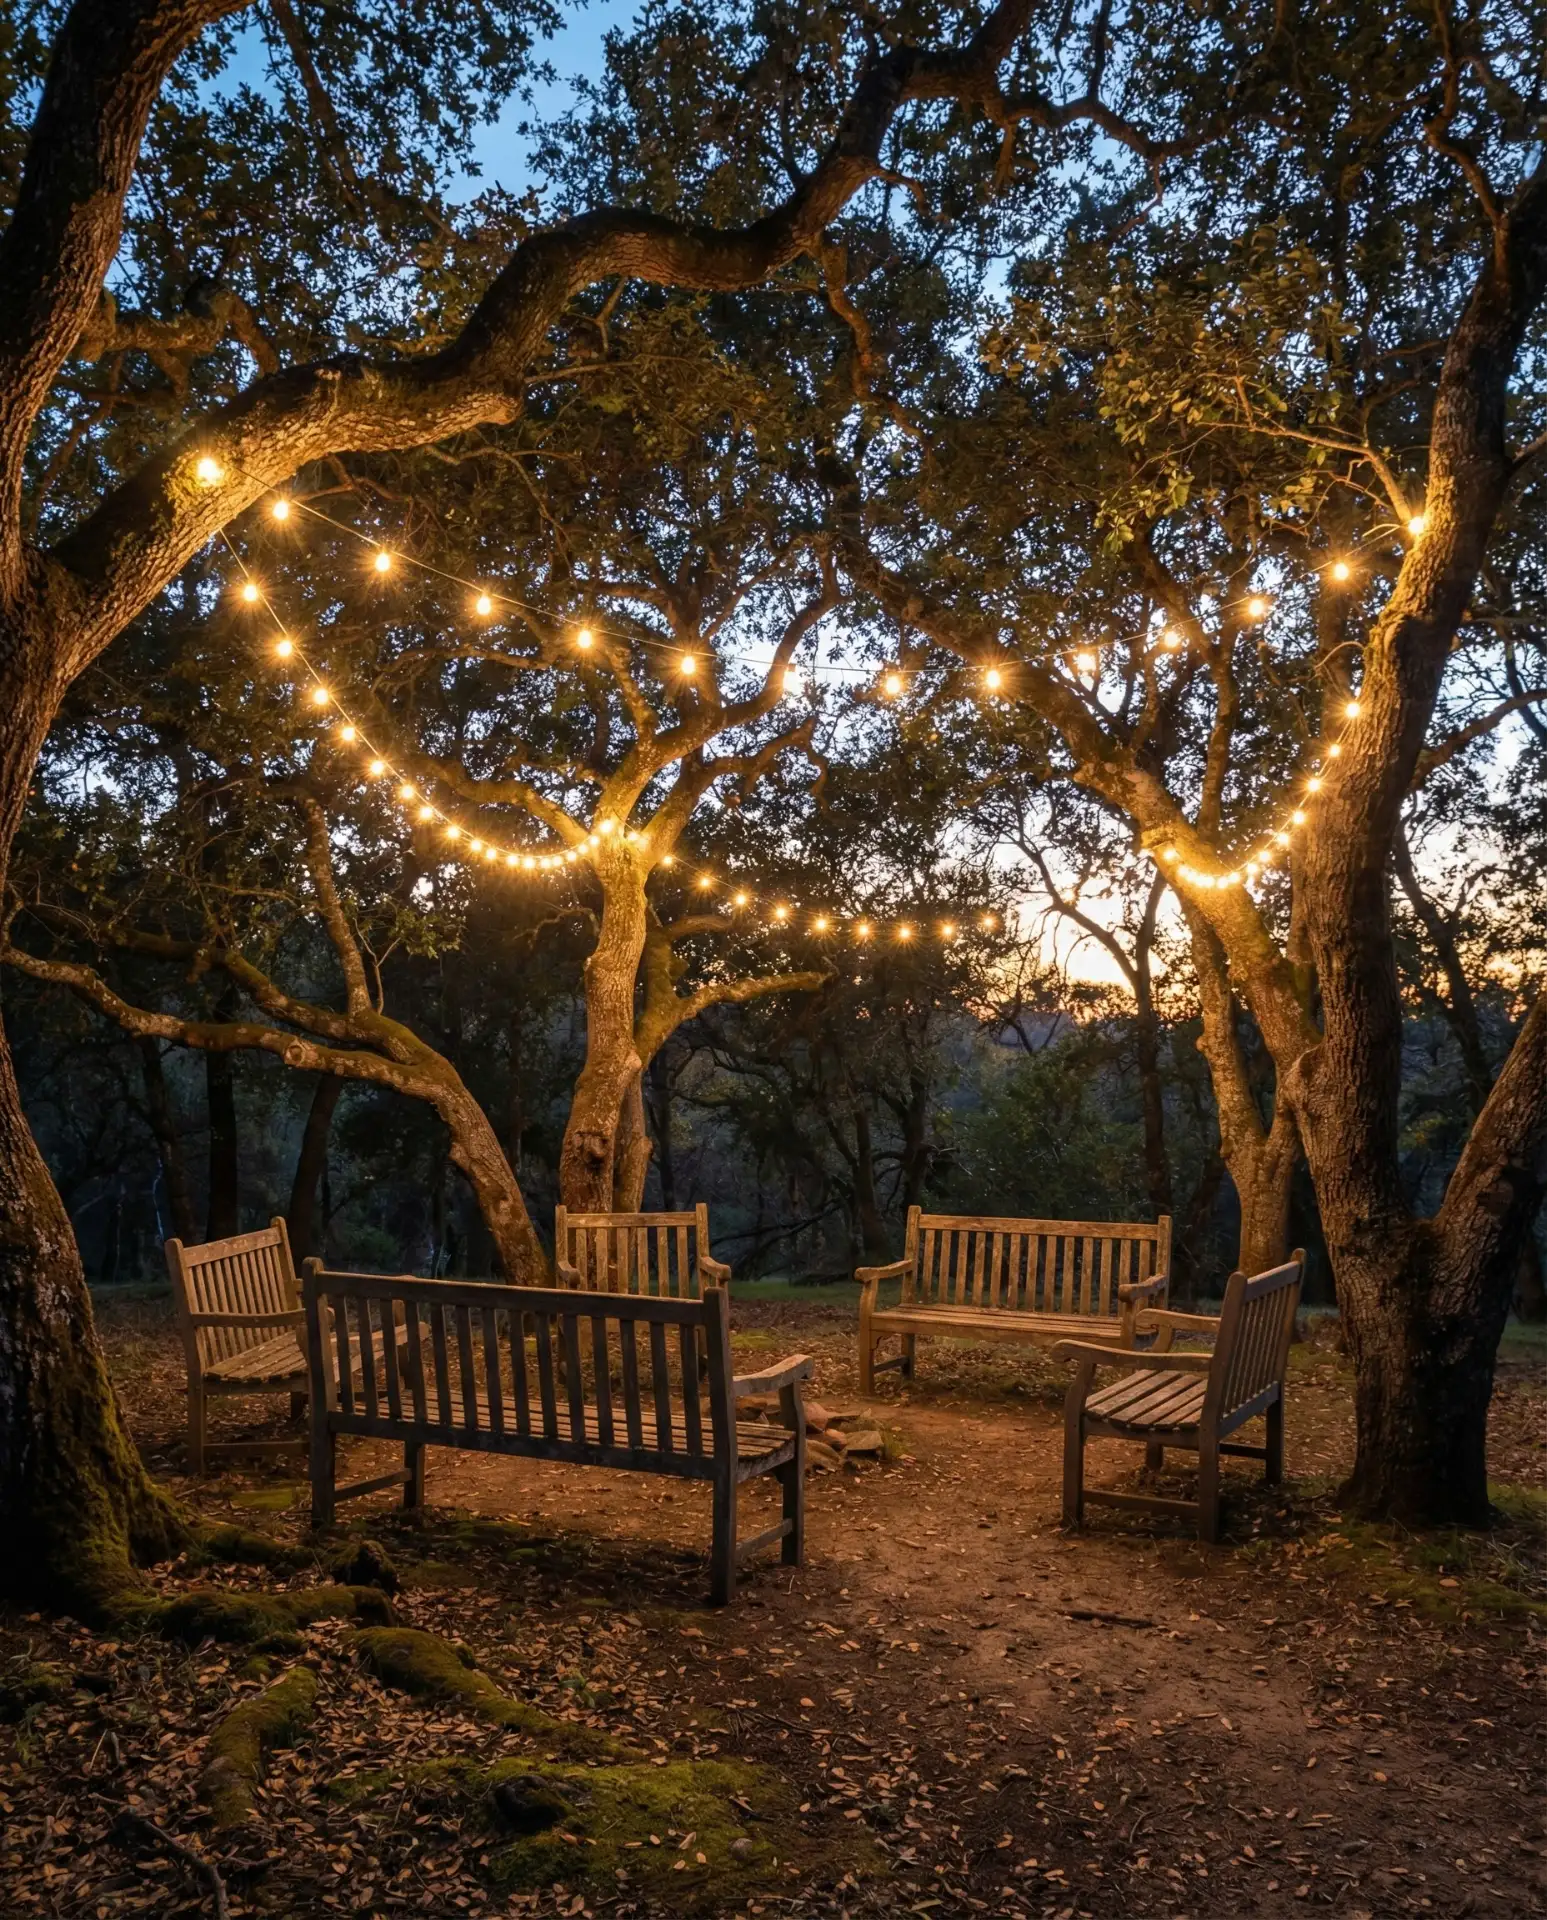
Where it works best: Properties with established trees spaced 15-30 feet apart, common in Midwestern and Northeastern suburbs. The installation requires a ladder and some physical effort to reach branches, but the result is stunning and requires no ground-level structures. Use tree-friendly strapping that expands as the tree grows rather than wire that can cut into bark over time. Many arborists recommend checking and adjusting the installation annually to ensure branch health isn’t compromised.
5. DIY Wooden Pole Corner Frame
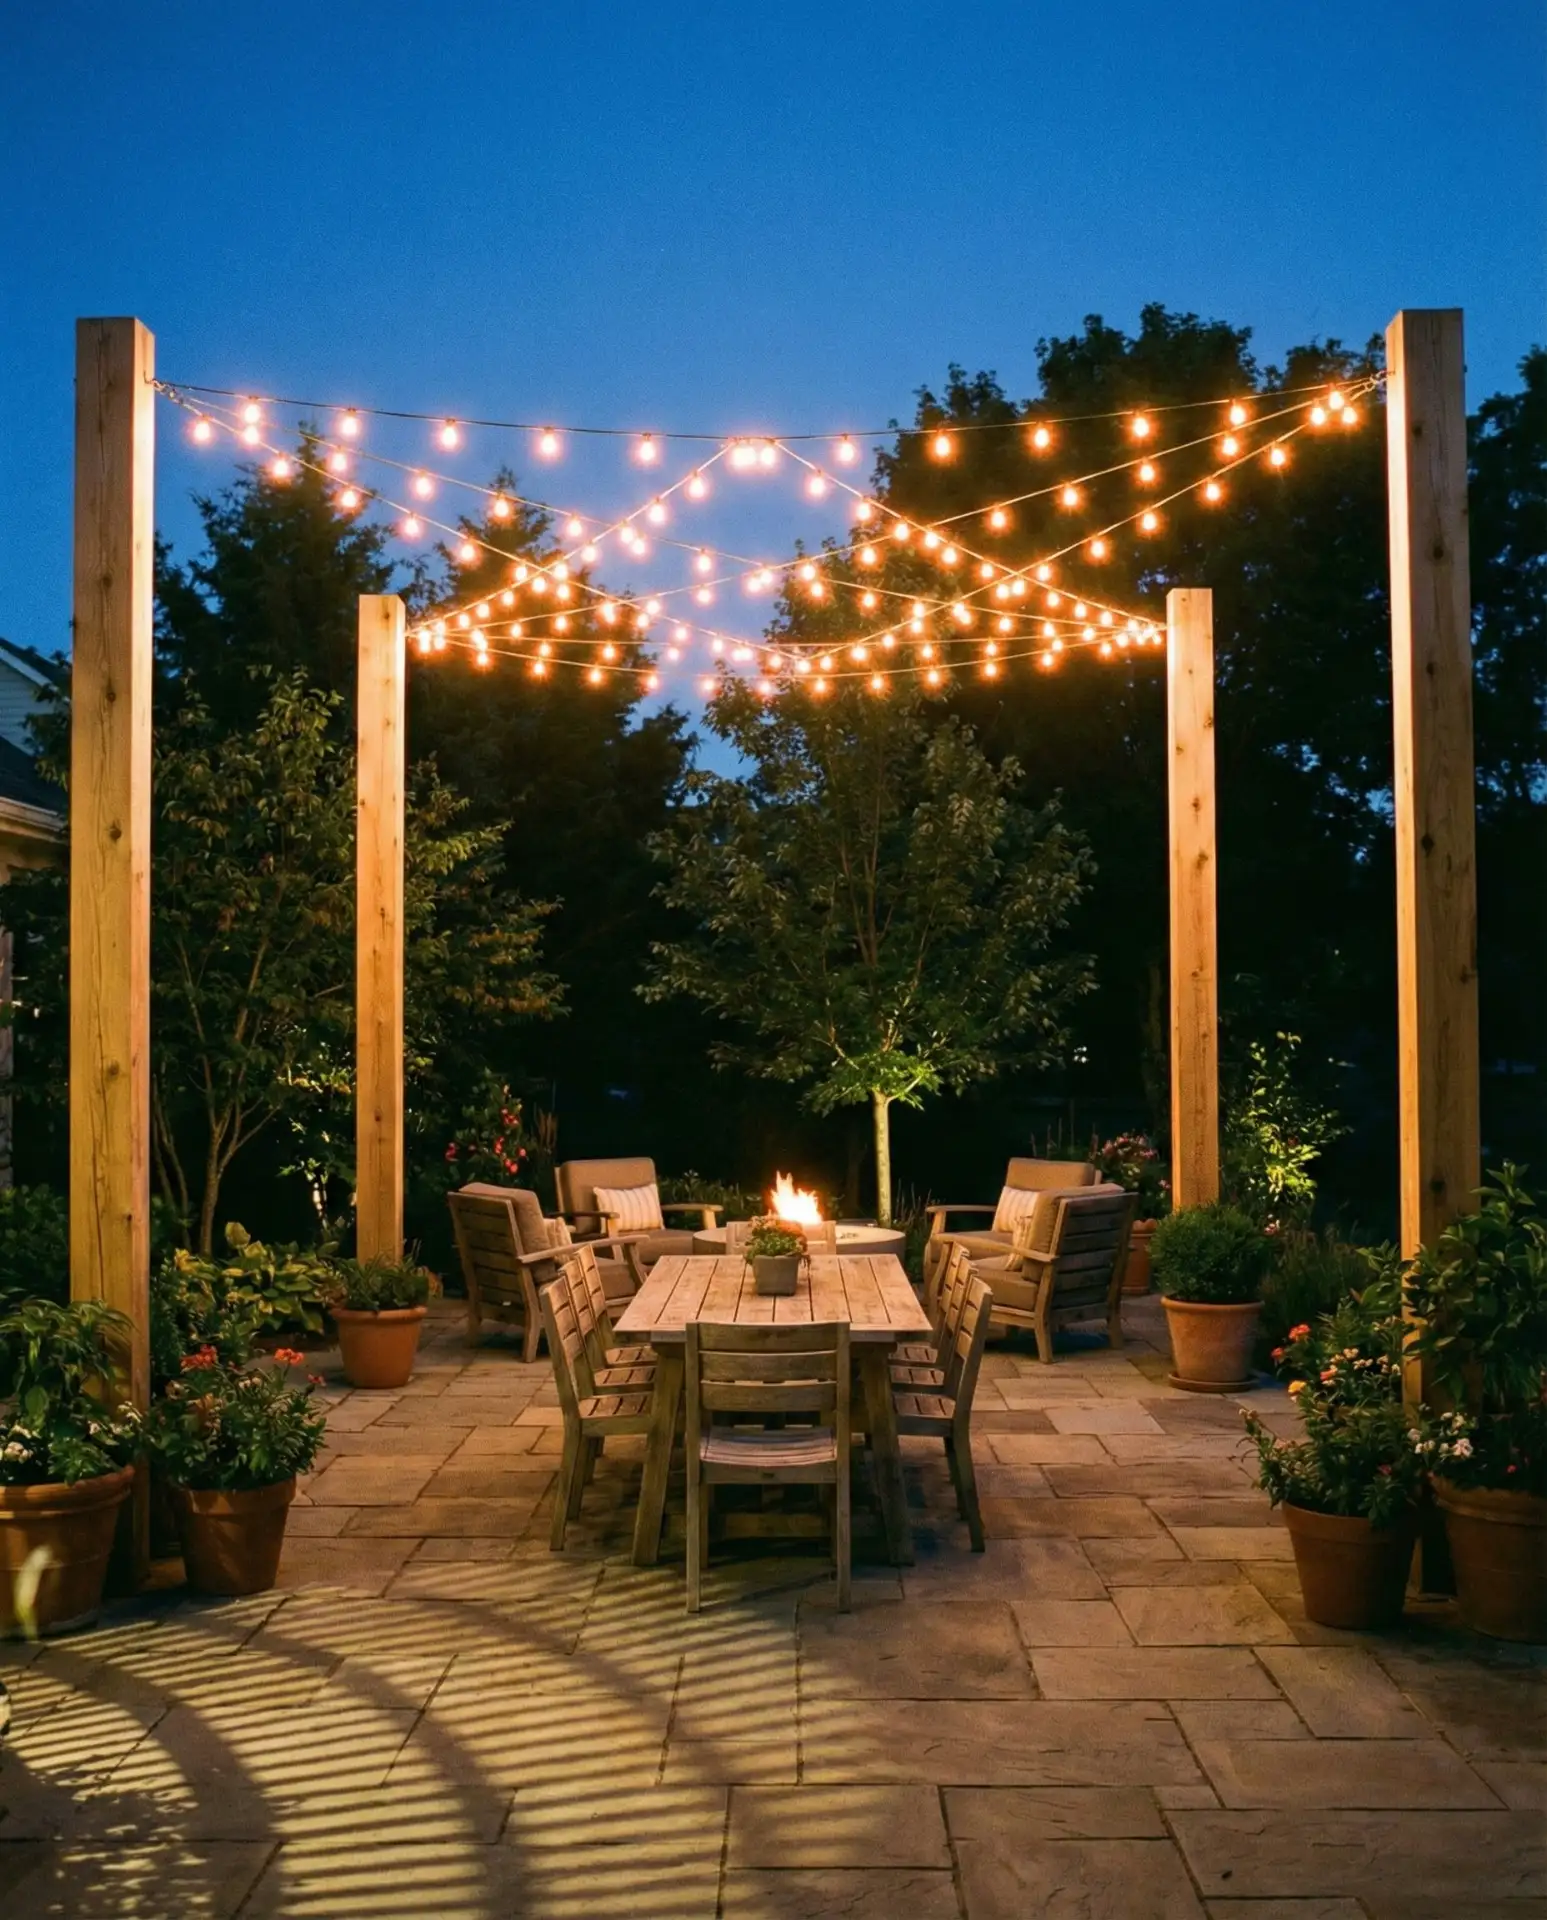
Building a simple four-pole frame using pressure-treated 4×4 lumber creates a permanent structure for hanging lights over seating areas. Set wooden poles in concrete-filled post holes at each corner of your patio, then attach eye hooks near the top of each post. This poles diy approach costs around $150-200 in materials but provides a rock-solid foundation that handles any weather condition. 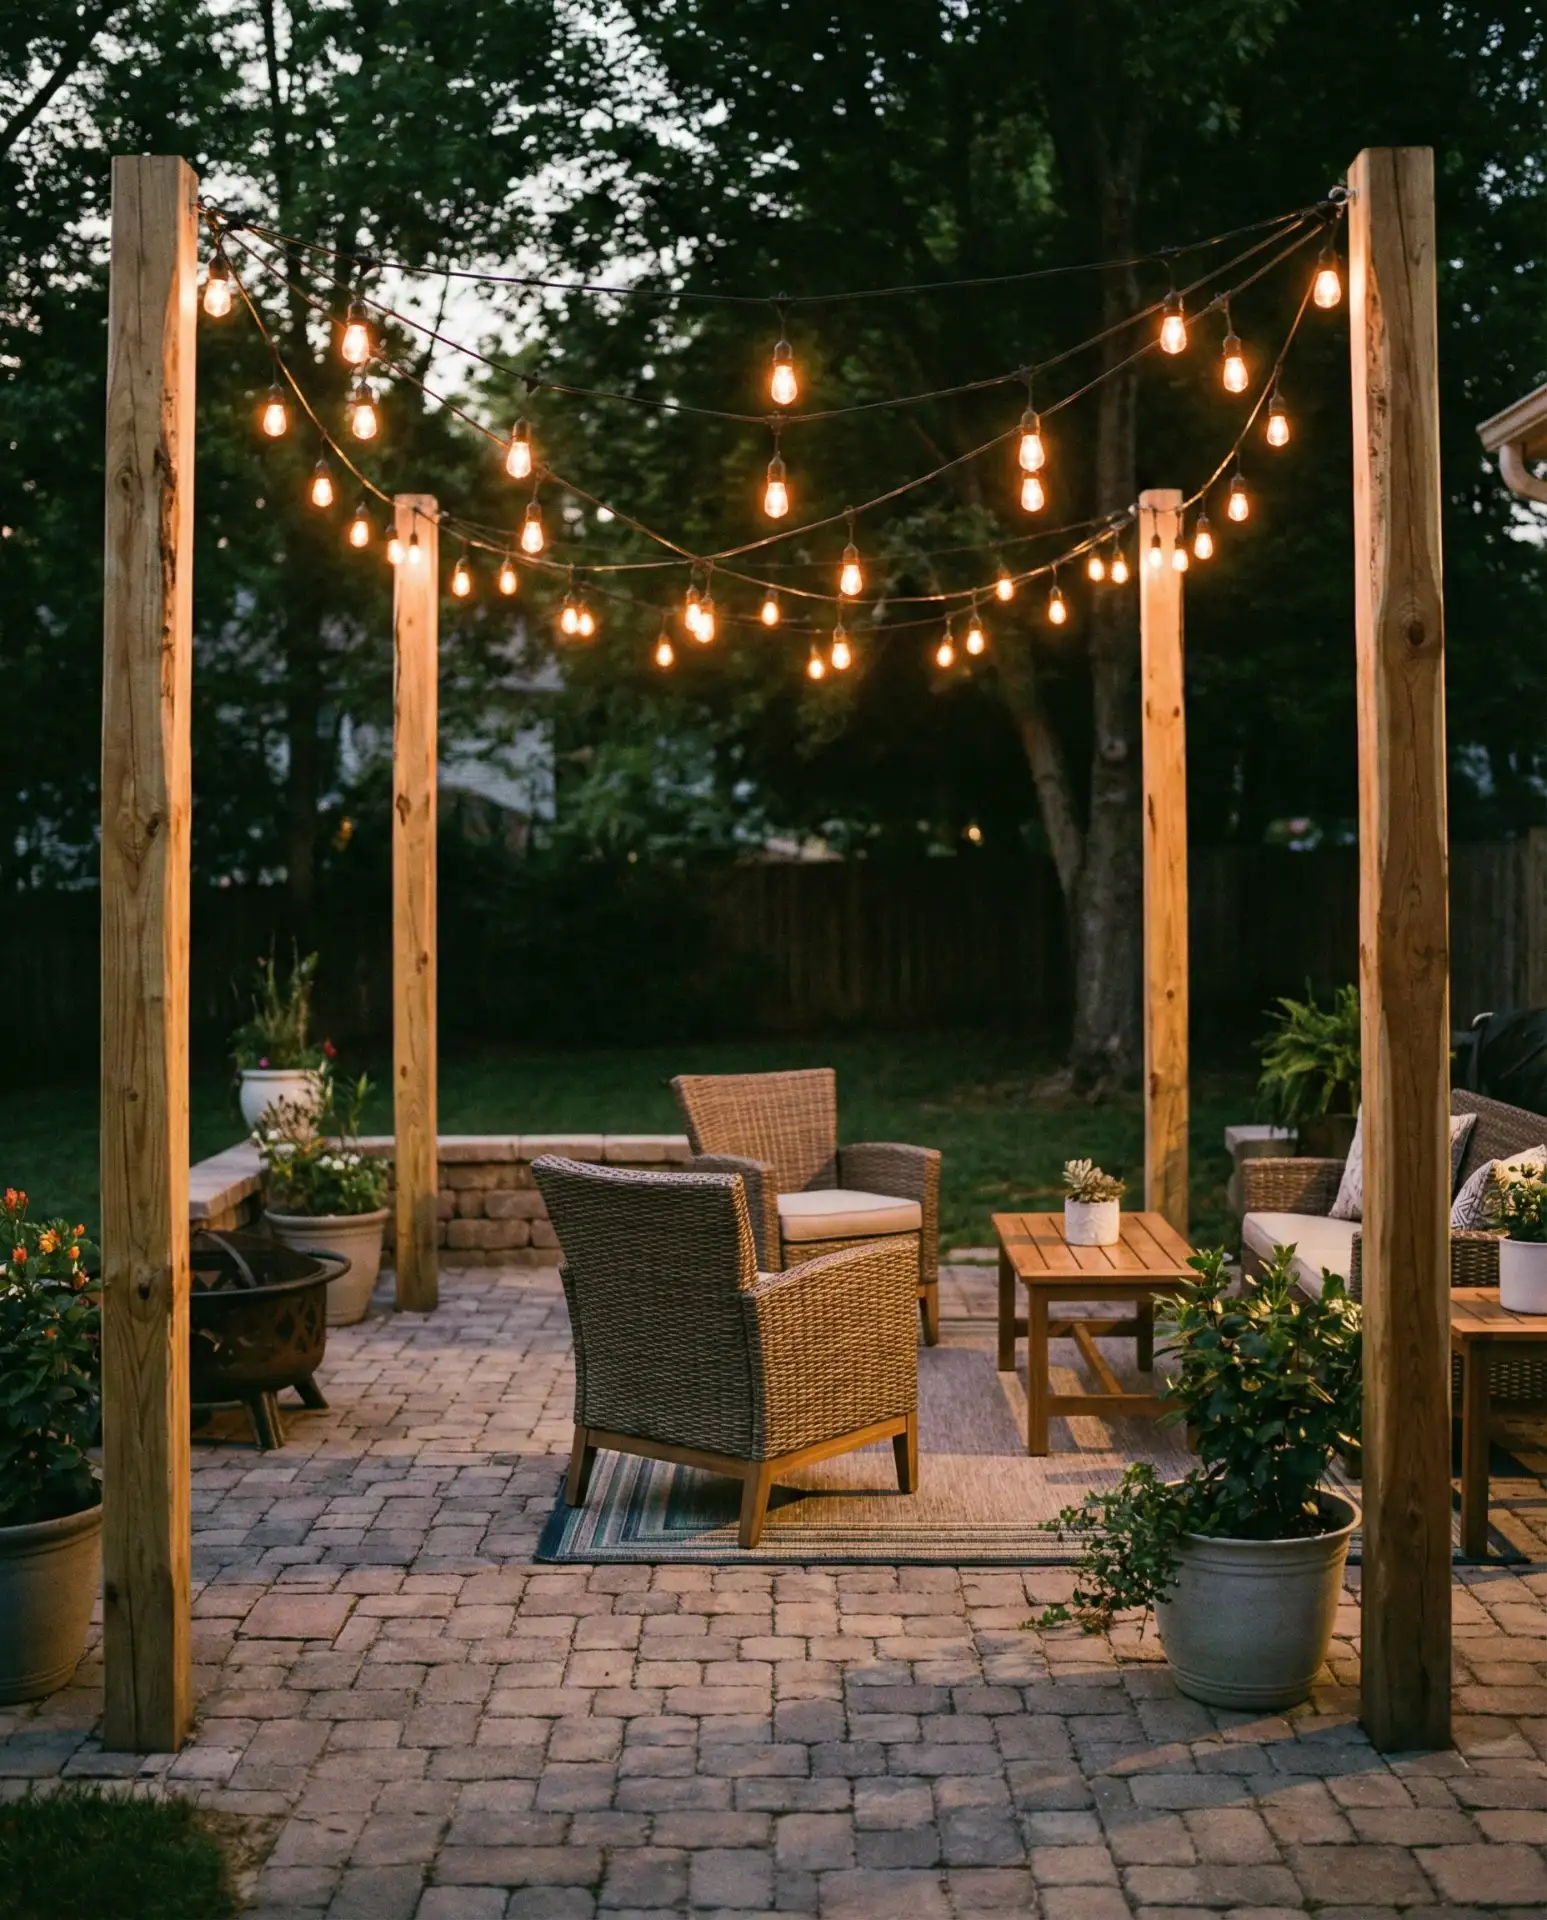
This setup has become increasingly popular in suburban backyards where homeowners want lighting that feels architectural rather than temporary. The poles can be stained to match deck railings or left natural for a rustic appearance. Installation typically takes a weekend—one day for setting posts and allowing concrete to cure, another for attaching hardware and lights. The frame creates defined boundaries that make outdoor rooms feel intentional and designed, particularly effective for deck patio ideas where you’re extending living space beyond the house footprint.
6. Planter Box Light Poles
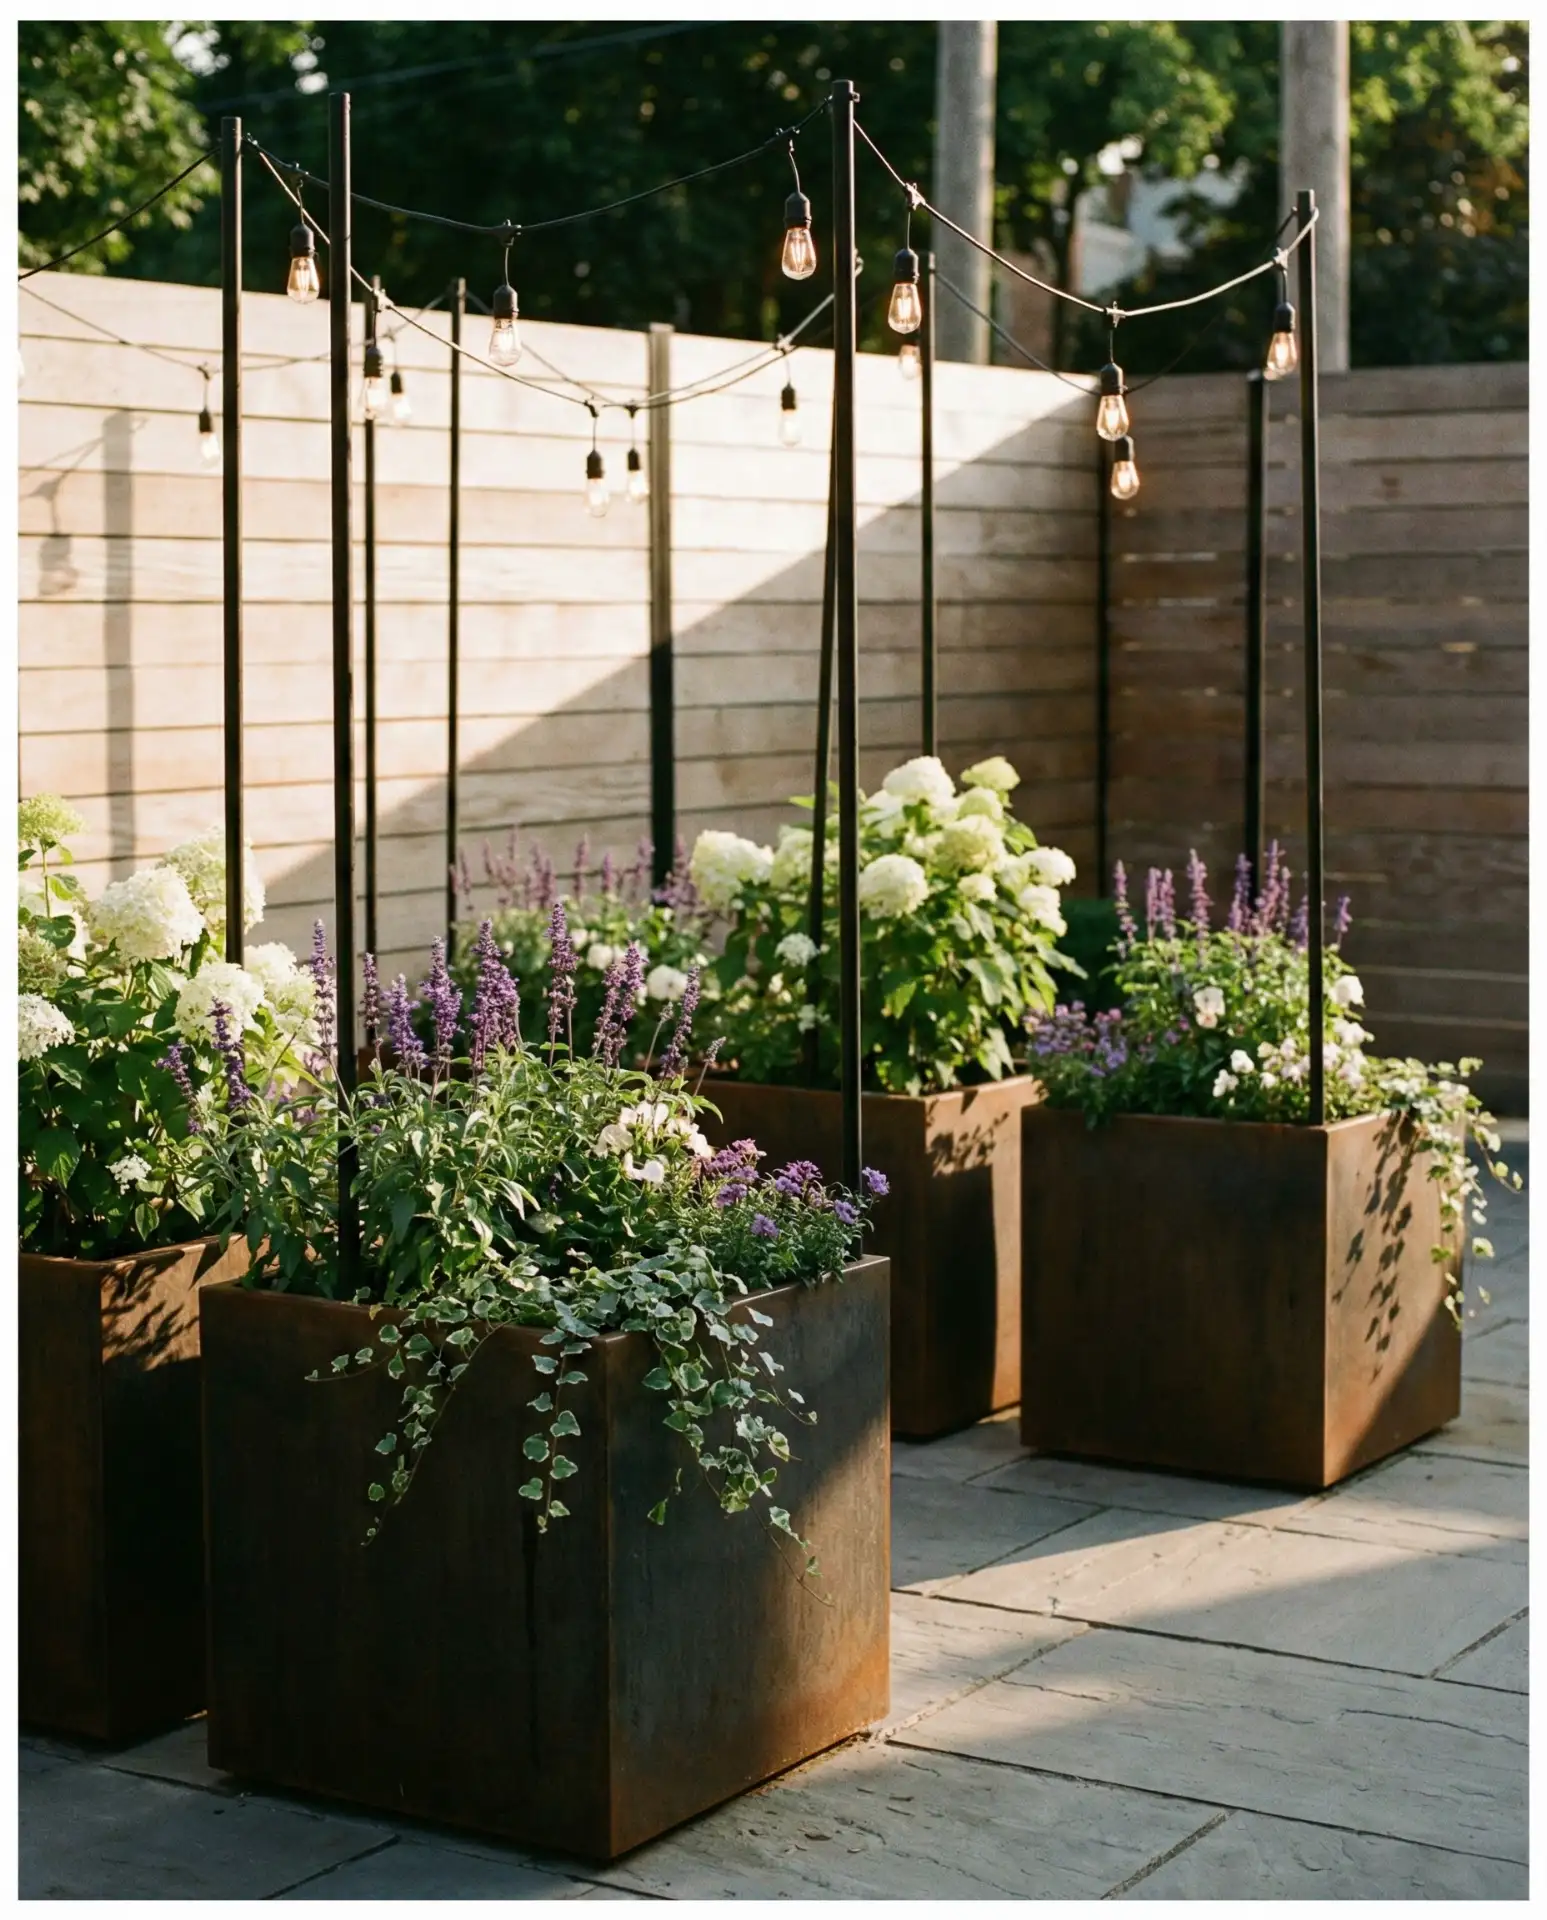
Large wooden planters filled with concrete can anchor tall poles without requiring ground excavation, perfect for renters or anyone with a concrete patio surface. The poles planter combination serves double duty, providing both vertical support for string lights and opportunities for adding greenery or seasonal plants. Build planters from cedar or composite materials, insert a metal pole, then pour concrete around the base before adding soil on top. 
A practical insight: Make planters at least 24 inches square and fill them with 150-200 pounds of concrete to ensure stability in wind. The poles should extend 8-10 feet above the planter rim for proper light height. This method has gained traction in urban settings where drilling into concrete isn’t permitted, and in coastal areas where portability matters during hurricane season. You can move the entire setup with a dolly, making it ideal for seasonal patio arrangements or wedding venues that need temporary but elegant lighting solutions.
7. Covered Patio Beam Installation
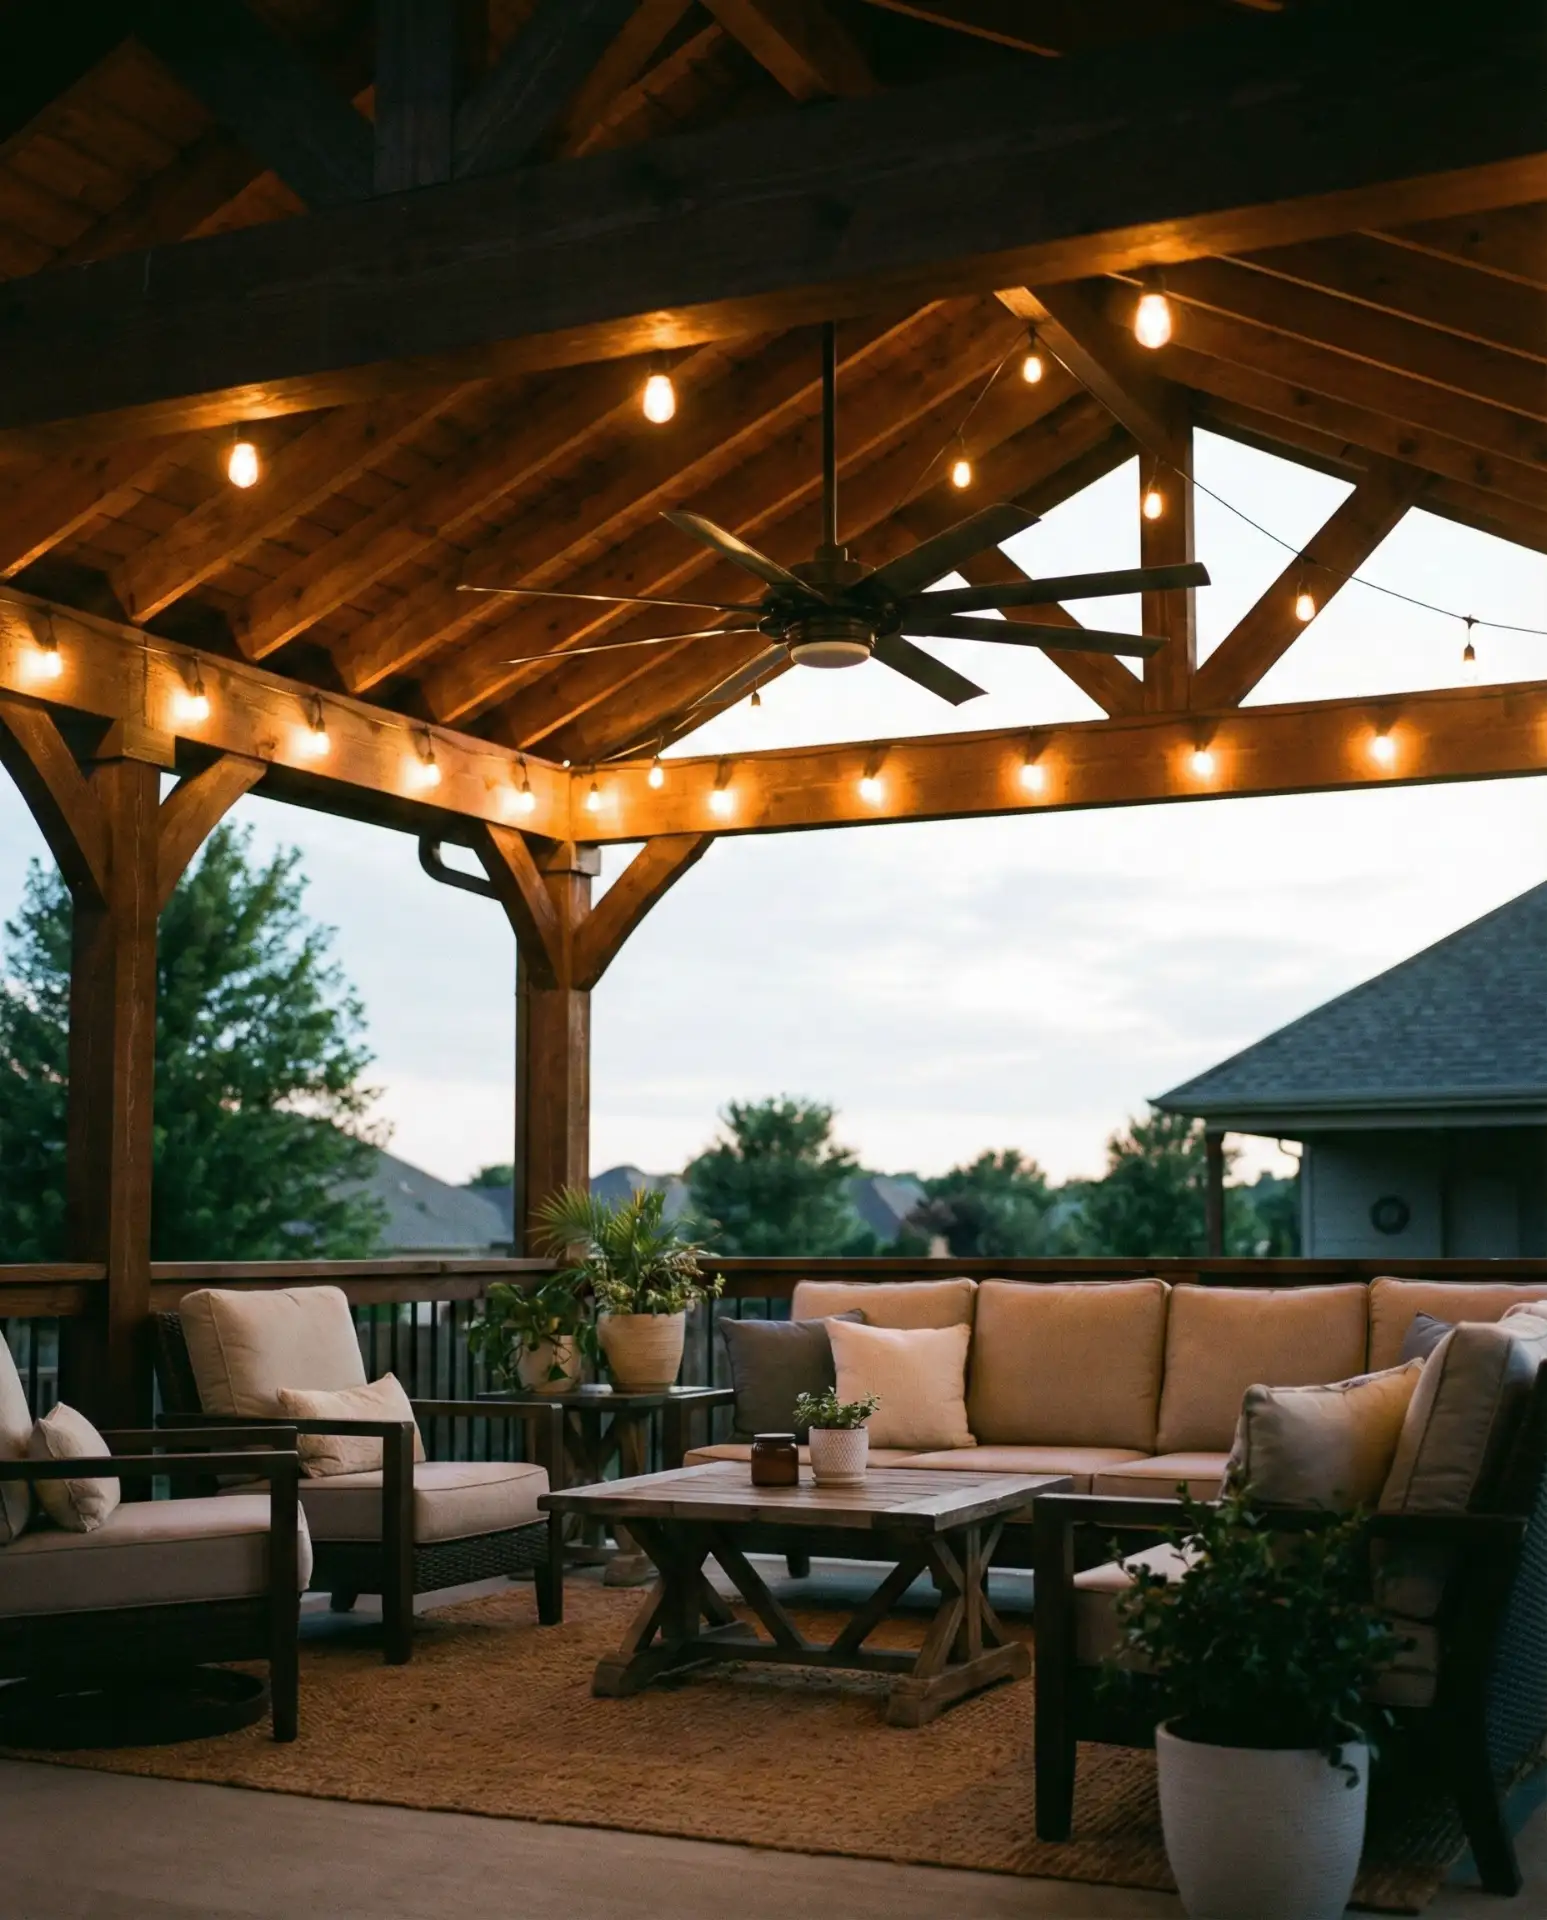
A covered patio with exposed beams provides ready-made attachment points for string lights without any drilling into house siding. Cup hooks or screw eyes installed into beam undersides create secure anchor points for running lights in parallel lines or gentle swoops. This creates an intimate, bistro-like atmosphere that extends usable evening hours in outdoor living spaces. 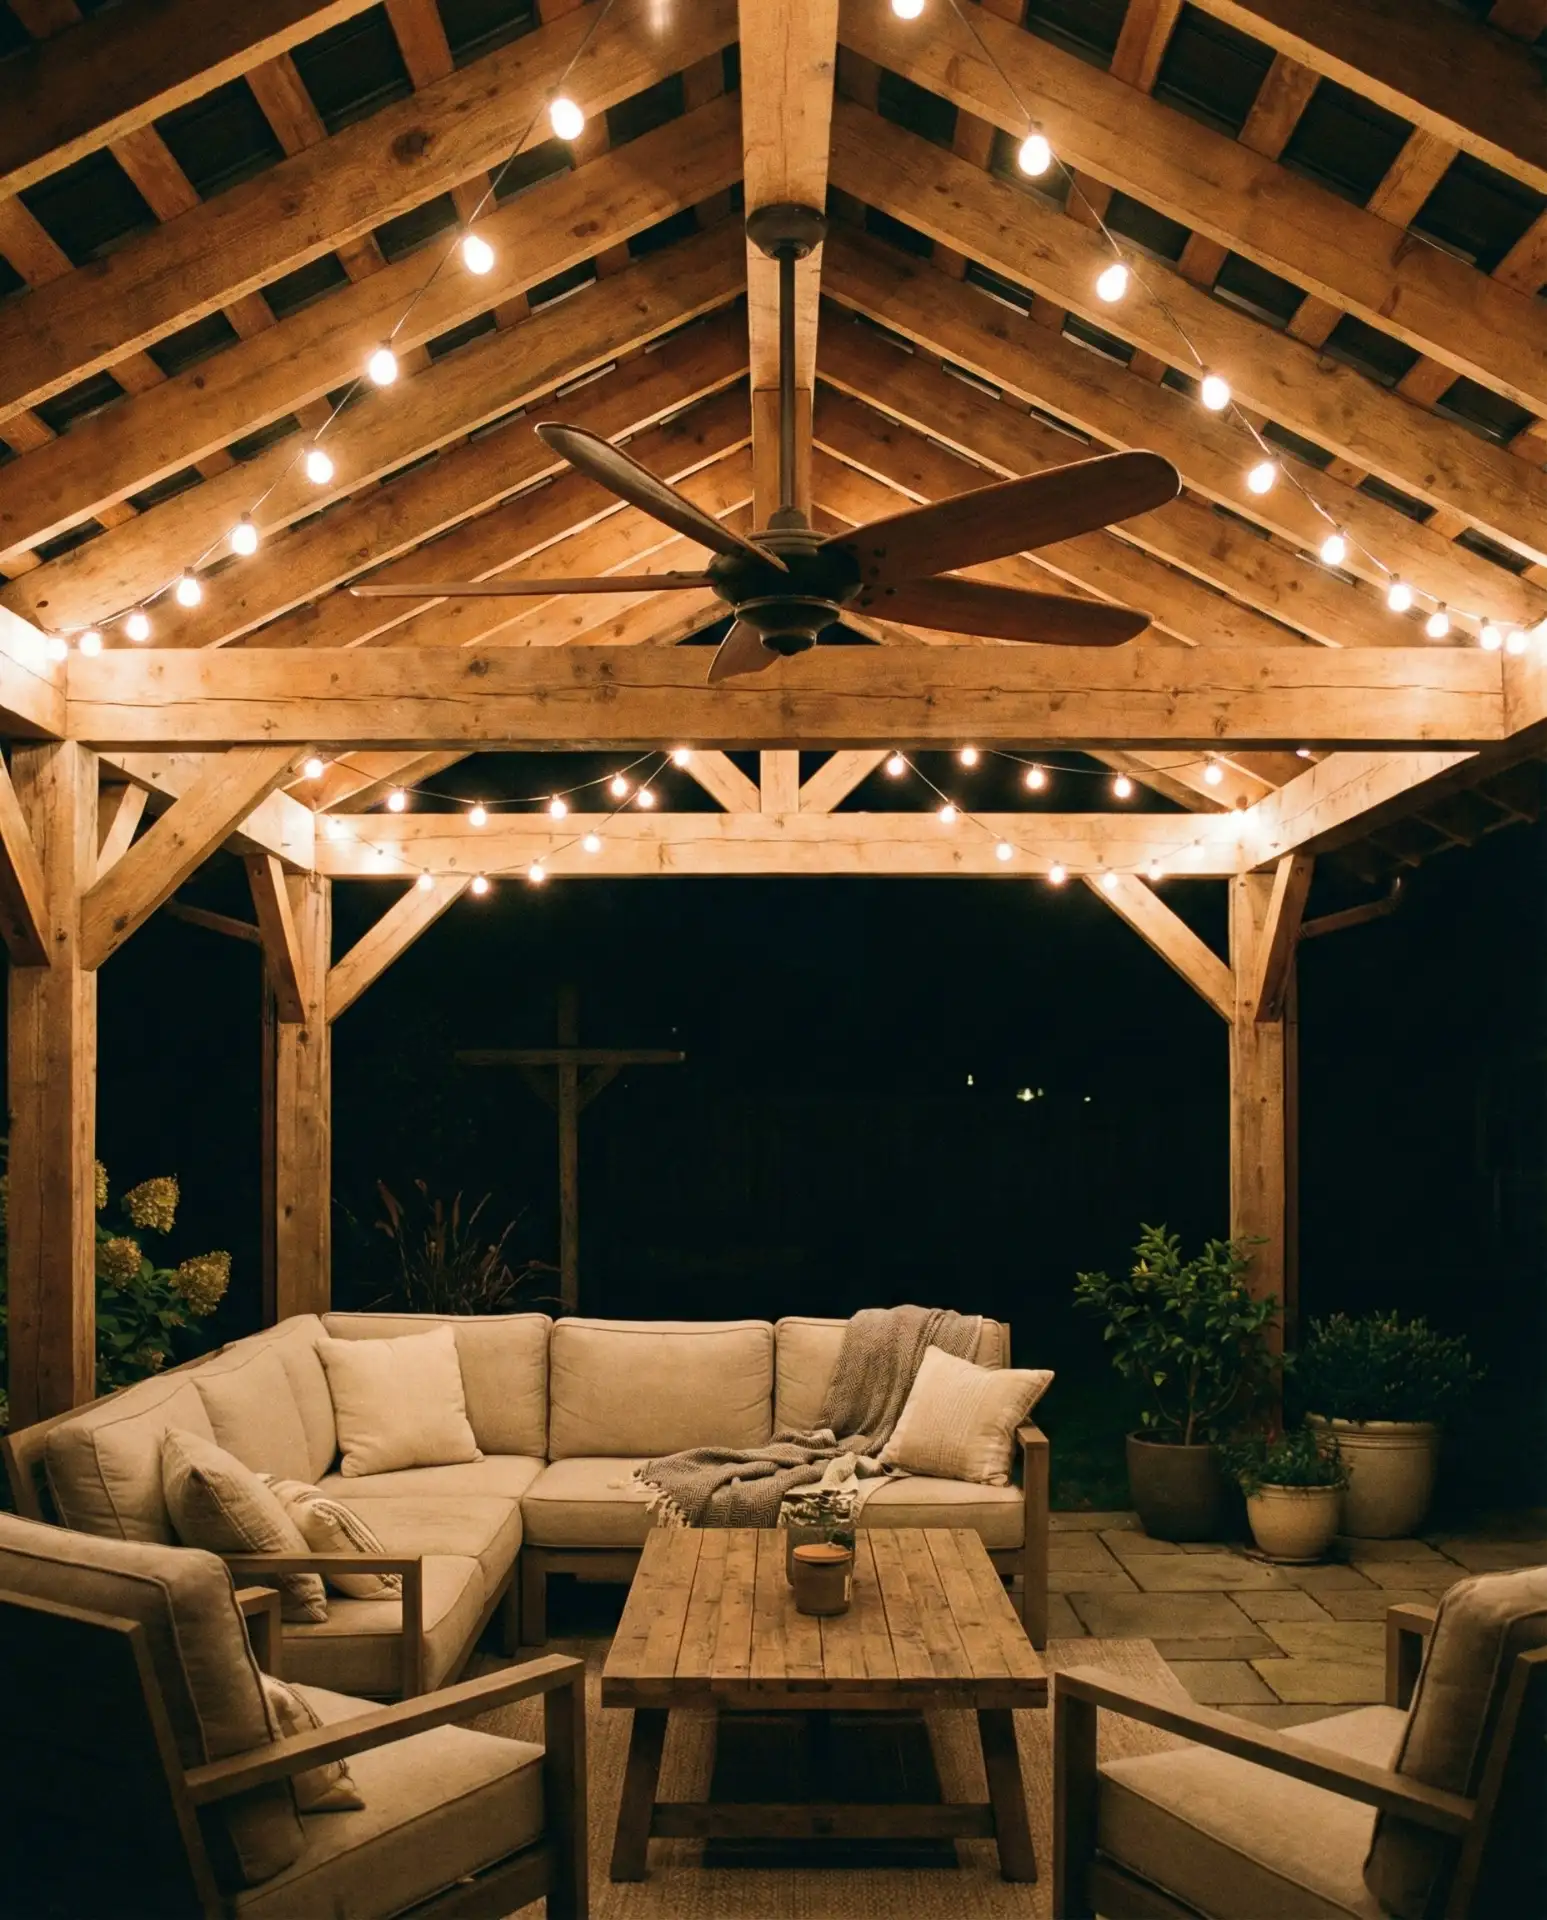
In the South and Southwest, where covered patios are standard architectural features, this installation method takes less than 30 minutes and provides weather-protected lighting that lasts for years. The overhead structure shields electrical connections from rain while creating a cozy, room-like feeling outdoors. Many homeowners add a dimmer switch to control light intensity for different occasions, transitioning from bright task lighting for dining to soft ambient glow for late-night conversations. Space hooks 3-4 feet apart for optimal draping without excessive sag.
8. Pool Perimeter Safety Lighting
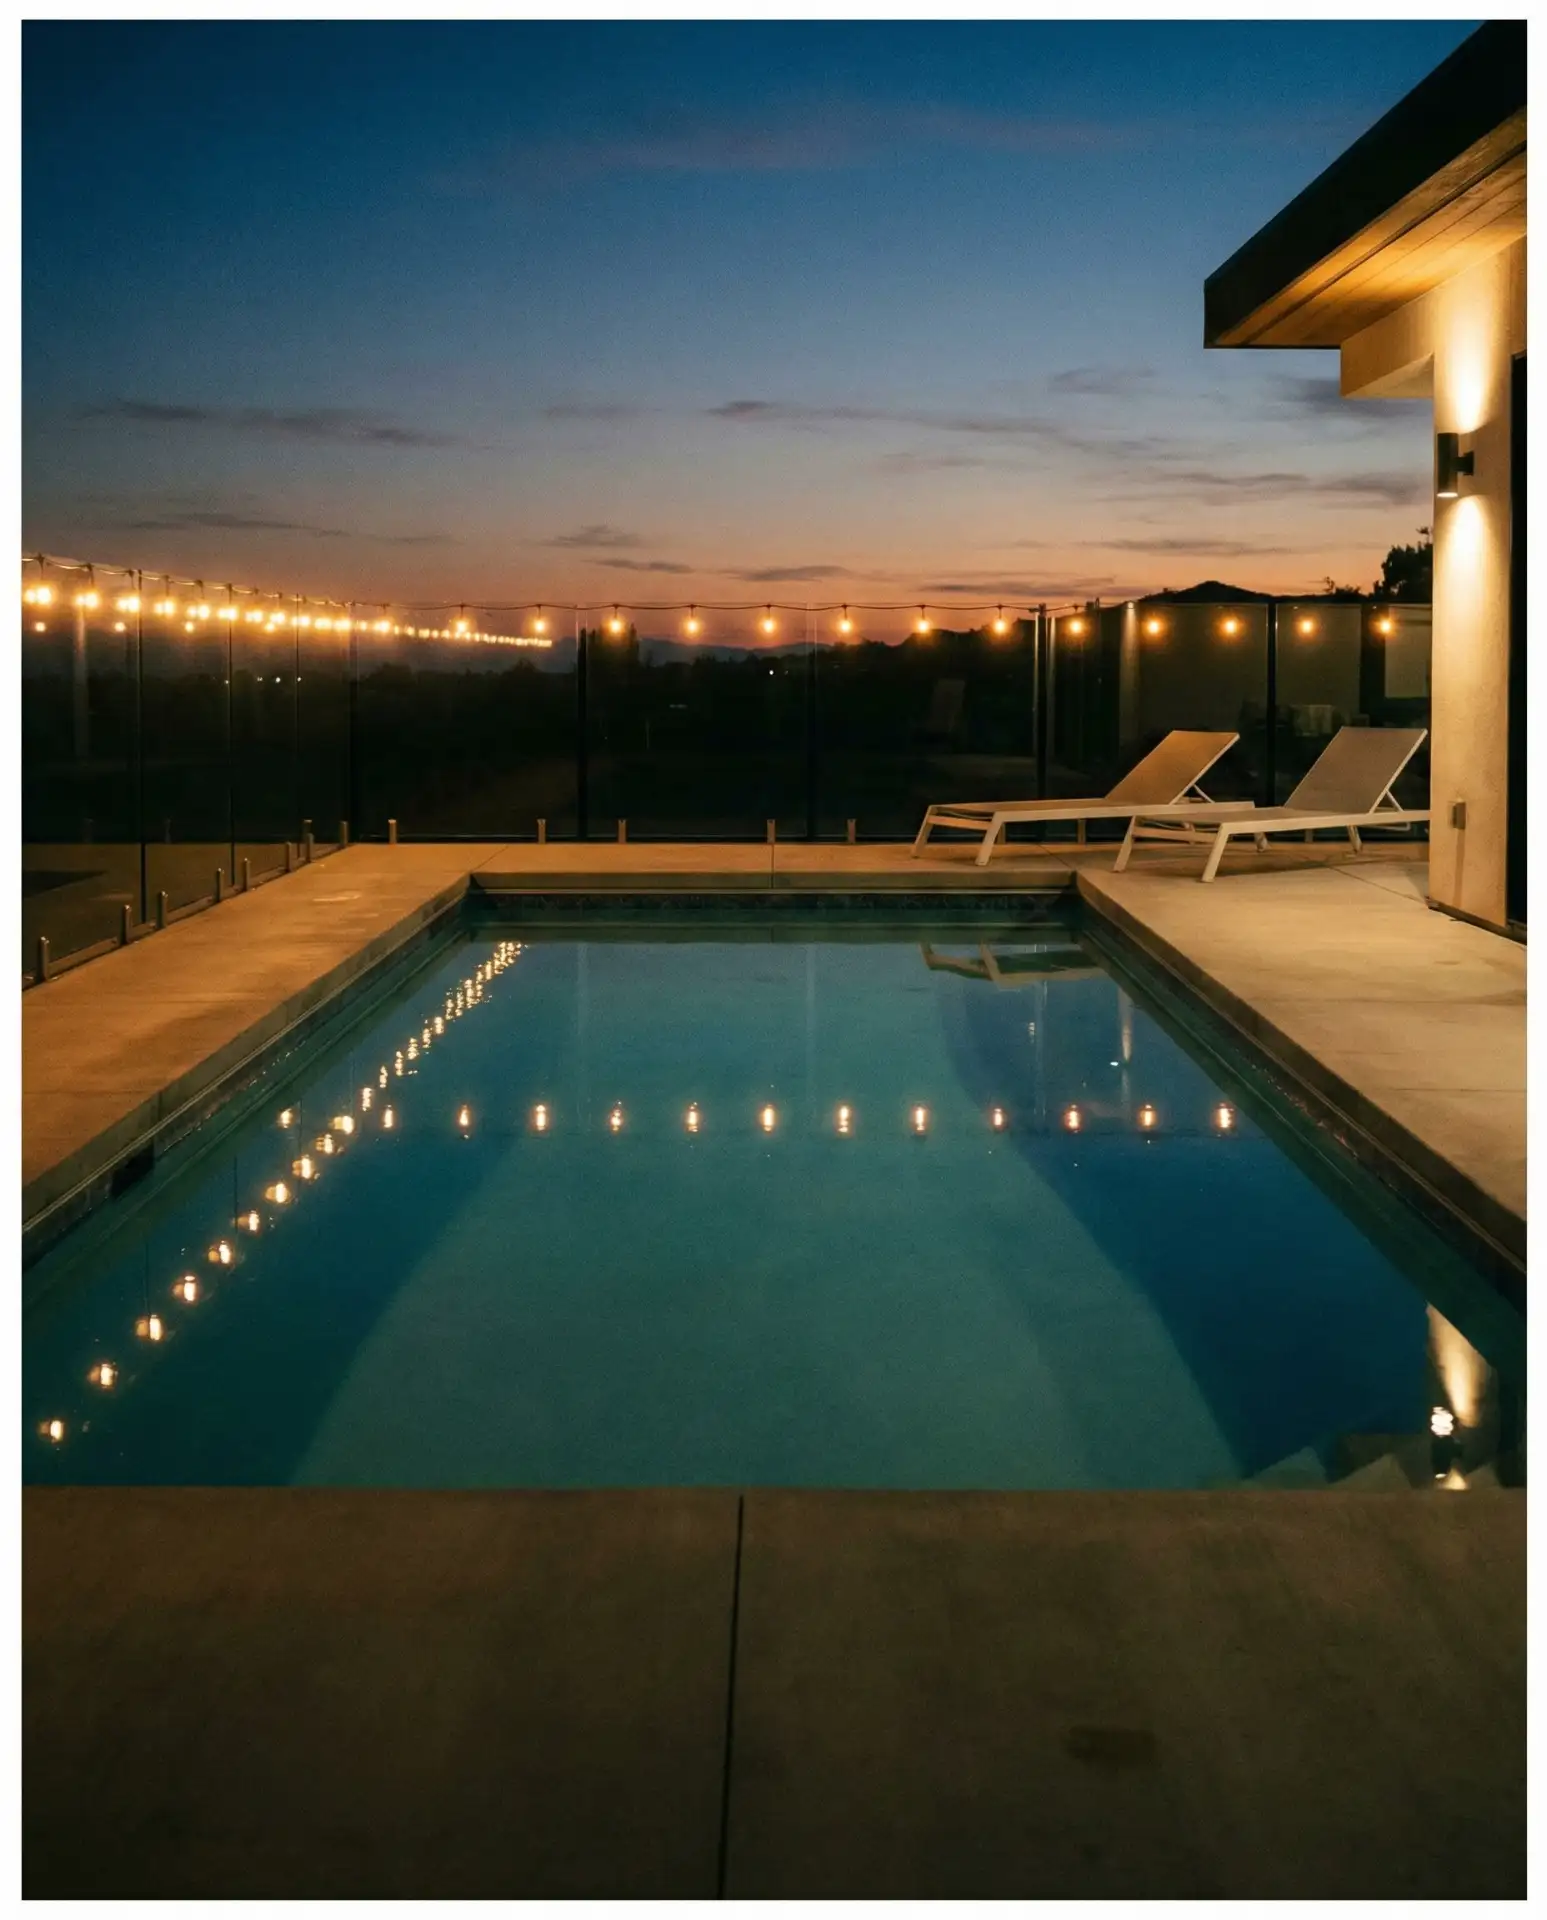
String lights around a pool area serve both aesthetic and safety functions, creating beautiful reflections on water while illuminating pool edges after dark. Mount lights on existing fence structures surrounding the pool, or install dedicated poles at key points around the deck. Use only UL-rated outdoor lights rated for damp or wet locations, and maintain proper distance from water per local electrical codes. 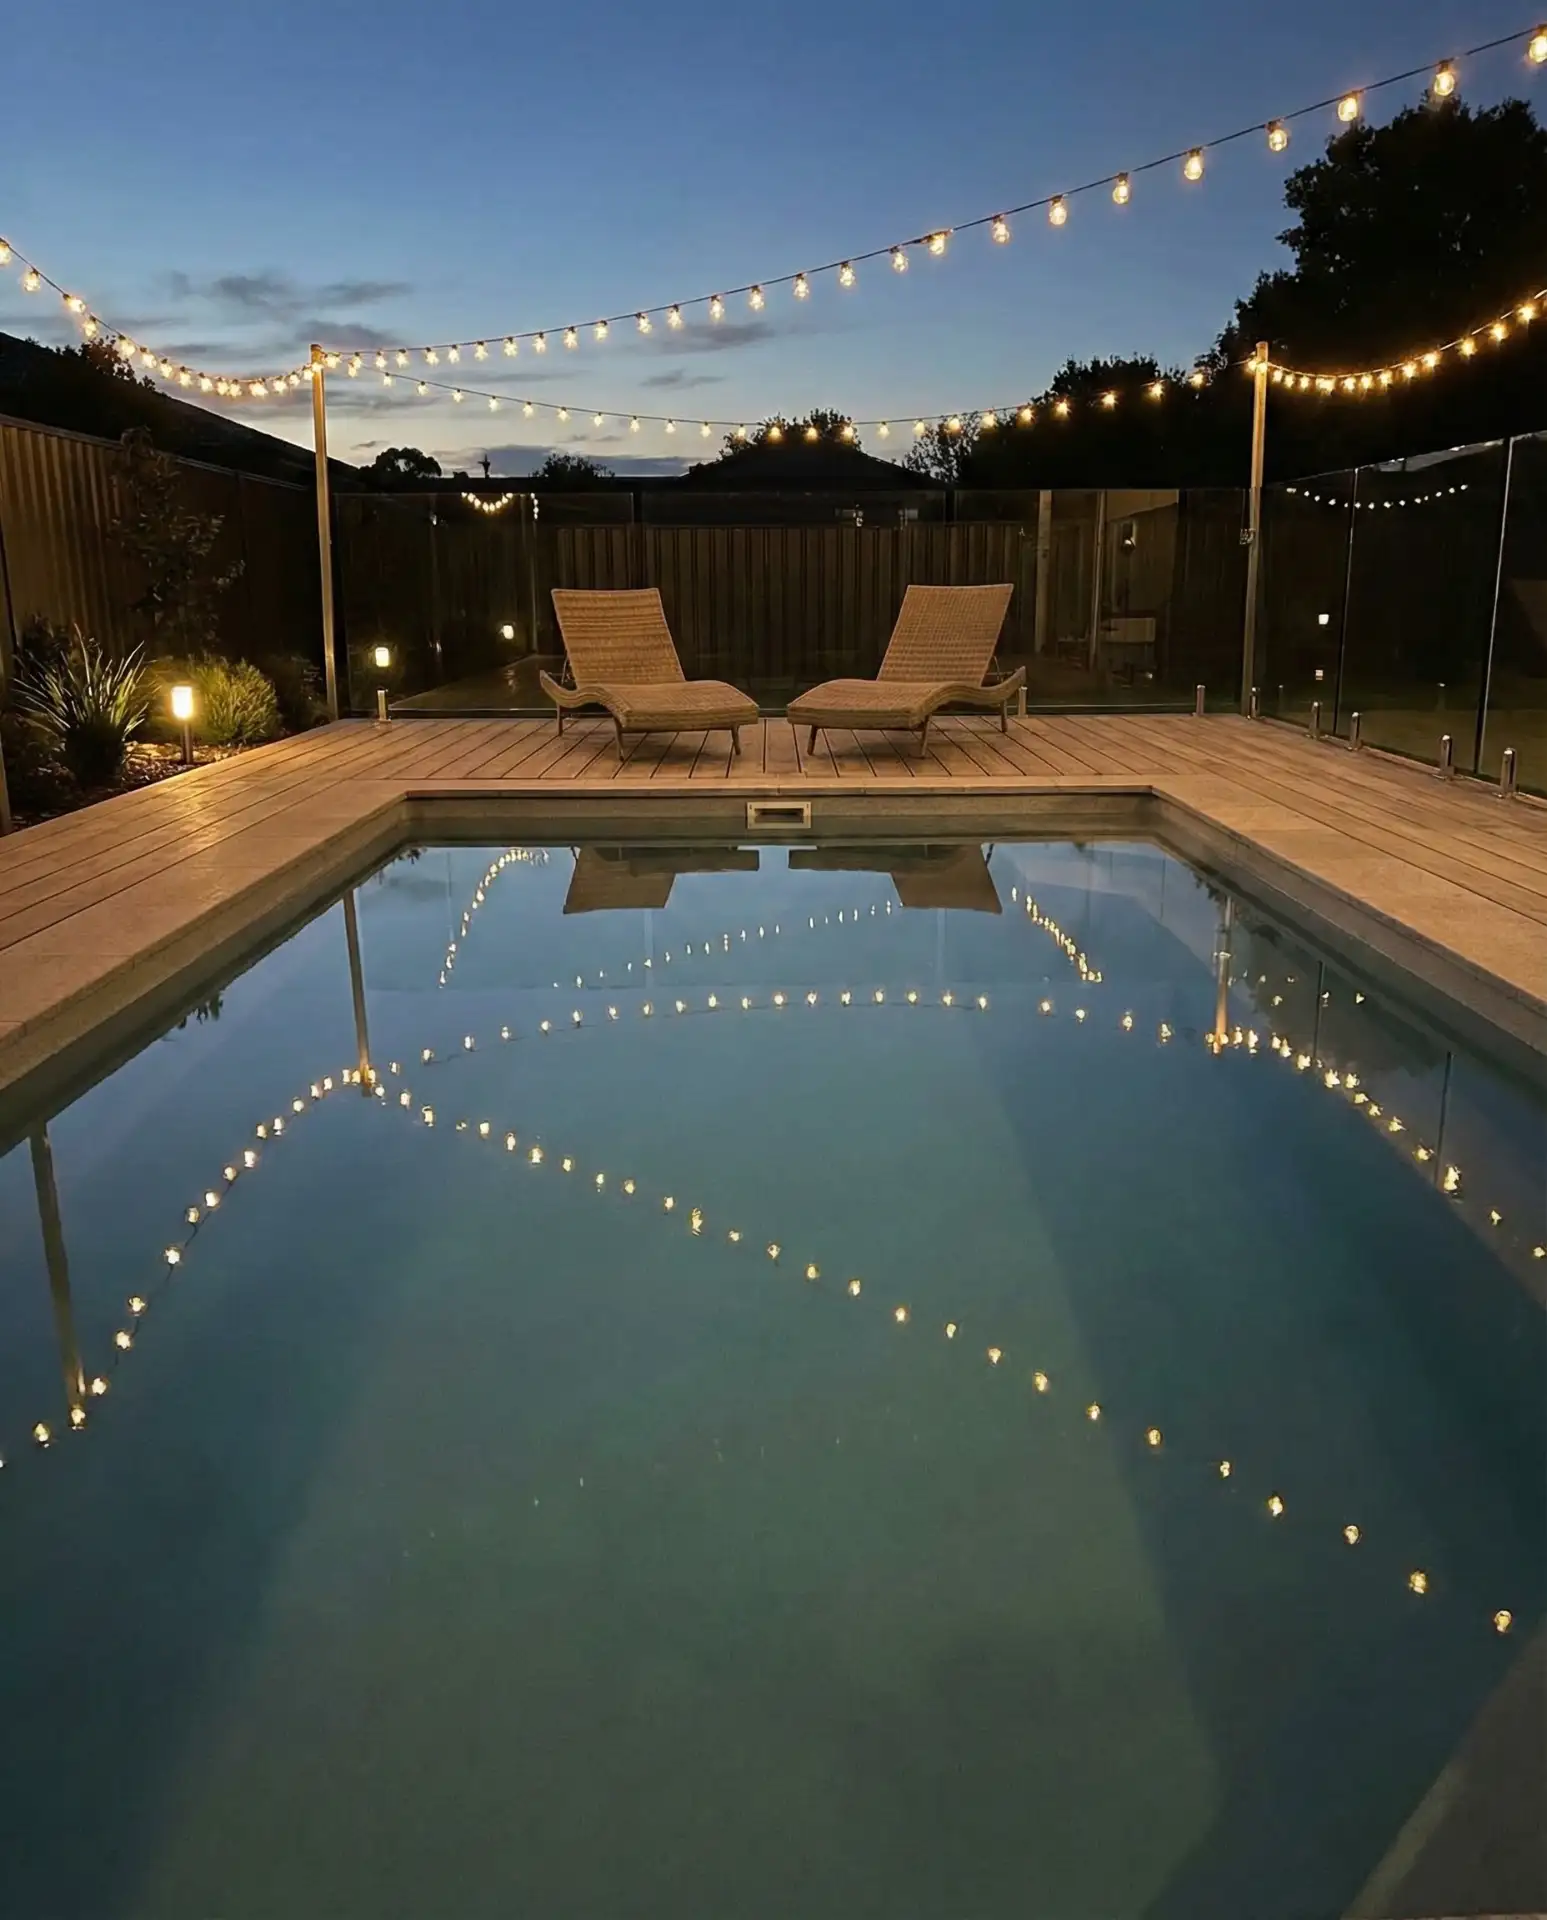
Real homeowner behavior shows that pool lighting dramatically increases evening swim usage, particularly in states like Arizona and Florida where summer nights remain warm. The lights create a resort-like atmosphere that makes ordinary backyard pools feel like destination spaces. Most installations cost $200-400 in materials and take an afternoon to complete, using existing fence posts or deck railings as anchor points. Avoid running lights directly over water—instead, create a perimeter frame that illuminates the area while keeping electrical components safely away from splash zones.
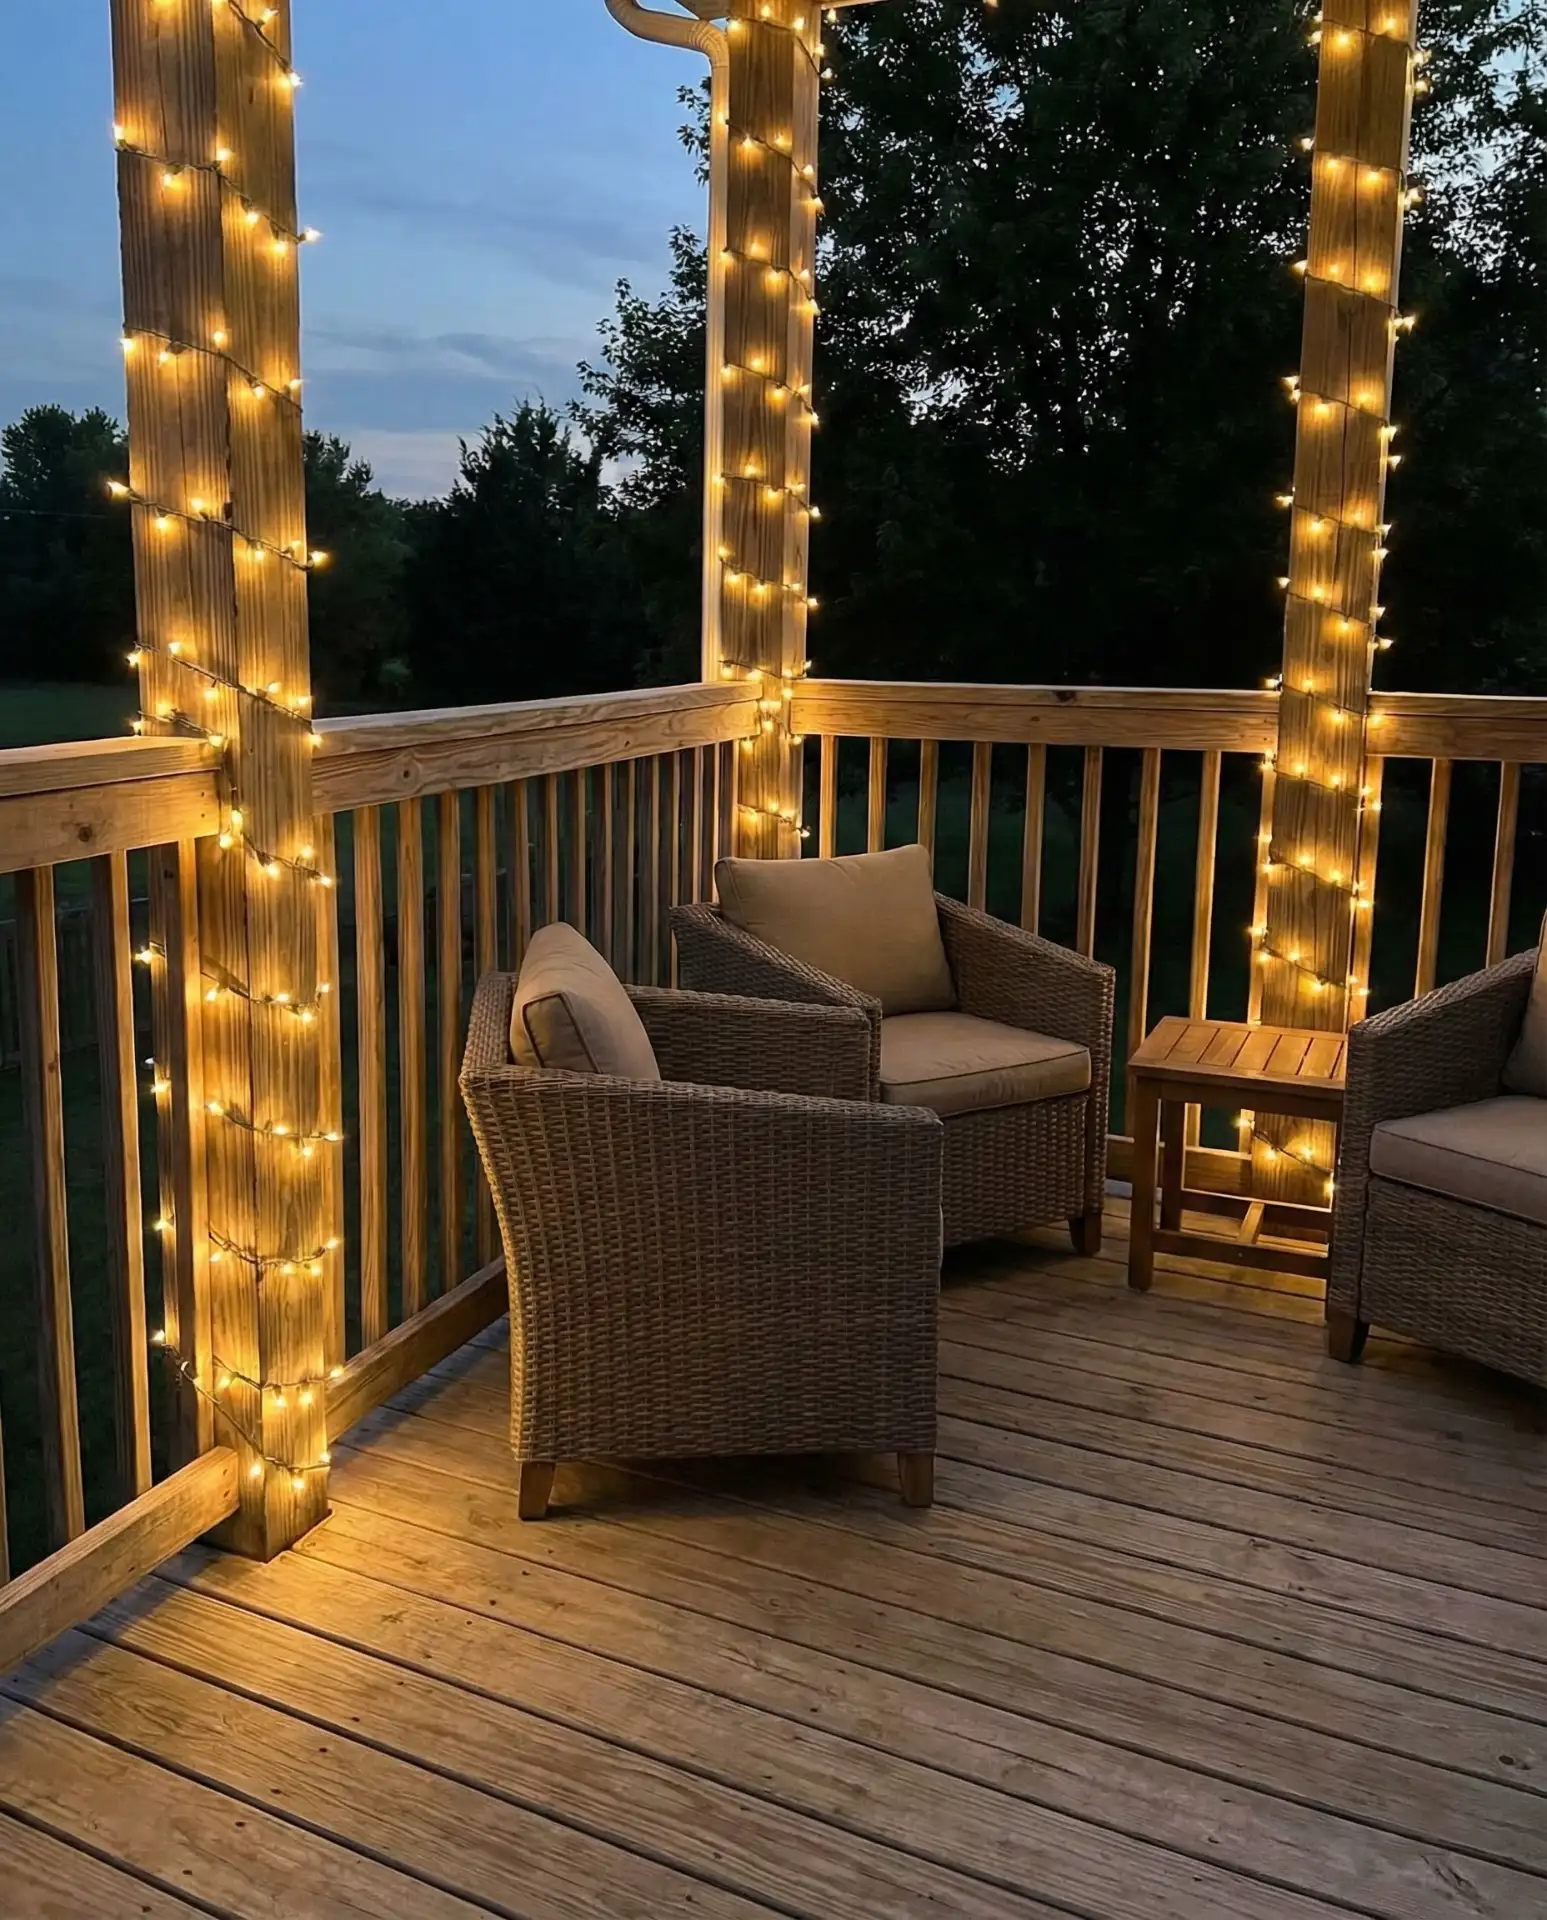
9. Porch Column Wrapped Lights
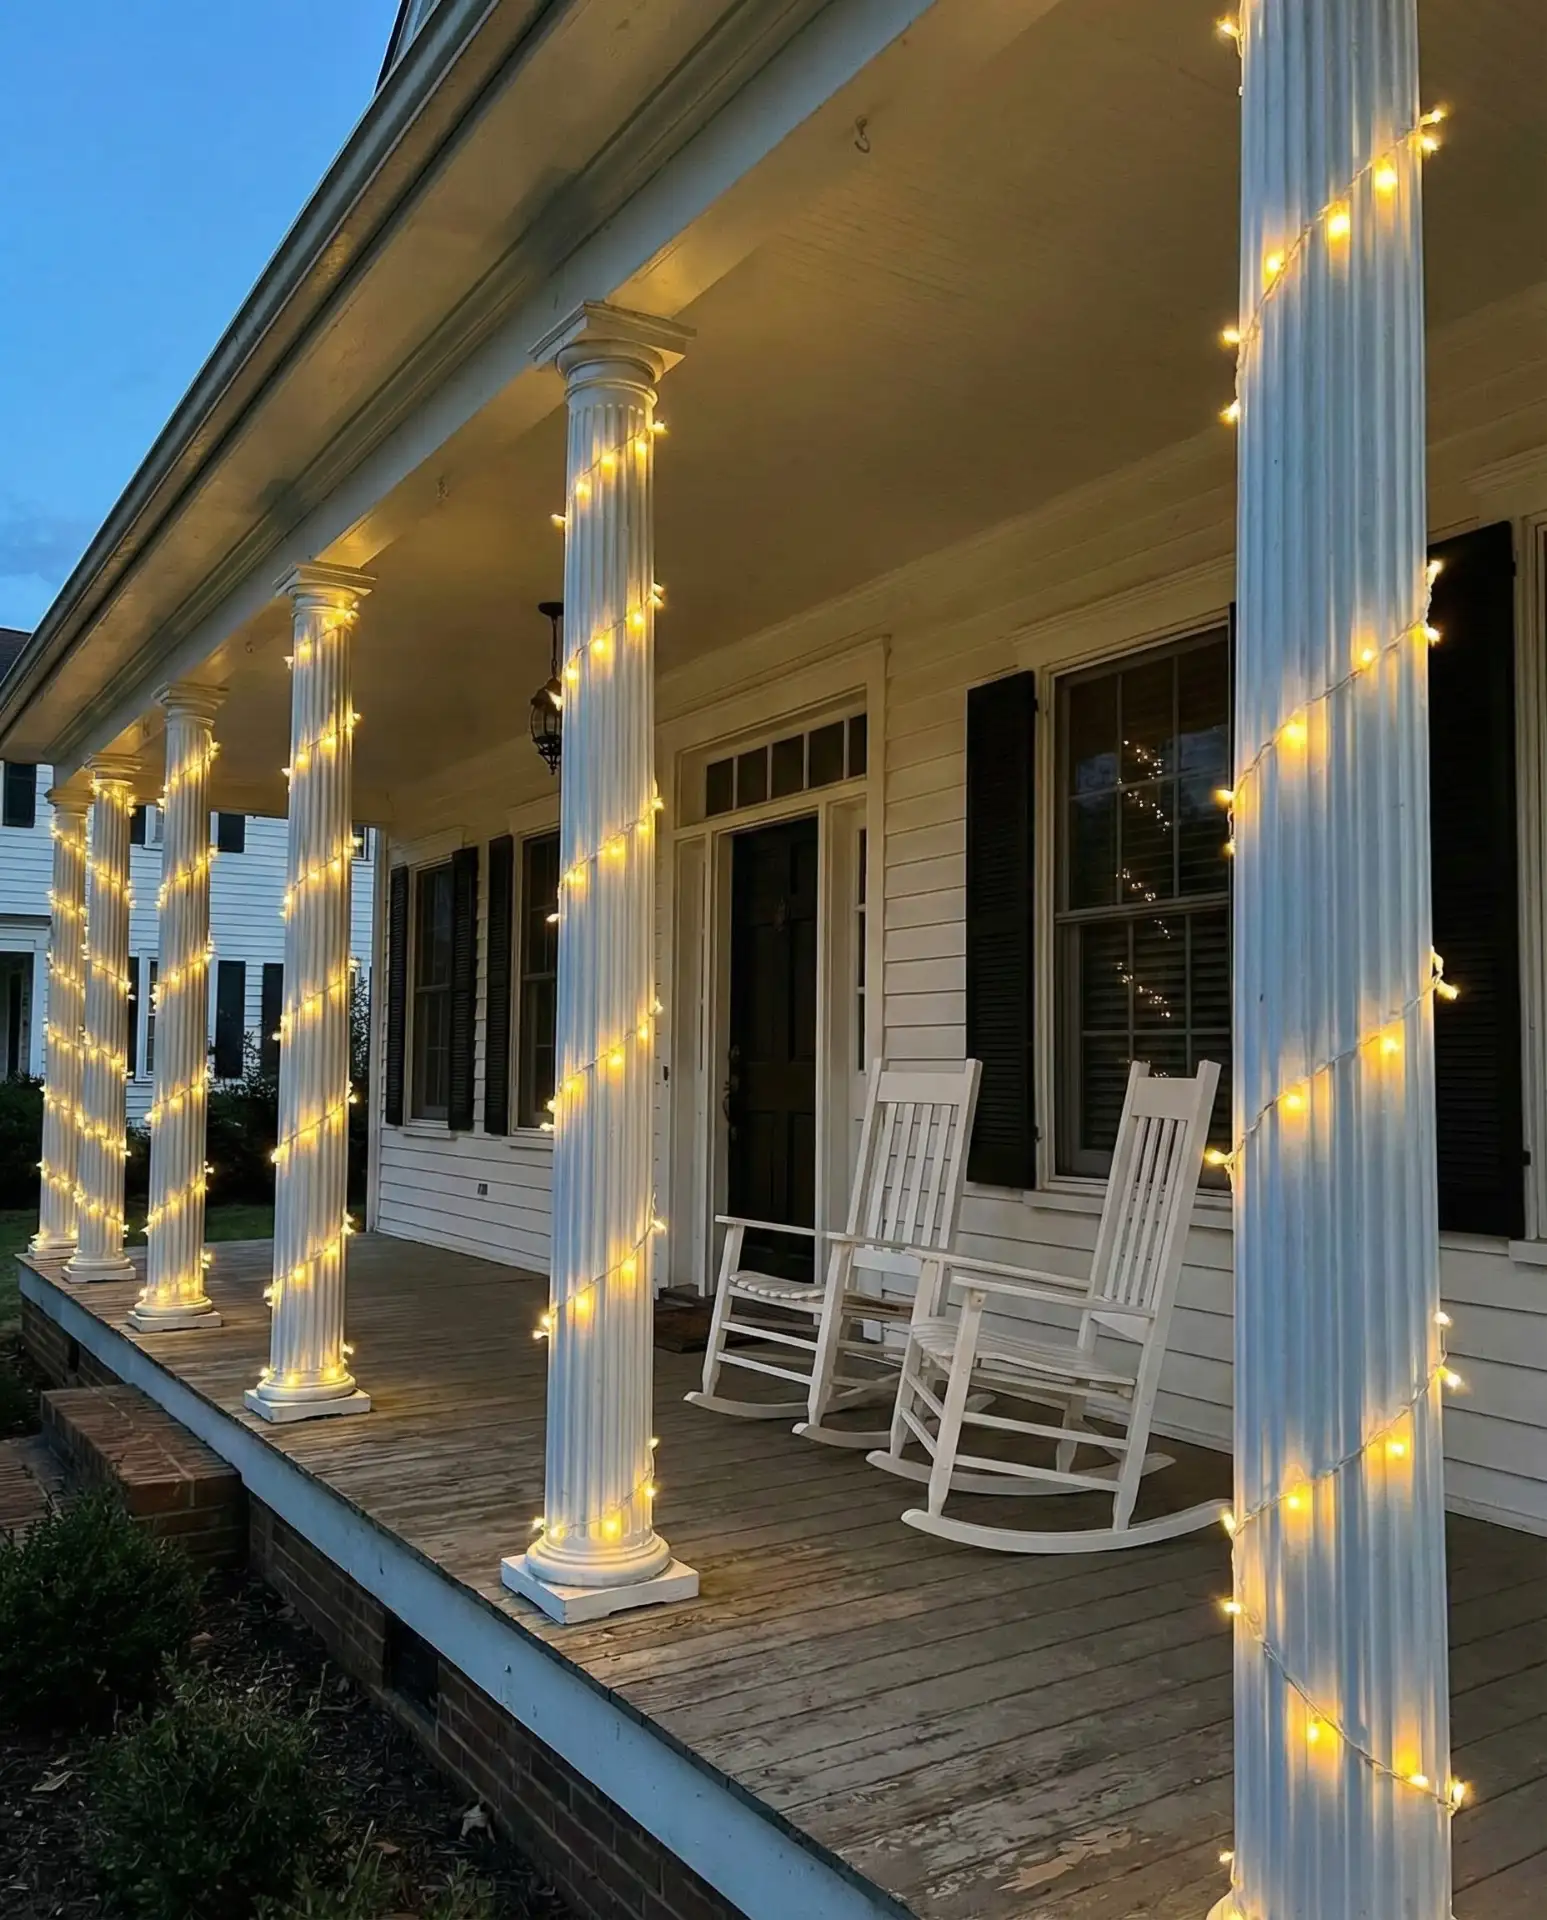
Wrapping string lights around porch columns from base to capital creates vertical accent lighting that highlights architectural features while providing gentle ambient illumination. This works beautifully on front porches, screened-in back porches, or any covered outdoor area with substantial posts. The spiral pattern draws the eye upward and makes standard columns look more sophisticated and welcoming. 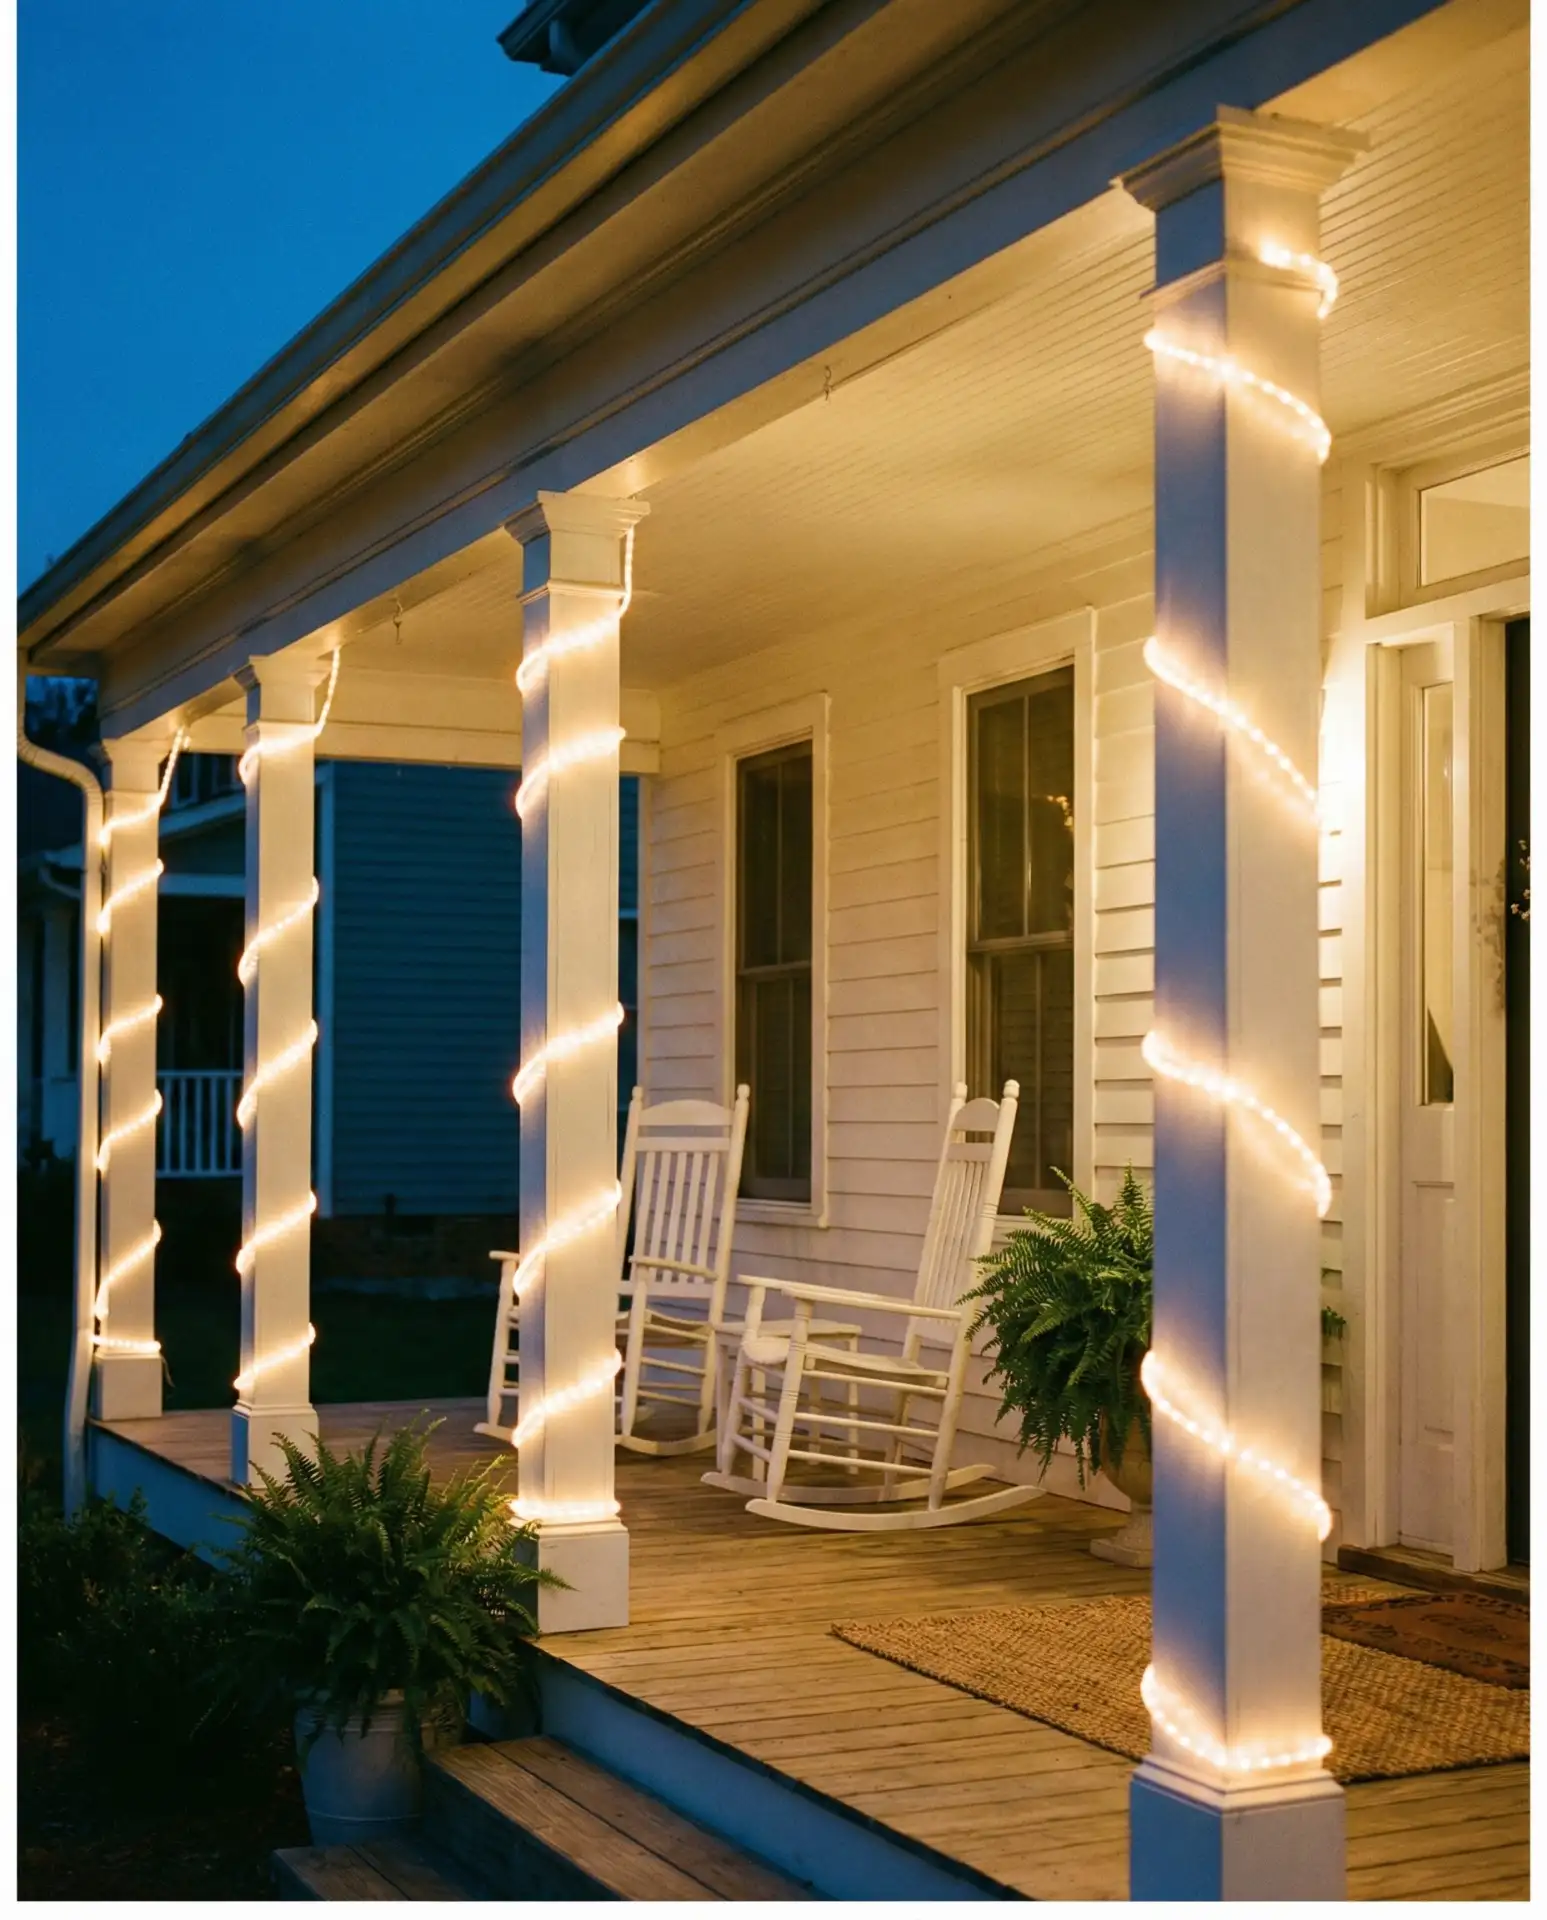
This installation method has become especially popular in the South, where wide front porches are central to home design and social life. Use small adhesive clips every 6-8 inches to secure lights without damaging painted surfaces—these clips are virtually invisible once lights are in place. The wrapped column approach works year-round and creates particularly striking effects during winter when contrasted against snow. Budget about 25-30 feet of lights per standard 8-foot column, and choose warm white bulbs that complement traditional home exteriors without looking too contemporary or stark.
10. Fire Pit Circle Overhead Canopy
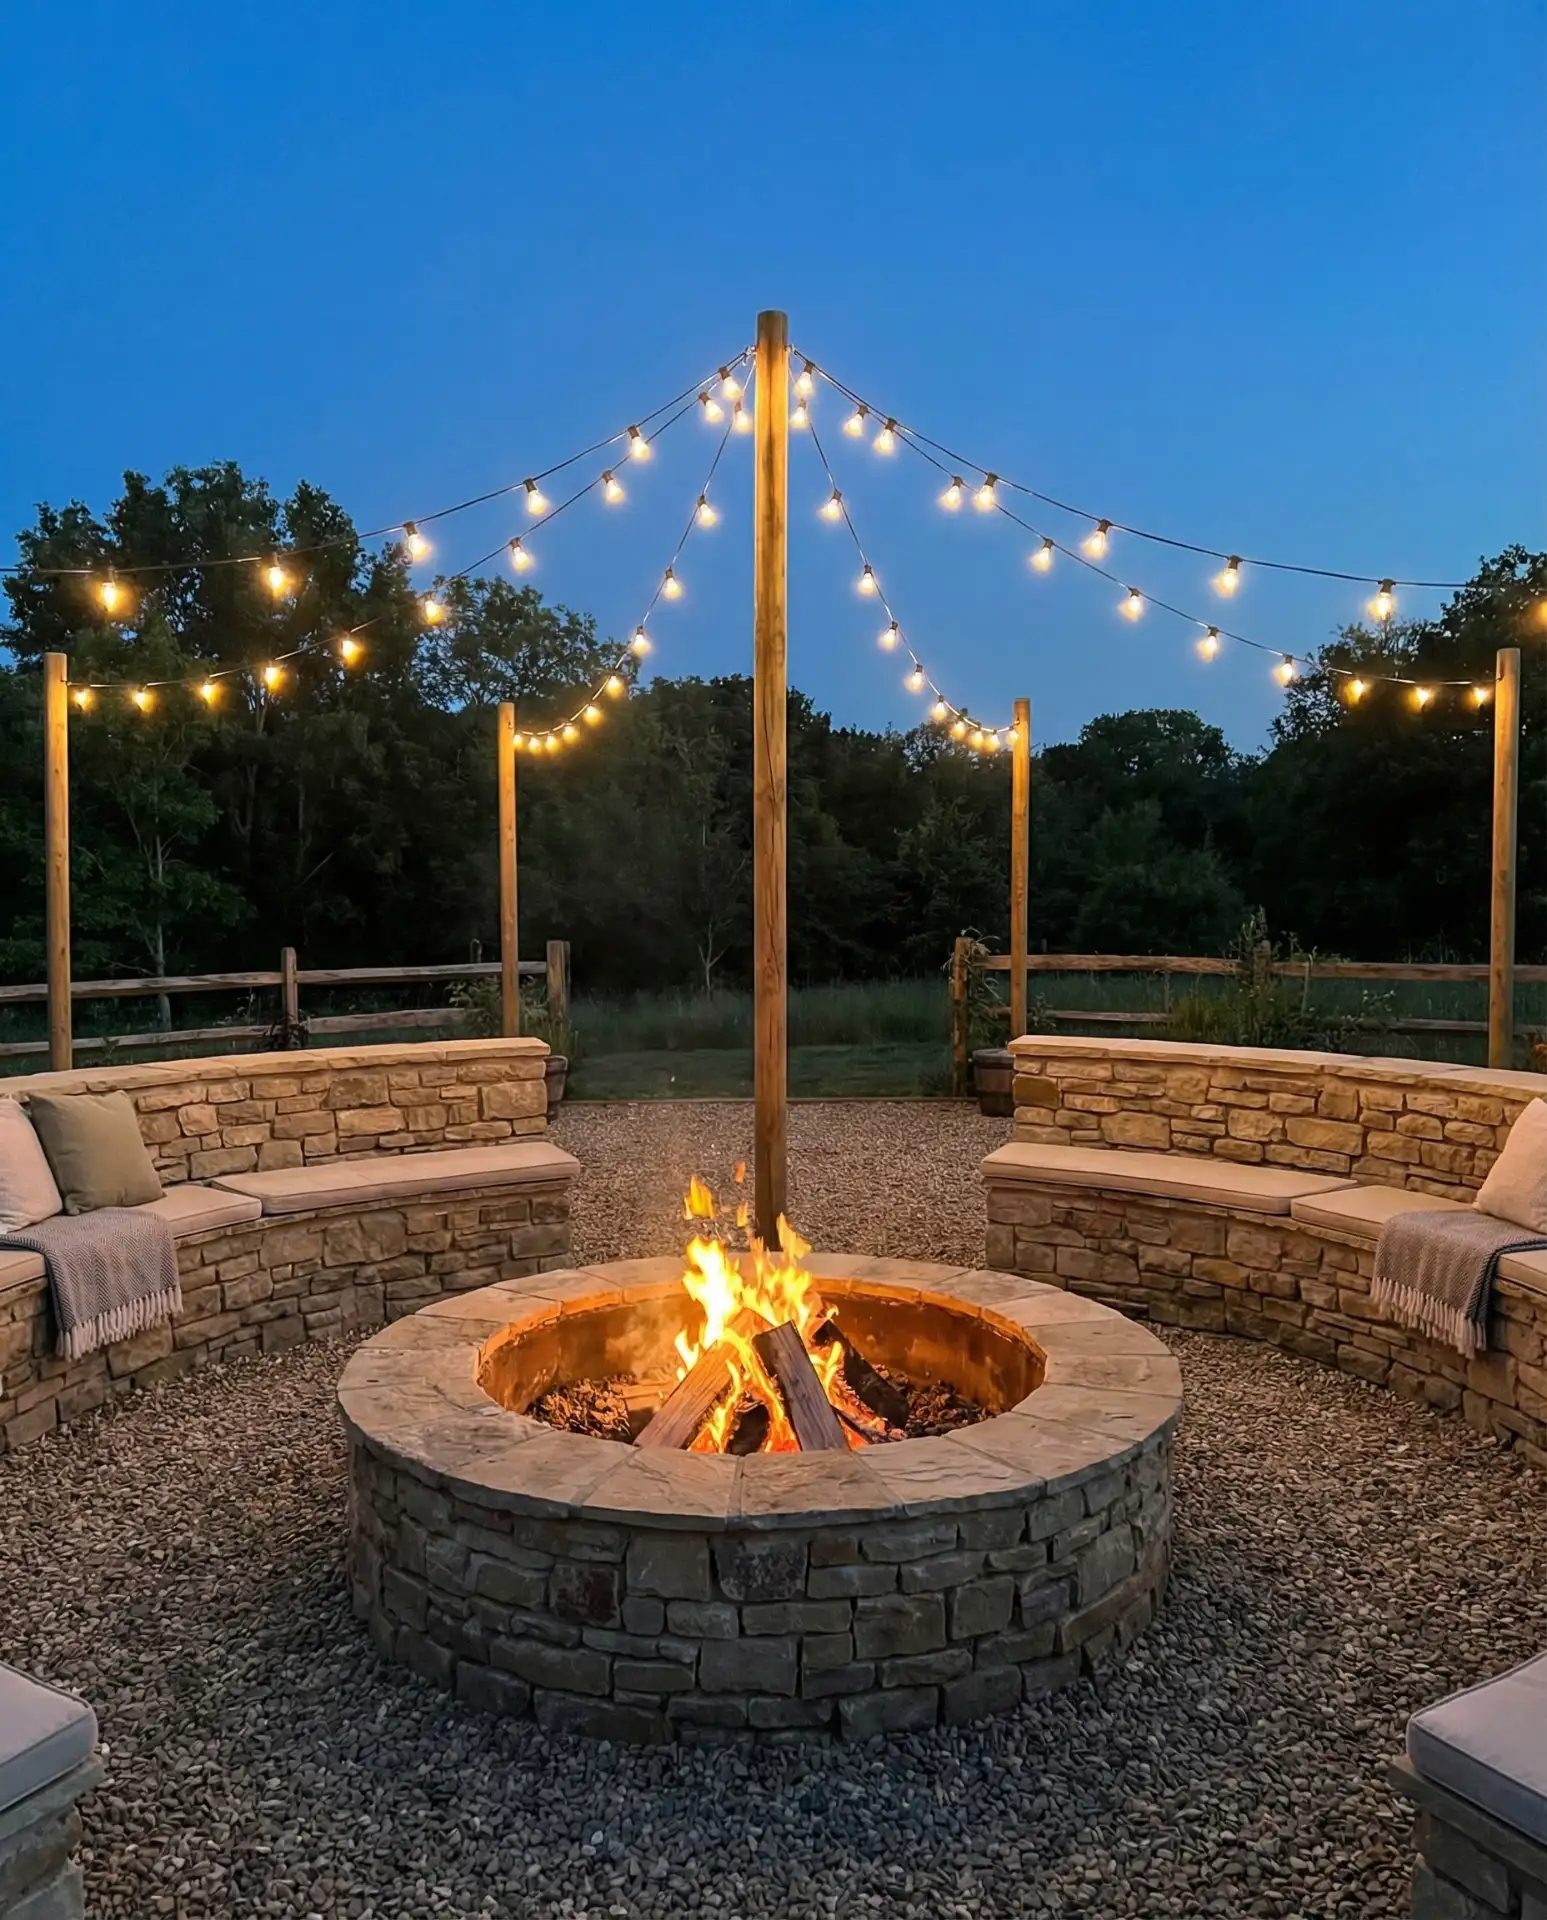
Creating a circular canopy of lights centered over a fire pit transforms the space into an intimate gathering spot with layered lighting from both the flames and overhead bulbs. Install four to six poles in a circle around the fire pit at equal distances, then run lights from each pole toward a central point, creating a tent-like structure. These ideas fire pit setups work especially well for backyard entertaining spaces designed around warmth and conversation. 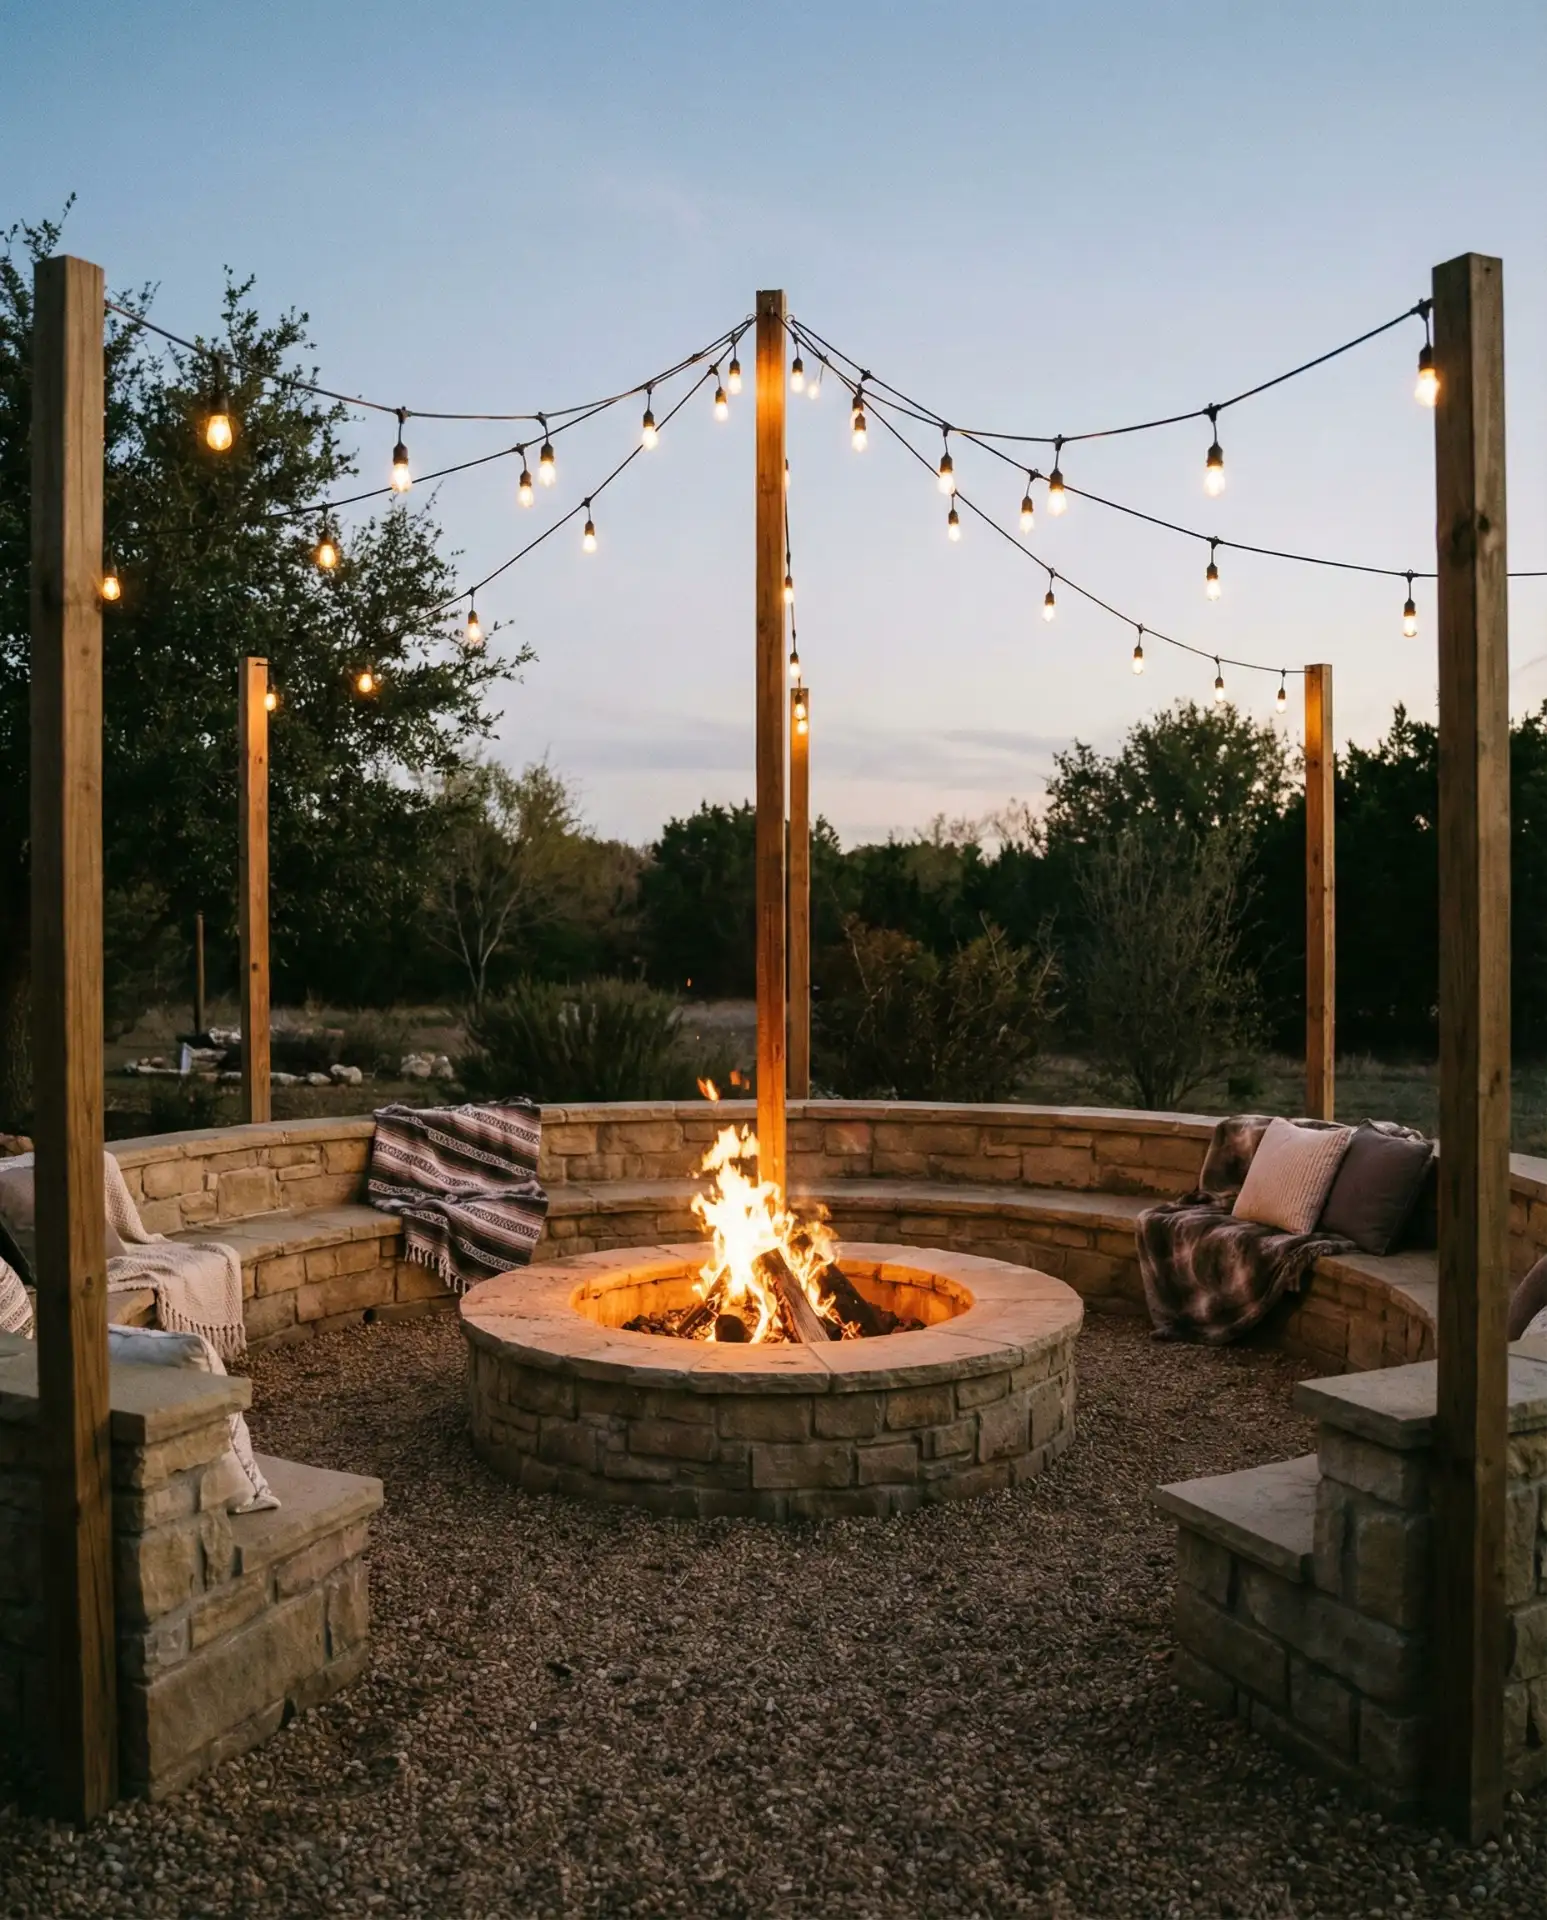
Expert-style commentary: Position poles 10-12 feet from the fire pit center to keep lights safely away from heat and smoke while still creating an enclosed feeling. The overhead lights should hang high enough that standing adults don’t bump them—typically 7-8 feet minimum. This design has become increasingly popular in mountain and lake communities where outdoor fire pits see heavy use from spring through fall. Use poles with ground stakes that can be removed and stored during winter months in cold climates where ground freezing makes removal difficult later.
11. Deck Railing Zigzag Pattern
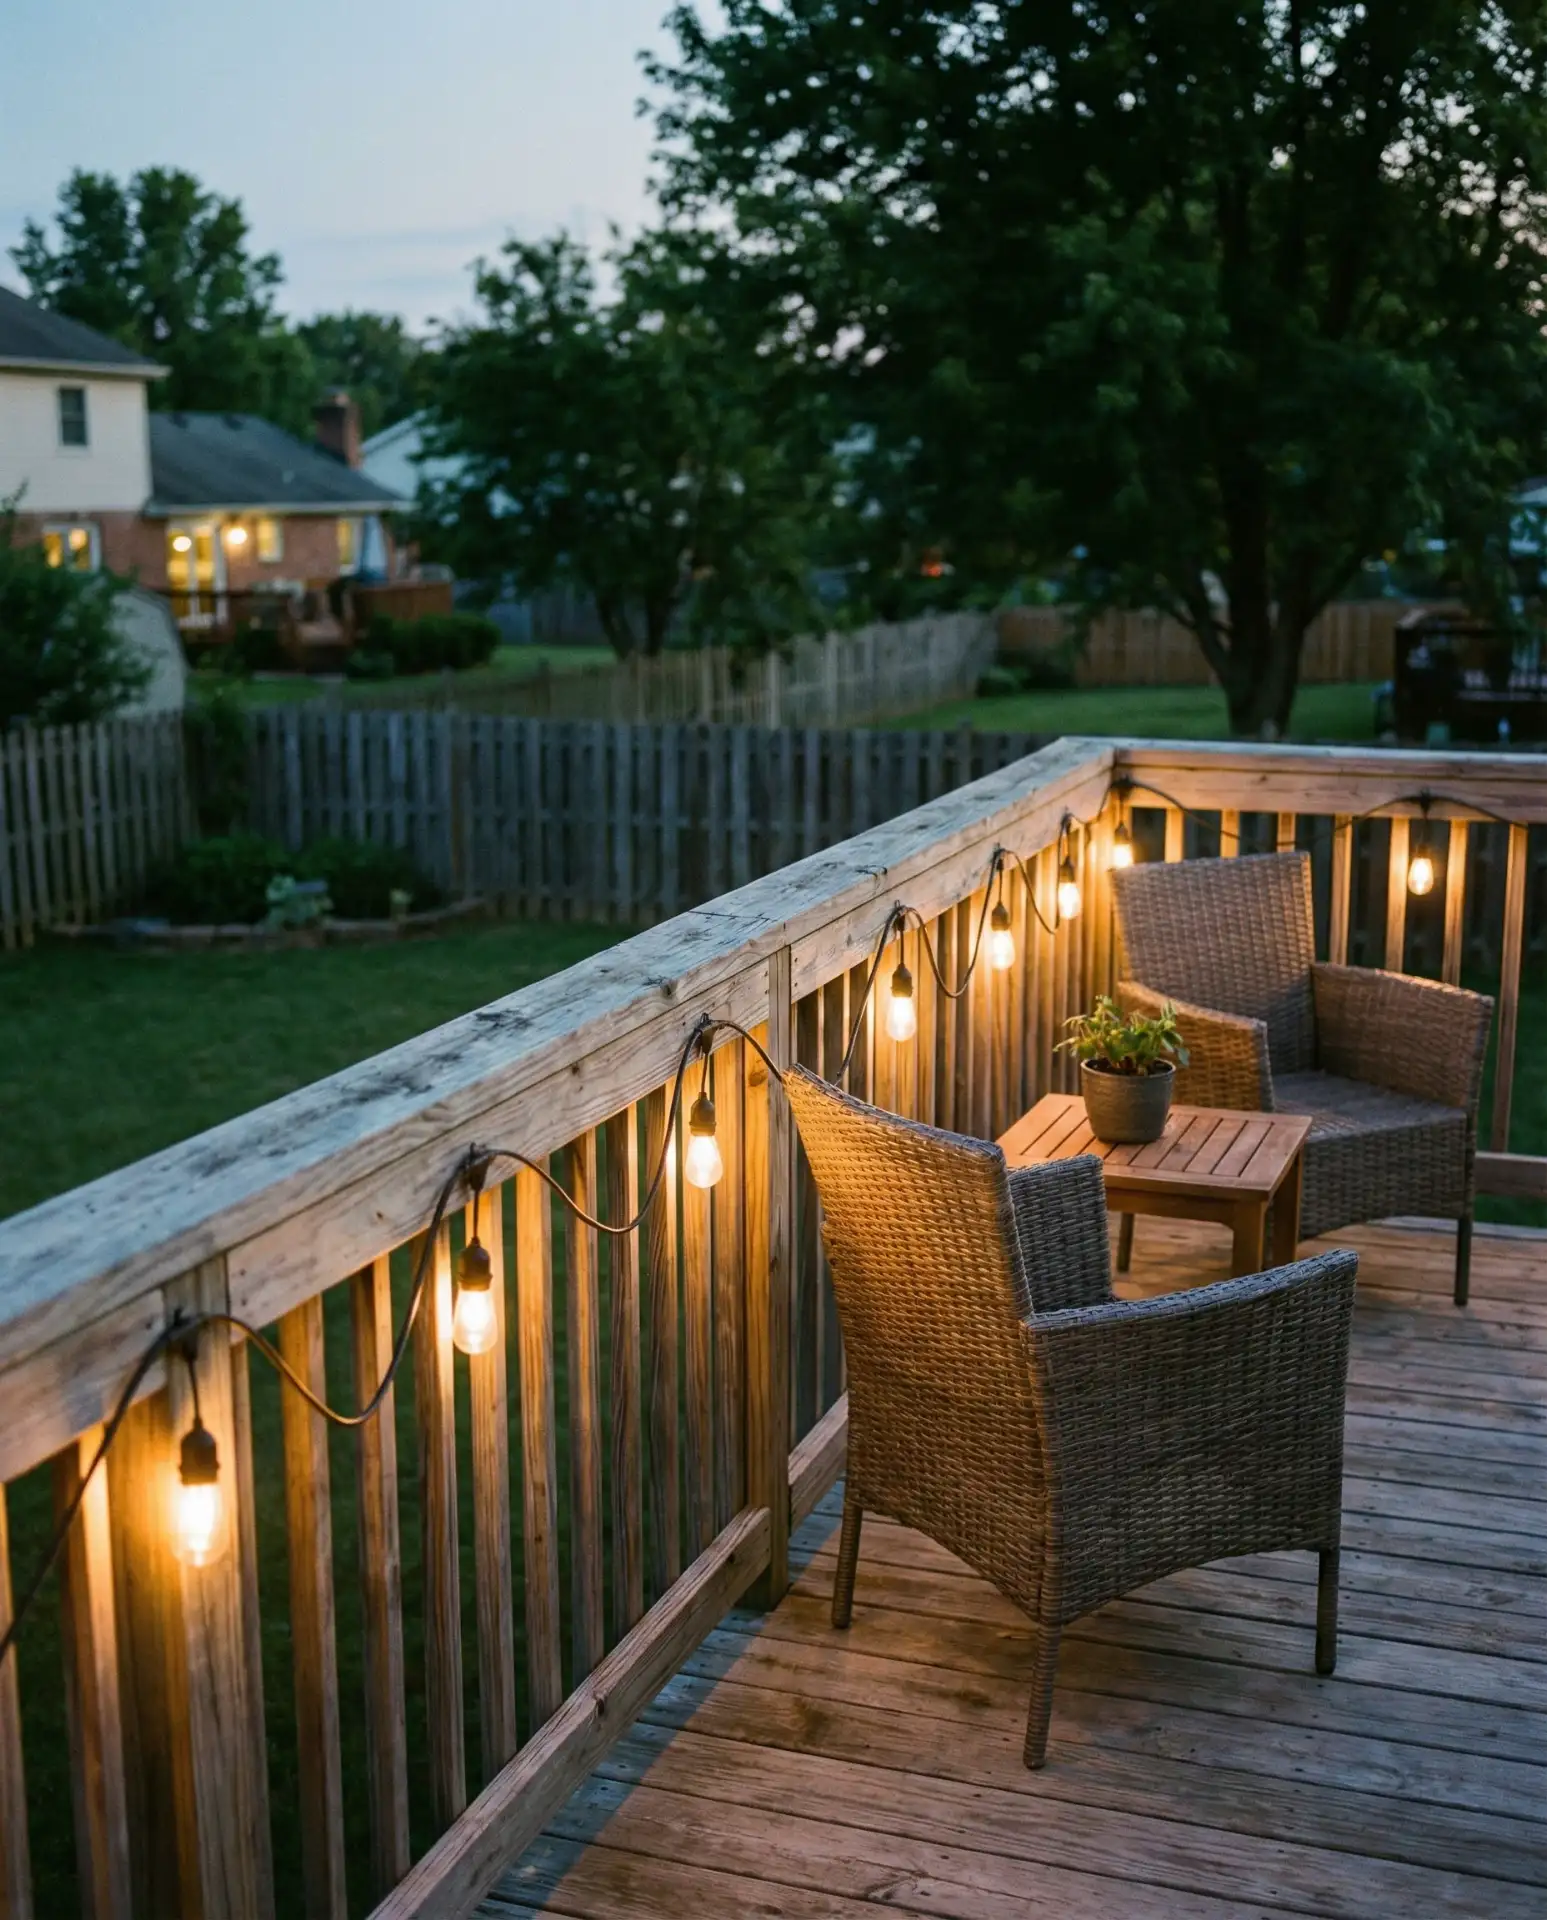
Weaving string lights in zigzag patterns along deck railings creates dynamic visual interest while providing functional lighting for evening gatherings. This approach uses the existing railing structure, requiring no additional hardware beyond small hooks or zip ties. The pattern works particularly well for multi-level decks where you want to define different zones while maintaining visual continuity. 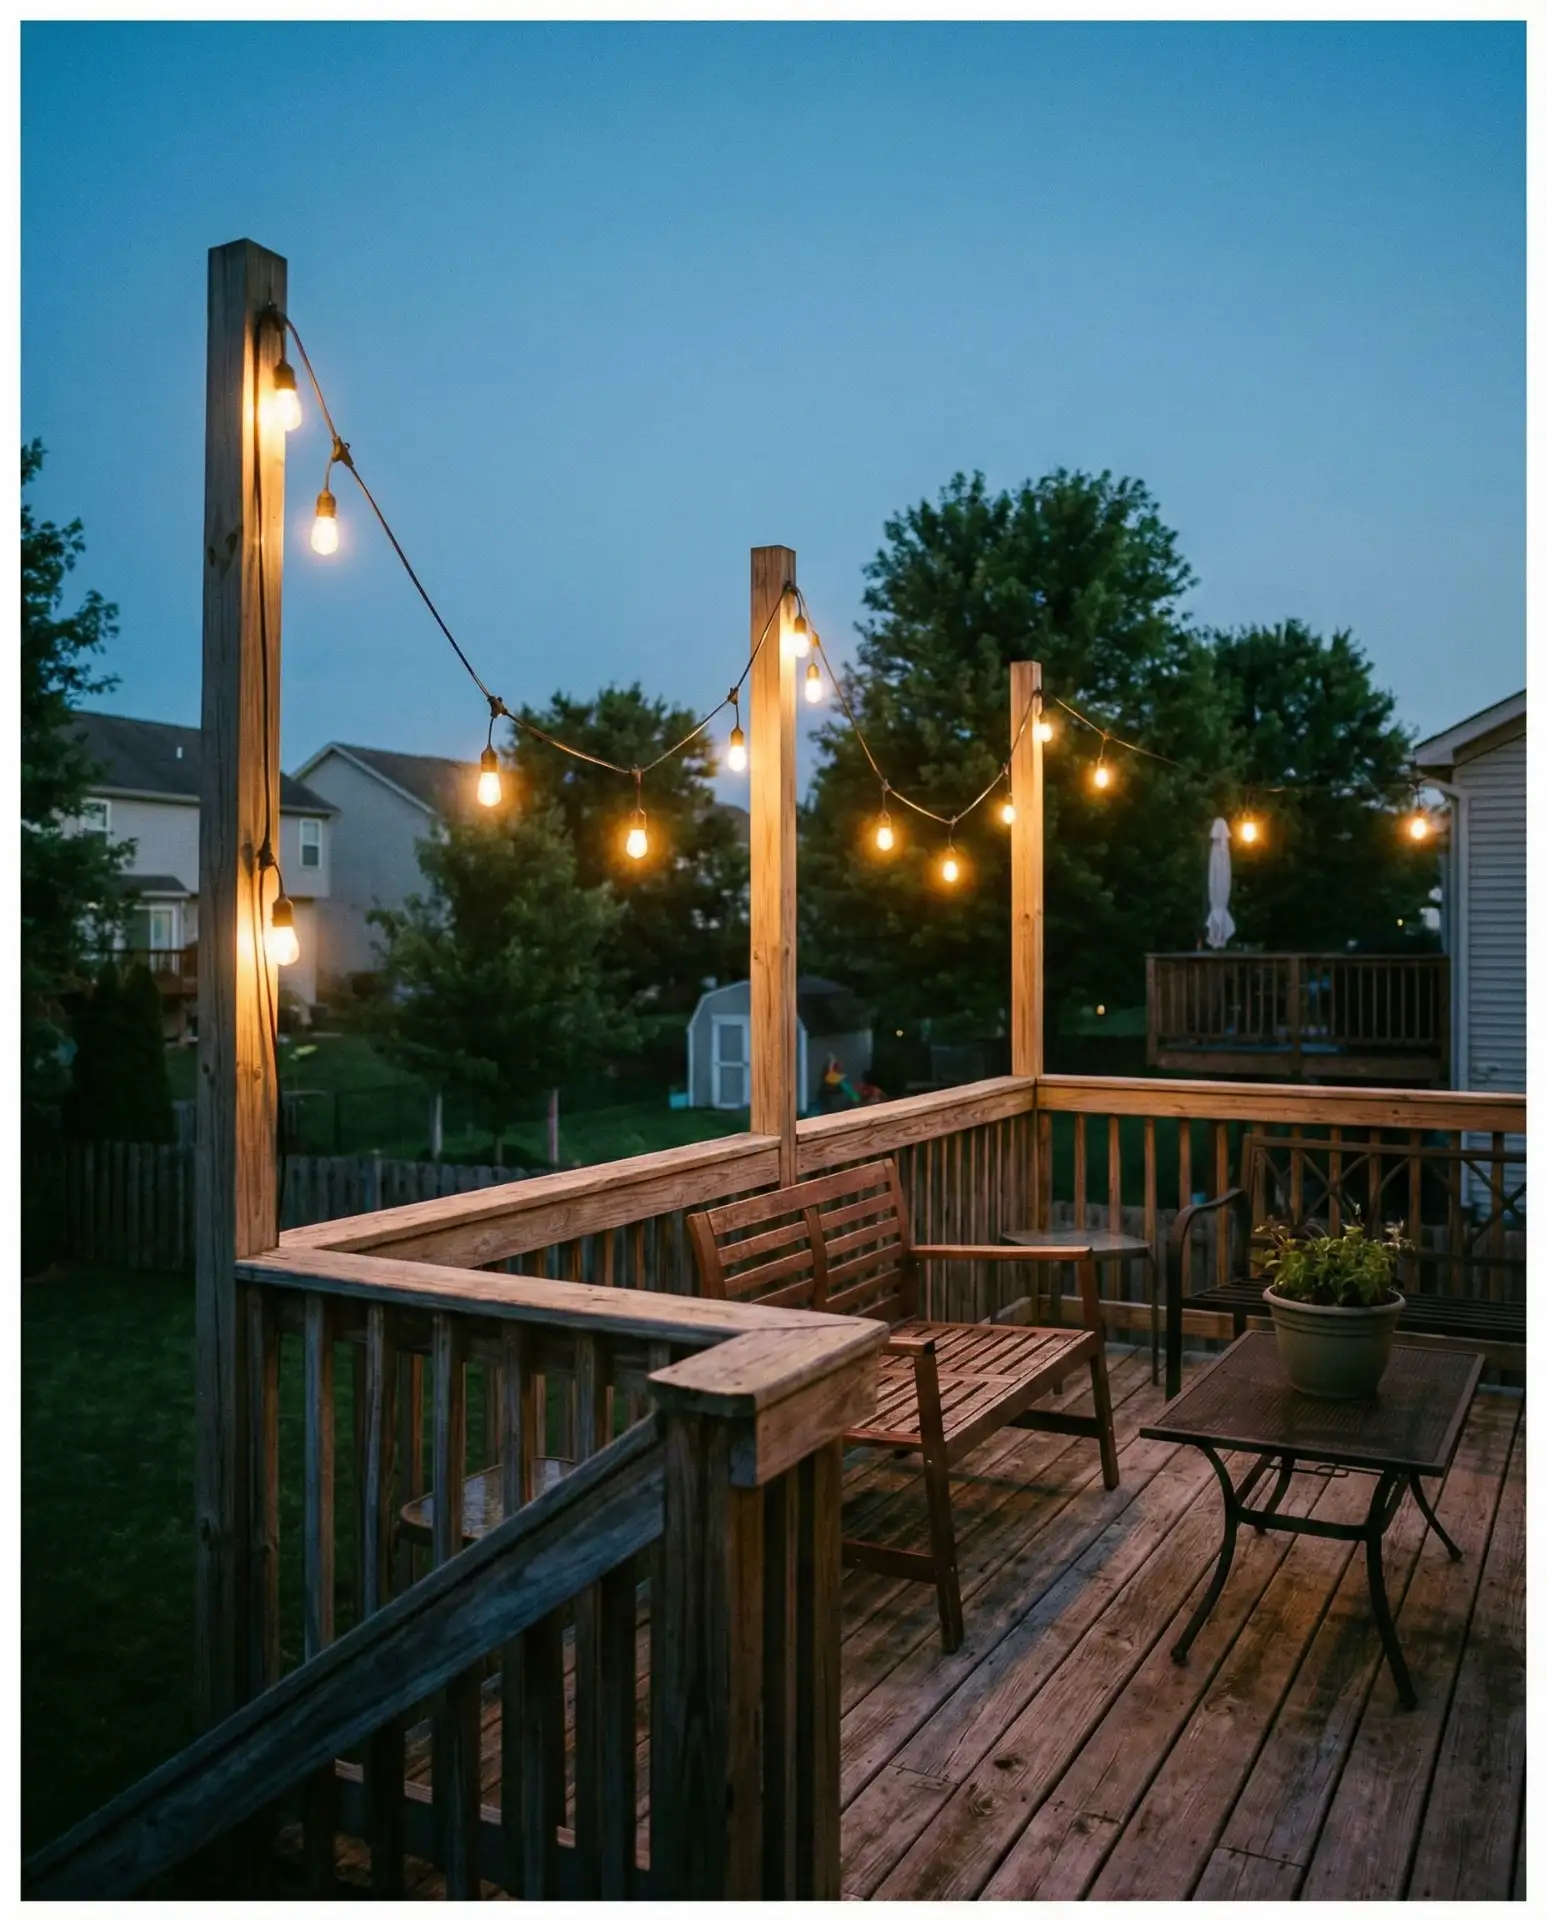
A micro-anecdote: One homeowner in Colorado found that this pattern not only looked beautiful but also helped guests navigate deck stairs safely after sunset, reducing trips and stumbles. The zigzag creates multiple light points along the railing without overwhelming the space, and the installation takes just 20-30 minutes for a standard deck. Use outdoor-rated cable clips that match your railing color for the cleanest look. This method works equally well with traditional wood railings or modern metal systems, and the lights stay protected from direct weather exposure under most deck roof overhangs.
12. Garden Trellis Light Integration
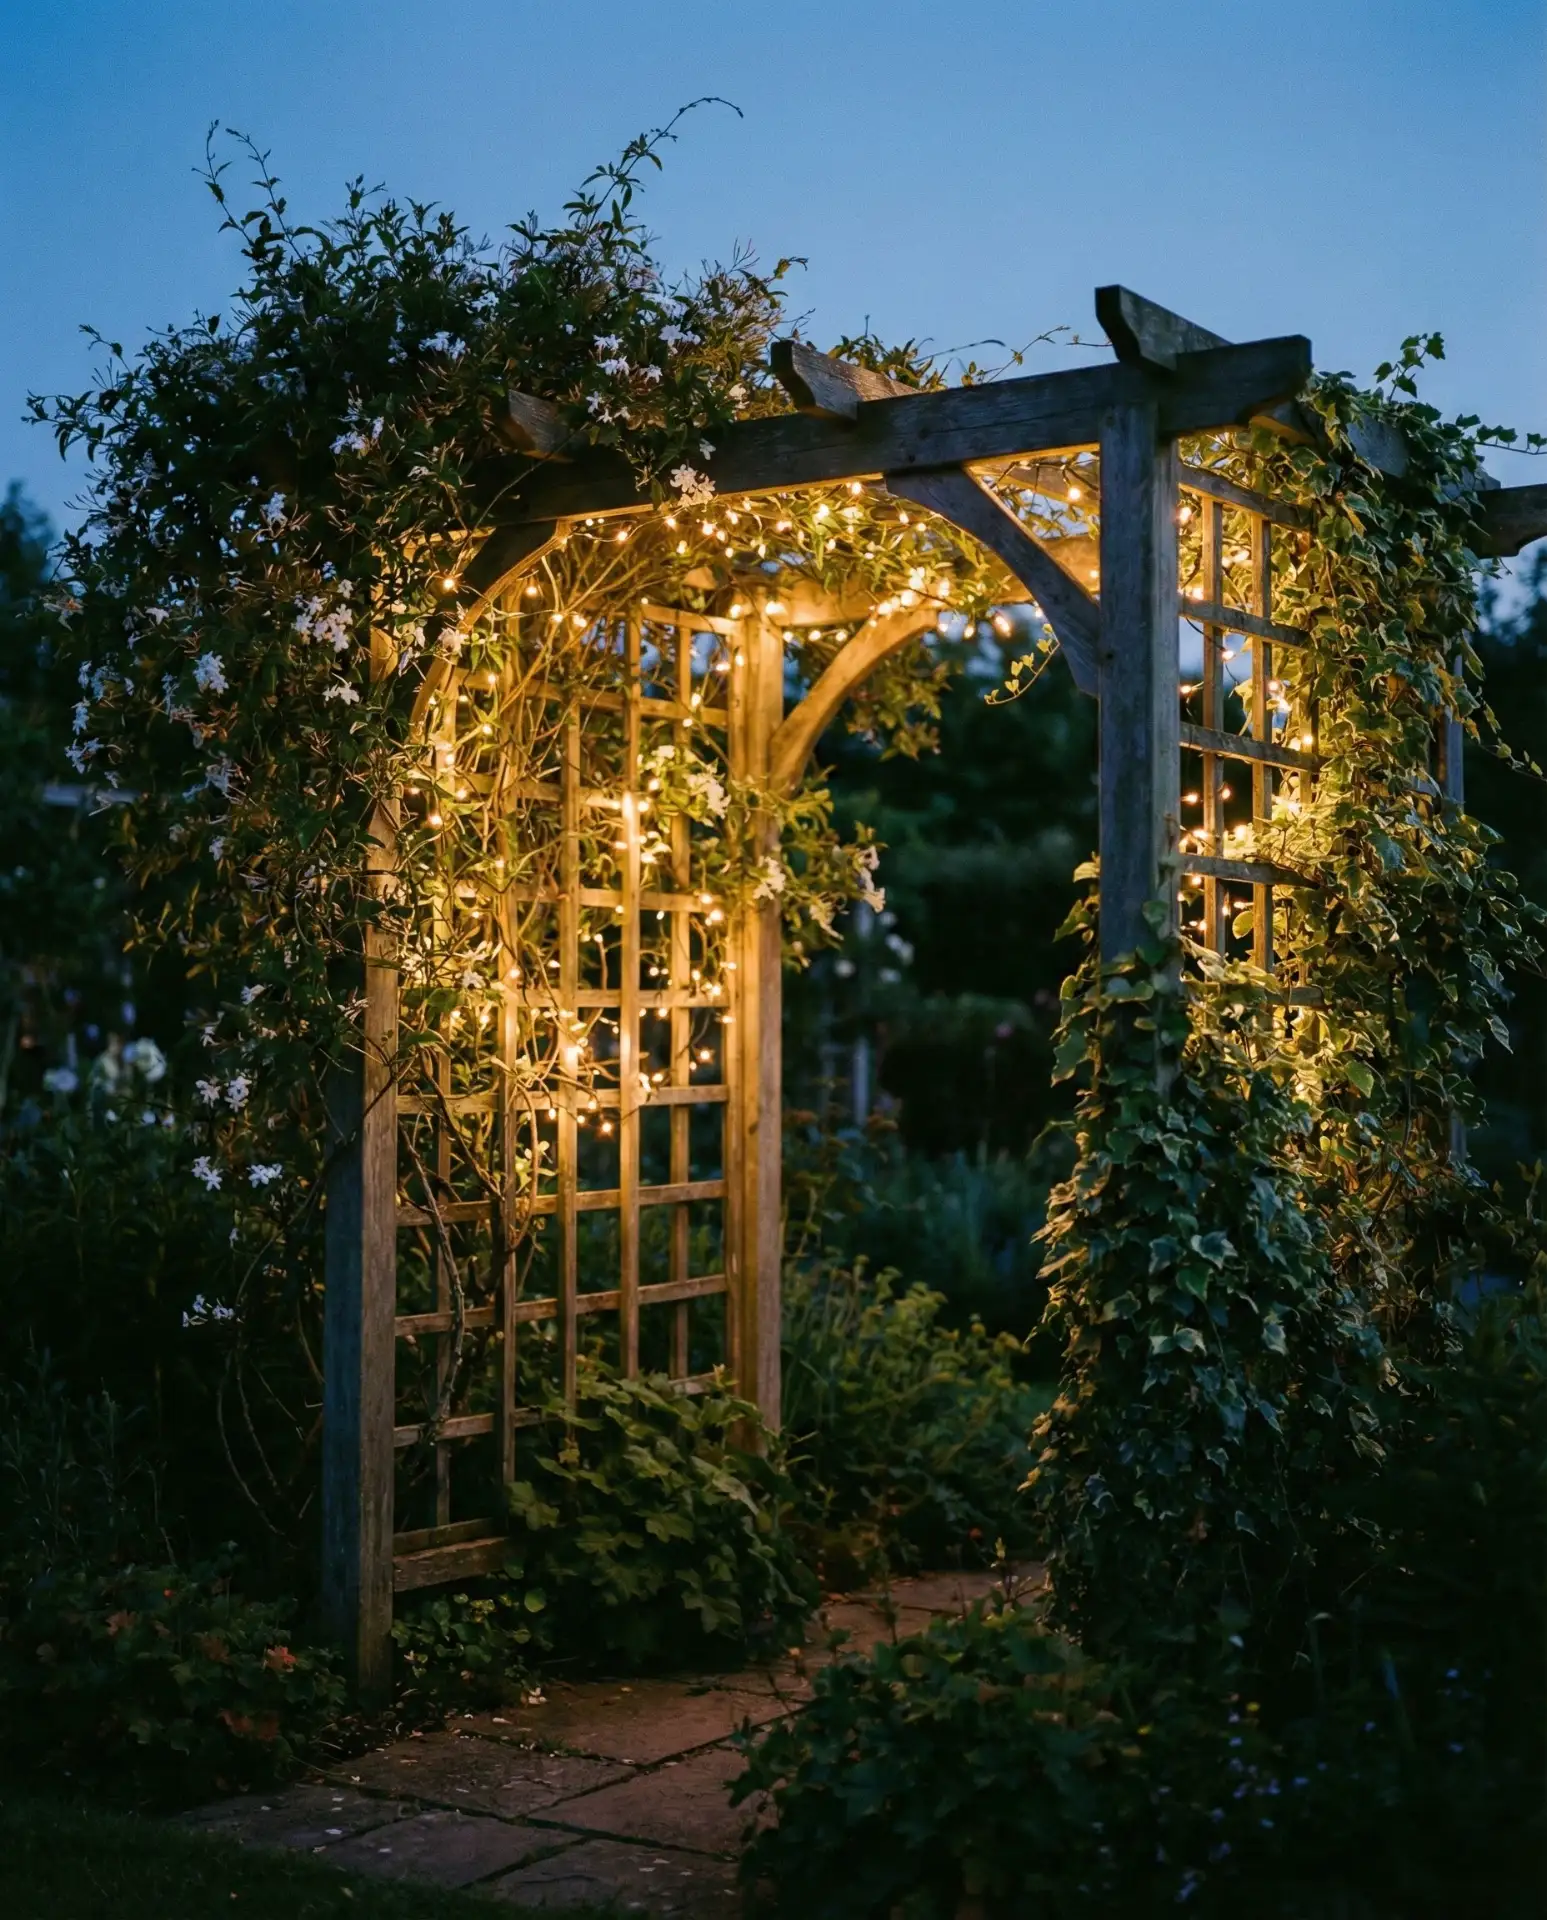
Weaving string lights through garden trellises combines structural plant support with evening illumination, creating living walls of light as vines grow around the bulbs. This works beautifully with climbing roses, clematis, or jasmine, where the foliage softens the light and creates dappled patterns. The trellis framework provides natural anchor points every few inches, making installation straightforward and secure. 
In cottage-style gardens throughout New England and the Pacific Northwest, this approach has become a signature look that blends ornamental and functional elements seamlessly. The combination works year-round—dramatic when vines are in full bloom during summer, and equally beautiful in winter when bare branches create geometric patterns with the lights. Choose LED bulbs that don’t generate significant heat to avoid damaging delicate plant growth near the fixtures. Position the trellis near seating areas or along pathways where the lighting serves a practical purpose beyond aesthetics.
13. Umbrella Pole Central Hub

A large patio umbrella pole serves as a central anchor point for radiating string lights outward to surrounding posts or structures, creating a tent-like canopy over dining areas. This way to hang lights maximizes coverage from a single high point while maintaining clear floor space below. The umbrella itself can stay in place during the day for shade, with lights adding evening functionality. 
This setup works particularly well on concrete or stone patios where installing ground poles isn’t practical. The umbrella base provides the necessary weight and stability, and most commercial umbrella poles are designed to handle additional load from light strings. Budget angle: A quality cantilever umbrella costs $200-400, but it serves triple duty as shade, structural support, and design centerpiece, making it more cost-effective than purchasing separate shade and lighting structures. Ensure your umbrella base weighs at least 75 pounds or is secured with concrete pavers to prevent tipping in wind.
14. Solar-Powered Shepherd Hook Garden Lights
Combining shepherd hooks with solar string lights creates a completely wireless lighting system perfect for garden beds, pathways, or areas far from electrical outlets. Modern solar lights have improved dramatically, with many models providing 6-8 hours of illumination after a full day of charging. This approach offers maximum flexibility for seasonal arrangements without any electrical work or extension cords to hide. 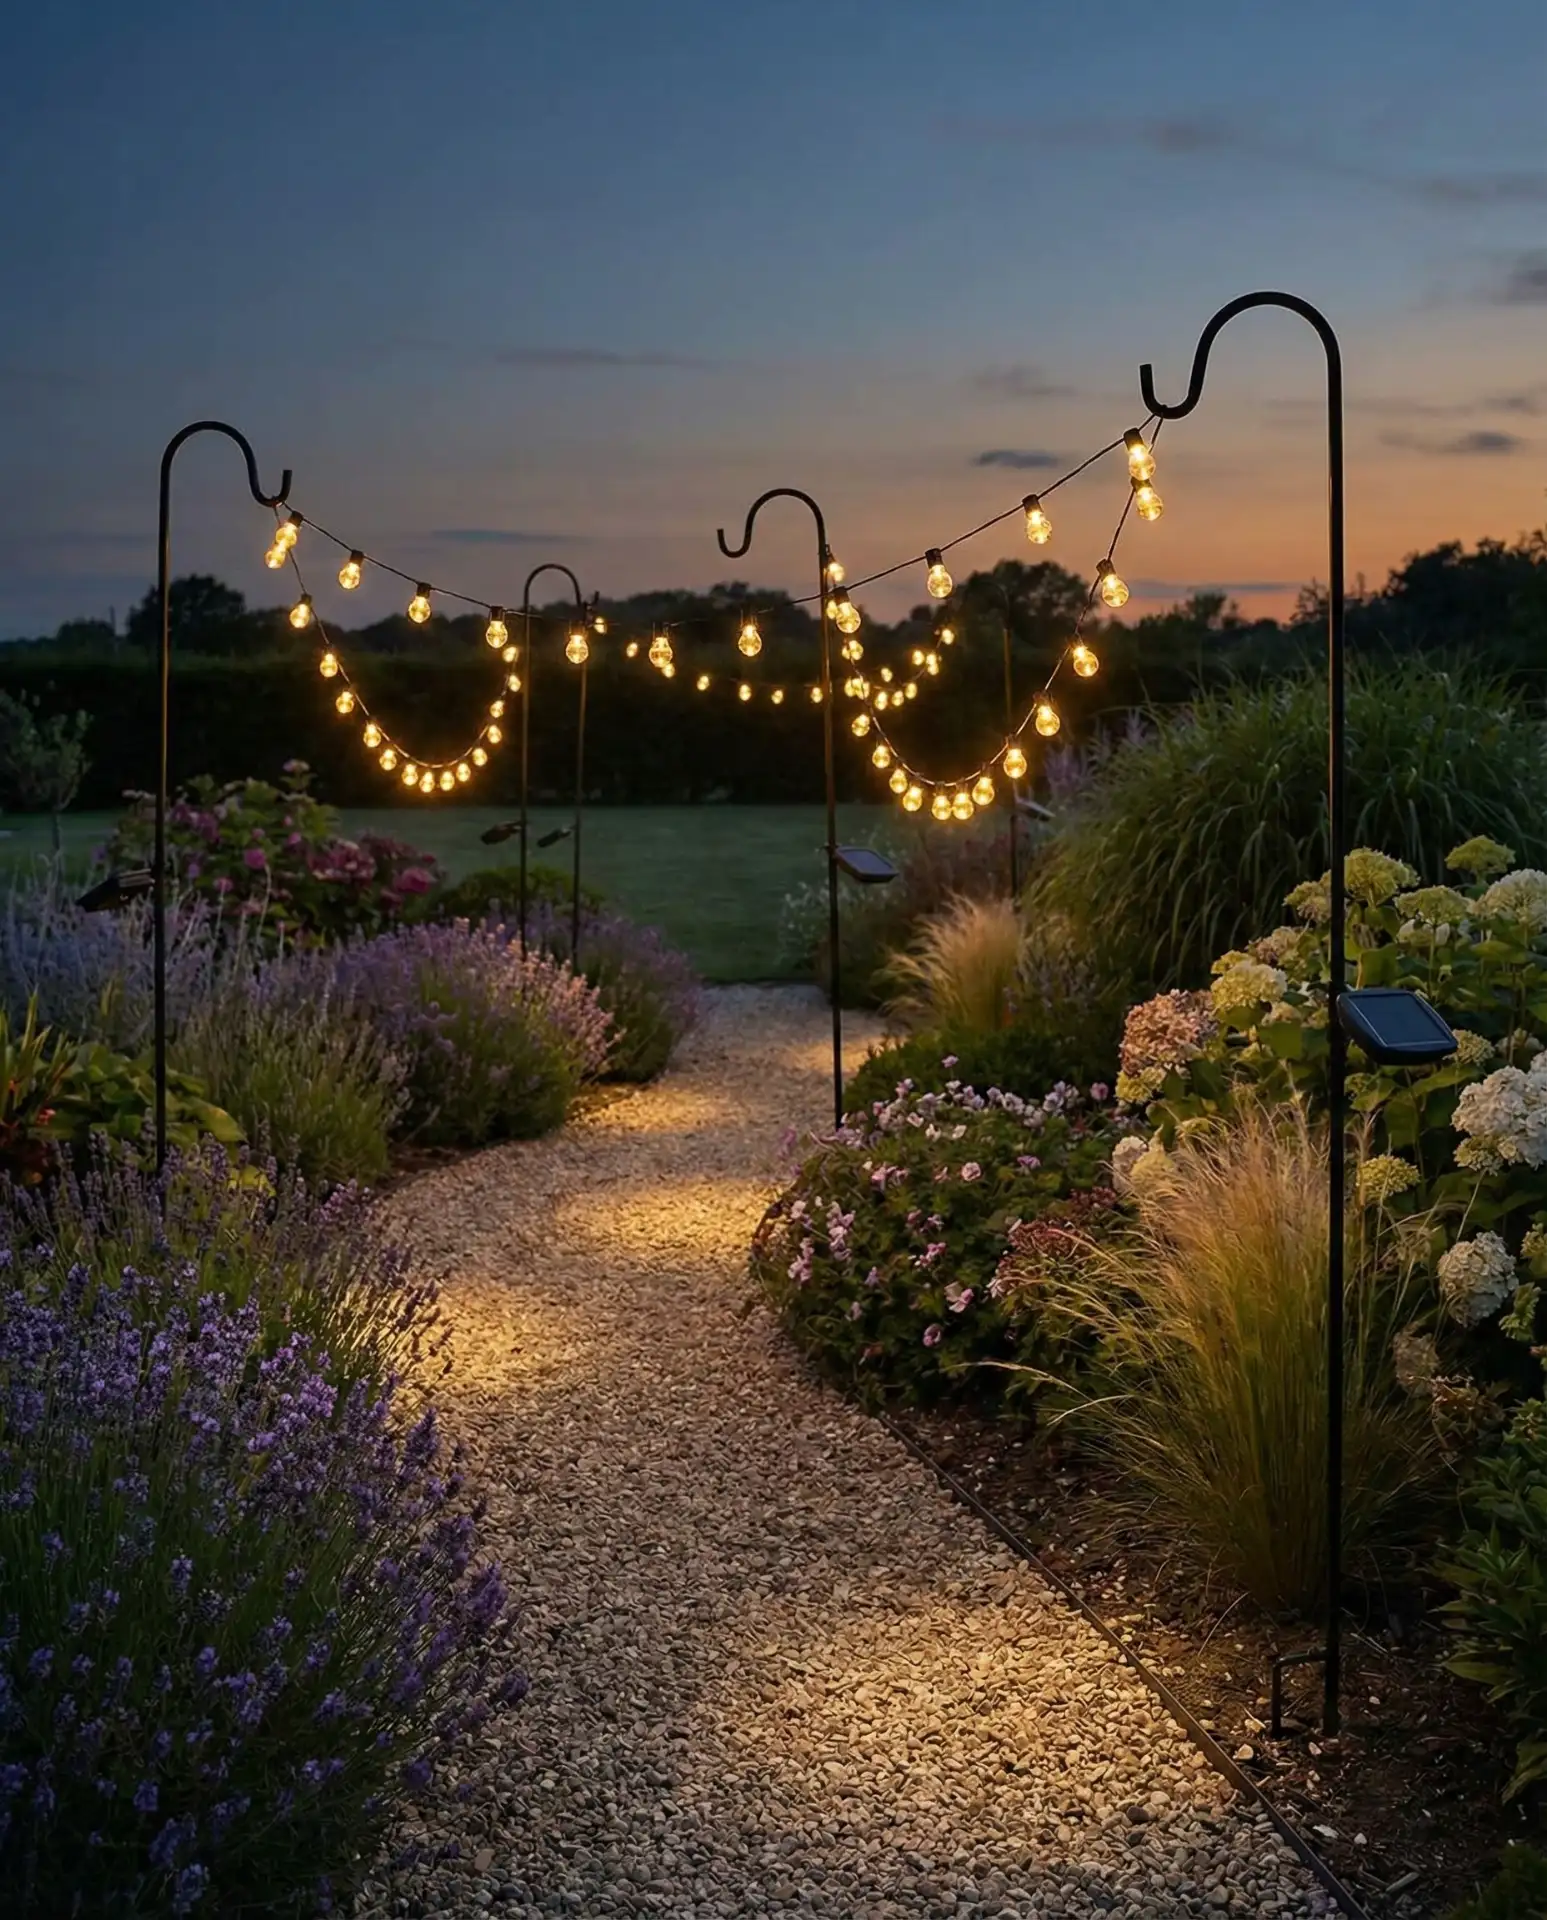
Where it works best: Sunny yards in California, Texas, and the Southwest where solar panels can charge efficiently. Northern climates with frequent cloud cover may see reduced performance during winter months. The technology has reached a point where solar options compete with plug-in versions for brightness and reliability, making them ideal for backyard spaces where running electrical lines would be expensive or disruptive. Most quality solar string light sets cost $40-80 and last 2-3 seasons before needing replacement, making them a smart choice for experimental layouts you might want to change frequently.
15. Aesthetic Minimalist Wire Grid

Creating a geometric grid pattern with thin black wire or cable overhead, then running lights along the grid lines, produces an aesthetic modern look that feels intentional and architectural. Install corner poles or use existing structures, then run horizontal and vertical wire lines to create squares or rectangles. Attach string lights along these wire guides for a clean, contemporary installation. 
This design approach has gained popularity in urban and modern homes where clean lines and deliberate design matter more than rustic charm. The grid structure provides excellent support for the lights while creating interesting shadow patterns on decking or paving below. Installation requires some planning and precision, but the result looks professionally designed and intentional. Use stainless steel or vinyl-coated wire rated for outdoor use, and tension it properly to prevent sagging over time. The geometric pattern works especially well over rectangular deck patio ideas where the grid echoes the linear architecture of the space.
16. Wedding Canopy Temporary Installation

For wedding ceremonies and receptions, creating a temporary canopy using rented or purchased light poles with extensive string light draping transforms any outdoor space into an elegant venue. This setup typically involves 8-12 tall poles arranged in a rectangle, with lights crisscrossing overhead in dense patterns that create a ceiling of warm glow. The installation can be completed in a day and removed just as quickly. 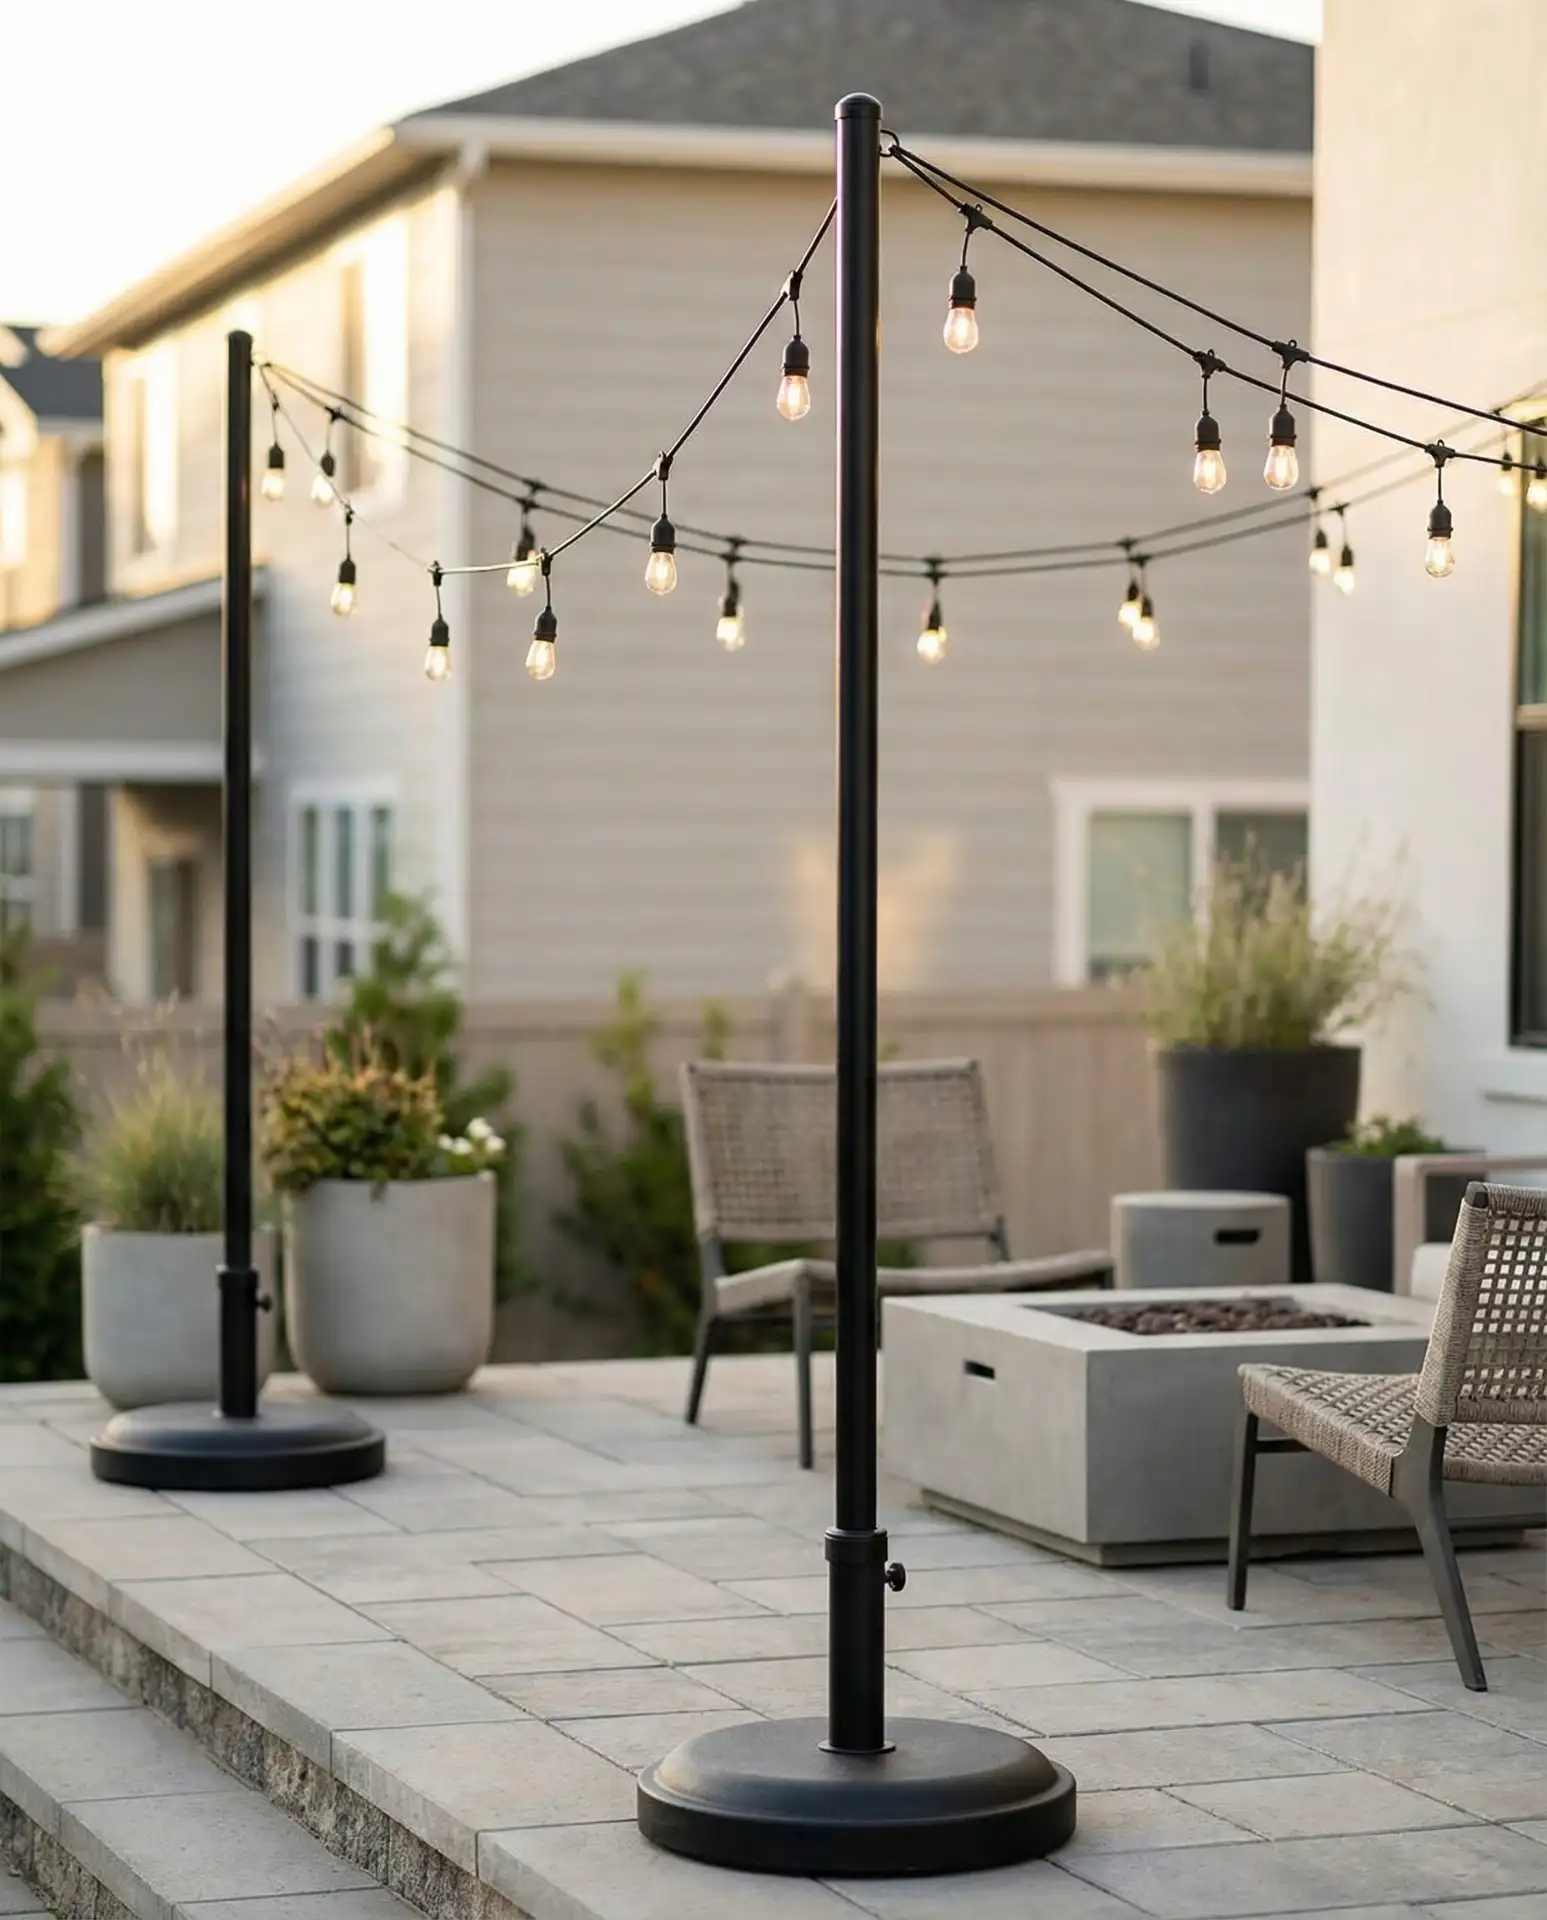
Common mistakes and how to avoid them: Many DIY wedding setups fail because poles aren’t secured properly or lights are hung too low, creating head-bumping hazards for guests. Use poles at least 10 feet tall with proper ground stakes or weighted bases (minimum 50 pounds each), and keep the lowest point of light draping at least 7 feet above ground. Hire a licensed electrician to handle power distribution if you’re running more than 500 bulbs, as the electrical load can overload standard outdoor circuits. This level of installation typically costs $800-1500 for materials and labor, far less than renting a tent with built-in lighting.
17. Pole Stand Freestanding Frames
Commercial pole stand systems with weighted bases offer portable, professional-grade solutions for creating string light frameworks without any ground installation. These aluminum or steel stands typically extend 8-12 feet high and include stabilizing plates or weight pans that can be filled with sand or water. The portability makes them ideal for renters or homeowners who want flexibility to reconfigure outdoor spaces seasonally. 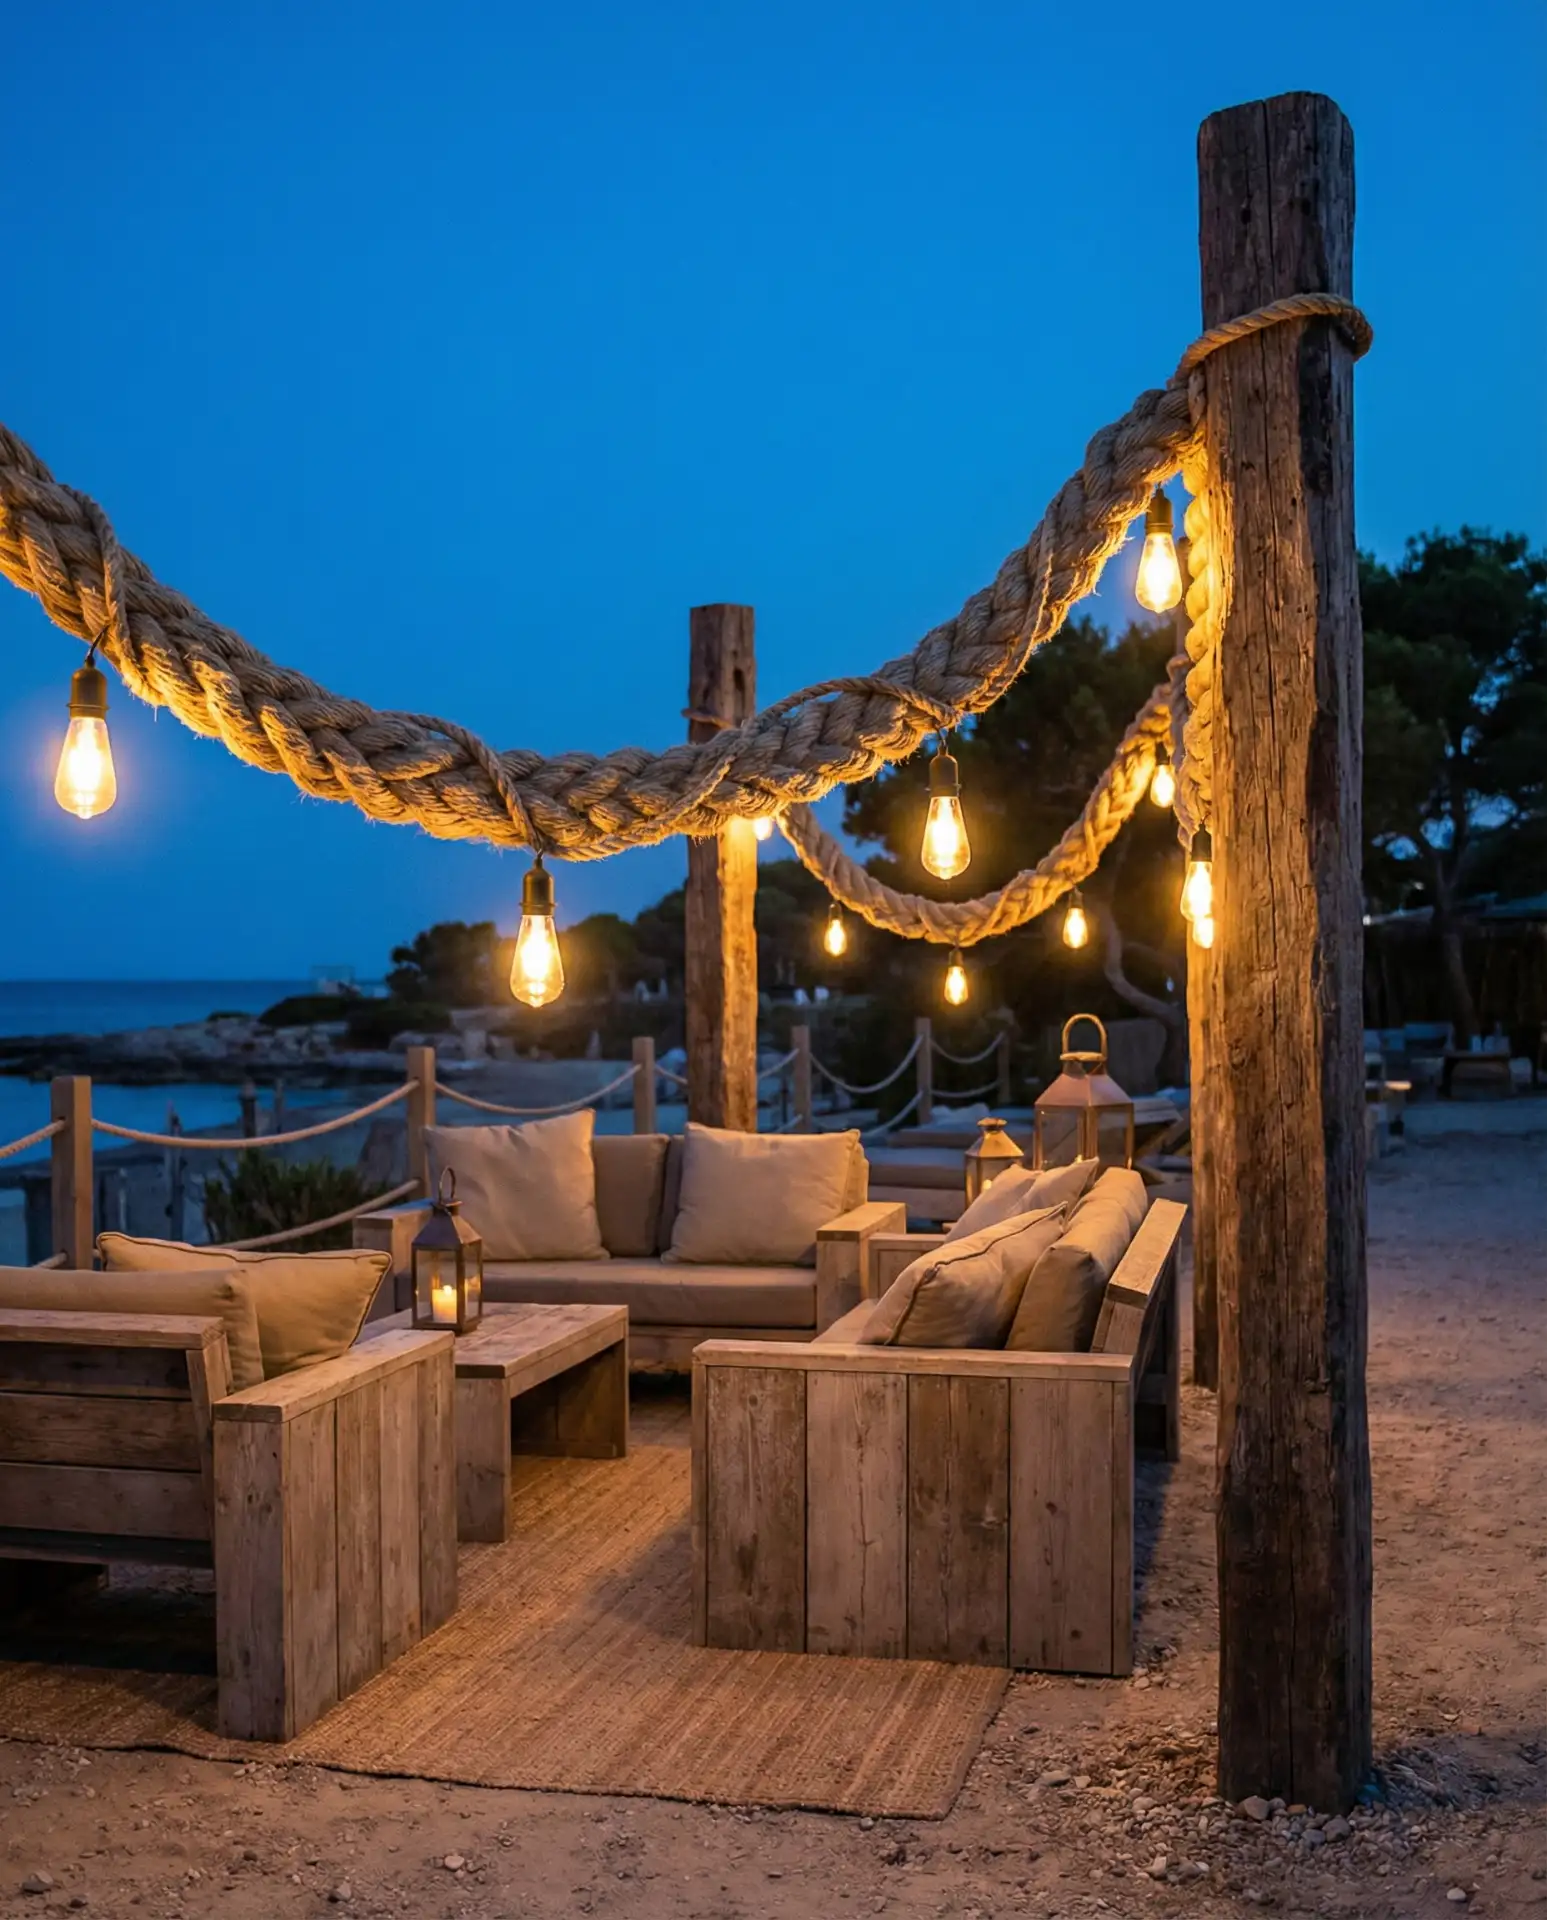
These systems have become increasingly popular for creating defined outdoor rooms on large properties where permanent installations aren’t desirable. The stands can be positioned to frame seating areas, dining spaces, or entertainment zones, then moved or stored during off-seasons. Quality pole stand sets cost $300-600 for a four-pole system, but they’re reusable indefinitely and can be taken along if you move. Fill bases with 40-50 pounds of weight per pole for stability in moderate wind conditions, and always take down lights during severe weather warnings regardless of how secure the installation feels.
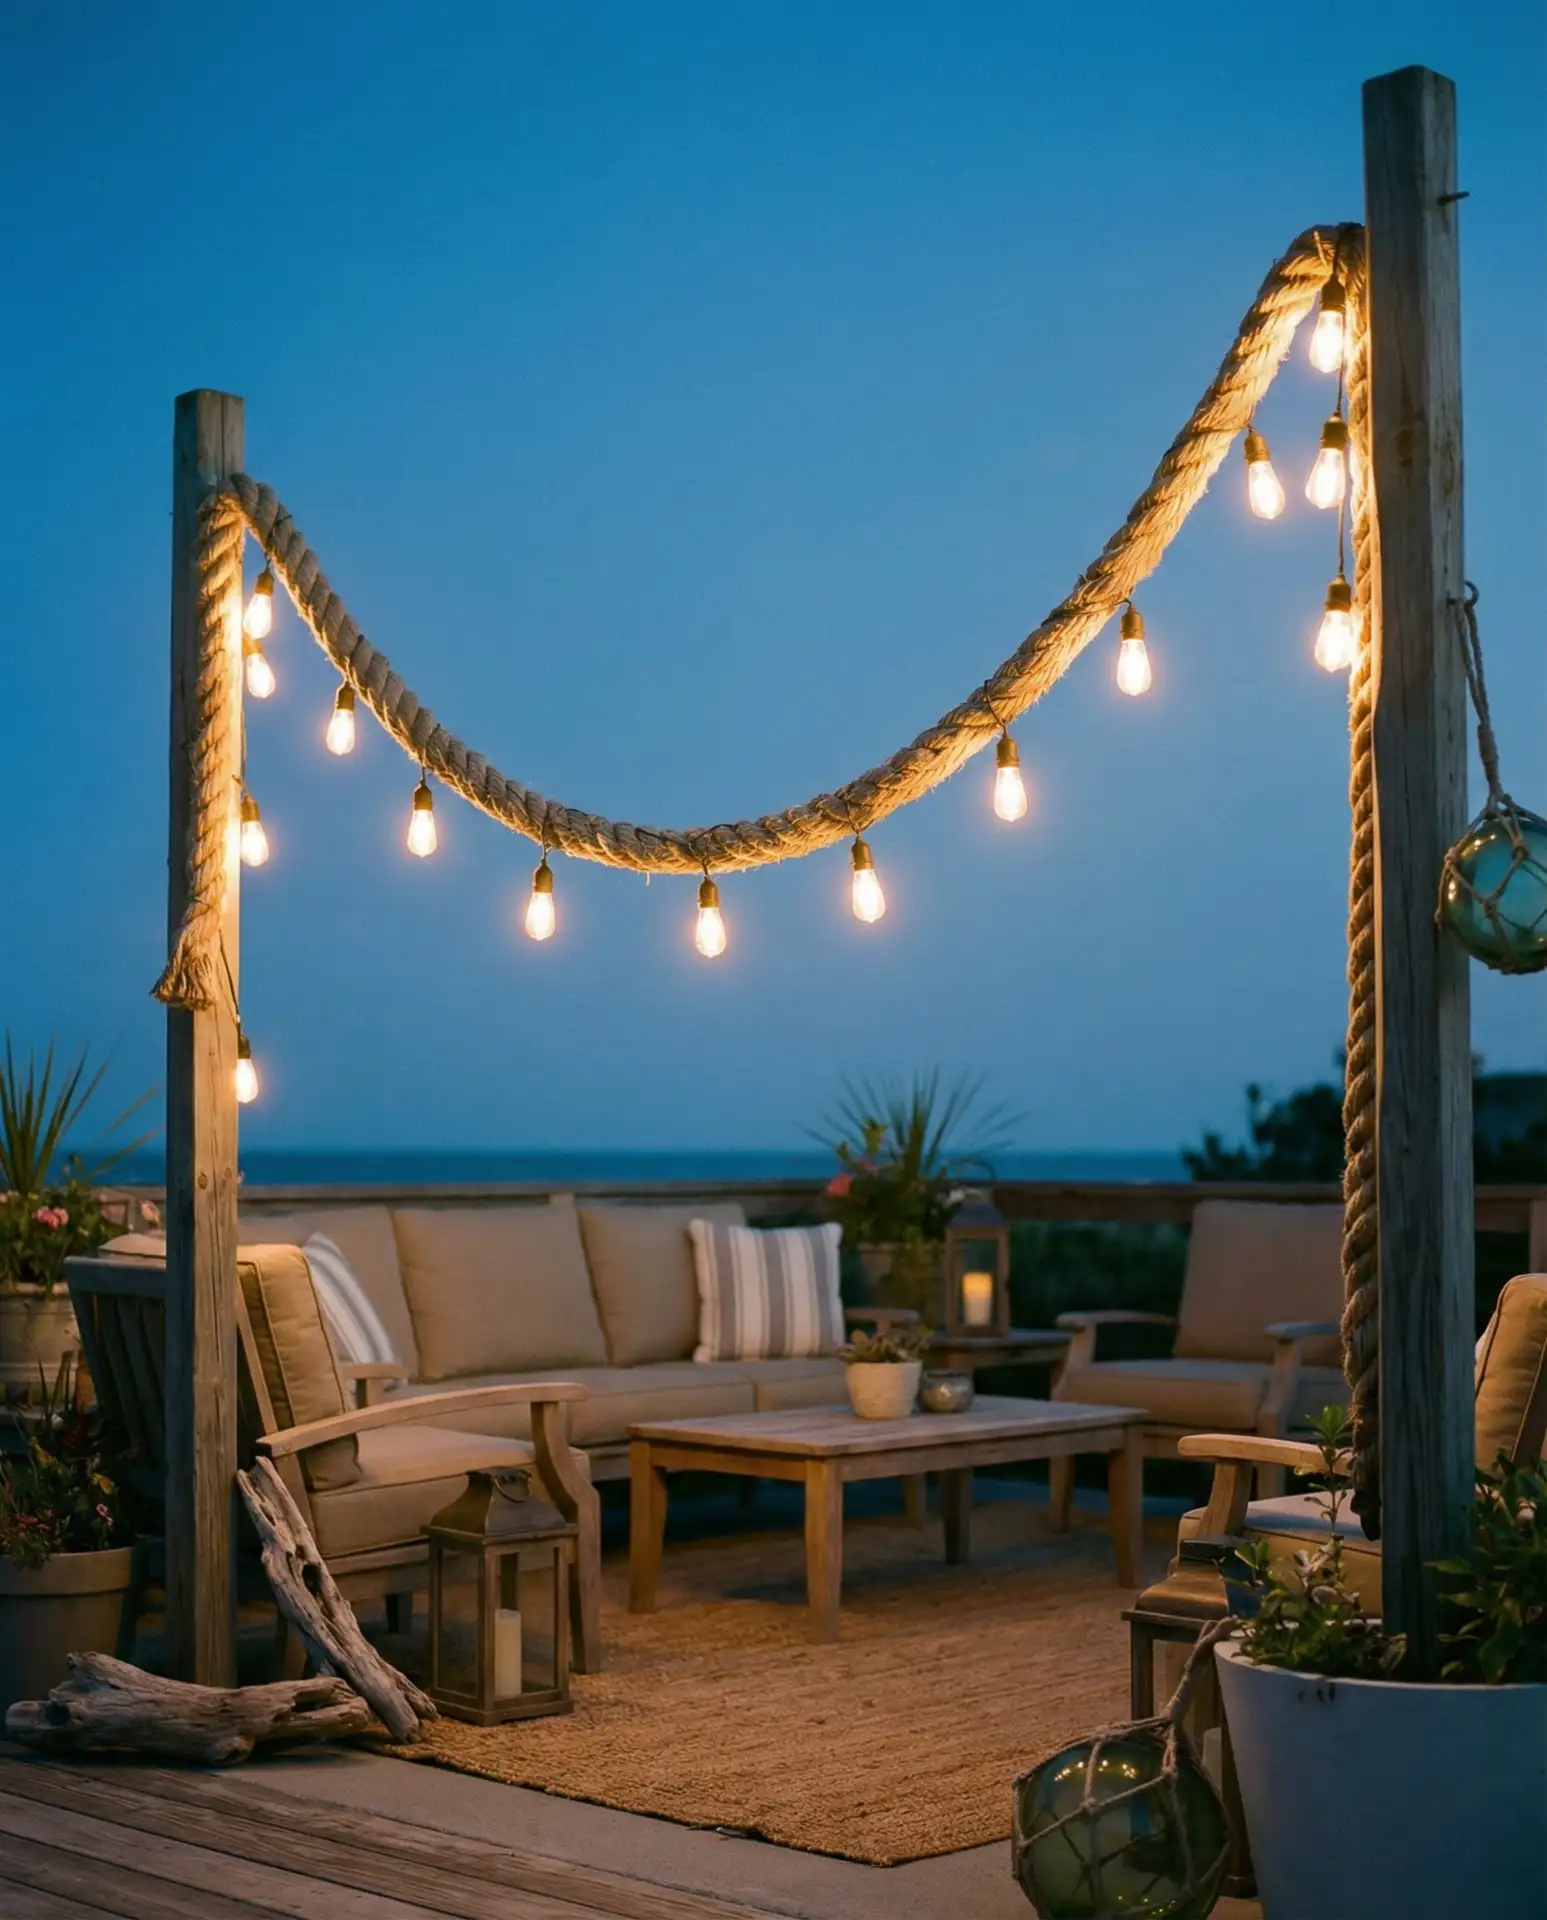
18. Creative Rope Suspension System
Using marine-grade rope to create suspension lines between trees, posts, or structures offers creative ways to hang lights in curving, organic patterns that feel less rigid than wire installations. The rope itself becomes part of the design, especially when you choose natural fiber options or brightly colored synthetic ropes that complement your outdoor décor. This method allows for adjustable height and tension, making it easy to fine-tune the final look. 
In coastal regions and lakefront properties, this nautical-inspired approach fits naturally with existing design themes while providing flexible lighting solutions. Use 1/2-inch or 5/8-inch rope rated for outdoor use, and attach lights with carabiners or zip ties that can slide along the rope to adjust spacing. The rope system works particularly well for creating swooping, relaxed curves rather than straight lines, giving spaces a more casual, vacation-like feeling. Check rope tension monthly, as natural fiber ropes can stretch when wet and may need retightening to maintain proper light height.
19. Deck Post Corner Uplighting
Wrapping lights around deck corner posts from ground level to rail height creates vertical accents that define space boundaries while adding architectural drama. This technique works especially well on raised decks where the posts are prominent visual elements. The upward-focused light draws eyes vertically and makes outdoor spaces feel taller and more expansive than horizontal lighting alone. 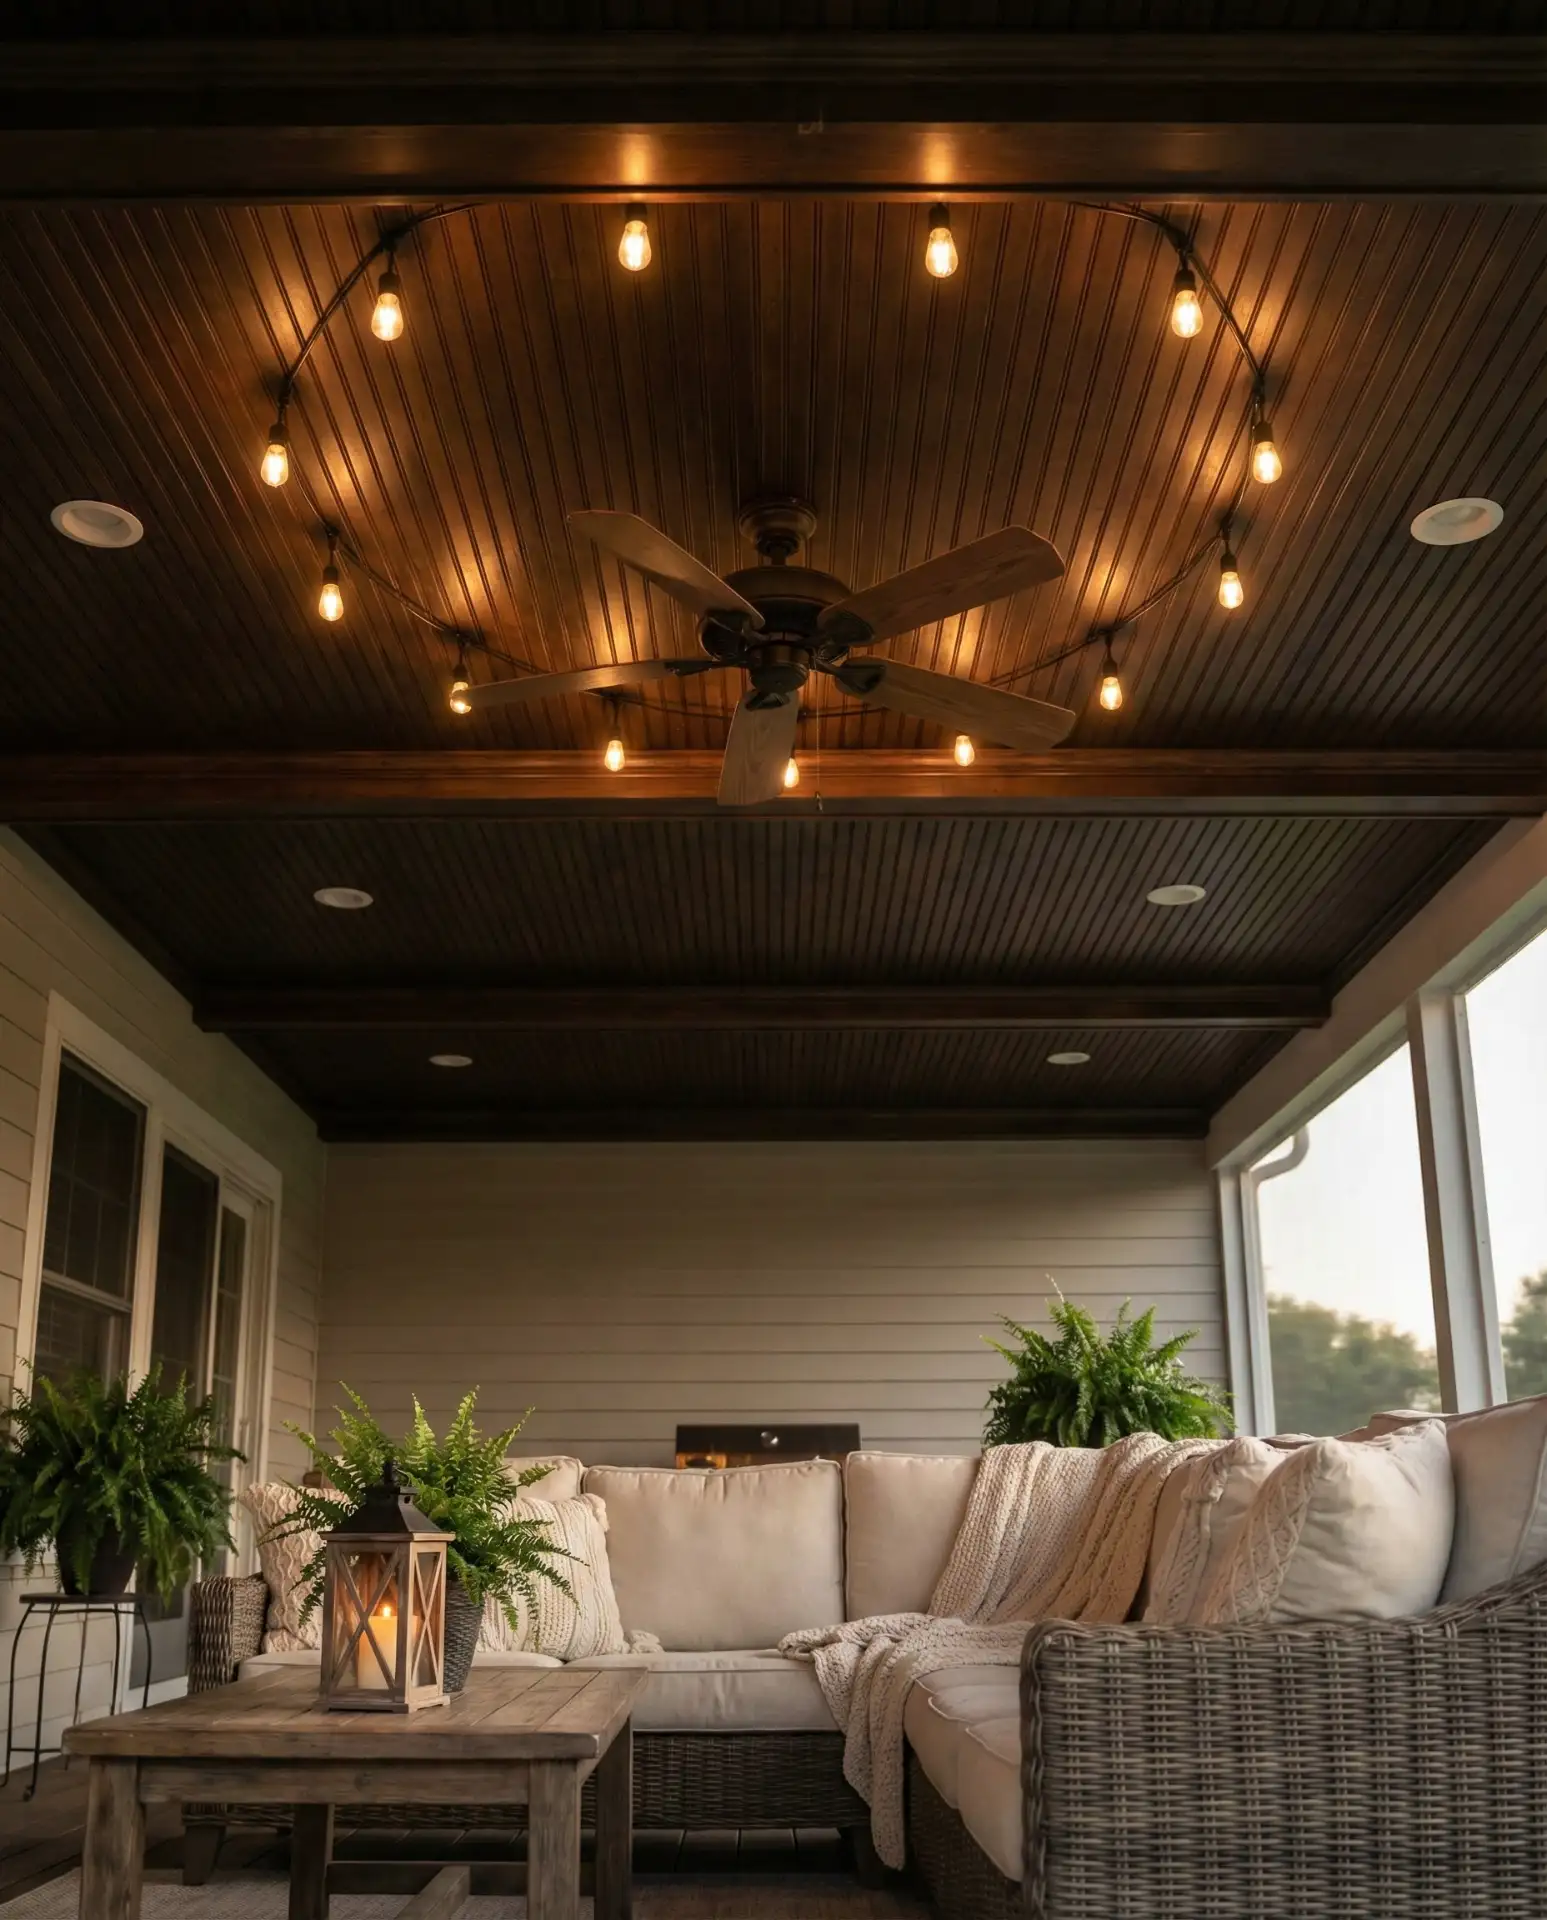
Real homeowner behavior shows that post lighting significantly improves navigation safety on decks after dark, as the lit posts clearly mark boundaries and stairs. The installation takes just 10-15 minutes per post using small cup hooks every 8-12 inches to secure lights. This approach works beautifully in combination with overhead string lights, creating layered lighting that serves both functional and aesthetic purposes. Choose warm white or amber bulbs that complement natural wood tones without creating harsh contrasts against darker evening surroundings.
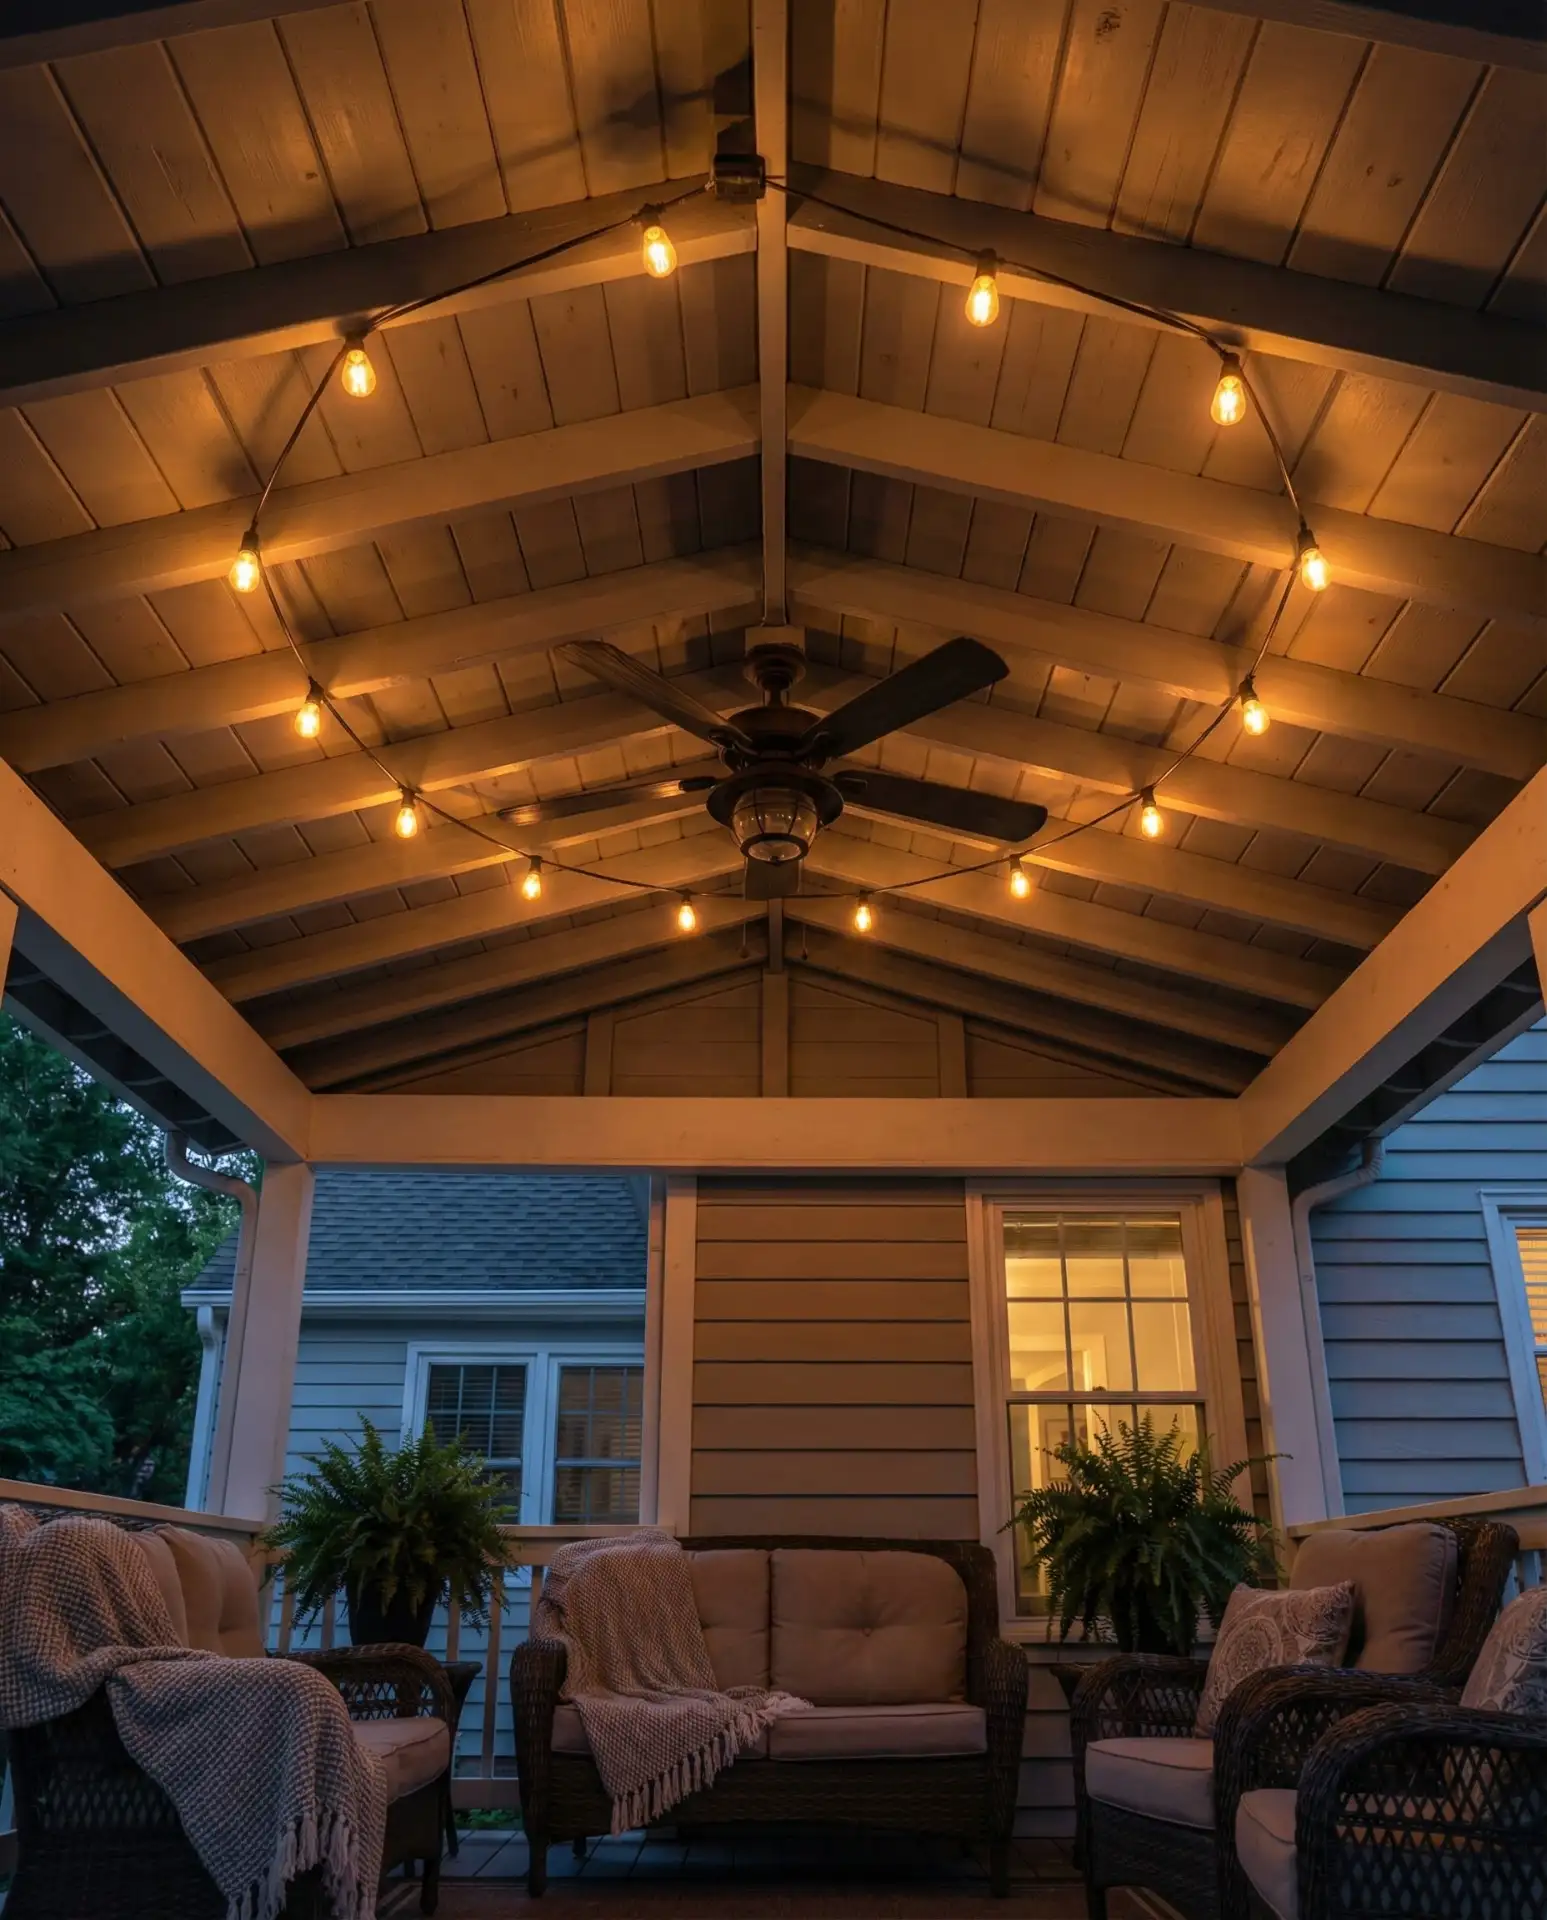
20. Porch Ceiling Fan Integration
Running string lights in a circular pattern around a porch ceiling fan creates a cohesive lighting design that combines ambient illumination with practical air circulation. Attach lights to ceiling beams or joists in concentric circles centered on the fan, ensuring lights stay clear of moving blades with at least 12 inches of clearance. This creates a mandala-like pattern that looks intentional and designed. 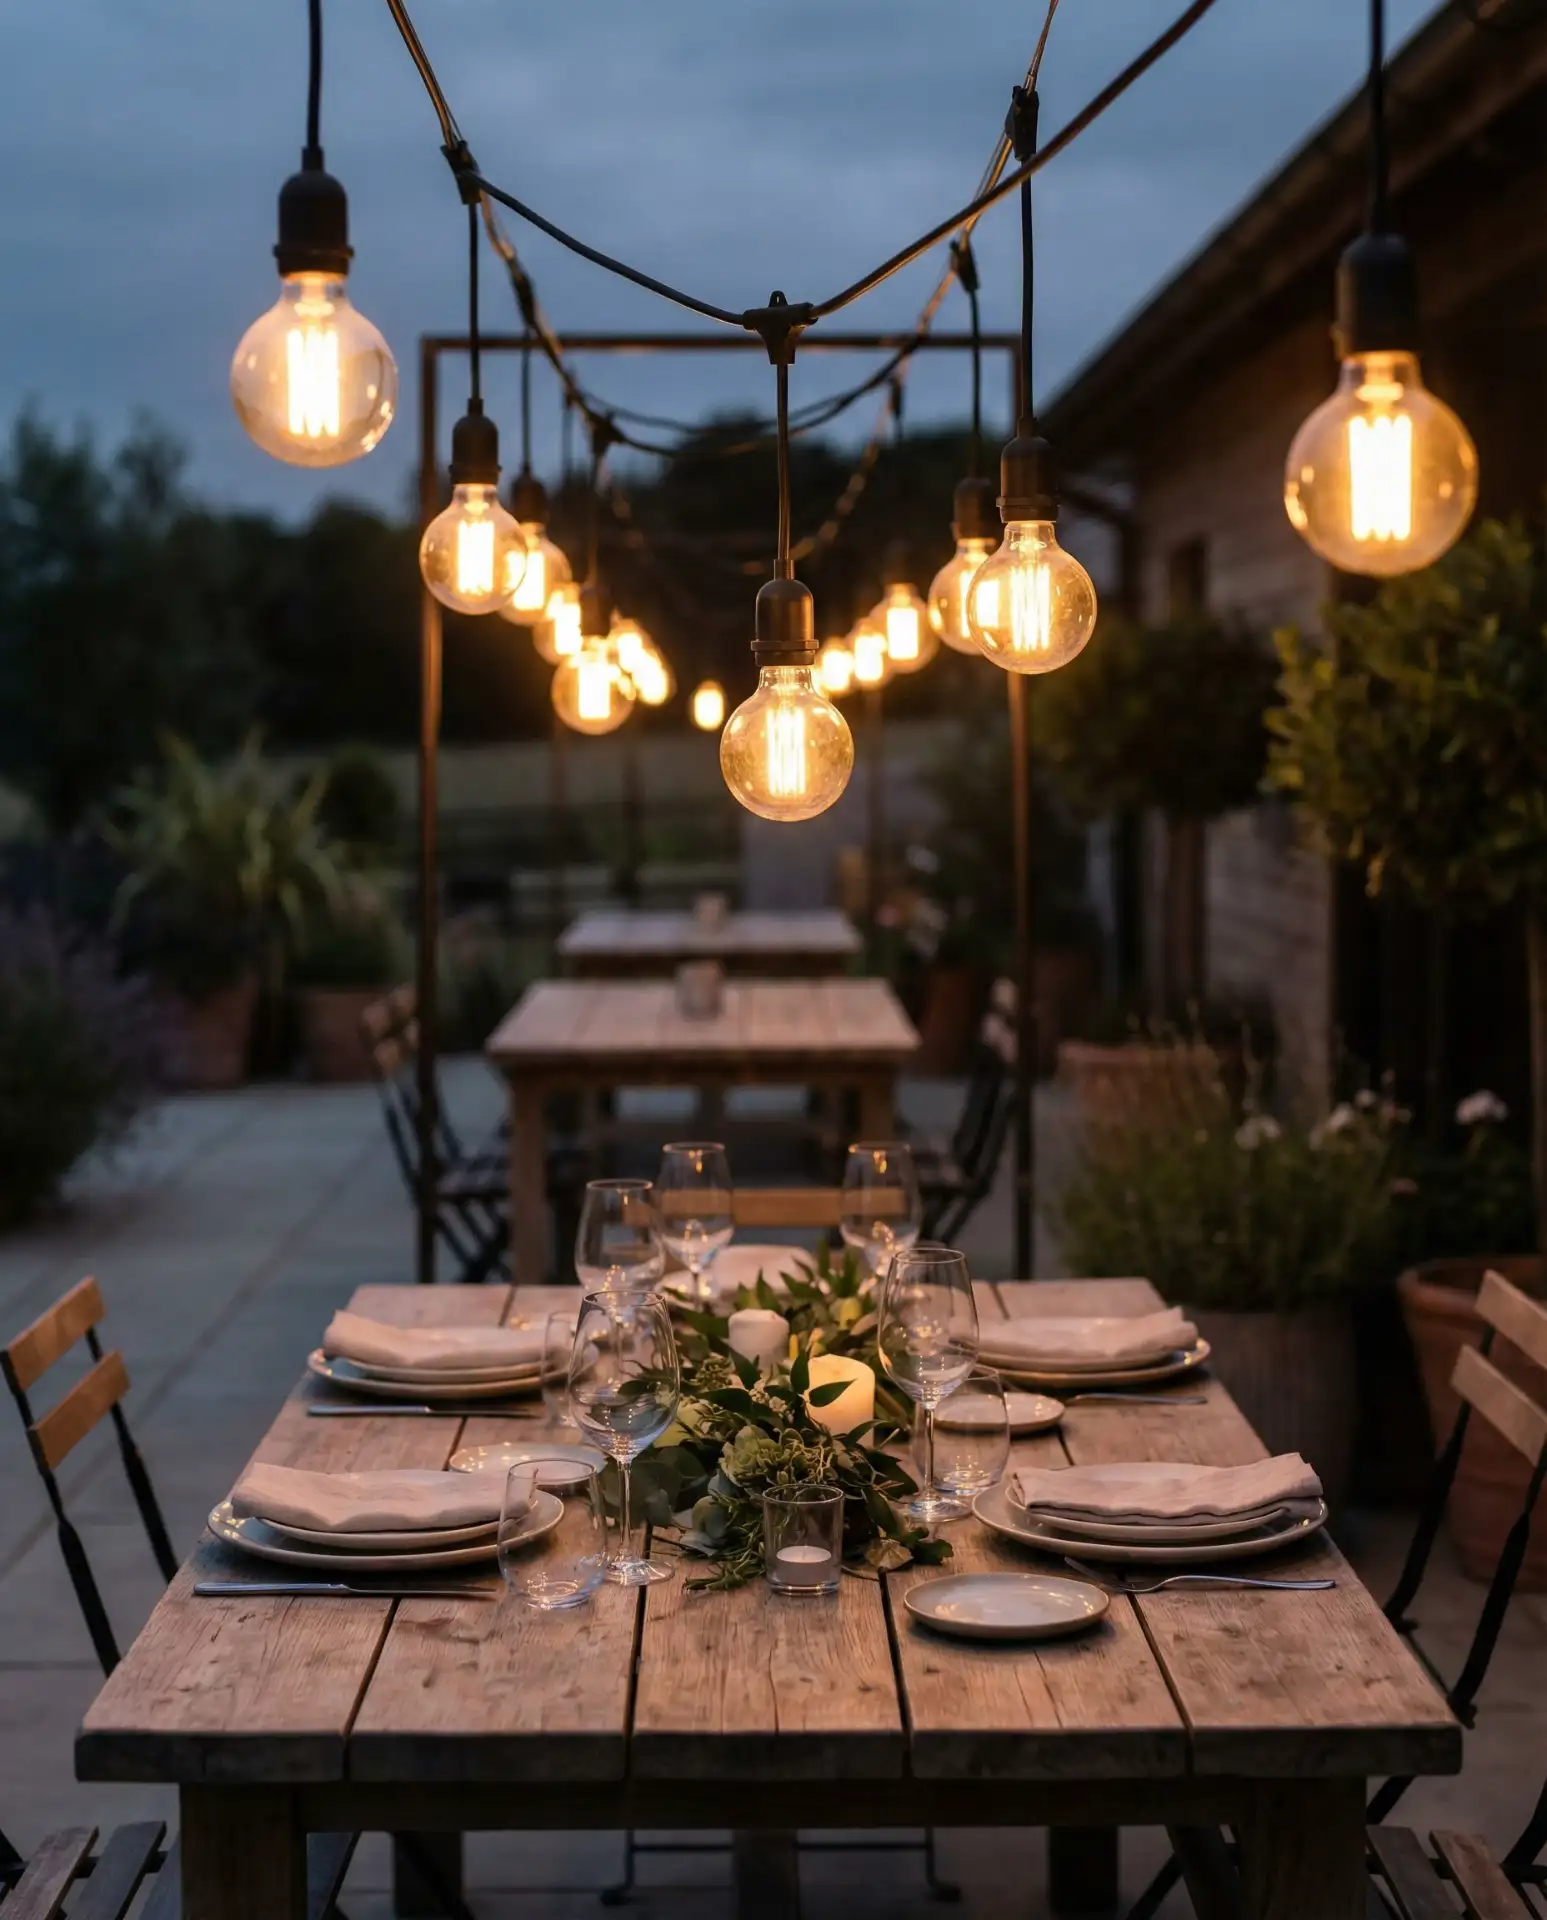
This design has become particularly popular on screened porches throughout the South and Midwest, where ceiling fans are essential for summer comfort. The circular light pattern complements the fan’s round shape while providing enough ambient lighting to reduce reliance on harsh overhead fixtures. Use adhesive hooks rated for ceiling mounting, and install them when temperatures are between 50-80°F for best adhesion. The setup works year-round and can be controlled with a separate switch from the fan itself, allowing independent operation of cooling and lighting as needed.
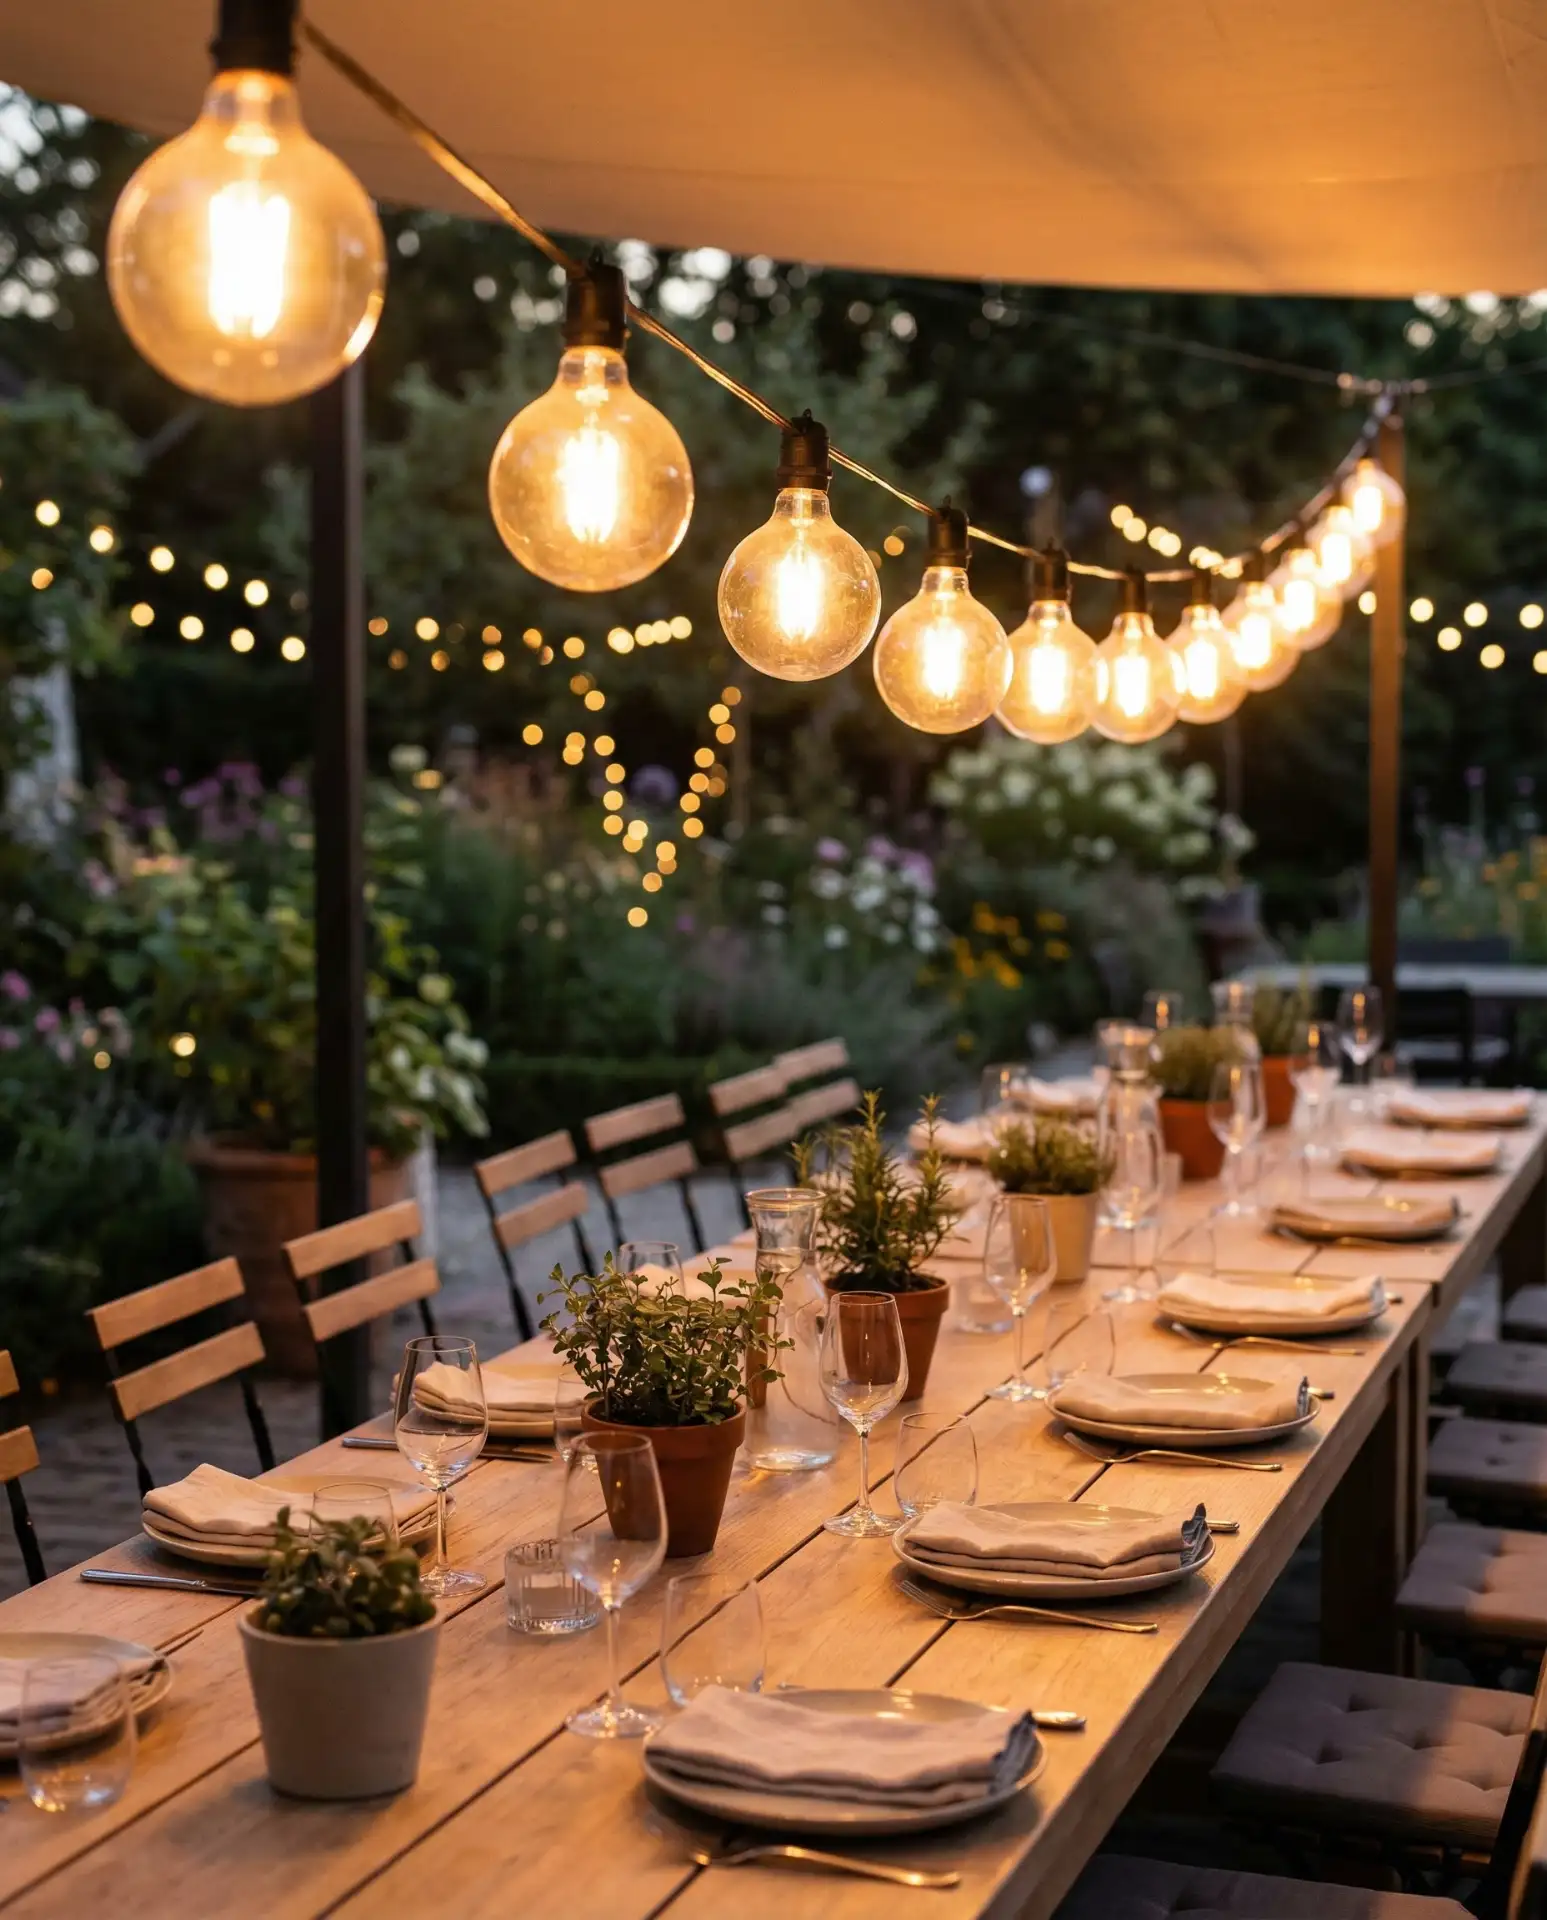
21. Bistro Light Dining Focus

Concentrating larger bistro-style globe bulbs directly over outdoor dining areas creates focused illumination perfect for evening meals and entertaining. These ideas patio setups use fewer, brighter bulbs spaced 24-30 inches apart rather than dense tiny lights, providing functional task lighting that still feels warm and inviting. The installation emphasizes the dining zone as the outdoor room’s centerpiece. 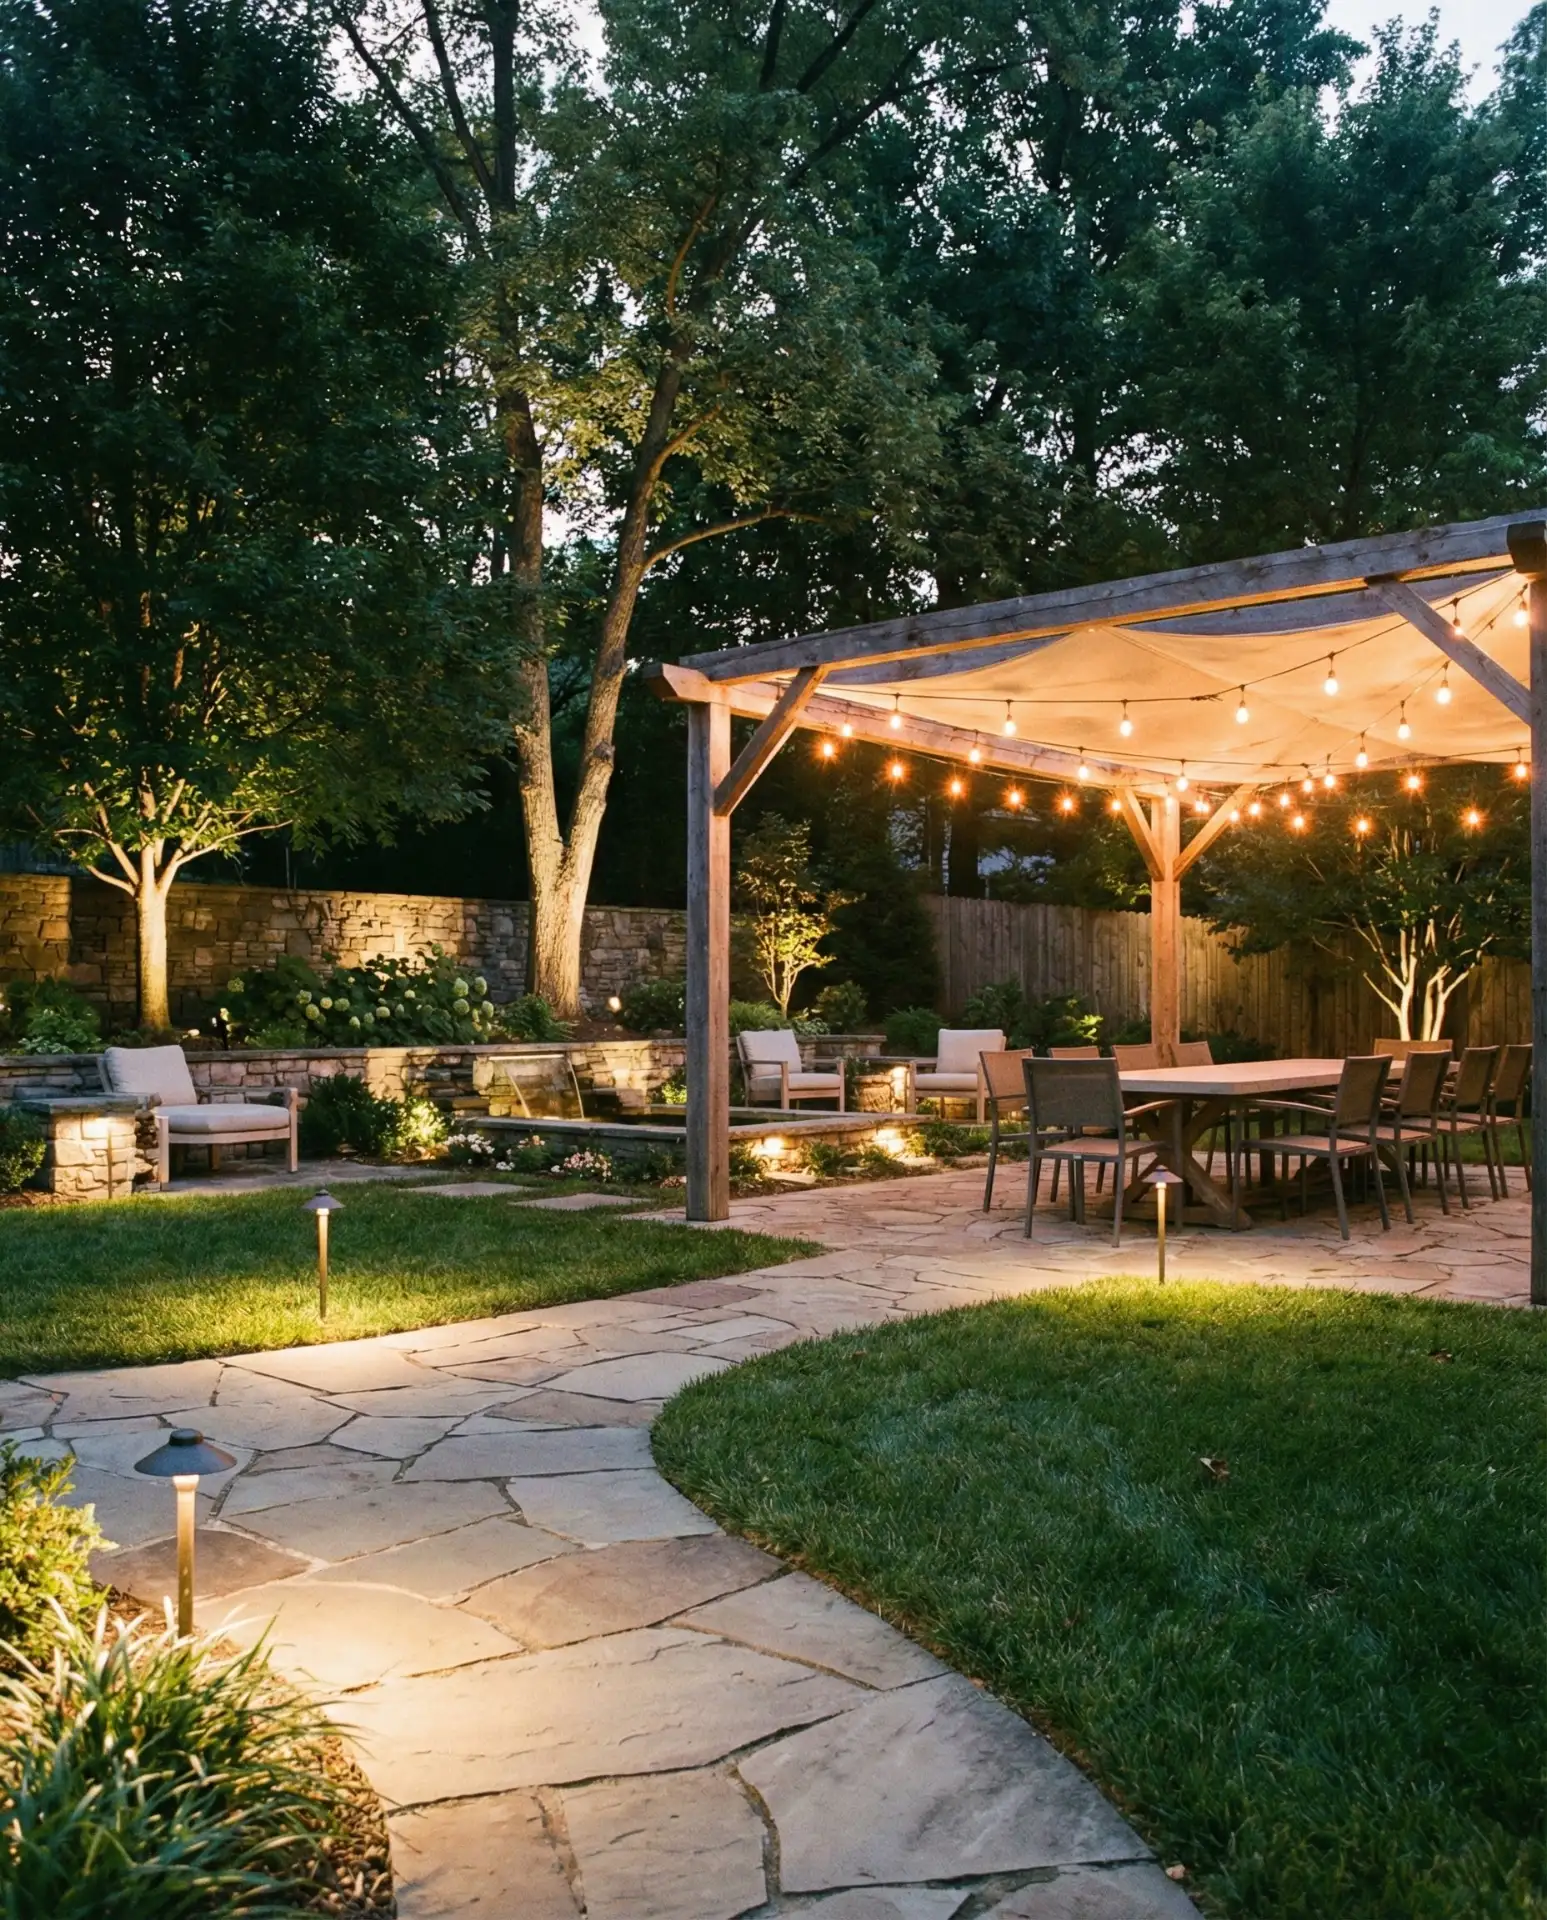
Practical insight: Position bistro lights 6-7 feet above the table surface to provide adequate illumination without creating glare for seated diners. This height allows standing adults to move around comfortably while keeping lights low enough to effectively light the table. Many homeowners install these on a dimmer system to adjust brightness from bright dinner lighting to soft after-dinner ambiance. The larger bulbs (typically G50 or G80 size) cost slightly more than mini lights but last longer and create more substantial light pools that make evening dining genuinely functional rather than just decorative.

Conclusion
These ideas prove that outdoor string lights offer endless possibilities for transforming your exterior spaces into magical evening destinations. Whether you’re working with a small patio or expansive backyard, the right lighting approach makes outdoor areas feel welcoming and intentional. Share your favorite string light setups in the comments below—we’d love to see how you’ve brought these ideas to life in your own home.